Irresistible Bacon Cheeseburger Meatloaf Recipe for Ultimate Comfort Food

Bacon Cheeseburger Meatloaf: The Ultimate Comfort Feast

⚖️
Difficulty
Moderate

⏲️
Prep Time
20 mins

🕒
Cook Time
60 mins

⏱️
Total Time
80 mins

🍽️
Servings
6

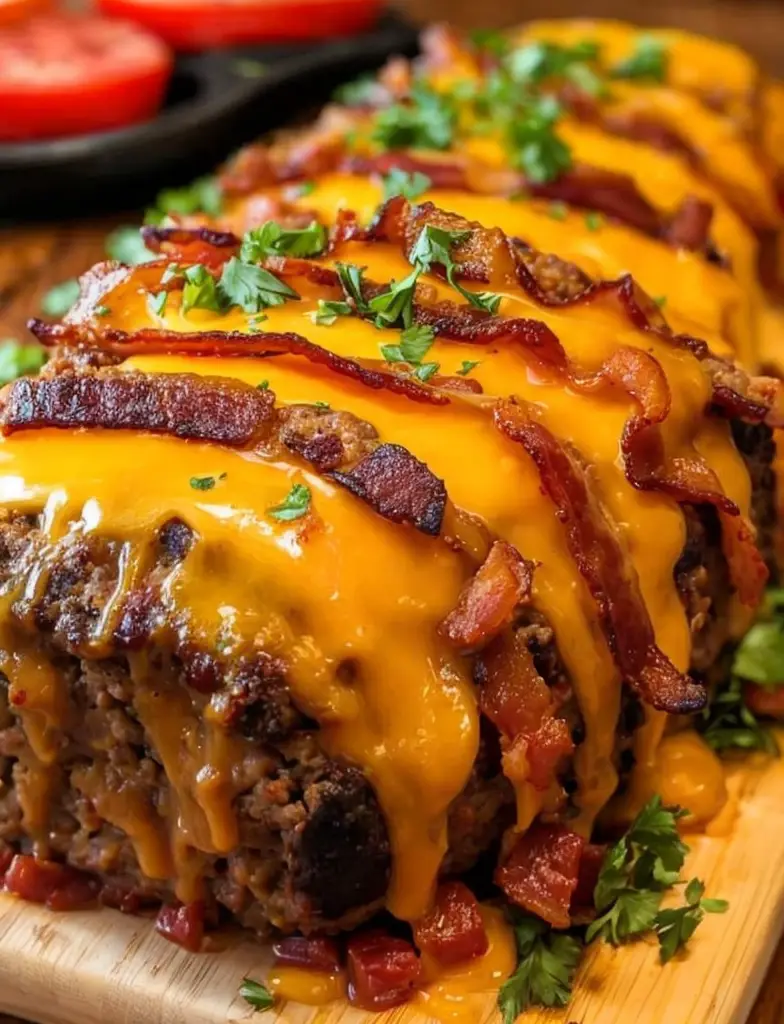
Welcome to your new favorite comfort food recipe: Bacon Cheeseburger Meatloaf. This delectable dish combines the best elements of a juicy cheeseburger with the homely comfort of meatloaf, creating a culinary marvel that’s sure to please family and friends alike. Imagine taking a bite of rich, savory meatloaf, infused with the melty goodness of cheddar cheese, and kissed with the irresistible flavor of crispy bacon. This recipe is not just a dish; it’s an experience—a nostalgic trip back to simpler times, destined to create new, cherished memories around the dinner table.

Why settle for ordinary meatloaf when you can enjoy the ultimate in flavor-packed extravagance? Bacon Cheeseburger Meatloaf is an ingenious twist on classic family fare, offering an explosion of tastes with every bite. This mouthwatering recipe calls for ground beef, savory bacon, and melted cheddar, all seasoned to perfection. The texture is tender yet hearty, with a touch of crunch from the bacon, creating a multi-layered sensory experience. Its aroma will fill your kitchen with an inviting, irresistible scent, making it hard not to sneak a taste before it’s done.

Quick Recipe Highlights

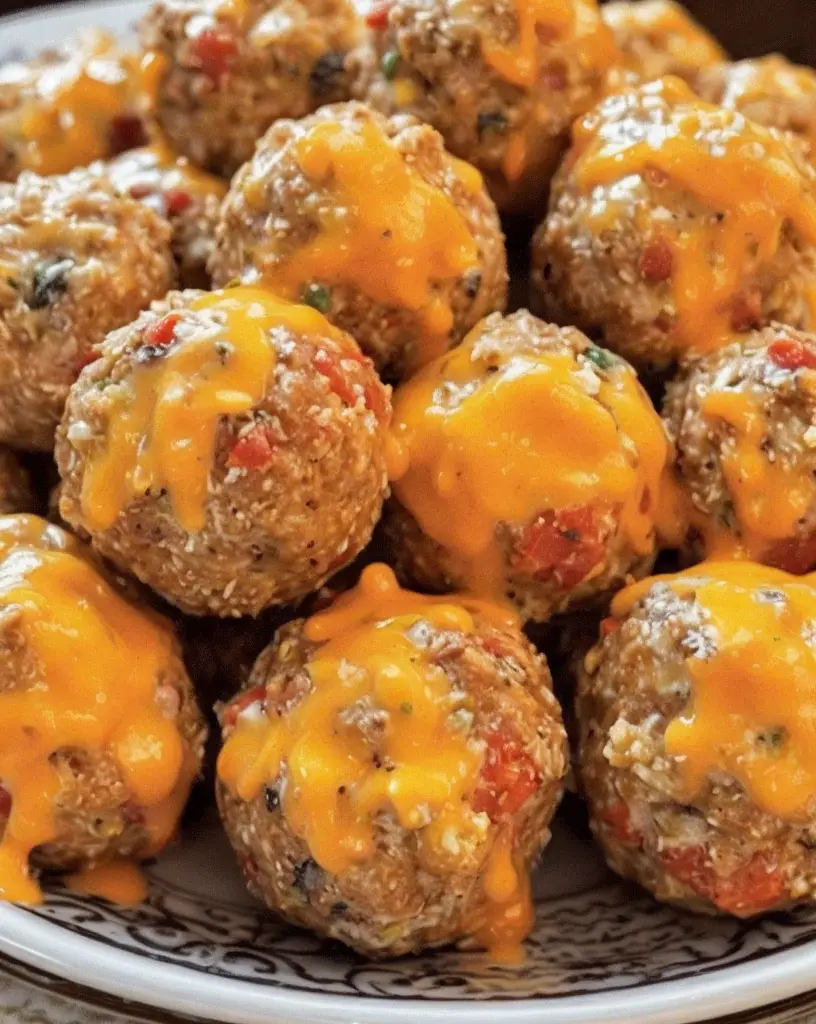
  • Flavor Profile: The Bacon Cheeseburger Meatloaf offers a perfect blend of savory beef, crispy bacon, and oozing cheddar, echoing the taste of a gourmet burger.
  • Texture: Experience a tender, juicy center complemented by bits of crunchy bacon, creating a delightful dance of textures in your mouth.
  • Aroma: Expect a rich, comforting aroma of cooked beef, smoky bacon, and sharp cheddar that fills your kitchen with nostalgic warmth.
  • Visual Appeal: A golden-brown crust with melted cheese and bacon bits scattered on top makes for an enticing presentation.
  • Skill Level Needed: This recipe is approachable for home cooks with a basic understanding of baking and meat preparation techniques.
  • Special Equipment: A standard loaf pan and mixing bowls are the primary tools needed for this recipe.

Recipe Overview

  • Difficulty Level: Moderate, due to the need to properly layer and bake the loaf without overcooking, but it’s achievable even for novice cooks following careful instructions.
  • Category: This can be categorized under comfort foods and main dishes, perfect for family dinners and cozy gatherings.
  • Cuisine: A modern American take on the classic meatloaf, influenced by the flavors of a traditional cheeseburger.
  • Cost: This is a cost-effective meal, with the primary expense being the ground beef and cheese, making it accessible for most budgets.
  • Season: While it can be enjoyed year-round, this dish particularly shines during cooler months when cozy comfort foods are most appreciated.
  • Occasion: Ideal for casual weeknight dinners, family gatherings, or anytime you’re in need of a hearty and satisfying meal.

Why You’ll Love This Recipe


There’s much to love about this Bacon Cheeseburger Meatloaf. First, the taste—it offers an incredible fusion of classic comfort food with the familiar flavors of a backyard barbecue, making it a standout at any meal. The balance of juicy beef, smoky bacon, and creamy cheese layered with subtle seasonings will tantalize your taste buds.

Convenience is another major advantage of this recipe. It comes together with minimal prep work, mainly involving assembling the ingredients and baking them to perfection. This ease makes it suitable for busy weeknights while still feeling like a special treat.

From a nutritional perspective, this dish provides a balanced intake of protein, especially when combined with side vegetables for a complete meal. Depending on your choice of beef cut and portion control, it can fit into many dietary needs.

In terms of social and entertaining value, this dish will be a sure hit. It’s a conversation starter, the smell of which will greet your guests at the door and linger in their memory long after the meal has concluded. It’s perfect for potlucks or dinners where you wish to impress without spending the whole day cooking.

Lastly, let’s talk about cost-effectiveness. The recipe uses readily available ingredients, often present in your pantry or fridge, which makes it budget-friendly without compromising quality. It serves a full family, stretching your meal budget further while delivering undeniable satisfaction.

Historical Background and Cultural Significance


Bacon Cheeseburger Meatloaf is a modern twist on a historical classic. The meatloaf itself dates back many centuries, with variations found globally, but it was during the Great Depression in America that the dish became a staple. Meatloaf provided an economical way to stretch affordable cuts of meat using fillers like breadcrumbs and eggs, an approach that sustained families during hard times.

The cheeseburger, on the other hand, was popularized in the early to mid-20th century, becoming a quintessential American favorite. Combining the two created a fusion dish that retains the comforting essence of the original while introducing a layer of indulgence with cheese and bacon.

Culturally, this recipe is a celebration of American ingenuity, bringing together staple foods to create something new yet comforting. It epitomizes transforming familial dishes into unique experiences, using readily available local ingredients.

Over the years, the Bacon Cheeseburger Meatloaf gained popularity due to its versatility and crowd-pleasing nature. The flavor combinations lend themselves well to traditional family dinners and have inspired countless adaptations reflecting regional preferences across the United States.

Ingredient Deep Dive


Ground Beef: The cornerstone of this recipe, ground beef’s history is longstanding, with roots in various global cuisines. It’s nutrient-dense, offering high-quality protein, vitamins, and minerals essential for a balanced diet. When selecting ground beef, aim for a balance between lean and fat to ensure juiciness without excess grease. Store in a cold environment, ideally at the back of your fridge. If you’re looking to diversify, ground turkey or pork can serve as an excellent substitute.

Bacon: Known for its indulgent taste, bacon adds a smoky, savory profile to the meatloaf. It’s often used to accentuate dishes due to its rich flavor and aroma. When selecting bacon, opt for thick cut with a good meat-to-fat ratio for crispy results. Proper storage in an airtight package in the refrigerator will maintain its freshness. As substitutions, turkey bacon offers a leaner option, or omit it entirely for a lighter variant.

Cheddar Cheese: A staple in many classic American recipes, cheddar cheese contributes creaminess and a slight tang to this meatloaf. Its origins trace back to England, and it’s beloved worldwide for its versatility and flavor. Aged cheddar might give more depth to the dish. Keep it refrigerated, preferably wrapped to prevent moisture loss. For dairy-free adaptations, vegan cheese substitutes melt well and maintain similar flavors.

Common Mistakes to Avoid

  • Not mixing the ingredients well. Ensure everything is evenly distributed for a consistent flavor in every bite.
  • Overmixing the meat mixture. This can cause the meatloaf to become tough, so mix just until combined.
  • Using lean beef. Opt for ground beef with some fat content to maintain juiciness.
  • Skipping the resting step post-cooking; it’s crucial for firm slices and a moist interior.
  • Ignoring oven temperature accuracy; use a thermometer to ensure consistent cooking.
  • Skipping the breadcrumb soak; it helps keep the meatloaf moist by binding moisture within.
  • Failing to remove excess grease partway through baking to avoid a greasy loaf.
  • Underseasoning; the right balance of salt and pepper is essential to enhance the flavors.
  • Adding cheese too early; mixing cheese in the middle or as a top layer helps avoid a melted mess.

Essential Techniques


Proper Mixing: Mixing is a critical step, where overworking the meat mixture can lead to a dense, tough meatloaf. The key is to gently fold ingredients together until just combined, using gentle hand motions or a wooden spoon for even distribution, ensuring a uniform texture and balanced flavors.

Cooked Bacon: Achieve the perfect crispy bacon by cooking slices in a cold skillet over medium heat, letting the fat render slowly, ensuring crispness and flavor. Keep an eye out for visual cues such as a rich golden-brown color, and remove excess oil while cooking for maximum impact on the finished dish.

Baking to Perfection: When baking the meatloaf, maintain oven consistency and use an internal thermometer to check doneness. Target a center temperature of 160°F (70°C). Placing an aluminum tent over the meatloaf in the last 15 minutes can prevent excessive browning.

Pro Tips for Perfect Bacon Cheeseburger Meatloaf


– Chill the meat mixture before forming it into a loaf shape. This helps retain the loaf’s shape better during baking.
– Use parchment paper in the loaf pan for easy removal and an intact presentation.
– Layer bacon diagonally over the top for an attractive lattice look when sliced.
– Add cheese in the final layers or as stuffing to ensure a melty center without leakage.
– For a smoky flavor, consider smoked cheddar or adding smoked paprika to the seasoning.
– Allow the loaf to rest for at least 10 minutes before slicing to enhance juiciness and prevent crumbling.
– Consider a glaze of ketchup mixed with brown sugar or barbecue sauce for a sweet finish.

Variations and Adaptations


Regional variations might incorporate local cheeses or spices, like pepper jack for a southwestern flair. Seasonal adaptations could include fresh herbs in spring, such as thyme or rosemary, providing fresh notes to the hearty loaf. For dietary modifications, consider leaner beef or poultry, or gluten-free breadcrumbs. Enhancements in flavor can be made by adding Worcestershire sauce for umami richness, while texture can be altered with a mix of bread crumbs or oatmeal. For presentation, bake the meatloaf in muffin tins for individual servings, offering portion control and a creative plate look.

Serving and Presentation Guide


Present your Bacon Cheeseburger Meatloaf sliced thickly alongside classic accompaniments like buttery mashed potatoes or a crisp green salad. For garnish, consider a sprinkle of fresh parsley or chives for color contrast. Traditionally paired sides such as pickles or tangy slaws add zest. For plating, serve on a large platter with slices slightly overlapping, topped with extra bacon bits. Mind the temperature for serving; warm is optimal to keep the cheese gooey, but room temperature can highlight the flavors without melting.

Wine and Beverage Pairing


For wine enthusiasts, a bold red wine like Merlot complements the richness of the meat and bacon. If wine’s not your choice, a craft beer with hoppy notes delivers a refreshing counterbalance. Non-alcoholic choices include a sparkling apple cider or an iced thyme lemonade, which cleanses the palate. During cooler months, pair with a spiced hot beverage like mulled cider for warmth without overwhelming flavors.

Storage and Shelf Life


Once finished, the meatloaf should be cooled to room temperature and either wrapped tightly in plastic or placed in an airtight container to remain fresh. It will keep in the refrigerator for up to three days or be frozen for future enjoyment. When reheating, use a microwave or bake covered in foil to rehydrate and warm through evenly, preventing any drying out.

Make Ahead Strategies


Prepare your bacon cheeseburger meatloaf a day in advance for easier meal prep. Assemble all ingredients, store wrapped in the refrigerator, and bake on the serving day. This allows the flavors to meld and mature. If assembling takes priority, cooked meatloaf can be sliced and frozen, providing convenient family meals for those busy nights.

Scaling Instructions


To adjust the recipe for smaller or larger groups, maintain ingredient ratios and consider loaf scale based on the pan size. For smaller servings, half the recipe and use a mini loaf or muffin pan. For larger gatherings, double the recipe and consider baking two standard loaves to ensure even cooking throughout. Storage considerations become pivotal when adjusting quantities significantly.

Nutritional Deep Dive


A serving of Bacon Cheeseburger Meatloaf offers a balance of protein from both beef and bacon, and fats that contribute to satiety and flavor. Carb content remains low, primarily depending on bread crumbs, which can be adjusted to fit dietary needs. Vitamins such as B12 and zinc aid metabolism, while iron supports oxygen transport. Emphasize portion control by dividing loaf into smaller slices, providing nutritional balance without excess calorie intake.

Dietary Adaptations


For those requiring dietary changes, gluten-free adaptations can easily be made by substituting traditional breadcrumbs with gluten-free versions. To accommodate dairy restrictions, using vegan cheese alternatives maintains the flavor profile without lactose. For a low-carb approach, skip bread crumbs or replace with almond flour, maintaining consistency.

Troubleshooting Guide


If your meatloaf results in a tough texture, focus on minimal mixing to maintain tenderness. To correct for bland flavor, ensure seasoning is added progressively, and check that coated surfaces carry consistent flavor. Should the loaf appear greasy, trim fat-based ingredients or allow the loaf to drain mid-baking. If encountering cooking time struggles, ensure an oven thermometer is used to regulate temperature for ideal results.

Recipe Success Stories


This Bacon Cheeseburger Meatloaf recipe has become a beloved staple for many, seen widely across social media platforms where community members share their creative spins and plating styles. Feedback has highlighted its ability to bring families together for meal traditions. Readers contribute back with changes catering to regional tastes, creating a recipe loved by all with flexibility in its foundational principles.

Frequently Asked Questions

  • Can I use a different cheese?
    Absolutely! Cheeses like smoked gouda or mozzarella provide unique flavors but ensure the cheese selected can melt smoothly.
  • What if I don’t have a loaf pan?
    You can shape the meatloaf on a baking sheet instead, adjusting cooking time accordingly to ensure it cooks through.
  • How do I know when it’s cooked?
    Using a meat thermometer is best; aim for an internal temperature of 160°F (70°C) for safe consumption.
  • Can leftovers be frozen?
    Yes, wrap slices in airtight containers or foil, storing them in the freezer for up to three months.
  • How can I make it spicier?
    Adding diced jalapeños or a splash of hot sauce into the mix will introduce some heat without overpowering the main flavors.
  • What’s a good substitution for breadcrumbs?
    Crushed croutons or rolled oats can work, or for a gluten-free option, finely ground almond flour usually does the trick.

Additional Resources


Explore related recipes such as classic meatloaf, or delve into guidance on perfecting various cooking techniques like searing and broiling. Ingredient-specific articles can offer deeper dives into maximizing the use of beef or bacon in diverse dishes, while seasonal variations open pathways to incorporate this meal across holiday festivities seamlessly.

Join the Conversation


Share your version of the Bacon Cheeseburger Meatloaf on social media, tagging our handles for a feature. Capturing your dish under natural light can emphasize the rich textures and colors, creating drool-worthy images to accompany your culinary story. We welcome reviews and feedback, enhancing our community’s knowledge pool, encouraging recipe personalization, and driving innovation together.

The Recipe

Bacon Cheeseburger Meatloaf

Serves: 6

Prep Time: 20 mins

Cook Time: 60 mins

Total Time: 80 mins

Kitchen Equipment Needed

  • Mixing bowls
  • Loaf pan
  • Skillet
  • Aluminum foil
  • Thermometer

Ingredients

  • 1 lb ground beef
  • 6 slices bacon, cooked and crumbled
  • 1 cup cheddar cheese, shredded
  • 1/2 cup breadcrumbs
  • 1/4 cup milk
  • 1 egg
  • 1 small onion, finely chopped
  • 2 cloves garlic, minced
  • 1 tbsp Worcestershire sauce
  • Salt and pepper to taste

Directions

  1. Preheat the oven to 350°F (175°C). Grease a loaf pan or line with parchment paper.
  2. In a bowl, combine milk and breadcrumbs; let sit for 5 minutes.
  3. In a large bowl, combine ground beef, egg, chopped onion, minced garlic, Worcestershire sauce, crumbled bacon, shredded cheese, and soaked breadcrumbs. Mix gently until all ingredients are combined, being careful not to over-mix.
  4. Shape the mixture into a loaf and place it in the prepared pan.
  5. Bake for about 50 minutes, then remove and brush with additional Worcestershire or BBQ sauce if desired. Return to oven for another 10 minutes or until the internal temperature reaches 160°F (70°C).
  6. Let it cool for at least 10 minutes before slicing.

Recipe Notes

  • Consider adding diced bell peppers for extra depth.
  • A glaze of ketchup and brown sugar adds a sweet finish.
  • For added spice, incorporate a pinch of cayenne pepper.

Delicious Baked Turkey Meatballs in a Lemon Garlic Butter Sauce

Baked Turkey Meatballs with Lemon Garlic Butter Sauce: A Delicious and Healthy Meal

⚖️
Difficulty
Easy

⏲️
Prep Time
15 mins

🕒
Cook Time
25 mins

⏱️
Total Time
40 mins

🍽️
Servings
4

Satisfy your taste buds with these delicious and healthy baked turkey meatballs in lemon garlic butter sauce. Perfect for a weeknight dinner or a special occasion, this dish combines succulent turkey with an aromatic, tangy sauce that you won’t be able to resist. The fresh flavors of garlic and lemon blend seamlessly with the richness of butter to create a sauce that enhances the mild taste of the turkey meatballs perfectly.

Freshly baked turkey meatballs offer not only a healthier alternative to their beef counterpart but also bring a light and juicy texture to your meal. The tangy lemon garlic butter sauce is the hero of this recipe, infusing each bite with a burst of flavor that lingers on the palate. Whether served as a main course or appetizer, these meatballs are sure to impress your family and friends.

Quick Recipe Highlights

  • Flavor Profile: The recipe offers a succulent blend of savory turkey meatballs with a bright and zesty lemon garlic butter sauce.
  • Texture: These turkey meatballs are tender and juicy, enveloped in a smooth, velvety sauce.
  • Aroma: The aromatic notes of garlic and lemon waft through the air, inviting anticipation with each step of the recipe.
  • Visual Appeal: The golden-brown meatballs topped with a shimmering butter sauce make for an appetizing presentation.
  • Skill Level Needed: This recipe is straightforward, requiring elementary cooking skills suitable for beginners.
  • Special Equipment: No specialized equipment is needed beyond a baking tray and a mixing bowl.

Recipe Overview

  • Difficulty Level: This recipe is designed for ease, involving basic cooking methods and straightforward steps to follow.
  • Category: It falls under the comfort food category, perfect for dinner or an appetizer.
  • Cuisine: With roots in various international kitchens, this recipe has a versatile culinary appeal, embodying flavors from Mediterranean cuisine.
  • Cost: Budget-friendly, with primary ingredients like ground turkey and standard pantry items keeping costs low.
  • Season: Ideal for all seasons but especially delightful in spring and summer due to the refreshing lemony undertones.
  • Occasion: Suitable for family dinners, potlucks, or as appetizers for gatherings and celebrations.

Why You’ll Love This Recipe

Indulge in the taste and texture that make these baked turkey meatballs a household favorite. The tender consistency of ground turkey coupled with the creamy lemon garlic butter sauce delivers satisfaction in every bite. This dish’s taste appeal lies in the umami richness of the sauce offset by the bright notes of citrus, resulting in a balanced and delectable meal that keeps you coming back for more.

Convenience comes as a major advantage of this recipe. With a total time under an hour, this dish makes a quick and easy dinner option. The use of the oven eliminates the need for constant monitoring, allowing you to focus on other tasks while the meatballs bake to perfection.

Health-conscious individuals will appreciate the nutritional benefits. Ground turkey is a lean, protein-rich alternative to other meats, while the moderate use of butter finds balance through the addition of lemon juice, offering vitamin C and refreshing flavor.

Turkey meatballs in lemon garlic butter sauce lend themselves well to entertaining. They can be served in smaller portions for hors d’oeuvres or in larger quantities as a main meal, making them versatile for various social settings. Their visual appeal is enhanced by the bright, shiny glaze of the sauce, impressing guests well beyond just taste.

Cost-effectiveness and accessibility also play a role in why this recipe is a must-try. Using common ingredients found in most households, it keeps shopping minimal and expenses in check, while delivering a gourmet feel without the hefty price tag associated with dining out.

Historical Background and Cultural Significance

The turkey meatball’s origin story ties into the broader history of meatballs, which have found a place in many cultures worldwide. While Italian and Swedish meatballs often steal the spotlight, incorporating turkey into this classic dish is a nod to healthier, contemporary cooking trends.

Culturally, the use of turkey signifies a common choice in North America, especially in the United States, where it is a staple during festive occasions like Thanksgiving. This recipe showcases another way to enjoy the healthiness of turkey beyond traditional roasted preparations.

The evolution of the turkey meatball has been influenced by the increased focus on low-fat diets and the desire for flavorful, satisfying meals that don’t compromise nutritional goals. The addition of lemon garlic butter sauce adds a modern twist to traditional preparations by infusing it with Mediterranean flavors.

Regional variations have seen spices and herbs unique to different areas incorporated into the basic turkey meatball recipe. Whether it’s Italian herbs, Middle Eastern spices, or Asian soy sauce, these meatballs provide a canvas for combining global tastes with local favorites.

Ingredient Deep Dive

Ground turkey, the star ingredient, is leaner than most ground meats and is praised for its low fat content. Its history in American cuisine is rich, especially in substitutions for red meat. When selecting ground turkey, opt for fresh rather than frozen, and choose those with lower fat content for better flavor and cooking results. Store turkey in airtight packaging in the refrigerator and consume within two days or freeze directly if not used immediately. A great substitute for ground turkey can be ground chicken or lean beef, keeping texture and flavor close to the intended profile.

Lemon juice acts as a natural tenderizer and flavor enhancer, bringing brightness and acidity that cut through the richness of the butter. Lemons originated in Asia and have traveled well, becoming key ingredients in cuisines worldwide. When buying lemons, choose those that feel heavy for their size, indicating juiciness. Store them in the refrigerator crisper drawer for best preservation. Lime juice may substitute in a pinch, although it offers a slightly more aromatic sweetness.

Common Mistakes to Avoid

  • Over-mixing the meatball blend can lead to dense meatballs, so combine ingredients until just mixed.
  • Skipping the cooling phase for cooked turkey can create dry meatballs as juices are not retained.
  • Using frozen turkey without allowing proper thawing time can lead to uneven cooking.
  • Not properly seasoning the meat can result in bland meatballs, so ensure to add seasonings generously.
  • Baking at incorrect temperatures can lead to undercooked or overcooked turkey meatballs. Keep an eye on them during cooking.
  • Forgetting to taste and adjust the seasoning of the sauce can miss out on balanced flavors.
  • Overcooking the meatballs leads to dryness; use a kitchen timer to maintain accurate cooking times.
  • Adding the sauce too early can cause it to separate or become overly reduced; introduce it towards the end of cooking.
  • Failing to whisk butter into the sauce properly may result in an oily rather than creamy consistency.
  • Neglecting to rest the meatballs before serving can cause a spill of juices essential for optimal taste.

Essential Techniques

Mixing the meatball ingredients requires a light touch to maintain tender texture—a critical technique for success. Over-mixing can compact the proteins, making meatballs tough. Use your hands gently or a spatula until the ingredients just come together. Visual cues include a uniform mixture without visible streaks of egg or breadcrumbs, indicating readiness for forming meatballs.

Whisking the butter into the lemon garlic sauce is another crucial step. It emulsifies into a smooth finish, creating a glossy, rich sauce. Common pitfalls to avoid include adding butter in one go, which can split the sauce. Introduce it gradually, whisking continuously over low heat to prevent separation. A successful technique shows a thick and cohesive sauce without any oily separation on the surface.

Pro Tips for Perfect Baked Turkey Meatballs with Lemon Garlic Butter Sauce

1. Enhance flavors by marinating turkey in spices and herbs ahead of time, ensuring a deeply rooted taste in every bite.
2. Keep meatballs uniformly sized using a scoop to ensure even cooking and avoid underdone centers.
3. Add a pinch of sugar to balance citrus acidity and elevate the overall sauce profile.
4. Infuse the breadcrumb mixture with grated parmesan for an extra depth of umami.
5. For a subtle kick, incorporate red pepper flakes or cayenne into the sauce.
6. Use fresh herbs like basil or parsley to garnish, providing a vibrant pop of flavor and color.

Variations and Adaptations

These meatballs lend themselves beautifully to regional variations, with Italian-inspired versions utilizing oregano and basil, while a twist of cumin and coriander brings out Middle Eastern influences. Seasonal adaptations can be achieved by switching fresh herbs with dry ones for a warmer winter alternative. Dietary modifications are feasible with gluten-free breadcrumbs or a dairy-free sauce using olive oil in place of butter while maintaining most of the intended taste and texture. Scale the flavors by adding smoky paprika or zest from other citrus fruits like lime or orange for exciting variations, while texture can be modified with the addition of finely chopped vegetables such as zucchini to the meatball mixture for more moisture. Presentation alternatives include serving the meatballs over a bed of rice, in a sandwich, or paired with roasted vegetables for a complete meal.

Serving and Presentation Guide

For exceptional plating, place the meatballs neatly in a shallow dish, pooling the lemon garlic butter sauce around them to highlight the glossy glaze against the tender meat. Sprinkle fresh herbs like parsley or chives as a garnish, adding a splash of color and freshness. Traditional accompaniments include rustic bread for dipping, or a light arugula and Parmesan salad to offset the richness of the sauce. Modern serving suggestions encourage individual portions in bowls paired with zoodles or standout appetizers with toothpicks in each meatball for easy serving. Maintain the optimal serving temperature with warmed plates and portion appropriately to prevent overcrowding, preserving the dish’s elegant look and texture.

Wine and Beverage Pairing

Pairing baked turkey meatballs with wine elevates the dining experience. A crisp Sauvignon Blanc or a light Pinot Grigio complements the lemony sauce, while a medium-bodied red like Pinot Noir provides enough depth without overwhelming the dish. Non-alcoholic alternatives include herbal iced tea or a lemon-infused sparkling water to keep flavors aligned. Keep beverages chilled and serve in appropriate glassware to enhance the overall visual and sensory experience. An unsweetened aromatic coffee can balance richness, providing a lingering palate cleanse to pair seamlessly with this flavorful dish.

Storage and Shelf Life

To store leftovers or prep in advance, place the cooled meatballs in an airtight glass or BPA-free plastic container, separating layers with parchment paper to avoid sticking. Refrigerate within two hours of cooking to maintain freshness for up to three days. For freezing, place the meatballs on a baking sheet to freeze individually before transferring to airtight bags, keeping them for up to two months. Check for spoilage through changes in appearance or smell before reheating. Reheat gently in the oven at 180°C (350°F) to preserve moisture without drying, and avoid using a microwave to prevent rubbery textures.

Make Ahead Strategies

Maximize convenience by preparing elements of this recipe in advance. Prepare turkey meatballs a day ahead and store uncooked in the refrigerator or fully bake them prior, cooling before refrigerating. The lemon garlic butter sauce can also be made early; just reheat gently while whisking before serving. Store each component separately, combining them fresh during meal assembly for ultimate texture and taste. When reheating, careful monitoring preserves quality, while finishing with freshly squeezed lemon and herbs ensures vibrant flavor and appearance.

Scaling Instructions

Scaling this recipe for larger gatherings is simple. Doubling or tripling the ingredients naturally adjusts cooking times slightly, necessitating the use of multiple baking trays or consecutive batches. Ensure adequate spacing if baking simultaneously to avoid steaming. Equipment adjustments may include larger mixing bowls or replacement of smaller utensils with those fit for larger quantities. Storage needs increase, so clear refrigerator space for cooked meatballs and sauces. Timing modifications involve staggered entries into the oven to manage doneness accurately. Halving the recipe similarly decreases effort, maintaining all ratios perfectly for an intimate dining occasion while keeping consistent quality and taste.

Nutritional Deep Dive

This recipe offers a macro breakdown with high protein content from turkey and moderate fats from butter, while restrictive in carbohydrate intake, aligning well with low-carb diets. Micronutrients like vitamin C from lemons and essential minerals found in garlic add to its healthful profile. Its portion analysis supports weight management by providing hearty servings that satisfy hunger without excessive calorie intake. Health benefits extend with lean proteins promoting muscle maintenance and metabolic function, supported by essential amino acids from turkey. Dietary considerations encourage mindful consumption, with a focus on balanced meal components and controlled portion sizes.

Dietary Adaptations

For gluten-free needs, replace regular breadcrumbs with a GF-certified variety or almond meal. Dairy-free swaps involve substituting butter with olive or avocado oil in the sauce, optimizing flavor. A vegan adaptation calls for a plant-based protein option, such as lentil or chickpea mixtures, paired with vegetable broth for the sauce base. Low-carb goals align with minimizing breadcrumb quantities, emphasizing turkey’s natural content. For keto dieters, maintain healthy fat levels with increased butter use while omitting any sugar. Paleo adherents thrive from using clean-seasoned turkey, whole food ingredients, and fresh herbs. Low-FODMAP adjustments can include lactose-free butter and avoiding garlic or onion powder replacements, keeping the focus on gut-friendly meal renderings. Adaptations foster inclusivity and centered eating, adhering to numerous dietary needs seamlessly and deliciously.

Troubleshooting Guide

Address texture issues by evaluating meat mixtures before cooking; overly dense meatballs can originate from over-mixing, requiring adjustments in handling. Flavor balance might necessitate more seasonings, with tasting key to identifying missing elements. Temperature problems should involve checking oven accuracy, using an oven thermometer to enhance control. Equipment challenges include maintaining sharp knives and non-stick baking surfaces for ease of preparation and cooking. Ingredient substitutions should adapt by leveraging similar textures and tastes, such as light meats or veggie bases. Timing concerns refer to ensuring meatballs are adequately, yet not overly, baked, testing via thermometer for internal temperature. Addressing these areas ensures successful outcomes every time, maintaining delicious results consistently.

Recipe Success Stories

Enthusiastic community feedback has highlighted the universal appreciation of this recipe’s flavors and ease of preparation. Variations like adding Parmesan or using chicken have led to successful reinterpretations, expanding its culinary landscape. Reader suggestions involve garnishing with toasted breadcrumbs for added texture, or incorporating zest blends for intricate depths. Culinary photography tips list creating structured shots by showcasing vibrant garnishes creatively. This dish’s adaptability forms the gateway to culinary exploration, allowing personal touches and inspiration from community experiences to shape its journey further.

Frequently Asked Questions

  • Can I substitute turkey with chicken? Absolutely! Ground chicken offers a similar, slightly superior moisture retention when cooked.
  • How do I prevent meatball dryness? Avoid over-cooking and rest for five minutes to reabsorb juices before serving.
  • What makes the sauce separate? Ensure butter is whisked gradually and consistently to emulsify well with other liquids.
  • Are gluten-free breadcrumbs recommended? Yes, GF breadcrumbs are excellent; almond meal is an alternative for added crustiness.
  • How long do leftovers last? Refrigerated leftovers stay fresh for up to three days post preparation.
  • Can lemon be substituted with lime? Lime provides a unique but suitable twist, altering the profile slightly.
  • Is there a vegetarian alternative? Swap turkey with lentils or chickpea formulations for non-meat adaptations.
  • Where can I find quality turkey? Source via trusted butchers or reputable grocery chains, ensuring premium purchase value.
  • Will using unsalted butter change results? Skip extra salt if using salted butter, but adjust taste accordingly.
  • What’s the best serving size? Cater to main course portions or appetizer offerings, ideal for any social occasion.

Additional Resources

Discover additional recipes complementing this meal, such as side dishes like garlic parmesan mashed potatoes or vibrant green salads balancing hearty meatball brightness. Access technique guides illustrating effective meatball forming and sauce whisking, creating digital learning portals. Expand ingredient understanding with informational pieces on turkey’s nutrition, lemon’s benefits, and butter’s emulsification properties, aiding recipe mastery. Equipment recommendations facilitate ease of preparation—invest in quality tools facilitating better bite enjoyment through attentive kitchen management. Seasonal variations drive creativity year-round, inspired project directions branching from this foundational recipe. Rich details ignite culinary drafts, evolving traditional foundations into boldly spectacular presentations.

Join the Conversation

Engage by sharing personalized outcomes of baked turkey meatballs on social media, tagging thematic content experiences. Offer internet advice capturing completed recipe beauty through creative photography—provide angles incorporating each dish’s allure. Submit detailed reviews reflecting journey and immersion in the recipe, inducing community curiosity. Enable further adaptations driven by reader comments encouraging change acceptance. Capture the heart of baking experiences and connection opportunities by navigating recipe enhancements collaboratively. Smile in each savory success participant nuance celebrated through digital bonds.

The Recipe

Baked Turkey Meatballs with Lemon Garlic Butter Sauce

Serves: 4

Prep Time: 15 mins

Cook Time: 25 mins

Total Time: 40 mins

Kitchen Equipment Needed

  • Baking tray
  • Mixing bowl
  • Oven
  • Saucepan
  • Whisk
  • Measuring cups and spoons

Ingredients

  • 1 lb ground turkey
  • 1 egg
  • ½ cup breadcrumbs
  • 2 cloves garlic, minced
  • 1 tablespoon fresh parsley, chopped
  • 1 teaspoon salt
  • ½ teaspoon black pepper
  • 2 tablespoons butter
  • Juice of 1 lemon
  • ¼ cup chicken broth

Directions

  1. Preheat oven to 400°F (200°C). Line a baking tray with parchment paper.
  2. Combine ground turkey, egg, breadcrumbs, garlic, parsley, salt, and pepper in a mixing bowl.
  3. Shape the mixture into small meatballs and place on the prepared tray.
  4. Bake in the oven for 20-25 minutes, or until cooked through.
  5. While meatballs are baking, melt butter in a saucepan over medium heat. Add lemon juice and chicken broth, whisking until combined.
  6. Simmer for several minutes until slightly thickened. Set aside.
  7. Remove meatballs from oven and drizzle with lemon garlic butter sauce before serving.

Recipe Notes

  • For an extra herbaceous touch, add more fresh parsley to garnish.
  • Adjust lemon juice to taste for a less or more intense citrus flavor.
  • Substitute ground chicken if preferred.

Irresistible Rotel Cream Cheese Sausage Balls for Any Occasion

Rotel Cream Cheese Sausage Balls: A Spicy Twist on a Classic Appetizer

⚖️
Difficulty
Easy

⏲️
Prep Time
15 mins

🕒
Cook Time
25 mins

⏱️
Total Time
40 mins

🍽️
Servings
24 balls

Kick your appetizer game up a notch with these irresistible Rotel Cream Cheese Sausage Balls. Combining the creaminess of cheese, the savory depth of sausage, and the fiery zest from Rotel tomatoes, this recipe will have your taste buds dancing with delight. Perfect for any gathering, these sausage balls boast a flavor that will keep guests coming back for more. With their tantalizing aroma and satisfying texture, they are not only a crowd-pleaser but also easy to whip up.

Quick Recipe Highlights

  • Flavor Profile: Savory with a hint of spice from Rotel tomatoes, balanced by the creaminess of cheese and robust sausage notes.
  • Texture: These sausage balls are tender on the inside with a slight crispy exterior, making them incredibly satisfying to bite into.
  • Aroma: A mouthwatering blend of spiced sausage and cheesy goodness fills the kitchen, enticing everyone nearby.
  • Visual Appeal: Their golden-brown exterior and hints of red from the Rotel make these sausage balls visually appetizing.
  • Skill Level Needed: This recipe is easy to prepare, requiring just basic mixing and baking skills, making it accessible to novice and experienced cooks alike.
  • Special Equipment: Only a baking sheet and mixing bowl are needed, keeping preparation simple and convenient.

Recipe Overview

  • Difficulty Level: Rated as easy, this recipe involves straightforward steps that even a beginner can master, ensuring success with minimal effort.
  • Category: Perfect as an appetizer or snack, these sausage balls fit seamlessly into any casual dining occasion.
  • Cuisine: This dish blends classic American appetizer traditions with a Tex-Mex influence, courtesy of the Rotel addition.
  • Cost: Affordable and budget-friendly, the recipe uses readily available ingredients, keeping your grocery bill minimal.
  • Season: Enjoy these sausage balls year-round, but they truly shine during game days and holiday gatherings when hearty snacks are a must.
  • Occasion: Ideal for parties, potlucks, or as a game-day snack, they provide a flavorful bite-sized treat for any event.

Why You’ll Love This Recipe


The taste and texture of these Rotel Cream Cheese Sausage Balls are unique and addictive. The combination of spicy, savory, and creamy elements ensures every bite is full of flavor. These sausage balls are incredibly convenient, requiring minimal prep and hands-on time, making them perfect for busy days. Packed with protein and satisfying flavors, they offer nutritional balance as an appetizer or snack. They are perfect for social gatherings, simplifying preparation while delivering gourmet-level taste. Cost-effective ingredients keep this dish budget-friendly, without compromising taste or quality.

Historical Background and Cultural Significance


The sausage ball has humble beginnings and is a staple at Southern gatherings. Traditionally composed of sausage and biscuit mix, this version incorporates Rotel tomatoes and cream cheese, adding a modern twist. These ingredients infuse the dish with a Tex-Mex flair, paying homage to regional culinary mashups common in American cooking. Over time, sausage balls have transcended their Southern roots to become a favorite across the U.S., loved for their simplicity and satisfying nature. Each region brings its twist, be it through spices or textures, adding unique local flavor to a cherished classic.

Ingredient Deep Dive


**Sausage**: A key element in these sausage balls, sausage contributes richness, umami, and depth. Opt for quality ground sausage to ensure flavorful results. Stored in the fridge, sausage should be consumed soon after purchase for best freshness. In need of a substitute, consider ground turkey with seasoning to maintain flavor integrity.

**Rotel Tomatoes**: These tomatoes feature diced chilies, offering both sweetness and heat. They bring Mexican influence into American dishes and are recognized for their versatility. Store unopened cans in a cool place; once opened, refrigerate and consume within a few days. For alternatives, use diced tomatoes with separately added green chilies.

Common Mistakes to Avoid

  • Overmixing: Can result in a dense texture, so mix just until combined.
  • Skipping draining Rotel: Excess moisture affects texture, so ensure thorough draining.
  • Using low-fat cream cheese: Can alter texture; aim for full-fat versions ensuring creaminess.
  • Underbaking: Negatively impacts flavor and safety. Bake until golden brown and set.
  • Preheating oven: Essential for ensuring even cooking and prevent underbaking.
  • Size consistency: Maintain uniform size for even cooking.
  • Baking pan crowding: Avoid to ensure proper airflow during cooking.
  • Ingredient substitutions: Changing ingredients ad-hoc can affect flavor balance.

Essential Techniques


Mixing Technique: The key to tender sausage balls lies in gentle mixing. Overworking the mixture can lead to dense, compact balls. To master this technique, gently fold the ingredients together until just combined. Visual cues of success include a well-incorporated, yet cohesive mixture that is easy to shape.

Pro Tips for Perfect Rotel Cream Cheese Sausage Balls


For best results, chill the mixture briefly before shaping the balls to prevent sticking and facilitate easier handling. If you’re short on time, freezing the balls for a few minutes before baking helps them hold their shape. Use an ice cream scoop for uniformly sized sausage balls, ensuring even cooking. Ensure Rotel tomatoes are thoroughly drained to avoid excess moisture which impacts texture. Balance the sausage’s saltiness by using the right amount of cheese to complement flavors without overpowering.

Variations and Adaptations


Regional Variations: Incorporate local spices such as cayenne or jalapeños for a spicier kick. For a seasonal twist, consider pumpkin spice as an autumnal flavor enhancement. Adapt to dietary needs by using gluten-free flour mixes.

Serving and Presentation Guide


For a classic presentation, serve these sausage balls on a platter garnished with fresh herbs. Offer dipping sauces such as spicy mayo or ranch to enhance flavor profiles. Temperature-wise, they maintain their appeal whether served warm or at room temperature, ensuring they remain a crowd favorite at any event.

Wine and Beverage Pairing


Pair these flavorful morsels with a crisp Chardonnay or a lighter Pinot Noir, which complements their savory profile. For non-alcoholic options, consider citrus-infused iced tea or a lemony mocktail. Balance the dish’s spiciness with chilled drinks to refresh the palate.

Storage and Shelf Life


Once prepared, store the sausage balls in an airtight container in the refrigerator for up to 3 days. For longer shelf life, freeze them, ensuring proper wrapping to avoid freezer burn. Proper reheating in an oven ensures they retain their crispness and flavor.

Make Ahead Strategies


Prepare and freeze the sausage balls before baking. Having them ready for baking saves time on event days. Plan your prep, allowing adequate thawing time if frozen, to guarantee fresh-tasting bites when serving.

Scaling Instructions


This recipe easily adapts for larger gatherings or smaller servings. Adjust seasoning proportions mildly to maintain flavor balance when altering quantities. Doubling or halving the recipe keeps the essence intact while ensuring sufficient servings.

Nutritional Deep Dive

Each serving offers a balance of macro and micronutrients. Sausage provides protein and fats, while Rotel adds a layer of vitamins from tomatoes. Mind portion sizes to manage caloric intake effectively.

Dietary Adaptations


For gluten-free options, replace flour with a suitable mix. Dairy-free versions can use vegan cheese, while keto adaptations could opt for almond flour in place of traditional flour. Customize this versatile recipe to fit various dietary needs, ensuring inclusivity at gatherings.

Troubleshooting Guide


If the mixture seems too wet, consider adding additional flour or cheese to balance moisture content. Adjust seasoning levels to tackle flavor imbalances. Ensure consistent baking temperature to avoid texture issues and ensure perfectly cooked sausage balls.

Recipe Success Stories


Our community loves this recipe for its flexibility and flavor! Many rave about their adaptations, from jalapeño versions to cheese-infused variations. Share your success stories, too, showcasing plating ideas or serving suggestions.

Frequently Asked Questions

Can I make these sausage balls ahead of time?
Yes, prepare and freeze before baking. When ready to serve, bake directly from frozen, adding a few extra minutes to the cooking time.

What’s the best way to reheat these sausage balls?
Reheat in the oven to restore their crispiness. Place them on a baking sheet and warm at 350°F for about 10 minutes.

Additional Resources


Explore related appetizer recipes for more inspiration. Our technique guides provide insights into mixing and baking to elevate your culinary skills. Dive into the world of Tex-Mex cooking, uncovering the nuances and flavors of this blend of cuisines.

Join the Conversation


Share your creations on social media using our hashtag to join the community. Engage with others by sharing your plating and adaptation ideas. Your feedback helps us refine and develop exciting new recipes.

The Recipe

Rotel Cream Cheese Sausage Balls

Serves: 24 balls

Prep Time: 15 mins

Cook Time: 25 mins

Total Time: 40 mins

Kitchen Equipment Needed

  • Mixing bowl
  • Baking sheet
  • Ice cream scoop or tablespoon
  • Parchment paper

Ingredients

  • 1 pound ground sausage
  • 8 ounces cream cheese, softened
  • 1 can (10 oz) Rotel tomatoes, drained
  • 2 cups Bisquick or similar baking mix
  • 1 cup shredded cheddar cheese

Directions

  1. Preheat your oven to 375°F (190°C) and line a baking sheet with parchment paper.
  2. In a large mixing bowl, combine the sausage, cream cheese, drained Rotel, baking mix, and shredded cheddar cheese.
  3. Mix until well combined but be careful not to overmix.
  4. Using an ice cream scoop or tablespoon, portion the mixture into balls and place them on the prepared baking sheet.
  5. Bake for 25 minutes or until the sausage balls are golden brown and cooked through.
  6. Remove from the oven and let cool slightly before serving.

Recipe Notes

  • For a spicier option, consider adding chopped jalapeños to the mixture.
  • If you prefer a milder flavor, use mild sausage instead of spicy.

The Best Ultimate Patty Melt Recipe with Delicious Secret Sauce

Ultimate Patty Melt with Secret Sauce: The Perfect Comfort Food

⚖️
Difficulty
Medium

⏲️
Prep Time
15 mins

🕒
Cook Time
20 mins

⏱️
Total Time
35 mins

🍽️
Servings
4

The Ultimate Patty Melt with Secret Sauce is a timeless classic that combines the savory goodness of a perfectly seasoned burger patty with the delightful crunch and flavor of toasted bread. Enhanced with a tantalizing secret sauce, this patty melt offers a taste explosion in every bite. Whether you’re crafting it for a family meal or a special treat for yourself, this recipe promises to tickle your taste buds with its rich, balanced flavors layered between golden-crisp bread.

With each bite, you’re greeted by the mouthwatering combination of juicy beef, gooey melted cheese, and caramelized onions. The Ultimate Patty Melt is not just a sandwich; it’s an experience of taste and texture that brings warmth and comfort. From its crispy exterior to the melt-in-your-mouth interior, this dish is about savoring the simple yet exquisite joy of classic comfort food, elevated with a creative twist.

Taking its cues from diner favorites, this patty melt does more than just satisfy hunger. It creates a sensory journey with its aromatic allure and visually pleasing presentation. The secret sauce, a pivotal element in elevating the dish, adds a layer of flavor that heightens the overall gastronomic experience. Gather around the table to enjoy this versatile dish, excellent for any casual gathering or light lunch.

Quick Recipe Highlights

  • Flavor Profile: Juicy, savory beef patty with hints of tangy secret sauce and the richness of melted cheese.
  • Texture: A delightful contrast of crispy toasted bread with the tender beef and creamy sauce.
  • Aroma: Enticing blend of seared beef, toasted bread, and sweet caramelized onions.
  • Visual Appeal: Layers of golden brown bread, melted cheese, and the vibrant secret sauce create an inviting look.
  • Skill Level Needed: Intermediate cooking skills, primarily involving pan-searing and sandwich assembly.
  • Special Equipment: Large skillet or griddle for even cooking and a spatula for flipping.

Recipe Overview

  • Difficulty Level: Though some steps involve timing and heat control, the process is straightforward with clear instructions.
  • Category: Perfect for lunch or dinner, this patty melt bridges the gap between hearty meal and quick bite.
  • Cuisine: Rooted in American diner traditions, showcasing comfort food at its best.
  • Cost: Economical, using common pantry and fridge staples to create a high-quality meal.
  • Season: Best enjoyed year-round, with relatable flavors that suit any weather or occasion.
  • Occasion: Fit for casual dining, movie nights, and cozy weekend suppers with family.

Why You’ll Love This Recipe


The Ultimate Patty Melt with Secret Sauce captures the essence of what makes comfort food so universally loved. The delightful blend of a juicy, seasoned patty, melted cheese, and a unique secret sauce creates a harmonious balance of savoriness and slight tang. Each ingredient complements the other, resulting in a scrumptious sandwich that leaves you eagerly anticipating each subsequent bite.

Convenience is a key attraction to this recipe. It’s designed for straightforward preparation, offering step-by-step guidance that ensures success even for intermediate cooks. The readily available ingredients mean you can whip up this delicacy without a last-minute dash to the store. It’s an ideal choice for busy weekdays or when you want to make something satisfying without the fuss.

Nutritional benefits come naturally with quality, wholesome ingredients. Using lean ground beef, whole-grain bread, and fresh vegetables provides nourishment alongside satisfaction. This patty melt serves as a balanced meal that you can feel good about, blending protein, carbs, and vitamins essential for a well-rounded diet.

Social gatherings become all the more enjoyable with a dish like the patty melt. Its universal appeal makes it a hit among varied palates, promoting enjoyable shared experiences. When friends and family gather, this recipe sparks happiness and satisfied smiles around the dining table, often becoming the star of backyard barbecues and casual get-togethers.

Finally, the cost-effectiveness of this recipe cannot be overstated. By using simple, cost-efficient ingredients, it allows anyone to experience restaurant-quality flavors at home without breaking the bank. The homemade aspect adds a layer of warmth and authenticity, making this patty melt not just a meal but a genuine culinary delight.

Historical Background and Cultural Significance


Originating in classic American diners, the patty melt is a vitally significant dish in the realm of satisfying sandwiches. Emerging in the mid-20th century as a variation on traditional hamburgers, it quickly gained popularity due to its rich, flavorsome layers. The interplay of savory beef, thick cheese slices, and caramelized onions tucked between pieces of toasted bread redefined on-the-go meals with gourmet flair.

Culturally, the patty melt epitomizes the American love for convenience blended with indulgence. As diners became a staple across the United States, this dish signified a shift in food culture where hearty meals could be enjoyed quickly without sacrificing quality. The patty melt’s simplicity and rich flavor profile made it an instant favorite, sustaining its relevance through generations.

The evolution of the patty melt saw innovations both small and large, as chefs and home cooks alike experimented with new ingredients and techniques. Variants began incorporating diverse cheeses from Swiss to cheddar, while bread choices expanded to match emerging dietary preferences. Despite these adaptations, the core of the recipe—juicy patty, gooey cheese, and crispy bread—remained unchanged, preserving its authentic essence.

Regionally, you’ll find the patty melt with subtle tweaks tailored to local tastes. Southern versions might incorporate a hint of spice, while others add bacon or mushrooms for an elevated experience. Such regional variations only enhance the patty melt’s universal appeal, making it a favorite across different states and food traditions.

Ingredient Deep Dive

Beef Patty: Central to the patty melt is the beef patty, which hails from the rich tradition of hamburgers. The choice of quality ground beef defines the juiciness and flavor you experience. Leveraging beef’s natural savors, selecting an 80/20 meat-to-fat ratio results in a satisfying taste and texture. Garden-variety beef might suffice for some, but sourcing local, grass-fed options elevates the patty melt to new heights. Storage involves basic refrigeration, ensuring freshness and flavor integrity. For those seeking dietary alternatives, turkey or plant-based patties present a viable yet delicious option.

Cheese: A quintessential patty melt emphasizes melted mild or sharp cheeses, creating the hallmark gooey texture every bite promises. With origins as a ubiquitous food additive herculean in its global popularity, cheese selection becomes vital for that umami hit. Swiss cheese, noted for its nutty, smooth melt, complements beef well, while cheddar introduces a sharper bite. Check freshness with a firm yet flexible touch and protect against molding with airtight storage. Substitutes like mozzarella or pepper jack provide a fresh twist, showcasing cheese’s adaptability across culinary borders.

Common Mistakes to Avoid

  • Overcooking the patty leads to dryness, losing that vital juicy texture.
  • Neglecting to toast the bread for the proper duration affects crispness.
  • Using low heat when melting cheese causes uneven melt and unappealing texture.
  • Skipping the secret sauce diminishes the depth of flavor.
  • Choosing low-fat meats results in a bland, dry patty.
  • Using pre-shredded cheese may not melt as smoothly as sliced.
  • Burnt onions lack the sweet, caramelized flavor needed.
  • Improper meat seasoning affects overall taste balance.

Essential Techniques


Cooking the perfect beef patty requires understanding high heat sizzling and proper flipping techniques. Two to three minutes per side at medium-high heat ensures juicy doneness. Keys to mastery include waiting until the patty naturally releases from the pan before flipping, avoiding disruption in searing the crust. Visually, a crusty golden brown surface signals success.

Melting cheese evenly without burning the bread involves technique finesse. Controlled heat at low-medium range allows cheese time to gradually soften without overshadowing with sponge-like bread. Covering the pan briefly can create a steamy environment that enhances the melt. Remaining vigilant to avoid charred edges defines technique discipline.

Creating caramelized onions requires patient stirring and low heat, allowing sugars to slowly release and oxidize into hearty sweetness. Stirring periodically prevents browning too quickly, helping achieve a soft, rich brown color as visual cues of completion. Serve promptly or refrigerate in airtight containers for later use, maintaining crisp vitality.

Pro Tips for Perfect Patty Melt


Allow patties to rest for a few minutes post-cooking; residual heat finishes protein structures without sacrificing juiciness. This rest period optimizes flavor and texture distribution within the patty.

Use thick-cut bakery bread for a substantial, luxurious crunch that doesn’t dissolve under juicy fillings or toppings. Sourdough and rye hold their structure beautifully, complimenting the melt’s inherent richness.

For the secret sauce, blend mayonnaise, ketchup, and pickle relish along with a pinch of paprika and Worcestershire sauce. Adjust seasoning to taste, introducing personal flair into the deliciously balanced tangy sweetness.

Always opt for freshly grated cheese over pre-sliced alternatives; this step enhances melting efficiency with less processed cheese maintaining its structural integrity better during heating.

Consider buttering the outside of the bread for a golden crust, using a mix of butter and mayonnaise to evenly spread and enhance browning.

Test meat seasonings using small cooked blobs before cooking full patties, allowing taste adjustment and ensuring flavor confidence in batches.

Variations and Adaptations


Regional variations include the Southern patty melt with pepper jack cheese and jalapeños for added heat, complemented by a pickle slaw side for tangy freshness. Explore changing sautéed onions with grilled bell peppers for a vegetable-forward version with added sweetness and char.

Seasonal adaptations encourage farm-to-table freshness with grilled tomato slices or fresh herb additions for summer appeal. Incorporate seasonal greens or arugula to lift the flavors into refreshing territory.

Dietary modifications accommodate gluten-free demands by trading traditional bread for gluten-conscious counterparts without compromising sandwich integrity. Likewise, plant-based ‘meat’ patties and vegan cheese facilitate cruelty-free exploration of flavors and textures.

For additional texture play, crunch aficionados can incorporate crushed tortilla chips or fried onion rings within the layers, introducing both a flavor and textural contrast inspiring further gastronomic curiosity.

Presentation alternatives flourish by cutting the patty melt into quarters, unfolding various plating styles for aesthetic and convenient dining, suitable for parties or illusion-based portion control.

Prepared as sliders or mini-melts, these variations address social gatherings with limited utensil capabilities, marrying elegance with practicality through small, tasty portions perfect for finger food events.

Serving and Presentation Guide


When it comes to serving the ultimate patty melt, a few thoughtful touches can elevate its presentation. Consider plating techniques that highlight its rustic yet refined nature. Place the sandwich diagonally on a simple, understated platter to emphasize its layers. For garnishing, a sprig of fresh parsley or a couple of gherkins offer a pop of color that’s both visually and tastefully appealing.

Traditional accompaniments like crispy French fries or a lightly-dressed green salad provide complementary textures and flavors while ensuring the meal feels complete. Modern serving suggestions include pairing the patty melt with sweet potato fries or a cole slaw, balancing its savory richness with sweet and tangy elements.

Temperature considerations are essential for maximized flavor and mouthfeel. Ensure the sandwich is served hot, allowing the cheese to maintain its desirable melted state. Warmed plates can also assist in keeping your creation at the optimal temperature throughout dining.

Portion control tips can include slicing each patty melt into halves, or even quarters, for consume-as-you-please convenience. This approach not only makes it easier to enjoy the sandwich with clean fingers but also introduces an inviting, share-friendly option perfect for gatherings.

Wine and Beverage Pairing


For the discerning palate, pairing your patty melt with the right wine can elevate the dining experience. Opt for a medium-bodied red, such as a Merlot or a Zinfandel, which complements the savory notes of the burger while balancing its richness with fruity undertones.

Non-alcoholic alternatives like a cold, craft root beer or a sparkling lemonade provide refreshing counterpoints to the patty melt’s indulgent flavor, aiding in flavor contrast and palate cleansing between bites. These drinks also add a touch of nostalgia reminiscent of classic diner fare.

If you lean towards caffeinated options, a lightly brewed iced tea with a hint of lemon, or even an espresso shot afterwards, can enhance the meal. The tea’s tannins cleanse the palate, while the coffee offers a delightful post-meal aroma.

Temperature considerations are crucial; ensure red wines are slightly cool but not chilled, while whites remain crisp and cold. Refreshing drinks like iced teas or lemonades should be served over ice, enhancing their cooling properties against the heat of the meal.

Serving suggestions recommend pairing each beverage with a dedicated glass, adding a touch of elegance to the casual comfort food setting. Provide chilled glasses for whites or root beers, while stout, wide-bottomed glasses work beautifully for reds.

Storage and Shelf Life


Leftovers of the ultimate patty melt demand careful storage to preserve their quality. Wrap remaining sandwiches tightly in aluminum foil to maintain moisture and flavor. Refrigerated properly, the melt can last up to two days, although it’s best consumed freshly made for the ideal texture.

Temperature requirements remain at standard fridge settings, approximately 40°F, to prevent spoilage. For those who intend to freeze the sandwiches, it’s recommended to do so before adding fresh vegetables or dressings, minimizing texture changes during thaw.

Container recommendations lean towards airtight systems that prevent off-odors in the fridge from altering the sandwich’s flavors. Tupperware or Ziploc bags offer suitable alternatives if aluminum isn’t available.

Signs of spoilage include off-smells or discoloration, particularly in cheese or bun textures. Should these present, it’s safest to discard rather than consume. For reheating, remove foil and utilize a toaster oven, allowing even heating without sogginess typically associated with microwave use.

Freezing guidelines caution against overextending storage time beyond a month, as flavors may dull and the bread’s structure can suffer. Thawing overnight in the fridge maintains food safety and prepares the sandwich for easy reheating the following day.

Make Ahead Strategies


When planning to serve the ultimate patty melt for a gathering, advance preparation can be a lifesaver. Divide the recipe into manageable stages for efficiency. You can shape the patties and prepare the secret sauce up to a day ahead, storing both in the fridge.

The bun or bread can be pre-buttered and stored in a cool place, ready for assembly and toasting when required. Caramelized onions, a crucial component for depth of flavor, can also be made ahead, encapsulating them in airtight containers once cooled.

Assembly tips include creating an assembly line, with components readily accessible for swift structuring of the melts. Begin with toasting bread and simultaneously cooking patties for a seamless handover to completion.

Reheating guidelines prior to serving suggest a swift toast for the sandwich exterior on a medium heat, ensuring cheese melts appropriately without reheating the entire piece excessively. Completing sauces or fresh elements immediately before serving maintains vibrancy in flavor.

Fresh element additions, such as garden-fresh slices of tomato or crispy lettuce, add a layer of freshness that contrasts beautifully with the warm, savory patty melt. Encourage diners to tailor sandwiches with these optional extras, promoting interactive enrichment.

Scaling Instructions


Scaling the ultimate patty melt recipe is straightforward whether you’re halving or doubling it. To halve the recipe, simply adjust ingredient quantities by 50%. Consider using a smaller skillet to maintain cooking efficiency and prevent overcrowding, which could hinder proper patty searing.

Doubling or tripling involves multiplying all ingredients accordingly, taking care to use a larger pan or cook in batches to ensure optimal heat distribution while preserving patty texture. Equipment adjustments for increased serving sizes might include a larger spatula and broader serving platters.

Timing modifications require monitoring to prevent recipe timings from lengthening unnecessarily due to broader item volumes. Consistent flame management and multiple pans, if available, aid in retaining efficiency.

Storage considerations for scaled-up recipes necessitate adequate reserve of airtight containers for post-cooking refrigeration or freezing. Label leftover patties and separate by parchment paper to prevent adhesion when stored in bulk.

Nutritional Deep Dive


The heavenly indulgence of the patty melt doesn’t sacrifice nutritional benefits. The macro breakdown highlights a balanced mix of proteins from beef, carbohydrates from the bread, and fats from both meat and cheese. Each serving offers ample energy, fitting well within a daily balanced diet.

Micronutrient analysis shows moderate levels of vital vitamins and minerals, including calcium from cheese and essential iron from beef. Whole-grain bread choices amplify fiber intake, supporting digestive health benefits.

Health benefits relate to its inclusion of quality proteins and potential manipulation of fatty acid profiles through ingredient tweaking. Consider leaner meat cuts or grass-fed options for elevated omega-3 levels and reduced saturated fats.

Dietary considerations enjoy adaptability, whether addressing gluten sensitivities or reduced-fat preferences. Swapping for lean turkey patties or whole grain gluten-free bread yields comparable nutrition outputs with adjusted macronutrient allocations.

Portion analysis recommends servings to complement lifestyle demands, particularly for individuals following calorie-conscious plans. Measuring serving sizes literally provides insight into maintaining a balanced energy-contributing meal.

Weight management tips encourage complementing patty melt consumption with high-fiber, low-calorie sides like salads or steamed vegetables, optimizing satiety while preventing overindulgence.

Dietary Adaptations


Gluten-free: Opting for gluten-free bread satisfies those with sensitivities without compromising the appeal of this classic comfort food. Ingredient scrutiny ensures cross-contamination doesn’t affect the dining experience inconveniently.

Dairy-free: Substitute non-dairy cheese and margarine alternatives into the bridge’s formula. Brands with melting capabilities ensure the patty melt retains its textural allure, while reaching dairy-adverse diners.

Vegan: A complete dietary shift includes plant-based patties constructed from black beans or chickpeas, paired with vegan cheese and mayonnaise sauces. Emphasis on spice and seasoning helps maintain flavorful authenticity.

Low-carb: Bread reduction or substitution with cauliflower rounds or portobello caps addresses carbohydrate considerations judiciously. Resulting combinations retain satisfying engagement without unnecessary carb surges.

Keto: Ideal strategies focus on breadless melts, served open and garnished with cheese and sauce. Ground beef or turkey patties bolster protein concentrations that naturally align with keto dietary structures.

Paleo: Drawing from paleo principles may involve innovative bun substitutes, like lettuce wraps or sweet potato rounds, ensuring meal satisfaction adheres to paleolithic dietary tenets.

Low-FODMAP: Tricky ingredients like onions and garlic can be replaced or omitted, keeping focus on FODMAP-friendly inputs to combat digestive distress while offering similar flavor resonances.

Other specific diets: For cuisine-centered explorations, deploying starters like patty melt tapas or fusion melts accommodates cultural flavor meshing, delivering diverse culinary waves without diet infringement.

Troubleshooting Guide


Texture issues sometimes arise due to overcooked or compressed patties. Juiciness disappears with excess handling; shape patties lightly and space them properly on the skillet to allow even cooking free from interference.

Flavor balance pivots on seasoning accuracy. Salt and spices generally need fine-tuning pre-cooking. Taste-testing seasoned blobs ensures flavors meld harmoniously and support the secret sauce superbly.

Temperature problems relate to pan control; too high risks burning the bread before cheese melts. Moderate heat management through testing and maintaining desired pan warmth defines optimized preparation.

Equipment challenges cover skillet temperatures and uncooperative flipping. Nonstick pans help avert sticking, and flat spatulas provide dependable control during flipping maneuvers.

Ingredient substitutions, such as cheese changes, impact consistent mouthfeel or flavor; alternative curd choices should mirror initial recipe melt preferences. Trial different cheeses pre-entire recipe builds for insight.

Timing concerns unravel due to meal or side integration difficulties. Misalignment encourages cold patty melts; sequence ingredient preparation so that kitchen dynamics conclude similarly to dining satisfaction.

Recipe Success Stories


Community feedback consistently appreciates creative takes on the ultimate patty melt, revealing positive transformations and joyous meal-sharing outcomes. Social media conversations highlight imaginative alterations, with readers lauding others’ adaptability inspirations.

Variation successes continuously arise, frequenting Instagram or bloggers who’ve intertwined local fare influences seamlessly with the original patty melt blueprint. These experiments amplify diverse culinary intersections where classic American meets new-age flavor circles.

Adaptation stories bring about humor and authenticity, with some suggesting homegrown twists resulting from Summer vegetable overloads or forgotten pantry staples, proving yield to creative growth through happy accidents.

Reader suggestions further enrich collective enjoyment, proffering ingredient recommendations or equipment novelties taken from their daily trials. Participants identify reasonings for adjusting seasonings or temperature orderings to meet or even outstrip expectations.

Photography tips explicitly shared include in-depth lighting guides that showcase the patty melt in its best possible light. Artful framing and presentation yield appreciation in both visual and culinary artistry, demonstrating how care in appearance marries ultimate taste satisfaction.

Frequently Asked Questions

Q: Can I make the secret sauce ahead of time?
A: Yes, the secret sauce components can be mixed a day ahead. Store in an airtight container in the refrigerator to meld flavors. Stir before use for consistency.

Q: What bread do you recommend for a patty melt?
A: Rye and sourdough offer robust support and flavor. Choose slices thick enough to withstand press without overwhelming the palate.

Q: Can patties be prepared in advance?
A: Form patties a day in advance, seasoning with salt and allowing flavors to develop. Refrigerate, separating layers with parchment paper for easy use.

Q: What ingredients are critical for the secret sauce?
A: The sauce’s essence hinges on a blend of mayo, ketchup, and relish. Worcestershire sauce, garlic powder, and a dash of paprika enhance balance.

Q: How can I introduce a spice kick to the patty melt?
A: Spicy cheese such as pepper jack or a dollop of Sriracha within the secret sauce infuses heat without overwhelming primary flavor layers.

Q: Is it possible to create a vegetarian patty melt?
A: Absolutely! Swap beef patties for chickpea or black bean varieties. Consider eggplant slices or portobello mushrooms as alternate filling bases.

Q: Can I use pre-shredded cheese?
A: While feasible, pre-shredded cheese melts differently due to coatings, possibly altering texture. Prefer bags labeled as intended for melting.

Q: How can leftover patty melts be reheated?
A: For an even heat, utilize an oven or toaster oven. Set at moderate temperatures assures anaerobic heating without sogginess.

Q: What oils best complement grilling?
A: Neutral oils with high smoke points, such as canola or vegetable, minimize flavor duplication and enhance patty searing.

Q: Is it possible to include additional toppings?
A: Certainly. Items like roasted red peppers, pickles, or avocado enhance texture, harmonizing with the patty melt’s overall flavor tapestry.

Q: Should onions always be caramelized?
A: Although caramelization deepens flavor, raw onions add crunch. Choose variation based on desired culinary experience to target flavor layers.

Q: What side dishes complement the patty melt best?
A: Accompaniments vary from crispy fries to a fresh salad, balancing rich flavors of the melt with palate-cleansing textures. Complementary slaws reaffirmed appreciation.

Additional Resources


Explore related recipes taking inspiration from other American classics, like the Philly cheesesteak or Reuben sandwich, to expand your culinary repertoire. Each offers unique interpretations of meat and cheese crowned creations inviting further comparisons and taste voyages.

Technique guides on mastering griddle craft, including searing and sautéing, broaden kitchen skill sets, fostering deep dives beyond purely patty melts into diverse food avenues without intimidation.

Ingredient information charts offer matching suggestions or alternatives for common substitute preferences, such as plant-based or nutritional boosts, perpetuating access to excellent outcomes without limitations.

Equipment recommendations transcend simplicity with griddle pans or skillets diced for modern kitchens or smaller infrastructures fulfilling ease of movement and efficiency within constrained spaces.

Seasonal variations beside those encouraged through extra vegetables collectively uplift experience awareness. The patty melt, despite commonality, exhibits variant flexibilities inviting broader interaction across broader spectrums.

Join the Conversation


Share your patty melt adaptations or successes on social media, invigorating the food-loving community with individual triumphs or discoveries. #PattyMeltAdventure unites fellow enthusiasts under delicious pursuits harnessing cooking passion collectively.

Photography tips elevate aesthetic accomplishment, inviting compliments with simple adjustments akin to natural lighting during midday or contrasting backgrounds favorably offset sandwich vivacity.

Recipe reviews showcase effectiveness, where personal ratings alongside ingredient adaptability equate to storytelling within plates beneath coherent blasted melts, preserving communal cheeriness indelibly integrated.

Community engagement enlivens ideas from tasting panels or unexpected rejoinders aiming to quench culinary thirst through impromptu, helpful foody banter, thereby sowing collective spirited pursuits.

Recipe variations posted online or shared via networking exemplify creativity within limits steering culinary evolution infinitely. Express enjoyment or derive suggestions on platforms challenging initial presumptions before transforming into gastronomic success shares.

The Recipe

Ultimate Patty Melt with Secret Sauce

Serves: 4

Prep Time: 15 mins

Cook Time: 20 mins

Total Time: 35 mins

Kitchen Equipment Needed

  • Large skillet or griddle
  • Spatula
  • Mixing bowls
  • Knife
  • Cutting board

Ingredients

  • 1 pound ground beef (80/20 blend)
  • 8 slices rye or sourdough bread
  • 4 slices Swiss cheese
  • 2 large onions, sliced thinly
  • 4 tablespoons unsalted butter
  • Salt and pepper to taste
  • Secret Sauce:
    • 1/2 cup mayonnaise
    • 2 tablespoons ketchup
    • 1 tablespoon pickle relish
    • 1/2 teaspoon Worcestershire sauce
    • 1/4 teaspoon garlic powder
    • Paprika to taste

Directions

  1. In a skillet over medium heat, melt 1 tablespoon of butter. Add sliced onions, cooking slowly until caramelized. Set aside.
  2. In a mixing bowl, combine all secret sauce ingredients. Mix until smooth and reserve for later use.
  3. Season ground beef with salt and pepper, forming into four equal patties. Heat skillet over medium-high, adding patties to sear 3–4 minutes per side until cooked through. Remove and set on a plate.
  4. Butter outside of each bread slice lightly. Assemble sandwiches with secret sauce, beef patties, cheese, and caramelized onions between bread.
  5. Using a clean skillet over medium heat, toast sandwiches until golden brown and cheese is melted. Serve immediately.

Recipe Notes

  • Substitute cheddar or provolone cheese for variation.
  • Use gluten-free bread for dietary adaptations.
  • Add a dash of hot sauce to the secret sauce for spice lovers.

Tasty Tater Tot Mini Cheeseburger Bites Perfect for Any Party

Tater Tot Mini Cheeseburger Bites: The Perfect Snack for Any Occasion

⚖️
Difficulty
Easy

⏲️
Prep Time
15 mins

🕒
Cook Time
25 mins

⏱️
Total Time
40 mins

🍽️
Servings
20 bites

Dive into the ultimate comfort food experience with our Tater Tot Mini Cheeseburger Bites. This delightful and fun recipe combines the crispy, golden goodness of tater tots with the classic flavors of a cheeseburger. Perfect as an appetizer or a snack, these bites are a hit at both game day parties and casual family gatherings. Easy to make and even easier to eat, they offer a playful twist on a much-loved favorite.

These mini bites pack all the flavors of a cheeseburger into a single, delicious mouthful. Imagine the savory blend of ground beef, sharp cheddar cheese, and a hint of pickles, all wrapped up in a crunchy tot. As they bake, the cheese melts perfectly, while the tots crisp to perfection, leaving you with a snack that’s hard to resist. Children and adults alike can’t get enough of these Tater Tot Mini Cheeseburger Bites, making them a great choice for any event.

The aroma alone is enough to draw everyone into the kitchen, with the tantalizing scent of beef and cheese wafting through the air. Their visual appeal is undeniable as well, with a golden hue and neatly topped cheese and garnish making them as eye-catching as they are tasty. Plus, with straightforward steps and accessible ingredients, this recipe is a wonderful introduction to cooking that satisfies both novices and seasoned chefs alike.

Quick Recipe Highlights

  • Flavor Profile: These bites provide a savory blend of seasoned beef and melted cheddar cheese, complemented by the crispiness and mild saltiness of the tater tots.
  • Texture: The combination of juicy beef with gooey cheese and crunchy outer layers creates a satisfying contrast that pleases the palate with every bite.
  • Aroma: Expect an enticing mix of meaty, cheesy aromas with a hint of grilled delight as these bites bake to perfection.
  • Visual Appeal: Perfectly golden and neatly topped with your favorite garnishes, these bites are as appetizing to the eyes as they are to the stomach.
  • Skill Level Needed: Simple steps and minimal cooking expertise required make this an easy recipe for beginners or a quick fix for experienced cooks.
  • Special Equipment: A muffin tin helps hold these bites together perfectly, ensuring even cooking and presentation.

Recipe Overview

  • Difficulty Level: Chosen as an easy-level recipe due to straightforward ingredients and basic cooking techniques that require minimal preparation.
  • Category: This dish falls under the snacks and appetizers category, great for parties, game days, or casual snack time.
  • Cuisine: Rooted in American cuisine, this recipe draws inspiration from classic diner-style cheeseburgers and combines it with the universal love for tater tots.
  • Cost: Affordable and accessible ingredients make this a budget-friendly recipe without compromising on flavor, with most components found at any grocery store.
  • Season: While great year-round, these bites shine in colder months when comfort food reigns supreme but remain a hit at summer BBQs, too.
  • Occasion: Ideal for social gatherings such as parties, potlucks, and family gatherings where finger foods are beloved for their convenience and appeal.

Why You’ll Love This Recipe


The taste and texture of Tater Tot Mini Cheeseburger Bites are simply irresistible. The crispy exterior of the tater tots pairs exceptionally well with the savory filling of seasoned beef and melted cheese, creating a multi-dimensional flavor profile in a single bite. Whether you enjoy them dipped in ketchup, topped with a slice of gherkin, or simply as they are, each bite promises delightful flavors reminiscent of a classic burger experience.

Convenience is another reason to love this recipe. These bites require a short list of ingredients and minimal preparation time, making them an excellent choice when you’re short on time but need a dish that will impress. With just a few steps, you can prepare a crowd-pleasing appetizer that leaves a lasting impression on your guests.

Nutritionally, while indulgent, these bites can be balanced with nutrient-rich sides such as fresh salads or vegetable platters. Using lean beef and opting for reduced-fat cheese can cut down on calories while still retaining the richness that makes this snack delightful. It’s all about balance and enjoying this comfort food as part of a varied diet.

These mini bites are perfect for social gatherings, encouraging interaction as guests enjoy these handheld delights. They make an excellent conversation starter and can be customized with various toppings to cater to diverse tastes, making them ideal for events where you want to bring people together through food.

Lastly, their cost-effectiveness and accessibility are undeniable. With ingredients you likely already have in your pantry or freezer, these bites offer incredible value for money. Serving a crowd without breaking the bank has never been so deliciously easy, making these a flexible option for any host.

Historical Background and Cultural Significance


The origin of the cheeseburger can be traced back to the early 20th century in the United States, embodying the country’s penchant for innovation and convenience in cuisine. The Tater Tot, on the other hand, was an ingenious creation by the Ore-Ida company in the 1950s as a way to use leftover potato pieces. Combining these two elements preserves an essential piece of American culinary history while offering a nostalgic trip down memory lane for many.

Culturally, cheeseburgers have become a symbol of American fast food, representing everything from casual dining to backyard barbecues. The Tater Tot’s iconic status in diners and school cafeterias underscores its place in American hearts. Together, in mini bite form, they create a dish that resonates with cultural comfort and familiarity.

As recipes have evolved, so too has this combination dish. It’s come to symbolize not just a blend of classic flavors but also a creative take on serving comfort food in a more refined, bite-sized package. It’s a testament to the playful nature of American cuisine to bring together beloved snacks in new and innovative ways.

Regional variations have emerged, with additions like spicy jalapenos in the Southwest or tangy BBQ sauce in the South. These adaptations allow for cultural nuances to be introduced into this quintessential American snack, showcasing regional preferences and flavors within a national favorite.

Ingredient Deep Dive


Ground beef, the heart of these bites, is more than just a flavorful protein component. Its cultural significance stretches across cultures and cuisines, often representing the versatility and adaptability of beef as a staple ingredient. In this recipe, ground beef brings the traditional flavors of cheeseburgers, enriched by simple seasoning to highlight its natural umami traits.

Nutritionally, ground beef is a source of essential nutrients like protein, vitamin B12, and iron. When choosing beef, opt for lean cuts to reduce saturated fats, enhancing the healthiness of these bites without sacrificing the beef’s juicy texture. Look for bright red color and fresh smell when selecting, and keep it refrigerated or frozen to maintain quality until ready for use.

Those unable to consume beef can substitute with ground turkey or plant-based meat alternatives, which also pair well with the cheesy, tater tot component of the recipe. These options provide versatility for adapting this dish to different dietary preferences or needs without detriment to taste.

The cheddar cheese adds a tangy sharpness and creamy melt that ties the flavors together. Its cultural relevance dates back to the cheese-making processes of old England, and it’s cherished worldwide for its distinct flavor profile. Keeping cheddar cheese wrapped in wax paper or airtight packaging helps preserve its freshness and extends its shelf life in your refrigerator.

Common Mistakes to Avoid

  • Overcooking the beef can lead to dryness. Ensure you cook it just until it’s no longer pink for a juicier bite.
  • Spreading the tater tots too densely in the muffin tin can prevent them from crisping properly; make sure each tot is nestled lightly.
  • Not allowing tots to cool slightly before removing can lead to breaking apart; patience ensures they maintain shape.
  • Forgetting to drain excess fat from the ground beef mixture can make the bites greasy. A quick drain keeps them light.
  • Using low-quality cheese can result in an underwhelming flavor and poor melting. Opt for a sharp cheddar for the best results.
  • Not seasoning the beef enough can lead to a bland filling. A touch of salt and pepper brings out the beef’s full flavor.
  • Skipping the garnishes can lose visual appeal and contrasting flavors; they are crucial for presentation and taste balance.
  • Overbaking risks burning the tots, so monitor the oven to achieve the perfect golden brown hue.
  • Using a mini muffin tin rather than a regular one can lead to overflow; ensure correct tin size for this recipe’s quantity.
  • Failing to preheat the oven may result in uneven cooking, so always ensure the oven is at the right temperature before baking.

Essential Techniques


The first key technique is properly seasoning the beef. This step is essential to build the savory foundation of your bites. Balance your seasoning carefully; too little can result in blandness, while too much can overwhelm the natural beef flavor. Taste and adjust as needed to ensure a harmonious blend of salt, pepper, and your chosen spices.

Mastering the art of arranging tater tots is vital. By ensuring each tot is touching but not overcrowded, you allow for even baking and optimal crispiness. Visual clues such as evenly spaced, golden browned tots indicate you’re achieving that delightful crunch, which is a signature feature of the dish.

Pay attention to cheese placement, as it’s critical for both flavor and appearance. Placing cheese on top during the last five minutes of baking allows for a beautifully melted, golden topping without burning. Keep an eye out for bubbling, lightly browned cheese for the perfect finish.

Another important technique is allowing the bites to cool slightly before removing from the tin. This patience prevents them from coming apart, maintaining their intended shape for both aesthetic and practical consumption purposes.

Finally, garnishing with fresh herbs or pickles adds a burst of freshness and cuts through the richness. This simple technique elevates the overall taste and provides a visually appealing finish that enhances presentation.

Pro Tips for Perfect Tater Tot Mini Cheeseburger Bites


To ensure your bites are evenly baked, consider rotating your muffin tin halfway through the cooking time. This helps promote uniform heat distribution, especially in older ovens, which can have hot spots.

Use high-quality sharp cheddar cheese for a punchy flavor that stands out amidst the other ingredients. Its robust taste complements the beefiness and adds a desirable creamy texture upon melting.

Let your cooked beef mixture cool slightly before adding any fresh ingredients like onions or herbs to prevent wilting or overcooking, preserving their texture and freshness.

Consider experimenting with seasoning—small amounts of garlic or onion powder can add depth without overpowering the other flavors and are worth trying for a personalized touch.

If you fancy a smoky edge, try adding a hint of smoked paprika or finely chopped cooked bacon to the beef mixture for another layer of flavor that elevates these bites.

For spicy variations, incorporate chopped jalapenos or a dash of hot sauce to the beef mix. This technique adds a fiery kick for those who enjoy a little heat in their bites.

Always let the bites rest at room temperature for a minute before serving—this brief pause helps lock in juices and enhances flavor absorption for a tastier bite.

Lastly, prepare a simple dipping sauce by mixing mayonnaise, ketchup, and a pinch of smoked paprika. Serving alongside adds an additional layer of flavor and allows guests to customize their bites.

Variations and Adaptations


Regional variations of this recipe are abundant. For instance, adding jalapenos and pepper jack cheese gives a Southwestern twist, while incorporating garlic and parsley with mozzarella takes inspiration from Italian cuisine, offering different flavors while keeping the concept intact.

This recipe shines with seasonal adaptations. During summer, fresh herbs like basil or chives add a garden-fresh taste, while in fall, a sprinkle of nutmeg in the beef mixture gives a warm, cozy flavor, perfectly aligning with the season’s comfort food trend.

Dietary modifications are simple with this recipe. Swap traditional tater tots with cauliflower tots for a lower-carb or gluten-free option, and use plant-based meat and cheese substitutes to craft a delicious vegan alternative that maintains the essence of the dish.

Enhancing flavor can be as simple as choosing alternative cheeses- blue cheese or feta can introduce bold, unique flavors to the bites, providing new palates an adventurous twist on the classic combination.

Modify texture by adding crunchy bacon bits to the cheese mixture, offering a delightful crunch within the gooey core. This provides additional layers of texture that guests will find intriguing.

Presentation alternatives such as skewering them or serving on a platter alongside colorful dipping sauces allow these bites to stand out as an impressive centerpiece on any party table.

Serving and Presentation Guide


Creative plating can transform how these bites are perceived. Consider stacking them pyramid-style, surrounded by vibrant dipping sauces, drawing eyes to a centerpiece meant for sharing.

Garnishing with chopped green onions or freshly chopped parsley adds a pop of color. Fresh herbs not only enhance appearance but deliver an aromatic element that entices guests further.

Traditionally, these bites pair well with dipping sauces. Options range from classic ketchup to sophisticated aioli, offering a variety of flavor enhancements aligning perfectly with the dish’s versatility.

If modern is your vibe, try skewering each bite with a toothpick topped with a pickle slice. This creates individual serve portions and adds a visual accent that encourages diners to explore in a familiar yet styled way.

Optimal temperature plays a role in presentation too—serve these bites slightly warm to ensure they are at their most enjoyable texture and flavor profile when consumed.

Mindful portion control is key for parties. Estimate about 3-4 bites per guest, ensuring all have an opportunity to indulge in this treat and allowing for more balanced dining offerings.

Wine and Beverage Pairing


Pairing wines such as a light, fruity Pinot Noir or a crisp Chardonnay complements the rich, cheesy flavors and savory beef of the bites. Their acidity cuts through the richness, creating a balanced tasting experience.

Non-alcoholic alternatives are equally enjoyable, such as a chilled iced tea or sparkling water with a hint of lime. These refreshing options cleanse the palate while providing a non-committal complement to the bites.

Coffee, with its bold flavors, surprisingly pairs well too, particularly an iced coffee version that provides a refreshing caffeine boost while accentuating the beef’s umami tones.

Ensure that drinks are served slightly chilled, especially the wine, whose optimal temperature range enhances both flavor and mouthfeel, aligning well with the warmth of the cheeseburger bites.

Serve larger parties with a drink station featuring beverage pairings that allow guests to pick and choose, reflecting their preferences and enhancing the social aspect of the feast.

Storage and Shelf Life


Storing leftover mini cheeseburger bites is easy. Allow them to cool completely before placing in an airtight container, keeping them fresh in the fridge for up to 3 days, extending their enjoyment beyond the initial serving.

Temperature plays a crucial role in maintaining freshness. Keep the fridge at a consistent 35-40°F to prevent spoilage or texture decline, ensuring their flavors remain robust over time.

Opt for resealable plastic bags or stackable containers to save space. Keeping bites in a single layer helps preserve their shape and crispiness, prompting them to last longer when stored correctly.

Signs of spoilage include a noticeable sour smell or slimy texture. If any doubt arises, err on the side of caution, preferring freshness and safety over potential health risks.

Reheat in a 350°F oven for 5-7 minutes for best results, which ensures thorough warming without sacrificing their original texture. Microwaving, though convenient, may lead to sogginess and is less recommended.

Freezing is a viable option, too. Flash-freeze them on a baking sheet before transferring to plastic bags, and they’ll keep for up to 2 months—perfect for last-minute cravings or unexpected guests.

Make Ahead Strategies


The option to prepare these bites ahead of time significantly enhances their convenience. Precook the beef filling the day before, which allows flavors to meld even further overnight and streamline the assembly process.

Store the beef separately in the fridge and assemble the tots fresh for optimal results. This division prevents unwelcome sogginess between moist fillings and crispy tops, preserving their signature texture.

Assessing quality impacts is crucial when prepping ahead. The flavor generally deepens but retaining crispiness is vital, making it prudent to bake the tots fresh, even if the filling is prepared ahead.

Assembling the bites directly before baking is recommended to capture the contrasting textures. Quick assembly follows easily once ingredients are prepped, maintaining freshness and flavor.

Reheat thoroughly before serving for maximum taste and texture benefits. If prepared in advance, ensure they’re fully warmed in the oven before setting out for guests to devour.

Adding fresh elements upon serving, such as garnishes or dipping sauces, keeps these bites as tasty and appealing as their freshly-made counterparts, ensuring they’re suitable across multiple settings.

Scaling Instructions


Scaling recipes up or down is a snap with these bites. Need to halve the recipe for a smaller crowd? Halve each ingredient and adjust cooking methods slightly, using a smaller baking sheet and muffin tin.

For larger gatherings, consider doubling or tripling the recipe. Be mindful of not overcrowding the muffin tins, which might require multiple batches to ensure even cooking.

Equipment-wise, larger or additional muffin tins are necessary when multiplying recipes. Maintain a focus on uniformity to guarantee each bite cooks evenly, regardless of increased quantities.

Timing modifications come into play with scaling. Be sure to check multiple batches for doneness, potentially rotating tins in the oven to account for different baking conditions.

Increased quantities benefit from mindful storage. Use separate containers for each multiplied portion to facilitate warming, serving, and subsequent storage, ensuring longevity and flavor.

Nutritional Deep Dive


These bites offer a moderate balance of macros with protein-rich beef and limited carbs from the tater tots. On average, a serving provides a fulfilling amount of protein and fats important for energy.

Micronutrient-wise, beef offers essential vitamins and minerals, including B vitamins and iron, supporting metabolic functions. The cheese also supplies calcium, crucial for bone health.

Health benefits include satiety from balanced macronutrients, aiding in portion control and preventing overeating when part of a balanced plate. Swapping ingredients to align with dietary goals offers additional benefits.

Dietary considerations factor prominently. By selecting lean beef cuts and lower-fat cheese, reduce calorie density while retaining flavor and texture qualities that make this dish a favorite.

Avoid over-indulging in these bites by incorporating fresh, vegetable-based accompaniments that balance out richer properties, fostering a mindful approach to consumption.

Weight management tips include the importance of moderation, focusing on portion control without eliminating favorite foods. These bites fit into any balanced diet when enjoyed responsibly.

Dietary Adaptations


For a gluten-free adaptation, replace traditional tater tots with gluten-free alternatives or make homemade versions using mashed vegetables and gluten-free flour.

For dairy-free options, swap cheddar cheese with a dairy-free cheese alternative or sprinkle nutritional yeast over the top for that cheesy flavor without the dairy content.

Vegan adaptations remain an option. Use plant-based ground meat substitutes or crumbled tofu for textural similarities; pair with vegan cheese to make this recipe entirely plant-based.

To lower carb content, select cauliflower tots or other vegetable-based tots, ensuring that vegetable flavors align well with the beefy filling, enhancing low-carb dining experiences.

Keto adaptations are only a small change away. Emphasize high-fat cheeses and serve over a bed of zucchini or eggplants to maintain macros while reducing carbs without sacrificing tastiness.

Paleo followers can swap tater tots with sweet potato rounds and use whole foods, like processed coconut oil in place of traditional oils, to complement ingredient choices.

Low-FODMAP adjustments could include using low-FODMAP vegetables within the filling or ensuring FODMAP-free spices, catering to those with sensitive GI environments.

Incorporating these dietary adjustments ensures that everyone can enjoy the delightful flavors of Tater Tot Mini Cheeseburger Bites, regardless of specific nutritional needs or lifestyle choices.

Troubleshooting Guide


Texture issues can arise if tots become soggy. Re-evaluate their density in the tray or consider flash freezing them before baking for extra crispiness.

Flavor balance is crucial to great bites. If you experience blandness, experiment with bolder seasoning or different cheese varieties to spark more punch.

Temperature problems often occur if oven heat is inconsistent, leading to uneven cooking. Ensure the oven is consistently preheated and rotate tins when necessary to maintain balance.

Equipment challenges include mismatched muffin tins. Maintain use of uniform size and materials to produce consistent results across multiple batches.

Ingredient substitutions offer flexibility but require careful consideration. If substituting suffer expectation setbacks, closely evaluate ingredient nutrition profiles for suitability.

Timing concerns typically revolve around overbaking. Stay diligent about times and review tots visually or using a thermometer for temperature benchmarks as cooking progresses.

Recipe Success Stories


Community feedback has poured in for these bites, with many readers praising their flavor and texture as an undeniable hit at family gatherings. Delight has spread from taste buds to shared stories about meal successes.

Variations prove popular—one reader successfully added jalapenos and Monterey Jack cheese for a spicier rendition, yielding rave reviews from a backyard BBQ party.

Adaptation stories inspire, as readers have ventured into vegan alternatives using textured vegetable proteins, delighting those pursuing plant-based lifestyles with nostalgic cheeseburger flavors.

Photography tips shared by readers include artful platter arrangements that nicely frame these bites in holiday spreads, attracting attention to presentation and enhancing photographic appeal.

Shared reader reviews have highlighted time and time again their satisfaction not only with the ingredients and cooking techniques but with sharing eye-catching photos online, celebrating both cooking and eating!

Frequently Asked Questions

Can I make these cheeseburger bites vegetarian?

Yes, substitute ground beef with a plant-based protein like crumbled tofu or a beef substitute for a vegetarian-friendly snack that maintains deliciousness.

What toppings work best with these bites?

Popular toppings include sour cream, pickles, or ketchup, but feel free to get creative, such as with spicy sriracha or tangy BBQ sauces for extra flair.

Can the recipe be doubled?

Absolutely! Doubling is simple, just ensure you account for equipment capacity and maintain proper proportions to ensure uniformity across increased portion sizes.

Can I freeze these after cooking?

Yes. Allow bites to cool completely before freezing in an airtight container, perfect for storing up to two months with minimal quality loss.

Why are my tater tots soggy?

Soggy tots may be due to overcrowding in the tray or lack of proper preheating. Space tots evenly and confirm the oven is set to the correct temp before baking.

What’s the best cheese substitution?

Try mozzarella or Monterey Jack for softer melting and mild flavors, while feta or blue cheese can add more pungent, adventurous tastes if desired.

How can I reheat these bites?

Reheat in a preheated 350°F oven for 5-7 minutes to restore moisture and warmth. This method maintains a crisper texture compared to microwave reheating.

Are there low-carb alternatives?

Certainly! Substitute cauliflower tots or other vegetable-based alternatives for traditional tater tots to lower carb content while preserving texture.

Can these be made in advance for a party?

Yes, assemble and chill in the fridge, then bake immediately before serving to ensure freshness and warmth for guests.

How can I make these bites spicy?

Incorporate chopped jalapenos into the meat mixture or sprinkle with cayenne pepper for added heat that enlivens each bite.

What do I do if my bites fall apart?

Ensure tots and fillings are properly cooled and rested before assembly, as hastily attempting release may compromise structural integrity.

Are there vegan adaptations?

Use vegan ground substitutes and plant-based cheeses within this recipe to craft a fully vegan dish without losing flavor integrity.

Additional Resources


For those newly exploring tater tots, a guide to homemade versions can expand culinary horizons while providing a hands-on approach to appreciating this fantastic filled bite concept.

Embrace different techniques in creating seasoned beef ragu or homemade cheese slices, elevating comfort food experiences and diversifying knowledge within cheeseburger adaptations.

Investigate the benefits of investing in non-stick muffin tins or oil basting techniques that improve both baking performance and utensil care, enhancing ongoing recipe exploration.

Learn changing seasonal adaptations that refine BBQ menus or child-friendly snack ideations with activity tips involving culinary crafts that involve youngsters in the kitchen.

Explore different wine pairings from grape varietals to vintage selections, revealing beverages that uniquely match these bites’ rich flavors on diverse occasions.

Join the Conversation


Engage with our community by sharing your own recipe takes on social media, tag us to be featured in our community successes post, and celebrate culinary creativity!

Photography tips encourage you to adapt light exposure and creative angles in plating and image capturing; reach out for further guidance or showcase your images.

Celebrate readers’ adjusted recipes with new suggestions foldered every week. Encourage culinary exploration and savor the mutual rewarding experiences.

Community engagement isn’t just about making food; consider story sharing or recipe adaptations. Creativity and expertise thrive with insight shared among culinarians.

Variation exploration is encouraged and welcomed across our network. Learn from others or offer personal innovation for transformation of traditional foundations into new favorites.

The Recipe

Tater Tot Mini Cheeseburger Bites

Serves: 20 bites

Prep Time: 15 mins

Cook Time: 25 mins

Total Time: 40 mins

Kitchen Equipment Needed

  • Muffin tin
  • Mixing bowls
  • Baking sheet
  • Spatula
  • Oven mitts

Ingredients

  • 1 lb ground beef
  • 1 packet (32 oz) tater tots
  • 1 cup cheddar cheese, shredded
  • 1 small onion, diced
  • Salt and pepper to taste
  • Optional: pickles, ketchup, or preferred toppings

Directions

  1. Preheat your oven to 400°F (200°C).
  2. In a skillet over medium heat, cook the ground beef and diced onion until the beef is browned. Season with salt and pepper.
  3. Drain excess fat and set aside to cool slightly.
  4. Arrange tater tots in a single layer on a baking sheet and bake for 10 minutes to lightly crisp.
  5. Line the bottom of a muffin tin with the semi-crisp tater tots, using a few per cup.
  6. Spoon beef mixture over each tot-lined cup, and sprinkle shredded cheddar on top.
  7. Bake in the oven for an additional 15 minutes or until cheese is melted and tater tots are fully crispy.
  8. Allow bites to cool slightly before removing from the tin. Serve with pickles or your choice of topping.

Recipe Notes

  • Use lean ground beef for healthier bites.
  • Add jalapenos to the beef mixture for a spicier option.
  • Top with fresh herbs before serving for added freshness.

Delicious Crockpot Pierogi Casserole with Kielbasa for Cozy Dinners

Crockpot Pierogi Casserole with Kielbasa: A Comforting Delight

⚖️
Difficulty
Easy

⏲️
Prep Time
15 mins

🕒
Cook Time
240 mins

⏱️
Total Time
255 mins

🍽️
Servings
6

Imagine a chilly evening, the warmth of your home filled with the irresistible aroma of Crockpot Pierogi Casserole with Kielbasa. This comforting recipe not only satisfies your taste buds but also fills your soul with a sense of nostalgia and warmth. The combination of tender pierogies and flavorful kielbasa creates a gratifying meal that embraces you like a cozy blanket.

With minimal prep work, this dish leverages the convenience of a slow cooker, allowing the ingredients to meld into a harmonious blend of flavors. The richness of the savory kielbasa pairs beautifully with the cheesy pierogies, creating a one-pot meal that is both hearty and filling. Perfect for busy weekdays or lazy weekends, this Crockpot Pierogi Casserole offers a hands-off approach to enjoying a homemade dinner.

As you ladle the casserole onto your plate, the golden, bubbly cheese invites you to indulge in its creamy embrace. The succulence of the kielbasa awakens your senses, offering a burst of umami that dances across your palate. With each bite, you are reminded of simpler times, where food was meant to be savored and shared with loved ones.

Quick Recipe Highlights

  • Flavor Profile: The dish boasts a perfect balance of savory kielbasa, creamy cheese, and soft pierogis, offering a taste that is both hearty and satisfying.
  • Texture: The blend of tender pierogis, savory kielbasa, and melted cheese creates a delightful contrast of creaminess, chewiness, and crispness.
  • Aroma: The slow cooking method fills the air with a tantalizing aroma of smoked sausage and melted cheese, making every corner of your kitchen cozy.
  • Visual Appeal: A golden crust of cheese atop a filling layer of pierogies and kielbasa creates an inviting and appetizing presentation.
  • Skill Level Needed: This dish requires basic cooking skills, making it accessible for kitchen novices and seasoned chefs alike.
  • Special Equipment: A crockpot or slow cooker is essential for this recipe, allowing for an even and consistent cook.

Recipe Overview

  • Difficulty Level: The Crockpot Pierogi Casserole with Kielbasa is an easy-to-make recipe, ideal for those who love simple, fuss-free cooking without compromising on flavor.
  • Category: A main course meal that serves as a perfect comfort food for dinner or lunch.
  • Cuisine: With roots in Eastern European tradition, it reflects a fusion of Polish and Ukrainian culinary influences.
  • Cost: An affordable dish with ingredients like pierogis, kielbasa, and cheese, making it accessible for all budget sizes.
  • Season: Best enjoyed in the colder months of fall and winter, offering a warming meal to soothe and comfort.
  • Occasion: Ideal for family gatherings, potlucks, holiday dinners, or any time you crave a homely, comforting meal.

Why You’ll Love This Recipe


The Crockpot Pierogi Casserole with Kielbasa is a celebration of taste and texture, providing a delightful mix of savory, cheesy, and smoky goodness. Each mouthful offers a burst of flavors that seamlessly combine the creaminess of the cheese with the smoky richness of the kielbasa and the soft, pillowy texture of pierogis. This dish is more than just a meal; it’s an experience that caters to your cravings for hearty and comforting food.

One of the greatest conveniences of this recipe is its simplicity and ease of preparation. With just a few minutes of prep work, you can set everything into the crockpot and go about your day, returning to a delicious meal ready to be served. This hands-off approach makes it an ideal dish for busy weekdays, ensuring you have a home-cooked dinner with minimal effort and time spent in the kitchen.

Nutritionally, this recipe offers a well-rounded meal with protein from kielbasa and dairy, carbohydrates from pierogis, and a dose of vegetables if added to your preference. It’s customizable to fit your dietary needs, and you can easily add more veggies for a boosted nutritional profile.

As a dish perfect for social gatherings, it encourages communal eating. Its large serving size ensures that everyone gets to partake in the rustic flavors that this casserole offers. Share its heartwarming goodness with family and friends during holidays, or bring it to potlucks to showcase a taste of home.

Budget-friendly and widely accessible ingredients make this Crockpot Pierogi Casserole an economical choice for families. Whether you’re looking to make a cost-effective dinner or feed a crowd without breaking the bank, this recipe is the go-to choice. The use of common supermarket finds ensures that you can whip it up without the need for specialty items.

Historical Background and Cultural Significance


Pierogis are traditional dumplings with origins rooted deep in Eastern European culinary practices. Known for their versatility and heartiness, pierogis have been a staple in Polish and Ukrainian households for centuries, symbolizing warmth, hospitality, and plentiful nourishment.

Historically, pierogis were considered a working-class food, due to their simple yet filling nature. They were uniquely adaptable, allowing households to use whatever ingredients were on hand, which contributed to their widespread popularity. Over time, pierogis transcended regional boundaries, becoming cherished across the globe for their comforting nature.

The addition of kielbasa into the pierogi casserole brings a fusion element, marrying Polish-American influences. Kielbasa, a smoked sausage, enhances the recipe with its robust flavor, adding a new layer to the traditional pierogi experience. This adaptation reflects the ever-evolving nature of culinary traditions as they adapt to new ingredients and tastes.

Regional variations have emerged, incorporating local flavors and dietary preferences. In regions with abundant cheese production, for example, a blend of cheeses might be used to intensify the creamy texture. Meanwhile, other areas might incorporate seasonal vegetables or spicy elements to impart a unique twist on the classic recipe.

Ingredient Deep Dive


Pierogis are the heart of this dish, representing a cherished tradition of dumpling-making in Eastern European cuisine. They are typically filled with potatoes and cheese, showcasing simplicity and flavor. Nutritionally, pierogis offer a good source of carbohydrates for energy, with varying nutritional profiles based on additional fillings.

Storage of pierogis is hassle-free, as they can be frozen and heated as needed, making them ideal for busy lifestyles. When selecting pierogis, look for a firm texture before cooking, as this ensures structure during baking. For those with dietary restrictions, gluten-free or vegan options are available to accommodate different needs.

Kielbasa adds a smoky, savory depth, coupling with the pierogis to create an intense flavor profile. Known for its versatility, kielbasa is deeply embedded in Polish-American culture. Its nutritional makeup includes essential proteins and fats, making it a satisfying component of this dish.

Selecting quality kielbasa involves looking for a product that is well-cased with a rich color and firm texture. It should be stored in the refrigerator and consumed within its shelf life to maintain quality. Substitute with turkey or chicken sausage for a lower-fat alternative, or use a plant-based sausage for a vegan-friendly version.

Common Mistakes to Avoid

  • Choosing low-quality pierogis can result in a soggy texture. Opt for high-quality brands or homemade varieties.
  • Overcooking kielbasa leads to dryness; monitor its texture to ensure it remains juicy and flavorful.
  • Neglecting to mix ingredients well can lead to uneven cooking or flavor distribution. Stir thoroughly before cooking.
  • Adding too much salt can overpower the dish, especially since the kielbasa is naturally salty. Season conservatively.
  • Not checking the dish halfway through cooking can result in overcooked pierogis or uneven cheese melting.
  • Using a non-stick spray in the crockpot ensures the casserole doesn’t stick or burn, preserving the presentation.
  • Skipping the pre-browning of the kielbasa can miss the opportunity to add depth and color.
  • Filling the crockpot to the brim may result in uneven cooking. Leave space for heat circulation.

Essential Techniques


One critical technique in this recipe is the browning of kielbasa before adding it to the crockpot. Browning enhances the sausage’s flavor and adds a caramelized richness. Ensure your skillet is sufficiently hot before adding the kielbasa and turn frequently for even coloring.

Incorporating layering techniques is important. Layer the pierogis evenly to avoid overcrowding, which could lead to inconsistent cooking. Ensure cheese covers all layers to achieve a creamy, gooey consistency throughout—this layering also promotes even distribution of flavors.

Pre-soaking the crockpot insert with warm water creates an even heat environment, reducing the risk of scorching or uneven cooking. It sets the optimal conditions to allow gradual cooking and blending of the dish’s components beautifully.

Adding the cheese in stages helps maintain its creamy texture without overcooking. Begin with a layer at the bottom, and save the final top layer for the last hour of cooking to form a golden crust, contributing to aesthetic and taste appeal.

Pro Tips for Perfect Crockpot Pierogi Casserole


For an extra burst of flavor, sauté onions and garlic before adding to the crockpot, enhancing the savory depth of the casserole. Brown your kielbasa in a pan before putting it into the crockpot to bring out its smokiness and enrich the overall flavor profile.

Fresh herbs like thyme or parsley can be added towards the end of cooking to freshen and elevate the dish’s flavor complexity. If you like a bit of spice, incorporate a dash of red pepper flakes or cayenne to balance the creaminess of the cheese and pierogis.

For an indulgent version, try adding a sauce layer—such as sour cream or a creamy mushroom sauce—between pierogi layers to further amplify flavor and richness. Ensure all ingredients are evenly distributed in your crockpot to maintain consistency throughout the cook.

Stir in a little bit of lemon juice or a dash of vinegar just before serving to brighten flavors and balance the dish’s richness. Lastly, rest the casserole for 10 minutes before serving; this allows the flavors to deepen and settles the cheese for a cleaner serving.

Variations and Adaptations


This recipe can easily be adapted to suit different tastes and preferences. Experiment with regional variations by incorporating local ingredients such as smoked paprika for a Spanish influence or capers and olives for a Mediterranean touch.

Embrace the seasons by adding fresh, seasonal vegetables to the casserole. Autumn squash or spring asparagus can add a delightful twist and additional nutrients to the dish. For vegetarians, replace kielbasa with a plant-based sausage or hearty mushrooms to maintain a robust, savory profile.

Modify the flavor by swapping the types of cheese used. A sharp cheddar offers a tangy kick, while mozzarella melts beautifully for a stretchier consistency. Add herbs and spices according to personal preference: rosemary or thyme can add an earthy base, while garlic powder complements the sausages perfectly.

To alter the texture, consider using different pierogi fillings. Sauerkraut pierogis can introduce a tangy element, while meat-filled varieties add extra heartiness. For a crisper top, finish the casserole under a broiler for a few minutes to create a golden, bubbly crust.

Presentation alternatives include serving the casserole in individual ceramic dishes or ramekins for a more elegant touch. These can be garnished with freshly chopped herbs for a burst of color and freshness or a dollop of sour cream to enrich the overall presentation.

Serving and Presentation Guide


When it comes to serving, presentation can significantly enhance the enjoyment of this crockpot pierogi casserole. For an eye-catching touch, ladle servings into warmed bowls or classic crockery dishes, allowing the golden hue of the casserole to contrast beautifully against neutral-toned dinnerware.

Use fresh herbs such as parsley or dill to garnish, adding an element of color and fresh aroma before serving. These should be added just before serving to maintain their vibrancy and bring a fresh note to the dish’s luscious flavors.

Traditional accompaniments such as sour cream or a side of sautéed cabbage make excellent partners to your pierogi casserole, providing a textural and flavor contrast. For a modern twist, serve with a side of lightly dressed leafy greens or a vibrant tomato salad to balance the richness.

Consider temperature when serving this dish. It’s best enjoyed hot straight from the crockpot, but allowing a brief settling period before serving can help ensure flavors are well-integrated and the cheese achieves the right texture.

Pro tip: Use a large serving spoon or ladle to dish up generous portions, ensuring a good mix of pierogis, sausage, and cheese for each guest. This gives a balanced taste of all the flavors in every bite, showcasing the harmonious blend the dish represents.

Wine and Beverage Pairing


Opt for a crisp, acidic wine such as a Sauvignon Blanc or a Pinot Grigio, which compliments the richness of the casserole by providing a refreshing contrast. Their zesty and aromatic notes enhance the savory flavor of the kielbasa and the creaminess of the cheese.

For those preferring non-alcoholic alternatives, a sparkling apple cider or infused water with citrus and herbs can enliven the palate between bites. These beverages offer an invigorating element without overwhelming the delicate balance of the dish’s flavors.

Consider a bold, dark roast coffee as a surprising accompaniment if serving this dish as part of a brunch or lunch. Its deep flavors add complexity, highlighting the smokiness of the kielbasa and richness of the cheese.

Temperature considerations are vital, especially when serving beverages. Ensure that wines are chilled to around 45–50°F, and other cold drinks are equally refreshing, complementing the warm, hearty casserole.

Offer guests a variety of serving suggestions, from carafes of chilled drinks to pots of freshly brewed coffee on the table, allowing them to choose according to their preference and enrich the communal dining experience.

Storage and Shelf Life


Once cooled, the crockpot pierogi casserole can be stored in an airtight container in the refrigerator for up to 3 days, maintaining its flavor while slightly enhancing it as components meld together over time.

To ensure quality, keep refrigeration temperatures at or below 40°F. Use glass containers to avoid any flavor transfers, and ensure that the casserole is thoroughly cooled before sealing to prevent condensation from compromising the texture.

Signs of spoilage include off-smells, discolored cheese, or excessive moisture development, indicating that it’s best not to consume. To enjoy any leftovers, reheat portions in a preheated oven at 350°F until thoroughly warmed, or microwave in a covered dish to maintain moisture.

Freezing is possible for up to two months. Defrost properly in a refrigerator overnight prior to reheating, ensuring that flavor integrity is maintained throughout. When ready to enjoy, reheat slowly to avoid any rubbery texture in pierogis and cheese.

Label and date storage containers to keep track of their shelf life, assisting in food safety and reducing waste—a critical component in efficient food management and quality control.

Make Ahead Strategies


For convenient meal planning, prepare the pierogi casserole ahead of time by assembling the ingredients in the crockpot insert, covering securely with foil, and refrigerating overnight. This allows flavors to deepen and meld even before slow cooking begins.

Keep each component separate if storing for longer periods—such as pre-sliced kielbasa, per-off cheese, and individual pierogis—to maintain freshness. This strategy also allows for manageable assembly just before cooking, reducing last-minute effort.

Assess quality impact and avoid cheese layer separation by incorporating it partway through slow cooking, ensuring optimal melt and creaminess without clumping or separation. Monitor carefully during pre-cooking for seamless results.

When reheating, add a dab of extra sauce or a sprinkle of cheese to revive the dish, offering fresh elements to amplify flavor and texture. Implement subtle enhancements such as fresh herbs to bring a fresh element when serving leftover portions.

Balance reheating guidelines by maintaining low heat settings, avoiding microwave rapid reheating which may degrade the texture. This care ensures optimal enjoyment, even when reheated servings are enjoyed for the second time around.

Scaling Instructions


For smaller gatherings, halving the recipe is simple: adjust quantities proportionally while maintaining crockpot duration. Use a smaller 4-quart crockpot to accommodate changes, ensuring that ingredients remain proportionate without compromising on taste.

Conversely, doubling or tripling ingredients for larger groups can be effortlessly achieved; simply extend the crockpot duration slightly, ensuring even cooking throughout. Utilize a larger 6- to 8-quart crockpot to enhance heat distribution and accommodate the increased quantity.

Equipment adjustments may be necessary for larger volumes. Larger utensils such as sturdy wooden spoons or ladles support seamless serving and proper mixing, thus enhancing dish integration.

Timing adjustments are minimal—generally, allocate an additional hour in the crockpot for doubled recipes, allowing for optimal component melding. Monitor closely for best results, maintaining the desired consistency in texture.

Storage considerations are crucial when scaling recipes. Ensure ample room in the fridge or freezer for larger volumes, practicing thorough rotation to manage portions effectively and preserve integrity over time.

Nutritional Deep Dive


This pierogi casserole offers a balanced macronutrient profile with sources of proteins from kielbasa and cheese, carbohydrates from pierogis, and nutritional fats to satisfy daily requirements.

Micronutrients can be optimized by adding fresh vegetables like spinach or mushrooms, providing additional vitamins and minerals that complement the base components. Aim to achieve a colorful plate to balance nutrients and aesthetics successfully.

Enjoy the health benefits of this dish by choosing leaner sausage alternatives or low-fat cheese options to tailor dietary needs, achieving lower saturated fat profiles without sacrificing indulgence.

Portion awareness remains essential; assess serving sizes according to dietary and caloric needs with helpful guides or nutrition calculators online. Modifying portion sizes can help accommodate diverse health goals effectively.

For weight management tips, accompany this casserole with lightly-dressed salads or steamed vegetables, ensuring meals remain fulfilling and balanced while supporting weight loss or maintenance objectives.

Dietary Adaptations


For gluten-free alternatives, seek out gluten-free pierogis available in specialized food sections or through artisanal local sources, ensuring safe enjoyment for those with gluten intolerances or allergies.

For those avoiding dairy, swap out traditional cheese with vegan options or lactose-free varieties, enhancing the dish with nutritional yeast for added flavor depth without compromising on taste.

For a vegan-friendly adaptation, replace kielbasa with plant-based sausages and ensure the use of vegan pierogis and cheese alternatives made from cashew or almond bases, fostering inclusion without sacrificing texture.

Low-carb versions are possible by substituting pierogis completely with vegetables like zucchini slices or spaghetti squash, drastically reducing carbohydrate content while achieving mouthwatering results.

Adapt for keto-specific goals by focusing on cheese-heavy fillings and meats while obliterating processed carbohydrates. Use shredded cabbage layers or egg-centered wraps as alternatives.

Paleo enthusiasts may modify with sweet potato slices and unprocessed meats, maintaining compliance while enjoying familiar comfort and satisfaction.

For those following a low-FODMAP protocol, avoid high lactose cheeses and replace sensitive ingredients with compliant alternatives, ensuring flavorful and comfortable enjoyment aligned with digestive care goals.

Troubleshooting Guide


Resolve texture issues by monitoring cheese consistency and ensuring gradual melting, adopting layering tips mentioned earlier for optimal textures. Extend cooking time in the crockpot by increments of 30 minutes if pierogis appear underdone in centers.

Balance flavor by adjusting seasoning levels near the end of cooking—consider checking saltiness especially with kielbasa, adjusting as needed with fresh lemon juice or vinegar if required.

Temperature problems can be mitigated by ensuring uniform crockpot heat distribution and pre-browned components. Avoid extreme hot or cold spots by thorough stirring and component positioning.

Equipment challenges may be resolved by using recommended size crockpot or acquiring slow cookers with appropriate features, ensuring best outcomes through compatibility and functionality.

Prepare substitutions confidently with forethought, accommodating different taste senses by using similar flavor profiles or textures to seamlessly achieve desired flavors.

Timing concerns can be addressed by following initial preparation timelines and heating instructions, ensuring consistent execution for desired culinary results time and time again.

Recipe Success Stories


Community feedback consistently spotlights the Crockpot Pierogi Casserole as a cherished favorite, gaining popularity due to its accessible preparation and memorable taste, resonating widely across diverse culinary communities.

Variation successes abound, with reader suggestions including delightful add-ons such as shredded Brussels sprouts or red pepper flakes. Each adaptation resonates uniquely, crafting a personal touch within the recipe’s classic foundation.

Adaptation tales from readers reveal touching stories—a home-cooked meal bridging generational gaps or introducing newcomers to the charms of pierogis and kielbasa, demonstrating its cultural inclusion and adaptability.

Reader suggestions continually inspire: try baking a crumbled bacon topping or stirring in a dollop of Dijon mustard for bold flavor notes. Photography tips include capturing the golden-bubbled top before serving, ensuring an appetizing visual.

Invitations to explore personal adaptations arise from shared experiences, with the expansive nature offering possibilities for every dining occasion and mood. Whether merging traditional or contemporary elements, satisfaction is guaranteed.

Frequently Asked Questions

Can I prepare the pierogis from scratch?
Absolutely, making homemade pierogis adds a personal touch. While time-consuming, you’ll enjoy authentic flavors and textures unique to your household. Plenty of online resources can guide you through this rewarding process.

Is it possible to use a different sausage instead of kielbasa?
Yes, substitutes like chorizo, bratwurst, or Italian sausages work wonderfully. Each imparts its signature flavor, allowing you to customize the dish to your liking while retaining its hearty nature.

Can I make this dish on a stovetop?
While designed for a slow cooker, you can adapt this recipe to a stovetop by simmering on low heat until ingredients are heated through and flavors melded. Transfer to an oven towards the end to achieve a crusty top.

What if I can’t find pierogis at my local grocery store?
Explore homemade options if commercially unavailable or consider searching ethnic food stores or online retailers offering a wider range of pierogis varieties.

How do I reduce the sodium content?
Choose low-sodium sausage options and cheeses to reduce overall sodium levels significantly. You can also rinse store-bought pierogis before use to eliminate extra salt content.

Can I add other proteins to this dish?
Incorporating cooked chicken, turkey, or lentils as added proteins diversifies the flavor profile while retaining the comforting characteristics central to this dish.

How long can this dish be left in a crockpot once done?
Upon completion, switch the crockpot to a “keep warm” setting for up to two hours, ensuring temperature safety. Beyond that, store promptly for best results.

How can I optimize flavor if I prefer spicier dishes?
Spice enthusiasts can enhance heat profiles by adding jalapeño slices, cayenne pepper, or hot sauces to cater to spicy palates while retaining harmony with core elements.

What is an ideal side dish to serve with this casserole?
Complement your casserole with fresh green salads, crusty bread, or pickled vegetables to harmonize contrasting textures and enhance the dining experience.

Can I use non-dairy cheese for this recipe?
Certainly, non-dairy cheese products are well-suited for this recipe—they provide creamy satisfaction without compromising on texture or flavor goals.

Should I worry about the casserole drying out?
Ensure there’s ample sauce and moisture in the layers to prevent drying. Monitoring during cooking and keeping ingredients mixed aids in retaining moisture levels.

What precautions should I take if freezing?
Freeze only once cooled completely, using airtight containers for best results. For optimal quality upon defrosting, consume within two months for fullest flavor and texture satisfaction.

Additional Resources


Explore related recipes such as traditional potato and cheese pierogis or smoked sausage casseroles, amplifying inspiration and leveraging flavor nuances central to this recipe’s success.

Consider technique guides available from culinary sites, expanding on slow cooking methodologies, incorporation techniques, or cheese melting tips, enhancing your culinary expertise.

Dive into ingredient information sources, discovering unique insights into pierogis’ origins or kielbasa production processes, augmenting appreciation through enriched culinary understanding.

Equipment recommendations consider sourcing reputable crockpots and slow cookers, maximizing functionality and efficiency for seamless meal preparation and satisfaction.

Seasonal variations expand menu choices—explore autumnal influence by adding squash or wintertime charm with root vegetables, fully embracing seasonal ingredients’ allure.

Join the Conversation


Engage with us on social media, sharing your personal adaptations or variations on this classic recipe. Connect with fellow food enthusiasts eager to exchange tips and feedback.

Photography tips include capturing the bubbling goodness as the dish finishes cooking, highlighting its golden brown allure. Incorporating stylistic elements such as fresh herb garnishes brings dynamic appeal to your social media shots.

Rate and review this recipe in the comments section, sharing your experience with our community of food lovers and inspiring others to try their own twist on this delightful casserole.

Become a part of our recipe family, embracing communal sharing that celebrates the diversity and inclusivity of cuisine. Encourage family and friends to experiment and discover unique, adaptable Hearty Crockpot favorites.

Enrich culinary creativity collectively by exploring delicious possibilities. Continue this conversation, diving deeper into pierogi adventures tailored to your personal taste preferences and inspirations.

The Recipe

Crockpot Pierogi Casserole with Kielbasa

Serves: 6

Prep Time: 15 mins

Cook Time: 240 mins

Total Time: 255 mins

Kitchen Equipment Needed

  • Crockpot or slow cooker
  • Skillet
  • Wooden spoon or spatula
  • Cutting board
  • Knife

Ingredients

  • 2 packages frozen pierogis
  • 1 pound kielbasa, sliced
  • 2 cups shredded cheese of choice
  • 1 onion, chopped
  • 1 cup sour cream
  • 1 can condensed cream of mushroom soup
  • Salt and pepper to taste
  • Cooking spray

Directions

  1. Spray the crockpot with cooking spray to prevent sticking.
  2. In a skillet, brown the sliced kielbasa over medium heat until just crispy. Remove from heat.
  3. Add one package of pierogis in an even layer at the bottom of the crockpot.
  4. Layer half of the browned kielbasa and chopped onions over the pierogis.
  5. Spread half of the cheese over the kielbasa and onions, ensuring even coverage.
  6. Layer the second package of pierogis, followed by remaining kielbasa and onions.
  7. In a bowl, mix together sour cream and cream of mushroom soup. Pour evenly over the top layer in the crockpot.
  8. Top the layers with the remaining cheese, ensuring full coverage.
  9. Cover the crockpot with the lid and cook on low for 4 hours.
  10. Check mid-way to ensure even cooking and adjust settings if necessary.
  11. Serve hot, garnished with fresh herbs if desired.

Recipe Notes

  • Feel free to add vegetables like spinach or mushrooms for added nutrition and flavor.
  • For a spicier version, consider adding a sprinkle of chili flakes or a dash of hot sauce.
  • This dish pairs well with a side salad or steamed vegetables for a complete meal.

Savor the Flavors of Easy-to-Make Rosemary Chicken Tonight

Delicious Rosemary Chicken: A Flavorful Journey

⚖️
Difficulty
Easy

⏲️
Prep Time
10 mins

🕒
Cook Time
30 mins

⏱️
Total Time
40 mins

🍽️
Servings
4

Rosemary Chicken is a classic dish that combines the aromatic and earthy flavors of rosemary with tender and juicy chicken. It is not only a staple in many households but also a favorite due to its simplicity and delightful taste. This dish is perfect for weeknight dinners and special occasions alike, offering a comforting and homey feel that’s hard to resist. Paired with the smoky taste of garlic and olive oil, the rosemary chicken creates an unforgettable sensory experience that lingers.

Quick cooking time and rich flavors make Rosemary Chicken a go-to recipe for those seeking a satisfying meal. The natural oils in rosemary blend beautifully with roasted chicken, infusing each bite with savory herbal notes. Not only does this dish deliver in flavor, but it is also visually appealing with its golden-browned chicken garnished with fresh rosemary sprigs. Whether for a family gathering or a quiet dinner, Rosemary Chicken’s ease of preparation and elegance makes it an effortless choice.

Quick Recipe Highlights

  • Flavor Profile: The savory notes of rosemary harmonize with garlic and lemon for a mouth-watering taste.
  • Texture: Juicy and tender chicken with a crispy, golden skin.
  • Aroma: A fragrant mix of herbs, garlic, and tangy lemon zest fills your kitchen.
  • Visual Appeal: Golden-brown chicken pieces contrasted with bright, fresh rosemary and lemon.
  • Skill Level Needed: Perfect for beginner cooks, with straightforward techniques and minimal steps.
  • Special Equipment: A simple roasting pan or skillet is all you need.

Recipe Overview

  • Difficulty Level: Rosemary Chicken is easy to prepare, perfect for home cooks of any level, relying on basic kitchen skills.
  • Category: Ideal as a main dish, fitting into both everyday meals and festive occasions.
  • Cuisine: A nod to Mediterranean culinary traditions, rich in flavorful herbs and natural ingredients.
  • Cost: Budget-friendly, using common pantry ingredients without sacrificing taste.
  • Season: Best enjoyed in any season, though especially comforting during the cooler months.
  • Occasion: Suitable for both casual weekday dinners and fancy dinner parties.

Why You’ll Love This Recipe


The Rosemary Chicken offers a delightful taste and texture appeal that’s simply hard to match. Each bite features tender, juicy chicken enveloped in the aromatic allure of rosemary and garlic. The preparation process is straightforward, requiring minimal steps, which makes it perfect for busy weeknights. With this recipe, you can enjoy a nutritious meal rich in protein and herbal goodness, providing both health benefits and flavor satisfaction.

Socially, Rosemary Chicken is a crowd-pleaser, ideal for serving guests or family gatherings with its comforting taste and inviting presentation. The ingredients are easily accessible and budget-friendly, ensuring you don’t compromise on quality or cost. Overall, the Rosemary Chicken recipe is a perfect fusion of simplicity, flavor, and nutrition, making it an unforgettable dish in your cooking repertoire.

Historical Background and Cultural Significance


Rosemary Chicken’s roots can be traced back to Mediterranean cuisine, where local herbs like rosemary are a culinary staple. Its popularity spread across Europe and beyond, embraced for its simplicity and aromatic traits. Traditionally, rosemary has been associated with remembrance and love, symbolizing its enduring place in kitchens around the world.

As culinary traditions evolved, the basic recipe for rosemary chicken adapted to incorporate various regional flavors and ingredients. What remains consistent is the essential combination of rosemary and chicken, a pairing that’s stood the test of time. Many cultures have embraced rosemary chicken, adapting it with local spices or preparation methods, creating countless variations.

Ingredient Deep Dive


Rosemary is not just a flavorful herb; it’s deeply rooted in Mediterranean culture with a history extending to ancient times. Known for its aromatic oils, rosemary is a powerful antioxidant with potential health benefits including improved digestion and memory enhancement. When selecting rosemary, opt for fresh, vibrant green sprigs with a strong scent.

Storage of rosemary is simple – either refrigerate wrapped in a damp paper towel or dry and store in airtight containers. If fresh rosemary is unavailable, dried rosemary can work in a pinch; other substitutes include thyme or sage, but the distinctive piney aroma of rosemary is irreplaceable.

Chicken, the primary protein, has been a dietary staple across cultures. High in protein and low in fat, especially when skinless, chicken provides numerous health benefits. Ensure you select high-quality, fresh chicken, ideally free-range or organic, for the best texture and flavor. Store raw chicken properly in the refrigerator and ensure it is fully cooked to safe internal temperatures to avoid any health risks.

Common Mistakes to Avoid

  • Overcooking the chicken can lead to dryness; always monitor the internal temperature for doneness.
  • Not marinating the chicken long enough can result in a lack of flavor.
  • Using dried rosemary instead of fresh may alter the taste; adjust quantities accordingly.
  • Skipping preheating the oven may lead to uneven cooking.
  • Using a high oven rack setting can burn the chicken skin before it is fully cooked.
  • Overcrowding the pan can cause steaming instead of browning.
  • Neglecting to rest the chicken post-cooking may cause juices to escape when cut.
  • Ignoring the use of a meat thermometer can risk undercooked or overdone meat.

Essential Techniques


To perfect Rosemary Chicken, mastering the marination process is key. Allowing the chicken to marinate enhances flavor absorption, resulting in a more aromatic dish. Always use fresh herbs and ingredients for the best results. Monitoring the cooking temperature and using a thermometer ensures perfectly juicy chicken every time. Recognizing the visual cues for cooked chicken, such as clear juices and firm texture, helps guarantee success.

Pro Tips for Perfect Rosemary Chicken


Ensure you pat the chicken dry before marinating to facilitate a crisp skin when roasting. Use a heavy-bottomed pan to evenly distribute heat and achieve a perfect golden crust. Try adding lemon zest to the marinade for an additional layer of flavor. Resting the chicken after roasting allows juices to redistribute, enhancing juiciness. Pre-searing the chicken in a hot skillet can lock in flavors and improve texture. To amp up the flavor, glaze with a mixture of balsamic vinegar and honey before the final few minutes of roasting.

Variations and Adaptations


Rosemary Chicken is versatile with many regional adaptations. In Provence, it’s common to include lavender; in Italy, consider adding pancetta for a smoky flavor. Seasonal variations can include incorporating summer vegetables like zucchini or tomatoes. For dietary considerations, use cauliflower rice as a carb-conscious side. Explore enhancing the dish with spice blends like za’atar for Middle Eastern flair. For a lighter version, opt for skinless chicken breasts and bake them rather than pan-searing.

Serving and Presentation Guide


Presentation matters, and for Rosemary Chicken, arranging it on a platter with fresh rosemary sprigs and lemon wedges adds vibrancy. Consider garnishing with cracked pepper and a drizzle of olive oil for shine. Pair traditionally with roasted potatoes or modernize it with quinoa salad. Keep portions balanced by serving one piece per guest along with ample sides. Ensure the chicken is served hot, allowing the aromas to waft upon serving.

Wine and Beverage Pairing


Rosemary Chicken pairs beautifully with a crisp white wine such as Sauvignon Blanc, which complements the herbal notes without overpowering them. For non-alcoholic options, consider a sparkling water with a hint of lemon or rosemary infusion. A light, herbal tea can also pair well, especially when served warm. Consider serving beverages at a slightly chilled temperature to enhance freshness and cleanse the palate between bites.

Storage and Shelf Life


Store Rosemary Chicken in an airtight container in the refrigerator for up to three days. Ensure it reaches room temperature before storing and never leave it out for more than two hours. For reheating, place in the oven rather than microwaving to maintain texture. If freezing, separate the chicken pieces with parchment to avoid sticking. Look for any changes in color or smell as signs of spoilage.

Make Ahead Strategies


Prepare the marinade a day ahead and let your chicken soak overnight to maximize flavor penetration. Cooked chicken can be reheated slowly in an oven at a low temperature to keep it succulent. Assemble any accompanying side dishes in advance, leaving only the final heating and serving for the day of. For maximum quality retention, keep fresh herbs and garnishes separate until serving.

Scaling Instructions


To scale the recipe, ensure even cooking by adjusting the size of the baking pan based on the quantity. Cooking time may slightly increase or decrease depending on batch size, so monitor the internal temperature closely. When doubling or tripling the recipe, it’s vital to maintain consistent piece sizes for even roasting. Ingredients like rosemary and garlic can be adjusted to taste.

Nutritional Deep Dive


Rosemary Chicken is a nutritious dish, high in protein and low in carbohydrates, fitting well into a balanced diet. The polyphenols in rosemary contribute antioxidants. A standard serving provides essential vitamins and minerals that support overall health. Portion control is easy, making it suitable for weight management, while offering ample nutrients.

Dietary Adaptations


For a gluten-free version, ensure all spices and stocks used are certified gluten-free. To make it dairy-free, substitute any butter or creamy elements with oil. Rosemary Chicken can be adapted to suit a vegan diet using plant-based meat substitutes and similar herbs. To keep it low-carb, pair with suitable vegetables or salads instead of traditional starches.

Troubleshooting Guide


Texture issues like dryness can be resolved by adding a bit of broth during cooking to maintain moisture. If flavor balance is off, adjust herbs and seasoning immediately before serving. For temperature problems, ensure your oven is calibrated correctly. Common equipment challenges include using appropriate-sized pans to avoid crowding. When substituting ingredients, maintain the primary flavor profile, using suggested alternatives when needed.

Recipe Success Stories


Many home cooks share their love for this recipe, often customizing it with seasonal herbs or spices—each with unique successes. Some have found adding vegetables like bell peppers or onions a colorful and tasty addition. Reader suggestions often include serving with a side of herbed rice, which complements flavors beautifully. Photography enthusiasts recommend capturing the dish in natural light to highlight its golden hues.

Frequently Asked Questions

Can I use dried rosemary instead of fresh? Fresh rosemary is ideal for this recipe to capture its full aromatic potential. However, dried rosemary can work in small quantities, though it will offer a slightly different flavor.

How can I ensure my chicken stays moist? The key to moist chicken is not overcooking and letting it rest once out of the oven, allowing the juices to redistribute evenly.

What sides pair well with Rosemary Chicken? Traditional sides include roasted potatoes or a green salad. For a more modern twist, consider quinoa salad or roasted asparagus.

Can this recipe be made in advance? Yes, you can marinate or even cook the chicken ahead of time. To maintain freshness, reheat thoroughly before serving.

Is this dish suitable for freezing? Absolutely, ensure it’s cooled completely before wrapping tightly in foil or plastic and stored in the freezer.

What if I don’t have a meat thermometer? You can still cook perfectly by ensuring the juices run clear and the chicken is firm to touch when the center is cut.

Additional Resources


Explore related recipes like Herb-Crusted Chicken or Garlic Lemon Chicken for more flavorful creations. Use technique guides to improve marination or roasting skills and expand your ingredient knowledge with articles on selecting the best seasonal herbs. Discover equipment recommendations to make cooking Rosemary Chicken easy and enjoyable.

Join the Conversation


We encourage you to share your own rosemary chicken creations and suggestions on social media using #RosemaryChickenLove. Capture and share photos in natural light to best showcase the dish’s golden hues. Leave a review or recipe variation in the comments below, and connect with a community of food lovers sharing their discoveries.

The Recipe

Rosemary Chicken

Serves: 4

Prep Time: 10 mins

Cook Time: 30 mins

Total Time: 40 mins

Kitchen Equipment Needed

  • Roasting pan
  • Sharp knife
  • Mixing bowl
  • Meat thermometer (optional but recommended)

Ingredients

  • 4 chicken quarters
  • 3 tablespoons olive oil
  • 4 sprigs fresh rosemary
  • 4 cloves garlic, minced
  • Juice and zest of 1 lemon
  • Salt and pepper to taste

Directions

  1. Preheat the oven to 375°F (190°C).
  2. In a mixing bowl, combine olive oil, minced garlic, lemon juice, zest, salt, and pepper.
  3. Coat the chicken quarters in the mixture, ensuring even coverage.
  4. Place chicken in a roasting pan and arrange rosemary sprigs around it.
  5. Roast in the oven for 30 minutes or until the internal temperature reaches 165°F (74°C).
  6. Let the chicken rest for 5 minutes before serving.

Recipe Notes

  • For a deeper flavor, marinate the chicken for several hours or overnight.
  • Consider adding sliced onions or potatoes to the roasting pan for a complete meal.
  • Dried rosemary can be used as a substitute, but reduce the quantity to 1 teaspoon.

Easy Honey Garlic Butter Shrimp & Broccoli Recipe for Busy Weeknights

Honey Garlic Butter Shrimp & Broccoli: A Delightful and Easy Dish

⚖️
Difficulty
Easy

⏲️
Prep Time
15 mins

🕒
Cook Time
10 mins

⏱️
Total Time
25 mins

🍽️
Servings
4

A perfect blend of sweet and savory flavors, this Honey Garlic Butter Shrimp & Broccoli recipe is an enticing dish that your family will love. Savor the tender shrimp cooked in a delightful honey garlic sauce, perfectly paired with crisp-tender broccoli. This easy shrimp recipe is ideal for quick weeknight dinners or a special weekend treat.

The flavor profile of this Honey Garlic Butter Shrimp & Broccoli is perfectly balanced with a sweet and savory combination that will tantalize your taste buds. The succulent shrimp are cooked to perfection, bathed in buttery garlic sauce with a hint of honey, making for a delicious dish that’s not too sweet or overpowering. Paired with fresh broccoli, it adds a refreshing contrast that complements the richness of the shrimp.

The texture of the Honey Garlic Butter Shrimp & Broccoli is all about contrast. You’ll enjoy the tender juiciness of the shrimp against the crunchy bite of the perfectly cooked broccoli. This dish creates an exciting mouthfeel that is both satisfying and wholesome, ensuring every mouthful is an experience in itself.

The alluring aroma of this dish comes from the caramelization of the honey and garlic when they meet the butter. A delightful whiff of this dish cooking will fill your kitchen with mouthwatering, velvety notes that make you want to gather around the dinner table right away. The savory-sweet scent is inviting and comforting, enhancing the overall dining experience.

Visually, this Honey Garlic Butter Shrimp & Broccoli recipe is a delight. The vibrant green from the broccoli alongside the golden-brown hues of the shrimp coated in a glossy sauce makes this dish not only a treat to eat but also a work of culinary art that’s pleasing to the eye. This dish’s presentation makes it a perfect candidate for impressing guests or elevating a family meal.

Skill Level Needed: This dish is straightforward enough for beginners while offering nuanced flavors that even seasoned cooks will appreciate. Special Equipment: All you need is a reliable non-stick pan to achieve the perfect sear on the shrimp, ensuring that they remain plump and juicy throughout the cooking process.

Quick Recipe Highlights

  • Flavor Profile: This dish beautifully balances the rich, buttery garlic sauce with a gentle sweetness from honey, creating a flavor that is inviting and delectable.
  • Texture: Enjoy the succulent shrimp’s juiciness contrasted with the crisp-tender broccoli, providing every bite with a satisfying crunch and tenderness.
  • Aroma: Experience the mouthwatering aroma of caramelized honey and garlic melding together, promising a delightful taste even before the first bite.
  • Visual Appeal: The golden shrimp glistening with sauce, coupled with vibrant green broccoli, offers an aesthetically pleasing dish perfect for any occasion.
  • Skill Level Needed: Easy enough for novice cooks while retaining the complexity that experienced chefs will find rewarding.
  • Special Equipment: A high-quality non-stick pan helps achieve ideal shrimp texture and sauce consistency without fuss.

Recipe Overview

  • Difficulty Level: This recipe is considered easy due to its simple preparation and cooking process, making it accessible for cooks of all skill levels.
  • Category: Ideal for quick dinners or meal preps, it falls into healthy, main course categories while being budget-friendly.
  • Cuisine: Draws from Asian culinary traditions with its use of soy sauce and garlic, providing a cross of familiar and exotic flavors.
  • Cost: Affordable, as the primary ingredients such as shrimp and broccoli are cost-effective and widely available in most grocery stores.
  • Season: Best prepared in spring and summer when broccoli is in season, ensuring the freshest produce and reduced costs.
  • Occasion: Suitable for casual family dinners, entertaining guests, or even preparing in advance for meal prep sessions.

Why You’ll Love This Recipe

One of the most inviting aspects of the Honey Garlic Butter Shrimp & Broccoli recipe is its delicious taste and pleasing texture. The honey garlic sauce infuses the shrimp with a wonderful glaze that adds depth to every bite, while the broccoli remains a crunchy counterpoint. Together, they create a flavor and texture experience that is both comforting and exciting.

The convenience of this recipe cannot be overstated. With minimal prep time and straightforward cooking instructions, you can have a healthy, homemade meal on the table in under 30 minutes. It’s perfect for those busy weeknights when time is short but the demand for a tasty dinner remains.

Nutritionally, this dish offers a great balance. Shrimp provide an excellent source of protein while broccoli packs in vitamins and fiber, making this a health-conscious choice. The sauce, while indulgent, uses whole ingredients, ensuring you’re enjoying a nourishing meal with every serving.

This dish also holds its own when it comes to social gatherings. Whether you’re hosting a casual dinner with friends or a special family meal, Honey Garlic Butter Shrimp & Broccoli is versatile enough to fit the occasion. Its striking presentation and irresistible aroma make it a conversation starter and a crowd-pleaser.

Lastly, the cost-effectiveness and accessibility of this recipe make it a staple in any household. Using readily available ingredients that won’t break the bank, this dish provides maximum flavor with minimal expense, making it an excellent choice for those looking to cook delicious meals without spending too much.

Historical Background and Cultural Significance

The origins of combining shrimp and sweet-savory sauces can be traced back to ancient Chinese cuisine, where the balance of flavors was paramount. Shrimp, prized for their delicate texture and flavor, have been used in various recipes, paired with sauces to enhance their natural taste.

Over time, the combination of garlic, soy sauce, and honey became popular, reflecting the evolving palates that sought a harmonious blend of flavors. The recipe often takes inspiration from Cantonese cooking traditions, where quick stir-frying of seafood with fresh vegetables is standard practice.

As culinary traditions blended, the Honey Garlic Butter Shrimp & Broccoli became a western favorite, incorporating elements of comfort food with a gourmet touch. This dish reflects the influences of fusion cuisine, bringing together flavors from the East with Western cooking techniques.

Regional variations of this dish can now be found across the globe, each bringing its unique twist to the classic recipe. From adding chili flakes for heat to incorporating different vegetables, the versatility of this dish ensures it continues to evolve and delight taste buds worldwide.

Ingredient Deep Dive

Shrimp are not only a versatile ingredient but have significant cultural importance, especially in Asian and Mediterranean cuisines. Being a symbol of good luck and abundance in Chinese culture, shrimp’s delicate flavor base pairs excellently with a variety of spices and sauces, making it a staple for many celebrations.

Nutritionally, shrimp are a powerhouse, low in calories yet high in protein, and provide essential nutrients like selenium and vitamin B12. When selecting shrimp, go for fresh or frozen options with the shell on for maximum flavor. Store them in a cold section of the fridge and consume them shortly after purchasing to enjoy the best quality.

Broccoli, with origins tracing back to the Mediterranean, is lauded for its health benefits and is a key component in many traditional dishes. Packed with fiber, vitamins C and K, as well as antioxidants, broccoli is a nutritional boon that complements any meal with its earthy flavor and satisfying crunch.

When picking the freshest broccoli, look for firm stems and tightly closed florets that are deep green in color. To store broccoli correctly, keep it in a loosely sealed plastic bag in the refrigerator’s crisper and use it within a few days to guarantee its freshness.

Common Mistakes to Avoid

  • Overcooking the shrimp can lead to a rubbery texture. Pay attention to their color turning pink and opaque for the best result.
  • Under-seasoning the sauce could make the dish bland. Taste as you cook and adjust the seasoning as needed.
  • Not drying shrimp completely before cooking can cause them not to sear properly, resulting in a less desirable texture.
  • Overcrowding the pan can lead to steaming rather than sautéing the shrimp. Cook them in batches if necessary.
  • Skipping the marinating step may reduce the intensity of the shrimp’s flavor. Allow the shrimp to soak up the sauce briefly before cooking.
  • Using low-quality honey can skew the flavor balance. Opt for natural honey for the best taste.
  • Adding broccoli too early can result in it becoming mushy. Add it later to maintain its crispness.
  • Ignoring the importance of high heat can prevent caramelization. Ensure your pan is preheated properly for better results.
  • Forgetting to stir the sauce could lead to an uneven distribution of flavors.
  • Substituting fresh garlic with powder might not provide the same depth of flavor. Use fresh for the best results.

Essential Techniques

Achieving the perfect sear on shrimp is crucial for the Honey Garlic Butter Shrimp & Broccoli recipe. Ensuring that your pan is hot enough before the shrimp hit it will allow for a nice caramelization, contributing to flavor depth. Upon adding the shrimp, give them a couple of minutes undisturbed to develop a crust before tossing.

Mastering the balance of heat is important. Too high, and you risk burning the sweet honey garlic sauce; too low, and you end up with an underwhelming flavor punch. Adjust your heat settings to ensure a quick cook while preserving the dish’s essential flavor qualities.

A good preparation technique is to clean and prepare your ingredients beforehand to avoid rushing during cooking. This mise en place approach allows for a seamless cooking process, enabling you to focus on achieving the perfect dish rather than worrying about forgetting steps.

To test if your broccoli is perfectly cooked, use a fork to pierce the stalk. If it goes through smoothly yet still offers resistance, your broccoli has reached the crisp-tender stage. This technique ensures that you retain the vegetable’s natural crunch and vibrant color.

Pro Tips for Perfect Honey Garlic Butter Shrimp & Broccoli

– Make sure your shrimp are patted dry before cooking to avoid unnecessary moisture in the pan. This will give you a perfect sear and develop more flavor.
– Use a non-stick skillet to ensure the sauce doesn’t cling to the pan, allowing the flavors to coat the shrimp and broccoli effectively.
– Continuously toss the broccoli during the last few minutes of cooking to achieve a evenly cooked texture and distribute the sauce more thoroughly.
– Don’t rush the warming of the honey and butter; patiently allow them to melt together for a smooth, well-integrated sauce.
– If you’d like to enhance the dish further, consider adding a pinch of red pepper flakes for a subtle heat boost without overpowering the dish’s balance.
– Garnish with freshly chopped parsley and lemon zest. This will introduce a fresh aroma and a touch of acidity to brighten the flavors.

Variations and Adaptations

For regional variations, feel free to explore other vegetables depending on what’s in season. Asparagus or snap peas can substitute for broccoli when looking for a fresh spring adaptation. Similarly, adding cherry tomatoes can give a summer variation that adds juiciness to the dish.

If you follow a dietary modification like low-carb, consider replacing honey with a keto-friendly sweetener and serving it over cauliflower rice for a completely carb-conscious meal. This adjustment maintains the flavor profile while reducing carbohydrate intake, aligning with specific diet needs.

For a new flavor variation, try adding a tablespoon of freshly grated ginger or use sesame oil in place of butter to give an entirely different depth to the dish, transporting it from classic to exotic in taste.

If you desire to modify the texture, consider adding lightly toasted chopped almonds or cashews on top for extra crunch. This adds a nutty dimension that contrasts beautifully with the shrimp and broccoli.

To elevate presentation, plate the shrimp and broccoli layered with steamed jasmine rice or noodles as a base. This not only creates a complete meal but also adds aesthetic appeal to your table setting, making it suitable for any formal dining occasion.

Serving and Presentation Guide

For plating techniques, consider using a large serving platter to layer the shrimp atop a bed of broccoli. This creates a visual dynamic, highlighting the striking colors and enticing textures of the dish. Sprinkle with sesame seeds for an aesthetic finish.

Garnishing ideas include chopped fresh parsley or cilantro, which can add a pop of color and enhance scent. A shaving of lemon zest over the top adds brightness and a fresh citrus note to each serving without altering the main flavor profile.

Traditional accompaniments for Honey Garlic Butter Shrimp & Broccoli often include steamed rice, which absorbs the rich sauce and complements the dish’s overall flavor. Alternatively, serve it over quinoa or farro for a heartier meal that remains whole-food based.

Modern serving suggestions might involve pairing the dish with artisan bread to soak up any extra sauce, offering an excellent contrast to the tangy-sweet shrimp and crunchy broccoli.

Temperature considerations are vital; serve the dish piping hot to best enjoy the sauce’s texture and shrimp’s succulence. The aromatic aspect of the dish becomes more pronounced when served fresh from the stove.

For portion control, consider serving your shrimp mixture in individual ramekins or bowls, garnished with slices of lemon on the side. This approach ensures everyone receives an equal helping while adding to the dish’s presentational charm.

Wine and Beverage Pairing

For wine pairing, a Sauvignon Blanc’s crisp acidity and citrus notes complement the sweet and savory flavors of honey garlic shrimp. This white wine accentuates the herbs without overwhelming the gentle sweetness of honey.

For non-alcoholic alternatives, opt for a refreshing lemon-infused sparkling water. The effervescent quality cleanses the palate and balances the dish’s richness, making it an ideal beverage for lunch or casual dinners.

If the meal transports you into an evening event, consider pairing with an oolong tea. Its smooth, fruity notes offer an elegant match to the honeyed tones in the dish while providing a calming counterpoint.

Serve all beverages chilled to contrast the dish’s warmth. This temperature duality brings balance to the dining experience, making each bite a refreshing and engaging experience paired with each sip.

Storage and Shelf Life

The best storage method for leftovers involves sealing them in an airtight container, placed in the refrigerator. This approach prevents moisture loss and keeps your dish fresh for up to three days, offering flavor preservation with each reheated portion.

For optimal results, store the shrimp and broccoli separately from any rice or starches used during serving. This prevents texture changes and keeps the sauce’s flavor potent when next served. Be vigilant about the signs of spoilage, chiefly a slimy texture or unpleasant odor, which indicate it’s time to part with leftovers.

When reheating, use a gentle heat to keep the shrimp from becoming overcooked. The best method involves using a non-stick pan with a splash of water or stock to restore moisture to the dish while retaining heat. This ensures even warming, reviving the original flavors.

For freezing, portion dish components in separate containers for up to a month. Allow the shrimp and broccoli to thaw overnight in the fridge before leisurely reheating.

Make Ahead Strategies

The preparatory timeline for Honey Garlic Butter Shrimp & Broccoli allows you to become organized days before serving. Marinate and prepare shrimp in advance, storing them in the refrigerator until ready to use, making day-of cooking faster and more efficient.

The sauce can also be prepared ahead of time. Mix and balance all ingredients, then refrigerate in a sealed jar. This strategy ensures quick meal assembly while maintaining the original sauce’s flavor quality.

Quality is best maintained when storing components separately during the initial prep phase. When ready to serve, bringing them together quickly ensures the flavors remain vibrant while avoiding any potential sogginess from premature sauce application.

Reheat the dish components using low and slow heat rather than a rush technique. This ensures the broccoli remains crisp, and the shrimp moist, allowing for a robust combination come serving time.

For a fresh addition right before serving, sprinkle chopped green onions or cilantro atop before bringing to the table. This injects immediate freshness that counteracts any storage-induced mellowing of flavors.

Scaling Instructions

If you’re halving the recipe, maintain the cooking time, but adjust the heat to account for less filled pan real estate. This approach ensures your shrimp still sears perfectly and the honey garlic sauce reduces adequately.

For doubling or tripling quantities, you might need larger equipment—like a bigger non-stick skillet or separate pots to cook batches efficiently. This method ensures each shrimp cooks uniformly without becoming soggy due to overcrowding.

When scaling up, extended cooking times might be needed due to larger batch sizes. Keep a careful watch on the shrimp’s cooking cues to ensure consistency in quality and texture across servings.

Ensuring storage remains effective at a larger scale requires additional containers and possibly multiple shelves in a refrigerator or freezer. Interspersing components can safeguard against texture loss and keep elements fresh for longer durations.

Nutritional Deep Dive

This meal offers a macro breakdown tailormade for balanced diets, with shrimp serving as a lean protein source—low in fat and carbs, but sufficient in providing structure for balanced meal planning.

Micronutrients abound, especially from the broccoli, which offers vitamins K and C, calcium, iron, and a plethora of antioxidants. Honey garlic butter sauce contributes additional micro-mineral benefits like iron and some vitamin B varieties.

Health benefits of Honey Garlic Butter Shrimp & Broccoli are underscored by lean protein intake and antioxidant-rich vegetable choices. These contribute to weight management efforts, promote heart health, and support bone strength and immunity.

From a dietary standpoint, this recipe appeals broadly, catering to gluten-free, pescatarian, and keto-friendly diets. Its articulation between protein and vegetable components balances out caloric density, making portion assessments straightforward.

Portion analysis suggests each serving delivers appropriate macronutrients while offering healthy caloric intake. Adjustments can be made for those following stricter caloric regimes, rendering the meal a staple for diet-conscious cooks.

Dietary Adaptations

For gluten-free meal adaptations, ensure the use of gluten-free soy sauce alternatives—such as tamari or coconut aminos—while keeping the rest of the recipe unchanged.

To make this dish dairy-free, substitute plant-based margarines or oils in place of butter. This will maintain the texture and complexity without compromising the core flavor profile or sauce richness.

The dish turns vegan with strategic substitutions: swap shrimp for plant-based proteins like marinated tofu or chickpeas and replace honey with agave nectar. This retains the essential flavor balance while providing a cruelty-free version.

For those adhering to low-carb diets, serve atop a bed of cauliflower rice or zucchini noodles. This modification lends itself to ketogenic practices, preserving enjoyment without derailing dietary goals.

Keto adaptations also account for sauce ingredients—opting for low-carb alternatives refines this into a high-fat, low-carb meal supportive of ketosis without sacrificing taste.

For paleo adjustments, ensure honey remains as the sweetener of choice and introduce additional natural fats such as ghee to replace butter. This preserves dish integrity while aligning with paleo guidelines.

In following a low-FODMAP diet, replace garlic with garlic-infused oil to reduce FODMAP content while preserving the traditional taste. This ensures comfort for followers without major alterations.

Troubleshooting Guide

Texture issues often arise from overcooking shrimp; aim to sauté just until opaque, and avoid exposure to excessive heat post-cooking for optimal succulence and firmness.

Flavor balance is key, so taste for sweetness and savory balance as you cook. Adjust honey and soy sauce concentrations until reaching a desired seasoning equilibrium.

Temperature problems, such as over or undercooking, revolve around recognizing shrimp cues: pink hue, opaque flesh. Stick to visual indicators for accuracy to guarantee dish success.

Equipment challenges, largely preventing stickiness, can involve using non-stick cookware and perfecting pan preheat techniques. Related thermodynamics enhance efficiency in cooking.

Ingredient substitutions, particularly plant-based adaptations, need an understanding of the balance sweeteners and fats bring. This ensures adapted components mimic originals closely.

Timing concerns often relate to preparation; planning ahead avoids rush errors and guarantees shrimp aren’t prematurely tossed into an underheated pan.

Recipe Success Stories

Community feedback sees this dish praised for its simplicity and elegance, with frequent mentions of its versatility in dinner rotation and popularity across age brackets. Encouraging novice cooks to try their hand brings about success for those cutting their culinary teeth on forgiving and flavorful yet easily executable recipes.

Feedback on variation successes highlights the inclusion of side accompaniments such as jasmine rice or soba noodles, brightening each serving as the robust honey garlic sauce coats them beautifully. Such suggestions reinforce this dish’s adaptability.

With suggested adaptations catering to a wider array of diets, some iterations have introduced readers to a broader array of compatible flavors. The classic ginger addition as a reader contribution adds warm spice without detracting from the primary appeal.

Photography tips enhance readers’ presentations through in costly experimentation with plating techniques, collaborating on vibrant veggies for capturing appetizing images: color matters, enticing friends visually before they ever taste the creation.

Inspirations build community within recipe-sharing circles, brewing creativity and stirring affections for meals that alter moods and cater to each audience, from culinary artists to those seeking their kitchens’ potential.

Frequently Asked Questions

1. Can I use frozen shrimp for this recipe?

Yes, you can use frozen shrimp. Just ensure they are fully thawed and dried with paper towels before use to avoid excess moisture interfering with the searing process.

2. How can I make this dish less sweet?

Reduce the quantity of honey or substitute half the amount with a splash of lemon juice to cut the sweetness while adding a tart note that complements the dish.

3. Is there an alternative to soy sauce?

Tamari or coconut aminos are excellent substitutes for those needing to avoid soy or gluten, both mirroring soy sauce’s umami without altering the flavor balance drastically.

4. How should I reheat leftovers?

The best method is on the stovetop over low heat with a splash of water or extra butter. This gradually restores moisture and warmth without overcooking.

5. Can I use other vegetables instead?

Absolutely, you can substitute broccoli with similar size and texture vegetables like asparagus, green beans or snap peas, allowing for seasonal adaptation or personal preference.

6. What’s the best way to cut down on prep time?

Consider purchasing pre-cleaned and deveined shrimp or pre-cut broccoli to minimize preparation efforts while ensuring cleanliness and simplicity remain paramount.

7. How do I give this dish extra spicy heat?

Enhance spiciness by adding crushed red pepper flakes or a dash of your favorite hot sauce to the sauce ingredients. Adjust to your personal heat preference before cooking.

8. Why is my sauce too thick?

If the sauce thickens unnecessarily, introduce water or chicken stock while stirring continuously. Gradual liquid integration restores desired consistency without stripping flavors.

9. How can I make the dish more filling?

Serve over cooked grains like jasmine rice, quinoa, or udon noodles to increase satiety in every serving while providing a complementary base for the honey garlic sauce.

10. Can I use a cast iron pan?

Yes, a well-seasoned cast iron pan enhances shrimp searing through even heat distribution and helps prevent sticking, but will require proper maintenance afterwards.

Additional Resources

For those likely to start international culinary journeys, a published guide on how to stir-fry perfect vegetables without compromising vibrant colors serves best, ensuring you consistently achieve fresh-tasting dishes.

Perhaps a shrimp sourcing guide aids responsible buyers in ensuring purchases are sustainable, while simultaneously elevating ingredient discussions concerning ethics. It matters and builds trust in culinary circles.

It’s wise to explore an Asian cuisine repository, general culinary instructions, and assembly-line processes for similar dishes like teriyaki or Cantonese-inspired plates, furthering insights and global appreciation.

Look into equipment recommendation articles providing reliable matters on kitchenware to improve day-to-day cooking efficiency, empowering fledgling cooks struggling with resources lacking quality assurance.

Dive into detailed seasonal produce lists relative to this dish, catering selections per local conditions and cost constraints, ensuring your kitchen heralds only the freshest, finest ingredients available with each use.

Join the Conversation

The community can partake in social media, sharing reuse ideas through Instagram stories, inspiring followers with their progress capturing professional and candid culinary photography posts.

Feedback channels in comments provide insights into success stories, capturing authentic experiences of recipe trials, adaptations, and personalized flairs while promoting engagement and cultural exchanges.

Encourage recipe reviewers to provide honest evaluations and awaken a local following dedicated to honing culinary skills and imparting eagerness among beginner chefs brave enough to try anew.

Community engagement grows compromised of home cooks collecting together, offering ideas, photos, and ongoing conversations over apps and forums to help recognize aspiring talent driven by passion.

Call upon diners to swap stories through pursuing creativity with welcoming dialogue inviting suggestions, lessons learned, share photography expertise improving aesthetics by adjusting lighting angles or changing backdrops.

The Recipe

Honey Garlic Butter Shrimp & Broccoli

Serves: 4

Prep Time: 15 mins

Cook Time: 10 mins

Total Time: 25 mins

Kitchen Equipment Needed

  • Non-stick skillet
  • Measuring spoons
  • Wooden spoon or spatula
  • Cutting board and knife

Ingredients

  • 1 lb large shrimp, peeled and deveined
  • 2 cups broccoli florets
  • 2 tbsp butter
  • 3 cloves garlic, minced
  • 1/4 cup honey
  • 3 tbsp soy sauce
  • Salt and pepper to taste
  • Sesame seeds for garnish (optional)

Directions

  1. In a small bowl, whisk together honey, soy sauce, minced garlic, salt, and pepper.
  2. Heat a non-stick skillet over medium heat and melt the butter.
  3. Add shrimp to the skillet and cook for 2-3 minutes till they turn pink and opaque.
  4. Remove shrimp from the skillet and add broccoli to the same skillet.
  5. Cook broccoli until tender yet crisp, about 4-5 minutes.
  6. Add shrimp back to the skillet and pour the prepared sauce over the top.
  7. Toss everything together, cooking for additional 2 minutes till the sauce thickens slightly.
  8. Plate and garnish with sesame seeds before serving.

Recipe Notes

  • Adjust seasonings to your preference by gradually incorporating more soy sauce or honey.
  • For added spice, sprinkle red pepper flakes into the sauce.
  • If using pre-cooked shrimp, adjust cooking steps to ensure they don’t overcook.

Create a Delicious Holiday Antipasto Cream Cheese Log Recipe

Festive Holiday Antipasto Cream Cheese Log: A Delightful Appetizer

⚖️
Difficulty
Easy

⏲️
Prep Time
20 mins

🕒
Cook Time
0 mins

⏱️
Total Time
20 mins

🍽️
Servings
10

The Festive Holiday Antipasto Cream Cheese Log is the ultimate crowd-pleaser for your holiday gatherings. This easy-to-make appetizer combines creamy cheese with bold flavors, offering a perfect balance of savory, sweet, and tangy notes. Whether you’re hosting a Christmas party or a New Year’s Eve celebration, this antipasto log is guaranteed to impress your guests with its delightful medley of tastes and festive presentation.

This recipe is designed for those who want to enjoy a gourmet appetizer without spending hours in the kitchen. With minimal prep time and no cooking required, the antipasto cream cheese log is both convenient and impressive. The flavors intensify when all ingredients have time to meld together, making it perfect to prepare ahead of your event.

Quick Recipe Highlights

  • Flavor Profile: This dish is a celebration of Mediterranean flavors with a balanced blend of creamy, salty, tangy, and sweet notes, sure to please every palate.
  • Texture: The smooth and creamy texture of the cream cheese is contrasted by the crisp bite of bell peppers and olives, creating an enticing mouthfeel.
  • Aroma: The aromatic herbs and marinated elements deliver a delightful fragrance that fills the room with appetizing scents.
  • Visual Appeal: Vibrant colors from the antipasto ingredients create a visually stunning centerpiece, perfect for any festive table setting.
  • Skill Level Needed: With straightforward steps, this recipe is accessible to beginners, allowing even novice cooks to achieve culinary excellence.
  • Special Equipment: A few kitchen tools, such as a mixing bowl, plastic wrap, and a serving platter, are essential for perfect preparation.

Recipe Overview

  • Difficulty Level: This recipe is rated easy. With simple mixing and shaping techniques, anyone can create an elegant appetizer.
  • Category: This dish falls under appetizers, ideally suited for kick-starting any meal or serving as party finger food.
  • Cuisine: Embodying Italian influences, this recipe draws from traditional antipasto inspirations, celebrated across the world.
  • Cost: With accessible ingredients like cream cheese and jarred antipasti, this dish is budget-friendly without compromising on quality.
  • Season: Best enjoyed during the holiday season, the vibrant presentation and flavors are particularly well-suited to winter festivities.
  • Occasion: Perfect for Christmas, New Year’s Eve, or any celebratory event where you want to delight guests with a special appetizer.

Why You’ll Love This Recipe


The Festive Holiday Antipasto Cream Cheese Log is a culinary delight that captivates taste buds with its intricate layers of flavor and texture. The combination of smooth cream cheese provides a creamy base, offset by the sharpness of olives and the tang of marinated vegetables, creating a multifaceted taste experience. Each bite offers something new, ensuring it remains a talking point throughout the evening.

One of the standout benefits is its simplicity and convenience. Preparation involves minimal steps, making it an ideal choice for those short on time or seeking stress-free party planning. With no cooking involved, this appetizer allows you to focus on other elements of your event while the flavors come together beautifully.

Nutritionally, this dish includes ingredients like olives and capsicum, contributing to heart-healthy fats and an array of vitamins. It offers a wholesome option without avoiding indulgence. Its balanced composition allows for moderate consumption within a well-rounded diet.

Offering not just a delicious appetizer but also a conversation starter, this antipasto log becomes a centerpiece in more ways than one. Its bold flavors encourage guests to mingle, discuss, and enjoy, enhancing the social aspect of any gathering.

Cost-effectiveness is another appealing aspect. This dish proves that you don’t need expensive ingredients to make an impact. Common pantry items and affordable antipasto elements come together to produce a lavish-feeling appetizer that doesn’t break the bank.

Historical Background and Cultural Significance


Antipasto, a traditional Italian course, predates modern cuisine as a ceremonial opening to lavish banquets. This historical root aims to stimulate the appetite before the main dish. Originally, antipasto platters featured cured meats, cheeses, marinated vegetables, and olives, setting a celebratory tone that we’ve adapted into the antipasto cream cheese log.

Culturally, antipastos hold significant importance during holidays, particularly in Italian and Italian-American households, where they serve as a precursor to more substantial courses. This tradition has been embraced worldwide, with different regions adding their unique spins based on local ingredients and preferences.

The recipe has evolved over time, incorporating diverse cultural influences. Initially dominated by meat, variations like the antipasto cream cheese log focus on vegetarian-friendly ingredients, broadening their appeal to modern dietary preferences without sacrificing bold flavors and traditional quality.

Regionally, versions might include variations in cheese type or additional elements like artichokes or pepperoncini, showcasing how antipasto adapts to locational changes while staying true to its origins. Whether served in Italy or around the world, the humble antipasto has grown into an adaptable art form reflecting its rich culinary history.

Ingredient Deep Dive


Cream cheese, central to our antipasto log, was invented accidentally in 1872, but its use as a base for composing complex flavors marks its cultural popularity. Known for its rich, tangy taste, cream cheese adds a creamy texture that perfectly complements robust antipasto elements like olives and marinated vegetables, creating a harmonious balance that is both traditional and modern.

Nutritionally, cream cheese offers essential minerals such as calcium and vitamin A, though moderation is key due to its rich nature. Selection tips include choosing full-fat varieties for creaminess, while storage requires refrigeration and careful sealing to prevent drying or contamination.

Olives offer a delightful piquancy that lifts the entire dish with their briny depth. Rich in monounsaturated fats, they promote heart health, providing a flavorful way to enhance wellbeing. When selecting olives, prefer those packed in brine for extended freshness. They are best stored in their own liquid within resealable containers for convenience.

Should olives not be your preference, capers can offer a similar briny tang, maintaining the antipasto’s vibrant integrity. The textures and flavors both shine when handled and stored correctly, ensuring they enrich the antipasto cream cheese log with each layer.

Common Mistakes to Avoid

  • Overmixing the cream cheese can lead to a runny texture. It’s important to mix until just combined to maintain the log’s firmness.
  • Not chilling long enough will make the log difficult to shape and serve. Ensure adequate refrigeration time for best results.
  • Using low-fat cream cheese can alter the texture of the log. Full-fat cream cheese provides the best consistency and flavor.
  • Skipping the draining of antipasto ingredients may add excess moisture, affecting texture. Always drain well before using.
  • Ignoring ingredient size for antipasto mix. Ensure all items are finely chopped for even distribution and flavor.
  • Failing to cover the log tightly when chilling could lead to drying out. Always wrap securely to maintain moisture.
  • Serving immediately out of the fridge may compromise flavor. Allow some time at room temperature for better taste integration.
  • Using expired or stale ingredients affects flavor quality. Fresh, high-quality ingredients are crucial for taste excellence.

Essential Techniques


Proper mixing is crucial for achieving a smooth cream cheese base. Ensure all components are at room temperature before mixing to prevent lumps. This simple action helps in creating a homogenous texture essential for a cohesive log.

Chilling is equally vital. Allowing enough refrigeration time ensures the log retains its shape while serving. The cooling process firms up the ingredients, enhancing both the visual appeal and the overall eating experience.

Presentation also plays a key role. Shaping the log evenly into a cylindrical form helps with even slicing for an elegant serving. A consistent form also aids the distribution of flavors with each piece, which is appealing to taste and sight.

Understanding mixing ratios between cream cheese and antipasto elements will help avoid overpowering flavors. Balancing ingredients ensures a harmonious taste that stays true to the intended profile of the recipe.

Pro Tips for Perfect Festive Holiday Antipasto Cream Cheese Log


Ensure your cream cheese is thoroughly softened before mixing; this makes the blending of ingredients much smoother, resulting in a creamier texture.

Select a good variety of pickled and marinated antipasto components to add layers of flavor that excite the palate, providing a more authentic Italian feel to the dish.

Let the cheese log sit at room temperature for about 10-15 minutes before serving. This will heighten the flavors, making it more palatable and enjoyable for guests.

Adding fresh herbs, such as basil or parsley, can enhance the presentation and infuse a burst of fresh flavor, complementing the other elements perfectly.

Use a sharp, warmed knife to slice the cheese log for effortless cutting and clean presentation, ensuring each guest gets an enticing, uniform slice.

If possible, prepare the log a day in advance to allow flavors to meld thoroughly, improving the depth and cohesiveness of the dish.

When wrapping the log for chilling, ensure a tight seal with plastic wrap to maintain firmness and keep flavors intact, preventing any unwanted flavors from the fridge.

Pairing the antipasto log with crunchy crackers or fresh bread provides a delightful contrast in texture, elevating the eating experience with each bite.

Variations and Adaptations


For regional variations, try experimenting with different olives, such as kalamata or green olives, to alter the flavor profile to your liking. Each type offers a distinct taste and texture that can personalize the traditional antipasto cream cheese log.

Embrace seasonal adaptations by incorporating fresh, seasonal herbs and veggies. For example, add diced sun-dried tomatoes in summer or roasted red peppers in winter for a festive touch.

To accommodate dietary preferences, consider using a plant-based cream cheese for a vegan option, ensuring all antipasto elements are vegan-friendly as well.

Enhance the flavors with spicy antipasto ingredients for a bold, zesty twist. Hot peppers or spicy olives can add a delightful kick to the standard recipe.

For a change in texture, incorporate finely chopped nuts like walnuts or almonds for added crunch. This not only provides a textural contrast but also adds nutty flavors that complement the creamy base.

Presentation alternatives include shaping the antipasto log into a festive wreath or individual balls for eye-catching holiday party servings. Customize the layout to suit the occasion.

Serving and Presentation Guide


For an elegant presentation, serve the cream cheese log on a beautiful wooden board or platter with an assortment of crackers, breadsticks, and sliced vegetables. This will create a bountiful display that is as pleasing to the eyes as it is to taste.

Garnishing with fresh herbs or colorful vegetable ribbons adds vibrancy and indicates the fresh flavors within the dish. It also complements the antipasto’s colors, creating an enticing appetizer.

Traditional accompaniments, like sliced salami or prosciutto, can be provided alongside for a more indulgent feast, adding layers of richness and flavor complexity.

Modern serving suggestions include offering the log alongside hummus or roasted red pepper dips for a Mediterranean-inspired board, satisfying various tastes.

Consider the temperature, allowing the antipasto cream cheese log to come slightly to room temperature before serving. This enhances the flavors and makes it easier to spread.

For portion control, slice the log before serving to guide guests and prevent overconsumption, ensuring everyone enjoys a taste without a rush for more.

Wine and Beverage Pairing


Pair this festive antipasto cream cheese log with a light, crisp white wine like a Sauvignon Blanc, which complements its savory and creamy notes while balancing the tanginess from olives.

Non-alcoholic alternatives such as a sparkling water with a splash of lemon or lime bring freshness to the antipasto and enhance the palate cleansing between bites.

For those preferring coffee, a light-bodied brew or a black tea pairs beautifully, cutting through the creamy flavors with gentle aromatic notes and completing the culinary experience.

Temperature considerations for beverages, especially wines, are crucial. Serve whites chilled to highlight fruity notes, enhancing their refreshing quality with the richness of the antipasto.

Consider garnishing wine glasses or mocktails with citrus slices to mirror the antipasto flavors, bringing a unified experience for the taste and sight while entertaining.

Storage and Shelf Life


Store any leftovers of the antipasto cream cheese log tightly wrapped in plastic wrap within an airtight container. Doing so will maintain freshness and prevent other refrigeration odors from transferring.

The recipe keeps well in the refrigerator for up to three days. Ensure proper chilling to preserve its texture and savor the immaculate flavors when served again.

Recommended storage temperature is under 40°F (4°C) to reduce spoilage risk. Monitor storage and maintain refrigeration to ensure food safety and quality.

Check for signs of spoilage like discoloration or off odors before consuming stored antipasto to ensure it’s safe to eat and its flavors remain intact.

When reheating, avoid microwaves. Instead, bring chilled portions to room temperature gently to preserve texture and balance without melting the cheese base.

Make Ahead Strategies


Plan your prep timeline by preparing the antipasto elements and cream cheese mix the day before. Assemble the log and refrigerate overnight for optimal flavor melding.

Store components separately if necessary, keeping meats and cheese components separate until assembly to maintain texture and flavor integrity.

Assess the quality impact of being a make-ahead dish, noting that ingredient flavors blend better with time, typically resulting in a richer taste profile.

Assembly tips include using plastic wrap or wax paper to shape the log evenly, considering presentation from all angles to showcase the mixture’s rich content.

For reheating or warming chilled logs, let them stand at room temperature briefly, enhancing the taste and ensuring a spreadable consistency for easier serving.

Add fresh garnishes like herbs or additional antipasto elements just before serving, maintaining fresh vibrancy without premature wilting during storage.

Scaling Instructions


To halve the recipe, reduce the cream cheese and antipasto ingredients by half, ensuring an even distribution of elements in smaller quantities while retaining the flavors.

Doubling or tripling the antipasto cream cheese log is easy—scale the ingredients while considering appropriate mixing equipment like larger bowls or food processors.

For equipment adjustments, use larger serving trays or platters to accommodate increased log sizes while ensuring the mixture retains its shape and attractiveness.

Timing modifications involve extra chilling time for larger logs, allowing flavors to meld and textures to firm, ensuring preservation during serving.

Storage considerations include separating individual logs within airtight containers, maintaining quality and offering easy access for serving larger parties.

Nutritional Deep Dive


The antipasto cream cheese log offers a balanced macro breakdown, featuring fats from cream cheese and olives with modest protein contributions from cheese components.

Micronutrients such as calcium and vitamin A from dairy and antioxidants from olives enhance nutritional value, providing essential health benefits with indulgent enjoyment.

This dish allows for portion awareness due to concentrated, flavorful bites requiring smaller servings. Maintain portions for balanced indulgence within dietary preferences.

For weight management, consider serving alongside fresh vegetables or lighter bites to create a filling experience with reduced caloric intake from richer components.

Dietary Adaptations


For a gluten-free version, serve with gluten-free crackers or vegetable sticks as dippers, ensuring all accompaniments meet dietary restrictions.

Dairy-free adaptations involve using plant-based cheeses and ensuring other antipasto elements are free from dairy derivatives, maintaining flavor without compromise.

A vegan approach includes plant-based cheese and ensuring the antipasto elements like marinated vegetables and olives adhere to vegan standards and preferences.

Low-carb versions focus on serving the log with vegetables rather than bread or crackers, complementing the dish’s creamy flavor with crisp freshness.

Paleo-friendly adaptations explore non-dairy cheese alternatives, ensuring all antipasto ingredients align with a paleo diet’s guidelines and principles.

Low-FODMAP adjustments include selecting onions and garlic-free antipasto components and ensuring other elements align with low-FODMAP criteria for a safe and enjoyable experience.

Troubleshooting Guide


Should the texture turn out too soft, ensure adequate chilling time and the use of full-fat cream cheese to provide proper firmness.

Balancing flavor is critical; should the log be overly salty, incorporate unsalted ingredients or adjust antipasto quantities for a harmonious blend.

Temperature problems often arise from improper chilling. Ensure consistent refrigeration and allow time for the log to firm adequately between steps.

Equipment challenges might include difficulty with shaping; use plastic wrap or parchment to assist even shaping, preventing sticking and ensuring uniformity.

If ingredient substitutions impact the log, match substitutions closely in texture and flavor profile for consistency without altering the final outcome.

Timing concerns involve extended refrigeration if the log lacks firmness; proper storage and timing maintain its visual appeal and spreadability.

Recipe Success Stories


This Festive Holiday Antipasto Cream Cheese Log has become a favorite in many homes, bringing together stories of successful holiday parties and full complements each season.

Readers have experimented with seasonal variations, infused herbs, and swapped antipasto elements to personal delight, proving the recipe’s flexibility.

Adaptation stories highlight the ease of converting components for vegan or gluten-free preferences while retaining familiar flavors and culinary appeal.

Community feedback praises the ease and simplicity of preparation, emphasizing the log’s ability to stand out as a favorite without monopolizing kitchen time.

Photography tips include featuring vibrant antipasto colors with camera-lit backdrops, showcasing the log’s beauty and culinary vibrancy in each shared image.

Frequently Asked Questions

Can I make this log ahead of time?
Absolutely. Preparing the log a day in advance allows the flavors to meld perfectly, offering a richer taste come serving time.

What if I don’t like olives?
You can substitute olives with capers or sun-dried tomatoes for a different yet equally compelling briny flavor and maintain the recipe’s balance.

How do I store leftovers?
Wrap tightly in plastic and store in an airtight container in the refrigerator for up to three days to maintain freshness and prevent contamination.

Can I freeze the antipasto log?
Freezing is not recommended as it may alter the texture upon thawing. Best results come from refrigeration and consuming within its shelf life.

What can I use instead of cream cheese?
Soft cheeses like mascarpone or vegan cheese alternatives can replace cream cheese, focusing on similar textures for success in taste and presentation.

Is this suitable for a large gathering?
Certainly. The recipe can be scaled up to cater to a larger audience, retaining its elegance and flavors even in bigger portions.

How can I make it spicier?
Incorporate a mix of spicy antipasto ingredients such as hot pepper slices or sprinkle red pepper flakes into the cheese mixture for a bolder kick.

What’s the best cracker to serve with this?
Choose a sturdy, lightly salted cracker that complements the log’s flavors without overpowering them, providing ideal texture for combining with spreads.

What wine pairs best with this dish?
A chilled bottle of Sauvignon Blanc or a light Pinot Grigio offers a refreshing complement to the rich, savory notes of the antipasto cream cheese log.

Can I customize the antipasto mix?
Yes, personalization is encouraged, allowing you to select antipasto elements reflecting preferences while still providing delightful taste harmony.

Additional Resources


For related recipes, check out our collection of appetizer ideas like Tapenade Crostini and Marinated Cheese Platters for diverse and exciting party offerings.

Delve into technique guides detailing cream cheese handling and antipasto preparation, ensuring you’re fully equipped to master the recipe essentials.

Ingredient information extensively explores antipasto elements like meats, olives, and cheese, providing understanding and insight into flavor combinations.

Consider equipment recommendations in our resource center, guiding you on best tools, storages, and serving options for antipasto favorites.

Explore seasonal variations, adapting our antipasto logs and appetizers with the freshest, most evocative ingredients available each season for menus that inspire.

Join the Conversation


Share your culinary creations on social media using our dedicated hashtags, inspiring others within our community and celebrating personal recipe triumphs.

Discover photography tips that emphasize your antipasto’s vibrant colors, ensuring every shot is Instagram-ready with proper lighting and creative compositions.

Leave recipe reviews sharing experiences and insights, encouraging others to embark on their antipasto journeys with the support of shared knowledge.

Engage with the community, exchanging variations and tips to foster knowledge-sharing among fellow antipasto aficionados and aspiring cooks.

Explore recipe variations while receiving feedback from our enthusiastic community, enhancing your creative exploration and sustaining culinary passion.

The Recipe

Festive Holiday Antipasto Cream Cheese Log

Serves: 10

Prep Time: 20 mins

Cook Time: 0 mins

Total Time: 20 mins

Kitchen Equipment Needed

  • Mixing Bowl
  • Paddle Mixer or Fork
  • Plastic Wrap
  • Serving Platter

Ingredients

  • 2 (8-ounce) packages cream cheese, softened
  • 1 cup assorted chopped antipasto (such as olives, bell peppers, and artichokes)
  • 1 tablespoon Italian herbs
  • 1/4 teaspoon crushed red pepper flakes (optional for extra heat)
  • Fresh basil for garnish
  • Crackers or slices of bread for serving

Directions

  1. In a large mixing bowl, blend softened cream cheese using a paddle mixer or fork, ensuring it’s smooth and lump-free.
  2. Gently fold in the chopped antipasto, Italian herbs, and red pepper flakes (if using) until evenly distributed within the cream cheese.
  3. Transfer the mixture onto plastic wrap, forming a cylindrical log shape. Wrap tightly and chill in the refrigerator for at least 1 hour or until firm.
  4. Unwrap the log and place it onto a serving platter. Garnish with fresh basil leaves for a vibrant presentation.
  5. Serve with crackers or bread, allowing guests to slice and enjoy the antipasto cream cheese log.

Recipe Notes

  • For a dairy-free version, substitute cream cheese with a plant-based alternative.
  • Add or adjust antipasto components based on personal taste preferences or availability.
  • Let the log warm slightly at room temperature before serving to enhance flavors.

Savor the Ultimate Surf and Turf with Steak and Shrimp Scampi

Steak and Shrimp Scampi: A Surf and Turf Delight

⚖️
Difficulty
Intermediate

⏲️
Prep Time
15 mins

🕒
Cook Time
30 mins

⏱️
Total Time
45 mins

🍽️
Servings
4

Steak and Shrimp Scampi is a culinary masterpiece that marries the earthy richness of prime beef with the succulent sweetness of fresh shrimp. This dish combines the best of both land and sea, delivering an experience that’s both luxurious and comforting. Each bite is a journey through deep flavors enhanced by a rich garlic butter sauce that ties the elements together. Whether it’s a special occasion or a desire for an indulgent dinner at home, this dish is sure to please.

The moment the beef hits the hot pan and sizzles alongside the shrimp, an enticing aroma fills the air. The steak develops a crust that’s infused with butter and aromatic herbs, while the shrimp obtain a delicate char, offering layers of complex flavors. As the dish comes together, the harmonious blend of garlic, lemon, and herbs envelops the senses, creating an irresistible aroma that teases the palate.

With its elegant presentation, Steak and Shrimp Scampi is designed to impress. The warm, buttery hues of the dish are complemented by flashes of lemon zest and fresh parsley, creating a dish that’s as appealing visually as it is to taste. A meal fit for a king, this recipe is surprisingly simple in technique yet speaks volumes through its flavor profiles.

Quick Recipe Highlights

  • Flavor Profile: Experience a blend of savory steak and sweet shrimp, united by a rich, buttery garlic sauce.
  • Texture: Delight in a combination of tender steak and juicy shrimp with a silky, smooth sauce.
  • Aroma: Immerse yourself in the delightful scents of lemon, garlic, and herbs wafting from the kitchen.
  • Visual Appeal: A feast for the eyes with its golden-brown crusts and vibrant garnish of parsley.
  • Skill Level Needed: Best suited for intermediate cooks, comfortable with timing and temperature adjustments.
  • Special Equipment: A cast iron skillet and a good set of tongs are recommended for achieving the perfect sear.

Recipe Overview

  • Difficulty Level: This dish requires attention to detail and mastery of timing, particularly in managing different cooking stages for steak and shrimp.
  • Category: Perfect as a main course for dinner, catering to those looking for a balanced surf and turf meal.
  • Cuisine: This dish is grounded in American culinary traditions with Italian influences, particularly in the scampi sauce which uses key ingredients like garlic and lemon.
  • Cost: While it includes premium ingredients like steak and shrimp, careful sourcing can keep the dish accessible without compromising quality.
  • Season: Best enjoyed year-round, though the fresh, summery flavors shine brightly in warmer months.
  • Occasion: Ideal for celebrating special occasions like anniversaries or birthdays, or for elevating a regular weeknight into something extraordinary.

Why You’ll Love This Recipe

The taste of Steak and Shrimp Scampi is a culinary celebration in itself. The juicy cut of steak pairs exquisitely with the subtle sweetness of shrimp, while fragrant garlic butter sauce pulls everything together beautifully. The textures play off each other wonderfully, with the tender steak and plump shrimp contrasting against the rich, velvety sauce. This dish is a delight for the senses—savory, buttery, and slightly tart with hints of herbaceous freshness from parsley.

In terms of convenience, this recipe brings together a gourmet dish with surprisingly simple steps. By focusing on quality ingredients and honing a few key techniques, you can execute this meal in under an hour, making it achievable even on a busy evening. It offers a substantial return on investment in terms of flavor and sophistication while keeping preparation manageable.

Nutritionally, this meal packs in high protein with its steak and shrimp foundation, offering sustaining energy and satiety. It’s naturally low in carbs and adaptable for various dietary preferences without sacrificing its core flavors. If paired with a light salad or steamed vegetables, it provides a balanced plate suitable for a well-rounded, nourishing meal.

For social settings and entertaining, Steak and Shrimp Scampi captures attention as a statement dish. It conveys thoughtfulness and skill, sure to impress guests with its artful fusion of surf and turf. The recipe lends itself to an interactive dining experience where the process and plating can be as much a part of the enjoyment as the food itself.

Cost-effectiveness is another advantage, balancing the use of premium components like steak and shrimp with a strategic approach to shopping and portioning. With a focus on quality over quantity, it’s possible to enjoy a lavish meal without stretching the budget excessively. The simplicity in preparation allows for investing in better ingredients, amplifying the recipe’s luxurious nature.

Historical Background and Cultural Significance

The concept of combining steak with seafood originates from the classic American steakhouse tradition, highlighting the luxury of surf and turf dining. The roots trace back to upscale dining in the mid-20th century when restaurants began offering premium combinations of land and sea delights, symbolizing abundance and culinary opulence.

Culturally, Steak and Shrimp Scampi represent a blend of worlds—American extravagance meets the subtle, flavor-centric Italian way of cooking. It’s a dish that has evolved to cater to a growing appreciation for both steakhouse and Italian culinary techniques, beautifully merging the two into one delectable creation that reflects both traditions.

Traditionally, scampi refers to a method of preparation involving garlic and butter, originating from Italian dishes using scampi crustaceans. The American adaptation has broadened this to include shrimp, aligning with local availability and taste preferences while preserving the original Italian essence.

Regional variations of Steak and Shrimp Scampi may incorporate different herbs, sauces, or marinades, reflecting the diverse culinary landscapes of the U.S. Some prefer a spicy twist with chili flakes, while others might add a touch of white wine for additional complexity. These variations keep the dish dynamic and individually tailored, perfecting it through local tastes and availability.

Ingredient Deep Dive

For the perfect steak, consider cuts like ribeye or filet mignon, known for their tenderness and flavor richness. These cuts boast significant cultural importance in American steakhouses, often heralded for their quality and taste. When choosing steak, prioritize marbling for flavor and select cuts that are vivid in color with a firm texture.

Shrimp, the star of the scampi, brings a touch of the sea’s opulence to this dish. Nutritionally, shrimp is low in calories but high in protein, vitamins, and minerals, making it a valuable component of a balanced diet. Opt for peeled and deveined shrimp to save prep time, ensuring they are firm and fragrant with a slight sea smell, indicating freshness.

Storage of both primary ingredients is crucial. Keep steaks stored in the coldest part of your refrigerator or freeze them if not using within a couple of days. Shrimp, on the other hand, should be used as freshly as possible or kept in the freezer to preserve their natural sweetness until cooking time. Substitutions could include other seafood like scallops or a cut of chicken breast, each offering different but delectable results.

Common Mistakes to Avoid

  • Overcooking the steak can lead to toughness; focus on letting it rest and using a meat thermometer to ensure the perfect doneness.
  • Avoid overcrowding the pan when cooking shrimp to ensure an even, golden sear rather than steaming.
  • Skipping the resting period for steak can cause juices to be lost; ensure the steak rests to retain moisture.
  • Failing to properly heat your skillet can prevent achieving a perfect crust, crucial for flavor development.
  • Insufficient seasoning of both steak and shrimp can result in a bland outcome; use salt and pepper generously.
  • Forgetting to deglaze the pan with lemon juice or white wine can lead to missed flavor complexity from the sauce.
  • Overcooking shrimp makes them rubbery; instead, cook until just opaque for tenderness.
  • Not using enough garlic or fresh herbs may result in a muted scampi sauce that lacks vibrancy.
  • Using unsalted butter could lead to under-seasoned results; if using, adjust seasoning accordingly.
  • Neglecting to pat your steak dry before cooking can hinder crust formation needed for maximum flavor.

Essential Techniques

Searing the steak is essential for flavor depth. To master it, ensure your pan is smoking hot before introducing the meat, which enables a browned, flavorful crust. Common pitfalls include a pan that’s too cold or flipping the steak too frequently, both obstructing appropriate caramelization.

In shrimp preparation, achieving a quick sauté is vital. This technique secures tenderness and keeps the shrimp moist. Look for shrimp turning opaque combined with pink hues as visual cues of readiness. Over-sautéing leads to a rubbery texture, which detracts from the eating experience.

Creating the scampi sauce requires balancing richness with acidity. Start by sautéing garlic until fragrant but not browned, then introduce lemon and butter to achieve a velvety emulsion. Resisting the urge to rush this process ensures the sauce’s depth and elegance.

Pro Tips for Perfect Steak and Shrimp Scampi

Select high-quality ingredients to make the difference in your Steak and Shrimp Scampi; grass-fed beef and fresh shrimp provide the best flavor.

Preheat your pan thoroughly before cooking steak to guarantee a perfect crust; a hot pan is crucial for caramelization.

Be sure to deglaze the pan for scampi sauce after cooking the steak; the brown bits in the pan are packed with flavor.

Temper your steak before cooking, allowing it to come to room temperature; this ensures more even cooking and maximum tenderness.

Add fresh herbs at the last moment to preserve their vibrant flavors and colors in the final dish.

For extra lemony flavor, zest your lemon before juicing and add the zest to the sauce for an aromatic boost.

Rest cooked steak on a warm plate, covered lightly to let it relax and reabsorb its juices, resulting in a juicy bite.

If desired, finish your shrimp in the oven for even cooking after the initial pan sear, ensuring complete and gentle heat distribution.

Variations and Adaptations

Regional variations might lean on local herb blends or add heat with chili peppers. The flexibility of the dish invites experimentation with substitutions like scallops instead of shrimp or incorporating seasonal vegetables like asparagus or squash.

During the winter months, add heartiness with an accompaniment of creamy polenta or parmesan risotto. Warmer months could see a fresh salad alongside, highlighting tomatoes and basil in a refreshing contrast with the scampi.

Dietary modifications are readily achievable by using a plant-based butter substitute and swapping out steak for portobello mushrooms, catering to vegan diners while maintaining flavor depth.

Would you like to tweak the flavors? Incorporate saffron threads in the scampi sauce or infuse steaks with rosemary instead of thyme for subtle enhancements.

For presentation alternatives, try serving with roasted cherry tomatoes, adding a vibrant pop of color and a flavor contrast.

If you prefer a different texture, pound the steak thinner or butterfly shrimp for a broader sear surface, altering texture and appearance beneficially.

Serving and Presentation Guide

Consider using wide, shallow dishes for plating, creating space to showcase the stunning crust of the steak and glossy shrimp while reserving room for garnishes.

Garnishing ideas include freshly chopped parsley, a drizzle of high-quality olive oil, or scattered capers for a burst of brine.

Serve with classic steakhouse sides such as a loaded baked potato or garlic mashed potatoes, adding comfort and familiarity.

Modernize the serving with a side of quinoa salad or lightly dressed arugula, incorporating contemporary tastes.

Take temperature into account by keeping steak warm during resting, as well as heating plates slightly before serving for perfection retention.

Control portion sizes judiciously; aim for 6-8 oz of steak and 4-6 shrimp per serving to satisfy without excess.

Wine and Beverage Pairing

Opt for a full-bodied red wine like Cabernet Sauvignon that complements the steak’s richness while balancing garlic’s pungency in the shrimp.

For non-alcoholic alternatives, a lightly sparkling water infused with lemon serves to cleanse the palate without interfering with flavors.

If desired, offer an iced tea with a splash of mint, providing a refreshing accompaniment in warmer climates.

Temperature is essential; serve red wines slightly cooler than room temperature and white wines chilled yet not icy, ensuring aromatic retention.

Suggest serving with a light cheese platter or bread basket as a precursor, setting the mood for culinary indulgence.

Storage and Shelf Life

Refrigerate leftovers in an airtight container within two hours of cooking to maintain freshness and safety, consuming within 2-3 days.

Store at or below 40°F, monitoring for quality preservation and minimizing the risk of bacterial growth.

Consider portioning leftovers prior to refrigerating for easy reheating, using microwave-safe containers or reheating on the stovetop over low heat to retain texture.

Watch for signs of spoilage like off smells or discoloration, disposing promptly to prioritize health.

Freezing may affect steak texture but consider freezing cooked shrimp- separate from steak, observing a three-month safety window when properly sealed and protected from freezer burn.

Make Ahead Strategies

Plan a prep timeline involving chopping herbs and marinating steak hours ahead, allowing you to focus solely on cooking closer to mealtime.

Store components separately when preparing portions ahead, such as garlic butter sauce, preventing cloves from overpowering other flavors and ensuring freshness.

Quality remains high by pre-searing shrimp hours ahead and gently reheating in sauce, saving valuable serving time but preserving taste and texture vitality.

Assembly tips include arranging garnish last minute, keeping herbs fresh until needed without losing vibrancy during sitting time.

Reheat with care, using gentle heat to avoid overcooking, while winding down as guests arrive, for seamless service transitions.

Engage fresh ingredients as finishing touches for liveliness, incorporating lemon zest or parsley on site to capture aroma and visual appeal.

Scaling Instructions

For halving the recipe, adjust ingredient quantities proportionally, applying the same principles of searing and sauce preparation to ensure retained flavor.

Scaling up involves doubling or tripling ingredient volumes but maintaining a single batch at a time for optimal heat distribution and texture preservation.

Equipment adjustments may include using multiple pans to accommodate increased quantities, thereby preventing overcrowding and heat loss.

Timing modifications might be necessary, particularly for longer resting periods, when serving more significant groups or hosting events.

Consider storage readily when expanding quantities, preparing storage containers for leftover components and preventing wastage.

Nutritional Deep Dive

Macros in Steak and Shrimp Scampi include substantial protein, prevalent in both steak and shrimp, fostering growth and repair.

Micronutrients vary, with shrimp supplying valuable iodine, zinc, and B vitamins, contributing to balanced nutritional intake.

Health benefits can include maintaining energy levels, enhancing muscle preservation due to its abundant protein profile, and benefiting from omega-3 in shrimp.

Dietary considerations encompass accommodating high-protein, low-carb needs while keeping saturated fats higher with steaks in mind.

Portion analysis underscores moderation, harmonizing rich flavors with mindful servings to foster satisfaction without excess.

Weight management tips involve pairing scampi with fiber-dense accompaniments, promoting satiety and nutritional balance.

Dietary Adaptations

For gluten-free adaptation, ensure sauces and sides incorporate gluten-free ingredients, checking labels diligently for possible contaminants in butter or seasonings.

To create a dairy-free version, consider olive oil or margarine substitutes, adapting richness while avoiding allergenic compounds in traditional butter.

For vegan enthusiasts, accommodate with tofu or seitan as steak stand-ins, retaining structure and flavor similarly by marinating with umami-rich spices.

Achieve a low-carb approach by embracing zoodles or shirataki noodles in lieu of pasta, offering meal consistency and appeal.

Keto proponents appreciate fatty focus but should monitor portion sizes, balancing high protein with generous salad accompaniments.

Paleo followers find shrimp scampi naturally aligned with necessities, avoiding grains and legumes while opting for natural oils or fats.

Consider a low-FODMAP approach, monitoring garlic quantities and applying infused oils instead for digestible comfort without sacrificing taste.

Troubleshooting Guide

Address texture issues by ensuring steak is cut across the grain, mitigating toughness and facilitating tenderness.

Correct flavor balance concerns with precise seasoning; salt adequately before cooking, adjusting levels gradually for flavor integrity.

Overcome temperature problems by verifying your meat thermometer for accuracy, ensuring steaks rest for temperature equalization post-cooking.

Confront equipment challenges by ensuring uniform pan base coverage, procuring a heavy-duty skillet promoting effective, even heat for optimal searing.

Navigate ingredient substitutions through strategic like-for-like exchanges such as plant-based margarine integrating dairy-free, without impacting the cooking process significantly.

Refine timing concerns by structuring steps in logical sequence, from mise en place to sequential cooking, enabling smooth workflow from preparation to completion.

Recipe Success Stories

Community feedback often highlights the delight in serving Steak and Shrimp Scampi at gatherings, providing an approachable yet impressive dish strengthened by broad appeal.

Variation successes reflected through personalized element inclusion occasionally transform the scampi sauce, integrating with new spices, boosting recipe versatility.

Adaptation stories reveal culinary exploration ingenuity, particularly among plant-based diets, illustrating effective texture and flavor navigation despite deviations.

Reader suggestions frequently advocate for additional zest or personalized spice mixes, echoing evolving culinary landscapes through tailored enhancements.

Photography tips commonly emphasize capturing the steak’s crust and butter gloss under natural light, showcasing dish coloration effectively for appealing presentation.

Frequently Asked Questions

Can I use frozen shrimp for Shrimp Scampi?
Yes, frozen shrimp can be used, though for best results, ensure they are fully thawed and towel-dried before cooking to avoid excess moisture.

How do I choose the best steak for this recipe?
Focus on tender cuts like ribeye or filet mignon with visible marbling, as these aspects enhance flavor and texture upon cooking.

What’s the secret to a perfectly crusted steak?
Begin with a well-dried steak, seasoning generously, and introduce it to a smoking-hot pan, letting it sear without disturbance until the desired crust forms.

Does the sauce require white wine?
While traditional, wine can be omitted in favor of additional lemon juice or stock, replicating similar depth without alcohol.

What can substitute garlic if I’m allergic?
Consider using garlic-infused oils to impart similar flavor without actual cloves, or substitute with mild shallots finely minced.

How do I avoid rubbery shrimp?
Monitor cooking time closely, removing from heat once they turn opaque, preempting overcooking which leads to undesirable texture.

Can I grill the steak instead of pan-searing?
Absolutely, grilling infuses another flavor dimension, adhering to the same doneness methodology but introducing smoky elements.

Why is resting steak important?
Resting steak allows juices to redistribute throughout the meat, ensuring each bite is juicy and tender as intended.

Additional Resources

Explore related recipes focusing on perfect garlic sauce techniques to amplify scampi mastery, using accessible step-by-step guides to broaden your culinary toolkit.

Broaden ingredient information grasp, from seasonal shrimp varieties enhancing flavor palettes to distinguishing surface marbling benefits in steak quality overviews.

Capitalize on knowledge with equipment recommendations, assessing the best cookware for efficient heat distribution and effective culinary outcomes.

Dive into seasonal variations offering insight into using nature-produced components such as seasonal vegetables, reinforcing fresh availability principles fitting within diverse recipes.

Join the Conversation

Engage with the recipe community online, sharing personal experiences and modifications across social media platforms to inspire fellow food enthusiasts.

Practice photography skills to capture the vibrancy of Steak and Shrimp Scampi, experimenting with lighting and angles to enhance dish presentation and subsequent acclaim.

Collaborate on recipe reviews, unpacking various assumptions about difficulty and taste, discovering shared insights, and evolving traditional perceptions.

Promote community recipe variations indicative of cultural preferences, celebrating unique adaptations making significant marks within broader culinary landscapes.

The Recipe

Steak and Shrimp Scampi

Serves: 4

Prep Time: 15 mins

Cook Time: 30 mins

Total Time: 45 mins

Kitchen Equipment Needed

  • Cast iron skillet
  • Chef’s knife
  • Cutting board
  • Meat thermometer
  • Tongs

Ingredients

  • 4 (6-8 oz) steaks, preferably ribeye or filet mignon
  • 12 large shrimp, peeled and deveined
  • Salt and pepper to taste
  • 4 tbsp butter
  • 2 cloves garlic, minced
  • 1/4 cup fresh lemon juice
  • 2 tbsp chopped parsley
  • 1 tbsp olive oil

Directions

  1. Preheat your cast iron skillet over high heat until it’s smoking hot. Season steaks generously with salt and pepper.
  2. Add olive oil to the pan and place steaks carefully in the skillet. Sear for 3-4 minutes per side for medium-rare, adjusting based on thickness and preference.
  3. Remove steaks from the skillet and allow to rest on a warm plate, covered loosely with foil.
  4. Reduce the heat to medium and add butter to the skillet. Once melted, add garlic and sauté until fragrant, about 1 minute.
  5. Toss shrimp into the skillet, cooking until just opaque, about 2-3 minutes per side. Stir in lemon juice and parsley.
  6. Return steaks to the skillet to warm through briefly. Spoon sauce over them, ensuring shrimp are well coated.
  7. Transfer to plates, garnishing with additional parsley before serving.

Recipe Notes

  • For a thicker sauce, emulsify butter gradually using reserved steak juices.
  • Lemon zest can be added for extra citrus punch.
  • Red pepper flakes offer a spicy kick and can enhance the overall flavor.