Delightful Crispy Parmesan Artichoke Hearts for a Flavorful Snack

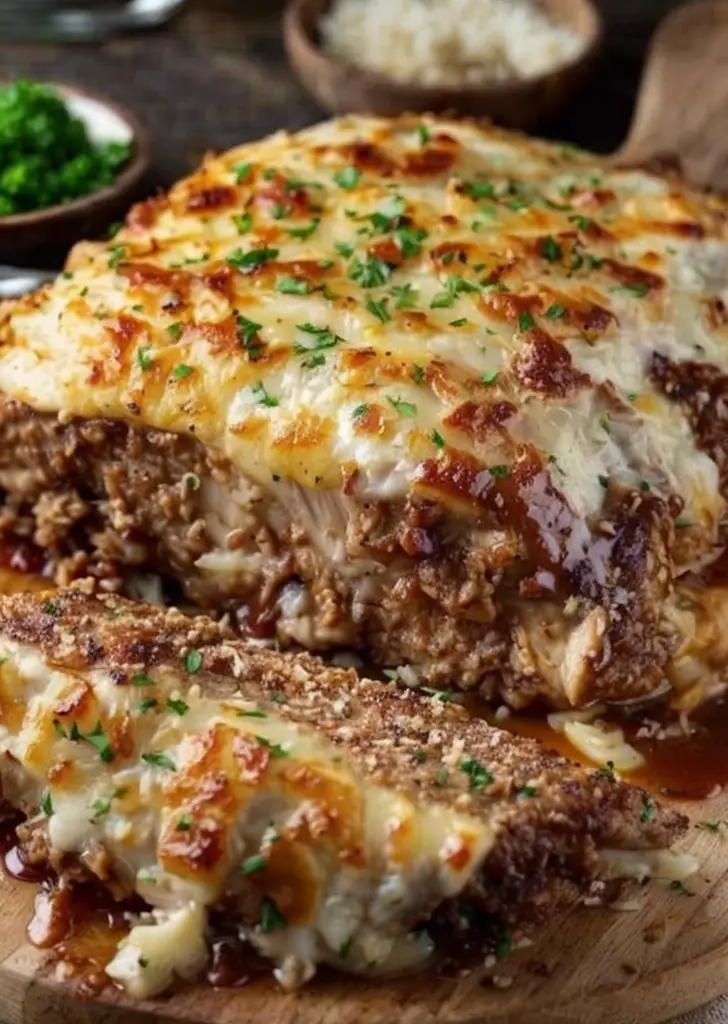
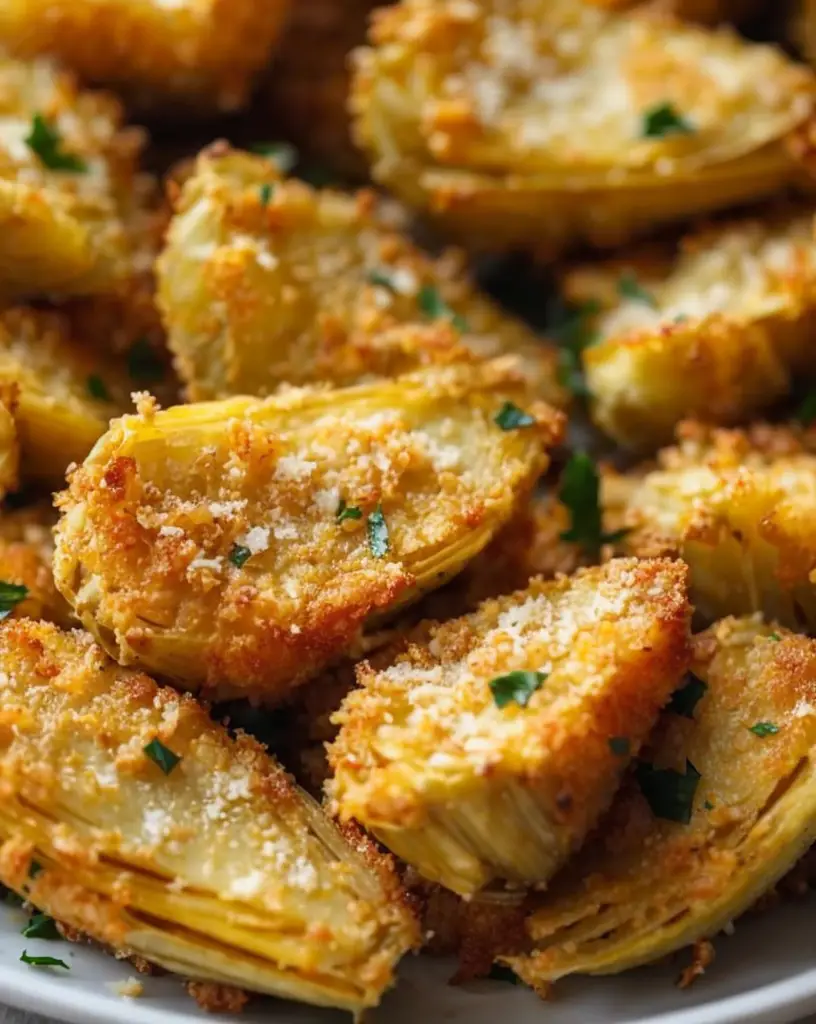
Crispy Parmesan Artichoke Hearts: A Savory Delight You’ll Love

⚖️
Difficulty
Easy

⏲️
Prep Time
15 mins

🕒
Cook Time
20 mins

⏱️
Total Time
35 mins

🍽️
Servings
4

Welcome to a delightful journey through flavors with this Crispy Parmesan Artichoke Hearts recipe. This dish combines the nutty richness of Parmesan with the tender heart of the artichoke, creating a perfect appetizer or side dish that will captivate any palate. Perfectly seasoned and delightfully crispy, these artichoke hearts are a testament to simple ingredients yielding extraordinary results.

Whether you are hosting a dinner party or just want to enjoy a snack that is both wholesome and flavor-packed, this recipe is your answer. The crisp outside contrasts wonderfully with the soft, savory inside, creating a harmony of textures that’s hard to resist. Buttery, with a hint of garlic and herbs, these artichoke hearts are a versatile dish you’ll find yourself making repeatedly.

Diving into the world of artichoke hearts is not only about their flavor but also about discovering their nutritional benefits. Rich in fiber, vitamins, and antioxidants, they are an excellent choice for a health-conscious foodie. With the Parmesan adding calcium and protein, this dish offers more than just a satisfying taste—it’s also a boon for your well-being.

Quick Recipe Highlights

  • Flavor Profile: The beautifully crispy Parmesan crust provides a nutty, savory punch, while the artichoke delivers a mild, earthy taste, perfectly balanced with hints of garlic and herbs.
  • Texture: Experience the satisfying crunch of the outer layer, juxtaposed against the soft, tender artichoke center, a genuine textural masterpiece.
  • Aroma: Let the inviting scent of baked Parmesan and herbs mingle with the subtle fragrance of artichoke, creating an aromatic symphony.
  • Visual Appeal: Golden brown and inviting, with specks of green herbs, this dish is as visually appealing as it is delicious, perfect for elevating any table setting.
  • Skill Level Needed: Simple and straightforward, this recipe requires basic kitchen skills, making it accessible for cooks of all levels.
  • Special Equipment: No complex gadgets needed—just a baking sheet, oven, and basic prepping tools, ensuring ease of preparation.

Recipe Overview

  • Difficulty Level: This recipe lands on the easier side, requiring minimal techniques and basic kitchen tools, making it an excellent choice for novice cooks or anyone short on time.
  • Category: Appetizer or side dish, this recipe shines in versatile roles, perfect for starting a meal or complementing a main course.
  • Cuisine: Rooted in European culinary traditions, this dish combines classic Italian ingredients with a creative twist, bringing the art of simplicity to the fore.
  • Cost: Economical and accessible, the main ingredients are cost-effective, making this a budget-friendly yet gourmet option for any occasion.
  • Season: Ideal year-round, but particularly satisfying in spring when artichokes are at their peak freshness.
  • Occasion: Great for casual gatherings, special dinners, or holiday feasts, these artichoke hearts are a versatile addition to any menu.

Why You’ll Love This Recipe

The taste and texture make this dish an unforgettable experience. The crispy Parmesan crust enveloping the tender, earthy artichoke creates a magnificent culinary combination that satisfies both crunchy and creamy cravings. It’s a delightful snack or starter that feels indulgent yet light enough to leave room for the main course.

This recipe is a breeze to prepare, requiring minimal ingredients and effort. The straightforward prep work means you can easily whip up a batch even on a busy weeknight or as a last-minute appetizer for guests, proving that fantastic food doesn’t have to take hours in the kitchen.

Nutritionally, the combination of artichokes and Parmesan offers a feast of fiber, antioxidants, and essential nutrients. Artichokes are known for their health-boosting qualities, with benefits ranging from improved digestion to heart health, while Parmesan adds a dose of calcium and protein to your meal.

Socially, this dish is a guaranteed crowd-pleaser. The unique blend of flavors and textures is sure to start conversations and bring people together over shared appreciation for great food. Ideal for parties and gatherings, it’s a dish that encourages communal enjoyment and engagement.

From a cost perspective, this is a highly affordable yet elegant recipe. The ingredients are easily available and budget-friendly, allowing you to create a luxurious dish without breaking the bank, making it a fantastic option for frequent enjoyment.

Historical Background and Cultural Significance

The origins of artichokes trace back to the Mediterranean region, where they have been cultivated for centuries. Known for their health properties and unique taste, artichokes have long been a staple in Italian and French cuisines. This recipe is a homage to these culinary traditions, bringing a beloved ingredient into modern kitchens with a simple, flavorful twist.

Culturally, artichokes have been a symbol of good taste and class across many European societies. The addition of Parmesan cheese, hailing from Parma in Italy, further deepens the cultural ties, as this cheese is a respected hallmark of Italian cuisine, celebrated for its nutty and savory qualities.

As food trends evolved, so did the preparation methods of artichokes. This crispy variant is an evolution from traditional steaming or boiling, offering a contemporary approach that highlights different textures and flavors, catering to modern palates that appreciate contrast and crunch.

Regionally, variations of this recipe exist, incorporating local herbs or cheeses, making each rendition unique to its locale. This adaptability showcases the recipe’s versatility and the universal appeal of combining crispy and creamy elements, ensuring its continued popularity across generations.

Ingredient Deep Dive

Artichokes are more than just a tasty ingredient; they’re steeped in history and symbolism. Known for their health benefits, they have been a staple in Mediterranean diets for centuries. Packed with fiber, vitamin C, and antioxidants, they are celebrated for aiding digestion and promoting heart health. Selecting petite, firm artichokes ensures the best flavor and texture for this recipe.

The star of this dish’s crispy coating, Parmesan cheese, brings its own rich legacy. Originating from the Parma region in Italy, this cheese is renowned for its nutty flavor and granular texture. It is an excellent source of calcium and protein, complementing the artichoke’s nutrients. For best results, choose fresh Parmesan and store it in a cool, dry place to maintain its integrity and flavor.

Substituting Pecorino Romano for Parmesan introduces a sharper taste, while using panko breadcrumbs can add extra crunch to the coating. These options ensure flexibility in flavor and texture profiles, allowing for customization based on dietary preferences or availability of ingredients.

Common Mistakes to Avoid

  • Skipping the pat dry step for artichokes can result in a soggy coating. Ensure they are thoroughly dried for maximum crispiness.
  • Overcrowding the baking sheet is a common mistake that leads to uneven cooking. Leave plenty of space between each piece for optimal results.
  • Undercooking the artichokes may leave them tough; follow the recommended temperature and time for best results.
  • Using pre-grated Parmesan cheese can affect the flavor and texture negatively. Opt for freshly grated for a superior taste.
  • Not preheating the oven might lead to uneven cooking, so ensure it’s fully preheated before baking.
  • Ignoring seasoning can lead to a bland dish. This recipe thrives on the balance of spices and cheese, so season generously.
  • If substituting ingredients, ensure compatibility with flavors to maintain the dish’s balance and appeal.
  • Avoid reheating in the microwave as this impacts the texture; opt for an oven or air fryer to maintain crispiness.

Essential Techniques

The pat dry technique for artichokes is crucial to ensure that the coating adheres properly and crisps up in the oven. Use paper towels to gently but thoroughly dry the artichokes after draining, which helps prevent the dreaded soggy crust.

Properly preheating the oven is essential for achieving the perfect golden brown crisp. A well-heated oven ensures even cooking, making sure the Parmesan crisps up nicely around the artichoke hearts.

Mastery of seasoning balance is key in this dish. The right amount of garlic powder, salt, and pepper enhances the natural flavors without overpowering the subtle artichoke taste.

Understanding visual cues for doneness, such as a golden brown color and audible sizzling, can guide you to know when the artichokes are perfectly cooked, creating a satisfying crunch with each bite.

Pro Tips for Perfect Crispy Parmesan Artichoke Hearts

Enhance the flavor by adding a pinch of red pepper flakes to the coating mix for a bit of heat that complements the cheesy crust beautifully.

Experiment with different cheese blends, such as adding grated Asiago for a punchier flavor alongside the Parmesan.

To maintain the crisp texture, serve immediately after baking. If you’re preparing in advance, reheat briefly in the oven to restore perfect crispiness.

For a richer flavor, lightly drizzle truffle oil over the artichokes after baking, adding an earthy, luxurious note to the dish.

To ensure even coating, use your hands to press the Parmesan mixture into each artichoke heart firmly, ensuring it sticks well before baking.

Consider pairing with a lemon aioli dip for an additional flavor layer, enhancing the savory aspects of the dish with tangy, creamy goodness.

Variations and Adaptations

Create a Mediterranean-inspired version by incorporating dried oregano and basil into the breadcrumb mixture, bringing a herby aroma that complements the Parmesan beautifully.

Adapt the recipe for winter by adding a touch of rosemary and thyme for an earthy, hearty take that pairs well with cozy, colder days.

For a vegan alternative, use nutritional yeast instead of Parmesan and flaxseed meal or aquafaba as a binder, ensuring the same crispy texture and robust flavor without dairy.

Add a pop of flavor without changing the core recipe by sprinkling lemon zest into the Parmesan mix, providing a fresh citrus note that enhances each bite beautifully.

Play with presentation by stacking artichoke hearts on skewers for a fun, party-friendly dish that offers visual appeal without compromising taste or texture.

Serving and Presentation Guide

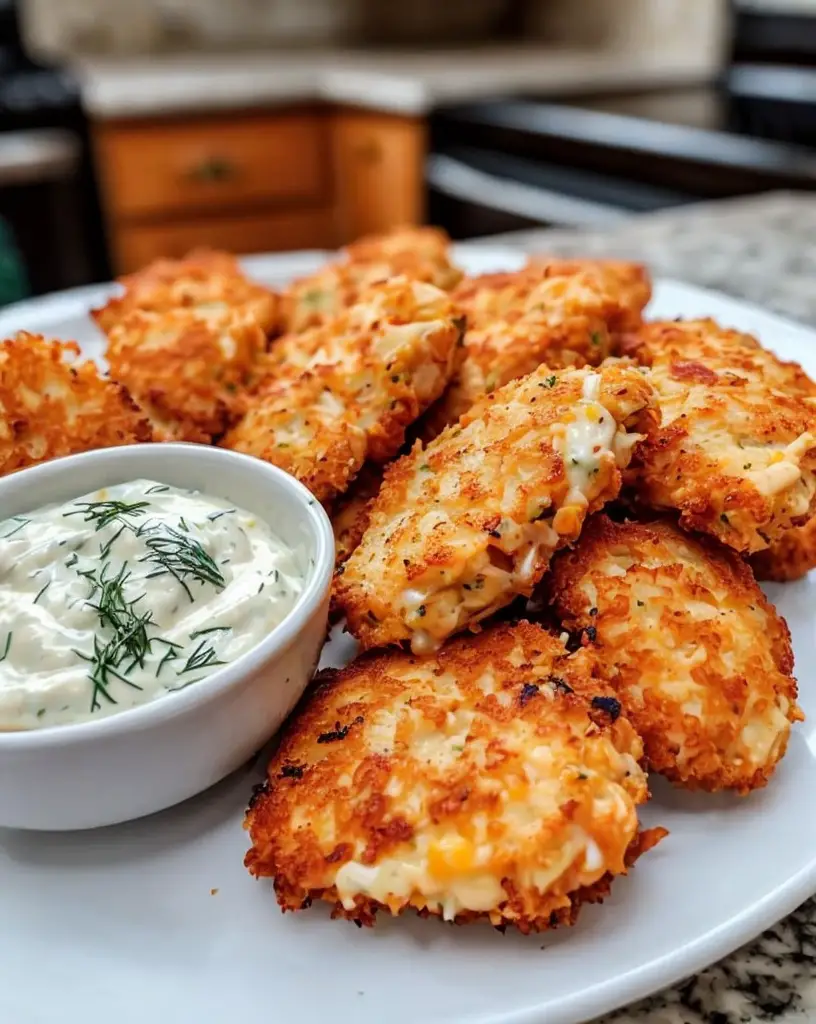
For an elegant serving presentation, arrange the crispy artichokes in a circular pattern on a white plate, garnished with fresh parsley for a pop of color against the golden brown crust.

Consider garnishing with lemon wedges or fresh basil leaves, adding an aromatic and visual flourish that invites diners to indulge.

Pair with a light salad using mixed greens, cherry tomatoes, and a simple vinaigrette to balance the richness of the artichokes with refreshing flavors.

Traditionally served hot to maintain crispness, they can also be enjoyed at room temperature, making them versatile for buffet-style or casual settings.

For portion control, consider serving in small ramekins or on individual appetizer plates, allowing each guest to savor their own share without overindulging.

Wine and Beverage Pairing

Pairing this dish with a crisp white wine such as Sauvignon Blanc or a light-bodied Chardonnay will highlight the nutty Parmesan and delicate artichoke flavor, enhancing the overall experience.

Non-alcoholic options like sparkling water with a slice of lemon or apple cider provide refreshing contrasts, maintaining the palate’s brightness with each bite.

For a comforting alternative, serve with a light green tea or herbal tea blend that complements the dish’s savory elements without overwhelming the taste profile.

Consider the temperature of beverages to ensure they refresh the palate; chilled wines or cool teas are ideal alongside warm, crispy artichokes.

Serve the beverages in appropriate glasses, enhancing the dining ambiance and allowing diners to experience the pairing fully.

Storage and Shelf Life

To store these crispy treats, place them in an airtight container lined with paper towels to absorb excess moisture, extending their shelf life in the refrigerator for up to three days.

Keep at a stable temperature to ensure they remain fresh and avoid placing near odorous foods that might impact flavor absorption.

For preservation, consider freezing the artichokes before baking. When you’re ready to serve, thaw them in the refrigerator and bake to enjoy the same crispness.

Watch for signs of spoilage, such as off-odors or growing mold, indicating they are no longer safe to eat.

When reheating, use an oven set to around 350°F for best results, restoring that delightful crispiness without making them chewy.

Make Ahead Strategies

Prepare the artichoke hearts up to a day in advance by cleaning and seasoning them, storing them in the refrigerator until you’re ready to coat and bake.

Prepare the Parmesan mixture ahead of time and store in an airtight container, allowing you to save time during meal prep and ensuring consistent flavors.

Consider baking a test batch a day before serving to perfect timing and flavor adjustments, improving confidence and satisfaction with the final dish.

Reheat in the oven briefly on serving day to melt the cheese and restore crispness, offering an easy make-ahead solution that doesn’t compromise quality.

Freshen up with a sprinkle of fresh herbs or a drizzle of olive oil before serving, ensuring vibrant flavors and textures for your guests.

Scaling Instructions

For a smaller yield, halve the recipe using precise measurements for seasoning and cheese, ensuring the flavors remain well-balanced and the coating is sufficiently crispy.

To cater to a larger group, double or triple the ingredient quantities while maintaining cooking techniques and adjusting oven time based on increased batches.

For larger batches, consider using multiple baking sheets and rotating them in the oven to ensure even baking and consistency across all artichoke pieces.

Store any unused ingredients appropriately to extend their usability for future recipes, ensuring nothing goes to waste and maximizing your budget.

With large batches, consider serving in stages to maintain optimal temperature and freshness, allowing each serving to be enjoyed piping hot.

Nutritional Deep Dive

Each serving of Crispy Parmesan Artichoke Hearts offers a balanced macro breakdown, with carbohydrates from breading, protein from cheese, and healthy fats, creating a nutrient-dense dish that satisfies hunger.

Artichokes provide an excellent source of fiber, aiding in digestion and promoting satiety, with low calorie content supporting weight-management goals.

Parmesan cheese offers high levels of calcium and protein, contributing to bone health and muscle maintenance, while its rich flavor adds significant taste without requiring large quantities.

The dish holds antioxidant properties, thanks to the artichokes, which are linked to a range of health benefits, from reducing inflammation to supporting liver function.

For conscious portion control, enjoy as part of a balanced meal rather than a standalone snack, ensuring nutritional needs are met without excess intake.

Dietary Adaptations

For a gluten-free version, replace breadcrumbs with gluten-free panko or almond flour, maintaining texture and flavor while accommodating dietary restrictions.

To create a dairy-free alternative, employ nutritional yeast in place of Parmesan and use dairy-free butter or olive oil to support the coating process.

Vegans can replace Parmesan with a mix of ground nuts and nutritional yeast for a similar nutty flavor, ensuring an inclusive approach without sacrificing taste.

For a low-carb/keto option, consider using crushed pork rinds or a nut-based crumb topping, maximizing the recipe’s appeal across various dietary landscapes.

Paleo followers can enjoy this dish with slight modifications, such as using arrowroot flour and coconut oil, ensuring adherence to dietary guidelines without losing flavor.

Troubleshooting Guide

  • If the coating isn’t sticking, ensure artichokes are thoroughly dried and you’ve firmly pressed the Parmesan mixture onto them before baking.
  • For flavor imbalances, adjust with additional seasonings like lemon zest or fresh herbs to enhance the taste without overpowering the artichoke’s natural flavor.
  • To address temperature issues, preheat your oven completely before introducing the artichokes to ensure they cook evenly to the desired crispness.
  • If you’re facing equipment challenges, remember, alternate methods like air frying can also yield crispy results, offering flexibility in cooking styles.
  • Ingredient substitutions such as alternative crumbs require adjustments in seasoning balance to maintain flavor intensity and crispiness.
  • Pay attention to timing concerns by using a timer and checking visual cues, like toastiness, to prevent under or overcooking the artichokes.

Recipe Success Stories

Our community of readers can’t get enough of these delectable, Crispy Parmesan Artichoke Hearts! Janet from Texas shared her variation of using gluten-free breadcrumbs, bringing a smile to her gluten-sensitive guests’ faces as they enjoyed each crispy bite.

Adapting for a keto diet, Mark from Ohio substituted almond flour for breadcrumbs, finding it added a delightful nuttiness that paired beautifully with the artichokes, providing a luxurious snack experience.

Frances in California recommended serving these artichoke hearts at her last holiday gathering, where they were a hit amongst both adults and kids, making for memorable culinary conversation starters.

Readers have experimented with various photography tips, capturing the artichokes’ beautiful golden crust and sharing their images across social media platforms, sparking inspiration for fellow home cooks.

Suggestions pour in for creative uses of leftover artichokes, from creating artichoke quiche to adding them to salads, showcasing the versatility and community enthusiasm for making the most of this recipe.

Frequently Asked Questions

How do I ensure the artichoke hearts remain crispy?
To maintain crispness, serve the artichokes immediately after baking. If reheating, use an oven or air fryer instead of a microwave to avoid sogginess.

Can I prepare these artichoke hearts in advance?
Yes, you can prepare them up to a day in advance by seasoning and storing them; coat and bake right before serving for best results.

Are there substitute options for Parmesan cheese?
Pecorino Romano offers a sharper, similar taste, while nutritional yeast is a great alternative for vegan diets.

How should I store leftovers?
Store in an airtight container lined with paper towels to absorb moisture, keeping them fresh in the refrigerator for 2-3 days.

Is there an alternative cooking method?
Yes, an air fryer can provide similar crispiness with less oil, cooking them at 375°F for about 15 minutes.

What wine pairs best with this dish?
A crisp Sauvignon Blanc or a light-bodied Chardonnay complements the nutty, savory flavors of the Parmesan.

Can I use canned artichokes?
While fresh artichokes offer the best texture, canned artichokes can be used if thoroughly dried to ensure the coating adheres properly.

How do I prevent the crumbs from falling off?
Ensure artichokes are properly dried and press the coating firmly onto them; refrigerating before baking helps adherence.

Are these artichokes freezer-friendly?
You’re better off freezing them before baking. Thaw in the fridge and bake when ready to enjoy optimum texture.

What can I serve with these artichokes?
A lemon aioli or a light yogurt-based dip complements their flavors, adding a refreshing contrast to this savory dish.

Additional Resources

Explore related recipes like our Roasted Garlic Aioli, perfect for dipping these artichokes as well as our other crisp vegetable sides that provide similar satisfaction and balance.

Utilize our technique guides to master crispy coatings and seamless baking methods, ensuring consistent results across various recipes.

Discover ingredient information that delves into the benefits and selection tips for artichokes, helping you make informed choices at the market.

Consider our equipment recommendations for baking essentials, enhancing efficiency and ease in the kitchen without unnecessary clutter.

Adapt recipes with seasonal variations for creativity and freshness whatever the time of year, ensuring robust flavors remain in focus.

Join the Conversation

Share your Crispy Parmesan Artichoke Hearts creations on social media, using our dedicated hashtag to join a community of enthusiastic cooks sharing their takes on this delightful dish.

Engage by reviewing the recipe and offering your unique insights, fostering a space where fellow readers can learn, adapt, and share experiences.

Participate by submitting your photography tips for capturing the dish’s golden crunchy allure, providing inspiration and encouragement for all food lovers.

Join in our community discussions around the myriad variations of this recipe and other artichoke-based dishes, contributing to a growing repository of culinary creativity.

Connect with other readers to share your adaptations and come up with new ideas to further enhance this timeless recipe, embracing the art of communal cooking and sharing.

The Recipe

Crispy Parmesan Artichoke Hearts

Serves: 4

Prep Time: 15 mins

Cook Time: 20 mins

Total Time: 35 mins

Kitchen Equipment Needed

  • Baking sheet
  • Parchment paper
  • Mixing bowls
  • Grater
  • Oven

Ingredients

  • 1 can (14 oz) artichoke hearts, drained and patted dry
  • 1 cup freshly grated Parmesan cheese
  • 1 cup panko breadcrumbs
  • 1 teaspoon garlic powder
  • Salt and pepper to taste
  • 2 tablespoons olive oil
  • 1 tablespoon chopped fresh parsley, for garnish

Directions

  1. Preheat your oven to 400°F (200°C) and line a baking sheet with parchment paper.
  2. In a bowl, combine the Parmesan, breadcrumbs, garlic powder, salt, and pepper.
  3. Dip each artichoke heart in olive oil, then roll in the Parmesan mixture until evenly coated.
  4. Place the coated artichokes on the prepared baking sheet, ensuring they are not touching.
  5. Bake for 20 minutes or until the coating is golden brown and crispy.
  6. Remove from the oven, transfer to a serving platter, and garnish with chopped parsley.

Recipe Notes

  • For extra flavor, add a pinch of red pepper flakes to the Parmesan mixture.
  • Store leftovers in an airtight container in the fridge for up to 3 days.
  • Reheat in the oven to restore crispiness; avoid microwaving as it may soften the coating.

Delicious Greek Chicken Meatballs with Refreshing Homemade Tzatziki Recipe

Greek Chicken Meatballs with Homemade Tzatziki: A Journey to the Mediterranean

⚖️
Difficulty
Moderate

⏲️
Prep Time
20 mins

🕒
Cook Time
30 mins

⏱️
Total Time
50 mins

🍽️
Servings
4

The lovely balance of tender Greek Chicken Meatballs with Homemade Tzatziki promises a delightful culinary experience. With a harmonious blend of fresh herbs, garlic, and zesty lemon, these meatballs encapsulate the vibrant tastes of the Mediterranean region. Paired with a creamy and refreshing homemade tzatziki, this dish is perfect for those seeking an authentic taste of Greece with flavors that excite your palate. Easy to prepare, these juicy meatballs not only pack a punch of flavor but are also visually appealing, making them an ideal choice for family dinners and get-togethers.

Experience the allure of Greek cuisine with these comforting chicken meatballs. The nutritious and filling quality of this meal caters to a variety of diets, ensuring everyone at the table leaves satisfied. Drawing from traditional Greek culinary methods, this recipe is packed with fresh ingredients that enhance each element’s natural taste. These meatballs are perfect served in a pita or alongside roasted vegetables, topped with a dollop of tzatziki sauce that adds a refreshing zing, ensuring a meal packed with textures and a stunning array of flavors.

Quick Recipe Highlights

  • Flavor Profile: A medley of lemon, garlic, and fresh herbs infuses these meatballs with bold and exciting flavors, complemented perfectly by the coolness of tzatziki.
  • Texture: These meatballs are wonderfully moist and tender, while the tzatziki adds a creamy touch with a subtle crunch from cucumbers.
  • Aroma: A delightful aroma of garlic mixed with fresh herbs wafts from the meatballs, creating a warm and inviting scent that draws you in.
  • Visual Appeal: The golden-brown meatballs contrast beautifully with the bright white tzatziki, enhanced by vibrant green herbs and flecks of cucumber.
  • Skill Level Needed: Fairly simple to execute, requiring basic cooking and knife skills with an eye for seasoning balance.
  • Special Equipment: A food processor and a skillet will be your best options to seamlessly mix and cook these delightful meatballs.

Recipe Overview

  • Difficulty Level: This recipe is moderate in difficulty, with straightforward techniques like mixing and sautéing requiring attentive seasoning and timing.
  • Category: Perfectly suits main meals, ideal for lunch or dinner; serves as a light but satisfying option for family or small gatherings.
  • Cuisine: Deeply rooted in Greek culinary traditions, the recipe incorporates Mediterranean influences known for their fresh, vibrant, and wholesome elements.
  • Cost: An affordable dish using budget-friendly ingredients such as ground chicken, garlic, yogurt, and cucumbers, making it accessible without compromising on quality.
  • Season: Best enjoyed during warm months when cucumbers and herbs are fresh and provide a summery taste, though suitable year-round.
  • Occasion: Whether for a casual weeknight meal or a special weekend cook-up, these meatballs cater to any dining demand with panache.

Why You’ll Love This Recipe


Delight in the seamless blend of taste and texture with Greek Chicken Meatballs, where each bite encases a mix of garlic flavor coupled with the tanginess of lemon and herbs. The addition of tzatziki brings a creamy texture, perfectly balancing the richness of the meatballs. As a healthy option, ground chicken provides a lean protein alternative, making it appealing for health-conscious eaters. The dish is well-rounded and nutrient-packed, offering a fulfilling meal that fits into a balanced diet effortlessly.

Convenience plays a large role in why these chicken meatballs remain a favorite. Simple preparation and minimal ingredients mean you can create a gourmet-style entrée in under an hour, with no need for advanced skills or fancy techniques. Packed with protein, these meatballs are not only delicious but also provide essential nutrients for energy and muscle maintenance. Adding tzatziki complements the meatballs with beneficial probiotics from yogurt, aiding in digestion and gut health, offering a nutritional boost.

Hosting a gathering? This recipe shines as a crowd-pleaser. The appeal of Greek flavors makes these meatballs an entertaining staple without the stress of elaborate cooking. Harmonic flavors, vibrant colors, and fresh ingredients speak to the tastes of many, ensuring guests are impressed. Economically, Greek Chicken Meatballs with Homemade Tzatziki are budget-friendly, utilizing items easily sourced from local markets. This allows foodies to enjoy authentic Mediterranean flavors at home without a hefty price tag, adding value to everyday meals.

Historical Background and Cultural Significance


Tracing back centuries, Greek cuisine has always celebrated its natural resources, with recipes evolving while cherishing staple ingredients like meats, herbs, and yogurt. Chicken, often seen as a healthier meat option, grew in popularity for its versatility and ease of cooking. Throughout Greek history, tzatziki has remained a staple, cherished for its cooling properties, especially essential in the Mediterranean climate where refreshment from heat is vital. The evolution of this dish represents a harmony between tradition and modern taste preferences.

In Greek culture, food is synonymous with connection, community, and celebration, making meals central to cultural identity. This recipe embodies the essence of Greek hospitality, ingrained in practices of sharing and enjoyment. Over time, regional variations emerged, each adding its spin based on local produce, altering the spices, or changing the zing of tzatziki to fit evolving palates. Whether visiting the streets of Athens or a quaint village, the flavors of these meatballs call familiar memories of Greece’s coastlines and bustling markets.

Ingredient Deep Dive


Ground chicken is the heart of these meatballs, offering a lean source of protein that is tender and readily absorbs flavors. Historically, chicken became widely used in Greek cooking due to its versatile nature and was often used in leaner versions of traditional recipes. Nutritionally, it provides essential amino acids and vital nutrients for muscle repair and energy. Selection tips suggest choosing freshly ground, light-colored meat with minimal liquid. Store ground chicken in the coldest part of the fridge for up to two days or freeze for longer shelf life. If unavailable, turkey can serve as a suitable substitute.

Fresh herbs like parsley, dill, and mint are crucial in achieving authentic Greek taste in these meatballs. Historically, herbs were prized for both their culinary and medicinal properties, with Greeks using them abundantly. They offer an array of health benefits, including promoting digestion and providing antioxidants. When selecting, look for vibrant, aromatic leaves free from wilting. To extend shelf life, store them wrapped in a damp paper towel inside a plastic bag. Although fresh herbs are preferred, dried herbs can be substituted in smaller quantities.

Common Mistakes to Avoid

  • Avoid over-mixing the meatball mixture, as it can lead to dense, dry meatballs.
  • Not seasoning enough: Ensure you taste-test and balance flavors with salt and lemon juice.
  • Skipping resting time: Allow the mixture to sit to absorb flavors and bind properly before cooking.
  • Incorrect cooking temperature: Use medium heat to avoid burning while ensuring even cooking.
  • Ignoring ratios: Stick to the ingredient measurements to maintain texture and flavor.
  • Improper meat selection: Opt for leaner cuts of ground chicken to maintain the intended taste and health benefits.
  • Cooking overcrowding: Do not pack the pan, as it can extend cooking time and result in uneven browning.
  • Over-chilled tzatziki: Serve tzatziki at room temperature for optimal consistency and flavor release.

Essential Techniques


Mixing ingredients is fundamental to this recipe, ensuring flavors harmonize without overworking the meat. Achieving evenly combined ingredients will guarantee that each meatball tastes balanced. To avoid overmixing, gently incorporate the herbs, spices, and meat until just combined. Proper mixing relies on recognizing visual cues, such as when the mixture becomes cohesive without visible clumping of separate ingredients.

Sautéing the meatballs is crucial to lock in juices and achieve a flavorful outer crust. Heat control is important here, using medium heat to balance cooking without burning. Watching for golden-brown exteriors while checking for internal doneness (no pink center) ensures success. Pitfalls include overheating causing burning, which can be visualized by the presence of excessive smoke or a deep-brown, instead of golden, appearance.

Pro Tips for Perfect Greek Chicken Meatballs


Use fresh, high-quality herbs for the best flavor; dried can work but lack freshness. If substituting, use a third of the quantity.

Rest the meatball mixture before rolling and cooking, allowing flavors to meld and enhancing overall texture.

Incorporate a breadcrumb and milk mixture, acting as a binder, ensuring moist meatballs without dense results.

For tzatziki, use Greek yogurt for its creamy, thick consistency; straining cucumber prevents a watery sauce.

Cook meatballs in batches to ensure even cooking, not overcrowding the pan.

Store leftovers properly to maintain flavor and freshness; cool completely before placing in airtight containers.

To jazz up presentation, garnish with a sprinkle of chopped mint or a dash of paprika, adding vibrant colors.

Variations and Adaptations


For a regional variation, consider the use of spices like cumin for a Middle Eastern twist, adding depth and warmth to the meatballs.

Embrace seasonal adaptations by substituting or enhancing herbs with what’s fresh at that time, such as adding a touch of rosemary in autumn.

For dietary modifications, use quinoa flakes instead of bread crumbs for a gluten-free alternative, ensuring the dish remains cohesive and flavorsome.

Customize flavors by introducing fillings like feta cheese for added richness or sun-dried tomatoes for a burst of umami.

Achieve a comforting, smoother texture by cooking slowly in a tomato-based sauce,giving an Italian-inspired aroma and plush mouthfeel.

Change up presentation by assembling open sandwiches with pita bread, along with lettuce and vibrant cherry tomatoes for a rustic, wholesome approach.

Serving and Presentation Guide


Kick up presentation with intentional plating techniques; stack meatballs on a bed of tzatziki to highlight contrasting colors.

Consider garnishing with fresh dill, lemon wedges, or split tomato pieces, each adding an aesthetic touch and visual interest to the plate.

Traditionally served with pita or flatbread, you can also opt for roasted vegetables or couscous to accompany your meal.

Modernize by incorporating microgreens or edible flowers – this could elevate the dish to a gourmet status while keeping it simple.

Overall temperature consideration requires serving meatballs hot but tzatziki slightly chilled for an optimal, experiential contrast.

For portion control, aim for equal-sized meatballs, ensuring even cooking and balanced servings, with recommended servings evenly distributed for guests.

Wine and Beverage Pairing


Pair Greek Chicken Meatballs with a crisp white wine such as Sauvignon Blanc; its acidity mingles well with the zest of lemon and counterbalances the creaminess of tzatziki.

Non-alcoholic alternatives could include a lightly sweetened iced herbal tea or citrus-infused water, providing a refreshing bite.

Serve hot beverages like a chamomile tea which mirrors the herbaceous ness of the dish, promoting warmth without overpowering subtler flavors.

Temperature suggestions advise around room temperature for wine pairings to fully appreciate the texture and aroma of both the wine and dish.

Suggest progressing from beverage to meal in a relaxed manner; eat a few bites before sipping to enhance flavor release.

Storage and Shelf Life


Store leftover meatballs in airtight containers to prevent drying out and maintain freshness over time.

Refrigerate at appropriate temperatures, ideally just above freezing, to prolong shelf life without altering taste integrity.

When reheating, opt for indirect heat such as an oven to avoid losing moisture content, maintaining their juicy quality.

Containers are best sealed plastic or glass, offering protection against air exposure that potentially accelerates spoilage.

Recognizing spoilage signs includes any off smells or discoloration away from normal degrees; discard if suspicious.

Freezing guidelines stress cooling meatballs first before individually wrapping for easy thawing, then reheating gently in oven or stovetop to avoid toughness.

Make Ahead Strategies


Embrace flexibility with Greek Chicken Meatballs by preparing components ahead, such as shaping meatballs for freezing.

An ideal prep timeline spaces initial mixing and cooking across several days for leisurely weeklong preparation.

Store in layers, separated by parchment in airtight containers, to ensure uniform preservation without clustering.

Consider reheating considerations for both flavor and texture, selecting appropriate warming techniques to avoid drying out meatballs.

Consider fresh element additions at serving time, like herbs, to provide a vibrant experience even after pre-preparation storage.

Quality impact assessment shows minimal flavor loss if adequately stored and reheated, demonstrating their dependability as a make-ahead meal option.

Scaling Instructions


For halving this recipe, maintain ratios closely while reducing quantities, ensuring maintained flavor integrity and proper ingredient proportion.

Doubling or tripling demands larger batch management, attentive blending to ensure even distribution without excessive handling.

Adjust equipment, using wider or deeper pans for cooking increased quantities in alignment with adjusted ratios for uniform results.

Modify timings minimally for larger batches, maintaining essential cooking durations to secure consistent results without altering flavor profiles.

Effective storage considerations include labeling adjusted portions for example measuring and distribution, to maintain quality over time and use.

Nutritional Deep Dive


Macro breakdown highlights proteins from chicken plus beneficial fats from yogurt, harmonizing nutritional needs with culinarian satisfaction.

Micronutrient analysis appreciates parsley and dill’s vitamin content, providing antioxidants and digestive aid without overshadowing core flavors.

Health benefits draw from balanced ingredients rooted in Mediterranean diets, promoting cardiovascular health while remaining flavorful.

Considerations for dietary concerns emphasize natural, lesser-processed elements, avoiding artificial additives for an honest meal preparation approach.

Delve into portion analysis offers guidance to maintain caloric boundaries without sacrifice to food quality or personal satisfaction during mealtimes.

Weight management tips suggest pairing with controlled side dishes like leafy salad for a balanced, fulfilling meal aligning with wellness goals.

Dietary Adaptations


Choose gluten-free options, sensorily indistinguishable from traditional ones, to fulfill needs of gluten-sensitive individuals or dietary preferences.

Adapting to dairy allergy use alternatives like lactose-free yogurt for tzatziki, retaining creamy textures without triggering sensitivities.

Propose vegan alternatives with plant-based protein sources and coconut yogurt, preserving core flavors without animal-based counterparts.

Low-carb and keto enthusiasts can substitute breadcrumb for almond meal, ensuring adherence to specific dietary protocols without loss of coherence.

Paleo-approved versions include replacing some herbs or incorporating additional vegetables for nutritionally dense meals appearing unchanged.

Low-FODMAP adjustments make discordant ingredients minor alterations, respecting individual digestion requirements peacefully alongside traditional dining.

Troubleshooting Guide


Combat issues like too-dry meatball texture by ensuring adequate measurements of binding agents keeping everything cohesive.

Maintain flavor balance: under-adjusted herbs or spices sacrifice authenticity; reflect before finalizing to refine taste identity accurately.

Temperature problems in cooking arise from either under- or overcooking; timing and technique correction along with meat thermometer use mitigates errors.

Inconvenience from equipment challenges inspires creativity adapt standard methods without compromising authenticity to keep effort rewarding.

Substitute wisely by observing appropriate alterations that suit overall theme while achieving necessary variation without deviating drastically from core intention.

Beware of timing concerns – give yourself ample preparation time, gauged success reflects foresight appreciation realistically ensuring stress-free cooking.

Recipe Success Stories


Find community feedback brimming with stories recounting personal touches adding uniqueness to classic crafting through adaptable recipes.

Reader variations uncover enticing surprises in each re-imagined experience, from carrying forward new eateries across global locations investing cultural developments.

Adaptation success chronicles encourage constant engagement among audience, fostering enthusiasm alongside culinary curiosity inspiring broader scope approaches.

Photography tips serve to embolden storytelling by artwork beyond written word, capturing essence through careful visual narrative complementing original charm.

Recount harmony of reader suggestions resonates throughout virtual kitchen forums, joining endless resourcefulness built upon shared passion flavors spaces.

Frequently Asked Questions

Can I make these meatballs gluten-free?
Absolutely! Use gluten-free breadcrumbs or almond meal as a substitute, maintaining consistency without gluten inclusion.

How do I achieve the best texture in meatballs?
Key lies in gentle mixing and proper ingredient balance, ensuring cohesion while avoiding overworking to preserve juiciness.

What can I use instead of cucumber in tzatziki?
Try grated zucchini or peeled, seeded tomatoes for an alternative texture while keeping the refreshing bite tzatziki is known for.

Is this recipe keto-friendly?
Modify the recipe by substituting almond meal for breadcrumbs and using full-fat yogurt, aligning with keto diet principles.

How do I store leftovers?
Place in airtight containers in the refrigerator for up to three days or freeze for extended storage, reheating gently to regain flavor and texture.

Can I substitute yogurt in tzatziki for a vegan option?
Coconut or almond-based yogurts are great vegan alternatives, retaining the crucial creamy texture without dairy inclusion.

How many meatballs should I serve per person?
Typically, four to five meatballs per person ensures balanced servings aligning portion control and satisfaction for guests.

What can replace lemon zest?
Lime zest offers an alternative zesting choice, imbuing different citrus notes compatible across various Mediterranean flavors.

Can I add cheese to these meatballs?
Feta cheese works harmoniously, adding a creamy-tangy depth producing an enticing soft center encased in golden exterior.

How does the cooking time vary with different meat types?
Different meats vary in cooking time; monitor internal temperature, wary of proteins requiring diverse preparation timelines for best outcomes.

Are these meatballs spicy?
While not inherently spicy, optional chili flake introduction can adjust depending on personal taste preference, enriching multiplicitous flavor layers.

Can I use a different type of oil for cooking?
Explore varieties like avocado or coconut oil, both promising healthy alternatives capturing nuances expected from traditional Mediterranean dishes.

Additional Resources


Discover related recipes boasting Mediterranean delights, spanning salads to desserts each honoring heritage flavor tenets.

Technique guides accommodate burgeoning chefs exploring advanced methodologies, sparking curiosity while honing contemporary kitchen practices incrementally.

Gain thorough ingredient insight to compel invention through adaptive experimentation, reviving authentic inspirations into novel culinary expressions.

Equipment recommendations ease initial reluctance among novices, enhancing tool accessibility contemporaneously raising aspiration within professionally cultivated spheres.

Seasonal variations focus attention forward natural cycles maximizing freshness existence through traditional balance and modern adaptation.

Join the Conversation


Engage with others passionate about Greek cuisine on social media platforms, sharing your own rendition and inspiration from this recipe.

Encourage community involvement through feedback collection, driving growth alongside knowledge exchange and sustained connections.

Embark on photographic exploration by capturing essence within frames, archiving memories alongside creativity through imaginative stylization.

Submit recipe reviews or variations, uplifting collective wisdom through collaborative commentary benefiting culinary union globally.

Embrace networking wonder where diverse experiences intermittently collide, fostering open discourse broadening horizons through cuisine appreciation universally.

The Recipe

Greek Chicken Meatballs with Homemade Tzatziki

Serves: 4

Prep Time: 20 mins

Cook Time: 30 mins

Total Time: 50 mins

Kitchen Equipment Needed

  • Food processor
  • Skillet
  • Baking tray
  • Mixing bowls
  • Grater

Ingredients

  • 500g ground chicken
  • 1/2 cup breadcrumbs
  • 1 egg, beaten
  • 2 tbsp fresh parsley, chopped
  • 2 tbsp fresh dill, chopped
  • 2 cloves garlic, minced
  • Zest of 1 lemon
  • Salt and pepper to taste
  • 2 tbsp olive oil
  • 1 cup Greek yogurt
  • 1 cucumber, grated
  • 1 tbsp lemon juice
  • 1 tbsp olive oil for tzatziki

Directions

  1. Combine ground chicken, breadcrumbs, egg, parsley, dill, garlic, lemon zest, salt, and pepper in a bowl. Mix gently.
  2. Shape into 16 meatballs and rest for 10 minutes.
  3. Heat olive oil in skillet over medium heat. Sauté meatballs in batches until golden brown and cooked through, about 10 minutes.
  4. For tzatziki, mix Greek yogurt, grated cucumber, lemon juice, olive oil, salt, and pepper.
  5. Serve meatballs warm with tzatziki as a dip or dressing.

Recipe Notes

  • If meatballs are too wet, add extra breadcrumbs until desired consistency is reached.
  • For added flavor, incorporate a pinch of chili flakes into meatball mix.

Elevate Your Dishes with Homemade Italian Compound Butter Recipe

Italian Compound Butter Recipe: Elevate Your Culinary Creations with Flavor

⚖️
Difficulty
Easy

⏲️
Prep Time
10 mins

🕒
Cook Time
5 mins

⏱️
Total Time
15 mins

🍽️
Servings
8

Transform your dishes with the flavor-packed Italian Compound Butter. This delightful creation combines the rich creaminess of butter with aromatic herbs and tomatoes, elevating any meal effortlessly. Whether you’re a seasoned chef or a kitchen novice, this compound butter recipe adds gourmet flair to your culinary repertoire. Infused with the essence of Italy, it pairs perfectly with bread, pasta, or grilled meats, bringing authentic Italian indulgence to every bite.

With its vivid colors and robust flavors, Italian Compound Butter is as versatile as it is delicious. Imagine a smooth blend of creamy butter enriched with sun-dried tomatoes, fresh basil, and a hint of garlic, creating a sensory experience that sings with the taste of Italy. The result is not only visually appealing but also a feast for the palate, where each bite bursts with vibrant flavors and a luscious mouthfeel.

Quick Recipe Highlights

  • Flavor Profile: Indulgent and herby with the zesty brightness of sun-dried tomatoes, balanced by the creamy richness of butter and aromatic herbs.
  • Texture: Smooth and luscious, with small bites of tomatoes providing a delightful contrast within the creamy base.
  • Aroma: A fragrant blend of garlic and herbs, reminiscent of a rustic Italian kitchen, enhancing the senses.
  • Visual Appeal: The vibrant reds and greens against the buttery base make it as appetizing to the eyes as to the taste buds.
  • Skill Level Needed: Beginners can easily master this recipe with minimal preparation and cooking steps.
  • Special Equipment: A food processor or blender is recommended for combining ingredients smoothly, ensuring a perfect blend.

Recipe Overview

  • Difficulty Level: Easy enough for novice cooks, yet provides results that impress with its gourmet appearance and complex flavors.
  • Category: This versatile butter fits into several categories, including appetizers, sides, and toppings, enhancing various dishes from breakfast to dinner.
  • Cuisine: Inspired by Italian culinary traditions, it harnesses classical Mediterranean flavors, bringing authentic tastes from Italy’s rich gastronomy.
  • Cost: Economical and accessible, using readily available herbs and pantry staples, making it a budget-friendly flavor enhancer.
  • Season: Best in the summer and spring when fresh basil and herbs are abundant, but enjoyable any time of year with store-bought ingredients.
  • Occasion: Perfect for entertaining, from casual get-togethers to elegant dinners, enhancing any meal effortlessly with its sophisticated flavor.

Why You’ll Love This Recipe


The taste and texture appeal of Italian Compound Butter are simply irresistible. The rich and creamy base of butter combined with fresh, vibrant herbs creates a symphony of flavors that dance on your palate. Every slice of bread, dollop on pasta, or melt over grilled vegetables transforms into a gastronomic delight, offering a taste of Italy in every bite.

Convenience is another reason this recipe will win you over. With minimal prep and cook time, it seamlessly fits into busy schedules while lending a gourmet accent to any meal. Once prepared, you can store it for days and use it to bring a new dimension to your favorite dishes, making meal preparation a breeze.

Nutritionally, the fresh herbs and tomatoes offer a burst of antioxidants and vitamins, making this butter not only a flavor staple but also a beneficial addition to your diet. The addition of high-quality butter provides beneficial fats when enjoyed in moderation, complementing a balanced diet.

Socially, this Italian Compound Butter can enhance your recipe collection, making you the star of any gathering. Spread it over a fresh baguette, accompany a cheese platter, or elevate a cooked steak—your guests will savor every mouthful and undoubtedly ask for the recipe, making you the culinary hero of the day.

Cost-effectiveness goes hand in hand with its accessibility. You can prepare a generous amount without breaking the bank, as most ingredients are affordable and found in regular supermarkets. This butter allows you to enhance everyday meals without stretching your budget, making gourmet accessible to all.

Historical Background and Cultural Significance


The origin of compound butter dates back centuries, where it was created as a way to infuse plain butter with flavors ranging from sweet to savory, enhancing its versatility. In Italy, the use of herbs and sun-dried tomatoes combines old-world preservatives with fresh ingredients, resulting in a taste that mirrors the country’s love for bold yet balanced dishes.

Cultural importance is ingrained in the Italian culinary heritage, where compound butter is used to add depth and interest to simple dishes. Its ability to transform a meal with minimal effort speaks to the Italian philosophy of quality over quantity, emphasizing flavor and authenticity.

Over the years, the evolution of the recipe has seen variations, with chefs and home cooks alike experimenting with different herbs and spices to suit local palates. Yet, the essence remains the same, a tribute to the harmonious blend of Italy’s rich ingredient legacy.

Regional variations within Italy might lean toward different herb combinations, such as incorporating rosemary in the north or oregano in the south, reflecting the diverse landscapes and cultures of the country. Each variation brings its unique twist while retaining the core elements that define this beloved culinary treasure.

Ingredient Deep Dive

For each main ingredient like sun-dried tomatoes and fresh basil, we delve into its cultural significance and history. Sun-dried tomatoes have roots in Southern Italy, where their intense flavor and long shelf life were highly valued. Nutritionally, they are packed with antioxidants like lycopene, offering health benefits alongside their robust taste.

Selecting sun-dried tomatoes involves choosing bright, pliable ones with a rich scent. They can be stored in airtight containers to maintain their freshness. If unavailable, you can substitute with tomato paste for a different consistency or roasted red peppers as an alternative for added flavor depth.

Fresh basil, the iconic herb of Italian cuisine, is revered for its sweet and peppery taste. Rich in vitamins A and K, it contributes to the nutritional value of this compound butter. When selecting basil, choose vibrant green leaves free from wilting. To store, wrap in damp paper towels inside a plastic bag in the refrigerator or freeze for long-term preservation. If you run out, fresh spinach leaves can serve as a mild substitute, though they lack basil’s distinct aroma.

Common Mistakes to Avoid

  • Overmixing the butter can lead to a greasy texture. Ensure ingredients are mixed until just combined to preserve creaminess.
  • Using cold butter can make incorporation challenging. Allow it to sit at room temperature to soften for easier blending.
  • Neglecting to season the butter can lead to a bland end result. A pinch of salt enhances the overall flavors significantly.
  • Failing to dry sun-dried tomatoes properly can introduce unwanted moisture, affecting the consistency.
  • Not using fresh basil may reduce the aroma and flavor profile. Opt for fresh herbs whenever possible.
  • Storing the butter uncovered will lead to flavor absorption from the fridge. Always wrap it or use airtight containers.
  • Skipping spreading tests on bread or toast means missing out on texture adjustments. Test and tweak as necessary.
  • Adding too much garlic can overpower subtle flavors. Use it sparingly to keep balance.
  • Not labeling the storage date can lead to unknowingly using butter past its prime when stored long-term.
  • Using unsalted butter without adjusting for salt can result in an underseasoned end product. Adjust seasoning accordingly.

Essential Techniques


Mastering the art of Italian Compound Butter involves understanding key techniques like perfecting the blend of ingredients. Importance lies in achieving a smooth and uniform mixture that ensures each herb, tomato, and butter adequately infuses its essence.

To master this, use a high-quality food processor or blender, carefully pulsing to prevent overmixing. Common pitfalls include over-processing, which leads to a loss of desired texture. Mixing should showcase a balance between creamy butter and discernible pieces of herbs and tomatoes.

Visual cues for success include a uniform coloration throughout the butter and visible yet small pieces of herbs and tomatoes, ensuring each bite has a perfect balance of flavor and texture.

Pro Tips for Perfect Italian Compound Butter


1. Experiment with your herb mix. Parsley or chives add a fresh twist while maintaining the Italian essence.
2. Always use room temperature butter for a smoother blending experience, preventing clumps.
3. Incorporate lemon zest for an added pop of freshness that complements the herb profile.
4. For a touch of heat, add a pinch of red pepper flakes to spice up your compound butter.
5. Test spreading on bread before storing, allowing for last-minute seasoning adjustments.
6. Seal thoroughly in plastic wrap before refrigerating to maintain peak flavor and texture.
7. When serving, allow butter to reach room temperature for optimal spreadability and taste.
8. Pair with crusty bread as an appetizer or melt atop steamed vegetables for sophisticated dining.

Variations and Adaptations


Regional variations offer delightful twists. Northern Italian versions might include cheese like Parmigiano-Reggiano for added richness. Meanwhile, in southern Italy, you might find versions incorporating olives, reflecting local ingredients that add unique flair.

For seasonal adaptations, consider incorporating winter herbs like sage or thyme during cooler months, keeping it fresh and relevant year-round. For summer, focus on vibrant herbs like cilantro for a brighter taste.

Dietary modifications can cater to diverse needs. To make it dairy-free, use a plant-based butter substitute without losing the luxurious texture. Vegan versions might incorporate nutritional yeast for a cheesy flavor without animal products.

Explore flavor variations by introducing spices such as paprika for smokiness or cumin for an earthy depth. Each spice infusion offers a new perspective on this classic recipe.

Texture modifications can be achieved by folding in nuts like toasted pine nuts for crunch or using whipped butter for a lighter consistency.

Presentation alternatives include rolling the butter into logs for slicing, creating elegant disks perfect for upscale dinner parties or casual brunches, impressing visually and gastronomically.

Serving and Presentation Guide


Plating techniques for Italian Compound Butter can visually enhance its appeal. Consider shaping the butter with molds or using a piping bag for decorative designs, adding an elegant touch to your table setting.

Garnishing ideas like sprinkling fresh herbs atop or incorporating edible flowers add color and sophistication, complementing its rustic yet polished charm.

Traditional accompaniments include crusty Italian bread or fresh pasta, providing familiar and comforting pairings. For a modern twist, serve as a topping for grilled steak or roasted vegetables, elevating everyday dishes to extraordinary.

Temperature considerations suggest serving at room temperature to ensure optimal spreadability and enjoyment, allowing the flavors to unfurl fully.

Portion control tips advocate small servings, letting it enhance rather than overwhelm dishes, ensuring a balanced and flavorful experience every time.

Wine and Beverage Pairing


Wine pairings elevate the Italian Compound Butter experience. Pair with a crisp Pinot Grigio or a rich Chianti to complement and enrich its flavors, highlighting the herbal and tomato notes.

For non-alcoholic alternatives, a sparkling water with a hint of lemon or lime offers a refreshing counterbalance to the butter’s richness, cleansing the palate between bites.

Consider coffee or tea pairings for breakfast indulgence; a bold espresso or herbal tea enhances its flavor profile, offering a comforting start or end to your meal.

Temperature considerations remain important here; room temperature butter melds beautifully with your choice of beverage, allowing a harmonious taste experience.

Serving suggestions include offering butter alongside an array of beverages, allowing guests to explore and discover their preferred pairing, adding another layer to the dining adventure.

Storage and Shelf Life


Proper storage of Italian Compound Butter prolongs its freshness and flavor. Store in the refrigerator wrapped in plastic wrap or parchment paper, ensuring no air contact, which could lead to spoilage.

Temperature requirements suggest keeping it below 40°F (4°C), maintaining its creaminess and flavor intensity. For short-term storage, airtight containers are recommended.

Container recommendations include glass jars or porcelain butter dishes, providing protection from odors and temperature fluctuations in the fridge.

Recognize signs of spoilage such as discoloration or off-putting odors, indicating it has surpassed its shelf life. Always err on the side of caution to maintain safety.

For reheating, allow to reach room temperature naturally. Avoid microwaving to preserve texture and flavor integrity. Freezing guidelines involve wrapping tightly in plastic wrap before placing in an airtight bag, extending its life up to six months.

Make Ahead Strategies


Making Italian Compound Butter ahead of time ensures you’re always prepared for any occasion. A prep timeline involves gathering and preparing ingredients, softening butter, and blending shortly before intended use.

Storage between steps is key. Keep chopped herbs and diced tomatoes refrigerated until blending to maintain freshness.

An assessment of quality impact shows that as flavors meld, nuances deepen, offering a more robust taste over time.

Assembly tips include using a silicone spatula for precise blending; keep in mind its delicate ingredients require gentle handling.

Reheating guidelines prioritize natural thawing, preserving the texture and flavor layers achieved during blending.

Fresh element additions just before serving, like a sprinkle of fresh herbs, highlight its freshness, ensuring it remains visually and gustatorily appealing.

Scaling Instructions


Scaling the recipe to suit your needs is straightforward. For halving, simply divide ingredient quantities by two while maintaining flavor ratios, ensuring balance across all elements.

Doubling or tripling necessitates similar adjustments: multiplying ingredient amounts proportionally and perhaps using larger mixing equipment to accommodate volume increases.

Timing modifications may include additional blending time, contingent upon volume.

Storage considerations scale similarly; ensure enough space in refrigeration or freezing areas, and use appropriately sized containers to prevent crushing or compression during storage.

Nutritional Deep Dive


Italian Compound Butter’s nutritional profile offers balance within its indulgence. Macro breakdown reveals fats as the primary component, complemented by carbs and proteins from its ingredients.

Micronutrient analysis highlights vitamins E and K from the butter, while sun-dried tomatoes contribute vitamins C and A, enhancing the health value.

Health benefits include antioxidants from tomatoes and heart-healthy fats from butter, which can be part of a balanced diet when enjoyed with moderation.

Dietary considerations provide for dairy adjustments or reduced-calorie versions by using substitutes without compromising experience.

Portion analysis underscores the need for moderation, transforming even small servings into large flavor rewards.

Weight management tips involve balanced servings; use sparingly to enhance, not overpower.

Dietary Adaptations

Gluten-free adaptation is naturally achieved since no gluten ingredients are used, allowing safe enjoyment for those with sensitivities.

Dairy-free adaptation employs plant-based butter alternatives, available in most grocers, ensuring creamy textures without dairy.

Vegan versions also leverage these alternatives, achieving rich flavors without animal products; add nutritional yeast for additional umami notes.

Low-carb and keto modifications naturally occur given its naturally low carbohydrate content, suiting those dietary approaches seamlessly.

Paleo followers enjoy it with grass-fed butter options, aligning it neatly with nutritional philosophies.

Low-FODMAP adjustments require careful consideration of tomato and garlic quantities to suit dietary guidelines, allowing enjoyment within restriction limits.

Troubleshooting Guide


Texture issues can arise from overmixing, leading to separation. Pulse blending and room temperature butter remedy these, preserving desired consistency.

Flavor balance concerns stem from overuse of garlic or under-seasoning. Adjust herbs and salt gently to realign taste profiles.

Temperature problems can occur if butter isn’t stored properly. Ensure correct refrigeration to maintain freshness and spreadability.

Equipment challenges often arise from inadequate blending tools. Invest in a high-quality processor or blender for optimal results.

Ingredient substitutions sometimes fail to offer parity. Consider flavor pairing and substitution guides when replacing ingredients like herbs or tomatoes.

Timing concerns revolve around pre-presentation thawing; proper planning mitigates these, ensuring smooth implementation.

Recipe Success Stories


Our community members have embraced Italian Compound Butter, sharing glowing feedback and celebratory successes. From spreading on freshly baked baguettes to topping sizzling steaks, readers report transformative culinary experiences that elevate everyday meals into gourmet dining.

Variation successes include incorporating roasted peppers for smokiness or adding truffle oil for luxury indulgence. Adaptation stories showcase creativity, with readers swapping herbs or intensifying flavor profiles according to mood and occasion.

Reader suggestions enhance the recipe with practical tips, such as using mold shapes for butter presentation or adding hints of lemon zest for added brightness.

Photography tips emphasize visual allure, encouraging shared experiences through wonderfully captured meals. The butter’s vibrant hues and textures make it a striking visual addition to any serving.

Frequently Asked Questions

Q: Can I use salted butter instead?
A: While unsalted butter is preferred to control flavor, salted can be used with seasoning adjustments to avoid overpowering the end taste.

Q: What’s the best way to soften butter?
A: Allow butter to sit at room temperature for an hour or use a low microwave setting briefly, taking care not to melt it.

Q: Is it freezer-friendly?
A: Absolutely. Wrap tightly before freezing, and enjoy defrosted butter within six months for optimal flavor and texture.

Q: How long does it remain fresh?
A: In the refrigerator, it lasts up to two weeks when stored properly, keeping flavors vibrant and delicious.

Q: Can I use dried herbs instead?
A: Dried herbs lack the same fresh vibrancy but can substitute in smaller quantities. Adjust seasonally as needed to compensate for potency differences.

Q: What other dishes can it enhance?
A: Beyond bread, this butter enriches pasta, vegetables, grilled meats, eggs, and as a sandwich spread, offering versatile applications.

Q: How do I prevent it from absorbing fridge odors?
A: Seal tightly in plastic wrap or use airtight containers, ensuring protection and maintaining singular, intended flavors.

Q: Could I use a hand mixer instead?
A: A hand mixer is less effective for achieving the desired smooth texture. A food processor is recommended for best results.

Q: Can children help make this recipe?
A: Absolutely! With supervision, kids can contribute by measuring and mixing ingredients, making it a fun and educational kitchen activity.

Q: Are there any allergens I should be aware of?
A: Be cautious of potential dairy allergies; substitute accordingly and check ingredient labels if customizing with nuts or alternative ingredients.

Additional Resources


For those passionate about exploring beyond Italian Compound Butter, related recipes and culinary guides offer inspiration. Discover variations on classical compound butters, like those infused with garlic chives and lemon dill, broadening your flavor horizons.

Technique guides empower you to make the most of Italian ingredients, understanding application and balance within various culinary contexts for optimal results.

Ingredient information spans origins and uses, from aromatic herbs to juicy tomatoes, offering a comprehensive understanding of flavors that define these masterpieces.

Equipment recommendations ensure you’re equipped for success, from processors to knives, providing efficiency and precision in preparation.

Seasonal variations bring extra dimensions to your cooking, exploring how diverse climates can influence ingredient availability and flavor profile adaptations, encouraging creativity year-round.

Join the Conversation


We invite you to share your Italian Compound Butter experiences across social media, tantalizing taste buds and inspiring others through stunning imagery and delightful culinary stories.

Photography tips help capture the vibrant, rich colors of your creations, showcasing them at their best and inspiring potential future culinary artists.

Recipe reviews reveal accolades and constructive thoughts, continually evolving the recipe’s journey as it passes from kitchen to kitchen, inspiring new innovation with each iteration.

Community engagement builds bridges, fostering a shared love of cooking and culinary discovery as readers share personal variations, successes, and real-world adaptations that can then inspire others.

Finally, explore and experiment with recipe variations, pushing boundaries and creating new sensations, grounding yourself in the teachings of an Italian culinary cornerstone, the humble yet wondrous compound butter.

The Recipe

Italian Compound Butter

Serves: 8

Prep Time: 10 mins

Cook Time: 5 mins

Total Time: 15 mins

Kitchen Equipment Needed

  • Food processor or blender
  • Spoon or spatula for mixing
  • Plastic wrap or airtight container for storage

Ingredients

  • 1 cup unsalted butter, softened
  • 1/2 cup sun-dried tomatoes, finely chopped
  • 1/4 cup fresh basil leaves, chopped
  • 2 cloves garlic, minced
  • Salt and pepper to taste

Directions

  1. Add softened butter, chopped sun-dried tomatoes, fresh basil, and minced garlic to a food processor.
  2. Pulse until ingredients are thoroughly combined and smooth.
  3. Season with salt and pepper to taste, pulsing briefly to incorporate.
  4. Spoon mixture onto plastic wrap or parchment paper. Shape into a log or desired form.
  5. Wrap tightly and refrigerate for at least one hour or until firm.
  6. Slice and serve at room temperature with bread, pasta, or vegetables.

Recipe Notes

  • If the mixture is too soft, chill in the refrigerator before shaping.
  • Experiment with different herbs for a unique twist.
  • This compound butter can be frozen for up to 6 months.

Deliciously Easy Cheesy Chicken Fritters with Garlic Aioli Dip

Cheesy Chicken Fritters with Garlic Aioli Dip: A Savory Delight

⚖️
Difficulty
Easy

⏲️
Prep Time
15 mins

🕒
Cook Time
20 mins

⏱️
Total Time
35 mins

🍽️
Servings
4

The Cheesy Chicken Fritters with Garlic Aioli Dip is a meal that will leave your taste buds yearning for more. Combining succulent chicken with gooey cheese, these fritters offer a delightful contrast between their crispy exterior and tender interior. Perfectly paired with a rich and flavorful garlic aioli dip, this dish becomes irresistible at first bite. Whether you are looking to impress guests at a dinner party or simply want a comforting snack, these fritters deliver on all fronts.

Imagine biting into these fritters; they surprise you with the supple melt of cheese mingling with finely seasoned chicken. The garlic aioli, creamy with a hint of tang, elevates every mouthful. The preparation is simple, yet the flavors are complex enough to intrigue any food enthusiast. Bring a sense of indulgence to your table with this exquisite blend of tastes that echoes both simplicity and sophistication.

Crafted to perfection, the Cheesy Chicken Fritters are not only delicious but easy to make, making them an ideal recipe for any culinary skill level. The aromatics of garlic and herbs entice your senses, promising a meal that is both delectable and nourishing.

Quick Recipe Highlights

  • Flavor Profile: The fritters boast a savory chicken base, enriched with the creamy depth of cheese, complemented by the zesty garlic aioli.
  • Texture: Crispy on the outside, moist and tender on the inside, these fritters offer a satisfying bite contrasted by the creamy, smooth dip.
  • Aroma: The combination of garlic and herbs provides an enticing aroma that’s both warm and inviting.
  • Visual Appeal: Golden-brown fritters with specks of herbs and a smooth, ivory-like dip create a visually appealing dish.
  • Skill Level Needed: Basic preparation and cooking techniques make this dish accessible to beginners and enjoyable for experienced cooks.
  • Special Equipment: A non-stick skillet and a mixing bowl are essential to bring these fritters to life.

Recipe Overview

  • Difficulty Level: Designed for ease, this recipe requires minimal culinary skills while still delivering impressive results. With straightforward steps, it is an entry-level recipe for home chefs seeking to expand their repertoire.
  • Category: Versatile enough to serve as a main dish, appetizer, or snack, these fritters adapt well to any meal part.
  • Cuisine: Drawing inspiration from American comfort food, this recipe adds a gourmet twist with its savory, cheesy goodness.
  • Cost: Economical and satisfying, the ingredients for these fritters fit within a modest budget, yet yield restaurant-quality flavor.
  • Season: Best enjoyed year-round, but particularly comforting in cooler weather when warm and hearty meals are most welcome.
  • Occasion: Ideal for casual gatherings, movie nights, or solo indulgence, these fritters cater to both relaxed and celebratory moments.

Why You’ll Love This Recipe

You will fall in love with these cheesy chicken fritters for their exquisite taste and texture. The combination of juicy chicken and stretchy melted cheese creates a delightful fusion of flavors that captivates your taste buds. Each fritter serves as a perfect morsel, harmoniously rigged with the robust zing of garlic aioli. Serve them piping hot and witness the elation they bring at each wonderful bite.

The convenience and simplicity of preparation make this recipe a lifesaver in the kitchen. Requiring only a few staple ingredients, these fritters come together quickly. This means you can enjoy a delectable homemade dish without spending hours over the stove. From a quick evening meal to a delightful lunchbox option, these fritters fit the bill effortlessly.

Aside from their pleasing flavors, these fritters offer nutritional benefits from chicken as a lean protein source, combined with the calcium and vitamins in cheese. The garlic aioli infuses additional health-enhancing properties, making this dish a nourishing meal that satisfies as much as it delights.

Perfect for socializing, these fritters act as a delightful conversation starter at gatherings. Their delectable profile pairs swimmingly with various dishes, sparking culinary admiration and joyful discussion. Your friends and family will marvel at your ability to provide such a wintry wonder, seated elegantly next to a lavish aioli centerpiece.

From a financial standpoint, these fritters are a cost-effective solution to entertaining. They require affordable, accessible ingredients without compromising on flavor and quality. Preparing these fritters allows you to create something special using common pantry items, offering an impressive return on any budget.

Historical Background and Cultural Significance

The origins of chicken fritters trace back to the traditional European fritter culture, where various fillings were enveloped in batter and fried. Initially popular in ancient Roman cuisine, this preparation technique spread across continents, eventually becoming cherished globally. While each nation evolved its version, the comforting idea of chicken fritters remained consistent.

In the culinary landscape, fritters hold a prestigious place, bridging cultures and cuisines while promoting the ingenious use of available ingredients. American cuisine embraced these delightful golden bites wholeheartedly, infusing native techniques and flavors to create a legacy dish. The evolution of chicken fritters showcases innovation and culinary elegance woven into every bite.

Regionally, the adaptation of chicken fritters saw creative transformations, reflecting local tastes and available resources. From Mediterranean herbs to Asian spices, diverse iterations emerged, each worthy of culinary accolade. This adaptability ensures that the heart of chicken fritters beats in every corner of the world, a dish cherished and enjoyed alike.

The cultural relevance of chicken fritters extends beyond their taste appeal. These fritters symbolize food unification, a testament to the art of merging cultural identities through cuisine. Over time, chicken fritters emerged not only as a dish but as a practice of flavor sharing and culinary harmony.

Ingredient Deep Dive

Chicken, the centerpiece of this recipe, boasts a fascinating cultural and nutritional legacy. Generally regarded as a staple across many global cuisines, chicken is both versatile and nutritious, providing families with a lean protein source essential for muscle health and body repair. When purchasing chicken for these fritters, choose high-quality, fresh meat, ensuring the flavor and health benefits enhance your dish.

Store chicken properly—ideally wrapped in the coldest area of your refrigerator for up to two days, or longer when frozen, to preserve freshness. Always consider substituting thighs for breasts if a juicier texture is desired. With its unmistakable taste and adaptability, chicken shines brightly as the fritter’s star.

The inclusion of cheese serves as an ode to culinary opulence, transcending the recipe’s simplicity. Rich in calcium, cheese not only flavors the fritters but enhances their nutritional profile, promoting bone and dental health. When selecting cheese, opt for varieties with melt-worthy textures, such as mozzarella or cheddar, both capable of delivering cheesy satisfaction.

Store cheese in an airtight container in the refrigerator, updating storage methods to suit hard or soft varieties. Mozzarella, known for its mild flavor, seamlessly complements any seasoning. Substitution possibilities include stretches of provolone or mild gouda, adding meager twists to this already exciting dish.

Common Mistakes to Avoid

  • Using chicken that’s not fully thawed can lead to uneven cooking. Ensure your chicken is completely defrosted for best results.
  • Over-mixing the batter risks a rubbery fritter. Mix just until combined to maintain a tender texture.
  • Cooking on too high a heat results in browned exteriors with raw insides. Maintain moderate heat for even frying.
  • Neglecting to drain cooked fritters is a mistake, resulting in a greasy dish. Let them sit on paper towels post-frying to remove excess oil.
  • Skipping ingredient quality dilutes flavor. Use fresh herbs and quality cheese to ensure taste excellence.
  • Overcrowding the pan reduces heat and leads to soggy fritters. Fry in batches for optimal crunch.
  • Under-seasoning affects flavor depth. Don’t shy away from salt and pepper to enhance the chicken’s natural savoriness.
  • Neglecting the aioli diminishes the dish’s flavor. Be sure to prepare and serve the dip to enhance dining enjoyment.

Essential Techniques

One fundamental technique for these fritters is achieving the right batter consistency. This creates a bind that holds the fritters together while ensuring a delightful mouthfeel. Proper batter mixing prevents dense pockets and ensures a crisp, uniform finish. Mastering this technique with finesse results in fritters that are tender within but boast golden, satisfying crusts.

Frying technique is equally crucial, impacting the fritters’ texture and appearance. Consider the appropriate frying temperature, around 350°F (175°C), which offers a perfect balance for cooking the chicken through while imparting that mouthwatering, golden-brown hue. Pay attention to the oil’s sizzle for an auditory cue of the correct heat levels.

Pro Tips for Perfect Cheesy Chicken Fritters

Achieve perfect fritters by ensuring your batter isn’t overly thick, striking a harmonious balance with just enough moisture to bind without drowning the texture. For added flair, spice the batter with herbs like parsley or chives to enhance flavors and presentation.

Utilize a cookie scoop when portioning the batter into the skillet, guaranteeing evenly-sized fritters that cook uniformly. This simple swap ensures consistency in both texture and taste, presenting you with perfectly cooked bites.

Consider lightly toasting the fritters on a baking sheet after frying for an even crispier finish. This examination allows the crust to firm up and any excessive oil to dissipate, resulting in better-tasting, light fritters that remain pleasingly tender.

For a smoother aioli, finely mince garlic and allow it to sit in a drizzle of lemon juice. The acid will soften the garlic’s bite, resulting in a creamy, sophisticated dip that pairs effortlessly with the fritters’ warmth and flavor.

Don’t sidestep pairing these fritters with a vibrant salad or tangy pickles. The juxtaposition of crunchy vegetables with cheesy meat delights the palate, creating balance and a wholesome dining experience.

Opt for a blend of cheeses to heighten flavor complexity. Try combining sharp cheddar with mild mozzarella for bold umami anchored by mellow creaminess. This blend surprises with depth that will delight your fritter-loving guests.

Enhance the batter with a dash of smoked paprika or chili flakes for a subtle fiery undertone. This addition introduces an unexpected yet welcome layer of heat, turning your fritters into a dynamic, flavor-packed experience.

Variations and Adaptations

For regional shifts, incorporate Mediterranean spices such as thyme or oregano, adding herbal nuances that harmonize perfectly with the foundational chicken and cheese. This versatile profile transcends global taste sensibilities, offering universal appeal.

Seasonal adaptations are where garlic blossoms can replace garlic cloves in the aioli during spring, if available. This substitution lends a milder, softer flavor that harmonizes with the innate crispness of fritters when warmer months call for subtler flavors.

Dietary modifications provide ample opportunity for your culinary creativity. Swap regular cheese with a dairy-free alternative, ensuring those with lactose intolerance savor in indulgence without reservation. Additionally, replace breadcrumbs with gluten-free panko to accommodate a wider range of dietary requirements.

The flavor-infused experiment doesn’t stop here, try enriching the dish with a handful of sautéed onions or sun-dried tomatoes for a fresh take on this classic rendition. These variations demonstrate infinite possibility, each adapting to personal taste or dietary needs seamlessly.

For an engaging texture, adjust the cheese-to-chicken ratio. Amp up the cheesiness for a gooey interior or favor chicken for a slightly firmer bite, tailoring fritters to personal preference and occasion need.

Change your fritter presentation by transforming them into sandwich fillings or sliders. Nestle between toasted buns with a vibrant slaw for an invigorating meal awakening the taste buds. Presentation stretches beyond mere plating, into ways you share and enjoy the recipe itself.

Serving and Presentation Guide

When serving Cheesy Chicken Fritters, consider plating them stacked, as their gold-brown hues create an eye-catching display. Garnish the plate with freshly chopped herbs, like parsley or chives, to enrich the color contrast and amplify the aroma.

Traditional accompaniments can lift a homely meal to new heights. Opt for coleslaw or roasted vegetables to complement and accentuate the fritters’ rich content and creamy dip. Temperature and portions are key; serve fritters hot for full flavor and crunch while managing serving size so each diner enjoys ample taste and enjoyment.

For a modern touch, employ slate or wooden boards for presentation, enhancing rustic charm while maximizing contrast between the fritters and garlic aioli dip. Match color palettes with the warmly browned fritters, inviting diners to appreciate both the culinary and visual craft.

Opt for diverse shapes when serving at gatherings. Transform fritters into bite-sized pieces, more suited to cocktail parties or informal settings, allowing guests easy access to these delicious morsels. Portion control is essential; small sizes yield delight without overwhelming.

Temperature considerations are vital—ensure fritters do not cool too quickly, reheating to maintain optimal warmth. Cover with foil while waiting to serve, as cooler fritters can lose much of their textural allure.

Wine and Beverage Pairing

Select a crisp white wine, such as a zesty Sauvignon Blanc, to pair with these cheesy chicken fritters. The acidity of the wine matches well with the richness of the cheese, creating a balanced pairing that complements the entire dish.

For those preferring non-alcoholic alternatives, sparkling water or a citrus-infused green tea can refresh and cleanse the palate, heightening the enjoyment of the garlic-infused fritters. The carbonation or citrus kick invigorates, bringing out lighter elements within the dish.

A gentle vanilla-infused black tea pairs delicately with the fritters, offering warmth and depth without overwhelming. The subtle creaminess harmonizes beautifully with the fritters’ seasoned chicken and garlic aioli profile.

Evaluate temperature considerations with precision; chilling beverages sufficiently allows the contrast to enhance the dining experience. Lukewarm alternatives may fail to deliver the desired harmonious sensations when paired alongside fritters.

Serve beverages in chilled glasses to maintain an even, refreshing temperature that enhances the meal’s sensory journey from start to finish. Opt for garnishes like lemon wedges or mint sprigs to bring out the culinary flair within both the beverage and the fritters alike.

Storage and Shelf Life

Proper storage is essential for extending the shelf life of these delectable cheesy chicken fritters. Allow them to cool completely before placing in airtight containers or resealable bags. Refrigerate them for up to three days to maintain flavor and texture.

Temperature requirements depend on freshness goals; refrigerated fritters should be kept at temperatures below 40°F (4°C) to ensure safety and quality. When reheating, ensure internal temperatures rise above 165°F (75°C) for optimal taste and food safety.

Containers should be airtight to preserve fritter crispness while preventing absorbing external odors. Store garlic aioli dip separately to retain the robust flavor and creamy texture separate from the fritters’ profile.

Keep an eye on signs of spoilage—changes in aroma, texture, or color are warning signals to discard fritters past their prime. Always reheating involves preheating the oven to 350°F and placing fritters on a baking sheet till heated through, reviving their crispy, warm allure.

Freezing guidelines require initial cooling and layering fritters between parchment paper within a freezer-safe container for future enjoyment. Remember to thaw completely before reheating using the methods above, extending shelf life while minimizing waste.

Make Ahead Strategies

This recipe accommodates make-ahead strategies, focusing on an organized prep timeline that ensures optimal flavor retention. Prepare the batter in advance, covering and refrigerating for up to 24 hours, saving valuable time and effort when you’re ready to cook.

Storage between steps aids efficiency—assemble batter and refrigerate, then shape and cook when ready to consume. The quality impact assessment remains high if the batter is stored correctly and mixed just before shaping and frying.

Assembly tips ensure even cooking; scoop uniform portions for predictable frying results. For the aioli, combine ingredients and refrigerate in a jar, allowing flavors to meld brilliantly before serving alongside warm fritters.

Reheat the fritters in a preheated oven as needed, maintaining crispness and savor while recreating that freshly cooked appeal. This strategy fosters minimal preparation efforts while maximizing flavor delivery right to the plate.

Add freshly chopped herbs and a splash of lemon to the aioli dip just before serving, providing brightness to the pre-prepared ingredients. This fresh element addition ensures your fritters maintain gourmet appeal even when made ahead.

Scaling Instructions

Adapting this recipe to suit varying serving needs is straightforward. Halving the recipe involves precision in adjusting ingredient quantities while maintaining the original proportions to retain the depth of flavor and ideal texture.

Doubling or tripling requires careful consideration of equipment capacity, as larger batches demand additional cooking space or staggered preparation. Regularly evaluate pan sizes and cookware when scaling up, ensuring consistent, even fritter results.

Timing modifications may become necessary; monitoring for desired golden brown exterior color becomes a simple yet effective indicator of doneness. Check internal fritter temperatures to verify thorough cooking throughout.

When preparing large amounts, consider storage aspects to preserve quality. Utilize segmented containers with dividers to separate portions, ensuring freshness and minimizing cross-flavor contamination.

Nutritional Deep Dive

The nutrient profile of these cheesy chicken fritters is robust, offering a favorable macro breakdown with protein-rich chicken, cheese-derived fats, and minimal carbs present within traditional breadcrumbs. This combination provides a balanced meal suitable for many diets.

Micronutrient analysis highlights the inclusion of vitamins B6 and B12, courtesy of chicken, and calcium-rich cheese adding invaluable nutritional supplements to your dietary intake. Garlic adds further health benefits, boasting anti-inflammatory properties.

With health benefits extending to weight management, these fritters deliver nutritional satisfaction in each bite. Carefully portioned and savored, they cater to caloric-conscious dining without sacrificing flavor.

Portion analysis aids weight considerations—diligent serving control ensures an enjoyable yet balanced dining experience. Mindfully approach meal portions to savor fritters while upholding nutritional optimization.

Dietary Adaptations

For gluten-free adaptations, substitute breadcrumbs with gluten-free panko or crushed rice cereal to maintain the fritter’s binding function without compromising flavor.

Dairy-free options encompass replacing cheese with a quality plant-based alternative, preserving creaminess and flavor presence while adhering to dietary constraints. Vegan cheese offers delicious, melt-worthy textures complementary to fritters.

Low-carb adaptations are achievable through replacing breadcrumbs with almond flour, reducing carbs yet maintaining flavor presentation. These considerations ensure your fritters cater to various carbohydrate-conscious lifestyles.

For keto adaptations, the almond flour substitution option prevails, enhancing keto-friendly profiles catering to distinct dietary preferences. Achieve an encompassing, flavorful fritter experience adhering to keto guidelines.

Paleo versions thrive with almond flour and coconut-based cheese alternatives, welcoming a paleo-friendly shift without flavor loss.

Low-FODMAP modifications tailor ingredient choices, minimizing FODMAP-intense foods while sustaining fritter delight. Consider alternatives like garlic-infused olive oil for the aioli to preserve flavor without accompanying FODMAP risks.

Adapting to other specific diets becomes seamless with ingredient consideration, accommodating personal taste or dietary preference. Options abound, ensuring these fritters fit into your life’s culinary needs effortlessly.

Troubleshooting Guide

Ensure ingredients are mixed evenly to maintain texture, as imbalanced ingredients can yield fritters lacking ideal consistency. Aim for a uniform mixture that distributes flavors and texture consistently.

For flavor balance, adjust seasoning levels to suit personal taste profiles. This approach guarantees a personalized fritter experience without sacrificing quality or dish integrity.

Tackle temperature problems by monitoring oil/frying temperature closely to prevent external charring before internal cooking completes. Use a thermometer to maintain precise frying conditions, avoiding inconsistently cooked fritters.

Resolve equipment challenges by selecting non-stick, appropriately sized skillets for even frying. Overcrowding leads to uneven cooking, so use multiple pans or batches to ensure consistency.

Adapt ingredient substitutions through trial and error, paying attention to substitution impacts on taste or texture profiles. Opt for similar consistencies, flavors, or nutritional benefits to maintain dish familiarity.

Address timing concerns by organizing available cooking tools and setting a pre-determined assembly method. Avoid rushing the frying stage, as consistent heat exposure is crucial for optimal fritter creation.

Recipe Success Stories

Community feedback highlights the recipe’s ability to bring joy across kitchens worldwide, creating moments of shared flavor enjoyment and cooking triumph. Readers celebrated adaptation successes that preserved signature flavors while fitting individual tastes.

Variations have emerged from these fritters—international spices or diverse cheese blends have charmed cooks and tasters alike. Reader suggestions have driven culinary innovation, enriching this fritter’s legacy through collective experimentation.

Photography tips suggest capturing fritters’ textures, focusing on their golden-brown crusts with contrasting dips to visualize their crisp quality. This photographic approach complements the fritters visually, communicating flavor appeal masterfully.

Frequently Asked Questions

Q: Can I bake rather than fry the fritters?

A: Yes, you can bake them by placing fritters on a parchment-lined baking sheet and baking at 400°F (200°C) for approximately 20 minutes. Flip midway for even browning.

Q: What type of cheese works best?

A: Mozzarella or cheddar are popular choices for their melting capabilities and flavors, but feel free to experiment with others.

Q: How can I make the aioli spicier?

A: Add a pinch of cayenne pepper or finely minced jalapeño to the aioli for a spicy kick.

Q: Are these fritters suitable for freezing?

A: Absolutely. Place cooled fritters between parchment and freeze in an airtight container. Reheat directly from frozen for crispy results.

Q: Can I substitute the garlic in aioli?

A: Garlic-infused oil can work as a milder substitute, maintaining essence without overpowering the dip.

Q: Is whole-grain or multigrain bread an option?

A: Yes, using whole grain or multigrain breadcrumbs can enhance nutritional content while creating a denser crumb profile.

Q: How to prevent fritters from crumbling?

A: Ensure you’ve used enough binding elements such as eggs and flour. Press gently while cooking for firmer fritters.

Q: What’s the best way to reheat leftovers?

A: Use an oven set to 350°F (175°C) to gently reheat the fritters, preserving their crispness while warming through.

Q: Can I prepare the batter ahead?

A: Yes, prepared batter stored in the fridge overnight can simplify next-day cooking without sacrificing quality.

Q: How can I reduce preparation time?

A: Use pre-grated cheese or pre-cooked chicken to streamline the preparation process and cut back on prep time.

Additional Resources

Discover related recipes that complement your fritter creations, including herb-infused dips or a refreshing seasonal salad to balance the meal’s hearty profile.

Explore technique guides focused on frying mastery or batter preparations, offering insights into techniques that elevate fritter textures and taste appeal.

Stay informed on ingredient information updates, from seasonal produce cycles to cheese pairing options to optimize and enhance your fry-up repertoire.

Recommendations for essential kitchen equipment used in fritter preparation ensure seamless cooking execution. Consider investing in quality non-stick pans or precise thermometers to heighten culinary proficiency.

Explore seasonal variations to extend this recipe’s desirability further. Fresh herbs or in-season cheeses enhance your culinary palette and cooking experience with each creation.

Join the Conversation

Engage in online communities by sharing your Cheesy Chicken Fritters creations through social media platforms, exchanging ideas with like-minded culinary enthusiasts worldwide.

Share photography tips, capturing vibrant, eye-catching fritter images to inspire community members expressing flavor through lens mastery.

Provide recipe reviews, enhancing community balance with your valuable input. Share mastery secrets and insights, amplifying communal cooking confidence.

Encourage creative recipe variations adapted to personal tastes or dietary needs. Exchange successful experimental insights and engage mutually with a passion for fritter fervor.

Create meaningful culinary dialogue, strengthening global food journeys through shared inspiration, collaborative exploration, and collective culinary ambition all centered around fantastic fritters.

The Recipe

Cheesy Chicken Fritters with Garlic Aioli Dip

Serves: 4

Prep Time: 15 mins

Cook Time: 20 mins

Total Time: 35 mins

Kitchen Equipment Needed

  • Non-stick skillet
  • Mixing bowls
  • Knife
  • Measuring cups
  • Whisk

Ingredients

  • 2 cups cooked chicken, shredded
  • 1 cup cheese, shredded (mozzarella or cheddar)
  • 2 eggs
  • 1/4 cup fresh parsley, chopped
  • 1/3 cup flour
  • 1/2 cup breadcrumbs
  • Salt and pepper to taste
  • 1/3 cup mayonnaise
  • 2 garlic cloves, minced
  • 1 tablespoon lemon juice

Directions

  1. In a large bowl, combine chicken, cheese, eggs, parsley, flour, and breadcrumbs. Season with salt and pepper.
  2. Mix thoroughly until well combined and form into small patties.
  3. Heat a non-stick skillet over medium heat and cook fritters for 3-4 minutes per side or until golden brown and cooked through.
  4. In a separate bowl, whisk together mayonnaise, minced garlic, and lemon juice to create the aioli dip.
  5. Serve the fritters warm, accompanied by the garlic aioli dip.

Recipe Notes

  • For added flavor, include herbs such as rosemary or thyme in the batter.
  • Adjust salt and pepper per taste preference; a smoky paprika can enhance the fritters’ flavor dimension.

Savor Irresistible Crispy Coconut Chicken with Homemade Bang Bang Sauce

Crispy Coconut Chicken with Bang Bang Sauce: An Irresistible Delight

⚖️
Difficulty
Medium

⏲️
Prep Time
20 mins

🕒
Cook Time
25 mins

⏱️
Total Time
45 mins

🍽️
Servings
4

Imagine biting into a piece of chicken that’s succulent on the inside and perfectly crispy on the outside. This Crispy Coconut Chicken with Bang Bang Sauce is a culinary experience that brings both textures and flavors together in a blissful union. The rich coconut coating provides a delightful crunch, harmonizing beautifully with the sweet and spicy Bang Bang Sauce.

The distinct flavor profile of the Crispy Coconut Chicken paired with the Bang Bang Sauce makes this dish unforgettable. Each bite is a journey through layers of savory, sweet, and spicy tastes that awaken the palate. If you’re a fan of texture, the crunchy exterior provides a perfect contrast to the juicy chicken, ensuring every mouthful is uniquely satisfying. The sauce adds a fragrant note that elevates the dish, making it a sure-fire hit at any dining occasion.

Quick Recipe Highlights

  • Flavor Profile: The dish combines the sweetness of coconut with the tangy, spicy notes of the Bang Bang Sauce, creating a harmonious balance of flavors.
  • Texture: Expect a delightful crunch from the coconut crust, offering a satisfying contrast to the tender, juicy chicken inside.
  • Aroma: The fragrant coconut and spicy aromas of the Bang Bang Sauce enhance the sensory experience.
  • Visual Appeal: Golden-brown crispy chicken drizzled with vibrant sauce creates a visually enticing plate.
  • Skill Level Needed: Requires intermediate cooking skills, such as frying and sauce preparation.
  • Special Equipment: A deep-fryer or a heavy skillet for perfect frying results.

Recipe Overview

  • Difficulty Level: Rated as medium due to the need for frying and careful sauce preparation to achieve the right consistency and flavor balance.
  • Category: A delectable main course, ideal for dinners and gatherings.
  • Cuisine: Drawing influence from Asian and American comfort food traditions, this dish integrates global flavors seamlessly.
  • Cost: Affordable, with ingredients available at most supermarkets, making it accessible for home cooks.
  • Season: Ideal for summer gatherings, but enjoyable year-round thanks to its tropical coconut element.
  • Occasion: Perfect for family dinners, casual gatherings, or as a standout dish at a party.

Why You’ll Love This Recipe

The flavors of crispy coconut chicken are a delightful treat for your palate, combining the tropical sweetness of coconut with the spicy kick from the Bang Bang Sauce. The interplay of textures is nothing short of delightful — the soft, juicy chicken contrasted with the crunch of the coconut makes each bite an experience.

Preparation is straightforward, and with a few tips, you can achieve a restaurant-quality dish at home. The simple combination of ingredients makes it easy to prepare, with the coconut crust ensuring the chicken remains moist and flavorful during cooking.

Nutritionally, this dish offers a balance of protein and healthy fat from the coconut, and it can be easily modified to suit dietary needs or preferences. The sauce can be made lighter by adjusting the mayonnaise component, or thickened for a richer taste.

Socially, Crispy Coconut Chicken with Bang Bang Sauce is sure to be a talking point at your next dinner party. Its exotic flavors and vibrant presentation make it a dish that not only fills the belly but also creates a memorable dining experience. This recipe is cost-effective, using common pantry staples and accessible proteins, making it an excellent choice for both entertaining and family meals.

Historical Background and Cultural Significance

The concept of crispy coated chicken is a global phenomenon with roots in various culinary traditions. The addition of coconut is a nod to tropical cuisines, where coconut is a staple ingredient. It’s a reflection of culinary ingenuity, combining textures and flavors.

Culturally, combining the crispy texture with a bold sauce like Bang Bang aligns with trends in contemporary Asian-American fusion cuisine. This style celebrates bringing diverse flavors and textures together to create innovative dishes that delight and surprise.

Over time, the recipe has adapted to incorporate diverse flavor profiles, creating endless possibilities for personalization while keeping the core components intact. The coconut remains a consistent feature, echoing both historical and modern culinary values.

Regional variations have emerged, showcasing local spices and sauces adapted to different palates, making this dish a great base for experimentation and flavor exploration around the world.

Ingredient Deep Dive

Chicken: Historically a versatile protein for many cultures, chicken remains a favorite due to its adaptability and mild flavor. Nutritionally, it’s a lean source of protein and vitamins. Choose fresh, free-range chicken for the best taste. Keep it refrigerated and use within a couple of days for maximum freshness. For substitutions, tofu or cauliflower can provide a plant-based alternative.

Coconut: Widely celebrated in tropical cuisines, coconut offers a naturally sweet and nutty flavor. It’s rich in fiber and healthy fats, providing a satiating crunch when toasted. Store desiccated coconut in a cool, dry place to prevent spoilage, or freeze for longer shelf life. Try panko breadcrumbs as an alternative for a lighter texture.

Bang Bang Sauce: Known for its signature creamy and spicy profile, this sauce embodies influences from Asian culinary traditions. It typically combines mayonnaise, chili sauce, and sweet chili components. For a healthier spin, replace mayonnaise with Greek yogurt. Balance the flavors for a sauce that complements, rather than overpowers, the coconut chicken.

Common Mistakes to Avoid

  • Over-frying the chicken can lead to a dry texture; ensure oil temperature is controlled.
  • Not patting the chicken dry before coating can result in a soggy crust.
  • Using cold chicken can lead to uneven cooking; allow it to come to room temperature.
  • Skipping seasoning the coconut layer will lead to a bland flavor profile.
  • Thick coating can prevent the chicken from crisping; apply an even layer.
  • Overcrowding the frying pan will lower oil temperature, preventing crisping.
  • Using low heat can make the chicken greasy as it absorbs more oil.
  • Not resting cooked chicken on a wire rack will cause loss of crispness.
  • Forgetting to taste and adjust the Bang Bang Sauce can result in imbalance.
  • Skipping resting labeled as such will affect how the flavors meld and taste.

Essential Techniques

Frying Technique: Achieving the perfect crunch requires maintaining the oil at an optimal temperature. Aim for 350°F to ensure crispy results without overcooking the chicken. Avoid common pitfalls like overcrowding the pan, which drops oil temperature and results in uneven frying. Visual cues for success include a golden-brown color and consistency in crust texture.

Sauce Preparation: The essence of Bang Bang Sauce lies in its balance of spicy and sweet. To master it, adjust the spice level to preference while aiming for a smooth consistency. Be cautious of the mayonnaise-to-chili ratio, adjusting as needed until achieving your desired flavor profile.

Pro Tips for Perfect Crispy Coconut Chicken

Let the chicken rest after frying to allow the juices to redistribute, enhancing moisture. Ensure the oil reaches the right frying temperature before you start to avoid absorbing excess oil. Toast the coconut lightly before applying; this helps in releasing its oils and heightening flavor. Use a thermometer for precise temperature control when frying. Drizzle the sauce sparingly to prevent the chicken from going soggy — serve extra on the side. For added crispy texture, double-coat by first dipping in flour, then egg, finished with coconut.

Variations and Adaptations

Regional variations might include the use of local spices in the coating, such as cardamom or turmeric, enhancing the dish’s cultural authenticity. Seasonal adaptations can be achieved by using fresh coconut in summer, lending a different sweetness. For dietary modifications, substitute chicken with tofu to create a vegan variant, while retaining the sauce’s spicy profile with plant-based yogurt. Add lime zest to the coating for a zesty twist on the flavor. Texturally, incorporating crushed nuts like almonds can add another dimension. For presentation alternatives, serve the chicken sliced on a bed of greens for a vibrant, refreshing dish.

Serving and Presentation Guide

For plating, arrange chicken pieces in a fanned-out design for visual impact, allowing the coatings’ golden hue to shine. Garnish with fresh cilantro and a sprinkle of toasted sesame seeds for added texture and aroma. Traditional accompaniments like jasmine rice enhance the dish’s aromatic profile, while servings of fresh sliced cucumbers add crunch and freshness. Serve at room temperature to preserve the crispiness. Consider portion control by slicing the chicken into strips, facilitating sharing and individual servings.

Wine and Beverage Pairing

Pair this dish with a crisp Riesling, whose sweet notes complement the coconut and balance the sauce’s spice. For non-alcoholic options, a chilled herbal iced tea or a zesty lemonade can refresh the palate. Lightly chilled coffee or jasmine tea can highlight the coconut’s nuttiness. Serve beverages cold to cleanse the palate between bites, enhancing the overall flavor experience. Experiment with drink serving in stemware to elevate presentation dynamics.

Storage and Shelf Life

Store leftovers in an airtight container in the refrigerator for up to three days. Your chicken will retain its quality when stored properly without sauce applied. Signs of spoilage include an off smell or slimy texture—discard if present. Reheat in an oven at low temperatures to restore crispness without overdrying. For freezing, place separated layers with parchment paper, reheat thoroughly to crisp again.

Make Ahead Strategies

Prepare the components and store separately: the sauce can be refrigerated, and the chicken can be breaded a day in advance. Reserve frying for just before serving to maintain crispiness, as fried chicken will lose its crunch if stored cooked. Assemble all elements just before meal time for optimal freshness and taste.

Scaling Instructions

This recipe scales easily: halve for a smaller gathering, retaining ingredient ratios for balance. Double or triple quantities to cater to larger parties, adjusting fryer capacity and time spent frying accordingly. Store excess cooked chicken without sauce for best longevity. Keep an eye on ingredient availability to ensure no wastage when preparing on a larger scale.

Nutritional Deep Dive

With a balance of macro-nutrients, this dish offers a good mix of protein from chicken and fats from coconut. Additional vitamins and minerals contribute to its nutritional profile, including vitamin C from sauce ingredients. For a well-balanced meal, add a side of vegetables to meet dietary fiber needs. Meticulously monitor portion size to maintain nutritional benefits without excess calorie intake.

Dietary Adaptations

Ensure gluten-free variations by using gluten-free flour in the coating mix. For a dairy-free version, substitute any dairy-based ingredients with alternatives like almond or oat milk. Vegan adaptations are achievable by replacing chicken with a meaty vegetable or protein substitute, and adjusting the sauce recipe to ensure no animal-based ingredients are used. Opt for low-carb ingredients in the coating to suit ketogenic preferences, while still maintaining flavor integrity. Paleo enthusiasts can replace fried elements with oven-baked solutions using coconut oil for healthy fats.

Troubleshooting Guide

If the texture is not crispy, consider using less batter coating or controlling frying temperature more precisely. Balance flavors by adjusting spice levels in the sauce to taste, bearing in mind desired heat. Temperature discrepancies are unforgiving: use a reliable thermometer for frying accuracy. Equipment challenges can be managed by testing prior to use, ensuring familiarity with all steps. Ingredient substitutions should still respect flavor interaction, choosing alternatives that harmonize within the dish’s overall flavor profile.

Recipe Success Stories

Readers across the globe celebrate this Crispy Coconut Chicken recipe, praising its adaptability and memorable taste. Community feedback often highlights variations such as additional spices or complementary side dishes. Adaptation stories frequently feature home-grown ingredients for a personal touch. Readers love sharing photos of their creations, and have generously offered new serving or sauce style suggestions.

Frequently Asked Questions

1. Can I substitute the chicken with another protein? Yes, tofu or cauliflower make excellent vegetarian substitutes without compromising flavor or texture.
2. How can I prevent the coconut coating from falling off? Ensure that the chicken is dry before coating and press the coconut mix firmly onto the surface to adhere properly.
3. What’s the best oil for frying? Use an oil with a high smoke point, such as canola or vegetable oil, for even frying results.
4. Can I make the dish ahead of time? Yes, prepare components separately and assemble just prior to serving for best results.
5. How do I adjust the sauce’s spice level? Modify the amounts of chili sauce or add chili flakes incrementally to meet desired heat preferences.
6. What’s the best way to store leftovers? Refrigerate in an airtight container and reheat gently in the oven to restore crispiness without overcooking.
7. Can I bake the chicken instead of frying? Yes, baking is an option—coat generously with cooking spray and bake until crispy for a lighter version.
8. Is there a gluten-free option? Indeed, replace flour in the coating with a gluten-free alternative like rice flour to cater to dietary needs.
9. Can I use fresh coconut? Fresh coconut is a great seasonal variation for a different texture and taste experience.
10. What can I serve with this dish? Serve alongside aromatic rice or a fresh salad to complement the spices and enhance the meal.

Additional Resources

For further exploration, check out related recipes such as coconut shrimp or sticky glazed chicken for similar flavor profiles. Technique guides on frying and sauce creation can further enhance culinary skills. Learn more about key ingredients like coconut for insight into versatile uses and benefits. Recommended equipment lists, including thermometers and fryers, are available for optimized cooking. Consider seasonal variations featuring fresh produce for a more bespoke dining experience.

Join the Conversation

We’d love to see your own takes on Crispy Coconut Chicken with Bang Bang Sauce—share your creations with us on social media. Tag your posts with #CoconutChickenLove and join a community of food enthusiasts sharing tips and experiences. Review the recipe and suggest any creative adaptations or serving suggestions you discover. Engage with fellow cooks, share insight, and celebrate the joy of homemade meals together.

The Recipe

Crispy Coconut Chicken with Bang Bang Sauce

Serves: 4

Prep Time: 20 mins

Cook Time: 25 mins

Total Time: 45 mins

Kitchen Equipment Needed

  • Deep-fryer or large heavy skillet
  • Mixing bowls
  • Tongs
  • Meat thermometer

Ingredients

  • 4 boneless, skinless chicken breasts
  • 1 cup all-purpose flour
  • 2 eggs, beaten
  • 1 cup shredded coconut
  • 1 cup panko breadcrumbs
  • Salt and pepper to taste

Directions

  1. Preheat oil in deep-fryer or skillet to 350°F.
  2. Season chicken with salt and pepper. Dredge in flour, dip in eggs, and coat with a mixture of coconut and breadcrumbs.
  3. Fry the coated chicken until golden brown and cooked through, about 6-8 minutes depending on thickness.
  4. Drain the chicken on a wire rack to maintain crispiness.
  5. While the chicken rests, prepare the Bang Bang Sauce by combining equal parts mayonnaise, sweet chili sauce, and a dash of sriracha for heat.
  6. Serve the chicken drizzled with sauce and additional sauce on the side for dipping.

Recipe Notes

  • Ensure oil is at the correct temperature before frying for the best results.
  • The Bang Bang Sauce can be adjusted to personal taste with spice levels.
  • Consider baking for a healthier alternative.

Deliciously Crispy Balsamic-Thyme Potato Torte Recipe for Your Table

Crispy Balsamic-Thyme Potato Torte: A Gourmet Delight

⚖️
Difficulty
Medium

⏲️
Prep Time
20 mins

🕒
Cook Time
45 mins

⏱️
Total Time
65 mins

🍽️
Servings
6-8

There is nothing quite like the savory aroma that fills your home when you bake a Crispy Balsamic-Thyme Potato Torte. This dish combines the earthy taste of fresh thyme with the tangy sweetness of balsamic glaze, enveloped in the texture of thinly-sliced potatoes. A Crispy Balsamic-Thyme Potato Torte is more than just a meal; it’s an exquisite dance of flavors and textures that is sure to captivate both your senses and your taste buds. The irresistible appeal of this torte makes it a crowd-pleaser for both family dinners and festive gatherings.

Quick Recipe Highlights

  • Flavor Profile: The combination of balsamic vinegar and thyme offers a robust, tangy flavor that’s complemented by the savory richness of potatoes and cheese.
  • Texture: Experience a satisfying crunch on the outside with a soft, creamy interior – the perfect balance of crispiness and tenderness.
  • Aroma: The smell of thyme mingled with the sweet vinegar wafts through the air, instantly whetting the appetite.
  • Visual Appeal: Golden-browned edges with layers of potatoes create an eye-catching pattern, making it a beautiful addition to any dinner table.
  • Skill Level Needed: Moderately experienced cooks will excel, requiring basic knife skills and attention to detail during layering.
  • Special Equipment: A mandolin for uniform slicing is highly recommended for this recipe to achieve even layers.

Recipe Overview

  • Difficulty Level: The torte is considered medium in difficulty due to the precise slicing and careful layering required to achieve the desired crispness and look.
  • Category: This is a versatile side dish that pairs well with roasted meats, adding sophistication to casual and formal meals alike.
  • Cuisine: With roots in French cooking, the torte draws influence from classic European culinary traditions.
  • Cost: Budget-friendly, mainly requiring pantry staples like potatoes and vinegar with some fresh herbs. Expect moderate costs for quality ingredients.
  • Season: Best enjoyed during fall and winter, when heartier dishes are welcomed and thyme is in its peak season.
  • Occasion: Perfect for holiday dinners, potlucks, or any occasion that calls for an elegant and comforting side dish.

Why You’ll Love This Recipe

The taste and texture of this Crispy Balsamic-Thyme Potato Torte are nothing short of extraordinary. The rich layers of potatoes, brushed with balsamic glaze, create a symphony of savory and sweet, while the thyme infuses herbaceous notes throughout. The variance in texture—from the crispy, golden exterior to the soft layers beneath—delivers a delightful mouthfeel that enhances every bite.

Convenience accompanies this recipe, as the ingredients are common pantry items, and the preparation allows for flexibility with a make-ahead option. This entails assembling the torte in advance and baking it just before serving, saving time without compromising quality.

Nutritionally, potatoes are low in calories and high in fiber, providing a healthy base, while thyme adds antioxidants without excess calories. This makes the dish not only delicious but also a sensible choice for weight-conscious diners and those looking to increase dietary fiber intake.

Serving this dish at social gatherings will surely make an impression. The presentation alone is bound to attract compliments, while the flavor fosters lively conversation at the table. The torte serves as an entry point to culinary sophistication, enhancing any meal without imposing elitism.

Cost-effectiveness is another reason to cherish this torte. Utilizing humble yet flavorful ingredients, it fills the gap between simplicity and luxury, especially when you allow seasonal produce to guide your ingredient choices. This accessibility ensures that anyone can attempt and perfect the recipe.

Historical Background and Cultural Significance

Potato tortes have deep roots in French culinary history, linked closely to dishes like gratins and galettes, where thin slices of potato are arranged or layered. French cuisine has traditionally embraced potatoes, celebrating their versatility and marrying them with various herbs, cheeses, and aromatic components to create hearty side dishes.

The cultural importance of such dishes is evident, as they’ve become staples in both home and professional kitchens across the world. They serve as a testament to the appreciation of simplicity made elegant through technique and pairing, a concept well-practiced in French cooking.

Over time, the recipe has evolved to include a variety of add-ons, such as different cheeses, vegetables, and spices, enriching the layers and complexity of flavor. Such adaptations are a reflection of modern culinary creativity, offering a canvas for chefs and home cooks alike.

Regional variations show the torte’s pliability; in Italy, you might find similar creations seasoned with rosemary and pecorino, while in northern climates, variations add smoked fish or meats for added depth. This diversity showcases the recipe’s adaptability to local flavors and preferences.

Ingredient Deep Dive

Potatoes are the hero of this dish, with a history rooted in global cultivation. Originating from the Andes, these tubers made their way to Europe in the 16th century, quickly becoming a staple for their versatile nature and nutritional benefits, including vitamin C, potassium, and dietary fiber.

To select the best potatoes, look for firm, smooth skins without blemishes or sprouting eyes. Varieties like Yukon Golds or Russets are ideal for this recipe due to their waxy yet starchy qualities, which hold shape and create crispy edges when cooked properly.

When storing potatoes, keep them in a cool, dark place to prevent sprouting and extend shelf life. Avoid refrigeration, as it can negatively impact their texture and flavor. A paper bag or ventilated basket works best for storage.

Should you need to substitute, sweet potatoes or other root vegetables like parsnips or celeriac can provide an innovative twist, altering flavor and color dramatically, while maintaining the structural integrity of the torte.

Common Mistakes to Avoid

  • Not slicing potatoes uniformly, which leads to uneven cooking and texture inconsistencies. Use a mandolin for precision.
  • Overloading thyme or balsamic vinegar, which can overpower the dish’s balance. Measure carefully to maintain harmony.
  • Skipping the step of preheating your oven, which affects the torte’s ability to crisp properly at the start of cooking.
  • Forgetting to season each layer of potatoes, resulting in a dish that’s lacking in depth and character.
  • Using wet potatoes, causing steaming instead of crisping. Pat them dry thoroughly before assembling.
  • Removing the torte from the oven too soon, which prevents the full development of golden edges and robust flavors.
  • Disregarding resting time after cooking, leading to structural collapse and messy slicing.
  • Underestimating the required fat for cooking, such as butter or oil, which ensures layers don’t stick to the baking dish.

Essential Techniques

Mastering the thin slicing of potatoes is critical for the success of this torte. Thin, even slices ensure uniform cooking, which allows for a consistent bite across the dish. A mandolin is indispensable here, offering precision beyond what a knife can easily achieve.

Layering the potatoes with finesse is another vital step. Each layer should be slightly overlapped, creating both a barrier that traps steam, helping in the cooking process, and a visually appealing pattern once the torte is finished.

The incorporation of balsamic vinegar during assembly yields an unusual touch of sweetness, counterbalanced by the savory thyme. It takes practice to gauge the right amount of vinegar to use, balancing flavor without making the potatoes soggy.

Golden-browning is the final technique to master, achieved by ensuring the oven is fully preheated. Keep a close eye during baking, and use the middle rack of the oven for optimal heat distribution, ensuring all surfaces achieve a homogeneous crispy finish.

Pro Tips for Perfect Crispy Balsamic-Thyme Potato Torte


– Always stabilize your mandolin by using the hand guard for safety and consistent slicing.
– Season each potato layer lightly but consistently to avoid a bland middle and an over-seasoned top.
– Use clarified butter to avoid the milk solids burning, which can add unwanted bitterness to the edges.
– Allow the torte to cool slightly before slicing, which helps maintain build integrity and presentation.
– A sprinkle of fresh thyme post-bake can revive the herbaceous note while offering a vibrant color contrast.
– Consider a final glaze of balsamic reduction to add a glossy finish and an extra hint of sweetness.
– Opt for Yukon Gold potatoes for their buttery flavor and ability to hold shape during cooking.
– Line your baking dish with parchment paper to facilitate easy removal and serving.

Variations and Adaptations

Regional interpretations of this torte embrace various ingredients signature to local palates. Try adding Italian Parmesan or Pecorino to the layers for a richer, umami punch, or incorporate Spanish chorizo for a spicy kick that’s certain to make the dish pop.

Seasonal adaptations allow for a constant evolution of flavors. Incorporate zucchini slices or summer squash during warm months for a lighter feel, or add roasted root vegetables in winter to enhance the earthy taste along with the potatoes.

Dietary modifications can also be made effortlessly. Replace butter with a high-quality olive oil to create a heart-healthy, dairy-free version; alternatively, substitute potatoes with lower-carb options such as cauliflower for a dish that aligns with keto guidelines.

Experimenting with fresh herbs can yield different dimensions. Consider rosemary in place of thyme for a more pronounced piney flavor, or basil in the summer for a softer herbal hint that complements tomatoes if using them as an additional ingredient.

For a shift in texture, incorporate crushed nuts like walnuts or pecans between layers, inserting crunch to the dish and intensifying nutty flavors that harmonize well with balsamic.

The visual presentation can easily shift from a rustic torte to scalloped baker’s delight by altering the arrangement style. Explore distinguishing patterns or use ring molds instead of a baking dish for individual servings that impress.

Serving and Presentation Guide

Plating this Crispy Balsamic-Thyme Potato Torte calls for elegance. Once cooled slightly, slice it into neat portions revealing its elegant, layered interior. Each slice should be carefully lifted using a wide spatula to maintain structure and presentation.

Garnishing with a dollop of creme fraiche or a sprinkle of fresh herbs such as parsley or cilantro can add a refreshing contrast, visually and in taste. The vibrant color contrast is visually appealing and adds a layer of flavor complexity.

Traditional accompaniments might include roasted meats or a leafy green salad, whose freshness helps balance the density of the torte. These pairings create a more complete dining experience and ensure varied flavors for a more rounded palate engagement.

Modern serving suggestions could involve positioning individual tartlets on arugula drizzled with light vinaigrette, which introduces a peppery note to the meal, or serving with a side of roasted cherry tomatoes for added color and acidity.

Temperature considerations are crucial; serve the torte warm to maintain its crispy texture, enhancing mouthfeel and ensuring its flavors are at their most vibrant.

Portion control tips include ensuring slices are not too thick, maintaining elegance, avoiding overwhelming servings and preserving room for accompaniments in a balanced meal.

Wine and Beverage Pairing

When considering wine pairings, look towards a full-bodied Chardonnay with notes of oak and butter to complement the richness of the torte. The complexity of such a wine echoes the balsamic’s sweetness and thyme’s earthiness beautifully.

For non-alcoholic choices, a sparkling water infused with lemon or lime can offer a refreshing palate cleanse between bites, enhancing the dining experience without overpowering the flavors presented.

Should the occasion call for coffee or tea, consider a brewed light roast coffee or unsweetened iced green tea. Both options provide necessary bitterness and astringency to offset the potato’s starchy nature and balsamic’s sweetness.

Temperature is imperative in creating balance, with wines served slightly chilled to maintain their vibrancy and soft drinks cold to achieve their refreshing qualities. Avoid overly sweet pairings to maintain focus on the torte’s robust flavors.

For serving suggestions, consider glassware that matches the elegance of the meal—such as wide, bold wine glasses, which create a visual harmony and a sophisticated atmosphere.

Storage and Shelf Life

Storage of the torte should be in an airtight container to prevent moisture loss and preserve freshness. Consider slicing before storing to allow for easy access and portion control upon reheating.

Proper temperature maintenance is key; store it in the refrigerator only once cooled to ambient temperature to avoid condensation, which can negatively affect the texture. Consume within three days to fully enjoy the torte’s intended texture and taste.

Choose glass or BPA-free containers with secure lids for the safe storage of your torte. This choice ensures flavor retention and negates any risk of plastic taste leaching into the dish over time.

Signs of spoilage that necessitate disposal include an off smell, mold, or a noticeable change in texture, as these indicate compromised food safety and quality.

Reheating instructions for maintaining crispness include using an oven preheated to 375°F (190°C) and warming the slices on a baking sheet for roughly 10 minutes. Avoid microwave use to prevent sogginess.

When freezing, assemble the torte but avoid baking prior to freezing. Once you plan to serve, thaw overnight in the fridge, then bake fresh for best quality results. This ensures a crispy exterior and creamy interior as intended.

Make Ahead Strategies

Creating this Crispy Balsamic-Thyme Potato Torte in advance can save precious time on the day it is served. Assemble the torte completely, wrap tightly in plastic wrap, and refrigerate for up to 24 hours before baking.

Storage between assembly and baking is crucial; utilize airtight methods such as plastic wrap or covered dishes, which prevent any moisture escape and result in even cooking.

Monitor the quality impact with visual inspection prior to cooking; slight darkening of raw potato edges is normal and will not affect overall taste or texture post-baking.

During assembly, layer with intention, and use the time to ensure each slice is precise, so when it is baked you have a perfect creation. Completing the assembly beforehand allows you to concentrate on flavor-building without rushing.

When preparing for serving, reheating guidelines should be followed strictly to preserve quality. Bake off only when needed, allowing for a fresh, warm dish that boasts both flavor quantity and aesthetics.

Fresh element additions might include the thyme or a garnish post-bake to invigorate flavor lost during refrigeration and offer a visual refresh to pre-baked items.

Scaling Instructions

For halving the recipe, use a smaller baking dish to maintain the visual presentation and proportional cook time, ensuring even layers and crisp finishes remain consistent with the original.

Doubling or tripling this recipe requires a large baking dish or several smaller ones to allow for uniform heat distribution. Pre-slice all potatoes in advance, ensuring you maintain efficiency and consistency across the expanded serving size.

Equipment adjustments should consider thickness and edges—use mandolins with signified settings to distribute even slices across various thicknesses when altering recipe amounts.

Momentarily increase cooking time with larger dishes but finely monitor the golden hue and crispness to avoid overbake. Adjust as necessary based on slice thickness and oven type, frequently turning your dish to achieve even cooking.

Consider storage of leftovers with an eye towards accessibility; pre-divide into portions to avoid waste or spoilage, allowing for easy reheating whenever desired.

Nutritional Deep Dive

The torte primarily features carbohydrate-rich potatoes, offering a significant source of energy and serving as a perfect pairing to protein-heavy main dishes. The use of russet potatoes introduces a high potassium content that supports cardiovascular health.

Micronutrient analysis presents a range of elements from potassium to vitamin C, found especially in fresh potatoes, each contributing to overall well-being and offering antioxidant properties that help in cellular repair and maintenance.

Health benefits are numerous, particularly when potatoes are paired with healthy fats like olive oil, crucial for efficient vitamin uptake and maintaining skin health through its E vitamin content found naturally in chosen oils.

Dietary considerations include opting for Yukon Gold potatoes if aimed towards boosting iron absorption, beneficial for those with lower B12 levels or anemia, considering the dish’s ability to balance out macronutrient requirements.

Portion analysis identifies the balance between maintaining the health-forward aspects of the torte while savoring indulgence as a side dish; it’s proportionally serving 1/8th slice with your main course ensures you enjoy its fullness without overindulgence.

Weight management tips involve mindful eating: the natural satiety of potatoes coupled with moderate portion sizes can contribute to feeling full without consuming unnecessary calories or fats.

Dietary Adaptations

For a gluten-free variant, ensure any thickeners used in balsamic glaze or accompanying sauces are certified gluten-free, allowing those with gluten sensitivity to enjoy without concern.

Creating a dairy-free option requires subtle changes: swap butter for olive oil or dairy-free margarine, ensuring all dairy products align with individual dietary needs for seamless adaptation.

A vegan twist mandates removal of all animal-derived products, substituting cheeses with nut-based alternatives, and focusing carefully on fat sources to maintain exquisite flavors without any dairy.

For a low-carb alternative, switch the primary ingredient from potatoes to thinly sliced turnips or cauliflower layers, replicating texture without needing significant carbohydrate content.

The keto-friendly version requires assessing fat sources, ensuring optimal macro distribution. Consider full-fat dairy or avocado oil spray to achieve this balance without reducing taste.

Paleo enthusiasts can focus on quality fats and ensure potatoes are substituted with comparably structured yet compliant vegetables, crafting a parsnip-based rendition that appreciates ancient dietary principles.

The low-FODMAP version focuses on using non-starchy vegetables like Lebanese cucumbers or zucchinis in place of potatoes, steered by individual digestive tolerances aligned with FODMAP guidelines.

Troubleshooting Guide

Texture Issues: If the torte is too soft, ensure excess liquid from potatoes has been drained, and that all slices are dried before assembling to promote a crisp bake.

Flavor Balance: Overwhelming thyme or balsamic can dominate. Taste each layer raw and adjust seasoning before cooking, ensuring a balanced intensity.

Temperature Problems: Ensure avoidance of uneven cooking through middle rack placement and proper oven preheating. Increase initial bake temperature slightly if necessary.

Equipment Challenges: If slices are uneven, maintain consistency by sharpening your kitchen tools pre-prep, or use a safe, reliable mandolin for perfect thickness.

Ingredient Substitutions: For alternate vegetables, ensure cook time alignment remains, avoiding textural dissonance. Choose comparable moisture contents for consistent results.

Timing Concerns: Share time management constraints by preparing slices in advance or utilizing pre-sliced equivalents where applicable to reduce active cooking hours.

Recipe Success Stories

Community feedback shines a warm light on the accolades for this delightful dish. Users express joy in the aroma filling their kitchen, with layers showcasing sophistication in execution and taste.

Variations of thinly sliced beet add-ons have been praised for color contrast and a sweet earthiness they carry, enriching the layers and the inherent rustic charm.

Adaptation stories inspire, with readers suggesting cheese varieties such as Gruyere and Emmental for Swiss-based renditions that lend both flavor depth and a melting touch to the torte.

Photography tips alternately highlight lighting: natural daylight captures the crisp finish and layered brilliance ready for socials and gatherings, transforming a snapshot into a visual delight.

Frequently Asked Questions

1. Can I make this recipe ahead of time? Yes, you can assemble the torte a day in advance, refrigerate it, and bake fresh to ensure it remains crisp and delicious when served.
2. What type of potato is best for this torte? Opt for Yukon Gold or Russet potatoes, as both deliver a perfect balance of creaminess and structure, holding shape post-baking.
3. Is this dish freezer-friendly? You can freeze the assembled, unbaked torte. Bake straight from frozen, adjusting cute time accordingly, or thaw entirely in the fridge before cooking.
4. How do you ensure even crispiness? Use parchment lining in your baking dish and ensure thorough drying of potato slices prior to assembly to achieve even browning and crisping.
5. What can I serve alongside this dish? Pair with roast meats or a fresh, vibrant salad to balance the richness and offer a varied dining experience.
6. Can I substitute thyme for another herb? Absolutely. Rosemary and sage can both contribute unique flavor profiles, so don’t shy away from trying herb combinations.
7. Is it possible to make this dish vegan? Yes, replace any dairy-based ingredients such as butter or cheese with vegan alternatives to enjoy a completely plant-based torte.
8. What’s the ideal oven temperature for baking? Set your oven to 400°F (200°C) to achieve the crispy exterior and tender, flavorful layers inside.
9. How do I store leftovers? Store any leftovers in an airtight container in the refrigerator for up to three days, ensuring portions remain fresh and moist.
10. Can I use sweet potatoes instead? Certainly! Sweet potatoes will enhance the sweetness alongside balsamic, complementing the thyme beautifully for a wholesome taste.
11. How do I prevent the torte from sticking? Adequate greasing with butter or oil, alongside parchment lining, helps in easy removal post-baking, avoiding any sticking issues.
12. How can I include protein in this dish? Consider adding cooked meats such as bacon or ham between layers, or topping with a poached egg upon serving for an extra protein boost.

Additional Resources

For those keen on future endeavors, explore related recipes like potato gratins and dauphinoise for similarities and variations on this comforting staple. Each offers a unique exploration into potato cuisine that celebrates textures and innovation.

Technique guides emphasize mastering kitchen skills; improve upon present methods with slicing precision and balancing seasoning for flawlessly executed layers each time the torte is created.

Ingredient information offers additional learning opportunities with a specific spotlight on potatoes, allowing the reader to harness their aromatic and textural possibilities across various culinary applications.

Explore equipment recommendations, highlighting versatile kitchen tools like mandolins that transform not only this dish but also contribute to newfound efficiencies in prep for many meals to come.

Seasonal variations continue to engage through exploration choices directly impacted by time-of-year offerings, allowing each maker’s unique take on classic torte recipes to flourish, resonating with their own culinary style.

Join the Conversation

Sharing on social media platforms can transform this culinary exploration into a digital masterpiece. Use dedicated hashtags and connect within community groups, adding a personal take or creative spin to these variations.

Engage with photography tips shared by the community, allowing a deep dive into showcasing this elegant dish at its best. Consider natural light and golden hour ambiance to capture moments worthy of the dish’s flavorsome essence.

Leave recipe reviews embraced by team members to spark dialogue. Comments allow feedback realization and other readers to comprehend, explore, and engage different perspectives when preparing the dish.

Community engagement through forums allows real-time engagement, adaptation options, or alternative techniques. Each contribution serves as a ripple effect, inviting broader perspectives and flavors into this traditional concept.

Encourage users to experiment with recipe variations based on new available flavors, ensuring each kitchen experience becomes unique while remaining tied to the original, captivating recipe essence.

The Recipe

Crispy Balsamic-Thyme Potato Torte

Serves: 6-8

Prep Time: 20 mins

Cook Time: 45 mins

Total Time: 65 mins

Kitchen Equipment Needed

  • Mandolin slicer
  • Large mixing bowl
  • Baking dish (9-inch suitable)
  • Pastry brush
  • Aluminum foil

Ingredients

  • 3 lbs potatoes, thinly sliced
  • 2 tablespoons balsamic vinegar
  • 2 tablespoons olive oil
  • 1 tablespoon fresh thyme leaves
  • Salt and black pepper, to taste
  • 2 tablespoons butter, melted
  • Optional: Grated Parmesan cheese

Directions

  1. Preheat the oven to 400°F (200°C). Grease a baking dish with butter.
  2. Thinly slice potatoes using a mandolin or sharp knife and place them in a large mixing bowl.
  3. Add balsamic vinegar, olive oil, thyme, salt, and pepper. Mix gently to coat evenly.
  4. Layer potatoes in the baking dish, ensuring consistent overlap. Brush each layer lightly with melted butter.
  5. Cover with foil and bake for 25 minutes in the preheated oven.
  6. Remove foil and bake for an additional 20 minutes, or until golden brown and crispy.
  7. Optional: Sprinkle Parmesan cheese in the last 5 minutes of baking for an extra savory touch.
  8. Remove from the oven and let rest 10 minutes before slicing. Serve warm.

Recipe Notes

  • For a vegan alternative, replace butter with plant-based margarine and omit cheese.
  • Additions like caramelized onions or garlic can enhance the depth of flavors.
  • Select suitable potatoes, with waxy yet firm features for best results.

Deliciously Healthy Walnut Maple Roasted Sweet Potatoes Recipe

Walnut Maple Roasted Sweet Potatoes: A Perfect Fall Side Dish

⚖️
Difficulty
Easy

⏲️
Prep Time
15 mins

🕒
Cook Time
30 mins

⏱️
Total Time
45 mins

🍽️
Servings
4

Whether you’re gathering around the table for a holiday feast or enjoying a cozy meal at home, Walnut Maple Roasted Sweet Potatoes provide a tantalizing blend of flavors and textures. With their naturally sweet and nutty taste, these roasted sweet potatoes are a delightful side dish that pairs beautifully with a variety of main courses. The maple syrup adds a hint of caramel flavor, while the walnuts lend a satisfying crunch.

This recipe brings out the best of fall’s warm spices and earthy sweetness, promising to fill your home with inviting aromas. It’s an easy yet impressive dish that requires minimal effort, making it perfect for hectic weeknights or elaborate holiday spreads. The natural sweetness of the sweet potatoes is enhanced by the maple glaze, creating a comforting taste that resonates with the essence of home-cooked goodness.

Quick Recipe Highlights

  • Flavor Profile: The blend of sweet maple glaze with savory roasted sweet potatoes is amplified by a sprinkle of cinnamon and a hint of salt.
  • Texture: Experience the creamy inside of sweet potatoes contrasted beautifully with the crunchy walnuts.
  • Aroma: The kitchen fills with the inviting scent of caramelized maple and roasted aromas.
  • Visual Appeal: A vibrant mix of orange sweet potatoes adorned with golden-brown walnut pieces.
  • Skill Level Needed: Easy enough for beginners, as it involves basic chopping and roasting techniques.
  • Special Equipment: A sturdy baking sheet ensures even roasting.

Recipe Overview

  • Difficulty Level: This recipe is straightforward, involving basic preparation and roasting steps that require no advanced culinary skills.
  • Category: Ideal as a side dish, it complements main dishes from traditional roasts to vegan entrees.
  • Cuisine: This recipe captures the rustic charm of American comfort cuisine with a touch of maple syrup sweetness.
  • Cost: Budget-friendly, with ingredients costing around $10, it serves generously without burdening your wallet.
  • Season: Perfect for fall and winter when sweet potatoes are at their peak, offering warmth and comfort.
  • Occasion: Suitable for Thanksgiving, Christmas, or any comforting family dinner gathering.

Why You’ll Love This Recipe


The sweet and savory appeal of this dish is undeniable. The natural sweetness of the sweet potatoes, heightened by the maple glaze, tantalizes the taste buds while offering a healthy alternative to more indulgent desserts. The walnuts introduce an earthy note that perfectly complements the dish. Enjoy the convenience of this recipe; with just a few preparatory steps, you can have a delicious, nutritious side dish with minimal cleanup. Packed with vitamins A and C, this recipe offers health benefits that are hard to overlook.

This dish serves as a great conversational piece, ideal for family gatherings where food is central to celebration. The combination of warm spices and sweet glaze allows it to fit seamlessly into any menu, making it a flexible option for those hosting. Factor in its cost-effectiveness, and you have a recipe that’s as kind to your wallet as it is to your palate.

Ingredient Deep Dive


Sweet potatoes are a versatile vegetable celebrated for their natural sweetness and nutritional density, rich in fiber and vitamins. Choose firm, smooth-skinned sweet potatoes for the best results. Maple syrup is the star addition, offering a natural sweetness with a hint of smokiness often used in North American cuisine. Opt for pure maple syrup for a richer flavor compared to pancake syrup alternatives.

Walnuts add a crisp texture and depth of flavor while providing essential fats and proteins. Store walnuts in a cool, dry place to maintain their freshness. When selecting, opt for halves or pieces to enhance the dish’s visual appeal.

Common Mistakes to Avoid

  • Overcrowding the baking sheet can result in steaming instead of roasting. Ensure sweet potato pieces are in a single layer for even cooking.
  • Skipping the oil can lead to uneven browning and dry potatoes. A light coating helps achieve a golden finish.
  • Using low-quality maple syrup dulls the flavor. Stick to pure maple syrup for the best taste.
  • Misjudging bake time can lead to soggy or hard potatoes; monitor closely during the last few minutes.
  • Not stirring the walnuts in advance. To enhance flavor and texture, toast the walnuts slightly.
  • Underseasoning; a pinch of salt elevates the sweet and savory balance.
  • Cutting potatoes too small; aim for uniform pieces for even cooking.
  • Not preheating the oven results in uneven cooking. Start with a hot oven.

Essential Techniques


Properly chopping the sweet potatoes is crucial. Use a sharp knife to ensure clean cuts, aiming for uniformity for even roasting. Coating with oil and seasoning ensures every piece absorbs flavor and caramelizes correctly. Monitor the aromas during roasting; they can provide clues that your dish is nearing perfection without overbaking.

Pro Tips for Perfect Walnut Maple Roasted Sweet Potatoes


Utilize parchment paper to prevent sticking and make cleanup easier. Experiment with adding a pinch of cayenne or black pepper for a spicy contrast to the sweetness. Rotate the baking sheet halfway through roasting to ensure even heat distribution. For added caramelization, drizzle extra maple syrup in the last five minutes of roasting.

Variations and Adaptations


For a regional twist, add a sprinkle of crushed red pepper for a southern kick. Consider swapping walnuts for pecans, aligning closer with Southern U.S. flavors. Veganise by ensuring all ingredients adhere to plant-based standards, which this recipe naturally supports. For a festive twist, sprinkle with dried cranberries before serving.

Serving and Presentation Guide


Serve these sweet potatoes fresh out of the oven on a rustic platter for a home-style feel. Garnish with fresh herbs such as parsley or thyme for a pop of color. Pair with roasted meats or enjoy alone as a hearty snack. Ensure the serving temperature is warm to experience the full flavor spectrum.

Wine and Beverage Pairing


Pair this sweet and savory dish with a medium-bodied wine such as Pinot Noir, which complements the earthiness of the walnuts and the sweetness of the maple syrup. For non-alcoholic options, consider chai or spiced tea to enhance the warming spices.

Storage and Shelf Life


Store leftovers in an airtight container in the fridge for up to three days. Reheat in the oven at a low temperature to revive the texture and flavors. Avoid microwaving, which can lead to sogginess. If freezing, ensure the potatoes are completely cool before sealing in a freezer bag.

Make Ahead Strategies


Chop sweet potatoes and mix with oil and spices a day in advance, storing them in the fridge. When ready, simply toss with walnuts and maple syrup before roasting. Reheat in the oven to retain texture, adding fresh walnuts for a crunchy finish.

Scaling Instructions


To halve the recipe, simply reduce each ingredient proportionally, maintaining the same cooking time. For larger gatherings, doubling is easy, just ensure plates or racks are not overcrowded. Consider using multiple baking sheets to ensure even cooking.

The Recipe

Walnut Maple Roasted Sweet Potatoes

Serves: 4

Prep Time: 15 mins

Cook Time: 30 mins

Total Time: 45 mins

Kitchen Equipment Needed

  • Baking sheet
  • Parchment paper
  • Mixing bowl
  • Sharp knife
  • Cutting board

Ingredients

  • 3 large sweet potatoes, peeled and chopped
  • 2 tablespoons olive oil
  • 1/4 cup pure maple syrup
  • 1 teaspoon ground cinnamon
  • 1/2 cup walnuts, roughly chopped
  • Salt, to taste

Directions

  1. Preheat your oven to 375°F (190°C) and line a baking sheet with parchment paper.
  2. In a mixing bowl, toss chopped sweet potatoes with olive oil, maple syrup, cinnamon, and salt.
  3. Spread the sweet potatoes in a single layer on the prepared baking sheet.
  4. Roast in the preheated oven for 20 minutes.
  5. Add the walnuts to the baking sheet and toss to mix. Continue roasting for another 10 minutes.
  6. Remove from the oven and serve fresh, garnished with extra walnut pieces if desired.

Recipe Notes

  • For added flavor, sprinkle with a pinch of cayenne pepper before serving.
  • Substitute walnuts with pecans for a different twist.

Delicious Chicken Stuffed Crescent Rolls for a Perfect Dinner Recipe

Chicken Stuffed Crescent Rolls: A Delightful Twist on Comfort Food

⚖️
Difficulty
Easy

⏲️
Prep Time
10 mins

🕒
Cook Time
20 mins

⏱️
Total Time
30 mins

🍽️
Servings
8

Picture this: golden, flaky crescent rolls oozing with a savory chicken filling that melts in your mouth. Our Chicken Stuffed Crescent Rolls are the perfect combination of convenience and gourmet taste, making them a go-to recipe for weeknight dinners or quick party snacks. Packed with protein-rich chicken and creamy flavors, these crescent rolls are as heartwarming as they are delicious. Give in to the temptation of this delightful dish that captivates both children and adults alike.

The first bite of a Chicken Stuffed Crescent Roll is like a warm hug on a cold day. The buttery texture of the pastry gives way to a tender, flavorful chicken filling that boasts rich aromas of spices and herbs. As you savor each mouthful, the contrast of flaky dough and creamy filling offers a satisfying balance of taste and texture. These delightful bites are incredibly easy to make yet deliver a gourmet experience that feels like a culinary triumph every time.

Quick Recipe Highlights

  • Flavor Profile: This recipe features a blend of savory chicken, creamy cheese, and subtle spices that create a complex yet comforting taste.
  • Texture: Expect a delightful contrast between the airy, flaky crescent rolls and the smooth, creamy chicken filling.
  • Aroma: The alluring scent of baking dough combined with the fragrant aromas of spices and herbs fills the air, making mouths water.
  • Visual Appeal: The golden brown crust of the crescent rolls envelops the creamy filling, creating an enticing dish that’s both appealing and appetizing.
  • Skill Level Needed: With straightforward steps and minimal prep work, this recipe is beginner-friendly, requiring only basic cooking skills.
  • Special Equipment: A baking sheet and mixing bowl are essential, making this recipe accessible to nearly any home cook.

Recipe Overview

  • Difficulty Level: This easy recipe is perfect for novice cooks, as it involves simple preparation steps and no complicated techniques, making it ideal for a stress-free cooking experience.
  • Category: Chicken Stuffed Crescent Rolls fall into the appetizer or main dish category, depending on how many you serve per person.
  • Cuisine: This recipe is a modern take on comfort food, blending elements of American home cooking with creative presentation.
  • Cost: Relatively inexpensive, this recipe utilizes affordable ingredients, making it budget-friendly for family meals or gatherings.
  • Season: Perfect for any season, this versatile dish can be enjoyed year-round, with its warming quality being especially comforting during colder months.
  • Occasion: Ideal for casual weeknight dinners, parties, and potlucks, Chicken Stuffed Crescent Rolls are crowd-pleasers that fit various occasions.

Why You’ll Love This Recipe


Dive into the world of taste and texture with our Chicken Stuffed Crescent Rolls. Each bite offers a heavenly combination that strikes the perfect balance between flaky, tender crescent dough and creamy, savory chicken filling. You’ll love how the subtle spices enhance the natural flavors without overpowering them, making these rolls a delightful indulgence for your taste buds.

Convenience is key with this recipe. With a prep time of just 10 minutes, you’ll have more time to relax and enjoy your meal. The step-by-step instructions ensure easy assembly, and in no time, your kitchen will be filled with the enticing aroma of freshly baked crescent rolls. Plus, they’re easily portable, making them a great option for lunches or picnics.

Nutritionally, Chicken Stuffed Crescent Rolls are a well-rounded choice. The protein-packed chicken offers essential nutrients while the controlled portion sizes keep the meal balanced. Pairing with a fresh salad or vegetable side dish turns this dish into a nutritional powerhouse.

When it comes to entertaining, these rolls are a hit. Their warm, inviting appearance and delicious flavor make them perfect for sharing with friends and family. Whether you’re hosting a casual gathering or an elegant affair, Chicken Stuffed Crescent Rolls are sure to impress your guests.

Cost-effectiveness is another reason to embrace this recipe. Using pantry staples and readily available ingredients, you can create a delicious dish without breaking the bank. Its affordability makes it an excellent option for feeding larger groups or meal prepping.

Historical Background and Cultural Significance


The origin of the crescent roll dates back to ancient times, where similar bread-like creations were enjoyed by civilizations across Europe and the Middle East. Over centuries, local adaptations have shaped them into the flaky pastries we adore today. Marrying this versatile bread with chicken filling is a modern innovation that celebrates culinary creativity.

Culturally, the crescent roll stands as a symbol of unity and hospitality. In many cultures, sharing bread is a gesture of goodwill and friendship. Our Chicken Stuffed Crescent Rolls continue this tradition, bringing people together around the dining table.

As culinary trends evolved, chefs began experimenting with fillings and flavors, giving birth to stuffed pastries. The fusion of chicken and crescent rolls is a testament to the adaptability of classic recipes in contemporary cuisine.

Across the globe, regional variations of stuffed breads are enjoyed, each showcasing distinct spices and fillings unique to their cultural heritage. Whether savory or sweet, these pastries embody the richness of culinary traditions and the endless possibilities of flavor.

Ingredient Deep Dive


The star ingredient, chicken, boasts a storied history as a dietary staple across many cultures. A lean and versatile protein, chicken is celebrated for its adaptability in various dishes around the world. Its mild flavor serves as a perfect canvas for an array of spices and herbs.

Nutritionally, chicken is a high-quality source of protein, essential amino acids, and B vitamins, making it an excellent choice for a balanced diet. When selecting chicken, freshness is key, so look for firm, pale flesh with minimal odor. Store it in a refrigerator below 40°F and use within 1-2 days for optimal freshness.

Common Mistakes to Avoid

  • Overfilling the dough can lead to bursting during baking, so use the recommended measurements.
  • Not sealing the edges properly will allow the filling to spill out, resulting in a messier dish.
  • Underestimating cook time may lead to doughy centers, so ensure rolls are golden brown.
  • Skipping preheating the oven can alter cooking times and result in uneven baking.
  • Using cold ingredients directly may extend cooking times, so allow them to come to room temperature first.
  • Ignoring the use of parchment paper can lead to sticking, so ensure the baking sheet is lined.
  • Not allowing the crescent rolls to cool slightly before serving can cause burns from hot filling.
  • Overwhelming flavor with too many spices can mask the natural taste of the chicken.

Essential Techniques


Mastering the art of rolling the crescent dough is crucial for achieving the perfect chicken stuffed roll. Start by unrolling the crescent dough triangles and lay them flat on a clean surface. Place a spoonful of filling at the widest end of each triangle, being careful not to overfill. Roll the triangle from the wide end towards the tip, tucking in the corners to encase the filling securely.

Pay attention to sealing edges properly. Use your fingers to gently pinch the dough together at all seams, ensuring the filling stays inside as it bakes. This technique prevents any unwanted leaks and gives each roll a pristine appearance.

The visual cue of a perfectly baked crescent roll is its golden hue. You’ll know they’re done when they have a uniform color and visibly puffed appearance. Watching for this cue will help you avoid doughy centers and ensure even cooking throughout.

Pro Tips for Perfect Chicken Stuffed Crescent Rolls


Using room temperature ingredients can improve texture and flavor, as they mix more evenly and produce a better rise in the dough. Incorporate a brush of melted butter on top before baking for added richness and golden color.

Experiment with spices to match your taste. Garlic powder, onion powder, or a dash of cayenne pepper can enhance the flavor profile while keeping the stuffing balanced. Consider adding finely chopped herbs like chives or parsley for a fresh burst of flavor.

If preparing in advance, assemble the rolls fully and store them in the refrigerator for up to a day before baking. This will save you time while ensuring the filling has time to meld with the dough.

For a twist, include shredded cheese in the filling mixture for gooey delight, using varieties like cheddar or mozzarella for added taste. Lastly, avoid overpacking your baking sheet, allowing adequate space between rolls to expand during baking.

Variations and Adaptations


For regional variations, add seasonings local to your area, such as using cumin and paprika for a Southwestern twist or curry powder for a hint of Indian cuisine. Each adaption brings its own unique spin to the classic.

To adapt to the seasons, try incorporating seasonal vegetables into the filling. In summer, fresh tomatoes and basil give a fresh edge, while winter invites cooked squash or sweet potatoes for hearty warmth.

Dietary modifications can make these crescent rolls accessible to more dietary needs. Substitute regular crescent dough for gluten-free alternatives for those with gluten sensitivities, or use plant-based chicken for a vegan version.

The flavor can be varied by adding different sauces or dips. Consider a tangy barbecue sauce mixed with chicken for a smoky profile, or a buffalo sauce for those craving a spicy kick.

In terms of texture, try adding chopped walnuts or sunflower seeds for added crunch, complementing the creamy filling. Cheese lovers can increase cheese content for extra meltdown in every bite.

Presentation alternatives allow for creative serving methods. Arrange rolls in a spiral pattern, sprinkle with poppy seeds or sesame seeds for visual interest, or use mini crescent dough for bite-sized appetizers perfect for party platters.

Serving and Presentation Guide


Present Chicken Stuffed Crescent Rolls on a large serving platter with vibrant garnish such as fresh herbs or sliced cherry tomatoes to enhance their visual appeal. Plating on bed of greens can add a sophisticated touch and is easy to implement.

For garnishing, consider delicate sprigs of cilantro or a light dusting of paprika for color contrast. Traditional accompaniments can include a marinara or ranch dipping sauce to balance the richness of the rolls.

Modern serving suggestions are ideal for quick gatherings, using ramekins with assorted dips for guests to enjoy. Ensure rolls are served slightly warm for optimal flavor release, considering a gentle reheat if prepared in advance.

Temperature considerations mean keeping the rolls at their best—crisp yet tender. Avoid reheating excessively in the oven, which can dry out the filling. Simply a warm oven or quick microwave blast suffices.

Portion control tips suggest two rolls per person as a main meal, allowing plenty of room for side dishes while maintaining a balanced meal.

Wine and Beverage Pairing


For a delightful wine pairing, consider a crisp white such as a Sauvignon Blanc or a lightly oaked Chardonnay, which complements the creamy chicken filling. The freshness of white wine accents the lightness of the crescent rolls uniquely.

Non-alcoholic alternatives might include sparkling water with citrus infusions or a mild herbal tea, adding refreshing notes to each bite. These options cleanse the palate between rich, savory flavors.

When considering sweet indulgences, lightly brewed iced coffee or a citrusy Earl Grey tea pairs harmoniously, offering diverse aromas to tantalize your taste.

Temperature considerations mean chilled beverages offer a refreshing contrast, particularly when enjoyed alongside the warm stuffed rolls. Aim for a drinkable temperature that enchants not overwhelms the senses.

Ensure beverages are served in ample glasses, adding class to any meal. Encourage experimentation within your preferences, highlighting flavors that you enjoy most.

Storage and Shelf Life


Storage methods focus on sealing freshness within the crescent rolls. Store them in airtight containers at room temperature for a day or in the fridge for up to three days, allowing retention of moisture and flavor.

Temperature requirements involve keeping rolls below 40°F to prevent spoilage, particularly in warmer climates. Avoid excess moisture within containers, as this can result in sogginess.

Container recommendations suggest sturdy Tupperware with secure lids, ensuring minimal air exposure. Line containers with parchment paper to prevent sticking and aid in easy retrieval.

Signs of spoilage include any unexpected odors or discoloration. If in doubt, discard to avoid risks of consumption.

Reheating instructions are simple: warm rolls in a preheated oven at 350°F for 5-7 minutes, or until heated through. Use a microwave with caution to prevent altering texture.

Freezing guidelines are effective too, with rolls frozen separately on a baking sheet before storage, preventing them from sticking together. Thaw completely before reheating for best results.

Make Ahead Strategies


Planning is key! Prepare the chicken filling a day in advance to let flavors meld together beautifully. Store the mixture, ensuring tight-fitting lids to avoid air contamination.

When assembling rolls early, tightly wrap and place them in the fridge, preserving texture and flavor integrity. Preheat oven and bake when ready, promising a fresh, irresistible aroma.

Quality impacts as flavor develops over time, enriching the taste for day-to-day enjoyment. Ensure crispness by reheating in the oven, avoiding microwave reheat where possible.

Assembly tips include rolling ahead and carefully sealing edges, maintaining focus on each fold to prevent leakages. Plan for quick access and assembly during busy dinner times.

Reheating guidelines stress using a warm oven for consistent flavor and quality. For added freshness, sprinkle chopped green herbs or diced scallions post reheating.

Fresh element additions can heighten dining experience. Try adding colorful tomato salsa for a touch of brightness or hot pepper flakes for those who prefer heat.

Scaling Instructions


Halving the recipe involves proportionately dividing every ingredient, ensuring consistency in flavor and bake time. Recommended when serving smaller groups or testing the recipe.

Doubling or tripling notes involve additional baking sheets or staggered cooking times, as crowding in an oven can affect quality and consistency. Proper spacing ensures optimal cooking.

Equipment adjustments are minimal, focused on adequate space and tray availability. Larger production may benefit from larger mixing bowls for filling preparation.

Timing modifications are key for large-scale baking ventures. Consider longer bake time when working with full trays: monitor throughout for golden perfection.

Storage considerations focus on maintaining freshly baked status. Store in airtight containers, being mindful of stacked items, and using cooling racks to avoid stale bottoms.

Nutritional Deep Dive


Each Chicken Stuffed Crescent Roll combines nutrition with indulgence. The macro breakdown includes balanced proteins from lean chicken, providing necessary amino acids for body health.

Micronutrient analysis highlights B vitamins and minerals found in chicken, prosperous for energy production, and immune system support.

Health benefits incorporate the sustained energy chicken provides along with benefits of portion control achieved through individualized rolls. Choices support weight management without deprivation.

Dietary considerations reflect complete protein availability, important for muscle growth and repair, central to a healthy diet.

Portion analysis displays moderated calorie counts, with typical servings contributing favorably to daily intake recommendations.

Weight management tips suggest complementing rolls with substantial salads or vegetables to curate fulfilling, nourishing meals rich in fiber.

Dietary Adaptations


Craft gluten-free crescents by utilizing alternative dough, ensuring the same satisfaction level. Embrace a gluten-free lifestyle without missing out on delightful experiences.

Dairy-free version swaps traditional ingredients with plant-based fillings. Use nutritional yeast in place of cheese, enhancing taste without sacrificing richness.

For vegan cravings, exchange chicken for chickpeas or tofu, aligning with individual lifestyle commitments while maintaining flavorful delight.

Low-carb offering swaps crescent rolls for similarly shaped veggies like zucchini, offering tenderness achieved without carb concerns. Wraps provide delightful juiciness with fewer carbs.

Keto enthusiasts thrive with almond or coconut flour alternatives, balancing fat needs within a keto diet without compromising taste or texture.

Paleo devotees adore the possibilities of creating grain-free concoction variants, presenting newfound culinary adventures with traditional health principles.

Low-FODMAP focus leads to choices aligning with dietary restrictions, leaving space for breathability and comfort through essential adaptation.

Troubleshooting Guide


Texture issues may involve undercooked rolls. Ensure even cooking by spreading crescent shapes evenly during baking steps, turning trays if needed for uniformity.

Flavor balance requires seasoning keenly, avoiding salt excess or underseasoning. Taste during stages to properly calibrate your palate’s preferred result.

Temperature problems in baking demands preheated alignment. Allow ovens to reach the correct temperature before baking commenced, giving even, reliable outcomes.

Equipment challenges often mean ensuring the right tool for the job. Firm rolling pins, reliable baking sheets, and parchment paper create unity in cooking efforts.

Ingredient substitutions invite creativity over constraint, offering varied components with equal purpose for personalized delight.

Timing concerns center on preparation stages. Assemble crescents efficiently to align rolling targets, mimicking desired timing management essential for desired quality.

Recipe Success Stories


Community feedback shines as praise gathers online! Families boast about creating heartwarming moments focused around stuffing and enriching rolls, bonding amid shared joy.

Variation successes showcase ingenious experiments combining eclectic flavors and regional favorites, respecting heritage dishes with brave, fusing adaptability.

Adaptation stories enable new culinary epiphanies from readers altering original approaches, embracing transformative potential and heartfelt, joyful creativity.

Reader suggestions enrich diversity and invite greater conversation. Tips flow forth, granting fresh features and enhancements to a continually evolving classic recipe.

Photography tips emphasize lighting, embracing character-defining textures and rich hues. Capture iconic rolling transitions using angles maximizing aesthetic charm.

Frequently Asked Questions

What can I use instead of crescent rolls? You can use puff pastry or homemade dough for similar results. Just be mindful of adjustments in baking times and thickness to match desired texture.

How do I prevent the filling from leaking? Ensuring proper sealing by pinching pastry tightly at seams and avoiding overstuffing minimizes the risk of leaks. Chow down with confidence!

Can I cook these in an air fryer? Yes, air frying maintains crispness. Adjust temperature to 350°F and time to about 10 minutes, checking halfway to ensure even cooking.

Are these freezer-friendly? Yes, freeze assembled rolls before baking for up to three months. Bake from frozen, adjusting time to guarantee even bake throughout.

What sides pair well with this dish? Pair delightful rolls with crisp salad offerings or chilled vegetables, crafting balanced, enriching meals ideal for an eclectic dining experience.

Can I add extra spices? Certainly! Customize with spices like cumin or curry powder for personalization. Taste frequently to ensure desired flavor profile remains intact.

Is there a low-sodium version? Yes, utilizing reduced-sodium products maintains enjoyment without excess salt. Explore spices that heighten flavor convention without compromising health considerations.

How can I make these vegetarian? Replace chicken with sautéed mushrooms, broccoli, or even black beans for vibrant, vegetarian allure. Diverse vegetable presence ensures satisfying, memorable bites.

Can I prepare these in advance? Absolutely! Fill and fold ahead of serving time. Refrigerate fully assembled until needed, bake as instructed for freshly aromatic results.

How do I reheat leftovers without drying them? Gently reheat in a warm oven, adding time to guarantee consistency. Microwave use should be monitored for brief intervals only to remain juicy and moist.

Additional Resources


Explore related recipes such as spinach-filled pastries or savory pockets that both enhance your crescent adventures with diverse ingredient explorations and taste experimentation.

Technique guides discussing puff pastry creation furnish expansion opportunities, offering foundational knowledge for those willing to create homogenous layers at home.

Ingredient information dives into fresh alternatives. Consider using local produce when feasible, pivoting traditional boundaries into new flavor horizons.

Equipment recommendations lead you towards nonstick essentials, including silicone mats and rolling pins, cementing success within advanced endeavors preparing multitudes of crescents.

Seasonal variations emphasize ongoing creativity tailored for specific harvesting periods. Collect flavor profiles to suit changing desires throughout continuous evolution efforts.

Join the Conversation


Enhance your culinary journey by sharing photos and variations on social media platforms. Tag us to showcase your mouthwatering creations hard at work in the kitchen.

Consider photography tips by adjusting lighting and using props to add character to your plated crescent rolls, capturing their essence on camera.

Provide recipe reviews online, letting fellow enthusiasts know how you adjusted or adored the flavors. Realize contribution roles when documenting shared experiences.

Engagement within the broader community fosters opportunities to collaborate in recipe customization, inclusion of creative methods, and fostering deep love within this unique eating adventure.

Delight in tasteful experimentation, retaining elements of beloved origin while pursuing vibrant transformation preferencial. Adjust natural beauty to better personal comfort.

The Recipe

Chicken Stuffed Crescent Rolls

Serves: 8

Prep Time: 10 mins

Cook Time: 20 mins

Total Time: 30 mins

Kitchen Equipment Needed

  • Baking sheet
  • Mixing bowl
  • Rolling pin (optional)
  • Parchment paper

Ingredients

  • 1 can crescent roll dough
  • 1 cup cooked shredded chicken
  • 4 ounces cream cheese, softened
  • 1/2 teaspoon garlic powder
  • 1/2 teaspoon onion powder
  • Salt and pepper to taste
  • 1/4 cup shredded cheddar cheese

Directions

  1. Preheat your oven to 375°F (190°C) and line a baking sheet with parchment paper.
  2. In a mixing bowl, combine shredded chicken, cream cheese, garlic powder, onion powder, salt, and pepper. Mix until all ingredients are well incorporated.
  3. Unroll the crescent dough and separate it into individual triangles on a flat surface.
  4. Place about a tablespoon of chicken mixture onto the wide end of each triangle.
  5. Sprinkle a little shredded cheddar cheese over the chicken mixture.
  6. Roll the dough starting from the wide end toward the point, encasing the chicken mixture securely.
  7. Place each roll onto the prepared baking sheet, leaving space between them.
  8. Bake in the preheated oven for 15-18 minutes, or until golden brown.
  9. Allow to cool for a few minutes before serving warm.

Recipe Notes

  • Feel free to add extra spices or herbs that you enjoy to customize the filling.
  • Store any leftovers in an airtight container in the refrigerator and reheat in the oven.

Irresistible Sausage Cream Cheese Crescents: Easy Appetizer Recipe to Try

Sausage Cream Cheese Crescents: A Savory Delight for Any Occasion

⚖️
Difficulty
Easy

⏲️
Prep Time
10 mins

🕒
Cook Time
15 mins

⏱️
Total Time
25 mins

🍽️
Servings
8

Elevate your appetizer game with these irresistible Sausage Cream Cheese Crescents. Perfectly flaky crescents encase a savory mixture of sausage and cream cheese, creating a flavor profile that is both comforting and alluring. Whether you’re hosting a party or looking for a quick snack, these crescents promise to impress with their delightful combination of textures and tastes.

The simplicity of preparing Sausage Cream Cheese Crescents is matched only by the complexity of flavors achieved. The crisp and golden pastry offers a satisfying crunch that complements the creamy and savory filling. As the aroma of baked crescent rolls fills your kitchen, you’ll anticipate the moment these mouthwatering bites are ready to enjoy. Ideal for brunches, potlucks, or as a stand-alone treat, these crescents are bound to become a household favorite.

With a prep time of just 10 minutes, you can whip up these delectable treats in a flash. The filling offers a balance between the creamy texture of the cheese and the robust flavor of sausage, making every bite a delight. As you make your way through this easy-to-follow recipe, you’ll find the process delightfully straightforward, allowing even novice cooks the satisfaction of crafting something truly special.

Quick Recipe Highlights

  • Flavor Profile: These crescents boast a rich, savory blend reminiscent of classic comfort food, with hints of pepper and garlic from the sausage.
  • Texture: The contrast between the flaky, buttery crescent pastry and the creamy, soft filling creates an irresistible balance in every bite.
  • Aroma: As they bake, the crescents release a mouthwatering aroma of browned sausage and savory herbs, enticing anyone nearby.
  • Visual Appeal: A golden brown hue and a neatly sealed edge make these pastries as inviting to the eyes as they are to taste.
  • Skill Level Needed: Accessible to cooks of all levels, requiring only basic techniques for assembly and baking.
  • Special Equipment: No special equipment needed, just a baking sheet and your trusted oven.

Recipe Overview

  • Difficulty Level: Easy — this recipe is ideal for beginners with straightforward steps that promise a high reward for minimal effort.
  • Category: Perfect for appetizers, snacks, or brunch bites, fitting seamlessly into various mealtime settings.
  • Cuisine: Influenced by Western culinary traditions, highlighting classic homestyle flavors with a modern twist.
  • Cost: Budget-friendly, utilizing minimal and accessible ingredients without sacrificing taste or quality.
  • Season: Enjoy year-round, though their warm, hearty flavors are especially comforting during fall and winter.
  • Occasion: Perfect for casual gatherings, holiday parties, or as a tasty companion to a family meal.

Why You’ll Love This Recipe


Experience the exquisite taste and texture of Sausage Cream Cheese Crescents, where the seamless blend of flaky pastry and savory filling creates a delightful culinary experience. The rich flavor of sausage intertwined with the creamy cheese ensures that each bite is full of satisfaction. Ideal for those who appreciate bold flavors delivered in a delicately wrapped package, these crescents will quickly find a place in your regular recipe rotation.

Aside from their phenomenal taste, these crescents boast exceptional convenience. With minimal prep and cook times, they are perfect for impromptu gatherings or last-minute treats. The straightforward preparation means you can focus on other aspects of your hosting duties or simply relax while the crescents bake to perfection. Their ease of preparation allows even the busiest home chefs a chance to create something special in the kitchen.

Nutritionally, Sausage Cream Cheese Crescents offer a balance of protein, fats, and carbohydrates. They provide a satisfying option for those seeking a hearty snack or a touch of indulgence during mealtime. While they may not be the centerpiece of a calorie-conscious meal plan, they serve as a welcome treat that supports a balanced dietary approach when enjoyed in moderation.

These crescents are a showstopper in social settings, drawing praise and requests for the recipe from guests of all ages. Their approachable and familiar flavors bring people together, making them a staple at holiday gatherings, family reunions, and neighborhood potlucks. The joy of sharing these delicious crescents extends beyond the taste, contributing to the creation of memorable moments with loved ones.

The cost-effectiveness and accessibility of this recipe make it a go-to choice for anyone looking to deliver high-quality flavor without breaking the bank. With readily available ingredients that are both affordable and easy to source, Sausage Cream Cheese Crescents prove that you don’t need to spend a fortune to enjoy gourmet-style snacks at home. This recipe’s simplicity ensures that fantastic taste is always within reach.

Historical Background and Cultural Significance


Sausage Cream Cheese Crescents are a modern take on classic pastries that combine the best of savory and creamy flavors. Originating from the marriage of breakfast sausage and the versatile crescent roll, these crescents symbolize the fusion of convenience and gourmet taste in contemporary cuisine. Their popularity has soared as ease of preparation meets universal flavor appeal.

These crescents carry cultural significance in their adaptability to various culinary traditions. While they are firmly rooted in Western cooking, reflecting a penchant for hearty and comforting flavors, their simplicity allows for infinite adjustments influenced by global spices and seasonings. As more home chefs experiment with fillings, the dish continues to evolve and gain cultural layers.

The crescent roll itself, a staple in many households, has historical roots in Europe, where similar types of dough have been used for ages. Over time, the convenience and uniformity of canned crescent dough broadened its reach, making it a common element in American kitchens and enabling recipes like Sausage Cream Cheese Crescents to thrive and be enjoyed widely.

Today, regional variations of this recipe exist, with each area putting a unique twist on the original. Whether it’s adding regional chiles for heat or incorporating local cheeses for flavor nuances, these modifications celebrate diversity while preserving the core idea of offering a delicious and satisfying snack. Such adaptability only enhances the crescents’ appeal, fostering a rich tapestry of culinary interpretations.

Ingredient Deep Dive


The sausage is a key player in this recipe, providing robust flavor and protein. Historically used as a preservation method, sausage offers cultural significance rooted in various cuisines worldwide. Select high-quality sausage with a balance of spices for the best result. Store any unused sausage in a sealed container in the refrigerator for up to a week or freeze for extended freshness. If needed, consider using ground turkey or chicken as a leaner substitution option.

Cream cheese contributes to the dish’s signature creaminess and richness. Originating in the United States, cream cheese has become a versatile ingredient in both sweet and savory recipes. It’s an excellent source of calcium and can be found in full-fat and reduced-fat versions to suit dietary preferences. Keep cream cheese refrigerated and use it within a week of opening to maintain its texture and flavor. For a dairy-free alternative, try using a plant-based cream cheese.

Crescent dough is the foundation of this recipe, offering a buttery, flaky texture that envelops the savory filling. The convenience of pre-packaged dough streamlines preparation while consistently delivering a delicious result. Always check the expiration date before using, store in the refrigerator, and use soon after purchase for optimal freshness and performance. Puff pastry or pie dough can serve as a viable substitution with slight texture variations.

Common Mistakes to Avoid

  • Overstuffing the crescent dough can lead to messy assembly and leakage during baking. Be sure to measure the filling for even distribution.
  • Failing to pre-cook the sausage can result in a greasy filling and uneven cooking. Always brown the sausage before combining with cream cheese.
  • Not sealing the edges properly can cause the crescents to open up during baking. Use a gentle pinch to secure them tightly.
  • Using cold crescent dough can make it difficult to shape and fill. Allow it to reach room temperature for easier handling.
  • Baking at incorrect temperatures can affect texture and doneness. Follow specified oven settings for best results.
  • Skipping the baking sheet lining can cause sticking issues. Use parchment paper or a silicone mat for easy release.
  • Overbaking will yield a dry pastry. Keep an eye on color and remove when golden brown.
  • Underestimating cooling time can lead to a runny filling. Allow crescents to set before serving for optimal texture.

Essential Techniques


Browning the sausage is vital for developing deep flavor and preventing grease accumulation in the final dish. Ensure a medium-high heat to encourage even cooking and reduce the sausage’s fat content before mixing with cream cheese. Pay attention to changes in color and texture, sign when the sausage is fully cooked and ready for the next step.

Proper dough handling requires room temperature to prevent tears and facilitate shaping. If refrigerated, leave the dough out for 10-15 minutes before using. Carefully unroll crescent sections and handle gently to maintain structural integrity. Avoid over-stretching during assembly to preserve the characteristic flaky layers.

Mastering the art of crescent wrapping can transform your presentation. Begin by placing the filling at the wider end, rolling towards the point while tucking the sides occasionally. Such techniques prevent overflow and create a clean, professional appearance. Deliberate rolling ensures uniform browning and texture in the oven.

Pro Tips for Perfect Sausage Cream Cheese Crescents


Pre-heating your oven ensures consistent results and reduces the risk of undercooked pastries. Keep an oven thermometer handy to verify accurate temperatures and adjust as necessary.

Opt for high-quality sausage and cream cheese to elevate the overall flavor profile. Experiment with seasoned or spiced sausages to introduce new dimensions to the classic recipe.

A light egg wash before baking can enhance the crescents’ aesthetic with a glossy finish. Brush onto each crescent for a bakery-worthy look.

For a touch of freshness, sprinkle the inside with chopped herbs, such as parsley or chives, before wrapping. This addition provides a subtle burst of flavor with every bite.

Double this recipe and freeze the extras for future gatherings or quick snacks. Allow for complete cooling before freezing to maintain texture and taste integrity.

Experiment with additional fillings once comfortable with the base recipe. Spinach, sun-dried tomatoes, or caramelized onions can add depth and variety.

Variations and Adaptations


Regional variations of Sausage Cream Cheese Crescents abound, reflecting local tastes and available ingredients. In the Southern US, some incorporate jalapeño or hot sauce for a spicy kick, while the Pacific Northwest often sees the addition of smoked salmon for a tangy twist.

Seasonal adaptations allow the recipe to shine year-round. During autumn, incorporate pumpkin puree and spices like nutmeg for a festive touch, or add cranberry sauce during the holiday season for a sweet contrast to the savory filling.

Those following a low-carb or gluten-free diet can use almond flour-based wraps or low-carb crescent dough alternatives to enjoy a guilt-free version of these delightful treats.

Experiment with different cheese varieties to alter the flavor and add richness. Sharp cheddar, Gouda, or brie can transform the filling’s taste profile, accommodating your preferences or available cheeses.

For a smoother texture, sauté the cream cheese and sausage filling before using to meld flavors together further and achieve a creamier consistency.

Presentation alternatives include shaping the dough into small braids or pinwheels for an intricate appearance. These methods can fit more filling into smaller portions or simply add a unique finish to your display.

Serving and Presentation Guide


Elevate your Sausage Cream Cheese Crescents with artful plating techniques. Arrange them in a circular pattern or pyramid stack on a platter, adorned with fresh herbs for a pop of color.

Garnishing is key to enhancing visual appeal and flavor. Add a sprinkle of flaked sea salt or cracked pepper before baking for added depth, or top with freshly grated Parmesan for an irresistible, savory crust.

Traditional accompaniments like a side of spicy mustard or creamy ranch dip can enhance the dish’s complexity and provide delightful contrasts.

For a modern serving idea, pair these crescents with a chilled charcuterie board or a selection of pickled vegetables to introduce layers of texture and flavor.

Temperatures play a crucial role in serving. Allow the crescents to cool slightly before serving for best texture, and offer warm from the oven when possible to preserve their signature flakiness.

Mind portion control by slicing larger crescents into smaller bites, ensuring guests can enjoy their flavors without feeling overwhelmed – a perfect option for party settings.

Wine and Beverage Pairing


Choose a crisp white wine, such as Sauvignon Blanc or Chardonnay, to balance the crescents’ rich, savory flavors with refreshing acidity and notes of citrus.

Non-alcoholic alternatives, like a sparkling water with a hint of lime or a crafted iced tea, can complement the crescents’ complex flavors and provide a clean finish to each bite.

For brunch settings, pairing these savory pastries with a robust tea, such as Earl Grey or English Breakfast, offers balanced tannins and warmth that enhance the dish.

Consider the temperature of your beverages: a chilled wine or iced drink can provide needed contrast, while a hot beverage offers comfort with each sip.

Serve beverages in attractive glasses or cups to elevate the presentation, encouraging guests to indulge in both the crescents and their accompanying drinks holistically.

Storage and Shelf Life


To store leftovers, allow the Sausage Cream Cheese Crescents to cool completely before wrapping individually in plastic wrap or placing in an airtight container. Refrigerated crescents should be consumed within three days to preserve their texture and flavor.

Microwave or bake in a preheated oven at 350°F (175°C) for 5-7 minutes to reheat, taking care to check for even warming throughout to avoid soggy crescents.

Freezing offers a longer storage solution. Arrange cooled crescents in a single layer on a baking sheet and freeze until solid before transferring into a freezer-safe bag. Label and date for proper tracking. They can be frozen for up to three months.

To identify spoilage, look for changes in color, distorted shapes, or unpleasant odors. If any of these signs are present, discard to ensure safety and quality when serving.

For best results when serving frozen crescents, bake directly from frozen in a preheated oven until warmed through, adding several minutes to cooking times as needed.

Make Ahead Strategies


Preparing Sausage Cream Cheese Crescents ahead of time can save valuable moments during entertaining. As a versatile dish, it fits well into various timelines without compromising quality or flavor.

Complete the assembly process the night before baking, storing wrapped crescents on a parchment-lined baking sheet covered securely with plastic wrap. Refrigerate overnight, ensuring they are fresh and ready to bake the next day.

Storing between steps is key to maintaining freshness. For partially cooked crescents, allow them to cool to room temperature before wrapping and continuing with refrigeration, an excellent choice for larger batches.

Assessing freshness and quality is simple when noting consistency of texture and aroma. Adjust storage practices if issues arise to ensure a satisfying, tasty final product every time.

When reheating, consider using a toaster oven, which offers even, quick heating without sacrificing the crescents’ signature flakiness and inner warmth.

For added freshness, garnish with personally selected herbs or sauces immediately before serving, giving each bite an aromatic and colorful finish.

Scaling Instructions


Scaling down or up with this recipe is straightforward, but adjustments for ingredient measurements and kitchen equipment should be considered to maintain quality and taste.

Halving the recipe allows you to maintain portion control and minimize potential waste. Downgrade ingredient quantities proportionally, ensuring that filling measurements remain balanced to avoid overly stuffed or underfilled crescents.

When doubling or tripling, ensure you have adequate baking sheets and spacing between pastries to promote even cooking and prevent overcrowding in the oven, which may result in underbaked crescents.

Additional cooking time may be required for larger batches, but avoid leaving them unattended for too long in the oven. Keep an eye on browning and adjust according to your desired level of crispiness.

For storage after scaling, consider individual wrapping if scaling up and make use of your freezer for long-term preservation, labeling batches clearly to track storage conditions and freshness effectively.

Nutritional Deep Dive


Sausage Cream Cheese Crescents provide a complex and satisfying macronutrient profile, with moderate carbohydrates from the crescent dough, proteins from the sausage, and fats from the cream cheese creating a balanced snack option.

A closer look at the micronutrients reveals marginally beneficial vitamins and minerals, such as calcium from the cheese and iron from the sausage, contributing positively to a moderate, nutritious diet.

With a mindful attitude, the indulgence in this dish provides an opportunity to include healthful moderation into your eating pattern, adhering to dietary goals with strategically planned portions and served alongside fresh vegetables.

Keeping an eye on portions enables weight management and the ability to savor each small pastry’s bold flavors without overextending daily intakes. Consider pairing with light salads or fruits to craft a well-rounded meal experience.

A savory treat can be enjoyed in moderation without derailing dietary objectives. Balancing protein-rich snacks and variety at mealtimes can support weight management goals positively.

Dietary Adaptations


For a gluten-free version, substitute the crescent dough with gluten-free pastry available in select grocery stores or create your own using almond flour and baking staples. Keep in mind the textural changes this introduces.

To tailor this recipe to a dairy-free diet, swap cream cheese for a plant-based alternative such as cashew or almond-based cheese to maintain the creamy consistency found in the original dish while being kind to dietary needs.

For a vegan alternative, utilize plant-based sausage and cheese substitutes found in health food stores. Innovations in plant-based cooking have expanded the options to create comparable results in flavor and texture.

A low-carb and keto-friendly version could see the use of finely ground low-carb dough shaped and crisped similarly, offering a continued savory indulgence with mindful carb management.

Paleo variations may forgo the crescent dough itself, transforming the filling into baked or sautéed cups to maintain the robust flavoring with creative presentation delivery methods.

With dietary considerations specific to low-FODMAP positives, select certified low-FODMAP ingredients or make precise adjustments toward savory, balanced flavors on individual digestive comfort levels.

Troubleshooting Guide


Enhance crescent texture through parity of filling and dough, avoiding overstuffing or thin dough that may compromise structural integrity once baked. Controlled portioning at each preparation stage guarantees even final results.

Actively balance flavors by tasting components before combining, ensuring no overpowering single element. Sausage type, seasoning, and additional fillings can greatly impact flavor profiles.

Correct temperature issues with oven calibration, ensuring accurate and evenly distributed heat through an oven thermometer placement. This will improve reliable cook times and overall outcome.

Overcome common equipment challenges with the right baking sheet and lining materials, such as parchment or silicone mats, crucial for effortless result execution and easy release of crisply finished pastries.

Incorporate practical ingredient substitutions through understanding flavor relationships, allowing for seamless transitions of widely fundamental components into each substitution’s specific best-suited recipes.

Optimizing timing concern responses with proper pre-bake organization and cooling assurances guarantees cohesive preparation and serving, offering flexibility and relaxation within kitchen adventures.

Recipe Success Stories


Our community of home chefs widely applauds this recipe, sharing their satisfying experiences and creative variations that have graced many meal occasions with fantastic results. Their shared enthusiasm speaks to its universal appeal.

Some highlight their adaptation success stories, incorporating new herbs like thyme or rosemary and substituting bulk purchase cheeses in place of cream cheese — effortlessly transforming the recipe to suit unique taste preferences.

Readers often share culinary tips, favoring silken dough lining on baking sheets to deter unnecessary kitchen mess, encouraging new participants to follow in rewarding finish placements.

Photography enthusiasts love the opportunity for sophisticated plating captures, ensuring eye-catching social shares and enticing viewers to recreate their presentations while enjoying the depths of handcrafted flavor.

Join the conversation: discuss your unique crescents, review shared suggestions, and embrace the evolution of this timeless recipe as it enriches mealtime with fulfillment and tasty journeys.

Frequently Asked Questions

Can I use vegetarian sausage for the filling?

Absolutely! Feel free to substitute vegetarian sausage to accommodate dietary preferences. Plant-based sausages offer great flavor alternatives without compromising savory appeal.

Is it possible to prepare the crescents with a different type of cheese?

Yes, experimenting with various cheeses such as cheddar, feta, or gruyere can enhance or transform flavor profiles, letting your creativity shine with alternative indulgences.

How can I ensure the crescents remain fresh when stored?

Complete cooling before storing is crucial, using airtight methods such as wrapping or containers to retain quality and prevent staleness over extended refrigerator conditions.

What methods achieve the best reheating results?

Reheat in the oven to reclaim pastry crispness and creamy filling warmth, enjoying similar initial cooked textural contrasts best below—microwave or flash-heat efficiency.

Are there any condiments that pair uniquely with the crescents?

Try offerings like spicy jalapeño jelly, honey mustard, or garlic aioli, adding flavor depth and complementing textures through any curated sauce inclinations.

What’s the best way to keep them warm for serving?

Keep crescents warmed through use of lidded ceramic or stoneware dishes, promoting balanced heat retention and offering delightful warm satisfaction upon serving guests.

What seasoning enhancements can I incorporate for additional flavor?

Consider including garlic powder, red pepper flakes, or dried herbs to sustain personal palates and invigorate the senses during the bustling preparation and baking moments.

How can I achieve better sealing of the crescent dough?

Gently press edges with fingertips or utilize a fork for additional crimping measure. Ingredients’ fullness and containment station are key to achievable perfection once sealed.

Is it possible to make this recipe gluten-free?

Yes, utilizing gluten-free pastry or dough options allows for accommodating dietary preferences without compromising on great flavor experiences when consumed freshly baked.

Do the crescents need to be thawed before baking if frozen?

No, you’ll achieve outstanding results baking directly from frozen. Adjust timing and bake at suggested temperatures until achieving that delightful golden brown outcome.

Additional Resources


Explore related recipes such as Mini Beef Wellingtons or Cheddar and Chive Biscuits, delivering complementary culinary experiences not far from the satisfying crescents at their best.

Improved technique guides offer tips for recognizing critical dough stages and evenly browning, supporting your ongoing kitchen journey toward flavor consistency persistence.

Access ingredient information, encouraging diligent selection and matching components harmoniously within categories, building expansive flavor evaluations and celebratory success alongside recipe execution.

Enhanced equipment recommendations further perfect presentation and practicality, creating multifunctional setups for easy promotion of inspired food. Rediscover specialized culinary ranges and demands.

Regional and seasonal variations bring widespread appeal through timeless crescents’ pathways, expressing joy and culinary depth by demonstrating their vast versatility through multiple horizons.

Join the Conversation


Share your unique Sausage Cream Cheese Crescent creations on social media using #SausageCreamCheeseCrescents, encouraging others to join the conversation and showcase their masterpieces.

Photography tips abound online to guide you in capturing the beauty and complexity of crafted crescents. Consider natural light for skin tones and hues, capturing an appealing, inviting glow.

Pen reviews and posts communicating your experiences with family, friends, or among culinary enthusiasts, fostering an actively engaged community through educational exchanges and inspired cooking.

Participate in community engagement efforts by suggesting regional swaps or alternatives, share your delightful modifications and anecdotal successes with culinary-minded peers.

Celebrate diversity among the recipe’s variations, further enriching shared culinary perspectives and encouraging robust, creative explorations of this globally inspired culinary mainstay.

The Recipe

Sausage Cream Cheese Crescents

Serves: 8

Prep Time: 10 mins

Cook Time: 15 mins

Total Time: 25 mins

Kitchen Equipment Needed

  • Baking sheet
  • Mixing bowl
  • Medium skillet
  • Wooden spoon
  • Parchment paper

Ingredients

  • 1 package (8 oz) cream cheese, softened
  • 1 pound sausage
  • 2 cans crescent roll dough (8 rolls in each)
  • Salt and pepper to taste

Directions

  1. Preheat your oven to 375°F (190°C) and line a baking sheet with parchment paper.
  2. In a medium skillet, cook the sausage over medium heat until browned and fully cooked. Drain any excess fat.
  3. In a mixing bowl, combine the cooked sausage with softened cream cheese. Mix until well combined. Add salt and pepper to taste.
  4. Unroll the crescent dough and place a small spoonful of the sausage mixture at the wide end of each triangle.
  5. Roll the dough, starting at the wide end, and tuck the ends in to completely enclose the filling.
  6. Place each roll onto the prepared baking sheet.
  7. Bake in the preheated oven for 12-15 minutes, or until the crescent rolls are golden brown.
  8. Allow to cool slightly before serving to ensure the filling is set.

Recipe Notes

  • Try adding chopped green onions or herbs to the sausage mixture for added flavor.
  • Consider varying the level of spice by selecting your preferred sausage type.

Flavorful Chicken with Garlic Parmesan Rice Recipe for Dinner

Chicken with Garlic Parmesan Rice: A Delightful Fusion of Flavors

⚖️
Difficulty
Medium

⏲️
Prep Time
15 mins

🕒
Cook Time
30 mins

⏱️
Total Time
45 mins

🍽️
Servings
4

The Chicken with Garlic Parmesan Rice is a comforting dish that brings together the savory taste of chicken with the aromatic blend of garlic and rich Parmesan cheese. This dish offers a symphony of flavors that will elevate your dining experience to gourmet levels right in your own kitchen. Ideal for family gatherings or a cozy dinner, it combines juicy chicken breasts with creamy, cheesy rice that is suffused with the flavor of garlic.

This savory dish is not just about taste; it’s about creating unforgettable moments around the dinner table. Imagine the tantalizing aroma of garlic wafting through your home as the rice simmers to perfection, enhanced by the nutty flavor of Parmesan cheese. With its beautiful presentation and tantalizing scents, this dish promises to be a favorite, evoking smiles and satisfied sighs with every bite.

Quick Recipe Highlights

  • Flavor Profile: Savory chicken marries well with garlic-infused, creamy Parmesan rice, creating a harmonious balance.
  • Texture: Tender chicken paired with creamy, perfectly cooked rice adds a delightful texture contrast.
  • Aroma: The scent of simmering garlic and melted Parmesan cheese will enchant your senses.
  • Visual Appeal: The golden brown chicken against the creamy rice creates a visually inviting plate.
  • Skill Level Needed: Basic sautéing and rice-cooking skills are required.
  • Special Equipment: A good-quality skillet and a saucepan with a lid will ensure cooking success.

Recipe Overview

  • Difficulty Level: With simple ingredients and classic techniques, this recipe is accessible to most home cooks while offering room for finesse in execution.
  • Category: This is a versatile main course that fits into both casual and formal meal categories.
  • Cuisine: While influenced by Italian-American traditions, this dish has a universal appeal across culinary borders.
  • Cost: Estimated cost is modest due to common, pantry-friendly ingredients like rice and Parmesan.
  • Season: Great year-round, with special warmth in cooler months due to its hearty nature.
  • Occasion: Perfect for any occasion from weeknight dinners to family celebrations.

Why You’ll Love This Recipe


The Chicken with Garlic Parmesan Rice is a textural and flavorful triumph that promises not only to satisfy your palate but also to warm your soul. The succulent chicken, when paired with the creamy, aromatic rice, ensures a meal that’s both indulgent and comforting. Its fuller mouthfeel is complemented by the robustness of the garlic and Parmesan, delivering a taste explosion with every bite.

In today’s fast-paced world, convenience is paramount, and this dish delivers. With minimal prep and cook time, you can indulge in the flavors of a gourmet meal right at home without the stress. It requires no complex techniques, making it perfect for both novice cooks and busy professionals looking to whip up a quick yet impressive dinner.

This dish offers nutritional benefits, as it combines protein-rich chicken with the beneficial aspects of garlic and Parmesan. Garlic is known for its immune-boosting properties, while Parmesan adds not just flavor but essential nutrients like calcium. It’s a comforting meal that doesn’t compromise on your health goals.

For social gatherings or family dinners, this dish stands out as a crowd-pleaser. Its elegant presentation makes it a centerpiece on any table, encouraging hearty conversation and shared enjoyment. Whether it’s a casual weeknight or special occasion, it’s bound to impress.

The affordability and accessibility of the ingredients ensure that this delightful dish can become a regular part of your meal rotation without breaking the bank. Chicken and rice are staple items, while garlic and Parmesan just elevate the everyday into exceptional.

Historical Background and Cultural Significance


Chicken with rice is a pairing that has traversed the globe, with each culture adding its own twist. In this fusion, the Italian inspiration shines through with the use of Parmesan and garlic, showcasing the famed Italian technique of creating flavor depth with minimal yet quality ingredients.

Garlic has been a beloved ingredient in cuisines worldwide, hailed for its pungency and health benefits. Parmesan cheese, rooted in Italian legacy, brings a taste of Italy to this otherwise global dish, adding a depth of flavor recognized and loved universally.

Over the decades, this recipe has evolved from a simplistic chicken and rice pairing into a beloved culinary favorite, celebrated for its versatility. By adding garlic and Parmesan, a modern twist is blended with traditional fundamentals, creating a dish that pays homage to its roots while being perfectly suited for today’s kitchens.

Regional variations abound, with additions of unique spices or local toppings turning this dish into an adaptable canvas, reflecting the diversity of culinary traditions while maintaining the integrity of its core flavors.

Ingredient Deep Dive


Chicken is a globally revered protein known for its versatility and health benefits. Rich in essential nutrients and low in fat, it adapts well to various culinary techniques, including sautéing for this recipe. Its subtle taste allows for infusion of flavors, making it the perfect base for garlic and Parmesan.

Garlic is lauded not only for its intense flavor but also for its myriad health benefits, including boosting the immune system. When incorporated into this dish, it offers a pungent flavor that enhances the savory profile of both the chicken and rice.

Parmesan cheese, a king in the cheese world, is valued for its nutty flavor and granular texture. Rich in calcium and protein, it melts into the rice, providing a creamy consistency and an umami-enhanced flavor profile. Always select a block of Parmesan to grate freshly whenever possible to maximize flavor and shelf life.

Rice, with its mild flavor and firm texture, serves as an essential companion to the flavorful chicken. Opt for long-grain varieties for this recipe, known for absorbing flavors well without turning mushy. Store rice in an airtight container in a cool, dry place to maintain its quality and nutritional value.

Common Mistakes to Avoid

  • Using cold rice can lead to uneven cooking, so make sure your rice is at room temperature before starting.
  • Overcooking the chicken can result in dry meat; cook just until the internal temperature reaches 165°F.
  • Adding cheese while the rice is too hot may cause it to separate. Allow rice to cool slightly before mixing in the Parmesan.
  • Under-seasoning is a common mistake; season each ingredient as you go for maximum flavor.
  • Not allowing the garlic to bloom can result in a bitter taste. Sauté it gently to release its sweet aroma.
  • Rushing the simmering step prevents flavors from fully merging, so don’t skimp on this crucial time for best taste results.
  • Using inferior quality Parmesan can drastically affect the flavor; always opt for real Parmigiano-Reggiano.
  • Stirring rice excessively can cause it to become gummy; stir sparingly to maintain separate, fluffy grains.

Essential Techniques


Mastering the sauté method is crucial, as it locks in the juices of the chicken while developing a seared crust for maximum flavor. Keep your skillet hot to achieve that perfect golden-brown hue without drying out the meat. The gentle sauté of garlic is vital to unlock its aromatic oils, adding depth to the dish without imparting any bitterness from overcooking.

Simmering the rice is key to achieving a creamy, cohesive texture rich in flavor. Observe for even absorption of flavors and liquids, ensuring a satisfyingly luscious outcome. Pay attention to the visual cues of the rice turning creamy as it releases its starches into the seasoned liquid.

Pro Tips for Perfect Chicken with Garlic Parmesan Rice


Achieve perfectly cooked, rich rice by toasting it slightly before adding liquid. This step brings out a nutty flavor that harmonizes with the Parmesan. Dicing the chicken into uniform pieces ensures even cooking and a consistent, tender texture throughout the dish. For an extra layer of flavor, consider marinating the chicken in a garlic and herb mixture for at least 30 minutes before cooking.

Use freshly grated Parmesan, as pre-grated variants are often coated with anti-clumping agents that affect meltability and flavor. When seasoning, focus on each layer—use herbs like thyme or basil along with salt and pepper—enhancing the depth of the final dish.

Balancing the flavors is critical in creating a harmonious dish. Taste as you go, adjusting the seasoning to your preference, ensuring that the garlic and Parmesan shine without overpowering. If the dish is too salty, a splash of cream or unsalted butter can cut through the excess saltiness, providing a smoother, richer flavor.

Variations and Adaptations


Regional variations could include the use of local herbs and spices, such as rosemary instead of thyme, or substitutions like adding sun-dried tomatoes for an added tang. Keep a seasonal twist in mind; integrate vegetables like asparagus or mushrooms during their peak season for a fresh dimension of flavor.

For a lighter version, substitute brown rice for white rice to increase fiber content, or use low-fat cheese to reduce caloric intake. Vegan adaptations can be explored by substituting chicken with a sturdy vegetable like eggplant or tofu and using a vegan Parmesan alternative.

To accommodate gluten-free diets, ensure that the chicken stock and cheese are certified gluten-free. Meanwhile, for those who want a bit more robust flavor, consider adding crispy pancetta or sautéed leeks to enrich the dish’s complexity.

Serving and Presentation Guide


When serving, plate the chicken atop the garlic Parmesan rice to create an elegant tower. For garnishing, freshly chopped parsley adds a pop of color and fresh aroma. To stay traditional, accompany the dish with a light side salad or steamed green beans, which enhance the overall dining experience without overshadowing the star elements.

A modern plating suggestion includes serving individual portions of rice in ramekins, overturned onto plates for a restaurant-style presentation. Temperature is essential; serve hot for the best taste and textural contrast between creamy rice and crisp chicken.

Mindful portion control ensures the dish remains balanced in nutritional content while being satisfying. Utilize ladles for rice and specified portion sizes for chicken to maintain consistency across servings.

Wine and Beverage Pairing


Pair this dish with a dry white wine like a Sauvignon Blanc or a light Chardonnay to complement the creamy Parmesan and garlic elements. For non-alcoholic options, consider serving with a chilled, aromatic herbal iced tea that mirrors the dish’s flavorful subtleties.

If you prefer warm beverages, a light green tea can cleanse the palate, refreshing it between bites. Temperature regulations suggest chilling wines appropriately or maintaining tea at warm temperatures to optimize the dining experience.

Serve drinks in appropriate glassware, such as a slender wine glass for whites to concentrate bouquets or a large mug for tea to maintain its warmth. Always present drinks alongside the dish to allow cohesiveness within the meal’s sensory journey.

Storage and Shelf Life


Store leftovers in airtight containers to preserve flavors and moisture in both the chicken and rice. Aim to refrigerate promptly, maintaining a storage temperature below 40°F to minimize bacterial growth and ensure safety.

Containers should ideally be glass or high-grade plastic with secure lids to prevent drying out. Always check for signs of spoilage, like off smells or discoloration, before reheating.

Reheat gently on the stovetop or microwave, adding a splash of broth or water to restore moisture. For freezer storage, defrost overnight in the refrigerator before reheating to maintain optimal texture and taste without compromising integrity.

Make Ahead Strategies


For make-ahead convenience, consider cooking the chicken and starch separately. Store components in separate containers to maintain texture integrity. Refrigerate rice and chicken for up to three days before combining and reheating, ensuring freshness.

Storing components allows you to enhance flavors with fresh garlic and garnish upon reheating. Quality assessments before serving ensure you revive the freshness and vibrancy of flavors.

When reheating, opt for stovetop methods to infuse moisture back into the dish, ensuring a home-cooked quality meal every time. Garnish with fresh Parmesan and herbs just before serving to revive that just-cooked visual appeal.

Scaling Instructions


Easily halve the recipe by reducing each ingredient proportionately, particularly useful for smaller households or intimate meals. Scaling up requires multiple pans or larger cookware to distribute heat evenly and ensure consistent cooking.

Double-check seasoning when scaling for larger portions, as larger volumes may require a slight increase to maintain flavor balance. Adjust cooking times and temperatures slightly, monitoring closely to ensure evenly cooked chicken and rice.

Storage space and equipment should be considered when multiplying this recipe. Ensure sufficient fridge or freezer capacity and utilize adjustable oven racks or multiple burners to facilitate swift cooking for large batches.

Nutritional Deep Dive


The Chicken with Garlic Parmesan Rice is informed by a macro balance that supports maintenance of lean muscle, attributed to its protein-rich chicken. Parmesan adds calcium and a trace amount of vitamin A, while garlic offers antioxidant benefits.

Recognizing micronutrient densities assists in meal planning; consider side dishes rich in fiber or vitamin C to round out the nutrient profile. A single portion provides satiety without excess calories, supporting weight management goals while satisfying flavor cravings.

For those monitoring dietary intakes, the dish can be part of a caloric-controlled plan. Recognizing the fat and protein content helps accommodate dietary needs without excluding satisfaction and joy derived from delicious meals.

Dietary Adaptations


The recipe’s gluten-free potential is optimized by ensuring broth and cheese selections avoid gluten-containing thickeners. Lactose intolerant individuals may consider lactose-free cheeses or experiment with alternative non-dairy cheeses.

For a vegan version, replace chicken with tempeh or plant-based chicken substitutes and ensure complete dairy alternatives for the cheese. Those following a low-carb or keto lifestyle can consider cauliflower rice as a substitute for traditional rice, fitting better within carb constraints.

To make this dish paleo-friendly, starch alternatives and coconut cream could replace traditional grains and dairy while retaining creamy consistency and flavor richness. This adaptability across dietary needs embodies a contemporary culinary inclusivity, emphasizing taste over dietary limitation.

Troubleshooting Guide


Stuck with mushy rice? Ensure the correct water-to-rice ratio and avoid over-stirring, aiding texture retention. Over-salted dish? Soften the taste with a splash of additional broth or fresh cream.

Does the chicken come out dry? Prioritize accurate cooking temperatures, removing from heat upon reaching 165°F to maintain juiciness. Encounter flavor imbalances? Introduce acidity like lemon or vinegar to harmonize overpowering flavors and enhance the overall palate.

Equipment challenges such as uneven heating might be remedied by rotating pans or ensuring heat sources are appropriately aligned with cooking vessels. Dial down heat when simmering to allow the gradual melding of flavors without burning.

Recipe Success Stories


Passionate cooks worldwide have shared versions of this recipe, from doubling garlic for adventurous flavor lovers to incorporating caramelized onions for sweetness. Community feedback overwhelmingly appreciates its adaptability.

Reader suggestions include spicing up the dish with red pepper flakes for a bit of heat or blanched vegetables for added color and nutrition. Dive into the vibrant online community of cooks sharing their visual interpretations and twists on this iconic blend.

Photography tips from successful chefs encourage attention to plating colors and clear contrast between golden chicken breast and creamy rice. Winning culinary clicks hinge on bright natural lighting and garnished details.

Frequently Asked Questions

Q: Can I use a different type of cheese?
A: Yes, feel free to experiment with cheeses like mozzarella for a milder flavor or sharp cheddar for a richer one.

Q: Is it possible to prepare this dish in advance?
A: Absolutely! Prepare components separately and store. Assemble fresh when ready to serve for maximization of flavor.

Q: What are some good substitutes for garlic?
A: Fresh shallots or onion powder can mimic the essence if garlic isn’t suitable for your palate.

Q: How can I lower the sodium content?
A: Use low-sodium chicken stock and cheese alternatives, and consider seasoning with herbs instead of salt.

Q: What wine would best complement this dish?
A: A crisp Sauvignon Blanc elevates the garlic and cheese flavors without overpowering the dish.

Q: Is Parmesan necessary, or can I use another cheese?
A: While Parmesan enhances the savoriness, you can opt for Asiago or Romano as sturdy substitutes.

Q: How can I veganize this dish?
A: Switch the chicken for tofu or chickpeas and use nutritional yeast in place of Parmesan for a flavorful vegan option.

Q: Are there low-carb options for the rice?
A: Yes, riced cauliflower is a delicious low-carb alternative that works well in this dish.

Q: What herbs pair well with this recipe?
A: Herbs like thyme, basil, or parsley can enhance this dish, complementing the garlic and Parmesan.

Q: Can leftovers be frozen?
A: Yes, but ensure proper packaging to prevent dryness and maintain flavor upon reheating.

Additional Resources


Dive deeper with similar Italian pasta dishes that offer complementary flavor profiles and recipe blogs exploring Parmesan’s versatility. Technique guides enrich understanding of rice preparation, and ingredient breakdowns offer insight into garlic’s health benefits.

Discover equipment recommendations for mastering sauté techniques, ensuring optimal results for this chicken recipe. Explore seasonal adaptations through culinary blogs focusing on winter and summer ingredient substitutions, maintaining this dish’s allure year-round.

Join the Conversation


Join fellow food enthusiasts on social platforms to share your culinary creations and insights into this beloved chicken dish. Discover photography techniques that showcase your recipe’s best light and engage in discussions on recipe adaptations.

Create a community by encouraging reviews, and share variations, enhancing this recipe’s experiential journey for home cooks worldwide. Emphasize family traditions tied to this dish, weaving your narrative into this flavor-intense piece of culinary art.

The Recipe

Chicken with Garlic Parmesan Rice

Serves: 4

Prep Time: 15 mins

Cook Time: 30 mins

Total Time: 45 mins

Kitchen Equipment Needed

  • Skillet
  • Saucepan with lid
  • Wooden spoon
  • Grater
  • Measuring cups and spoons

Ingredients

  • 4 boneless, skinless chicken breasts
  • 2 cups of chicken broth
  • 1 cup of uncooked long-grain rice
  • 1/2 cup grated Parmesan cheese
  • 4 cloves of garlic, minced
  • 1 tablespoon olive oil
  • Salt and pepper to taste

Directions

  1. Heat olive oil in a skillet over medium heat. Season chicken breasts with salt and pepper and add to the skillet.
  2. Sauté chicken until golden brown and cooked through, approximately 6-7 minutes per side. Remove from skillet and set aside.
  3. In the same skillet, add minced garlic and sauté briefly until fragrant, about 30 seconds.
  4. Add rice, stirring to coat in garlic oil, and cook for 1-2 minutes until slightly toasted.
  5. Pour in chicken broth and bring to a simmer. Cover and reduce heat to low, cooking until rice is tender and liquid has been absorbed, about 18-20 minutes.
  6. Stir in Parmesan cheese and remove from heat. Adjust seasoning if necessary.
  7. Slice chicken into strips and serve over the garlic Parmesan rice. Garnish with additional Parmesan and parsley if desired.

Recipe Notes

  • For creamier rice, add a splash of cream or more Parmesan cheese before serving.
  • Adjust sodium by using low-sodium broth or substituting water for some broth.
  • Feel free to add herbs or vegetables such as spinach or mushrooms for added nutrition and flavor.