Delicious Sweet Potato Casserole Recipe for Your Holiday Table

Sweet Potato Casserole Recipe – Perfect Holiday Side Dish

⚖️
Difficulty
Easy

⏲️
Prep Time
20 mins

🕒
Cook Time
40 mins

⏱️
Total Time
60 mins

🍽️
Servings
8

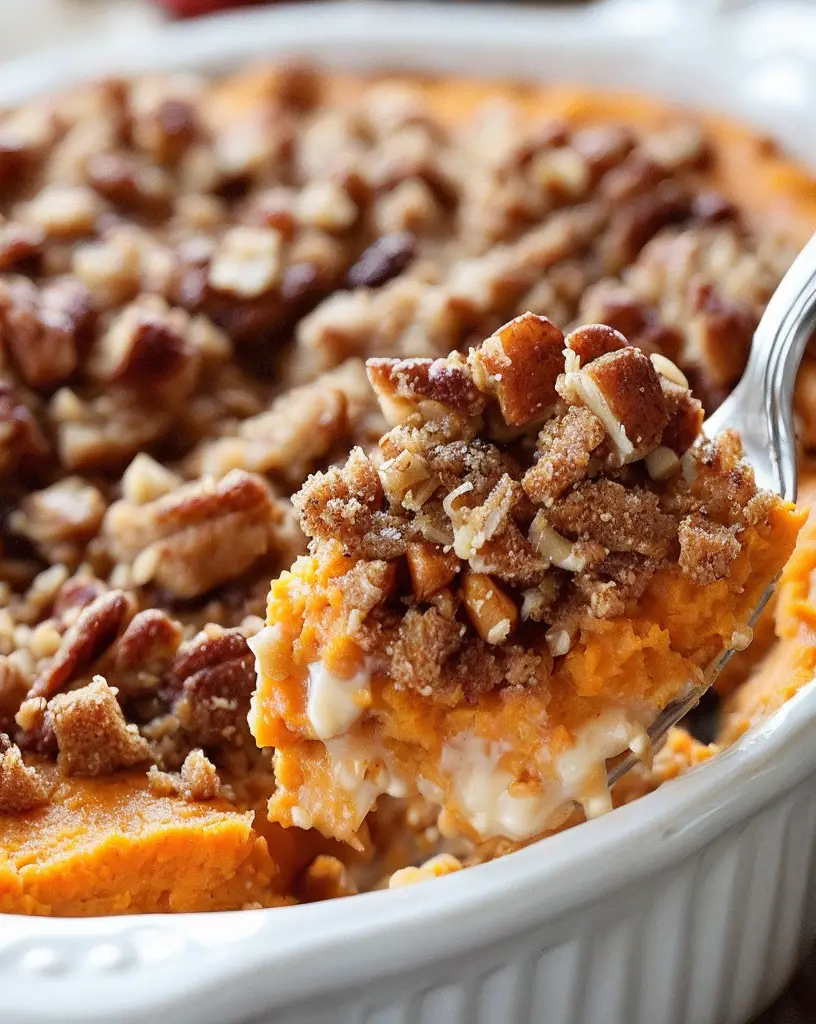
Sweet Potato Casserole is the star side dish of any holiday feast, bringing together creamy layers of sweet potatoes with a delightful, crunchy topping that is simply irresistible. Whether you’re hosting a large family gathering or a cozy dinner with friends, this dish promises to be a crowd-pleaser. Its vibrant orange color sets a festive tone on your dining table, while the mix of textures and flavors provides a comforting experience with every bite.

Indulge in the perfectly balanced taste of sweet potatoes enhanced by the warmth of cinnamon and nutmeg, and topped with a buttery pecan crumble. The delightfully creamy interior contrasts beautifully with the crispy topping, creating a dynamic tasting experience. The aroma of this casserole, as it bakes, fills your home with a sweet, cozy fragrance that hints at the deliciousness to come.

Quick Recipe Highlights

  • Flavor Profile: The sweet potatoes are sweet and spiced, perfectly balanced with a buttery pecan topping.
  • Texture: Creamy and smooth with a contrasting crunch from the pecan topping.
  • Aroma: Sweet with hints of cinnamon and nutmeg, filling your home with a holiday scent.
  • Visual Appeal: Vibrant orange contrasted by the golden-brown topping.
  • Skill Level Needed: Easy, suitable for beginners and seasoned cooks alike.
  • Special Equipment: Requires a casserole dish and a hand mixer for best results.

Recipe Overview

  • Difficulty Level: Easy, thanks to straightforward steps and minimal equipment.
  • Category: Side dish, perfect for holiday meals and special occasions.
  • Cuisine: American, with Southern influences highlighted by sweet potatoes and pecans.
  • Cost: Affordable, with sweet potatoes and pecans being the main ingredients.
  • Season: Best in the fall and winter when sweet potatoes are in peak season.
  • Occasion: Ideal for Thanksgiving, Christmas, or any festive gathering.

Why You’ll Love This Recipe


This Sweet Potato Casserole recipe boasts an incredible taste that captivates the senses with its perfect balance of sweetness and spiced warmth. The creamy sweet potatoes are beautifully complemented by a crunchy topping, making every bite a delightful experience. Its convenience shines through in simplicity, requiring minimal preparation time and easy steps that guarantee perfect results every time.

Nutritionally, sweet potatoes are a powerhouse of vitamins and fiber, providing a healthful addition to your meal. This dish also offers social benefits as a beloved component of traditional holiday meals, enhancing your festive table with its vibrant colors and inviting aromas. Cost-effectiveness is another plus, with mostly affordable ingredients that make it accessible for any cook aiming to impress without breaking the bank.

Historical Background and Cultural Significance


Sweet Potato Casserole has its roots deeply embedded in American culinary traditions, particularly within Southern cuisine. Historically, sweet potatoes have been a staple food in the South due to their adaptability to the region’s agriculture and climate. This dish gained prominence as a holiday staple, evolving with various regional adaptations over time.

Culturally, the casserole signifies the warmth and unity of festive gatherings, marking a special place in Thanksgiving and Christmas menus across the country. Over generations, this recipe has adapted to include marshmallow toppings in some regions, while others prefer the classic pecans, demonstrating its versatility and the local flair added by different communities.

Ingredient Deep Dive


Sweet potatoes take center stage in this recipe, offering a rich history linked to Native American and African cultures. These vibrant tubers are celebrated for their nutritional benefits, being a rich source of vitamins A and C, fiber, and antioxidants. When selecting sweet potatoes, look for firm ones without blemishes or sprouting for the best quality.

The pecans contribute a delightful crunch and add a heart-healthy dose of omega-3 fats and fiber. Opt for fresh pecans for maximum flavor, and store them in a cool, dry place to ensure they remain crisp and flavorful. Butter and spices like cinnamon and nutmeg enhance both sweetness and warmth in this comforting dish while providing room for variations with other nuts or spices.

Common Mistakes to Avoid

  • Overcooking takes away the natural sweetness and texture of the potatoes. Aim for a fork-tender texture without becoming mushy.
  • Neglecting to season the sweet potatoes properly can result in a bland casserole. Be generous with spices and salt to bring out the flavors.
  • Skipping the topping can lead to a one-note dish. The pecan crumble is crucial for providing textural contrast.
  • Not mashing the sweet potatoes completely leaves lumps that affect the creamy texture.
  • Forgetting to grease the baking dish can result in sticky casserole sides, making serving messy.
  • Storing the casserole with the topping can make it soggy. Keep the topping separate if making ahead.
  • Using old pecans results in a rancid taste; ensure freshness for the best flavor.
  • Adding too much sugar can overshadow the natural sweetness of the potatoes; adjust to taste.

Essential Techniques


Achieving a perfectly creamy mash relies on properly cooked sweet potatoes. Steam or boil until just tender, and immediately mash them to maintain their natural juices and flavor. The pecan topping requires the right ratio of butter to nuts, ensuring it turns golden brown and crunchy without burning.

Master the art of seasoning by tasting as you go; this allows you to adjust spices and sweetness according to your preference. Visual cues like a bubbling casserole edge signal optimal baking time, while a golden topping indicates it’s ready to serve. Avoid overbaking, which can dry out the dish.

Pro Tips for Perfect Sweet Potato Casserole


Pre-cook sweet potatoes with the skin on to lock in moisture and nutrients. Cooling them slightly before peeling keeps the flesh intact.

Toast pecans lightly before adding for a deep, nutty flavor that’s unmatched. To prevent the topping from sinking, distribute it evenly just before baking.

Use fresh, high-quality spices for a more pronounced aroma and taste. For a twist, add orange zest to the sweet potatoes for a citrusy lift.

For optimum results, always mash sweet potatoes while warm. This ensures a smoother texture and better integration of butter and spices.

Variations and Adaptations


Regional variations welcome marshmallow toppings in some recipes, offering a sweeter ending contrast. In the South, it’s common to add bourbon for a sophisticated depth.

Seasonal adaptations can include cranberries for a tart twist during Thanksgiving. For dietary modifications, swap pecans with gluten-free oats for the topping or add maple syrup instead of sugar for a natural sweetener.

Flavor enhancements include incorporating ginger or cayenne for a spicy kick, or rosemary for an herby note. For texture modifications, add some chunky pineapples to create another layer of texture and sweetness.

Serving and Presentation Guide


Plating techniques such as using a crisp, white dish can enhance the vibrant color contrast of the casserole. Garnishing with fresh herbs like parsley adds a touch of greenery and freshness.

Traditional accompaniments might include roasted turkey or glazed ham, providing depth to the sweet-savory profile. Modern suggestions include pairing with kale salads or stuffed portobello mushrooms for a vegetarian touch.

Serve at room temperature to allow the flavors to harmonize seamlessly. Portion control can be managed by serving from the baking dish with a wide spatula for precision.

Wine and Beverage Pairing


For wine pairings, opt for a warm Riesling or a light Pinot Noir that complements the sweet and savory notes of the casserole. Non-alcoholic alternatives include sparkling apple cider or a cinnamon-infused iced tea.

For coffee or tea pairings, consider a spiced chai that mirrors the casserole’s warm spices. Ensure all beverages are slightly chilled to contrast the warm casserole, enhancing the entire dining experience.

Storage and Shelf Life


Store leftovers in an airtight container in the refrigerator for up to three days. If your casserole dish allows, covering and refrigerating in the same dish can save time and effort.

Before reheating, allow the casserole to come to room temperature for even warming. To prevent topping sogginess, consider reheating in the oven under a low broil. Freezing is an option, but for best quality, freeze components separately, avoiding added moisture to the topping.

Make Ahead Strategies


Prep elements like boiling and mashing sweet potatoes a day ahead for efficiency. Store the topping separately and combine just before baking.

Assess the impact of pre-baking, noting that texture and flavor remain intact up to two days after assembly. Following assembly, refrigerated storage ensures flavors meld beautifully.

Before serving, ensure fresh elements like herbs are added post-baking to elevate presentation and taste.

Scaling Instructions


Halve the recipe by reducing ingredient quantities proportionally, noticing that smaller baking dishes may require adjusted cooking times.

For larger gatherings, doubling is seamless; adjust seasoning levels accordingly to prevent overwhelming flavors. Ensure sturdy mixing equipment for larger portions to maintain creamy textures.

Extra portions warrant separate containers for balanced freezing and reheating. Timing modifications might involve increased baking time for deeper dishes to ensure the center is fully warmed.

Nutritional Deep Dive


This dish offers a macro breakdown of carbohydrates from sweet potatoes, healthy fats from pecans, and moderate protein content. Micronutrients include beta-carotene from sweet potatoes, beneficial for eye health, and vitamin E from pecans with antioxidant properties.

Dietary considerations include balancing the natural sugars present while still benefiting from the fiber content. It offers ease in managing portions as a side serving, providing satiety through its nutrient-dense nature.

Dietary Adaptations


For a gluten-free version, simply verify the source of your spices and optional toppings, like marshmallows. Dairy-free adaptations are easily made by using coconut oil instead of butter, complementing the casserole’s sweetness.

Vegan modifications involve skipping eggs, relying on a small amount of almond milk for creaminess. Low-carb enthusiasts can replace sweet potatoes with butternut squash, though texture and sweetness will vary slightly.

Troubleshooting Guide


If texture issues arise from overcooking, combine the potatoes with a little cream to restore smoothness. Balance overly sweet flavors with a dash of lemon juice or additional salt for complexity.

Don’t forget equipment challenges; if a hand mixer is unavailable, use a sturdy whisk and elbow grease for similar results. Ingredient substitutions like swapping nuts should maintain the essence without impacting taste.

Timing concerns from undercooking the topping can be corrected by broiling briefly to achieve the desired crispness.

Recipe Success Stories


Our readers have shared delightful variations, like incorporating chopped apples for a fall twist or a personal favorite – adding a chocolate-chip pecan topping for a sweet indulgence.

Community engagement proves inspiring with shared images of decorated casseroles enhancing festive tables, prompting collective creativity through user suggestions for diverse presentations.

Photography tips emphasize utilizing natural light to capture the casserole’s rich hues and textures, ensuring the visual delight translates through the screen and inspires kitchen creativity.

Frequently Asked Questions

What can be used instead of pecans for nut allergies?

Consider using oats or sunflower seeds as alternatives for the crunchy topping without compromising texture.

Can the casserole be frozen after baking?

While freezing post-baking is possible, expect some textural changes. It’s best to freeze components separately where possible.

How do I prevent the topping from becoming soggy?

Ensure the topping is added just before baking. If reheating, do so under a broil or add fresh topping to restore crispness.

Is there a way to make this recipe vegan?

Yes, replace butter with coconut oil, and utilize a dairy-free milk alternative to maintain moisture and flavor.

How can I make the dish less sweet?

Reduce added sugars and focus on spices to highlight the natural sweetness of the potatoes without overpowering them.

Which wine pairs best with sweet potato casserole?

A dry Riesling or a light Pinot Noir complements the sweet and savory elements without overshadowing flavors.

Are there suitable non-alcoholic beverage options?

Yes, a spiced cider or sparkling water with citrus works beautifully to enhance the dining experience without alcohol.

Can I prepare parts of the recipe in advance?

Absolutely, advance preparations include boiling and mashing potatoes and storing toppings separately until ready to bake.

What if I don’t have a hand mixer?

A whisk or potato masher works as a manual alternative for achieving a smooth consistency in the sweet potatoes.

How can I experiment with flavor variations?

Introduce spices like ginger or add fruits like cranberries for seasonal experiments that lend depth and complexity.

Why did my casserole not thicken?

Ensure sweet potatoes are fully drained before mashing to prevent excess liquid that could affect consistency.

What’s the best way to store this casserole?

Refrigerate in an airtight container for freshness, or freeze individual components to preserve quality effectively.

Additional Resources


Explore related recipes like our ‘Classic Mashed Potatoes’ or ‘Holiday Roasted Vegetables’ for more festive inspiration. Review technique guides on perfect potato preparation and pecan toasting in our culinary toolbox for honed skills.

For further ingredient insights, visit our comprehensive database on seasonal produce with storage recommendations ensuring quality and sustainability. Season-specific variations are detailed in our ‘Annual Flavor Calendar’ showcasing how to integrate seasonal produce into everyday cooking.

Join the Conversation


Share your Sweet Potato Casserole creations on our social platforms with #CasseroleCreations, and engage with our community to explore global variations and seasonal adaptations.

Review this recipe and share your tweaks to inspire others and expand communal knowledge. Discover photography tips to beautifully capture your culinary endeavors, enhancing both presentation and plating techniques through peer exchanges and expert advice.

The Recipe

Sweet Potato Casserole

Serves: 8

Prep Time: 20 mins

Cook Time: 40 mins

Total Time: 60 mins

Kitchen Equipment Needed

  • Casserole dish
  • Hand mixer or potato masher
  • Baking sheet

Ingredients

  • 4 cups sweet potatoes, mashed
  • 1 cup brown sugar
  • 1/2 cup melted butter
  • 1/2 cup milk
  • 2 teaspoons vanilla extract
  • 1/2 teaspoon cinnamon
  • 1/4 teaspoon nutmeg
  • 1/4 teaspoon salt
  • 2 cups chopped pecans
  • 1/2 cup flour
  • 1/2 cup brown sugar (for topping)
  • 1/4 cup melted butter (for topping)

Directions

  1. Preheat oven to 350°F (175°C).
  2. In a large bowl, combine mashed sweet potatoes, brown sugar, melted butter, milk, vanilla extract, cinnamon, nutmeg, and salt. Mix until smooth and creamy.
  3. Spread the sweet potato mixture evenly into a greased casserole dish.
  4. In a separate bowl, mix pecans, flour, brown sugar, and melted butter for the topping. Sprinkle evenly over the sweet potato mixture.
  5. Bake in the preheated oven for 30-40 minutes or until the topping is golden brown and crispy.

Recipe Notes

  • Ensure sweet potatoes are fully drained before mashing to avoid extra moisture.
  • Adjust sugar levels based on your preferred sweetness.
  • Try adding a sprinkle of bourbon or orange zest for flavor variations.
  • For nut-free alternatives, use crushed gluten-free cookies for topping.

Spicy Cajun Chicken and Shrimp Alfredo: A Quick Dinner Delight

Cajun Chicken and Shrimp Alfredo Recipe 🍝 – Easy Dinner Idea 🍴

⚖️
Difficulty
Medium

⏲️
Prep Time
15 mins

🕒
Cook Time
30 mins

⏱️
Total Time
45 mins

🍽️
Servings
4

Indulge in the ultimate comfort food experience with this Cajun Chicken and Shrimp Alfredo recipe. Combining succulent chunks of seasoned chicken and juicy shrimp with creamy, rich Alfredo sauce, this dish is perfect for a cozy dinner at home. The spice of Cajun seasoning beautifully complements the velvety Alfredo, creating a burst of flavor that’s both hearty and satisfying. Whether it’s a family meal or a special occasion, this easy dinner idea brings a taste of restaurant-quality pasta right to your table.

Experience the magic of flavors as bold Cajun spices meet smooth, creamy Alfredo sauce. Each bite is a delicious dance of textures—from the tender chicken and shrimp to the luxurious, silky pasta coating. The fusion of these distinct elements leads to a memorable culinary experience that will leave everyone craving for more. This Cajun Chicken and Shrimp Alfredo recipe is not just a meal; it’s an occasion in itself.

Quick Recipe Highlights

  • Flavor Profile: Expect a harmonious blend of spicy and creamy, with a hint of garlic and herbs.
  • Texture: Enjoy tender and juicy proteins with perfectly cooked pasta swimming in a luscious sauce.
  • Aroma: Smell the inviting mix of garlic, spices, and cheese as it fills your kitchen.
  • Visual Appeal: A vibrant mélange of golden-brown chicken, shrimp, and fresh parsley garnishes on a creamy pasta backdrop.
  • Skill Level Needed: Moderate skills required, mainly for timing and sequence management in cooking proteins and sauce simultaneously.
  • Special Equipment: Basic kitchenware like a pot, skillet, and strainer; optional use of a microplane for fresh parmesan.

Recipe Overview

  • Difficulty Level: Considered medium due to the need for multitasking between sauces and proteins but straightforward with prep done right.
  • Category: This recipe falls under main course and pasta categories, ideal for hearty dinners.
  • Cuisine: A satisfying fusion of Italian and Cajun cuisines, bringing creamy Alfredo together with spicy Southern flavors.
  • Cost: Relatively affordable, with chicken, shrimp, and cheese being the main cost factors balanced by pantry staples.
  • Season: Perfect year-round, although its warmth and spices suit colder months beautifully.
  • Occasion: Excellent choice for family dinners, date nights, and dinner parties where you aim to impress.

Why You’ll Love This Recipe


The Cajun Chicken and Shrimp Alfredo recipe stands out due to its unique taste and texture appeal. The spicy Cajun seasoning and creamy Alfredo sauce create a perfect contrast, resulting in a dish that’s both flavorful and comforting. The juicy shrimp and tender chicken add protein that complements the creamy pasta, making each bite a delightful experience.

Convenience is another big plus of this recipe. With a total cooking time of just 45 minutes, it’s an easy dinner idea perfect for busy weeknights. Preparation can be streamlined with simple ingredients and minimal cooking techniques, ensuring you can enjoy a delicious homemade meal without much hassle.

Nutritional advantages lie in its balance of protein from chicken and shrimp, along with carbs from pasta. While it’s rich, using fresh ingredients and controlled portions makes this recipe a relatively healthy indulgence. You can customize it further by adjusting the cream or opting for whole-grain pasta.

In terms of social and entertaining value, this dish garners compliments for its restaurant-style quality and impressive flavors. Whether it’s family night or Friday friends gathering, this recipe brings the wow factor to the dining table, encouraging interaction and enjoyment.

Cost-effectiveness and accessibility make it accessible for most shopping budgets, using a combination of pantry goods and fresh items like chicken and seafood. No need for exotic ingredients; its appeal lies in the quality and cooking techniques that enhance the flavors of everyday items.

Historical Background and Cultural Significance


Cajun cuisine has its roots in Southern Louisiana, influenced by French, African, and Spanish culinary traditions. This recipe takes inspiration from traditional Cajun cooking, which emphasizes bold spices and rich flavors, and combines it with Italian pasta culture, known for its creamy and cheesy bases.

The cultural importance of blending Cajun and Italian influences shines through in this recipe, illustrating the dynamic nature of American cuisine where diverse flavors come together. Such recipes showcase the adaptability of Cajun spices with globally loved dishes like Alfredo pasta.

Evolution of the recipe reflects modern palates that seek the thrill of fusion dishes. While traditional Cajun and Italian recipes stand robustly on their own, combining them creates a new culinary experience that satisfies multi-ethnic flavor cravings.

Regional variations might involve swapping shrimp for other seafood like crawfish or using different pasta types. Across regions, the basic principle remains: a spicy and creamy blend that unites contrasting textures and flavors into one harmonious dish.

Ingredient Deep Dive


Chicken is the star protein, offering culinary versatility and broad appeal. In southern cooking, chicken is often used as a base for flavor-rich meals. It absorbs Cajun spices well, enhancing both taste and aroma. Choose boneless, skinless chicken breast for the best texture in this recipe.

Nutritionally, chicken provides lean protein and essential minerals like selenium, known for supporting thyroid health and metabolism. It’s a staple protein choice due to its low-fat content and high vitamin B6 levels, crucial for heart health and energy metabolism.

Storage recommendations suggest raw chicken should be kept refrigerated or frozen, ideally consumed within two days of purchase when fresh. Opt for airtight containers or butcher paper for freezing to prevent freezer burn. For leftover cooked chicken, store it for up to four days in the refrigerator.

Substitution options can include boneless thighs for richer flavor or turkey breast for a leaner alternative. Ensure that any substitute follows appropriate cooking time adjustments for optimal tenderness.

Common Mistakes to Avoid

  • Overcooking the chicken can result in a dry texture. Ensure you sear the chicken until golden brown but not fully cooked, allowing it to finish in the sauce.
  • Using under-seasoned shrimp can dull the flavor profile. Marinate shrimp adequately with spices to match the dish’s bold taste.
  • Failing to properly time pasta cooking leads to soggy noodles; cook it al dente for the perfect bite.
  • Adding cream too quickly can cause it to break; instead, slowly incorporate it into your sauce for a smooth consistency.
  • Overuse of oil may result in a greasy dish, which can overshadow intended aromas and spices.
  • Not letting proteins rest before cutting leads to moisture loss; allow the chicken and shrimp to sit for a few minutes.
  • Ignoring garnish details limits visual appeal; fresh parsley or a sprinkle of parmesan can elevate presentation.
  • Using pre-made sauce negates custom flavor depth; making fresh Alfredo ensures tailored seasoning balance.

Essential Techniques


Mastering the searing technique is crucial here for that perfect crust on both chicken and shrimp. It creates complex flavors through the Maillard reaction, enhancing overall taste. Pat proteins dry to encourage browning, and avoid overcrowding the pan to prevent steaming.

Creating the creamy Alfredo sauce requires patience; continuous stirring and gradual heat prevent cream from curdling. Monitoring temperature helps maintain the sauce’s luxurious texture. Aim for silky smoothness as garlic and parmesan mingle with cream.

Cooking pasta properly means achieving an al dente texture, ensuring a perfect bite that stands firm against rich sauces. Stir pasta occasionally to prevent sticking, and avoid rinsing post-cooking to keep the surface starches, promoting sauce adhesion.

Visual cues include sauce thickening and pasta’s firm texture. The creamy sauce should cling to the spoon without being runny, indicating it’s ready. Practice makes perfect, so keep an eye on these subtle changes to gauge readiness.

Pro Tips for Perfect Cajun Chicken and Shrimp Alfredo


Use a combination of olive oil and butter to sauté, providing a rich, nutty background flavor while preventing burning due to butter’s lower smoke point. This combo sets the foundation for deep flavors in both chicken and shrimp.

Deglaze your pan with a splash of white wine before adding cream to incorporate fond, which consists of browned, flavorful bits left from searing. This step adds depth to your Alfredo sauce, heightening the dish’s overall taste.

Always reserve some pasta water when draining; this starchy water can adjust sauce consistency later if needed. It integrates seamlessly, providing perfect sauce coverage without adding extra cream.

Use high-quality parmesan for an authentic Alfredo touch. Freshly grated parmesan offers unmatched flavor and texture, avoiding the graininess of pre-grated varieties often treated with anti-caking agents.

Enhance Cajun seasoning with smoked paprika for an added layer of complexity and subtle smokiness, elevating the dish’s flavor profile beyond basics.

Balance out rich flavors with fresh herbs like parsley or basil. Use a sprinkle as garnish to cut through the creamy richness, adding color and freshness to the plating.

Variations and Adaptations


Regional variations could include incorporating Andouille sausage for an extra layer of Cajun flavor, offering a smokier and spicier kick. In coastal regions, opting for local fish can provide a fresh twist.

Seasonal adaptations involve using vegetables like asparagus or cherry tomatoes during spring for added brightness or substituting dairy-free cream alternatives during animal product scarcity.

For dietary modifications, gluten-free pasta varieties work efficiently without compromising texture, offering those sensitive to gluten a delicious alternative. Choose rice or chickpea-based pasta for best results.

Flavor adaptations are limitless; tweak spices to your preference by increasing cayenne for heat or incorporating lemon zest for a citrusy note that complements the seafood.

Texture modifications come through choosing different pasta shapes. Rigatoni or fusilli hold sauce well, while spaghettini offers a lighter texture contrast, allowing customization based on desired mouthfeel.

Presentation alternatives aim at layering pasta, sauce, and proteins almost lasagna-style for a dramatic reveal, or side-serving components for interactive meal assembly at the table.

Serving and Presentation Guide


Plating techniques often utilize wide bowls to emphasize pasta’s curvatures and sauce draping overtop, creating a natural focal point for other ingredients like chicken and shrimp.

Garnishing ideas include finely chopped parsley sprinkles or parmesan shavings, adding an elegant touch by providing vibrant color and contrasting textures on a creamy surface.

Traditional accompaniments recommended include garlic bread or a simple green salad, their crispiness and freshness balancing the richness and creaminess of the main dish.

Modern serving suggestions might explore nesting the pasta in individual bowls for controlled portions, designed to showcase carefully curated colors and textures with garnishes positioned strategically.

Temperature considerations highlight serving the pasta hot, ensuring the saucy coating remains luscious and enticing while avoiding dilution or separation, crucial for Alfredo.

Portion control tips focus on measuring pasta and proteins beforehand to maintain balance in servings, preventing any ingredient from overshadowing the others, thus preserving flavor harmony.

Wine and Beverage Pairing


Wine pairings suggest a crisp Chardonnay or Sauvignon Blanc for their acidity, which cuts through the sauce’s creaminess while enhancing the garlic and parmesan notes.

Non-alcoholic alternatives include sparkling water with a splash of lemon or lime, providing a refreshing cleanse between bites, highlighting the seasoning and texture interplay.

Coffee/tea pairing is unnecessary but could explore light green teas for their subtlety and palate-clearing properties, if served afterward.

Temperature considerations encourage chilled beverages to contrast the warm pasta, offering a refreshing balance especially during warmer weather.

Serving suggestions recommend ensuring wines or beverages are freshly chilled to maintain optimal flavor infusion, making them complement the rich notes of the Cajun Alfredo.

Storage and Shelf Life


Proper storage methods involve airtight containers for any leftovers, prolonging life by minimizing air exposure which can lead to spoilage or texture deterioration.

Temperature requirements guide keeping the dish refrigerated, as this helps maintain optimal freshness and safety, ideally consumed within 3-4 days post-cooking.

Container recommendations include using glass containers, which not only track freshness visually through transparency but guard against odor transfer, preserving dish purity.

Signs of spoilage often manifest in unpleasant odor changes or texture shifts, such as excessive separation in sauces or protein dryness, signaling the dish is no longer good for consumption.

Reheating instructions favor gentle warming in a skillet over low heat, adding a splash of milk if the sauce thickened due to chilling, ensuring even heat distribution without overcooking proteins.

Freezing guidelines should be conservative due to cream sauces which can undergo undesirable texture changes—if necessary, freeze separately from pasta to mitigate this.

Make Ahead Strategies


Make-ahead strategies involve prepping components like chopped vegetables, peeled shrimp, and spice mixtures up to two days earlier, reducing final day workload.

Storage between steps like sauce preparation ahead of time can streamline the cooking process on busy days, justifying its status as a quick easy dinner idea when planned correctly.

Quality impact assessment views advanced prepping for this dish as beneficial, maintaining flavor integrity while easing time-intensive tasks closer to serving.

Assembly tips encourage staging materials efficiently and considering individual servings for optimal presentation and speed during final assembly at mealtime.

Reheating guidelines favor low-heat methods to prevent chalky pasta or rubbery proteins. Keep backups such as cream on hand for texture refresh if needed.

Fresh element additions like herbs or grated cheese should be saved for just before serving, ensuring the freshest garnish touch and complementing reheated components.

Scaling Instructions


Scaling instructions are handy for adapting to different group sizes; doubling ingredients is straightforward but ensure sufficient pot size and staggered protein cooking for large batch results.

Halving recipes still hold proportional integrity; adjust pan sizes to maintain proper browning and simmering depth important for sauces and proteins.

Doubling or tripling requires careful attention to seasoning adjustments; taste tests are crucial for maintaining undercurrent notes like cayenne or garlic amidst increased volumes.

Equipment adjustments often involve more substantial skillets or extra pasta pots, allowing space for varied elements ensuring even and consistent cooking.

Timing modifications may mean staggered starts for proteins to avoid overcrowding or ingredient sequencing ensuring all elements are ready concurrently.

Storage considerations emphasize storing separate portions for large batches ensuring freshness and easy meal retrieval during post-production periods.

Nutritional Deep Dive


Nutritional deep dive highlights the recipe’s balance between protein, fat, and carbohydrates. chicken and shrimp provide lean protein, while cream and parmesan contribute to the flavorful fat content.

Micronutrient analysis offers insights into vitamins and minerals like B12 and selenium from shrimp, with calcium inputs provided by parmesan cheese, supporting bone health and energy metabolism.

Health benefits align with moderate fat intake, emphasizing portion sizes and ingredient choice like low-sodium broth or light cream to reduce sodium and saturated fats intake if desired.

Dietary considerations encourage awareness of Alfredo’s rich nature, aligning it with indulgent days or balanced with lighter meals in subsequent days.

Portion analysis demonstrates crucial balance, ensuring energy needs meet culinary satisfaction without excess, recognizing the importance of earning hearty dishes their rightful place within a holistic diet.

Weight management tips incorporate mindful pasta serving sizes while focusing on protein distribution within the dish, allowing flavorful enjoyment aligned with nutritional goals.

Dietary Adaptations


Gluten-free adaptations effortlessly utilize alternative pasta types like corn or quinoa-based options, avoiding gluten without sacrificing cooking quality or texture.

Dairy-free versions utilize plant cream substitutions and nutritional yeast for that umami cheesy essence, offering satisfying Alfredo flavors for those avoiding dairy.

Vegan approaches can transform proteins into tofu or plant-based alternatives, coupled with cashew cream sauces which replicate richness while remaining animal product-free.

Low-carb adaptations focus on vegetable noodles like zucchini zoodle options for a lighter yet equally delicious version of a traditionally carb-rich dish.

Keto-friendly variations prioritize high-fat components like cream and skip pasta, embracing veggie noodle alternatives maintaining this lifestyle’s fat-oriented approach.

Paleo diets find solace in chicken and shrimp while substituting traditional Alfredo components with nuts like macadamia for base textures aligning with Paleo ideals.

Low-FODMAP accommodations involve garlic-infused oils and gluten-free pasta adjustments, aligning with sensitive digestive needs still thrilled by Cajun Alfredo’s flavors.

Specific diets can always find refuge in simple component swaps or portions control, maintaining diet adherence without forfeiting flavor.

Troubleshooting Guide


Texture issues, such as grainy Alfredo sauce, often stem from overheating cream; ensure gradual temperature increases and constant stirring when whisking cheese.

Flavor balance discrepancies, like blandness, may result from inadequate seasoning amounts; consider increasing Cajun spices and salt levels as needed for desired depth.

Temperature problems, especially rubbery shrimp, may arise from overcooking; monitor cooking time carefully and remove proteins once just done.

Equipment challenges like small pans or crowded cooking spaces hinder proper searing; use adequate sizes ensuring proteins can brown effectively thus developing key flavors.

Ingredient substitutions demand testing given differences in moisture content or heat resistance, affecting overall cooking times necessary for consistency and desired outcomes.

Timing concerns seek resolution through detaching prep from production timing, verifying mise-en-place before cook commencement, guaranteeing seamless kitchen operations.

Recipe Success Stories


Community feedback highlights consistent success with recommended tweaks such as varied cheese applications or alternative spice experimentation for personalized preferences.

Variation successes feature intriguing results with novel protein combinations like smoked sausage or blackened fish – expanding typical expectations creatively.

Adaptation stories relate how diets like veganism embraced alterations maintaining Cajun Alfredo’s beloved flavor platform without compromise on lifestyle commitments.

Reader suggestions often lead to exploration like pasta shape shifts enhancing texture variety, producing remarkable impressions achieved through minor adjustments.

Photography tips emerge to catalyze culinary visual engagements – employ color contrasts and vibrant garnishes to elevate visually appealing captures for all to enjoy.

Frequently Asked Questions

Can I make this recipe ahead of time?

Yes, you can prep the sauce and proteins separately and combine them just before serving to ensure freshness and texture integrity.

What type of pasta is recommended?

Fettuccine is traditional for Alfredo, but penne or linguine can also work well, providing sturdy textures that hold the sauce effectively.

Is this recipe suitable for kids?

Yes, adjust the spiciness by reducing Cajun seasoning for milder tastes, making it a family-friendly choice adaptable to all ages.

How can I reduce the calorie content?

Replace heavy cream with a lighter version or use half-and-half, manage portion sizes and increase the vegetable content for added bulk.

Can I use frozen shrimp?

Yes, thaw them completely and pat dry before using to ensure a superb sear and prevent water release during cooking, which would affect texture.

What’s a good substitute for cream?

Coconut milk or cashew cream can act as substitutes for a dairy-free version, altering the base subtly but effectively retaining Alfredo creaminess.

What should I do if my sauce breaks?

Whisk vigorously off heat with a splash of warm water or cream, stabilizing the mixture to restore smoothness and maintain cohesiveness.

Are there vegan variations for this recipe?

Absolutely, substitute dairy and proteins with plant-friendly options like tofu and almond milk-based sauce, ensuring compatibility with dietary preferences.

How long can leftovers be stored?

Properly refrigerated in airtight containers, keep leftovers fresh for up to 3-4 days, ensuring they maintain flavor and quality upon reheating.

Can I add vegetables to this recipe?

Definitely, incorporating vegetables such as spinach, bell peppers, or zucchini aligns with taste and texture profiles while boosting nutritional intake.

What’s the best way to reheat this dish?

Reheat gradually on the stovetop over low heat, adding a touch of milk if needed to return the sauce’s creamy consistency while avoiding protein overcooking.

What goes well with Cajun Chicken and Shrimp Alfredo?

Pair with garlic bread, a light green salad, or even a refreshing fruit salad to complement the rich flavors presented by this dish.

Additional Resources


Explore related recipes like classic Alfredo variations or spicy Cajun jambalaya, uncovering new dimensions of flavor and culinary challenges.

Technique guides focusing on mastering roux preparation, whisking techniques, or protein searing offer valuable insights for elevating kitchen skills.

Ingredient information delves into detailed analyses and spotlight features on local or seasonal items surrounding the Cajun Chicken and Shrimp Alfredo ensemble, enriching culinary understanding.

Equipment recommendations include worthy investments for sustaining cooking enjoyment, from multifunctional cookware pieces to cutting-edge kitchen tools enhancing recipe executions.

Seasonal variations provide inspiration for ingredient rotations, ensuring adaptability in varying climates or harvest periods, celebrating sustainable and locally-sourced cooking.

Join the Conversation


Engage with us on social media platforms where community exchanges bring fresh insights, sharing proud culinary outcomes, swaps, or story-rich recipe journeys with fellow enthusiasts.

Offer photography tips that accentuate recipe appeal through favorable lighting, composition strategy, and creative angle selection, enticing wider audience reach with visual allure.

Share personal recipe reviews and highlight journeys, enabling learning opportunities from variations attempted and experiences shared, fostering dialogue and mutual growth.

Nurture community engagement via user-submitted ideas, expanding recipe explorations, and experimenting with proposed modifications that resonate positively within shared spaces.

Express love for flavors through hashtag participation, connecting global enthusiasts collaborating over shared Cajun Chicken and Shrimp Alfredo experiences.

The Recipe

Cajun Chicken and Shrimp Alfredo

Serves: 4

Prep Time: 15 mins

Cook Time: 30 mins

Total Time: 45 mins

Kitchen Equipment Needed

  • Large skillet
  • Pot for boiling pasta
  • Knife and cutting board
  • Grater for fresh parmesan

Ingredients

  • 2 boneless, skinless chicken breasts
  • 1 pound shrimp, peeled and deveined
  • 2 tablespoons Cajun seasoning
  • 3 tablespoons olive oil
  • 1 cup heavy cream
  • 1 cup grated parmesan cheese
  • 3 cloves garlic, minced
  • 12 ounces fettuccine pasta
  • Salt and pepper to taste
  • Fresh parsley, chopped for garnish

Directions

  1. Cook the fettuccine pasta according to package instructions until al dente. Drain and set aside.
  2. Season the chicken breasts with Cajun spice, salt, and pepper.
  3. Heat olive oil in a skillet over medium heat. Add the chicken and cook until golden brown and cooked through. Remove and set aside.
  4. In the same skillet, add shrimp and cook until pink and opaque. Remove and set aside.
  5. Add minced garlic to the skillet, sauté until fragrant. Pour in heavy cream, stirring constantly.
  6. Reduce the heat and stir in the parmesan cheese until the sauce is smooth and creamy.
  7. Return the chicken and shrimp to the skillet to reheat and coat with sauce.
  8. Toss pasta with the sauce until well-coated. Serve with chopped parsley sprinkled on top.

Recipe Notes

  • Marinate shrimp with lemon juice before seasoning for additional zing.
  • If the sauce thickens too much, thin it out with reserved pasta water.

Irresistible Mozzarella Cheesesteak Stromboli: A Delicious Twist on a Classic

Mozzarella Cheesesteak Stromboli: A Savory Delight

⚖️
Difficulty
Medium

⏲️
Prep Time
20 mins

🕒
Cook Time
25 mins

⏱️
Total Time
45 mins

🍽️
Servings
4

Dive into the rich, savory flavors of the Mozzarella Cheesesteak Stromboli. This delicious recipe combines the goodness of a classic cheesesteak and wraps it in a warm, flaky breading that is both satisfying and comforting. With its perfect blend of mozzarella cheese and tender beef, this stromboli embodies the essence of comfort food. The Mozzarella Cheesesteak Stromboli is perfect for family dinners and gatherings.

Quick Recipe Highlights

  • Flavor Profile: A delightful combination of cheesy goodness with the savory taste of beef, highlighted by spices and herbs.
  • Texture: A crispy exterior envelops a warm, gooey center that melts in your mouth.
  • Aroma: Tempting notes of melted cheese and spices fill the air, enticing your senses.
  • Visual Appeal: A golden brown, flaky crust with oozing cheese peeping through the scored edges.
  • Skill Level Needed: Medium; requires some experience in dough handling and rolling techniques.
  • Special Equipment: A baking sheet and sharp knife for scoring the dough.

Recipe Overview

  • Difficulty Level: The recipe is moderately difficult, primarily due to dough preparation and filling distribution. It requires an intermediate understanding of baking and rolling.
  • Category: Perfect as a main dish or appetizer for gatherings.
  • Cuisine: This fusion dish combines traditional Italian-style stromboli with the iconic American cheesesteak.
  • Cost: The recipe is budget-friendly, reliant on basic ingredients like mozzarella, beef, and dough.
  • Season: Ideal for all year round, especially comforting in colder months when warm, hearty meals are desired.
  • Occasion: Great for family dinners, game nights, or casual get-togethers with friends.

Why You’ll Love This Recipe


Mozzarella Cheesesteak Stromboli is a crowd-pleaser, marrying rich taste with a pleasing texture. The melted mozzarella and tender beef provide indulgent satisfaction in every bite. The crispy crust adds a delightful contrast, making each serving a complete sensory experience. Its convenience lies in its straightforward preparation; the stromboli is easy to assemble and bake, making it a perfect option for busy weeknights. Nutritionally, it offers a hearty source of protein and calcium, essential for growth and maintenance of bones and muscles.

Socially, this dish is fantastic for entertaining. It serves well as an appetizer that can be casually enjoyed at parties. Its budget-friendly ingredients make it accessible for all. Cost-effectiveness is furthered by the use of readily available supermarket items, making it a hassle-free culinary endeavor for any home cook.

Historical Background and Cultural Significance


The stromboli originates from Italian-American culinary traditions. Its name derives from the Italian word for an island, known for its volcanic features, which metaphorically relate to the molten cheese and rich fillings encased within the dough. Cultural importance lies in its representation of Italian immigration influences on American cuisine. Over time, it evolved from traditional recipes, adapting to local tastes and ingredient availability.

Regionally, variations of stromboli reflect diverse flavor profiles, such as incorporating local cheeses and meats. These adaptations showcase the versatility and enduring appeal of this beloved dish, which continues to delight generations of food enthusiasts.

Ingredient Deep Dive

**Mozzarella Cheese**: A staple in Italian cuisine, mozzarella is renowned for its melting qualities, traditional in pizzas and other baked dishes. Rich in calcium and protein, it supports bone health. Choose fresh, quality mozzarella for the best flavor. Store in a refrigerator and use within a week of purchase. Substitute with smoked mozzarella for a unique twist.

**Beef**: Central to the cheesesteak experience, beef adds depth and richness. Opt for cuts like sirloin for optimal tenderness and flavor. It provides essential nutrients like iron and zinc. Store raw meat in the coldest part of the fridge and consume it within a few days of purchase. Substitutions include chicken or plant-based alternatives for dietary preferences.

Common Mistakes to Avoid

  • Overfilling: Avoid stuffing the stromboli excessively to prevent bursting during baking.
  • Under-baking: Ensure a fully baked crust to achieve the desired crispy texture.
  • Improper sealing: Securely pinch dough edges to contain the fillings.
  • Skipping resting: Let dough rest before rolling for easier handling.
  • Uneven filling distribution: Spread evenly to ensure balanced bites.
  • Overcooking beef: Cook just until tender to avoid toughness.
  • Excessive seasoning: Balance flavors without overwhelming the dish.
  • Direct refrigeration: Let stromboli cool before refrigerating to prevent sogginess.

Essential Techniques

**Dough Rolling**: Mastering dough rolling is crucial for a uniform stromboli. Ensure to apply even pressure and avoid tearing. Roll to the recommended thickness for the perfect bake.

**Filling Preparation**: Precise cutting of beef and cheese ensures optimal filling distribution within the stromboli. It enhances flavor uniformity in every bite.

Pro Tips for Perfect Mozzarella Cheesesteak Stromboli

– Use a pastry brush to apply an egg wash over the dough for a superior golden finish.
– Allow cooked beef to cool slightly before adding it to the dough, preventing premature melting of cheese.
– Score the stromboli top carefully to allow steam to escape and prevent bursting.
– Experiment with herbs like oregano and basil in the cheese mix for additional depth.
– Avoid over-kneading the dough to maintain a light, airy texture.
– Let the stromboli cool for a few minutes post-baking, making slicing clean and easier.

Variations and Adaptations

**Regional Variations**: In the northeastern US, variations might incorporate local cheeses or spicy peppers for added heat.

**Seasonal Adaptations**: Incorporate seasonal vegetables like bell peppers or mushrooms to complement traditional fillings.

**Dietary Modifications**: Substitute with gluten-free dough for those with dietary sensitivities, ensuring cross-contamination prevention.

Serving and Presentation Guide

Serve the Mozzarella Cheesesteak Stromboli sliced, revealing its luscious layers. Pair with a fresh salad for contrast or classic marinara sauce on the side for dipping. Presentation on a wooden board adds a rustic touch, enhancing the dining experience. Consider room temperature or slightly warm servings for optimal flavor release.

Wine and Beverage Pairing

Pairing this stromboli with a robust red wine like Cabernet Sauvignon complements its rich flavors. For non-alcoholic options, a sparkling water with lemon provides a refreshing contrast. Consider serving beverages slightly chilled to balance the warmth of the dish.

Storage and Shelf Life

Store leftovers in an airtight container in the refrigerator for up to 3 days. Reheat in a preheated oven to maintain the crispy texture, avoiding microwaves to prevent sogginess. For longer storage, consider freezing portions and reheating directly from frozen.

Make Ahead Strategies

Prepare the dough and cook the fillings in advance, storing them separately. Assemble shortly before baking for an efficient meal prep solution without compromising quality. Reheat leftovers with a fresh herb garnish for a revitalized taste.

Scaling Instructions

For larger gatherings, double the recipe ingredients, ensuring to adjust bake time accordingly. Utilize multiple baking sheets to avoid overcrowding and allow even heat distribution. Consider preparation in batches, maintaining an optimal workflow.

Nutritional Deep Dive

The Mozzarella Cheesesteak Stromboli provides substantial protein, essential for muscle health. Its calcium-rich cheese supports bone strength. Pair with vegetables to offset caloric intake, promoting a balanced meal. Mindful portioning aids weight management.

Dietary Adaptations

Create a dairy-free version using vegan cheese alternatives. Gluten-free flour can accommodate those with intolerances. Adjust the filling with plant-based beef for a vegan adaptation, ensuring meticulous seasoning to replicate flavors.

Troubleshooting Guide

If the crust is too pale, increase bake time slightly for a crispier finish. Ensure fillings are pre-cooked to prevent release of excess moisture that can lead to a soggy bottom. In case of dryness, reduce oven temperature for a better bake.

Recipe Success Stories

Our readers rave about the Mozzarella Cheesesteak Stromboli’s crowd-pleasing comfort. Many return to the recipe with personal tweaks like adding spicy condiments. Submit your variations and photos for a chance to be featured.

Frequently Asked Questions

Can I use pre-made dough? Absolutely, store-bought dough can save time without compromising on taste.

How do I avoid the bottom becoming soggy? Ensure fillings are not overly juicy and pre-bake the stromboli on a wire rack for airflow.

What can I do if I don’t have mozzarella? Use provolone or cheddar as a substitution for a slightly different flavor.

Can this recipe be made vegetarian? Swap beef for sautéed vegetables like mushrooms or zucchini for a vegetarian twist.

How do I reheat leftovers? Reheat in the oven for optimal texture or use a toaster oven for smaller portions.

Additional Resources

Explore related recipes like Italian Calzones or Philly-style sandwiches for more culinary adventures. Our technique guides provide essential tips on dough handling for perfect results every time.

Join the Conversation

Share your ramen hacks and photos with us on social media. Engage with fellow readers to exchange ideas and feedback. Our community thrives on social interaction, enhancing everyone’s cooking experience.

The Recipe

Mozzarella Cheesesteak Stromboli

Serves: 4

Prep Time: 20 mins

Cook Time: 25 mins

Total Time: 45 mins

Kitchen Equipment Needed

  • Baking sheet
  • Sharp knife
  • Rolling pin
  • Pastry brush

Ingredients

  • 1 lb pizza dough
  • 1 cup shredded mozzarella cheese
  • 1/2 lb thinly sliced beef, cooked
  • 1 bell pepper, sliced
  • 1 onion, sliced
  • 1 tbsp olive oil
  • Salt and pepper to taste
  • 1 egg, beaten (for egg wash)

Directions

  1. Preheat your oven to 375°F (190°C).
  2. In a skillet, sauté onions and peppers in olive oil until soft. Season with salt and pepper.
  3. Roll out pizza dough into a rectangle on a floured surface.
  4. Layer cooked beef, sautéed vegetables, and mozzarella cheese evenly over the dough, leaving room at the edges.
  5. Carefully roll the dough over the filling into a log shape. Pinch the seams to seal.
  6. Transfer to a baking sheet, make slits on the top, and apply an egg wash.
  7. Bake for 25 minutes or until golden brown.
  8. Allow to cool for a few minutes before slicing and serving.

Recipe Notes

  • Substitute mozzarella with your cheese of choice for a different flavor profile.
  • Add a dash of hot sauce to the filling for an extra kick.

Luscious Herb-Infused Grilled Lobster: Elevate Your Seafood Experience

Tremendous Herb-Infused Grilled Lobster with Garlic Essence: A Culinary Delight

⚖️
Difficulty
Medium

⏲️
Prep Time
20 mins

🕒
Cook Time
15 mins

⏱️
Total Time
35 mins

🍽️
Servings
4

Savor the ultimate luxury with our Tremendous Herb-Infused Grilled Lobster with Garlic Essence. Perfectly blending the robust flavors of fresh herbs and the aromatic allure of garlic, this recipe presents an exceptional culinary experience. The succulent lobster, grilled to perfection, exudes a mouthwatering aroma that promises to tantalize your taste buds from the first bite. Ideal for special gatherings or for turning a regular dinner into a memorable feast, this dish combines elegance and simplicity in every bite.

Quick Recipe Highlights

  • Flavor Profile: Rich, savory flavors with herbaceous notes complemented by a subtle garlic undertone that enhances without overpowering the lobster’s natural sweetness.
  • Texture: The lobster is tender yet firm, maintaining a slight chewiness that speaks to the freshness and perfect grilling technique, paired with the smoothness of the infused flavors.
  • Aroma: A delightful blend of herby freshness and roasted garlic that weaves a heavenly scent, creating an inviting ambience in your kitchen.
  • Visual Appeal: A visually stunning presentation with vibrant colors of the grilled lobster garnished with green herbs, perfect for impressing guests.
  • Skill Level Needed: While some grilling experience is beneficial, the dish is accessible to dedicated home cooks willing to follow detailed instructions.
  • Special Equipment: A quality grill, kitchen shears, and a basting brush are essential for creating this masterpiece with precision and ease.

Recipe Overview

  • Difficulty Level: This dish strikes a balance between simple and challenging, providing an achievable gourmet experience with some grilling skill and patience.
  • Category: Mainly a seafood main course, this dish fits well within the fine dining and special occasion food categories.
  • Cuisine: Reflecting coastal culinary traditions, it draws heavily from Mediterranean influences with its use of fresh herbs and simple preparation.
  • Cost: The main expense is the lobster, making this an investment for special dinners, yet each ingredient contributes significantly to the end flavor profile.
  • Season: Best enjoyed in summer when grilling outdoors is a delight, but can be made year-round with indoor grilling options.
  • Occasion: Ideal for celebrations, romantic dinners, or impressing guests at an elegant dinner party where seafood is center stage.

Why You’ll Love This Recipe


The Tremendous Herb-Infused Grilled Lobster with Garlic Essence offers a gastronomic journey filled with taste and texture. Its rich, aromatic profile lures you into a symphony of flavors only lobster can deliver. The fresh herbs intertwine seamlessly with garlic, elevating the lobster into an extraordinary dish that is both sophisticated and delightful. You’ll relish not only the taste but also the irresistible aroma that fills your kitchen.

Convenience and preparation benefits abound with this recipe. Though it requires some initial prep, assembling the herb marinade and managing the grill enhance your cooking precision and timing, resulting in a beautifully cooked dish that showcases your culinary skills. The step-by-step directions ensure reliable results, keeping the process stress-free.

Nutritionally, lobster is a protein powerhouse, providing essential nutrients like Omega-3 fatty acids and selenium with minimal fat. Together with the herbs and garlic, this dish contributes to a balanced diet, rich in antioxidants and anti-inflammatory properties. Enjoy a satisfying meal that supports your health without compromising on taste.

Social and entertaining value is at the forefront of this grill setup, easily becoming the centerpiece of any gathering. Sharing this dish with family or friends over a well-set table fosters memorable experiences, guaranteed to provoke oohs and aahs from your guests with every spectacular mouthful they take.

Despite lobster’s general association with luxury, this recipe proves cost-effective and attainable. By focusing on quality over quantity in ingredients, you ensure each bite is impactful and rewarding. Accessible cooking methods and available ingredients make this an approachable task for many aspiring home cooks.

Historical Background and Cultural Significance


The lobster’s rich history adds depth to this recipe’s allure. Originating from ancient cuisines, lobster has been revered for its delicacy across centuries. Once a staple peasant food, it transformed into a luxury ingredient, adored for its unique flavors and versatile cooking profiles seen today. Lobster’s evolution highlights changes in food cultures, transitioning from coastal abundance to contemporary gastronomy prized by chefs worldwide.

This recipe, deeply rooted in Mediterranean culinary traditions, illustrates the cultural importance of simplicity and quality. The Mediterranean people have long valued the harmony of natural flavors, letting star ingredients like fresh seafood shine. Just as those traditions prioritize fresh herbs and minimal interference, our recipe reflects this focus on genuine savor.

Through time, variations of grilled lobster have emerged across regions, each adapting to local tastes and ingredient availability. Whether accompanied by garlic scapes in New England or butter drizzled in France, global interpretations demonstrate the vast adaptability and beloved status of lobster in international cuisine.

Significant regional variations have consistently maintained the lobster’s elevated stature. Southeastern U.S. styles may feature heavier spice rubs or buttery sauces, whereas West Coast chefs opt for lighter, citrus-infused approaches. Our herb-infused version pays homage to classic techniques while incorporating current global trends of garlic essence and herbaceous integrity.

Ingredient Deep Dive


Lobster is the jewel of this dish, celebrated for its sweet, delicate flesh and status as an oceanic treasure. Historically, lobster was caught and consumed by coastal communities, a humble sustenance later transformed into a luxury owing to culinary advancements and refined palates. Today’s gourmet scenes embrace lobster’s full potential, incorporating it into modern dining with reverence.

Nutritionally, lobster is lauded for being low-fat yet protein-rich, making it ideal for health-conscious consumers. Additionally, it is abundant in vitamins and minerals such as copper, zinc, and B12, supporting metabolic and cognitive functions. Its contribution to dietary excellence is unparalleled among seafood, underscoring why it’s a popular, nutrient-dense choice.

For the verdant blend of herbs, select a fresh and vibrant mix to enhance flavor and presentation. Basil, parsley, and rosemary are our top choices, boasting ancient culinary significance due to their health benefits, flavor complexity, and aromatic strengths. Ensure herbs are crisp and bright green, indicative of freshness, as this greatly impacts the dish’s essence. Store them by loosely wrapping in damp paper towels within the refrigerator to maintain vitality.

Garlic, the subtle hero of the recipe, brings layers of nuanced flavor and depth. Known for its potent health properties, it fortifies heart health and boosts the immune system. Select firm, plump garlic bulbs free from sprouting or withering. Skillfully stored in a cool, dry space, garlic imparts its full potential in infusing dishes with distinguished profiles.

Common Mistakes to Avoid

  • Overcooking the lobster can lead to a tough and rubbery texture. Monitor closely and remove from heat promptly once fully cooked.
  • Under-seasoning the dish diminishes the complex flavor profile. Ensure consistent herb application and allow marination time for full flavor penetration.
  • Selecting lobsters that are not fresh compromises texture and taste. Purchase from reputable sources and verify freshness before use.
  • Failing to maintain consistent grill heat results in uneven cooking. Preheat grill adequately and use a thermometer for steady grill temperatures.
  • Using dried herbs instead of fresh ones can alter flavor dynamics significantly. Stick to fresh for superior infusion and aromatic benefits.
  • Skipping the resting period causes flavor imbalance. Letting the cooked lobster rest allows the juices to redistribute, enhancing taste experience.
  • Improper basting technique can lead to uneven herb application. Use a brush, applying uniform coats of the herb mixture during grilling.
  • Neglecting presentation affects appreciation and appetite appeal. Ensure attractive garnishing and alignment for impressive visual impact.
  • Ignoring shell-cleaning results in residual sand or hard particles. Thoroughly clean the lobster shells before preparation to avoid unwanted textures.
  • Lacking patience impacts dish quality. Take time with each step, from preparation through execution, for optimal results.

Essential Techniques


Grilling lobster to perfection is central to this dish’s success. Proper heat management and timing ensure that the lobster remains juicy and flavorful. Begin with high heat to sear, sealing in the juices, followed by moderate grilling to cook the lobster through without overdoing it. Embrace the art of basting with an herb-infused brush for each flip to maximize flavor absorption.

One key technique is deftly applying the herb mixture. Using fresh herbs enhances both aromatics and taste, but uneven application can result in flavor gaps. This demands uniform distribution, achieved through skillful basting at intervals, infusing the crustacean with tantalizing essence while maintaining the natural lobster flavor.

Achieving perfect caramelization signals flavors blending appropriate textures. Watch for lobster’s beautiful color transition from raw translucence to a deep, vibrant red hue, indicating readiness. Grilled marks should be prominent yet not charred, highlighting expert grillsmanship balancing smokiness and lobster delicacy.

Signs of Doneness are vital in avoiding overcooked or undercooked lobster. Visual cues include opaque meat and firm but not rubbery texture, combined with a shell turning a bright red hue indicative of thorough cooking. A taste test confirms doneness, revealing succulent, nuanced layers of flavors integral to the finished dish.

Pro Tips for Perfect Tremendous Herb-Infused Grilled Lobster


Ensure the lobster is at room temperature before starting the grilling process for even cooking. This also prevents the meat from seizing up when exposed to heat, maintaining a tender bite.

Using quality, fresh herbs is critical for achieving the best flavor. Fresh, aromatic herbs deliver a beautiful illusion of complexity to your sauce, enhancing the natural beauty of the lobster’s flesh.

Monitor your grill’s heat levels closely. Fluctuating temperatures can lead to undesirable overcooking or uneven heat distribution, impacting the dish’s overall success.

Resting the cooked lobster allows juices to be evenly reabsorbed. This step is critical for flavor development and contributes to a savory mouthful with every bite.

Do not rush the marination process. Allow ample time for the herbs and garlic to infuse into the lobster, ensuring the best possible depth of flavor.

Keep safety paramount when grilling seafood. Use appropriate grilling gloves and tools when handling high-temperature components to prevent accidents.

Experiment with complementary dips to enhance your grilled lobster’s taste. A lemon butter sauce or herb-citrus aioli adds an extra layer of flavor complexity.

Allow for varying grilling times based on lobster size to ensure each piece reaches succulent perfection without overexposure to heat.

Variations and Adaptations


In regions with traditional smoky barbecues, this recipe adapts wonderfully by incorporating wood chips for an added smoky flavor that pairs beautifully with the herb condiments.

Spring or fall adds an inventive twist by incorporating seasonal herbs like frisée or fennel, enhancing inter-seasonal cuisine adaptability.

For a gluten-free option that retains robust flavors, replace traditional side breads with grain-based alternatives or fresh greens.

Alter flavors by adjusting the herb blend, experimenting with additions like tarragon or cilantro for creative spins on the herb profile.

The texture can be modified by experimenting with different grilling techniques, such as indirect cooking for a more subtle char and softer flesh.

For a dazzling presentation at gatherings, plate these lobsters atop a brightly colored platter, garnished artistically with lemon halves and sprigs of fresh herbs, captivating both the eye and the palate.

Serving and Presentation Guide


Optimal plating combines aesthetic appeal with functional elegance, ensuring both pleasing visuals and maneuverability. Remove lobster meat from shells before serving, allowing guests easy access to every flavorful mouthful it offers.

Vibrant garnishes like fresh parsley and lemon wedges add zing, enhancing lobster’s natural pinkish-red hue and creating an inviting, colorful display that encourages sampling.

Pair the dish it with traditional accompaniments like classic French fries or a Mediterranean-inspired couscous salad, which introduces refreshing contrast to the meal.

For modern chic styles, arrange lobster tails over bedded greens, invoking freshness and balance aligning with seasonal dining trends.

Maintain its ideal serving temperature by pre-warming plates, conveying added luxury and maintaining warmth for a delightful dining experience right through to last bite.

For precise portion control, use pre-cut lobster portions, allowing uniform servings, reducing waste, and ensuring satisfaction from each diner, irrespective of appetite size.

Wine and Beverage Pairing


Lobster’s exquisite flavor is highlighted with a glass of crisp, white Burgundy wine, introducing notes of citrus and light oak, enhancing the dish’s inherent delicacy.

Non-alcoholic options can equally captivate guests through a fresh, herbal iced tea with mint and lemon. Its refreshing nature aligns perfectly with lobster’s aromatic qualities.

Lobster and roasted garlic pair intriguingly with fragrant, lightly brewed teas, like a jasmine tea recently steeped, introducing floral hints to the experience.

Serve beverages chilled but not too cold—whether wine or an iced alternative—to effectively balance delicate nuances of both lobster dish and drink selections.

Assemble wine or tea flights to offer guests variety, creating explorative opportunities and potential rave pairings each showcasing lobster’s versatility anew.

Storage and Shelf Life


Careful storage ensures preservation of lobster’s unique taste. Wrap leftovers tightly with cling film or store in airtight containers, refrigerating promptly after cooling.

Maintain fridge temperatures below 40°F to preserve freshness and avoid spoilage. Lobster can be stored for up to two days at optimal quality.

Utilize sealed, non-reactive containers to keep both strong odors and moisture away, ensuring pristine taste and texture upon reheating.

Check for spoilage signs, such as off smells or changed color. Properly stored lobster maintains its original scent and appearance, indicating safety and flavor retention.

For reheating, gently warm lobster meat on low heat to prevent overcooking. Steaming or microwave options on a moderate setting retain moisture and flavor.

Freezing requires thorough cleaning and vacuum sealing. For best results, use within three months, defrosting slowly in the refrigerator for optimal outcomes.

Make Ahead Strategies


Prepare herbs and marinade mix in advance, storing separately to ensure peak freshness when amalgamated with fresh-caught lobster.

Grill, then store grilled lobster only briefly, covering with foil to preserve heat while arranging accompanying sides, maintaining dish cohesiveness.

Clear assembly instruction plans allow smooth transition between prep stages without detracting from overall meal synergy or resulting flavor quality.

Reheating guidelines around low temperatures retain moistness, protecting dish from dryness or textural compromise, assuring enjoyable dining every serving.

Fresh elements added late complement key dishes. Such adjustments enhance dynamics, keeping tastes vibrant, enhanced by final garnish or decor.

Strategize labor-intensive tasks, like shell cleaning or herb chopping, beforehand, ensuring focused efforts when finalizing lobster, a fuss-free finishing parade.

Scaling Instructions


Halve the recipe for intimate dinners where portions need reduction. Adjust ingredient ratios carefully, ensuring marination and basting meets taste expectations.

Doubling provides ample lobster for larger crowds, necessitating increased marinade quantity and grill space, guaranteeing consistent flavor presence holiday events.

Transition equipment, using larger grills or additional stations when scaling upward to prevent crowding, maintaining air circulation, even cooking harmony.

Adaptation timings become crucial, adjusting initial cooking rounds, moving from grill-to-table rapidly to ensure precise cooking and serving accuracy.

Store extra ingredients, using airtight methods while sequencing preparation of main elements according to event timelines affording uninterrupted culinary flow.

Nutritional Deep Dive


Lobster exhibits a remarkable macronutrient balance – rich in proteins yet low in harmful fats, aiding muscle growth and offering substantial nourishment.

Micronutrients abound, with lobster contributing essential minerals like selenium and phosphorus, both supporting immune health and bone development.

Beyond its omega-3 bounty, lobster meat helps combat inflammation, lowering cardiovascular risks, enhancing clarity of mind, and boosting longevity benefits.

Dietary considerations facilitate easy inclusion for health-conscious individuals or those monitoring fat or caloric intake due to its lean nature.

Precise portion analysis ensures effective consumption, meeting energy needs without excess intake, in line with energy balance and weight maintenance principles.

Dietary Adaptations


For gluten-free iterations, eliminate gluten-containing sides, focusing on naturally gluten-free complements like rice or quinoa salads with simple dressing.

Make it dairy-free by substituting butter with olive oil or ghee during the basting stage, retaining rich flavor nuances inherent to the original recipe.

Vegan adaptation requires significant ingredient substitution, swapping lobster with plant-based alternatives like protein-packed tofu marinated similarly.

Low-carb diets benefit naturally from lobster, accentuating low carbohydrate profiles with side salads instead of starchy accompaniments enhancing overall health.

Keto enthusiasts should highlight lobster’s favorable lipid profile, incorporating fats from sources like avocado at garnishes for adherence to dietary themes.

Strict Paleo adherents align with this dish through whole, unprocessed foods, featuring only natural interim additions fitting non-industrialized eating lifestyles.

Accommodate low-FODMAP needs by ensuring none of the added ingredients trigger digestive discomfort, delivering delectable satisfaction across gut-friendly nutrition.

Troubleshooting Guide


Struggling with texture issues? Check roast profiles. Overcooked lobster can firm drastically, whereas undercooked delights remain supple for satisfying mouthfuls.

Correct flavor imbalances by altering herb combinations or incorporating additional spices, ensuring appealing, balanced, all-around experiences.

Temperature problems solved through immediate grilling machine calibration, accurate thermometer readings, establishing baseline ranges for success sustained.

Confront equipment challenges by adjusting volumes or grilling regions to suit personal setups, maintaining distribution, and achieving favorable conditions.

Ingredients sensitive to change can utilize substitutes, examining like-flavors or potential impact adjustments, preserving lobster’s intrinsic attractiveness.

Timing concerns address, mapping peak delays, allocating needed preparations, wielding chef clock maximally, guiding improved outcomes without hurdles.

Recipe Success Stories


Foodies rave, astonished by creating such restaurant-quality lobster at home. Their feedback cites unforgettable textures and harmonious flavor blending perfection.

Variations on this classic continue extending through communities, highlighting customization opportunities based on available local ingredients or desired biases.

Adaptation highlights emerge as families adjust beloved recipes while maintaining core components revered, offering delicious, versatile remakes household favorites.

Engagement flourishes through reader cues, contributing tips, enhancing both results and satisfaction. Tips include varying lead times or unexpected ingredient turns.

Photography enhances invites showcasing photogenic brilliance, capturing moments in history via imagery depicting fulfilled guests savoring creations.

Frequently Asked Questions

Q: Can I use frozen lobster for this recipe?
A: Fresh lobster is preferred for best texture and flavor. If using frozen, ensure it is completely thawed and drained well to prevent excess water during grilling.

Q: How can I prevent my lobster from sticking to the grill?
A: Preheat your grill thoroughly and oil the grates before placing the lobster on them. This ensures a nice char and prevents sticking.

Q: Is it necessary to marinate the lobster beforehand?
A: While not absolutely compulsory, marinating significantly enhances the flavor. Allow at least 30 minutes for the herbs and garlic to permeate the lobster.

Q: Can I prepare this recipe without a grill?
A: Yes, an oven broiler or stovetop grill pan serves as excellent alternatives, although you’ll need to adjust cook times to match these methods.

Q: What herbs work best in this recipe?
A: Fresh basil, parsley, and rosemary are recommended for their aromatic properties and flavor profiles. Customize based on available herbs like thyme or dill.

Q: How do I know when my lobster is properly cooked?
A: Look for bright red shell color and opaque meat. A slight firmness with juicy texture indicates perfect readiness.

Q: Can leftover lobster be used in other dishes?
A: Absolutely. Incorporate into salads, pasta dishes, or even seafood chowders to enjoy continued indulgence in various forms.

Q: What’s the best way to handle tough lobster shells?
A: Use quality kitchen shears for cutting through shells post-cooking. Also, a cracker and pick set lets diners handle remaining hard areas independently.

Q: Could I add a dipping sauce?
A: Definitely consider a simple lemon butter dipping sauce to complement the flavors or even a light aioli for an added zing.

Q: Do you recommend any specific sides?
A: Roasted vegetables, fresh salads, or crusty bread align splendidly with this dish, forming a complete, balanced meal presentation.

Q: How do I ensure an attractive plating?
A: Use vibrant platters and garnish liberally with fresh herbs and lemon to create eye-catching visuals that appeal as much to the eye as to taste.

Additional Resources


For those exploring more seafood recipes, check out our lemon herb butter shrimp or our quick and easy seared scallops, both consistent crowd-pleasers.

Dive deeply into grilling expertise with guides on proper tools, setup organization, and key safety fundamentals for safe practices and delicious outcomes.

Gain ingredient insights for herb substitutions by exploring key property profiles matching your preferred palates for nuanced culinary variations across cuisine.

Select premium equipment explicitly reviewed for reliability across culinary needs— from grills and shears to accurate thermometers ensuring ideal cooking finishes.

Seasonal variations include our collection of fall-inspired seafood favorites, capitalizing on readily available produce and tastes harmonizing with cooler months.

Join the Conversation


Excited about trying this recipe? Join in on social media, and share your own grilling triumphs or photographic captures of this delectable seafood masterpiece.

Express feedback through our comment section with personalized tips and technique enhancement ideas to bolster hands-on learning outcomes.

Share thoughtful, comprehensive reviews to inspire others, highlighting key elements that refine your experience as indicative of valued community insight.

Contribute to community enthusiasm with fresh interpretations of herb-infused grilled lobster, fostering innovative culinary development ideas among readers.

Embrace photography tips to improve sharing visuals, converting culinary charm into inviting visuals which invite likes, shares, and interactions collectively.

The Recipe

Tremendous Herb-Infused Grilled Lobster with Garlic Essence

Serves: 4

Prep Time: 20 mins

Cook Time: 15 mins

Total Time: 35 mins

Kitchen Equipment Needed

  • Grill
  • Kitchen Shears
  • Basting Brush
  • Thermometer
  • Parchment Paper

Ingredients

  • 4 lobster tails
  • 1/4 cup extra-virgin olive oil
  • 2 tbsp fresh basil, chopped
  • 2 tbsp fresh parsley, chopped
  • 1 tbsp fresh rosemary, chopped
  • 3 cloves garlic, minced
  • 1 lemon, cut into wedges
  • Salt and pepper to taste

Directions

  1. Preheat the grill to medium-high heat.
  2. Prepare the lobster by using kitchen shears to cut through the top shell lengthwise down the center of the back to the tail.
  3. Combine olive oil, basil, parsley, rosemary, garlic, salt, and pepper in a bowl and blend well.
  4. Baste the herb mixture over each lobster tail generously, ensuring the entire flesh is covered.
  5. Place the lobsters shell side down on the grill and cook for 12-15 minutes, basting occasionally until shells are bright red and meat is opaque.
  6. Remove from the grill and let the lobster rest for 5 minutes. Serve warm, garnished with lemon wedges.

Recipe Notes

  • For extra flavor, marinate for up to 1 hour in the refrigerator before grilling.
  • Adjust herb combinations as per personal preference for unique twists on flavor.
  • If using smaller or larger lobster tails, adjust grilling time accordingly.

Delicious Mini Tater Tot Cheeseburgers Recipe for Snack Lovers

Mini Tater Tot Cheeseburgers: Bite-Sized Delights For All Occasions

⚖️
Difficulty
Easy

⏲️
Prep Time
15 mins

🕒
Cook Time
20 mins

⏱️
Total Time
35 mins

🍽️
Servings
4

If you’re searching for a fun and tasty appetizer, look no further than these Mini Tater Tot Cheeseburgers. These bite-sized burgers combine the comfort of cheeseburgers with the crispy goodness of tater tots—a match made in culinary heaven. The perfect treat for game day, parties, or even a weekend snack, these mini delights are easy to make and joyful to eat. You’ll love the savory beef, melty cheese, and crispy tater tots, coming together in each bite. Indulge in the rich flavors that will make these Mini Tater Tot Cheeseburgers a hit at your next gathering!

Quick Recipe Highlights

  • Flavor Profile: Salty, with a delightful balance between savory beef and gooey cheese, highlighted by the crispy and golden tater tots.
  • Texture: Expect a wonderful contrast between the crispy tater tot exterior and the juicy, tender beef interior, with the cheese melting perfectly in between.
  • Aroma: The enticing scent of grilling beef and melting cheddar cheese is complemented by the nostalgic aroma of freshly baked tater tots.
  • Visual Appeal: These mini burgers present a festive appearance on a platter, with golden tater tots wrapping the melty cheddar cheese and juicy burger patties.
  • Skill Level Needed: Simple enough for beginner cooks, requiring basic skills of browning beef and assembling mini sandwiches.
  • Special Equipment: A mini muffin tin aids in shaping these perfectly sized burger bites and ensuring even baking.

Recipe Overview

  • Difficulty Level: This recipe is designed with ease in mind, perfect for cooks of all skill levels. With simple cooking techniques like browning ground beef and baking frozen tater tots, it’s an accessible recipe for any occasion.
  • Category: These Mini Tater Tot Cheeseburgers fall under appetizers and snacks, making them the star of game-day gatherings or casual parties.
  • Cuisine: This recipe is a playful twist on American cuisine, combining classic cheeseburger ingredients with the beloved tater tot.
  • Cost: The ingredients are budget-friendly, making use of staples like ground beef, cheese, and frozen tater tots, costing approximately $10 for a batch of mini burgers.
  • Season: Ideal for any season, these mini cheeseburgers are especially popular during backyard barbecue season or fall football gatherings.
  • Occasion: Perfect for any party, these bite-sized delights are also fantastic for casual entertaining with friends or quick family snacking.

Why You’ll Love This Recipe


These Mini Tater Tot Cheeseburgers offer a burst of flavor and texture that enchants with every bite. The juicy beef, lightened by melted cheese, is delightfully encased in crispy tater tots, making for an exceptionally satisfying mouthful. The convenience of this recipe cannot be overstated—quick prep and minimal cooking time make them a go-to choice for effortless entertaining. Nutritionally, they offer a balanced indulgence with protein-packed beef and cheesy richness to satisfy your cravings.

Socially, this recipe works wonders; the fun presentation captures attention at parties and brings people together over shared enjoyment. Easy on the wallet, the ingredients are readily accessible and affordable, ensuring everyone can partake. Their smaller size means they’re perfect for portion control, making you a hit at events without any guilt. Indeed, these Mini Tater Tot Cheeseburgers bring culinary joy with remarkable versatility.

Historical Background and Cultural Significance


The origin story of cheeseburgers dates back to the 1920s in the United States, when chefs began adding cheese to hamburgers to enhance flavor. The evolution of the tater tot is equally fascinating, originating in the 1950s as a clever way to utilize potato scraps. The cultural importance of these two American classics underscores their amalgamation in this creative recipe, combining the innovative spirit of early American fast food with the satisfying crunch of the beloved tater tot.

Over the decades, mini tater tot cheeseburgers have become a popular fixture in social gatherings and sports events. They offer the nostalgic taste of American comfort food while appealing to modern dining trends favoring small, shareable bites. Regional variations across the U.S. may include adding different spices or toppings, but the core concept—savory bite-sized fun—remains constant.

Ingredient Deep Dive


Ground beef, the starring ingredient, holds deep cultural significance as a staple in American comfort food. It offers a high protein content, essential for muscle growth and cell repair. Choose quality ground beef, such as 80/20 mix, for the best juiciness-to-fat ratio when browning. Store it in the fridge or freezer, and substitute it with ground turkey for a leaner option if desired.

Cheddar cheese adds creamy richness and flavor. High in calcium, it supports bone health. Selecting sharp cheddar can enhance flavor because it melts well and offers a tangy kick. Store it refrigerated, and shop for it in block form for grating yourself. Alternative cheeses like Monterey Jack or Gouda can be used to personalize your flavor profile further.

Common Mistakes to Avoid

  • Overbrowning the beef: Avoid using high heat, which can dry out the meat. Cook on medium to retain juiciness.
  • Not pre-cooking tater tots: Ensure they’re hot and crispy before assembly to keep them from becoming soggy.
  • Using cold cheese: Let cheese sit at room temperature for even melting during baking.
  • Skipping seasoning: Add salt and pepper to enhance beef flavors before browning.
  • Incorrect muffin tin size: Use a mini muffin tin for proper burger shape and size.
  • Rushing assembly: Ensure uniform layering for balanced bites, allowing cheese to keep toppings together.
  • Skipping greasing: Grease the muffin tin well to avoid any sticking issues.
  • Serving delayed: Serve promptly after baking for the best texture and taste experience.

Essential Techniques


Mastering the art of browning beef is crucial for these Mini Tater Tot Cheeseburgers. Proper browning creates a rich, complex flavor by caramelizing the meat’s natural sugars. Start with a hot pan and avoid overcrowding; too much meat lowers heat and steams instead of browning. Keep an eye on the meat, stirring occasionally, and remove excess fat to avoid greasy results. Achieving a rich, dark crust on the beef is the goal, signifying successful Maillard reaction, enhancing depth and aroma.

Pro Tips for Perfect Mini Tater Tot Cheeseburgers


Elevate your Mini Tater Tot Cheeseburgers with these pro tips. For added flavor, mix finely chopped onion and garlic with the ground beef before browning. Using a mustard glaze—for example, brushing dijon mustard atop each burger before baking—enhances taste and adds a tangy top note. Consider adding seasonings like Worcestershire sauce or smoked paprika for a smoky depth. Present these mini burgers with a light sprinkle of toasted sesame seeds over the tater tops for visual and textual appeal. Personalize with a zigzag of spicy mayo or a pickle slice for that authentic burger taste.

Variations and Adaptations


Experiment with regional tastes by incorporating bacon bits inside the beef for a smoky richness reminiscent of Southern barbecue. Adapting these cheeseburgers for a season-specific theme could include adding fresh, sliced jalapeños for a summer spice punch. Dietary modifications, like using turkey meat or plant-based patties, cater to diverse preferences. Enhance flavors by introducing gourmet cheese varieties such as blue cheese or Swiss. For a twist in texture, try a potato crisp base instead of tater tots. Creative plating could include serving with sriracha ketchup for a modern edge.

Serving and Presentation Guide


Present these Mini Tater Tot Cheeseburgers on a rustic wooden board or a sleek, modern platter for visual appeal. Consider garnishing with fresh herbs like parsley or thinly sliced radishes to add a splash of color and freshness. Traditional accompaniments like ketchup and mustard suit well, but adding aioli or barbecue sauce provides a modern twist. Serve at room temperature or slightly warm, ensuring the cheese remains melty and enticing. Portion control tips include allocating 2-3 burgers per person, ensuring delightful satisfaction without overindulgence.

Wine and Beverage Pairing


Opt for a light, fruity red wine like a Pinot Noir to complement the rich, savory flavors of the Mini Tater Tot Cheeseburgers. This wine option balances tartness and acidity without overpowering the dish. For non-alcoholic alternatives, consider a crisp iced tea or sparkling water with a lemon twist to refresh the palate. If serving with coffee, go for a mild roast with nutty undertones to harmonize flavors. Beverage temperature should remain chilled to contrast the warm cheeseburgers effectively, enhancing the overall tasting journey.

Storage and Shelf Life


Store leftover Mini Tater Tot Cheeseburgers in an airtight container in the refrigerator for up to three days. For optimal freshness, keep them away from aromatic foods to prevent flavor absorption. To reheat, bake in a preheated oven at 375°F for 10-12 minutes until hot, avoiding the microwave, which can make tots soggy. If freezing, individually wrap each mini cheeseburger for up to a month, thawing in the fridge before reheating for best results. Watch for signs of spoilage, like off-smells or changes in appearance.

Make Ahead Strategies


Efficiently plan by prepping components ahead. Shape and brown beef patties a day in advance, cooling and refrigerating until needed. Cook tater tots ahead but reserve final assembly and baking for serving day to retain crispness. Assess that assembly steps and component storage don’t impact quality, maintaining flavor balance. When reheating, ensure elements are added fresh, like any post-bake condiments. This strategy saves time without sacrificing the delightful taste and texture love with Mini Tater Tot Cheeseburgers.

Scaling Instructions


Easily scale this recipe to suit different crowd sizes by adjusting ingredient quantities. To halve the recipe, maintain proportions and adjust cooking timing slightly to ensure ideal texture and flavor. Doubling or tripling involves larger pans or multiple muffin tins for even cooking, ensuring all components maintain quality. Timing modifications usually include monitoring cook times closely, pulling from the oven when golden and warm throughout. Store extra ingredients carefully to prevent spoilage, extending longevity for further use.

Nutritional Deep Dive


Assessing the nutritional profile, Mini Tater Tot Cheeseburgers offer a balanced macro-nutrient content, with protein-rich beef supporting muscle repair and cheddar cheese complementing with fat for energy. The tots contribute additional carbohydrates, maintaining a fulfilling meal. Micro-nutritionally, expect a boost of iron and calcium from combined beef and cheese, enhancing vitality. Dieters should consider moderating portion size or selecting lower-fat cheese options to adhere to dietary needs. Overall, mindful consumption within a balanced diet framework easily accommodates these tasty mini burgers.

Dietary Adaptations


Adjust the recipe for gluten-free diets by verifying all ingredients are certified gluten-free, especially the tater tots. Swap regular buns with cauliflower or cabbage leaves for a low-carb approach, aligning with keto-friendly meals. For a dairy-free version, replace cheddar with dairy-free cheese alternatives and opt for dairy-free condiments. To accommodate vegans, substitute the beef with plant-based protein mixes and cheese with vegan cheese. Adhering to dietary preferences is simple with ingredient replacements, making Mini Tater Tot Cheeseburgers universally enjoyed.

Troubleshooting Guide


Ensure optimal flavor balance by seasoning the beef properly before browning, mindful to prevent under- or over-flavoring. If texture becomes an issue, adjust cook times to achieve a tender, juicy interior. When confronting temperature problems, verify oven thermostats for accuracy, or consider an oven thermometer. Overcome equipment challenges by using alternatives like silicone molds instead of mini muffin tins. Ingredient substitutions, such as ground turkey for beef, may require adjustments to maintain desired taste profiles. Timing concerns can be resolved by thoroughly understanding each step’s duration and orchestrating accordingly.

Recipe Success Stories


Many readers have expressed enthusiasm for these Mini Tater Tot Cheeseburgers in online forums and recipe reviews. Adaptations include reader success stories of adding spices like cumin or smoked chipotle powder for personalized tastes. Photography tips from the community suggest highlighting bright garnishes, like green onions or cherry tomatoes, for an appealing visual presentation. Others have shared how rotating the tater tots during baking achieves an even crisp, delighting guests. Each story contributes to the shared joy and growing versatility of this beloved recipe.

Frequently Asked Questions

Can I use different types of cheese?

Yes, you can use any cheese that melts well, like Monterey Jack or mozzarella, to tweak flavor profiles.

How can I make them vegetarian?

Substitute the ground beef with plant-based meat alternatives for a delicious vegetarian twist.

Is it possible to prepare these in advance?

Yes, you can precook the components, and store them separately. Assemble and bake right before serving.

Are there low sodium alternatives?

Choose low-sodium cheese and season the beef conservatively to align with low-sodium dietary guidelines.

What if I don’t have a muffin tin?

Use a baking sheet and shape the burgers by hand, adjusting cooking time to protect integrity and size.

Can I freeze leftovers?

Yes, wrap each mini cheeseburger tightly and freeze for up to a month. Thaw in the fridge before reheating.

How can I make tater tots extra crispy?

Bake the tater tots separately until crispy before assembling, enhancing overall texture.

What side dishes pair well?

Consider fresh salads, roasted vegetables, or simple fries as complementary side dishes offering contrast.

Can I adjust this for smaller servings?

Yes, easily scale the recipe down to serve smaller groups by halving ingredients and adjusting cook times slightly.

What dip pairs best with these burgers?

Sriracha mayo, honey mustard, or barbecue sauce provide delightful dipping options enhancing the burger taste.

Additional Resources


Explore related recipes like traditional sliders or stuffed potato skins for further snacking inspiration. Technique guides focusing on achieving perfectly cooked ground beef expand skills, ensuring future recipe success. Ingredient information articles explore different cheese varieties’ flavor profiles, helping select alternatives. Equipment recommendations include mini muffin tins or burger presses, optimized for universal kitchen use. Seasonal variations suggest incorporating fresh seasonal produce into the recipe or complementing sides to keep meals dynamic and flavorful all year round.

Join the Conversation


We’d love to see your versions of these Mini Tater Tot Cheeseburgers! Share your creative adaptations on social media using #TaterTotCheeseburgers. Enhance the presentation with photography tips, focusing on lighting and garnish to make the dish a feast for the eyes. Leave your recipe reviews in the comments section, helping the community learn from your experiences. Participate in discussions for variations, seasoning tweaks, or innovative integrations making unforgettable impressions at gatherings. Embrace the recipe’s versatility while engaging with a vibrant cooking community celebrating these delightful bites.

The Recipe

Mini Tater Tot Cheeseburgers

Serves: 4

Prep Time: 15 mins

Cook Time: 20 mins

Total Time: 35 mins

Kitchen Equipment Needed

  • Mini muffin tin
  • Frying pan
  • Oven
  • Mixing bowl
  • Spatula

Ingredients

  • 1 lb ground beef
  • 1 cup shredded cheddar cheese
  • 1 package frozen tater tots
  • Salt and pepper to taste
  • Ketchup and mustard (optional, for serving)

Directions

  1. Preheat the oven to 400°F (200°C).
  2. Brown the ground beef in a frying pan over medium heat, seasoning with salt and pepper.
  3. Cook the tater tots separately until they’re golden and crispy.
  4. In a mini muffin tin, place a layer of shredded cheddar cheese.
  5. Fill each muffin cup with a spoonful of the browned beef, pressing down gently.
  6. Top each with a cooked tater tot.
  7. Bake in the preheated oven for 8-10 minutes, or until cheese is melted and bubbly.
  8. Serve immediately with ketchup and mustard, if desired.

Recipe Notes

  • For extra flavor, add spices like smoked paprika or garlic powder to the beef.
  • Try different cheeses such as Monterey Jack for variation.
  • To store leftovers, keep in an airtight container in the refrigerator for up to three days.

Savory Longhorn Steakhouse Parmesan Chicken Recipe You Must Try

Longhorn Steakhouse Parmesan Chicken: A Culinary Delight

⚖️
Difficulty
Moderate

⏲️
Prep Time
20 mins

🕒
Cook Time
25 mins

⏱️
Total Time
45 mins

🍽️
Servings
4

Craving a dish that’s perfect for a family dinner or a gathering with friends? Look no further than the Longhorn Steakhouse Parmesan Chicken. This recipe combines the juicy tenderness of chicken breast with a savory parmesan crust that’s sure to impress. The melted cheese and rich flavors create an irresistible aroma that fills your kitchen, making this dish not only a treat for the taste buds but also a feast for the senses.

Whether you’re seeking the comfort of a homemade meal or the satisfaction of mastering a restaurant-worthy dish, this Parmesan Chicken delivers in every aspect. The flavors meld perfectly with each bite, offering a balanced taste that’s both rich and delightful. The result? A dish that’s as comforting as it is indulgent.

Quick Recipe Highlights

  • Flavor Profile: Savory and robust with rich parmesan and aromatic herbs blending with the succulent chicken.
  • Texture: Perfectly crunchy on the outside with a tender, juicy inside, thanks to the perfect frying technique.
  • Aroma: Aromas of melting cheese, fresh herbs, and crisp breadcrumbs journey through your kitchen.
  • Visual Appeal: A golden-brown crust paired with a vibrant combination of melted cheese and fresh parsley.
  • Skill Level Needed: Moderate skill level; familiarity with frying chicken and creating a crust is beneficial.
  • Special Equipment: While a basic frying pan and oven are standard, a meat mallet might be useful for an even thickness.

Recipe Overview

  • Difficulty Level: This recipe is deemed moderate due to the frying step requiring attention and control for optimal crust.
  • Category: Perfect as a main dish that pairs well with simple sides, bringing sophistication to any meal occasion.
  • Cuisine: Inspired by the heartwarming flavors of Italian-American cuisine, mixing hearty cheeses and tender meats.
  • Cost: Relatively cost-effective with primary expenses in cheese and quality chicken; overall, a worthy home investment.
  • Season: This dish is perfect for cooler months when hearty meals become comforting and satisfying.
  • Occasion: Ideal for family dinners and celebrations where a little extra effort is appreciated in creating warmth and joy.

Why You’ll Love This Recipe


The taste of Longhorn Steakhouse Parmesan Chicken is a symphony of flavors, delightful to the palate. The rich and robust parmesan perfectly complements the succulent chicken, enhancing its natural juiciness. This dish offers a satisfying crunch with every bite, creating a textural experience that’s both delightful and fulfilling. Coupled with its delicious taste, this chicken is also convenient to prepare. It requires typical ingredients and straightforward methods, making it suitable for any home cook seeking to impress.

Nutritionally speaking, this dish offers a welcome balance. Protein-rich chicken is complemented by calcium-packed parmesan, contributing to a meal that’s both flavorful and nourishing. Its robust flavors and hearty composition make it perfect as a satisfying main course. Socially, this dish serves as a perfect centerpiece for gatherings. Its impressive presentation and comforting flavors invite conversation and joy around the dining table, nourishing not only the body but also growing shared memories.

From a cost perspective, this chicken is surprisingly economical. Utilizing ingredients that are likely already in your kitchen, it avoids the need for complex or costly elements, making it accessible to wide audiences. Overall, this dish isn’t just a meal; it’s an experience of flavors, emotions, and culinary traditions brought together in one perfect plate.

Historical Background and Cultural Significance


Parmesan Chicken has rich culinary roots tracing back to the fusion of Italian and American cuisines, brought together through waves of migration and adaptation. This dish evolved as an interpretation of traditional Italian recipes, adapted to suit American tastes and ingredient availability. While its core essence remains tied to Italy’s culinary ethos, it has since evolved into a celebrated American favorite, especially in steakhouses.

Culturally, recipes like Parmesan Chicken serve as reminders of culinary adaptability and the intermingling of traditions. It reflects how cuisine evolves, morphing with each new culture it encounters, bringing along its original flavors and adding new ones. The dish has gained significant popularity across the United States, presented in various forms by restaurants and cherished in home kitchens.

As it has spread, it continues to evolve, each cook adding a personal touch, whether it be an extra spice or an innovative cooking method. Regional variations of Parmesan Chicken now exist, with each area bringing its own cultural twist to this classic dish.

Ingredient Deep Dive


The star of this dish, chicken breasts, are an essential protein component in various cuisines, including Italian and American. This choice cut of meat is loved for its tenderness and ability to absorb flavors, making it an ideal base for the Parmesan crust. Traditionally, chicken holds cultural significance in Italian cuisine as a symbol of abundance and family meals. Nutrient-wise, chicken is rich in protein and a good source of essential vitamins and minerals.

Parmesan cheese, a staple in Italian cooking, brings a savory depth and rich texture to this dish. Its production and culture are well ingrained in Italian tradition, renowned for its protected designation of origin (PDO) status in Europe. Apart from its delightful taste, parmesan provides a good dose of calcium and protein, adding nutritional value to the meal.

Common Mistakes to Avoid

  • Overcooking the chicken can lead to dryness; always monitor cooking time and temperature for juicy meat.
  • Skipping the breading step will compromise the crust’s texture, taking away the desired crunch.
  • Using low-quality cheese could diminish the flavors; opt for authentic parmesan to retain richness.
  • Cooking at too high a heat can lead to burnt crusts; maintain medium heat for even cooking.
  • Forgetting to pat dry chicken leads to a soggy crust; moisture prevents proper browning.
  • Neglecting proper seasoning results in a bland dish; ensure each component is well-seasoned.
  • Using the wrong oil for frying can alter flavors; use a neutral oil with a high smoke point.
  • Underestimating prep time can rush steps; prepare ingredients in advance for a smoother process.

Essential Techniques


Bread-crusting the chicken is vital. Proper technique ensures the crust adheres well, offering that desirable crunch. Begin by dredging the chicken in flour to create a dry surface, allowing the egg mixture to stick. Follow with breadcrumbs mixed with grated parmesan for flavor depth. The importance of maintaining an even crumb layer cannot be understated; it equally distributes flavor, texture, and appearance.

When frying, maintain consistent medium heat. This ensures that the crust crisps up without burning and that the chicken cooks through evenly. Visually, the aim is to achieve a golden brown crust, signaling the right balance between texture and doneness. Mastering these techniques leads to a delectable Parmesan Chicken.

Pro Tips for Perfect Longhorn Steakhouse Parmesan Chicken


For the perfect crunch, ensure your breadcrumbs are finely milled and evenly coating the chicken. Freshly grated Parmesan cheese is preferred for its moisture and flavor retention compared to pre-packaged options. If possible, let the chicken rest for a few minutes before serving, allowing flavors to meld and juices to redistribute, enhancing every bite.

Keep your kitchen tools at the ready; it helps in organizing the cooking process better. The use of a meat mallet can ensure even thickness in chicken breast, promoting uniform cooking. If you’re short on time, prepare and freeze the breaded chicken in advance, then simply defrost and cook when needed.

A meat thermometer can save your day. Ensure your chicken reaches an internal temperature of 165°F (75°C) for safe consumption while retaining tenderness. Experiment with adding a pinch of herbs to your breadcrumb mixture for nuanced flavors.

Variations and Adaptations


Regional interpretations may include herbs like basil or sage infused in the breadcrumb mixture, echoing Italian culinary notes. For a seasonal touch, summer offers fresh tomato relish toppings while winter invites warm, melted provolone cheese. Dietary modifications can accommodate various needs; gluten-free panko works well for those avoiding wheat, and leaner cuts can be utilized for a lower-fat version.

For a flavor twist, smoked paprika can lift the crust’s profile, adding a hint of richness. Additionally, consider adapting textures by supplementing panko for traditional breadcrumbs, offering a lighter, airier crust.

Presentation alternatives include individual servings topped with fresh microgreens and drizzles of balsamic reduction, offering a contemporary touch to a classic dish.

Serving and Presentation Guide

A vibrant garnish of fresh basil or parsley lays beautifully atop the golden crusted chicken, adding a touch of freshness. For plating, consider resting the chicken atop a bed of arugula for a contrast in color and a peppery bite. Traditional accompaniments like roasted vegetables or creamy mashed potatoes enhance the dish’s appeal.

Modern serving suggestions might include pairing with light, zesty salads, bringing balance to the hearty flavors. Attention to temperature is crucial; the chicken is best enjoyed hot and fresh from the kitchen. For portion control, slice chicken into medallions, artfully displaying each slice.

Wine and Beverage Pairing


A crisp white wine like Sauvignon Blanc or a light red like Pinot Noir pairs nicely with the savory flavors of Parmesan Chicken, both complementing and cutting through the richness. For non-alcoholic alternatives, consider an iced lemon tea or spritzed sparkling water with a hint of lime.

Beverage temperatures should be cool, refreshing the palate and enhancing the dish’s enjoyment. Suggestions for serving include using tall glasses with clear ice for an elevated presentation, adding elegance to your dining experience.

Storage and Shelf Life


Store leftovers in an airtight container to maintain moisture levels; refrigeration will keep it fresh for up to three days. Ideally, reheat using an oven to retain the crust’s crispness rather than a microwave, which can make it soggy. Avoid freezing cooked Parmesan Chicken due to texture alteration.

Containers should be lined with paper towels to absorb excess moisture, maintaining crust texture. Signs of spoilage include off smells, slimy texture, and discolored appearance. Always prioritize fresh ingredients to prolong shelf life post-cooking.

Make Ahead Strategies


Prepare elements such as the breadcrumb mix and slather separately; they can be stored for a week in containers. While assembling the dish, pre-breading and freezing individual pieces provide a head start for quick meals ahead.

When reheating, add fresh elements like herbs to bring life back to flavors dulled during refrigeration. Maintain quality by avoiding extended freezer storage which leads to freezer burn or taste dilution. Separate moist ingredients during make-ahead to maintain textural integrity.

Scaling Instructions


For half recipes, reduce cooking times slightly, monitoring closely for doneness to avoid overcooking. Doubling involves maintaining an organized station and working in batches to retain the quality of frying. Larger scales will require additional tools like larger pans to prevent crowding the oil, ensuring even cooking.

Timing adjustments may be necessary, as increased volume affects cooking dynamics and requires attention to ensure consistency across all servings. Ensure equal seasoning distribution to maintain flavors when scaling the recipe.

Nutritional Deep Dive


Macronutrient-wise, Parmesan Chicken is a protein-dense dish with moderate fat content from frying, well-suited for active lifestyles. Companioned by cheeses, it offers a source of necessary calcium.

Portion considerations could involve calorie adjustments, with options for leaner chicken portions or reduced cheese for weight management. Exploring the micronutrient contribution, Parmesan offers essential minerals such as zinc and phosphorus, contributing to overall nutritional benefits.

Dietary awareness supports portion control strategies, balancing out protein intake with recommended sides like vegetables for diversified nutrient access.

Dietary Adaptations


For gluten-free versions, utilize alternative breadcrumbs composed of ground nuts or gluten-free flour, accommodating gluten-sensitive diets. Dairy-free adaptations include plant-based cheese options or nutritional yeast for that desired umami effect.

Vegan transformations rely on seitan or tofu as protein alternatives, seasoned thoroughly for maximum flavor. Carb-conscious individuals adapt by using almond meal as a crust base, lowering carbohydrate levels while maintaining taste.

Keto-approved recipes focus on high-fiber coatings and healthy fats through oils and nuts, giving texture while minimizing carb impact, suitable across multiple dietary restrictions.

Troubleshooting Guide


Texture challenges, such as soggy crusts, stem from trapped moisture during cooking; proper drying and temperature maintenance solve this. Balanced flavors require seasoning experimentation; tasting as you go ensures harmonious blends.

Temperature issues may arise if heating equipment is unsuitable; invest in quality thermometers and pans. Substituting key ingredients like breadcrumbs should be done carefully, ensuring similar texture and flavor profiles are maintained. Timing can be adjusted through close monitoring, especially for chicken deferment affecting cooking efficiency.

Recipe Success Stories


Cooking enthusiasts rave about the adaptive flavor profiles achievable through herbs and spice infusions, lending personalization to each recipe attempt. Successes involve marinating meat overnight for intensified flavors, extending beyond standard execution.

Modified ingredient stories unfold—readers share innovative approaches within community groups, cultivating shared culinary advances. Photography captures the dish’s essence, often spotlighting vibrant ready-to-eat meals paired with complements, showcasing presentation brilliance.

Frequently Asked Questions

How long can Parmesan Chicken be stored post-cooking?
Answer: Properly stored in airtight containers, your Parmesan Chicken remains safe for consumption within three days when refrigerated. Always monitor for signs of spoilage, ensuring safe reheating practices.

Can I substitute Parmesan for a different cheese?
Answer: Parmigiano Reggiano is optimal for its flavor; however, Asiago or Romano offer an excellent replacement with similar profiles. The key is maintaining a high smelting point appropriate for crust creation.

What’s the best size for chicken portions?
Answer: Aim for uniform thickness to ensure consistent cooking; using a mallet assists in achieving this while promoting even crust adherence and preventing overcooked portions.

What oil is best for frying?
Answer: Opt for neutral oils like canola or vegetable oil with a high smoke point to achieve an ideal fry without imparting additional flavors that could alter the intended taste profile.

Can leftovers be frozen?
Answer: While freezing cooked Parmesan Chicken is possible, note the potential for altered texture—notably in the crust; prioritize refrigeration for short-term storage where possible.

Why does my crust not adhere?
Answer: Likely causes include insufficient drying of the chicken’s surface or uneven breading. Pat chicken dry, utilize flour adhesion, and press breadcrumbs firmly for best results.

How to achieve even frying?
Answer: Maintain oil height adequate for shallow frying and avoid overcrowding pans. Fry in small batches while monitoring heat levels to ensure constant cooking temperatures.

How do I enhance flavor further?
Answer: Layering flavors with marinades, fresh herbs, and balancing seasoning during preparation amplifies depth; remember to taste-test frequently for personalized perfection.

Any non-alcoholic pairings?
Answer: Complement each meal with sparkling mineral water with lemon slices or herbal teas infused with mint to provide a refreshing palate-cleansing experience.

Is pre-breading essential?
Answer: Pre-breading aids in thorough crust formation, essential for textural success. Skipping this can lead to uneven adhesion; incorporate this step for maximum quality.

Steps for vibrant presentation?
Answer: Use colorful garnishments, precision slicing, and contrasting plate selections to visually enhance the dish, capturing attention while pleasing delightful diverse palates.

Additional Resources


Explore further with related recipes harnessing parmesan’s culinary diversity; try recipes like Chicken Piccata or Eggplant Parmesan, where cheese is central. Guides to mastering frying techniques, ingredient optimization, and suitable equipment will equip you, elevating cooking skills.

Incorporating seasonal twists enhances this recipe’s adaptability year-round, supported through detailed seasonal ingredient analyses.

Join the Conversation


Engage with our community through social media sharing, showcasing your recipe attempts with visually enticing photographs. Constructive reviewing helps others, inspiring innovative improvements to collective meals. Share your unique variations and adaptations, contributing to a growing recipe resource. Embrace culinary connections, creating a sense of virtual togetherness one joyful dish at a time.

The Recipe

Longhorn Steakhouse Parmesan Chicken

Serves: 4

Prep Time: 20 mins

Cook Time: 25 mins

Total Time: 45 mins

Kitchen Equipment Needed

  • Meat mallet
  • Frying pan
  • Oven
  • Baking sheet
  • Mixing bowls

Ingredients

  • 4 boneless, skinless chicken breasts
  • 1 cup all-purpose flour
  • 2 eggs, beaten
  • 1 cup breadcrumbs
  • 1 cup grated Parmesan cheese
  • Salt and pepper to taste
  • 1 tsp Italian herbs
  • Cooking oil for frying

Directions

  1. Preheat the oven to 350°F (175°C).
  2. Slightly flatten chicken breasts using a meat mallet for uniform thickness.
  3. Set up a breading station: one bowl with flour, one with beaten eggs, and a mixture of breadcrumbs and parmesan cheese in a third.
  4. Season each chicken breast with salt, pepper, and Italian herbs.
  5. Dredge each piece in flour, dip in egg, and coat with breadcrumb mixture.
  6. Heat oil in a frying pan over medium heat. Fry chicken until golden brown on each side, about 3-4 minutes per side.
  7. Transfer fried chicken to a baking sheet and bake in the preheated oven for an additional 10-15 minutes until cooked through.
  8. Let rest for 5 minutes before serving, allowing juices to redistribute.

Recipe Notes

  • Substitute panko for breadcrumbs for an airier texture.
  • Pair with fresh arugula salad or roasted vegetables for a complete meal.
  • Add red chili flakes to the breadcrumb mix for a spicy kick.

Irresistible Slow Cooker Beef Brisket with Homemade BBQ Sauce

Slow Cooker Beef Brisket with BBQ Sauce: A Flavorful Delight

⚖️
Difficulty
Easy

⏲️
Prep Time
15 mins

🕒
Cook Time
480 mins

⏱️
Total Time
495 mins

🍽️
Servings
8

Indulge in the rich and savory flavors of Slow Cooker Beef Brisket with BBQ Sauce, a truly comforting dish for any occasion. This recipe captures the essence of tenderness, where the beef brisket is slow-cooked to perfection, absorbing the smoky, tangy essence of homemade BBQ sauce. The brisket, bathed in a robust sauce, not only delights the palate but also fills your home with an inviting aroma.

This dish celebrates the heartfelt connection of good food and great company. Imagine the brisket, moist and juicy, effortlessly flaking onto your fork. The BBQ sauce enhances the savory notes while introducing a satisfying hint of sweetness. Whether it’s a family gathering or an intimate dinner, the perfect combination of flavors and textures in this beef brisket promises to leave a lasting impression.

Quick Recipe Highlights

  • Flavor Profile: A harmonious blend of smoky, tangy, and sweet notes that bring out the rich flavor of the beef.
  • Texture: The beef is incredibly tender and juicy, with each bite practically melting in your mouth.
  • Aroma: The aroma is a delightful mix of cooked beef and the distinct smoky scent of BBQ sauce, filling the air with warmth.
  • Visual Appeal: The dish boasts a beautiful caramelized glaze from the BBQ sauce, with a rustic, hearty presentation.
  • Skill Level Needed: Perfect for beginners, the recipe involves straightforward preparation and slow cooking.
  • Special Equipment: A slow cooker is essential to achieve the tender, slow-cooked texture desired in this recipe.

Recipe Overview

  • Difficulty Level: Easy – This dish relies on the slow cooker to tenderize the brisket and infuse it with flavor, requiring minimal hands-on effort.
  • Category: Ideal as a main course for lunch or dinner, especially suitable for casual gatherings and family meals.
  • Cuisine: Rooted in American barbecue traditions, particularly renowned in Southern US cuisine for its hearty and comforting nature.
  • Cost: Relatively affordable, as brisket is a more budget-friendly cut of beef, while the BBQ sauce uses common pantry ingredients.
  • Season: Perfect for autumn and winter, although it can be enjoyed year-round, especially for cookouts and backyard barbecues.
  • Occasion: Suitable for casual get-togethers, Sunday dinners, or any event where comforting and satisfying food is desired.

Why You’ll Love This Recipe


The combination of taste and texture in this Slow Cooker Beef Brisket with BBQ Sauce is nothing short of a culinary masterpiece. The tender, melt-in-your-mouth brisket paired with the luscious sauce creates a perfect harmony of flavors. It’s a delightful dish that rewards patience with a satisfying sensory experience, from the rich aroma to the delectable taste.

Convenience is at the heart of this recipe. With a prep time of just 15 minutes, you can set it up in the morning and come home to a delicious, ready-to-eat meal. The slow cooker does all the heavy lifting, making it an effortless way to achieve a restaurant-quality dish in the comfort of your home.

Nutritionally, this recipe balances protein-rich beef with a sauce that’s flavorful yet not overly indulgent. It’s a comforting option without the heavy additives typical of pre-made sauces, allowing for a more wholesome meal that’s substantial without any compromise on taste.

The social aspect of this dish cannot be understated. It’s a communal affair perfect for family gatherings and social events. Sharing this dish creates a connection among diners, providing not only a wholesome meal but also a shared experience around a table filled with warmth and laughter.

Lastly, the recipe is highly cost-effective. Using a cut like brisket allows for a substantial meal without breaking the bank. The ingredients are readily accessible and affordable, meaning that even a novice cook can recreate this impressive meal without needing exotic or costly elements.

Historical Background and Cultural Significance


The beef brisket has a storied history in culinary traditions, particularly in the United States, where it holds a place of honor at barbecues and festive occasions. Originating as a cut that requires long, slow cooking methods, brisket was embraced for its rich flavor when cooked correctly. Today, it stands as a staple in Southern barbecue culture.

Culturally, the beef brisket transcends regional boundaries, celebrated not just in Southern barbecue but also in Jewish cuisine, especially as the centerpiece of holiday meals. It speaks to the universality of comfort food and its ability to bring people together through shared taste experiences.

Over time, the recipe for brisket has evolved, with variations and adaptations reflecting regional tastes and available ingredients. From simple salt and pepper rubs to complex spice and sauce blends, brisket has become a canvas for flavor exploration, illustrating the creativity of cooks across different cultures.

While the method of slow-cooking is universal, the addition of BBQ sauce represents a distinctly American take on brisket. It highlights the spirit of American cuisine—bold, flavorful, and rooted in tradition with a flair for experimentation. This integration showcases the dynamic nature of food and its capacity to adopt and innovate within different cultural contexts.

Ingredient Deep Dive


The star of this recipe, beef brisket, is integral to its success. Traditionally a working cut from the forequarter, brisket is known for its robust flavor and potential for tenderness when cooked slowly. Historically, it has been favored in ethnic and regional cuisines for its ability to absorb flavors while maintaining a satisfying beefiness.

Nutritionally, brisket is rich in protein and essential vitamins such as B12 and zinc. To select the perfect brisket, look for one with even marbling and a consistent thickness. Proper storage involves wrapping it tightly and keeping it refrigerated before cooking, ensuring freshness and preventing contamination.

The BBQ sauce in this recipe serves as more than just a condiment—it is a flavor-enhancer with roots in Southern barbecue traditions. The sauce offers a balanced combination of smoky, sweet, and tangy elements, achieving depth and richness in every bite. Key to its depth are ingredients like smoked paprika and apple cider vinegar, each contributing unique aromatic qualities.

Selecting a quality barbecue sauce starts with recognizing specific flavors you enjoy, such as spiciness level and sweetness. For those aiming to store it, a cool, dark pantry is optimal, ensuring the sauce maintains its integrity and taste over time.

Common Mistakes to Avoid

  • Not trimming the excess fat from the brisket can result in a greasy texture rather than a tender finish.
  • Overcrowding the slow cooker inhibits proper heat distribution, leading to uneven cooking.
  • Skipping the searing process means losing out on the depth of flavor from caramelization.
  • Using the wrong setting on your slow cooker can alter cooking times and moistness.
  • Adjusting the recipe with too much sauce can mask the brisket’s natural flavor.
  • Not allowing the brisket to rest after cooking can cause juices to spill out, losing moisture.
  • Using an improper knife to slice the brisket can tear the meat, affecting presentation.
  • Cutting the brisket against the grain is key; not doing so results in tougher slices.

Essential Techniques


One crucial technique is to sear the brisket before slow-cooking. This step builds flavor by forming a crust from the Maillard reaction, sealing in juices and maximizing tenderness. Mastering this involves using high heat and a proper cut of meat.

Timing is important. While the slow cooker is designed to be forgiving, precise cooking ensures the ideal tenderness. Checking doneness with a fork—when it slides easily, the brisket is ready.

Proper slicing post-cooking is essential. Identify the grain of the brisket and make perpendicular cuts. This ensures the tender texture you’re aiming for, as slicing into the grain makes the meat more toothsome and satisfying.

Pro Tips for Perfect Slow Cooker Beef Brisket


Allow the brisket to rest prior to slicing. This rest period allows internal juices to redistribute, keeping the meat moist and delicious.

For a balanced sauce flavor, taste as you go, adjusting sweetness and tang level based on your palate and desired dish outcome.

Introduce a smokey depth by adding a drop of liquid smoke into the BBQ sauce, enhancing the barbecue feel without a smoker.

Consider making the dish a day ahead—flavors tend to deepen over time, and reheated portions often taste better.

For a hearty meal, serve over a bed of mashed potatoes or cheesy grits to complement the rich, savory brisket.

Slice only what’s about to be served. Leaving the remaining brisket whole ensures moisture preservation and longer lasting leftovers.

Variations and Adaptations


Regional variations can introduce diverse flavor profiles. For example, add a Midwest touch with a mustard-based sauce, replacing or complementing the traditional tomato base.

For a seasonal twist, consider incorporating fresh summer herbs in the sauce or a fall-inspired spice mix using cinnamon and nutmeg for warmth.

Those on specialty diets can adapt the recipe easily. For keto, adjust the sugar levels in the BBQ sauce or explore sugar substitutes without altering the flavorful results.

Introduce an Asian flair with soy sauce and ginger as part of the sauce base, imparting a uniquely umami taste to the dish.

Creating a soft texture extends beyond the slow cooker. Use a meat tenderizer before cooking, or consider marinating overnight for phenomenal softness.

Presentation matters. Served sliced thinly over a wooden board, garnished with fresh herbs or roasted veggies, gives the meal a rustic elegance perfect for any occasion.

Serving and Presentation Guide


Exceptional plating elevates the presentation to match the exceptional taste. Consider arranging slices of brisket overlapping slightly, forming a visually appealing layout.

Garnishing with a sprinkle of chopped parsley or scallions adds a fresh splash of color, creating contrast against the rich sauce.

Traditional accompaniments like corn on the cob, creamy coleslaw, or pickles provide texture and balance, complementing the brisket’s depth.

For more modern serving suggestions, serve brisket sliders with a brioche bun, or offer brisket tacos for a refreshing twist.

Temperature is a key consideration—serve warm or hot for the best mouthfeel, as cooling diminishes flavor intensity and enjoyment.

Maintain portion control by slicing brisket according to serving sizes, ensuring everyone experiences a balanced portion of meat and sauce without overindulgence.

Wine and Beverage Pairing


Slow Cooker Beef Brisket pairs beautifully with full-bodied red wines such as Zinfandel or Syrah. These wines complement the richness of the brisket without overpowering the flavors.

For non-alcoholic alternatives, offer cold brewed iced tea or a tangy, carbonated lemonade to balance and refresh the palate amidst the meal.

If coffee or tea is a preferred accompaniment, choose robust, earthy varieties that harmonize with the beef’s depth.

Temperature considerations are crucial, with drinks kept chilled to contrast the warmth of the brisket, providing a sensory refresh.

For serving suggestions, present wine in large-bowled glasses to capture the aromatic compounds, enhancing both taste and enjoyment throughout the meal.

Storage and Shelf Life


Proper storage involves placing cooled brisket slices in airtight containers, extending freshness for up to four days in the refrigerator.

Temperature is paramount—avoid leaving cooked brisket out for extended periods, keeping it below 40°F when storing.

Opt for glass or high-quality plastic containers to limit exposure to air and moisture, which can degrade the texture and flavor.

Signs of spoilage include off smells, discoloration, or slimy residue—at any indication, avoid consumption.

Reheat slices gently over low heat on the stovetop or in the microwave, adding a splash of sauce or broth to maintain moisture.

Freezing guidelines advocate for freezing beef brisket in sealed, vacuum-packed bags for up to three months, with thawing recommended in refrigeration before use.

Make Ahead Strategies


The Slow Cooker Beef Brisket can be prepared a day or two in advance, benefiting from the melding of flavors over time.

Divide the cooling and storage processes to ensure quality, storing sauce separately to avoid soaking the meat, which can alter texture.

Assess the quality impact—brisket tastes better over time, but freshness is key. Refrigerated storage should precede freezing for optimal taste.

Consider key assembly tips—stand at the ready with all needed garnishes and accompaniments once the brisket is reheated.

Reheat either in the slow cooker on low or gently in an oven, covered, to maintain moisture and suppress any tendency to dry out.

Incorporate fresh herbs or citrus zest post-storage, intensifying flavors and enlivening the dish, making it appear newly prepared.

Scaling Instructions


Scaling recipes requires substituting appropriately, ensuring proportions remain consistent. For instance, doubling the saucing components but retaining any rub blends ensures balanced flavors and ample coverage.

Modifications for timing may be necessary in cases of large-scale doubling, considering the increased mass, influencing slow cooker temperatures slightly and centralizing supporting heat distribution.

Equipment adjustments include expanding slow cooker capacity or dividing quantities in separate appliances, preventing overcrowding and ensuring thorough, even cooking.

Consideration about storage exists when scaling—plan for dividing leftovers ahead of time, ensuring prompt chilling free of spoilage risks.

Nutritional Deep Dive


The Slow Cooker Beef Brisket provides a satisfying macronutrient profile, heavily reliant on quality protein. Each portion fits into a wholesome meal with ample amino acids supporting muscle maintenance and development.

Micronutrients include iron and vitamin B12, essential in oxygen transport and cellular energy levels, especially benefiting those with active lifestyles or who require higher nutrition needs.

Health benefits align with adhering to lean cuts without excess fats, while using controlled sauce quantities preserves beneficial keto or paleo diet intentions.

Dietary considerations adhere to portion control, where excess sodium or sugar in sauces requires adjustments for health-conscious eaters observing intake limits.

This recipe, when managed with moderation, supports portion analysis and maintains dietary goals, refining nutrient balances and offering flavorful enjoyment within constraints.

Weight management is possible with mindfulness, ensuring portions do not surpass caloric recommendations and instead slot into larger, holistic, balanced meal plans.

Dietary Adaptations


To make the dish gluten-free, ensure all BBQ sauce ingredients and trickle-down provisions remain certified gluten-free and free from any cross-contact substances.

For dairy-free variance, modifications are not extensive, focusing on no hidden inclusions within saucing or after-prep, enhancing its natural suitability.

Vegans may significantly adapt the recipe, substituting seitan or an equivalent protein substitute with equal weight distribution, avoiding animal-based broths.

Low-carb lifestyles find the recipe adaptable, removing sugar-based sauce components favoring sweeteners or natural extract inclusions, enhancing keto credibility.

Incorporations of whole30 or paleo options arise, ensuring clean, minimally-processed sauce ingredients align with a reflection of nutritional importance.

Low-FODMAP adjustments consider omitting onions or garlic in the sauce, instead embracing alternative spice blends for flavor compensation.

Troubleshooting Guide


Texture issues arise from improper slicing methods; resolve this by identifying meat grain and adjusting knife angles accordingly through precise cuts.

Imbalances in flavor can follow oversized sauces—dilution with water, broth, or dilution adjustments help mediate these taste projections.

Temperature control can falter—monitor slow cooker steps diligently, ensuring set points mirror recommended guidelines preventing uncooked centers.

Equipment challenges stem from slow cooker incompatibility, remedying with appropriately matched purchasing around capacity-dependent suggestions, and fitting components.

Ingredient substitutions should follow suitability checks—ensuring new inclusions not only mimic original textures but reproduce equivalent taste complexities.

Timing concerns resonate closely with rest allowances post-cooking; allocate reasonable resting periods for redistributive moisture and temperature control.

Recipe Success Stories


This recipe remains a standout favorite among readers seeking hearty, flavorful dinners requiring minimal preparatory stress. It has inspired countless adaptations across varied culinary levels, from novice cooks embracing meal prep inclusions to seasoned chefs refining signature sauce additions.

Creative variations involve selections of spices—adjusting flavor intensities to reflect personalized preferences, yielding new brisket renditions celebrated as photogenic achievements.

Adaptation stories posted by readers light up social media, demonstrating the adaptability of this slow cooker recipe across diverse dietary needs and festive contexts.

Proactive engagement through user suggestions sparked meaningful culinary conversations, reflecting community insights centered on improvements or successes in dish performances.

Photography forms the backdrop of shared triumphs—strategically illuminated closeups capturing glossy sauce applications and flawless slicing receive universal accolades.

Frequently Asked Questions

What is the ideal cut of brisket for this recipe?
For Slow Cooker Beef Brisket, choose a “flat cut,” which ensures even cooking and tenderness without excess fat or muscle complexities.

How do I prevent the brisket from drying out?
Brisket dryness can be mitigated with adequate saucing and keeping the slow cooker lid closed throughout cooking to lock in moisture.

What kind of wood flavor suits the best if I decide to smoke it?
If adding smoke, flavors like hickory or oak balance the brisket’s beef notes without overpowering the intrinsic sauce smokes.

Can I make this recipe using a pressure cooker?
Yes, but adjust timing significantly—pressure cooking can rapidly tenderize brisket, requiring timing conversion down to approximately 1 hour.

Is it possible to cook brisket on high rather than low?
While feasible, slow-cooking on low optimizes tenderness and flavor absorption. High settings may reduce cook time but risk texture inconsistency.

What’s a good side dish for this beef brisket?
Complement this beef brisket with creamy mashed potatoes, roasted vegetables, or spicy grilled corn for diverse taste and texture alignment.

How important is it to remove brisket fat before serving?
Post-cooking fat removal is recommended—significantly affecting both presentation and being key in achieving desired dining texture dynamics.

What portion control guidelines should I follow?
When serving brisket, allocate around 6 ounces per person, ensuring nutrient density doesn’t compromise overall meal nutritional goals.

What are the best containers for freezing brisket?
Vacuum-sealed pouches are superior—they preserve both taste and texture integrity through optimal moisture locking and space conservation.

How do I know when the brisket is cooked correctly?
Cooked brisket appears fork-tender, pulling apart effortlessly, and showcases a luscious, deep brown glisten from sauce application.

Additional Resources


Explore related recipes where BBQ brisket introduces a strong foundation for smoked meat inspirations or enhances international crossover dishes bridging barbecue flavors with Mexican or Asian influences.

Technique guides delve further into slow-cooker efficiencies and explore diverse saucing attributes and smoke infusions achievable at home.

Ingredient information compiles data on premium beef selections detailing nutritional rolls and optimal marinade or sauce pairings for pivotal taste outcomes.

Equipment recommendations include high-quality slicing knives essential for clean, precise cutting or mini-choppers for efficient, quick sauce prep processes.

Seasonal variations offer guides exploring different herbs or rubs across growing seasons, tweaking brisket profiles through subtle pleas from native, organic selections.

Join the Conversation


We encourage sharing your spin on this Slow Cooker Beef Brisket in our vibrant social media community where enthusiasts unite in showcasing their successes or unique tweaks.

Photography tips are readily accessible across food photography forums, navigating from dish composition to strategic lighting, sharing aesthetic triumphs abound.

Recipe reviews invigorate blog discussions, rewarding us insightfully with tweaks explored when replicating the brisket, informing potential improvements.

Community engagement offers immersion into vibrant exchanges—garnered through comments or culinary events—embracing culture exchange surrounding dishes we love.

Variations on this beef brisket are celebrated as narratives of emerging creativity—documenting factors like new sauces lighting up taste adaptations we’re all keen to try.

The Recipe

Slow Cooker Beef Brisket with BBQ Sauce

Serves: 8

Prep Time: 15 mins

Cook Time: 480 mins

Total Time: 495 mins

Kitchen Equipment Needed

  • Slow cooker
  • Large skillet
  • Knife and cutting board
  • Basting brush
  • Measuring cups and spoons
  • Mixing bowl

Ingredients

  • 3 lbs beef brisket
  • Salt and pepper, to taste
  • 2 tablespoons olive oil
  • 3 cups BBQ sauce
  • 1 cup beef broth
  • 2 cloves garlic, minced
  • 1 tablespoon smoked paprika

Directions

  1. Season brisket generously with salt and pepper.
  2. In a skillet, heat olive oil over medium-high heat. Sear brisket on all sides until brown and crispy.
  3. Place seared brisket into slow cooker.
  4. In a bowl, combine BBQ sauce, beef broth, minced garlic, and smoked paprika.
  5. Pour the sauce mixture over brisket.
  6. Cover and cook on low for 8 hours, until meat is tender.
  7. Once cooked, let brisket rest for 10 minutes before slicing against the grain.
  8. Serve with extra sauce drizzled over the top.

Recipe Notes

  • For extra flavor, marinate the brisket in BBQ sauce overnight.
  • Consider adding a bay leaf or thyme sprigs to the cooker for additional aroma complexity.
  • Adjust the BBQ sauce based on desired sweetness or spice level.

Irresistibly Delicious Cheesy Garlic Chicken Wraps for Quick Meals

Cheesy Garlic Chicken Wraps: A Flavorful Delight

⚖️
Difficulty
Easy

⏲️
Prep Time
15 mins

🕒
Cook Time
20 mins

⏱️
Total Time
35 mins

🍽️
Servings
4

Indulge in these delightful Cheesy Garlic Chicken Wraps, a perfect balance of savory flavors and cheesy goodness. These wraps are not only incredibly delicious but also easy to prepare, making them a fantastic option for a quick lunch or a hearty dinner. The combination of tender chicken, garlic-infused cheese, and fresh veggies wrapped in a soft tortilla will leave you craving more. Whether you’re feeding a crowd or enjoying a quiet dinner at home, these wraps are a guaranteed hit that blends convenience and exquisite taste.

These Cheesy Garlic Chicken Wraps offer a symphony of flavors that will have your taste buds rejoicing. The garlic enhances the juiciness of the chicken while the cheese provides a creamy richness. Layered with fresh vegetables, each bite offers a perfect harmony of textures. The wraps are visually appealing with vibrant colors captured in a warm, golden tortilla, making them as delightful to look at as they are to eat.

Quick Recipe Highlights

  • Flavor Profile: Savory chicken paired with aromatic garlic and creamy, melted cheese creates a mouthwatering blend that is complemented by fresh, crunchy vegetables.
  • Texture: Experience the contrast between the tender juiciness of the chicken and the soft embrace of the tortilla, enhanced with crisp veggies.
  • Aroma: The inviting aroma of garlic and melted cheese wafts through the air, setting the stage for a delightful meal.
  • Visual Appeal: These wraps present a medley of colors, from the vibrant greens of lettuce to the golden hue of perfectly melted cheese.
  • Skill Level Needed: Ideal for all cooks, even beginners can easily master this recipe with simple ingredients and steps.
  • Special Equipment: All you need are basic kitchen tools like a skillet, cutting board, and knife for preparation.

Recipe Overview

  • Difficulty Level: This recipe is categorized as easy, requiring minimal cooking skills thanks to its straightforward steps and readily available ingredients.
  • Category: Primarily a lunch or dinner option, these wraps fit perfectly into casual yet flavorful meal planning.
  • Cuisine: Drawing from international influences, this recipe combines elements from Mediterranean and Tex-Mex cuisine to create a global fusion dish.
  • Cost: Affordable and cost-effective, this recipe uses common kitchen staples, keeping budget considerations in mind.
  • Season: Suitable for any season, with its fresh vegetables making it especially popular during spring and summer.
  • Occasion: Whether for a family meal, picnic, or even a party, these wraps serve as a versatile and crowd-pleasing option.

Why You’ll Love This Recipe

The taste and texture of Cheesy Garlic Chicken Wraps are irresistible. The wraps deliver a fusion of creamy, savory, and fresh flavors with every bite. The melted cheese nestled over herb-marinated chicken fills your mouth with rich goodness, while the vegetables add a refreshing crunch. It’s like a symphony of textures from tender meat to crisp and fresh accents, encapsulated in a warm, soft tortilla.

Convenience and ease of preparation make this recipe a winner for busy individuals who still want to enjoy a homemade meal. With a prep time of just 15 minutes and simple steps, you can have a delicious meal on the table in under 40 minutes. The ingredients are likely already in your pantry, adding to the convenience factor. This recipe is also perfect for meal prep, staying fresh in the fridge for days.

Nutritionally, this dish offers a balanced meal, rich in proteins from the chicken and vitamins from the fresh vegetables. By using whole-grain tortillas and light cheese options, this meal accommodates various dietary preferences. The incorporation of garlic and veggies not only enhances flavor but boosts health benefits with antioxidants and essential nutrients.

Cheesy Garlic Chicken Wraps are great for social gatherings and entertaining guests. Their easy-to-eat format makes them ideal for picnics, potlucks, or casual parties. Offering customizable options, guests can adjust the fillings to their liking, making these wraps a versatile party favorite.

Cost-effectiveness and accessibility are key features of this dish. The recipe relies on easy-to-find ingredients, ensuring it’s affordable. By choosing accessible, budget-friendly produce and store brands, you can keep meals economical without compromising on taste or quality. This makes Cheesy Garlic Chicken Wraps not just a delightful option but a practical one too.

Historical Background and Cultural Significance

The origin of chicken wraps dates back to the melding of culinary practices from around the world, taking cues from traditional wraps such as those found in Greek gyros or Mexican burritos. The ability to envelop richly flavored fillings with an edible wrapper makes wraps a global comfort food. The evolution has led to many adaptations, including the popular Cheesy Garlic Chicken Wraps we enjoy today.

Culturally, these wraps hold a significant place as an international favorite, bridging culinary gaps between different cuisines. The universal appeal of combining savory ingredients in a portable format has made it a staple in many households.

Over the years, the Cheesy Garlic Chicken Wraps have evolved, influenced by trends in healthier eating and convenient meal solutions. Incorporating fresh vegetables and lean proteins ensures it remains a nutritious option, while the rich garlic and cheese give it a comforting touch that’s been appreciated across generations.

Different regions have added their unique twists to the standard recipe, with variations in spices, types of cheese, and additional flavorings. Whether loaded with spicy sauces or enriched with herbs, the ability to tweak the recipe has fueled its popularity around the globe.

Ingredient Deep Dive

Chicken, the main protein in the wraps, has been a dietary staple in various cultures for centuries. Known for its versatility, chicken absorbs the flavors of marinades and spices while maintaining a tender texture. Nutritionally, it’s a high-quality protein source, low in fat, making it a healthy choice.

Garlic is another crucial component, bringing depth of flavor and myriad health benefits. Used historically for its medicinal properties, garlic is recognized for boosting heart health and immunity. When selecting garlic, choose firm, plump bulbs and store them in a cool, dry place.

Cheese adds creaminess and indulgence to the wraps. While nutritional values vary between types, opting for lighter or reduced-fat cheeses can help manage calorie intake. Store cheeses in a sealed container in the fridge to retain freshness, and experiment with different types for varied tastes.

Fresh leafy greens and vegetables, such as lettuce and bell peppers, are vital for texture and nutrients. Rich in vitamins and fiber, they balance the dish and add color. For peak freshness, select vibrant and crisp vegetables, storing them in the refrigerator’s crisper drawer.

Soft tortillas serve as the wrap’s vessel, providing the foundation for all flavors. Whole-grain tortillas are a healthier option, containing more fiber and nutrients. Store tortillas in their original packaging, avoiding moisture or warmth to prevent spoiling.

Common Mistakes to Avoid

  • Avoid overcooking the chicken; it can become dry and lose flavor. Cook until just done for juicy tenderness.
  • Ensure the garlic is not burned; this will impart a bitter taste. Cook it until golden for the best flavor.
  • Resist overstuffing the wraps; too many fillings make them difficult to fold or become soggy.
  • Don’t skip the resting time after cooking chicken; this helps to lock in juices and flavor.
  • Balance the cheese quantity, as too much can overwhelm other flavors, while too little won’t provide enough creaminess.
  • Use fresh ingredients; stale tortillas or wilted vegetables detract from the freshness and appeal of the dish.
  • Select complementary herbs and spices; conflicting flavors can mask the natural, savory profile of the wraps.
  • Cut the vegetables uniformly; inconsistent sizes lead to uneven cooking or textural differences within the wrap.
  • Keep the cheese’s melting point in mind; a cheese that melts too quickly or not at all can affect texture.
  • Check wrap tightness; wraps that are too loose or open-edged can lead to fillings spilling out.

Essential Techniques

Marinating the chicken is crucial for infusing flavor and maintaining moisture. Use a simple marinade with garlic, herbs, and olive oil to achieve a savory base. Ensure enough time for the marinade to deeply penetrate the chicken, enhancing its taste.

Cooking garlic to the right doneness is essential. Softened and browned lightly in oil enhances its natural sweetness without the bitterness. Watch closely and stir to ensure even cooking.

Layering ingredients is an art to mastering wrap preparation. Start with the least moist ingredients like lettuce, adding proteins next, and topping with cheese. Proper alignment prevents leaking and ensures consistent flavor with each bite.

The folding technique impacts presentation and functionality. Fold in sides before rolling tightly to secure ingredients. This technique prevents spills and concentrates flavors in every mouthful.

Balancing seasoning can transform the wraps. Taste and adjust salt, herbs, and pepper level; the right balance enhances all flavors without overpowering any single element.

Pro Tips for Perfect Cheesy Garlic Chicken Wraps

– Choose organic and free-range chicken for the best flavor and texture, ensuring it’s fresh for optimal results.
– Mix a bit of grated Parmesan into the cheese for a sharper flavor that complements the garlic wonderfully.
– Fresh herbs like cilantro or parsley can add a burst of flavor when chopped and mixed into the wraps.
– Warm the tortillas slightly in a dry skillet to make them more pliable and prevent cracking.
– For a spicy kick, add a dash of hot sauce or thinly sliced jalapeños into the filling.
– Let the cooked chicken cool slightly before adding it to the tortilla to prevent it from wilting the lettuce.
– Use a rotisserie chicken for a time-saving option; the pre-cooked bird can save several minutes of preparation.

Variations and Adaptations

Regional variations of these wraps might include spices like cumin or coriander for a Middle Eastern flair. Consider substituting the cheese with feta for a tangy alternative that’s popular in Mediterranean cuisine.

Seasonal adaptations can be as simple as using roasted root vegetables in winter or fresh garden tomatoes in summer. This approach keeps the wraps exciting and fresh year-round.

For dietary modifications, use gluten-free tortillas for those with gluten sensitivities, and substitute cheese with nutritional yeast for a vegan-friendly version that retains cheesy flavors.

Flavor variations allow for creativity; switch up the herbs or add sundried tomatoes for a deeper umami hit. You can also incorporate smoked paprika for a smoky depth that complements grilled chicken beautifully.

Texture modifications are achievable by using crispy fried onions for added crunch or a spoonful of creamy avocado for a luscious mouthfeel.

Presentation alternatives could involve cutting the wraps into bite-sized pinwheels, ideal for appetizers. Pair with colorful dipping sauces for an artistic display that doubles as a burst of flavor.

Serving and Presentation Guide

For plating, cut the wraps at an angle and arrange them overlapping on a platter, offering a visual appeal that’s easy to serve. A sprinkle of chopped herbs over them enhances both aroma and presentation.

Garnish with fresh lime wedges or a drizzle of zesty sauce around the plate to add color and an extra dimension of flavor.

Traditionally, these wraps pair well with a side of fresh salad or a light soup, keeping the meal balanced and nutritious.

For modern twists, serve with dipping sauces such as sriracha mayo or a cool yogurt dressing. These options add extra layers of flavor and create a dynamic taste experience.

Considered a warm dish, ensure proper heating before serving by either using a low oven or quickly reheating the wraps wrapped in foil.

Portion control tip: if serving as part of a larger meal, consider halving the wraps or making mini versions to avoid overeating and encourage a diverse tasting experience.

Wine and Beverage Pairing

Pairing these wraps with wine can enhance the dining experience. Opt for a crisp Sauvignon Blanc or a Chardonnay, which complements the garlic and chicken beautifully.

Non-alcoholic alternatives like a chilled herbal iced tea or a sparkling water with lemon can offer a refreshing counterpoint to the richness of the cheese.

If you’re a coffee or tea lover, consider offering a mildly brewed coffee or a light herbal tea that won’t overpower the delicate flavors.

Temperature considerations are crucial for beverages. Serve cold drinks cool and allow wines to breathe for a balanced temperature pairing.

For serving suggestions, chilled beer such as a mild lager offers a casual compliment suitable for relaxed dining. Ensure glassware is appropriate to maintain beverage temperature.

Storage and Shelf Life

These wraps stay fresh for a couple of days when stored properly. Wrap them tightly in plastic wrap or foil and place in an airtight container to preserve flavor and prevent drying.

Refrigerate the wraps within two hours of preparation, keeping them chilled no more than three days to maintain best quality.

If freezing, wrap each in plastic wrap and place inside a freezer bag. Consume within a month for the best flavor retention and foregoing the addition of fresh vegetables before freezing.

Thaw frozen wraps overnight in the fridge when ready, and warm them through gently by either steaming or microwaving to avoid tough textures.

Signs of spoilage include any off smells or discoloration. Always err on the side of caution, discarding if the wraps show any signs of spoilage beyond their prime.

Reheated using low heat to maintain softness, these wraps become pliant and delightful, reminiscent of their freshly-made state.

Make Ahead Strategies

Marinating chicken overnight allows flavors to develop and deepen, setting a flavorful base from the get-go.

Pre-slice vegetables and store them in airtight containers, keeping them crisp and ready for instant assembly without wilting.

Prepare wraps a day in advance, keeping them cold until heating, ensuring convenience for busy schedules or unexpected guests.

Assemble components separately, allowing for a quick build at mealtime while maintaining freshness and quality of each ingredient.

Reheating guidelines are straightforward: keep the wraps under foil in a preheated oven at low temperature for even warmth and moisture retention.

Add fresh elements like leafy greens or herbs just before serving to preserve their crispness and enhance the flavor profile of the dish.

Scaling Instructions

Halve the recipe by reducing ingredients accordingly, maintaining perfect flavor without excess. Careful scaling keeps proportions correct, avoiding ingredient imbalance.

Doubling or tripling is effortless, ensuring ample preparation. Adjust cookware size accordingly to accommodate larger quantities without crowding pans.

More ingredients may require adjustments in timing; for instance, thicker protein pieces may take longer to cook thoroughly.

Storage considerations when scaling up should include additional refrigerator space or larger containers to handle increased volumes.

Ensure consistent portioning by using kitchen scales or measuring tools for accurate distribution, keeping wraps uniform whether increased or decreased amount.

Nutritional Deep Dive

Cheesy Garlic Chicken Wraps offer a balanced macronutrient profile, rich in lean protein and moderate carbohydrates.

With micronutrient boosts from the fresh vegetables and garlic, these wraps provide essential vitamins and minerals.

The inclusion of whole-grain tortillas adds dietary fiber, aiding in digestion and maintaining energy levels over time.

Considering dietary fats, cheese provides healthy fat content, crucial for taste and satiety, when chosen in moderation.

Each portion delivers key health benefits, from low cholesterol chicken to the antioxidants in garlic, promoting overall wellness.

These wraps align well with weight management strategies, offering a satisfying meal without excessively high calories when portions and ingredients are carefully managed.

Dietary Adaptations

For a gluten-free version, select certified gluten-free tortillas. Ensure all seasonings are also free from gluten for those with sensitivities.

Dairy-free adaptations involve swapping cheese for plant-based alternatives or nutritional yeast, achieving a cheesy taste free from lactose.

Vegan adaptations exclude chicken, using grilled tofu or tempeh as a protein alternative, ensuring flavor retention with garlic and herbs.

Low-carb adjustments are feasible by choosing low-carb wraps or lettuce for the base, maximizing nutrients with minimal carbohydrates.

Keto-friendly options can include high-fat cheeses and reduced-carb tortillas, maintaining the wrap’s flavor while aligning with the ketogenic diet.

Paleo enthusiasts might opt for a mix of vegetables and proteins, omitting dairy for a delicious, compliant meal.

Low-FODMAP adjustments include garlic-infused oils instead of fresh garlic, complementing digestive health concerns while maintaining flavor integrity.

Troubleshooting Guide

Texture issues might arise from overbaked tortillas; ensure they remain soft for ideal wrapping. Reheat with a damp cloth to restore flexibility.

Flavor balance can skew if the garlic is under or overcooked. Adjust cooking times for ideal aromatic release, avoiding bitterness or blandness.

Temperature problems like cold centers are resolved with even warming; maintain a moderate heat to ensure internal warmth matches external presentation.

Equipment challenges like uneven heating are mitigated by using proper-sized pans and evenly spaced ingredients to ensure consistent cooking.

Ingredient substitutions maintain integrity, using suitable alternatives like nutritional yeast for cheese or gluten-free wraps to address dietary needs.

Timing concerns avoid overcooking by closely monitoring the chicken’s doneness, maintaining juiciness and flavor.

Recipe Success Stories

Our community praises the flavor and versatility of these wraps, as illustrated in several reader feedback stories. From family dinners to casual get-togethers, Cheesy Garlic Chicken Wraps have been warmly received.

Successful variations have included added crunch from nuts and seeds, enhancing textural appeal and adding a nutty note.

Adapting the recipe for different dietary requirements has proven seamless, with ample suggestions from readers experimenting with vegan and gluten-free versions.

Reader suggestions like incorporating roasted red peppers for sweetness or anchovies for umami have inspired alternative renditions of the classic.

Photography tips for achieving the perfect food shot include capturing steam rising or highlighting the vibrant colors for magazine-worthy images.

Frequently Asked Questions

Can I prepare these wraps in advance?
Yes, you can prepare most components in advance, storing them separately and assembling before serving to maintain freshness and texture.

What type of cheese works best for this recipe?
A mix of cheddar and mozzarella is recommended for a creamy melt and robust flavor, but feel free to experiment with your favorite types.

How do I ensure the garlic flavor is not overpowering?
Use garlic sparingly and cook it until lightly golden to bring out sweetness and fragrance without overwhelming other flavors.

Are these wraps suitable for freezing?
Although fresh is best, you can freeze wraps. Thaw completely before reheating and avoid adding fresh vegetables until serving day.

What’s a good substitute for chicken?
For a vegetarian option, consider using grilled tofu or portobello mushrooms, offering similar texture and absorbing the delightful garlic marinade.

Can I use leftover chicken?
Absolutely. Leftover chicken works well, saving time and reducing waste. Simply ensure it’s well-incorporated with seasoning to keep the wrap flavorful.

Is there a way to make them spicier?
Yes, incorporate sliced jalapeños or chili flakes into the chicken or toppings to introduce heat, adjusting to personal taste.

Do I need special equipment to make these wraps?
Only basic kitchen tools like a skillet, cutting board, and knife are required, keeping the preparation simple and accessible.

How can I add more vegetables?
Feel free to load the wraps with your choice of vegetables, such as bell peppers, cucumbers, or spinach, enhancing both nutrition and taste.

What should I do if the wraps fall apart?
Ensure proper folding and avoid overstuffing. Slightly heating the tortillas and using ingredients like shredded cheese can help them stick together.

Additional Resources

To explore cooking techniques further, you might find value in our guide on mastering the art of marination and achieving perfect wrap folds.

For those interested in expanding their dietary repertoire, our gluten-free and vegan recipe guides offer delicious alternatives to traditional dishes.

Equipment recommendations include a sharp chef’s knife and non-stick skillet to ensure efficient preparation and consistent results in your kitchen.

Seasonal variations in ingredients are highlighted in our guide to fresh produce through the seasons, identifying the best times for peak flavor.

Join the Conversation

Engage with our community by sharing your success stories, whether through social media platforms or our comment section, fostering a sense of culinary camaraderie.

Photography tips are shared under our #foodartistry tag, showcasing how best to photograph the Cheesy Garlic Chicken Wraps with creative flair.

We welcome recipe reviews and encourage honest feedback, propelling us to continuously refine and perfect our offerings to match your tastes.

Engage in our community by offering your unique recipe variations and creative twists, inspiring fellow cooks to try new ingredients and methods.

Celebrate our passion for flavor and quality by connecting with like-minded food lovers, sharing experiences, and exploring endless culinary possibilities together.

The Recipe

Cheesy Garlic Chicken Wraps

Serves: 4

Prep Time: 15 mins

Cook Time: 20 mins

Total Time: 35 mins

Kitchen Equipment Needed

  • Skillet
  • Cutting board
  • Sharp kitchen knife
  • Grater
  • Mixing bowls

Ingredients

  • 4 boneless, skinless chicken breasts
  • 2 cloves of garlic, minced
  • 1 cup shredded mozzarella cheese
  • 1 tablespoon olive oil
  • Salt and pepper to taste
  • 4 large whole-grain tortillas
  • 1 cup fresh lettuce, chopped
  • ½ cup sliced red bell pepper
  • Juice of 1 lime
  • 1 tablespoon chopped fresh parsley

Directions

  1. Heat olive oil in a skillet over medium heat. Season the chicken breasts with salt and pepper and cook until fully cooked, about 6-8 minutes per side. Remove from skillet and let them rest.
  2. In the same skillet, add minced garlic and sauté for about 30 seconds until fragrant.
  3. Return chicken to the skillet, sprinkle with shredded cheese, cover, and let the cheese melt over the chicken, about 2 minutes.
  4. Warm tortillas in a pan or microwave to make them pliable.
  5. Slice the chicken into strips and place on warmed tortillas. Top with lettuce, bell peppers, a squeeze of lime juice, and fresh parsley.
  6. Fold the sides in and roll tightly to form the wraps.
  7. Cut in half diagonally and serve warm.

Recipe Notes

  • For an extra layer of flavor, marinate chicken beforehand with garlic and herbs.
  • Feel free to swap mozzarella with your preferred cheese variety.
  • Add avocado slices for a creamy texture.

Savor the Flavor: Chicken with Garlic Parmesan Rice Recipe

Chicken with Garlic Parmesan Rice: A Delectable Culinary Delight

⚖️
Difficulty
Medium

⏲️
Prep Time
15 mins

🕒
Cook Time
30 mins

⏱️
Total Time
45 mins

🍽️
Servings
4

Imagine a delightful dish where tender chicken embraces your taste buds, complemented perfectly by a rich, creamy garlic Parmesan rice. This Chicken with Garlic Parmesan Rice recipe is a must-try for anyone who loves a savory and satisfying meal. Enriched with fragrant garlic and finely grated Parmesan cheese, this dish offers a layered flavor experience, evoking a mix of comfort and gourmet dining right in your own kitchen.

Quick Recipe Highlights

  • Flavor Profile: A harmonious blend of savory chicken and creamy garlic Parmesan rice with subtle herbaceous notes.
  • Texture: The dish combines tender chicken chunks with smooth, creamy rice, creating a delightful contrast in every bite.
  • Aroma: Dominated by the warm, inviting scent of garlic mingled with nutty Parmesan, creating an irresistible kitchen fragrance.
  • Visual Appeal: A beautifully golden chicken atop a bed of rich, creamy rice, garnished with fresh parsley for a pop of color.
  • Skill Level Needed: Intermediate cooking skills are sufficient to master the culinary techniques employed in this recipe.
  • Special Equipment: A sturdy skillet and a reliable saucepan are the only tools needed to bring this recipe to life.

Recipe Overview

  • Difficulty Level: Medium difficulty best describes this recipe, requiring attention to timing and temperature to ensure perfectly cooked chicken and well-prepared rice.
  • Category: Ideal for dinner, this dish is firmly nestled in the comfort food category, offering a warm and fulfilling meal option.
  • Cuisine: Primarily a fusion of Italian and American influences, this dish harnesses the rich flavors of Parmesan and garlic prevalent in Italian cooking.
  • Cost: Making this dish is cost-effective, with most ingredients being pantry staples and affordable proteins.
  • Season: While enjoyable year-round, this dish shines in cooler months when warm, hearty meals are especially welcome.
  • Occasion: Perfect for family dinners or casual gatherings, its home-cooked appeal makes it a hit for nurturing convivial environments.

Why You’ll Love This Recipe

One of the main reasons to fall in love with Chicken with Garlic Parmesan Rice is the mouth-watering taste and rich texture it delivers. The creamy rice paired with perfectly cooked chicken provides a sensory delight that is hard to beat. This dish is also incredibly convenient, needing only 45 minutes from start to finish, which is perfect for busy weeknights. You contribute to a balanced diet—with proteins, carbs, and fats represented—while enjoying this meal. Hosting a dinner party? The dish’s irresistible aroma and homely charm will surely impress your guests without the fuss of elaborate preparation.

Historical Background and Cultural Significance

The journey of garlic Parmesan rice showcases a beautiful blend of Italian culinary tradition with contemporary American influences. Originally, cheese and rice were staple components of Roman cuisine, which gradually traversed through eras and across countries, evolving with each iteration. Garlic and Parmesan, each holding a revered place within Italian cooking, have played significant roles in numerous variations of rice dishes across Mediterranean and European regions. Italian immigrants carried their culinary secrets to America, inspiring variations like chicken with garlic Parmesan rice, capturing enrichments and adjustments according to local tastes.

Ingredient Deep Dive

Chicken is a globally beloved protein, celebrated for versatility and affordability. It’s lean with high protein content, perfect for various dietary needs. Selecting fresh, organic chicken grants not only health benefits but also a superior flavor profile. Garlic, heralded for its pungent punch, adds depth and warmth to innumerable dishes. With great anti-inflammatory properties, garlic is a superfood in disguise. Parmesan cheese, known for its intense savory notes, enhances richness in this recipe, creating a depth that distinguishes the rice from mundane.

Common Mistakes to Avoid

  • Overcooking the chicken results in dryness, so ensure you monitor it closely, cooking just until done.
  • Using low-quality Parmesan can undermine the rice’s flavor; opt for freshly grated, high-quality Parmesan for best results.
  • Not allowing the rice to become creamy by skimping on liquid leads to subpar texture.
  • Forgetting to season adequately with salt and pepper could lead to blandness in the final dish.
  • Cooking rice on too high a heat may cause burning; maintain a simmer instead.
  • Ignoring the resting period post-cooking means robbing yourself of a dish that could develop deeper flavors.
  • Skipping the step to brown the chicken will reduce the overall flavor impact of the dish.
  • Rushing the process results in poorly developed flavors, especially regarding the garlic and cheese blend.

Essential Techniques

Proper seasoning is pivotal; it involves layering flavors through seasoning at each stage. When browning chicken, patience is essential—allow a golden crust to form, enhancing its taste. Ensure the rice is rinsed well if using a starchy variety to avoid heaviness, and gently stir when combining ingredients to maintain the dish’s integrity. Mastering these techniques will elevate your cooking to impressive levels.

Pro Tips for Perfect Chicken with Garlic Parmesan Rice

Understanding chicken’s variability in cooking times due to size and thickness means employing a meat thermometer for accuracy. Always opt for fresh garlic bulbs, noting the size and firmness as youthfulness signifies intensified flavor. Stir Parmesan into warm rice to ensure even melting. Incorporate herbs such as parsley towards the end for the freshest taste profile. Creaminess is best achieved by adjusting broth according to desired consistency. Temper your garlic to prevent bitterness through careful roasting.

Variations and Adaptations

Regionally, this dish sees adaptation with added vegetables like spinach or asparagus, enriching it with vitamins and added consistency. Seasonal adaptations may include a butternut squash infusion during autumn or a hint of lemon zest in spring. Dietary modifications abound, such as using cauliflower rice for a low-carb alternative, ensuring its presence in more health-conscious meal plans. Kale or arugula provide a nutritional boost if spinach isn’t available.

Serving and Presentation Guide

For an Instagram-worthy presentation, layer fabric napkins beneath rustic-styled dishes for a homey feel or elegant platters for sophistication. Fresh herbs are a visually and aromatically pleasing garnish, while matching its golden hue with colorful salads can enhance visual impact. Serving warm optimizes flavor release, while allowing guests to serve themselves promotes communal dining experiences.

Wine and Beverage Pairing

A light-bodied white wine, such as a Pinot Grigio or Sauvignon Blanc, perfectly complements this dish by cutting through the rich creaminess and enhancing garlic’s freshness. For non-drinkers, a chilled herbal iced tea or sparkling water with lemon provides a delightful palate cleanser. Consider temperature: chilled pairings often balance a warm dish’s richness.

Storage and Shelf Life

Store leftovers in airtight containers in the refrigerator for up to three days. When reheating, a splash of broth can revive creaminess. Avoid the freezer, as rice and cheese undergo textural changes when frozen. Watch for dullness or sour aroma as spoilage indicators. Proper practices ensure the meal’s safety and quality.

Make Ahead Strategies

Prepare ingredients in advance to simplify initial cooking stages. Store components like pre-sliced chicken and minced garlic separately in airtight bags. Ensuring cooked rice cools before refrigerator storage maintains texture quality. Reheating low and slow in your oven retains moisture, while fresh herbs are added last to preserve vibrancy.

Scaling Instructions

Effortlessly adjust the recipe by individually increasing ingredient proportions while maintaining a 1:1 volume ratio of chicken to rice. Larger cookware accommodates increased quantities, mindful always of cooking duration increases. Leftovers scale well if stored correctly, offering the convenience of multi-day meals following a single preparation.

Nutritional Deep Dive

Boasting a balanced macronutrient profile, providing protein from chicken and carbohydrates from rice, the dish delivers sustainability for active lifestyles. Parmesan not only nourishes with flavorful satisfaction but is a calcium source. Moderation with serving sizes ensures nutrition balance, aligning with dietary goals.

Dietary Adaptations

Gluten-free enthusiasts can use broths accommodating such dietary restrictions. Lactose-free Parmesan varieties allow those with sensitivities to indulge without guilt. Rice alternatives like quinoa present opportunities for nutrient enrichment in every meal experience, showcasing flexible cooking’s boundless potentialities.

Troubleshooting Guide

For chewiness in rice, add broth and gently reheat, permitting absorption. When flavors underwhelm, a seasoning tweak might be the remedy. Encountered burning? Lower cooking temperatures might be necessary for more even heat dispersion. Ensure starters like garlic have sufficiently developed to enrich every ingredient’s natural qualities.

Recipe Success Stories

Community feedback often highlights the dish’s rich flavor profile as a beloved facet, with readers keen to innovate through ingredient variations, such as introducing seasonal vegetables or herbal infusions. Photography enthusiasts find its inviting hues a delightful challenge in optimal presentation, with tips adding visual dimension.

Frequently Asked Questions

What type of rice works best? Long-grain rice is preferred for its fluffiness, maintaining a perfect texture balance.

Can I substitute chicken breast? Absolutely, though adjusting cook time is essential due to its lesser fat content.

Is freshly grated Parmesan essential? Yes, it significantly elevates flavor richness, further enhancing the dish’s texture.

How can I add heat? Incorporate red pepper flakes for a subtle spicy lift or hot sauce for more intensity.

Would adding mushrooms work? Certainly, providing a savory note that complements garlic.

Is whole milk an acceptable cream substitute? While richer creams are traditional, whole milk offers a lighter option.

Could I prep rice in advance? Pre-cooked rice can streamline meal prep, particularly on busy days.

How do I prevent burning garlic? Control heat to avoid bitterness, aiming for golden shade rather than browning.

Can meat alternatives replace chicken? Yes, tofu or seitan adjust well with adapted cooking times.

What herbs work beyond parsley? Basil or chives bring unique aromatic profiles, adding personalized creative flair.

Additional Resources

Complementing recipes such as herb-infused soups or roasted vegetable medleys elevate dining experiences, reinforcing culinary skills’ breadth. Explore ingredient guides brimming with historical and nutritional insights, as well as equipment reviews to ensure your kitchen space optimizes all potential for culinary success.

Join the Conversation

Feel inspired to share your recipe triumphs in our vibrant community, where photography tips celebrate extensive culinary exploration. Not only does your interaction enrich the dialogue, but it empowers fellow at-home chefs in their respective journeys. Through shared successes and constructive feedback, continuous improvement prospers, uniting all over a joyous cooking experience.

The Recipe

Chicken with Garlic Parmesan Rice

Serves: 4

Prep Time: 15 mins

Cook Time: 30 mins

Total Time: 45 mins

Kitchen Equipment Needed

  • Sturdy skillet
  • Reliable saucepan
  • Wooden spatula
  • Measuring cups and spoons
  • Sharp kitchen knife

Ingredients

  • 4 chicken thighs
  • 1 cup uncooked long-grain rice
  • 2 tablespoons olive oil
  • 4 cloves garlic, minced
  • 1/2 cup grated Parmesan cheese
  • 2 cups chicken broth
  • Salt and pepper to taste
  • Fresh parsley, chopped for garnish

Directions

  1. Heat olive oil in a skillet over medium heat. Season chicken with salt and pepper.
  2. Add chicken to skillet, browning on each side for 5-7 minutes. Remove and set aside.
  3. In the same skillet, sauté garlic until fragrant, about 30 seconds.
  4. Add rice, stirring to coat in oil and garlic. Cook for 1 minute.
  5. Pour in chicken broth, bring to a simmer. Reduce heat, cover, and cook for 15 minutes.
  6. Return chicken to pan on top of the rice, cover, and cook an additional 10 minutes, until chicken is cooked through and rice is tender.
  7. Stir in Parmesan cheese, adjusting seasoning with salt and pepper. Serve garnished with parsley.

Recipe Notes

  • For extra creaminess, stir in 1 tablespoon of butter with the Parmesan cheese.
  • For a lighter dish, substitute chicken broth with vegetable broth and use chicken breast for lower fat content.

Delicious Chicken with Garlic Parmesan Rice: A Flavorful Dinner Idea

Chicken with Garlic Parmesan Rice: A Flavorful Delight

⚖️
Difficulty
Easy

⏲️
Prep Time
10 mins

🕒
Cook Time
30 mins

⏱️
Total Time
40 mins

🍽️
Servings
4

There’s nothing quite like the comforting aroma of Garlic Parmesan Rice wafting through your kitchen, tantalizing your taste buds and hinting at the mouthwatering meal to come. This Chicken with Garlic Parmesan Rice recipe combines tender, juicy chicken breasts, delicately seasoned with a robust blend of garlic and parmesan, all nestled in a bed of perfectly cooked rice. This dish promises a taste experience that is both fulfilling and exciting, ideal for a cozy family dinner.

Imagine spooning a rich serving of rice, each grain infused with the savory, nutty essence of Parmesan and the robust pungency of fresh garlic. Complemented by succulent pieces of chicken, this meal is truly a celebration of textures and flavors. It’s perfect for nights when you’re longing for something hearty, yet comforting, something that brings warmth with every bite, while still being a straightforward dish to prepare.

Perfect for those who love an easy recipe that transforms simple ingredients into an impressive, restaurant-quality dinner. With this Chicken with Garlic Parmesan Rice, you’ll find a swift path from your stovetop to a satisfied smile.

Quick Recipe Highlights

  • Flavor Profile: A delightful fusion of savory Parmesan, aromatic garlic, and succulent chicken.
  • Texture: A harmonious blend of tender chicken and fluffy, creamy rice.
  • Aroma: Irresistible scents of garlic and nuttiness fill your kitchen.
  • Visual Appeal: Golden sautéed chicken over a white, cheesy rice palette.
  • Skill Level Needed: Basic cooking skills with simple steps
  • Special Equipment: Frying pan, saucepan

Recipe Overview

  • Difficulty Level: This recipe is straightforward and perfect for beginners, making it easy for anyone to enjoy a gourmet meal at home.
  • Category: A versatile main course, ideal for lunch or dinner.
  • Cuisine: Inspired by Italian flavors, it brings a modern twist to classic comfort food.
  • Cost: Affordable for family meals, costing around $15 depending on the quality of chicken and cheese.
  • Season: Perfect all year round, but especially comforting in cooler months.
  • Occasion: Ideal for family dinners, casual gatherings, or a romantic dinner at home.

Why You’ll Love This Recipe


This dish combines the rich, creamy flavors of Parmesan with the hearty essence of chicken, wrapped in a garlicky embrace, appealing to all your taste buds. Its texture is perfectly balanced, with tender chicken that melts in your mouth and rice that absorbs the heavenly flavors, offering a complete sensory experience.

One of the most convenient aspects of this Garlic Parmesan Rice is how easily it comes together. With straightforward ingredients and a simple cooking process, it’s a recipe you can whip up even on a busy weeknight without compromising flavor.

Nutritionally, this recipe is a balanced meal packed with protein and carbohydrates, vital for energy and muscle health. A sprinkle of parsley adds a dose of vitamins A, C, and K, enhancing the dish’s nutritional profile.

Socially, it’s a conversation starter at dinner parties. Its aromatic nature fills the room, creating an inviting atmosphere that naturally brings people together to share not just a meal, but an experience.

Cost-effectiveness is another excellent reason to love this recipe. With a handful of simple, budget-friendly ingredients, this meal feels like a luxury without breaking the bank, making it an accessible treat for any household.

Historical Background and Cultural Significance


The Chicken with Garlic Parmesan Rice we know today stems from a rich history of European culinary traditions, particularly from Italy, where garlic and Parmesan cheese are staples.

Culturally, such recipes symbolize warmth and hospitality, with garlic being known for its healing properties and Parmesan traditionally made with craftsmanship that spans generations.

Over the years, this recipe has evolved, adapting to modern tastes by incorporating influences from various cuisines, embracing a more global palate while retaining its comforting essence.

Regional variations are abundant, with Southern comfort foods and Mediterranean diets providing their unique takes, ensuring that the dish remains as diverse as the cooks who make it.

Ingredient Deep Dive


Rice: Long considered a versatile staple, rice’s historical significance is vast, from its origins in Asia to becoming a pantry must-have worldwide. When selecting rice for this dish, opt for a long-grain variety like basmati or jasmine for their flavor absorption capabilities, maximizing the garlic and Parmesan essence.

Chicken: A universal protein hero, chicken’s nutritional benefits are well-known, offering lean protein. To ensure quality, select boneless, skinless breasts and store them in airtight containers for freshness. For variation, try using thighs for added richness.

Garlic: Esteemed for its bold flavor and numerous health benefits, garlic is a culinary staple. Choose firm, plump bulbs, store in a cool, dry place, and consider using roasted garlic for a sweeter flavor profile.

Parmesan Cheese: Known as the ‘King of Cheeses,’ Parmesan adds a nuanced nuttiness. Authentic Parmigiano-Reggiano provides the best flavor; however, domestic versions are accessible and budget-friendly. Keep it in the fridge wrapped in parchment or wax paper.

Common Mistakes to Avoid

  • Overcooking the chicken can lead to dryness; aim for golden brown crispness.
  • Not rinsing the rice, which can cause clumping due to excess starch.
  • Using low-quality cheese; opt for real Parmesan for authentic flavor.
  • Neglecting to season properly; ensure each layer of the dish is seasoned.
  • Cooking over too high heat may burn the garlic, resulting in bitterness.
  • Forgetting to let the rice rest after cooking can prevent a fluffy texture.
  • Using a pot that is too small; give the rice space to cook evenly.
  • Stirring the rice too often, which may make it mushy.

Essential Techniques


Sautéing: This technique enhances the chicken’s flavor and texture by creating a delicious crust. Keep the heat moderate, and let each side achieve a golden hue without disturbing too often to ensure you’re maximizing taste.

Cooking Rice: Fluffiness is your goal, achieved by rinsing and allowing it to rest after cooking to absorb flavors and achieve the perfect texture. Use the correct ratio of liquid to rice for consistency.

Pro Tips for Perfect Chicken with Garlic Parmesan Rice


Rest the chicken after cooking to seal in juices before slicing. This helps maintain its tenderness and prevents the rice from becoming soggy.

Add a splash of lemon juice at the end for a fresh finish that brightens the flavors and cuts through the richness.

Use freshly grated Parmesan instead of pre-grated for the most vibrant taste and best melting quality.

For an extra flavor boost, sauté the rice slightly before adding broth to give it a nutty undertone.

Incorporate a handful of spinach or peas for color, nutrition, and a hint of freshness.

Enhance the dish’s creaminess by stirring in a tablespoon of butter right before serving.

Variations and Adaptations


Regional: Infuse the rice with saffron for a Mediterranean twist, which adds color and subtle flavor depth.

Seasonal: Switch to zucchini or bell peppers in the warmer months for a fresh vibe, or add mushrooms in winter for heartiness.

Dietary: Go gluten-free by replacing any breaded chicken components with cornstarch or simply omitting them for an all-natural dish.

Flavor: Experiment with different cheeses such as Pecorino Romano or Gruyere, each bringing its own flavor characteristics.

Presentation: Create stuffed chicken breasts with a garlic-Parmesan mixture for an elegant take on this recipe.

Serving and Presentation Guide


For restaurant-style plating, mold the rice with a small bowl for a neat dome shape and place sliced chicken elegantly along the side.

Garnish with freshly chopped parsley or basil and a sprinkle of Parmesan, enhancing both color and flavor.

Traditional accompaniments such as a crisp side salad with a tangy vinaigrette add freshness and balance richness.

Presentation can be modernized by serving family-style in a large, rustic dish, encouraging a communal dining atmosphere.

Maintain a warm serving temperature for the optimal eating experience; consider warming the plates in advance.

When serving, consider portion sizes; keep the rice rugged and filling, and use the chicken as the protein centerpiece.

Wine and Beverage Pairing


Pairing wines like a crisp Sauvignon Blanc or a lightly oaked Chardonnay can complement the creamy, garlicky richness of the dish beautifully.

For non-alcoholic options, a citrus-infused sparkling water or a homemade iced tea with lemon and herbs provides a refreshing contrast.

Coffee and tea pairings are not typical for this dish, but a light herbal tea could work as a post-meal digestif.

Ensure beverages are adequately chilled; cold drinks aid in balancing the warm, savory notes of the meal.

Serve white wine in medium-sized glasses allowing for aroma appreciation, and keep water or non-alcoholic options ample to enhance hydrating qualities.

Storage and Shelf Life


To store, transfer the cooled dish into airtight containers, separating the rice and chicken for best results.

Keep in the refrigerator for up to 3 days, ensuring containers are tightly sealed to preserve flavors and prevent dryness.

Spoilage signs include off-odor and discoloration; when detected, discard the dish promptly.

Reheat gently on the stovetop or microwave, adding a splash of broth or water to moisten the rice if necessary.

Freezing is possible, though it can slightly alter texture; when freezing, use sturdy containers and consume within one month for optimal quality.

Make Ahead Strategies


Prepare and marinate the chicken in advance, storing it in the refrigerator until ready to cook, minimizing prep time on serving day.

Chop garlic and shred Parmesan beforehand, keeping them in separate, clearly labeled containers in the fridge for efficiency.

Quality can remain uncompromised by combining cooked chicken and rice just before serving, ensuring both elements maintain their texture.

Reheat prepared components separately, bringing together with fresh herbs before serving for a just-cooked vibe.

Integrate freshly cooked greens upon reheating for a contrast in temperatures and textures, reviving the dish with garden freshness.

Scaling Instructions


For smaller servings, halve all ingredients while maintaining original cooking techniques and times for consistent results.

Doubling the recipe is straightforward, but ensure your cookware can handle increased volumes; larger pans ensure even cooking.

Scaling up requires timing adjustments; check doneness more frequently to prevent overcooking when in larger quantities.

Plan for adequate storage space or serving plates, especially for doubled portions; adjust accordingly to properly accommodate.

Nutritional Deep Dive


This dish offers a balanced macronutrient profile, combining protein-rich chicken with carbohydrate-dense rice, suited for energy provision and muscle repair.

Micronutrients from garlic and parsley, such as Vitamin C, enhance immune support with additional anti-inflammatory properties.

Dietary fiber from rice can support digestive health, while lean proteins keep overall fat intake lower, supporting weight management.

Portion analysis supports fullness, aiming for a balance of rice and protein, essential for maintaining nutritional integrity.

Dietary Adaptations


For gluten-free diets, simply ensure that all components, such as thickeners or sauces, are naturally gluten-free.

To adapt for dairy-free needs, substitute Parmesan with nutritional yeast and use plant-based margarine or oil instead of butter.

To cater to a vegan diet, switch the chicken for a plant protein like chickpeas or tofu, maintaining the essence and structure.

For low-carb versions, replace rice with cauliflower rice, reducing carbohydrate content while maintaining the dish’s flavor core.

Troubleshooting Guide


Texture concerns, when rice is mushy, usually stem from overcooking; ensure proper liquid ratios and resting time post-cooking.

Adjusting flavor balance may require tweaking; add salt or acidity if richness overpowers the palate.

For temperature issues, ensure cookware heats evenly or adjust portions to cook in manageable batches.

When equipment poses challenges, ensure non-stick surfaces for browning chicken or invest in thicker pans for heat retention.

Ingredient substitution is easy; if Parmesan is unavailable, other hard cheeses can flavor similarly.

Timing concerns often relate to dish size; smaller portions aid in managing cooking times effectively.

Recipe Success Stories


Community feedback highlights the recipe’s versatility, with readers experimenting by adding mushrooms or cherry tomatoes for added pizzazz.

Many have found success with adaptations, such as using quinoa or farro instead of rice for a twist on traditional grains.

Readers have shared beautiful photos, often featuring variances in presentation, inspiring others to explore creativity with garnishes.

Frequently Asked Questions

Can I use brown rice instead of white rice?
Yes, brown rice offers a nuttier flavor and added fiber; however, adjust the cooking time as it takes longer to cook.

Is it possible to omit the garlic?
Garlic is key to the flavor profile, but if necessary, roasted shallots or onions offer a milder alternative.

What are suitable substitutes for Parmesan cheese?
Aged Asiago or Grana Padano are excellent alternatives that mimic the sharp, nutty flavor of Parmesan.

Can I prepare this recipe using chicken thighs?
Absolutely, chicken thighs bring additional richness; however, adjust the cooking time to ensure they are fully cooked.

How can I ensure my rice is not sticky?
Rinse rice before cooking to remove excess starch, and refrain from over-stirring during the cooking process.

Is it suitable for freezing?
While freezing could alter texture slightly, it’s possible. Use airtight containers, and consume within a month for best results.

Can this be adapted for a vegetarian diet?
Yes, replace chicken with a plant-based substitute, and include a variety of vegetables for texture diversity.

How do I prevent burning the garlic?
Ensure garlic is cooked on medium heat and added at appropriate stages, with constant stirring to prevent scorching.

What wine pairs best with this dish?
A crisp Sauvignon Blanc complements the creamy textures, while a light Chardonnay adds balance to the garlic notes.

Are there any low-sodium options?
Use low-sodium broth and fresh herbs for flavoring instead of relying solely on salt.

Additional Resources


For those interested in similar recipes, exploring risottos or other Italian-inspired rice dishes can broaden culinary experiences.

Technique guides for perfect rice cooking can enhance understanding and confidence, ensuring proficiency and consistent results.

Dive into books focused on Parmesan cheese to appreciate its versatility, discovering new ways to incorporate it into various dishes.

Seek recommendations on high-quality kitchenware, such as non-stick pans or rice cookers, for optimized cooking experiences.

Experiment with seasonal variations to expand culinary horizons, using ingredients at peak freshness for maximum flavor and nutrition.

Join the Conversation


Share your creation on social media with the hashtag #GarlicParmesanRiceJoy, and join a community of food lovers eager to see your take.

Photography tips include capturing the dish under natural light for the most appealing results, emphasizing the dish’s vibrant colors.

Participate in recipe reviews, offering insights or questions that contribute to a dynamic cooking collective, enhancing communal knowledge.

Share your variations and experiences, encouraging others to experiment and evolve their cooking, creating personal, signature dishes.

When engaging with the community, remember that cooking is an art open to interpretation; your unique takes enrich the shared culinary narrative.

The Recipe

Chicken with Garlic Parmesan Rice

Serves: 4

Prep Time: 10 mins

Cook Time: 30 mins

Total Time: 40 mins

Kitchen Equipment Needed

  • Frying Pan
  • Saucepan
  • Wooden Spoon
  • Measuring Cups and Spoons

Ingredients

  • 4 chicken breasts, boneless and skinless
  • 1 cup uncooked long-grain rice
  • 4 cloves garlic, minced
  • 1/2 cup grated Parmesan cheese
  • 2 cups chicken broth
  • 2 tablespoons olive oil
  • Salt and pepper, to taste
  • Chopped parsley, for garnish

Directions

  1. Season the chicken with salt and pepper. In a frying pan, heat the olive oil over medium heat. Cook the chicken until golden brown on both sides and cooked through. Remove and set aside.
  2. In the same pan, add the minced garlic and sauté until fragrant, about 1 minute. Add the rice and sauté for an additional minute.
  3. Add the chicken broth to the rice and bring to a simmer. Cover the pan and reduce the heat to low, cooking the rice for 15 minutes or until tender.
  4. Stir in the Parmesan cheese until well combined. Add the chicken back to the pan and let it warm through for 2 minutes.
  5. Garnish with chopped parsley before serving. Enjoy!

Recipe Notes

  • For a richer flavor, use chicken thighs instead of breasts.
  • For added creaminess, incorporate a tablespoon of butter before serving.
  • The dish can be stored in the refrigerator for up to 3 days.