Delicious Beef Stroganoff with Egg Noodles Recipe Explained

Delicious Beef Stroganoff with Egg Noodles: A Comforting Classic

⚖️
Difficulty
Moderate

⏲️
Prep Time
20 mins

🕒
Cook Time
30 mins

⏱️
Total Time
50 mins

🍽️
Servings
4 servings

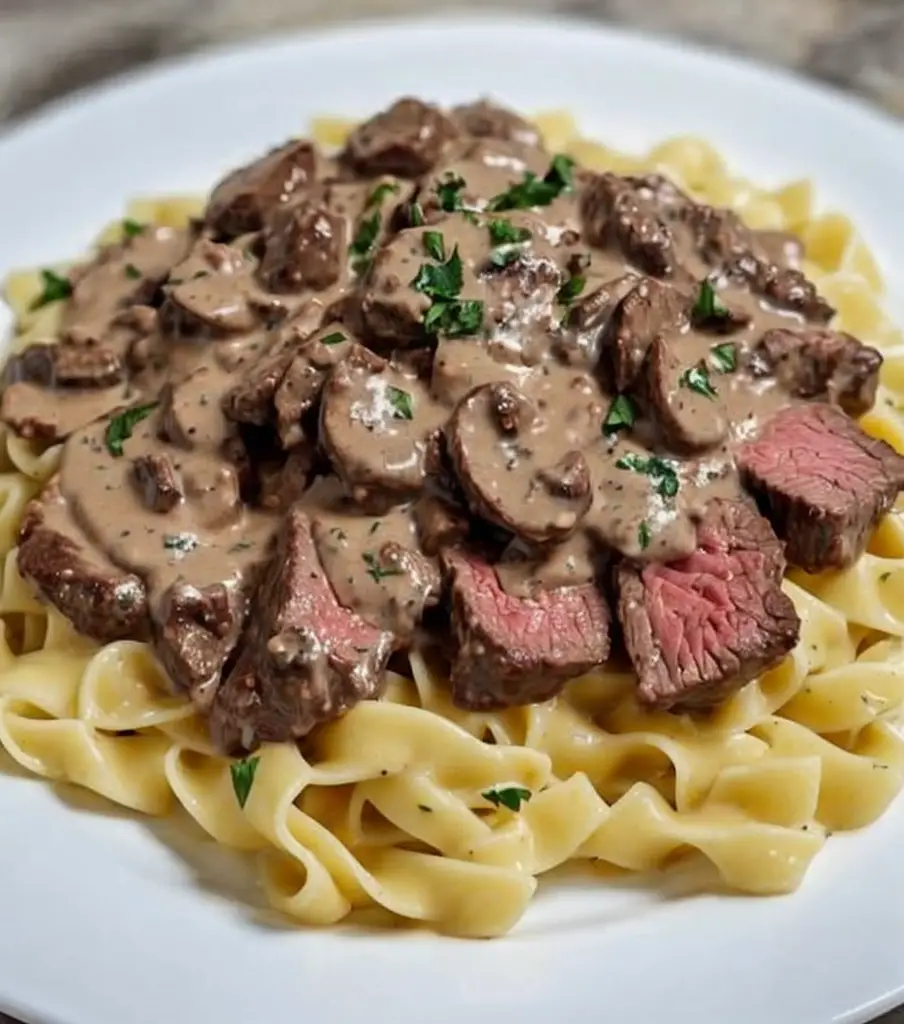
Beef Stroganoff with Egg Noodles is a classic dish that evokes feelings of warmth and comfort. This rich and creamy recipe features tender strips of beef simmered in a luscious sauce alongside perfectly cooked egg noodles, making it an ideal choice for family dinners or cozy gatherings. The harmony of flavors in this dish is enhanced by the earthiness of mushrooms and the aromatic notes of onions, all tied together with a drizzle of sour cream that brings a delightful tanginess. The result is a meal that not only satisfies the palate but also warms the heart.

Imagine plopping down after a long day, greeted by the inviting aroma of beef stroganoff wafting through your kitchen. The tender beef soaks up the delicious sauce while the egg noodles serve as the perfect vehicle for each bite. This comfort food staple is not just about fullness; it’s about pleasure and nostalgia. Whether you’re new to cooking or a seasoned chef, this recipe will guide you through creating a mouthwatering dish that’s guaranteed to impress.

Quick Recipe Highlights

  • Flavor Profile: Earthy, creamy, and slightly tangy, the balance of flavors in this dish provides a deliciously satisfying experience.
  • Texture: The combination of tender beef and soft egg noodles creates a pleasing contrast in every bite, enriched by the creamy sauce.
  • Aroma: The savory scent of sautéed onions and garlic combined with the rich scent of beef creates an enticing aroma that fills your kitchen.
  • Visual Appeal: Creamy sauce-coated noodles dotted with tender beef and mushrooms make for an inviting and comforting presentation.
  • Skill Level Needed: This recipe is moderately difficult, making it perfect for those eager to expand their culinary skills without feeling overwhelmed.
  • Special Equipment: A large skillet and a pot for boiling noodles are essential, along with basic cooking utensils.

Recipe Overview

  • Difficulty Level: This beef stroganoff is considered a moderate recipe, requiring some chopping and sautéing skills, but it is manageable for most home cooks.
  • Category: This dish falls under the category of main course meals, suitable for lunch or dinner, especially during colder months.
  • Cuisine: Originating from Russia, beef stroganoff has become a popular meal in many countries, each adding their own twist to the traditional recipe.
  • Cost: The ingredients for this recipe are generally affordable, making it a cost-effective option for family meals.
  • Season: Beef Stroganoff is a fantastic dish for all seasons, particularly fall and winter when hearty meals are most comforting.
  • Occasion: Whether it’s a weeknight dinner or a special family gathering, this dish fits perfectly into a variety of dining scenarios.

Why You’ll Love This Recipe

The taste and texture appeal of Beef Stroganoff with Egg Noodles cannot be understated. The combination of tender beef, creamy sauce, and soft noodles creates a satisfying experience that resonates with both young and old. Every bite brings forward a fusion of flavors that performs a delightful dance on your palate, making it hard to resist seconds.

Convenience is another key benefit. This recipe can be prepared in under an hour, making it an excellent option for busy weeknights. The simplicity of the ingredients and the straightforward cooking steps allow even novice cooks to whip up a gourmet meal with ease, providing an enriching experience in the kitchen.

Nutritional advantages come into play with this dish, balancing protein from the beef with the carbohydrates in the egg noodles, providing sustenance and energy. You can also include additional vegetables such as spinach or bell peppers to boost the nutritional value.

This recipe shines when it comes to social and entertaining value. It’s a crowd-pleaser that’s perfect for gatherings. A hearty beef stroganoff dish tends to pique interest and spark conversations around the table, creating a warm and inviting atmosphere.

Cost-effectiveness and accessibility are significant perks as well. Most of the ingredients for Beef Stroganoff are budget-friendly, and they’re typically staples found in many households. This makes preparing a delicious meal both economical and accessible for everyone.

Historical Background and Cultural Significance

The origin of Beef Stroganoff can be traced back to 19th-century Russia, named after the Stroganov family, who were wealthy landowners. Initially, the dish contained just beef and mustard, as culinary traditions evolved, it developed into the creamy version we know today, enriched with the influence of French cuisine.

Culturally, Beef Stroganoff holds a significant place in Russian gastronomy, symbolizing the blending of cuisines and culinary techniques. Over time, this dish has transformed into an international staple, reflecting the cultural exchanges that occur via food.

The evolution of this recipe has seen various iterations, from the original simplified version to the creamy, mushroom-laden dish popular today. Each adaptation tells a story about the taste preferences and ingredients available throughout different eras and regions.

In terms of regional variations, cultures around the world have embraced this dish, leading to delightful interpretations such as using chicken or pork, or even going vegetarian. These variations showcase regional flavors and local ingredients, ensuring that Beef Stroganoff can be found on dinner tables globally.

Ingredient Deep Dive

Beef: This key ingredient is the star of the dish, providing a hearty and satisfying base. Choose quality cuts such as sirloin or tenderloin for the best texture and flavor. Nutritionally, beef is rich in protein and essential nutrients, including iron and B vitamins. It’s important to store beef correctly to maintain freshness; always refrigerate or freeze it promptly after purchase. For those seeking alternatives, chicken or turkey can be used, though the flavor will differ.

Egg Noodles: A classic component, egg noodles offer a delightful texture that complements the creamy sauce. These noodles are typically made with eggs, allowing them to hold onto sauces well. In terms of nutrition, egg noodles provide carbohydrates for energy. When selecting, look for fresh noodles for a tender bite or choose whole grain options for added fiber. Store any leftover noodles in an airtight container in the fridge, and they can be enjoyed later in salads or soups.

Common Mistakes to Avoid

  • Not searing the beef properly, which can result in tougher meat. Always heat the pan well before adding the beef to lock in the flavors.
  • Overcooking the noodles, leading to a mushy texture. Cook them until just al dente, as they will continue to cook in the sauce.
  • Skipping the resting time for the beef after cooking, diminishing tenderness. Allowing the beef to rest helps in retaining moisture.
  • Adding the sour cream too early, causing it to curdle. Add it at the end of the cooking process for the best results.
  • Using low-quality beef, which can negatively impact flavor and texture. Always opt for good cuts of meat.
  • Failing to season adequately throughout the cooking process. Seasoning at each step enhances overall flavor.
  • Overloading the dish with too many ingredients, leading to a lack of balance in flavors. Stick to the core ingredients for the best outcome.
  • Not letting the sauce simmer enough for flavors to develop. Take the time to let the mixture meld for a richer taste.

Essential Techniques

Searing the Beef: This technique is crucial for developing deep, rich flavors. Begin by bringing a skillet to a high heat, ensuring the pan is hot enough to achieve a good sear. This process caramelizes the meat’s surface, intensifying flavor. Avoid overcrowding the pan as it can lead to steaming instead of searing, which can dull the flavors.

Deglazing the Pan: After sautéing the beef and vegetables, deglazing is important to capture the flavorful bits stuck to the pan. Pour a splash of broth or wine into the hot skillet, scraping with a wooden spoon to lift those flavors into your sauce. This technique adds depth and complexity to the final dish.

Pro Tips for Perfect Beef Stroganoff

1. Choose tender beef cuts like sirloin or tenderloin for a juicy texture. The quality of the beef will greatly affect the overall taste of your stroganoff.

2. Don’t rush the cooking process. Allow ample time for each ingredient to develop its flavor before adding the next. This will ensure a rich and savory sauce.

3. Use good stock for a flavorful sauce. Homemade or high-quality store-bought stock can deeply enhance the taste profile of your stroganoff.

4. For added depth, consider a splash of Worcestershire sauce or Dijon mustard to the sauce.

5. Experiment with different mushrooms, such as shiitake or cremini, for an earthy flavor boost.

6. Consider fresh herbs like thyme or parsley for a bright finish just before serving.

7. Make the sauce in advance and store it separately until ready to serve to allow flavors to meld.

8. Always adjust seasoning to your preference. A touch of salt and pepper can elevate the dish.

Variations and Adaptations

Regional variations of Beef Stroganoff can introduce exciting twists on the classic dish. For instance, in Hungary, Paprika is often added for a kick of heat, while in Sweden, it’s common to see this dish served with pickles for an added crunch.

Seasonal adaptations can include adding fresh vegetables during the spring and summer months. Incorporating asparagus, peas, or bell peppers can create a lighter version, allowing you to enjoy the dish year-round.

For dietary modifications, consider using mushrooms or tempeh as alternatives to beef for a vegetarian take. You can also opt for gluten-free pasta if necessary, allowing everyone to enjoy this delicious meal.

Flavor variations can include experimenting with different herbs and spices, such as smoked paprika or a sprinkle of cayenne pepper, to add a new dimension to the dish. Additionally, substituting heavy cream with Greek yogurt can provide a tangy twist while cutting down on fat content.

Serving and Presentation Guide

Plating can elevate your Beef Stroganoff experience. Serve the dish in wide, shallow bowls to showcase the creamy sauce and noodles. Top with parsley or chives for a pop of color, and consider adding a sprinkle of paprika for added visual appeal.

Garnish ideas include a dollop of sour cream or crème fraîche on each portion, enhancing the creaminess of the dish. Traditional accompaniments like crusty bread or a side salad balance the richness and provide a refreshing contrast.

Modern serving suggestions might include pairing the dish with sautéed vegetables or a grain salad for a nutritious spin. Keep temperature considerations in mind to ensure the stroganoff stays warm until serving.

Wine and Beverage Pairing

When it comes to wine pairings for Beef Stroganoff, look for red wines with soft tannins, such as Merlot or Pinot Noir. These will complement the rich flavors of the beef without overwhelming the dish. Serve your wine at a slightly cooler temperature, around 60-65°F, for optimal enjoyment.

Non-alcoholic alternatives could include cranberry or pomegranate juice served with a splash of club soda for a refreshing yet complementary beverage. For coffee lovers, a robust dark roast or an espresso can provide a wonderful contrast to the creamy sauce.

Storage and Shelf Life

When it comes to storage methods, ensure your Beef Stroganoff is cooled properly before transferring it to an airtight container. Refrigerated, it will last about 3 to 4 days. For longer storage, consider freezing the stroganoff; it can last for up to 3 months when properly sealed in a freezer-safe container.

Signs of spoilage include an off smell or discoloration in the sauce or meat. When reheating, do so slowly either on the stove or in the microwave, ensuring that the dish reaches an internal temperature of 165°F for safe consumption.

Make Ahead Strategies

For those who want to streamline dinner preparations, consider making the beef stroganoff sauce a day in advance. Allowing the sauce to sit overnight enhances the flavors, making it even more delicious. Store it separately from the egg noodles, which can be cooked fresh just before serving.

When assembling the dish, ensure you have all the components ready—beef, sauce, and noodles—to save time. To maintain freshness, refrigerate any ingredients you aren’t using immediately and be sure to reheat the sauce gently.

Scaling Instructions

For those looking to scale down, simply halve the recipe while maintaining the balance of ingredients and seasoning. If doubling or tripling, it’s wise to cook in batches to ensure even cooking and flavor distribution.

Equipment considerations are crucial when scaling recipes. Using a larger pot or multiple skillets may be necessary to ensure your beef is seared correctly without crowding. Adjust the cooking times slightly, as larger quantities might require a bit more cooking time.

Nutritional Deep Dive

This Beef Stroganoff recipe offers a balanced macro breakdown, providing a hearty dose of protein from the beef, carbohydrates from the egg noodles, and fats from the sauce, making it a satisfying meal.

Micronutrient analysis reveals that beef contributes essential iron and B vitamins, which support various bodily functions, while the addition of mushrooms provides antioxidants and fiber. It’s advisable to keep portion analysis in mind, especially for those monitoring their dietary intake.

Dietary Adaptations

For those following a gluten-free diet, using gluten-free egg noodles or alternative grains such as quinoa is an excellent option. Additionally, selecting gluten-free soy sauce—if used—will help maintain the integrity of the dish.

For dairy-free adaptations, substituting sour cream with coconut cream or a dairy-free alternative can achieve a similar creaminess without using dairy products. Exploring these modifications allows everyone to enjoy the richness of the dish while adhering to dietary restrictions.

Troubleshooting Guide

If you encounter texture issues with the beef, ensure that you are not overcooking it, as this can lead to a chewy result. Use a meat thermometer to achieve the preferred doneness and allow resting time for better tenderness.

Flavor balance can sometimes be off; if the dish tastes bland, try adding a pinch of salt or a splash of vinegar to brighten up the flavors. Always taste the sauce before serving to make necessary adjustments.

Recipe Success Stories

Community feedback on this beef stroganoff recipe has been overwhelmingly positive, with many sharing their successful adaptations and variations. Readers enjoy experimenting with different ingredients, sharing pictures of their delicious creations on social media.

Success stories highlight how simple adaptations, such as including seasonal vegetables or using alternative proteins, have led to new favorites within families. These contributions foster a supportive cooking community, encouraging more home cooks to try their hands at this beloved dish.

Frequently Asked Questions

Can I use frozen beef? Yes, but make sure to thaw it completely before cooking. Frozen beef can result in uneven cooking and texture issues.

What can I substitute for egg noodles? You can opt for gluten-free pasta, rice, or even zucchini noodles for a low-carb alternative.

How long can I store the leftovers? Stored properly in an airtight container, leftovers can last 3 to 4 days in the refrigerator and up to 3 months in the freezer.

Can I make this dish in advance? Absolutely! You can prepare the sauce in advance and refrigerate it, then cook the noodles when ready to serve.

Is it possible to make this recipe without mushrooms? Yes, you can omit the mushrooms or substitute them with another vegetable like bell peppers or spinach.

How do I prevent the sauce from curdling? Avoid boiling the sauce after adding sour cream; instead, let the sauce cool slightly before incorporating it.

Can I use a slow cooker for this recipe? Yes, you can use a slow cooker, but sear the beef first to enhance the flavor. Cook on low for several hours until tender.

What herbs work well in Beef Stroganoff? Fresh parsley, thyme, or dill pairs beautifully with stroganoff, adding herby freshness to the dish.

Is Beef Stroganoff gluten-free? Traditional recipes are not gluten-free; however, you can easily adapt it by using gluten-free noodles and sauces.

Can I use cream instead of sour cream? Yes, but keep in mind that you may lose some of the tangy flavor. A little lemon juice can help mimic the acidity.

How spicy is Beef Stroganoff? It’s usually not spicy, but you can add crushed red pepper or hot sauce for a kick if desired!

Additional Resources

If you’re looking for more meal ideas, check out our collection of related recipes such as creamy chicken alfredo or classic macaroni and cheese. We also have technique guides on sautéing and making sauces that may enhance your cooking skills further.

For ingredient information, explore our guides on selecting quality beef and fresh herbs. Additionally, check out essential kitchen equipment recommendations to ensure you are well-equipped for your cooking endeavors.

Join the Conversation

We invite you to share your cooking experiences and adaptations of this Beef Stroganoff recipe on social media. Connect with our community, share your photography tips, or leave a review about your experience preparing this comforting dish.

The Recipe

Beef Stroganoff with Egg Noodles

Serves: 4 servings

Prep Time: 20 mins

Cook Time: 30 mins

Total Time: 50 mins

Kitchen Equipment Needed

  • Large skillet
  • Pot for boiling noodles
  • Wooden spoon
  • Knife and cutting board
  • Airtight container for leftovers

Ingredients

  • 1 lb beef (sirloin or tenderloin), sliced into strips
  • 8 oz egg noodles
  • 1 cup mushrooms, sliced
  • 1 medium onion, chopped
  • 2 cloves garlic, minced
  • 2 tbsp olive oil
  • 1 cup beef broth
  • 1 cup sour cream
  • 1 tbsp Worcestershire sauce
  • Salt and pepper, to taste
  • Fresh parsley, chopped (for garnish)

Directions

  1. Heat olive oil in a large skillet over medium-high heat. Add the sliced beef, searing until browned on all sides. Remove and set aside.
  2. Add onions and garlic to the skillet, sautéing until translucent.
  3. Stir in mushrooms and cook until soft.
  4. Add the beef back to the skillet along with beef broth and Worcestershire sauce. Bring to a simmer and cook for 10 minutes.
  5. Reduce heat, then stir in sour cream. Mix well and heat through, ensuring not to boil.
  6. Meanwhile, cook the egg noodles according to package instructions. Drain and set aside.
  7. Serve the beef mixture over the egg noodles, garnished with fresh parsley.

Recipe Notes

  • Feel free to adjust the amount of sour cream based on your preference for creaminess.
  • For a thicker sauce, simmer the beef broth longer to reduce it before adding sour cream.
  • Leftover stroganoff is great for pasta salads the next day!

Decadent Gourmet Meatballs with Irresistible Mushroom Sauce Recipe

Gourmet Meatballs with Mushroom Sauce: A Deliciously Elegant Dish

⚖️
Difficulty
Medium

⏲️
Prep Time
30 mins

🕒
Cook Time
45 mins

⏱️
Total Time
75 mins

🍽️
Servings
4 servings

Indulge in the rich flavors and satisfying textures of these Gourmet Meatballs with Mushroom Sauce, a dish that brings warmth and comfort to any dinner table. These meatballs are packed with a blend of savory herbs and spices, creating a flavor explosion with each bite. Paired perfectly with a creamy, umami-rich mushroom sauce, this meal is not just food; it’s a culinary experience that delights the senses.

The tender meatballs are seared to golden perfection, providing a delightful contrast to the smooth, luscious sauce that blankets them. As they simmer together, the flavors meld into a comforting dish that’s excellent for gatherings or an intimate dinner at home. With a touch of elegance and a hint of gourmet flair, this recipe will impress friends and family alike.

Quick Recipe Highlights

  • Flavor Profile: Savory meatballs complemented by a creamy, earthy mushroom sauce.
  • Texture: Juicy meatballs with a tender, smooth sauce that glides over your palate.
  • Aroma: An inviting blend of sautéed garlic, fragrant herbs, and roasted mushrooms.
  • Visual Appeal: Richly colored sauce with beautifully seared meatballs garnished with fresh parsley.
  • Skill Level Needed: Perfect for home cooks with basic kitchen skills and a passion for delicious food.
  • Special Equipment: Requires a frying pan, mixing bowl, and a saucepot for preparation.

Recipe Overview

  • Difficulty Level: This recipe is a medium difficulty, ideal for those wanting to elevate their cooking while still achieving fantastic results without complex techniques.
  • Category: Perfect for a main course that fits seamlessly into dinner parties, family meals, or romantic dates.
  • Cuisine: This dish borrows inspiration from Italian cuisine, emphasizing the harmony of meat and rich sauces.
  • Cost: The ingredients are relatively budget-friendly, making this dish both an affordable and sophisticated option.
  • Season: Enjoy it year-round, but it shines particularly in colder months when comfort food is most desired.
  • Occasion: An excellent choice for gatherings, holidays, or simply when you want to treat yourself or your loved ones.

Why You’ll Love This Recipe

The combination of tender meatballs and a succulent mushroom sauce will create an irresistible dish that becomes a staple in your kitchen. Each bite is a satisfying blend of juicy meat and rich sauce that dances in harmony. The play of flavors is enhanced by the inclusion of spices, which brings a depth that’s incredibly appealing and comforting. Plus, it’s versatile enough to pair with pasta, rice, or even crusty bread.

Preparation is straightforward, making it an ideal recipe for both novice cooks and seasoned chefs. You can whip it up in under 75 minutes—a perfect balance of flavor and efficiency. The meatballs can be made ahead and frozen, giving you flexibility. This makes it a fantastic option for busy nights or meal prepping for the week.

From a nutritional perspective, these meatballs pack a protein punch, providing essential nutrients in each serving. The mushrooms contribute fiber, vitamins, and minerals, making this dish not just delicious but also nourishing for your body.

Sharing this dish with friends and family will create lasting memories around the dinner table. The gourmet presentation will impress, evoking feelings of warmth and togetherness that comes from enjoying a home-cooked meal. It’s a feel-good dish that brings everyone together.

Moreover, this gourmet meal is cost-effective. Most ingredients are easy to source, allowing for a luxurious dish without breaking the bank. The accessible nature of meatball recipes also invites creativity—whether you’re adding your favorite spices or experimenting with different sides, the possibilities are endless.

Historical Background and Cultural Significance

The humble meatball has a rich history that traces back to ancient civilizations. Originally crafted from leftover meats, they evolved over centuries into the flavorful delicacies we know today. Their versatility is rooted in cultures across the globe, from Swedish köttbullar to Italian polpette, showcasing the adaptability of this delightful dish.

In Italian cuisine, meatballs often symbolize comfort and familial bonds. Recipes are passed down through generations, integrating personal touches and regional specialties, creating a tapestry of flavors that resonates with many households. They’re often featured at gatherings, reinforcing their role as a unifying dish.

Throughout the years, gourmet variations have emerged, showcasing high-quality ingredients and refined techniques. This evolution reflects broader culinary trends, highlighting the shift towards sophistication in traditional dishes. The mushroom sauce in this recipe exemplifies this trend, elevating a simple meatball into a gourmet treat.

Regional variations abound, with different cultures contributing unique spices, sauces, and preparation methods. From adding cheese to using various meats, the meatball continues to be a canvas for creativity in kitchens worldwide, celebrating diverse culinary traditions and flavors.

Ingredient Deep Dive

Ground Beef: Ground beef is the star ingredient in meatballs, offering rich flavor and texture. Originating from various cuts of meat, it provides a protein-rich base for this dish. When selecting ground beef, look for a blend of lean meat and fatty portions for optimal flavor and moisture. Store it refrigerated and use it within a few days, or freeze it for prolonged freshness. Ground turkey or chicken can serve as healthier substitutions.

Mushrooms: Mushrooms add depth to the sauce, introducing umami flavor that elevates the dish. Varieties like cremini and shiitake are popular due to their robust taste and nutritional profile. They are low in calories yet rich in antioxidants and vitamins. When choosing mushrooms, look for firm, plump specimens free of blemishes. Store them in a paper bag in the fridge to maintain freshness. Consider substituting with different varieties or even dried mushrooms for unique flavor profiles.

Common Mistakes to Avoid

  • Overmixing the meat mixture—this can lead to tough meatballs; mix just until combined for tender results.
  • Skipping browning the meatballs—browning adds flavor and texture; don’t rush this step.
  • Using the wrong mushroom type—always choose mushrooms that enhance the flavor you desire in your sauce.
  • Cooking meatballs at too high a heat—this can result in burnt outsides and raw insides; use medium heat for even cooking.
  • Not allowing the meatballs to rest—letting them sit after cooking ensures they stay juicy and flavorful.
  • Using dried herbs instead of fresh—fresh herbs provide more flavor and aromatic appeal.
  • Adding salt too early in the cooking process—this can toughen the meat; instead, season at the end.
  • Skipping the simmering time for the sauce—allowing the sauce to develop flavors is crucial for depth.
  • Neglecting to coat the meatballs in the sauce before serving—they should be well covered for optimal flavor.

Essential Techniques

Mixing Meatballs: This step is crucial for achieving the right texture. Combine meat gently, as overmixing can result in dense, chewy meatballs. Use your hands or a fork to mix just until everything is incorporated. Look for a uniform blend of ingredients while ensuring the mixture is still light and airy.

Browning Meatballs: Browning before simmering adds depth to the flavor. Heat a skillet until it’s hot, add oil, and place meatballs in without crowding. Turn them occasionally for even browning. Visual cues include a deep golden color on the outside that enhances flavor while retaining juicy meat inside.

Pro Tips for Perfect Gourmet Meatballs with Mushroom Sauce

1. Use day-old bread soaked in milk for extra moist and flavorful meatballs—this traditional trick works wonders.
2. Incorporate diced onions and garlic into the meat mixture for added depth.
3. Experiment with spices like crushed red pepper or smoked paprika for a unique twist on flavor.
4. Allow the meatballs to rest in the pan after cooking to absorb the sauce’s flavor effectively.
5. For a lighter sauce, use low-sodium broth or Greek yogurt instead of heavy cream.
6. Pair the meatballs with sautéed spinach or a fresh salad for a balanced meal.
7. Serve with fresh herbs on top for an eye-catching garnish that brightens the dish.
8. For an elevated experience, serve with truffle oil drizzled on top just before serving.

Variations and Adaptations

Regional variations of gourmet meatballs can include Italian-style, which often feature ricotta cheese or parmesan, or Asian-inspired versions using ginger and soy sauce. Seasonal adaptations like adding pumpkin or squash puree during fall can rejuvenate this classic dish.

Dietary modifications can cater to various preferences; for example, using ground turkey or plant-based meat substitutes for a lighter or vegan option. Flavor variations might include different sauces like a spicy arrabbiata or honey-soy glaze, which offer bold contrasts.

Texture modifications can be made by incorporating breadcrumbs or oats for a heartier meatball, while presentation alternatives could mean serving over creamy polenta or in a bread bowl for rustic charm.

Serving and Presentation Guide

Serving gourmet meatballs beautifully enhances their appeal. For plating, consider a wide, shallow bowl with a sprinkle of parsley and a drizzle of sauce around the sides for elegance. Garnishing with fresh herbs or a dusting of grated parmesan will add vibrancy.

Pair your plated dish with rustic bread or over creamy polenta, presenting an inviting contrast in colors and textures. Serve the dish warm and address portion control to avoid overwhelming guests, allowing them to savor each bite.

Wine and Beverage Pairing

When it comes to pairing wine with gourmet meatballs, a medium-bodied red like Chianti or a smooth Pinot Noir will enhance the dish’s flavors beautifully. A crisp white wine such as Sauvignon Blanc also complements the richness of the mushroom sauce, providing a refreshing contrast.

For non-alcoholic options, consider a sparkling water infused with lemon or a light herbal tea that won’t overpower the meal. Quality coffee or a rich, fragrant black tea can also serve as delightful complements if serving meatballs during a brunch or casual gathering.

Storage and Shelf Life

Storing gourmet meatballs requires careful attention to preserve freshness. Keep the meatballs in an airtight container in the fridge for up to three days. If you plan to keep them for longer, freezing is an excellent option—place them in a freezer-safe container or bag for up to three months.

Be vigilant for signs of spoilage—foul odors or discoloration indicate it’s time to discard. For reheating, thaw overnight in the fridge and warm gently in a skillet or oven to maintain texture and flavor. Microwaving can also work in a pinch, but be cautious to avoid overcooking.

Make Ahead Strategies

Planning ahead makes this gourmet dish even more enjoyable. Prepare the meatballs a day or two in advance and freeze them before cooking. This allows you to have meals ready to go during busy weeks while retaining fresh flavor.

Assemble the mushroom sauce ahead of time as well, cooling it completely before storing in the fridge. Reheating the sauce while cooking the frozen meatballs creates a seamless cooking experience that ensures warm, flavorful meals that feel homemade even on the busiest evenings.

Scaling Instructions

For gatherings or family meals, scaling this recipe can be simple. To halve, just divide each ingredient accordingly, ensuring you maintain the balance of flavors. Doubling or tripling the recipe works well too; just ensure your cooking vessels can accommodate the extra meatballs.

Timing adjustments are necessary when cooking bigger batches; allow for a longer simmering time to ensure all meatballs are evenly cooked and infused with flavor. Be mindful of storage space, as larger quantities may require more space in the fridge or freezer.

Nutritional Deep Dive

Understanding the nutrition behind gourmet meatballs enriches your cooking practice. A typical serving provides a robust protein source, essential for muscle health and overall body function. Fat content varies based on the meat used; opting for leaner cuts can help manage dietary goals without sacrificing flavor.

Micronutrient analysis shows that mushrooms provide vital vitamins, including vitamin D and B-complex vitamins, important for energy metabolism. This classic dish can also be adapted for various dietary considerations, making it not just delicious but beneficial for diverse nutritional needs.

Understanding portion sizes can help maintain a balanced diet while still enjoying gourmet dishes. Aiming for a two to three meatball serving ensures satisfaction without excessive calorie intake.

Dietary Adaptations

For those who follow specific dietary regimes, gourmet meatballs can be adapted easily. For a gluten-free option, substitute breadcrumbs with almond flour or ground oats. Dairy-free individuals can use cashew cream instead of heavy cream in the mushroom sauce.

Vegans can experiment with plant-based meat substitutes and cashew cheese, ensuring rich flavors without animal products. Low-carb or keto diets benefit from using ingredients like zucchini noodles instead of traditional pasta, providing a nutrient-rich alternative.

Each modification retains the core of what makes gourmet meatballs delectable, allowing enjoyment across dietary preferences and restrictions.

Troubleshooting Guide

If your meatballs turn out too dense, ensure minimal mixing and use enough fat for moisture. If the flavors lack balance, adjust seasoning gradually during cooking, tasting as you go to achieve the desired outcome.

Temperature problems can arise if the heat is too high; ensure you’re cooking on medium heat for even distribution of heat. Equipment issues like non-stick pans can make browning tricky; using cast iron or stainless-steel cookware can enhance flavor and prevent sticking.

Ingredient substitutions like using dried herbs instead of fresh ones can affect flavor profiles; always aim for fresh for the best taste experience. Timing concerns such as overcooking can be reduced by keeping an eye on meatballs during the simmering phase and adjusting cooking times based on size.

Recipe Success Stories

Our community has shared multiple success stories featuring gourmet meatballs, highlighting personal touches that led to amazing outcomes. Readers have loved experimenting with various sauces, with some opting for spicy variations that added an exciting twist.

Adaptations for dietary restrictions have showcased the versatility of this dish, with feedback praising the flavor retained even with gluten-free or vegan ingredients. Sharing photography of their crafted dishes, readers emphasize the visual appeal and gourmet presentation that can be achieved at home.

Every adaptation and feedback further encourages creativity, allowing home chefs to discover what works best for them and their loved ones, resulting in dishes that feel uniquely personalized.

Frequently Asked Questions

Q1: Can I use lean meat for this recipe?

Absolutely! Lean meats, such as ground turkey or chicken, can be used for a healthier twist. Just remember, they may require additional moisture like eggs or bread crumbs to keep the meatballs juicy.

Q2: How can I prevent meatballs from falling apart?

To prevent your meatballs from falling apart during cooking, make sure to include binding agents like eggs and breadcrumbs. These ingredients help keep the meat together, ensuring they hold their shape.

Q3: Can I make the meatballs ahead of time?

Yes! You can prepare the meatballs in advance and refrigerate or freeze them. Just ensure they’re fully cooled before storing and use them within 3 months if freezing.

Q4: What if I don’t have fresh herbs?

If you don’t have fresh herbs on hand, dried herbs can work as well. Use about one-third the amount of dried herbs compared to fresh, as dried herbs are more concentrated.

Q5: How do I know when the meatballs are done?

Cooked meatballs should have a temperature of 165°F (75°C) inside, and they should be golden brown on the outside when you check them carefully for doneness.

Q6: Can I use a different type of sauce?

Absolutely! Feel free to experiment with different sauces, such as marinara, barbecue, or even an Asian-inspired teriyaki sauce, to give your meatballs a unique flavor profile.

Q7: Are these meatballs suitable for freezing?

Yes! Gourmet meatballs freeze beautifully. Just make sure they’re completely cooled before placing them in an airtight container or freezer bag.

Q8: What side dishes go well with meatballs?

These meatballs pair wonderfully with pasta, rice, mashed potatoes, or a fresh garden salad. Garlic bread is also a fantastic accompaniment to soak up the delicious sauce!

Q9: Can children enjoy these meatballs?

Yes, gourmet meatballs are generally a hit with kids! Their familiar flavors and textures make them a great meal for the entire family. You can reduce spice levels or modify the sauce to suit their tastes.

Q10: How do I modify the spice level?

To adjust the spice level, control the amount of black pepper or red pepper flakes you use in the meat mixture and the sauce. Start with a small amount and adjust according to your preference.

Additional Resources

For those looking to expand their culinary repertoire, explore more related recipes, such as traditional spaghetti with marinara sauce or mashed potatoes that pair perfectly with these gourmet meatballs.

Seek out technique guides for mastering meat sauces, as well as ingredient information to help you make the best choices when shopping for fresh produce. Investing in quality kitchen equipment will also boost your cooking experience, making it easier to prepare gourmet dishes at home.

Don’t forget to consider seasonal variations for your meals—adapting ingredients based on what’s fresh will enhance flavors and support local markets.

Join the Conversation

We encourage our readers to share their experiences and photos when making these gourmet meatballs with mushroom sauce. Connect with us on social media platforms and use our tags to showcase your culinary creations.

Recipe reviews and feedback help our community grow, and we love to hear about any variations you’ve tried or tips you might have. Your creativity can inspire others to step into the kitchen and try their hand at crafting this delightful dish.

The Recipe

Gourmet Meatballs with Mushroom Sauce

Serves: 4 servings

Prep Time: 30 mins

Cook Time: 45 mins

Total Time: 75 mins

Kitchen Equipment Needed

  • Mixing bowls
  • Frying pan
  • Wooden spoon or spatula
  • Meat thermometer
  • Oven-safe baking dish

Ingredients

  • 1 lb ground beef
  • 1/2 cup breadcrumbs
  • 1/4 cup grated parmesan cheese
  • 1/4 cup chopped parsley
  • 1 egg
  • 2 cloves garlic, minced
  • Salt and pepper to taste
  • 1 lb mushrooms, sliced
  • 1 cup heavy cream
  • 1 cup beef broth
  • 1 tbsp olive oil
  • 1 tsp dried thyme

Directions

  1. Preheat your oven to 375°F (190°C).
  2. In a large bowl, combine ground beef, breadcrumbs, parmesan cheese, parsley, egg, garlic, salt, and pepper. Mix until just combined.
  3. Form meatballs using your hands, roughly the size of golf balls.
  4. Heat olive oil in a frying pan over medium heat. Add meatballs in batches and brown all sides, about 5-6 minutes.
  5. Once browned, transfer meatballs to an oven-safe dish and set aside.
  6. In the same pan, add sliced mushrooms and cook until softened, about 5-7 minutes.
  7. Add broth, cream, thyme, and season with salt and pepper. Stir to combine and bring to a simmer.
  8. Pour mushroom sauce over meatballs in the dish and cover with foil.
  9. Bake for 25-30 minutes or until meatballs are cooked through.
  10. Serve warm with your favorite sides, and enjoy!

Recipe Notes

  • Feel free to substitute ground beef for ground turkey or chicken as needed.
  • These meatballs can be frozen; just ensure they are cooled properly before storage.
  • If you prefer a lighter sauce, replace heavy cream with half-and-half or Greek yogurt.

Delicious Creamy Alfredo Lasagna Soup Recipe for Cozy Nights

Creamy Alfredo Lasagna Soup: A Comforting Twist on Classic Flavors

⚖️
Difficulty
Medium

⏲️
Prep Time
20 mins

🕒
Cook Time
30 mins

⏱️
Total Time
50 mins

🍽️
Servings
6 servings

Imagine indulging in a cozy bowl of Creamy Alfredo Lasagna Soup after a long day. This delightful dish captures the essence of traditional lasagna but with an inviting soup twist that adds warmth and culinary excitement to your dining table. With rich, creamy Alfredo sauce, savory ground meat, and succulent pasta, every spoonful is a comforting embrace. The flavors meld together beautifully, evoking a sense of nostalgia while also pleasing the taste buds with each delectable layer of flavor.

As you dive into a bowl filled with this creamy goodness, the alluring aroma of garlic, fresh herbs, and melted cheese wafts through the air, instantly transporting you to an Italian kitchen bustling with warmth. Garnished with fresh basil and a sprinkle of Parmesan, this culinary treat not only satiates your hunger but also ignites joy and family connections around the dinner table. Perfect for cold evenings or simple gatherings, this Creamy Alfredo Lasagna Soup is sure to become a family favorite.

Quick Recipe Highlights

  • Flavor Profile: This dish combines the rich creaminess of traditional Alfredo sauce with a robust blend of herbs and spices. The addition of ground meat and cheese layers enhances the savory depth, making it a satisfying meal.
  • Texture: Each bowl offers a delightful assortment of textures, from tender pasta to velvety sauce and juicy meat, ensuring every bite is a pleasing combination of softness and richness.
  • Aroma: The tantalizing scent of garlic, simmering tomatoes, and freshly grated Parmesan fills the kitchen, creating an irresistible aroma that draws everyone to the table.
  • Visual Appeal: Served in a large bowl, this soup presents itself with a beautiful creamy base flecked with herbs and topped with bubbling cheese, creating a warm and inviting visual that entices diners.
  • Skill Level Needed: This recipe is of medium difficulty, requiring basic cooking skills like sautéing, simmering, and assembling ingredients. Ideal for home cooks looking to hone their culinary expertise.
  • Special Equipment: You’ll need a large pot or Dutch oven for cooking the soup and a baking dish for the cheese topping, ensuring that you can create a lovely layering effect.

Recipe Overview

  • Difficulty Level: The creamy Alfredo lasagna soup is categorized as medium in difficulty due to the multiple layers of preparation involved, including cooking meat, simmering sauce, and assembling the final dish.
  • Category: This dish is perfect as a comforting meal for lunch or dinner, especially appealing during cooler weather or on busy weeknights.
  • Cuisine: Drawing inspiration from Italian cuisine, this soup infuses classic lasagna components with convenience by transforming it into a delectable soup format that is easy to serve and enjoy.
  • Cost: The estimated cost for preparing this meal is quite budget-friendly; with affordable ingredients such as ground meat, pasta, and cheese, it’s a great option for feeding larger families.
  • Season: Creamy Alfredo Lasagna Soup shines best in fall and winter months, as people tend to gravitate towards hearty and comforting meals that provide warmth and satisfaction.
  • Occasion: This dish is exceptionally versatile, making it perfect for family dinners, gatherings, or potlucks, where everyone can share in the creamy goodness!

Why You’ll Love This Recipe

This Creamy Alfredo Lasagna Soup is a true delight for the senses. The enticing flavors combine the creamy richness of Alfredo with the heartiness of traditional lasagna, delivering a unique and comforting taste experience that you won’t forget. Each spoonful leaves you craving more, as the savory blend of spices and herbs immerse you in aromatic bliss. The added textures of the perfectly cooked pasta and ground meat create a robust mouthfeel that adds even more satisfaction to this already delightful dish.

In addition to its deliciousness, this recipe is convenient and straightforward to prepare. It allows you to enjoy the essence of lasagna without the time-intensive layering process that can often be daunting. With all the ingredients simmering together in one pot, you’ll find that clean-up is a breeze, allowing you to focus on enjoying the meal and sharing it with your loved ones rather than being stuck in the kitchen for hours.

From a nutritional standpoint, Creamy Alfredo Lasagna Soup provides a well-rounded mix of protein, carbs, and healthy fats. Packed with ingredients, each bowl delivers essential vitamins and minerals necessary for a nutritious diet. Plus, the ability to incorporate additional vegetables allows you to customize the soup to meet your family’s preferences and dietary needs.

Socially and entertaining-wise, this dish is a real crowd-pleaser. Nothing brings people together like a warm bowl of soup, especially when paired with crusty bread or a fresh salad. Whether it’s gathering with friends for a cozy night in or serving a meal to family after a busy day, this soup fosters connection and conversation.

Finally, the cost-effectiveness of this Creamy Alfredo Lasagna Soup cannot be overstated. With relatively inexpensive ingredients, you can feed a family of six or more without breaking the bank. This makes it an ideal choice for budget-conscious cooks who still want to deliver a delicious, homemade meal that feels indulgent and special.

Historical Background and Cultural Significance

The roots of lasagna can be traced back to ancient Greece and Rome, where pasta became a staple in the Mediterranean diet. Over centuries, different regional variations emerged, solidifying lasagna as a beloved dish within Italian culture. The introduction of creamy sauces, particularly Alfredo, evolved the dish into a more decadent experience, gaining popularity in American homes. Creamy Alfredo Lasagna Soup pays homage to this historical evolution while introducing an approachable twist to a classic.

Culturally, lasagna represents family gatherings, celebrations, and Italian feasts, symbolizing warmth and togetherness. This soup variation embodies those very same characteristics, inviting loved ones to share in a memorable meal while preserving the richness of Italian heritage. As families adapt this recipe to their preferences, it takes on new significance, becoming a comfort food that reflects their shared experiences and traditions.

As the recipe continues to evolve, the introduction of soup elements signifies a shift towards quicker, more convenient cooking. Modern cooks are constantly looking for ways to streamline meals without sacrificing authenticity and flavor. This Creamy Alfredo Lasagna Soup showcases how culinary traditions can adapt and flourish in contemporary kitchens.

Regional variations of lasagna can be seen globally, with numerous interpretations featuring varying ingredients and even methods of preparation. This versatility helps unite different cultural influences while maintaining the essence of lasagna, appealing to diverse tastes and preferences.

Ingredient Deep Dive

– Ground Meat: A cornerstone of this recipe, ground meat adds both protein and richness. Versatile in nature, it allows for various substitutions, such as turkey or plant-based options, accommodating different dietary needs. When selecting ground meat, look for high-quality, lean options for optimal flavor and health benefits.

– Pasta: Traditionally a lasagna noodle, the type of pasta significantly impacts the soup’s overall texture and mouthfeel. Opting for a quality pasta ensures it holds up well in the broth, preventing overly soft or mushy noodles. You can easily substitute gluten-free pasta for a dietary adaptation.

– Alfredo Sauce: This creamy blend of butter, cream, and cheese serves as the flavor backbone of the dish. Made from scratch or purchased, it’s essential to choose a sauce with the right balance of flavors. Preparing homemade Alfredo sauce allows you to control the ingredients and create a fresher, more customized taste.

– Vegetables: Common additions such as spinach, mushrooms, or zucchini enhance nutritional benefits while adding depth of flavor. Incorporating fresh or frozen vegetables into the soup allows for customization depending on seasonal availability and personal preference.

– Cheese: A crucial component, cheese not only imparts flavor but also adds creaminess. Freshly grated Parmesan serves as an ideal finishing touch for this soup, bringing everything together with its nutty, savory notes. Consider using different cheese varieties to create unique flavor profiles.

Common Mistakes to Avoid

  • Skimping on Seasoning: One major pitfall is not seasoning the components of the soup adequately. Each layer of flavor, from the meat to the Alfredo sauce, should be seasoned well to enhance the overall taste. Always taste as you go!
  • Overcooking Pasta: Another common mistake is cooking the pasta too much before adding it to the soup. It’s crucial to undercook the noodles slightly as they will continue to soften in the broth.
  • Using Low-Quality Sauce: Opting for a low-quality Alfredo sauce significantly impacts flavor. Homemade or high-quality store options yield richer and more robust results that elevate the dish.
  • Skipping the Sauté Step: Neglecting to sauté the garlic and onions can result in a flat broth. Sautéing these ingredients releases essential oils and flavors that enrich the overall taste.
  • Not Adjusting Consistency: Sometimes the soup can become too thick or too thin based on personal preference. Always adjust the broth according to your liking by adding more liquid or cooking uncovered to reduce thickness.
  • Inadequate Blending: If freshly grated cheese is not blended properly, it can clump together, becoming challenging to distribute throughout the soup. Stir continuously to ensure a smooth, creamy texture.
  • Overloading Ingredients: While it’s tempting to add lots of ingredients, maintaining balance is essential. Too many components can overshadow the deliciousness of the Alfredo sauce.
  • Forgetting to Garnish: Presentation plays a huge role in the enjoyment of food. Skipping garnishes like fresh basil or extra cheese can make the dish look unappetizing.
  • Not Prepping Ahead: Failing to prep ingredients beforehand can lead to a chaotic cooking experience. Organizing ingredients in advance ensures smooth cooking and better results.
  • Ignoring Leftovers: Many people overlook storing and reheating their soup properly. Proper storage helps retain flavor and quality for future meals.

Essential Techniques

– Sautéing: This technique allows for the development of flavors by cooking ingredients in a small amount of fat over medium heat. The goal is to soften and release essential oils, enhancing the taste of your dish. Mastery involves monitoring the cooking temperature and stirring often to avoid burning. Signs of success include softened onions and aromatic garlic.

– Layering Flavors: Achieving a depth of flavor requires thoughtful layering in your cooking process. Begin with aromatics, add proteins, then incorporate liquids, enriching the final result. To master this, always consider the overall balance of tastes and adjust accordingly. A well-layered dish will have a harmonious medley of flavors.

– Adjusting Consistency: Managing the soup’s consistency is key to mastering this recipe. Creating a velvety texture may require altering the liquid levels or cooking uncovered to evaporate excess moisture. Ensure you sample the broth regularly to determine the desired thickness and make modifications if needed, as this can elevate the soup experience.

Pro Tips for Perfect Creamy Alfredo Lasagna Soup

– Use high-quality ingredients for the best flavor; fresh herbs, good cheese, and homemade sauce can make a big difference.
– Consider using multiple cheese varieties for added depth; combinations of mozzarella and provolone enhance the cheesy goodness.
– Always taste and adjust seasonings throughout the cooking process. Flavors intensify as they blend, so getting it just right is important!
– If you prefer a vegetable-rich soup, consider adding sautéed vegetables like bell peppers or carrots alongside the meat for added flavor and nutrition.
– For a spicy twist, try adding a pinch of red pepper flakes to the sauce, offering a delightful kick to your creamy dish.
– Cooking the soup in a Dutch oven helps maintain an even heat distribution, improving overall cooking results.
– If time permits, allow the flavors to meld by letting the soup simmer for a longer duration, enhancing its taste and complexity.
– To present beautifully, serve your soup in individual bowls garnished with freshly chopped basil and a sprinkle of Parmesan for a professional touch.

Variations and Adaptations

– Regional variations may include additional spices or herbs specific to different Italian regions, such as bay leaves or fresh oregano, which can be incorporated to enhance the flavor profile, adding authenticity to the dish.
– Seasonal adaptations offer opportunities for unique twists. For instance, during summer months, incorporating fresh zucchini or other seasonal vegetables can freshen the flavor and add nutrition.
– Dietary modifications can be made by substituting gluten-free pasta for traditional noodles or using almond milk and dairy-free cheese for a vegan-friendly option, catering to different dietary preferences.
– Flavor variations can be achieved by introducing different meats. Ground turkey or sausage adds a savory depth, while incorporating seafood can lend a unique coastal spin.
– Texture modifications, such as blending some of the soup before serving, can create a creamier consistency while leaving some chunky bits for contrast.
– Presentation alternatives might include serving the soup in bread bowls for a delightful dining experience that adds to the meal’s aesthetic and taste.

Serving and Presentation Guide

– Plating techniques that emphasize visual appeal include using oversized, shallow bowls and a light drizzle of cream or a touch of green for contrast.
– Garnishing ideas like a sprinkle of fresh herbs, a dash of olive oil, or a twist of lemon zest can elevate the soup’s presentation and flavor profile.
– Traditional accompaniments such as garlic bread or a fresh salad pair beautifully and round out the meal, enhancing the dining experience.
– For modern serving suggestions, consider creating a charcuterie board with complementary appetizers before serving the soup to set a festive tone.
– Temperature considerations are important; serve immediately after preparation while the soup is still steaming hot for the best taste and experience.
– Portion control tips can help moderate serving sizes; aim for 1-2 cups per serving for a well-balanced meal that satisfies without overeating.

Wine and Beverage Pairing

– Wine pairings for this hearty soup include a medium-bodied Chardonnay or a light Pinot Grigio, which complements the creaminess of the Alfredo sauce without overwhelming the flavors.
– For non-alcoholic alternatives, a crisp sparkling water infused with fresh citrus or herbal tea can refresh the palate between spoonfuls of rich soup.
– Coffee or tea pairings may be less common but can provide a pleasant finish; opt for a light herbal tea mixed with a touch of honey to cleanse the palate after enjoying the dish.
– Temperature considerations play a role in wine selections; serve whites chilled for refreshing contrast against the warm soup.
– Serving suggestions could include presenting wine in elegant glasses alongside the meal to enhance the overall dining experience, creating a warm and inviting atmosphere.

Storage and Shelf Life

– Store leftovers in airtight containers in the fridge for up to three days, ensuring that the soup retains its flavor and texture.
– Maintain temperature requirements by allowing the soup to cool to room temperature before refrigerating, helping to prevent bacterial growth.
– Container recommendations include glass or sturdy plastic containers that can withstand being stored and reheated without issues.
– Signs of spoilage to watch for include an off smell, changes in color, or separation of ingredients, all indicators that the soup should not be consumed.
– Reheating instructions suggest using a saucepan over low heat, stirring frequently until warmed throughout; microwaving is also an option but should be done in 30-second intervals to avoid overheating.
– For longer storage, consider freezing the soup in portions, ensuring it’s labeled with the date for easy tracking, and use within three months for the best quality.

Make Ahead Strategies

– Prep timeline suggests chopping vegetables and measuring ingredients a day in advance, allowing for a smoother cooking experience.
– Storage between steps can involve preparing the soup base in advance and saving the finishing touches, such as cheese and fresh herbs, for just before serving.
– Quality impact assessment indicates that some flavors, like garlic and herbs, may deepen in taste when allowed to sit overnight, which can positively impact the final dish.
– Assembly tips involve preparing components separately and quickly bringing together in one pot close to meal time—this ensures freshness without compromising on taste.
– Reheating guidelines suggest a gentle reheat process to maintain the integrity of ingredients, providing a quality dish that feels freshly made.
– Fresh element additions, such as a drizzle of olive oil or fresh basil upon serving, can elevate the final presentation and flavor, making it feel like a made-to-order meal.

Scaling Instructions

– Halving the recipe is straightforward; simply reduce each ingredient by half while keeping cooking times consistent, ensuring that flavors remain balanced.
– Doubling or tripling the recipe requires greater care in managing cooking times; larger pots may be necessary to prevent overcrowding.
– Equipment adjustments may include using multiple pots if doubling the recipe or a larger stockpot to contain all the ingredients effectively.
– Timing modifications should account for the increase in volume to ensure all flavors meld properly. Adjust simmering time based on volume for the best results.
– Storage considerations include using larger containers when freezing portions for later use, ensuring each portion is accessible for quick meals.

Nutritional Deep Dive

– Macro breakdown reveals the balance of protein, carbohydrates, and fats within a serving of Creamy Alfredo Lasagna Soup, making it a well-rounded meal option that fuels energy.
– Micronutrient analysis typically shows an array of vitamins and minerals provided by the vegetables and cheeses used, promoting overall health.
– Health benefits include the protein and calcium provided by the cheese and meat, supporting muscle and bone health, essential for a balanced diet.
– Dietary considerations arise, especially for those monitoring caloric intake; opting for lean meat and controlling portion sizes can facilitate better health outcomes.
– Portion analysis encourages mindful eating; one serving provides a fulfilling experience without excessive caloric intake.
– Weight management tips suggest being cautious with additional toppings or sides, as they can quickly alter the meal’s caloric density.

Dietary Adaptations

– Gluten-free options can be easily made by substituting traditional pasta with gluten-free varieties or using zucchini noodles for a lower-carb option.
– Dairy-free adaptations may involve using almond or coconut milk in the Alfredo sauce with the incorporation of nutritional yeast for a cheesy flavor.
– Vegan versions utilize plant-based ground meat and cheese substitutes to achieve a similar creamy texture while adhering to a strict dietary lifestyle.
– Low-carb variations can employ cauliflower or squash as replacements for pasta, maintaining a hearty feel while reducing carbohydrates.
– Keto adaptations require careful selection of low-carb ingredients, ensuring adherence to the dietary guidelines while still enjoying this comforting soup.
– Paleo options can be achieved by focusing on whole ingredients, eliminating dairy and refining carbs for a clean, nutrient-dense dish.
– Low-FODMAP modifications may involve using lactose-free cheese or avoiding specific high-FODMAP ingredients to cater to unique dietary needs without sacrificing flavor.
– Exploring other specific diets can lead to excellent adaptations, such as Mediterranean versions featuring olives and capers or Asian influences with ginger and sesame oil to create a diverse range of flavors.

Troubleshooting Guide

– Texture issues can arise if the pasta is overcooked; it’s best to keep it slightly undercooked, as it continues to soften in hot soup.
– Flavor balance challenges include overly salty soup; using low-sodium broth or carefully monitoring salt levels during preparation can help avoid this issue.
– Temperature problems often come down to improper simmering; too high a heat can lead to uneven cooking. Maintain a gentle simmer for even results.
– Equipment challenges can arise from the wrong pot size; ensure you’re using a pot large enough to accommodate all ingredients without overcrowding.
– Ingredient substitutions should be approached with care; introducing new ingredients may require adjustments in seasoning or cooking times.
– Timing concerns can affect flavor quality—ensure you factor in additional time when scaling or adapting recipes to retain their integrity.

Recipe Success Stories

– Community feedback consistently praises the comforting nature of this dish, often shared during gatherings and special occasions, showcasing its universal appeal.
– Variation successes demonstrate adaptability; readers commonly share tips on incorporating personal favorites, such as different vegetables or meats, enhancing the soup’s versatility.
– Adaptation stories highlight those who have made this recipe gluten-free or vegan, proving the soup’s flexibility across dietary spectrums, making it inclusive for various eaters.
– Reader suggestions frequently recommend pairing the soup with a fresh salad or crusty bread, highlighting its compatibility with other dishes for a complete meal.
– Photography tips emphasize capturing the soup’s rich texture and creamy appearance; appealing servings encourage others to try this delightful dish, showcasing its potential.

Frequently Asked Questions

Q: Can I make this soup ahead of time?

A: Absolutely! You can prepare the soup, store it in the fridge, and reheat just before serving. This allows the flavors to meld even better.

Q: Can I freeze Creamy Alfredo Lasagna Soup?

A: Yes! This soup freezes well in an airtight container. Just be sure to let it cool completely before freezing and consume within three months.

Q: Is the soup gluten-free?

A: It can be! Simply use gluten-free pasta, and check soy sauce if used, ensuring that all ingredients meet your needs.

Q: How do I store leftovers?

A: Leftovers should be stored in airtight containers in the refrigerator for up to three days. Reheat gently before serving.

Q: Can I add vegetables to the soup?

A: Yes, adding vegetables can enhance the nutritional profile; consider spinach, mushrooms, or any other seasonal veggies!

Q: What can I use instead of heavy cream?

A: You can substitute milk mixed with a bit of cornstarch for a lighter version, or use non-dairy alternatives for a vegan option.

Q: How spicy can I make this soup?

A: Adjusting the spice level is easy—simply add red pepper flakes or hot sauce to taste, and always start with a little to not overpower the flavors.

Q: Can I use different meats?

A: Certainly! Ground turkey, chicken, or even sausage can work well, creating unique flavors and textures for the soup.

Q: What is the best way to reheat the soup?

A: Reheat slowly over a burner, stirring often. Avoid using too high heat, which could alter the creaminess of the soup.

Q: Can I skip the pasta altogether?

A: Yes! This soup is delicious as a creamy sauce on its own; simply omit the pasta for a low-carb version.

Additional Resources

– Related recipes such as traditional lasagna or baked ziti can provide inspiration for upcoming meals, allowing you to explore similar flavors.
– Technique guides on making homemade Alfredo sauce or prepping vegetables can elevate your culinary skills and enhance your cooking experience.
– Ingredient information sources can serve as helpful references to understand the nutritional value and origins of the ingredients used in this recipe.
– Equipment recommendations for ideal pots and pans can assist in the cooking process, ensuring success in your kitchen endeavors.
– Seasonal variations provide an opportunity to adapt this soup throughout the year with the addition of fresh, seasonal ingredients that change with availability.

Join the Conversation

– Social media sharing can amplify your experience; consider posting photos of your finished dish and tagging friends to inspire them to try this Creamy Alfredo Lasagna Soup.
– Photography tips emphasize capturing the beautiful creamy layers and inviting colors of the soup, potentially prompting others to join in and recreate your masterpiece.
– Recipe reviews can provide insight into cooking adventures, documenting what worked well and adjustments made, fostering a sense of community among food lovers.
– Community engagement is encouraged, as sharing personal stories or variations of the recipe leads to new ideas and encourages collaboration within the culinary world.
– Recipe variations are highly welcome; share your unique twists or creative adaptations for others to try at home and enhance the dish’s legacy.

The Recipe

Creamy Alfredo Lasagna Soup

Serves: 6 servings

Prep Time: 20 mins

Cook Time: 30 mins

Total Time: 50 mins

Kitchen Equipment Needed

  • Large pot or Dutch oven
  • Wooden spoon
  • Measuring cups and spoons
  • Knife and cutting board
  • Colander for draining pasta

Ingredients

  • 1 pound ground beef or turkey
  • 1 onion, diced
  • 2 cloves garlic, minced
  • 4 cups chicken broth
  • 1 can (15 oz) crushed tomatoes
  • 1 teaspoon dried oregano
  • 1 teaspoon dried basil
  • 8 ounces lasagna noodles, broken into pieces
  • 1 cup heavy cream
  • 1 cup shredded mozzarella cheese
  • 1/2 cup grated Parmesan cheese
  • Salt and pepper to taste
  • Fresh basil for garnish

Directions

  1. In a large pot or Dutch oven, cook the ground meat over medium heat until browned. Drain excess fat.
  2. Add the onion and garlic to the pot, sautéing until the onion is translucent.
  3. Stir in the chicken broth, crushed tomatoes, oregano, and basil. Bring to a boil.
  4. Add the broken lasagna noodles and cook for about 10 minutes, until tender.
  5. Lower the heat and stir in the heavy cream, mozzarella, and Parmesan. Mix until cheese is melted and soup is creamy.
  6. Season with salt and pepper to taste, and let simmer for an additional 5 minutes.
  7. Serve hot, garnished with fresh basil and extra cheese if desired.

Recipe Notes

  • For a richer flavor, consider adding a splash of white wine while cooking.
  • Feel free to substitute the ground meat with plant-based alternatives for a vegetarian version.
  • Leftovers can be stored in an airtight container for up to three days.
  • You can use any type of pasta; however, lasagna-style will achieve the most authentic taste.

Delicious Creamy Alfredo Lasagna Soup Recipe for Cozy Nights

Creamy Alfredo Lasagna Soup: A Cozy Comfort Dish

⚖️
Difficulty
Easy

⏲️
Prep Time
15 mins

🕒
Cook Time
25 mins

⏱️
Total Time
40 mins

🍽️
Servings
4

If you’re on the hunt for a dish that combines the rich flavors of traditional lasagna with the comforting essence of a soup, then look no further than this Creamy Alfredo Lasagna Soup. This delightful recipe infuses all the beloved elements of lasagna, such as creamy cheese, tender noodles, and savory meat, transformed into a dreamy, warming soup that’s perfect for any occasion. Like a warm hug in a bowl, this soup is not just about filling your stomach; it’s about satisfying your soul with each comforting spoonful.

With a luscious creamy texture, this soup delivers an indulgent experience that is sure to impress anyone at your table. The flavors meld together beautifully, creating a harmonious blend that replicates the taste of classic alfredo sauce, balanced with the freshness of basil and the heartiness of ground meat. Whether you’re serving it on a chilly evening or during a busy weeknight dinner, this Creamy Alfredo Lasagna Soup is simple to make and bursting with delightful flavors that will have everyone coming back for seconds!

Quick Recipe Highlights

  • Flavor Profile: The soup offers a rich, cheesy alfredo flavor enhanced with seasoned ground beef, complemented by fresh parsley and basil.
  • Texture: This dish showcases a creamy and velvety mouthfeel, contrasted by soft noodles and tender chunks of meat.
  • Aroma: Expect tantalizing aromas of garlic and herbs wafting from your pot, inviting everyone to gather around the dinner table.
  • Visual Appeal: The vibrant colors of the parsley and vibrant noodles create a visually enticing dish that’s both comforting and inviting.
  • Skill Level Needed: With minimal technique involved, this soup is perfect for beginner chefs and experts alike, providing an easy yet delicious cooking experience.
  • Special Equipment: You will need a large pot or Dutch oven to create this flavorful soup, along with a stirring spoon and measuring cups for precision.

Recipe Overview

  • Difficulty Level: This Creamy Alfredo Lasagna Soup is classified as easy, making it accessible for cooks of all skill levels. With straightforward steps, you can create a comforting meal without hassle.
  • Category: Perfect for casual dinners or family gatherings, this soup is a delightful option for lunch or dinner, satisfying both adults and children alike.
  • Cuisine: Drawing inspiration from Italian cuisine, the creamy alfredo flavor in this dish is a classic beloved in many homes, with variations across the globe.
  • Cost: The ingredients are relatively inexpensive, making it a budget-friendly meal that doesn’t compromise on flavor or satisfaction.
  • Season: Although this soup can be enjoyed any time of year, it’s particularly delightful during fall and winter when comfort food is in high demand.
  • Occasion: Ideal for family dinners, potlucks, or even cozy nights in front of the TV, this soup is flexible enough for any gathering or meal.

Why You’ll Love This Recipe

The taste and texture of this Creamy Alfredo Lasagna Soup are undeniably appealing. The robust flavors of the creamy cheese combined with the hearty meat create a comforting dish that resonates with those seeking both richness and warmth. The balance achieved in this recipe ensures that each spoonful is a delightful experience with every element of lasagna shining through.

Another benefit is the convenience and ease of preparation. With a simple recipe that requires minimal hands-on time, you can whip up this soup swiftly without sacrificing quality or flavor. The one-pot aspect means less cleanup, and that’s always a win for busy cooks.

Nutritionally, this soup can be tailored to suit various dietary needs. By adjusting the meat and utilizing whole wheat pasta or fresh vegetables, you can enhance its health benefits without losing the delicious flavors that make it truly satisfying.

From a social perspective, this Creamy Alfredo Lasagna Soup is excellent for entertaining. Its inviting aroma and rich taste create an engaging atmosphere, making it a fantastic choice for gatherings where family and friends converge. It easily accommodates larger groups, allowing you to serve hearty portions that leave everyone delighted.

Last but not least, its cost-effectiveness is an essential plus. Using affordable, accessible ingredients means you can enjoy this creamy, indulgent meal without straining your budget. It’s a wonderful example of how comfort food doesn’t have to break the bank!

Historical Background and Cultural Significance

Lasagna itself originates from Italy, with roots extending back to Ancient Greece. This layered dish showcases the heart of Italian cooking, which emphasizes fresh ingredients and rich flavors. The combination of pasta, cheese, and meat has evolved over centuries, finding a permanent place at tables across the globe.

Creamy Alfredo sauce, originally made with butter and Parmigiano-Reggiano, became popular in the U.S. in the early 20th century. Its rich flavor complements pasta perfectly, leading to it being widely used in various recipes, including this delicious soup creation.

The evolution of the recipe reflects the adaptability of culinary practices, allowing people to reinterpret traditional elements using contemporary techniques. Today, variations exist for those wishing to explore regional ingredients or dietary needs, showcasing the versatility of lasagna-based dishes.

Regional variations of lasagna are rich and diverse, with each cultural spin offering new twists. From hearty meaty layers to vegetable-infused alternatives, the essence of lasagna persists, whether as soup, casserole, or classic pasta. This Creamy Alfredo Lasagna Soup continues that tradition, breathing new life into a classic dish.

Ingredient Deep Dive

One key ingredient in this Creamy Alfredo Lasagna Soup is lasagna noodles. Traditionally made from durum wheat flour, these noodles have a rich history in Italian cuisine. They provide a hearty base for the dish, soaking up the creamy sauce’s flavors. When selecting noodles, opt for oven-ready varieties or whole wheat for added texture and nutrition. Stored properly, dry lasagna noodles can last for years in your pantry, making them a convenient staple.

Another significant ingredient is ground beef. This versatile meat can be adapted easily to suit dietary preferences. Ground beef is nutrient-rich, offering essential protein, vitamins, and minerals. When selecting meat, look for lean cuts to reduce excess fat. For optimal freshness, store ground beef in your refrigerator and use it within a couple of days or freeze for extended shelf life.

Common Mistakes to Avoid

  • Using overcooked noodles: Noodles that become mushy can ruin the texture of your soup. Always follow package instructions for cooking times.
  • Not seasoning enough: Flavor development is crucial—don’t hesitate to add salt, pepper, and herbs at various stages of cooking to layer flavors.
  • Forgetting to sauté aromatics: Sautéing onions and garlic first helps to enhance flavor depth and prevents a raw taste.
  • Using low-quality cheese: Quality cheese enhances the dish; opt for fresh varieties for better creamy consistency.
  • Skipping fresh herbs: Fresh basil or parsley makes a noticeable difference. Don’t skip the garnish for color and freshness.
  • Rushing the cooking process: Allow enough time to let the flavors meld together. Good things take time!
  • Inaccurate measurements: Ensure you measure ingredients accurately to maintain balance in flavors and textures.
  • Ignoring personal taste preferences: Adjust spices and ingredients to suit your palate, making the soup truly your own.

Essential Techniques

Mastering the technique of sautéing is crucial for developing flavors in this soup. It’s not just about cooking ingredients; it’s about blooming the flavors. When sautéing, use medium heat and allow onions and garlic to become fragrant, which forms a flavorful foundation for your soup. Common pitfalls include using high heat, which can burn the ingredients and create bitterness.

Cooking your noodles separately is also essential for achieving the perfect soup texture. This helps maintain their integrity while allowing the sauce to shine. Master this technique by timing the cooking of the noodles to match your soup’s readiness, avoiding overcooked mush. Your cues for success are al dente texture and even cooking, which elevate your dish.

Pro Tips for Perfect Creamy Alfredo Lasagna Soup

For an even creamier soup, consider adding a dollop of cream cheese during the cooking process. It melts beautifully into the broth, amplifying the richness.

For deeper flavor, add a splash of white wine to the sautéing aromatics. This will deglaze the pan and enhance the taste of the meat and vegetables.

Don’t forget to taste as you go! Adjust your seasoning gradually to ensure a perfectly balanced flavor profile that suits your preferences.

For added nutritional value, throw in some fresh spinach or kale during the last few minutes of cooking—you won’t compromise flavor while enhancing the meal.

Allow leftovers to cool before refrigerating. This helps maintain texture and flavor quality when you reheat the soup.

Consider garnishing with freshly grated Parmesan and cracked black pepper just before serving, adding an elegant touch that enhances the dish’s appearance and flavor.

Variations and Adaptations

One enticing regional variation is the addition of Italian sausage, providing a spicier kick that complements the alfredo base. Another option is to experiment with seasonal vegetables like zucchini or bell peppers, adding freshness and robust flavors.

If you’re looking to accommodate dietary modifications, consider using lentils or mushrooms as a hearty alternative to ground beef for a vegetarian version. This will maintain the soup’s richness while providing nutrient density.

In terms of flavor, try incorporating sun-dried tomatoes or olives for a unique twist that adds a Mediterranean flair to your soup.

For a texture modification, blend a portion of the soup to create a creamy base, then fold in the remaining ingredients for a delightful contrast.

Garnishing can go modern or traditional—try fresh microgreens for an elegant presentation or crushed red pepper for a touch of heat, making your meal visually striking.

Serving and Presentation Guide

For plating, consider using deep bowls to showcase your Creamy Alfredo Lasagna Soup. A generous ladleful offers a warm and inviting presentation, encouraging everyone to dive in. Swirl some fresh cream over the top for a visually stunning effect.

Garnish with freshly grated Parmesan cheese and a sprinkle of freshly cracked black pepper. Additionally, a few sprigs of fresh parsley or basil can enhance the visual appeal while adding a touch of freshness that complements the rich flavors.

Modern serving suggestions include pairing the soup with warm, crusty bread or a side of garlic knots, providing a hearty companion that enhances the comfort food experience. Remember, serving hot and fresh is key to bringing out the best flavors!

Wine and Beverage Pairing

For this Creamy Alfredo Lasagna Soup, a light white wine such as Pinot Grigio or Chardonnay pairs beautifully with the richness of the dish, providing a refreshing contrast.

If you’re looking for non-alcoholic alternatives, opt for sparkling water with citrus, which helps cleanse the palate between bites while complementing the creaminess.

Coffee lovers may enjoy a light roast coffee or an herbal tea post-meal to provide a gentle finish to the indulgent flavors from the soup.

Storage and Shelf Life

To store leftover Creamy Alfredo Lasagna Soup, use airtight containers to keep moisture in and prevent drying out. Refrigerated, it can last up to three days while maintaining flavor and texture.

For longer storage, this soup freezes well. Allow it to cool fully before transferring to freezer-safe containers. Be sure to label them with the date—this soup can remain delicious for up to three months in the freezer.

When reheating, do so slowly over low heat to ensure even warming and to prevent the cream from separating. You may need to add a splash of broth or milk to loosen the consistency.

Make Ahead Strategies

To make this Creamy Alfredo Lasagna Soup ahead of time, prepare the base ingredients, such as sautéing the aromatics and browning the meat. Store these components separately until you’re ready to serve.

If you want to assemble portions ahead, layer cooked noodles with the soup base in your storage container, making it simple to heat single servings as needed.

Considering the quality impact, know that fresh ingredients can enhance flavor, so avoid adding herbs until just before serving for maximum freshness.

Scaling Instructions

If you find yourself needing to halve the Creamy Alfredo Lasagna Soup, simply adjust all ingredient quantities accordingly while maintaining the same cooking method.

Should you choose to double or triple the recipe, cross-check your pot size to ensure it can accommodate the increased volume, and consider extending cooking time slightly if needed.

Timing modifications might also be necessary if you’re cooking larger batches. Monitor the soup closely for doneness, as the base ingredients may meld and flavor more quickly than expected.

Nutritional Deep Dive

This Creamy Alfredo Lasagna Soup provides a satisfying balance of macronutrients, including protein from the meat and cheese, carbohydrates from the noodles, and healthy fats from the cream. Each serving contributes to a well-rounded meal.

In terms of micronutrients, the dish contains essential vitamins and minerals, especially if loaded with vegetables like spinach. This enhances its health benefits, contributing to vitamin A and iron intake.

When considering portion control, aim to divide your servings based on dietary needs. The richness of the soup means smaller portions can be very satisfying, which is beneficial for weight management and overall health.

Dietary Adaptations

For a gluten-free version of this Creamy Alfredo Lasagna Soup, swap traditional lasagna noodles for gluten-free varieties or use spiralized vegetables like zucchini or squash to keep that comforting feel.

If you’re catering to a dairy-free crowd, consider using coconut cream or cashew cream as a substitute for the alfredo base, and opt for cashew cheese for added creaminess.

This soup can also be adapted to be vegan by replacing the ground beef with lentils or a plant-based meat alternative while keeping the overall flavor profile intact.

For those on a keto diet, select lower-carb noodles or simply omit the pasta altogether, allowing the base flavors of the soup to shine while keeping it satisfying.

A paleo variation can be achieved by using zucchini noodles, coconut milk, and grass-fed meat, aligning perfectly with clean eating principles.

Troubleshooting Guide

If you notice texture issues with your soup, such as a watery consistency, it could be due to overcooking the noodles. Keep noodles al dente and add them towards the end for a better soup consistency.

Flavor balance can be adjusted by incorporating more seasoning as necessary. If the soup tastes bland, a pinch of salt or a squeeze of lemon juice can elevate the overall flavor dramatically.

Should you encounter temperature problems, ensure the soup heats on a medium setting and allow it to simmer gently—high heat can thwart flavor melding.

Equipment challenges arise when using pots that aren’t suited for even cooking; ensure your pan provides adequate heat distribution for best results.

If you’ve made substitutes, pay attention to the flavors these alternatives introduce. Some may require additional seasoning or adjustments to achieve the desired taste.

Timing concerns might occur if using frozen components. Make sure to adjust your cooking time accordingly when ingredients come from frozen states.

Recipe Success Stories

Readers across various platforms rave about their success stories with this creamy soup. Many share photos that capture the beautiful presentation and rich texture, adding to the excitement of meal preparation.

Some have also adapted the recipe to cater to personal tastes, swapping in ingredients like spicy sausage and seeing fantastic results. This flexibility allows for a personalized touch in every kitchen.

Various feedback has highlighted how this recipe has become a family favorite, making it appear in all seasons across multiple meals—showcasing its versatility and broad appeal.

When sharing their experiences, readers often mention the ease of following the detailed instructions, which helps beginners achieve great results without frustration.

Frequently Asked Questions

Can I freeze Creamy Alfredo Lasagna Soup?

Yes, it freezes well! Store it in airtight containers for up to three months. Be sure to cool it completely before freezing to maintain texture.

What can I substitute for ground beef?

You can use ground turkey, chicken, or even plant-based alternatives such as lentils or crumbled tempeh to fit dietary preferences while still enjoying a hearty soup.

How can I make this soup spicier?

Add a pinch of red pepper flakes during cooking or mix in some diced jalapeños for a kick. Adjust based on your desired spice level!

Can I use other types of cheese?

Absolutely! Experiment with mozzarella, ricotta, or even a sharp cheddar for a different flavor profile while maintaining that necessary creaminess.

How long does leftover soup last in the fridge?

Leftover Creamy Alfredo Lasagna Soup can be stored in an airtight container in the refrigerator for about 3 days while still tasting delicious.

What’s the best way to reheat this soup?

Reheat gently on the stovetop over low heat, stirring occasionally. If it appears too thick, add a splash of broth or cream to loosen it.

Can I make this soup vegetarian?

Definitely! Omit the meat and use vegetable broth with additional veggies or beans for protein and a wholesome meal.

What’s the best type of noodles to use?

Traditional lasagna noodles are best, but you can also use whole-wheat or gluten-free options. Cook them separately before adding them to the soup.

Is there a way to make it low-carb?

Yes! Use zucchini noodles or omit the noodles altogether to maintain the soup’s richness without the carbs.

Can I add vegetables to this soup?

Incorporating vegetables like spinach, mushrooms, or bell peppers not only enhances nutrition but also adds vibrant colors and textures to your soup.

Additional Resources

If you enjoyed this Creamy Alfredo Lasagna Soup, check out other comforting recipes like Chicken Noodle Soup or Butternut Squash Soup that are sure to warm your heart during chilly nights. Delve into technique guides for sautéing vegetables or making homemade pasta to further elevate your culinary skills.

Explore seasonal variations of similar comforting dishes that highlight the best ingredients each season has to offer, allowing you to switch things up year-round!

Join the Conversation

Share your photos, potential variations, and thoughts on this recipe across social media to engage with fellow food enthusiasts. Inviting community reviews and suggestions can foster inspiration and encourage everyone to make this Creamy Alfredo Lasagna Soup their own!

Join the discussion about adaptations that work, or exchange tips for creating the most delicious version of this comforting dish. Community sharing can help expand everyone’s culinary repertoire and inspire delicious meals!

The Recipe

Creamy Alfredo Lasagna Soup

Serves: 4

Prep Time: 15 mins

Cook Time: 25 mins

Total Time: 40 mins

Kitchen Equipment Needed

  • Large pot or Dutch oven
  • Stirring spoon
  • Measuring cups and spoons
  • Knife and cutting board

Ingredients

  • 1 pound ground beef
  • 1 onion, diced
  • 3 cloves garlic, minced
  • 4 cups chicken broth
  • 8 ounces lasagna noodles
  • 1 cup heavy cream
  • 1 cup shredded mozzarella cheese
  • 1 cup ricotta cheese
  • Salt and pepper, to taste
  • Fresh parsley or basil, for garnish

Directions

  1. In a large pot, brown the ground beef over medium heat, breaking it apart until fully cooked; drain excess fat if necessary.
  2. Add the diced onion and minced garlic, sautéing until fragrant, about 2-3 minutes.
  3. Pour in the chicken broth and bring to a simmer. Then, add the lasagna noodles and cook according to package instructions until al dente.
  4. Stir in the heavy cream, and both cheeses, mixing until melted and well combined. Season with salt and pepper as needed.
  5. Serve hot, garnished with fresh parsley or basil.

Recipe Notes

  • Feel free to substitute ground beef with ground turkey or chicken for a lighter option.
  • For a vegetarian version, replace meat with lentils or additional veggies like zucchini.
  • This soup thickens as it cools, so adding extra broth when reheating can help maintain the desired consistency.

Revitalize Your Snack Game with Chicken Pecan Cranberry Salad

Chicken Pecan Cranberry Salad – A Healthy Snack Delight

⚖️
Difficulty
Easy

⏲️
Prep Time
15 mins

🕒
Cook Time
10 mins

⏱️
Total Time
25 mins

🍽️
Servings
4

The Chicken Pecan Cranberry Salad is not only a delight for your taste buds but also a nutritious option for those looking for a healthy snack or meal. The combination of tender chicken, crunchy pecans, and tart cranberries creates a perfect balance of flavors that tantalizes the palate. Whether it’s a hot summer day or a cozy winter evening, this salad provides a refreshing taste of joy, making it an adaptable dish for any occasion.

The salad features a vibrant mix of greens that adds a splash of color to your table, enhancing its visual appeal. Fresh ingredients come together harmoniously to create a dish that is as pleasing to the eye as it is to the taste. The nutty essence of pecans, paired with the sweetness of cranberries, makes every bite a delightful experience. It’s perfect for meal prep, picnics, or as a quick dinner option, demonstrating how healthy eating doesn’t need to be boring.

Quick Recipe Highlights

  • Flavor Profile: This salad balances savory and sweet flavors with the richness of chicken and the tartness of cranberries.
  • Texture: Enjoy the crunch of pecans alongside tender chicken and crispy greens—with every bite offering a delightful mouthfeel.
  • Aroma: The aroma is inviting, with nutty notes from the pecans and a hint of sweetness from the cranberries.
  • Visual Appeal: The vibrant colors of fresh greens and cranberries make the salad visually alluring and appetizing.
  • Skill Level Needed: An easy recipe, perfect for beginner cooks with minimal preparation steps.
  • Special Equipment: All you need is a mixing bowl and basic kitchen utensils.

Recipe Overview

  • Difficulty Level: This Chicken Pecan Cranberry Salad ranks easy due to straightforward steps and accessible ingredients, making it ideal for cooks of all skill levels.
  • Category: It falls under the category of salads, ideal for lunch, dinner, or as a side dish.
  • Cuisine: This recipe showcases American culinary influences, combining classic flavors with a modern twist.
  • Cost: It’s relatively inexpensive, with an approximate cost of $15 for the ingredients, serving 4 people.
  • Season: Enjoy this dish year-round, as it utilizes ingredients that are readily available, regardless of the season.
  • Occasion: Perfect for casual gatherings, lunch boxes, or even a light dinner with friends.

Why You’ll Love This Recipe

This Chicken Pecan Cranberry Salad features a delightful interplay of flavors and textures that are sure to please. The tender chunks of chicken provide a satisfying protein boost, while the crunchy pecans offer a nutty flavor complimented effectively by the sweetness of cranberries. Each bite is a balance of savory, sweet, and crunchy elements that make it exciting.

Convenience is another reason to love this salad. With a quick preparation and cooking time, it’s an accessible meal that you can whip up in less than thirty minutes. For those with busy lifestyles, this recipe is an excellent choice for meal prep. You can make it in advance and enjoy it throughout the week.

Nutritionally, this salad is a powerhouse. Packed with protein from the chicken, healthy fats from the pecans, and a punch of antioxidants from the cranberries, it supports a healthy lifestyle while satisfying your hunger. Also, it’s a great way to add more vegetables to your diet, making it a well-rounded meal.

For social gatherings, this dish shines. Its colorful presentation and mix of flavors make it an excellent choice for sharing. Guests will appreciate a healthy option that still feels indulgent. It’s a salad that transforms a simple meal into an exciting culinary experience.

Finally, this recipe is cost-effective. With basic ingredients that can be sourced without breaking the bank, it’s an affordable meal option. You can enjoy high-quality flavors and nutrition without overspending, making it suitable for families or individuals seeking budget-friendly meals.

Historical Background and Cultural Significance

The Chicken Pecan Cranberry Salad has its roots in American cuisine, drawing upon the southern tradition of pecan use in cooking. Pecans are native to North America and have become a staple in many American recipes, particularly southern dishes. Their nutty flavor enhances both sweet and savory dishes, making them versatile.

The cultural significance of this salad lies in its embodiment of comfort food while also adhering to modern health trends. The blend of ingredients reflects a move towards healthier eating while still valuing rich flavors. This salad represents a harmonious blend of health and indulgence that is celebrated in many gatherings and meals.

Over the years, this recipe has evolved from basic chicken salads to incorporate more diverse ingredients, such as nuts and fruits. Variations now exist globally, adapting to local tastes and available ingredients. The addition of cranberries reflects a trend towards combining tart and sweet flavors, enriching the overall experience.

Regional variations exist, especially with different nuts and fruits prevalent in various areas. For example, walnuts or almonds may replace pecans in certain contexts. These adaptations keep the spirit of the dish alive while introducing unique local flavors, showcasing the dish’s flexibility in American cuisine.

Ingredient Deep Dive

Chicken

Chicken plays a pivotal role in this salad, providing lean protein essential for muscle repair and overall health. Historically, chicken has been a staple protein source in many cuisines due to its availability and versatility. When selecting chicken for this recipe, opt for free-range or organic options for better flavor and quality. It’s best stored in the refrigerator if used within a couple of days or can be frozen for longer freshness.

Pecans

Pecans are not only delicious but also carry cultural significance, particularly in the southern United States where they are native. These nuts are rich in healthy fats and essential nutrients, making them a fantastic addition to salads. When buying pecans, look for ones that are plump and have a fresh aroma. Store them in an airtight container in a cool, dark place to maintain their freshness. Pecans can often be substituted with walnuts if necessary, changing the flavor profile slightly.

Cranberries

Cranberries have a rich history, known for their antioxidant properties and benefits to urinary health. Fresh cranberries can be tart, so this recipe takes advantage of dried cranberries, which provide a sweet contrast to the chicken and nuts. When selecting cranberries, ensure they are plump and vibrant in color. Store them in an airtight container to keep them fresh. If you wish to lower the sugar content, look for unsweetened varieties or consider swapping with chopped apples for a different twist.

Mixed Greens

Mixed greens add not only nutritional value but also a beautiful color to this salad. The variety in flavor and texture, from crunchy to peppery greens, enhances the overall dining experience. Always choose fresh and vibrant greens, and wash them thoroughly before use. For storage, keep them wrapped in a damp paper towel inside a container to maintain crispness. For variations, other hearty greens like kale or spinach can also be used.

Common Mistakes to Avoid

  • Not seasoning the chicken adequately: Ensure to season your chicken with salt, pepper, or marinades to enhance flavor.
  • Using stale nuts: Check the freshness of pecans before use; they can go rancid if stored improperly.
  • Overcooking the chicken: Cook the chicken just until it’s done to maintain tenderness and moisture.
  • Skimping on the dressing: A good dressing ties the salad together; don’t be afraid to generously coat your salad.
  • Not mixing the salad well: Tossing ensures each bite contains an equal balance of flavors.
  • Using pre-packaged greens: Fresh greens have better flavor and nutritional content—opt for whole heads of lettuce if possible.
  • Forgetting to add textural elements: Don’t omit the nuts or fruits as they provide essential crunch and flavor balance.
  • Storing leftovers improperly: Keep leftover salad separate from dressings to prevent sogginess.
  • Ignoring ingredient quality: Fresh, high-quality ingredients significantly impact the final flavor of your dish.
  • Following the recipe too rigidly: Feel free to substitute ingredients based on personal preference or availability.

Essential Techniques

Chopping Chicken

Chopping cooked chicken correctly is essential for achieving the right texture and bite size. Use a sharp knife and chop against the grain for tenderness. It’s beneficial to allow the chicken to cool before chopping—this helps maintain its juices.

Tossing the Salad

Tossing the salad ensures an even distribution of ingredients and dressing. Use a gentle hand to mix delicate greens, and avoid bruising them. Aim for light, folding motions to maintain freshness and structure.

Making the Dressing

The dressing can significantly improve your salad. Whisking together oil, vinegar, and seasonings emulsifies them perfectly. Experiment with ratios according to your taste preferences and adjust seasoning accordingly.

Storing Ingredients

Proper storage of salad ingredients is crucial. Keep chicken and salad components separate until serving to maintain freshness. This prevents wilting and ensures your salad remains appetizing.

Pro Tips for Perfect Chicken Pecan Cranberry Salad

Use leftover chicken or rotisserie chicken for convenience. This saves time and effort while providing great flavor. For added richness, consider toasting the pecans before adding them to the salad; this enhances their flavor significantly.

Pair your salad with a light, tangy vinaigrette to complement the sweetness of the cranberries. Experiment with different ratios of oil to vinegar to find your ideal balance. Adding fresh herbs like parsley or cilantro can elevate the freshness of your salad, adding depth to the overall taste.

Make sure to adjust portions according to your crowd, as this salad can easily be scaled up or down. For a heartier version, consider adding grains such as quinoa or brown rice.

Store any leftovers properly by separating the greens from the other ingredients to keep them fresh. When ready to enjoy, reassemble and dress just before serving for the best flavor.

Variations and Adaptations

Consider regional variations by incorporating local nuts or fruits. If pecans are unavailable, walnuts or almonds make excellent substitutes, providing a similar crunch. For a seasonal touch, add roasted butternut squash in the fall or swap cranberries for fresh berries in the summer, enhancing the dish’s adaptability.

For dietary modifications, this salad can easily cater to gluten-free or dairy-free diets by substituting or omitting certain ingredients while retaining its core flavors. If you are looking for a low-carb version, replace traditional greens with leafy vegetables like kale or spinach.

Enhancing the dish with texture can be done by adding crispy bacon or croutons for extra crunch. If you’re after a more substantial meal, serve the salad over whole grain pasta or Couscous to turn it into a filling main dish.

Presentation can also be varied; try serving this salad in a mason jar or on a large platter to create a beautiful centerpiece at a gathering. For elegance, serve alongside a light soup to make a complete meal.

Serving and Presentation Guide

For an impressive presentation, consider layering the ingredients in a bowl to showcase the vibrant colors. Drizzle the dressing on top just before serving to keep the greens fresh and crisp.

Garnishing with additional pecans or a sprinkle of feta cheese can enhance the visual appeal of your salad while adding complementary flavors.

Pair the salad with crusty bread or whole grain rolls as a side to create a balanced meal. Alternatively, elevate the serving method by plating individual portions on chilled plates for a more formal dining experience.

Temperature considerations are essential; serve this salad chilled for an optimal taste experience. Allow the components to reach room temperature before combining for the freshest flavor.

For portion control, consider using small bowls or jars to serve individual portions, making it easier for guests to enjoy without being overwhelmed by serving sizes.

Wine and Beverage Pairing

Pair this Chicken Pecan Cranberry Salad with a crisp white wine such as Sauvignon Blanc or a light-bodied red wine like Pinot Noir. These options complement both the nutty and fruity flavors in the salad.

For non-alcoholic alternatives, consider sparkling water with a slice of lemon or a chamomile iced tea that balances the sweetness of the cranberries.

If incorporating coffee or tea, opt for a mild green tea served at a slightly cooler temperature to enhance the salad’s freshness without overpowering it.

Consider temperature considerations while serving beverages; chilled wines and teas pair well with salad for a refreshing combination. Additionally, ensuring all elements are served at appropriate temperatures enhances the overall dining experience.

Storage and Shelf Life

To store your Chicken Pecan Cranberry Salad, place it in an airtight container to keep it fresh. Ideally, it should be consumed within 3 days for the best taste and texture.

The salad can be stored in the refrigerator, but separate the greens from the dressing until ready to serve to avoid sogginess. Pecans should be kept in a cool, dry place to maintain their crunch.

Signs of spoilage include a foul odor or a noticeable change in texture or color of the greens. If these occur, it’s best to err on the side of caution and dispose of the salad.

For reheating, if you’d like to warm up any leftovers, gently warm the chicken separately and toss it back into the salad. Avoid microwaving the entire salad, as this may wilt the greens.

Freezing is not recommended for this salad due to the fresh and delicate ingredients, which do not hold up well to freezing and thawing.

Make Ahead Strategies

Preparation can be streamlined by prepping individual components ahead of time. Cook the chicken and allow it to cool before chopping, and store in the refrigerator for up to 3 days.

Greens can also be washed and dried in advance, then wrapped neatly in a paper towel in a container to keep them fresh and crisp until serving. Dressing can be made a day ahead and stored separately to avoid sogginess.

While assembling, consider doing so a few hours before serving—this enables the flavors to meld while keeping textures intact.

Ideally, add remaining fresh ingredients just before serving for the best flavor and texture experience.

If you want to add fresh ingredients like nuts or fruits at the last moment, consider preparing them in small batches to retain their flavor and crunch.

Scaling Instructions

Scaling the Chicken Pecan Cranberry Salad recipe is simple. Halving the recipe can be done easily; just adjust ingredient portions accordingly, ensuring the ratios remain consistent.

Doubling or tripling the salad will require a larger mixing bowl and possibly additional storage containers. A larger bowl allows for easier mixing and distribution of dressing.

Timing modifications may be needed based on quantities—if making a larger batch, the mixing may take longer but scale well with proper techniques.

Keep the preparation techniques in mind; consider chopping and prepping ingredients in batches to ensure all elements are fresh when it’s time to combine them.

Storage considerations are especially important when scaling; the salad may need to be stored in multiple containers or a larger one to maintain freshness, keeping components separated when possible.

Nutritional Deep Dive

Macronutrient analysis reveals that this Chicken Pecan Cranberry Salad is a balanced meal, providing protein from chicken, healthy fats from pecans, and fiber from greens and cranberries.

Micronutrient content is impressive, with numerous vitamins and minerals derived from fresh ingredients. The nuts provide manganese, while chicken is a source of B vitamins.

The health benefits include supporting muscle repair and overall body functions from the protein and antioxidants found in cranberries that can improve heart health and reduce inflammation.

Each serving can be tailored to dietary considerations; adjust portions to fit personal calorie needs while serving a wholesome, nutrient-dense dish.

Weight management benefits can also be achieved by including this salad in your meal plan, which delivers satiety through its combination of protein, fiber, and healthy fats.

Dietary Adaptations

For gluten-free adaptations, ensure all ingredients are certified gluten-free; this applies particularly to any packaged dressings used.

Those seeking dairy-free options can easily remove cheese or creamy dressings, replacing them with vinaigrettes that ensure delicious flavors without dairy content.

Vegans can benefit from substituting chickpeas or tofu for chicken, providing the necessary protein while maintaining the salad’s flavor profile.

For low-carb versions, consider using more leafy greens and avoiding high-carb ingredients such as croutons. Similarly, keto adaptations can similarly focus on healthy fats and moderate protein.

Paleo dieters can enjoy this salad by omitting any processed ingredients and focusing on whole, unprocessed foods packed with nutrients.

Individuals following a low-FODMAP diet may want to avoid excess nuts and cranberries, considering substitutions with other low-FODMAP fruits such as strawberries or oranges.

Troubleshooting Guide

Texture issues may arise if the greens become wilty due to improper storage. Keep ingredients separate until serving time to maintain freshness.

For flavor balance concerns, taste the dressing before adding it to the salad; adjust the sweetness or acidity as necessary to achieve the desired flavor.

Temperature problems may occur if the chicken is either too hot or too cold. Allow it to cool before mixing with salad ingredients to prevent wilting greens.

Equipment challenges can arise if you lack adequate mixing bowls or utensils. Ensure you gather necessary tools before beginning to facilitate a smooth cooking experience.

Ingredient substitutions may sometimes result in unexpected flavors. It’s often wise to test new ingredients separately before incorporating them into the salad.

Timing concerns can lead to undercooked or overcooked chicken. Nursing the chicken while monitoring its internal temperature becomes crucial—165°F is the target for safe cooking.

Recipe Success Stories

Community feedback often highlights the delightful balance of flavors in this salad, emphasizing its versatility across various occasions. Many readers have shared their successful variations, incorporating seasonal ingredients to adapt the dish year-round.

Success stories often spotlight the salad as a potluck favorite, with attendees drawn to its colorful presentation and fresh ingredients. The salad’s adaptability has led to individual adaptations that reflect local culture or family preferences.

Among adaptations, readers suggest using ground spices to enhance flavors or integrating different fresh fruits, showcasing the recipe’s flexibility with minimal effort.

Photography tips often accompany sharing, with an emphasis on using natural light to capture the vibrant colors of the salad ingredients beautifully.

Frequently Asked Questions

Can I make the salad ahead of time?

Yes, you can prep the individual ingredients about 1-2 hours before serving. It’s best to mix them right before serving to maintain the freshness of the greens.

What can I substitute for chicken?

Consider chickpeas, tofu, or roasted vegetables as alternatives if you’re looking for a vegetarian option while keeping the flavor intact.

Are pecans essential for this recipe?

Pecans add a unique flavor and crunch, but you can substitute them with any nuts like walnuts or almonds as per availability or preference.

Can I add fruits other than cranberries?

Absolutely! Seasonal fruits like apples, pears, or fresh berries can bring exciting flavors and textures to your salad.

How long can I store leftovers?

Leftovers can be stored in the fridge for up to 3 days, but it’s best to keep dressing separate to maintain freshness.

Is this a suitable dish for meal prep?

Definitely! This salad is perfect for meal prep as you can prepare the ingredients and just mix them when needed.

What dressing goes best with this salad?

A vinaigrette made with olive oil and vinegar or a citrus-based dressing pairs wonderfully with this salad, enhancing its fresh flavors.

Can I freeze this salad?

Freezing is not recommended due to the fresh greens that may lose their texture upon thawing. It’s best enjoyed fresh.

Is this salad gluten-free?

The salad can easily be made gluten-free by avoiding croutons or any gluten-containing dressings, ensuring all ingredients are certified gluten-free.

What’s the best way to pack this salad for lunch?

Keep the dressing separate from the salad and pack in an airtight container to ensure freshness. Add the dressing just before eating.

Additional Resources

For those looking to explore more salad recipes, consider trying variations with seasonal vegetables, hearty quinoa salads, or roasted vegetable mixes.

Technique guides focusing on salad dressings can also elevate your culinary experience, helping you create custom flavors that align with your taste preferences.

Ingredient information can provide insight into the health benefits of various nuts and fruits, allowing for informed choices during meal prep.

Equipment recommendations focus on helpful kitchen tools, such as salad spinners for greens and high-quality knives for efficient chopping.

Seasonal variations can inspire new takes on the classic Chicken Pecan Cranberry Salad, showcasing different ingredients relevant to the time of year.

Join the Conversation

Share your experience with this Chicken Pecan Cranberry Salad by connecting on social media! Tag friends and encourage them to explore this healthy snack delight and other variations you try.

Photography tips on capturing the bright colors and textures can enrich our community’s visual engagement, enhancing our shared joy of cooking.

Recipe reviews are a great way to build engagement; sharing your favorite tweaks or successes helps others discover new ideas to implement in their kitchens.

Engagement in our community discussions can enhance the learning experience, as members exchange tips and tricks about their personal adaptations of this recipe.

Molding this salad into various unique presentations fosters creativity, allowing each cook to leave their signature touch when sharing with others.

The Recipe

Chicken Pecan Cranberry Salad

Serves: 4

Prep Time: 15 mins

Cook Time: 10 mins

Total Time: 25 mins

Kitchen Equipment Needed

  • Mixing bowl
  • Sharp knife
  • Cutting board
  • Whisk
  • Airtight container for storage

Ingredients

  • 2 cups cooked chicken, diced
  • 1 cup pecans, chopped
  • 1 cup dried cranberries
  • 4 cups mixed greens (spinach, arugula, romaine)
  • 1/4 cup vinaigrette dressing
  • Salt and pepper to taste

Directions

  1. Begin by preparing your ingredients: chop the cooked chicken and measure out the pecans and cranberries.
  2. In a mixing bowl, combine the mixed greens and add the diced chicken, pecans, and cranberries.
  3. Toss the salad gently to mix all ingredients evenly.
  4. Drizzle the vinaigrette dressing over the salad and toss lightly to coat.
  5. Season with salt and pepper to taste before serving.
  6. Serve immediately for maximum freshness or refrigerate if enjoying later (see storage instructions).

Recipe Notes

  • Feel free to adjust ingredient quantities based on personal preferences.
  • Experiment with different dressings to enhance flavors.
  • Consider adding fresh herbs for additional flavor.
  • Leftovers should be stored in an airtight container, keeping dressing separate for best results.

Delicious No-Peek Chicken Casserole for Effortless Family Meals

No-Peek Chicken Casserole: A Comforting Family Favorite

⚖️
Difficulty
Easy

⏲️
Prep Time
15 mins

🕒
Cook Time
1 hour

⏱️
Total Time
1 hour 15 mins

🍽️
Servings
6 servings

If you’re looking for a hearty and satisfying dish that requires minimal effort, look no further than this No-Peek Chicken Casserole. This one-dish wonder combines tender chicken, flavorful vegetables, and a creamy sauce all baked to perfection. The beauty of this recipe lies in its simplicity; toss the ingredients together, pop it in the oven, and let the magic happen without any fuss. Perfect for busy weeknights or cozy family dinners, this casserole is sure to become a go-to favorite in your home.

The combination of layers creates a symphony of flavors that will have your family reaching for seconds. As it cooks, the aromas of the savory chicken and herbs waft through the kitchen, promising a comforting meal. The golden top layer, when pulled back to reveal the soft, melted cheese underneath, is enough to make anyone’s mouth water. Plus, this No-Peek Chicken Casserole is incredibly versatile; you can customize it with your favorite vegetables and seasonings, making it a staple at your dinner table.

Quick Recipe Highlights

  • Flavor Profile: This casserole features a rich and creamy base, complemented by tender chicken and an assortment of hearty vegetables.
  • Texture: A combination of creamy, softened vegetables and tender chicken creates a satisfying mouthfeel, contrasted by a crisp topping.
  • Aroma: Expect inviting scents of garlic, herbs, and roasted chicken to fill your kitchen as it bakes.
  • Visual Appeal: The golden-brown topping garnished with herbs makes for an eye-catching dish, perfect for serving.
  • Skill Level Needed: Ideal for beginner cooks, this recipe requires minimal skills and delivers impressive results.
  • Special Equipment: Just a simple baking dish and basic kitchen utensils are needed to whip this up with ease.

Recipe Overview

  • Difficulty Level: This No-Peek Chicken Casserole is considered easy due to its straightforward preparation and minimal steps, making it accessible for all skill levels.
  • Category: Perfect as a main course, this casserole is ideal for family meals, potlucks, or lazy Sundays.
  • Cuisine: Influenced by classic American comfort food traditions, this dish embodies the heartwarming essence of home-cooked meals.
  • Cost: Preparation costs are reasonable, making it an affordable option for families looking to maximize flavors without breaking the bank.
  • Season: This casserole is perfect for year-round enjoyment but is especially satisfying in colder months when comfort food cravings arise.
  • Occasion: Suitable for casual family gatherings, weeknight dinners, or cozy weekends with loved ones.

Why You’ll Love This Recipe

The No-Peek Chicken Casserole is a delightful marriage of taste and texture that will leave your taste buds longing for more. The tender chicken melds beautifully with the creamy sauce and mixed vegetables, creating a rich, flavorful dish that satisfies on every level. This casserole is not just about taste; it also delivers on texture, offering a wonderful contrast between the creamy interior and crispy topping.

Convenience is at the heart of this recipe’s appeal. With simple preparation, you can have a comforting meal ready to serve with minimal effort. Just prep the ingredients, mix them in a single dish, and let the oven do the work. It’s an ideal solution for busy weeknights when time is of the essence yet you still want to serve something nourishing and fulfilling.

From a nutritional standpoint, the No-Peek Chicken Casserole provides a well-rounded meal. Packed with lean protein from the chicken and fiber from the vegetables, this dish supports a healthy diet while keeping you full and satisfied. It’s a great way to sneak in extra veggies for picky eaters too!

Socializing over a hearty dish is a timeless tradition, and this casserole fits perfectly for gatherings. Its easy serving style encourages sharing and conversation, making it great for potlucks or family nights. Guests will feel at home with a cozy portion of this comforting casserole.

Lastly, affordability is a crucial aspect of any family recipe, and this one checks that box too. Using simple ingredients that are likely already in your pantry, this chicken casserole delivers delicious flavor without straining your budget. It’s less about intricate cooking techniques and more about the comfort of a meal that brings everyone to the table.

Historical Background and Cultural Significance

The origins of casserole dishes can be traced back to the time when cooking vessels were created to make hearty meals that could feed the family. In American cuisine, casseroles became popular during the mid-20th century, particularly as convenience foods gained traction. The No-Peek Chicken Casserole exemplifies the efficiency and satisfaction that casserole-style meals provide, catering to the needs of busy households.

Casseroles hold significant cultural importance, especially in American culinary traditions, where they embody the spirit of comfort food. They have evolved into a family favorite, capable of being personalized with various ingredients depending on regional and personal preferences. Dishes like the No-Peek Chicken Casserole serve as a unifying meal, often appearing at family gatherings and celebrations across the nation.

As home-cooked meals became less common with the rise of fast food in the late 20th century, casseroles have seen something of a renaissance. Recipes that evoke nostalgia and comfort have regained popularity. The No-Peek Chicken Casserole pays homage to simpler cooking times where meals were lovingly prepared at home using readily available ingredients.

Regional variations of the casserole exist due to the diverse food culture in the United States. For instance, in the Southern states, one might find a No-Peek Chicken Casserole featuring a kick of spice or local vegetables, making it uniquely their own. This adaptability is part of the dish’s charm and continues to delight diners everywhere.

Ingredient Deep Dive

Chicken serves as the backbone of this dish, providing the essential protein. Historically, chicken has been a staple in many cultures, known for its versatile use in various cuisines. It is rich in vitamins B6 and B12, which contribute to energy metabolism. When selecting chicken for your casserole, look for lean cuts such as boneless breasts or thighs, and always store it properly to avoid spoilage. Substituting with turkey is possible if you’re looking for a lighter option.

Rice, the next key ingredient, provides bulk and heartiness to the casserole. It is a staple grain worldwide, revered for its versatility and cultural significance in many dishes. Nutritionally, rice provides carbohydrates for energy and can be substituted with whole grains or quinoa for added nutrients. Always rinse rice before cooking to remove excess starch, and store it in a cool, dry place for longevity.

Cream of chicken soup provides the creamy base and contributes significantly to the flavor profile. This canned staple has been a pantry favorite for decades, simplifying home cooking. Featuring a mix of chicken stock, cream, and seasonings, it allows for a rich taste without elaborate preparation. However, homemade versions can easily be made for those avoiding preservatives.

Vegetables in this casserole add color, flavor, and essential nutrients. Common choices include carrots and green beans, each contributing their unique tastes and textures. Vegetables are vital for a balanced diet, rich in vitamins and minerals essential for health. Fresh produce should be inspected for firmness, and leftovers should be stored in airtight containers to maintain freshness.

Cheese, particularly shredded cheddar, adds a delightful layer of flavor and a bubbly topping that makes for an appealing presentation. Cheddar cheese embodies American comfort-food culture and appeals to many palates. It is essential for the dish’s richness and should be stored correctly to ensure it stays fresh, while variations can include Monterey Jack or Gruyère for unique flavors.

Common Mistakes to Avoid

  • Not measuring ingredients properly: Precision ensures consistent taste and texture, so always adhere to measurements.
  • Skipping the sautéing step: Sautéing vegetables before mixing them can enhance their flavors, ensuring the casserole is well-rounded.
  • Using too much liquid: Watch the ratios; too much broth can make the casserole soupy.
  • Not allowing enough cooking time: Each oven varies; ensure it’s cooked sufficiently for the right consistency.
  • Overcooking: Keep an eye on the casserole to avoid drying out the chicken and ruining textures.
  • Ignoring flavor seasoning: Under-seasoning can lead to bland dishes; always taste and adjust seasoning to your palate.
  • Skipping the broiling step: A short broil at the end gives a golden finish that’s visually appealing.
  • Not letting it rest before serving: This allows the casserole to set, making serving easier and enhancing flavors.
  • Not storing leftovers promptly: Proper storage is key to maintaining freshness and preventing spoilage.
  • Using canned soup too liberally: Adjust the amount for personal taste to avoid overpowering the dish.

Essential Techniques

Sautéing is a critical technique in this recipe that enhances the flavor of the vegetables. It involves cooking them quickly over medium heat in a small amount of oil until they soften. This step builds depth of flavor that is essential for a delicious casserole, making it important to master. Common pitfalls include using too high a heat, resulting in burnt vegetables instead of tender ones. Visual cues include a slight browning of the vegetables, which indicates they are ready to mix into the casserole.

Layering is another vital technique when assembling the casserole. It’s essential for ensuring even cooking and distribution of flavors. Proper layering helps to prevent ingredients from sinking to the bottom. To master this technique, ensure each layer is evenly spread and avoid overcrowding the baking dish, which can cause uneven cooking. An ideal visual cue is a harmonious stacking of ingredients, which reflects a well-constructed casserole.

Pro Tips for Perfect No-Peek Chicken Casserole

Using fresh ingredients will elevate the flavors of your casserole. Whenever possible, choose fresh vegetables over frozen to enhance texture. Blending different types of cheese can provide a more complex flavor profile—experiment with your favorites. For those who enjoy a kick, adding spices like cayenne can introduce a delightful warmth that complements the dish.

Ensure your chicken is at room temperature before mixing it with other ingredients to promote even cooking. Adapt the recipe to suit your dietary needs by substituting with gluten-free options or swapping out dairy products. To maximize flavor, consider marinating the chicken overnight in herbs and spices—a simple step that pays off big in taste.

Watch the baking time carefully; this casserole is best when it’s not overcooked but rather just heated through, with a golden top. For a more appealing finish, broil for a few minutes at the end to achieve that perfect crispy topping. Lastly, let the casserole rest for about 10 minutes before serving to allow the flavors to meld and the textures to set.

Variations and Adaptations

There are many delicious regional variations of the No-Peek Chicken Casserole. In the South, for instance, adding jalapeños can kick up the heat, while in the Midwest, a version could feature a corn topping for sweetness. Seasonal adaptations might include using butternut squash in the fall or fresh asparagus in spring for a delightful twist.

For dietary modifications, those following a gluten-free diet can substitute regular rice with cauliflower rice, while vegan adaptations may use plant-based proteins and dairy alternatives. Exploring flavor variations can turn this dish into something new; try incorporating different seasonings or adding a can of diced tomatoes for a tangy kick.

Texture modifications can enhance the eating experience—mix crispy fried onions or breadcrumbs into the topping for added crunch. Presentation alternatives may include serving the casserole in individual ramekins, adding a modern touch to your meal that is visually impressive.

Serving and Presentation Guide

Presentation elevates the dining experience, transforming a simple casserole into an elegant dish. To plate, use a large serving spoon to scoop out portions into bowls or onto plates. For an inviting touch, sprinkle with fresh herbs such as parsley or chives to brighten the dish and add a pop of color.

Pair this casserole with a simple side salad to offset its richness, providing balancing freshness to your meal. For a rustic touch, serve with crusty bread or warm dinner rolls that complement the creamy base. When serving, ensure portions are generous yet controlled to avoid waste, especially when catering to families or guests.

Temperature plays a critical role; this dish is best served hot and fresh, ensuring that the flavors are vibrant. Offer sides at room temperature so that the casserole doesn’t cool down too quickly. Additionally, consider arranging utensils aesthetically for a more refined presentation that enhances the dining atmosphere.

Wine and Beverage Pairing

For wine pairings, a Chardonnay or a light Pinot Grigio complements the creamy textures of the No-Peek Chicken Casserole beautifully. These wines provide a crisp briskness that balances the richness of the dish. Alternatively, a light red wine such as a Pinot Noir works well, bringing a subtle fruitiness that enhances the flavor.

For those preferring non-alcoholic options, consider serving sparkling water with a slice of lemon or a refreshing iced tea to cleanse the palate. A light coffee can be an excellent pairing for an evening meal, rounding off the flavors with its organic depth.

Temperature considerations are paramount; serve white wines chilled to heighten their refreshing qualities. For optimal enjoyment, pour red wines at room temperature, allowing their tastes to develop. Finally, consider a whimsical pairing with seasonal cocktails that can add a festive touch to your meal.

Storage and Shelf Life

To ensure your No-Peek Chicken Casserole lasts, store leftovers in an airtight container in the refrigerator for up to 3-4 days. Cool the casserole completely before transferring it to prevent condensation, which can lead to sogginess. When reheating, aim for an internal temperature of 165°F, ensuring a safe and enjoyable meal.

For longer storage, this casserole freezes well for up to 3 months. Portion it into smaller containers for convenient grab-and-go meals. When ready to enjoy, allow it to thaw in the refrigerator overnight before reheating; this ensures an even temperature distribution for optimal tasting.

Signs of spoilage include an off-putting odor, discoloration, or excessive moisture on the surface, which should not be ignored. When reheating, maintain low heat to avoid overcooking and drying out the chicken; adding a splash of broth can help retain moisture during the reheating process.

Make Ahead Strategies

To maximize convenience, consider preparing the No-Peek Chicken Casserole a day in advance. Simply assemble the dish, cover it, and store it in the fridge until you’re ready to bake. This method allows the flavors to blend beautifully, enhancing the overall taste of the casserole.

For those pressed for time, you can also pre-cook the vegetables and chicken, keeping them in separate containers until ready to assemble. This strategy maintains freshness and allows for quicker preparation when the hunger strikes.

Assess quality impact by testing flavors and textures; dishes that are allowed to rest overnight often yield more robust results. When reassembling, ensure fresh ingredients are added right before baking to preserve their crunch and flavor.

Don’t forget to label the storage container with the assembly date for easy reference. Reintroduce fresh ingredients, such as herbs or crispy toppings, right before serving to maintain vibrancy and texture that might diminish over time.

Scaling Instructions

Scaling the recipe for a smaller crowd is straightforward—simply halve the ingredient amounts and continue with the same cooking instructions. This flexibility accommodates smaller gatherings without losing any of the dish’s charm or flavor.

For larger gatherings, doubling or tripling the recipe works wonders, but be mindful of adjusting cooking times and utilizing larger baking dishes. Ensure even cooking by occasionally stirring if using deeper pans.

Timing modifications may be necessary with larger batches; a longer cooking time is usually required for thicker casseroles. Using a meat thermometer can help guarantee your dish reaches the ideal internal temperature of 165°F.

Proper storage considerations need to be revisited when scaling. Larger portions can be split into multiple containers for easier reheating. Keep in mind to label each container with the date it was prepared to maintain organization, especially when freezing sizable quantities.

Nutritional Deep Dive

Understanding the macronutrient profile of No-Peek Chicken Casserole is essential for making informed dietary choices. Each serving typically provides a well-balanced profile consisting of lean proteins, healthy carbohydrates, and essential fats, promoting satiety and overall nourishment.

Micronutrient analysis often reveals a wealth of vitamins and minerals present in the vegetables, such as Vitamin A from carrots and Vitamin C from green beans, contributing to a robust immune system. Additionally, minerals like potassium from the chicken play a crucial role in bodily functions.

Health benefits are significant, as this casserole promotes balanced nutrition while satisfying the taste buds. Lean chicken offers necessary protein for muscle health, while vegetables provide critical dietary fibers that assist digestion.

Dietary considerations, particularly for those on high-protein diets, make this casserole an excellent option. A careful analysis of portioning also reveals the potential to tailor meals to specific dietary goals, supporting weight management or health-oriented plans.

In weighing portions, remember that a typical serving is around one-sixth of the dish, guiding those focused on managing caloric intake without sacrificing flavor. This recipe is an excellent way to enjoy comfort food while keeping health priorities in check.

Dietary Adaptations

Adapting the No-Peek Chicken Casserole for gluten-free diets is simple; use gluten-free rice or an alternative grain, ensuring all ingredients are certified gluten-free. Casseroles can often be tricky for dietary restrictions, but this dish can easily accommodate such needs without sacrificing taste.

For those who require dairy-free options, focus on plant-based cheeses and creamy alternatives such as coconut milk to recreate that satisfying texture. Be sure to read labels carefully to avoid hidden dairy ingredients.

Vegans can enjoy a hearty version by omitting chicken entirely and substituting with chickpeas or lentils, ensuring the protein content remains high. A rich vegetable broth can replace cream of chicken soup, making for a fully plant-based meal that doesn’t skimp on flavor.

Individuals following low-carb or keto diets may replace rice with cauliflower rice for reduced carbohydrate content while still maintaining the casserole’s overall structure. Tradition meets dietary flexibility with this beloved recipe, allowing everyone to enjoy it.

Paleo dieters can eliminate dairy and use compliant ingredients, focusing on whole foods. While low-FODMAP diets require caution with certain vegetables, substitutions can permit enjoyment of a modified casserole without triggering sensitivities.

Troubleshooting Guide

Texture issues often arise when casseroles are undercooked or overcooked. If your casserole appears too soupy, ensure your cooking time is appropriate, allowing it to thicken during the baking process. Alternatively, if it ends up too dry, adding extra cream or broth during the bake can help keep it moist.

Flavor balance might be off due to insufficient seasoning; always taste as you go, and experiment with herbs and spices to achieve the desired depth. For an overly salty dish, adding a dash of sugar can counteract the saltiness, bringing balance back to the casserole.

Temperature problems can arise if the oven isn’t preheated correctly; always ensure your oven is sufficiently heated before placing your casserole inside. If your oven tends to run hot or cold, this may also affect the cooking duration and result.

Ingredient substitutions may introduce unforeseen challenges; be cautious about replacing key ingredients without understanding how they may alter the dish. Commonly, swapping fresh vegetables for frozen may lead to inconsistent textures; fresh is recommended for optimal results.

Timing concerns become an essential factor, especially if making multiple dishes at once; ensure to prioritize essential cooking times for casseroles to avoid over or undercooking. Regularly checking your dish as it nears completion allows for peak flavor and texture.

Recipe Success Stories

The No-Peek Chicken Casserole has garnered positive feedback in kitchens nationwide, becoming a beloved recipe among readers who have shared their successes. Many families have praised the ease of preparation, making it a weekend staple for busy households.

Adaptation stories from readers highlight the versatility of the casserole to suit personal tastes. Those with dietary restrictions have discovered ways to modify the recipe, noting that their friends and family couldn’t tell the difference in taste or texture—a true testament to the dish’s universal appeal.

Community engagement surrounding this recipe has led to successful variations; readers are often inspired to experiment with different vegetables and spices, sharing pictures and tips on social media. The visual aspect of the dish not only invites others to try it but also guarantees the satisfaction of flavor and comfort.

Finally, photography tips from enthusiasts recommend showcasing the bubbling cheese and golden crust by capturing it right out of the oven. This captured beauty invites others to experience such delight in their own kitchens, expanding the casserole’s legacy further.

Frequently Asked Questions

Can I make this casserole in advance?

Yes, this casserole can be assembled a day before and stored in the refrigerator until you’re ready to bake it. This allows the flavors to meld beautifully.

What can I substitute for chicken?

You can replace chicken with turkey or chickpeas to make it vegetarian. Just ensure seasonings and cooking times are adjusted appropriately.

Can I freeze leftovers?

Absolutely! Freeze leftovers in an airtight container for up to three months. Thaw overnight in the refrigerator before reheating.

What should I serve with the casserole?

Pair the casserole with a crisp green salad, bread, or steamed vegetables for a complete meal.

How can I make it spicier?

Add diced jalapeños or a sprinkle of red pepper flakes to the mix to kick your casserole up a notch.

Is this casserole gluten-free?

You can easily make this dish gluten-free by using certified gluten-free rice and ensuring all other ingredients do not contain gluten.

Can I use brown rice instead of white?

Yes, but you will need to adjust cooking times as brown rice typically takes longer to cook than white rice.

How do I store leftovers?

Store leftovers in an airtight container in the refrigerator for 3-4 days. Make sure it cools before refrigerating to avoid condensation.

Can I make this casserole in a slow cooker?

Yes, you can adapt this recipe for a slow cooker. Cook on low for 6-8 hours for best results. Just ensure to pre-cook the rice slightly.

How can I make this a vegetarian dish?

Use vegetable broth in place of chicken broth, and substitute the chicken with lentils or hearty vegetables to maintain a filling meal.

Additional Resources

If you enjoyed this No-Peek Chicken Casserole, why not try other comforting casseroles such as Cheesy Broccoli Rice Casserole or Tater Tot Casserole? Mixing techniques can improve your cooking repertoire—check out guides on sautéing and layering. To optimize your kitchen skills, invest in basic kitchen equipment like a good-quality casserole dish and utensils suitable for cooking elaborate meals.

Explore ingredient information about chicken, rice, or various vegetables to learn their health benefits and usage. Seasonal variations can inspire your creativity; try adding seasonal produce to enhance the flavors of your casseroles throughout the year.

Join the Conversation

Sharing your No-Peek Chicken Casserole experiences on social media can inspire others to try this dish. You can engage with fellow cooks by sharing photos and stories from your table. Recipe reviews help foster a sense of community, so don’t hesitate to comment on variations you’ve tried or liked.

Feedback is also valuable; it can enhance future recipe development and personalization. Discuss your favorite adaptations or substitutions, and connect with others who share your passion for home-cooked meals. Your journey in cooking this casserole and beyond can inspire many to gather around their family table for memorable meals.

The Recipe

No-Peek Chicken Casserole

Serves: 6

Prep Time: 15 mins

Cook Time: 1 hour

Total Time: 1 hour 15 mins

Kitchen Equipment Needed

  • 9×13 inch baking dish
  • Large mixing bowl
  • Wooden spoon or spatula

Ingredients

  • 4 cups cooked rice
  • 2 cups shredded cooked chicken
  • 1 cup chopped vegetables (carrots, green beans)
  • 1 can cream of chicken soup
  • 1 cup shredded cheddar cheese
  • 1 cup chicken broth
  • 1 teaspoon garlic powder
  • Salt and pepper to taste
  • Fresh herbs for garnish (optional)

Directions

  1. Preheat your oven to 350°F (175°C).
  2. In a large mixing bowl, combine the cooked rice, shredded chicken, and chopped vegetables.
  3. Add the cream of chicken soup, chicken broth, garlic powder, salt, and pepper; mix well.
  4. Transfer the mixture into your greased baking dish and spread evenly.
  5. Sprinkle the shredded cheddar cheese over the top.
  6. Bake for 1 hour or until bubbly and the cheese is golden brown.
  7. Let it rest for about 10 minutes before serving; garnish with fresh herbs if desired.

Recipe Notes

  • This casserole can be customized with your favorite vegetables or proteins.
  • If using frozen vegetables, allow extra cooking time to ensure they are heated through.
  • Leftovers can be stored in an airtight container for up to 3-4 days.
  • Freezing is possible; thaw overnight before reheating.

Ultimate Creamy Baked Mac and Cheese Recipe You’ll Love

Creamy Baked Mac and Cheese: Comfort Food at Its Best

⚖️
Difficulty
Easy

⏲️
Prep Time
15 mins

🕒
Cook Time
30 mins

⏱️
Total Time
45 mins

🍽️
Servings
4 Servings

Creamy Baked Mac and Cheese is a timeless classic that resonates with both children and adults alike. Imagine golden pasta enveloped in a luscious, gooey cheese sauce, bubbling and slightly crispy on top, creating that perfect textural contrast. This dish is not just comfort food; it’s an emotional experience, evoking cozy family gatherings and cherished memories. The combination of flavors—from rich sharp cheddar to creamy mozzarella—coalesce into a symphony of cheesy delight that warms the heart and soul.

Every bite of this creamy baked mac and cheese provides an indulgent experience, reminiscent of Sunday dinners where delicious aromas wafting from the kitchen draw everyone together. This recipe is simple yet rewarding, making it a perfect meal for any day of the week. You can easily elevate the dish with a sprinkle of herbs or spices, tailoring it to your family’s preferences while maintaining that classic flavor we all love. Let’s dive into the scrumptious details of this beloved dish!

Quick Recipe Highlights

  • Flavor Profile: A delightful blend of sharp cheese and creamy textures makes each bite memorable.
  • Texture: The pasta has a tender bite, while the cheese sauce is rich and velvety, topped with a golden-brown crust.
  • Aroma: The warm scent of baked cheese fills the air, mingling with hints of nutmeg and freshly cracked black pepper.
  • Visual Appeal: The dish is visually stunning with its golden crust and creamy white interior, making it irresistible.
  • Skill Level Needed: Perfect for beginners, with straightforward steps that ensure success!
  • Special Equipment: All you need is a pot, baking dish, and basic kitchen tools to create this masterpiece.

Recipe Overview

  • Difficulty Level: This creamy baked mac and cheese is classified as easy, perfect for novice cooks and aspiring chefs alike.
  • Category: Ideal for family dinners, potlucks, or casual gatherings, it fits perfectly into comfort food cuisine.
  • Cuisine: A staple in American kitchens, this dish brings together influences from British and Italian culinary traditions.
  • Cost: With commonly available ingredients, making this creamy baked mac and cheese is budget-friendly, with most costs under $15.
  • Season: Enjoy year-round, though it shines during colder months when hearty meals are desired.
  • Occasion: Perfect for holidays, family gatherings, or as a comforting weeknight dinner for loved ones.

Why You’ll Love This Recipe

This creamy baked mac and cheese is a feast for the senses. Each mouthful bursts with rich flavor, predominantly from the variety of cheeses that meld together beautifully. It’s a dish that’s not only indulgent but also elicits feelings of joy and nostalgia, connecting people through shared meals. The textures, from the tender macaroni to the creamy sauce and crispy topping, create an enjoyable eating experience that delights every palate.

The convenience of this recipe is a major plus. With minimal preparation time and straightforward cooking steps, you can have a satisfying meal ready in under an hour. The true beauty lies in its versatility; whether you choose to enjoy it as a standalone dish or pair it with meats and vegetables, it always delivers satisfaction. Plus, leftovers—if there are any—make for an equally delightful experience the next day.

Nutritionally, while it might be seen as a comfort dish, there is room for balance. Incorporating whole-grain pasta and adding veggies like broccoli or spinach can increase its nutritional value without sacrificing taste. This makes it not only a comfort food but also a meal that can be tailored to be slightly healthier.

On a social level, creamy baked mac and cheese is a welcome addition to any gathering. Its appeal cuts across ages, making it a universally loved dish that brings people together. Imagine the joy on your family members’ faces as they gather around the dinner table to dive into this cheesy goodness.

Lastly, this recipe is cost-effective, requiring affordable ingredients that are likely already in your pantry. By preparing this creamy baked mac and cheese at home, you can enjoy a delicious, satisfying meal that is far cheaper than eating out. So grab your ingredients and get ready for a delightful cooking experience!

Historical Background and Cultural Significance

The origins of mac and cheese can be traced back to 18th-century Europe, particularly in Italy, where a dish known as “maccheroni” was prepared with cheese and possibly baked. Over time, as this dish traveled to America, it evolved into the creamy comfort food we know today, gaining immense popularity during the 1930s due to the affordability of cheese and pasta during the Great Depression.

In American culture, creamy baked mac and cheese has become synonymous with home cooking and comfort food. It’s frequently served during Thanksgiving and other family celebrations, reinforcing its position as a dish that brings people together. The sense of community built around sharing meals is something that this dish embodies perfectly.

The recipe has continuously evolved, with various interpretations across regions. Southern cooks often introduce a spicier rendition using ingredients like pepper jack cheese or adding breadcrumbs on top for an extra crunch. In contrast, some Northern variations might lean towards creamier sauces, focusing heavily on rich cheeses like Gruyère.

Today, mac and cheese has transcended its humble beginnings, appearing in gourmet restaurant menus with a myriad of upscale ingredients, such as lobster and truffles, proving its versatility and enduring appeal. Whether served in a casual setting or dressed up for fine dining, creamy baked mac and cheese remains a beloved dish in many households.

Ingredient Deep Dive

Elbow Macaroni: The foundation of every great mac and cheese, elbow macaroni provides the ideal shape and texture to hold on to the creamy cheese sauce. Rich in carbohydrates, this pasta forms the backbone of the dish, making it filling and comforting. When selecting, opt for whole-grain varieties for added nutrition. Store in a cool, dry place, and for long-term storage, consider freezing any batch you won’t use soon.

Cheese: Cheese is the star of this dish, with sharp cheddar being the most popular option for its robust flavor. Nutritious and high in calcium, cheese enhances the taste while offering some health benefits. To achieve the perfect melt, choose a mix of cheeses—sharp cheddar, mozzarella, and cream cheese work harmoniously. When buying, ensure cheese is fresh and well-stored, and consider pre-grating for convenience.

Common Mistakes to Avoid

  • Skipping the pasta cooking time: Overcooking or undercooking the pasta can lead to a mushy or chewy texture, hindering the perfect balance.
  • Using low-quality cheese: Cheddar can make or break your dish. Opt for fresh, high-quality cheese for the best flavor and melting properties.
  • Not seasoning the pasta water: Salt your pasta water generously to season the pasta from the inside out.
  • Overbaking the dish: This can dry out the pasta and cheese, resulting in a less creamy dish. Keep an eye on your mac and cheese as it bakes.
  • Ignoring the resting time: Letting the dish sit for a few minutes after coming out of the oven allows flavors to meld and makes for easier servings.
  • Not adding a topping: A simple breadcrumb topping can elevate the texture and flavor significantly; don’t skip this step!
  • Using too much liquid: Maintaining the right consistency in your cheese sauce is key; too much liquid can lead to soupy mac and cheese.
  • Skipping the funk: Spice up with a touch of mustard, cayenne, or paprika for an added flavor dimension.
  • Forgetting to mix well: Ensure your cheese sauce is fully integrated with the pasta to achieve a uniform flavor.
  • Not tasting before baking: Always do a final taste check to adjust flavors before placing the dish in the oven!

Essential Techniques

Making a Cheese Sauce: Creating a perfect cheese sauce starts with a roux, mixing equal parts fat and flour until golden before adding milk slowly. This base thickens beautifully, but be sure to whisk constantly to avoid lumps. Aim for a creamy texture and a rich flavor that lightly coats the back of a spoon. Common pitfalls include rushing the process or not whisking enough, which can lead to undesired lumps.

Baking Your Dish: Baking is crucial for mac and cheese to allow flavors to meld while creating that coveted golden crust. Preheat your oven and use a baking dish that allows space for the pasta to expand. Watch for visual cues like a golden top and bubbly edges, and remember that the dish continues to cook slightly after it’s removed from the oven—let it rest a few minutes before serving to achieve the best texture and flavor.

Pro Tips for Perfect Creamy Baked Mac and Cheese

1. Experimenting with cheese blends can elevate your dish to new flavor heights—don’t shy away from trying Gruyère, Gouda, or even Brie for unique offerings.
2. For extra creaminess, add a dollop of sour cream or cream cheese while making your cheese sauce.
3. Creating a crispy topping using breadcrumbs mixed with Parmesan will add texture and visual appeal.
4. Try infusing your milk with bay leaves or crushed garlic while heating for an aromatic twist in your cheese sauce.
5. Make it a main dish by adding protein like cooked chicken, bacon, or even lobster for a more gourmet experience.
6. Don’t forget to season each layer—adding salt and pepper to your pasta and cheese mix can make all the difference to the overall flavor.
7. Consider baking in individual portions for easy serving at gatherings; this is great for portion control and makes for a beautiful presentation.
8. Keep a close eye on the baking time—this dish can go from perfection to overdone quickly, depending on your oven’s quirks.

Variations and Adaptations

This creamy baked mac and cheese is adaptable based on regional tastes and dietary needs. Incorporate flavorful regional ingredients, like chorizo for a spicy kick, or use smoked cheeses reminiscent of Southern barbecue cultures. Seasonal adaptations could include adding roasted butternut squash or fresh peas in spring for a pop of color and flavor.

For those with dietary restrictions, swapping regular pasta for gluten-free varieties can retain the essence of the dish. Vegans can enjoy it too by utilizing cashew cheese or nutritional yeast, ensuring that everyone can partake in this beloved dish. Experiment with textures by adding nuts for crunch or incorporating a creamy spinach or artichoke dip to elevate the flavor. Customize your mac and cheese to suit everyone at the table with these delightful variations!

Serving and Presentation Guide

When it comes to serving creamy baked mac and cheese, presentation can enhance the dining experience immensely. Begin by plating up your portions in warm bowls to maintain temperature. Garnishing ideas can encompass fresh herbs like parsley or chives sprinkled on top to add color and freshness.

Traditional accompaniments include a crisp green salad or steamed vegetables, striking a balance with the rich, cheesy dish. For a modern twist, serve the mac and cheese in mini cast iron skillets or ramekins, offering individual servings that look both rustic and polished. It’s key to consider temperature—always serve hot or warm to ensure the cheese sauce maintains its creamy identity.

Lastly, portion control is important; typically, a half cup to three-quarters cup serving per person is satisfying when accompanied by sides, allowing for a hearty yet balanced meal.

Wine and Beverage Pairing

For the perfect wine pairing with your creamy baked mac and cheese, white wines like Chardonnay offer a wonderful balance, while a light Pinot Noir can also complement the richness. Opt for lighter-bodied wines that won’t overshadow the dish’s flavors. Another option is a deep-rooted rosé that offers both acidity and fruitiness, enhancing every bite.

Non-alcoholic alternatives can also shine with a glass of sparkling water infused with lemon, bringing fresh brightness to each creamy mouthful. For something warm, consider a light chamomile tea with its subtle floral notes that won’t compete with the dish. Always ensure beverages are served at the proper temperatures to maximize flavors and enjoyment.

Storage and Shelf Life

To properly store your creamy baked mac and cheese, look for airtight containers—this will ensure freshness and prevent your pasta from drying out. Allow it to cool to room temperature before sealing and refrigerating. Properly stored, it can last in the refrigerator for about 3 to 5 days.

When reheating, a gentle heat is key to avoiding dried-out pasta and cheese. Try adding a tablespoon of milk before microwaving to restore creaminess. If you wish to freeze leftovers, place them in a freezer-safe container. Creamy baked mac and cheese can last in the freezer for up to 3 months. Remember to thaw in the refrigerator overnight before reheating.

Signs of spoilage include an off smell, a change in texture, or visible signs of mold. Always prioritize safety and freshness when enjoying your delicious creation.

Make Ahead Strategies

To maximize efficiency, prep your creamy baked mac and cheese in advance. You can cook the pasta and prepare the cheese sauce the day before, storing them separately in the fridge. Assemble everything before your gathering, topping it with breadcrumbs right before baking.

Prepare the dish up until the baking step and store it in the fridge for up to 24 hours. Just be sure to add a few minutes to your baking time, as it will need to warm through. To enhance flavor, consider allowing it to rest for a few minutes at room temperature before putting it in the oven.

For freshness, add a sprinkle of fresh herbs or a layer of crispy topping before serving. This can elevate the dish for a vibrant flavor and appealing presentation.

Scaling Instructions

If you wish to halve or double the recipe for a larger gathering or smaller meal, the ingredients can be adjusted proportionally without compromising the flavor. For half the recipe, simply target two servings, while ensuring you monitor cooking time as it could alter slightly.

When increasing the serving size, make sure you have a sufficiently sized baking dish to accommodate the increased volume. Always keep an eye on the baking time; larger or denser dishes may require additional cooking, so use visual cues to determine doneness. Adjust your cooking tools accordingly as larger batches may need to be cooked in separate dishes or potentially staggered in the oven.

Lastly, remember that flavors intensify with greater volumes; a mild seasoning may need a slight increase to ensure the dish remains delicious and well-balanced.

Nutritional Deep Dive

Taking a closer look at the nutrition of creamy baked mac and cheese reveals a blend of macronutrients beneficial for energy. Carbohydrates from pasta serve as a fuel source, while cheese contributes protein and fats necessary for overall well-being.

Additionally, while rich in calories, mac and cheese can be adjusted for healthier options by incorporating whole grains or fortified plant-based cheeses, offering additional vitamins and minerals. For those managing their diet, being mindful of portion sizes helps maintain balance while still indulging.

Each serving of creamy baked mac and cheese also provides valuable calcium and phosphorus from the cheese, supporting bone health. For those focusing on dietary management, understanding this dish’s breakdown aids in making informed choices.

Dietary Adaptations

For gluten-free variations, consider using gluten-free pasta, which now comes in a variety of shapes and flavors, allowing you to maintain the integrity of the dish while accommodating dietary needs.

Dairy-free and vegan adaptations can be made using plant-based creams and cheeses, which can be both delicious and satisfying. Nutritional yeast is another great addition for a cheesy flavor without using animal products; feel free to mix in vegetables for added nutrition.

Keto adaptations might focus on zoodles or cauliflower as a pasta substitute, greatly reducing carbohydrate intake while still delivering a comforting dish. Different diets like Paleo or low-carb can also be approached similarly while retaining the essence of this beloved creamy baked mac and cheese.

Troubleshooting Guide

Texture issues can arise, leading to either a clumpy cheese sauce or a dry pasta mix. If your cheese sauce isn’t smooth, return it to low heat and add a splash of milk while whisking to restore creaminess. If your dish appears dry upon serving, consider adding cream or milk during reheating to reinvigorate flavor and texture.

Flavor balance can also be a challenge; if your dish tastes bland, consider incorporating garlic powder, onion powder, or a splash of vinegar for depth. Should it be too salty, balancing it with a splash of cream or water during reheating helps.

Temperature problems often occur due to uneven heating in the oven; using a thermometer to check that the center has reached the correct temperature can prevent surprises. Finally, when it comes to ingredient substitutions, be mindful of differences in melting properties; always test for best results.

Recipe Success Stories

The feedback from the community around this creamy baked mac and cheese highlights its status as a beloved staple. Readers often share how their families have adopted it as a favorite dish, leading to successful gatherings and potlucks, each variation adding a personal touch.

Many have had success in using unique ingredients like smoked meats or vegetables, praising how these adaptations have delighted their guests. This dish has proven to be not just a recipe but a bonding experience, sparking creativity in the kitchen.

Diners also appreciate the photography tips shared alongside this recipe, making the colorful presentation even more appealing. Whether presented simply for family dinner or dressed up for a special occasion, creamy baked mac and cheese consistently receives rave reviews.

Frequently Asked Questions

Can I use different types of cheese? Absolutely! You can mix and match cheeses based on your preference. Cheddar, mozzarella, and Gruyère create a delightful blend, but you can experiment with others like Gouda or Parmesan for added flavor.

Can I use gluten-free pasta? Yes! There are many gluten-free pasta options available that work well in this recipe without compromising texture or taste.

Can I prepare this ahead of time?Definitely! You can assemble the dish a day before, allowing it to rest in the fridge until you’re ready to bake it.

What’s the best way to reheat leftovers? The best way to reheat is in the oven, covered with foil to prevent drying out. Add a splash of milk if needed for extra creaminess.

How can I make it more nutritious? Consider adding vegetables like spinach or broccoli for additional nutrients and fiber, or switch to whole-grain pasta.

Is it possible to freeze mac and cheese? Yes! Portion it out into airtight containers and freeze for up to 3 months. Just remember to thaw it in the fridge before reheating.

What can I substitute for milk? For a dairy-free option, unsweetened almond milk or oat milk works well. You can also use broth for a different flavor.

Are there any common problems with making mac and cheese? Yes, common issues include clumpy cheese sauce or dry pasta. The key is to maintain proper heat, and stirring continuously can help prevent lumps.

How spicy can I make my mac and cheese? You can add spices like cayenne or chili powder to achieve your desired heat level—add gradually for the best results.

Can I add proteins to this recipe? Definitely! Shredded chicken, crumbled bacon, or even seafood like shrimp pairs wonderfully with the creamy cheese.

Additional Resources

If you love creamy baked mac and cheese, you’ll find joy in complementary recipes such as creamy casseroles or baked pasta dishes. Explore more techniques for perfecting your cheese sauce or discover the nutritional benefits of various cheeses to enhance your cooking knowledge.

Don’t miss out on learning about kitchen equipment recommendations that can ease your cooking processes, especially for novice cooks looking to streamline their kitchen experience. Seasonal variations are also an excellent way to add new twists to your favorite flavors—try incorporating local produce for fresh takes on this classic dish.

Join the Conversation

Engagement with your culinary creations can spice things up! Share your photos on social media using unique hashtags related to your creamy baked mac and cheese. Community feedback is valuable—don’t hesitate to share your experiences or variations to inspire others.

Participate in recipe reviews, offering tips and suggestions based on your tasting experience. Engage with fellow cooking enthusiasts who enjoy similar recipes, fostering an interactive cooking community and sharing the joy this cheesy delight brings to everyone.

The Recipe

Creamy Baked Mac and Cheese

Serves: 4 servings

Prep Time: 15 mins

Cook Time: 30 mins

Total Time: 45 mins

Kitchen Equipment Needed

  • Pot for boiling pasta
  • Large mixing bowl
  • Baking dish
  • Whisk
  • Pasta strainer

Ingredients

  • 2 cups elbow macaroni
  • 2 tablespoons butter
  • 2 tablespoons all-purpose flour
  • 2 cups milk
  • 2 cups shredded sharp cheddar cheese
  • 1 cup shredded mozzarella cheese
  • 1 cup breadcrumbs
  • Salt and pepper to taste
  • Optional: ¼ teaspoon cayenne pepper

Directions

  1. Preheat your oven to 350°F (175°C).
  2. Boil the macaroni in salted water until al dente; drain and set aside.
  3. In a pot, melt the butter over medium heat, add flour, and whisk for 1 minute until golden.
  4. Gradually add milk, whisking continuously until thickened, about 5-7 minutes.
  5. Stir in the cheddar and mozzarella cheese until melted and smooth; season with salt, pepper, and cayenne.
  6. Add the cooked macaroni to the cheese sauce, mixing until well combined.
  7. Pour the mixture into a greased baking dish and top with breadcrumbs.
  8. Bake for 25-30 minutes until bubbly and the top is golden brown.
  9. Let cool for a few minutes before serving.

Recipe Notes

  • Feel free to add vegetables or proteins to make it a complete meal.
  • For a spicier version, incorporate diced jalapeños or hot sauce into the mix.
  • Experiment with different cheese combinations to find your perfect flavor profile.

Delicious Creamy Alfredo Lasagna Soup: A Comfort Food Delight

Creamy Alfredo Lasagna Soup: A Comforting Twist on a Classic Dish

⚖️
Difficulty
Easy

⏲️
Prep Time
15 mins

🕒
Cook Time
30 mins

⏱️
Total Time
45 mins

🍽️
Servings
6

Welcome to the cozy world of Creamy Alfredo Lasagna Soup! This delightful recipe combines the rich flavors of traditional lasagna in a warm, comforting soup that is perfect for any occasion. Picture this: a velvety sauce infused with garlic and Italian herbs, sumptuous layers of lasagna noodles, and the melty goodness of cheese, all culminating in a hearty bowl of comfort. With each spoonful, you will experience the familiar taste of lasagna, but with the added warmth and soulfulness that only a soup can provide. Whether it’s a chilly evening or a family gathering, this soup will warm your heart and please your taste buds.

As you indulge in this creamy delight, the balance of flavors will dance on your palate. The combination of cream, butter, and cheese creates a luscious base, while the herbs introduce an aromatic experience that mimics the delightful aroma of an Italian kitchen. The noodles soften beautifully, soaking up the savory broth, and the added protein or vegetables can easily customize it to suit your family’s preferences. Serve it with a side of crusty bread, and you have a meal that is wholesome, filling, and utterly satisfying.

Quick Recipe Highlights

  • Flavor Profile: Creamy, savory, and slightly nutty, the flavors of this soup come together to create a harmonious blend reminiscent of classic lasagna.
  • Texture: The soup boasts a silky broth, tender pieces of noodle, and gooey melted cheese that provides a delightful contrast.
  • Aroma: Expect enticing notes of garlic, butter, and fresh herbs that waft through your kitchen as you prepare this mouthwatering dish.
  • Visual Appeal: A creamy white base with flecks of green from the herbs, and strands of melted cheese stretching beautifully makes for an appetizing presentation.
  • Skill Level Needed: This easy recipe requires no specialized skills, making it perfect for beginner cooks and busy families alike.
  • Special Equipment: You will just need a large pot, a wooden spoon, and basic cooking utensils to whip up this delicious soup.

Recipe Overview

  • Difficulty Level: This Creamy Alfredo Lasagna Soup is rated as easy, making it accessible for cooks of all skill levels. With straightforward ingredients and simple steps, anyone can create this delicious dish in no time.
  • Category: This recipe falls under the category of comfort food and is perfect for hearty dinners or gatherings, combining simplicity and satisfaction.
  • Cuisine: Rooted in Italian cuisine, this soup captures the essence of lasagna with a twist, reflecting the creativity that characterizes traditional Italian cooking.
  • Cost: The ingredients for this recipe are relatively inexpensive, averaging around $15, making it an economical choice for families and meal prepping.
  • Season: Enjoy this dish year-round, but it’s particularly delightful during fall and winter months when comfort food is most sought after.
  • Occasion: This soup is great for weeknight family dinners, potlucks, and gatherings, inviting everyone to gather around the table and enjoy a warm bowl of goodness.

Why You’ll Love This Recipe

This Creamy Alfredo Lasagna Soup is a culinary masterpiece that harmonizes taste and texture fantastically. The rich creaminess envelopes each bite, while the tender lasagna noodles bring comfort and familiarity. For anyone who enjoys hearty soup recipes, the combination of delicate flavor and satisfying texture elevates this dish to a favorite. It’s a trendy twist on a classic Italian favorite that satisfies cravings effortlessly.

Preparing this soup is a breeze, significantly reducing kitchen time while retaining the indulgent flavors found in traditional lasagna. Busy weeknights become more manageable when you can whip up a wholesome, comforting meal in under an hour. One pot does it all—cooking the noodles and sauce together minimizes the mess, making cleanup a non-issue, thus allowing you more time to enjoy your meal and family.

Nutritionally, this soup is adaptable, allowing for the inclusion of veggies or protein that enhances the dish’s overall health benefits. Adjust the ingredients according to dietary preferences; using whole-grain pasta or adding spinach can elevate the nutritional profile without sacrificing taste. Opting for lower-fat cheese alternatives can also maintain the creamy texture while reducing calories.

Not only is this soup a fabulous family meal, but it’s also excellent for entertaining friends. The inviting aroma and beautiful presentation have the ability to impress guests. You’ll create an atmosphere filled with warmth and comfort, making this dish an unforgettable centerpiece for gatherings and parties.

Moreover, the cost-effectiveness of this Creamy Alfredo Lasagna Soup cannot be ignored. Using simple ingredients typically found in your pantry keeps expenses low, making it a great option for meal prepping without breaking the bank. The versatility allows you to stretch leftovers into lunches or transform them into a new dish entirely.

Historical Background and Cultural Significance

The origins of lasagna trace back to Ancient Greece, where layers of dough were baked with meat and sauces. Over centuries, this dish has evolved, particularly in Italy, where lasagna became a staple of regional cuisines, each featuring unique ingredients and cooking methods. The creamy Alfredo sauce, originating from Rome, was developed in the early 20th century by Alfredo Di Lelio, who created it to ensure his wife would eat following her recovery from an illness.

Culturally, lasagna represents heartwarming family meals shared among loved ones on special occasions or Sunday gatherings. This version—lasagna soup—modernizes the dish while maintaining its roots, transforming the traditional lasagna into a warm bowl of comfort that invites joy and laughter at the table.

Throughout the years, lasagna recipes have adapted, leading to countless variations that reflect personal tastes and dietary needs. The introduction of lighter ingredients or alternative cooking methods illustrates creativity in maintaining tradition while embracing modern dietary trends.

Regional variations of lasagna, like the local adaptations seen in the United States, showcase the dish’s adaptability. With each new twist, many families find their unique way to enjoy this culinary classic, demonstrating the dish’s timeless appeal and its ability to bring people together.

Ingredient Deep Dive

Pasta: The base of any good lasagna soup, pasta brings substance and heartiness. Traditionally, lasagna noodles are used, but you can opt for other shapes as needed. When selecting pasta, look for high-quality options made with semolina for better texture. Cook pasta just until al dente to prevent it from becoming mushy in the soup.

Alfredo Sauce: This creamy sauce is made from butter, heavy cream, and Parmesan cheese. It provides the rich and velvety texture that characterizes lasagna. Opt for fresh, locally sourced cheese for peak flavor. If health is a concern, consider using cream alternatives while maintaining taste.

Cheese: A blend of mozzarella and Parmesan produces the classic cheesy goodness that pairs perfectly with Alfredo sauce. Cheese adds an indulgent element and helps tie all flavors together. When choosing cheese, shredded varieties melt better and more evenly within the soup. Store cheese in an airtight container to retain freshness, and never forget to look for substitute options in case you’re looking to accommodate dairy-free diets.

Herbs and Spices: Fresh garlic, Italian seasoning, and basil contribute to the soup’s deep flavor profile. These ingredients are essential in creating that signature Italian taste. Fresh herbs should be used where possible for maximum flavor, but you can also rely on dried versions. Be sure to store dried herbs in a cool, dark place for longevity and potency.

Common Mistakes to Avoid

  • Overcooking the pasta: Cook the pasta separately to al dente or add it to the soup towards the end of cooking. This ensures the pasta won’t become mushy and lose its texture.
  • Ignoring seasoning: Taste as you go! Each ingredient contributes to the final flavor, and the dish often requires additional salt or pepper to elevate it.
  • Using low-quality cheese: Good quality cheese makes all the difference in the creaminess and overall taste of the soup. Always opt for block cheese and shred it yourself when possible.
  • Skipping fresh herbs: Fresh herbs provide a brighter flavor than dried. Don’t underestimate their importance; be generous with fresh basil or parsley when garnish.
  • Filling the pot too much: The soup should have enough space to boil, so avoid overfilling your pot, which can lead to uneven cooking.
  • Not allowing flavors to meld: Give yourself time for the ingredients to simmer together; this step helps enhance the depth of flavor in the dish.
  • Inadequate stirring: Stir the soup consistently to prevent sticking or burning. This ensures even heat distribution and prevents a crust from forming on the pot’s bottom.
  • Neglecting preparation: Pre-measure your ingredients for an organized cooking experience. This makes the process smoother and less stressful.
  • Omitting toppings: A sprinkle of fresh herbs or a dusting of grated cheese at the end can add an appealing finish and enhance presentation.
  • Not adjusting for leftovers: Leftovers may thicken; add a little broth or cream when reheating to return the desired creaminess.

Essential Techniques

Sautéing garlic: Sautéing garlic brings out its natural sweetness and aroma. Start by heating oil, then gently add minced garlic until fragrant. Avoid high heat to prevent burning, which imparts a bitter flavor. You want it golden, not brown.

Layering flavors: Developing flavors is essential in a rich soup. Begin with foundational ingredients like onions and garlic before building upon them with herbs and stock. This layering enhances the depth of your dish, making each bite more satisfying.

Cooking pasta: Ensuring perfect pasta is crucial to overall texture. Aim for al dente, and consider cooking it separately. If cooking in the soup, check doneness frequently. Once added to the soup, pasta will continue to cook; manage timing correctly.

Incorporating cream: When adding cream, do so slowly at low heat to prevent curdling. Stir continuously while adding to maintain its creaminess and ensure even distribution. A sudden change in temperature could result in a split.

Pro Tips for Perfect Creamy Alfredo Lasagna Soup

– Use homemade Alfredo sauce for enhanced flavor; it’s simple and worth the effort.
– Toss in seasonal vegetables like spinach or mushrooms for added nutrition and color.
– Experiment with different types of cheese for unique variations; Gouda adds a delightful smoky flavor.
– For extra protein, consider adding cooked chicken or sausage; it’s an easy way to make the dish more filling.
– Allow leftovers to cool before storing; this prevents condensation and maintains consistency.
– Use fresh basil or parsley as a vibrant garnish to elevatethe dish’s presentation.
– When reheating leftovers, use low heat and stir frequently to preserve texture.
– Consider a squeeze of lemon before serving for a touch of acidity that brightens flavors.

Variations and Adaptations

This Creamy Alfredo Lasagna Soup can be adapted in many exciting ways. For instance, adding in seasonal vegetables like zucchini in summer or root vegetables in winter can enhance nutrition and flavor. For a vegetarian version, substitute meat with lentils or mushrooms, while keeping the creamy base intact.

Additionally, dietary adaptations like gluten-free pasta could make this soup suitable for gluten-sensitive diners. You can also try a dairy-free option using cashew cream and coconut-based cheese to cater to lactose-intolerant or vegan friends.

Flavor variations are endless; consider adding sun-dried tomatoes or roasted red peppers for an Italian twist. For those who adore spice, a sprinkle of red pepper flakes can add a wonderful kick without losing the essence of creaminess.

In terms of texture modifications, experiment with the thickness of the soup. More broth will yield a more soupy consistency, while less broth will transform it into a creamy casserole style, which can be baked to bring about additional textures.

Lastly, think about presentation alternatives; serve in rustic bowls with crusty bread on the side or top with crispy bacon bits for an appealing finish when entertaining guests.

Serving and Presentation Guide

When it comes to plating and serving, presentation elevates the dining experience. Choose shallow bowls to allow for easy access to the soup, and consider using rustic-style cookware for a homey feel. For garnishing, fresh herbs like basil or parsley add visuals and enhance flavor.

Consider serving with crusty Italian bread on the side, perfect for dipping. A sprinkle of Parmesan cheese right before serving adds a touch of elegance. For a refined presentation, consider drizzling a bit of olive oil or balsamic glaze over the top to highlight the dish’s rich colors.

Serve the soup hot to encourage comforting indulgence, but be mindful of portion control, especially for guests. Aim for ladling just the right amount, allowing your diners to savor the experience without overwhelming portions.

Wine and Beverage Pairing

For wine pairings with Creamy Alfredo Lasagna Soup, opt for a light white wine. A crisp Pinot Grigio or a Sauvignon Blanc complements the richness of the soup beautifully, cutting through the creaminess with their acidity. If you prefer red wine, choose a light-bodied Chianti for a nice contrast without overpowering the dish.

For non-alcoholic alternatives, consider serving fizzy sparkling water with a splash of lemon for a refreshing touch. Alternatively, you could enjoy herbal tea or Italian soda for a delightful, refreshing pairing.

Temperature is crucial; serve the wine slightly chilled to enhance the overall meal experience. Offering a few choices allows guests to find their perfect match for the delicious, comforting soup.

Storage and Shelf Life

Storage of this Creamy Alfredo Lasagna Soup is simple yet necessary to maintain freshness. Store any leftovers in an airtight container in the refrigerator, where they’ll keep well for about 3-4 days. Be sure to cool the soup before sealing to prevent condensation, which can dilute flavor.

Always check for signs of spoilage, such as an off smell or mold on the surface before consuming. If the soup thickens in the fridge, you can easily add a little milk or broth during reheating to return its creamy consistency.

If you intend to freeze, portion the soup into freezer-safe containers, leaving space for expansion. Properly stored, it can last for up to three months in the freezer. When ready to eat, thaw it overnight in the fridge before reheating on the stovetop or microwave.

Make Ahead Strategies

Preparing Creamy Alfredo Lasagna Soup in advance is a great strategy for busy weeknights. Start by prepping all ingredients—chopping vegetables, shredding cheese, and measuring pasta—so everything is ready to go when you’re ready to cook.

You can also prepare the soup base, including the sauce and the broth, a day in advance. Store it in the refrigerator, then cook the pasta fresh when you are ready to serve. This will ensure the pasta retains its perfect texture.

When storing between steps, you can assemble the soup without the pasta, then add it just before serving to keep everything fresh. As a finishing touch, consider adding fresh herbs or a squeeze of lemon when reheating to brighten flavors.

For freezing, allow the soup to cool before portioning it into containers. This allows for easy reheating while maintaining quality without compromising flavor.

Scaling Instructions

Scaling this Creamy Alfredo Lasagna Soup up or down is easy, depending on your needs. To halve the recipe, simply adjust ingredient quantities by 50% and keep the same cooking times.

Doubling or tripling requires minimal adjustments; just ensure your pot is large enough to accommodate the increased volume—an extra-large pot might be necessary. Always double-check cooking times as larger batches may take a few minutes longer.

For sandwiching leftovers or convenient meals, consider using smaller containers to portion out servings for lunch boxes after an entertaining evening.

Monitoring flavor when adjusting the recipe is essential; always taste as you scale up or down to ensure balance is retained.

Nutritional Deep Dive

This Creamy Alfredo Lasagna Soup presents a delightful array of macronutrients, including fats, carbohydrates, and proteins. The creamy base contributes healthy fats primarily from cheese and cream, while the pasta enhances carbohydrate content, providing a satisfying energy source.

In terms of micronutrient analysis, this soup includes calcium from the dairy ingredients, supporting bone health, and vitamin A present in creamy sauces. The inclusion of vegetables increases fiber content, enhancing digestive health, especially when adapting with choices like spinach or carrots.

Health benefits extend beyond basic nutrition; outside of comfort, this soup provides warmth and satisfaction, ideal for colder months or when seeking a cozy meal. For portion analysis, one serving typically contains about 300-400 calories, depending on ingredient variations, making it a fulfilling dish with reasonable caloric content.

Weight management is feasible with this recipe, allowing flexibility to substitute lower fat options if desired. Experiment with whole-grain pasta and low-fat cheeses to boost fiber and reduce calories without sacrificing the creamy, indulgent taste.

Dietary Adaptations

For those following a gluten-free lifestyle, substitute traditional pasta with gluten-free varieties made from rice or lentils. This adaptation retains the comforting essence while meeting dietary needs.

For a dairy-free version, replace cream with coconut milk and utilize cashew-based cheeses. This ensures the dish remains creamy and satisfying without the dairy component, making it ideal for lactose-intolerant individuals.

Vegans can adapt by removing any animal products entirely. Utilize nutritional yeast in place of cheese for flavor, while retaining the creaminess through blended silken tofu or pureed cashews.

Low-carb dieters can replace pasta altogether with spiralized vegetables such as zucchini or squash. These alternatives maintain the integrity of the soup without excess carbohydrates, allowing enjoyment without guilt.

Other dietary trends, including the ketogenic or paleo diets, can also find adaptable versions of this recipe by using non-pasta ingredients and substituting non-dairy options to meet their specific dietary requirements.

Troubleshooting Guide

When making Creamy Alfredo Lasagna Soup, be prepared for potential hiccups. If the soup turns out too thick, add additional broth or cream to achieve the desired consistency. Alternatively, if it’s too thin, let it simmer longer to allow moisture to evaporate.

Flavor balance issues can arise; if the taste is lacking, consider incorporating more herbs or a splash of lemon juice to elevate overall flavors. An overly creamy sauce can be brightened by acidity, while salt can help deepen savory notes.

Temperature problems may occur when reheating; ensure you use low and slow methods to avoid curdling cream or overcooking the pasta. Stir frequently, especially on indirect heat, to maintain even warmth.

When dealing with ingredient substitutions, ensure you adjust cooking times and methods accordingly. Some alternatives, such as pre-cooked veggies or quick-cooking pasta, will require a different approach to maintain consistency in the dish.

If your sauce separates during cooking, simply whisk it back together while gently heating. An emulsion might have broken, but in most cases, using smooth mixing methods will reintroduce creaminess to your dish.

Recipe Success Stories

Our community of cooks has shared numerous success stories featuring this Creamy Alfredo Lasagna Soup. Many have praised its comforting nature and family appeal, noting that it becomes a favorite for cozy dinners and gatherings.

Variations include stories of adding additional proteins, such as chicken or sausage, which have led to greater satisfaction among family members. Adapting ingredients based on seasonal availability has proven to enhance the dish, demonstrating its versatility.

Photography tips have emerged from enthusiastic cooks sharing their presentations. Snap beautiful images of the soup garnished with fresh herbs to inspire others in making this delectable dish.

Reader suggestions have also prompted new ideas for serving and pairing, including offering light salads or crusty bread alongside the soup, opening up discussions about complementary flavors and suggested sides.

Frequently Asked Questions

1. Can I use store-bought Alfredo sauce for this recipe?
Yes, while homemade Alfredo sauce is recommended for optimal flavor, store-bought options can serve as convenient shortcuts. Enhance their flavor by adding fresh garlic or herbs while heating.

2. How do I prevent the pasta from getting mushy?
Cook the pasta separately and add it to the soup just before serving. This ensures al dente pasta that maintains texture without overcooking in the broth.

3. Can I freeze the leftovers?
Yes, you can freeze the soup for up to three months. Ensure it cools before storing in airtight containers. When ready to eat, thaw and reheat gently on the stovetop.

4. What toppings can I add to enhance flavor?
Fresh herbs like basil and parsley, a sprinkle of Parmesan cheese, or a drizzle of olive oil all enhance flavor and presentation.

5. Is it possible to make this dish vegan?
Absolutely! Replace dairy-based ingredients with plant-based alternatives. Use coconut milk for cream and nutritional yeast for cheese to maintain creaminess.

6. How long will leftovers last in the fridge?
Leftovers can be stored in the refrigerator for 3-4 days when kept in airtight containers. Always ensure it’s cooled before sealing to avoid condensation.

7. What vegetables can I add for nutritional benefits?
You can include spinach, carrots, or bell peppers. They cook quickly and blend well with the soup, enhancing both nutrition and flavor.

8. Can I use different types of noodles?
Yes, while lasagna noodles are preferred, you can experiment with other pasta types like shells or rotini, though cooking time may vary.

9. How can I make the soup spicier?
Add red pepper flakes or diced jalapeños to increase heat. This elevates the flavor profile and gives it an exciting kick.

10. What should I do if the soup is too salty?
If the soup is too salty, add a diced potato while simmering, as it absorbs excess salt. Remove the potato after some minutes of cooking.

Additional Resources

For those eager to dive deeper into the world of comfort food, check out related recipes like Classic Lasagna, Cheesy Chicken Alfredo, or Mother’s Day Creamy Tomato Soup. Also, explore our technique guides on master pasta cooking skills, ingredient information on cheese varieties, and essential equipment recommendations for cooking success. Seasonal variations for not only soups but entire dinner ideas to match flavors with the time of year will also serve to spark inspiration in the kitchen.

Join the Conversation

We invite you to share your Creamy Alfredo Lasagna Soup experiences on social media! Use our dedicated hashtags to connect with other food enthusiasts and swap tips, recipes, and photography ideas. We love to hear about your creative variations and how this dish has found a place at your dining table. Join our community engagement and reviews to inspire fellow cooks to enjoy this comforting recipe.

The Recipe

Creamy Alfredo Lasagna Soup

Serves: 6

Prep Time: 15 mins

Cook Time: 30 mins

Total Time: 45 mins

Kitchen Equipment Needed

  • Large pot
  • Wooden spoon
  • Measuring cups and spoons
  • Cutting board
  • Knife

Ingredients

  • 8 oz lasagna noodles, broken into pieces
  • 2 tablespoons olive oil
  • 4 cloves garlic, minced
  • 4 cups chicken or vegetable broth
  • 2 cups heavy cream
  • 1 cup grated Parmesan cheese
  • 2 cups shredded mozzarella cheese
  • 1 teaspoon Italian seasoning
  • Salt and pepper to taste
  • Fresh basil for garnish

Directions

  1. In a large pot, heat olive oil over medium heat. Add minced garlic and sauté until fragrant, about 1 minute.
  2. Pour in the broth and bring to a boil. Add the broken lasagna noodles and cook according to package instructions for about 8-10 minutes.
  3. Reduce heat, then stir in the heavy cream, Parmesan cheese, and Italian seasoning. Stir until cheese melts and the soup becomes creamy.
  4. Mix in mozzarella cheese, continuing to stir until it’s melted and incorporated.
  5. Season with salt and pepper, adjusting to taste. Serve hot, garnished with fresh basil.

Recipe Notes

  • Feel free to add cooked sausage or chicken for extra protein.
  • Substitute heavy cream with half-and-half for a lighter version.
  • This soup can be customized with your favorite vegetables, like spinach or bell peppers.
  • Leftovers can thicken; add broth when reheating for a creamier texture.

Delicious Mongolian Ground Beef Noodles: A Flavorful Recipe Guide

Mongolian Ground Beef Noodles Recipe: A Flavorful Asian Delight

⚖️
Difficulty
Easy

⏲️
Prep Time
15 mins

🕒
Cook Time
20 mins

⏱️
Total Time
35 mins

🍽️
Servings
4 servings

Mongolian Ground Beef Noodles are a delectable fusion of flavors and textures that captures the essence of Asian cuisine. This dish combines the comfort of hearty beef with the satisfying chewiness of noodles, all bathed in a savory sauce that tantalizes your taste buds. As you take your first bite, the rich umami flavors explode in your mouth, offering a delightful experience that feels like a warm hug on a plate. Whether you’re a busy professional or a family looking for a quick weeknight meal, this recipe is sure to become a beloved staple in your kitchen.

Imagine slurping up perfectly cooked noodles, casual yet elegant—perfect for any occasion. The sauce, imbued with soy sauce’s depth and a hint of sweetness, coats the noodles beautifully while tender green onions and vibrant bell peppers add a refreshing crunch that complements the softness of the beef. It’s a beautiful medley of colors, smells, and flavors that you’ll want to return to time and again.

Quick Recipe Highlights

  • Flavor Profile: Sweet and savory with a kick of umami from soy sauce.
  • Texture: Tender beef paired with chewy noodles and crunchy vegetables.
  • Aroma: Rich and fragrant, with the scent of garlic and ginger permeating the air.
  • Visual Appeal: A colorful dish with vibrant greens, reds, and golden-brown beef.
  • Skill Level Needed: Perfect for beginner cooks who want to expand their culinary repertoire.
  • Special Equipment: A non-stick skillet and a pot for boiling noodles.

Recipe Overview

  • Difficulty Level: This Mongolian Ground Beef Noodles recipe is classified as easy, making it accessible for novice cooks and families alike.
  • Category: A fantastic choice for dinner, it offers a well-rounded meal in one dish.
  • Cuisine: This recipe draws inspiration from Mongolian cuisine, known for its rich, savory flavors and hearty ingredients.
  • Cost: Ingredients are generally budget-friendly, with the total cost around $15 for four servings.
  • Season: Great for year-round dining, but particularly delicious during colder months when comfort food is desired.
  • Occasion: Perfect for family meals, casual gatherings, or weeknight dinners.

Why You’ll Love This Recipe

Mongolian Ground Beef Noodles are not just a meal; they’re an experience. This dish’s taste and texture are unmatched, with the savory beef creating a satisfying bite paired with soft noodles. The addition of fresh vegetables adds crunch, while the sauce ties everything together, making each bite delightful and satisfying.

Convenience is another highlight of this recipe. With a prep time of just 15 minutes and a cook time of 20 minutes, you can whip up this delicious meal even on the busiest weeknights. It’s the perfect solution for families seeking quick, tasty dinner options without compromising on flavor or nutrition.

Speaking of nutrition, this dish offers a balanced mix of protein from the beef and carbohydrates from the noodles, along with essential vitamins from the vegetables. It’s not just filling—it’s a wholesome meal option that satisfies both hunger and nutritional needs.

Moreover, Mongolian Ground Beef Noodles are fantastic for social gatherings. Whether you’re hosting a dinner party or a casual get-together, this dish is sure to please your guests, with its flavors inviting compliments and second helpings.

Finally, let’s talk about cost-effectiveness. Most ingredients are easily found in your local grocery store, and the entire dish can be made for a fraction of what you’d pay for a takeaway. This makes it a budget-friendly option for families looking to stretch their dining dollar.

Historical Background and Cultural Significance

The roots of Mongolian Ground Beef Noodles can be traced back to the cultural exchanges between Mongolian and Chinese culinary traditions. Originally, stir-fried noodle dishes were popular among nomadic herders who required hearty meals that fueled their labor-intensive lifestyles. Over time, as trade routes opened up, flavors and cooking techniques blended, giving birth to dishes that are now loved across many cultures.

Culturally, Mongolian cuisine emphasizes the importance of meat, particularly beef and lamb. Both are central to Mongolian identity and livelihood, as the harsh climate favors livestock farming. Thus, beef became a staple ingredient in various Mongolian dishes, including stir-fried noodle preparations that resonate with the longevity of these traditions.

The evolution of the recipe reflects regional influences, notably incorporating aspects of Chinese and even Western cuisine through the introduction of sauces and cooking methods. Today, Mongolian Ground Beef Noodles not only serve as a delicious meal but also stand as a testament to culinary adaptation and globalization, making it popular in many households worldwide.

Regional variations of this dish can be found throughout Asia, often utilizing different types of noodles or proteins. This adaptability showcases the dish’s versatility and widespread appeal, allowing it to fit seamlessly into various gastronomic cultures while retaining its identity.

Ingredient Deep Dive

Ground Beef: This key ingredient is not only a source of protein but also plays a significant role in Mongolian culinary traditions. Beef is favored for its rich flavor and tender texture when cooked right. When selecting ground beef, look for options with a good fat content (around 80/20) for balanced flavor. Store in the refrigerator and consume within a couple of days or freeze for longer storage. Substitutions can include ground turkey or chicken for a leaner option.

Egg Noodles: Egg noodles are widely used in many Asian dishes for their chewy texture and ability to absorb sauces. Historically, they are prominent in East Asian cuisine, offering a hearty and fulfilling base. For selection, opt for fresh noodles when available, and store them appropriately to maintain freshness. If you need alternatives, consider using rice noodles or even whole grain options for different dietary preferences.

Bell Peppers: The addition of bell peppers not only provides a vibrant pop of color but also contributes essential vitamins and a touch of sweetness to the dish. Traditionally, bell peppers are easy to incorporate into various cuisines due to their versatility and flavor. When purchasing, select firm unblemished peppers, and store them in the refrigerator. Consider substituting with other vegetables like snap peas or carrots for a varied twist.

Common Mistakes to Avoid

  • Overcooking the noodles: Make sure to follow the package instructions for cooking time to avoid mushy noodles, which detract from the overall texture of the dish.
  • Using high heat for too long: While stir-frying, maintaining the right temperature is crucial to avoid burning the meat and vegetables—aim for medium-high heat.
  • Not seasoning properly: Ensure ample seasoning of both the meat and vegetables; under-seasoned dishes can taste bland.
  • Skipping the marination: Allowing the ground beef to marinate briefly enhances flavor throughout the dish, making it more enjoyable.
  • Using cold ingredients: Ensure your vegetables and meat are at room temperature before cooking to promote even cooking.
  • Rushing the process: Give yourself time to prepare ingredients properly; mise en place will simplify your cooking session.
  • Ignoring the resting time: Letting the cooked dish sit for a few minutes helps the flavors to meld together beautifully.
  • Not adjusting sauce levels: Taste your sauce as you cook; it’s essential to balance sweetness, saltiness, and spiciness according to your preference.

Essential Techniques

Stir-Frying: This fundamental technique allows for quick cooking at high heat, preserving the flavors and nutrients of the ingredients. Mastering stir-frying involves using a non-stick skillet or wok, keeping the ingredients moving constantly, and ensuring not to overcrowd the pan.

Marination: Allowing the ground beef to marinate in soy sauce and other seasonings is crucial for depth of flavor. The process not only tenderizes the meat but also infuses it with additional taste, enhancing the overall dish. Avoid vegetable-based marinades if you’re looking for a strong flavor infusion.

Pro Tips for Perfect Mongolian Ground Beef Noodles

1. **Prep Ingredients Before Cooking:** Have all your ingredients prepped and ready to go; stir-frying goes fast, and you’ll want everything at hand.
2. **Use Fresh Noodles:** If possible, opt for fresh egg noodles—they will elevate the dish’s texture significantly compared to dried varieties.
3. **Adjust Sauce According to Taste:** Feel free to tweak soy sauce, sugar, or even add chili paste based on your personal flavor preference.
4. **Don’t Rush the Cooking Process:** Allow the beef to sear properly before adding the vegetables for the best flavor development.
5. **Experiment with Vegetables:** Don’t hesitate to add or substitute your favorite vegetables; broccoli or bok choy can be great additions.
6. **Serve Hot for Best Flavor:** Always serve immediately for the best taste experience; noodles are best enjoyed fresh.
7. **Garnish Creatively:** Consider garnishing with sesame seeds or cilantro to boost visual appeal and add extra flavor layers.
8. **Make it a Meal:** Pair with a side salad or spring rolls to turn this simple dish into a full meal spread.

Variations and Adaptations

Regional variations of this dish can include switching up the protein—try chicken or tofu for a vegetarian-friendly option. Seasonal adaptations might involve adding seasonal vegetables like zucchini in the summer. For those looking to reduce carbs, spiralized veggies such as zucchini or carrots can serve as a base in place of traditional noodles.

Flavor variations can be achieved by incorporating different sauces like teriyaki or even adding a splash of vinegar for a tangy twist. Texture adaptations may include adding nuts or seeds for crunch or cooking the vegetables just until tender for an extra crisp bite.

Presentation alternatives could involve serving the dish in lettuce wraps for a fun, fresh twist or in bowls garnished with chopped nuts and green onions, scaling the dish up for entertaining.

Serving and Presentation Guide

For optimal presentation, serve Mongolian Ground Beef Noodles in a large bowl or platter, showcasing the ingredients’ colors. Use chopsticks or large forks for a traditional aesthetic and garnish with green onions and sesame seeds.

Accompany the dish with a side of pickled vegetables, enhancing the flavor profile. Consider using thinly sliced lime or lemon on the side, allowing guests to brighten their plates to their taste.

For temperature considerations, ensure that the noodles are served hot but not scalding; allow a minute of rest before serving. Finally, practice portion control, serving smaller amounts to encourage guests to take seconds without overfilling their plates.

Wine and Beverage Pairing

When it comes to wine pairings, consider a light-bodied red, such as Pinot Noir or a medium-bodied white like Riesling. Those wines complement the sweet and savory aspects of the dish beautifully.

For non-alcoholic options, a refreshing iced tea or lemonade can also provide the perfect balance, enhancing the meal’s flavors without overpowering them. If you enjoy coffee or tea, a mild green tea can be delightful alongside, bringing a refreshing, herbaceous note to the table.

Temperature is essential—serve wine chilled or at room temperature, while iced tea should be served abundantly, catering to guests’ preferences during meals.

Storage and Shelf Life

To store any leftover Mongolian Ground Beef Noodles, place them in an airtight container in the refrigerator, where they will keep well for 3-4 days. For longer storage, consider freezing the dish in iindividual portions to enjoy later on busy days.

Ensure the dish has cooled to room temperature before sealing to prevent condensation buildup which can cause sogginess. If reheating, utilize a microwave or stovetop for quick and even warming, adding a splash of water or broth to restore moisture if needed.

Watch for signs of spoilage such as an off smell or changing color; these are indicators to discard. When freezing, enjoy within 2-3 months for the best quality and taste.

Make Ahead Strategies

To make your Mongolian Ground Beef Noodles ahead of time, consider prepping ingredients a day before. Chop vegetables and marinate the ground beef, storing them separately in the refrigerator to maintain freshness.

While you can cook the noodles in advance, it’s best to do it on the day you intend to serve for the optimal texture. Assemble and cook the dish when ready, ensuring that all ingredients are at room temperature for even cooking.

If you’d like to add a fresh touch, consider keeping additional herbs or fresh vegetables to sprinkle on right before serving, adding crispness and color.

Scaling Instructions

If you wish to halve the Mongolian Ground Beef Noodles recipe, simply divide all measurements by two and adjust cooking times slightly if necessary. For doubling or tripling, prepare ingredients in larger batches, and ensure you have enough cooking space to avoid overcrowding the pan.

Equipment adjustments may be necessary, opting for larger skillets or two pans working together if preparing for crowds. Monitor timing carefully, as larger quantities may take a little longer to cook through while still achieving that beautiful sear on the beef.

For storage considerations, allow extra portions to cool completely before placing them in appropriate containers; ensure you label them well with dates for freshness tracking.

Nutritional Deep Dive

Mongolian Ground Beef Noodles offer a healthy balance of macronutrients, providing protein from the beef, carbohydrates from the noodles, and essential fats if you choose higher fat content beef. Each serving can contain around 400-500 calories, depending on the portion size and recipe variations.

Micronutrient-wise, this dish is rich in iron, zinc (from beef), and vitamins A and C (from the bell peppers). Incorporating various vegetables contributes to a broader spectrum of vitamins and minerals.

When considering health benefits, protein is essential for muscle repair and growth, while the vitamins contribute to overall immune function and skin health. For portion analysis, serving sizes should be controlled, particularly if one aims to maintain or lose weight, being mindful of ingredient ratios in larger batches.

Dietary Adaptations

For those following gluten-free diets, rice noodles can be substituted to make this dish safe for all diners. For dairy-free adaptations, all ingredients are naturally dairy-free, making the dish inclusive.

Vegetarians can replace beef with tofu or mushrooms, adding meat-like textures and flavors when marinated properly. Low-carb or keto enthusiasts can use spiralized zucchini or shirataki noodles as a replacement for traditional egg noodles to enjoy a similar dish without the carbs.

Paleo followers might use coconut aminos instead of soy sauce and replace the noodles with spiralized vegetables for a compliant meal. Low-FODMAP eaters can adjust ingredients by excluding high-FODMAP vegetables while retaining flavor by focusing on the lean protein and acceptable veggies.

Troubleshooting Guide

For texture issues such as overly chewy noodles, ensure they are cooked al dente; they should have a slight bite to them. If the beef turns out tough, consider marinating it longer next time or reducing cooking time to enhance tenderness.

Flavor balance can become skewed if over-salted; balance with additional sugar or fresh vegetables. Monitor your other ingredients to alleviate any bitterness from the sauce, using maple syrup or honey for a natural sweetness.

Temperature problems often arise from cooking on high heat too long; always strive for a consistent medium-high heat for even cooking results. If ingredients are substituted, be wary of different cooking times needed and adjust accordingly.

Lastly, if timing concerns arise, consider preparing components in advance to ensure all ingredients are ready to go so your meals can be stress-free.

Recipe Success Stories

Community feedback reveals that Mongolian Ground Beef Noodles have become a family favorite, with readers often sharing their enjoyment and success stories. Parents have noted how their children adore the dish, prompting them to try various adaptations with different vegetables and noodles.

Many have experienced success with variations that incorporate local produce, showing how delightful it can be to alter a traditional recipe. Feedback often highlights tips on how to take great photos of the dish, emphasizing proper plating and natural lighting to showcase the vibrant colors beautifully.

Readers also enjoy sharing suggestions for spice levels and alternative marinades, creating a lively exchange of culinary experiences that fosters community engagement around this beloved dish.

Frequently Asked Questions

What can I use instead of ground beef?
Ground turkey, chicken, or even plant-based meat alternatives can work well in this dish. Just ensure to adjust cooking times as necessary to ensure fully cooked protein.

Can I make this dish vegetarian?
Absolutely! Use tofu or tempeh and incorporate more vegetables for a filling and satisfying vegetarian meal.

How do I store leftovers?
Place any leftovers in an airtight container and refrigerate for up to 3-4 days, or freeze for longer shelf life.

Can I prepare this dish in advance?
Yes, you can prepare ingredients a day in advance but it is best to cook the noodles fresh right before serving.

What type of noodles should I use?
Egg noodles are traditional, but feel free to substitute with rice noodles or even whole wheat noodles for a slight twist.

Is this dish gluten-free?
To make it gluten-free, simply substitute traditional noodles with rice noodles or a gluten-free variety, and use tamari instead of soy sauce.

How can I make it spicier?
Add in some crushed red pepper flakes or a dash of chili sauce for an extra kick if you enjoy heat in your dishes.

Is there a way to reduce calories in this recipe?
Opt for leaner cuts of beef or utilize ground turkey to lower calorie content, and serve with a larger portion of vegetables.

Can I add more vegetables?
Certainly! Feel free to add favorites such as carrots, snap peas, or broccoli for extra flavor and nutrients.

What should I serve with this dish?
Consider pairing with a light salad or some spring rolls to create a full meal experience that balances flavors and textures.

Additional Resources

For further inspiration, explore related recipes like Quick Stir-Fried Noodles or Beef and Vegetable Stir Fry, both offering variations on similar flavor profiles. Additionally, techniques such as quick marinades or mastering stir-fry can enhance your overall cooking skills.

Investing in quality kitchen equipment can also make significant differences. Woks and good knives can improve your preparation speed and stirring techniques, drastically changing your cooking experience.

For seasonal variations, consider adapting main ingredients to align with summer produce or winter root vegetables that might mix delightfully with this recipe’s core components.

Join the Conversation

We’d love to hear your experiences with making Mongolian Ground Beef Noodles! Share your culinary creations on social media using our hashtag, and show us your delicious twists on the classic recipe.

Don’t forget to leave us feedback on your experience—your insights help other home cooks navigate their culinary adventures. Engage with others in the community by commenting on their photos and suggestions to create a lively and informative space for sharing family recipes and ideas.

Let’s keep the conversation going as we embrace delicious, diverse culinary experiences and continue creating exciting dishes together!

The Recipe

Mongolian Ground Beef Noodles

Serves: 4 servings

Prep Time: 15 mins

Cook Time: 20 mins

Total Time: 35 mins

Kitchen Equipment Needed

  • Non-stick skillet
  • Pot for boiling noodles
  • Cutting board
  • Knife
  • Measuring cups and spoons

Ingredients

  • 1 pound ground beef
  • 8 ounces egg noodles
  • 1 bell pepper, sliced
  • 3 green onions, chopped
  • 3 cloves garlic, minced
  • 1 inch ginger, grated
  • 1/4 cup soy sauce
  • 2 tablespoons brown sugar
  • 2 tablespoons vegetable oil
  • Salt and pepper to taste

Directions

  1. Cook the noodles according to package instructions; drain and set aside.
  2. In a large skillet, heat oil over medium-high heat.
  3. Add ground beef and cook until browned, breaking it apart with a spatula.
  4. Stir in garlic and ginger, cooking for an additional minute until fragrant.
  5. Add bell pepper, soy sauce, and brown sugar to the beef; mix well.
  6. Add the cooked noodles to the skillet, tossing to combine and heat through.
  7. Season with salt and pepper, and garnish with green onions before serving.

Recipe Notes

  • Feel free to substitute ground beef with turkey or chicken for a leaner option.
  • Adjust the level of sweetness or saltiness based on your taste preferences.
  • Add your favorite vegetables for variety and nutrition.

Delicious Golden Scallops with Creamy Parmesan Polenta Recipe

Golden Scallops with Parmesan Polenta: A Delightful Seafood Dish

⚖️
Difficulty
Medium

⏲️
Prep Time
15 mins

🕒
Cook Time
20 mins

⏱️
Total Time
35 mins

🍽️
Servings
4

Indulge in the exquisite combination of flavors in this Golden Scallops with Parmesan Polenta dish, a seafood culinary delight that elevates any dinner occasion. Each plump, tender scallop is seared to golden perfection, creating a savory crust that beautifully contrasts the creamy, rich polenta infused with Parmesan cheese. Whether you’re cooking for a special occasion or simply wanting to savor a gourmet meal at home, this dish promises to impress your guests with its elegant presentation and delightful taste.

As you take your first bite, the crisp exterior of the scallops gives way to a buttery, ocean-kissed interior. Paired with the smooth and cheesy polenta, the dish delivers a delightful balance of textures and flavors—each mouthful is a harmonious blend of sea and savor. It’s not just a meal; it’s an experience that invites you to slow down and relish the moment.

Quick Recipe Highlights

  • Flavor Profile: The dish offers a rich umami flavor from the Parmesan cheese, perfectly complemented by the sweet undertones of the scallops.
  • Texture: Expect a delightful contrast between the crispy outer layer of the scallops and the creamy, velvety mouthfeel of the polenta.
  • Aroma: The warm, buttery aroma of seared scallops combined with the rich scent of melted cheese fills your kitchen with a comforting fragrance.
  • Visual Appeal: The striking golden color of the scallops against the silky white polenta creates a visually stunning presentation.
  • Skill Level Needed: This recipe requires basic cooking skills, making it accessible yet impressive for novice and seasoned cooks alike.
  • Special Equipment: A non-stick skillet and wooden spoon are essential for achieving the ideal sear and creamy texture for the polenta.

Recipe Overview

  • Difficulty Level: Preparing Golden Scallops with Parmesan Polenta is rated medium due to the need for precise cooking times for both components to achieve optimal texture and flavor.
  • Category: This recipe falls under the seafood category and serves as a fantastic main course, ideal for dinner parties or romantic meals.
  • Cuisine: This dish showcases influences from Italian cuisine, emphasizing the harmony between seafood and cheese, commonly found in coastal regions.
  • Cost: Ingredients such as scallops can vary in price, but the overall cost remains reasonable, typically around $15-$20 for a delicious dinner for four.
  • Season: While scallops are available year-round, this dish is particularly delightful in the cooler months when hearty meals are most appreciated.
  • Occasion: Perfect for a variety of events, from intimate dinners to festive gatherings, this recipe is versatile enough to suit many occasions.

Why You’ll Love This Recipe

Crafted to please the palate, this Golden Scallops with Parmesan Polenta dish celebrates the exquisite flavors of the sea. The subtle sweetness of the golden scallops is enhanced by a perfect sear, which locks in their natural juices, resulting in a succulent and tender bite that melts in your mouth. The creamy Parmesan polenta serves as a delicious canvas, soaking up the flavors of the dish while adding a rich, comforting element that complements the scallops beautifully.

Additionally, the convenience of this recipe makes it a constant favorite. The cooking steps are straightforward and can be accomplished in about 35 minutes, allowing you to enjoy a gourmet meal without spending hours in the kitchen. This time efficiency does not compromise the quality or experience, making it perfect for both weeknight dinners and weekend gatherings.

From a nutritional standpoint, scallops are lean protein powerhouses, offering an excellent source of vitamins and minerals such as B12, selenium, and omega-3 fatty acids. When paired with the wholesome benefits of polenta, which provides fiber and healthy carbohydrates, this dish becomes a well-rounded meal that supports a balanced diet. It’s a smart, delicious way to indulge without compromising your health goals.

Sharing this dish at your dinner table creates a space for connection and conversation. The appealing presentation of the scallops and creamy polenta invites compliments, making it a perfect centerpiece for family dinners or celebrations with friends. Enjoying this meal together fosters enjoyment, sparking delightful conversations about food culture and personal experiences.

Finally, this dish is budget-friendly, especially when prepared at home. Purchasing fresh scallops and simple pantry ingredients means that you can serve an elegant meal without breaking the bank. It’s a cost-effective way to impress your guests and indulge in the flavors of fine dining.

Historical Background and Cultural Significance

The origins of scallop dishes can be traced back to coastal communities worldwide, celebrating the seafood bounty available to them. In Italy, seafood is pivotal in many traditional dishes, especially in coastal regions where fresh ingredients thrive. The combination of seafood and cream-based sauces has evolved over centuries, highlighting the elegance of fresh, local seafood.

Culturally, scallops represent abundance and prosperity. In many traditions, they are viewed as a delicacy served during significant ceremonies or gatherings, symbolizing luxury and celebration. The appreciation for scallops is reflected in their inclusion in various recipes and culinary adaptations around the globe.

Over the years, recipes featuring scallops have transformed, adapting to contemporary tastes and cooking methods. The traditional approach of sautéing scallops has now found its way into modern interpretations involving unique techniques and flavor profiles, showcasing chefs’ creativity while respecting time-honored traditions.

Regional variations also exist, with different cultures using local herbs, spices, and cooking techniques to enhance their scallop dishes. Whether grilled, baked, or seared, the versatility of scallops allows for a wide array of culinary expressions that celebrate diverse flavor profiles.

Ingredient Deep Dive

For the scallops, their cultural significance extends beyond delightful taste; they are integral to many coastal cuisines. Rich in protein and low in fat, scallops provide many essential nutrients, including B vitamins and selenium. When selecting scallops, look for fresh, firm specimens with a slight sweet scent of the sea. Store them in the coldest part of your refrigerator and aim to consume them within a day of purchase for optimal freshness. If unavailable, shrimp or tilapia can serve as suitable substitutions.

Parmesan cheese is another key ingredient, renowned for its rich flavor and nutritional benefits. This cheese is a staple in Italian cuisine, providing depth to pasta, salads, and sauces. When selecting Parmesan, opt for the real thing with a proper D.O.P. certification for quality. It adds calcium and protein to your meal and enhances flavor complexity. Properly storing Parmesan involves keeping it wrapped tightly in wax paper within a refrigerator, ensuring it stays fresh for as long as possible.

Polenta, a staple in Italian cooking, is made from ground corn and boasts a rich history tied to rural food traditions. It’s a whole grain that provides essential nutrients and is gluten-free, making it an excellent option for those with dietary restrictions. When choosing polenta, look for stone-ground varieties for better texture and flavor. Store it in a cool, dry place and consider experimenting with toppings and mix-ins to adjust flavors and textures.

Common Mistakes to Avoid

  • Overcooking the scallops: This leads to a rubbery texture; aim for about 2-3 minutes per side.
  • Underseasoning: Don’t forget to season both the scallops and the polenta; a pinch of salt can make a big difference in flavor.
  • Not preheating the skillet: Make sure your skillet is hot enough before adding scallops to achieve a proper sear.
  • Using cold ingredients: Ensure that your ingredients, especially the polenta, are at room temperature before cooking for ideal consistency.
  • Not tasting as you cook: Adjust flavors along the way to ensure your final dish is well-seasoned.
  • Skipping the resting period: Allowing scallops to rest for a minute after cooking helps retain moisture.
  • Using low-quality Parmesan: It can affect the overall flavor of the dish; opt for fresh-grated or block cheese instead.
  • Neglecting the order of cooking: Cook the polenta first to ensure it’s warm when served with scallops.
  • Not allowing polenta to thicken: Stir frequently and monitor the heat, as polenta needs proper cooking time to reach its creamy state.
  • Inadequate cleaning of the scallops: Remove the side muscle and any grit for the best taste and texture.

Essential Techniques

Searing scallops is a critical technique that elevates their flavor and presentation. It allows the natural sugars to caramelize, creating a golden crust while keeping the interior tender and juicy. To master this, preheat your skillet and dry the scallops thoroughly—this prevents steaming and enables that coveted sear. A common pitfall is overcrowding the pan, which populates heat and leads to uneven cooking. Watch for visual cues; scallops should be opaque and easily release from the pan.

For preparing polenta, it’s essential to understand the importance of slow cooking. This technique helps the cornmeal absorb water and swell, creating a creamy texture. Regular stirring prevents lumps and sticking, ensuring smoothness. Many beginners rush this step or use high heat, leading to burnt bits or undercooked grains. Look for a thick, creamy consistency as an indication of success, and don’t hesitate to adjust with more liquid as needed.

Pro Tips for Perfect Golden Scallops with Parmesan Polenta

1. Always pat the scallops dry before cooking to ensure that you achieve that beautiful sear without steaming them.
2. Use a combination of olive oil and butter for searing to enhance both flavor and browning.
3. When cooking the scallops, resist the urge to move them too much in the pan—let them be to allow for the development of a perfect crust.
4. For even creamier polenta, consider adding a splash of cream or a pat of butter at the end, enriching the overall texture.
5. Experiment with different cheeses in the polenta, such as Gouda or feta, to add unique flavors that complement the scallops.
6. Always taste as you go; small adjustments of cheese or seasoning preparations can enhance the dish significantly.
7. Use fresh herbs such as parsley or chives for sprinkling on top just before serving to add a touch of freshness.
8. Make sure to serve immediately after plating for the best texture and taste experience.

Variations and Adaptations

Explore exciting regional variations of this dish by utilizing local seafood options in place of scallops. For example, substituting shrimp or crab can introduce different flavor profiles and textures while preserving the essence of the dish. Seasonally, feel free to enhance your polenta with roasted vegetables like zucchini or peppers for added depth.

For dietary modifications, consider using dairy-free cheese alternatives if making the dish vegan. The texture of polenta remains complimentary, and you can still achieve a rich, creamy base. You can also customize the flavors of polenta by incorporating spices such as smoked paprika or turmeric, adding warmth and vibrant color.

Adjusting the presentation can also elevate the dining experience; consider layering the polenta with fresh spinach or arugula before adding the scallops for an inviting visual contrast. This change not only enhances the dish’s appearance but also adds nutritional value.

Serving and Presentation Guide

When serving Golden Scallops with Parmesan Polenta, consider plating techniques that showcase the delicate textures and colors of the dish. A simple yet elegant approach is to place a generous scoop of polenta in the center of the plate, creating a pool for the scallops to rest. For garnish, sprinkle freshly chopped herbs over the top, enhancing the dish’s aesthetic appeal.

Garnishing ideas include adding a sprinkle of freshly grated lemon zest for a burst of brightness that complements the oceanic flavors. Traditional accompaniments such as a drizzle of high-quality olive oil or a light squeeze of lemon juice can further enhance the taste profile.

For modern serving suggestions, consider setting the scallops atop the polenta at a slight angle, allowing their golden edges to create visual interest. Temperature considerations should ensure the polenta is served warm for optimal creaminess, while the scallops should be cooked just before serving.

Portion control can be adjusted based on serving size preferences; averaging 3-4 scallops per person, accompanied by a generous portion of polenta, makes for a balanced meal.

Wine and Beverage Pairing

To complement the rich flavors of Golden Scallops with Parmesan Polenta, consider pairing it with a crisp, white wine such as Sauvignon Blanc or a light Chardonnay. These wines possess refreshing acidity that beautifully balances the dish’s buttery elements.

For non-alcoholic alternatives, consider a bright lemon-infused sparkling water, which can cleanse the palate between bites and enhance the seafood’s essence. If coffee or tea options are desired, an herbal tea with citrus notes can provide a refreshing finish to the meal, particularly after indulging in a creamy dish.

Wine serving suggestions include slightly chilling the Chardonnay to maintain its refreshing crispness while enhancing the scallops’ flavors. Ensure that your beverage pairings are served at optimal temperatures for the best experience.

Storage and Shelf Life

The best storage methods for leftover Golden Scallops with Parmesan Polenta include placing them in an airtight container to maintain freshness and prevent sogginess. Refrigeration is necessary for short-term storage, allowing leftovers to last for 2-3 days.

Ensure the leftovers are stored promptly and at appropriate temperatures, aiming to consume them quickly to maintain quality. Signs of spoilage can include off odors or visual changes in texture, particularly in the scallops.

Reheating instructions should involve using a gentle heat to prevent overcooking the scallops, ideally employing a stove or microwave. Consider adding a splash of broth or water when reheating the polenta to restore its creamy consistency.

For longer storage, you can freeze the polenta but should avoid freezing scallops, as this can affect texture and flavor significantly.

Make Ahead Strategies

To streamline your cooking experience, consider preparing the polenta in advance. It can be made a day ahead and stored in the refrigerator until it’s time to serve. Simply reheat it with a little water or broth to achieve the desired creamy consistency.

If you’re planning to entertain, searing the scallops just before serving is essential for optimal texture. To ensure that proteins are perfectly timed, have all ingredients measured and ready to go before you start cooking. This approach creates a smooth experience and means you can focus on enjoying your time with guests.

Consider preparing additional sauces or garnishes in advance, such as herb toppings or dressings, to save time and elevate your dish easily. Having these elements prepped allows you to create a beautiful presentation without fuss at the moment of serving.

Finally, be strategic about your serving timeline; allowing the polenta time to cool in shapes or molds can enhance presentation without impacting quality.

Scaling Instructions

Adjusting the quantities of Golden Scallops with Parmesan Polenta is straightforward. To halve the recipe, cut the ingredients down by 50%, ensuring to maintain the same cooking techniques for best results.

If doubling or tripling, be mindful of equipment adjustments; using larger skillets or cooking in batches can ensure that scallops achieve that golden crust without crowding. Timing modifications will be minimal unless using a larger skillet, in which case, keep an eye on cooking times to ensure even doneness.

Storage considerations become crucial with larger batches; ensure ample space in your fridge or containers to accommodate the extra volume while retaining quality. Note that reheating larger quantities may take longer, so plan accordingly.

Nutritional Deep Dive

Golden Scallops with Parmesan Polenta presents a balanced approach to nutrition, showcasing macronutrients critical for overall health. The dish consists primarily of lean proteins from scallops, supporting muscle maintenance and overall physical health, while polenta offers valuable carbohydrates, providing energy to fuel your day.

Micronutrient analysis reveals essential vitamins and minerals such as B12, iron, and magnesium derived from the scallops, essential for neurological function and reducing fatigue. The cheese in the polenta also adds calcium, supporting bone health and well-being.

Health benefits extend beyond the plate; scallops are rich in omega-3 fatty acids, beneficial for cardiovascular health, while polenta, being gluten-free, accommodates those with sensitivities. This dish aligns well with dietary considerations, catering to various needs while providing satisfaction and flavor.

Portion analysis remains important; consider serving sizes of scallops along with an appropriate portion of creamy polenta. This control encourages enjoying your meal while still being aligned with mindful eating practices.

Dietary Adaptations

Golden Scallops with Parmesan Polenta can be adjusted to suit various dietary needs. For a gluten-free version, simply ensure that all ingredients, including any broths used, are gluten-free, as polenta is naturally gluten-free.

Dairy-free adaptations are achievable by using nutritional yeast for cheesy flavor in the polenta or argyle-specific dairy alternatives. This keeps the comforting texture while ensuring dietary restrictions are met.

For those following vegan diets, replace scallops with a plant-based protein option such as mushrooms or marinated tofu, conveying umami flavors while enhancing the meal’s nutritional profile. Be cautious with seasoning to retain depth.

Low-carb variations can involve substituting polenta with a cauliflower mash, offering a similar texture while reducing carbohydrate intake. This swap retains the creaminess of the dish while supporting low-carb diets.

For keto enthusiasts, opting for high-fat dairy products in the preparation, such as cream cheese or grass-fed butter, can increase fat content with a similar texture. Portions should still align with keto-friendly guidelines.

Troubleshooting Guide

Addressing texture issues in scallops often involves adjusting cooking times or heat settings; ensure your skillet is properly heated before adding the seafood to avoid rubbery results.

For flavor balance, adjust seasoning gradually, using salt, acids, or herbs to enhance or counter-balance natural sweetness; taste as you experiment to achieve the desired profile.

Temperature problems may arise if scallops are added too cold; always allow them to reach room temperature before cooking to ensure even cooking and a golden crust.

Equipment challenges often involve cookware that isn’t non-stick. To prevent sticking, ensure proper preheating and adjust your oil quantities accordingly; cast iron or seasoned pans typically work best for high temperatures.

Ingredient substitutions should be considered if staple ingredients are unavailable; culinary creativity allows for unique presentations—consider using different seafood or cheeses for varied offerings.

Timing concerns for scallops require careful monitoring. A quick sear is vital; overcooking can lead to unsatisfying outcomes. Knowing when to flip and efficiently timing polenta preparation will yield the best results.

Recipe Success Stories

In our community, countless home cooks share stories of the joy brought by Golden Scallops with Parmesan Polenta during family meals. Many have reported delight at how quickly the dish comes together, even when entertaining guests, emphasizing the recipe’s accessibility for skill levels of all backgrounds.

Feedback highlights that variations, such as using different types of cheese or seafood, can lead to surprising results that sparked deeper culinary exploration and experimentation. Individual adaptations honoring taste preferences have resulted in unique family recipes, leading to proud moments during gatherings.

Photography tips abound as well; home chefs often showcase the vibrant colors and textures of this dish on social media, generating excitement and appreciation from family and friends. Such feedback contributes towards building confidence in culinary skills and elevating home dining experiences.

Adapting the recipe for dietary restrictions has also led to success stories, with many sharing how modifications make the dish wholesome while still honoring the essence of the original.

These anecdotal experiences emphasize the enduring nature of the recipe, showcasing its success in diverse kitchens and among various culinary cultures.

Frequently Asked Questions

1. How can I make the scallops more flavorful?
Seasoning with fresh herbs, citrus zest, or spices can elevate the flavor profile significantly. A marinade or a quick brine before cooking can also deepen their taste.

2. Can I use frozen scallops for this recipe?
Yes, but ensure to thaw them properly in the refrigerator before cooking to maintain their texture and flavor—never refreeze scallops after thawing.

3. What can I use instead of Parmesan cheese?
Alternatives like Pecorino Romano or Nutritional Yeast can provide a similar cheesy flavor depending on dietary preferences and restrictions.

4. How do I ensure my polenta is creamy?
Regular stirring while gradually adding broth or water helps achieve a smooth, creamy texture. Use high-quality cornmeal for the best results.

5. How can I store leftovers?
Place scallops and polenta in airtight containers; consume them within 2-3 days for optimal freshness. Reheat gently to avoid overcooking.

6. Should I rinse the scallops before cooking?
Yes, rinsing helps remove any grit, but remember to pat them dry with paper towels to ensure proper searing.

7. Can I double the recipe?
Absolutely! Just adjust cooking times as needed, cooking in batches if necessary to ensure even searing.

8. Is this dish suitable for meal prep?
The polenta can be made ahead, but scallops are best cooked fresh due to their delicate texture.

9. What sides would pair well with this dish?
A fresh, crisp salad or roasted asparagus can make excellent accompaniments that enhance the overall meal.

10. Can I serve this dish cold?
This dish is best enjoyed warm, but if preferred, you can chill it slightly; however, it will affect the texture of both components.

Additional Resources

Explore related recipes on our blog that highlight seafood and creamy grains to enhance your culinary repertoire. Dive into technique guides that provide insightful cooking methods for perfecting your skills in the kitchen.

Investigate ingredient information ensuring you select the best types for your culinary endeavors—understanding the nuances of seafood quality can significantly impact flavor. Utilize equipment recommendations to choose appropriate tools that enhance your cooking experience.

Seasonal variations provide the opportunity for creativity; explore fresh ingredients that can be incorporated into this dish, allowing your meals to change with the seasons while retaining essential flavors.

Join the Conversation

We invite you to share your culinary adventures with Golden Scallops with Parmesan Polenta on social media. Show us your successful plates and engage with our community for inspiration, tips, and personal stories surrounding this enjoyable recipe.

Leave a review on this recipe to help fellow cooks discover its potential, or share a unique variation you’ve tried. Your contributions help build a supportive community centered on culinary exploration and shared success.

Photography tips for capturing the beauty of this dish are encouraged, ensuring that even the most novice cook can showcase their efforts in an engaging way—making every dining experience memorable.

The Recipe

Golden Scallops with Parmesan Polenta

Serves: 4

Prep Time: 15 mins

Cook Time: 20 mins

Total Time: 35 mins

Kitchen Equipment Needed

  • Non-stick skillet
  • Wooden spoon
  • Pot for polenta
  • Measuring cups and spoons
  • Knife and cutting board

Ingredients

  • 1 pound of scallops
  • 1 cup of polenta
  • 4 cups of chicken or vegetable broth
  • 1 cup of grated Parmesan cheese
  • 2 tablespoons of butter
  • 2 tablespoons of olive oil
  • Salt and pepper to taste
  • Fresh herbs for garnish

Directions

  1. In a pot, bring the broth to a boil. Add the polenta, whisking continuously to prevent lumps. Reduce heat and simmer until thickened, about 10-15 minutes.
  2. Stir in the Parmesan cheese, butter, salt, and pepper until smooth and creamy.
  3. While polenta cooks, heat olive oil in a non-stick skillet over medium-high heat. Pat scallops dry and season with salt and pepper.
  4. Add scallops to the hot skillet; sear for 2-3 minutes on each side until golden brown and cooked through.
  5. To serve, spoon polenta onto plates and top with sautéed scallops. Garnish with fresh herbs.

Recipe Notes

  • Don’t overcrowd the pan when cooking scallops for an even sear.
  • Ensure scallops are dried thoroughly for best texture.
  • Protein (scallops) can be swapped with any other seafood of preference.