Delicious Greek Chicken Meatballs with Easy Homemade Tzatziki Recipe

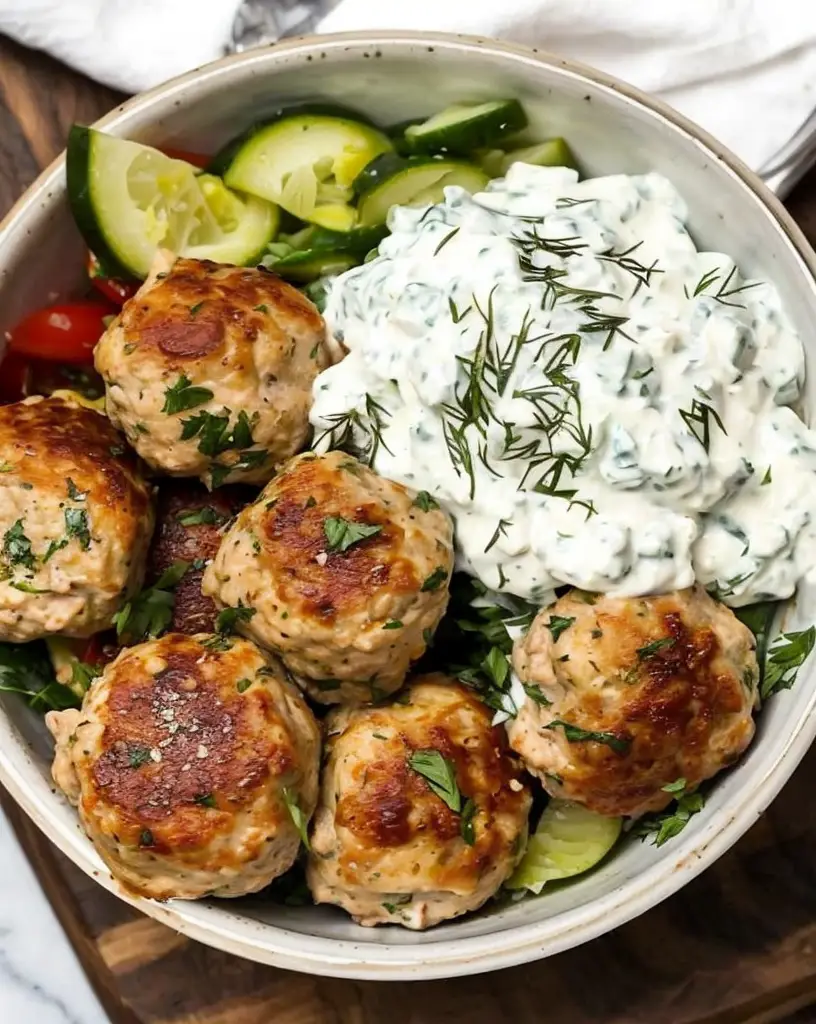
Greek Chicken Meatballs with Tzatziki: A Flavorful Mediterranean Delight

⚖️
Difficulty
Easy

⏲️
Prep Time
15 mins

🕒
Cook Time
25 mins

⏱️
Total Time
40 mins

🍽️
Servings
4 servings

Indulge your taste buds with these delicious Greek Chicken Meatballs paired perfectly with a creamy tzatziki sauce. This dish captures the essence of Mediterranean cuisine, showcasing the vibrant flavors of herbs, spices, and fresh ingredients. Every bite offers a juicy chicken meatball, seasoned with classic Greek flavors like garlic, oregano, and parsley, which create a delightful mix that is both savory and refreshing.

This Greek Chicken Meatballs recipe is more than just a meal; it’s a cultural experience. The lightness of the chicken combined with the coolness of the tzatziki makes it perfect for any occasion, whether a casual family dinner or an impressive gathering with friends. Serve these meatballs on a platter or make them the star of your plate with a side of your favorite veggies, rice, or pita.

Quick Recipe Highlights

  • Flavor Profile: The Greek Chicken Meatballs are infused with aromatic spices and fresh herbs that create a well-balanced flavor, while the tzatziki sauce adds a zesty and cooling effect.
  • Texture: These meatballs offer a tender and juicy bite, complemented by the creamy texture of the tzatziki sauce making every mouthful delightful.
  • Aroma: The irresistible aroma of garlic, dill, and lemon in the meatballs and tzatziki will fill your kitchen and invite everyone to the table.
  • Visual Appeal: The vibrant colors of the meatballs, paired with the fresh green herbs and creamy white tzatziki, make this dish beautiful and appetizing.
  • Skill Level Needed: This recipe is suitable for beginners, as it involves straightforward measurements and cooking techniques that anyone can master.
  • Special Equipment: No special equipment is required other than basic kitchen tools like mixing bowls, measuring cups, and a frying pan.

Recipe Overview

  • Difficulty Level: The ease of preparing Greek Chicken Meatballs makes it accessible to home cooks of all skill levels, requiring minimal steps and ingredients.
  • Category: This dish can be categorized as an appetizer, main course, or snack, offering versatility in meal planning.
  • Cuisine: Rooted in Greek culinary traditions, this recipe showcases the region’s love for fresh ingredients and bold flavors.
  • Cost: Greek Chicken Meatballs are budget-friendly, with ingredients typically ranging from $10 to $15, making them an economical choice for meal preparation.
  • Season: Perfect for any season, these meatballs shine in summer gatherings or winter comfort food dining.
  • Occasion: Ideal for social gatherings, potlucks, or family dinners, these meatballs are sure to impress your guests.

Why You’ll Love This Recipe

Taste and texture appeal: The Greek Chicken Meatballs combine juicy chicken with a medley of spices that transports your taste buds to the sun-drenched shores of Greece. Each meatball delivers a satisfying bite, bursting with flavor and tender juiciness.

Convenience and preparation benefits: With only 15 minutes of preparation and 25 minutes of cooking time, this easy recipe fits effortlessly into your busy lifestyle without sacrificing flavor.

Nutritional advantages: These meatballs are lean, high in protein, and gluten-free, making them a healthy option for maintaining a balanced diet while still enjoying delicious meals.

Social and entertaining value: The shareable nature of these meatballs makes them perfect for parties or gatherings, encouraging guests to mingle while enjoying a taste of Greece.

Cost-effectiveness and accessibility: Affordable ingredients make this recipe accessible to anyone, ensuring you can whip up a delightful dish for family and friends without breaking the bank.

Historical Background and Cultural Significance

The origin of meatballs can be traced back to ancient civilizations where they were a convenient way to utilize leftover meats and spices. In Greek cuisine, they evolved into a cherished dish known as “keftedes,” often made with lamb or beef before poultry variations became popular.

Cultural importance is underscored by the prominence of meatballs in Mediterranean gatherings and celebrations. In Greece, families often prepare these savory bites to share during festive occasions, representing hospitality and togetherness.

The recipe has evolved over the years, incorporating various herbs and spices reflecting regional tastes and available ingredients. Today, these Greek Chicken Meatballs are a modern twist on classic recipes cherished by generations.

Regional variations abound, as different areas of Greece have their unique takes on meatballs, ranging from additional ingredients like feta cheese to variations in the sauce served alongside.

Ingredient Deep Dive

Chicken: As a lean protein source, chicken is favored in many cuisines for its versatility. It is rich in essential nutrients, including B vitamins and selenium. When selecting chicken for meatballs, choose fresh, organic options for the best flavor. Store raw chicken in the coldest section of your fridge and use it within 2 days, or freeze for longer storage. If you’re looking for alternatives, ground turkey or pork can save the day.

Oregano: This herb provides a quintessential flavor found in Greek cuisine. Oregano is laden with antioxidants and has anti-inflammatory properties. Always choose fresh oregano when available for optimal flavor, and store dried oregano in a cool, dark place to retain its potency. Consider substituting dried thyme or Italian seasoning in a pinch.

Common Mistakes to Avoid

  • Using overly lean meat: While chicken is a lean option, using too lean a cut can result in dry meatballs. Opt for ground chicken with some fat content to retain moisture.
  • Overmixing the ingredients: Mixing too vigorously can lead to tough meatballs. Use your hands gently to combine meat and seasonings.
  • Skipping the resting time: Allowing meatballs to rest before cooking helps them retain moisture. Skipping this step can lead to dryness.
  • Ignoring cooking temperature: Cooking meatballs at too high a temperature can result in burnt exteriors and undercooked centers. Aim for medium heat for even cooking.
  • Not using aromatics: Ingredients like garlic and onion are key to flavor. Omitting these can leave your meatballs bland.
  • Using stale breadcrumbs: Fresh breadcrumbs lead to better texture and flavor. Use day-old bread or purchase fresh bread crumbs for best results.
  • Not using enough seasoning: A well-seasoned meatball is essential. Don’t hesitate to taste your mixture before cooking to adjust seasoning.
  • Overcrowding the pan: Cooking too many meatballs at once can lower the oil temperature, resulting in steaming rather than browning.
  • Ignoring sauce pairing: A flavorful tzatziki enhances the meatballs. Don’t skip on this essential accompaniment.
  • Serving without accompaniments: Consider serving with pita bread, salad, or rice for a well-rounded meal.

Essential Techniques

Mixing the meat: Properly mixing ground meat with seasonings is crucial for flavor and texture. Use your hands to combine ingredients gently, ensuring not to overwork the meat, which can lead to a tough consistency. Visual cues for success include a uniform color throughout the mixture without any dry patches.

Shaping meatballs: When forming meatballs, aim for uniform size for even cooking. A quick way to portion your mixture is using a small ice cream scoop or your hands to create equally sized spheres. Avoid pressing too firmly; a light touch keeps them tender.

Pro Tips for Perfect Greek Chicken Meatballs

Chill the mixture before forming meatballs to help them hold their shape during cooking.

For added flavor, consider mixing some grated lemon zest into the meat mixture.

Cook a small test meatball to check for seasoning before shaping the entire batch.

Brown the meatballs in batches, allowing them space in the pan for a perfect sear.

Use a meat thermometer to ensure an internal temperature of 165°F for safe consumption.

Prepare a double batch and freeze for quick meals later—just thaw and reheat!

Variations and Adaptations

Regional variations include alternative meat choices, like lamb or beef, and mixing in local spices. Swap feta cheese for classic Greek flavor within the meatball mixture for a twist. Use gluten-free breadcrumbs for dietary adaptations or serve with whole wheat pita for a healthier twist on the traditional.

For a seasonal adaptation, consider incorporating finely grated zucchini or spinach for added nutrients and moisture during the summer months.

Serving and Presentation Guide

Plating your Greek Chicken Meatballs beautifully enhances your dining experience. Arrange meatballs in a circular pattern drizzled with tzatziki and garnished with fresh herbs, creating an inviting visual centerpiece. For garnishing, consider fresh parsley, dill, or a sprinkle of paprika. Traditional accompaniments may include warm pita, Greek salad, or roasted vegetables.

Temperature plays a key role in serving; ensure meatballs are served hot for optimal flavor. Portion control can be managed by serving 2-3 meatballs alongside a generous scoop of tzatziki and a side salad for a balanced dinner plate.

Wine and Beverage Pairing

When it comes to wine pairing, a crisp white wine like Sauvignon Blanc or a light-bodied red like Pinot Noir complements these meatballs wonderfully. For non-alcoholic alternatives, consider serving sparkling water with a splash of lemon for refreshment. If you enjoy a warm beverage, opt for a light herbal tea to cleanse the palate after a delicious meal.

Storage and Shelf Life

These Greek Chicken Meatballs can be stored in an airtight container in the refrigerator for up to 3 days. For longer shelf life, freeze them individually on a baking sheet before transferring to a storage bag or container. Signs of spoilage include an off smell or discoloration. When reheating, ensure they reach an internal temperature of 165°F. To freeze, consider placing meatballs in a single layer, then stacking once frozen to save space.

Make Ahead Strategies

To save time on busy days, prepare the meatball mixture and form meatballs the day before, then refrigerate until ready to cook. Consider cooking the meatballs partially and finishing them on the day of serving for maximum flavor retention. Additionally, you can prepare the tzatziki a day in advance to allow flavors to meld together. Keep fresh elements like diced cucumber to add just before serving for optimal texture.

Scaling Instructions

When scaling this Greek Chicken Meatballs recipe, simply adjust ingredient quantities based on the number of servings desired. For halving, use 50% of the ingredients and for doubling or tripling, ensure you have large enough pots and pans for cooking. Timing may also need adjustments; monitor cooking times when scaling up for even cooking and don’t overcrowd the pan.

Nutritional Deep Dive

Each serving of Greek Chicken Meatballs offers a hearty protein boost, with an average of 25 grams per serving, making them a superb choice for those looking to maintain muscle health. Carbohydrate content is low, especially if paired with veggies instead of grains, and fat content can vary based on the meat choices used. Incorporating fresh ingredients provides vital vitamins and minerals necessary for overall health.

Dietary Adaptations

For gluten-free options, simply use gluten-free breadcrumbs or ground oats as a substitute. Dairy-free adaptations are achievable by choosing a dairy-free yogurt for the tzatziki sauce. Vegan alternatives can be created by using textured vegetable protein or chickpeas in place of chicken, mixing in spices for flavor adjustments. For those following low-carb diets, serving meatballs with zucchini noodles instead of pita is a delicious option.

Troubleshooting Guide

If texture issues arise, ensure that you’re using the right fat content in your ground chicken—lean chicken can lead to dryness. For flavor balance, bit of salt or lemon juice can enhance taste if bland. If you struggle with equipment challenges, ensure your frying pan is well-preheated before adding meatballs to avoid sticking. Keep a close watch on timing; each stove varies slightly, so adjust as necessary.

Recipe Success Stories

Feedback from readers has highlighted the tenderness of the Greek Chicken Meatballs and their simple-to-follow recipe, resulting in rave reviews from family gatherings. Many have shared experiences adapting the recipe with different meats, showcasing the versatility of the dish. Photography tips shared by the community suggest focusing on vibrant colors and rich textures to best display this exquisite dish.

Frequently Asked Questions

Can I use ground turkey instead of chicken?

Absolutely! Ground turkey provides a lean alternative that works well with the same seasonings and cooking methods.

Is tzatziki necessary for this recipe?

While tzatziki enhances the meatballs with its coolness, they can be enjoyed on their own or with other dipping sauces as preferred.

Can I freeze these meatballs for later use?

Yes, they freeze well! Allow them to cool completely before placing them in an airtight container or freezer bag.

How do I know when the meatballs are cooked through?

Using a meat thermometer, check for an internal temperature of 165°F to ensure they are fully cooked.

What are some good sides to serve with these meatballs?

Consider pairing the meatballs with Greek salad, pita bread, or roasted vegetables for a well-rounded meal.

Can I add cheese to the meatball mixture?

Absolutely! Adding feta cheese to the mixture provides an additional layer of flavor and can help keep the meatballs moist.

What if I can’t find fresh herbs?

Dried herbs can be substituted at a ratio of 1:3; however, fresh herbs provide a brighter flavor.

Is this recipe suitable for meal prep?

Yes! Greek Chicken Meatballs are perfect for meal prep, and they reheat well, making them convenient for busy days.

How spicy are these meatballs?

This recipe is not spicy, but feel free to add chili flakes or a pinch of cayenne for some heat if desired.

Can I serve these meatballs cold?

While they’re best served warm, they can be enjoyed cold as an appetizer or in a salad.

Additional Resources

Explore related recipes such as Mediterranean Quinoa Salad or Grilled Vegetable Skewers for a full Greek feast. Consider technique guides on making homemade tzatziki or mastering ground meat cooking methods.

Join the Conversation

We’d love to hear from you! Share your experiences with Greek Chicken Meatballs on social media, post photos of your creations, or engage with others by sharing tips and variations. Join our community, and let’s celebrate the joy of cooking together!

The Recipe

Greek Chicken Meatballs with Tzatziki

Serves: 4 servings

Prep Time: 15 mins

Cook Time: 25 mins

Total Time: 40 mins

Kitchen Equipment Needed

  • Mixing bowls
  • Meat thermometer
  • Frying pan
  • Spatula

Ingredients

  • 1 lb ground chicken
  • 1/2 cup breadcrumbs
  • 1/4 cup parsley, chopped
  • 1 tsp oregano
  • 1/4 cup onion, finely chopped
  • 2 cloves garlic, minced
  • Salt and pepper to taste
  • 1 egg, beaten
  • 2 tbsp olive oil
  • 1 cup Greek yogurt for tzatziki
  • 1 small cucumber, grated
  • 2 cloves garlic for tzatziki, minced
  • 1 tbsp lemon juice
  • Salt to taste

Directions

  1. In a large mixing bowl, combine ground chicken, breadcrumbs, parsley, oregano, onion, minced garlic, salt, pepper, and beaten egg.
  2. Mix until well combined, but avoid overmixing.
  3. Form mixture into small meatballs (about 1 inch in diameter).
  4. Heat olive oil in a frying pan over medium heat.
  5. Add meatballs to the pan, cooking until browned on all sides and cooked through (approximately 10-15 minutes).
  6. For the tzatziki, combine Greek yogurt, grated cucumber, minced garlic, lemon juice, and salt in a bowl. Mix well.
  7. Serve meatballs warm with tzatziki sauce on the side.

Recipe Notes

  • For added flavor, consider adding feta cheese to the meat mixture.
  • These meatballs can be frozen for later use; simply thaw and reheat before serving.

Delicious French Onion Ground Beef and Rice Casserole Recipe

French Onion Ground Beef and Rice Casserole: A Cozy Comfort Dish for Any Occasion

⚖️
Difficulty
Easy

⏲️
Prep Time
15 mins

🕒
Cook Time
30 mins

⏱️
Total Time
45 mins

🍽️
Servings
4

Indulge in the warm, comforting flavors of a French Onion Ground Beef and Rice Casserole. This dish marries the rich and savory essence of French onion soup with hearty ground beef and tender rice, creating a delightful one-pot meal that your family will crave. Picture yourself enjoying a cozy night in as the aroma of caramelized onions and melted cheese wafts through your kitchen, inviting everyone to the table.

Perfect for busy weeknights or leisurely weekends, this casserole serves as both a satisfying dinner and a delicious leftover dish for lunch. It combines textures beautifully, with the crispy topping of golden cheese contrasting with the creamy rice and savory beef—each bite is a delightful mix of flavors that creates a fulfilling and memorable meal.

Quick Recipe Highlights

  • Flavor Profile: This casserole features a delicious blend of savory beef, sweet caramelized onions, and the deep, rich flavor of melted cheese.
  • Texture: Enjoy a mix of creamy rice, juicy ground beef, and a crispy, cheesy top that makes every bite satisfying.
  • Aroma: The dish releases tantalizing aromas of sautéed onions and beef, bringing a warmth into your home.
  • Visual Appeal: The golden-brown cheese topping beautifully contrasts with the creamy filling, making it visually enticing.
  • Skill Level Needed: This dish is easy to prepare, requiring basic cooking skills like sautéing and baking.
  • Special Equipment: A large skillet and a baking dish will suffice for this simple yet delicious meal.

Recipe Overview

  • Difficulty Level: This French onion ground beef and rice casserole is classified as easy, making it a perfect dish for novice cooks or those looking for a quick and tasty option.
  • Category: This recipe fits perfectly into the comfort food category, offering warmth and nostalgia in every bite.
  • Cuisine: Combining elements of French cooking with American comfort dishes, this casserole is a true culinary hybrid that delights the palate.
  • Cost: This recipe is budget-friendly, utilizing everyday ingredients that won’t break the bank, making it accessible for all families.
  • Season: While this dish is satisfying all year round, it’s particularly comforting during the colder months.
  • Occasion: Whether it’s a weeknight dinner or a cozy gathering with friends, this casserole is an excellent choice for any occasion.

Why You’ll Love This Recipe

Experience the unique combination of flavors and textures in this French Onion Ground Beef and Rice Casserole. The savory and slightly sweet onions harmonize beautifully with the rich ground beef, creating a tantalizing taste that welcomes you home after a long day. The melted cheese provides an indulgent finish, adding just the right amount of creaminess to the dish.

Convenience is key, especially on busy nights. This one-pot casserole allows you to prepare a hearty meal with minimal cleanup. Simply sauté your ingredients, combine them in the baking dish, and let the oven do the rest. It’s a straightforward process, perfect for those who want to enjoy a homemade meal without spending hours in the kitchen.

Incorporating nutritious ingredients, such as ground beef and rice, this casserole not only satisfies your hunger but also provides essential vitamins and minerals. Ground beef is an excellent source of protein, while onions offer antioxidants and eye-catching levels of vitamin C. Together, they create a balanced meal that’s as good for your body as it is for your tastebuds.

Sharing food brings people together, and this casserole is no exception. Serve it for family dinners or at potlucks and watch as your guests can’t resist coming back for more. It’s not just a meal; it’s a way to create lasting memories with friends and family as you gather around the table.

Cost-effectiveness is another reason to adore this French Onion Ground Beef and Rice Casserole. With easily accessible ingredients and the ability to feed a crowd, it’s an economical choice for anyone looking to make the most of their budget. The leftovers are just as delicious, allowing for easy meals throughout the week.

Historical Background and Cultural Significance

The origins of French onion soup date back to ancient times, but it wasn’t until the 18th century in France that it became a beloved dish. With its simple ingredients of onions, beef broth, and stale bread, it embodied the philosophy of making the most out of humble ingredients. This casserole takes inspiration from that classic soup, bringing its savory depth into a hearty meal.

In addition to its delicious flavor, this dish reflects the culinary traditions of rustic French cooking, where hearty, comforting meals were a staple. It reminds us of the value of tradition in cooking—how recipes evolve while retaining their essence. Combining American ingredients like ground beef and rice illustrates the fusion of cultures and cuisines that define modern home cooking.

As variations of the dish emerged over the years, each region adapted it to local tastes, proving that comfort food can transcend boundaries. By creating a casserole version, we honor that tradition while offering a twist that is especially accessible for today’s family meals.

This casserole is more than just a meal; it carries a story. It invites us to remember our roots and the timeless comfort of gathering around the dinner table. It’s a dish meant to evoke feelings of warmth, nostalgia, and togetherness, encapsulating the essence of home cooking.

Ingredient Deep Dive

Ground Beef: Ground beef is a versatile ingredient often associated with quick and satisfying meals. Its history can be traced back to the need for preserving meat through chopping and grinding. Rich in protein and iron, ground beef supports muscle growth and energy. When selecting ground beef, choose options with a fat percentage that suits your dietary needs and always check for freshness. Store it in the coldest part of your refrigerator; for long-term storage, consider freezing it in portions.

Onions: Onions are one of the oldest cultivated crops, often featured in various cuisines around the world. They are known for their rich flavor and significant health benefits, including lowering cholesterol and aiding digestion. When buying onions, look for ones with firm, dry skin. Store them in a cool, dark place, and avoid storing them with potatoes to prevent spoilage. For a sweeter taste, consider using Vidalia or yellow onions in this casserole.

Rice: Rice has been a staple food in many cultures for thousands of years, recognized for its versatility and energy-boosting carbohydrates. With a range of varieties available, it’s important to choose the right type for your dish; for this casserole, long grain or medium grain rice works best. Store rice in a sealed container in a cool, dry environment to maintain its freshness. If you have dietary restrictions, quinoa or cauliflower rice can serve as healthy substitutes.

Cheese: Cheese adds both flavor and creaminess to many dishes, and its origins date back to ancient civilizations. Nutritionally, cheese provides calcium and protein but can be calorie-dense, so portion control is essential. For this recipe, choose a cheese like Gruyère or Swiss for a deliciously creamy topping. When selecting cheese, try to find high-quality, fresh options from local dairies. Store cheese in the fridge wrapped in parchment paper or cheese paper to preserve its quality.

Common Mistakes to Avoid

  • Using low-quality beef can lead to a greasy or bland flavor. Opt for medium fat content for the best results.
  • Not letting the onions caramelize properly can impact the overall sweetness and depth of the casserole.
  • Overcooking or undercooking the rice will affect the texture; make sure to follow instructions precisely.
  • Skipping the cheese topping will result in a less satisfying final dish; embrace the gooey goodness!
  • Failing to preheat the oven can lead to uneven cooking; always make sure it’s hot before placing your casserole inside.
  • Using too much liquid can make the casserole soggy; stick to the recommended measurements for a perfect consistency.
  • Not seasoning adequately during each step can lead to a flat flavor; remember to taste as you go.
  • Storing leftovers improperly will affect freshness; always refrigerate promptly after serving.

Essential Techniques

Sautéing: This technique is crucial for developing flavors, particularly with onions. Sauté over medium heat and allow the onions to cook slowly, stirring occasionally. Visual cues for success include a soft, translucent glow and the release of sweet aromas. Avoid burning the onions, as this will create bitterness.

Baking: Baking is fundamental for combining flavors and finishing the dish. Preheat your oven to ensure even cooking, and use a suitable baking dish that can withstand high temperatures. Watch for visual cues like bubbling edges and a golden-brown cheese topping to determine when the casserole is perfectly done.

Layering: Proper layering of ingredients is essential for achieving balanced flavors and textures. Start with the rice mixture, followed by the beef, and finally the cheese on top. This prevents the cheese from burning while ensuring the rice cooks evenly underneath.

Pro Tips for Perfect French Onion Ground Beef and Rice Casserole

1. For added depth of flavor, consider adding a splash of Worcestershire sauce or balsamic vinegar to the beef while cooking.
2. Try incorporating different herbs, such as thyme or rosemary, to elevate the flavor profile of the casserole.
3. Use a combination of cheeses for a more complex flavor—mix mozzarella with Gruyère for great results.
4. If you prefer a spicier kick, add some diced jalapeños or red pepper flakes into the beef mixture.
5. To enhance the caramelization of onions, add a pinch of sugar while cooking them.
6. Allow the casserole to rest for a few minutes before serving; this will help the layers settle for better serving.
7. Experiment with brown rice or wild rice for added nutritional value and a nutty flavor.
8. For an even creamier consistency, add a dollop of sour cream to the rice before layering.

Variations and Adaptations

Regional variations of this casserole can include the addition of local vegetables, such as bell peppers or mushrooms, to complement the dish. Seasonal adaptations can leverage fresh herbs and vegetables available, like zucchini in the summer or root vegetables in the winter. Dietary modifications may involve substituting cauliflower rice for a low-carb option or using ground turkey for a leaner protein. Additionally, experimenting with different cheese types, such as feta or blue cheese, could offer unique flavor twists. For presentation, serving in individual ramekins adds a charming touch.

Serving and Presentation Guide

Plating your casserole can enhance its appeal. Use a spatula to serve neat portions, and consider garnishing with fresh parsley for a pop of color. Traditional accompaniments include a crisp green salad or garlic bread, enhancing the overall dining experience. Modern serving suggestions might involve using individual portions, keeping the dish warm in a double boiler. Serve hot for optimal taste, and control portions to ensure everyone enjoys a satisfying experience without overindulging.

Wine and Beverage Pairing

For wine pairings, a medium-bodied red wine, such as Cabernet Sauvignon or Merlot, complements the hearty flavors of the casserole beautifully. For non-alcoholic alternatives, consider a sparkling apple cider, which balances sweetness with acidity. If you prefer coffee, a dark roast with nutty notes can enhance the savory aspects of the dish. Serve beverages at room temperature to allow the flavors to shine.

Storage and Shelf Life

To store your casserole, place leftovers in an airtight container and refrigerate for up to four days. Ensure it cools completely before sealing to maintain freshness. For longer preservation, consider freezing it in a secure container, where it can last up to three months. Signs of spoilage include off odors, color changes, or mold. Reheat leftovers in the oven for a crispier texture or in the microwave for convenience, ensuring it’s heated thoroughly.

Make Ahead Strategies

For make-ahead convenience, you can prepare the beef and onion mixture and store it separately before assembly. Assemble the casserole the night before, cover, and refrigerate for easy baking the next day. When doing so, you might opt to add the cheese topping just before baking to preserve texture. To maintain freshness, consider adding fresh elements, such as herbs, right before serving to enhance flavor.

Scaling Instructions

When scaling the recipe, halving or doubling ingredients is straightforward, but be conscious of the baking time, as it may vary. For smaller portions, consider using a smaller dish, and check for doneness earlier when baking a smaller quantity. If tripling the recipe, ensure your equipment can handle larger volumes, and increase cooking times gradually while monitoring closely.

Nutritional Deep Dive

This casserole is protein-packed, with ground beef providing significant macronutrients, including protein and healthy fats. In terms of micronutrients, onions contribute notable levels of vitamins C and B6, while cheese adds calcium and phosphorus. When considering portion control, aim for a balance that supports dietary goals without compromising satisfaction. For those focusing on weight management, pairing the casserole with low-calorie sides can promote a well-rounded meal.

Dietary Adaptations

For gluten-free options, ensure all imported products are certified gluten-free. Dairy-free substitutions can involve using almond cheese or cashew cream instead of traditional cheese. Those following a vegan diet can achieve similar flavors with plant-based ground meat and cashew cream to replace cheese topping. For low-carb fans, cauliflower rice is an excellent alternative to traditional rice, while keto proponents can adjust ingredients accordingly, utilizing high-fat cheese options.

Troubleshooting Guide

If you’re facing texture issues, such as dryness, making sure not to over-bake your casserole is critical. For flavor balance, consider adjusting seasoning during cooking; adding salt in layers helps achieve a well-rounded outcome. If you experience temperature problems, utilizing a meat thermometer can ensure beef is cooked through without overcooking. For ingredient substitutions, try to match flavors closely for best results, and consult reputable sources for equivalent measurements.

Recipe Success Stories

Community feedback often highlights how this casserole became a family favorite, with readers adapting it to fit personal tastes. Many have shared success stories about adding unique ingredients or upsizing components to cater to larger gatherings. Photography tips shared by readers emphasize the importance of good lighting to capture the golden hues of the melted cheese. Experimentation with variations has spurred excitement on social media, igniting conversations about comfort foods.

Frequently Asked Questions

Can I freeze the French Onion Ground Beef and Rice Casserole?
Yes, it freezes well. Just make sure it’s in an airtight container and consume within three months.

What type of cheese works best for this casserole?
Go for Gruyère or Swiss for a classic flavor, but you can mix in mozzarella for a creamy texture.

Can I use brown rice instead of white rice?
Yes, but you may need to adjust the cooking time as brown rice typically takes longer to cook.

Is it possible to make this dish vegetarian?
Absolutely! Substitute ground beef for plant-based alternatives and use nutritional yeast for a cheesy flavor.

What sides pair well with this dish?
A fresh green salad or some garlic bread would make great accompaniments.

How can I tell when the casserole is done?
Look for bubbling edges and a golden brown top that indicates the cheese is melted and flavors have melded.

Can I add different vegetables to the casserole?
Yes, adding vegetables like spinach, bell peppers, or mushrooms can enhance the nutritional value.

How do I reheat the casserole best?
For best results, reheat in the oven to maintain the crispy cheese top, or use a microwave for convenience.

How long can I keep leftovers in the fridge?
Store leftovers in an airtight container and consume within four days for optimal freshness.

What is the ideal serving temperature for this dish?
Serve it warm, just out of the oven for the best experience of flavors and textures.

Additional Resources

Explore related recipes that complement this dish, like crusty bread or hearty salads. Technique guides on basic sautéing or baking can enhance your cooking arsenal. Ingredient information for alternative grains and cheeses can also adapt your meal prep. Additionally, equipment recommendations on baking dishes can help in achieving perfect results. For seasonal variations, consider recipes that incorporate fresh produce as they become available.

Join the Conversation

Don’t forget to share your experiences on social media! Post your casserole creations, including any unique adaptations or angles you captured in photography. Engaging with our community allows you to receive feedback, swap tips, and enjoy the wonderful variety this recipe can provide. Join in the discussion, and let’s celebrate the joy of cooking together.

The Recipe

French Onion Ground Beef and Rice Casserole

Serves: 4

Prep Time: 15 mins

Cook Time: 30 mins

Total Time: 45 mins

Kitchen Equipment Needed

  • Large skillet
  • Baking dish
  • Spatula
  • Glass lid or aluminum foil

Ingredients

  • 1 lb ground beef
  • 2 medium onions, thinly sliced
  • 2 cups cooked rice
  • 1 cup shredded cheese (Gruyère or Swiss)
  • 2 tablespoons olive oil
  • 1/2 teaspoon garlic powder
  • Salt and pepper to taste

Directions

  1. Preheat the oven to 350°F (175°C).
  2. In a large skillet, heat olive oil over medium heat and sauté onions until they are caramelized.
  3. Add ground beef and cook until browned, then stir in garlic powder, salt, and pepper.
  4. In a baking dish, combine the cooked rice with the beef and onion mixture.
  5. Spread the mixture evenly and sprinkle cheese on top.
  6. Bake for 25-30 minutes or until the cheese is golden and bubbly.
  7. Allow to cool slightly before serving.

Recipe Notes

  • Feel free to experiment with different types of cheese or grains in this casserole.
  • Leftovers can be stored in an airtight container for up to four days in the refrigerator.
  • For extra flavor, consider adding herbs like thyme or rosemary while cooking.

Delicious Creamy Thai Coconut Shrimp Curry Recipe to Try

Creamy Thai Coconut Shrimp Curry: A Flavorful Escape

⚖️
Difficulty
Easy

⏲️
Prep Time
15 mins

🕒
Cook Time
20 mins

⏱️
Total Time
35 mins

🍽️
Servings
4

Welcome to a culinary journey to Thailand with this amazing Creamy Thai Coconut Shrimp Curry. This dish is not only quick and easy to prepare, but it also bursts with unique flavors that evoke the tropical essence of southeast Asia. Imagine succulent shrimp dancing in a rich, creamy coconut sauce infused with vibrant herbs and spices, creating an aromatic experience that’ll transport your taste buds straight to the streets of Bangkok.

Indulging in this creamy shrimp curry is like getting a warm hug after a long day. The combination of sweet coconut milk, the umami of fish sauce, and the zest of fresh lime creates a richness that’s perfect for both casual dinners and special occasions. Nestled alongside warm jasmine rice, this dish becomes a complete meal, offering comfort with every bite.

Quick Recipe Highlights

  • Flavor Profile: Creamy coconut balanced with spicy, tangy notes of lime and the fresh aroma of cilantro.
  • Texture: Luxuriously smooth sauce enveloping tender shrimp with a hint of crunch from diced vegetables.
  • Aroma: An enchanting fragrance of coconut and Thai spices wafting through your kitchen.
  • Visual Appeal: A colorful medley of bright orange shrimp, green veggies, and a creamy white sauce.
  • Skill Level Needed: Perfect for beginners and seasoned cooks alike; this recipe is straightforward and forgiving.
  • Special Equipment: A large skillet or wok, measuring cups, and a wooden spoon are all you need!

Recipe Overview

  • Difficulty Level: This recipe is classified as easy due to its simple steps and quick cooking time, making it perfect for weeknight dinners.
  • Category: Ideal as a main course, this creamy shrimp curry pairs well with appetizers or salads to create a full dining experience.
  • Cuisine: A staple of Thai cuisine, this dish reflects the vibrant flavors and fresh ingredients characteristic of the region.
  • Cost: Affordably priced, the recipe primarily uses budget-friendly shrimp and pantry staples.
  • Season: Enjoy it year-round; however, it particularly shines in the summer with fresh, seasonal produce.
  • Occasion: Perfect for family dinners, get-togethers, or even festive gatherings where you want to impress your guests.

Why You’ll Love This Recipe

This Creamy Thai Coconut Shrimp Curry captivates the palate with its perfectly blended combination of flavors. The main attributes of this dish—sweetness from the coconut milk, heat from the red curry paste, and the freshness of lime juice—merit every bite. The shrimp is transformed into a delectable highlight, soaking up all the delicious flavors from the sauce. It’s a dish that promises an unforgettable taste experience.

Moreover, this recipe is immensely convenient. With just one pan needed and a total cooking time of only 20 minutes, it makes for a quick weeknight dinner without sacrificing flavor. You can also adjust the ingredients and servings according to your family’s preferences and dietary needs, making it incredibly versatile.

Nutritionally speaking, shrimp is a fantastic source of protein and is low in calories, making it a guilt-free indulgence. Coupled with nutrient-dense vegetables and coconut milk, you reap both health benefits and flavor. This dish supports a balanced diet while still satisfying those comfort food cravings.

When it comes to hosting, this shrimp curry is a showstopper. It encourages communal dining—as guests can serve themselves over jasmine rice or noodles—which encourages conversation and connection. There’s something about a communal dish that brings people together around the table, allowing them to savor not only the meal but also the company.

In terms of cost-effectiveness, the ingredients are fairly inexpensive. You can find them at your local grocery store or an Asian market, and leftovers can easily be stored for future meals. This recipe’s affordability and accessibility make it an excellent choice for every home cook.

Historical Background and Cultural Significance

Coconut curries have long held a special place in Thai cuisine, with their roots stemming from the rich cultural exchanges across Southeast Asia. Shrimp, being widely available in coastal regions, became a popular protein in many variations of curries. This Creamy Thai Coconut Shrimp Curry embraces the essence of traditional cooking passed down through generations, showcasing a blend of indigenous ingredients and flavors.

The cultural importance of this dish transcends mere sustenance; it represents communal dining and shared experiences. Within Thai culture, meals are often enjoyed together, with a variety of dishes served to encourage family-style serving where everyone shares the food, enhancing the spirit of togetherness.

This recipe has evolved significantly within kitchens around the world, adapting flavors and styles to fit modern tastes while keeping original techniques alive. Today, you’ll find countless adaptations, but the creamy base and luscious shrimp remain central to the allure of this dish.

Regional variations of coconut curry differ vastly, depending on local ingredients and culinary traditions. From the use of different types of seafood to various vegetable choices, it demonstrates the adaptability and creativity of home cooks interpreting classic dishes.

Ingredient Deep Dive

Shrimp: In many cultures, shrimp symbolizes prosperity and good fortune, often used in celebratory dishes. It’s rich in protein, low in calories, and packed with nutrients like selenium and vitamin B12. When shopping for shrimp, look for fresh, firm options ensuring they are sustainably sourced. For storage, keep them in the coldest part of your refrigerator. If you need to substitute, chicken, tofu, or even chickpeas can work well in this recipe.

Coconut Milk: Indigenous to tropical regions, coconut milk is celebrated for its versatility and richness. It offers healthy fats and nutrients such as manganese, copper, and magnesium. When selecting coconut milk, go for full-fat varieties for the creaminess this recipe requires. Store opened cans in an airtight container in the refrigerator for up to a week, and if necessary, alternatives like almond or cashew milk can suffice for lighter versions.

Common Mistakes to Avoid

  • Overcooking the shrimp can lead to a rubbery texture—ensure they are cooked just until pink and opaque.
  • Neglecting to taste and adjust seasoning throughout can result in an imbalanced flavor profile—always check for salt levels when using fish sauce.
  • Using light coconut milk may affect the creaminess of the dish—opting for full-fat provides a richer texture.
  • Rushing the simmering step can prevent the flavors from fully developing; allow enough time for the sauce to meld.
  • Not incorporating fresh herbs at the end can diminish the freshness—adding them just before serving brightens the dish.
  • Using stale or old spices can compromise flavor—ensure your spices are fresh for optimal taste.
  • Neglecting to prep all ingredients beforehand can create chaos—have everything measured and chopped before you start.
  • Forgetting to adjust for dietary restrictions can alienate guests; always check your crowd’s preferences!

Essential Techniques

Sautéing: This technique is vital for enhancing flavor through caramelization. Always preheat your pan to ensure even cooking. Pay attention to the vegetables’ texture; they should be just tender yet crisp.

Simmering: This method allows flavors to marry and develop fully. Look for gentle bubbling, indicating it’s time to introduce ingredients like shrimp to ensure they absorb those delicious flavors without overcooking.

Pro Tips for Perfect Creamy Thai Coconut Shrimp Curry

1. Use fresh herbs like basil or cilantro as a final garnish to elevate freshness and presentation.

2. A squeeze of fresh lime juice right before serving can enhance all the flavors dramatically.

3. Don’t rush the simmering process; let the dish cook low and slow to develop deeper flavors.

4. If you want extra spice, consider adding sliced fresh chilies or extra red curry paste.

5. Make sure your shrimp is completely thawed before cooking for even results.

6. Pair your curry with jasmine rice or steamed vegetables for a well-rounded meal.

7. Make the curry base ahead of time for easier meal prep; simply reheat and add shrimp just before serving.

8. Consider using a splash of coconut cream at the end for an extra creamy finish.

Variations and Adaptations

Regional variations abound; consider using different proteins like scallops or firm fish for diversity. For those seeking seasonal adaptations, adding summer vegetables such as zucchini or bell peppers can enhance the dish. Dietary modifications can include using gluten-free tamari instead of soy sauce or opting for a vegan approach with tofu or chickpeas.

If you crave deeper flavors, adding a splash of fish sauce can amp up the umami. For texture modifications, switching to a firmer coconut cream will offer a creamier feel, while presentation alternatives could include plating beside a fresh mango salad to brighten the dish.

Serving and Presentation Guide

To create an appealing plate, use wide, shallow bowls to showcase the vibrant colors of the curry. Garnish with fresh chopped cilantro, which adds a pop of green against the creamy sauce. Incorporating side elements like lime wedges invites guests to customize their flavor experience. Serve with fluffy jasmine rice or crunchy wontons to balance textures.

When serving, ensure the curry is hot, matching the warmth of the rice for a cozy presentation. For portion control, consider serving smaller bowls to encourage multiple helpings, allowing everyone to savor the flavors without overindulgence.

Wine and Beverage Pairing

To complement the richness of the coconut shrimp curry, opt for a crisp white wine like Sauvignon Blanc or a lightly oaked Chardonnay. For non-alcoholic options, a refreshing hibiscus iced tea balances the spices beautifully. If you prefer coffee, a cold brew with hints of chocolate can also go well with the dish, creating an intriguing pairing with its deep flavors.

Storage and Shelf Life

Proper storage means keeping any leftovers in an airtight container in the fridge for up to 3 days. Reheating is simple, just ensure you’re heating through evenly to maintain texture. If freezing, the curry can last for up to 3 months; however, the shrimp’s texture may change slightly upon thawing. Look out for any off smells or colors before consuming, as those are clear signs of spoilage.

Make Ahead Strategies

For this dish, prepping ingredients a day in advance can save time. Chop vegetables and store them in the fridge, and thaw shrimp overnight for quick cooking. You can make the coconut base a few days prior and simply combine with the shrimp when ready to serve, ensuring a quick meal with minimal fuss. You may want to add fresh herbs just beforehand to keep their vibrant flavor.

Scaling Instructions

To halve or double this recipe, simply adjust the ingredient quantities proportionally. When increasing portions, consider using a larger skillet to prevent overcrowding and ensure proper cooking. Timings should remain roughly the same; however, you might need to adjust simmering times slightly depending on the quantity. Always maintain the balance of flavors, and store leftovers accordingly!

Nutritional Deep Dive

This creamy shrimp curry is a balance of macronutrients, offering a substantial amount of protein from the shrimp and healthy fats from the coconut milk. A single serving provides a delightful source of vitamins B12 and D, alongside potassium and selenium. It’s an excellent choice for maintaining energy levels without compromising taste or dietary goals—ideal for those looking to integrate flavorful, wholesome meals!

Dietary Adaptations

For gluten-free options, use tamari instead of traditional soy sauce, while a vegan spin can be achieved by substituting shrimp for tofu or seitan. Keto dieters can enjoy this dish by opting for low-carb vegetables while minimizing the coconut milk’s servings. Spice lovers can increase the level of chili in the curry, and those looking for low-FODMAP options can choose garlic-infused oils instead of garlic cloves to maintain flavor without digestive discomfort.

Troubleshooting Guide

For texture issues, avoid overcooking shrimp; a perfectly cooked shrimp should be pink and firm. If your flavor is off, adjust seasoning gradually, tasting as you go. Temperature problems often stem from cooking ingredients too quickly or on too high heat, so be sure to simmer gently. If substitutions were made, ensure the new ingredients are appropriately seasoned and cooked for similar results.

Recipe Success Stories

This Creamy Thai Coconut Shrimp Curry has garnered rave reviews from home cooks for its simplicity and fantastic flavor. Readers share stories of how they’ve made this dish their own by adding seasonal vegetables or experimenting with different seafood. Success is often found in thoughtful adaptations, as many have found ways to dial up the spice or create a vegetarian version, broadening its appeal across diverse diets.

Frequently Asked Questions

Can I use frozen shrimp for this recipe? Yes, you can use frozen shrimp, just make sure they are fully thawed before cooking to ensure even cooking.

What if I can’t find coconut milk? You can substitute with almond milk, though it will alter the flavor and richness of the curry.

Can I make this dish in advance? Yes, you can prepare the base of the curry in advance, but it’s best to add the shrimp right before serving to maintain their texture.

Is it possible to make this dish vegan? Absolutely! Replace the shrimp with tofu or chickpeas for a delicious vegan alternative.

What sauces can I pair this with? Serve with lime wedges and a sprinkle of fresh herbs for an extra flavor boost; fish sauce can enhance the umami flavor.

How do I store leftovers? Store any leftovers in an airtight container in the fridge for up to 3 days; reheat gently over low heat.

Can I add additional vegetables? Yes! Feel free to include vegetables like bell peppers, snap peas, or broccoli for added nutrition and color.

What can I use instead of shrimp? You can substitute shrimp with chicken, tofu, or even chickpeas for a vegetarian option.

How spicy is this dish? The spiciness can vary based on the amount of red curry paste used; adjust according to your heat preference.

What type of shrimp should I use? Fresh or frozen shrimp works best; ideally opt for medium to large shrimp for optimal texture.

Can I freeze this dish? Yes, but the shrimp’s texture may change. It’s best enjoyed fresh.

Additional Resources

For more delicious recipes that showcase the flavors of Thailand, explore a range of dishes like Pad Thai or Thai Basil Chicken. Delve into technique guides that help improve your cooking skills, such as sautéing or simmering, and learn about the rich varieties of Thai ingredients available at your local market.

Join the Conversation

We invite you to share your own experiences with this Creamy Thai Coconut Shrimp Curry on social media! Post your cooking adventures, photography tips, or modifications you’ve made, and engage with a community of food lovers. We’re excited to see how you put your spin on this recipe and look forward to hearing your feedback!

The Recipe

Creamy Thai Coconut Shrimp Curry

Serves: 4

Prep Time: 15 mins

Cook Time: 20 mins

Total Time: 35 mins

Kitchen Equipment Needed

  • Large skillet or wok
  • Measuring cups and spoons
  • Wooden spoon or spatula

Ingredients

  • 1 lb shrimp, peeled and deveined
  • 1 can (13.5 oz) coconut milk
  • 2 tbsp red curry paste
  • 1 cup chicken or vegetable broth
  • 1 tbsp fish sauce
  • Juice of 1 lime
  • 1 cup bell peppers, sliced
  • 1 cup snap peas
  • Fresh cilantro for garnish

Directions

  1. In a large skillet, heat a splash of oil over medium heat. Add the red curry paste and sauté for 2 minutes until fragrant.
  2. Add in the coconut milk, broth, and fish sauce, stirring to combine.
  3. Bring to a simmer and add the bell peppers and snap peas. Cook for 5-7 minutes until slightly tender.
  4. Stir in the shrimp and cook for another 5 minutes until shrimp are cooked through and pink.
  5. Remove from heat and stir in lime juice. Adjust seasoning as desired.
  6. Serve hot with rice and garnish with fresh cilantro.

Recipe Notes

  • Feel free to adjust the amount of red curry paste based on your spice preference.
  • Seafood can be replaced with chicken, tofu, or vegetables for variety.
  • Coconut milk can be replaced with almond or soy milk for a lighter version.

Delicious Cheesy Chicken Crescent Roll-Ups for Quick Dinners

Cheesy Chicken Crescent Roll-Ups: A Quick & Easy Dinner Recipe

⚖️
Difficulty
Easy

⏲️
Prep Time
15 mins

🕒
Cook Time
20 mins

⏱️
Total Time
35 mins

🍽️
Servings
8 roll-ups

Indulge in the irresistible flavors of Cheesy Chicken Crescent Roll-Ups, a perfect blend of savory chicken and tantalizing cheese wrapped in flaky crescent dough. This quick and easy dinner recipe is not only satisfying but also a crowd-pleaser that brings warmth and joy to any meal. Picture a family gathering around the table, laughter filling the air, as you serve these golden roll-ups fresh from the oven, their cheesy goodness oozing out as you take the first bite. With every mouthful, the tender chicken perfectly complements the cheesy richness, creating a delightful experience you won’t forget.

Whether you’re a busy parent looking for a fuss-free weeknight dinner or someone wanting to impress friends at a casual get-together, these Cheesy Chicken Crescent Roll-Ups deliver on taste and convenience. They come together in just over half an hour and require minimal ingredients, making them a go-to recipe in your culinary arsenal. Get ready to savor the buttery, flaky crust enveloping delicious chicken and cheese and enjoy this delightful dish that promises to bring joy to your dinner table.

Quick Recipe Highlights

  • Flavor Profile: The combination of creamy cheese and savory chicken creates a rich flavor profile that is sure to please any palate, from kids to adults.
  • Texture: Each bite offers a delightful contrast between the crispy crescent exterior and the tender, cheesy filling, providing a satisfying mouthfeel that keeps you craving more.
  • Aroma: As these roll-ups bake, they release a mouth-watering aroma that fills your kitchen, enticing everyone to gather around the table.
  • Visual Appeal: With their golden-brown crust and bubbling cheese peeking out, these roll-ups present beautifully, making them a stunning addition to any meal.
  • Skill Level Needed: Perfect for all skill levels—from novice cooks to experienced chefs—this recipe requires no special techniques, making it easy for everyone to master.
  • Special Equipment: You will only need a baking sheet and some parchment paper, making the preparation quick and hassle-free.

Recipe Overview

  • Difficulty Level: With simple steps and easily manageable techniques, this recipe is categorized as easy, making it accessible for cooks of all levels.
  • Category: This dish falls under the category of comfort food, perfect for family dinners, movie nights, or casual gatherings.
  • Cuisine: Drawing inspiration from American cuisine, these roll-ups align with the comfort food traditions of hearty, satisfying meals that bring people together.
  • Cost: The recipe is budget-friendly, with basic ingredients that won’t break the bank, allowing you to enjoy a delicious meal at home.
  • Season: Ideal for any season, these cheesy delights shine at cozy family meals during the winter and make for a great appetizer during summer barbecues.
  • Occasion: Perfect for any occasion, from weeknight dinners to birthday parties, these roll-ups can be served as a main dish or as a delightful appetizer.

Why You’ll Love This Recipe

Cheesy Chicken Crescent Roll-Ups are a delightful treat that offer a harmonious blend of taste and texture that your entire family will adore. The creamy cheese melts seamlessly into the tender chicken, wrapped in a golden, flaky exterior that is both satisfying and comforting. This recipe is designed to be both delicious and enjoyable, making dinner times memorable.

This dish shines in its convenience, requiring minimal preparation time while still providing maximum flavor and satisfaction. In just 35 minutes, you can have a hearty meal on the table, making it an ideal choice for busy weeknights. You can prepare the filling ahead of time and simply roll and bake right before serving, adding to its flexible appeal.

Nutritionally, these roll-ups can be adapted to include various vegetables, such as spinach or bell peppers, increasing their health benefits without compromising on flavor. You can enjoy a well-rounded meal that can cater to both your taste buds and dietary needs, ensuring everyone at the table is happy.

These Cheesy Chicken Crescent Roll-Ups also present a fantastic opportunity for social engagements. Serve them as appetizers at gatherings, and watch as your guests devour them in no time. They’re fun to share and perfect for creating a lively atmosphere at any celebration.

Finally, this recipe is economical, allowing you to create a delicious meal without spending a fortune. With inexpensive ingredients that are easy to source, this dish proves that great food doesn’t have to come with a high price tag, making it accessible to everyone.

Historical Background and Cultural Significance

The origin of crescent rolls can be traced back to Austria, where they were first created as a celebratory bread shape inspired by the crescent moon. Since then, crescent rolls have evolved and been embraced by numerous cuisines, becoming a staple in many American households. By incorporating chicken and cheese into the classic dough, we create a dish that showcases the adaptability and popularity of pastry across cultures.

In American culture, comfort foods like these roll-ups hold a special place in the hearts of families. They evoke nostalgia and warmth, often associated with family gatherings and treasured memories of home-cooked meals. This dish has been embraced for its simplicity and flavor, making it suitable for casual gatherings as well as special occasions.

Through the years, various adaptations of this recipe have appeared, each unique to the cook’s creativity and available ingredients. The evolution of ingredients illustrates the versatility of crescent rolls, with cooks combining different meats, cheeses, and vegetables to customize their roll-ups.

Regional variations also exist, with some incorporating local flavors and ingredients, showcasing the importance of cultural nuances in family cooking. Whether it’s spicy jalapeños in the Southwest or local cheeses in New England, these adaptations reflect the diversity of American culinary traditions.

Ingredient Deep Dive

Crescent Roll Dough: Crescent roll dough is a quintessential item in American baking that symbolizes ease and accessibility. Its layers create an impressive presentation and texture often found in fancy pastries. Nutritionally, it is mainly composed of carbohydrates and fats, but it’s important to check for preservatives when purchasing. Always store in a cool, dry place, and if you find leftover dough, it can also be frozen for later use. Alternatively, you can opt for homemade dough if you prefer to avoid preservatives.

Cooked Chicken: Chicken is a versatile protein that forms the base of this dish. Rich in protein, this lean meat is an excellent choice for a healthy diet. Selecting chicken that is free-range or organic can enhance flavor and ensure better farming practices. Store cooked chicken in the fridge for 3-4 days, and if you have leftover meats, they can easily be shredded and used in other dishes. For a unique twist, consider substituting rotisserie chicken for added flavor.

Common Mistakes to Avoid

  • Not sealing the roll-ups properly: Ensure that the edges of the crescent rolls are well sealed to avoid leaking cheese during baking.
  • Overstuffing the crescent rolls: Adding too much filling can lead to unmanageable roll-ups and potential spills during cooking.
  • Baking at the wrong temperature: Always preheat the oven to ensure even cooking and a perfectly golden color.
  • Using cold filling: Ensure the chicken filling is at room temperature before wrapping it, as this helps in sealing and baking evenly.
  • Not checking for doneness: Make sure the cheese is fully melted and the rolls are golden brown before serving to ensure optimal taste.
  • Skipping the parchment paper: This can lead to sticking, making it difficult to remove the roll-ups from the baking sheet.
  • Not letting the roll-ups cool: Allow them to cool for a few minutes after baking; this makes them easier to handle and enhances flavor.
  • Omitting seasoning: Don’t forget to season the chicken filling, as it enhances the overall flavor profile of the dish.
  • Using outdated ingredients: Always check the expiration dates on ingredients, especially the crescent roll dough, for the best results.
  • Ignoring personal preferences: Feel free to customize filling options; avoid sticking to the original if you prefer different taste combinations.

Essential Techniques

Sealing the Dough: Properly sealing the crescent roll dough is crucial to prevent leaks while baking. To master this technique, press the edges firmly together and pinch them if needed. Visual cues for success include the edges looking smooth without any gaps.

Baking: Baking at the right temperature ensures even cooking. Use an oven thermometer to confirm your oven’s accuracy, and keep an eye on the roll-ups in the last few minutes for an appealing golden brown finish. Avoid opening the oven door too often, as this can affect cooking times.

Pro Tips for Perfect Cheesy Chicken Crescent Roll-Ups

1. Use a mix of cheeses to diversify flavor; consider mozzarella, cheddar, or even pepper jack for a spicy kick.

2. Incorporate sautéed vegetables such as bell peppers or onions to add extra flavor and nutrition.

3. Brush the tops of the roll-ups with melted butter before baking to enhance browning and create a beautiful shine.

4. Experiment with different herbs and spices in the chicken filling for personalized taste; try garlic powder or paprika for added depth.

5. Allow the roll-ups to rest for a few minutes post-baking for easier cutting and serving.

6. Consider using homemade barbecue sauce for dipping to elevate the flavor and add an exciting element of taste.

7. Double the recipe for larger gatherings; they’re sure to be a hit!

8. For a sweet twist, consider adding a dessert filling for a fun variation after the savory roll-ups.

Variations and Adaptations

For a regional twist, try using local cheeses or spices that represent your area, enhancing the recipe’s connection to your culinary culture. Seasonal adaptations might include adding spinach and artichokes during the spring or roasted vegetables in the fall for a different flavor and texture.

Dietary modifications can be made to accommodate different preferences. For a vegetarian version, replace the chicken with a medley of sautéed mushrooms, zucchini, or tofu, while maintaining the cheese for that rich flavor. For a low-carb option, consider using almond flour-based dough instead of traditional crescent rolls.

Flavor variations can be explored by adding different sauces or toppings; consider buffalo sauce or ranch dressing for an unexpected kick. For texture modifications, try pre-baking the crescent rolls for a crispier exterior before adding the filling.

Presentation alternatives can include serving them with a vibrant salad or dipping sauce to brighten the plate, adding color and taste contrast to the meal.

Serving and Presentation Guide

For an appealing presentation, place the Cheesy Chicken Crescent Roll-Ups on a rustic wooden platter, garnished with fresh herbs such as parsley or cilantro. Consider serving them in individual portions, adding flair and elegance to your table setting.

Garnishing ideas include a drizzle of ranch or barbecue sauce on top of the roll-ups, which not only adds flavor but also creates a visually appealing dish. Traditional accompaniments could consist of a fresh salad or potato wedges, while modern suggestions might f use a side of sweet potato fries for a trendy edge.

Temperature considerations are key; serve the roll-ups warm for the best taste and experience. Additionally, consider portion control by serving two roll-ups per person, as their delicious nature might tempt guests to go back for more!

Wine and Beverage Pairing

For the perfect wine pairing, consider a light-bodied white wine such as Sauvignon Blanc or Pinot Grigio that complements the cheese without overpowering the dish. Alternatively, a light red like Pinot Noir can also enhance the flavors effectively.

For non-alcoholic alternatives, sparkling water infused with citrus adds a refreshing touch that cleanses the palate. An iced tea with a splash of lemon could also pair nicely.

If you prefer coffee or tea, consider an herbal tea that can provide a soothing contrast to the savory roll-ups. Temperature should be considered when serving beverages; serve wine chilled to amplify its flavors and keep sparkling water deeply refreshed.

Storage and Shelf Life

To maintain freshness, store leftover Cheesy Chicken Crescent Roll-Ups in an airtight container in the refrigerator for up to 4 days. Make sure they are cooled completely before sealing to avoid condensation. For longer storage, you can freeze the roll-ups, allowing you to enjoy them later. Just ensure they are wrapped tightly to prevent freezer burn.

Signs of spoilage include any unusual odor or visual mold growth. When reheating leftovers, consider using an oven to retain their crispiness; pop them in for about 10 minutes at 350°F. If you’ve frozen the roll-ups, thaw them in the fridge overnight before reheating to ensure even warmth.

Make Ahead Strategies

You can prepare the chicken filling a day ahead, storing it in the refrigerator until you’re ready to assemble the roll-ups. This makes weeknight dinners stress-free and allows for a quicker bake time.

Storing between steps is also effective; freeze the assembled but uncooked roll-ups and bake them directly from the freezer when needed, adjusting the baking time slightly longer for best results.

To maintain quality, allow the baked roll-ups to cool down completely before storing them, and this ensures the texture doesn’t change negatively. For added freshness upon serving later, consider adding a small side salad right before meal time for a freshly prepared element.

Scaling Instructions

If halving or doubling the recipe, keep in mind that the cooking time might vary slightly; smaller batches may cook faster while larger quantities might require additional time. Adjust your baking sheet size accordingly to accommodate the roll-ups.

For tripling the recipe, be mindful of the size of your mixing bowl, ensuring you have enough room to mix all the ingredients without spilling. Always check for doneness when scaling ingredients, as this can affect cooking times and result in unevenly cooked roll-ups.

Storage considerations become important when adjusting serving sizes; ensure there is room in your fridge or freezer for leftovers or adjust your storage containers as necessary to maintain freshness.

Nutritional Deep Dive

These Cheesy Chicken Crescent Roll-Ups are packed with macros, offering a solid protein source from the chicken while providing carbs from the crescent dough. The inclusion of cheese adds necessary fats, making for a filling meal that encompasses all macronutrients.

Micronutrient analysis shows that incorporating vegetables in the filling can further enhance vitamins and minerals necessary for a balanced diet, contributing to overall health. As modifications can suit dietary preferences, adjusting the type of cheese or chicken can also lead to variations in nutrient profiles.

Health benefits include a source of lean protein from chicken, which supports muscle growth and metabolism. When considering dietary choices, portions should be balanced, as roll-ups can be high in calories depending on filling choices.

The dish can also be part of a weight management strategy, allowing for satisfying cravings in moderation, especially when combined with fresh salads or vegetables to increase fiber intake while enjoying the main attractions.

Dietary Adaptations

For those needing a gluten-free option, consider using gluten-free crescent dough available in stores or making your own using gluten-free flour blends. This ensures that everyone can enjoy your delicious roll-ups without compromising dietary restrictions.

Dairy-free adaptations can be achieved by swapping traditional cheese with plant-based alternatives, focusing on brands that melt well to retain the flavors of the dish. Ensure the chicken or any filling used aligns with dietary needs, and many non-dairy proteins could substitute meat.

For a vegan version, simply replace chicken with chickpeas or lentils, incorporating plenty of spices for flavor, while utilizing a dairy-free cheese substitute to keep the rich taste intact.

Low-carb and keto adaptations can involve using almond flour or shredded zucchini in place of crescent dough. This reduces carbohydrate content while still delivering satisfying textures and flavors in each roll-up.

Lastly, for paleo diets, consider using sweet potato slices in place of typical dough, turning it into a unique bite-sized delight rich in nutrients without processed ingredients.

Troubleshooting Guide

If your roll-ups turn out soggy, it could be due to excess moisture in the chicken filling or not baking them long enough. Ensure ingredients are well-drained and fully cooked before sealing in the dough.

For issues with flavor balance, seasoning is critical; always taste your filling before wrapping. If too bland, add herbs or spices to enhance taste profiles, as the triumph of this dish relies heavily on seasoning.

If you find the roll-ups undercooked, increase the baking time only by a few minutes and keep an eye on them to avoid over-baking. Often an oven thermometer helps ensure your temperature is where it needs to be.

Common equipment challenges can include sticky dough; using parchment paper or a silpat can help to reduce this, while buttering pans may assist with non-stick properties.

For ingredient substitutions failing during preparation, remember that texture plays a significant role. Aim to stay within similar texture profiles, keeping in mind that some vegetables may require pre-cooking before adding to the filling.

Recipe Success Stories

Community feedback highlights the joy surrounding Cheesy Chicken Crescent Roll-Ups, with many expressing delight in how quickly they come together and how loved they are at family gatherings. Reader suggestions often include personal twists, from adding spicy fillings to using marinara sauce for dipping.

Variation successes abound as friends share their takes on the roll-ups, showcasing their imagination while maintaining the recipe’s core integrity. Some have successfully used taco-seasoned beef or even pulled pork as filling, highlighting the dish’s versatility.

Engaging with readers showcases their photography tips; several have recommended photographing the roll-ups while they’re fresh out of the oven to capture that melty cheese and golden crust that draws viewers in.

Frequently Asked Questions

Can I prepare these roll-ups in advance? Absolutely! You can prepare the filling ahead of time and store it in the refrigerator. Assemble just before baking for optimal freshness.

What side dishes pair well with Cheesy Chicken Crescent Roll-Ups? Fresh salads, potato wedges, or steamed vegetables serve as delightful accompaniments to balance the richness of the roll-ups.

Can I freeze the roll-ups? Yes, you can freeze uncooked roll-ups. Just freeze them on a baking sheet and transfer them to an airtight container. Bake directly from frozen, increasing the baking time.

How can I make these roll-ups spicy? Consider adding jalapeños or using spicy cheese to incorporate heat into your filling, catering to those craving a little extra kick!

Is it possible to make these roll-ups gluten-free? Definitely! Opt for gluten-free crescent dough available at most grocery stores. Make sure to check labels for proper certification.

What’s the best way to store leftovers? Store leftovers in an airtight container in the refrigerator for up to four days or freeze for later enjoyment!

Are there vegetarian alternatives for the chicken? Yes! Substitute the chicken with vegetables like bell peppers, mushrooms, or even black beans to create a delicious vegetarian filling.

Can I use other meats in this recipe? Definitely! Feel free to try turkey, ham, or even shredded beef, adjusting seasoning and flavor profiles to fit your taste.

How do I know when the roll-ups are done? Look for a golden-brown top and ensure the cheese is fully melted. If unsure, use a thermometer; the internal temperature should be around 165°F.

What’s the best way to reheat these roll-ups? Reheat them in the oven at 350°F for about 10 minutes to keep them crispy instead of the microwave, which can make them soggy.

Additional Resources

For those looking to expand their cooking repertoire, check out related recipes such as Bacon-Wrapped Chicken Bites or Veggie-Loaded Stuffed Peppers. Technique guides can help improve your skills, focusing on dough-making and perfecting sauces to complement your meals.

Ingredient information, including descriptions and cooking tips for chicken and cheese, help elevate your culinary experience. Recommendations on kitchen equipment could guide you towards investing in quality baking sheets or mixing bowls to enhance your cooking adventures.

Lastly, seasonal variations can inspire you to use fresh, local produce in your recipes. Embrace the flavors of the season and adapt the filling to include items like zucchini or corn during the summer months for delightful freshness.

Join the Conversation

Share your experiences with Cheesy Chicken Crescent Roll-Ups on social media! Connect with fellow food lovers by posting your photos or variations of this recipe, inspiring others to try it. Engage in recipe reviews and discussions, encouraging creativity, and fostering a supportive cooking community.

Ask questions, share tips, and explore various methods to adapt this dish to your unique tastes. By gathering feedback and exchanging ideas, we can continue to enhance and celebrate our culinary journeys together!

The Recipe

Cheesy Chicken Crescent Roll-Ups

Serves: 8 roll-ups

Prep Time: 15 mins

Cook Time: 20 mins

Total Time: 35 mins

Kitchen Equipment Needed

  • Baking sheet
  • Parchment paper
  • Mixing bowl
  • Knife for chopping
  • Measuring cups and spoons

Ingredients

  • 1 package (8 oz.) crescent roll dough
  • 2 cups cooked chicken, shredded
  • 1 cup shredded cheese (cheddar or mozzarella)
  • 1/4 cup cream cheese, softened
  • 1/2 teaspoon garlic powder
  • Salt and pepper to taste
  • 1 tablespoon olive oil (optional, for brushing)

Directions

  1. Preheat your oven to 375°F (190°C) and prepare a baking sheet lined with parchment paper.
  2. In a mixing bowl, combine the shredded chicken, shredded cheese, cream cheese, garlic powder, salt, and pepper.
  3. Unroll the crescent roll dough onto a clean surface and separate the triangles.
  4. Place a generous spoonful of the chicken mixture on the wider end of each triangle.
  5. Roll up each triangle, starting from the wide end and tucking in the sides as you go.
  6. Place the roll-ups on the prepared baking sheet seam-side down. Brush with olive oil if desired.
  7. Bake in the preheated oven for 15-20 minutes, or until golden brown and cheese is melted.
  8. Remove from the oven and cool for a few minutes before serving.

Recipe Notes

  • Feel free to customize the filling with your choice of vegetables or different cheese.
  • These roll-ups can be frozen before baking; increase the baking time by a few minutes if baking from frozen.
  • Serve with your favorite dipping sauce or side salad for a complete meal.

Delicious Coconut Lime Fish Soup: A Tropical Delight Recipe

Coconut Lime Fish Soup: A Tropical Delight

⚖️
Difficulty
Medium

⏲️
Prep Time
15 mins

🕒
Cook Time
30 mins

⏱️
Total Time
45 mins

🍽️
Servings
4

Coconut Lime Fish Soup is a vibrant and refreshing dish that embodies the essence of tropical flavors. This comforting soup melds the zest of lime with the creamy richness of coconut milk, creating a harmonious balance that awakens the palate. As you indulge in this delightful recipe, the tender fish fillets soak up the aromatic broth, making each spoonful a tantalizing experience. With its bright colors and invigorating scents, this fish soup transforms any meal into a festive occasion.

The combination of fresh ingredients, such as lime zest, cilantro, and coconut milk, brings about a culinary journey that transports you to sandy beaches and swaying palm trees. Whether served on a chilly evening or a warm day, this Coconut Lime Fish Soup brings a bit of sunshine to your table. Perfect for sharing with family or enjoying solo, this dish is easier to make than you might think.

Quick Recipe Highlights

  • Flavor Profile: With a contrast of citrus and creaminess, every sip of this soup is a burst of freshness complemented by tender fish and aromatic herbs.
  • Texture: The soup has a silky smooth mouthfeel from the coconut milk, while the fish pieces add a satisfying bite.
  • Aroma: Expect an enticing aroma with notes of lime and fresh herbs that invoke the spirit of the tropics.
  • Visual Appeal: The bowl of soup features bright green cilantro and lime wedges, creating an inviting presentation.
  • Skill Level Needed: This dish is approachable for those with basic cooking skills, making it perfect for novice and experienced cooks alike.
  • Special Equipment: A large pot is sufficient, and a sharp knife for preparing the fish will enhance your experience.

Recipe Overview

  • Difficulty Level: While the technique is straightforward, balancing the flavors requires attention to detail, especially with the lime and seasonings.
  • Category: This soup falls under the categories of comfort food and main dishes, making it versatile for lunches or dinners.
  • Cuisine: Drawing inspiration from Southeast Asian culinary traditions, this soup reflects the region’s love for coconut and spices.
  • Cost: Ingredients such as coconut milk and fresh fish can be slightly higher, but the overall cost remains reasonable for a delightful meal.
  • Season: Ideal for any time of year, this recipe shines in warm months when fresh herbs and fish are abundant.
  • Occasion: Perfect for special gatherings, casual dinners, or cozy nights at home, this dish is a crowd-pleaser that impresses.

Why You’ll Love This Recipe

Taste and texture are at the forefront of what makes this Coconut Lime Fish Soup so special. The creamy coconut milk paired with the zingy lime delivers a perfect play of richness and sharpness. Every bite of fish is tender and flavorful, enriched with the broth’s tropical essence. This delightful contrast creates an unforgettable dish that is as enjoyable to eat as it is to prepare.

Convenience is another advantage of this recipe. With a simple ingredient list and straightforward instructions, you can whip up this tropical soup in under an hour, making it ideal for weeknight dinners or last-minute gatherings. The ability to use readily available ingredients also means that cooking this soup doesn’t require extensive planning or effort.

Nutritionally, this Coconut Lime Fish Soup is a fantastic option. Packed with lean protein from the fish and healthy fats from the coconut milk, it offers a well-rounded meal that satisfies without being heavy. The addition of fresh herbs like cilantro adds vitamins and minerals, making it a nourishing choice without sacrificing flavor.

Socially, this dish makes a great centerpiece for gatherings. It encourages sharing and conversation as guests savor the vibrant flavors from a communal pot. The tropical essence of this soup adds an exotic flair, making it a memorable dish that sparks joy and conversation at any table.

Finally, the cost-effectiveness of this recipe cannot be overlooked. While seafood can sometimes be expensive, purchasing fresh fish in-season or opting for a budget-friendly white fish keeps this recipe accessible. Moreover, since each bowl is filling, it stretches your dollar further while delivering a gourmet experience at home.

Historical Background and Cultural Significance

The origins of fish soups date back to ancient times when coastal communities utilized the ocean’s bounties for sustenance. Coconut Lime Fish Soup, in particular, is a vibrant representation of Southeast Asian origins where coconut and citrus flavors dominate traditional culinary practices. The soup embodies the region’s reliance on fresh ingredients and a tropical climate that supports diverse fishing practices.

Cultural importance comes into play when considering how this soup unites people, reminiscent of communal meals shared among family and friends. Across various cultures, soup acts as a comfort food, fostering connections and traditions. This fish soup offers a modern twist to culinary rituals, celebrating both heritage and innovation.

Over the years, recipes for Coconut Lime Fish Soup have evolved, incorporating various local ingredients and tastes. While the base remains similar, chefs experiment with different fish varieties and garnishes, allowing for personal adaptations and reflections of individual culinary styles.

Regional variations are also abundant. From Thailand’s Tom Kha to Vietnam’s Canh Chua, these adaptations remain tied to the use of fresh ingredients, showcasing local produce and herbs. Each twist tells a unique story within the broader narrative of this beloved dish.

Ingredient Deep Dive

Fish

Fish holds a central role in many culinary traditions, providing a primary protein source. Understanding the nutritional benefits, including omega-3 fatty acids, makes fish a king in healthy eating. When selecting fish for this recipe, look for varieties known for their firm texture, such as cod or snapper. Freshness is crucial; choose fish with clear eyes and a mild, ocean-like scent. Proper storage involves keeping the fish cold and consuming it within a couple of days. Substitutions can include frozen fish, but fresh offers the best flavor.

Coconut Milk

Coconut milk is a fundamental ingredient in tropical cuisines, celebrated for its creamy texture and rich flavor. Packed with essential fats, it supports heart health and provides energy. When purchasing coconut milk, opt for canned varieties with no additives for the purest flavor. Store in a cool, dry place and refrigerate once opened, using it within a few days. For those seeking alternatives, almond or soy milk can substitute, but the coconut flavor will be altered.

Lime

Lime adds a bright acidity that enhances the overall dish. Its vitamin C content boosts immunity and protects skin health. When selecting limes, look for those that feel heavy for their size, indicating they’ll be juicier. Store limes at room temperature, or in the fridge for longevity. If you don’t have limes, lemon can be used as a suitable substitute.

Common Mistakes to Avoid

  • Overcooking the Fish: Fish can easily become tough if overcooked; aim for tender, flaky pieces.
  • Ignoring Seasoning Adjustments: The balance of lime and salt is key; taste as you go to achieve the perfect zing.
  • Using Low-Quality Ingredients: Using fresh, high-quality fish and coconut milk elevates the dish significantly.
  • Neglecting Aromatics: Fresh herbs like cilantro elevate the dish; don’t skip out on these key flavor components.
  • Not Allowing the Flavors to Marry: Letting the soup sit for a few minutes after cooking helps the ingredients meld beautifully.
  • Forgetting to zest the Lime: Adding zest enhances the flavor, making your soup more aromatic and flavorful.
  • Running Out of Broth: Keep extra coconut milk or fish stock on hand, especially if you prefer a soupier consistency.
  • Rushing the Preparation: Take your time to prepare and chop ingredients finely for better texture and flavor throughout.

Essential Techniques

Simmering

Simmering is a crucial technique that allows flavors to develop without boiling, ensuring the fish remains tender. Master it by keeping an eye on the heat; small bubbles should break the surface. Avoid boiling; it can toughen the fish and cloud the broth. Look for a consistent, gentle bubbling to signal success.

Chopping Herbs

Chopping herbs correctly enhances their flavor and aroma. Use a sharp knife for clean cuts, preventing bruising. This step is vital as any bruised herb can yield bitterness. Aim for a fine chop to integrate seamlessly into your dish.

Pro Tips for Perfect Coconut Lime Fish Soup

1. Always choose the freshest fish available for the best flavor and texture.
2. Experiment with different fish varieties based on what’s local and in season.
3. Don’t be afraid to customize the spice level to suit your taste for heat.
4. Fresh lime juice added right before serving brightens the entire dish.
5. Consider adding shrimp for a mixed seafood experience; just adjust cooking time accordingly.
6. Allow the soup to cool slightly before serving to let flavors intensify.
7. Keep a bowl of extra lime wedges on the side for guests who enjoy a more zesty kick.
8. Pair with a light salad or artisan bread for a complete meal experience.

Variations and Adaptations

Regional variations abound in Coconut Lime Fish Soup. For instance, you may opt for adding tropical fruits like mango or pineapple to provide a sweet contrast to the lime. Seasonal adaptations include using winter squashes or root vegetables to enhance heartiness in colder months.

For dietary modifications, substituting fish for plant-based alternatives, like mushrooms or tofu, caters to vegan diets while still maintaining the dish’s essence. In terms of flavor variations, consider experimenting with different herbs like basil or mint for a unique twist.

Serving presentations can be varied as well; serve in individual bowls garnished with colorful vegetables or herbs for a vibrant display that enhances visual appeal.

Serving and Presentation Guide

Plating techniques play an important role in how your Coconut Lime Fish Soup is received. Use shallow bowls to showcase the soup’s colorful ingredients. A generous sprinkle of chopped cilantro and a lime wedge on top can add a professional touch.

For garnishing ideas, toasted coconut flakes can enhance the tropical vibe and offer a satisfying crunch. Additionally, traditional accompaniments like crusty bread could be served on the side for dipping, adding texture to the meal.

Temperature considerations are essential; serve the soup hot to fully appreciate the aromatic ingredients. Portion control tips indicate that a cup and a half of soup per serving strikes the perfect balance for satisfying appetites.

Wine and Beverage Pairing

When it comes to wine pairings, a light, crisp white wine like Sauvignon Blanc complements the zesty lime in your soup beautifully. The fruitiness and acidity of this wine will not overpower the delicate flavors.

For non-alcoholic alternatives, consider a refreshing coconut water or sparkling water with lime to keep the tropical theme alive. If you fancy coffee or tea, choose something light and floral; a herbal tea could also serve as an excellent pairing.

Temperature considerations advise that chilled beverages pair well with warm soup, creating a satisfying contrast to the palate. Always serve drinks in chilled glasses to enhance the refreshing experience.

Storage and Shelf Life

Proper storage methods for Coconut Lime Fish Soup are essential for maintaining flavor and safety. Cool the soup down quickly and store it in an airtight container to preserve its integrity.

Ideal temperature requirements involve refrigeration; the soup should be consumed within 3-4 days when properly stored. For longer storage, freezing is an option, but be mindful of texture changes. Ensure you store in freezer-safe containers, leaving some room for expansion.

Signs of spoilage include off odors or discoloration, indicating it’s time to discard. When reheating, do so gently on the stovetop, bringing it back to a simmer but avoiding boiling to retain the best texture and flavors.

Make Ahead Strategies

Planning ahead can elevate your cooking game. Prepare all ingredients ahead of time, chopping vegetables and measuring out spices, allowing for a quick and easy assembly later. The soup can be prepped a day in advance, letting the flavors deepen overnight.

Storage between steps involves keeping fish separate until you’re ready to cook to prevent it from becoming rubbery. Quality impact assessments indicate that fresh ingredients provide the best results, so focus on the optimal timing for performance.

Assembly tips suggest that you cook the soup base ahead of time and add fish components just before serving to maintain ideal textures. Finally, you can add fresh elements like herbs right before serving to ensure freshness.

Scaling Instructions

Scaling the recipe up or down is easy; to halve the recipe, simply divide every ingredient by two. When doubling or tripling, be aware of pot size—ensure your pot can hold all components comfortably without risk of overflow.

Equipment adjustments may involve using larger pots or multiple batches for larger gatherings, maintaining the same cooking times. Timing modifications may be necessary as larger quantities can affect how quickly the soup comes to temperature.

When storing leftovers, ensure you have enough containers, and remember that flavors often improve overnight, making it worthwhile to prepare certain portions ahead of time.

Nutritional Deep Dive

A macro breakdown reveals that this Coconut Lime Fish Soup contains a healthy balance of protein from the fish and fats from the coconut milk. For those watching their carbohydrates, this meal is low-carb, fitting well into various dietary restrictions.

Micronutrient analysis shows that ingredients like lime and cilantro are rich in vitamins C and K, promoting overall health. The nutritional benefits extend to heart health, thanks to the omega-3 fatty acids found in fish.

Dietary considerations for this soup cater to a wide audience, offering excellent options for weight management thanks to the high-quality protein and healthy fats. Portion analysis suggests that a serving of this soup is satisfying while still being mindful of calorie intake, making it a guilt-free indulgence.

Dietary Adaptations

For those following gluten-free diets, Coconut Lime Fish Soup is naturally gluten-free, ensuring all can enjoy it without worry. It can easily be adapted to cater to dairy-free needs, as the coconut milk replaces traditional dairy products seamlessly.

Vegetarians can enjoy this dish by substituting fish with tofu or edamame, ensuring the recipe remains filling and delicious. Low-carb diets find this dish appealing as it incorporates vegetables without added starch, fitting perfectly into such eating plans.

Keto and Paleo enthusiasts can also enjoy this soup, as the low carbohydrate content aligns with their dietary restrictions, emphasizing whole food ingredients. Further adaptations for low-FODMAP diets involve understanding ingredient limitations while swapping in accessible alternatives.

Troubleshooting Guide

Texture issues can arise from overcooking the fish, leading to a rubbery mouthfeel. To avoid this, remain vigilant during cooking and remove fish as soon as it’s opaque. For flavor balance, adding extra lime or a drizzle of fish sauce can rectify overly bland soup; always taste and adjust as you go.

Temperature problems often stem from cooking on high heat; maintain medium to low heat for broth-making. If you find your ingredients are unbalanced, consider incorporating sweetness with a dash of sugar or honey to counteract too much acidity.

Equipment challenges come into play when tools aren’t suitable; ensure that pots are large enough to accommodate your entire recipe, preventing spillage. Ingredient substitutions may alter the intended flavor; keeping the key ingredients intact will provide the best result. Lastly, timing concerns are crucial; refer to cooking times accurately to ensure everything finishes together perfectly.

Recipe Success Stories

Our readers have applauded Coconut Lime Fish Soup for reigniting their love for fish dishes. One community member shared how adding shrimp transformed the dish into a fabulous seafood medley, delighting family and friends at gatherings.

Another success story highlighted adapting the recipe with local, seasonal vegetables, such as bok choy, adding depth and nutrition. Engaging our readers for feedback showcased successful adaptations that empower others to experiment, reinforcing the community’s enthusiastic embrace of creativity.

Photographic tips suggest capturing the vibrant colors against a neutral background, emphasizing the freshness of ingredients. These moments serve to inspire fellow home cooks to recreate this tropical delight at their tables.

Frequently Asked Questions

Can I use frozen fish? Yes, but it’s best to thaw frozen fish in the refrigerator before cooking to maintain texture and flavor.
Can I make this soup vegetarian? Absolutely! Substitute the fish with firm tofu or tempeh, and the broth with vegetable stock for a vegetarian option.
What types of fish work best? Firm white fish like cod, snapper, and halibut are excellent choices for this recipe.
How spicy is this soup? The spice level can be adjusted based on your preference; add fresh chili peppers for heat or omit them for a milder soup.
Can I make this soup in advance? Yes, the soup can be prepared ahead of time, but add the fish just before serving to ensure it stays tender.
How long does the soup last in the fridge? Store leftovers in an airtight container for up to four days for the best flavor and quality.
Can I freeze the soup? Yes, you can freeze the soup, but textures may change; it’s advisable to consume it within three months for best results.
What can I serve with this soup? Serve alongside crusty bread, a light salad, or over steamed rice for a filling meal.
What can I substitute for coconut milk? Alternatives can include almond milk or cashew cream, though the flavor will differ from the original.
Is this soup keto-friendly? Yes, this soup is low in carbohydrates, making it suitable for keto diets.
How can I make it more filling? Consider adding vegetables like bok choy or carrots to bulk it up and increase its nutritional value.

Additional Resources

Explore related recipes to broaden your culinary repertoire. Look into techniques that enhance fish dishes, offering insights into choosing the right cooking methods or flavor pairings. Stayed informed about ingredient selections to maximize freshness and taste for your next meal. Also, don’t hesitate to invest in recommended kitchen tools to improve your cooking efficiency.

Seasonal variations add excitement—try adapting this dish with ingredients reflecting the availability in your region.

Join the Conversation

We invite you to share your Coconut Lime Fish Soup experiences with us! Engage with our community on social media, showcasing your culinary creations, and inspiring others. Photography tips for this recipe encourage capturing the vivid colors and textures to entice fellow food lovers.

Leave reviews and feedback to enhance our culinary treasure trove while sharing your unique variations of this dish. Let’s spark a vibrant conversation filled with creativity and love for cooking!

The Recipe

Coconut Lime Fish Soup

Serves: 4

Prep Time: 15 mins

Cook Time: 30 mins

Total Time: 45 mins

Kitchen Equipment Needed

  • Large pot
  • Sharp knife
  • Cutting board
  • Measuring cups and spoons

Ingredients

  • 1 lb fish fillets (cod, snapper, or similar)
  • 1 can (13.5 oz) coconut milk
  • 4 cups fish stock or chicken broth
  • 2 limes (zest and juice)
  • 1 cup chopped cilantro
  • 1 onion, diced
  • 2 cloves garlic, minced
  • 1 tablespoon fresh ginger, minced
  • 1-2 Thai chilies, sliced (optional)
  • Salt to taste

Directions

  1. In a large pot, heat a drizzle of oil over medium heat. Add onion, garlic, and ginger, sautéing until softened.
  2. Pour in the fish stock and bring to a simmer. Add lime zest and cayenne for a hint of spice.
  3. Stir in the coconut milk and let it cook for about 5 minutes, allowing flavors to meld.
  4. Add the fish fillets and cook gently until just cooked through, about 10 minutes.
  5. Finish with lime juice and cilantro to brighten the flavors. Adjust seasoning with salt as necessary.
  6. Serve hot, garnished with extra cilantro and lime wedges.

Recipe Notes

  • For a richer texture, consider using full-fat coconut milk.
  • Feel free to add vegetables like bell peppers or snap peas for additional nutrition.
  • Adjust the spice level based on your preference by including or omitting chilies.

Indulge in Gourmet Meatballs with Savory Mushroom Gravy Recipe

Gourmet Meatballs with Rich Mushroom Gravy: A Comfort Food Classic

⚖️
Difficulty
Intermediate

⏲️
Prep Time
20 mins

🕒
Cook Time
30 mins

⏱️
Total Time
50 mins

🍽️
Servings
4

Indulge in the rich flavors of Gourmet Meatballs with Rich Mushroom Gravy, a dish that celebrates the comforting essence of home cooking. These meatballs are lovingly crafted from high-quality ground meat, combined with fragrant herbs and spices, and enhanced by the umami notes of freshly sautéed mushrooms. The elegance of this recipe makes it perfect for any occasion, whether it’s a family dinner or a special gathering with friends.

Each bite offers a delightful combination of textures—from the tender meatballs to the velvety gravy that envelops them, making this dish a true feast for the senses. The savory aroma wafting from your kitchen as the mushrooms simmer alongside the meatballs will have your family eagerly awaiting mealtime. Experience the joy and satisfaction of serving a classic comfort food that balances heartiness with gourmet flair.

Quick Recipe Highlights

  • Flavor Profile: The gourmet meatballs deliver a savory balance of herbs, spices, and the earthy richness of mushrooms, covered in a luscious gravy that enhances each bite.
  • Texture: Expect tender meatballs complemented by a smooth, creamy gravy that adds a luxurious mouthfeel.
  • Aroma: The fragrant blend of sautéed mushrooms, garlic, and fresh herbs fills your kitchen with an irresistible scent.
  • Visual Appeal: Serve the meatballs in a deep, rich gravy, garnished with fresh parsley for a pop of color against the warm brown tones.
  • Skill Level Needed: This recipe requires intermediate cooking skills, including sautéing and sauce-making, suitable for home cooks looking to elevate their culinary abilities.
  • Special Equipment: A skillet for browning the meatballs, a mixing bowl, and measuring tools are essential for success in this recipe.

Recipe Overview

  • Difficulty Level: This recipe falls into an intermediate category due to the need for multitasking and the techniques involved in creating the perfect meatball and gravy.
  • Category: Gourmet Meatballs with Rich Mushroom Gravy is ideal for hearty dinners and special occasions, embodying a comforting yet refined dining experience.
  • Cuisine: This dish draws inspiration from traditional Italian and American cooking, marrying rich flavors with comfort elements.
  • Cost: The ingredients are moderately priced, providing good value for a gourmet meal that can impress guests.
  • Season: Perfect for fall and winter, this dish offers warmth and comfort during colder months, making it a family favorite.
  • Occasion: Great for family gatherings, dinner parties, or as a satisfying weeknight meal when you want something special.

Why You’ll Love This Recipe

The Gourmet Meatballs with Rich Mushroom Gravy will quickly become a favorite thanks to their incredible taste and texture. The combination of premium ground meat and aromatic mushrooms creates a depth of flavor that is hard to resist. Each meatball is juicy, while the gravy contributes a luxurious richness that coats every bite, making it perfect over pasta or mashed potatoes.

Convenience is another reason to love this dish. Although it requires some prep time, the steps are straightforward, allowing you to create a restaurant-quality meal right in your home kitchen. Plus, the ingredients are generally available in most grocery stores, making it easy to gather what you need.

From a nutritional perspective, this recipe provides protein from the meatballs, while the mushrooms add fiber and essential nutrients. This balance makes it a wholesome option for those seeking to maintain a healthy diet without sacrificing flavor.

When it comes to entertaining, these gourmet meatballs shine. Their elegant presentation and delicious taste make them a fantastic choice for serving guests. Pair them with a side salad or crusty bread, and you have a complete meal that everyone will enjoy.

Lastly, consider the cost-effectiveness of this dish. With just a few high-quality ingredients, you can make a substantial meal that satisfies everyone at the table. This recipe is designed to impress without breaking the bank, allowing for an elegant dining experience at home.

Historical Background and Cultural Significance

Gourmet meatballs have a storied history that traverses various cultures, with roots in ancient Roman cuisine. Initially, meatballs were fashioned as a way to use leftover meats, making them a humble yet resourceful dish. Over time, the concept evolved, gaining prominence in traditional Italian and American households, each adding their unique spin on flavors and cooking techniques.

Culturally, meatballs represent comfort and home-cooked meals. They have been served at family gatherings and festive occasions, symbolizing togetherness and warmth. Whether in an Italian Sunday dinner or served at a holiday buffet, these tasty morsels bring people together, creating cherished memories around the table.

The evolution of the gourmet meatball reflects changing tastes and trends in cuisine. Once merely a simple meal, it has transformed into a beloved dish featured in high-end restaurants and home kitchens alike, where chefs innovate with spices, sauces, and presentation.

Regional variations of meatballs showcase local ingredients and flavors. For example, Swedish meatballs feature a creamy sauce, while Middle Eastern kofta incorporates fragrant spices and herbs, each telling a story of its cultural heritage.

Ingredient Deep Dive

Ground Beef: This versatile ingredient is central to the meatball, providing a robust flavor and satisfying texture. Rich in protein, iron, and essential nutrients, it’s a staple in many diets. When selecting ground beef, look for blends with a good fat content for moisture without excessive grease. Store it in the refrigerator for 1-2 days or freeze it for longer preservation, and consider leaner cuts if health is a priority.

Mushrooms: Known for their umami flavor, mushrooms enrich the gravy and add depth to the dish. They’re low in calories but high in nutritional value, offering fiber, vitamins, and antioxidants. Fresh mushrooms are ideal, but dried varieties can be used for intense flavor. Store fresh mushrooms in a paper bag in the fridge, and be sure to substitute with other types like shiitake or cremini for variety.

Breadcrumbs: These are often used as a binding agent in meatballs, contributing to their texture. Made from stale bread, breadcrumbs offer a crispy finish when baked. Opt for homemade or whole-grain options for better nutrition. Keep breadcrumbs in a cool, dry place, and they can last several months. If gluten sensitivity is a concern, consider almond or oat flour as alternatives.

Common Mistakes to Avoid

  • Overmixing: When combining the meat mixture, don’t overdo it. Overmixing can lead to tough meatballs rather than tender, juicy ones.
  • Skipping the resting time: Allowing the meatballs to rest before cooking helps them hold their shape and enhance their flavor.
  • Not browning properly: Give meatballs enough time in the skillet to develop a good sear. This step is crucial as it adds depth to the final dish.
  • Using the wrong meat: Opt for a blend of meats for a richer flavor. Using only lean meat may result in dry meatballs.
  • Cooking at too high heat: Cooking meatballs over high heat can burn them on the outside while leaving them raw in the center.
  • Thickening the gravy improperly: Avoid adding cornstarch directly to the sauce without mixing it in a separate bowl, which can lead to lumps.
  • Serving immediately: Allow the meatballs to rest after cooking to let the flavors meld for a more cohesive dish.
  • Ineffective storage: Store leftovers properly in airtight containers to maintain their freshness and flavor.

Essential Techniques

Browning Meatballs: This technique is crucial for developing flavor. Browning creates a crust that enhances the overall taste of your dish. To achieve perfect browning, ensure your pan is hot enough before adding the meatballs, and avoid crowding the pan to maintain high heat.

Making a Rich Gravy: Creating a flavorful gravy is an art. Start by sautéing onions and mushrooms in the renderings from the meatballs to build a flavor base. Gradually add in broth to deglaze the pan, scraping up lovely browned bits that contribute to the sauce’s complexity.

Pro Tips for Perfect Gourmet Meatballs with Rich Mushroom Gravy

1. Use a combination of meats: Mixing ground beef with ground pork can elevate flavors and improve moisture.
2. Don’t forget seasoning: Be generous with salt, pepper, and spices, as the flavor of the meat must shine through the gravy.
3. Opt for fresh, high-quality breadcrumbs: Fresh breadcrumbs have a lighter texture and better flavor than store-bought varieties.
4. Control the size: Using a scoop to form uniform meatballs ensures even cooking and consistent texture.
5. Allow time for flavors to meld: Let the meatballs simmer in the gravy for a few minutes before serving to enhance the overall flavor.
6. Modulate the gravy thickness: Adjust the consistency of the gravy to your liking by adding more broth or allowing it to reduce further on the heat.
7. Garnish creatively: Fresh herbs like parsley or chives add a beautiful touch and a burst of freshness.
8. Experiment with spices: Don’t hesitate to introduce different herbs and spices to customize your meatballs to your taste.

Variations and Adaptations

Regional Variations: Explore different flavor profiles by integrating regional spices. For instance, try adding cumin and coriander for a Middle-Eastern flair or parmesan cheese for an Italian twist.

Seasonal Adaptations: In summer, you can grill the meatballs for a smoky flavor. In winter, incorporate warming spices like cinnamon for a comforting meal.

Dietary Modifications: To make this dish gluten-free, substitute regular breadcrumbs with gluten-free options like almond flour or crushed rice cakes.

Flavor Variations: Infuse the meatball mixture with different cheeses, herbs, or citrus zest for a personal flavor touch.

Texture Modifications: For added crunch, consider incorporating finely chopped vegetables like carrots or bell peppers in the meatball mixture.

Presentation Alternatives: Serve the meatballs over roasted vegetables or zoodles for a lighter, more modern take on the dish.

Serving and Presentation Guide

Plating techniques are essential for an elegant presentation. Use a clean, white plate to contrast the colors of the dish. Lay a bed of mashed potatoes or pasta, and then artistically pile the meatballs on top, cascading the rich gravy over them.

Garnishing ideas include a sprinkle of freshly chopped parsley or a drizzle of balsamic reduction to add visual interest and flavor. Complement your servings with crusty bread or a fresh green salad for added textures and colors.

For modern serving suggestions, consider using small cast iron skillets for individual portions, bringing a rustic touch to your table. Temperature is crucial—ensure meatballs are served hot to enhance their appeal and ensure a comforting experience.

Portion control tips recommend serving two meatballs per person, depending on their size, allowing room for sides without overwhelming the plate.

Wine and Beverage Pairing

Wine pairings for Gourmet Meatballs with Rich Mushroom Gravy can enhance the dining experience. A robust red wine like Cabernet Sauvignon or a smooth Merlot complements the savory flavors beautifully. For a lighter option, consider a Pinot Noir which tends to have a fruity, acidic profile that pairs well with meat dishes.

Non-alcoholic alternatives might include sparkling grape juice or a refreshing iced tea with lemon. The acidity in these beverages works well to balance the richness of the dish.

If coffee is your preference post-dinner, choose a medium roast that highlights the earthiness of the meatballs while providing a delightful end to the meal.

Temperature considerations matter too; serve red wine slightly chilled to keep it refreshing, especially during warmer seasons.

Storage and Shelf Life

To keep your Gourmet Meatballs and Gravy fresh, store leftovers in airtight containers in the refrigerator for up to three days. Make sure they cool before sealing them to avoid condensation. If you want to preserve them longer, freezing is an option—just ensure they are well-packed in freezer-safe containers or bags.

Temperature requirements demand your meatballs be reheated to an internal temperature of 165°F before serving. Reheat gently on the stovetop or in the microwave, adding extra broth if the gravy seems thick.

Signs of spoilage include an off smell or discoloration, so always check before consuming leftovers.

For best results, freeze meatballs without the gravy to maintain their texture, adding the sauce after reheating.

Make Ahead Strategies

To streamline your cooking process, consider preparing the meatball mixture a day in advance, allowing flavors to meld. Store the uncooked mixture in the refrigerator and form meatballs just before cooking.

For step-wise storage, prepare the gravy and refrigerate it separately from the meatballs. This prevents the meat from becoming soggy.

Assess the quality impact: While you can make meatballs in advance, they are best when freshly cooked. However, cooked meatballs can last well in the fridge and remain delicious next day.

Timing during prep can be crucial; prepare the meatball mix while the gravy is simmering to optimize kitchen time.

Reheating guidelines suggest gentle warming over low heat with a splash of broth to keep them moist.

Don’t forget to add any fresh herbs just before serving to brighten the dish after reheating.

Scaling Instructions

Halving the recipe is straightforward—just divide all ingredients by two—ideal for smaller households. Keep in mind the cooking time may slightly decrease.

For doubling or tripling, ensure you have adequate cooking space; larger batches may require cooking in batches for optimal results. Adjust the timing slightly, as larger quantities may take longer to heat through.

When scaling up, consider using larger pots or skillets to accommodate the expanded volume, ensuring even cooking.

Don’t forget about storage considerations: left over meatballs can be stored for future meals, keeping portion sizes manageable.

Nutritional Deep Dive

In terms of macronutrients, these meatballs provide significant protein, essential for muscle repair and growth. The combination of meat and mushrooms contributes valuable fiber, aiding digestion, and enhancing satiety.

Micronutrient analysis reveals the richness of iron in the beef paired with vitamin D and B vitamins often found in mushrooms, making this a nutritionally robust dish.

Health benefits abound as this meal is packed with iron and protein while being lower in carbohydrates, depending on the serving choice of sides.

Dietary considerations also come into play; adjust portions for overall caloric intake and consider accompanying sides that align with personal nutrition goals.

Weight management tips advise pairing meatballs with vegetables or whole grains to enhance fullness while enjoying this gourmet dish.

Dietary Adaptations

For gluten-free adaptations, use certified gluten-free breadcrumbs or explore alternatives like quinoa or almond flour for binding.

If you need a dairy-free version, omit any cheese and use non-dairy options for the gravy. Coconut milk is a great alternative that offers creaminess without the dairy.

For a vegan take, replace meat with lentils or mushrooms, and use flaxseed meal as a binder in place of eggs, ensuring the same comforting flavor profile.

Adjustments can also be made to fit low-carb or keto diets, swapping breadcrumbs with crushed pork rinds or almond exteriors to keep the meatballs satisfying without the carbs.

Paleo followers can utilize ground turkey or chicken, for a lighter meat while adhering to paleo-friendly ingredients.

Troubleshooting Guide

Texture issues often arise if meatballs are overmixed. Ensure you mix just until combined to prevent dense meatballs. If they fall apart while cooking, consider adding an egg to the mixture for better binding.

Flavor balance can be challenging; always taste and adjust seasoning. If the meatballs turn out bland, a double check on salt before serving can go a long way.

Temperature problems may occur if your meatballs are not fully cooked. Invest in a meat thermometer to ensure they reach an internal temperature of 165°F.

Equipment challenges might include the need for larger skillets when cooking in batches. Have more than one cooking surface ready, or cook smaller batches to avoid overcrowding.

Ingredient substitutions need to be planned ahead—if you need to swap out an ingredient last minute, ensure you have an alternative that complements the dish’s flavor profile.

Timing concerns can be addressed by prepping components ahead of time. If you’re short on time, consider making the meatballs in advance or using frozen meatballs for an even quicker option.

Recipe Success Stories

Community feedback often highlights how gourmet meatballs bring families together over a comforting plate of food. Many have noted adjustments they made, from tweaking seasoning to leveraging local ingredients for unique variations.

Variation successes speak to the flexibility of the recipe; some users have successfully incorporated vegetarian alternatives, creating delightful lentil-based meatballs that still satisfy.

Adaptation stories showcase creative takes on this classic, with readers sharing how they innovated the dish to fit dietary needs while maintaining its essence.

Photography tips reveal that presenting the dish with a sprinkle of vibrant herbs not only enhances visual appeal but makes a dish memorable, urging others to recreate these gourmet meatballs in their kitchens.

Frequently Asked Questions

Can I freeze the meatballs and gravy?

Yes, you can freeze the meatballs separately from the gravy for optimal texture. Store in airtight containers, ensuring they are cooled completely before freezing. Thaw in the fridge overnight and reheat before serving.

What can I serve with gourmet meatballs?

Gourmet meatballs pair beautifully with sides like mashed potatoes, pasta, or a fresh green salad. Crusty bread is also a fantastic option for soaking up the delicious gravy!

Can I make this dish ahead of time?

Absolutely! You can prepare meatballs and the gravy a day ahead. Just reheat gently before serving for best results.

What type of ground meat works best?

A mix of ground beef and pork often yields the best flavor and moisture. However, feel free to experiment with turkey or chicken for leaner options.

Can I make this recipe dairy-free?

Yes, simply skip any dairy ingredients in the gravy. Coconut milk can be a delicious alternative that provides creaminess without dairy.

How do I prevent meatballs from falling apart?

To help meatballs hold their shape, do not overmix your ingredients, and ensure you are using the right amount of breadcrumbs or fillers. Adding an egg can also provide extra binding.

What spices are essential for flavor?

Essentials include salt, black pepper, garlic powder, and Italian seasoning. Fresh herbs like parsley or basil can enhance flavor greatly.

Can I use dried mushrooms in the gravy?

Absolutely! Dried mushrooms can add an intense flavor to the gravy. Be sure to rehydrate them in warm water before adding to your sauce.

How many servings does this recipe make?

This recipe serves about four people, depending on portion sizes and side dishes served. It can be easily scaled up or down.

What kitchen tools do I need?

You will need a mixing bowl, a skillet for browning the meatballs, and a pot for making the gravy. A meat thermometer can also be useful for ensuring proper cooking temperature.

Additional Resources

Explore related recipes for more comfort food ideas, including classic spaghetti and meatballs or creamy mushroom risotto. Discover technique guides for mastering meatball-making and browse ingredient information for substitutions and tips on freshness.

Look for equipment recommendations focused on essential kitchen tools that can enhance your cooking experience, and don’t miss out on seasonal variations that highlight fresh produce throughout the year.

Join the Conversation

We’d love to hear about your experiences with this Gourmet Meatballs with Rich Mushroom Gravy recipe! Share your photographs, provide feedback, and engage with the community through social media. Together, we can inspire more culinary adventures and discover delicious variations.

The Recipe

Gourmet Meatballs with Rich Mushroom Gravy

Serves: 4

Prep Time: 20 mins

Cook Time: 30 mins

Total Time: 50 mins

Kitchen Equipment Needed

  • Mixing bowl
  • Skillet
  • Measuring tools
  • Spatula
  • Meat thermometer

Ingredients

  • 1 lb ground beef
  • 1/2 lb ground pork
  • 1/2 cup breadcrumbs
  • 1/4 cup milk
  • 1 egg
  • 2 cloves garlic, minced
  • 1 tsp salt
  • 1/2 tsp black pepper
  • 1 tsp Italian seasoning
  • 8 oz mushrooms, sliced
  • 1 onion, chopped
  • 2 cups beef broth
  • 2 tbsp olive oil
  • Fresh parsley for garnish

Directions

  1. In a mixing bowl, combine ground beef, ground pork, breadcrumbs, milk, egg, garlic, salt, pepper, and Italian seasoning. Mix until just combined.
  2. Form the mixture into approximately 1-inch meatballs.
  3. Heat olive oil in a skillet over medium heat. Add meatballs and brown on all sides. Remove from skillet and set aside.
  4. In the same skillet, add onions and mushrooms. Sauté until softened. Pour in beef broth, scraping the bottom of the pan for flavor.
  5. Return the meatballs to the skillet, cover, and let simmer for 15-20 minutes.
  6. Adjust seasoning if needed, and garnish with fresh parsley before serving.

Recipe Notes

  • For extra flavor, add grated parmesan cheese to the meat mixture.
  • Feel free to substitute any ground meat for the beef and pork.
  • This dish pairs well with spaghetti or mashed potatoes.

Hearty Beef Barley Soup Recipe for Cozy Comfort Food

Hearty Beef Barley Soup: Comfort in Every Spoonful

⚖️
Difficulty
Moderate

⏲️
Prep Time
15 mins

🕒
Cook Time
1 hr 30 mins

⏱️
Total Time
1 hr 45 mins

🍽️
Servings
6 servings

Warm, nourishing, and brimming with flavor, this Beef Barley Soup is the perfect dish to enjoy on a chilly day. Rich beef broth combines with tender chunks of beef, plump barley grains, and a medley of fresh vegetables to create a hearty meal that comforts the soul. The balance of protein and fiber in this stew not only makes it delicious but also satisfying, ensuring that every bowl leaves you feeling nourished and content.

What sets this Beef Barley Soup apart is its incredible depth of flavor. With every spoonful, you’ll experience the savory notes from the beef, enhanced by aromatic herbs and spices. The barley adds a unique chewiness that contrasts beautifully with the tender vegetables, creating a symphony of textures. Whether you’re serving it for a family dinner or a cozy night in, this soup is sure to please and leave everyone asking for seconds!

Quick Recipe Highlights

  • Flavor Profile: Savory beef flavor combined with earthy herbs and a hint of garlic gives this soup a robust taste.
  • Texture: The barley lends a delightful chewiness while the beef remains tender and juicy, creating a satisfying mouthfeel.
  • Aroma: The smell of simmering beef, fresh vegetables, and fragrant herbs will fill your kitchen and invite everyone to the table.
  • Visual Appeal: The rich golden-brown broth, flecks of vibrant vegetables, and soft grains of barley make this soup an enticing dish.
  • Skill Level Needed: This recipe is moderate in difficulty, as it requires some knife skills and understanding of simmering techniques.
  • Special Equipment: A sturdy pot or Dutch oven is essential for proper cooking and to achieve that deep, flavorful broth.

Recipe Overview

  • Difficulty Level: This Beef Barley Soup comes with a moderate level of difficulty. It involves browning beef and lengthy simmering, both of which require attention to detail for the best flavor development.
  • Category: This dish falls under the category of soups and stews, perfect for a warming meal on cold days.
  • Cuisine: Beef Barley Soup has roots in Eastern European cuisine, where hearty, warming dishes are the staples of family meals.
  • Cost: With affordable ingredients like beef, barley, and seasonal vegetables, this soup is budget-friendly while providing great flavor and nourishment.
  • Season: Ideal for autumn and winter, this soup brings warmth and comfort during the colder months.
  • Occasion: Beef Barley Soup is great for family dinners, meal prep, or even festive gatherings where comfort food is a necessity.

Why You’ll Love This Recipe

This soup is a delightful balance of taste and texture that everyone will love. The robust flavors meld together beautifully, resulting in a savory broth that warms the soul. It’s perfect for cozy nights and comforting dinners. The tenderness of the beef, paired with the chewiness of the barley and the freshness of the vegetables, creates an irresistible dish that you’ll be eager to share.

Aside from its delightful taste, the convenience of this Beef Barley Soup is a standout feature. It can be made in large batches, perfect for meal prep or family nights when you want to ensure plenty of leftovers. You can prepare it in advance, reheat it, and enjoy the same comforting flavors all week long without extra effort. Just make sure to let everyone know to expect seconds!

This hearty soup offers nutritional advantages, packing in protein from the beef and fiber from the barley and vegetables. It serves as a wholesome meal that can satisfy hunger without needing excessive calories. This ensures you have a well-rounded meal that you feel good about feeding your family.

Socially, this recipe is fantastic for gatherings. It promotes sharing and togetherness, offering a meal that everyone can enjoy equally. The aromatic scent draws people to the kitchen, creating an inviting atmosphere where stories can be shared over warm bowls of soup.

In terms of cost, this recipe is highly accessible. The ingredients are typically inexpensive, especially if you buy in bulk or seasonal. This allows you to enjoy a delicious, nourishing meal without straining your budget, making it a practical choice for any household.

Historical Background and Cultural Significance

Beef Barley Soup has its origins in Eastern Europe, where farmers and families relied on hearty meals that could sustain them through the long, harsh winters. This soup not only provided nourishment but also a sense of community, as families gathered around the table to share a warm bowl together.

Culturally, the soup represents comfort and tradition, often being passed down through generations of families. It reflects a time when food was prepared with love and shared, creating bonds between those who ate it together. Over the years, various cultures have adopted and adapted the recipe, adding local spices, or vegetables, enriching the soup with different flavors and character.

As the recipe evolved, regional variations emerged. Some might add mushrooms for an umami boost, while others incorporate root vegetables or spices to give it a unique twist. This adaptability showcases how a simple recipe can bring people together and remain relevant in diverse culinary traditions.

Today, Beef Barley Soup is celebrated not only for its flavor and nutritional benefits but also for its story—one that is steeped in cultural heritage and familial love. It continues to be a favorite among home cooks seeking to connect with tradition while enjoying a satisfying meal.

Ingredient Deep Dive

Beef: The star of the soup, beef provides protein and richness. Opt for cuts like chuck or brisket for their ideal fat content. These tougher cuts become tender after slow cooking, adding depth to the broth. Storage in the refrigerator for a few days is ideal, but can also be frozen for longer preservation. If needed, substitutes can include lean cuts, although they might alter the soup’s richness.

Barley: Barley isn’t just a traditional grain; it’s incredibly nutritious, containing fiber and essential nutrients. It acts as a thickener, giving the soup its hearty consistency. When selecting barley, choose hulled or pearl barley for tenderness. Store in a cool, dry place, and if necessary, it can be replaced with quinoa or farro, though cooking times may vary.

Vegetables: Carrots, celery, and onions form the mirepoix, bringing sweetness and flavor. Freshness in preparation directly impacts the flavor, so opt for seasonal, vibrant produce. Properly store them in the refrigerator, and for substitutes, consider adding bell peppers or peas for variety.

Herbs and Spices: Fresh herbs like thyme and bay leaves enhance the aromatic quality of the soup. They hold historical significance in cooking, often used to impart flavor in dishes over time. Always use fresh herbs when possible; if needed dried herbs can be used but in smaller quantities.

Common Mistakes to Avoid

  • Skipping the Browning Step: Not browning the beef before adding it to the soup can lead to a lack of depth in flavor. Browning creates a rich base that elevates the soup.
  • Adding Barley Too Early: If you add the barley too soon, it can become overly mushy. Instead, add it in the last 30-40 minutes of cooking to ensure it retains its texture.
  • Overcooking Vegetables: Cooking vegetables for too long can result in them losing their texture and flavor. Add hearty vegetables like carrots at the right time to maintain a slight crunch.
  • Using Low-Quality Broth: Stock or broth provides the backbone of this soup. Using low-quality or overly salty broth can detract from the overall flavor. Opt for homemade or good-quality broth whenever possible.
  • Neglecting to Skim the Foam: During simmering, foam may develop. Skim this off for a clearer and more pleasant broth.
  • Not Tasting as You Go: Failing to taste the soup during cooking means you may miss out on adjusting flavors. Regular tasting helps achieve the desired balance.
  • Cooking at High Heat: A common mistake is cooking the soup on high heat. This can lead to tough meat and uneven cooking. Slow and steady is key.
  • Overseasoning: It’s important to season as you go, but avoid dumping all the salt and pepper at once; this can make the soup too salty. Season gently and adjust later.

Essential Techniques

Browning Meat: Browning the beef is crucial for enhancing flavor through the Maillard reaction. To master this, ensure your pot is hot enough to sear the meat without boiling. Look for a golden crust before removing the beef, which indicates a successful browning.

Simmering: Simmering transforms the ingredients, allowing the flavors to meld beautifully. To achieve it, bring your soup to a gentle boil then reduce heat until tiny bubbles rise. Watch for signs of bubbling; too vigorous can lead to toughness, while too little can undercook.

Knife Skills: Proper chopping of vegetables ensures even cooking. To master this, practice uniform cuts; this not only improves presentation but also ensures they cook uniformly. Gauge doneness by testing with a fork.

Deglazing: After browning the meat, deglazing with broth lifts flavorful browned bits from the pot. It’s essential for flavor depth; simply add broth and scrape while simmering. A good deglaze results in a richer soup.

Pro Tips for Perfect Beef Barley Soup

1. Always start with quality beef to ensure a rich and satisfying flavor throughout the soup. Cut against the grain for the most tender bites.

2. Use a mix of fresh herbs for a more complex flavor profile. Thyme and bay leaves are staples, but don’t hesitate to bring in rosemary or parsley for variety.

3. To enhance the broth, consider adding a splash of red wine after browning the meat and before adding the broth to give extra depth.

4. If time allows, let the soup sit for an hour after cooking. This rest period allows the flavors to meld and develop, making the soup even better.

5. When reheating leftovers, add a splash of water or broth to maintain the soup’s consistency, as it may thicken in the fridge.

6. If you’re planning to freeze leftovers, consider omitting the barley from the soup. Adding it fresh when reheating ensures optimal texture.

7. Use a slow cooker for this recipe if you prefer a hands-off approach. Browning the ingredients on the stovetop first, then transferring to a slow cooker can develop flavors beautifully.

8. Experiment with garnishing fresh herbs or a sprinkle of grated parmesan before serving for a touch of elegance and added flavor.

Variations and Adaptations

Regional variations of Beef Barley Soup often intrude delightful twists. For instance, adding mushrooms brings a wonderful umami quality that complements the beef beautifully. In autumn, throwing in seasonal squash or pumpkin can lend a hint of sweetness and vibrant color.

For dietary preferences, consider a gluten-free version using quinoa in place of barley. It retains a similar texture, making it just as satisfying. Additionally, swapping in lentils can introduce a plant-based protein that’s both hearty and nutritious.

Serving styles can also vary; consider presenting the soup in a bread bowl for a delightful twist. The bread absorbs the delicious broth, adding to the experience of enjoying every last bite. You can also serve it beside a fresh green salad or crusty bread for a balanced meal.

Seasonal adaptations can enhance flavors—try experimenting with fresh herbs available in your garden during the summer months or adding fresh peas for a touch of sweetness. The possibilities are endless!

Serving and Presentation Guide

For an appealing presentation, serve the soup in wide bowls to showcase its rich, colorful ingredients. Consider garnishing with freshly chopped parsley or a sprinkle of black pepper to enhance visual appeal. Accompany with crusty bread, ideally artisanal, for dipping and enjoying the broth.

Temperature is essential; serve the soup hot, ensuring the flavors are vibrant. For portion control, consider serving smaller bowls and allowing guests to return for refills rather than overwhelming them at once.

For a modern touch, serve the soup alongside a fresh side salad dressed lightly with vinaigrette. This creates a well-rounded meal with contrasting textures and flavors.

Lastly, encourage guests to top their soup with a dollop of sour cream or a splash of vinegar, which can balance the richness of the broth wonderfully.

Wine and Beverage Pairing

Beef Barley Soup pairs beautifully with a medium-bodied red wine, such as a Merlot or Pinot Noir, which complements the savory flavors without overpowering them. Serve it slightly chilled to enhance the experience.

For non-alcoholic options, a robust grape juice or sparkling water with a squeeze of lemon can be refreshing and pairs well with the meal’s hearty elements.

If coffee or tea is more your style, a rich coffee would work well, while a medium-strength black tea can also provide a complimentary taste profile. Just ensure both beverages are served brewed hot for an optimal experience!

Storage and Shelf Life

To ensure lasting flavors, store leftover Beef Barley Soup in an airtight container in the fridge for 3-4 days. Divide portions to make reheating easier later. Ensure it cools before refrigerating to maintain quality.

For longer storage, consider freezing the soup. Divide it into freezer-safe containers for individualized servings. This allows you to enjoy a bowl at a moment’s notice. Defrost in the fridge overnight and reheat gently for the best results.

Watch for signs of spoilage, such as off smells or discolored ingredients. If you observe any changes in color or texture after prolonged storage, it’s best to err on the side of caution and discard.

When reheating, do so gently on the stove, adding a splash of water or broth as needed to restore consistency. Always ensure the soup reaches a safe serving temperature before enjoying again!

Make Ahead Strategies

This Beef Barley Soup is an excellent candidate for make-ahead meals. Prepare the broth and base ingredients a day in advance; the flavors develop beautifully when they sit overnight. Store separately until ready to simmer with the barley just before serving.

After cooking, allow the soup to cool before storing it in the refrigerator. This will enhance the flavors and make it easier to serve the next day. When reheating, remember to add fresh herbs for a pop of flavor.

If you plan to assemble later, consider pre-chopping vegetables and marinating the beef in herbs overnight. This prep reduces time in the kitchen and maximizes flavor development.

Finally, consider adding fresh elements like spinach or herbs just before serving to retain their color and nutritional value.

Scaling Instructions

If you need to adjust quantities, this Beef Barley Soup scales beautifully. To halve the recipe, simply use the same proportions, ensuring you still follow timing for cooking to maintain flavor balance.

To double or triple the recipe, use a larger pot to accommodate increased volume. You may need to adjust the simmering time slightly for optimum flavor extraction as larger batches may take longer to reach appropriate temperatures.

Keep an eye on the soup during simmering; more significant amounts require careful monitoring to avoid overcooking. For any adjustments, rely on taste often to ensure it remains delicious!

Make sure to consider your storage plan, as larger batches will require more containers. Utilize the freezer effectively, allowing you to store excess portions in manageable sizes for future meals.

Nutritional Deep Dive

This Beef Barley Soup provides a nourishing blend of macronutrients, making it a wholesome choice. The beef offers a significant source of protein, essential for muscle repair and maintenance, while the barley contributes complex carbohydrates and dietary fiber.

Additionally, a careful balance of vegetables introduces essential vitamins and minerals, aiding in wellness and immunity. The broth, flavored with herbs and spices, packs antioxidants that contribute to overall health.

For portion analysis, consider a standard serving of one generous cup as a single serving—ideal for most diets. Keep in mind that while hearty, moderation is crucial for overall caloric control, especially if paired with bread or other side dishes.

The inclusion of barley can also assist those focusing on weight management, as its high fiber content can promote satiety, keeping you fuller longer. Just be mindful of portion control and have balanced accompaniments!

Dietary Adaptations

This Beef Barley Soup can easily be adapted for various dietary preferences. For a gluten-free version, swap barley with quinoa or millet, both of which lend a similar texture without the gluten content.

For those needing dairy-free options, ensure that any garnishes, like sour cream, are omitted or replaced with cashew cream for a creamy touch—an excellent dairy alternative.

If you’re following a vegan diet, replace the beef with lentils or mushrooms to still deliver heartiness while retaining protein. Choose vegetable broth as a base, and pile in colorful veggies for nutritional variety.

Low-carb dieters can utilize cauliflower rice or shredded zucchini instead of barley, offering a lighter, yet still delicious option. Be sure to adjust cook times as necessary to accommodate these ingredients.

Troubleshooting Guide

Too Salty: If your soup turns out too salty, add a diced potato during cooking—it’ll absorb some of the excess saltiness. Be sure to remove it before serving!

Too Thick: If the soup thickens too much during storage or cooking, simply add a splash of broth or water while reheating to attain the desired consistency.

Flavor Lacking: If flavors are muted, consider enhancing it with a dash of vinegar or a squeeze of lemon just before serving to brighten the dish.

Vegetables Overcooked: If the vegetables turn mushy, add fresh ones as a garnish during serving for texture, or serve alongside for contrast.

Recipe Success Stories

Many home cooks have celebrated the comforting flavors of this Beef Barley Soup. Readers praise its heartiness and the ability to feed a crowd, making it a staple for family gatherings and chilly days.

Variations abound, with individuals sharing success stories of adjustments made, such as using leftover roast beef or adding different spices for personal flair. Each adaptation showcases the recipe’s versatility, proving it’s a canvas on which to create and experiment.

Engaged readers often mention the joy of serving it at “soup night” events, leading to shared experiences and photograph-worthy moments captured around the table.

Photography tips have also emerged from community members, with many highlighting the importance of natural light for capturing the vibrant colors of this delicious dish.

Frequently Asked Questions

1. Can I freeze Beef Barley Soup? Absolutely! This soup freezes well, but it’s best to add the barley when you reheat it, to retain its texture.

2. How long can I store leftovers? Leftovers can be stored in the fridge for 3-4 days. Just ensure they’re in an airtight container.

3. What can I use instead of beef? For a vegetarian twist, try lentils or mushrooms instead, paired with vegetable broth.

4. Is this soup gluten-free? Traditional barley contains gluten, but you can substitute it with quinoa or millet to make it gluten-free.

5. How can I make it spicier? Add crushed red pepper flakes or a dash of hot sauce while it’s simmering for a delightful kick.

6. Can I make this in a slow cooker? Yes! Brown the beef first, then cook on low for 6-8 hours. Add barley for the last hour.

7. What’s a good side dish? Crusty bread or a fresh salad pairs beautifully with Beef Barley Soup.

8. How do I know when the beef is tender? The beef should easily break apart with a fork when it’s properly cooked.

9. Can I add beans to the recipe? Yes! Adding beans can boost fiber and protein; just adjust the cooking time accordingly.

10. What’s the origin of Beef Barley Soup? It has roots in Eastern European cuisine, where hearty soups have long been a staple for comfort and nutrition.

Additional Resources

For further cooking guides, check out our technique resources covering knife skills, browning meat, and simmering essentials. If you loved this recipe, consider trying other hearty soups such as Chicken Noodle or Lentil Soup.

Equipment recommendations include sturdy Dutch ovens for even cooking or high-quality knives for precision in chopping. Seasonal variations enhance flavors, so look out for produce specials to keep your meals fresh and exciting!

Join the Conversation

We encourage readers to share their successes and variations of this Beef Barley Soup. Join us on social media to connect—post your images, share your thoughts, and discuss improvements or personal twists you’ve made. Each story enriches our community.

Feedback and suggestions are essential; feel free to comment below or reach out with questions. Every bowl tells a story—what’s yours?

The Recipe

Beef Barley Soup

Serves: 6 servings

Prep Time: 15 mins

Cook Time: 1 hr 30 mins

Total Time: 1 hr 45 mins

Kitchen Equipment Needed

  • Large pot or Dutch oven
  • Cutting board
  • Knife
  • Wooden spoon or ladle
  • Cup measuring tools

Ingredients

  • 2 pounds beef (chuck or brisket), cubed
  • 1 cup pearled barley
  • 3 carrots, diced
  • 2 stalks celery, diced
  • 1 onion, chopped
  • 4 cloves garlic, minced
  • 8 cups beef broth
  • 2 bay leaves
  • 1 teaspoon thyme
  • Salt and pepper to taste
  • Fresh parsley for garnish

Directions

  1. In a large pot or Dutch oven, brown the beef cubes over medium-high heat. Remove and set aside.
  2. Add onions, carrots, celery, and garlic to the pot, and sauté for about 5 minutes until softened.
  3. Return beef to the pot and add beef broth, bay leaves, and thyme. Bring to a simmer.
  4. Cover, reduce heat, and let it simmer for about 1 hour.
  5. Add barley to the pot and stir; cook for an additional 30-40 minutes until barley is tender.
  6. Season with salt and pepper to taste. Remove bay leaves before serving.
  7. Garnish with fresh parsley and serve hot.

Recipe Notes

  • For extra flavor, add a splash of red wine after browning the meat.
  • Adjust seasoning to personal preference, adding more herbs as desired.
  • This soup can be made ahead and tastes even better the next day!

Hearty Beef Vegetable Soup: Comfort in Every Spoonful

Hearty Beef Vegetable Soup: A Comforting Classic

⚖️
Difficulty
Easy

⏲️
Prep Time
20 mins

🕒
Cook Time
1 hour

⏱️
Total Time
1 hour 20 mins

🍽️
Servings
6 servings

Beef Vegetable Soup is a beloved classic that brings warmth and comfort to any meal. Packed with nutritious vegetables and tender beef, this soup is not just hearty, but also filling and delicious. Imagine the fragrance of savory beef mingling with fresh herbs, complementing vibrant vegetables, and simmering in a rich broth. This dish is not only satisfying, but it also creates a sense of nostalgia, making it an excellent choice for family dinners or gatherings with friends.

The beauty of this Beef Vegetable Soup lies in its versatility. You can customize it with your favorite seasonal vegetables or let the ingredients you have on hand inspire your creation. Each bowl is filled with colorful veggies, succulent beef chunks, and a flavorful broth that warms the soul. With the first spoonful, you’ll feel connected to the heart of home cooking, embracing the comfort that only a bowl of soup can provide.

Quick Recipe Highlights

  • Flavor Profile: A perfect blend of savory beef, earthy vegetables, and aromatic herbs creates a comforting and satisfying experience.
  • Texture: The tender beef complements the crunch of fresh vegetables, providing a delightful contrast that enhances the enjoyment with every bite.
  • Aroma: The fragrance of slow-simmered broth infused with herbs fills your kitchen, inviting everyone to come together for a warm meal.
  • Visual Appeal: The vibrant colors of carrots, peas, and potatoes make the soup visually appealing and appetizing.
  • Skill Level Needed: This is an accessible recipe suitable for beginner cooks looking to explore the joys of hearty soups.
  • Special Equipment: A large pot or Dutch oven is ideal for creating this comforting dish efficiently and thoroughly.

Recipe Overview

  • Difficulty Level: This Beef Vegetable Soup is easy to prepare, making it perfect for both novice cooks and seasoned chefs looking for a quick meal.
  • Category: It serves as an excellent main course, ideal for lunch or dinner any day of the week.
  • Cuisine: Influenced by home-cooked traditions, this soup reflects comfort food at its finest, commonly found in various culinary cultures worldwide.
  • Cost: Generally budget-friendly, the ingredients can be sourced at local markets without breaking the bank.
  • Season: Enjoy this soup year-round, utilizing seasonal vegetables to enhance its freshness and flavor.
  • Occasion: Perfect for cozy family nights, holiday gatherings, or even potluck dinners, this soup brings everyone together.

Why You’ll Love This Recipe

The taste and texture of Beef Vegetable Soup make it a crowd-pleaser. The juicy, tender beef pairs harmoniously with a medley of vegetables like carrots, celery, and potatoes, creating a satisfying and flavorful dish. As you savor each spoonful, the warmth and heartiness keep you coming back for more.

Convenience is another reason to love this recipe. With just a few simple steps, you can have a pot of delicious soup simmering on the stove. Perfect for busy weeknights, or you can prepare a large batch ahead for meal prep. The leftovers taste even better the next day, making it a great dish for busy days.

Nutritionally, this soup is packed with vitamins and minerals from the vegetables and protein from the beef. A bowl is not only satisfying but also a wholesome way to nourish your family, ensuring everyone gets their daily intake of nutrients.

Gathering around a pot of Beef Vegetable Soup creates a sense of community and warmth. It’s an excellent dish for sharing, whether with friends or family, inviting conversation and connection over a comforting meal.

Lastly, the cost-effectiveness of this recipe can’t be overlooked. Utilizing affordable ingredients, it’s simple to feed a crowd without overspending. Plus, making your own soup at home allows you to control the ingredients and avoid preservatives found in store-bought options.

Historical Background and Cultural Significance

Beef Vegetable Soup has its roots in traditional comfort food, appreciated across various cultures for its heartiness and rich flavors. Historically, families utilized leftover meats and seasonal vegetables to create a dish that would stretch their food supply, making it both economical and nourishing. Orthodox and seasonal adaptations often arose, from Italian minestrone to hearty Irish stews, all embodying the spirit of home-cooked meals.

Culturally, this soup holds a significant place in many households as a communal dish. It’s not just about sustenance; it embodies family gatherings and shared moments, capturing the essence of nurturing and comfort. The act of sharing a bowl of soup represents hospitality, making it a staple for welcoming guests or celebrating occasions.

As time has progressed, the recipe has evolved. Various adaptations have incorporated different meats and spices, reflecting regional tastes and available ingredients. This evolution speaks to the dynamism of home cooking, allowing personal touches while maintaining the comfort that the dish is known for.

In terms of regional variations, Beef Vegetable Soup finds a unique expression in many places. Each community adapts the recipe using local vegetables and spices, ensuring that every bowl tells a story of its cultural influence and the ingredients at hand.

Ingredient Deep Dive

  • Beef: A staple protein, beef provides essential nutrients like iron and protein, helping to build muscles and maintain energy. When selecting beef for soup, opt for tougher cuts, like chuck roast, which become tender when cooked slowly. Store beef in the refrigerator for up to three days or freeze for longer storage. If you’re looking for alternatives, turkey or chicken can also work well.
  • Carrots: A common soup add-in, carrots offer sweetness and color, along with beta-carotene for eye health. Look for firm carrots with a rich color, and store them in a cool, dry place. If you need a substitute, parsnips can provide a similar texture with a slightly different flavor.
  • Celery: This vegetable adds crunch and a mild flavor, balancing the richness of the beef. Nutritionally, celery is low in calories and high in hydration. Choose fresh, bright green stalks; they should feel firm and crisp. You can replace celery with bell peppers if desired.
  • Potatoes: Potatoes give bulk and heartiness to soup, enhancing the filling nature of the dish. High in potassium and vitamin C, they’re a nutritious choice. Select potatoes that are smooth and firm, without any sprouts. Sweet potatoes or squash can provide a different twist on this classic recipe.

Common Mistakes to Avoid

  • Overcooking the vegetables: While you want them tender, mushy vegetables can ruin the texture. Be mindful of cooking times.
  • Using lean cuts of beef: Lean cuts will not yield the tenderness and flavor that fatty cuts offer when slow-cooked.
  • Skip seasoning: Don’t forget to season the broth well; underseasoned soup can taste bland and uninviting.
  • Neglecting to brown the beef: This creates a rich depth of flavor that elevates your soup.
  • Not letting it simmer: A shorter cooking time limits the flavors from developing; be patient and allow it to simmer fully.
  • Adding cold ingredients: Ensure that all ingredients are at room temperature before adding them to the pot for even cooking.
  • Piling too many ingredients: Keep it simple; a cluttered soup can lose its individual flavors.
  • Skipping the herbs: Fresh herbs can significantly elevate the flavor profile of your soup.

Essential Techniques

  • Browning the meat: This technique builds flavor through the Maillard reaction. To master it, ensure your pot is hot before adding beef; avoid overcrowding to achieve a good sear. Look for a deep brown color on the meat for success.
  • Simmering: Simmering gently extracts flavors without boiling the broth away. Master this by adjusting the heat—if bubbles break the surface, it’s too hot. A slow bubble is perfect for achieving soft textures.
  • Chopping vegetables: Uniform cuts ensure even cooking. Invest time in mastering the dice and julienne techniques for presentation and texture. Visually, cuts should be consistent in size for an appealing finish.
  • Layering flavors: Start with aromatics (like onions and garlic) before adding other ingredients for depth. Add spices early to release their oils and maximize their impact throughout cooking.

Pro Tips for Perfect Beef Vegetable Soup

  • Use bone-in beef for richer flavor—bones impart an additional depth to your broth.
  • Incorporate fresh herbs such as thyme or parsley at the end to brighten the flavor.
  • To thicken the soup, mash a few potatoes once cooked, then stir them back in.
  • For an umami boost, add a splash of Worcestershire sauce or soy sauce during the simmer.
  • Ensure your broth is flavorful—homemade broth is best for an authentic taste.
  • Adjust the consistency by adding more broth or water if your soup is too thick.
  • Top with a dollop of sour cream or some shredded cheese for a creamy finish.
  • Let the soup sit for an hour before serving; this allows the flavors to meld beautifully.

Variations and Adaptations

  • Regional variations: Change the protein; for a Mexican twist, switch beef for chorizo and add corn and black beans.
  • Seasonal adaptations: Use seasonal vegetables like zucchini in summer or root vegetables in winter for freshness.
  • Dietary modifications: For a lighter option, you can make it with ground turkey or add more lentils for protein.
  • Flavor variations: Spice up with red pepper flakes or serve with a squeeze of lemon for brightness.
  • Texture modifications: If you prefer a smoother soup, blend a portion and return to the pot.
  • Presentation alternatives: Serve in bread bowls for a rustic feel or garnish with microgreens or croutons for added texture.

Serving and Presentation Guide

  • Plating techniques: Ladle soup carefully into deep bowls, allowing it to fill without spilling over.
  • Garnishing ideas: Sprinkle chopped parsley or chives on top for a pop of color and added flavor.
  • Traditional accompaniments: Serve with crusty bread or biscuits for a satisfying meal.
  • Modern serving suggestions: Consider offering a side salad for a refreshing balance to the soup.
  • Temperature considerations: Beef Vegetable Soup is best served piping hot; keep it warm until ready to serve.
  • Portion control tips: Use measuring cups if serving at a gathering to maintain even portions.

Wine and Beverage Pairing

  • Wine pairings: A full-bodied red wine like Cabernet Sauvignon pairs wonderfully with the rich flavors of beef.
  • Non-alcoholic alternatives: Try a sparkling water with a lime wedge or a refreshing iced tea to cleanse the palate.
  • Coffee/tea pairings: A robust black tea can balance the hearty flavors, enhancing your meal experience.
  • Temperature considerations: Serve wine lightly chilled to maintain its refreshing qualities alongside a warm soup.
  • Serving suggestions: Offer wine in elegant glasses to elevate your dining experience when enjoying the soup.

Storage and Shelf Life

  • Storage methods: Cool the soup completely before transferring it to airtight containers for storage.
  • Temperature requirements: Refrigerate leftovers and consume within 3–4 days or freeze for longer storage options.
  • Container recommendations: Use glass or BPA-free plastic containers; glass allows you to reheat directly.
  • Signs of spoilage: If the soup develops an off-smell, discoloration, or any mold, discard it immediately.
  • Reheating instructions: Reheat on the stove over medium heat, stirring until heated through, or microwave until boiling.
  • Freezing guidelines: Label containers with dates to track freshness; thaw in the refrigerator overnight before reheating.

Make Ahead Strategies

  • Prep timeline: Chop the vegetables and marinate the beef one day in advance for maximum flavor.
  • Storage between steps: Store ingredients separately until you are ready to cook to maintain freshness.
  • Quality impact assessment: Preparing soup a day ahead enhances the flavors as they meld overnight.
  • Assembly tips: Gather all ingredients beforehand to expedite the cooking process and simplify your workflow.
  • Reheating guidelines: If you’ve made the soup ahead of time, ensure it’s heated gently to preserve the texture.
  • Fresh element additions: Add fresh herbs just before serving to elevate the soup and add new flavors.

Scaling Instructions

  • Halving the recipe: For smaller servings, simply divide all ingredients in half while maintaining cooking times.
  • Doubling or tripling: Increase ingredient quantities accordingly and adjust pot size to accommodate more volume.
  • Equipment adjustments: Ensure that your pot is large enough to handle increased portions for even cooking.
  • Timing modifications: Larger batches may require longer simmering times to achieve tenderness.
  • Storage considerations: Consider portioning into smaller containers for freezing to make reheating easier later on.

Nutritional Deep Dive

  • Macro breakdown: Each serving offers a balance of carbohydrates, proteins, and healthy fats, making it a well-rounded meal.
  • Micronutrient analysis: The vegetables provide essential vitamins like A and C, supporting immune health and vision.
  • Health benefits: This soup promotes satiety, making it a great choice for maintaining healthy eating habits.
  • Dietary considerations: Full of nutrients while being low in calories, it’s beneficial during weight management.
  • Portion analysis: Keeping servings consistent helps control calorie intake while ensuring satisfaction.
  • Weight management tips: Pair it with a salad or veggies for a low-calorie, nutrient-dense meal option.

Dietary Adaptations

  • Gluten-free: This recipe is naturally gluten-free; just ensure your beef broth is gluten-free as well.
  • Dairy-free: The soup does not require dairy; enjoy it as is or enhance with dairy-free toppings.
  • Vegan: Substitute beef with lentils or mushrooms and vegetable broth to create a plant-based version.
  • Low-carb: Skip the potatoes or replace them with cauliflower for a lower-carb meal.
  • Keto: Use more high-fiber vegetables and choose fats like olive oil for added richness without compromising carb limits.
  • Paleo: Ensure all ingredients align with paleo standards, focusing on whole foods without preservatives.
  • Low-FODMAP: Use suitable vegetables and spices to manage symptoms associated with digestive sensitivities.
  • Other specific diets: Customize the soup to fit within different dietary lifestyles by being mindful of ingredient choices.

Troubleshooting Guide

  • Texture issues: If the soup is too thin, cook it uncovered for a bit to reduce liquid; if too thick, add water or broth gradually.
  • Flavor balance: If bland, consider adding more salt, herbs, or fresh ingredients to enhance the overall taste.
  • Temperature problems: Ensure your pot is adequately heated before adding ingredients; adjust heat as necessary during cooking.
  • Equipment challenges: If you lack a Dutch oven, a heavy-bottomed stock pot works perfectly for an even simmer.
  • Ingredient substitutions: Be resourceful with substitutes if you’re out of specific ingredients—most will work fine in this flexible recipe.
  • Timing concerns: If beef isn’t tender, increase simmering time while keeping an eye for doneness.

Recipe Success Stories

  • Community feedback: Readers have praised this soup for its simplicity and taste, often sharing their own adaptations and secret ingredients.
  • Variation successes: Many have enjoyed adding different vegetables and proteins, making it their own family favorite.
  • Adaptation stories: Families have created tradition around this soup, customizing it yearly for celebrations.
  • Reader suggestions: Numerous suggestions include adding unique spices for an adventurous twist that updates the classic recipe.
  • Photography tips: Stunning images have emerged showcasing this soup’s vibrant colors, encouraging others to try it themselves.

Frequently Asked Questions

Can I freeze Beef Vegetable Soup? Yes, it freezes well. Allow it to cool completely before transferring to airtight containers. It can be stored in the freezer for up to three months.

How do I make the soup spicier? You can add red pepper flakes, diced jalapeños, or hot sauce to the pot during cooking to increase the heat.

What vegetables work best in this soup? Carrots, potatoes, celery, and peas are classic choices, but feel free to incorporate any vegetables you enjoy or have on hand!

Can I add noodles to this soup? Absolutely! Add cooked noodles towards the end of cooking to avoid overcooking them. Egg noodles or whole grain options work great.

What if I don’t have beef broth? You can use vegetable or chicken broth as an alternative to create a lighter version.

How long does it take for the beef to become tender? Depending on the cut, beef usually takes around 1-1.5 hours to become tender when simmered properly.

Is this soup good for meal prep? Yes, it’s perfect for meal prep and tastes even better the next day as the flavors meld together.

What’s the best way to reheat the soup? Heat the soup gently on the stovetop or in the microwave until hot. Stir occasionally for even heating.

Can I make this soup in a slow cooker? Yes! Brown the beef first, then add all ingredients into the slow cooker and cook on low for 6-8 hours or high for 4-5 hours.

What herbs should I add for flavor? Fresh herbs such as thyme, parsley, or bay leaves can enhance the flavor of the soup tremendously.

How can I thicken Beef Vegetable Soup? Simmering uncovered helps reduce liquid, or you can mash some potatoes into the soup for a thicker texture.

Additional Resources

  • Related recipes: Explore other comforting soup recipes like Chicken Noodle Soup or Vegetable Lentil Soup for more variations.
  • Technique guides: Check out guides on how to chop vegetables efficiently or how to properly season your meals.
  • Ingredient information: Dive deeper into the nutritional benefits of root vegetables or the best cuts of beef for soup.
  • Equipment recommendations: Invest in quality knives and pots that will elevate your cooking experience.
  • Seasonal variations: Discover recipes that highlight seasonal produce, ensuring freshness and flavor throughout the year.

Join the Conversation

  • Social media sharing: Share your Beef Vegetable Soup experiences on social media, tagging friends and inspiring them to participate.
  • Photography tips: Take captivating photos of your soup and share your creations with the community, inspiring others to try the recipe.
  • Recipe reviews: Leave feedback on how the recipe turned out for you; your experience can guide others in their cooking journey.
  • Community engagement: Engage with others by sharing substitutes and variations you’ve tried, creating a communal cooking experience.
  • Recipe variations: Post about your unique takes on the recipe, showcasing regional ingredients and personal touches.

The Recipe

Beef Vegetable Soup

Serves: 6 servings

Prep Time: 20 mins

Cook Time: 1 hour

Total Time: 1 hour 20 mins

Kitchen Equipment Needed

  • Large pot or Dutch oven
  • Cutting board
  • Sharp knife
  • Measuring cups and spoons
  • Wooden spoon or spatula

Ingredients

  • 1 lb beef chuck roast, cut into 1-inch cubes
  • 2 tablespoons olive oil
  • 1 large onion, diced
  • 3 cloves garlic, minced
  • 3 carrots, sliced
  • 2 celery stalks, sliced
  • 3 potatoes, diced
  • 1 cup peas (fresh or frozen)
  • 6 cups beef broth
  • 1 teaspoon dried thyme
  • 1 bay leaf
  • Salt and pepper to taste

Directions

  1. In a large pot, heat olive oil over medium heat. Add the beef and brown on all sides.
  2. Add onion and garlic, cooking until softened.
  3. Stir in carrots, celery, and potatoes. Cook for a few minutes until vegetables begin to soften.
  4. Add the beef broth, thyme, bay leaf, salt, and pepper. Bring to a boil.
  5. Reduce heat and let it simmer for about 1 hour until the beef is tender and vegetables are cooked through.
  6. Last 5 minutes of cooking, add in peas and stir to combine.
  7. Remove bay leaf and serve hot with your favorite crusty bread.

Recipe Notes

  • Feel free to add any vegetables you have on hand.
  • This soup can be made ahead of time and reheats well.

Indulge in Luxurious Seafood Bisque with Crab, Shrimp, and Lobster

Seafood Bisque: A Luxurious Blend of Crab, Shrimp, and Lobster

⚖️
Difficulty
Medium

⏲️
Prep Time
30 mins

🕒
Cook Time
60 mins

⏱️
Total Time
90 mins

🍽️
Servings
4 servings

Experience the rich, velvety texture of our Seafood Bisque—perfectly blending the tastes of crab, shrimp, and lobster into a decadent soup that warms the soul. From the first spoonful, the bisque captivates your senses with its creamy consistency and luxurious flavors. Infused with aromatic spices and herbs, each bite is a delightful journey, evoking memories of seaside dinners and gourmet bistros.

This Seafood Bisque not only delights the palate but also brings the ocean’s bounty to your table. Its rich and savory essence is elevated by a touch of sherry, perfectly balancing the sweetness of the seafood. Ideal for a cozy dinner or an elegant gathering, this recipe shines in its simplicity and sophistication, delivering comfort with an air of elegance.

Quick Recipe Highlights

  • Flavor Profile: This bisque showcases the sweet, succulent flavors of crab, shrimp, and lobster, enhanced by a savory base of broth and aromatic vegetables.
  • Texture: The creamy bisque offers a rich and smooth mouthfeel, with tender pieces of seafood providing delightful contrast.
  • Aroma: The enticing aroma of simmering seafood and fresh herbs fills the kitchen, creating an inviting atmosphere.
  • Visual Appeal: The bisque presents beautifully in a bowl, with vibrant flecks of seafood against the creamy backdrop, garnished with fresh herbs.
  • Skill Level Needed: Suitable for home cooks with a moderate skill level, this recipe requires a knack for balancing flavors and textures.
  • Special Equipment: A high-quality blender or immersion blender is recommended for achieving the perfect creamy consistency.

Recipe Overview

  • Difficulty Level: This medium-difficulty recipe requires basic cooking techniques like sautéing and simmering, making it accessible to most home cooks.
  • Category: Seafood Bisque falls into the soup category, specifically within the realm of gourmet dining.
  • Cuisine: With French and coastal influences, this bisque incorporates classic culinary techniques that highlight seafood.
  • Cost: While fresh seafood can be an investment, the overall cost is justifiable for a comforting dish that serves multiple people.
  • Season: Best enjoyed during the cooler months, when the warmth of the bisque is most comforting.
  • Occasion: Perfect for special occasions, elegant gatherings, or holiday dinners, Seafood Bisque elevates any event.

Why You’ll Love This Recipe

When the rich, savory taste of Seafood Bisque dances on your palate, it’s hard not to fall in love with this luxurious dish. Each spoonful transports you to a coastal paradise, filled with the sweet flavors of crab, shrimp, and lobster. The combination of these seafood marvels creates a symphony of flavors that is satisfying and indulgent, making it a perfect centerpiece for a dinner party or a comforting family meal.

Preparing this bisque is a rewarding endeavor. The step-by-step process allows you to immerse yourself in the kitchen, from sautéing the aromatic vegetables to simmering the seafood in a harmonious broth. As the ingredients meld together, the kitchen fills with delightful aromas that are sure to make everyone eager to dig in. Plus, the option to blend the bisque provides a delightful textural experience, allowing you to customize smoothness to your preference.

The nutritional benefits of this Seafood Bisque are truly impressive. Packed with protein and omega-3 fatty acids from the seafood, it contributes to a well-balanced diet while delivering essential nutrients. Additionally, the presence of vegetables like onions, carrots, and celery contributes fiber and vitamins, making the bisque feel even more wholesome.

In a social setting, serving Seafood Bisque can elevate your hosting game. It impresses guests with its sophisticated flavors and presentation, encouraging conversation and delight at the table. You’ll find that it becomes a memorable highlight of the meal, prompting requests for the recipe.

Lastly, while seafood might sometimes come with a higher price tag, preparing this bisque at home is often more economical than dining out. With the ability to serve several people at once, it’s an accessible luxury you can create in your kitchen without breaking the bank.

Historical Background and Cultural Significance

Seafood bisques have a rich history rooted in French culinary tradition, originally crafted by fishermen to make use of their freshest catches. The term “bisque” is thought to derive from the Spanish word “bizcocho,” referring to the toasting of crab shells used in its preparation. Over time, this method evolved, leading to the luxurious versions we enjoy today.

In coastal regions, the bisque symbolizes culinary heritage and a connection to the sea. It showcases local ingredients and reflects the ebb and flow of fishing traditions. The dish often represents celebration, making appearances during special occasions and gatherings where seafood is abundant.

Various adaptations of the bisque can be found, influenced by regional ingredients and trends. While the classic version highlights crab, others incorporate shellfish and different blends of fish, evolving alongside culinary innovations over the years. The combination of creaminess and seafood evokes feelings of nostalgia and comfort that resonate through generations.

From elegant restaurants to home kitchens, Seafood Bisque continues to adapt. It remains a staple on menus and a beloved dish for many, embodying warmth and sophistication that makes any meal feel special.

Ingredient Deep Dive

Crab: Crab not only offers a delightful sweetness to the bisque but also adds a touch of elegance. Rich in protein and omega-3 fatty acids, it contributes to heart health. When selecting crab meat, look for lump or backfin varieties for best texture. Fresh crab is ideal, but pasteurized crab can be a great time-saver. Store crab in the coldest part of your fridge and use it within a few days for optimal freshness.

Shrimp: Shrimp is a universal favorite due to its juicy texture and versatility. Packed with protein and low in calories, shrimp is a nutritious addition to any meal. Choose shrimp that are firm and odorless, with a glossy appearance. Properly store shrimp in the refrigerator and consume them within one to two days. Frozen shrimp are also an excellent option for convenience, ensuring you always have some on hand for spontaneous bisque cravings.

Lobster: Lobster brings an opulent flavor to this bisque, with its sweet, succulent meat elevating the overall dish. It is high in protein and low in fat, making it a guilt-free luxury. When purchasing lobster, choose live or fresh lobster tails for the best flavor. If you’re using frozen lobster, ensure it is thawed properly before cooking. Store live lobster in a cool, damp environment, and consume it promptly for the freshest flavor.

Common Mistakes to Avoid

  • Using frozen seafood: While frozen seafood can be convenient, fresh seafood yields the best flavor and texture for your bisque.
  • Not sautéing the vegetables properly: Sautéing releases flavors; undercooking can result in a bland soup.
  • Overcooking the seafood: Adding seafood too early can lead to a rubbery texture; it’s best to add it during the last few minutes of cooking.
  • Skipping the blending step: Blending ensures a creamy texture; skipping it leaves the bisque chunky.
  • Using low-quality broth: A rich broth is essential; use homemade or high-quality stock for maximum flavor.
  • Neglecting to season adequately: Seasoning is vital; taste as you go to avoid blandness.
  • Not allowing the flavors to meld: Allow the bisque to simmer adequately to ensure the flavors develop.
  • Ignoring garnishes: Beautiful garnishes enhance presentation; they also add freshness.
  • Improper storage of seafood: Always follow safe seafood handling guidelines to prevent spoilage.

Essential Techniques

Sautéing: This critical technique involves cooking ingredients in a small amount of fat over medium-high heat. It helps to release and develop flavors essential for the bisque. To master sautéing, use a heavy-bottomed pot and avoid overcrowding, which can lead to steaming instead of browning.

Simmering: Simmering is crucial for allowing flavors to meld. To achieve a perfect simmer, maintain a gentle bubbling and watch for ingredients to soften while developing a flavorful broth. It’s important to monitor closely to avoid boiling, which can dilute flavors.

Pro Tips for Perfect Seafood Bisque

1. Invest in good-quality seafood for an unbeatable flavor that shines.
2. Experiment with different herbs and spices for your personalized twist.
3. Always taste your bisque as it cooks to adjust seasoning appropriately.
4. For extra richness, consider adding a splash of cream at the end.
5. If you prefer a thicker bisque, let it simmer longer before blending.
6. Pair your seafood with complementary vegetables, like leeks or fennel.
7. For a sophisticated garnish, drizzle with truffle oil for enhanced flavor.
8. Serve alongside crusty bread or a fresh garden salad for a complete meal.

Variations and Adaptations

Seafood Bisque can be adapted in many delightful ways. For a regional twist, consider using local seafood options that cater to the area’s fishery. Seasonal adaptations, such as incorporating fresh spring vegetables like asparagus or peas, can lighten the bisque.

Dietary modifications are also easily achievable; for a dairy-free version, substitute cream with coconut milk or nut-based cream. If you’re looking to amp up the flavor, consider adding a splash of white wine or sherry during cooking for an added depth.

Texture modifications can also create variety; some may prefer a chunkier bisque with larger pieces of seafood, while others might enjoy the smooth consistency of a pureed version.

Lastly, for a creative presentation, serve in individual cups or bowls, garnished with microgreens or edible flowers, transforming this classic dish into an artistic delight.

Serving and Presentation Guide

Plating Seafood Bisque with care elevates its dining experience. Use shallow, wide bowls to showcase the creamy texture and garnishes. Fresh herbs like chives or parsley can brighten the dish visually and add a pop of color.

For garnishing, consider a dollop of crème fraîche or a drizzle of flavored oil to enhance flavor and presentation. Traditional accompaniments include freshly baked bread, which pairs wonderfully with the bisque.

Temperature is vital; serve the bisque hot but not boiling to improve the tasting experience. In terms of portion control, these bowls should comfortably serve 1-2 ladles of bisque, ensuring that each guest is well satisfied.

Wine and Beverage Pairing

When it comes to pairing beverages, a crisp white wine, such as Sauvignon Blanc or Chardonnay, works beautifully with Seafood Bisque. The acidity and light fruity notes balance the creaminess of the soup.

For those who prefer non-alcoholic options, sparkling water with a hint of lemon can provide a refreshing contrast. Alternatively, a light herbal iced tea adds an aromatic element that complements the bisque well.

If you enjoy coffee or tea, consider pairing with a delicate green tea or an herbal blend that accentuates the flavors of this exquisite dish. Always serve these beverages chilled or at optimal temperatures to enhance the overall dining experience.

Storage and Shelf Life

To maximize the shelf life of your Seafood Bisque, store it in an airtight container in the refrigerator promptly after it cools. It can typically last up to 3 days in the fridge. For longer storage, consider freezing the bisque; use freezer-safe containers and store it for up to 3 months.

Ensure the bisque is completely cooled before freezing to prevent ice crystals from forming. When reheating, do so gently on the stove, adding a splash of water or stock to restore its original creamy consistency. Signs of spoilage include a sour smell or odd texture, so it’s best to release and use your senses when judging freshness.

Make Ahead Strategies

To prepare a delightful Seafood Bisque ahead of time, focus on the base. You can cook the broth with vegetables and let it cool overnight in the refrigerator. The next day, simply blend it, add the seafood, and finish the cooking process.

When storing between steps, keep seafood separate until you’re ready to serve to preserve freshness. This will allow you to serve it freshly cooked, providing the best texture.

Consider how flavors develop over time; the bisque can taste even better the next day as the ingredients meld. When reheating, always do so at a gentle simmer to avoid overcooking.

Adding fresh herbs or a squeeze of citrus just before serving can brighten flavors and give the soup a fresh finish.

Scaling Instructions

Scaling your Seafood Bisque recipe can be easily done. If you’re looking to halve the recipe, simply divide the amounts for each ingredient. This is ideal for intimate dinners or smaller families.

When doubling or tripling the recipe, ensure your equipment is large enough to handle the increased volume. Opt for a larger pot to prevent overflow during cooking.

Timing adjustments are also crucial; while most cooking times will remain similar, you may need to account for longer heating times when dealing with larger quantities.

If not serving all at once, consider cooling and storing excess bisque promptly after cooking. This approach maximizes freshness while allowing you to enjoy leftovers later.

Nutritional Deep Dive

Seafood Bisque offers a rich macro breakdown, with a substantial amount of protein from the seafood and healthy fats from the cream. Each serving contains a balance of carbohydrates and fat, making it both filling and nutritious.

In terms of micronutrients, this bisque is rich in vitamins, such as B12 from shellfish and vitamin A from stock ingredients. Additionally, the vegetables contribute dietary fiber, promoting digestive health.

Health benefits are abundant; omega-3 fatty acids from seafood support cardiovascular health, while the vitamins and minerals contribute to overall wellness.

When analyzing portions, consider size and richness; a standard serving can be both satisfying and complement a well-balanced meal when served with side dishes.

Lastly, weight management tips suggest enjoying Seafood Bisque in moderation due to its rich ingredients while focusing on nourishing components like seafood and vegetables.

Dietary Adaptations

For gluten-free variations of Seafood Bisque, ensure all broths and seafood ingredients are labeled gluten-free. You can use alternative thickening agents like cornstarch or arrowroot powder for a gluten-free alternative to flour.

To create a dairy-free version, opt for coconut cream or almond milk instead of traditional dairy cream, providing a unique flavor twist while catering to lactose sensitivities.

Vegan adaptations, while more complex, can substitute seafood with mushrooms and hearty vegetables, using seaweed to impart a marine flavor.

Keto enthusiasts can embrace the high-protein, low-carb aspects of this dish by focusing on seafood and eliminating high-carb thickeners.

For Paleo dieters, maintain the use of whole ingredients and fresh seafood while avoiding dairy and grain-based thickeners for a healthy alternative.

Specific diets like Low-FODMAP may limit the types of onions or garlic, but alternatives such as shallots can add flavor without the discomfort.

Troubleshooting Guide

For texture issues, the prime consideration is the blending stage; ensuring that your bisque is puréed smoothly will resolve any grainy texture. If the bisque becomes too thick, add broth or water to reach the desired consistency.

Flavor balance is critical; if your bisque becomes too salty, incorporate additional cream or a sugar agent to mellow out the saltiness. Spicy elements can be balanced with cream, while acidity can be softened with sugar.

Temperature problems can arise if the bisque is boiling rapidly; reduce to a simmer for even cooking, preventing seafood from overcooking, which can result in rubberiness.

Equipment challenges often involve dealing with overflows or improper heating; ensure to select pots suited to the quantity of soup being made and monitor carefully.

Ingredient substitutions may alter flavors; when swapping seafood, be aware that less flavorful fish may require additional seasoning to balance.

Timing concerns can lead to overcooked seafood or underdeveloped flavors; always prepare vegetables and broth before adding seafood, judging the cooking time carefully.

Recipe Success Stories

Community feedback surrounding Seafood Bisque highlights how this dish can bring people together. Many readers commented on their successful adaptations, from adding their favorite spices to tailoring seafood quantities based on what they had at hand.

Several home cooks have shared beautiful photography of their Seafood Bisque creations, showcasing vibrant colors and appetizing garnishes that invite others to try their hand at this gourmet recipe.

Story adaptations abound, with families sharing traditions of cooking Seafood Bisque during holidays or as a special treat, making the recipe part of their customs.

Readers often exchange tips on how to make the soup their own, encouraging creativity and experimentation in the kitchen.

Photography insights reveal the importance of lighting and plating in creating mouthwatering images; capturing the elegance of this bisque can inspire others to dive into seafood cooking.

Frequently Asked Questions

Can I use frozen seafood for the bisque? Absolutely! Frozen seafood can be a convenient option; just ensure it is thawed properly before adding it to your bisque. Fresh seafood will enhance the flavors, but frozen can work well in a pinch.

How do I store leftovers? Store any leftover bisque in an airtight container in the refrigerator and enjoy within 3 days. You can also freeze it for longer storage.

Can I make this bisque without dairy? Yes! Substitute the cream with coconut cream or other non-dairy alternatives for a delicious and creamy texture without using dairy.

What can I substitute for crab in this recipe? If crab is unavailable, you can use additional shrimp or lobster. Alternatively, consider using crab-flavored imitation seafood for a similar experience.

Is it possible to make Seafood Bisque spicy? Absolutely! You can add crushed red pepper flakes or a dash of cayenne pepper to the bisque during cooking to adjust the heat to your liking.

Can the recipe be doubled easily? Yes, this recipe can be doubled or even tripled, but ensure you use a large enough pot to accommodate the increased quantity without overflowing.

How long should I blend the bisque? Blend until smooth, typically taking about 30 seconds to a minute, depending on your blender. You can adjust the texture based on personal preference.

What are some great side dishes to serve with Seafood Bisque? Pair your bisque with crusty bread, a crisp salad, or vegetable sides to create a well-rounded meal experience.

Can I freeze leftover bisque? Yes, you can freeze Seafood Bisque for up to 3 months. Ensure it is cooled completely and stored in freezer-safe containers.

What kind of wine pairs well with Seafood Bisque? Crisp white wines, such as Sauvignon Blanc or a light Chardonnay, complement the flavors of Seafood Bisque beautifully.

Additional Resources

If you loved making this Seafood Bisque, explore other recipes such as Lobster Ravioli, Clam Chowder, or Shrimp Scampi to further your seafood culinary adventures.

For those interested in elevating their cooking techniques, check out our technique guides addressing sautéing, simmering, and blending to enhance your skills in the kitchen.

Understanding seafood selections and the importance of sourcing fresh ingredients can vastly improve your culinary creations.

Equipment recommendations can provide you with the necessary tools to achieve perfect textures and flavors; don’t hesitate to invest in a high-quality blender or a good pot.

Seasonal variations invite you to explore cooking with fresh, in-season ingredients; consider adapting the recipe depending on what’s available in your area.

Join the Conversation

We invite you to share your experiences making Seafood Bisque or discuss your favorite seafood recipes with us on social media. Photography enthusiasts can join our community, exchanging tips for capturing the perfect seafood dish.

Your recipe reviews and feedback are invaluable; tell us what you loved about this bisque and how you made it your own. We encourage engagement and enthusiasm in the kitchen, fostering a vibrant cooking community.

Explore the variations you’ve created or found delightful and inspire others to join the culinary journey with this Seafood Bisque!

The Recipe

Seafood Bisque

Serves: 4 servings

Prep Time: 30 mins

Cook Time: 60 mins

Total Time: 90 mins

Kitchen Equipment Needed

  • Large pot
  • Blender or immersion blender
  • Cutting board
  • Chef’s knife
  • Ladle
  • Airtight containers for storage

Ingredients

  • 1 lb crab meat
  • 1 lb shrimp, peeled and deveined
  • 1 lobster tail, cooked and chopped
  • 4 cups seafood stock
  • 1 cup heavy cream
  • 1 onion, finely chopped
  • 2 carrots, diced
  • 2 celery stalks, diced
  • 2 cloves garlic, minced
  • 1 tsp tomato paste
  • 1/2 cup dry sherry
  • 2 tbsp olive oil
  • Salt and pepper to taste
  • Fresh herbs for garnish

Directions

  1. In a large pot, heat olive oil over medium heat. Sauté onion, carrots, and celery until soft, about 5-7 minutes.
  2. Add garlic and tomato paste, cooking for another minute until fragrant.
  3. Pour in the seafood stock and dry sherry; bring to a simmer and cook for 20 minutes.
  4. Reduce heat, add crab meat, shrimp, and lobster. Cook for an additional 10 minutes.
  5. Blend the mixture until smooth. Return to the pot and stir in heavy cream.
  6. Season with salt and pepper. Simmer gently for 10 more minutes, ensuring seafood is cooked through.
  7. Serve hot, garnished with fresh herbs.

Recipe Notes

  • Adjust the thickness by adding more or less seafood stock based on preference.
  • Feel free to use additional seafood or substitute based on availability.
  • This bisque can be enjoyed with crusty bread or a light salad.

Delicious Beef-Stuffed Pasta Shells with Creamy Ricotta Filling Recipe

Beef-Stuffed Pasta Shells with Creamy Ricotta Filling: A Delicious Comfort Food

⚖️
Difficulty
Medium

⏲️
Prep Time
20 mins

🕒
Cook Time
40 mins

⏱️
Total Time
60 mins

🍽️
Servings
4 servings

The delightful flavors of Beef-Stuffed Pasta Shells with Creamy Ricotta Filling make this dish a standout choice for any dinner table. Imagine large pasta shells cradling a savory mixture of seasoned ground beef, aromatic herbs, and a velvety ricotta filling, all enveloped in a rich marinara sauce. This comforting dish brings a sense of warmth and satisfaction, making it perfect for family gatherings or weeknight dinners.

As the pasta bakes, the cheese melts and blends into the sauce, creating a delectable aroma that fills your kitchen. Each bite offers a delightful contrast of textures, from the tender pasta shells to the hearty beef filling and the creamy ricotta. Whether you are serving this up for a special occasion or simply enjoying a cozy night in, these beef-stuffed shells are sure to impress your taste buds and heart.

Quick Recipe Highlights

  • Flavor Profile: A rich blend of beefiness complemented by the creaminess of ricotta and the acidity of marinara sauce.
  • Texture: Tender pasta shells filled with a robust beef mixture and topped with a luscious, creamy ricotta.
  • Aroma: Inviting scents of herbs, garlic, and slow-cooked tomatoes will make your kitchen smell heavenly.
  • Visual Appeal: A vibrant plate featuring golden pasta shells smothered in bright red marinara sauce and garnished with fresh basil.
  • Skill Level Needed: Ideal for cooks with basic knowledge, yet can impress advanced chefs with its presentation.
  • Special Equipment: A large baking dish for assembly and oven-safe cookware for added convenience.

Recipe Overview

  • Difficulty Level: Medium, perfect for those who are comfortable with basic cooking techniques yet willing to take on a bit more.
  • Category: Comfort food, ideal for cozy family meals or potluck gatherings.
  • Cuisine: Italian-inspired, reflecting the rich pasta tradition of Italy while embracing hearty beef fillings common in many comfort dishes.
  • Cost: Approximately $18-25 for a filling meal that serves four, affordable for family dinners.
  • Season: Year-round favorite, but particularly comforting during cooler months when heartier meals are desired.
  • Occasion: Perfect for family dinners, gatherings with friends, or casual potlucks.

Why You’ll Love This Recipe

Indulge in the savory taste and delightful texture of these Beef-Stuffed Pasta Shells with Creamy Ricotta Filling. The combination of ground beef and ricotta creates a satisfying meal that is both hearty and comforting. You’ll love how easy it is to prepare this dish, making it a great option for busy weeknights or special gatherings.

This recipe also offers impressive nutritional advantages, as it incorporates protein-rich beef and cheese, delivering essential nutrients while remaining filling and delicious. Sharing this dish with friends or family guarantees memorable moments around the dinner table, sure to generate conversation and compliments.

When considering cost-effectiveness, this recipe shines, allowing you to enjoy a gourmet experience without breaking the bank. The affordability of the ingredients makes it accessible for most home cooks, turning each meal into a celebration of flavor without excessive spending.

Historical Background and Cultural Significance

Like many beloved Italian dishes, the origin of stuffed pastas can be traced back to Italy’s rich culinary traditions. Historically, pasta stuffing was a way to utilize leftover meats and cheeses, allowing families to create hearty meals with minimal waste. Over time, various regions developed their unique interpretations of stuffed pasta, each infusing local flavors and ingredients.

Cultural importance is woven into the fabric of this dish, representing the Italian philosophy of sharing food with loved ones. From family holidays to everyday dinners, pasta has always played a central role in gathering people together, making it a cornerstone of community and family bonds.

The evolution of the recipe has seen numerous adaptations, with chefs experimenting with ingredients ranging from classic ground beef to vegetarian options using spinach and cheese. Each variation tells a story of its region and personal touch, showcasing the versatility of stuffed pastas while staying true to their comforting roots.

Regional variations can be found in dishes like cannelloni or manicotti, each offering a slight twist on the original concept while celebrating pasta’s ability to transform into countless forms. Regardless of the specifics, all stuffed pasta retains the core essence of comfort and family.

Ingredient Deep Dive

  • Pasta Shells: Typically made from durum wheat semolina, pasta shells are crucial for holding the delicious filling. Consideral selection tips include choosing large shells for easy stuffing and checking for integrity (no cracks). Store them in a cool, dry place. For substitutions, consider large conchiglie or jumbo shells.
  • Ground Beef: A staple protein choice, ground beef provides essential iron and protein. When selecting, opt for leaner cuts to avoid excessive grease. If unavailable, ground turkey or chicken could also serve as great alternatives. Store in the fridge for up to 2 days or freeze for longer use.
  • Ricotta Cheese: Renowned for its creamy texture, ricotta enhances the filling and adds richness. For the best taste, fresh ricotta is preferred, which can be made from whole milk. Proper storage includes refrigeration and use within a week for the best flavor. Substitutes include cottage cheese blended until smooth.
  • Marinara Sauce: This tangy tomato-based sauce elevates the dish, bringing moisture and flavor. Opt for sauces rich in herbs and spices for the best taste. Store in the fridge for 3-5 days; jarred versions can last longer. Homemade versions offer the best flavor profile with fresh tomatoes and herbs.

Common Mistakes to Avoid

  • Overcooking the pasta shells can lead to a mushy texture, making them difficult to stuff.
  • Not seasoning the beef mixture properly results in a bland filling that lacks depth of flavor.
  • Piling too much filling into each shell can cause them to burst while cooking.
  • Skipping the baking step can lead to a less cohesive dish; the flavors meld beautifully in the oven.
  • Using low-quality marinara sauce compromises the overall taste of the dish; choose a brand known for robust flavor.
  • Not letting the baked shells cool slightly before serving can lead to burns and tricky plating.
  • Forgetting to cover the baking dish with foil can lead to uneven cooking and dryness.
  • Using pre-grated cheese can yield a less creamy texture; always prefer fresh cheese for the best results.
  • Ignoring the cooking time can either dry out the pasta or leave the meat undercooked.
  • Rushing through the ingredient prep creates inconsistency in texture and flavor.

Essential Techniques

Expertly mastering the technique of stuffing pasta shells is vital for successful presentation and flavor distribution. Properly filling each shell involves using a small spoon or piping bag to ensure no gaps. Practice makes perfect; aim for consistency in portioning.

Baking the pasta shells with marinara sauce is an art that captures the essence of harmony in flavors. Preheating your oven to the correct temperature before putting the dish inside guarantees even cooking and bubbling cheese. Use visual cues, like bubbling sauce and a golden cheese top, to signify readiness.

Pro Tips for Perfect Beef-Stuffed Pasta Shells

1. Ensure your pasta shells are cooked al dente for the right texture and firmness.
2. Incorporate fresh herbs into your beef mixture for an elevated flavor.
3. Let the ricotta sit at room temperature before mixing to create an ultra-creamy texture.
4. Consider adding sautéed vegetables, such as spinach or mushrooms, to the beef mixture for added nutrition.
5. Drizzle freshly grated parmesan on top before serving to add a touch of luxury.
6. Bake the shells uncovered for the last 10 minutes for a delightful crispy topping.
7. For a spicy kick, add crushed red pepper flakes to your marinara sauce.
8. Allow the stuffed shells to rest after baking to enable easy serving without falling apart.

Variations and Adaptations

Explore regional variations by colorful adaptations such as using seafood or vegetarian fillings. Seasonal adaptations can include adding pumpkin or squash for a fall-themed dish, enhancing not just flavors but visuals too.

Dietary modifications can accommodate gluten-free consumers by substituting traditional pasta shells with gluten-free ones. For vegan needs, consider a chickpea-based filling with a cashew ricotta alternative for a rich, creamy texture.

Flavor variations can be executed by incorporating herbs like basil or oregano, while texture modifications can include adding crispy breadcrumbs on top for an inviting crunch. Presentation alternatives such as serving the shells in individual ramekins can add an elegant touch for special gatherings.

Serving and Presentation Guide

Effective plating techniques enhance the visual appeal of beef-stuffed pasta. Consider adding a light sprinkle of fresh herbs over the plated shells for color and elegance. Garnishing with shredded cheese or a spoonful of marinara can elevate the presentation.

Traditional accompaniments like a side salad or garlic bread provide a well-rounded meal. For modern servings, consider offering a wine pairing or artisan bread to augment the dining experience. Serving at a warm temperature allows the cheese to maintain its creamy texture while inviting guests to dig in.

Lastly, maintaining a reasonable portion size ensures everyone can savor the dish without feeling overly stuffed, facilitating enjoyable meal pacing.

Wine and Beverage Pairing

When pairing wine with Beef-Stuffed Pasta Shells, a medium-bodied red like Chianti or Sangiovese complements the meaty flavor while balancing the acidity of the marinara sauce. For white wine enthusiasts, a lightly oaked Chardonnay can add extra depth to the creamy ricotta.

Non-alcoholic alternatives like sparkling water with a lemon wedge can cleanse the palate effectively. Additionally, for a cozy touch, serve coffee or a robust herbal tea as a delightful end to the meal, drawing out the flavors of both the pasta and dessert if desired.

Storage and Shelf Life

Proper storage of the Beef-Stuffed Pasta Shells ensures freshness for later enjoyment. To store, allow the dish to cool completely, cover it tightly with plastic wrap or aluminum foil, and refrigerate for up to 3 days. If planning to freeze, assemble the dish without baking for optimal results, allowing you to bake it fresh later.

Signs of spoilage include an off odor or unusual texture changes, indicating it’s best to discard. When reheating, ensure the internal temperature reaches 165°F to guarantee food safety, either in the oven or microwave.

For freezing, consult guidelines for securely packaging, and note that the dish may harbor slightly altered textures upon thawing, worth considering when planning your meals.

Make Ahead Strategies

Prepare your Beef-Stuffed Pasta Shells in advance by boiling the shells and preparing the filling a day beforehand, storing separately until you’re ready to bake. This approach allows flavors to meld beautifully when combined fresh just before baking.

Consider assembling the entire dish without baking, refrigerating it until you’re ready to cook. Quality is preserved by covering the dish in the fridge. If slightly reheating ingredients before baking, be sure to adjust baking times accordingly to achieve a perfect finish.

Adding fresh ingredients such as herbs right before serving can infuse extra vibrancy into your dish, avoiding wilting or losing flavor during storage.

Scaling Instructions

When scaling your Beef-Stuffed Pasta Shells recipe, consider halving or doubling the ingredients accordingly. For larger gatherings, simply prepare additional baking dishes to accommodate increased portions while managing oven space efficiently.

Ensure that cooking times remain relatively consistent; larger or smaller portions may require minor adjustments but typically cook within the same range. Consider timing not just for baking but also for prep—enlist help for an efficient assembly line when preparing larger batches.

Storage considerations should remain similar; additional dishes might necessitate faster cooling methods to promote optimal food safety, particularly when preparing in advance or for freezing.

Nutritional Deep Dive

The Beef-Stuffed Pasta Shells deliver a satisfying macro breakdown, with proteins from the beef and ricotta, carbohydrates from the pasta, and fats that add richness. Each serving provides excellent fiber content through whole grain options or added vegetables.

Micronutrient analysis shows essential vitamins and minerals, such as iron and calcium, benefiting muscle and bone health through the hearty ingredients. Balance in dietary considerations can help those mindful of their nutrition while still enjoying a hearty meal.

Understanding portion analysis can aid in weight management; balance your plate by pairing with lighter sides like salad or fresh vegetables. Engaging in mindful eating practices around this dish can help appreciate flavors while staying mindfully satiated.

Dietary Adaptations

Crafting gluten-free versions of Beef-Stuffed Pasta Shells can involve substituting traditional pasta with a gluten-free product made from rice or lentils, ensuring that everyone can enjoy the meal.

For dairy-free needs, replacing ricotta with a plant-based cheese or puree can create an equally satisfying filling. To accommodate vegan diners, consider a hearty filling of lentils and fresh vegetables packed with flavor.

Low-carb adaptations can include using zucchini noodles in place of pasta shells, maintaining the comfort of the dish while adhering to dietary needs. Keto and paleo-friendly versions can be achieved through similar vegetable substitutes paired with a delicious meat sauce.

Troubleshooting Guide

If your filling lacks flavor, revisit your seasoning choices; adding salt, pepper, and herbs while tasting can elevate the overall dish. Addressing texture issues in the beef filling can be resolved by taking care not to overcook it before assembly.

Temperature problems arise when the dish is not heated evenly. Use a meat thermometer to verify cooking, ensuring each portion reaches safe temperatures. Ingredient substitutions must be measured accurately for success; not all toppings contribute equally to flavor.

Sticking pasta can be resolved by proper cooking methods that account for just the right amount of water and time, while any pooling excess sauce can be handled with careful control during assembly and dispersing of marinara.

Recipe Success Stories

Community feedback showcases the delightful experiences that come from preparing Beef-Stuffed Pasta Shells. Many readers have embraced personal variations, like swapping out marinades or incorporating seasonal vegetables, leading to inspiring adaptations.

Variation successes often include friends gathering to share this dish; stories finalized with memories made during cooking or family discussions elevate the experience, showing how food creates camaraderie.

Photography captures the vibrant colors of the completed dish, inviting everyone’s appetite. Tips from readers regard optimal lighting and angles for showcasing sumptuous servings, adding visual appeal and making the recipe more shareable.

Frequently Asked Questions

Can I make these shells in advance? Yes, you can prep the pasta shells and filling in advance, storing them separately in the fridge until you’re ready to bake.

What can I substitute for ricotta cheese? Cottage cheese blended until smooth or tofu mixed with nutritional yeast can serve as dairy-free alternatives while providing similar creamy textures.

Can I freeze beef-stuffed shells? Absolutely, they freeze well! Just ensure they are cooled completely, then wrap in airtight containers or freezer bags.

What sauces go well with this dish? Besides marinara, a béchamel or alfredo sauce can also enhance the flavor profile, especially for creamy variations.

How do I keep the shells from breaking? Cooking the shells just until al dente before stuffing helps maintain their structural integrity during baking.

What herbs can I add for more flavor? Fresh basil, oregano, or parsley contribute delightful Mediterranean flavors, enhancing the overall appeal.

How do I select the best ground beef for this recipe? Look for lean ground beef with a fat content of 80/20, providing a good balance of flavor and moisture without being overly greasy.

Can I add vegetables to the filling? Yes! Chopped spinach, mushrooms, or bell peppers can be incorporated into the beef mixture for added nutrition and flavor.

Is this recipe suitable for kids? Absolutely! Kids typically love this comforting dish, and you can adjust the spice level for younger palates.

What is the best way to reheat leftovers? Oven reheating creates an evenly warmed dish, while the microwave is fine for quicker reheats, ensuring cheese remains melty but not dry.

Additional Resources

For more exciting Italian-inspired recipes, consider exploring our collection of pasta dishes that guide you through authentic preparations. Included are technique guides for mastering pasta-making, ingredient information for making fresh sauces at home, and equipment recommendations to enhance your culinary journey.

Connecting with seasonal variations opens avenues for creative cooking throughout the year, ensuring every occasion can feature a festive centerpiece dish.

Join the Conversation

Engaging with our community through social media sharing of your recipe attempts and feedback will inspire others to recreate their own Beef-Stuffed Pasta Shells. Share your photography to showcase your unique presentation styles, fostering a shared love for cooking.

Participate in recipe reviews to share your modifications and successes, helping others to find their path while exploring culinary creativity.

The Recipe

Beef-Stuffed Pasta Shells

Serves: 4 servings

Prep Time: 20 mins

Cook Time: 40 mins

Total Time: 60 mins

Kitchen Equipment Needed

  • Large baking dish
  • Large pot for boiling pasta
  • Mixing bowl
  • Spoon or piping bag for stuffing
  • Oven-safe cookware

Ingredients

  • 12 large pasta shells
  • 1 pound ground beef
  • 1 cup ricotta cheese
  • 2 cups marinara sauce
  • 1/2 cup grated parmesan cheese
  • 1 tablespoon olive oil
  • 1 teaspoon garlic powder
  • Salt and pepper to taste
  • Fresh basil for garnish

Directions

  1. Preheat the oven to 375°F (190°C).
  2. Cook the pasta shells according to package instructions until al dente and drain.
  3. In a skillet, heat olive oil over medium heat, add ground beef, garlic powder, salt, and pepper, and cook until browned.
  4. In a bowl, mix the cooked beef with ricotta cheese until combined.
  5. Stuff each pasta shell with the beef and ricotta mixture and place them in the baking dish.
  6. Pour marinara sauce evenly over the stuffed shells, ensuring they are well coated.
  7. Sprinkle grated parmesan cheese on top.
  8. Cover the dish with aluminum foil and bake for 25 minutes. Remove the foil and bake for an additional 15 minutes until heated through and golden.
  9. Let cool slightly before serving; garnish with fresh basil.

Recipe Notes

  • Feel free to substitute ground beef with turkey or chicken for a lighter version.
  • Experiment with adding vegetables to the filling for added nutrition.
  • This dish can be frozen unbaked, just allow extra cooking time when baking from frozen.
  • Consider adding capers or olives to the marinara sauce for a flavor twist.