Delicious Grilled Scallops with Rémoulade Sauce Recipe to Try

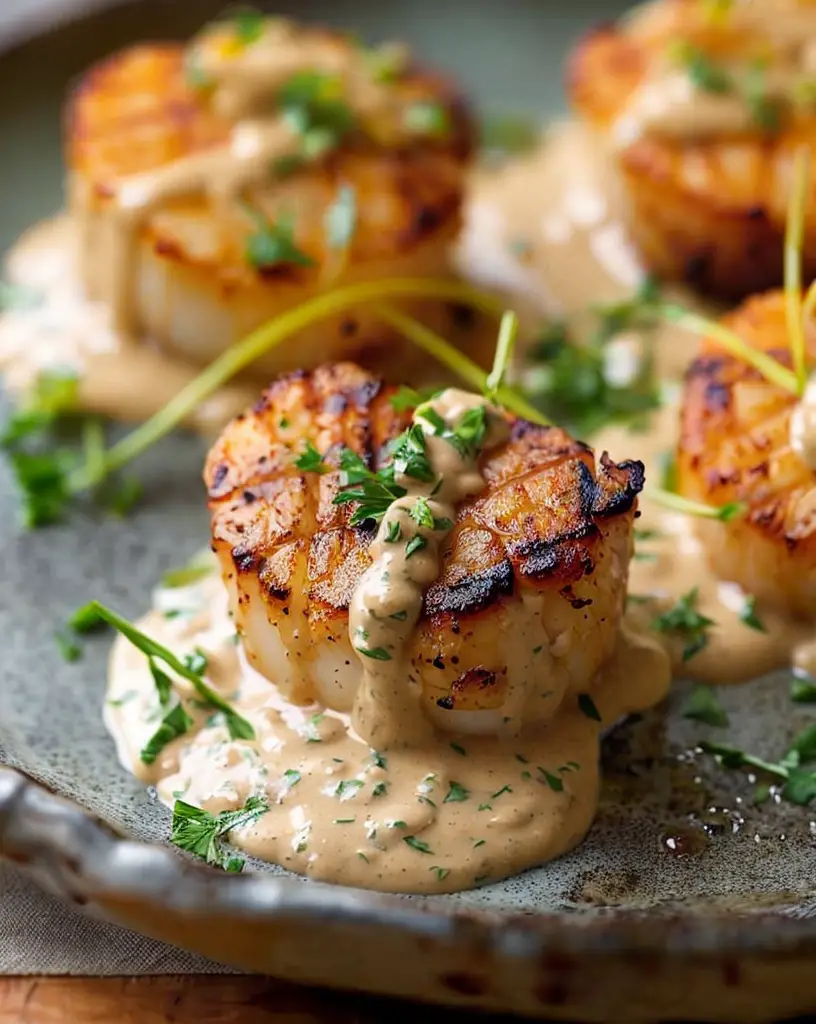
Grilled Scallops with Rémoulade Sauce: A Seafood Delight

⚖️
Difficulty
Medium

⏲️
Prep Time
15 mins

🕒
Cook Time
6 mins

⏱️
Total Time
21 mins

🍽️
Servings
4

Experience the taste of the ocean with our delightful Grilled Scallops with Rémoulade Sauce. This recipe brings together the sweet and delicate flavors of scallops perfectly grilled, complemented by the tangy and zesty Rémoulade sauce. With just the right balance of spices, this dish will transport your taste buds to a coastal paradise, making it an ideal choice for a special dinner or a casual summer gathering.

Cooking scallops can be intimidating for some, yet this recipe is simple, highlighting the natural sweetness of the seafood. The Rémoulade sauce, with its creamy texture and robust flavor, adds an exciting punch that elevates the overall dining experience. Perfectly paired with fresh greens or roasted vegetables, Grilled Scallops are sure to impress both family and guests alike.

Quick Recipe Highlights

  • Flavor Profile: Sweet scallops combined with a tangy, creamy sauce create a delightful contrast that tantalizes your palate.
  • Texture: The scallops have a tender yet slightly charred exterior, while the Rémoulade offers a creamy, smooth mouthfeel.
  • Aroma: The enticing aroma of grilled seafood mixed with fresh herbs and spices fills the air, making it hard to resist.
  • Visual Appeal: Beautifully charred scallops arranged on a plate with a vibrant green sauce create a stunning presentation.
  • Skill Level Needed: This recipe is perfect for novice to intermediate cooks looking to enhance their seafood preparation skills.
  • Special Equipment: A grill (or grill pan) and skewers (if using) are recommended for optimal results.

Recipe Overview

  • Difficulty Level: Medium, this recipe involves grilling which requires attention to timing and heat control.
  • Category: Seafood main course, perfect for summer dinners or elegant gatherings.
  • Cuisine: This dish reflects coastal and French influences, particularly with the use of Rémoulade sauce.
  • Cost: Relatively moderate, scallops can be pricier but their superior taste justifies the expense.
  • Season: Ideal during warmer months when seafood is freshest and outdoor cooking is most enjoyable.
  • Occasion: Great for parties, fancy dinners, or romantic date nights.

Why You’ll Love This Recipe

This Grilled Scallops with Rémoulade Sauce is a taste sensation that will leave you craving more. The sweet flavor of the scallops, grilled to perfection, is beautifully complemented by the Rémoulade, making for a harmonious dish. Each bite showcases the natural sweetness of the seafood, alongside the zestiness of the sauce, creating an exquisite culinary experience. With a delectable texture that’s both tender and slightly crispy from the grill, this dish truly excites the senses.

What’s more, this recipe is extremely convenient to make. With a preparation time of just 15 minutes and a quick grilling process, you can have this sophisticated meal ready in no time. Ideal for eager home cooks, it allows for minimal fuss while delivering impressive results that are perfect for sharing with loved ones.

Not only is this dish delicious, but it also offers nutritional benefits. Scallops are an excellent source of lean protein, coupled with essential vitamins and minerals. They are low in calories and provide heart-healthy omega-3 fatty acids, making them a smart choice for anyone looking to eat healthily.

This recipe also shines during social gatherings, where its stunning presentation and delicious combination of flavors create a memorable experience. Serve it to impress your guests or bring it to potlucks—it’s sure to spark delightful conversations at the dinner table.

Cost-effective for the flavors you’re receiving, this dish stands as a testament to the idea that exquisite dining doesn’t have to break the bank. With the right technique, you’ll deliver a fine dining experience that is accessible to home cooks everywhere.

Historical Background and Cultural Significance

The origins of scallops date back thousands of years, tracing their roots to ancient coastal communities. Known for their natural sweetness, scallops have been a favorite among seafood lovers for centuries, celebrated in various cuisines around the world. The dishes served with scallops reflect the culinary diversity of coastal regions, highlighting local ingredients and preparation styles.

Rémoulade sauce has its origins in France, where it was initially served as a condiment for cold meats and fish. Over time, variations of the sauce spread across different cultures, often adapting to local tastes and ingredients. The sauce became synonymous with seafood dishes, providing a tangy balance to the delicate flavor of fish and shellfish.

This recipe showcases the meeting of two beloved culinary traditions, placing scallops at the forefront alongside a classic French sauce. As seafood becomes increasingly popular, both scallops and Rémoulade have become staples at both casual and upscale dining establishments, which speaks to their versatility and broad appeal.

Regional variations of this dish can be found in coastal areas around the world, each bringing unique local twists and flavor integrations reflective of their geography and culinary practices. Adaptations can include the use of different herbs in the Rémoulade or variations in how the scallops are cooked or accompanied.

Ingredient Deep Dive

Scallops: These shellfish are celebrated for their delicate sweetness and versatility in cooking. They are rich in protein, vitamins B12 and A, and minerals such as iron and magnesium. When selecting scallops, look for those that are firm, shiny, and have a slight ocean smell. Scallops should be stored in the refrigerator and used within one to two days for maximum freshness.

Options for substitution include sea scallops or bay scallops, with the former providing a larger size and meatier texture, making them ideal for grilling. If fresh scallops aren’t available, frozen scallops can be a suitable alternative, although fresh is generally recommended for optimal flavor.

Rémoulade Sauce: This classic sauce originated from a base of aioli and has evolved into a versatile condiment. It typically includes mayonnaise, mustard, capers, pickles, and herbs, giving it a bright and tangy flavor profile. Nutritionally, homemade Rémoulade can be made healthier by reducing oil or incorporating Greek yogurt. When preparing, be sure to taste and adjust seasoning to preference. Store in the refrigerator for up to a week, making it a convenient condiment for various dishes.

Substitutions can include using Greek yogurt as a base for a lighter version or swapping in different herbs to customize the flavor, tailoring the Rémoulade to suit your palate or the season.

Common Mistakes to Avoid

  • Overcooking scallops: Scallops cook quickly; too much time on the grill will turn them rubbery.
  • Not drying scallops: Ensure scallops are dry before grilling to achieve a great sear.
  • Skipping preheating the grill: A hot grill is essential for getting that perfect char on the scallops.
  • Using low-quality scallops: Fresh, high-quality scallops will make a noticeable difference in flavor.
  • Neglecting seasoning: Properly seasoning both the scallops and the Rémoulade sauce enhances the dish’s flavor.
  • Incorrect sauce storage: Rémoulade should be refrigerated immediately and used within a week.
  • Not using skewers: If grilling smaller bay scallops, consider using skewers to prevent them from falling through the grill.
  • Making Rémoulade too far in advance: Fresh herbs in the sauce may lose flavor over time, so prepare just before serving.
  • Forgetting to taste: Always taste your sauce and scallops before serving to ensure seasoning is balanced.
  • Using cold scallops: Let scallops sit at room temperature for a few minutes before cooking; this helps in even cooking.

Essential Techniques

Grilling: Grilling scallops perfectly is key to this dish. It’s important to use high heat to achieve that delicious char and to not overcrowd the grill. Mastering the grill will enhance the scallop’s flavors and create a delightful texture. Look for a golden brown crust as a visual cue for perfect timing.

Making Rémoulade: This technique is crucial for crafting the perfect sauce that complements the scallops. Start by mixing your base and adjusting flavors gradually. Tasting as you go will help achieve a balanced sauce. The key is to avoid over-mixing, as the sauce should retain some texture from the herbs and seasonings.

Pro Tips for Perfect Grilled Scallops with Rémoulade Sauce

1. Always start with dry scallops for that perfect sear; pat them dry with paper towels before cooking.

2. Use a high-quality grill for even heat distribution and optimal cooking.

3. For maximum flavor, marinate scallops for 30 minutes before grilling with olive oil and lemon juice.

4. Maintain grill temperature; ideal grilling temperature is around 400°F (200°C).

5. Let Rémoulade sit in the fridge for at least 30 minutes to allow flavors to meld before serving.

6. Pair scallops with seasonal vegetables to enhance their flavor profile and provide a balanced meal.

7. When serving, layer the sauce in the center of the plate and arrange scallops beautifully on top.

8. Use a meat thermometer to ensure scallops reach an internal temperature of 125°F (52°C) for optimal doneness.

Variations and Adaptations

For a regional twist, consider using local herbs or citrus in the Rémoulade, such as dill or grapefruit, to give it a distinctive flavor. Additionally, seasonal adaptations can include pairing grilled scallops with summer vegetables like zucchini or corn for a refreshing touch.

Dietary modifications can be made by using a vegan alternative for the Rémoulade or skipping the mayonnaise entirely in favor of a tahini-based sauce for a nutty flavor. Texture variations might involve serving the scallops over a bed of creamy polenta or risotto for a heartier dish.

Flavor variations can also opt for different marinades, such as a spicy remoulade using Sriracha or chili powder, giving the dish a kick. Presentation alternatives could include serving scallops on skewers for a fun, party-ready presentation.

Serving and Presentation Guide

When plating your grilled scallops, consider using a large, white plate to highlight the beautiful colors of the dish. A drizzle of the Rémoulade around the scallops not only enhances visual appeal but also adds flavor with every bite. For garnish, freshly chopped herbs or lemon zest can add a pop of color.

Pair your scallops with traditional accompaniments like a light salad or grilled vegetables, maintaining a focus on fresh ingredients. For modern serving suggestions, present the scallops on a wooden board for a rustic touch, or atop a bed of greens for a refreshing contrast.

Temperature considerations are essential; serve the dish immediately after cooking to ensure the scallops are warm and retain their tender texture. Portion control tips include serving 3-4 scallops per person, depending on the sides, to ensure a well-rounded meal.

Wine and Beverage Pairing

For a perfect pairing, consider a crisp white wine such as Sauvignon Blanc or a lightly oaked Chardonnay, which will beautifully complement the delicate flavor of the scallops. The acidity of these wines balances the richness of the Rémoulade sauce, creating a harmonious pairing.

If you prefer non-alcoholic beverages, consider serving a sparkling water with a slice of lemon or a refreshing lemonade to cleanse the palate. Tea, such as a light green tea, can also work well with the dish, offering a soothing contrast to the rich flavors of the scallops.

Storage and Shelf Life

To store leftover scallops, place them in an airtight container in the refrigerator. They are best consumed within one to two days for optimal freshness. Rémoulade should also be stored in the refrigerator and will keep for up to a week if properly sealed.

Signs of spoilage include an off smell or slimy texture for the scallops. If reheating scallops, do so gently to avoid overcooking; a quick sauté on low heat can work wonders. Freezing is not recommended for cooked scallops, as their texture can suffer upon thawing.

Make Ahead Strategies

To streamline your cooking process, consider preparing the Rémoulade sauce a day in advance, allowing the flavors to develop deeply. The scallops can be prepped by cleaning and drying them ahead of time, refrigerated until grilling.

Quality impact assessment is crucial; while scallops can be marinated in advance, avoid marinating too long as they may become mushy. Assembly tips involve grilling scallops just before serving to ensure optimal flavor and texture, making the most of your make-ahead strategies.

Scaling Instructions

Scaling the recipe is straightforward; simply adjust the quantity of scallops and Rémoulade sauce accordingly. If halving the recipe, ensure to divide the cooking time appropriately, particularly if using a smaller grill.

When doubling or tripling, consider the grill space; grilling in batches may be necessary to maintain even cooking. Additionally, timing modifications can be made by keeping an eye on the first batch to gauge cooking duration for subsequent batches.

Storage considerations include using larger containers for leftover Rémoulade and ensuring scallops are tightly sealed to avoid drying out.

Nutritional Deep Dive

Each serving of grilled scallops boasts impressive macros, particularly high in protein while being low in carbs and fat. This makes them a favorable choice for those focusing on muscle building and weight management.

Micronutrient analysis reveals scallops are rich in vitamins and minerals vital for overall health. They contain significant amounts of vitamin B12, essential for nerve function, and magnesium, which is key for muscle recovery.

This dish provides numerous health benefits, including potential cardiovascular advantages thanks to healthy omega-3 fatty acids present in scallops. Paying attention to portion analysis can help align this dish with dietary goals, making them an advantageous addition to many meal plans.

Dietary Adaptations

For gluten-free modifications, ensure all ingredients for the Rémoulade are gluten-free. This dish can naturally fit into gluten-free diets without any adjustments.

Vegan adaptations can be made by substituting scallops with marinated and grilled oyster mushrooms, while for those on a paleo diet, serve the dish with a tangy avocado sauce instead of traditional Rémoulade.

Low-carb variations can be achieved by serving scallops on a bed of zoodles (zucchini noodles) instead of rice or other starchy accompaniments. Similarly, a keto-friendly adaptation could involve focusing on butter-based sauces instead of traditional mayonnaise.

Troubleshooting Guide

Texture issues often arise if scallops are overcooked, leading to a rubbery consistency. To remedy, be vigilant and cook only until they are opaque and firm to the touch. For flavor balance, if the scallops appear bland, a light sprinkle of salt prior to grilling can enhance their natural sweetness.

If you experience temperature problems, ensure that your grill is adequately preheated before placing the scallops on it; a hot grill is essential for achieving the desired sear.

For equipment challenges, be mindful of your grill type; a cast-iron grill pan can be a suitable alternative to an outdoor grill to ensure that grilling can be done indoors without sacrificing flavor.

Recipe Success Stories

Readers have shared delightful stories of how this recipe has become a go-to for summer gatherings, with many commenting on the impressive flavor balance. Numerous variations have emerged, with individuals adding their own local herbs and spices, leading to unique twists on the classic Rémoulade.

Photography enthusiasts have also found joy in capturing the beautiful presentation of the scallops. Social media feedback frequently showcases stunning plates, inspiring others to try their hand at recreating this dish at home.

Frequently Asked Questions

Can I use frozen scallops for this recipe?
Yes, you can use frozen scallops; just ensure they are completely thawed and properly dried before grilling to achieve that perfect sear.

What can I do if I don’t have Rémoulade ingredients?
You can substitute with a mix of mayonnaise, mustard, and lemon juice for a quick and easy alternative or serve the scallops with a simple garlic butter sauce.

How do I prevent scallops from sticking to the grill?
Make sure both the grill and the scallops are adequately oiled before cooking, and always preheat the grill. This will help create a non-stick surface.

How long should scallops be grilled?
Grill scallops for about 2-3 minutes on each side, depending on their size, or until they are opaque and lightly browned.

Can I make the sauce ahead of time?
Absolutely! Rémoulade can be made in advance and stored in the refrigerator for up to a week.

Can I use this recipe with other shellfish?
Yes, you can adapt this recipe for shrimp, lobster, or even fish fillets using the same grilling method and sauce.

What should I serve with grilled scallops?
Grilled vegetables, a fresh salad, or a light grain like quinoa complement the dish beautifully.

What is the best way to know if scallops are cooked?
Scallops should feel slightly firm to the touch and be opaque throughout. Overcooked scallops become rubbery and dry.

How do I store leftover scallops?
Store cooked scallops in an airtight container in the refrigerator and consume within 1-2 days for the best taste and texture.

Do scallops have a lot of calories?
No, scallops are low in calories; approximately 30 calories per ounce, which makes them a healthy protein choice.

Additional Resources

For more seafood inspiration, check out our other recipes featuring shrimp, crab cakes, and grilled fish. Additionally, dive into our technique guides for grilling and seafood preparation to enhance your culinary skills.

Explore ingredient information to learn about the best seafood choices and their sustainability. This will help you make informed decisions while cooking and contribute to responsible consumption.

Join the Conversation

We’d love to hear your experiences with this Grilled Scallops with Rémoulade Sauce recipe. Share your photos, tips, and any variations you’ve tried on our social media channels. Engaging with our community helps inspire other cooks and spreads the love of seafood.

The Recipe

Grilled Scallops with Rémoulade Sauce

Serves: 4

Prep Time: 15 mins

Cook Time: 6 mins

Total Time: 21 mins

Kitchen Equipment Needed

  • Grill
  • Grill pan (optional)
  • Mixing bowl
  • Whisk
  • Measuring cups
  • Knife and cutting board

Ingredients

  • 1 lb fresh scallops
  • 2 tbsp olive oil
  • Salt and pepper, to taste
  • For Rémoulade Sauce:
  • 1 cup mayonnaise
  • 1 tbsp Dijon mustard
  • 1 tbsp capers, chopped
  • 2 tbsp fresh parsley, chopped
  • 1 tbsp lemon juice
  • 1 tbsp pickles, finely chopped
  • Salt and pepper, to taste

Directions

  1. Preheat your grill to medium-high heat.
  2. Pat the scallops dry and season with olive oil, salt, and pepper.
  3. In a mixing bowl, combine mayonnaise, Dijon mustard, capers, parsley, lemon juice, pickles, salt, and pepper to prepare Rémoulade sauce.
  4. Place scallops on the grill and cook for 3 minutes on one side, flip, and grill for an additional 2-3 minutes until cooked through and slightly charred.
  5. Plate the grilled scallops and drizzle with Rémoulade sauce before serving.

Recipe Notes

  • For a spicier version, add a teaspoon of hot sauce to the Rémoulade mix.
  • Consider marinating the scallops with herbs for extra flavor before grilling.
  • The Rémoulade can be stored in the refrigerator in an airtight container for up to a week.
  • Any leftovers can be added to salads or served with sandwiches for added flavor.

Delicious Brown Sugar Ham Glaze for Perfect Holiday Meals

Delicious Brown Sugar Ham Glaze: Elevate Your Holiday Ham

⚖️
Difficulty
Easy

⏲️
Prep Time
10 mins

🕒
Cook Time
15 mins

⏱️
Total Time
25 mins

🍽️
Servings
8 servings

Brown Sugar Ham Glaze is the epitome of comforting flavors that bring a touch of sweetness to your holiday gatherings or family dinners. The luscious combination of brown sugar, honey, and spices creates a glaze that not only caramelizes beautifully but also enhances the natural flavor of the ham. As you apply this glaze during the cooking process, the sweet aroma wafts through your kitchen, promising an unforgettable culinary experience.

This easy Brown Sugar Ham Glaze recipe is not just about flavor—it’s about creating memorable moments around the dining table. The perfect balance of sweetness with a hint of spice turns an ordinary ham into a centerpiece that delights the palate and warms the heart. With just a few simple ingredients and minimal prep time, you’ll have a glaze that can transform any occasion into a special celebration.

Quick Recipe Highlights

  • Flavor Profile: This Brown Sugar Ham Glaze offers a rich sweetness from the brown sugar and honey, paired with warm spices like cinnamon and clove that add depth and complexity.
  • Texture: The glaze creates a sticky and caramelized coating that complements the juicy tenderness of the ham, enhancing its mouthfeel.
  • Aroma: Expect an inviting blend of sweet and spicy notes that envelops your kitchen, making it impossible to resist!
  • Visual Appeal: The deep golden hue of the glaze contrasts beautifully against the pink tones of the ham, making it visually stunning on any table.
  • Skill Level Needed: This recipe is perfect for beginners as it requires no advanced techniques, just a watchful eye to ensure perfect caramelization.
  • Special Equipment: A simple baking dish and a basting brush are all you need to make this glaze shine.

Recipe Overview

  • Difficulty Level: This Brown Sugar Ham Glaze is easy to prepare, making it a great choice for novice cooks looking to impress their guests without stress.
  • Category: Ideal for holiday meals, this glaze not only enhances ham but also works brilliantly for various meat dishes during festive gatherings.
  • Cuisine: Drawing from traditional American cooked meals, the flavors of this glaze are beloved and widely appreciated across different culinary backgrounds.
  • Cost: Economically, the ingredients are common pantry staples, making this a budget-friendly option for elevating your dish.
  • Season: This glaze is a classic favorite during the winter holiday season, perfect for Thanksgiving and Christmas feasts.
  • Occasion: Whether it’s a holiday gathering, family dinner, or special celebration, this glaze adds a touch of festivity to any meal.

Why You’ll Love This Recipe

You will adore the taste and texture of this Brown Sugar Ham Glaze, as it combines rich sweetness and a hint of spice to create a perfect balance that compliments the savory flavors of your ham. The tender, juicy ham absorbs the flavors of the glaze during cooking, resulting in each bite being a delightful explosion of taste. Furthermore, the caramelized surface it forms during baking provides an added crunch, enhancing the overall eating experience.

Convenience is key with this easy Brown Sugar Ham Glaze recipe. With minimal preparation time and simple ingredients, you can whip it up in just minutes. Simply combine the ingredients and baste your ham while it cooks, allowing the oven to do the hard work. This makes it an excellent choice for busy cooks who still want to impress their guests without spending all day in the kitchen.

Nutritionally, the glaze, while indulgent, enhances the enjoyment of a balanced meal. You can also lighten the glaze with fewer sugars or by adding some herbs, allowing you to adapt it to fit your dietary preferences while still adding flavor to your meal. It’s all about celebrating delicious textures and tastes without sacrificing health.

Social gatherings come alive with this glaze as your guests savor the rich, sweet, and spicy notes that fill the atmosphere. It creates an inviting setting, encouraging conversation and connection over a shared love of food. Whether you’re hosting a casual get-together or a formal dinner, this glaze is sure to garner compliments and requests for the recipe.

Lastly, from a cost perspective, this Brown Sugar Ham Glaze delivers impressive results without breaking the bank. The ingredients are affordable, widely available, and versatile, meaning you can use them for other recipes too. Plus, it’s a great way to enhance any leftover ham, making it a budget-friendly solution that stretches your food further.

Historical Background and Cultural Significance

The origins of the Brown Sugar Ham Glaze can be traced back to traditional cooking practices in the American South, where ham has long been a staple at family feasts and celebrations. The use of sweet glazes on meats, especially during holidays, was rooted in the desire to add flavor and enhance the richness of ham, often cured with salt and spice before cooking. Over time, the variations of glazes have expanded, with brown sugar becoming a beloved ingredient due to its depth of flavor.

Culturally, the brown sugar glaze is tied to holiday celebrations in American households, particularly during Thanksgiving and Christmas. It symbolizes warmth, hospitality, and gathering around the table to enjoy a meal with loved ones. The preparation and sharing of food, especially a dish as celebrated as glazed ham, evoke deep traditions and foster memories across generations.

The evolution of the Brown Sugar Ham Glaze reflects the broader trends in culinary practices where traditional recipes merge with modern tastes. Contemporary cooks often experiment with additional ingredients like mustard, fruit juices, or even spices to make the glaze resonate with their individual palates while honoring its traditional roots. This adaptability allows families to make the recipe their own, creating unique versions while preserving the essence of the original.

Regional variations of the glaze can be seen, particularly across the United States, where ingredients can shift based on local preferences and available resources. For example, in some Southern states, apple cider vinegar might be added for tang, while other regions might lean towards additional spices that reflect their culinary heritage. Through these adaptations, the Brown Sugar Ham Glaze continues to thrive in diverse kitchen settings.

Ingredient Deep Dive

Brown sugar is the star ingredient of the glaze, renowned for its ability to not only sweeten but also add a rich, caramel-like flavor and moist texture to dishes. Originating from sugarcane and sugar beet processing, brown sugar retains some of the plant’s molasses, which contributes to its unique taste. Rich in minerals like calcium, potassium, and iron, brown sugar can also provide some nutritional benefits as compared to white sugar, although it should still be consumed in moderation.

When selecting brown sugar for your glaze, consider using light brown sugar for a milder flavor or dark brown sugar for a richer, more intense sweetness. Proper storage is essential to keep it from hardening; always seal it in an airtight container. If you need a substitute, you can create a blend of granulated sugar and molasses to mimic the taste and texture of brown sugar quite effectively.

Honey is another key ingredient that adds distinct floral notes to the glaze. As a natural sweetener, honey has been used for centuries, not just for its taste but also for its potential health benefits. Rich in antioxidants, honey can support immune health while balancing the sweetness of the glaze. When looking for honey, consider using local varieties for the best flavor or opt for raw honey to retain beneficial properties.

Storage of honey is straightforward; keep it in a cool, dark place, and it will have an indefinite shelf life. In terms of substitutions, agave syrup or maple syrup can be used as alternatives, each bringing its own unique flavor profile that can complement the glaze beautifully.

Common Mistakes to Avoid

  • Not measuring ingredients accurately can lead to an unbalanced flavor. Always use precise measurements for the best results.
  • Overcooking the glaze can cause it to become too thick and caramelized, making it difficult to spread. Watch the cooking time closely.
  • Skipping the basting step can prevent the ham from absorbing the flavors of the glaze. Be sure to baste periodically for maximum flavor impact.
  • Using cold ham can lead to uneven cooking. Allow it to come to room temperature before applying the glaze.
  • Not stirring the glaze properly can cause ingredients to clump or burn. Make sure to stir consistently while heating.
  • Ignoring the type of ham used may yield unsatisfactory results. Opt for a quality ham with enough fat to absorb the glaze well.
  • Not allowing the glaze to set post-cooking can result in a less flavorful final dish. Let it sit to enhance the flavor.
  • Using low-quality brown sugar can lead to a lackluster taste. Choose a good quality sugar for the best glaze.
  • Neglecting to check your oven temperature can cause discrepancies in cooking time, leading to under or overcooking.
  • Overlooking garnishing options can leave your dish looking plain. Add fresh herbs or sliced fruits for a decorative touch.

Essential Techniques

To master the art of glazing, it is essential to understand the technique of basting. Basting is the process of spooning or brushing liquid over meat as it cooks, ensuring even coverage and allowing flavors to penetrate. To master this technique, start by using a basting brush or spoon at regular intervals, typically every 15-20 minutes for larger cuts of meat. Be wary of letting the ham become too dry; a good indication for success is a shiny, caramelized exterior.

Another technique integral to creating a great glaze is achieving the correct cooking temperature. High heat helps to caramelize sugars, providing both flavor and appealing color. Use a meat thermometer to ensure the ham reaches a safe internal temperature, around 140°F for precooked ham. Visual cues include a bubbly, bronzed surface that signals the sugars are doing their thing.

Pro Tips for Perfect Brown Sugar Ham Glaze

Be mindful of the type of ham you choose, whether it be smoked, fresh, or cured. Each carries its own flavors, which can enhance or alter the outcome of the glaze.

For added depth, consider adding spices such as nutmeg or ginger to the glaze mixture. This enriches the flavor profile and introduces an unexpected element that guests will love.

Don’t skimp on the time you spend letting the glaze set. After cooking, allowing the ham to sit for a few minutes before serving helps the glaze adhere better and enhances flavor.

Experiment with adding a splash of citrus juice, like orange or lemon, for a refreshing twist that cuts through the sweetness.

If the glaze appears thicker than desired, mix in a small amount of broth or water to reach your preferred consistency for easy application.

Consider garnishing with freshly chopped herbs such as rosemary or thyme for an aromatic and visually appealing touch that brightens the dish.

Lastly, when storing leftover glazed ham, ensure it’s kept in an airtight container. This maintains the quality and flavor, making sure you enjoy every bite again.

Variations and Adaptations

Regional variations of the Brown Sugar Ham Glaze can add unique twists. For example, some may use apple cider instead of water or broth, providing a fruity undertone that complements the savory ham beautifully.

Seasonal adaptations can also come into play. For instance, during summer, incorporating fresh herbs like basil or cilantro can provide a refreshing contrast, turning this glaze into a lighter version suited for barbecued ham.

Dietary modifications might require minimizing sugar or substituting with natural sweeteners like maple syrup or agave nectar, ensuring that the recipe remains accessible for various dietary needs while keeping it delicious.

For flavor variations, try adding extra spices like smoked paprika or chipotle powder, infusing an exciting smoky element that both surprises and pleases the palate.

Texture modifications can be achieved by leaving the glaze slightly chunky by using brown sugar as a base combined with chopped nuts, providing a delightful crunch alongside the smoothness of the ham.

Presentation alternatives, such as serving the glaze on the side for guests to ladle to their taste, can provide a unique dining experience and allow for customization on each plate.

Serving and Presentation Guide

When plating your glazed ham, presentation plays a crucial role. Place the ham on a large platter with ample space to accommodate garnishes and sides. Slicing the ham into thick, juicy portions allows guests to appreciate the golden glaze and its enticing appearance.

Consider garnishing your glazed ham with fresh bay leaves or sprigs of rosemary for a rustic presentation. This adds a touch of freshness and enhances the aroma as it is served. Additionally, a drizzle of extra glaze over the slices can create an inviting sheen that draws the eye.

Traditional accompaniments, such as roasted vegetables or a hearty potato dish, complement the richness of the glazed ham. Presenting these sides around the ham on the platter elevates the overall visual appeal.

Modern serving suggestions might include offering a fruit chutney or mustard on the side, allowing guests to mix and match flavors according to their preferences. Plating these elements together creates an appealing visual contrast against the ham.

Temperature considerations are also essential. Serve the ham warm, but not too hot, as this allows the flavors to shine without overwhelming the palate. Portion control can be managed by cutting slices before serving, ensuring guests can help themselves without waste.

Wine and Beverage Pairing

When selecting a wine to pair with your Brown Sugar Ham Glaze, opt for a light-bodied red such as Pinot Noir. Its fruit-forward qualities complement the sweetness of the glaze while maintaining sufficient acidity to balance the richness of the ham. Alternatively, a dry Riesling provides a refreshing contrast that enhances the flavors without overpowering them.

For non-alcoholic alternatives, a sparkling apple cider or herb-infused iced tea can offer a refreshing palate cleanser that works beautifully alongside the glazed ham. The natural sweetness of these beverages pairs wonderfully with the dish’s flavor profile.

Coffee enthusiasts can benefit from pairing a medium roast coffee post-meal. The subtle smoky notes found in many medium roasts can elegantly echo the flavors of the ham, enhancing the overall dining experience.

Temperature considerations are paramount when serving beverages. White wines should be chilled prior to serving, while red wines can be served slightly below room temperature. Sparkling beverages should remain ice cold for a refreshing experience.

Finally, alongside any beverage, presentation matters. Use elegant glassware and consider garnishing drinks with fresh herbs or citrus slices that complement the ham’s flavors, enhancing the dining atmosphere.

Storage and Shelf Life

To ensure the best flavor and quality, store any leftover Brown Sugar Ham Glaze in an airtight container in the refrigerator. It should last up to a week, retaining its delicious flavors. If you venture into freezing, be aware that the texture may slightly alter upon thawing, so consider using freezer-safe jars for airtight protection.

Signs of spoilage can include an off or sour smell, discoloration, or any mold formation. Discard any glaze that shows these signs to ensure food safety.

When it comes to reheating, gently warm the glaze on the stovetop over low heat or in the microwave in short intervals, stirring in between until it reaches the desired consistency for serving again. This method helps maintain the texture and flavor without compromising quality.

If your glaze becomes too thick during storage, simply whisk in a little water or broth while reheating to bring it back to the perfect flowing consistency.

Freezing is also an option if you have a large quantity. Portion out the glaze into smaller containers before freezing so you can thaw just what you need for future meals, maximizing taste and reducing waste.

Make Ahead Strategies

To streamline your cooking process, consider prepping your Brown Sugar Ham Glaze a day in advance. Gather and measure all ingredients into one container, allowing flavors to meld overnight in the refrigerator. This not only saves time but enhances the glaze’s taste when prepared in advance.

During the preparation stages, you can store your ham uncooked in the refrigerator for up to two days before baking, facilitating a stress-free cooking experience. Ensure it is well-covered to prevent odors from other foods from permeating.

Quality impact assessment is crucial; by making the glaze ahead of time, you won’t lose any flavor. However, ensure you reheat and use it within a week for the best results.

Assembly tips should include letting the sauce come to room temperature before applying it to the ham. If you heat up the glaze too much, it might not stick well, so take care to follow proper temperature guidelines.

If you plan to add fresh herbs or citrus as garnishes, do these just before serving to maintain their vibrant colors and aromas. These final touches will elevate your presentation and taste just in time for your guests.

Scaling Instructions

Halving this Brown Sugar Ham Glaze recipe is straightforward. Simply divide each ingredient by two, ensuring to balance flavors. Be sure to taste as you go, adjusting for personal preferences.

If you choose to double or triple the recipe for a larger gathering, consider batch preparing in a larger saucepan to maintain an even cooking process, stirring frequently for consistent results.

Equipment adjustments, such as using a larger baking dish, can accommodate your needs when scaling up, so ensure you have adequate space for the ham and the glaze to bake beautifully.

Timing modifications are important to consider—larger batches may require additional cooking time to allow flavors to develop fully and the glaze to caramelize.

Storage considerations should also change; when scaling up, think about how you’ll store excess glaze. Larger airtight containers can facilitate easy access for future meals, ensuring they stay fresh and flavorful.

Nutritional Deep Dive

When analyzing the macros of the Brown Sugar Ham Glaze, you’ll find a balance of carbohydrates primarily from the sugars. While good fats are minimal, the protein content comes from the ham itself, providing a comprehensive meal experience.

Looking into micronutrient analysis, brown sugar does offer trace amounts of minerals like calcium and iron. However, the overall glaze should be enjoyed as an accompaniment, as moderation is key given its sweetness.

In terms of health benefits, the glaze does encourage enjoying protein-rich meats while enhancing the taste, which could prompt the inclusion of more meals centered around lean meats.

Dietary considerations for this dish are essential. For those mindful of sugar intake, consider reducing brown sugar or substituting with healthier alternatives, aligning the recipe with more health-conscious choices.

Portion analysis indicates that, while delicious, the glaze should be used sparingly, especially on heavier meats, to ensure a well-rounded meal. This helps in managing overall caloric intake while still enjoying the flavors of the glaze.

As part of a weight management strategy, balancing this flavorful dish with fresh vegetables and whole grains can create a satisfying yet nutritious plate, keeping indulgence in check without sacrificing enjoyment.

Dietary Adaptations

For gluten-free adaptations of the Brown Sugar Ham Glaze, you can rest assured as this recipe is naturally gluten-free. However, ensure you verify that any store-bought ingredients, such as mustard, are also GF labeled.

Dairy-free concerns are also addressed, as this glaze contains no dairy products, making it suitable for those who avoid dairy for health or lifestyle reasons while still benefiting from flavors and textures.

Vegan adaptations would require a complete substitution of the main components; using a plant-based sweetener alongside a vegan-friendly ham alternative can yield a glaze that is both flavorful and satisfying.

For low-carb dieters, consider reducing the sugar and substituting with erythritol or monk fruit sweetener to minimize carbohydrate content while still achieving sweetness in the glaze.

Keto enthusiasts might find this recipe can easily pivot; simply adjust the sugar ratio to maintain ketosis while enjoying a sweet flavor profile.

Paleo-friendly adaptations would echo the use of natural sweeteners and whole ingredients, ensuring compliance with dietary guidelines while enjoying robust flavors.

For those on a low-FODMAP diet, pay attention to ingredient sources, ensuring you opt for low-FODMAP options where necessary to enjoy that sweet flavor profile without gastrointestinal distress.

Troubleshooting Guide

If you experience texture issues with your glaze, such as it being too runny or too thick, adjust by adding a pinch of cornstarch dissolved in water for thickening or a little liquid for thinning.

Flavor balance is a common concern; if your glaze is too sweet, adding a splash of vinegar or citrus juice can help cut through the sweetness. Adjusting the acidity can enhance the overall profile of flavors, providing depth.

Temperature problems can arise if the oven is not preheated; check your oven accuracy to ensure the glaze caramelizes properly and doesn’t burn.

Equipment challenges, such as improper cookware, can lead to uneven cooking. Use a heavy-bottomed pot to distribute heat evenly during the glaze preparation.

For ingredient substitutions, beware of altering ratios; different sweeteners may have varying sweetness levels, so always taste and adjust accordingly.

Timing concerns can lead to overcooked ham or burnt glaze; use a thermo probe inserted into the ham to ensure it cooks through without overdoing the outside.

Recipe Success Stories

Community feedback on the Brown Sugar Ham Glaze reveals stories from families who have made this dish their holiday staple, transforming traditional meals into something extraordinary.

Many readers have shared variations that include adding fruit preserves, which has enhanced the dish for their gatherings, proving that this glaze recipe is a canvas for creativity.

Several have highlighted the presentation of the glazed ham, with beautiful photos and descriptions detailing their holiday tables, successfully incorporating this recipe while also making it memorable.

Adaptive stories reflect how some have shifted this recipe to cater to dietary needs, ensuring friends can enjoy the glaze limited by health concerns without compromising on flavor and festive spirit.

Photography tips from the community highlight the use of natural light and simple garnishes like fresh herbs to elevate their dish presentation, enhancing the appeal of their culinary creations.

Frequently Asked Questions

What type of ham is best for this glaze?
Choosing a well-cured ham, like a bone-in smoked ham, typically allows for a balanced flavor profile when paired with the sweetness of the glaze. The smoky notes often enhance the overall taste, making it more complex.

Can I make the glaze ahead of time?
Absolutely! Preparing the glaze a day in advance can intensify the flavors. Store it in the refrigerator and reheat gently before using on the ham.

Is there a way to make this glaze less sweet?
If you find it too sweet, consider reducing the amount of brown sugar or adding a bit of apple cider vinegar to balance the sweetness with acidity.

How long can I store leftover glaze?
Leftover glaze can be stored in an airtight container in the refrigerator for up to a week. If you want to extend its life, you can freeze it for up to three months.

Does this glaze work with other meats?
Yes, this versatile glaze is excellent for other meats including chicken, turkey, or even roasted vegetables. The flavors adapt beautifully across various proteins.

Can I add more spices to the glaze?
Definitely! Feel free to experiment with spices like cinnamon, nutmeg, or smoked paprika to make the glaze reflect your taste preferences.

What can I substitute for honey?
If you don’t have honey, consider using maple syrup or agave nectar, both of which will retain the sweetness and add character to the glaze.

How do I prevent the glaze from burning?
Preheat your oven and baste the ham regularly to ensure the glaze caramelizes evenly without burning. Cover with foil if it browns too quickly.

Could this be adapted for a smaller gathering?
Yes! Halve the recipe easily by reducing the glaze ingredients or preparing a smaller ham to adapt to your gathering size.

What are some good side dishes to serve with glazed ham?
Popular choices include roasted vegetables, sweet potato casserole, or a light salad that complements the richness of the ham.

Additional Resources

For those looking to expand their cooking repertoire or further explore Southern cuisine, consider exploring related recipes that highlight flavorful glazes or slow-cooked meats. Resources on mastering roasting techniques can enhance skills further, ensuring beautiful dishes each time.

Ingredient information regarding the types of sugars and sweeteners can help optimize your recipes, while equipment recommendations can guide you in selecting the best tools for efficient cooking.

Seasonal variations can lead to exciting twists on your traditional dishes, allowing cooks to bring new life to old favorites.

Join the Conversation

We encourage readers to share their experiences with the Brown Sugar Ham Glaze on social media, showcasing their unique adaptations and the joy this recipe brought to their tables. Engaging with our community not only fosters connection but allows space for sharing photography tips and presenting stunning dishes.

Feedback on how this glaze turned out in your kitchen is invaluable; sharing successful stories and clever variations will inspire others and enhance the communal spirit of cooking.

Your reviews can help create a collection of success stories that resonate with home cooks, driving home how this glaze can be a delightful addition to any table.

The Recipe

Brown Sugar Ham Glaze

Serves: 8 servings

Prep Time: 10 mins

Cook Time: 15 mins

Total Time: 25 mins

Kitchen Equipment Needed

  • Baking dish
  • Basting brush
  • Mixing bowl
  • Measuring cups and spoons

Ingredients

  • 1 cup brown sugar
  • 1/2 cup honey
  • 2 tbsp Dijon mustard
  • 1 tsp ground cinnamon
  • 1/4 tsp ground cloves
  • 1/4 cup apple cider vinegar

Directions

  1. Preheat your oven according to the ham instructions.
  2. In a mixing bowl, combine brown sugar, honey, Dijon mustard, cinnamon, cloves, and vinegar. Mix until smooth.
  3. Baste the ham generously with the glaze before placing it in the oven.
  4. Continue to baste the ham every 15 minutes until cooked through and caramelized.
  5. Once the ham reaches the desired internal temperature, remove it from the oven and let it rest before slicing.
  6. Serve warm and enjoy!

Recipe Notes

  • This glaze can be made ahead of time and stored in the refrigerator for up to a week.
  • For added flavor, consider mixing in additional spices or citrus juice to your preference.
  • Feel free to adjust the sweetness by modifying the amount of brown sugar used.

Sweet and Savory Brown Sugar Potatoes Recipe to Try Today

Sweet and Savory Brown Sugar Potatoes: A Comforting Delight

⚖️
Difficulty
Easy

⏲️
Prep Time
15 mins

🕒
Cook Time
30 mins

⏱️
Total Time
45 mins

🍽️
Servings
4

Brown sugar potatoes are the ultimate comfort food, combining the sweetness of brown sugar with the earthy flavor of potatoes. As the potatoes roast, they caramelize in a rich, buttery glaze that gives them a sweet and savory allure. This dish is not only simple to prepare but also makes for a delightful side that pairs well with various mains, making it a versatile addition to any meal.

Imagine the aroma wafting through your kitchen, a fragrant mix of buttery sweetness with a hint of caramelization as these beautiful brown sugar potatoes cook to perfection. Their golden-brown exterior and soft, tender inside create a sensory experience that is simply irresistible. Whether you are entertaining guests or enjoying a family dinner, these potatoes promise to elevate your menu.

Quick Recipe Highlights

  • Flavor Profile: Sweet and savory with a hint of spice, making for a delightful contrast.
  • Texture: Crispy on the outside, soft and fluffy on the inside—perfectly balanced.
  • Aroma: The sweet scent of brown sugar and butter fills your kitchen, inviting everyone to the table.
  • Visual Appeal: The golden hue of caramelized sugar on the potatoes glistens beautifully.
  • Skill Level Needed: Suitable for beginner and seasoned cooks alike, requiring only basic techniques.
  • Special Equipment: A baking sheet and aluminum foil for easy cleanup are recommended.

Recipe Overview

  • Difficulty Level: This recipe is classified as easy, making it perfect for those new to cooking or busy home chefs.
  • Category: A perfect side dish for family dinners or holiday gatherings, complementing various meat and vegetarian entrees.
  • Cuisine: Rooted in American home cooking, this dish adopts a sweet and savory approach often found in southern cuisine.
  • Cost: Inexpensive to prepare, this dish can be made with budget-friendly ingredients you likely already have on hand.
  • Season: Although delightful year-round, brown sugar potatoes shine best during the fall and winter months.
  • Occasion: Ideal for Thanksgiving dinners, casual family meals, and festive celebrations.

Why You’ll Love This Recipe

This recipe for brown sugar potatoes stands out because of its perfect harmony of taste and texture. The balance of sweet and savory makes every bite delicious, with aromas that add warmth to your home. The simplicity of the recipe allows for easy preparation, making it an ideal choice for busy nights or special occasions. Nutritionally, potatoes provide essential vitamins while the sweetness of brown sugar can satisfy your sweet tooth without overwhelming it.

When hosting gatherings, brown sugar potatoes serve as an excellent conversation starter. Their unique flavor invites questions and compliments alike, enhancing the dining experience. The affordability of this dish also contributes to its widespread appeal, as it requires minimal investment yet yields satisfying results.

Historical Background and Cultural Significance

The origins of brown sugar potatoes trace back to traditional American cooking, where simple ingredients are transformed into comforting fare. This dish reflects the essence of home-cooked meals, evoking memories of family gatherings and celebrations. Over time, this recipe has evolved, with families adding personal touches, making it unique to their heritage.

Culturally, brown sugar potatoes symbolize hospitality and community. They are often served during festive occasions and gatherings, fostering connections among friends and family. In many households, the preparation of this dish is passed down through generations, each adding their flair and techniques that honor their ancestors.

Different regions may have their interpretations of this dish, incorporating local ingredients that reflect their culinary traditions. This variation enhances its versatility, allowing it to fit seamlessly into diverse menus while remaining a favorite comfort food.

Ingredient Deep Dive

Potatoes: Potatoes are celebrated for their versatility and nutritional benefits. Rich in vitamins and potassium, they provide sustained energy and satisfy hunger. Choosing the right potato is crucial; starchy varieties like Russets are perfect for this recipe due to their fluffy texture when cooked.

Brown sugar: This ingredient infuses sweetness and depth to the dish. Brown sugar’s molasses content enhances flavor complexity, making it ideal in various recipes. Opting for light brown sugar will yield a milder taste, while dark brown provides a richer flavor. Store brown sugar in an airtight container to keep it moist and fresh, and if necessary, it can be substituted with coconut sugar for a unique twist.

Common Mistakes to Avoid

  • Not Preheating the Oven: Always preheat to ensure even cooking and proper caramelization.
  • Cutting Potatoes Unevenly: Cut potatoes into similar sizes to ensure uniform cooking.
  • Using Too Much Sugar: Balance is key; too much can overpower the dish.
  • Overcooking: Keep an eye on the potatoes to avoid mushiness; they should be tender yet firm.
  • Skipping Foil: Covering during part of the baking process can help steam the potatoes, enhancing texture.
  • Using the Wrong Type of Potato: Select starchy potatoes for the best results; waxy types won’t achieve the desired fluffiness.
  • Neglecting Seasoning: Don’t forget to season potatoes before baking; it elevates the flavor profile.
  • Not Tasting Before Serving: Always taste your dish before serving to ensure the flavors are to your liking.

Essential Techniques

Proper roasting is essential for achieving the perfect texture in brown sugar potatoes. Ensure your oven is adequately preheated; this promotes caramelization, resulting in a deliciously sweet crust. To master roasting, keep the potatoes in a single layer for even heat distribution, which prevents steaming and encourages crispiness.

Lifting the foil during the last minutes of cooking allows the potatoes to brown beautifully. Watch for visual cues—golden edges are a sign of delicious caramelization. If your brown sugar potatoes aren’t browning as desired, consider increasing the oven temperature slightly for the final minutes of baking for optimal results.

Pro Tips for Perfect Brown Sugar Potatoes

To ensure your brown sugar potatoes turn out perfectly every time, try the following tips. First, coat your potatoes with melted butter before adding sugar; this fosters an incredible glaze. Additionally, consider adding spices such as cinnamon or nutmeg for more depth and warmth.

For an extra crunch, sprinkle some breadcrumbs over the potatoes before baking. If allowed, let the potatoes sit after baking for a few minutes to let the flavors settle in, enhancing taste. Adding a splash of apple cider vinegar can balance the sweetness with a tangy note.

Variations and Adaptations

Brown sugar potatoes can be adapted to fit various culinary preferences. For a seasonal twist, add pecans or walnuts for crunch during the fall. If you prefer a healthier version, reduce the amount of brown sugar and substitute with a sugar alternative. For those with dietary restrictions, explore using sweet potatoes for a different flavor profile and added nutrients.

Incorporating seasonal vegetables like carrots or parsnips can create a colorful medley, appealing visually and nutritionally. On top of that, try infusing the dish with herbs such as rosemary or thyme for a sophisticated taste.

Serving and Presentation Guide

For beautiful presentation, arrange the brown sugar potatoes on a platter, garnished with fresh herbs. A sprig of parsley or a sprinkle of chopped chives adds color and elevates the dish’s presentation. Serve alongside grilled meats or roasted vegetables for a balanced plate.

When serving, consider temperature; brown sugar potatoes are best enjoyed warm, right from the oven. Portion control can be managed by using small bowls to allow guests to help themselves, creating a more inviting experience.

Wine and Beverage Pairing

Pairing beverages with brown sugar potatoes can enhance the dining experience. A Sauvignon Blanc with its crisp acidity can provide a lovely contrast to the sweetness of the potatoes. For red wine enthusiasts, consider a medium-bodied Pinot Noir that complements the dish’s flavors without overpowering it.

For non-alcoholic options, a sparkling water with a twist of citrus can refresh the palate, while a lightly brewed iced tea provides a comforting pair. Temperature plays a crucial role; serve wines chilled and non-alcoholic options at room temperature to highlight their flavors.

Storage and Shelf Life

Proper storage of brown sugar potatoes ensures they retain their deliciousness. Allow leftovers to cool completely before transferring to an airtight container. Store them in the refrigerator for up to three days. Reheating can be done in an oven to restore their crispy texture, avoiding the microwave which may make them soggy.

For long-term storage, consider freezing the dish. To do this, lay the potatoes flat on a baking sheet to freeze them individually before transferring to a freezer-friendly container. This method prevents clumping, allowing you to take out only what you need.

Make Ahead Strategies

For those looking to save time, preparing brown sugar potatoes a day in advance is entirely feasible. Cut and coat the potatoes in the brown sugar mixture, then store them in the refrigerator until ready to bake. This allows flavors to develop and eliminates hassle during mealtime.

Consider assembling the dish in the morning and popping it into the oven just before serving, ensuring it’s fresh from the oven when it’s time to eat. When reheating, if you’ve made it ahead, doing so on a lower temperature will help preserve its texture and flavor.

Scaling Instructions

Adjusting this recipe to serve more or fewer people is simple. To halve the recipe, use smaller potatoes and accordingly reduce the brown sugar and butter. When doubling or tripling, be aware of the size of your baking dish; you may need additional cooking time to ensure even cooking.

Timing modifications may be necessary based on the size of the dish. Monitor the potatoes closely as they may need a little longer to cook through without burning.

Nutritional Deep Dive

Brown sugar potatoes provide a hearty serving of carbohydrates, ideal for an energy boost. They also carry micronutrients such as vitamin C and potassium, which support overall health. While potatoes are naturally low in calories, the addition of brown sugar and butter should be considered for those monitoring their caloric intake.

Portion control is vital when enjoying this delicious side. Understanding serving sizes is essential for maintaining a balanced diet while indulging in this comforting dish. Opting for sweet potatoes can enhance the nutritional value by adding fiber and vitamins while keeping the familiar taste.

Dietary Adaptations

Brown sugar potatoes can be easily adapted for various dietary needs. A gluten-free version can be easily achieved, as this recipe naturally does not include gluten. For those needing dairy-free options, substitute butter with a non-dairy alternative.

Vegans can replace butter with coconut oil, preserving creaminess while maintaining the sweetness from brown sugar. Low-carb enthusiasts might explore using cauliflower instead of potatoes, adjusting cooking times accordingly. These adjustments maintain the spirit of the dish while accommodating diverse dietary preferences.

Troubleshooting Guide

If your brown sugar potatoes turn out too sweet, consider reducing the amount of brown sugar next time or balancing the sweetness with a pinch of salt. Should they become soggy during cooking, ensure they are not overcrowded on the baking sheet to avoid steaming.

If you’re struggling with uneven cooking, verify that your oven is accurately calibrated, and rotate the baking sheet halfway through. For flavor concerns, taste and adjust seasonings before serving; adding a splash of apple cider vinegar can enhance the flavor profile if it feels one-dimensional.

Recipe Success Stories

Many home cooks have embraced this brown sugar potatoes recipe, sharing their delightful experiences. One reader noted how the dish became a staple at family gatherings, often receiving rave reviews for its comforting flavors. Adaptations such as adding garlic and herbs have led to creative twists on the original, showcasing the recipe’s versatility.

Photographers in the community recommend presenting the dish in vibrant colored bowls or on textured wooden platters. Sharing these experiences not only celebrates individual creativity but also inspires others to put their spin on the beloved brown sugar potatoes.

Frequently Asked Questions

Can I use other types of sugar?
Yes, while brown sugar provides a unique flavor, coconut sugar or maple syrup can also work. Adjust measurements based on sweetness preference.

Are leftovers good the next day?
Leftovers will keep well for 3 days when stored correctly. Reheating can maintain texture and flavor if done in the oven.

Can I add other vegetables?
Absolutely! Consider adding carrots or parsnips for additional flavors and textures. Ensure they are cut to similar sizes for even cooking.

What types of potatoes are best?
Starchy potatoes like Russets or Yukon Gold are ideal due to their fluffy texture. Avoid waxy potatoes as they don’t caramelize well.

Is this recipe suitable for meal prep?
Yes, this dish can be prepared ahead of time and stored in the refrigerator, making it a convenient option for busy weeks.

How do I prevent the potatoes from burning?
Monitor cooking time closely and use foil to cover the potatoes if they brown too quickly, uncovering them for the last few minutes.

Can this recipe be made in a slow cooker?
Yes! You can adapt the recipe for a slow cooker, allowing the flavors to meld beautifully over several hours.

What spices work well in this recipe?
Cinnamon, nutmeg, or even paprika can be added for an extra flavor punch and warmth—feel free to experiment with your favorites!

How do I know when they are done?
The potatoes should be golden brown and easily pierced with a fork when they are finished cooking.

Can I freeze brown sugar potatoes?
Yes, they can be frozen for future use. Consider blanching before freezing to preserve texture, and reheat properly to retain the flavor.

Additional Resources

If you’re interested in exploring more recipes like brown sugar potatoes, check out our site for delicious side dishes that complement any meal. Additionally, several technique guides can aid in perfecting your cooking skills, helping you unlock new flavors. Dive into our ingredient information section for nutritional details and sourcing tips.

Our equipment recommendations will equip you with the necessary tools for successful cooking, ensuring you have everything you need to replicate this comforting dish. Seasonal variations can offer fresh ideas tailored to available ingredients, keeping your meals exciting.

Join the Conversation

We invite you to share your experiences and photographs of your brown sugar potatoes creations on social media with our community. Your feedback on this recipe inspires fellow cooks and contributes to an engaging community.

Recipe reviews are crucial, so please share your thoughts on how this dish turned out for you. If you’ve made variations or adaptations, we want to hear about those too! Join us in creating a vibrant network of culinary enthusiasts as we explore new flavors and celebrate the joys of cooking together.

The Recipe

Brown Sugar Potatoes

Serves: 4

Prep Time: 15 mins

Cook Time: 30 mins

Total Time: 45 mins

Kitchen Equipment Needed

  • Baking sheet
  • Aluminum foil
  • Mixing bowl
  • Measuring cups
  • Knife and cutting board

Ingredients

  • 4 medium potatoes, peeled and cubed
  • 1/2 cup brown sugar
  • 1/4 cup butter, melted
  • 1 teaspoon vanilla extract
  • 1/2 teaspoon salt
  • 1/4 teaspoon cinnamon (optional)

Directions

  1. Preheat your oven to 400°F (200°C).
  2. In a mixing bowl, combine melted butter, brown sugar, vanilla extract, salt, and cinnamon (if using).
  3. Add the cubed potatoes to the bowl and coat them evenly with the brown sugar mixture.
  4. Spread the potatoes in a single layer on a baking sheet, lining it with aluminum foil if desired for easy cleanup.
  5. Bake for 25 minutes, covered with foil, then uncover and bake for an additional 5-10 minutes until golden brown.
  6. Remove from the oven and let cool slightly before serving.

Recipe Notes

  • Feel free to add nuts or other spices for enhanced flavor.
  • These potatoes can be stored in the fridge for up to 3 days.
  • To reheat, place in the oven until warm; this helps retain crispness.

Delicious Easy Homemade Crab Cakes Recipe for Seafood Lovers

Easy Homemade Crab Cakes: Deliciously Simple Seafood Delight

⚖️
Difficulty
Easy

⏲️
Prep Time
15 mins

🕒
Cook Time
20 mins

⏱️
Total Time
35 mins

🍽️
Servings
4

Crab cakes are a seafood lover’s dream, perfectly blending the sweetness of crab meat with spices and herbs to create a dish that’s as delightful to the palate as it is simple to prepare. These Easy Homemade Crab Cakes are not only full of flavor but also feature a light and crispy exterior, making them an excellent choice for a main dish or an appetizer at your next gathering. Each bite unleashes a medley of textures—from the tender meat to the crunchy breadcrumbs—ensuring a satisfying experience.

The beauty of these crab cakes lies in their versatility. Serve them with a zesty remoulade for a refreshing zing or nestle them on a bed of greens for a light, healthy meal. With minimal cooking involved, you can effortlessly whip up these crab cakes and impress your guests with your culinary skills. Whether you are planning a cozy dinner at home or a lively seafood feast, these crab cakes are bound to leave a lasting impression.

Quick Recipe Highlights

  • Flavor Profile: These crab cakes offer a fantastic balance of sweet, succulent crab meat and savory spices, combined with fresh herbs and a hint of lemon.
  • Texture: Enjoy a delightful crunch on the outside that gives way to a moist and tender interior bursting with flavor.
  • Aroma: The aromatic notes of sautéed onions and fresh herbs tantalize the senses, setting the stage for a delicious seafood experience.
  • Visual Appeal: Golden brown and beautifully crisp, these crab cakes are vibrant with flecks of green herbs, making them an eye-catching dish.
  • Skill Level Needed: With straightforward techniques and easily accessible ingredients, anyone can master this recipe!
  • Special Equipment: You’ll need a mixing bowl, skillet, and a baking sheet for optimal cooking results.

Recipe Overview

  • Difficulty Level: Easy and quick to prepare, this crab cake recipe is perfect for both beginner cooks and seasoned chefs looking for a simple dish.
  • Category: These crab cakes can be classified into appetizers or main dishes, making them versatile for any meal plan.
  • Cuisine: Rooted in coastal traditions, crab cakes showcase the flavors of the sea, commonly associated with the Eastern United States and Chesapeake Bay cuisine.
  • Cost: This recipe provides high-quality flavor at a reasonable price, with the main expense being quality crab meat, which can vary based on availability.
  • Season: Ideal for warm weather months, crab cakes are perfect for summer gatherings or as a seafood treat on special occasions.
  • Occasion: Perfect for parties, family dinners, and casual summer barbecues, these crab cakes cater to various dining experiences.

Why You’ll Love This Recipe

The taste and texture of these crab cakes are simply irresistible. The soft crab meat combined with a crispy breading provides an enjoyable contrast that makes each bite a pleasurable experience. Plus, the delightful addition of fresh herbs and spices elevates the flavor profile, delivering a dish that is both savory and refreshing.

Convenience is another winning feature of this recipe. With only 15 minutes of prep time and minimal cooking requirements, these crab cakes allow you to spend less time in the kitchen and more time with your guests. They can be prepared in advance and easily cooked right before serving, adding to their appeal for entertaining.

Nutritionally, crab is rich in protein and low in fat, making these crab cakes a smart choice for a satisfying meal. Packed with essential vitamins and minerals, they are a wholesome option that doesn’t sacrifice flavor for health benefits.

Socially, crab cakes are a crowd-pleaser, making them an excellent choice for gatherings. Their finger-food nature means they can be enjoyed casually, sparking conversations and laughter among guests.

Lastly, this recipe offers a stellar cost-to-flavor ratio. While fresh crab can be an investment, making crab cakes at home allows you to control costs and ingredient quality, offering a dining experience comparable to upscale seafood restaurants without the hefty price tag.

Historical Background and Cultural Significance

Crab cakes trace their roots to the coastal communities of the United States, especially in Maryland, where they are a staple in the local cuisine. Traditionally made with blue crab, these cakes symbolize regional identity and the bounty of local waters. The recipe has evolved over time, with each community adding its twist, making crab cakes a beloved dish across the nation.

The cultural importance of crab cakes extends beyond just food; they represent communal gatherings, summer celebrations, and coastal life. They are often associated with family traditions and are a popular feature at local seafood festivals.

The evolution of crab cakes reflects changes in culinary preferences and ingredient availability. Originally simple and straightforward, modern interpretations often feature gourmet ingredients and innovative cooking methods, accommodating diverse palates and dietary needs.

Regional variations of crab cakes abound. In Louisiana, for example, you might find them spiced with Cajun seasoning, while in the Pacific Northwest, salmon may take center stage. Such adaptations highlight the versatility of this dish and its ability to harmonize with different culinary traditions.

Ingredient Deep Dive

Crab meat is the star of any crab cake recipe, delivering rich flavor and a delightful texture. Sourced from various types of crabs, including blue, king, and lump crab, each variety imparts its unique taste profile. When selecting crab meat, freshness and quality are critical; look for pasteurized crab in vacuum-sealed packages or freshly picked from local seafood markets. Proper storage involves keeping it refrigerated and consuming within a few days of purchase.

Bread crumbs serve as a binder and help create a crispy exterior for the crab cakes. You can opt for store-bought or make your own from stale bread, which can add freshness and different flavor nuances to the cakes. When storage is necessary, keep them dry in an airtight container to prevent spoilage.

Mayonnaise adds creaminess and moisture to the mixture and elevates the flavor. Consider using homemade mayonnaise or high-quality store-bought varieties to enhance the taste. Always keep mayonnaise refrigerated, and check for the expiration date on store-bought jars for safe consumption.

Fresh herbs like parsley or dill contribute brightness and freshness. They also enhance the visual appeal of crab cakes. When purchasing herbs, opt for vibrant and fragrant bunches. Store them in the refrigerator wrapped in damp paper towels or in containers to extend shelf life.

Lemon juice is key for brightening flavors, balancing the richness of crab meat, and providing a refreshing touch. Use freshly squeezed juice for maximum flavor. Store unused lemons in the fridge, and they’ll keep for several weeks.

Common Mistakes to Avoid

  • Overmixing the crab cake batter, which can lead to a compact texture instead of the desired lightness.
  • Using excess filler, such as breadcrumbs, which can overpower the crab flavor and result in dry cakes.
  • Not allowing the crab cakes to chill before cooking, which can cause them to break apart during frying.
  • Cooking at too high a temperature, which can burn the outside before the inside is fully cooked.
  • Neglecting to taste the mixture before cooking to ensure seasoning balance.
  • Using canned crab meat without checking for quality, as it can have a fishy taste.
  • Cooking too many at once, overcrowding the pan can lower the cooking temperature and result in uneven browning.
  • Failing to preheat the pan before adding the crab cakes, which is essential for achieving a crispy exterior.
  • Not using a non-stick skillet or enough oil, making it difficult to flip the cakes without damaging them.
  • Ignoring the resting phase after cooking, overlooking the benefits of letting them sit briefly for improved flavor.

Essential Techniques

To achieve perfect crab cakes, mastering the technique of gently folding the mixture is crucial. This method allows you to incorporate ingredients without breaking the delicate crab meat, ensuring a light and airy texture. Tools like a rubber spatula are recommended for careful folding.

Chilling the crab cake mixture prior to cooking is another essential step. This process solidifies the mixture, enhancing the cakes’ structure. Aim for at least 30 minutes of chilling time in the refrigerator to produce a firmer cake that holds together during cooking.

Pan-frying is the preferred cooking method for achieving that coveted crispy exterior. A medium-high heat ensures proper browning without burning. Visual cues, such as golden edges, indicate that the cakes can be flipped; use a non-stick skillet to achieve optimal results.

Lastly, shaping the crab cakes uniformly is important for even cooking; aim for a consistent size, roughly the diameter of a hockey puck. Using a cookie cutter can help achieve uniformity in shape, leading to an attractive presentation.

Pro Tips for Perfect Easy Homemade Crab Cakes

Selecting high-quality crab meat is essential for flavor and texture. Choose fresh crab from local seafood markets when possible, as it typically has better taste compared to canned versions.

Chilling the formed crab cakes for at least 30 minutes before cooking helps them maintain their shape during frying. This extra step is critical for achieving the desired texture and preventing them from falling apart.

Experiment with different seasonings to customize flavor profiles—Old Bay seasoning is a classic choice, but adding a dash of Worcestershire sauce can give an additional depth of flavor.

Utilizing both panko and traditional breadcrumbs in your mixture can create a delightful texture, offering a satisfying crunch without compromising the crab flavor.

Mixing in small amounts of finely diced vegetables, such as bell peppers or green onions, can introduce an exciting freshness and color to your crab cakes.

Serve warm with a squeeze of fresh lemon juice over the top for a refreshing and zesty finish that elevates the overall taste.

Prepare a batch ahead of time and freeze them raw. They can be cooked straight from the freezer, making dinner quick and convenient on busy nights.

Use a non-stick skillet and a decent amount of oil to ensure the cakes brown beautifully without sticking—this is key to achieving that perfect golden crust.

Variations and Adaptations

Regional variations can significantly enhance the traditional crab cake recipe. For a Southern spin, add diced jalapeños and serve with a spicy remoulade. In the Pacific Northwest, consider incorporating smoked salmon for a unique flavor twist that celebrates local seafood.

Seasonal adaptations also allow you to exploit the freshest ingredients available. During summer, fresh corn could be added to the mixture for sweetness and texture, while in fall, diced apples can contribute a delightful crunch.

For dietary modifications, gluten-free bread crumbs or almond flour can replace traditional breadcrumbs for a gluten-free version. Vegan crab cakes can be made from chickpeas or hearts of palm mixed with seafood-inspired seasonings to mimic flavors.

Flavor variations are abundant; consider incorporating unique spices such as curry powder or smoked paprika for a bold twist. These simple changes can create a new dining experience while still honoring the classic crab cake foundation.

Texture modifications might include adding finely chopped nuts for crunch or incorporating a creamy ingredient like sour cream to enhance moisture and richness. Lastly, for an eye-catching presentation, consider stacking crab cakes with fresh salad greens or mango salsa for visual appeal.

Serving and Presentation Guide

When plating your crab cakes, aim for a rustic yet elegant presentation. Arrange them on a large platter with garnishes like lemon wedges, fresh herbs, or microgreens to add a pop of color.

Consider garnishing with a dollop of tartar sauce or the aforementioned remoulade for added flavor and visual interest. Drizzling a homemade sauce in artistic patterns can elevate your presentation game.

Traditional accompaniments for crab cakes include coleslaw, a tangy side salad, or crispy potato wedges, providing a harmonious balance to the meal. For a modern twist, serve with avocado crema or a lime vinaigrette.

Temperature considerations are crucial for serving crab cakes; they are best enjoyed fresh and warm. If baking for a crowd, keep them warm in the oven at a low temperature.

Portion control is essential for serving; aim for 1-2 crab cakes per person as an appetizer and 2-4 as a main course, depending on the size of the cakes and accompanying dishes.

Wine and Beverage Pairing

Pair your Easy Homemade Crab Cakes with a crisp white wine, such as a Sauvignon Blanc or a chilled Chardonnay. The acidity of these wines beautifully complements the richness of the crab, enhancing the overall dining experience.

If you prefer non-alcoholic options, consider sparkling water with a splash of lemon juice or a refreshing iced tea infused with herbs and citrus. These beverages will cleanse the palate between bites without overwhelming the dish.

For coffee or tea pairings, try serving a light herbal tea, such as chamomile or mint, alongside your meal for an inviting balance to the rich flavors of the crab cakes. The key is to choose beverages that highlight the seafood without overshadowing its delicate flavor.

When serving wine, ensure it is chilled to the right temperature—white wines are best served between 45°F to 50°F—and provide wine glasses that allow the aromas to be appreciated.

Storage and Shelf Life

Crab cakes can be stored in the refrigerator for up to 3 days. To maintain freshness, place them in an airtight container once they have cooled completely after cooking.

If you need to store them longer, consider freezing the uncooked cakes for up to three months. Ensure they are well-wrapped in plastic wrap and placed in a freezer-safe bag to prevent freezer burn.

When reheating, avoid microwaving as it can make the cakes soggy; instead, bake at 350°F for about 10-15 minutes until heated thoroughly or pan-fry them briefly to restore crispness.

Signs of spoilage include an off odor, discoloration, or a slimy texture. Always check your crab meat for freshness before use and discard any cakes that exhibit these signs.

If you choose to freeze cooked crab cakes, they can last for about a month. Just make sure to cool them completely and wrap them tightly before placing them in the freezer.

Make Ahead Strategies

For efficient meal prep, you can assemble the crab cake mixture a few hours in advance, allowing the flavors to meld beautifully. Store it in an airtight container in the fridge until you’re ready to shape and cook.

Consider forming the cakes and chilling them before your gathering for a stress-free cooking experience. This way, you can simply cook them right before serving without spending time prepping.

When preparing in advance, keep the mixture separate from wet ingredients like sauces until closer to serving time, as this will ensure a fresh taste.

Quality impact should be assessed when considering make-ahead methods; crab cakes are best enjoyed fresh, so keep that in mind when planning.

Make sure to follow proper storage techniques to preserve the quality of your crab cakes, ensuring they remain delicious and appealing.

Scaling Instructions

Adjusting the recipe to serve more guests is straightforward—doubling or tripling the ingredients is often easily manageable, but watch for changes in cooking time for larger batches.

When halving the recipe, ensure your seasonings are proportionally adjusted to maintain flavor balance. For herb-heavy recipes like these, the halving may seem less significant than it is.

Use larger or additional cooking equipment as needed; this may involve using multiple skillets or a griddle for efficient cooking.

Timing modifications may be necessary for larger quantities, as they often require a longer cooking time to ensure even heating throughout the crab cakes.

Remember that storage considerations differ; ensure leftovers are properly cooled, packed, and labeled for later use, particularly if you plan to serve them later.

Nutritional Deep Dive

Examining the macro breakdown of these crab cakes, they are primarily composed of protein from the crab meat, making them an excellent choice for filling meals. Each serving boasts a generous protein content while remaining relatively low in fat.

From the micronutrient perspective, crab meat is rich in vitamins such as B12 and minerals like zinc, supporting overall health. It’s a nutritious option that can fit perfectly into a balanced diet.

The health benefits of consuming crab include its anti-inflammatory properties and the presence of Omega-3 fatty acids. These components contribute positively to brain and heart health, making crab cakes a wholesome meal option.

For dietary considerations, these crab cakes can be incorporated into various eating patterns, particularly those focused on high protein or low-carb diets, responding to the needs of diverse eaters.

A portion analysis suggests that two crab cakes usually account for a satisfying meal, especially when served alongside a light salad or vegetable dish. This balance helps maintain healthy portions without feeling deprived.

Dietary Adaptations

For those requiring gluten-free options, substituting traditional breadcrumbs with gluten-free alternatives is key, ensuring the cake remains hearty while accommodating dietary restrictions.

Dairy-free adaptations are simple, too; use dairy-free mayonnaise, or skip creamy ingredients entirely while ensuring flavor depth with extra spices and herbs.

To create vegan-friendly crab cakes, you can substitute crab meat with chickpeas or jackfruit, seasoning liberally to mimic the crab’s unique flavor profile and texture.

Low-carb and keto adaptations can involve replacing breadcrumbs with almond flour, which keeps the dish low in carbohydrates while providing necessary binding.

Paleo-friendly versions can focus on whole food ingredients, removing processed fillers like breadcrumbs and using seeds for binding instead.

Exploring low-FODMAP options means choosing ingredients carefully, avoiding high-FODMAP items like onions and garlic while still packing in flavor with herbs and shallots.

Troubleshooting Guide

When facing texture issues, consider adjusting the wet-to-dry ratio in your mixture. If cakes are too dry, adding a tablespoon of mayonnaise can remedy it. Conversely, if too wet, increasing breadcrumbs can help solidify the mixture.

To ensure proper flavor balance, always taste the mixture before cooking. If it seems lacking, consider adding several pinches of salt, pepper, or spices to enhance the overall taste.

Temperature problems can be avoided by cooking at medium heat. If the cakes are browning too fast, reduce the heat to allow for more even cooking without burning.

Equipment challenges can arise with sticky pans; ensure non-stick skillets are treated with oil or cooking spray before adding the cakes, reducing the risk of sticking and breaking.

Ingredient substitutions can lead to unexpected results; if you use different types of crab meat, remember that flavors may differ based on freshness and quality, impacting the final taste.

Timing concerns can be addressed by preparing your accompaniments in advance, allowing you to focus on the crab cakes, preventing rush cooking that could lead to compromised quality.

Recipe Success Stories

Community feedback often highlights how accessible this recipe is for both home cooks and novices alike. Many have expressed gratitude for the simple steps and basic ingredients that yield stunning results.

Variation successes inspire readers to tailor this crab cake recipe to personal tastes. From spicy iterations to those featuring seasonal veggies, creativity is encouraged and celebrated within the community.

Adaptation stories demonstrate how locals have infused regional flavors into the traditional crab cake, showcasing the versatility of the recipe while respecting its origins.

Photography tips shared amongst readers focus on capturing the golden-brown exterior and vibrant colors of the dish, emphasizing presentation as much as taste, thus making it appealing for social media sharing.

Recipe reviews are overwhelmingly positive, with community members eager to share their own twists on ingredients or accompaniments, sparking further conversation and ideas for upcoming meals.

Frequently Asked Questions

Q: Can I use frozen crab meat instead of fresh?
A: Yes, you can use frozen crab meat for your crab cakes. Just ensure it’s fully thawed and well-drained before using it in the recipe to maintain a great texture and flavor.

Q: What’s the best type of crab for these cakes?
A: While blue crab is traditional, lump crab or Dungeness crab works wonderfully as well, offering rich flavor and a nice texture. Always opt for high-quality crab meat to maximize taste.

Q: Can I bake these crab cakes instead of frying them?
A: Absolutely! For a healthier version, bake them at 375°F for about 25-30 minutes, flipping halfway through until they are golden brown and cooked through.

Q: How do I prevent my crab cakes from falling apart?
A: Ensure you allow your mixture to chill before cooking, as this helps the cakes hold their shape. Additionally, don’t overmix the ingredients, or they could become too dense.

Q: Can I make these crab cakes in advance?
A: Yes, you can prepare the mixture ahead of time and refrigerate or freeze uncooked crab cakes. Just ensure to thaw them completely before cooking to ensure even cooking.

Q: What can I serve with crab cakes?
A: Crab cakes pair excellently with tartar sauce, remoulade, or any light salad. Serve with sides like coleslaw, grilled vegetables, or even a refreshing pasta salad.

Q: Are these crab cakes suitable for freezing?
A: Yes, both cooked and uncooked crab cakes freeze well. Just ensure they are sealed properly in airtight containers or bags to prevent freezer burn.

Q: How long do leftovers last?
A: Cooked crab cakes can last in the fridge for 3-4 days when stored correctly in an airtight container. Reheat in the oven or skillet for the best results.

Q: Can I customize the herbs and spices?
A: Definitely! Feel free to experiment with different herbs and spices, such as dill, cilantro, or Old Bay seasoning. Adjust according to your flavor preferences!

Q: What’s the secret to perfect crispy crab cakes?
A: The secret lies in the right temperature and plenty of fat for frying. Make sure your pan is preheated and use ample oil to create that golden crust.

Additional Resources

For those passionate about cooking, exploring related recipes can lead to new culinary adventures. Consider trying easy shrimp fritters or a classic clam chowder as companions to crab cakes.

Technique guides focusing on how to select and prepare seafood can enhance your skills and boost your confidence in the kitchen, enriching your overall culinary repertoire.

Ingredient information is vital—understanding the best sources for crab meat, especially in your local area, can ensure you’re always cooking with the freshest options available.

Equipment recommendations might suggest investing in quality skillets, knives, or kitchen scales that can aid in preparing flawless dishes not just crab cakes.

Don’t overlook the potential for seasonal variations; experimenting with different ingredients based on the time of year can keep your meals exciting and flavorful.

Join the Conversation

Sharing your crab cake creations on social media is a fantastic way to inspire others to join in and try the recipe themselves! Engage with fellow cooking enthusiasts by sharing your photos or personal tips.

Photography tips are beneficial for showcasing your culinary masterpieces. Highlighting the golden-brown exterior of your crab cakes can inspire others to cook.

Don’t shy away from leaving reviews or comments about your experience with the recipe. Communities thrive on shared experiences and learn from one another’s successes and failures.

Engage with your audience by asking questions about their variations or accompaniments, fostering a sense of community and shared enthusiasm for cooking.

Creating a space for recipe adaptations encourages others to experiment and customize based on their taste preferences and dietary needs, fostering a creative cooking environment.

The Recipe

Easy Homemade Crab Cakes

Serves: 4

Prep Time: 15 mins

Cook Time: 20 mins

Total Time: 35 mins

Kitchen Equipment Needed

  • Mixing bowl
  • Non-stick skillet
  • Spatula
  • Measuring cups and spoons
  • Baking sheet (if baking)

Ingredients

  • 1 lb fresh lump crab meat
  • 1 cup breadcrumbs
  • 1/4 cup mayonnaise
  • 1 tablespoon Dijon mustard
  • 1 tablespoon Worcestershire sauce
  • 2 teaspoons lemon juice
  • 1/4 cup finely chopped fresh parsley
  • 1/4 teaspoon cayenne pepper (optional)
  • Salt and pepper to taste
  • Olive oil for frying

Directions

  1. In a mixing bowl, gently combine crab meat, bread crumbs, mayonnaise, mustard, Worcestershire sauce, lemon juice, parsley, cayenne pepper, salt, and pepper until just mixed.
  2. Form the mixture into patties (about 2-3 inches in diameter) and place them on a plate. Chill in the refrigerator for at least 30 minutes.
  3. Heat oil in a non-stick skillet over medium heat. When hot, carefully add the crab cakes; cook until golden brown, about 4-5 minutes per side.
  4. Transfer cooked crab cakes to a baking sheet lined with paper towels to absorb excess oil.
  5. Serve warm with lemon wedges and your choice of sauce!

Recipe Notes

  • For a gluten-free option, substitute traditional breadcrumbs with gluten-free breadcrumbs.
  • Feel free to add your favorite spices to the mix to customize the flavor!
  • If using frozen crab, ensure it is well drained and thawed before using.

Crispy Air Fryer Pork Chop Bites for Delicious Quick Meals

Crispy Air Fryer Pork Chop Bites: The Ultimate Snack Delight!

⚖️
Difficulty
Easy

⏲️
Prep Time
10 mins

🕒
Cook Time
15 mins

⏱️
Total Time
25 mins

🍽️
Servings
4

Elevate your mealtime with these Crispy Air Fryer Pork Chop Bites that are bursting with flavor and textures! Cooked to perfection in an air fryer, these bite-sized delights are not only savory but also healthier than traditional fried pork. Imagine taking a crispy morsel, featuring juicy pork enveloped in a golden, crunchy coating, and savoring every moment. Perfect for gatherings or a cozy evening at home, these pork chop bites will quickly become a family favorite!

The balance of spice, crunch, and tenderness makes these bites irresistible. With each bite, the smokiness of paprika and the subtle bite of garlic swathe your senses in a pleasant embrace. You’ll find yourself going back for more, whether as a snack, appetizer, or even a meal paired with your favorite sides. It’s time to bring out your air fryer and prepare for a culinary adventure!

Quick Recipe Highlights

  • Flavor Profile: Savory, slightly smoky, with a hint of garlic.
  • Texture: Crispy outside and tender within, creating a delicious contrast.
  • Aroma: Enticing notes of roasted garlic and warm spices fill the air.
  • Visual Appeal: Golden brown bites that look as tempting as they taste.
  • Skill Level Needed: Ideal for novice cooks and seasoned chefs alike.
  • Special Equipment: An air fryer is essential for that perfect crisp.

Recipe Overview

  • Difficulty Level: This recipe is straightforward, making it a breeze for cooks at any skill level to master.
  • Category: Perfect as an appetizer, snack, or casual dinner option.
  • Cuisine: These pork chop bites blend classic American flavors with modern air frying techniques.
  • Cost: Affordable ingredients come together to create a delicious family meal.
  • Season: Ideal for any time of year but perfect for gatherings during any season.
  • Occasion: Great for game day, parties, or casual family dinners.

Why You’ll Love This Recipe

The taste and texture appeal of these Crispy Air Fryer Pork Chop Bites are truly remarkable. Each bite delivers a punch of flavor from the well-seasoned coating that perfectly complements the pork. This unexpected combination captivates the taste buds and leaves a lingering satisfaction that is hard to resist. The crispy exterior creates a delightful crunch followed by the juicy, tender pork filling that melts in your mouth.

Convenience is key with this recipe; it requires minimal prep and cooking time, allowing you to whip up a delightful dish in just 25 minutes. The air fryer not only makes this method quick but also cuts down on excess oil, offering a healthier alternative without sacrificing taste. Imagine being able to serve up a snack or meal that everyone will love without spending hours in the kitchen.

When it comes to nutritional advantages, pork is a great source of protein, providing essential amino acids to fuel your body. These pork chop bites can be part of a balanced diet when served with fresh veggies or whole grains, creating a satisfying meal that includes protein, fiber, and essential vitamins. It’s a fantastic way to incorporate wholesome ingredients into your family’s diet.

Socially, these crispy bites are perfect for entertaining. Their bite-sized nature makes them ideal for sharing at parties, and they present beautifully on any platter. Guests will appreciate the bold flavors, leading to great conversations around the snack table. You’ll find that the Crispy Air Fryer Pork Chop Bites not only please the palate but also foster an enjoyable social atmosphere.

Cost-effectiveness is another highlight of this recipe. Using simple ingredients, you can create a delicious dish that serves several people without breaking the bank. This makes it a great option for families and budget-conscious cooks looking for flavor-packed ideas that don’t rely on expensive cuts of meat. Everyone deserves a tasty treat without overspending!

Historical Background and Cultural Significance

The origin of pork in culinary culture dates back to ancient times when it was one of the first domesticated animals. Across various cultures, pork has played a vital role in different recipes, reflecting the adaptability and versatility of this meat. In the southern United States, for example, pork dishes often bring a combination of flavors and cooking techniques that highlight regional uniqueness.

Culturally, pork holds symbolic meanings in certain traditions, often associated with good fortune and prosperity. The way pork is prepared and served can vary widely across regions, yielding a rich tapestry of flavors and techniques that influence modern recipes today. The rise of air frying as a cooking method revolutionizes how we enjoy traditional pork dishes, making them healthier and more convenient.

The evolution of crispy pork recipes can be seen in the growing popularity of air fryers in contemporary kitchens. These machines allow cooks to achieve a deep-fried texture without the need for excess oil, appealing to health-conscious individuals while satisfying cravings for crispy bites. This transformation has given rise to a new generation of pork recipes that are equally delicious and healthier.

Regional variations of pork chop recipes exist, often influenced by local ingredients and spices used in traditional cooking. This dish embodies that spirit, enabling everyone to tailor their pork chop bites to fit their taste preferences by incorporating local flavors, creating a delightful fusion that resonates with both heritage and modern culinary practices.

Ingredient Deep Dive

The primary ingredient in this recipe is pork chop, a cut revered for its rich flavor and tenderness. Pork has been a staple in many diets around the world due to its versatility—whether it’s roasted, grilled, or cooked in stews, it adapts well to various culinary styles. Nutritionally, pork is a good source of protein, vitamin B12, and iron. When selecting pork chops, look for cuts with a pink hue and firm texture, avoiding any signs of discoloration or excessive marbling.

To ensure freshness, store pork chops in the refrigerator for up to 3-5 days before cooking. If you won’t use them within that timeframe, freezing is a viable option that can maintain their quality. If substituting, consider skinless chicken breast or turkey slices, which mirror the traditional flavor profile while still delivering tenderness.

Next up, let’s talk about breadcrumbs, which are essential for creating that perfect crispy exterior. Breadcrumbs, made from crusty bread, provide texture and crunch, elevating the overall mouthfeel of the dish. They can be plain or seasoned, adding layers of flavor to each bite. When opting for gluten-free options, look for gluten-free breadcrumbs to accommodate dietary needs.

Lastly, spices like garlic powder and paprika are crucial for enhancing the flavor profile of the pork chop bites. Garlic powder provides a savory aroma and richness, while paprika contributes overall depth and warmth. When selecting spices, opt for fresh and high-quality options, as they greatly impact the finished dish’s flavor. Store spices in a cool, dark place to prolong their potency, and don’t hesitate to adjust the quantities to fit your personal taste preferences.

Common Mistakes to Avoid

  • Overcooking the pork chop bites which results in a dry texture. Use a meat thermometer to ensure an internal temperature of 145°F (63°C).
  • Using stale breadcrumbs can lead to a soggy coating. Ensure your breadcrumbs are fresh and crispy for the best texture.
  • Not seasoning adequately; a sprinkle of salt and pepper goes a long way in enhancing flavors.
  • Skipping the preheating step of the air fryer can lead to uneven cooking. Always preheat your air fryer for optimal results.
  • Overcrowding the air fryer basket will prevent proper air circulation, leading to less crispy bites. Cook in batches if necessary.
  • Inconsistent chopping sizes can affect cooking time. Cut pork into uniform pieces for even cooking.
  • Neglecting to let the pork rest after cooking can drain moisture. Allow the bites to rest for a few minutes before serving.
  • Using too much oil can lead to greasier bites. A light misting is sufficient for achieving that crispy finish.
  • Ignoring the choice of dipping sauce can dull the flavors. Pair with a complementary sauce for an enhanced taste experience.
  • Forgetting to check on the bites midway through cooking can lead to burnt edges. Monitor them to ensure they cook perfectly.

Essential Techniques

Prepping the pork to ensure even cooking is essential. Use a sharp knife to cut the pork chop into uniform bite-sized pieces, ensuring that they will cook evenly. It’s important to also pat the pork dry with paper towels before seasoning and breading to help the coating adhere better. This technique not only enhances flavor but also improves texture.

Mastering the air frying technique is vital. An air fryer circulates hot air, creating a crispy exterior similar to deep-frying but with far less oil. Familiarize yourself with the different settings and cooking times unique to your air fryer model for optimal results. Pay attention to visual cues—golden-brown color and a crispy coating indicate that your pork bite is ready to perfection.

Pro Tips for Perfect Crispy Air Fryer Pork Chop Bites

1. Ensure your air fryer is preheated before adding the pork bites to ensure they cook evenly from the start.

2. Experiment with breadcrumbs, trying different types such as Panko for an extra crunch.

3. Season the flour mixture in addition to the breadcrumbs for a more flavorful bite.

4. Lightly spray your pork bites with cooking oil before air frying for enhanced crispiness.

5. Allow for enough space around the pork bites in the air fryer basket to avoid steaming.

6. Use a meat thermometer to check the internal temperature for perfect doneness.

7. Pair the bites with a dipping sauce like honey mustard or spicy mayo for a delicious flavor contrast.

8. If you have leftovers, place them in a hot air fryer for a few minutes to revive their crispy texture.

Variations and Adaptations

Regional variations can introduce exciting new elements to your Crispy Air Fryer Pork Chop Bites. You might consider incorporating a Southern-inspired seasoning blend that includes cayenne or a Midwestern style with a hint of sage. Each addition will give a unique twist to the traditional recipe, showcasing local flavors and preferences.

Seasonal adaptations may call for fresh herbs during spring or summer, such as rosemary or thyme, which can be infused into the coating or served as a garnish. In the fall, adding a touch of pumpkin spice to your breadcrumb mixture could create a warm, inviting flavor that ties into seasonal gastronomic trends.

If dietary modifications are necessary, consider using alternative proteins like chicken or turkey for a lighter version. You could also go meatless with tofu or tempeh bites that can be seasoned and air-fried similarly, catering to vegetarian diets while still satisfying the craving for crispy bites.

For flavor variations, experiment with different spice blends. Perhaps a Mediterranean twist with oregano and lemon zest or an Asian-inspired approach using sesame seeds and five-spice powder could enhance the overall experience. Adjusting your spices is a fantastic way to keep this recipe fresh and exciting!

For texture modifications, you can switch from regular breadcrumbs to nut-based coatings for a more crunchy experience. Ground almonds or pistachios can provide an interesting nutty flavor while adding a delightful crunch to your bites.

Presentation alternatives include serving these pork chop bites on a vibrant platter adorned with fresh herbs or with colorful dipping sauces alongside. Presentation can elevate the dining experience and make the dish feel special and festive.

Serving and Presentation Guide

Plating techniques play a significant role in the presentation of your dish. Arrange the pork chop bites in a circular pattern on a large platter, creating an appealing visual effect. For added color and appeal, garnish with fresh parsley or cilantro around the border.

Garnishing ideas include serving with a sprinkle of finely chopped green onions for a fresh touch. Consider drizzling a sauce over the bites or serving a dipping sauce in a small bowl positioned in the center of the platter for easy access.

Traditional accompaniments, such as coleslaw or potato salad, can enhance the flavor profile while providing a balancing element to the meal. Modern serving suggestions could include a side of roasted vegetables or a light salad for a complete dinner experience.

Temperature considerations are essential when serving these bites. They are best served hot, straight from the air fryer, so aim to time your cooking to coincide with your meal serving. If necessary, keep them warm in a resting oven set at a low temperature.

When it comes to portion control tips, consider serving the pork chop bites in small bowls or baskets alongside a selection of sauces, encouraging guests to sample different flavors while maintaining mindful portions without overloading their plates.

Wine and Beverage Pairing

When it comes to wine pairings, a crisp white wine such as Sauvignon Blanc or a light-bodied red wine like Pinot Noir would complement the flavors of the pork chop bites beautifully. The acidity in white wine helps cut through the richness while providing refreshing counterpoints to the meat.

For non-alcoholic alternatives, sparkling water with a twist of lemon or a homemade iced tea with herbs can enhance the meal pairing without overpowering the flavor. These drinks have cleansing properties that refresh the palate between bites.

If interested in coffee pairings, consider sampling a lightly roasted brew that accentuates the dish’s savory notes. Be sure to serve the coffee at a warm temperature to maximize the flavor experience.

Storage and Shelf Life

The best storage methods for leftover Crispy Air Fryer Pork Chop Bites involve placing them in an airtight container to avoid moisture build-up. Store the bites in the refrigerator for up to 3 days for optimal freshness. For longer shelf life, consider freezing them in a single layer on a baking sheet before transferring them to a freezer-safe container or bag.

When it comes to temperature requirements, ensure the bites are cooled to room temperature before refrigerating a batch to preserve their texture. Use a container that allows for even distribution of the bites, preventing crushing during storage.

Signs of spoilage include an off smell or signs of discoloration. If the pork bites have been stored correctly, they should remain safe to eat within the suggested time frame. To reheat, place them back in the air fryer for about 5-7 minutes at 350°F (175°C) for the crispiest outcome.

If you decide to freeze your pork bites, they can last up to 2-3 months in the freezer. Be sure to label and date your containers for tracking. Avoid making multiple freeze-thaw cycles, as they can compromise quality. Reheating your frozen bites should also take place in the air fryer for best results.

Make Ahead Strategies

Prepare your pork chop bites up to 24 hours in advance by cooking, cooling, and then storing them. Simply reheat them in the air fryer right before serving for a quick and easy solution. For a step-by-step prep timeline, marinate your pork and bread the pieces while the air fryer preheats.

In addition to preparing the pork bites, consider storing dips and sauces in advance for quicker serving. Make any sauces a day ahead, ensuring they have nice flavor profiles when it comes time to enjoy your bites. This not only saves time but also enhances the flavors in your dips.

Quality impact analysis allows you to assess the difference in flavor between freshly cooked verses reheated bites. Leftovers may not have the same crispy texture but can still be incredibly delicious when reheated effectively. If you know you have a busy schedule, making the bites ahead of time will be to your advantage.

Use assembly tips by breading your pork but waiting to air fry until closer to mealtime. Store the prepped pork in the refrigerator until you’re ready to cook. By assembling ahead and cooking last minute, you preserve freshness.

Fresh element additions can include topping the pork bites with herbs right before serving to enhance the visual and flavor profile. This simple step can make all the difference in presentation and taste!

Scaling Instructions

For halving the recipe, simply reduce all ingredients proportionately, ensuring all seasonings and breadcrumbs maintain flavor integrity. You can save time and maintain quality while using smaller quantities of pork.

When doubling or tripling the recipe, work in batches to avoid overcrowding the air fryer. Adjust cooking time as needed, checking doneness with a meat thermometer to ensure each batch cooks evenly and reaches a safe internal temperature.

Equipment adjustments may involve using multiple trays or a larger air fryer model to accommodate the increased quantity of pork chop bites. Timing modifications should accompany any change in portion sizes, ensuring that none of the bites are left uncooked or overcooked.

Storage considerations include safely refrigerating or freezing extras. Duplicating a recipe can lead to freezing leftovers, so ensure you’re following proper guidelines. It’s essential to observe how leftovers reheat and the timings you need in the air fryer.

Nutritional Deep Dive

When analyzing the macro breakdown, consider the protein content of pork, which serves as an excellent building block for muscle repair and energy. Each bite delivers a satisfying amount of protein, typically around 20 grams in a typical serving size.

Micronutrient analysis showcases the importance of vitamin B12 and iron found in pork, essential for energy production and the formation of red blood cells. Inclusion of side dishes rich in vitamins will enhance nutritional value.

Health benefits advance when these pork bites are combined with colorful vegetables that supply additional fiber and antioxidants. Opting to serve the bites with a side salad contributes to a well-rounded meal.

Dietary considerations come into play regarding individuals who must monitor sodium intake. You can easily customize the recipe to suit sodium-restricted diets by adjusting the salt content or selecting low-sodium breadcrumbs.

Portion analysis entails noting that moderation is key; aim for balanced servings alongside wholesome sides to align with a healthy eating approach. Enjoy these savory bites while being mindful of portions!

Dietary Adaptations

For gluten-free variations, select gluten-free breadcrumbs or crushed gluten-free crackers to maintain the dish’s crunchy exterior. Using almond or coconut flour can also yield delightful results without gluten.

If looking for a dairy-free option, ensure none of the breadcrumbs contain dairy. This adaptation allows everyone to savor the dish without the concerns of lactose or dairy allergies.

Trying a vegan alternative can turn these Pork Chop Bites into a unique tofu or tempeh dish. Marinate and coat these plant-based proteins in similar spices and place them in the air fryer for a crispy finish.

Low-carb options may include using crushed pork rinds in place of traditional breadcrumbs. This adjustment lends itself to the keto lifestyle while keeping the dish flavorful and satisfying.

The paleo diet can be accommodated by using almond or coconut flour as a breading choice, omitting grains entirely while maintaining texture and flavor. Access to ingredients also enhances the overall nutritional profile.

For a low-FODMAP approach, ensure seasoning blends don’t include garlic or onion powder. There are various substitutions to introduce flavor without compromising dietary needs.

Troubleshooting Guide

If you experience texture issues with your pork bites, ensure you’re not overcooking them, as this can lead to dryness. Keep a close watch during cooking to achieve that crispy yet tender texture.

Flavor balance problems may crop up due to insufficient seasoning. Adjust spices during prep to ensure that pork is well-seasoned before cooking, following the advice within this recipe.

Temperature problems can arise if the air fryer is not preheated adequately. Ensure your air fryer has fully reached the desired temperature before adding your pork bites for the best results.

Equipment challenges come from overcrowding the air fryer basket. Cooking in smaller batches will ensure that hot air circulates properly, resulting in consistent cooking.

Ingredient substitutions may lead to unforeseen outcomes. Search for ingredient alternatives that don’t compromise flavor, ensuring you’re using effective swaps that work well with air frying.

Timing concerns usually stem from unfamiliarity with your air fryer model. Always refer to the manufacturer’s recommendations when attempting new recipes, especially regarding cooking times and temperatures.

Recipe Success Stories

Community feedback often highlights the delightful flavor combinations that this recipe offers. Many readers rave about how quickly these bites become a family favorite, encouraging them to make repeat appearances at mealtime.

Variation successes have led readers to experiment with different spice blends and dipping sauces, emphasizing the adaptability of this recipe. People have loved customizing their bites to suit their individual palettes, often sharing their favorite adaptations.

Adaptation stories showcase not just recipe modifications but also cooking experiences, where parents involve children in the cooking process. Involving family members in meal prep often creates lasting memories in the kitchen.

Reader suggestions often revolve around making the recipe even simpler, collaborating on ideas to improve efficiency and cooking techniques for the busy home cook. They’ve also shared tips on meal prepping, providing insight into how best to enjoy these bites throughout the week.

Frequently Asked Questions

Can I use chicken instead of pork? Absolutely! Chicken breasts or thighs can be substituted using similar methods and flavors. Just adjust cooking times as needed based on the thickness of the pieces.

What dipping sauces work best? Sauces like honey mustard, ranch, or spicy mayo enhance the flavor of the pork bites. Feel free to get creative and mix your favorite condiments!

Can I freeze the cooked pork bites? Yes, you can freeze the bites! Ensure they are cooled completely before placing them in an airtight container for up to 2-3 months.

How do I reheat leftovers? For the best texture, reheat in the air fryer at 350°F (175°C) for about 5-7 minutes until warmed through and crispy again.

What type of air fryer is best for this recipe? Any standard air fryer will work well for this recipe. Adjustable temperature settings and adequate basket size contribute to the best results.

Can I make these bites ahead of time? Yes! Prepare and bread the pork bites in advance. Store them in the refrigerator and air fry just before serving.

What are good side dishes to serve with pork bite? Pair these bites with a fresh green salad, roasted vegetables, or some classic coleslaw for a full meal experience.

Are these bites gluten-free? You can make them gluten-free by using gluten-free breadcrumbs or almond flour as a coating instead.

Is it better to marinate the pork before cooking? Marinating can enhance flavor but is not mandatory. Seasoning the pork just before coating works well too.

Can I use a different protein for this recipe? Yes, other proteins like tofu or even seitan can be used, making them versatile for various dietary needs.

Additional Resources

If you enjoyed making Crispy Air Fryer Pork Chop Bites, you may want to check out related recipes like air fryer chicken wings, shrimp tempura, and vegetable fritters. Exploring these dishes can elevate your cooking repertoire.

Technique guides focused on air frying will provide you with tips, best practices, and troubleshooting for a variety of recipes. Knowing how the air fryer functions can maximize your creativity in the kitchen and help you achieve crispy perfection every time.

Ingredient information resources can lead you deeper into understanding the varieties of meat, breadcrumbs, and spices that will enhance your cooking. Knowing your ingredients not only makes you a better cook but allows for informed choices to suit dietary preferences.

If you need more equipment recommendations, consider researching air fryers with higher capacity or additional functionality that can serve a broader range of dishes and cooking styles. It’s a worthwhile investment for any cooking enthusiast.

Lastly, seasonal variations can inspire new ideas for how to incorporate seasonal fruits or veggies into your meals, keeping your cooking style fresh and creative throughout the year!

Join the Conversation

Sharing your cooking experiences, including photos of your crispy pork bites, creates a vibrant community. Engaging with others on social media helps create a network of sharing tips and ideas, as well as receiving feedback on your culinary adventures.

If you’ve tried this recipe and loved it, consider leaving a review or comments so other home cooks can get inspired as well! Encouragement from fellow cooks often leads to fruitful exchanges and ideas.

Photography tips are essential when showcasing your dishes online. Use natural light and experiment with angles to capture the beauty of your crispy pork bites. Sharing eye-catching images can draw others into discovering this exciting recipe.

Finally, encourage community engagement by initiating discussions about variations. What have others done to enhance their pork bites? Sharing adaptations opens doors to new ideas and creative cooking techniques!

The Recipe

Crispy Air Fryer Pork Chop Bites

Serves: 4

Prep Time: 10 mins

Cook Time: 15 mins

Total Time: 25 mins

Kitchen Equipment Needed

  • Air Fryer
  • Cutting Board
  • Sharp Knife
  • Mixing Bowls
  • Drying Paper Towels

Ingredients

  • 1 lb pork chops, cut into bite-sized pieces
  • 1 cup breadcrumbs
  • 1/2 cup flour
  • 2 tsp garlic powder
  • 1 tsp paprika
  • Salt and pepper to taste
  • 1 egg, beaten
  • Cooking spray

Directions

  1. Preheat the air fryer to 400°F (200°C).
  2. In a mixing bowl, combine breadcrumbs, garlic powder, paprika, salt, and pepper.
  3. Coat pork pieces in flour, then dip into the beaten egg, and finally roll in the breadcrumb mixture.
  4. Arrange the coated pork bites in the air fryer basket in a single layer, ensuring they are not crowded.
  5. Lightly spray the bites with cooking spray to promote crispiness.
  6. Air fry for 12-15 minutes, turning halfway through, until the bites are golden brown and cooked through.
  7. Remove from the air fryer, allow to rest for a few minutes, and serve with your choice of dipping sauce.

Recipe Notes

  • Feel free to adjust spices based on your preference.
  • Consider marinating the pork for extra flavor before breading.
  • These bites may also be made ahead of time and frozen for later enjoyment.

Delicious Fried Cornbread Fritters Recipe for a Perfect Snack

Fried Cornbread Fritters Recipe: A Southern Delight

⚖️
Difficulty
Easy

⏲️
Prep Time
15 mins

🕒
Cook Time
20 mins

⏱️
Total Time
35 mins

🍽️
Servings
4 servings

If you’re craving a delicious and comforting treat, look no further than this Fried Cornbread Fritters recipe. These golden-brown fritters are crispy on the outside and soft on the inside, offering a perfect balance of flavors. Made from simple pantry ingredients, they provide a taste of Southern cooking that’s both nostalgic and satisfying. Ideal as a snack, side dish, or even a light meal, these fritters are sure to bring a smile to your face.

The aroma of frying cornmeal combined with spices fills your kitchen, tempting anyone nearby with its warm, inviting scent. Each bite reveals a delightful crunch, followed by the tender chew of cornbread that melts in your mouth. Served fresh and hot, these fritters complement everything from spicy chili to a refreshing salad. You’ll find that they can easily steal the show at any gathering or cozy family dinner!

Quick Recipe Highlights

  • Flavor Profile: Expect a rich, buttery flavor with a subtle sweetness complimented by a hint of jalapeño heat.
  • Texture: These fritters provide a delightful crispy exterior that gives way to a moist, fluffy interior.
  • Aroma: The sweet, nutty scent of cornmeal intertwined with spices creates an irresistible kitchen fragrance.
  • Visual Appeal: Golden-brown fritters are visually stunning, often garnished with fresh herbs or served alongside colorful dips.
  • Skill Level Needed: Perfect for beginners, but even seasoned chefs will enjoy making this easy dish.
  • Special Equipment: No extensive equipment needed—just a frying pan or deep fryer for perfect results.

Recipe Overview

  • Difficulty Level: This Fried Cornbread Fritters recipe is considered easy, making it approachable for cooks of all skill levels.
  • Category: This recipe fits perfectly into snack foods, appetizers, or side dishes, bringing versatility to your meal plans.
  • Cuisine: Fritters have deep roots in Southern American cuisine, drawing on traditions that celebrate corn as a staple ingredient.
  • Cost: Ingredients are budget-friendly, typically costing under $10 to make a batch.
  • Season: Ideal for all seasons, but especially winter gatherings where comfort food is a must.
  • Occasion: Perfect for family parties, casual get-togethers, or cozy weeknight dinners with friends.

Why You’ll Love This Recipe

First and foremost, the taste and texture of these fried cornbread fritters are simply irresistible. The buttery flavor paired with just the right amount of sweetness creates a mouthwatering treat that satisfies every craving. The contrast of crispy outside and fluffy inside keeps you coming back for more, making them an instant favorite for both kids and adults. Enjoy them plain, or dip them in your favorite sauce for added fun!

Convenience is another reason to love this fried cornbread fritters recipe. With a quick prep time of only 15 minutes and a cook time of 20 minutes, you can have a delicious snack or side dish ready to serve in under an hour. Minimal cooking experience is needed, so even novice cooks can tackle this recipe with success, making it a great option for busy weeknights.

Let’s not forget about the nutritional advantages. Cornmeal is enriched with fiber, vitamins, and minerals, making these fritters a more wholesome choice than some fried alternatives. Paired with tasty veggies or served with a fresh salad, they can contribute to a balanced meal without compromising flavor.

Entertaining made easy! These fritters are an excellent addition to any gathering. Their bite-sized nature encourages sharing and socializing around the table. Serve them at parties, and watch as guests rave about them while enjoying the hearty flavor they bring. They also pair splendidly with various dips and sauces, allowing for customization to suit everyone’s taste.

Finally, the affordability of this recipe ensures that you can enjoy a taste of home without breaking the bank. With simple ingredients that you can find at any grocery store, creating these delightful fritters is not just delicious—it’s easy on the wallet, too!

Historical Background and Cultural Significance

The origins of cornbread date back to Indigenous people in North America, who cultivated corn long before the arrival of Europeans. Cornmeal became a staple ingredient for many Southern households, leading to the creation of numerous dishes, including fritters. Over generations, the recipe for fried cornbread fritters evolved, integrating regional flavors and ingredients that highlight the diversity of Southern cooking.

Culturally, cornbread holds a special place in Southern tables, often associated with family gatherings, church events, and celebratory feasts. The act of cooking and sharing these dishes reinforces community bonds, inviting friends and family to gather around for hearty meals and stories from the past.

The evolution of the fritters themselves showcases regional variations, such as the addition of peppers, cheese, or spices reflecting local tastes. Each family often has its unique take on fried cornbread fritters, showcasing personal and cultural narratives that enrich the dish’s history.

Regional variations of corn fritters can be found across the South, from Louisiana-style with a kick of Cajun spices to sweet versions found in desserts. Each recipe tells a story—of the land, the people, and the evolving culinary arts that continue to bring together communities around delicious food.

Ingredient Deep Dive

Cornmeal: As the primary ingredient in these fritters, cornmeal is not only versatile but also rich in fiber and essential nutrients. When selecting cornmeal, look for stone-ground varieties for the best flavor and texture. Store it in an airtight container in a cool, dry place to maintain freshness, and consider using it in other dishes like cornbread or polenta.

Corn kernels: Fresh, frozen, or canned corn can be used in fritters to add flavor and texture. When using fresh corn, select ears that are plump and brightly colored. Corn is low in calories, rich in vitamins A and B, and provides a satisfying sweetness that enhances the overall taste of the fritters. If you find yourself with a surplus, cooked corn can be stored in an airtight container and frozen for up to six months.

Common Mistakes to Avoid

  • Overmixing the batter can result in dense fritters instead of light and fluffy ones—mix until just combined for the best results.
  • Heating the oil to the wrong temperature may lead to soggy fritters. Ensure the oil is hot enough before adding the batter and adjust heat as needed.
  • Not letting the fritters drain on paper towels can make them greasy—it’s essential to remove excess oil for better texture.
  • Frying too many fritters at once can drop the oil temperature, leading to unevenly cooked fritters. Fry in small batches to maintain a consistent temperature.
  • Using stale ingredients, especially cornmeal, can negatively affect the flavor. Always check for freshness before cooking.
  • Not seasoning the batter can lead to bland fritters. Adding salt and spices enhances the overall flavor profile.
  • Skipping the resting time for the batter can result in less fluffy fritters. Allow the mixture to sit for a bit before frying.
  • Forgetting to prepare the cooking area can result in a messy kitchen. Lay out all utensils and ingredients beforehand to streamline the process.
  • Using low-quality oil can impart undesirable flavors to the fritters. Select oils with high smoke points for frying, such as vegetable or canola oil.
  • Not storing leftovers properly can lead to spoilage. Always refrigerate uneaten fritters and follow reheating instructions to maintain flavor and texture.

Essential Techniques

Frying: This technique is crucial for crispy fritters. Ensure oil is heated to around 350°F (175°C) for optimal frying results. To master this, use a thermometer and test with one fritter before adding more to the pan. Watch for a golden-brown color as a cue for doneness.

Mixing batter: Proper mixing ensures the right consistency. Mix until the wet and dry ingredients just come together to prevent overworking the batter, which can lead to tough fritters. The batter should be somewhat chunky—avoid a smooth consistency for ideal results.

Pro Tips for Perfect Fried Cornbread Fritters

1. Use freshly ground cornmeal for enhanced flavor and texture. The fresher the cornmeal, the richer the taste in your fritters.

2. Experiment with spices—add cayenne or smoked paprika for an extra kick if you’re adventurous!

3. Try fresh herbs like chives or parsley to elevate the flavor further. Mix them into the batter for a fresh taste.

4. Pair fritters with a zesty dipping sauce, such as a lime crema or spicy remoulade, to balance flavors beautifully.

5. Adjust the frying time based on the size of your fritters; smaller ones cook quicker, so monitor them to avoid burning.

6. If you have leftovers, reheat them in the oven for crispiness rather than the microwave, which can make them soggy.

7. Keep the fritters warm in an oven set to low heat while you finish frying the remaining batches.

8. For added sweetness, consider adding a touch of honey or a sprinkle of sugar to the batter for dessert-like fritters.

Variations and Adaptations

One popular variation includes adding cheese, such as cheddar or pepper jack, to the batter for a creamy, savory twist. Alternatively, you can make them sweeter by including corn kernels and a dash of sugar, turning the fritters into a delightful dessert option. Additionally, experimenting with different spices can offer unique tastes, such as cumin for a more earthy flavor.

Seasonal adaptations are also possible; in summer, try incorporating fresh herbs or zucchini to add freshness to the dish. For a heartier winter option, mix in cooked bacon bits or sausage for a comforting twist. Adapting the fritters to fit dietary needs, such as gluten-free options using corn flour, is another way to enjoy this recipe without compromising flavor.

Texture modifications can be done to make them lighter or denser—baking instead of frying or using mashed potatoes in the mixture for a unique twist. Lastly, for presentation, consider forming them into dipper shapes and serving with colorful, vibrant dips for an enticing appetizer spread.

Serving and Presentation Guide

Plating techniques can make a significant difference in presentation. Arrange fritters in a circle on a platter, drizzling a complementing sauce in the center, or stack them high for a fun visual effect. Garnishing with fresh herbs or a sprinkle of cheese will elevate your dish to restaurant-worthy status.

Traditional accompaniments to serve alongside these fritters include leafy greens or a simple coleslaw, which adds a fresh crunch. Modern serving suggestions may include side dishes, such as roasted veggies or a bed of grains like quinoa for balanced plating. Pay attention to temperature; fritters are best served hot, so keep them warm in the oven until ready to serve.

Wine and Beverage Pairing

For wine pairings, consider a light Chardonnay or Pinot Grigio, which complements the flavors without overwhelming them. If you’re a red wine enthusiast, a light-bodied Pinot Noir can work wonderfully as well. For non-alcoholic alternatives, try a refreshing iced tea or sparkling lemonade to cut through the richness of the fritters.

Storage and Shelf Life

To store leftover fritters, place them in an airtight container in the refrigerator, where they should last for up to three days. For longer storage, freeze fritters by placing them on a baking sheet until solid, then transfer to a freezer bag. Signs of spoilage include an off smell or discoloration; always check before consuming.

Reheating is simple—microwave for a quick option, but for best texture, bake in the oven at 350°F (175°C) for about 10-15 minutes until heated through. You can also re-fry them briefly in a skillet for that crispy freshness.

Make Ahead Strategies

To save time, prepare your fritter batter a few hours in advance, allowing the flavors to meld. This will reduce the prep time when you’re ready to cook. Store the batter in the fridge, covered, until you’re ready to fry. Ensure to stir the batter before proceeding with cooking.

If needed, you can fry the fritters and then cool them on a wire rack before storing them in the fridge. Reheating them is easy, but ensure to avoid any sogginess by following proper reheating guidelines. For extra freshness, consider adding chopped herbs or grated cheese when ready to serve.

Scaling Instructions

Halving the recipe is easily achievable by reducing each ingredient accordingly, maintaining the ratios. If doubling or tripling, ensure your frying pan or deep fryer can accommodate the increased quantity without overcrowding, which could result in uneven cooking.

Make adjustments to cooking times as needed, as larger batches may take slightly longer to cook through. Store leftovers in airtight containers to maintain quality, and implement safety guidelines for storage and reheating for best results.

Nutritional Deep Dive

These fried cornbread fritters provide a delightful balance of macronutrients, featuring carbohydrates from cornmeal and proteins mainly from any added components. A typical serving contains moderate calories, making them suitable as a snack or side without excessive indulgence.

Micronutrient-wise, the fritters provide vitamins B and C, essential for maintaining energy levels and supporting the immune system. Adding vegetables or herbs can increase the nutritional content significantly, offering more fiber and essential nutrients, making them even more beneficial.

Dietary Adaptations

For a gluten-free version, simply substitute cornmeal with gluten-free corn flour. To cater to dairy-free diets, use almond milk or other non-dairy milk instead of regular milk in the batter. Vegans can also enjoy these fritters by ensuring the additional ingredients are plant-based.

For low-carb diets, consider reducing the cornmeal and incorporating almond flour instead, allowing for a low-carb option while still enjoying the flavors of the fritters. Adapting to various dietary needs can ensure everyone has a chance to enjoy this scrumptious recipe!

Troubleshooting Guide

If your fritters end up too dense, it may be due to overmixing the batter or using too much cornmeal. To rectify, consider adjusting your ingredients in future batches. If they come out oily, ensure your oil is hot enough before frying, and don’t overcrowd the pan.

Flavors falling flat can often be fixed by adding more seasoning or a splash of acid—lemon juice can brighten up the taste significantly. Watch for temperature issues while cooking; use a thermometer to maintain proper frying temperatures for best results.

Recipe Success Stories

Many cooks have shared their excitement after trying this fried cornbread fritters recipe, praising its simplicity and deliciousness. Community feedback often highlights how versatile these fritters are, with variations enjoyed by all who try them. Adaptation stories abound, with readers experimenting with different spices, cheeses, and serving styles.

Photography tips often encourage capturing the golden-brown fritters while serving on vibrant plates, surrounded by fresh garnishes. The visual appeal of the dish plays a crucial role in showcasing its deliciousness to friends and family, inviting them to join in on the culinary joy!

Frequently Asked Questions

Can I use white cornmeal instead of yellow? Yes, both types of cornmeal work well. The choice often comes down to personal preference in flavor and color.

What can I dip these fritters in? Fritters pair deliciously with a variety of dips such as sour cream, salsa, or avocado dip.

Can I bake these instead of frying? While frying gives them a distinct crispiness, you can bake them at a high temperature for a healthier option.

Is there a way to make these fritters spicier? Absolutely! Adding diced jalapeños or a pinch of cayenne pepper will amp up the heat significantly.

How should I store leftover fritters? Refrigerate them in an airtight container and enjoy them within three days for the best quality.

Are these fritters suitable for freezing? Yes, you can freeze cooled fritters in a single layer before transferring them to a freezer bag for longer storage.

What side dishes go well with fritters? They pair excellently with salads, soups, or a robust chili—making a great combo for meal planning.

Can I add different vegetables to the fritters? Certainly! Chopped bell peppers, green onions, or spinach could be fantastic additions for flavor and nutrition.

Are fried cornbread fritters gluten-free? Regular cornmeal is gluten-free, but always check the package to ensure no gluten-containing grains were included.

How long do I need to let the batter rest? Allowing it to rest for about 15 minutes can enhance texture and flavor, providing better results.

Additional Resources

For more treat options, consider exploring our extensive related recipes on the blog. Also, check out our technique guides for perfect frying and storage methods to elevate your culinary skills. Explore ingredient information to enhance your dish further, and find equipment recommendations for kitchen essentials necessary for making these fried cornbread fritters.

Join the Conversation

We invite you to share your experience with this fried cornbread fritters recipe! Engage with us over on social media by posting your successes and variations. Join our community of cooking enthusiasts as we explore shared recipes and ideas that inspire creativity in the kitchen. Your feedback and tips help to enrich our community, fostering a love for delicious and unique culinary creations!

The Recipe

Fried Cornbread Fritters

Serves: 4 servings

Prep Time: 15 mins

Cook Time: 20 mins

Total Time: 35 mins

Kitchen Equipment Needed

  • Large mixing bowl
  • Frying pan or deep fryer
  • Spatula or slotted spoon
  • Measuring cups and spoons
  • Cooking thermometer

Ingredients

  • 1 cup cornmeal
  • 1/2 cup all-purpose flour
  • 1 tsp baking powder
  • 1/2 tsp salt
  • 1 cup milk
  • 1 egg
  • 1 cup corn kernels (fresh or frozen)
  • 1-2 tbsp diced jalapeños (optional)
  • Vegetable oil (for frying)

Directions

  1. In a large bowl, combine cornmeal, flour, baking powder, and salt.
  2. In a separate bowl, whisk together milk and egg. Add to the dry ingredients and mix until just combined.
  3. Fold in corn and jalapeños, if using.
  4. Heat oil in a frying pan over medium heat until hot.
  5. Drop spoonfuls of batter into the hot oil, frying in batches to avoid overcrowding.
  6. Cook for 2-3 minutes each side, or until golden brown. Transfer to a paper towel-lined plate to drain excess oil.
  7. Serve warm with your favorite dipping sauce.

Recipe Notes

  • For added richness, substitute milk with buttermilk.
  • Feel free to experiment with different cheeses or spices for varied flavors.
  • Store leftovers in an airtight container in the fridge for up to 3 days.

Indulge in Garlic Butter Steak Bites with Parmesan Cream Sauce

Garlic Butter Steak Bites with Parmesan Cream Sauce: A Decadent Treat

⚖️
Difficulty
Easy

⏲️
Prep Time
15 mins

🕒
Cook Time
10 mins

⏱️
Total Time
25 mins

🍽️
Servings
4

Garlic Butter Steak Bites with Parmesan Cream Sauce is an indulgent and delicious dish that brings the rich flavors of steak to your dinner table in a matter of minutes. The tender meat, seared to perfection, is coated in a fragrant garlic butter sauce that amplifies its natural flavors, while the creamy Parmesan sauce provides a luxurious finish. Whether you’re cooking for a weeknight meal or hosting a special occasion, these steak bites are sure to impress.

The combination of umami-rich steak, aromatic garlic, and rich Parmesan creates a flavor explosion that tantalizes your taste buds. Each bite is succulent, juicy, and perfectly complemented by the creamy sauce, making this dish not only a treat for the palate but a feast for the eyes as well. Serve these steak bites over a bed of mashed potatoes or alongside fresh veggies for a complete meal that satisfies both your hunger and your desire for flavor.

Quick Recipe Highlights

  • Flavor Profile: The rich and buttery garlic flavor pairs beautifully with the savory steak and the sharpness of the Parmesan.
  • Texture: Expect a tender bite from the steak contrasted with a creamy sauce that envelops it for a delightful mouthfeel.
  • Aroma: The enticing scent of garlic sizzling in butter fills your kitchen, promising a memorable dining experience.
  • Visual Appeal: The dish boasts a gorgeous golden-brown exterior with a delectable, creamy white sauce poured generously over it.
  • Skill Level Needed: Perfect for beginners, this recipe requires basic cooking skills and minimal preparation.
  • Special Equipment: A cast-iron skillet or a heavy frying pan works best for searing the steak bites.

Recipe Overview

  • Difficulty Level: This recipe is rated as easy, making it an ideal choice for novice cooks who want to make a delicious meal without extensive culinary skills.
  • Category: This dish fits perfectly into the dinner category, suitable for both family meals and special occasions.
  • Cuisine: Inspired by American cuisine, this dish features classic steak preparations melded with Italian influences through the use of Parmesan cheese.
  • Cost: An approximate cost breakdown makes this dish affordable, with steak and cheese being the main expenses, typically amounting to around $15 to $20 for four servings.
  • Season: While hearty enough for any season, the richness of the butter and cream makes it especially comforting in the cooler months.
  • Occasion: Great for date nights, family dinners, or even casual gatherings with friends, these steak bites are guaranteed to be a hit.

Why You’ll Love This Recipe

Garlic Butter Steak Bites with Parmesan Cream Sauce offer a tantalizing blend of flavors and textures that truly captures the essence of comfort food. Each bite bursts with the rich, buttery flavor of garlic while the steak provides a satisfying chew. The creamy sauce ties everything together, ensuring that you get a harmonious mix of flavors with every mouthful. This is a meal where every bite makes you want to indulge further, so be prepared to fall in love with it.

Convenience is another fantastic aspect of this recipe. With minimal prep and cook time, you can whip up a gourmet-style dish with ease. Perfect for busy weeknights or last-minute dinner parties, it allows you to enjoy a restaurant-quality meal without a long wait. Plus, you can have this delightful dish on the table in under half an hour.

Nutritionally, while this dish is indulgent, it does provide protein from the steak and beneficial fats from the butter and cream. Pair it with vegetables or a fresh salad to create a balanced meal. This dish can help fuel your body while also being a delightful treat, making it a versatile option to include in your meal rotation.

Socially, serving Garlic Butter Steak Bites is a sure way to impress your guests. The ease of preparation and the sumptuousness of the dish mean that you can focus on enjoying time with friends and family while relishing the compliments you’ll receive. This dish cold sparks lively conversation around the table, making your dining experience more memorable.

Lastly, cost-effectiveness is a clear highlight of this recipe. Sourcing quality steak doesn’t necessarily mean spending a fortune. Opting for more economical cuts can bring down the cost significantly, making this dish accessible for most home cooks. With such flavorsome results from relatively simple ingredients, it’s a win-win situation in any home kitchen.

Historical Background and Cultural Significance

The origins of steak bites trace back to a love for perfectly cooked beef, prevalent in many cuisines worldwide. Steak itself has a deep-rooted history, being a symbol of indulgence and celebration in various cultures, particularly in the United States where barbecues and grilling are essential aspects of culinary tradition. The practice of cutting steak into bite-sized pieces allows for quicker cooking, making it both practical and appealing for lives that are often fast-paced.

Culturally, steak bites may not only reflect a desire for delicious food but also the sense of community that comes from sharing a meal. In many traditions, preparing and enjoying beef dishes has brought families together, ensuring that the act of sharing food becomes a bonding experience. This recipe embraces that heritage, creating an opportunity for families and friends to gather around the table.

With time, the evolution of this dish has embraced new flavor profiles and cooking techniques. Incorporating global influences such as the creamy Parmesan sauce has added a contemporary twist, allowing home cooks to diversify their menus. This evolution reflects the dynamic nature of cooking where creativity and tradition go hand in hand.

Regional variations of steak bites can be found, showcasing how different cultures interpret the idea of bite-sized beef. From Asian marinated steak bites to Latin-style churrasco, these adaptations highlight the versatility of the basic concept, ensuring that steak bites can suit a myriad of palates and preferences.

Ingredient Deep Dive

Steak, a primary ingredient in this dish, enjoys cultural significance across many societies. It represents indulgence in Western cultures, where it is often featured in celebratory meals. Nutritionally, steak is an excellent source of protein, vitamins B12 and B6, iron, and zinc. When selecting steak for this recipe, look for cuts that are tender yet flavorful, like sirloin or ribeye. Store your steak in the coldest section of the fridge and consume it within a few days, or freeze for longer storage. If you need a substitute, consider using chicken or pork tenderloin, adjusting cooking times accordingly.

Butter is another key ingredient that enhances flavor and richness. Its historical roots tie back to ancient civilizations where it was prized for its versatility and flavor. Nutritionally, butter contains fat-soluble vitamins, although it should be consumed in moderation due to its calorie density. When selecting butter, opt for unsalted to have better control over the saltiness of the dish. Store it in the refrigerator, well-wrapped to maintain freshness. If you need a dairy-free option, you can use ghee or olive oil, keeping in mind that the flavor profile of the dish may slightly change.

Parmesan cheese brings an exceptional richness to the cream sauce, ultimately enhancing the overall depth of the dish. Originally from Italy, Parmesan cheese is revered for its sharp flavor and granular texture. It provides calcium and protein and can elevate even the simplest recipes. When purchasing, choose a block of cheese for the best flavor, and store it in an airtight container in the fridge. If you’re looking for substitutes, Pecorino Romano can offer a similar sharpness, while nutritional yeast serves as a dairy-free alternative.

Common Mistakes to Avoid

  • Overcooking the steak: It’s essential to sear the steak quickly to maintain its tender texture. Use a meat thermometer for precision.
  • Using cold ingredients: Starting with cold butter or cream can lead to a separated sauce. Allow these ingredients to come to room temperature for better emulsification.
  • Skipping the resting period: After cooking the steak, let it rest for a few minutes before slicing. This helps retain the juices.
  • Too much salt: It’s easy to oversalt when the sauce thickens. Add salt gradually to achieve the desired flavor without overwhelming the dish.
  • Using too much heat: Cooking on too high a heat can char the outside while leaving the inside undercooked. Medium-high heat is typically best for steak bites.
  • Piling the steak into the pan: Overcrowding the pan prevents proper browning. Cook in batches if necessary for a better sear.
  • Neglecting to taste as you go: Regularly tasting your dish helps you make adjustments and ensures balanced flavors.
  • Settling for pre-grated cheese: Pre-grated Parmesan lacks the rich flavor of fresh cheese. Always grate your cheese just before using to capture its full taste.
  • Insufficient sauce: Not making enough cream sauce can result in a dry meal. Ensure you’re preparing an ample amount to coat the steak bites nicely.
  • Choosing the wrong cut of meat: Opt for tender cuts like sirloin for the best results. Tougher cuts will affect both the cooking time and texture.

Essential Techniques

Searing meat is a crucial technique that ensures a flavorful crust. This method involves cooking the steak over high heat to create a Maillard reaction, enhancing the dish’s overall flavor. To master this, preheat your skillet until it’s hot, then add the meat without overcrowding. Look for a rich brown color to know your steak is developing the desirable crust—this should take just a few minutes. Avoid moving the steak around too much; let it sit and develop that essential sear.

Making a cream sauce involves bringing together ingredients in a way that creates a smooth, cohesive sauce. Start with a roux by cooking butter and flour until golden, then slowly add your liquid while whisking to prevent lumps. Aim for a gentle simmer to allow the sauce to thicken without boiling, which can cause it to separate. Monitor the consistency closely, as dairy-based sauces can thicken quickly. A well-made cream sauce enhances flavor and adds a velvety texture that is delightful with steak.

Pro Tips for Perfect Garlic Butter Steak Bites with Parmesan Cream Sauce

To get the best sear, ensure your meat is at room temperature before cooking, allowing for more even cooking throughout. Use a combination of butter and oil for sautéing; this prevents burning and helps achieve a lovely golden brown. Always check doneness using a meat thermometer—aim for 130°F for medium-rare, which remains juicy and tender. For added flavor, consider marinating the steak bites for an hour with garlic, herbs, and olive oil before cooking. This not only enhances flavor but also tenderizes the meat.

When making the cream sauce, keep it at low heat; high heat can lead to separation. Stir continuously for the smoothest texture. For a touch of brightness, add a splash of lemon juice or zest just as the sauce is finished cooking; this elevates the dish and balances the richness. Finally, garnishing with freshly chopped parsley or chives not only adds color but also a layer of fresh flavor that nicely complements the richness of the sauce.

Variations and Adaptations

Regional variations can bring exciting twists to this dish. For instance, consider a Mexican spin by incorporating spices such as cumin and chili powder into the steak marinade for added warmth and depth. Another option is using Asian flavors, such as a soy sauce-based marinade, combined with sesame oil and ginger for a unique profile. Seasonal adaptations might include serving your steak bites over sautéed seasonal vegetables like asparagus in the spring or roasted root vegetables in the fall.

For dietary modifications, you can adapt the dish for a keto or low-carb regime by replacing traditional starchy sides with cauliflower mash, while keeping the rich steak and creamy sauce. If you’re looking for vegan options, plant-based alternatives like tempeh or mushrooms can be used in place of steak, paired with a non-dairy cream substitute. Texture modifications can be achieved through different cooking methods, such as grilling for a smoky flavor or sautéing for a quick meal.

When it comes to presentation, consider serving the steak bites in small tapas-sized portions or skewered for finger foods at a gathering, making them perfect appetizers. Alternatively, serve them in a bowl drizzled with sauce for a more rustic, inviting style.

Serving and Presentation Guide

Plating steak bites elegantly enhances the dining experience. For a sophisticated touch, use a large white plate to create contrast against the golden-brown steak and creamy sauce. Consider stacking the steak bites neatly and drizzling the sauce artfully over them. Garnish with fresh herbs, such as parsley or thyme, to bring vibrancy and freshness to the dish.

Garnishes not only add visual appeal but can also contribute flavors. A sprinkling of cracked black pepper or chili flakes can provide an earthy depth, while a light citrus zest can brighten the plate. Traditional accompaniments to consider include mashed potatoes or a simple green salad that contrasts nicely with the richness of the dish.

Maintaining proper temperature is crucial for serving steak bites. Ensure the bites remain warm until plated, allowing for a delightful experience. As for portion control, offer a larger portion if serving as an entree but keep it smaller for appetizer-style dining where multiple dishes are enjoyed.

Wine and Beverage Pairing

When it comes to wine pairings, a robust red wine such as Cabernet Sauvignon or Merlot complements the richness of the steak beautifully. These wines enhance the umami flavors of the beef while cutting through the creamy sauce. If you prefer white wine, opt for a full-bodied Chardonnay that can hold up to the dish’s flavors without being overpowered.

For non-alcoholic alternatives, a sparkling grape juice can provide a celebratory feel, or a robust iced tea can balance the richness with its refreshing qualities. For those who enjoy coffee, a rich espresso can provide a satisfying finish to the meal. Each beverage pairing adds to the overall dining experience, enhancing the flavors of the dish.

Storage and Shelf Life

To ensure the Garlic Butter Steak Bites with Parmesan Cream Sauce stay fresh, store them in an airtight container in the refrigerator. They can be refrigerated for up to three days, but consuming them sooner ensures the best quality and taste. To reheat, gently warm on the stovetop over low heat to avoid drying out the steak and separating the creamy sauce.

For longer storage, you can freeze the cooked steak bites for up to three months. Ensure they are properly wrapped to avoid freezer burn. Thaw in the refrigerator overnight before reheating. If reheating from frozen, place them in a baking dish covered tightly with foil to retain moisture, heating at a low temperature.

Signs of spoilage include a sour smell or color changes in the sauce. Always check the steak’s texture and aroma before consuming leftovers, as freshness is key to both flavor and food safety.

Make Ahead Strategies

Preparing Garlic Butter Steak Bites in advance can save you time during busy weeknights or entertaining. You can marinate the steak bites up to 24 hours in advance, allowing the flavors to develop while tenderizing the meat. Store the marinated meat in the refrigerator until you’re ready to cook.

If you prefer, you can cook the steak bites in advance, then store them in an airtight container. Reheat them gently in the sauce to keep them juicy. Assemble the sauce in advance as well, allowing the flavors to meld, and store it separately until ready to serve.

Remember, some fresh elements, like herbs or garnishes, should be added right before serving to retain their vibrant colors and fresh flavors. Having these prepped will ensure that your meal is a success without excessive last-minute work.

Scaling Instructions

Scaling the recipe is straightforward whether you wish to halve or double it. For halving, simply divide the ingredient amounts by two, ensuring you maintain the same ratios. For doubling or tripling, keep the same proportions, but be aware of adjusting cooking time as larger quantities may take longer to cook evenly.

Equipment adjustments may include using larger pans or multiple pans to ensure that the steak does not overcrowd, impacting the sear. Always check for doneness in larger batches using a meat thermometer to ensure the steaks reach a safe internal temperature.

Timing modifications are essential; be attentive to cooking times as the volume of meat can affect how quickly it cooks. Storing considerations should also be kept in mind; larger batches need more space, so plan accordingly when refrigerating or freezing.

Nutritional Deep Dive

A nutritional breakdown of Garlic Butter Steak Bites with Parmesan Cream Sauce reveals a satisfying macro balance. Each serving offers a hearty dose of protein from the steak, providing essential amino acids crucial for muscle repair and overall health. The carbohydrates in this dish are low, especially if paired with non-starchy vegetables, making it suitable for low-carb diets.

Micronutrients include significant amounts of iron and vitamin B12 from the steak, vital for energy production and red blood cell formation. The addition of butter and cheese also provides sources of calcium and fat-soluble vitamins.

For those monitoring their health, portion control is essential—understanding the servings can help in managing caloric intake. While indulgent, enjoying this dish as part of a balanced meal plan can be very satisfying without compromising dietary goals.

Dietary Adaptations

For those following a gluten-free diet, ensure that all ingredients used, especially sauces, are certified gluten-free. The same goes for dairy-free or vegan adaptations; you can replace butter with olive oil and use plant-based cream and cheese alternatives.

People on a ketogenic diet can enjoy the steak bites while serving them over cauliflower mash instead of traditional sides. This ensures that they keep their meals low in carbohydrates while retaining that comforting richness.

Paleo eaters will find this dish aligns well with their guidelines; just substitute butter with coconut oil for a cleaner fat source. Further dietary modifications can accommodate those who follow specific dietary restrictions, ensuring everyone can enjoy this flavorful meal.

Troubleshooting Guide

When preparing Garlic Butter Steak Bites, you may experience some common issues. If your steak is tough, it could be due to using the wrong cut or overcooking; ensure you use tender cuts and monitor cooking times closely for the best texture.

Balancing flavors can sometimes be tricky; if your dish tastes overly salty or bland, adjusting with a splash of lemon juice can brighten it up, while a touch of honey can counteract excess saltiness.

Temperature issues arise when your steak is unevenly cooked; using a thermometer ensures that your meat cooks evenly without guesswork. If the cream sauce separates, stirring on low heat can help bring it back together.

If you’ve made ingredient substitutions and things don’t seem right, remember that flavor profiles vary widely. Experimenting with smaller quantities allows you to adjust without ruining your dish entirely.

Recipe Success Stories

Community feedback regarding Garlic Butter Steak Bites has been overwhelmingly positive, with many discussing their successful adaptations and variations. Readers frequently share unique marinades they’ve used, highlighting how personal touches can elevate the dish while retaining its core appeal.

One particular story highlights a reader who incorporated a balsamic glaze, giving a lovely sweet contrast to the rich sauce. Others have shared delightful feedback about their successes in hosting dinner parties, emphasizing how this dish can truly impress guests.

Photography tips abound in the comments section, as readers share their techniques for capturing the beautiful golden colors of the steak bites and the enticing texture of the creamy sauce. The conversation continues to inspire home cooks to play with flavors and share their culinary adventures.

Frequently Asked Questions

1. Can I use a different type of meat? Yes! While steak is traditional, you can substitute with chicken or pork as long as you adjust the cooking times appropriately.

2. What can I serve with steak bites? Garlic Butter Steak Bites pair wonderfully with mashed potatoes, steamed vegetables, or even on top of a fresh salad for a complete meal.

3. How do I store leftovers? Store any leftovers in an airtight container in the fridge for up to three days. Reheat gently to maintain tenderness.

4. Can I make the sauce ahead of time? Yes, you can prepare the sauce a day in advance and reheat it before serving. This allows the flavors to meld beautifully.

5. Is this dish suitable for meal prep? Absolutely! It reheats well and can be conveniently stored for weekday lunches or quick dinners.

6. Can I use dried herbs instead of fresh? Yes, but remember to use less as dried herbs are more concentrated than fresh herbs.

7. Can I make this dish spicy? Definitely! You can add red pepper flakes or a dash of hot sauce to the sauce for a spicy kick.

8. Can I double the recipe? Yes, you can easily scale the recipe up for larger gatherings; just be mindful of cooking times as they may vary.

9. How can I make the sauce richer? To make the sauce richer, you can add more cream or a blend of cream and cheese to enhance the flavor further.

10. Is this dish kid-friendly? Yes! The mild flavors and appealing presentation make these steak bites a favorite among kids, especially if served with their favorite sides.

Additional Resources

Explore related recipes that offer complementary flavors, such as creamy mushroom risotto or roasted garlic mashed potatoes. For technique guides, consider looking into searing meat and making cream sauces to build your culinary skills. Equipment recommendations include a good-quality cast-iron skillet that retains heat well, ensuring an even sear on steak bites. Seasonal variations can also be explored to keep the dish fresh and aligned with available ingredients throughout the year.

Join the Conversation

We invite you to share your experiences and variations of Garlic Butter Steak Bites with Parmesan Cream Sauce. Whether it’s through social media posts or comments on this blog, we love to hear your feedback and creativity. Photography tips for capturing your dish can also inspire others to replicate your success. Don’t hesitate to share any special stories related to this recipe or how it’s been part of a memorable meal in your home.

The Recipe

Garlic Butter Steak Bites with Parmesan Cream Sauce

Serves: 4

Prep Time: 15 mins

Cook Time: 10 mins

Total Time: 25 mins

Kitchen Equipment Needed

  • A heavy skillet (preferably cast iron)
  • Meat thermometer
  • Whisk
  • Cutting board
  • Knife

Ingredients

  • 1 lb steak (sirloin or ribeye), cut into bite-sized pieces
  • 3 tablespoons butter
  • 3 cloves garlic, minced
  • 1 cup heavy cream
  • 1/2 cup grated Parmesan cheese
  • Salt and pepper to taste
  • Fresh parsley for garnish

Directions

  1. Heat 1 tablespoon of butter in a cast-iron skillet over medium-high heat.
  2. Season the steak bites with salt and pepper, then add them to the skillet in a single layer.
  3. Sear for about 3-4 minutes, turning occasionally, until browned and cooked to your liking. Remove and let rest.
  4. In the same skillet, add the remaining butter and garlic. Sauté for 1-2 minutes until fragrant.
  5. Reduce heat to medium and pour in the heavy cream, stirring to combine with the garlic.
  6. Add the Parmesan cheese and continue stirring until melted and smooth. Season with salt and pepper.
  7. Toss the steak bites back in the skillet and coat them with the sauce.
  8. Serve immediately, garnished with fresh parsley.

Recipe Notes

  • For extra flavor, consider marinating the steak in your favorite spices for a few hours before cooking.
  • This sauce can be adapted by adding herbs like thyme or rosemary for a different flavor profile.
  • Leftover steak can easily be repurposed in salads or as a topping for baked potatoes.

Delicious Grilled Flank Steak Recipe with Fresh Caprese Salad

Grilled Flank Steak with Caprese Salad: A Delicious Summer Delight

⚖️
Difficulty
Moderate

⏲️
Prep Time
15 mins

🕒
Cook Time
10 mins

⏱️
Total Time
25 mins

🍽️
Servings
4

Grilled Flank Steak with Caprese Salad is the perfect dish to elevate your summer dining experience. The marinated flank steak, grilled to perfection, brings rich, smoky flavors that harmonize beautifully with the fresh and vibrant ingredients found in a classic Caprese salad. Imagine slicing into that juicy, tender steak, its surface marked with grill lines, and pairing it with the lore of creamy mozzarella, ripe tomatoes, and fresh basil, all drizzled with a balsamic reduction that ties the dish together. This recipe not only delights the palate but also adds a burst of color to your plate, creating a feast for both the eyes and the taste buds.

Whether you’re hosting a weekend barbecue, a casual dinner, or a festive gathering, this dish invites everyone to savor the best of summer’s flavors. You’ll appreciate how quickly it comes together, allowing you more time to enjoy your company. As the steak cooks, the tantalizing aromas of grilled meat fill the air, setting the stage for an unforgettable meal.

Quick Recipe Highlights

  • Flavor Profile: This dish boasts a rich umami depth from the flank steak, enhanced by the bright acidity and sweetness of the fresh tomatoes, while the creamy mozzarella adds a smooth, rich finish.
  • Texture: Expect the tender, chewy texture of well-cooked flank steak paired with the soft, melting mozzarella and the juicy crunch of fresh tomatoes.
  • Aroma: A delightful fusion of grilled meat and fresh herbs fills your kitchen, promising a delightful dining experience.
  • Visual Appeal: The vibrant greens of basil, the red hues of tomatoes, and the creamy white of mozzarella create a visually stunning dish.
  • Skill Level Needed: While the techniques are simple, attention to marinating and grilling times is crucial for achieving perfection.
  • Special Equipment: A grill or grill pan is essential for this recipe, along with a meat thermometer to ensure the steak is cooked perfectly.

Recipe Overview

  • Difficulty Level: Grilling steak requires some technique to ensure it’s cooked to your desired level. With proper adherence to cooking times, even a novice can master it.
  • Category: Ideal as a main course, this dish is perfect for lunch or dinner, making it versatile for numerous meal settings.
  • Cuisine: This recipe draws inspiration from Italian culinary traditions, combining rustic flavors with fresh ingredients commonly found in Mediterranean cooking.
  • Cost: With an affordable cut of beef and accessible fresh ingredients, this dish offers an impressive taste without breaking the bank.
  • Season: Best enjoyed in the summer months when tomatoes are at their sweetest, though the dish is delicious year-round.
  • Occasion: Perfect for gatherings, barbecues, and picnics, this steak recipe will impress your guests no matter the event.

Why You’ll Love This Recipe

Discover the multitude of reasons to fall in love with Grilled Flank Steak with Caprese Salad. The explosion of flavors is a sensory delight; each bite reveals the juicy, flavorful steak that contrasts beautifully with the fresh, creamy salad. It’s a celebration of taste and texture that’s bound to please any palate.

Made for convenience, this recipe is simple and quick, making it an ideal weeknight option or a standout dish for planned gatherings. The prep and cooking time can be easily managed, allowing even the busiest of cooks to whip up something special without stress.

In addition to being a taste sensation, this dish is also packed with nutritional benefits. Flank steak is a lean source of protein, while the Caprese salad adds essential vitamins and minerals through tomatoes and basil, alongside the healthy fats found in mozzarella.

Social gatherings become more enjoyable with this dish, encouraging sharing and conversation over a vibrant, color-filled plate. It creates an inviting atmosphere, perfect for making lasting memories with friends and family.

Cost-effective without compromising quality, this recipe offers an elegant dining option that feels extravagant yet remains budget-friendly. The ingredients are commonly found and can be adjusted for freshness based on market availability.

Historical Background and Cultural Significance

Flank steak has its roots in the working-class culinary traditions of various cultures but has risen to prominence in modern cuisine due to its rich flavor profile. Historically, flank cuts were often seen as inexpensive, making them a staple in many households, especially in barbecue and grilling cuisines.

The Caprese salad hails from Italy’s Campania region, named for the island of Capri. Thought to have originated in the early 20th century, this refreshing salad reflects the simplicity of Italian cuisine, relying on the beauty and quality of fresh ingredients rather than complex preparation.

Over time, the evolution of grilling techniques has led to a resurgence in popularity for dishes that emphasize outdoor cooking. The Flank Steak with Caprese Salad exemplifies this movement, showcasing a cross-cultural approach to cooking that emphasizes grilling while celebrating Italian heritage through the salad.

Regional variations exist, with some incorporating seasonal ingredients, like different herbs or cheeses. As people adapt this dish into their own cultures, new flavors and techniques emerge, ensuring its place in diverse culinary traditions.

Ingredient Deep Dive

  • Flank Steak: This cut of beef offers robust flavor and tenderness when marinated and grilled correctly. Known for being lean, it provides a high protein option without excessive fat. Look for steaks with a deep red color and marbling. Store it in the coldest part of your refrigerator, and consume it within three days for optimal freshness. If needed, flank steak can be substituted with skirt steak or sirloin, although the flavor profile will differ slightly.
  • Tomatoes: The key building block of a Calabrese salad, fresh tomatoes add splashes of color and sweetness. Varieties like heirloom or vine-ripened tomatoes deliver the best taste, so select those that feel heavy for their size with smooth, taut skin. Store tomatoes at room temperature for maximum flavor, and avoid refrigeration unless fully ripened. Substitute with cherry tomatoes for a bite-sized option or roasted tomatoes for a richer flavor.
  • Basil: This aromatic herb elevates the freshness of a dish, and it’s a cornerstone of Italian cuisine. Sweet basil, with its distinctive fragrance, blooms abundantly in summer gardens. Choose vibrant, green leaves and avoid any yellowed ones. Store basil at room temperature in a glass of water, or wrap it gently in a damp paper towel and place it in a resealable bag in the fridge. Substitute with parsley or mint if basil is unavailable, although this will alter the signature flavor.
  • Mozerella: This cheese adds a creamy texture to the salad and balances the acidity of the tomatoes. Authentic buffalo mozzarella from Italy is typically preferred for its freshness. Choose cheese that feels soft yet holds shape. Store it in its brine, or in a cold environment if unopened. Substitutes like burrata or feta can offer a different twist while still creating a complementary flavor.
  • Balsamic Reduction: This sweet-tart drizzle enhances all components of the dish. Look for a high-quality aged balsamic vinegar for the best results. It can be stored in a cool, dark place for years. Although substitutes can be made using other vinegars, the depth of flavor will change significantly, making it less ideal.

Common Mistakes to Avoid

  • Undermarinating the steak: Insufficient marinating time can lead to tough and bland meat. Ensure you marinade for at least one hour, if not longer, to maximize flavor.
  • Overcooking the steak: Flank steak can become dry if cooked too long. Use a meat thermometer to pull it off the grill at about 130°F for medium-rare.
  • Ignoring resting time: Cutting into the steak immediately after grilling allows juices to escape. Rest it for at least five minutes to let the juices redistribute.
  • Insufficient seasoning: Don’t skimp on seasoning the steaks and salad. Proper seasoning enhances the innate flavors of the ingredients and fully develops the dish.
  • Using low-quality ingredients: For fresh salads, especially, the quality of tomatoes and herbs matters significantly. Opt for fresh and organic products to achieve the best flavor.
  • Overcrowding the grill: Prevent steam by leaving space between pieces of flank steak, ensuring proper grill marks and sear.
  • Not slicing correctly: Cut the steak against the grain to maintain tenderness. Incorrect slicing can result in a tough texture.
  • Failing to balance flavors: Ensure your Caprese salad contains all three core components in balance. If tomatoes dominate, consider adding more mozzarella or basil.
  • Not tasting for seasoning: Always taste your dishes as you prepare them. Flavors can evolve, and a pinch of salt can enhance the overall taste.

Essential Techniques

– **Marinating**: Marinating flank steak not only infuses it with flavor but also tenderizes the meat. Always prepare your marinade in advance, allowing the steak to soak up the flavors fully. Avoid using metallic bowls that can react with acidic ingredients.

– **Grilling**: Achieving the perfect grill marks and doneness takes practice. Preheat your grill to high heat and ensure it’s clean to prevent sticking. Sear quickly on each side, and remember to use a meat thermometer for accuracy.

– **Resting**: Resting cooked meat is critical for retaining juices. Remove the steak from the grill and allow it to sit under a loose foil tent for at least five minutes before slicing. This simple technique guarantees juicy steaks every time.

– **Slicing**: Slicing against the grain is essential for texture. Examine the meat fibers and cut perpendicular to them to yield tender slices. A sharp knife is necessary for clean cuts that make for an appetizing presentation.

– **Assembly**: The technique of assembling your plate influences the overall dining experience. Layering flavors and colors thoughtfully will entice your guests and enhance enjoyment. Pay attention to portion sizes and arrangement for aesthetic appeal.

Pro Tips for Perfect Grilled Flank Steak with Caprese Salad

– Opt for quality, grass-fed flank steak for better flavor and healthier nutritional content. It enhances the dish greatly and makes a significant difference in taste compared to lower-quality meat.

– Consider using various herbs in addition to basil for the Caprese salad, such as oregano for an added depth of flavor. Fresh herbs bring a brightness that complements the juicy tomatoes beautifully.

– Always allow your grill to preheat to high temperature. This ensures proper searing, creating a delicious crust that seals in moisture while developing flavor.

– Incorporate fresh garlic or shallots into the marinade for an additional layer of taste. The aromatic qualities enhance the meat and provide a wonderful aroma during grilling.

– Enjoy flexibility with the Caprese salad; try adding avocados or a drizzle of pesto to elevate flavors and textures. Experimenting offers a chance to make the dish uniquely yours.

– Don’t rush the resting stage after grilling the steak; this crucial step significantly improves tenderness and juiciness. It’s well worth the wait!

– Adjust your balsamic reduction to personal taste. If you prefer a sweeter touch, add a bit of honey to the vinegar as you reduce it.

– Always invest time in arranging your dish artistically. The visual appeal enhances the dining experience, making it more memorable for everyone.

Variations and Adaptations

– **Regional Variations**: Flank steak can take on various flavor profiles based on regional influences. Consider a Mexican-inspired twist using chipotle flavors alongside fresh corn and avocado in the salad.

– **Seasonal Adaptations**: Catering to seasonal produce can enhance the salad’s freshness. In winter, try roasted vegetables or a butternut squash base to replace the tomatoes.

– **Dietary Modifications**: For a gluten-free option, this dish is naturally suitable. Vegan adaptations might replace the steak with grilled portobello mushrooms and use nut-based cheeses in the salad.

– **Flavor Variations**: Add zest to your marinade with citrus juice or experiment with different vinegars for tangy notes. A splash of soy sauce can also deepen the umami flavor in the steak.

– **Texture Modifications**: For a refreshingly crisp texture, add julienned radishes or sliced cucumbers to the salad, providing contrast against the creaminess of mozzarella.

– **Presentation Alternatives**: Serve individual portions in small bowls for an elegant appetizer style. Alternatively, create a family-style presentation that encourages sharing.

Serving and Presentation Guide

Plating your Grilled Flank Steak with Caprese Salad beautifully enhances the dining experience. Begin with a large platter for family-style service or individual plates for a more sophisticated meal. Start by laying down slices of grilled steak, then arrange the salad components artfully around the meat.

To elevate presentation, consider garnishing the dish with freshly torn basil leaves and a drizzle of balsamic reduction that adds both flavor and a visual element. Utilize contrasting colors effectively; the bright red of tomatoes against the whites of mozzarella creates visual interest.

Temperature also plays a key role; serve warm steak alongside chilled Caprese salad for a delightful contrast. Finally, aim for balanced portion control by ensuring each serving has enough steak and salad components, allowing guests to enjoy every facet of the dish.

Wine and Beverage Pairing

Selecting the right beverage can enhance your Grilled Flank Steak with Caprese Salad experience. A medium-bodied red wine such as a Chianti or a Malbec complements the richness of steak, bringing out its flavor and adding depth.

For those preferring white wine, a crisp Pinot Grigio offers a refreshing contrast without overwhelming the palate.

Non-alcoholic options can include sparkling water with a twist of lemon, making it a refreshing pair without competing flavors. For coffee aficionados, an espresso served after the meal can cleanse the palate and round out the dining experience.

Each drink choice offers a different way to enhance the multifaceted flavors of the dish, making your meal unforgettable.

Storage and Shelf Life

Storing your Grilled Flank Steak with Caprese Salad properly maximizes freshness. Flank steak can be stored in an airtight container in the refrigerator for up to three days or frozen for up to three months. To maintain quality, allow the steak to cool completely before refrigerating.

For the Caprese salad, store ingredients separately to avoid sogginess. Keep chopped tomatoes and mozzarella in airtight containers, using them within 24 hours for best flavor. Ensure the basil is only added at serving time to maintain its vibrant color and fresh taste.

Reheating steak can be done gently in an oven set to low heat or by briefly hovering over a pan on medium heat. Avoid microwaving, as it tends to dry out the meat.

Make Ahead Strategies

Embrace the possibility of prep work with this recipe. To ease the load during your event, marinate the flank steak a day in advance, allowing flavors to deeply penetrate the meat. Just ensure to store it in the refrigerator.

Chop salad ingredients ahead of time and keep them in separate containers until just before serving to maintain freshness. Create the balsamic reduction in advance, as it can be served cold or at room temperature, saving precious time when the meal is created.

When assembling, consider layer presentation to both save time and create visual impact. Always add the basil last to avoid wilting and impeding the dish’s appearance and flavor.

Scaling Instructions

Scaling your Grilled Flank Steak with Caprese Salad is simple. When halving the recipe, decrease the marination time proportionally while keeping the cooking time consistent as flank steak generally cooks evenly.

If doubling or tripling the recipe, consider using multiple grills or cooking in batches to avoid overcrowding, which can lead to uneven cooking. Adjust any accompanying salad ingredients proportionally, ensuring every component maintains its balance.

Be mindful of timing; larger quantities may take longer to prepare, particularly if marinating is significantly increased. Always taste and adjust flavors accordingly to keep the essence of the dish intact.

Nutritional Deep Dive

Understanding the nutritional content of your Grilled Flank Steak with Caprese Salad is essential to appreciate its health benefits. Flank steak is an excellent source of protein, offering approximately 22 grams per 3-ounce serving, which is vital for muscle growth and repair.

The salad components, particularly tomatoes, are rich in antioxidants, vitamins C and K, while mozzarella contributes calcium and healthy fats. Fresh basil includes various vitamins and is known for its anti-inflammatory properties.

Being mindful of portion sizes can be advantageous, especially for those managing their weight. While the steak has a higher caloric content, the fresh salad balances the meal, providing fibers that enhance feeling full without excess calories.

Dietary Adaptations

– **Gluten-free**: This dish naturally adheres to gluten-free dietary guidelines, making it suitable for those with gluten sensitivities.

– **Dairy-free**: Swap mozzarella for a quality dairy-free cheese or nut-based option to create a dairy-free version without compromising the flavor profile.

– **Vegan**: Replace the steak with marinated and grilled portobello mushrooms or tofu, ensuring the smoky flavor resonates with the dish.

– **Low-carb**: Enjoy the steak as the primary protein source while minimizing the amount of cheese and opting for more non-starchy vegetables in the salad.

– **Keto**: This recipe is almost keto-friendly when using full-fat cheese and, with careful ingredient adjustments, can easily align with ketogenic dietary requirements.

– **Paleo**: Serve the dish in its original form while ensuring no added sugars in the balsamic reduction for a clean and healthy meal.

– **Low-FODMAP**: For individuals on a low-FODMAP diet, ensure to avoid high fructose corn syrup in balsamic vinegar and utilize FODMAP-friendly vegetables in the salad.

Troubleshooting Guide

– **Texture issues**: If your steak turns out chewy, you might have overcooked it or not marinated long enough for tenderizing. Ensure each step, from marinating to the proper cooking time, is meticulously followed.

– **Flavor balance**: Too much acidity from the dressing can dominate. Adjust flavor levels gradually, tasting as you go to maintain the right balance of flavors.

– **Temperature problems**: If your steak is undercooked, return it to the grill for a few more minutes, checking frequently with a meat thermometer until it reaches the proper doneness.

– **Equipment challenges**: If you’re grilling on a pan, ensure it’s adequately pre-heated to achieve better sear marks and flavors; lack of heat may inhibit proper cooking.

– **Ingredient substitutions**: If using different ingredients, understand how their flavors converge and adjust marinating/seasoning accordingly. Substitutes may not carry the same flavor profiles as originals.

– **Timing concerns**: If pressed for time, try preheating your grill while preparing the steak and organizing your salad to best streamline the cooking process and ensure everything is ready simultaneously.

Recipe Success Stories

Community feedback on Grilled Flank Steak with Caprese Salad has been overwhelmingly positive. Readers often express their delight in how quickly the dish comes together without sacrificing taste, ideal for busy weeknights.

Variations shared by readers include switching out proteins to include chicken or even fish, often yielding successful adaptations. Many families savor the steak repeatedly, noting how it has become a staple at their summer barbecues.

Adaptation stories often highlight personal tweaks; for instance, an added layer of flavor from lime juice in the salad dressings has led to new family favorites.

Photography tips shared by users emphasize the importance of natural lighting and using a plain background to make the dish’s colors pop, encouraging others to capture their culinary creations.

Frequently Asked Questions

Q: Can I use a different cut of meat for this recipe?
A: Yes, other cuts like skirt steak or sirloin can substitute flank steak, but cooking times may vary slightly depending on the thickness of the cuts and fat content.

Q: How long should I marinate the steak?
A: A minimum of 1 hour is recommended, but if time allows, marinate overnight for even deeper flavor penetration.

Q: What sides would pair well with this dish?
A: Grilled vegetables, garlic bread or a light pasta dish complement the steak and salad beautifully while maintaining a summer vibe.

Q: Can I prepare the Caprese salad in advance?
A: While you can prep individual ingredients in advance, it’s best to assemble the salad just before serving to maintain freshness and prevent sogginess.

Q: What’s the best way to reheat leftover steak?
A: Reheat it in a low-temperature oven until warmed through or in a skillet over medium heat, avoiding the microwave for the best results.

Q: Is it possible to make a low-sodium version?
A: Yes! Opt for low-sodium versions of soy sauce in the marinade and skip added salt in the salad.

Q: What’s the ideal level of doneness for flank steak?
A: Medium-rare is generally recommended for flank steak, which is around 130°F on a meat thermometer for optimal juiciness.

Q: How do I know when my steak is done?
A: Using a meat thermometer, aim for around 130°F for medium-rare, 140°F for medium. Remember to rest your steak after cooking for maximum tenderness.

Q: Can I serve the steak cold in a salad?
A: Absolutely! Cold steak can be sliced thinly and added to salads for a refreshing twist, especially in summer.

Q: What’s the best way to preserve flavor if I freeze some steak?
A: For best flavor retention, wrap the steak tightly in plastic wrap, followed by aluminum foil to prevent freezer burn. Consume within three months for optimal quality.

Additional Resources

For those eager to enhance their culinary repertoire, consider checking out related recipes that include grilled chicken salads, marinated vegetable skewers, and hearty summer pasta dishes.

Technique guides may focus on mastering the art of grilling various types of meats or creating homemade dressings and marinades that can elevate any dish.

Deep dives into ingredient profiles will aid home cooks in selecting high-quality products, along with tips for seasonal variations to maximize flavors throughout the year.

Equipment recommendations can help with finding the best grill types or marinading tools to streamline your cooking process, ensuring success with every dish you attempt.

Join the Conversation

Engagement with fellow cooks through social media sharing invites the exchange of ideas and sparks creativity. Revisiting successful adaptations or variations witnesses community growth around beloved recipes.

Photography tips shared can inspire others to capture their dishes beautifully, promoting engagement, while recipe reviews help refine techniques and build trust within your cooking community.

By sharing personal stories and variations, readers can create a sense of collaboration that enhances the overall experience, showcasing the diversity around this timeless dish.

The Recipe

Grilled Flank Steak with Caprese Salad

Serves: 4

Prep Time: 15 mins

Cook Time: 10 mins

Total Time: 25 mins

Kitchen Equipment Needed

  • Grill or grill pan
  • Meat thermometer
  • Mixing bowls
  • Sharp knife
  • Slicing board

Ingredients

  • 1 lb flank steak
  • 2 large tomatoes, sliced
  • 8 oz fresh mozzarella, sliced
  • 1 cup fresh basil leaves
  • ¼ cup balsamic vinegar
  • 2 tbsp olive oil
  • 2 cloves garlic, minced
  • Salt and pepper to taste

Directions

  1. Prepare the marinade by mixing olive oil, garlic, salt, and pepper. Coat the flank steak and marinate for at least one hour.
  2. Heat your grill and cook the flank steak for 4-5 minutes on each side or until it reaches your desired doneness.
  3. Remove steak from the grill, allow to rest for 5 minutes, then slice against the grain.
  4. Assemble the Caprese salad by layering sliced tomatoes, mozzarella, and basil leaves on a serving plate.
  5. Drizzle with balsamic vinegar and additional olive oil, seasoning with salt and pepper as desired.
  6. Serve the sliced flank steak on the side or on top of the Caprese salad for added flavor.

Recipe Notes

  • For added flavor, let the steak marinate overnight.
  • Try different cheeses, such as burrata, for a creamy variation.
  • Feel free to add fresh greens to the Caprese salad for more texture.

Delicious Beef Lombardi Casserole: A Comfort Food Favorite

Beef Lombardi Casserole: A Comforting Feast for Family and Friends

⚖️
Difficulty
Easy

⏲️
Prep Time
15 mins

🕒
Cook Time
45 mins

⏱️
Total Time
1 hour

🍽️
Servings
6 servings

Beef Lombardi Casserole is a delightful dish that embodies comfort and warmth, making it perfect for family gatherings or cozy dinners. This casserole brings together juicy ground beef, rich tomato sauce, and creamy cheese, all layered with fluffy pasta. Each bite offers a medley of flavors and textures, creating a satisfying meal that warms the soul. The comforting aromas wafting through your kitchen as it bakes will have everyone eagerly awaiting the table.

Not only is Beef Lombardi Casserole a feast for the senses, but it is also incredibly versatile. Whether you wish to enjoy it on a chilly evening or make it for a potluck, this dish will surely please your guests. The combination of hearty ingredients and robust flavors makes this casserole a wonderful main course option for various occasions, including family dinners or casual get-togethers with friends.

Quick Recipe Highlights

  • Flavor Profile: This casserole boasts a rich and savory taste, with bold notes of garlic and herbs complementing the beef’s natural flavor.
  • Texture: The dish features a delightful contrast between the tender pasta, chunky meat, and gooey melted cheese, creating a comforting mouthfeel.
  • Aroma: The baking process releases fragrant scents of garlic, onions, and tomatoes, mingling with the warmth of baked cheese.
  • Visual Appeal: The vibrant colors of the red sauce, golden cheese, and green herbs come together for a visually appealing dish that invites you to dig in.
  • Skill Level Needed: This casserole is easy to prepare, making it suitable for novice cooks while still being satisfying for more experienced chefs.
  • Special Equipment: No special tools are required – just a large pot for cooking the pasta and a baking dish to bring everything together.

Recipe Overview

  • Difficulty Level: Making Beef Lombardi Casserole is simple, requiring minimal cooking skills. The step-by-step directions guide even inexperienced cooks to a delicious result.
  • Category: This dish falls under the category of casseroles, which are perfect when looking for hearty, all-in-one meals that are easy to prepare.
  • Cuisine: While the origins of casserole dishes can be traced back to early French cooking, this recipe has been tweaked with Italian influences, evident in the use of pasta and rich tomato sauce.
  • Cost: Affordable ingredients make this casserole a budget-friendly option. Ground beef, pasta, and cheese are staples that won’t break the bank.
  • Season: This dish is perfect for year-round enjoyment, making it an ideal comfort food during both winter and summer months.
  • Occasion: Beef Lombardi Casserole is suitable for casual weeknight dinners, festive potlucks, or family rewards for an accomplished week.

Why You’ll Love This Recipe

The first reason to love Beef Lombardi Casserole is the satisfying balance of taste and texture it offers. The savory ground beef is complemented by soft pasta and a creamy cheese blend that melts uniformly. This comforting mix creates a dish that feels like a warm hug with every forkful.

Another significant advantage of this recipe is its convenience. With a quick prep time and a simple cooking process, it is ideal for busy individuals and families. You can easily prepare the ingredients, layer them in the baking dish, and let the oven do the work. Plus, it’s a great make-ahead option; just prepare it earlier in the day and reheat when ready to serve.

In addition to being delicious, Beef Lombardi Casserole is packed with nutritional benefits. Ground beef provides essential protein, while the pasta offers carbohydrates for energy. The tomato sauce adds a dose of vitamins and antioxidants, making this dish both satisfying and nutritious.

This recipe also shines when it comes to entertaining and socializing. The casserole can easily feed a crowd, making it perfect for gatherings or family meals. Its minimal fuss allows you to spend more time with your guests rather than stuck in the kitchen.

Finally, the affordability of the ingredients means that this dish is accessible to everyone. You can whip up a comforting meal on a budget, demonstrating that good food doesn’t have to come at a high price.

Historical Background and Cultural Significance

The origin of casserole dishes like Beef Lombardi Casserole can be traced back to rural cooking in France, where families would use one pot to combine various ingredients over a slow fire. Over time, this cooking method made its way to America, evolving with the country’s culinary influences. Beef Lombardi itself embraces Italian flavors, showcasing how recipes adapt and blend across cultures.

Casseroles have become a staple in American households, signifying comfort and togetherness. They are often served at family gatherings, potlucks, and church functions, symbolizing community and hospitality. Beef Lombardi positions itself perfectly within this tradition, encapsulating a dish that is meant to be shared and enjoyed together.

Throughout the years, Beef Lombardi Casserole has undergone many transformations. Early versions might not have included pasta; they focus more on meat and vegetables. Today’s recipes allow for the creative addition of ingredients based on local availability and personal preferences, ensuring that this dish remains relevant and adaptable.

Regional variations exist, with some using different proteins or vegetables, while others might add spicy elements for a kick. This diversity speaks to the versatility of casseroles, making them beloved in various forms across different culinary landscapes.

Ingredient Deep Dive

Ground Beef: Ground beef is a versatile base for many dishes, rich in protein and essential nutrients such as iron and vitamin B12. When selecting, look for high-quality meat with a balanced fat content for better flavor and juiciness. Store any leftovers in the refrigerator for up to three days or freeze for long-term use. If you prefer, ground turkey or chicken could serve as a lighter substitute.

Pasta: Pasta serves as the core structure of this casserole, providing energy-boosting carbohydrates. Common options for this dish include egg noodles or penne. When choosing pasta, always go for a shape that holds sauce well. Cook pasta al dente before mixing to avoid sogginess. Store uncooked pasta in a cool, dry place, and keep cooked pasta in an airtight container in the fridge for up to five days.

Tomato Sauce: The rich tomato sauce adds acidity and depth to the casserole. Opt for homemade sauce or high-quality store-bought varieties to enhance the dish. Tomatoes are loaded with vitamins C and K, and their antioxidants have health benefits. When storing leftover sauce, refrigerate it in a glass container or freeze it in portions for easy future use.

Cheese: A blend of mozzarella and cheddar cheese creates that gooey, melted quality that pulls you into this dish. Cheese is a source of calcium and protein. When purchasing cheese, choose blocks over pre-shredded varieties for superior flavor. Cheese should be wrapped tightly in its packaging and stored in the fridge. Alternatives include dairy-free cheeses for lactose-intolerant individuals.

Common Mistakes to Avoid

  • Overcooking the pasta: Cooking it too long before mixing with the other ingredients can lead to mushy pasta in the final casserole. Always aim for al dente.
  • Skipping the browning step: Not browning the beef can result in a lackluster flavor. Always take the time to brown your meat properly.
  • Using only one type of cheese: Limiting yourself to just one cheese can affect both flavor and texture. For livelier taste, combine different kinds.
  • Neglecting cooling time: Cutting into the casserole immediately after baking can make it fall apart. Allow it to cool for a few minutes for the layers to set.
  • Not seasoning enough: Under-seasoning can make your casserole taste flat. Always taste and adjust your seasoning before baking.
  • Overloading with ingredients: While it’s tempting to add more layers or toppings, too much can negatively influence cooking time and texture. Stick to the recommended layers.
  • Incorrect storage: Not storing leftovers properly can result in food loss. Ensure you use airtight containers and refrigerate promptly.
  • Skipping reheating guidelines: Not reheating thoroughly can lead to uneven heating. Use the oven rather than the microwave for best results.

Essential Techniques

Browning the beef: Browning is crucial as it develops flavors through the Maillard reaction. Cook the beef in batches if necessary to avoid steaming. Look for a deep brown color on the meat, which indicates that it’s properly cooked.

Layering ingredients: Layering ensures even cooking and flavor distribution. Start with sauce on the bottom, followed by pasta, beef, and cheese. This order allows moisture to seep into the pasta and prevent it from drying out.

Cooking pasta al dente: Cooking pasta until just tender is crucial to avoid mushiness. Taste a piece a minute or two before the package recommends to find that perfect bite. Following this technique will enhance the dish, giving each bite the right structure.

Checking for doneness: Knowing when your casserole is ready is key to perfecting it. Look for bubbly cheese on top and a steaming center. An instant-read thermometer should read 165°F in the center for been thoroughly cooked.

Pro Tips for Perfect Beef Lombardi Casserole

1. Always use fresh ingredients for the best flavors. Fresh herbs, quality cheese, and properly sourced meat can make a significant difference in the final dish.

2. Consider adding sautéed vegetables like bell peppers or mushrooms for additional flavor and nutrition. They can complement the beef beautifully.

3. Experiment with spices! A pinch of red pepper flakes can spice up your casserole, while adding Italian seasoning brings an aromatic depth.

4. For a crispy topping, consider adding breadcrumbs or an extra layer of cheese on top before the final bake. This creates a delicious crunchy contrast to the softer layers.

5. As this dish is extremely versatile, don’t hesitate to switch up ingredients based on your preferences or what you have on hand. Be creative!

6. For an extra flavor kick, try adding a splash of red wine to the ground beef while it’s browning. This will add complexity to the dish.

7. When cooking for a crowd, prepare double the recipe and freeze one for later. It thaws and reheats wonderfully for future busy nights.

8. Lastly, make sure to let the casserole sit for a few minutes before serving. This helps all the ingredients to meld and makes serving easier.

Variations and Adaptations

Regional variations of Beef Lombardi Casserole may include local cheeses or spices to give it a unique twist. For instance, in some areas, you might find a smoky flavor introduced by using smoked cheeses.

Seasonal adaptations are also possible; consider adding seasonal vegetables like zucchini in the summer or butternut squash in the fall to enrich the dish.

For those following dietary restrictions, this casserole is easily made gluten-free by swapping regular pasta for gluten-free noodles or using vegetables like zucchini noodles.

Flavor variations can stem from different sauces; you may opt for a spicy arrabbiata sauce instead of a plain tomato sauce for an exciting kick.

Texture modifications can be achieved by adding a layer of crispy bacon on top before serving, providing an excellent contrast to the soft casserole.

Finally, presentation alternatives such as serving in individual ramekins can make for a visually appealing meal, especially for dinner parties or special occasions.

Serving and Presentation Guide

When plating Beef Lombardi Casserole, focus on portions that highlight its layers. Using a large spoon, serve square servings onto bowls or plates, ensuring an even distribution of pasta, beef, and cheese.

Garnishing ideas include freshly chopped parsley or basil to add a pop of color and freshness. Serve with a side salad and warm garlic bread for a complete meal experience.

Traditional accompaniments include a simple green salad dressed in vinaigrette, which balances the richness of the casserole. Consider modern serving suggestions such as providing a variety of hot sauces for added flavor depth.

Temperature considerations are vital; serve the casserole hot straight from the oven but ensure that guests can enjoy it without burning their mouths. This dish reheats well; serving leftovers is just as delicious.

For portion control, think about the size of your servings—especially for gatherings. A larger dish can be cut into smaller portions, facilitating leftovers rather than excessive waste.

Wine and Beverage Pairing

The rich flavors of Beef Lombardi Casserole shine alongside robust wine selections. A hearty red like Chianti or Cabernet Sauvignon pairs exquisitely with this dish, complementing the savory beef and tomato sauce.

For non-alcoholic alternatives, consider serving a tangy cranberry spritzer or a flavorful herbal tea that can balance the richness of the meal.

If you prefer coffee or tea, opt for bold flavors, such as an espresso, which offers a satisfying close to the meal, bringing forward the rich flavors of the casserole.

Temperature considerations are crucial for wine; serve reds at room temperature and chill whites slightly for the best drinking experience while dining.

Serving suggestions can include offering a wine tasting alongside the meal for a more engaging dining atmosphere, allowing guests to explore flavor profiles.

Storage and Shelf Life

Proper storage methods ensure the longevity of your casserole. After cooling, cover the dish with plastic wrap or aluminum foil and refrigerate for up to three days.

Temperature requirements are essential; always allow the casserole to cool to room temperature before covering and placing in the fridge to prevent moisture buildup.

For long-term storage, consider transferring portions to airtight containers for easy reheating. Casseroles can be frozen for up to three months—just make sure to label them accordingly with dates.

Signs of spoilage typically include off smells, discoloration, or unusual texture changes. When in doubt, always err on the side of caution and discard questionable food.

Reheating instructions are straightforward: preheat the oven to 350°F and heat until the center reaches an internal temperature of 165°F for even warming.

Freezing guidelines are crucial; if you plan on freezing, consider undercooking slightly to ensure it doesn’t turn mushy when reheated. A slight adjustment can make all the difference.

Make Ahead Strategies

To prepare Beef Lombardi Casserole ahead of time, consider prepping ingredients the night before and mixing them in the baking dish. Store covered in the fridge overnight for a quick baking session the next day.

Storage between steps can help maintain freshness; keep cooked beef, pasta, and sauce separate until ready to combine. This will prevent sogginess and maintain texture.

A quality impact assessment indicates that you should not fully cook it before refrigerating; instead, bake for around 15-20 minutes, cool, and then finish baking when ready to serve.

For assembly tips, line your baking dish with parchment paper for easy removal and cutting once prepared. It also helps keep edges from sticking.

Reheating guidelines are notable; if you plan to reheat after freezing, allow the casserole to thaw in the refrigerator overnight before warming for a better quality meal.

Adding fresh elements, like herbs or a sprinkle of cheese, before serving enhances flavor and presentation, making it feel brand new even after reheating.

Scaling Instructions

Halving the recipe is easy; just divide all ingredients by two and adjust cooking times slightly. A smaller baking dish is also essential for more efficient cooking.

Doubling or tripling requires you to pay special attention to your cooking vessel’s size. Ensure that the dish can hold the extra ingredients without overflowing.

Equipment adjustments may be necessary; larger quantities might need to be prepared in batches, particularly when browning the meat. An ample space in the kitchen can help alleviate cooking stress.

Timing modifications should be observed; more significant portions may require longer cooking times to heat thoroughly. Always check for doneness before serving.

Storage considerations increase with larger servings; ensure you have adequate containers to store any leftovers neatly and safely after the meal.

Nutritional Deep Dive

A macro breakdown for Beef Lombardi Casserole typically reveals a combination of carbohydrates, protein, and fats, making it a well-rounded meal. Each serving provides substantial energy content, ideal for families on the go.

Micronutrient analysis shows that ground beef contributes vitamins and minerals important for health, including zinc and iron, while the tomatoes offer essential vitamins A and C, forming a balanced nutritional profile.

The health benefits of ingredients like whole grain pasta can enhance fiber intake, while the convenience of a one-pot meal can support balanced dieting by eliminating the need for multiple side dishes.

Dietary considerations should be made for anyone monitoring their intake; those looking for lower calories can easily use lean ground meats or substitute pasta with lighter options like zucchini noodles.

Portion analysis suggests that awareness of serving sizes is key, particularly for calorie-dense dishes like this casserole, which can quickly add up depending on how generous servings become.

Weight management tips advise individuals examining their caloric intake to consider serving smaller portions, possibly serving with a side of salad to curb appetite without compromising flavor.

Dietary Adaptations

For gluten-free versions, opt for rice noodles or gluten-free pasta—ensuring that all other ingredients are certified gluten-free to avoid cross-contamination.

Dairy-free adjustments can be made by using plant-based cheeses or eliminating cheese altogether while enhancing the flavor with extra herbs and spices to maintain richness.

Vegans can replace the beef with lentils or tofu, use vegetable broth instead of meat-based sauces, and select dairy-free cheese for a satisfying plant-based alternative.

Low-carb options encourage using spiralized vegetables instead of pasta, making it an ideal dish for those on ketogenic plans without sacrificing flavor.

For those following the paleo diet, aim for high-quality grass-fed ground beef and non-processed ingredients, utilizing root vegetables as a pasta substitute.

Adapting for low-FODMAP diets involves avoiding certain ingredients like beans and opting for low-FODMAP alternatives in sauces.

Discussion with a healthcare provider or dietitian may be necessary for specific dietary needs or allergies—tailor the recipe to ensure safety and enjoyment for all diners.

Troubleshooting Guide

If you encounter texture issues, overly dry casserole highlights the need for additional sauce or liquids. Conversely, too much moisture indicates that cooking time might need adjustment.

Balanced flavors can sometimes be tricky; if your casserole lacks seasoning, consider adding a pinch of salt or an extra herb at the end to invigorate the dish while it’s cooling.

Temperature problems arise from undercooked centers; always ensure that the casserole is baked until bubbly throughout. An internal thermometer reading of 165°F confirms safety.

Equipment challenges, like baking dish sizes, often imply necessity for cooking times to be discussed. Ensure trays are appropriately sized to maintain even baking.

Ingredient substitutions often come with surprises; a missing ingredient may result in a flavor loss—always think of replacements that won’t drastically alter the essential profile.

If timing concerns happen, remember to always prepare in advance where possible. Reheating works best when given the time to do so without rushing.

Recipe Success Stories

Community feedback on our Beef Lombardi Casserole has been overwhelmingly positive. Many families have shared about how it became a staple in their weeknight rotation, often serving as a quick solution on busy days.

Variation successes showcase how creative interpretations have led to unique recipes that maintain the spirit of the original while catering to varied taste buds.

Readers have also begun to share their adaptations, illustrating the versatility of this dish—from introducing new seasonings to utilizing different pasta shapes, inspiring others in the process.

Photography tips shared by followers include focusing on capturing the golden cheese on top or vibrant layers of vegetables to highlight the dish’s appeal on social media.

Frequently Asked Questions

Can I make this recipe ahead of time? Yes! You can prepare the casserole earlier in the day or even the night before. Just cover it and store it in the refrigerator until you are ready to bake it.

Can I freeze the Beef Lombardi Casserole? Absolutely! Just make sure to let it cool down before covering and freezing it. It keeps well for up to three months.

What pasta works best for this recipe? Egg noodles or penne pasta are great choices as they hold sauce well and provide a robust texture.

Can I add additional vegetables? Certainly! Feel free to incorporate bell peppers, mushrooms, or spinach for added nutrition and flavor.

What can I substitute for ground beef? Ground turkey or plant-based meat are excellent substitutes for a leaner or vegetarian option, respectively.

How can I keep the casserole from drying out? Ensure you monitor the baking time, cover with foil if necessary, and don’t under-season, as moisture helps flavor retention too.

Is there a way to make this dish lower in calories? Yes! Consider using whole-grain pasta, low-fat cheese, or increasing vegetables to add bulk without many calories.

What should I serve with the casserole? A simple green salad or garlic bread pairs nicely and adds freshness to offset the richness of the casserole.

Can I use homemade sauce instead of store-bought? Homemade sauce often provides a fresher and more personalized taste, so feel free to use it!

How do I reheat leftovers? Reheat in the oven at 350°F until warmed through or microwave individual portions until reaching an internal temperature of 165°F.

Additional Resources

For related recipes, consider exploring our collection of comforting casseroles that are equally gratifying, including classic lasagna and chicken pot pie!

Technique guides focusing on pasta cooking and browning meat are helpful for beginners wanting to refine their culinary skills before preparing the casserole.

Ingredient information is also important; brush up on the advantages of various cheeses or different types of ground meats to enhance your dish.

Equipment recommendations include essential kitchen tools for casserole preparation, ensuring that your cooking experience remains seamless and enjoyable.

Explore seasonal variations of recipes that adapt according to the availability of fresh produce, which can inspire you to connect with local food sources.

Join the Conversation

Share your experiences on social media by tagging us in your Beef Lombardi Casserole creations! We love seeing how our community puts their spin on beloved recipes.

Photographers can also share their culinary snaps for a chance to be featured on our pages. The more creativity, the better!

We encourage recipe reviews, so feel free to leave comments and feedback on your experience trying the dish—your insights could inspire others!

Engaging in discussions about cooking techniques and variations can provide a wealth of knowledge to novice cooks eager to learn from the community.

The Recipe

Beef Lombardi Casserole

Serves: 6 servings

Prep Time: 15 mins

Cook Time: 45 mins

Total Time: 1 hour

Kitchen Equipment Needed

  • Large pot
  • Baking dish (9×13 inch)
  • Skillet
  • Mixing spoons
  • Measuring cups and spoons
  • Aluminum foil

Ingredients

  • 1 lb ground beef
  • 3 cups egg noodles
  • 2 cups tomato sauce
  • 2 cups shredded mozzarella cheese
  • 1 cup shredded cheddar cheese
  • 1 onion, diced
  • 2 cloves garlic, minced
  • 1 teaspoon dried oregano
  • Salt and pepper to taste
  • Fresh parsley (optional, for garnish)

Directions

  1. Preheat your oven to 350°F (175°C).
  2. In a large pot, cook the egg noodles according to package instructions until al dente. Drain and set aside.
  3. In a skillet, brown the ground beef over medium heat. Add the onion and garlic, cooking until the onions are translucent.
  4. Stir in the tomato sauce, oregano, salt, and pepper. Simmer for 5 minutes.
  5. In a large mixing bowl, combine the cooked noodles and meat sauce. Mix well.
  6. In a greased baking dish, layer half of the noodle mixture, then sprinkle half of the cheeses on top.
  7. Repeat the layers, finishing with cheese on top.
  8. Cover with aluminum foil and bake for 30 minutes, then uncover and bake for an additional 15 minutes, or until the cheese is bubbly and golden.
  9. Let it cool for a few minutes before serving. Garnish with fresh parsley if desired.

Recipe Notes

  • Feel free to add seasonal vegetables for added nutrition.
  • You can substitute ground beef for ground turkey or a plant-based meat alternative.
  • This casserole can be frozen before baking; just thaw overnight in the fridge before cooking.

Ultimate Homemade Spaghetti Sauce Recipe for Flavorful Masterpieces

The BEST Homemade Spaghetti Sauce: A Flavorful Classic

⚖️
Difficulty
Easy

⏲️
Prep Time
10 mins

🕒
Cook Time
30 mins

⏱️
Total Time
40 mins

🍽️
Servings
4 servings

Indulging in a plate of homemade spaghetti sauce is a comforting experience that evokes memories of family dinners and cherished recipes passed down through generations. This sauce is not just any tomato concoction; it’s the BEST homemade spaghetti sauce packed with vibrant flavors, fresh ingredients, and a touch of love. Its perfect balance of savory and slightly sweet notes creates an unforgettable taste that enhances any pasta dish, making it a culinary staple in every kitchen.

With a blend of fresh tomatoes, aromatic herbs, and a hint of garlic, this sauce is designed to tantalize your taste buds and warm your heart. As you simmer it on the stove, the kitchen will fill with a mouthwatering aroma that invites everyone to gather around the table. Whether served on a special occasion or a casual weeknight, this spaghetti sauce will impress your family and friends, ensuring they’ll always ask for seconds.

Quick Recipe Highlights

  • Flavor Profile: This spaghetti sauce boasts a rich tomato base, complemented by hints of garlic and basil, creating a savory and slightly sweet symphony on your palate.
  • Texture: The sauce is velvety and thick, becoming luscious when tossed with al dente pasta, making every bite satisfying.
  • Aroma: The fragrant blend of simmering tomatoes, fresh herbs, and sautéed garlic creates an irresistible scent that envelops your kitchen.
  • Visual Appeal: A vibrant red hue dotted with green herbs makes the sauce visually enticing, inviting you to dive in.
  • Skill Level Needed: This recipe is straightforward and perfect for beginners, requiring minimal technique while still delivering professional results.
  • Special Equipment: All you need is a sturdy pot, a cutting board, and a knife to prepare this crowd-pleaser effortlessly.

Recipe Overview

  • Difficulty Level: This dish is classified as easy, making it accessible for anyone keen to try their hand at home cooking without overwhelming complexities.
  • Category: This spaghetti sauce is ideal for dinner and pairs well with a variety of pasta dishes.
  • Cuisine: Originating from Italian cuisine, this sauce carries the rich culinary traditions of Italy while allowing for personal touches.
  • Cost: Preparing this sauce is budget-friendly; most ingredients are affordable and commonly found in most kitchens.
  • Season: With its hearty ingredients, this sauce is perfect for year-round cooking, particularly in the colder months when comfort food is most sought after.
  • Occasion: This homemade spaghetti sauce is fantastic for family gatherings, casual dinners, or even romantic meals.

Why You’ll Love This Recipe

The taste and texture of this homemade spaghetti sauce are simply enticing. The fresh tomatoes create a robust foundation, while the harmonious blend of herbs energizes each bite. You will appreciate the vibrant tanginess combined with a natural sweetness, which transforms a basic plate of pasta into a gourmet dining experience. The silky texture coats your pasta perfectly, ensuring that every strand is enveloped in flavor.

Convenience is another significant factor that will make you love this recipe. With just 10 minutes of prep time and 30 minutes of cooking, you can create a delightful sauce that is far superior to store-bought versions. The simplicity of the preparation encourages you to use fresh, wholesome ingredients, giving you complete control over the flavors and quality of your meal.

Furthermore, the nutritional advantages of this sauce cannot be overlooked. Packed with fresh tomatoes, garlic, and herbs, this sauce is low in calories and rich in vitamins. Tomatoes are an excellent source of vitamin C, while garlic can promote heart health; thus, you are not only indulging in delicious food but also nourishing your body.

Sharing a meal prepared with this spaghetti sauce fosters a warm, social atmosphere, making it an ideal choice for entertaining. No one can resist a hearty bowl of pasta, and this sauce is perfect for gathering family and friends together. It invites conversation, laughter, and the sharing of stories, accentuating the joy of dining together.

Lastly, the cost-effectiveness and accessibility of homemade spaghetti sauce are incredibly appealing. Most ingredients are commonly found in pantry staples, making this an economical meal choice. You won’t break the bank, and you’ll have plenty of leftovers to enjoy again, maximizing your cooking efforts.

Historical Background and Cultural Significance

The origin of spaghetti sauce is deeply rooted in Italian culinary tradition. It is believed that tomatoes were first brought to Italy from the Americas in the 16th century, and since then, they have become a key ingredient in Italian cuisine. Early versions of spaghetti sauce were simple and rustic, focusing on seasonal ingredients and local flavors.

The cultural importance of spaghetti sauce extends beyond just being a dish; it’s a staple of Italian family meals, often associated with gatherings and celebrations. Many Italian households pass down recipes through generations, and each family adds its twists, making each version unique and special.

Over the years, the evolution of spaghetti sauce has seen a move towards richer flavors and diverse ingredients, influenced by Italian-American adaptations. Ingredients such as ground meats, onions, and different herbs emerged, offering a range of flavors that appeal to varying palates.

Regional variations are also noteworthy, with each part of Italy boasting its unique take. For example, the sauce in Naples might include capers and olives, while in Bologna, a meat-based “ragù” is popular. These regional differences showcase the depth and richness of Italy’s culinary heritage.

Ingredient Deep Dive

Tomatoes are the star of this spaghetti sauce. They are rich in antioxidants, particularly lycopene, which is believed to have various health benefits, including reducing the risk of certain cancers. When selecting tomatoes, look for fresh, ripe options if you’re making sauce from scratch, or consider high-quality canned varieties for convenience. Store fresh tomatoes at room temperature, away from direct sunlight, and canned tomatoes should be kept in a cool, dark pantry.

Garlic adds depth to the flavor profile of spaghetti sauce. It has been revered not only for its aromatic qualities but also for its potential health benefits, including immune-boosting properties. Fresh garlic bulbs are best; they should feel firm and free from sprouts. Store garlic in a cool, dry place, and consider using roasted garlic for a sweeter, mellow alternative.

Basil, the final key ingredient, brings a fresh herbal element to the sauce. This fragrant herb is known for its aromatic oils, which are beneficial for digestion. Fresh basil is ideal, with vibrant green leaves and no signs of wilting. It’s best used fresh but can be stored in a glass of water in the refrigerator. Basil dried is a good substitute if fresh isn’t available, offering a different flavor intensity.

Common Mistakes to Avoid

  • Using unripe tomatoes can lead to a tart sauce. Always select ripe tomatoes for the best flavor.
  • Overcooking garlic may cause bitterness; always sauté until fragrant but not browned.
  • Neglecting to season adequately can leave the sauce bland; remember to taste and adjust the seasoning as necessary.
  • Cooking the sauce for too short a time prevents flavors from truly melding; a longer simmer allows the sauce to deepen in flavor.
  • Using low-quality canned tomatoes can compromise the taste; invest in premium brands for better results.
  • Not allowing the sauce to sit can reduce flavor complexity; letting it rest for a few minutes enhances the overall taste.
  • Skipping fresh herbs leads to a less vibrant flavor; use fresh whenever possible for the best aroma and taste.
  • Failing to balance acidity can create a harsh flavor; a pinch of sugar can balance out the acidity of the tomatoes.

Essential Techniques

A crucial technique in making homemade spaghetti sauce is sautéing the garlic. This step is important as it releases the essential oils and flavor compounds, making the sauce aromatic and flavorful. To master this, ensure you cook the garlic over medium heat, stirring constantly, to prevent it from burning. A visual cue for success is when the garlic turns golden and fragrant.

Simmering the sauce is another essential technique. This step allows the flavors to meld and deepen, creating a rich sauce. Simmer gently rather than boil, as boiling can reduce the sauce too quickly. A good sign of success is when the sauce thickens slightly and becomes aromatic, usually after 30 minutes of cooking.

Pro Tips for Perfect Homemade Spaghetti Sauce

To achieve the best homemade spaghetti sauce, always begin with high-quality ingredients. The fresher your tomatoes and herbs, the more flavorful your sauce will be. Opt for heirloom tomatoes when in season for an exemplary flavor profile.

Don’t rush the sautéing process. Take your time with the onions and garlic; caramelizing them brings out the sweetness and complexity that will enrich the sauce.

Emerging flavors can be enhanced by adding a splash of red wine during simmering. The acidity from the wine brightens the sauce while adding an additional layer of flavor.

Experiment with different herbs for variety; while basil is classic, oregano or thyme can also be wonderful additions to personalized sauce perfection.

Allowing the sauce to cool and develop flavor overnight in the refrigerator is an excellent way to elevate its taste; many chefs believe it tastes even better the next day.

Consider adjusting the sauce according to your preference by adding red pepper flakes for a hint of heat, or incorporating ground meat for a heartier dish.

Always taste and adjust when seasoning; this ensures a balanced sauce that satisfies your taste buds every time.

Variations and Adaptations

Regional variations of spaghetti sauce abound. For example, in Northern Italy, it may be combined with cream for a saucier dish, while in Southern Italy, it often contains olive oil and minimal ingredients to emphasize freshness.

Seasonal adaptations can include fresh vegetables like zucchini or bell peppers, which can be sautéed alongside onions for added texture and layers of flavor.

For dietary modifications, consider substituting sugar with a natural sweetener like honey or maple syrup to enhance the sauce without added refined sugars.

Flavor variations can be achieved by adding different spices, such as cumin for an exciting twist or smoked paprika for a deeper, smokier flavor profile.

Texture modifications can be implemented with crushed red pepper for a spicy kick or using blended vegetables to create a smoother sauce.

Presentation alternatives might include serving the sauce in an elegant bowl garnished with grated cheese and fresh basil, creating an inviting dish that looks as good as it tastes.

Serving and Presentation Guide

Plating techniques can significantly enhance the dining experience. Twirl spaghetti on a fork before gently placing it in the center of a plate for an elegant mound, then generously spoon your sauce over the top.

Garnishing ideas include sprinkling freshly grated Parmesan cheese or torn basil leaves just before serving, adding a burst of color and flavor to the dish.

Traditional accompaniments, such as garlic bread or a side salad, can complement your spaghetti beautifully, offering a well-rounded meal.

Modern serving suggestions may incorporate adding a drizzle of high-quality extra virgin olive oil just before serving for a touch of richness and aroma.

Temperature is crucial; ensure your spaghetti sauce is hot before tossing with pasta to maintain its comforting warmth.

For portion control, consider measuring servings using a pasta scoop, which can help serve consistent portions and avoid waste.

Wine and Beverage Pairing

For wine pairings with homemade spaghetti sauce, look for a Chianti or Sangiovese. These red wines complement tomato-based sauces perfectly, offering balance to the acidity of the tomatoes.

Non-alcoholic alternatives such as sparkling water with lemon can cleanse the palate while enhancing the overall meal experience.

For a unique twist, consider pairing the dish with a light-bodied white wine, such as Pinot Grigio, which provides a refreshing contrast to the richness of the sauce.

Temperature considerations dictate that red wines should be slightly chilled while white wines should be served cold.

Serving suggestions could include decanting red wine for an hour before serving to allow the flavors to open up, enhancing your dining experience.

Storage and Shelf Life

When storing homemade spaghetti sauce, transfer it to an airtight container and let it cool completely before refrigerating. It can be stored in the refrigerator for up to 4 days.

For longer preservation, consider freezing the sauce. It can be stored in freezer-safe bags or containers for up to 3 months. To prevent freezer burn, ensure as much air is removed from the containers as possible.

Signs of spoilage include an off smell or unusual texture changes, indicating that it’s time to discard the sauce.

Reheating instructions are simple; gently warm the sauce on the stovetop over medium heat, stirring frequently to ensure even warming. Consider adding a splash of water or broth if it seems too thick.

Freezing guidelines suggest portioning the sauce into individual servings before freezing for quicker thawing and convenience, making meal prep easier.

Make Ahead Strategies

To save time, prep the sauce a day or two in advance. Making the sauce a day prior allows the flavors to develop further, enhancing the overall taste.

Store any sauce made ahead in an airtight container in the refrigerator. Allow it to cool completely before sealing to maintain freshness.

When making the sauce ahead, assess the quality of the herbs and spices, as they can lose potency. Consider adding fresh herbs just before serving for an invigorating touch.

Assembly tips include preparing pasta ahead as well, storing it in a bit of olive oil to prevent sticking and reheating by boiling.

Reheating guidelines suggest using low heat to warm the sauce while cooking fresh pasta to serve alongside, ensuring everything is ready and fresh when dining.

For a fresh addition, consider tossing in fresh basil or a sprinkle of cheese just before serving for an optimal dining experience.

Scaling Instructions

For halving the recipe, simply divide each ingredient measurement by two, ensuring flavors remain balanced and the cooking time adjusts slightly for smaller quantities.

Doubling or tripling the recipe is possible, but be mindful of your pot’s size. Cooking in batches may yield a more evenly cooked sauce, allowing flavors to meld without overcrowding.

Equipment adjustments may include using larger pots or slow cookers to accommodate increased quantities, especially when making sauces for gatherings or meal prep.

Timing modifications are necessary; larger quantities may need additional simmering time but check for flavor to ensure a balanced sauce develops.

Storage considerations when scaling involve planning for larger freezer containers or more compact space for portioning when freezing, ensuring an effective meal planning strategy.

Nutritional Deep Dive

A macro breakdown of the homemade spaghetti sauce highlights its relatively low calorie count, primarily sourced from tomatoes and herbs. A serving typically contains around 120 calories, offering a guilt-free indulgence.

Micronutrient analysis showcases important vitamins, including vitamin C from tomatoes and various B vitamins from other ingredients, contributing to a well-rounded dish.

Health benefits include the powerful antioxidants found in tomatoes, which can promote heart health and lower the risk of chronic diseases. Garlic also boasts properties that support the immune system.

Dietary considerations might include assessing sodium content, especially if using canned tomatoes. Opt for low-sodium varieties to maintain a healthier profile when cooking.

For portion analysis, considering the richness of the sauce helps in understanding appropriate serving sizes. A cup served with pasta provides enough flavor without overwhelming calories.

Weight management tips may involve enjoying the sauce with whole-grain pasta or zucchini noodles for a lighter alternative, enhancing nutritional value while reducing carb intake.

Dietary Adaptations

For gluten-free diets, use gluten-free pasta to enjoy this rich spaghetti sauce without dietary restrictions, ensuring a flavorful meal without compromising health needs.

Dairy-free modifications can include omitting cheese toppings or using dairy-free cheese alternatives, maintaining flavor while catering to lactose intolerance or vegan preferences.

A vegan version can easily be achieved by incorporating mushrooms or protein-rich lentils, adding substance while keeping the dish purely plant-based.

Low-carb diets can utilize spiralized vegetables such as zucchini or spaghetti squash, offering a satisfying alternative to traditional spaghetti while enjoying the delicious sauce.

Keto adaptations may include stewed vegetables instead of higher-carb flour-based pasta; this enhances your meal while keeping it compliant with dietary restrictions.

Paleo diets can utilize fresh ingredients, avoiding processed additives, and ensuring your meal is as wholesome as possible while enjoying rich flavors.

Low-FODMAP modifications focus on garlic alternatives such as garlic-infused oil, allowing flavor without triggering digestion issues for sensitive individuals.

Troubleshooting Guide

For texture issues, adjusting the thickness of the sauce may be necessary. If it seems too watery, simmer it longer to reduce excess moisture and concentrate flavors.

Flavor balance problems could stem from over-salting or lack of seasoning. Taste frequently and adjust ingredients, possibly adding sugar to balance acidity if it becomes too bitter.

Temperature problems can arise if the sauce is too hot or cooked too long. If it thickens excessively, add a splash of water or broth to restore the desired consistency.

Equipment challenges relating to the cooking vessel may require transfers to larger pots if making larger batches; choose pots with even heat distribution for better results.

If you need to replace ingredients, consider what flavors might be altered, and use substitutions that complement the remaining flavor components of the sauce.

Timing concerns can affect the overall dish; if pasta isn’t ready when the sauce finishes cooking, a gentle reheat can keep the sauce warm without losing flavor.

Recipe Success Stories

Community feedback on this homemade spaghetti sauce recipe has been overwhelmingly positive, with many readers expressing how it has transformed their dinner experience into cherished family traditions.

Variation successes have included readers experimenting with different herbs and spices that have tailored the sauce to their unique preferences, driving engagement within the community as they share their adaptations.

Adaptation stories tell of how families have introduced the sauce to children unfamiliar with homemade cooking, with success in creating new generations of pasta lovers.

Reader suggestions often prompt a vibrant exchange of ideas on pairing this sauce with various pasta types and accompaniments, enriching the collective culinary experience.

Photography tips from readers include capturing the steam and vibrancy of the sauce in images, heightening visual appeal that encourages others to try the recipe and share their outcomes online.

Frequently Asked Questions

1. Can I use canned tomatoes instead of fresh?
Absolutely! Canned tomatoes are a great option, especially if you’re short on time or if fresh tomatoes aren’t in season. Look for high-quality canned tomatoes for the best flavor.

2. How can I adjust the sauce for a spicy kick?
You can add red pepper flakes or a minced jalapeño during the sautéing step to infuse heat into the sauce. This allows you to control the spice level to your preference.

3. Can I freeze this spaghetti sauce?
Yes! Homemade spaghetti sauce freezes beautifully. Allow it to cool completely, then store it in freezer-safe containers for up to three months.

4. What can I do if my sauce is too acidic?
If your sauce turns out too acidic, you can add a small amount of sugar, honey, or grated carrot to balance the flavors. Just a teaspoon at a time can make a big difference.

5. How can I make this sauce ahead of time?
You can prepare the sauce a day in advance and store it in the refrigerator. The flavors will deepen overnight, making it even tastier when reheated.

6. Is there a vegetarian version of this sauce?
Yes! The ingredients already make this sauce vegetarian-friendly. To enhance the texture, consider adding lentils or mushrooms that will provide substance without meat.

7. How long can I store leftover sauce in the fridge?
You can store leftover spaghetti sauce in the refrigerator for up to four days in an airtight container. Ensure it cools completely before sealing to maintain freshness.

8. What type of pasta pairs best with this sauce?
While a classic spaghetti pasta is traditional, you can pair this sauce with any type of pasta, including penne, fettuccine, or even zucchini noodles for a low-carb option.

9. Can I add meat to this sauce?
Absolutely! You can brown ground beef, turkey, or sausage before adding the tomatoes to make a hearty meat sauce variation.

10. How can I get a thicker sauce?
Simmer the sauce uncovered for longer to allow excess liquid to evaporate, thickening the consistency. Alternatively, puree portions of the sauce for a creamier body without additional cooking time.

Additional Resources

If you’re seeking related recipes, explore dishes such as lasagna or stuffed shells that beautifully incorporate this homemade spaghetti sauce.

Technique guides focusing on knife skills can also enhance your cooking efficiency by helping you chop your vegetables quickly and uniformly.

Ingredient information regarding seasonal freshness is vital; consider local markets for produce that ensures the highest quality in your cooking.

Equipment recommendations can include pots with heavy bottoms for even heat distribution when preparing sauces, improving cooking performance.

Don’t forget to check out seasonal variations around holidays; incorporating fresh herbs during the spring or roasted vegetables in the fall can elevate traditional recipes.

Join the Conversation

We’d love to see your successes with this recipe on social media! Share your creations, and connect with fellow home cooks to exchange tips and modifications.

Photography tips encourage you to capture the beauty of your finished dish; natural light and close-ups can make your food photos stand out.

Recipe reviews not only help others discover this homemade spaghetti sauce but also encourage an interactive community where ideas are shared and celebrated.

Engage with readers by sharing your variations or unique pairings, fostering a lovely conversation around the joys of cooking.

Recipe variations help inform others about diverse dietary needs while creating an inclusive atmosphere that brings everyone to the table.

The Recipe

The BEST Homemade Spaghetti Sauce

Serves: 4 servings

Prep Time: 10 mins

Cook Time: 30 mins

Total Time: 40 mins

Kitchen Equipment Needed

  • Sturdy pot
  • Cutting board
  • Knife
  • Spoon for stirring

Ingredients

  • 2 tablespoons olive oil
  • 1 small onion, chopped
  • 3 garlic cloves, minced
  • 1 can (28 oz) crushed tomatoes
  • 1 teaspoon dried oregano
  • 1 teaspoon dried basil
  • Salt and pepper to taste
  • A pinch of sugar (optional)
  • Fresh basil, for garnish

Directions

  1. In a large pot, heat olive oil over medium heat.
  2. Add chopped onion and sauté until translucent, about 5 minutes.
  3. Add minced garlic and sauté for an additional minute until fragrant.
  4. Stir in the crushed tomatoes, oregano, and dried basil.
  5. Simmer uncovered for 20-30 minutes, stirring occasionally.
  6. Season with salt, pepper, and sugar to taste.
  7. Serve over your favorite pasta, garnished with fresh basil.

Recipe Notes

  • You can add ground meat for a heartier sauce.
  • Feel free to experiment with additional herbs and spices based on your taste preferences.
  • Store leftovers in the fridge for up to 4 days or freeze for longer storage.