Easy Maple Balsamic Brussels Sprouts – Perfect Side Dish

Easy Maple Balsamic Brussels Sprouts: A Simple and Delicious Side Dish

⚖️
Difficulty
Easy

⏲️
Prep Time
10 mins

🕒
Cook Time
20 mins

⏱️
Total Time
30 mins

🍽️
Servings
4

Brussels sprouts often get a bad rap, but once you try these Easy Maple Balsamic Brussels Sprouts, you’ll want to make them a regular part of your meal rotation. The sweetness of maple syrup beautifully balances the tangy notes of balsamic vinegar, creating a dish that’s not only flavorful but also incredibly satisfying. Roasting these tiny cabbages brings out their natural sweetness and adds a crispy texture that is hard to resist.

This recipe makes it easy to prepare Brussels sprouts that shine on any dinner table or holiday spread. Whether you’re serving them alongside roasted meats, as a vegetarian main, or tossing them into salads, the flavor combination is versatile enough to elevate any meal. Plus, they’re a great way to introduce more vegetables into your diet without sacrificing taste.

Quick Recipe Highlights

  • Flavor Profile: A delightful blend of sweetness and tang from the maple syrup and balsamic vinegar that enhances the natural flavors of Brussels sprouts.
  • Texture: Tender on the inside with a satisfying crispy exterior, perfect for any palate.
  • Aroma: The warm aroma of roasted vegetables mixed with the sweet smell of maple syrup and tangy balsamic will fill your kitchen with an inviting scent.
  • Visual Appeal: The vibrant green of the Brussels sprouts, caramelized edges, and glossy finish from the glaze create an eye-catching dish.
  • Skill Level Needed: Suitable for beginners, this recipe requires minimal cooking techniques such as chopping, tossing, and roasting.
  • Special Equipment: A baking sheet and a mixing bowl are all you need to create this delectable dish.

Recipe Overview

  • Difficulty Level: This Easy Maple Balsamic Brussels Sprouts recipe is straightforward, making it perfect for both novice cooks and seasoned chefs.
  • Category: It’s a versatile side dish that easily fits into any meal, making it the perfect addition to weeknight dinners or festive occasions.
  • Cuisine: While Brussels sprouts are often associated with European cuisine, the use of maple syrup and balsamic vinegar gives this dish a unique, modern twist.
  • Cost: The ingredients are affordable and widely available, making this dish easy on the wallet for everyday meals.
  • Season: Brussels sprouts are in peak season during the fall and winter months, making this the ideal recipe for cooler weather.
  • Occasion: Great for holidays, potlucks, and family dinners, this dish is sure to impress guests and make any table festive.

Why You’ll Love This Recipe

This Easy Maple Balsamic Brussels Sprouts dish is packed with taste and texture. The balance of sweetness and acidity offers a delightful experience with each bite. The method of roasting enhances the natural flavors of the Brussels sprouts while ensuring that they maintain their crisp-tender perfection. Moreover, this dish can be effortlessly adapted to various flavors, allowing you to get creative in the kitchen.

Convenience is another reason to love this recipe. With just a few simple ingredients and minimal prep work, you can whip up a delicious side dish in no time. It’s a fantastic option for busy weeknights when you want something nutritious but don’t have hours to spend in the kitchen. The straightforward steps make it a great addition to your repertoire of easy weeknight meals.

In terms of nutritional advantages, Brussels sprouts are a powerhouse of vitamins K and C, fiber, and antioxidants. They contribute to a healthy diet, and when combined with the natural sweetness of maple syrup, they offer a guilt-free indulgence that you can feel good about serving to your family and friends.

This recipe is also perfect for entertaining. The stunning presentation and delicious flavor make it an ideal side for any meal, ensuring that your guests will be raving about it long after the meal is over. The easy preparation allows you to spend more quality time with loved ones while still serving something remarkable.

Lastly, the cost-effectiveness of this dish is significant. With just a few budget-friendly ingredients, you can create a gourmet-looking dish that impresses without overspending. It’s an excellent way to enjoy seasonal produce while sticking to your budget.

Historical Background and Cultural Significance

Brussels sprouts have a long history, believed to have originated in Belgium in the 16th century. They gained popularity in Europe and eventually made their way to the United States, where they have become a staple in many homes, especially during the fall and winter months. The appeal of Brussels sprouts has seen a resurgence in recent years as chefs and home cooks alike seek to highlight their unique flavor and adaptability.

Culturally, Brussels sprouts have significance in many cuisines, often associated with hearty meals and holiday feasts. They’ve transitioned from an often-overlooked vegetable to a trendy ingredient almost everywhere, being featured on menus across casual and fine dining restaurants. Their evolution in culinary circles reflects a growing appreciation for vegetables and plant-based dishes.

The evolution of recipes for Brussels sprouts has led to numerous adaptations and variations. From being boiled and bland, they are now often roasted or sautéed with rich flavors, such as garlic, bacon, or, in this case, maple syrup and balsamic vinegar. This versatility keeps them fresh and exciting, promoting their renewed popularity among health-conscious diners.

Moreover, regional variations of Brussels sprouts preserve their cultural importance. Different areas have their unique methods of preparation, such as adding local herbs or spices, which give them added character. This illustrates how a single ingredient can be celebrated in diverse culinary traditions.

Ingredient Deep Dive

Brussels sprouts are the star of this dish, known for their unique flavor and nutritional benefits. Characterized by their small, cabbage-like spheres, they belong to the Brassica family—which includes broccoli and kale—making them a nutrient-rich choice. Brussels sprouts are high in vitamins C and K, fiber, and antioxidants, contributing to overall well-being.

When selecting Brussels sprouts, look for firm, green heads with tightly packed leaves. Avoid any that are yellowing or wilted, as they may not taste as fresh. Store them in the refrigerator in a plastic bag to keep them crisp for longer. If you need a substitute, you can use green beans or even broccoli, keeping in mind that the cooking times may differ.

Maple syrup—an essential component of this dish—not only adds sweetness but also brings a unique flavor that enhances the Brussels sprouts. Traditionally produced in North America, maple syrup is rich in antioxidants and offers some minerals, making it a healthier sweetener alternative compared to refined sugars. When selecting maple syrup, choose pure maple syrup over imitation varieties for the best flavor and quality.

Balsamic vinegar, another key ingredient, lends a tangy flavor that beautifully complements the sweetness of maple. This vinegar is made from the fermentation of grape must, and its complexity evolves over time. Balsamic vinegar is relatively low in calories but adds depth and an appealing tartness to dishes. Look for high-quality balsamic that has a rich, syrupy consistency for the best results. If you need a substitute, consider using apple cider vinegar or red wine vinegar, though the flavor profile will differ slightly.

Common Mistakes to Avoid

  • Not trimming the Brussels sprouts: Always remove the woody ends and any yellow outer leaves to ensure even cooking and a more pleasant taste.
  • Overcrowding the baking sheet: Give the Brussels sprouts space to roast properly. Too many in a pan can lead to steaming instead of roasting, resulting in a soggy texture.
  • Neglecting to season adequately: Salt and pepper may seem basic, but they are essential for enhancing the flavors. Don’t skip these or rely solely on the syrup.
  • Using cheap balsamic vinegar: Opt for a high-quality balsamic; it makes a significant difference in flavor and the overall dish.
  • Roasting at too low a temperature: Aim for a high oven temperature to achieve that crispy, caramelized exterior on the Brussels sprouts.
  • Overcooking: Keep an eye on the sprouts as they cook to prevent them from becoming mushy; they should be tender yet crisp.
  • Ignoring stirring: Stirring helps promote even cooking and ensures that every sprout gets that delicious caramelization.
  • Skipping the preheating phase: Always preheat the oven properly before roasting to ensure optimal cooking temperatures from the start.
  • Cooking in a too-large pan: If your baking sheet is too big, the heat can dissipate too much, leading to uneven cooking.
  • Choosing the wrong type of maple syrup: Pure maple syrup will yield a better flavor than imitation syrup, so always check the label.

Essential Techniques

Roasting is a critical technique for this Easy Maple Balsamic Brussels Sprouts dish. It enhances the flavor and texture of the Brussels sprouts, creating a caramelized exterior while keeping the inside tender. To master roasting, make sure your oven is properly preheated and that you toss the sprouts to ensure even cooking. Look for a golden-brown color as a cue that they’re perfectly roasted.

Another important technique is effectively combining flavors. When mixing the balsamic and maple syrup with the Brussels sprouts, ensure every sprout is coated evenly. This will contribute to a balanced taste and prevent any individual sprout from being overwhelmed by the sweetness or acidity. Don’t hesitate to adjust the ratios based on your palate, and remember that the glaze can be tweaked for a sweeter or more tangy profile.

Pro Tips for Perfect Easy Maple Balsamic Brussels Sprouts

1. For added depth of flavor, consider adding minced garlic or shallots to the Brussels sprouts before roasting. This will infuse them with a rich aroma and taste.
2. Experiment with different sweeteners like honey or agave syrup for a unique flavor twist. Adjust the quantity based on personal preference.
3. Add a sprinkle of crushed red pepper flakes for a touch of heat, balancing the sweetness and tanginess beautifully.
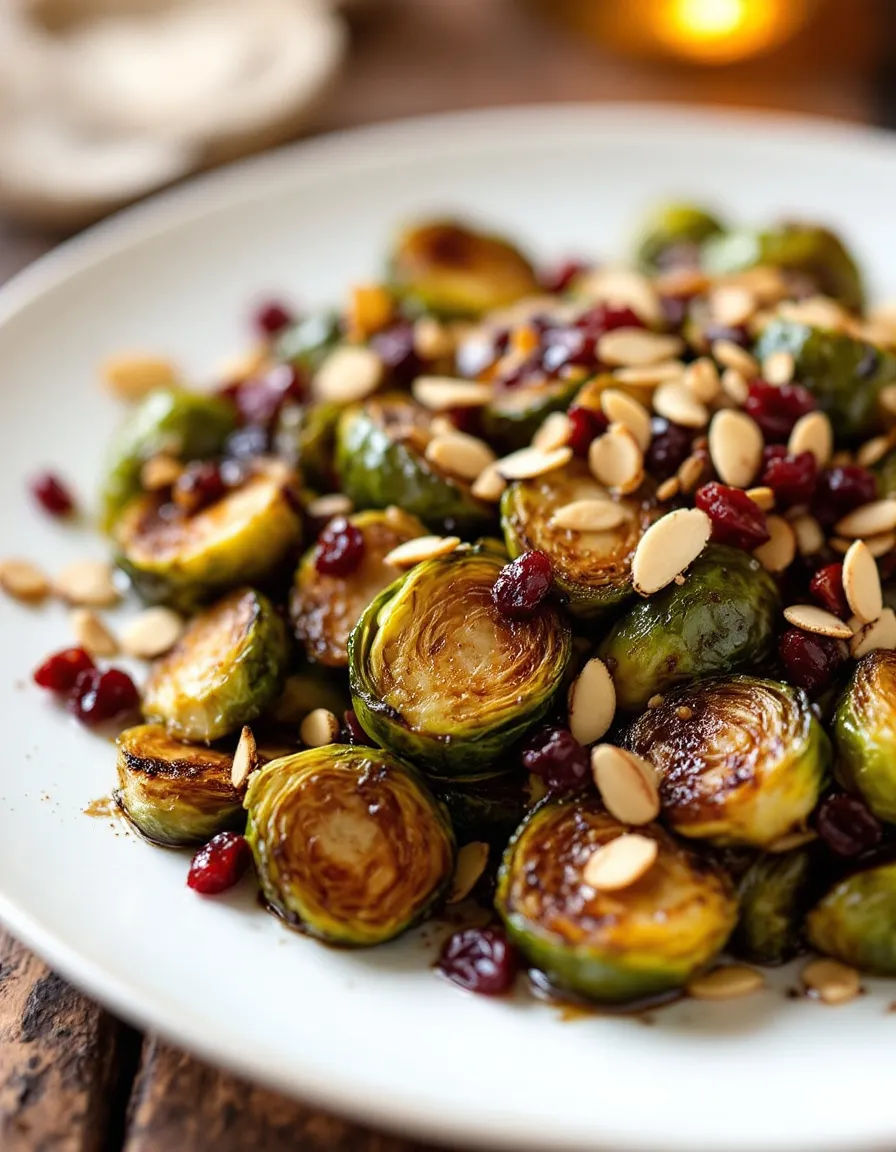
4. Top the finished dish with toasted nuts for a crunch and an additional layer of flavor; walnuts or pecans work wonderfully in this recipe.
5. If you have some fresh herbs on hand, consider sprinkling some chopped thyme or rosemary over the sprouts before serving for a fresh touch.
6. For a smoky twist, toss in diced bacon or pancetta before roasting. This adds a savory layer that complements the sweet and tangy flavors beautifully.
7. Keep an eye on the baking time; smaller sprouts will cook faster than larger ones, so they may benefit from being cut in half or quartered.
8. Allow the dish to cool slightly before serving, as this will help the flavors settle and offers a more pleasant eating temperature.

Variations and Adaptations

Brussels sprouts are incredibly adaptable, allowing for numerous flavor accents. Consider creating seasonal variations by incorporating fall elements such as roasted butternut squash or cranberries. This twist adds unexpected sweetness and visual color, elevating the dish’s appeal.

For those with dietary restrictions, the Easy Maple Balsamic Brussels Sprouts recipe can be modified to be vegan by ensuring all ingredients are plant-based. You might also explore gluten-free options by pairing them with naturally gluten-free grains or dishes.

You can also change the texture by experimenting with cooking techniques. For example, you might try sautéing instead of roasting for a softer sprout, or you could opt for grilling them for a smoky flavor. Additionally, if you enjoy a sweeter dish, adding more maple syrup can completely change the flavor profile.

Finally, presentation plays a key role. Instead of serving them as is, consider stacking them atop creamy polenta or quinoa for a captivating dish that’s as visually stunning as it is delicious.

Serving and Presentation Guide

When plating your Easy Maple Balsamic Brussels Sprouts, aim for a clean and tidy presentation. Use a wide-brimmed bowl or a platter, allowing the vibrant green color to stand out. Consider garnishing with freshly chopped parsley or microgreens for a pop of color and freshness.

Pair your Brussels sprouts with a selection of complementary dishes to enhance the dining experience, such as garlic mashed potatoes, grilled chicken, or holiday ham. For modern serving suggestions, consider serving them in individual ramekins to give a fancy touch to casual dining.

Temperature is key; serve the Brussels sprouts warm to maintain their crispness and full flavor. For portion control, a serving size of about half a cup is usually fitting as a side dish.

Wine and Beverage Pairing

When it comes to wine pairings for Easy Maple Balsamic Brussels Sprouts, a Pinot Noir is an excellent match. The bright acidity and low tannins complement the sweetness of the maple syrup and the acidity of the balsamic vinegar. If you prefer white wine, opt for a Chardonnay with a bit of oak to add complexity.

For non-alcoholic options, light herbal teas or sparkling water with a twist of lemon can provide a refreshing accompaniment. If you’d rather have coffee or tea, a strong black coffee brewed without heavy flavors will complement the maple’s sweetness without overwhelming the palate.

Always consider the temperature of the beverage; serve white wines chilled and red wines slightly below room temperature for the best tasting experience.

Storage and Shelf Life

For optimal freshness, store any leftover Easy Maple Balsamic Brussels Sprouts in an airtight container in the refrigerator. They are best consumed within 3 days; however, expect some texture changes as they sit stored.

To reheat, microwave them in short bursts, stirring in between, or place them in a preheated oven at 350°F (175°C) until warmed through. Avoid reheating multiple times as this diminishes the quality.

If you want to extend the shelf life, consider freezing the cooked Brussels sprouts. Lay them flat on a baking tray to freeze individually before transferring them to a freezer-safe bag. Consume them within 2 months for the best flavor and texture.

Make Ahead Strategies

To save time, you can prep the Brussels sprouts a day in advance. Wash and trim them, then store them in an airtight container in the refrigerator, ready to roast when you’re prepared to cook.

Alternatively, you can roast them ahead of time and reheat as needed. They can also be added to any cooked grain or salad to create a more substantial meal. To keep them fresh, add dressings or sauces just before serving for the best flavor and texture.

When planning a meal, consider roasting the Brussels sprouts alongside proteins to maximize your kitchen time. This way, everything finishes cooking simultaneously, making for a more efficient cooking process.

Scaling Instructions

This Easy Maple Balsamic Brussels Sprouts recipe can easily be scaled up or down depending on your needs. To halve the recipe, simply reduce the ingredient amounts by 50% while keeping the same cooking time, as slight changes in quantity will not significantly alter results.

If you’re looking to serve a larger crowd, feel free to double or triple the ingredients. Just be mindful of the spacing on your baking sheet. You may need to use multiple sheets to avoid overcrowding and ensure proper roasting.

Remember that larger quantities may require an additional few minutes of cooking time; just check for doneness based on your desired texture and color.

Nutritional Deep Dive

When considering the nutrition of Easy Maple Balsamic Brussels Sprouts, per serving, you’ll find a healthy balance of macronutrients. The dish offers a source of carbohydrates from the maple syrup but remains low in simple sugars compared to many sweetened dishes, making it a smarter choice for sweetness.

Brussels sprouts are also an excellent source of vitamins K and C, which are vital for bone health and immune function, respectively. A serving contains fiber that aids digestion, promoting overall gut health.

When moderate in calories, each serving of this dish provides essential nutrients while allowing you to maintain a balanced diet. This recipe can easily fit into various dietary plans, enhancing its appeal to health-conscious diners.

In terms of portion analysis, moderation is key. Enjoying a half-cup serving alongside other healthy dishes promotes a satisfying and well-rounded meal without excessive caloric intake.

Dietary Adaptations

This Easy Maple Balsamic Brussels Sprouts recipe can be easily adapted to suit a variety of dietary needs. For gluten-free individuals, the recipe is naturally gluten-free, allowing for a delicious side dish that everyone can enjoy.

Vegans will also find this recipe appealing as it does not include any animal products. The fresh, natural ingredients are perfect for any plant-based diet.

For those following low-carb or keto diets, consider reducing the amount of maple syrup to minimize carbs, or substituting it with a keto-friendly sweetener like erythritol for a low-sugar alternative.

Lastly, if you’re adapting the dish for a low-FODMAP diet, ensure to use a smaller quantity of balsamic vinegar, as it can cause digestive issues for some.

Troubleshooting Guide

If you find that your Brussels sprouts have a chewy texture, it’s likely that they were not cooked long enough, or perhaps they were overcrowded on the baking sheet. Ensure that they have enough space to roast properly, allowing hot air to circulate.

For flavor balance issues, pay attention to the proportions of maple syrup and balsamic vinegar. If your dish turns out too sweet, consider adding a splash of balsamic vinegar to counterbalance the flavors.

If you’re having trouble with uneven roasting, make sure to stir the Brussels sprouts halfway through cooking. This allows them to brown evenly and avoid burning on one side.

Utilizing the wrong equipment can also lead to baking troubles. Non-stick pans often don’t provide the optimal surface for roasting; instead, try using a heavy-duty baking sheet for the best results.

Keep an eye on timing as well. If you’re unfamiliar with your oven’s true temperature, invest in an oven thermometer to ensure accuracy, which can dramatically affect the outcome of your dish.

Recipe Success Stories

Many have shared delightful experiences when preparing Easy Maple Balsamic Brussels Sprouts. Community feedback highlights the ease of the recipe and its surprisingly satisfying taste, turning sprout skeptics into enthusiasts.

Several readers have reported variations that worked well, such as adding crumbled feta or incorporating roasted nuts, proving the versatility of this dish. They often rave about how guests who previously turned their noses up at Brussels sprouts have gone back for seconds.

Cooks have also noted that the visual appeal of these Brussels sprouts, with their caramelized edges and glossy finish, has made them a show-stopper on holiday tables and at family gatherings.

Photography tips from home cooks have also emerged, suggesting that taking shots during different stages of preparation can yield stunning visuals to share on social media. The colorful presentation has inspired many to try their hand at recreating this dish with their own unique flair.

Frequently Asked Questions

Can I use frozen Brussels sprouts?

While fresh Brussels sprouts yield the best texture and flavor, frozen Brussels sprouts can be used in a pinch. Just ensure they’re thawed and drained well before roasting to minimize excess moisture.

How do I know when Brussels sprouts are done?

Your Brussels sprouts are done when they are tender on the inside and slightly browned on the outside. A fork should easily pierce through, and they should have a nice caramelization.

Can I prepare this dish in advance?

Yes, you can prep the Brussels sprouts a day ahead of time, keeping them stored in the refrigerator. However, it’s best to roast them fresh to maintain their crispy texture.

What can I serve with these Brussels sprouts?

These Brussels sprouts pair well with roasted meats, such as chicken or pork, and can also complement grains like quinoa or couscous. They make a great addition to salads too.

Is this dish healthy?

Absolutely! Brussels sprouts are packed with nutrients, and the maple syrup adds a touch of sweetness without excessive calories. It’s a nutritious side dish that can complement any meal.

Can I use another sweetener instead of maple syrup?

Yes, you can experiment with honey or agave syrup, but this may alter the flavor slightly. Ensure any substitutions maintain a similar sweetness profile.

How do I store leftovers?

Store any leftover Brussels sprouts in an airtight container in the refrigerator for up to 3 days. To reheat, either microwave them for a few minutes or warm them in the oven.

What if my Brussels sprouts don’t crisp up?

If your Brussels sprouts are not crispy, it could be due to overcrowding on the baking sheet or baking at too low a temperature. Spread them out and ensure your oven is hot enough before roasting.

Can I freeze the leftovers?

Yes, you can freeze cooked Brussels sprouts. Lay them flat on a baking tray to freeze individually before transferring them to a freezer-safe bag, and consume them within 2 months.

Are there any variations I can make to the recipe?

Definitely! You can add nuts for crunch, incorporate different vegetables, or change the seasoning to suit your taste. The base recipe can be adjusted easily for quinoa salads or grain bowls.

Additional Resources

Explore more delicious side dishes like Roasted Garlic Mashed Potatoes or Honey-Glazed Carrots to complement your meals. For technique guides, consider checking out roasting tips or exploring how to select the best fresh vegetables.

Ingredient information on Brussels sprouts and seasonal variations can also enhance your meal planning, allowing you to make the most of what’s available. Consider investing in high-quality kitchen equipment that makes prepping and cooking easier.

Join the Conversation

We encourage you to share your experiences with Easy Maple Balsamic Brussels Sprouts on social media! Post your photos and tag us; we love seeing how everyone makes this dish their own. Your feedback can inspire others to give Brussels sprouts another chance, and we welcome your variations and adaptations as well.

For more discussions about healthy eating, cooking tips, and recipe variations, join our community. Let’s share, learn, and enjoy great food together!

The Recipe

Easy Maple Balsamic Brussels Sprouts

Serves: 4

Prep Time: 10 mins

Cook Time: 20 mins

Total Time: 30 mins

Kitchen Equipment Needed

  • Baking sheet
  • Mixing bowl
  • Sharp knife
  • Cutting board

Ingredients

  • 1 pound Brussels sprouts, trimmed and halved
  • 2 tablespoons maple syrup
  • 2 tablespoons balsamic vinegar
  • 2 tablespoons olive oil
  • Salt and pepper, to taste

Directions

  1. Preheat your oven to 400°F (200°C).
  2. In a mixing bowl, combine the halved Brussels sprouts, olive oil, maple syrup, balsamic vinegar, salt, and pepper.
  3. Toss everything until the Brussels sprouts are evenly coated.
  4. Spread the Brussels sprouts onto a baking sheet in a single layer.
  5. Roast in the preheated oven for about 20 minutes, or until tender and caramelized, stirring halfway through.
  6. Remove from oven and adjust seasoning if necessary before serving.

Recipe Notes

  • For added crunch, top with toasted nuts before serving.
  • This dish can be prepared a day ahead; simply reheat before serving.
  • Feel free to adjust the sweetness of the glaze to your liking!

Easy Maple Balsamic Brussels Sprouts – Perfect Side Dish

Easy Maple Balsamic Brussels Sprouts: A Deliciously Simple Side Dish

⚖️
Difficulty
Easy

⏲️
Prep Time
10 mins

🕒
Cook Time
20 mins

⏱️
Total Time
30 mins

🍽️
Servings
4

Brussels sprouts have a unique charm that often surprises those who think they dislike them. This Easy Maple Balsamic Brussels Sprouts recipe brings out their natural sweetness and nuttiness while adding a delightful tang from balsamic vinegar. Roasted to perfection, these sprouts become crispy on the outside yet tender within, making them a perfect addition to any meal or a stand-alone side dish. Their vibrant green color, paired with a glossy maple glaze, not only looks stunning on your plate but also tempts taste buds with the promise of flavor.

This dish is wonderfully versatile, perfect for holiday gatherings, weeknight dinners, or as part of a fresh lunch. The combination of maple syrup and balsamic vinegar creates a sweet-and-sour balance that elevates the humble sprout into something extraordinary. You’ll find every bite packed with flavor, leaving your guests or family coming back for seconds, or even thirds. Pair with roasted meats or grains, and you’re set for a culinary experience that’s both nourishing and satisfying.

Quick Recipe Highlights

  • Flavor Profile: This dish combines the earthy taste of Brussels sprouts with the sweetness of maple syrup and the acidity of balsamic vinegar for a well-rounded flavor experience.
  • Texture: Expect a delightful contrast, with the sprouts achieving a crispy exterior and a tender interior, creating an enjoyable mouthfeel.
  • Aroma: The roasting process brings out a rich, caramelized aroma that is enhanced with the sweet and tangy notes of maple and balsamic.
  • Visual Appeal: The bright green of the Brussels sprouts, coupled with the amber glaze, creates an eye-catching dish that’s as appealing to the eyes as it is to the palate.
  • Skill Level Needed: This recipe is easy for any home cook to tackle, making it perfect for beginners yet still a hack for seasoned chefs.
  • Special Equipment: No special equipment is needed—just a sheet pan and an oven will do!

Recipe Overview

  • Difficulty Level: This recipe is easy and straightforward, making it accessible for cooks of all skill levels. It requires minimal ingredients and effort, ensuring a stress-free cooking experience.
  • Category: Considered a side dish, these sprouts complement a variety of main courses—from roasted meats to wholesome grains.
  • Cuisine: This dish draws on American culinary influences, embracing the simple pleasure of seasonal ingredients enhanced by sweet and sour flavors.
  • Cost: The ingredients are budget-friendly, making this an affordable option for family meals or larger gatherings.
  • Season: Brussels sprouts peak in fall and winter; however, they’re available year-round, making this recipe a versatile choice any time of year.
  • Occasion: Perfect for family dinners, potlucks, or holiday celebrations, this recipe enhances any table setting.

Why You’ll Love This Recipe

Brussels sprouts have traditionally been perceived as an acquired taste, but their deliciously versatile nature lends them well to various flavor combinations. The crispy edges from roasting give each bite an exceptional release of flavor, emboldened further by the sweet maple syrup and zesty balsamic. This combination creates a harmonious flavor explosion that elevates your side dish game.

In addition to the delightful flavors, the convenience and preparation minimalism are commendable. You can have this dish on the table in less than 30 minutes, freeing you up to focus on your main courses or other parts of your meal prep. Just toss the Brussels sprouts with the dressing and let the oven work its magic. The simplicity of the recipe is one of its standout features.

From a nutritional perspective, Brussels sprouts are a powerhouse of antioxidants, vitamins, and minerals, making this dish not only tasty but also beneficial for your health. When coupled with maple syrup, which contains vitamins and beneficial compounds, the health benefits of this dish become apparent. Enjoy guilt-free indulgence as you enjoy this vibrant side dish alongside your favorite proteins.

Social gatherings are another opportunity to showcase this delicious dish. With its stunning presentation and mouthwatering aroma, it will surely become a centerpiece on any table, making it a conversation starter. It’s an outstanding addition when entertaining guests and guarantees to impress everyone with your culinary expertise.

Cost-effective and accessible, this recipe brings inexpensive ingredients together while providing extraordinary taste. You won’t need to break the bank to create a restaurant-quality side dish at home. We all appreciate a great dish that doesn’t require gourmet ingredients, and this one stands tall amongst the rest.

Historical Background and Cultural Significance

Brussels sprouts originated in ancient Rome, with cultivation evidence dating back to the 16th century in Belgium. Their geographical name derives from Brussels, the capital of Belgium, where they gained popularity for their hardiness and nutritional value. Over the centuries, they spread across Europe, becoming a winter staple thanks to their hearty growth properties.

Culturally, Brussels sprouts earned their place on European and American dinner tables, often viewed with skepticism until their recent culinary renaissance. Chefs began experimenting with various preparation methods, transforming the perception of Brussels sprouts from boring and bitter to delicious and appealing to the masses. The modern culinary scene often celebrates Brussels sprouts’ adaptability and unique flavor profile, enhancing their significance in contemporary cuisine.

The evolution of this recipe showcases the trend of taking traditional dishes and giving them a modern twist. The addition of maple syrup and balsamic vinegar reinterprets the classic Brussels sprout preparation, celebrating innovation while respecting culinary traditions. This blend of flavors highlights the growing trend of enhancing the natural sweetness of vegetables through inventive ingredient pairings.

There are various regional variations around the world, particularly within American cuisine. In the southern United States, Brussels sprouts are sometimes cooked with bacon, while in other cultures, they may be roasted with different spices and glazes. These adaptations underscore Brussels sprouts’ versatility, reflecting various tastes and preferences and allowing for creativity in preparation across the globe.

Ingredient Deep Dive

Brussels Sprouts
Brussels sprouts are not only nutritious but also carry cultural significance. Historically considered a winter vegetable, they were consumed largely in Europe for their hardiness during colder months. Packed with vitamins K and C, folate, and fiber, they help support digestion, immune function, and energy levels.

When selecting Brussels sprouts, you should look for vibrant green, compact sprouts. Avoid those that appear yellow or wilted. Store them in the fridge in a sealed bag to keep them fresh. If you need to substitute, broccoli florets or cauliflower can stand in, although the flavor will be slightly different.

Maple Syrup
Maple syrup is a quintessential North American product, with a long history of indigenous peoples harvesting sap from maple trees. Rich in antioxidants and nutrients like manganese and zinc, maple syrup provides a healthier alternative to refined sugar. It enhances the sweetness of dishes, offering a unique flavor profile without added chemicals.

When choosing maple syrup, opt for pure maple syrup over artificial alternatives for superior flavor and health benefits. Store it in a cool, dark place, and once opened, keep it refrigerated. If you’re looking to substitute, honey or agave nectar can work well, but be prepared for a different flavor outcome.

Balsamic Vinegar
Originating from Italy, balsamic vinegar is a staple in Mediterranean cuisine, adored for its complex flavor derived from aged grape must. High in antioxidants, it is known to support heart health and lower blood pressure.

When shopping for balsamic vinegar, look for authentically produced varieties labeled “Tradizionale” for the best quality. Store it in a dark, cool place, and be cautious of substitutions, as the unique flavor is challenging to replicate. If needed, red wine vinegar can serve as a substitute, diversifying the flavor profile.

Common Mistakes to Avoid

  • Overcooking: One of the most common mistakes is overcooking Brussels sprouts, which can lead to a mushy texture and bitter taste. Aim for a firm but tender bite.
  • Not preheating the oven: Skipping this step can prevent achieving that lovely caramelization on the outside of the sprouts, leading to less flavor.
  • Using subpar vinegar: Avoid using low-quality balsamic vinegar, which can affect the overall flavor of the dish. Always choose good quality for impactful taste.
  • Neglecting to cut them: Not cutting the sprouts in half can result in uneven cooking, leaving the centers undercooked.
  • Skipping seasoning: Failing to season properly before roasting can result in bland Brussels sprouts; salt and pepper should never be overlooked!
  • Ignoring size uniformity: Irregularly sized sprouts can cook unevenly, so try to select sprouts of similar sizes for even roasting.
  • Overcrowding the baking sheet: Overcrowding can cause the sprouts to steam rather than roast. Ensure they are spaced out well for optimal browning.
  • Inadequate glazing: Skipping the maple glaze can leave the dish tasting plain. Glazing enhances both flavor and presentation.
  • Not monitoring cooking time: Leaving the sprouts unattended can result in burnt bottoms; be sure to keep an eye on them while baking.
  • Choosing low-quality maple syrup: Using imitation syrup will detract from the taste and richness; go for pure maple syrup for the best results.

Essential Techniques

One key technique is roasting, which is vital for achieving a delightful caramelization that enhances the natural sweetness of Brussels sprouts. To master roasting, ensure your oven is at the right temperature—high heat (around 425°F) is best for getting that crispy exterior. The visual cue for success is a deep golden-brown color with slight charring around the edges.

Another fundamental technique is cutting the Brussels sprouts properly. Halving them helps them cook evenly and absorb the flavors of your seasonings and glazes. The critical aspect is to cut them with a sharp knife to ensure clean cuts that maximize surface area for roasting. Watch for visual cues such as a slight shrinkage to indicate they are tender and done.

Pro Tips for Perfect Easy Maple Balsamic Brussels Sprouts

To enhance flavor, consider adding garlic or shallots to the roasting pan for an aromatic boost that complements the Brussels sprouts beautifully. Experimenting with different herbs, such as thyme or rosemary, can elevate the profile further.

Make your prep even easier by purchasing pre-trimmed Brussels sprouts, saving time on washing and cutting. When roasting, ensure each sprout is individually coated in your glaze to maximize flavor absorption.

If you’re in a hurry, parboiling the Brussels sprouts for a few minutes before roasting can significantly reduce the cooking time while maintaining tenderness. Monitor closely to prevent overcooking during this step.

Roasting the Brussels sprouts at two different temperatures will create more char and flavor. Start at a high temperature and finish at a lower one, allowing for an even cook and enhanced sweetness.

For an extra crunch, toss the roasted sprouts with some toasted nuts, such as pine nuts or almonds, just before serving. This adds a delightful crunch and layer of flavor that pairs perfectly with the balsamic glaze.

Lastly, drizzle some extra maple syrup just before serving for an appealing presentation and a touch of sweetness, ensuring every bite is a flavorful journey.

Variations and Adaptations

Regional variations include incorporating Southern flavors like bacon or spicy chorizo, which can be sautéed with the sprouts for a delightful flavor fusion. Experimenting with different sauces, such as teriyaki or a sriracha glaze, can infuse it with new dimensions suited to various palates.

Seasonal adaptations might include incorporating sliced seasonal vegetables, such as sweet potatoes or carrots, roasting them along with the Brussels sprouts for a vibrant and colorful platter that highlights the season’s bounty.

Dietary modifications can also be made by omitting the maple syrup for a savory version or using agave nectar for a vegan replacement. The balsamic vinegar can be replaced with apple cider vinegar or lemon juice for a different acidity note.

Flavor variations can be achieved by adding unexpected spices like curry powder or smoked paprika for an exciting twist that complements the sweetness of the maple glaze and the earthiness of the Brussels sprouts.

Texture modifications could include steaming the sprouts instead of roasting for a softer bite. Alternatively, crisping in an air fryer can achieve great results in texture while offering a healthier cooking method.

Lastly, presentation can be characterized by serving the sprouts on a bed of fresh greens or grains, adding a splash of color using pomegranate seeds or cranberries, which will contrast beautifully against the greens.

Serving and Presentation Guide

Plating techniques can elevate your dish significantly. Consider using a large, shallow bowl to showcase the vibrant greens of the sprouts mixed with glistening glaze. Garnishing with fresh herbs like parsley or thyme can add brightness.

Traditional accompaniments such as roasted meats pair perfectly with Brussels sprouts, particularly glazed ham or herb-roasted chicken. For a modern twist, consider serving alongside a grain salad or quinoa for a complete meal.

It’s advisable to serve the Brussels sprouts warm but not piping hot, allowing the glaze to settle in without losing its texture. Always consider portion control, serving medium-sized portions on each plate to ensure everyone gets enough while maintaining a fancy presentation.

For a festive occasion, serve the dish family-style on a large platter, allowing guests to help themselves while adding an inviting touch to your dining experience.

Wine and Beverage Pairing

For wine pairings, opt for a crisp Sauvignon Blanc that complements the sweetness of the maple syrup while cutting through the richness of the dish. A light-bodied red wine, such as Pinot Noir, can also play nicely, offering depth without overpowering.

If you are looking for non-alcoholic alternatives, a sparkling apple cider provides a refreshing contrast to the rich flavors of the dish, while herbal iced teas can do justice too.

For those who enjoy coffee or tea, consider a roasted herbal tea blend that can echo the earthy notes and enhance the overall experience of the meal.

Temperature is crucial; serve wines chilled and ensure any non-alcoholic beverages are refreshing but not overly cold, allowing for flavor appreciation.

Garnish your beverages with seasonal fruits or herbs to create an inviting atmosphere that corresponds with the whole dining experience.

Storage and Shelf Life

To store, keep the leftovers in an airtight container in the refrigerator. They will stay fresh for about 3-4 days. For optimum freshness, consume within this timeframe to enjoy their taste and nutritional value fully.

Avoid leaving Brussels sprouts out at room temperature to minimize spoilage risk. Always keep an eye out for discoloration or an off smell before reheating.

When reheating, the oven provides the best results for preserving texture—set the oven to 350°F and warm until heated through. Alternatively, microwave sparingly, as it may cause them to become soft.

If you’d like to freeze the Brussels sprouts, first blanch them in boiling water for 3 minutes, then transfer to an ice bath before storing in freezer-safe bags. They can retain quality for up to 6 months in the freezer.

Make Ahead Strategies

To prep ahead of time, consider washing and trimming the Brussels sprouts one day in advance and storing them in the fridge in a sealed bag. This makes one step of the process quick and easy.

Develop a prep timeline—aim to prepare the ingredients early in the day, allowing for easy assembly before dinner. A night before, you can also whisk together your maple and balsamic dressing, ensuring maximum flavor infusion upon serving.

If you decide to parboil the sprouts, thoroughly cool them before storing in the refrigerator to maintain their texture. This step saves time when roasting just before serving.

For the highest quality, assemble everything before baking without adding the glaze. Add the dressing just before roasting for freshness and to avoid sogginess.

When reheating, ensure you maintain sufficient cooking time to ensure the sprouts are warm but avoid losing their crispiness.

Scaling Instructions

To halve the recipe, simply divide the number of Brussels sprouts and corresponding glaze ingredients accordingly, retaining the same cooking times for consistency.

For doubling or tripling, ensure that your roasting pan has enough space for even cooking, switching to a larger baking sheet as needed. You may need to adjust cooking times slightly if you are adding more veggies.

Keep in mind that ingredient quality will remain consistent regardless of scaling; simply ensure proper seasoning ratios for the best results.

When modifying serving sizes, consider the number of guests and adjust quantities to ensure everyone has enough to enjoy without overly complicated preparation.

While scaling up, taste as you go; adjusting seasonings and flavors can be necessary based on the increased quantity to maintain balance.

Nutritional Deep Dive

Brussels sprouts are low in calories but packed with fiber, making them a satisfying choice for weight management. One cup of cooked Brussels sprouts contains approximately 56 calories, making it a nutritious addition to meals without excessive calorie intake.

Macro breakdown reveals a rich fiber content aiding digestion and promoting satiety. They also provide protein in small amounts, making this dish versatile for various dietary needs.

With high concentrations of vitamins K and C, Brussels sprouts play a crucial role in supporting immune health, free radical protection, and bone strengthening. The addition of maple syrup contributes valuable minerals, including manganese and zinc.

Considering portion analysis, one serving provides beneficial nutrients while remaining within recommended daily intake for vitamins. Balancing this side dish with protein-rich mains creates a well-rounded meal.

If monitoring your weight, combining Brussels sprouts with healthy fats like olive oil or nuts can provide flavor while supporting nutritional needs without overstepping calorie limits.

Dietary Adaptations

For a gluten-free variation, simply ensure all seasonings and sauces used are labeled gluten-free. Given the dish’s nature, it can easily cater to gluten-free diets without compromising on taste.

For dairy-free options, this recipe is already suitable, focusing on plant-based ingredients that allow it to fit well within vegan diets as well.

Keto dieters will appreciate the low carbohydrate count in Brussels sprouts; however, using maple syrup requires moderation, with alternative sweeteners like erythritol or stevia being suitable substitutes.

Paleo and Whole30 diets can easily accommodate this dish by replacing maple syrup with an approved natural sweetener while keeping the core flavor intact through seasoning variations.

For those on low-FODMAP diets, sticking to servings of sizing and ensuring their glaze contains appropriate ingredients that don’t provoke symptoms is key.

Lastly, consider the versatility of this recipe; with slight modifications, it can suit many diet preferences while still remaining delightfully tasty.

Troubleshooting Guide

For texture issues, if your Brussels sprouts turn out mushy, consider adjusting cooking times or baking them at a higher temperature for better crispiness next time. A key point is to monitor them closely toward the end of cooking.

Flavour balance can often be improved by adjusting the quantities of balsamic vinegar and maple syrup if overdone. For future attempts, taste the glaze before baking to reach a desired balance.

Temperature problems may arise during cooking. If they are cooking unevenly, it helps to ensure the oven’s temperature is accurate. Investing in an oven thermometer can aid in consistency.

Ingredient substitutions can be tricky; if you’re unsure about ingredient alternatives, consider researching reliable swaps to maintain flavor integrity.

Timing concerns can be managed by prepping ingredients ahead or starting your cooking earlier to avoid rushed servings, particularly during special occasions or gatherings where timing contrasts matter.

Lastly, don’t hesitate to troubleshoot as you grow accustomed to the recipe. Make notes for future iterations to refine your process and experience.

Recipe Success Stories

Community engagement has revealed a multitude of delicious variations for this easy recipe, with readers sharing their twists using their favorite seasonal ingredients. With each iteration, they’re discovering how creatively versatile Brussels sprouts can be.

Success has often been attributed to the roast process, where even novice cooks are astounded at how a simple technique can transform vegetables into such a flavorful side. Community members frequently report their families’ excitement over healthy dishes with exciting flavors.

Photography tips also abound, as many readers have taken to sharing their creations on social media, illustrating how great presentation can elevate even straightforward meals to artistic endeavors.

Lastly, shared stories of variations suggest that readers embrace the flexibility of the recipe, often suggesting new ingredients and techniques, fostering a community of shared culinary discovery.

Frequently Asked Questions

1. Can I make this dish ahead of time?
Yes! You can prepare the Brussels sprouts and glaze a few hours in advance. Simply toss them together and roast them just before serving for the best results.

2. What can I serve with Brussels sprouts?
This dish pairs wonderfully with roasted meats, fish, or as a standalone option on a grain salad. Feel free to experiment with different protein pairings to enhance your meal!

3. Are there alternatives to maple syrup?
If you prefer, honey, agave syrup, or even coconut nectar can work as alternatives, though be mindful that they may slightly alter the flavor profile.

4. How do I store leftovers?
Store leftovers in an airtight container in the refrigerator for up to 3-4 days. To reheat, warm them in the oven for optimal texture.

5. Can I freeze Brussels sprouts?
Yes, you can blanch, cool, and freeze Brussels sprouts for later use. They maintain quality for about 6 months in the freezer.

6. Are there vegetarian variations of this recipe?
Absolutely! This recipe is already vegetarian and can be enjoyed by all. You can enhance it with additional vegetables based on your preferences.

7. What’s the best way to cut Brussels sprouts?
Cut them in half lengthwise for an even roast and to maximize the surface area for the glaze; this will also help them cook evenly.

8. Can I use frozen Brussels sprouts?
Yes, you can use frozen Brussels sprouts, although fresh vegetables typically provide better texture. Ensure to thaw and dry them before roasting.

9. How long should I roast them?
Roast the Brussels sprouts for about 20-25 minutes, tossing halfway through, until they are golden brown and crispy.

10. Can this recipe be multiplied for larger groups?
Certainly! Just keep in mind to allow extra space on the baking sheet, as overcrowding can affect cooking time and texture.

Additional Resources

For additional inspiration and resources, consider exploring related recipes that showcase seasonal vegetables. Techniques for roasting and other preparation can be particularly helpful in maximizing vegetable flavors in different contexts.

Also, investigate ingredient information—learning about the many health benefits of Brussels sprouts and their culinary applications can diversify your meal planning.

Equipment recommendations should include investing in good quality baking sheets and sharp knives for better results in your cooking endeavors.

Lastly, seasonal variations can be adapted to incorporate what’s available, enabling you to craft meals that are timely and fresh, enhancing your culinary experience.

Join the Conversation

We encourage you to share your experiences with this Easy Maple Balsamic Brussels Sprouts recipe! If you’ve tried it, drop your feedback in the comments, letting us know your favorite adjustments.

Don’t forget to share your culinary masterpieces on social media using #BrusselsSproutsLove, and connect with our vibrant community of food enthusiasts.

Photography tips may also interest you as you present your version of this dish. Whether it’s attempting a new angle or experimenting with backgrounds, showing off your Brussels sprouts can spark exciting conversations.

Lastly, your recipe reviews and suggestions contribute to the flavors of our community—what other ingredients do you think work well with this dish? Join in the dialogue and enhance the enjoyment of good food together!

The Recipe

Easy Maple Balsamic Brussels Sprouts

Serves: 4

Prep Time: 10 mins

Cook Time: 20 mins

Total Time: 30 mins

Kitchen Equipment Needed

  • Baking sheet
  • Mixing bowl
  • Sharp knife
  • Measuring spoons

Ingredients

  • 1 lb Brussels sprouts, trimmed and halved
  • 3 tablespoons maple syrup
  • 2 tablespoons balsamic vinegar
  • 2 tablespoons olive oil
  • Salt and pepper, to taste
  • Optional: Crumbled feta or chopped nuts for garnish

Directions

  1. Preheat the oven to 425°F (220°C).
  2. In a mixing bowl, combine maple syrup, balsamic vinegar, olive oil, salt, and pepper.
  3. Add the Brussels sprouts to the bowl and toss until thoroughly coated.
  4. Spread the Brussels sprouts evenly onto a baking sheet in a single layer.
  5. Roast for 20-25 minutes, flipping halfway through, until golden brown and crispy.
  6. Remove from the oven and garnish with optional feta or nuts if desired. Serve immediately.

Recipe Notes

  • Feel free to adjust the ratio of maple syrup and balsamic vinegar to suit your taste preferences.
  • This recipe can be easily doubled for larger gatherings!
  • Leftovers can be stored in an airtight container in the refrigerator for 3-4 days.

Easy Creamy Garlic Pork Chops – Ready in 30 Minutes

Creamy Garlic Pork Chops: A Deliciously Indulgent Dinner

⚖️
Difficulty
Medium

⏲️
Prep Time
10 mins

🕒
Cook Time
20 mins

⏱️
Total Time
30 mins

🍽️
Servings
4 servings

If you’re seeking a recipe that delivers on flavor and comfort, these Creamy Garlic Pork Chops are sure to impress. Not only are they richly decadent, but the creamy garlic sauce is the star, complementing the juicy, tender pork with a depth of flavor that makes each bite a mini celebration. The combination of garlic, cream, and seasoning transforms a simple dinner into an indulgent experience that satisfies both body and soul.

This dish is perfect for family dinners, intimate gatherings, or even when you want to treat yourself after a long day. Imagine serving these pork chops alongside a side of garlic mashed potatoes or sautéed green beans, enhancing the meal and making it a feast for your taste buds and your eyes. The creamy garlic sauce takes only minutes to prepare, ensuring you spend less time in the kitchen and more time savoring delicious food with loved ones.

Quick Recipe Highlights

  • Flavor Profile: Rich, creamy, and garlicky with subtle herbs that balance the dish perfectly.
  • Texture: Tender, juicy pork chops enveloped in a smooth, velvety sauce.
  • Aroma: Fragrant garlic and herbs fill the kitchen, creating an inviting atmosphere.
  • Visual Appeal: A gorgeous golden-brown crust on the chops, enhanced by a creamy white sauce.
  • Skill Level Needed: Perfect for home cooks with a basic understanding of sautéing and sauce-making.
  • Special Equipment: A large skillet or frying pan is all you need for this dish.

Recipe Overview

  • Difficulty Level: Medium. This recipe requires watching the cooking time and achieving the right sear for the pork. However, it is still manageable for novice cooks.
  • Category: Dinner. This dish is perfect for a hearty family meal or a special occasion dinner.
  • Cuisine: American with influences from French cooking, particularly in the sauce preparation.
  • Cost: Approximately $15-$20, depending on the quality of the pork and whether you use fresh or dried herbs.
  • Season: Enjoy year-round; however, it shines during cooler months, making it perfect for cozy dinners.
  • Occasion: Ideal for gatherings, anniversaries, or simply a delightful weeknight dinner.

Why You’ll Love This Recipe

First and foremost, the taste of these Creamy Garlic Pork Chops is nothing short of heavenly. The rich garlic flavor combines with the creaminess of the sauce to create a dish that feels luxurious yet remains easy to prepare. Each bite of the tender pork, enhanced by the aromatic sauce, will make you yearn for more. The deep, savory notes of garlic, paired with the succulent meat, deliver a comforting sensation that’s perfect for relaxed family dinners.

Convenience is another reason to love this recipe. With just a few core ingredients and one pan, you can whip up an impressive meal that will undoubtedly leave your family and friends raving. The simplicity of preparation, along with minimal cleanup, makes this dish an excellent choice for bustling weekdays and laid-back weekends alike. You’ll appreciate how quickly this recipe comes together, allowing you to focus on enjoying your time with loved ones.

Nutritional advantages also play a role in this recipe’s appeal. Pork is a great source of protein, vitamin B12, and zinc, all essential for maintaining a healthy diet. Pairing it with a rich garlic sauce not only adds flavor but also brings the health benefits of garlic, known for its immune-boosting properties. This makes these pork chops a satisfying option for those looking to indulge without the guilt.

Additionally, this dish offers a fantastic opportunity for socializing and entertaining. With its rich flavors and comforting nature, Creamy Garlic Pork Chops are a fantastic choice for gatherings, turning any dinner party into a memorable occasion. The ability to impress guests while enjoying a home-cooked meal fosters a warm atmosphere that encourages connection and conversation.

Finally, the cost-effectiveness of this recipe is a significant bonus. Utilizing a single protein and minimal ingredients means you can create an elegant meal without breaking the bank. The balance of quality and affordability allows everyone to experience gourmet flavors at home, showcasing that delicious food doesn’t have to come at a high price.

Historical Background and Cultural Significance

The origin of pork chops can be traced back centuries, with the domestication of pigs for food. Pork has been a staple in many cultures, contributing to its widespread popularity. In American cuisine, pork chops became a dinner table favorite due to their versatility and ability to adapt to various flavors and cooking methods.

Across many cultures, garlic has held a significant place not just in culinary traditions but in folklore and medicine as well. Its strong flavor and aroma are highly regarded in numerous dishes, symbolizing health and vitality. Combining garlic with pork is a classic execution seen in French and Mediterranean cuisines, where hearty flavors and wholesome ingredients come together harmoniously.

Over the years, the preparation of pork chops has evolved, allowing for innovative techniques and recipes to emerge. From simple pan-frying to luxurious creamy sauces, pork chops remain an essential entrée choice in home kitchens across the globe. The continuous refinement of flavors reflects the ever-changing landscape of cooking while honoring traditional methods.

Regional variations of pork chops exist, highlighting the diversity of culinary traditions. From Southern fried pork chops to Asian-inspired flavors with soy and ginger, there’s no shortage of recipes to explore. This adaptability ensures that pork remains a beloved protein enjoyed by many.

Ingredient Deep Dive

Pork Chops: Pork chops are a cut of meat from the pig that’s rich in flavor and tenderness. Look for chops with a bit of marbling, as the fat helps keep the meat juicy during cooking. Nutritionally, pork chops are a fantastic source of protein and essential vitamins like B6 and B12. For storage, keep them in the refrigerator for up to 5 days or freeze for longer-term use.

Garlic: Garlic has been a key ingredient in cooking and medicine for centuries. Its pungent flavor adds depth to dishes, making it a favorite in both savory and sweet preparations. Nutritionally, garlic is known for its potential health benefits, including heart health support. When selecting garlic, choose firm bulbs with no brown spots. Store in a cool, dark place to keep it fresh longer.

Common Mistakes to Avoid

  • Overcooking the pork: This leads to dry, tough meat. Always use a meat thermometer to check for doneness (145°F is ideal).
  • Not letting the meat rest: Resting meat after cooking allows the juices to redistribute, ensuring maximum flavor and tenderness.
  • Skipping the sear: Searing the pork chops before adding the sauce helps lock in moisture and develop a delicious crust.
  • Using too much garlic: Balance is key. Too much garlic can overpower the dish, so measure appropriately.
  • Not adjusting sauce consistency: If the sauce is too thick, thin it out with a splash of broth or cream; if too thin, allow it to reduce further.
  • Not seasoning adequately: Don’t forget to season with salt and pepper; seasoning enhances the natural flavors of the meat.
  • Using cold pork: Room temperature meat cooks more evenly, so take it out of the fridge about 30 minutes before cooking.
  • Neglecting to taste: Always taste the sauce before serving to ensure desired flavor and seasoning levels.

Essential Techniques

Searing: Searing is crucial to develop flavor through the Maillard reaction. To master searing, ensure your pan is hot before adding the pork chops; this helps create a beautiful crust without sticking. Common pitfalls include overcrowding the pan, which results in steaming rather than browning. A simple visual cue for success is a golden-brown color on the meat.

Making Sauce: Crafting a sauce brings depth and moisture to your dish. Start by deglazing the pan with broth or wine to capture all the flavorful bits stuck to the bottom. Stir continuously and adjust the consistency with additional cream or broth if needed. Be mindful not to boil vigorously, as this can curdle the cream.

Pro Tips for Perfect Creamy Garlic Pork Chops

1. Choose bone-in pork chops for added flavor and moisture, as the bone helps retain juices during cooking.

2. Use fresh garlic for a brighter and more intense flavor, but if using dried, reduce the amount by half.

3. Allow the cream to come to room temperature before adding to prevent curdling when mixed with the hot ingredients.

4. Consider adding herbs like thyme or rosemary to enhance the aroma and flavor of the sauce.

5. Pair the dish with sides that complement the rich sauce, such as garlic mashed potatoes or steamed vegetables.

6. Keep the sauce on low heat after it’s prepared to prevent overcooking the garlic and altering its taste.

7. For a unique twist, add Parmesan cheese to the sauce for an extra layer of richness.

8. Always serve with a sprinkle of fresh chopped parsley for a splash of color and freshness on the plate.

Variations and Adaptations

Regional variations are abundant, like Southern-style pork chops served with a gravy made from pan drippings. Seasonal adaptations can involve incorporating fresh herbs or vegetables based on what is locally available, ensuring freshness and flavor. Dietary modifications could include using boneless, skinless chicken thighs as a substitute, adapting the cooking time as necessary. If you prefer a cream-free version, a delicious alternative is to use a broth-based sauce with sautéed mushrooms for a lighter approach.

Serving and Presentation Guide

When plating, consider a spacious plate to allow the pork chops to stand out. Optionally, drench the chops in sauce and arrange garlic mashed potatoes beside them for a delightful contrast. Garnish with fresh herbs to enhance visual appeal and add a burst of color. Temperature plays a crucial role; serve the dish immediately after cooking for the best experience. Don’t forget portion control; using a standard serving size ensures all guests receive a balanced plate.

Wine and Beverage Pairing

When it comes to wine pairing, a creamy garlic sauce complements white wines beautifully. A Chardonnay or a light Sauvignon Blanc works well, bringing freshness and acidity to balance the dish’s richness. For non-alcoholic alternatives, consider serving sparkling water infused with lemon or a light herbal iced tea, enhancing the dining experience without overshadowing the flavors of the pork. Each sip should seamlessly blend with the meal to elevate the entire experience.

Storage and Shelf Life

To store leftovers, create airtight containers and place them in the refrigerator, where they can last for up to three days. Always allow the pork to cool before sealing to avoid condensation. For longer storage, consider freezing the cooked pork chops for up to three months; however, ensure they’re wrapped securely to prevent freezer burn. When reheating, aim for gentle heating in a skillet or microwave until warmed through to preserve texture and flavor.

Make Ahead Strategies

To streamline your cooking experience, consider marinating the pork chops overnight for enhanced flavor. You can also prepare the garlic sauce in advance and reheat it just before serving. Store the sauce separately to maintain the pork’s texture and the sauce’s creaminess. If you’re hosting, set the table and prep sides beforehand to minimize stress on the day of serving. Just before eating, reheat everything simultaneously for a cohesive dining experience.

Scaling Instructions

If you plan to halve the recipe, adjust the cooking time slightly, reducing it to ensure the pork still cooks evenly. For doubling or tripling, use a large skillet and adjust your cooking time as necessary to accommodate more chops; use oil and space them out adequately to prevent steaming. Additionally, keep an eye on the sauce’s consistency, as you might need to adjust the broth or cream amounts accordingly while maintaining rich flavors.

Nutritional Deep Dive

The macro breakdown of this dish reveals a high protein content from the pork, approximately 25 grams per serving, which is vital for muscle repair and growth. It’s also rich in fats, particularly if using fatty cuts, so be mindful of balance within your overall diet. The dish provides essential micronutrients such as vitamin B12 from pork and beneficial compounds from garlic, enhancing immunity. Portion control plays a key role in managing overall calorie intake, making this dish a wonderful treat while monitoring health goals.

Dietary Adaptations

If you’re adhering to a gluten-free diet, ensure all ingredients, particularly any broths or sauces used, are labeled gluten-free. For those following a dairy-free lifestyle, substitute the heavy cream with coconut cream or a dairy-free alternative. If you’re vegan, consider using tofu or seitan as a protein substitute and prepare the sauce using cashew cream and garlic. For low-carb or keto adaptations, focus on reducing the portion of potatoes and serving alongside low-carb vegetables.

Troubleshooting Guide

If you run into texture issues, check that the pork chops have been seared well—an overcooked chop can be rubbery! To fix flavor balance problems, you can add more salt or acidity to brighten the flavor. If you find your garlic sauce is too heavy, achieve a lighter profile by adding a splash of broth or even a squeeze of lemon juice. For equipment challenges, familiarize yourself with the pan you are using; some stovetops heat differently, which can alter cooking times.

Recipe Success Stories

Our readers love sharing their experiences with these Creamy Garlic Pork Chops, often highlighting the meal’s impressive taste. Feedback typically centers around the deliciously rich sauce that complements the chops, with suggestions pouring in for additional ingredients like mushrooms. Many have reported experimenting with the recipe, achieving their delightful variations. Captivating photographs of their plated creations flood our community, inspiring others to try their hand at this dish and share their own delicious twists.

Frequently Asked Questions

What can I serve with Creamy Garlic Pork Chops?

Great side dish ideas include garlic mashed potatoes, roasted vegetables, or a light salad, enhancing the overall dining experience.

Can I use chicken instead of pork?

Yes, chicken breast or thighs can be substituted, but adjust cooking times as necessary to ensure they are cooked through.

How can I store leftovers?

Store the leftover pork chops in airtight containers in the refrigerator for up to three days, or freeze for up to three months.

Is it possible to make this dish dairy-free?

Yes, use coconut cream or any dairy-free alternative in place of heavy cream for a suitable substitution.

What if my sauce is too thick?

Add a small amount of broth or milk to the sauce over low heat, stirring until you reach the desired consistency.

Can I prepare this dish in advance?

Absolutely! You can marinate the pork chops overnight and prepare the sauce ahead of time, rewarming it before serving.

How do I know when the pork is cooked?

Using a meat thermometer, ensure that the internal temperature reaches at least 145°F for perfectly cooked pork.

Can I add mushrooms to the sauce?

Yes, adding sautéed mushrooms enhances the flavor and texture, making for a hearty sauce that adds depth.

Is this recipe suitable for freezing?

Yes, cooked pork chops freeze well, but be sure to wrap them tightly to prevent freezer burn.

Can I use dried herbs instead of fresh?

Yes, dried herbs can be used, but adjust the quantity since dried herbs are more concentrated in flavor.

Additional Resources

For those who want to explore more flavors, we recommend checking out our recipes for garlic grilled chicken or creamy mushroom pasta. Technique guides on sautéing and sauce making offer invaluable tips to enhance your cooking skills. Additionally, keep an eye out for seasonal variations that introduce new ingredients and culinary twists, allowing you to explore diverse flavor profiles suited to each time of the year.

Join the Conversation

We invite our readers to share their experiences with Creamy Garlic Pork Chops or any variations they’ve tried! Post your photographs on social media using our hashtag or leave comments with your suggestions and feedback. Community engagement enriches our cooking experiences and inspires others to explore new delicious options. Your insights matter, and together we create a thriving space for culinary exploration.

The Recipe

Creamy Garlic Pork Chops

Serves: 4

Prep Time: 10 mins

Cook Time: 20 mins

Total Time: 30 mins

Kitchen Equipment Needed

  • Large skillet
  • Meat thermometer
  • Mixing spoon

Ingredients

  • 4 pork chops
  • 3 tablespoons olive oil
  • 4 cloves garlic, minced
  • 1 cup heavy cream
  • 1 teaspoon dried thyme
  • Salt and pepper, to taste
  • Fresh parsley, for garnish

Directions

  1. Heat olive oil in a large skillet over medium-high heat.
  2. Season the pork chops with salt and pepper, then add them to the hot skillet.
  3. Sear the pork chops for about 4-5 minutes on each side or until golden brown and cooked through.
  4. Remove the pork from the skillet and set aside to keep warm.
  5. In the same skillet, add minced garlic and cook until fragrant, about 1 minute.
  6. Pour in the heavy cream, thyme, and adjust seasoning as desired; allow simmering until slightly thickened.
  7. Return the pork chops to the skillet, coating them in the creamy sauce.
  8. Garnish with fresh parsley before serving.

Recipe Notes

  • You can replace heavy cream with a dairy-free version for a lighter or vegan option.
  • Experiment with additional herbs like rosemary or basil for varied flavor profiles.

Perfect Whole Roasted Chicken – Juicy and Flavorful

Whole Roasted Chicken: The Ultimate Comfort Food Recipe

⚖️
Difficulty
Moderate

⏲️
Prep Time
15 mins

🕒
Cook Time
1 hour 30 mins

⏱️
Total Time
1 hour 45 mins

🍽️
Servings
4

There’s nothing quite like the comforting aroma of a whole roasted chicken wafting through the kitchen, inviting everyone to gather around the dining table. This recipe for a perfectly roasted chicken, seasoned to perfection and crisp on the outside, is a quintessential dish that never goes out of style. Whether you are hosting a family get-together or simply indulging in a cozy dinner at home, a whole roasted chicken delivers warmth and satisfaction with each bite.

The well-roasted chicken boasts tender, juicy meat that melts in your mouth while the golden, crispy skin promises a satisfying crunch. It can be paired effortlessly with sides like roasted vegetables or creamy mashed potatoes, offering a versatile meal option that caters to all palates. To elevate the experience, add a drizzle of homemade gravy or a sprinkle of herbs for a finishing touch. Ultimately, it’s more than just a meal; it’s a gathering around shared flavors and memories.

Quick Recipe Highlights

  • Flavor Profile: Savory, herbal notes combine with a hint of citrus for a balanced taste.
  • Texture: The chicken skin is irresistibly crispy while the meat remains moist and tender.
  • Aroma: The enticing aroma of garlic, rosemary, and lemon fills your kitchen.
  • Visual Appeal: A golden-brown crust with a rustic presentation makes it an eye-catching centerpiece.
  • Skill Level Needed: Basic roasting techniques; ideal for novice cooks wanting to impress.
  • Special Equipment: Roasting pan and meat thermometer for perfect results.

Recipe Overview

  • Difficulty Level: This recipe is classified as moderate, making it suitable for cooks at various skill levels. The steps involved are straightforward, though careful attention to timing is essential for achieving the perfect roast.
  • Category: Whole roasted chicken falls under the comfort food category. It is a traditional main dish, often served during family gatherings and special occasions.
  • Cuisine: This recipe is rooted in classic American cuisine, influenced by various culinary traditions that celebrate roasting meats.
  • Cost: Roasting a whole chicken is budget-friendly, typically costing between $10 and $20 depending on the source and quality of the chicken.
  • Season: While it can be cherished year-round, a whole roasted chicken is especially popular during the fall and winter months, making it ideal for holidays and family gatherings.
  • Occasion: This dish is perfect for Sunday dinners, holiday feasts, and celebratory events when shared with loved ones.

Why You’ll Love This Recipe

The taste and texture of a perfectly roasted chicken are truly irresistible. Imagine biting into the warm, juicy meat that’s been seasoned generously with herbs and spices, delivering a comforting flavor with every mouthful. The contrasting crunch of the skin adds a delightful element that elevates this dish from ordinary to extraordinary.

Convenience is another major plus for this recipe. Once you prepare the chicken and place it in the oven, your job is mostly done. This allows for a stress-free cooking experience, giving you time to whip up some sides or relax while the roast develops its flavors. It’s a fantastic option for busy weeknights or hosting friends without spending all day in the kitchen.

Nutritional advantages abound when you choose to prepare your own whole roasted chicken. It’s a source of lean protein, packed with essential nutrients, while you control the ingredients, reducing excess sodium and unhealthy fats. When paired with fresh vegetables, you create a balanced meal that everyone will appreciate.

Socially, the whole roasted chicken lends itself to sharing and celebration. Nothing brings people together quite like the act of carving a whole chicken at the table, encouraging conversation and laughter. It’s a dish that invites joy and company, so you’re sure to create lasting memories while enjoying this meal.

Finally, the cost-effectiveness of cooking a whole roasted chicken cannot be overstated. With its substantial size, one chicken can feed several people, often with leftovers that provide opportunities for delightful next-day meals, making it an accessible choice for any home cook.

Historical Background and Cultural Significance

The origins of the whole roasted chicken can be traced back to various cooking traditions around the world. Roasting meats over an open flame or in an oven is a technique that dates back centuries, allowing cooks to develop deep flavors while ensuring their meats are thoroughly cooked.

Culturally, the whole roasted chicken holds significant importance in many families. It is often associated with family gatherings and celebrations, offering a means to connect generations through shared recipes and traditions. This simple yet elegant dish crosses culinary borders, bringing together diverse cooking styles and flavors from various traditions.

The evolution of the roasted chicken has seen it adapted to reflect regional preferences, while still retaining its rustic appeal. Different herbs and spices are used across cultures, giving rise to variations that highlight local ingredients and culinary practices, from Mediterranean to Asian influences.

Many regions indulge in their unique take on the roast chicken, leading to delightful regional variations such as Adobo from the Philippines, Peruvian Pollo a la Brasa, and French Coq au Vin. Each variation offers a tantalizing glimpse of its cultural background, further enhancing the dish’s significance on the global culinary stage.

Ingredient Deep Dive

Chicken is the star of the show in this recipe. Historically, chicken has been a staple protein in many diets around the world due to its availability and adaptability. Nutritionally, chicken is high in essential proteins and low in saturated fats when cooked without excessive oils or creams. When selecting chicken, look for a bird that is firm, plump, and has a fresh appearance; storing it promptly in the refrigerator is key to maintaining its freshness.

Another key ingredient is fresh herbs, notably rosemary and thyme. These herbs not only enhance the flavor profile but also contribute essential nutrients, such as vitamins and antioxidants. Selecting herbs that are vibrant and aromatic ensures a fresh taste, and they can be stored in the refrigerator or freezer for longer viability.

Garlic adds depth and aromatic qualities to the roasted chicken. With its rich history in various cuisines, garlic is renowned for its health benefits, including antimicrobial properties. When selecting garlic, choose bulbs that are firm and papery, and store them in a cool, dark place to maximize longevity. Roasting enhances its natural sweetness, creating a sumptuous flavor that pairs beautifully with chicken.

Lemon brings brightness to the dish with its zesty acidity. Historically, lemons have traveled across continents, often utilized in various cooking methods to elevate dishes. Full of vitamin C, lemons are also high in flavor. Choose lemons that are heavy for their size; they will provide the most juice. Store them in the refrigerator, and they will last for several weeks.

Lastly, olive oil is essential for achieving that perfect roast. Olive oil has been used since ancient times for its health properties, including good fats and antioxidants. Selection should focus on high-quality extra virgin olive oil, which maximizes flavor. It can be stored in a cool, dark place to maintain its flavor integrity.

Common Mistakes to Avoid

  • Not patting the chicken dry: For crispy skin, make sure the chicken is thoroughly dried before seasoning and roasting.
  • Skipping the seasoning: A well-seasoned chicken won’t have that rich, full flavor—don’t be sparing with your herbs and spices.
  • Incorrect oven temperature: Ensure your oven is preheated properly to avoid undercooked or unevenly cooked chicken.
  • Overcrowding the pan: Allow for airflow around the chicken to promote even cooking and browning.
  • Not letting the chicken rest: Allowing the chicken to rest after roasting helps redistribute the juices for a moister meat.
  • Using a dull knife for carving: A sharp knife makes carving much more manageable and helps maintain the chicken’s presentation.
  • Forgetting to check doneness: Use a meat thermometer to check that the internal temperature reaches at least 165°F for safety.
  • Rushing the cooking process: Avoid cooking at too high of a temperature, as this can lead to burnt skin while the meat remains raw.
  • Miscalculating cooking time: Always factor in the size of the chicken when estimating roast time to ensure it cooks through.
  • Neglecting side dishes: Pair your chicken with complementary sides to enhance the overall meal experience.

Essential Techniques

One essential technique for roasting a whole chicken is butterfly roasting (spatchcocking) which allows for a faster and more even cook. This method opens up the chicken, allowing heat to reach all parts more effectively. To master this technique, ensure you have kitchen shears or a sharp knife to remove the backbone, and practice with a small amount of pressure to avoid damaging the meat. Your visual cue for success is a flattened chicken that lays evenly in the roasting pan.

Another vital technique is proper seasoning. An effective method is to apply a dry rub with herbs and spices directly onto the skin and beneath it. This not only helps flavor the meat internally but also enhances the skin’s crispiness during roasting. Avoid using too much salt initially to prevent drawing out moisture; instead, focus first on herbs, spices, and oil. Visual cues here include a uniformly coated chicken, glistening with oil and seasonings before roasting.

Pro Tips for Perfect Whole Roasted Chicken

To prepare a stunning whole roasted chicken, start with room temperature meat; allowing the chicken to sit outside the fridge for about an hour helps ensure even cooking.

Inject flavor by using a marinade or brine to enhance moisture and infuse savory tastes. Marinate for several hours or overnight for the best results.

Don’t skip basting! Basting the chicken with its own juices during the roasting process helps develop additional flavor and encourages a crispy skin.

Use a meat thermometer to accurately assess doneness, ensuring your chicken reaches 165°F internally without overcooking.

For enhanced flavor, consider stuffing the cavity with aromatics like onions, garlic, and lemon slices before roasting, imparting delightful aromas and tastes.

Always rest the chicken for at least 10-15 minutes post-roasting. This allows juices to redistribute, ensuring a moist and flavorful chicken when carving.

Experiment with herb blends in your rub for unique flavors, alternating between savory spices like smoked paprika and sweet herbs like thyme.

Finally, consider using a roasting rack to elevate the chicken, allowing heat to circulate effectively and promote even browning.

Variations and Adaptations

Regional variations include using spices unique to your locale, such as Cajun seasoning for a Southern twist or utilizing Mediterranean flavors like oregano, lemon, and garlic for a spirited kick.

Seasonal adaptations might involve pairing your roasted chicken with vegetables that are fresh and in-season, enhancing the meal’s vibrancy and health.

Dietary modifications can be made by adapting the rub or marinade—swap out traditional ingredients for gluten-free or dairy-free alternatives.

For flavorful variations, try adding fruits like apples or peaches in the roasting pan, giving off their natural sweetness during the cook for a delightful contrast to the savory chicken.

Texture modifications might involve using different cooking methods, such as slow-roasting or pressure-cooking, to achieve varied textures, from crispy skin to fall-off-the-bone tenderness.

Lastly, consider presentation alternatives by carving the chicken into pieces or serving it whole but garnished with fresh herbs or colorful vegetables for an inviting sight on your table.

Serving and Presentation Guide

When it comes to plating your whole roasted chicken, consider a rustic wooden board or a beautiful platter. Arrange the chicken in the center, allowing space for accompanying sides, such as roasted potatoes or a fresh salad.

Garnishing ideas can include fresh herb sprigs around the dish, adding natural color and aroma. It creates an elegant presentation while also hinting at the flavors to come.

Traditional accompaniments vary across cultures, with mashed potatoes and gravy in American households or couscous and roasted vegetables in Mediterranean traditions.

For modern serving suggestions, consider carving the chicken into quarters on the serving dish, making it easier for guests to serve themselves and creating an inviting atmosphere.

Temperature considerations are crucial; serving the chicken warm, but not piping hot is ideal, allowing flavors to be fully appreciated.

Portion control tips can suggest serving a mix of dark and white meat, catering to individual preferences while ensuring no one leaves the table hungry.

Wine and Beverage Pairing

Wine pairings for roasted chicken shine with medium-bodied whites like Chardonnay or Sauvignon Blanc, providing refreshing acidity to counterbalance the richness of the meat.

For red wine enthusiasts, consider a light Pinot Noir or Grenache, offering a fruity, earthy undertone that complements the savory flavors beautifully.

For non-alcoholic alternatives, consider pairing with well-crafted herbal teas or homemade lemonades that accentuate the dish’s fresh ingredient profile.

Temperature considerations are essential for wine; whites should be nicely chilled while reds can be served slightly below room temperature, enhancing aroma and flavor.

Serving suggestions can involve offering guests a choice of beverages, ensuring everyone finds something they enjoy while complementing the delightful aroma and taste of the roasted chicken.

Storage and Shelf Life

For storage methods, wrap leftover roasted chicken in plastic wrap or store in an airtight container to maintain moisture and flavor.

Temperature requirements are vital; refrigerate any leftovers promptly within two hours of cooking to prevent spoilage.

Container recommendations include using glass containers for easy reheating and to maintain freshness over time.

Signs of spoilage can be assessed through visual inspection and smell—discard the chicken if you notice any off-putting odors or discoloration.

Reheating instructions suggest using an oven set to 350°F, allowing the chicken to heat evenly and remain moist. Microwaving can be done, but is less recommended due to the potential of drying out the meat.

Freezing guidelines should include wrapping the chicken well in freezer-safe containers to prevent freezer burn, allowing for storage of up to six months without significant loss of quality.

Make Ahead Strategies

Prep timelines can be organized by marinating or seasoning the chicken the night before, allowing flavors to meld thoroughly and cooking day to be straightforward.

Storage between steps may include chopping vegetables or preparing sides a day in advance, reducing the burden on the cooking day.

Quality impact assessments show that marinating too long can sometimes lead to overly salty or mushy chicken, so adhering to recommended marinating times is helpful.

Assembly tips could involve prepping sauces or gravies in advance, ensuring they are ready to enhance the roasted chicken right before serving.

Reheating guidelines encompass ensuring the chicken is warmed through, resting briefly before serving again to lock in moisture.

Fresh element additions can include tossing together fresh herbs or salads right before mealtime to deliver vibrant colors and textures alongside your roasted chicken.

Scaling Instructions

Halving the recipe requires careful measurement of the rub and cooking time; smaller chickens will roast faster. Maintain similar cooking temperatures but anticipate a shorter time frame.

Doubling or tripling the recipe means investing in larger pans and potentially extending cooking times, depending on oven space availability.

Equipment adjustments might entail utilizing multiple roasting pans if cooking several chickens to ensure even cooking across the board.

Timing modifications require extra vigilance; check the internal temperature frequently to avoid overcooking while ensuring thorough doneness.

Storage considerations for scaled up recipes involve ensuring ample refrigeration space and following guidelines for leftover storage pertaining to larger batch cooking.

Nutritional Deep Dive

The macro breakdown of a serving of roasted chicken typically includes a healthy proportion of proteins, essential for muscle development and repair.

Micronutrient analysis reveals that roasted chicken provides significant B vitamins, important for energy production and metabolic functions, alongside impressive amounts of selenium.

Health benefits are abundant, from providing low-fat protein to being versatile enough to pair with numerous healthy sides, such as vegetables and whole grains.

Dietary considerations should acknowledge any specific dietary needs of guests when preparing sides, ensuring a well-rounded meal.

Portion analysis encourages mindful serving sizes to help manage overall calorie intake while enjoying the luxuries of a hearty roast.

Weight management tips include balancing this indulgent dish with lighter fare during the rest of the week, focusing on satisfied cravings without overexerting calories.

Dietary Adaptations

For gluten-free adaptations, ensure that any rubs or marinades used contain no gluten-based substances to suit dietary restrictions.

Dairy-free options can be simple, focusing on oil-based marinades and avoiding butter or cream when preparing sides.

Vegan alternatives typically revolve around roasted vegetables, emphasizing flavors through spices and cooking techniques without the use of chicken.

Low-carb variations can include pairing with salads instead of starchy sides, keeping meals light while balancing proteins effectively.

Keto-friendly suggestions focus on additional fat sources like avocados to accompany the chicken, enhancing flavor and nutritional value.

Paleo adaptations can highlight natural ingredients, ensuring no processed or grain-based sides are used, instead opting for fresh veggies and fruits.

Low-FODMAP considerations require careful selection of specific herbs and vegetables to accommodate sensitive digestive needs without sacrificing flavors.

Troubleshooting Guide

If you encounter texture issues like dry meat, consider adjusting cooking temperatures or using brines to increase moisture retention during roasting.

For flavor balance discrepancies, always taste the seasoning blend before applying, adjusting accordingly to avoid overpowering the natural chicken flavor.

Temperature problems can arise if cut sizes are inconsistent; follow even cooking and check internal temperatures carefully while roasting.

Equipment challenges, such as an unreliable oven, should prompt the use of an oven thermometer for accurate readings, helping maintain optimal roast conditions.

Ingredient substitutions might entail experimenting with fresh herbs instead of dried or using alternatives like avocados instead of butter to suit dietary needs.

Timing concerns revolve around knowing your chicken size; always verify doneness with a meat thermometer to prevent overcooking.

Recipe Success Stories

Community feedback often highlights how a simple whole roasted chicken recipe can bring families together, triggering nostalgic memories of sharing meals together.

Variation successes are abundant, with readers sharing their twitches on spices and marinades, lending a personalized touch while staying true to the main recipe.

Adaptation stories frequently emerge from subscribers, showcasing how they addressed dietary restrictions yet maintained flavor integrity, further emphasizing the versatility of this dish.

Reader suggestions often refer to unique side combinations that enhance the meal, strengthening the bond between recipe and personal flavor profile.

Photography tips shared by the community frequently showcase the beauty of a whole chicken served on a gorgeous platter, inspiring others to connect their culinary creations visually.

Frequently Asked Questions

Q: How can I ensure my chicken is tender and juicy?

A: To guarantee a tender and juicy chicken, avoid overcooking it. Use a meat thermometer to check for doneness at 165°F, and let it rest after roasting to lock in moisture.

Q: Can I roast a chicken from frozen?

A: While it’s not ideal, you can roast a chicken from frozen. However, the cooking time will be longer, and you must ensure the internal temperature reaches 165°F.

Q: What sides pair well with roasted chicken?

A: Delicious sides to serve with roasted chicken include mashed potatoes, roasted vegetables, or a fresh garden salad. You can also try grains like quinoa or rice.

Q: Is it necessary to marinate a whole roasted chicken?

A: Marinating is not strictly necessary, but it can enhance flavor and moisture. A simple rub of oil, salt, and herbs can also provide significant flavor without additional time.

Q: How do I know when my chicken is fully cooked?

A: You can tell your chicken is fully cooked when the internal temperature reaches 165°F. Additionally, juices should run clear, and the meat should no longer be pink near the bone.

Q: Should I cover the chicken while roasting?

A: Covering the chicken with foil during the initial stage of roasting can help prevent over-browning. Remove the foil later in the cooking process for crispy skin.

Q: What’s the best way to store leftovers?

A: Store leftover roasted chicken in an airtight container in the fridge for up to 4 days. For longer storage, wrap it in plastic wrap and freeze for up to 6 months.

Q: Can I use dried herbs instead of fresh?

A: Yes, you can use dried herbs, but use less than you would for fresh because dried herbs are more concentrated in flavor.

Q: How can I achieve crispy skin?

A: For crispy skin, dry the chicken thoroughly before applying oil and seasoning. High oven temperatures at the start of cooking help achieve that desired crunch.

Q: Is there a specific type of chicken to use for roasting?

A: Ideally, choose a roasting chicken, typically around 3 to 4 pounds, for the best results. They are juicier and suitable for roasting.

Additional Resources

For related recipes, consider exploring ideas like herb-roasted vegetables or homemade gravy that can enhance your whole roasted chicken experience.

Technique guides that focus on proper carving techniques can further assist you in serving the chicken beautifully at your next gathering.

Ingredient information can offer insights into understanding the different types of poultry available in your area, aiding selection for the best flavor.

Equipment recommendations might include quality roasting pans or thermometers that increase efficiency and accuracy in your roasting endeavors.

Seasonal variations, especially around the holiday times, can inspire you to switch up traditional flavors with seasonal ingredients for a fresh take on this classic dish.

Join the Conversation

We’d love to hear your thoughts! Share your experience making our whole roasted chicken recipe on social media using our hashtags, and connect with a community of fellow food lovers.

For those inquisitive about photography tips, we encourage you to snap a picture of your finished roast and tag us. We adore seeing your culinary creations and how you style them!

Recipe reviews are an invaluable resource for potential new cooks; your feedback plays a crucial role in shaping our content and community.

Community engagement can happen through commenting on posts or sharing variations you made in the recipe, enriching the dialogue on culinary creativity.

As we explore new avenues in recipe development, your contributions will help us evolve and create more delicious experiences for all.

The Recipe

Whole Roasted Chicken

Serves: 4

Prep Time: 15 mins

Cook Time: 1 hour 30 mins

Total Time: 1 hour 45 mins

Kitchen Equipment Needed

  • Roasting Pan
  • Meat Thermometer
  • Kitchen Twine (optional)
  • Cutting Board
  • Sharp Knife

Ingredients

  • 1 whole chicken (3-4 pounds)
  • 2 tablespoons olive oil
  • 2 teaspoons salt
  • 1 teaspoon black pepper
  • 2 teaspoons garlic powder
  • 1 tablespoon fresh rosemary (or 1 teaspoon dried)
  • 1 lemon (halved)
  • 5 garlic cloves (smashed)
  • 2 onions (quartered)
  • Fresh herbs for garnish (optional)

Directions

  1. Preheat the oven to 425°F (220°C).
  2. Pat the chicken dry with paper towels and place it in a roasting pan.
  3. Rub the chicken all over with olive oil, and season with salt, pepper, garlic powder, and rosemary, making sure to season under the skin where possible.
  4. Stuff the cavity with lemon, smashed garlic, and quartered onions.
  5. Tie the legs together with kitchen twine, if desired, and tuck the wings under the body.
  6. Roast the chicken for 1 hour and 15 minutes, or until a thermometer reads 165°F (75°C) at the thickest part of the thigh.
  7. Remove from oven and let the chicken rest for 10-15 minutes before carving.
  8. Serve hot, garnished with fresh herbs if desired.

Recipe Notes

  • Feel free to experiment with different herbs based on your taste preferences.
  • Leftovers can be stored in the refrigerator for up to 4 days.
  • For a crispy skin, ensure you dry the chicken thoroughly before seasoning.

Easy Parmesan Crusted Chicken with Lemon Butter Sauce

Parmesan Crusted Chicken with Lemon Butter Sauce: A Deliciously Simple Dinner

⚖️
Difficulty
Easy

⏲️
Prep Time
15 mins

🕒
Cook Time
20 mins

⏱️
Total Time
35 mins

🍽️
Servings
4

Parmesan Crusted Chicken with Lemon Butter Sauce is the perfect dish for anyone looking to elevate their dinner game with minimal effort. The combination of a crispy, golden Parmesan crust and a silky lemon butter sauce offers an exciting flavor profile that is both refreshing and indulgent. This recipe not only highlights the rich taste of chicken but infuses it with a zesty, buttery sauce that captivates the senses, making it a favorite for family dinners and entertaining guests alike.

Not only is this dish packed with flavor, but it also boasts a beautiful presentation. The vibrant lemon sauce enhances the aesthetic appeal of the dish, turning simple chicken into a gourmet experience. The crunchy texture of the Parmesan coating contrasts brilliantly with the tender and juicy chicken, providing a mouthfeel that’s delightful with every bite. This easy-to-follow recipe guarantees a meal that your guests will rave about, making it a go-to for recipe enthusiasts and novice cooks alike.

Quick Recipe Highlights

  • Flavor Profile: The savory notes of Parmesan blend beautifully with the zesty lemon, creating a delightful medley that dance on your palate.
  • Texture: Enjoy the crispy exterior combined with tender, juicy chicken that melts in your mouth.
  • Aroma: The fragrant aroma of garlic and fresh lemon fills the air as this dish cooks, setting the stage for a delicious meal.
  • Visual Appeal: The golden-brown crust and bright lemon sauce create an alluring plate that is sure to impress.
  • Skill Level Needed: Perfect for beginners, this easy recipe requires minimal cooking experience.
  • Special Equipment: You will need a baking sheet, frying pan, and a meat mallet for optimal results.

Recipe Overview

  • Difficulty Level: This recipe is classified as easy, making it accessible for all skill levels.
  • Category: This dish is suitable for dinner and lunch, making it incredibly versatile.
  • Cuisine: This recipe draws inspiration from Italian cuisine, highlighting the classic flavors of Parmesan cheese.
  • Cost: Affordable ingredients make this a budget-friendly meal, perfect for family dining.
  • Season: Ideal for all seasons, particularly lively spring and summer when fresh lemons are at their best.
  • Occasion: Great for weeknight dinners, gatherings, and even special occasions.

Why You’ll Love This Recipe

Taste and texture are paramount, and this Parmesan Crusted Chicken with Lemon Butter Sauce nails both. The rich, nutty flavor of Parmesan crisps perfectly with the zing of fresh lemon juice, rendering a dish that is both comforting and refreshing. Each bite delivers a satisfying crunch, giving way to tender, juicy chicken that is seasoned to perfection. This harmonious pairing of ingredients ensures that your taste buds are always delighted.

Convenience is another highlight of this recipe. With a prep time of just 15 minutes and a cook time of 20 minutes, you can have a gourmet meal ready in under an hour. This makes it an excellent choice for busy weeknights or when unexpected guests arrive. The straightforward method of preparation allows you to enjoy cooking without the stress, making it an inviting experience.

Nutritionally speaking, this dish is balanced and fulfilling. The chicken provides lean protein, while the lemon offers a dose of vitamin C. The use of whole ingredients ensures that you are feeding your family wholesome food that tastes great, making it a smart choice for health-conscious eaters. Pair this dish with a side salad or steamed vegetables for a complete meal rich in nutrients.

Socially, this Parmesan Crusted Chicken is an excellent dish for entertaining. Its stunning presentation and delightful flavors are sure to impress your guests, sparking conversations and making any gathering memorable. Serving this dish can create opportunities for shared experiences and stories over a beautiful meal.

Lastly, its cost-effectiveness is a huge plus. Using relatively inexpensive ingredients, this recipe serves four people, making it a fantastic option for families or gatherings. You can create a restaurant-quality meal without breaking the bank, proving that delicious food doesn’t need to come at a high price.

Historical Background and Cultural Significance

The origin of Parmesan cheese dates back to the Middle Ages in Italy, where it was created by monks in Northern Italy as a way to preserve milk. Due to its rich flavor and long shelf life, it became a staple in many Italian households. This chicken dish draws on those culinary traditions, bringing a taste of Italy to your dinner table.

Culturally, Italian cuisine celebrates fresh ingredients and robust flavors. Parmesan Crusted Chicken with Lemon Butter Sauce embodies this ethos, reflecting the proud Italian traditions of using high-quality components to enhance and elevate a meal. The zest of the lemon is a nod to the Mediterranean climate, making it a popular choice in Italian cooking.

Over the years, recipes using Parmesan cheese have evolved, incorporating various cooking techniques and ingredients from around the world. The introduction of butter and lemon in combination with Parmesan reflects a modern twist, elevating the traditional chicken dish into something sophisticated and universally appealing.

Regional variations of this dish are plenty, with many cultures putting their own spin on the concept of crisply baked chicken. Whether it’s in Italy or elsewhere, adapting flavors to suit local palettes gives this dish a sense of global unity rooted in comfort food.

Ingredient Deep Dive

– **Parmesan Cheese**: Originating from Italy, Parmesan cheese has a storied past that enhances its esteemed status in cooking. Known for its sharp and nutty flavor, it’s a favored ingredient in countless dishes. Nutritionally, it is high in calcium and protein, and it can be found in various aged forms. When selecting Parmesan, look for wheels that are labeled “Parmigiano Reggiano” for authenticity. Store it in an airtight container in the fridge to maintain freshness.

– **Chicken Breast**: As a lean source of protein, chicken breast is a popular choice in healthy cooking. Historically, it has been a staple protein in many cultures around the world. When selecting chicken, choose those that are pink and moist with no blemishes. Store your chicken in the coldest part of the refrigerator and use or freeze it within a few days to avoid spoilage.

– **Lemon**: This vibrant fruit adds a refreshing note to many dishes around the globe. Lemons are rich in vitamin C and are known for their digestive health benefits. When selecting lemons, opt for those that feel heavy for their size and have a bright yellow skin. They can be stored at room temperature or in the fridge and have a shelf life of up to a week.

– **Butter**: A quintessential ingredient in many cuisines, butter adds richness and flavor, acting as a base for many sauces. The history of butter spans thousands of years, originating from various cultures. Nutritionally, it is often better to choose unsalted butter for cooking, allowing you to control the salt content in your dishes. Store butter in the refrigerator and use it within a few months for optimal freshness.

Common Mistakes to Avoid

  • Not pounding the chicken: This can lead to uneven cooking and varying textures, resulting in a dry piece of chicken.
  • Using stale Parmesan cheese: Always check the freshness of your cheese, as old cheese can drastically alter the flavor of the dish.
  • Skipping the lemon zest: The zest adds a vibrant flavor that enhances the overall dish and is crucial to its taste.
  • Overcooking the chicken: Use a meat thermometer to ensure that the chicken is cooked to an internal temperature of 165°F to maintain juiciness.
  • Not letting the chicken rest: Allowing the chicken to rest before serving will help retain moisture and flavor.
  • Incorrect pan temperature: Make sure the pan is hot enough before adding the chicken; this will help achieve a perfect crust.
  • Using the wrong baking sheet: Preferably use a rimmed baking sheet to catch any drippings from the chicken.
  • Not seasoning the chicken: Ensure you season the chicken properly before coating to enhance the flavor.
  • Skipping the sauce: The lemon butter sauce is essential, so don’t neglect to prepare it for serving.
  • Not adjusting for dietary needs: Be cautious about substitutions if cooking for someone with dietary restrictions or allergies.

Essential Techniques

– **Pounding Chicken**: This technique is crucial for ensuring even cooking and tenderness. To master it, place the chicken between two sheets of plastic wrap and pound it gently with a meat mallet. Aim for an even thickness throughout the breast. Common pitfalls include using too much force, which can tear the meat. Look for visual cues like uniform thickness for success.

– **Coating Chicken**: Properly coating the chicken ensures optimal flavor and texture. Begin by dredging the chicken in flour, dipping it in beaten eggs, and finally coating with Parmesan. Overcrowding the pan during frying can lead to soggy results, so make sure to leave enough space. You’ll know you’ve done this step correctly when you can achieve a crispy golden-brown crust.

– **Making Sauce**: The lemon butter sauce should be whisked together on medium heat to emulsify the butter. Avoid adding too much lemon juice at once, which can cause the sauce to become runny. A good visual cue is when the sauce thickens slightly; this indicates it’s ready to serve.

Pro Tips for Perfect Parmesan Crusted Chicken with Lemon Butter Sauce

– **Use Fresh Ingredients**: Opt for freshly grated Parmesan cheese rather than pre-grated. This enhances flavor and texture, resulting in a superior crust.
– **Marinate for Extra Flavor**: For an added depth of flavor, consider marinating the chicken in olive oil, lemon juice, and herbs for 30 minutes before coating.
– **Avoid Overcrowding the Pan**: Cook the chicken in batches if necessary to ensure even cooking and a perfect, crispy crust.
– **Adjust Cooking Time for Thickness**: If the chicken breasts are particularly thick, you may need an extra few minutes in the oven to cook through fully.
– **Experiment with Herbs**: Add chopped fresh herbs like parsley or thyme to the Parmesan mixture for an aromatic twist.
– **Make It Spicy**: For those who enjoy heat, add a pinch of red pepper flakes to the Parmesan coating for an intriguing kick.
– **Serve Immediately**: This dish is best enjoyed right after cooking when the crust is crispy and the chicken is juicy.

Variations and Adaptations

– **Regional Variations**: Add Italian herbs such as oregano and basil for an authentic Italian flavor profile. In other regions, consider incorporating local spices that reflect local tastes.
– **Seasonal Adaptations**: In summer, consider pairing the chicken with a fresh garden salad or grilled vegetables for a light meal.
– **Dietary Modifications**: For gluten-free options, replace regular flour with almond flour or gluten-free breadcrumbs.
– **Flavor Variations**: Infuse your butter with garlic before amalgamating with lemon for a deeper flavor.
– **Texture Modifications**: For a crunchier crust, use panko breadcrumbs instead of traditional breadcrumbs.
– **Presentation Alternatives**: Serve the chicken over a bed of sautéed spinach or alongside a colorful vegetable medley for visual appeal.

Serving and Presentation Guide

– **Plating Techniques**: For an elevated presentation, consider stacking the Parmesan Crusted Chicken on top of a bed of lemon-infused sautéed vegetables or orzo pasta.
– **Garnishing Ideas**: Sprinkle fresh herbs like parsley or basil on top just before serving to add a pop of color and freshness.
– **Traditional Accompaniments**: Serve with a side of roasted potatoes or a simple arugula salad for a classic meal.
– **Modern Serving Suggestions**: Turn this dish into a sandwich by using the chicken as a filling in a crusty baguette, topped with fresh salad greens.
– **Temperature Considerations**: Ensure the chicken is served hot, as the sauce can congeal when allowed to cool.
– **Portion Control Tips**: Serve individual portions artfully arranged with a tablespoon of sauce drizzled over the chicken for an elegant touch.

Wine and Beverage Pairing

– **Wine Pairings**: A crisp white wine, such as Sauvignon Blanc or Pinot Grigio, pairs beautifully with the chicken’s lemony notes, enhancing the dish’s flavors.
– **Non-alcoholic Alternatives**: Sparkling water with a twist of lemon can refresh and complement the dish without the alcohol.
– **Coffee/Tea Pairings**: When it comes to an after-dinner drink, consider a lightly brewed green tea or a citrus-infused herbal tea to cleanse the palate.
– **Temperature Considerations**: Serve white wine chilled to balance the richness of the dish.
– **Serving Suggestions**: Pour wine into a large, elegant glass to enhance the dining experience, and serve with ice water to keep meals refreshing.

Storage and Shelf Life

– **Storage Methods**: Store leftovers in an airtight container in the refrigerator for up to three days to maintain freshness.
– **Temperature Requirements**: Refrigeration is essential to ensure the longevity of both chicken and sauce.
– **Container Recommendations**: Glass containers with tight-fitting lids work best for preventing moisture loss and absorbing odors.
– **Signs of Spoilage**: Look for off-odors or a change in the texture of the sauce; if either has spoiled, it’s best not to consume.
– **Reheating Instructions**: Gently reheat in a pan on low heat to retain moisture, or microwave in short intervals while covered.
– **Freezing Guidelines**: For longer storage, freeze the chicken in a sealed container, though the sauce may separate upon thawing.

Make Ahead Strategies

– **Prep Timeline**: Start by marinating the chicken and preparing the sauce a day in advance for optimal flavor.
– **Storage Between Steps**: After battering the chicken, place it in the fridge to allow the coating to set before cooking.
– **Quality Impact Assessment**: Allowing the chicken to rest before reheating can help retain moisture, ensuring a tender outcome.
– **Assembly Tips**: You may also prepare the entire dish and simply reheat before serving, making it a fantastic option for entertaining.
– **Reheating Guidelines**: Bring the chicken to room temperature before reheating for even results.
– **Fresh Element Additions**: Consider adding freshly chopped herbs to the lemon butter sauce right before serving for a burst of flavor.

Scaling Instructions

– **Halving the Recipe**: This dish can easily be halved for a smaller group, ensuring that you maintain the balance of flavors.
– **Doubling or Tripling**: When preparing for a larger crowd, increase the ingredients proportionally and ensure sufficient cooking space.
– **Equipment Adjustments**: Use larger baking sheets and pans to accommodate extra chicken without overcrowding.
– **Timing Modifications**: Cooking times will remain relatively the same; simply monitor doneness based on thickness.
– **Storage Considerations**: Be mindful of separating portions for freezing and reheating, ensuring quality is preserved.

Nutritional Deep Dive

– **Macro Breakdown**: Each serving of Parmesan Crusted Chicken provides a balanced macronutrient profile, loaded with protein from chicken and healthy fats from butter and cheese.
– **Micronutrient Analysis**: The inclusion of lemon adds a noteworthy amount of vitamin C to your meal, helping to boost the immune system.
– **Health Benefits**: This dish can fit into a balanced diet when paired with vegetables, offering lean protein without excess carbs.
– **Dietary Considerations**: The dish can be modified to cater to various dietary needs, such as gluten-free or low-carb options, enhancing its versatility.
– **Portion Analysis**: Keeping an eye on serving sizes, this dish is satisfying while still maintaining a healthy caloric intake.
– **Weight Management Tips**: Balance this meal with lighter sides, such as salads, to maintain portion control while enjoying rich flavors.

Dietary Adaptations

– **Gluten-Free**: To prepare a gluten-free version, substitute all-purpose flour with almond flour and use gluten-free breadcrumbs for coating.
– **Dairy-Free**: Replace butter with a plant-based alternative and use a dairy-free cheese substitute to achieve similar flavors.
– **Vegan**: For this adaptation, substitute chicken with tofu or portobello mushrooms and use nutritional yeast for a cheesy flavor.
– **Low-Carb**: Stick to a low-carb version by omitting the flour and using crushed pork rinds for the crust.
– **Keto**: Pair with low-carb vegetables and use almond flour for the batter to keep it keto-friendly.
– **Paleo**: Make this dish Paleo by using coconut flour and maintaining clean, whole ingredients.
– **Low-FODMAP**: Use garlic-infused oil instead of fresh garlic for those following a low-FODMAP diet while still infusing flavor.

Troubleshooting Guide

– **Texture Issues**: If the chicken turns out tough, ensure you pound it evenly and not overcook it on the stovetop.
– **Flavor Balance**: If the flavors seem off, adjust seasoning during the cooking process, or add more lemon juice for brightness.
– **Temperature Problems**: Ensure that your pan is preheated before adding the chicken; if not hot enough, frying could lead to sogginess.
– **Equipment Challenges**: If you don’t have a meat mallet, use a heavy skillet or pan to achieve the same effect on chicken.
– **Ingredient Substitutions**: When substituting ingredients, always try to mimic the texture and flavor of the original for consistent results.
– **Timing Concerns**: If the chicken is not cooking uniformly, check that the pieces are of similar thickness to ensure even cooking across all pieces.

Recipe Success Stories

– **Community Feedback**: Readers have raved about the balance of flavors, and many have tried adding their own spin with additional spices or ingredients.
– **Variation Successes**: Many have succeeded in adapting this dish by using different proteins or gluten-free coatings while maintaining the same delicious results.
– **Adaptation Stories**: People have shared their experiences, such as turning this into a meal prep option for healthy weekly lunches.
– **Reader Suggestions**: Suggestions for serving with specific wine pairings have highlighted how versatile this dish can be for pairing with different wines.
– **Photography Tips**: Users have also provided feedback on plating and how it significantly improves the dish’s presentation in social media posts.

Frequently Asked Questions

Can I use chicken thighs instead of breasts?

Yes, chicken thighs would work wonderfully in this recipe. They tend to be juicier and more flavorful, though you may need to adjust cooking times slightly.

Can I make the sauce ahead of time?

While you can prepare the butter sauce ahead of time, it’s best to reheat it gently and add lemon juice just before serving for the freshest flavor.

Is it possible to bake the chicken instead of frying?

Absolutely! Baking is a healthier option; simply coat the chicken with oil and bake at 400°F until golden and cooked through.

What sides pair well with this dish?

Consider serving with a light salad or roasted vegetables, which complement the rich flavors of the chicken and sauce.

Can I freeze leftovers?

Yes, you can freeze leftover chicken. Just be sure to wrap it well and consume within three months for the best quality.

How can I make this dish spicier?

Add crushed red pepper flakes into the Parmesan coating or a dash of cayenne pepper in the butter sauce for an extra kick!

What type of Parmesan should I use?

Using freshly grated Parmigiano-Reggiano will provide the best flavor and texture. Some pre-grated varieties can lack taste.

Does this dish reheat well?

Yes, reheating slowly on low heat helps to prevent the chicken from drying out, keeping it moist and tender.

Can I use different herbs in the coating?

Definitely! Feel free to experiment with your favorite herbs, like thyme or basil, to tailor the flavor to your liking.

What if I don’t have lemon juice?

You could substitute lemon juice with white wine or vinegar for an acidic component, though it will alter the flavor profile slightly.

Additional Resources

– **Related Recipes**: Check out our other delicious chicken recipes, including Lemon Herb Chicken and Garlic Butter Chicken.
– **Technique Guides**: Dive into our detailed article on mastering the art of breading chicken to enhance your culinary skills.
– **Ingredient Information**: Learn more about the health benefits of Parmesan cheese and the various types available.
– **Equipment Recommendations**: Explore our kitchen tools guide for must-have items that make cooking easier.
– **Seasonal Variations**: Discover other seasonal recipes that utilize fresh and local ingredients for optimal freshness in your cooking.

Join the Conversation

– **Social Media Sharing**: Share your experiences with this dish on social media using our hashtag to connect with fellow home cooks!
– **Photography Tips**: When posting your dishes, remember to use natural light and try to capture the vibrant colors to entice viewers.
– **Recipe Reviews**: We’d love to hear your thoughts! Leave a review to help others discover this recipe’s flavors and nuances.
– **Community Engagement**: Engage with our community to share your variations and adaptations for Parmesan Crusted Chicken with Lemon Butter Sauce to inspire others!
– **Recipe Variations**: What unique twists have you put on this classic dish? Share your ideas and learn from other cooks’ creative experiences.

The Recipe

Parmesan Crusted Chicken with Lemon Butter Sauce

Serves: 4

Prep Time: 15 mins

Cook Time: 20 mins

Total Time: 35 mins

Kitchen Equipment Needed

  • Meat mallet or rolling pin
  • Baking sheet
  • Frying pan
  • Mixing bowls
  • Measuring cups and spoons
  • Whisk

Ingredients

  • 4 boneless chicken breasts
  • 1 cup grated Parmesan cheese
  • 1/2 cup all-purpose flour
  • 2 large eggs, beaten
  • 1/4 cup unsalted butter
  • 2 tablespoons fresh lemon juice
  • 1 tablespoon minced garlic
  • Zest of 1 lemon
  • Salt and pepper to taste

Directions

  1. Preheat the oven to 400°F (200°C) and line a baking sheet with parchment paper.
  2. Pound the chicken breasts to an even thickness for uniform cooking.
  3. Season both sides of the chicken with salt and pepper.
  4. Set up a breading station with three bowls: one for flour, one for beaten eggs, and one for the Parmesan cheese.
  5. Dredge each chicken breast in flour, shaking off excess.
  6. Dip the floured chicken into the egg, then coat it with Parmesan cheese, pressing to adhere.
  7. Heat a frying pan over medium heat and add 2 tablespoons of butter; cook the chicken for 3-4 minutes per side until golden brown.
  8. Transfer the chicken to the prepared baking sheet and bake for 15 minutes or until cooked through.
  9. While the chicken is baking, melt the remaining butter in the same pan and add minced garlic and lemon juice. Stir to combine.
  10. Once the chicken is done, serve it drizzled with the lemon butter sauce on top.

Recipe Notes

  • You can substitute chicken thighs for breasts if you prefer dark meat.
  • Feel free to experiment with different herbs in the cheese coating for added flavor.
  • For a lower fat version, consider baking the chicken instead of frying.

Easy Stovetop Smothered Chicken with Rich Gravy

Easy Stovetop Smothered Chicken: A Flavorful Delight

⚖️
Difficulty
Easy

⏲️
Prep Time
10 mins

🕒
Cook Time
30 mins

⏱️
Total Time
40 mins

🍽️
Servings
4 servings

Welcome to a delicious culinary adventure with this easy stovetop smothered chicken recipe! This dish is not only simple to prepare but also delivers a burst of flavor that will tantalize your taste buds. Imagine succulent chicken pieces smothered in a rich, creamy sauce that is perfect for serving over rice or mashed potatoes. The combination of savory ingredients brings warmth and comfort, making it an ideal choice for a family dinner or a casual gathering with friends.

The beauty of this easy stovetop smothered chicken is in the balance of flavors and textures. The chicken is cooked to perfection, tender and juicy on the inside while enveloped in a luscious sauce, complemented by the aromatic notes of garlic and onion. Each bite is a delightful experience, where the creaminess of the sauce pairs beautifully with the savory chicken, creating a symphony of flavors that is sure to impress. Let’s dive into this mouthwatering recipe that is both satisfying and effortless!

Quick Recipe Highlights

  • Flavor Profile: This easy stovetop smothered chicken features a blend of savory and creamy flavors, highlighted by garlic and spices that enhance the dish’s depth.
  • Texture: The chicken is tender and juicy while the sauce is thick and creamy, providing a delightful contrast that keeps each bite exciting.
  • Aroma: The irresistible aroma of sautéed onions and garlic wafts through your kitchen, inviting everyone to gather around the table.
  • Visual Appeal: The dish boasts a beautiful golden brown color from the sautéed chicken, accented by the rich white sauce that coats each piece.
  • Skill Level Needed: This recipe is quite forgiving and requires basic cooking skills, making it perfect for novice cooks and busy families alike.
  • Special Equipment: All you need is a large skillet, a spatula, and a cutting board to prepare this comforting meal.

Recipe Overview

  • Difficulty Level: This recipe is categorized as easy due to straightforward steps and short cooking time, ensuring you can whip it up even on a busy weeknight.
  • Category: This dish falls under the main course category, ideal for lunch or dinner and perfect for comfort food lovers.
  • Cuisine: Drawing inspiration from Southern cooking traditions, smothered chicken is a beloved dish that features hearty flavors and simple ingredients.
  • Cost: The overall cost to prepare this meal is budget-friendly, utilizing common ingredients that are easy to find at local grocery stores.
  • Season: The comforting nature of this dish makes it a great choice year-round, but it especially shines during cooler months when hearty meals are desired.
  • Occasion: Perfect for family dinners, gatherings, or even as a meal prep option for the week, this recipe offers versatility for various occasions.

Why You’ll Love This Recipe

The taste and texture appeal of this easy stovetop smothered chicken truly sets it apart from other recipes. The combination of succulent chicken and creamy sauce creates a mouthwatering experience that will have you coming back for seconds (and maybe thirds!). The rich flavors are elevated with the perfect seasoning, satisfying your hunger and your taste buds.

Convenience is another fantastic benefit of this recipe. With minimal preparation and cooking time, you can have a delicious homemade meal on the table in just 40 minutes. This makes it an excellent choice for families with busy schedules, allowing you to enjoy a wholesome meal without the added stress of complicated cooking methods.

From a nutritional perspective, this recipe provides essential protein from the chicken, along with the goodness of any vegetables you choose to incorporate. It’s a well-rounded dish that can be adapted to include healthy sides such as steamed vegetables or a fresh salad, adding more nutrients to your meal.

Hosting a gathering? This dish also carries social and entertaining value. Serve it at your next dinner party, and you’re sure to wow your guests with its comforting, crowd-pleasing flavors. Plus, it’s sure to spark conversations about family recipes and cherished traditions, further enhancing the dining experience.

In terms of cost-effectiveness, the ingredients used in making this easy stovetop smothered chicken are both affordable and accessible. The meal is designed to feed a family of four without breaking the bank, making it an economical choice for delightful home cooking.

Historical Background and Cultural Significance

The origin of smothered chicken dates back to Southern cooking roots in the United States, where many traditional recipes were born out of necessity and resourcefulness. This method of cooking evolved as home cooks sought to use available ingredients to create hearty and satisfying meals. Smothering techniques, which involve cooking meat in a rich gravy or sauce, became popular as they accentuated the flavors of the main ingredients.

Culturally, smothered chicken is celebrated in Southern households as a dish that brings family and friends together. It’s often served during gatherings and special occasions, reinforcing bonds and creating memories around the dinner table. This dish exemplifies the warmth and hospitality characteristic of Southern cuisine.

Over the years, the evolution of the recipe has seen many variations, from adding different spices to incorporating local vegetables. Regional adaptations have contributed to the diversity of flavors, allowing for creativity and innovation in the kitchen while still honoring the original concept of smothered chicken.

Different regions in the South have developed their unique takes on this dish, showcasing local ingredients and flavor preferences. Whether it’s adding a kick of heat with cayenne pepper or incorporating seasonal vegetables, these adaptations reflect the rich tapestry of Southern culinary traditions and personal family recipes passed down through generations.

Ingredient Deep Dive

Chicken: The star of this dish, chicken is a versatile protein that is widely loved for its flavor and ease of preparation. Historically, chicken has been a staple in many cultures, providing essential nutrients. When selecting chicken for this recipe, look for fresh, high-quality cuts. Storage is simple—keep it in the refrigerator for up to 2 days or freeze it for longer. If you prefer, you can substitute chicken with turkey or even mushrooms for a vegetarian version.

Onions: Often referred to as “the backbone of flavor” in many dishes, onions add a savory base to smothered chicken. They are rich in antioxidants and support heart health. When choosing onions, select firm, dry, and blemish-free bulbs. Store them in a cool, dry place away from sunlight. If onions aren’t available, leeks can be a delicious alternative, maintaining a similar flavor profile.

Common Mistakes to Avoid

  • Skipping marinating the chicken can lead to less flavor absorption.
  • Overcrowding the pan during cooking can cause uneven browning and steaming.
  • Not allowing the sauce to thicken properly may result in a runny consistency that doesn’t coat the chicken.
  • Using low-quality ingredients can compromise the overall taste of the dish.
  • Not tasting and adjusting seasonings during cooking can lead to bland flavors.
  • Rushing the cooking time will yield tougher chicken instead of tender meat.
  • Ignoring the importance of browning the chicken properly; it adds essential flavor.
  • Not letting the dish rest before serving can affect the overall texture.

Essential Techniques

Mastering the technique of sautéing is crucial in this recipe. Sautéing over medium-high heat allows for a perfect browning process, enhancing flavor through caramelization. To master this technique, make sure the pan is hot before adding your chicken. Watch for golden brown edges as an indicator of doneness, and avoid overcrowding in the pan to encourage even cooking.

Another essential technique is creating a roux for the sauce. This mixture of flour and fat (butter or oil) thickens your sauce while adding depth of flavor. To do this well, cook it slowly over medium heat until it turns a light brown color before whisking in any liquids. This will prevent a raw flour taste and ensure a velvety texture.

Pro Tips for Perfect Easy Stovetop Smothered Chicken

1. Always pat your chicken dry before cooking to ensure a good sear — moisture will create steam instead of a golden crust.

2. Use low-sodium chicken broth for a healthier option without sacrificing flavor.

3. Experiment with your spices; add paprika or cayenne for added depth and warmth.

4. Consider adding sliced mushrooms for an earthy flavor that complements the dish perfectly.

5. Deglaze the pan with a splash of wine after sautéing the chicken to incorporate all the browned bits into your sauce for maximum flavor.

6. Serve over freshly cooked rice or mashed potatoes for the perfect vehicle to soak up the delicious sauce.

7. For a fresh touch, garnish with chopped parsley or green onions before serving to add color and brightness.

8. Make sure to let the chicken rest before slicing to keep it moist and tender.

Variations and Adaptations

Regional variations of this recipe may include different spice blends depending on local tastes. For example, Cajun flavors from Louisiana could enhance the dish with a spicy kick, while a Southwestern twist could incorporate smoked paprika and corn.

Seasonal adaptations can also bring freshness to your dinner table. In summer, consider adding zucchini or bell peppers for a colorful addition, while root vegetables like carrots and potatoes can be perfect for fall.

For dietary modifications, this dish can easily be made gluten-free by substituting regular flour with a gluten-free alternative. For a vegan option, substitute the chicken with plant-based protein like tofu or tempeh and utilize vegetable broth.

Flavor variations can be achieved by altering the base sauce; adding a splash of lemon juice or balsamic vinegar can provide brightness, while a tablespoon of Dijon mustard can add tang.

Texture modifications can involve increasing creaminess by using full-fat coconut milk instead of heavy cream for a dairy-free option. You can also make the sauce chunkier by adding more vegetables.

Presentation alternatives are all about color and appeal—serve this dish in a cast-iron skillet for rustic charm or plate it elegantly in a bowl with fresh herbs for a refined touch.

Serving and Presentation Guide

When plating your easy stovetop smothered chicken, use a wide, shallow bowl to create an inviting presentation. Start with a base of rice or mashed potatoes, then elegantly arrange the chicken on top, allowing the luscious sauce to cascade over the sides. Garnish with fresh herbs like parsley or chives to add a pop of color and freshness.

For garnishing ideas, consider a sprinkle of lemon zest to elevate the flavor profile and add visual interest. Traditional accompaniments, such as cornbread or steamed green beans, can enhance your meal, providing both texture and visual appeal.

Modern serving suggestions might include artisanal bread for dipping in the creamy sauce or a side salad for a refreshing contrast. Pay attention to temperature, serving the dish hot for maximum enjoyment, and consider portion control to ensure everyone leaves satisfied.

Wine and Beverage Pairing

For wine pairings, a medium-bodied Chardonnay works beautifully with easy stovetop smothered chicken, enhancing the rich flavors of the dish. The crisp acidity of the wine balances the creaminess of the sauce, making each sip a delightful complement to your meal.

If you prefer non-alcoholic alternatives, consider serving sparkling water with a twist of lemon or a refreshing iced tea infused with lemon or mint. Both options add a lightness to your dining experience while keeping the focus on the delicious chicken.

Coffee or herbal tea can also be a comforting finish to the meal, especially if served warm alongside dessert. Just remember to keep temperature in mind; either serve drinks chilled or warm, depending on your overall meal setting.

Storage and Shelf Life

To store your easy stovetop smothered chicken, transfer it to an airtight container and keep it in the refrigerator. It will last 3-4 days, ensuring you can enjoy leftovers throughout the week. For longer storage, freezing is an option; place the chicken in freezer-safe containers for up to 3 months.

Temperature requirements are crucial; for safe storage, the chicken should cool to room temperature before refrigerating. Signs of spoilage include a sour smell and changes in color or texture. When reheating, ensure the chicken reaches an internal temperature of 165°F for safe consumption. Microwaving, stovetop warming, or baking are all effective methods for reheating the dish.

Make Ahead Strategies

Preparation can be streamlined by prepping your ingredients ahead of time; chop onions and measure spices the day before for a quicker cooking process. You can also marinate the chicken overnight to deepen the flavor and make cooking a breeze on busy nights.

Storage between steps can involve cooking the chicken early in the day and finishing the sauce just before serving. This can help enhance flavors as they meld together over time without losing freshness. Quality impacts can be minimized by not overcooking during the initial steps.

Assembly tips include reheating the chicken gently to prevent drying out, and adding freshly minced herbs or a squeeze of lemon juice just before serving for a burst of freshness.

Scaling Instructions

Scaling this recipe is easy! If you need to halve the recipe, cook time remains the same, but ensure proper spacing in the pan to maintain even cooking. Doubling or tripling the recipe will require a larger skillet or cooking in batches.

Equipment adjustments may include using a larger pot for doubling the sauce, ensuring that flavors remain consistent. Timing modifications come into play when managing larger volumes—allow for longer simmering when cooking more chicken to ensure thorough heating throughout.

When scaling, keep in mind that storage considerations will also change; refrigerate cooled leftovers in a proportionate sized container to maintain optimal freshness.

Nutritional Deep Dive

The macro breakdown of this easy stovetop smothered chicken includes significant protein from the chicken, making it an excellent source for muscle repair and satiety. Each serving contains balanced carbohydrates if served with rice or potatoes, aiding in energy replenishment post-meal.

Micronutrient analysis reveals that this dish can provide vitamins such as B6 and niacin from the chicken, while onions add fiber and Vitamin C to the mix. Understanding these nutrients is essential for anyone focused on a balanced diet.

This dish offers multiple health benefits, from enhancing muscle health and immune function due to high protein and vitamin content, to providing a hearty meal that can contribute to overall well-being when paired with vegetables.

Specific dietary considerations include balancing portion sizes; watching carbohydrate intake if you’re monitoring blood sugar levels by serving with lower-carb options.

Weight management tips include substituting sour cream or cream with Greek yogurt, thus maintaining a creamy texture with fewer calories.

Dietary Adaptations

For a gluten-free adaptation of this recipe, simply replace all-purpose flour with cornstarch or a gluten-free flour blend. This will ensure everyone can enjoy the dish without digestive concerns.

Dairy-free options can be easily achieved by substituting heavy cream with coconut milk or almond milk. This maintains the creamy texture while removing lactose.

For vegan transformations, replace chicken with hearty vegetables or plant-based proteins like tofu. A vegetable broth can provide a base for your sauce, keeping the essence of flavors intact.

Low-carb and keto adaptations can include serving with cauliflower rice instead of traditional carbohydrates, allowing for a satisfying meal while meeting dietary restrictions.

Paleo dieters can enjoy this recipe by focusing on whole ingredients, ensuring the absence of processed items and sticking with natural fruits and vegetables as sides.

For those adhering to a low-FODMAP diet, consider substituting onions with garlic-infused olive oil to achieve similar flavors while avoiding digestive issues.

Troubleshooting Guide

If you encounter texture issues, such as the chicken being tough, ensure you are cooking it low and slow, and not overcooking during initial preparation. Use a tenderizing method before cooking, like brining.

For flavor balance problems, taste as you go, and adjust the seasonings incrementally; adding salt, pepper, or acidity can help balance overly rich tastes.

Temperature problems can usually stem from uneven cooking, which can be resolved by ensuring consistent heat and pan size relative to the ingredient volume. Watch for cues like simmering rather than boiling.

If you face equipment challenges, have backup plan options; consider a stovetop-safe casserole dish for alternative cooking methods, or using oven-safe skillets for added versatility.

Ingredient substitutions can initially break flavor profiles, so familiarize yourself with the basics of spices and their properties to maintain taste outcomes. Always opt for fresh replacements when possible.

Timing concerns can often cause dishes to fall short; keep an eye on reminders throughout cooking to ensure precision, especially in sauce thickening periods.

Recipe Success Stories

Community feedback has been overwhelmingly positive, with many home cooks praising the ease and taste of this easy stovetop smothered chicken. It has become a staple recipe in many households, helping families reconnect over dinner.

Variation successes are often noted, with readers sharing their unique twists, like adding spinach or using different herbs. This has encouraged creativity within the community, making cooking more fun and personalized.

Adaptation stories highlight how this recipe has been used for meal prep, with portions frozen and labeled for quick lunches. Families have found this dish to be a lifesaver during hectic weeks.

Photography tips from readers emphasize the beauty of the finished dish; showcasing vibrant colors can enhance social media sharing and inspire others to recreate the dish in their kitchens.

Frequently Asked Questions

1. Can I use frozen chicken for this recipe?
While it’s possible to use frozen chicken, it’s recommended to thaw it first to ensure even cooking and to achieve the best texture. Planning ahead can make a significant difference.

2. Can I prepare this dish in advance?
Yes, you can prepare the dish one day in advance by cooking the chicken and sauce, then refrigerating them separately to maintain freshness. Reheat before serving.

3. How can I make the sauce spicier?
To add heat, consider incorporating cayenne pepper, crushed red pepper flakes, or even sliced jalapeños into the sauce for an extra kick.

4. What should I serve with smothered chicken?
This dish pairs wonderfully with rice, mashed potatoes, or a side of steamed vegetables to complement the rich flavors of the sauce.

5. How do I store leftovers?
Leftovers should be placed in an airtight container and can last in the refrigerator for 3-4 days. If freezing, ensure they are stored in freezer-safe containers.

6. Can I substitute different vegetables?
Absolutely! Visit seasonal vegetables like bell peppers, carrots, or zucchini are great additions or substitutes in this dish for added nutrition and variety.

7. Is this recipe good for meal prep?
Yes! This easy stovetop smothered chicken is perfect for meal prep. It stores well and reheats easily, making it an ideal option for weekly lunch or dinner planning.

8. What type of chicken should I use?
Boneless, skinless chicken breasts or thighs work best for this recipe. You can also use chicken legs or a whole cut-up chicken for extra flavor.

9. Can I make this dish in a slow cooker?
Yes, this recipe can be adapted for a slow cooker. Simply brown the chicken first and then add the ingredients to the slow cooker, cooking on low for 4-6 hours.

10. What is the best way to reheat smothered chicken?
The best way to reheat is on the stove over low heat; this allows the sauce to re-thicken without drying out the chicken. Microwaving works but can lead to uneven heating.

Additional Resources

For those who enjoyed this recipe, check out related recipes like creamy garlic chicken, chicken and broccoli casserole, or classic chicken pot pie. These dishes share similar comforting flavors and cooking methods.

Technique guides can help enhance your kitchen skills; consider exploring sautéing methods, sauce-making fundamentals, and pantry staples to elevate your home cooking.

Ingredient information on chicken cuts and preparation tips, such as marinating and seasoning techniques, can further improve your culinary journey.

Equipment recommendations include the best skillets for sautéing and optimal sizes for batch cooking, enhancing your kitchen efficiency.

Seasonal variations can inspire you to incorporate fresh ingredients corresponding to the time of year, keeping your meals creative and vibrant.

Join the Conversation

Engage with us on social media by sharing your own photos and experiences with this easy stovetop smothered chicken recipe. We love to see how you’ve made it your own!

Photography tips for capturing your culinary creations can enhance your sharing experience, making your dishes look as delicious as they taste. Utilize natural light and showcase colors to attract attention.

Recipe reviews help nurture a community of home cooks; your insights can assist others in making this dish successfully. Share your thoughts and any variations you’ve tried!

Let’s foster community engagement—feel free to offer suggestions, swap stories about your cooking experiences, or ask questions. Every comment helps cultivate a vibrant cooking community!

The Recipe

Easy Stovetop Smothered Chicken

Serves: 4

Prep Time: 10 mins

Cook Time: 30 mins

Total Time: 40 mins

Kitchen Equipment Needed

  • Large skillet
  • Spatula
  • Cutting board
  • Measuring cups and spoons

Ingredients

  • 4 boneless, skinless chicken breasts
  • 1 medium onion, diced
  • 2 garlic cloves, minced
  • 1 cup chicken broth
  • 1 cup heavy cream
  • 2 tablespoons flour
  • 2 tablespoons olive oil
  • Salt and pepper to taste
  • Fresh parsley for garnish

Directions

  1. In a large skillet, heat olive oil over medium-high heat. Season the chicken breasts with salt and pepper, then add to the skillet and cook until golden brown on both sides, about 5-7 minutes per side. Remove and set aside.
  2. In the same skillet, add the diced onion and sauté until translucent, about 3-4 minutes. Add minced garlic and sauté for an additional minute.
  3. Sprinkle flour over the onions and garlic, stirring to combine and cook for another minute to remove the raw flour taste.
  4. Slowly pour in the chicken broth, stirring constantly to prevent lumps. Bring to a simmer.
  5. Add the heavy cream and stir until the sauce thickens, about 3-5 minutes.
  6. Return the chicken breasts to the skillet, spooning the sauce over them. Simmer for an additional 10-15 minutes until the chicken is cooked through.
  7. Garnish with fresh parsley before serving.

Recipe Notes

  • This recipe can easily be doubled for larger gatherings.
  • For a lighter version, substitute half-and-half for the heavy cream.
  • Feel free to add in your favorite vegetables for added flavor and nutrients.

Easy Classic Philly Cheesesteak with Tender Ribeye

Easy Classic Philly Cheesesteak: A Quick and Delicious Recipe

⚖️
Difficulty
Easy

⏲️
Prep Time
10 mins

🕒
Cook Time
15 mins

⏱️
Total Time
25 mins

🍽️
Servings
4

Welcome to the world of mouthwatering flavors with our Easy Classic Philly Cheesesteak recipe! This iconic sandwich perfectly embodies the heart of Philadelphia’s culinary heritage, featuring tender, juicy beef paired with melty cheese and a fresh hoagie roll. Whether you’re enjoying this delectable dish at a street cart or whipping it up in your home kitchen, it’s sure to leave an impression on your taste buds.

The rich taste from the sautéed onions, the mouthwatering beef, and the ooey-gooey cheese combine to create a symphony of flavors that is both satisfying and comforting. Imagine the spicy sweetness of the seasoned beef melding perfectly with the creamy, melted cheese, nestled in a warm, fresh bread. Each bite offers a delightful complexity of textures and tastes that keep you coming back for more.

Quick Recipe Highlights

  • Flavor Profile: Savory, with a blend of seasoned beef and rich cheese, perfect for meat lovers.
  • Texture: A satisfying crunch from the hoagie roll meets soft, juicy beef and melt-in-your-mouth cheese.
  • Aroma: The tantalizing scent of caramelized onions wafting through the kitchen creates an irresistible invitation.
  • Visual Appeal: Layers of vibrant beef and golden-brown cheese glisten invitingly between perfectly toasted buns.
  • Skill Level Needed: Ideal for beginners but rewarding for all cooking enthusiasts.
  • Special Equipment: Just a skillet or griddle is needed for this easy, delightful sandwich.

Recipe Overview

  • Difficulty Level: Easy, making it perfect for novice cooks and quick weeknight meals.
  • Category: This sandwich falls under comfort foods, making it excellent for lunch or dinner.
  • Cuisine: A beloved American classic that originated in Philadelphia, rich in local tradition.
  • Cost: An affordable meal option, costing around $15-$20 for four servings, depending on selection.
  • Season: Enjoy anytime, but perfect for summer cookouts or casual gatherings.
  • Occasion: Makes for a fun weekday dinner or a festive gathering treat.

Why You’ll Love This Recipe

You will love the taste and texture appeal of this Easy Classic Philly Cheesesteak! The tenderness of the beef, combined with the creaminess of the cheese, creates a deliciously satisfying bite that’s packed with flavors. It’s not just about the taste—it’s also about the sensation of enjoying a hearty, comforting sandwich that fills you up without feeling heavy.

Convenience is another reason to cherish this recipe. It comes together in under 30 minutes, making it a smart choice for busy weeknights or last-minute dinner plans. With minimal prep and cooking time, you’ll have a delicious meal ready in a flash, allowing you to focus on enjoying your time with family or friends.

From a nutritional standpoint, this cheesesteak provides a solid amount of protein and essential nutrients, especially when paired with vegetables. You can easily incorporate bell peppers or mushrooms into the filling, enhancing both the flavor and nutritional value of your meal.

Social gatherings or casual dinners will benefit from the deliciousness of this recipe. It’s a surefire crowd-pleaser that can cater to varying tastes, ensuring everyone leaves satisfied. Plus, the fun of assembling your own sandwich adds a communal element perfect for entertaining.

Cost-effectiveness is another highlight of this Easy Classic Philly Cheesesteak. For a budget-friendly dish that serves four, you get a restaurant-quality meal that you can make at home. The combination of affordability and quality makes this recipe a true kitchen gem.

Historical Background and Cultural Significance

The origins of the Philly Cheesesteak date back to the early 20th century in Philadelphia, where local street vendors crafted the now-iconic sandwich. Legend has it that a hot dog vendor decided to create a new dish by grilling beef and serving it on a roll, which quickly gained popularity among the locals.

Culturally, the cheesesteak holds a special place in Philadelphia’s identity. It represents more than just food; it showcases American ingenuity and the fusion of flavors that the city has embraced. The sandwich has evolved to become a symbol of the city, drawing not only locals but also tourists eager to indulge in this hearty meal.

Over the decades, the classic recipe has undergone numerous adaptations. While the traditional version includes thinly sliced ribeye beef and Cheez Whiz, many variations now incorporate different types of cheese, sauces, or additional toppings. This flexibility showcases the sandwich’s enduring popularity and adaptability within American cuisine.

Regionally, the cheesesteak has inspired many variations beyond Philadelphia, with different cities putting their spins on the classic sandwich. You’ll find everything from vegetarian versions to gourmet toppings, making it a beloved and ever-evolving dish across the nation.

Ingredient Deep Dive

Beef: The star of the Philly Cheesesteak, thinly sliced ribeye provides a rich and flavorful base for this sandwich. Packed with protein, it’s essential for muscle health. When selecting beef, choose well-marbled cuts for the best flavor, and ensure it’s fresh for optimal results. Store it in the refrigerator and consume within a few days, or freeze if you need to keep it longer. If ribeye isn’t available, other cuts like flank or sirloin can serve as suitable substitutes, though they may require additional tenderization.

Cheese: The choice of cheese is crucial in this recipe. Cheez Whiz is the classic option, offering a creamy texture and savory taste that complements the beef beautifully. However, provolone and American cheeses are popular alternatives, providing a different flavor profile and texture. When selecting cheese, opt for high-quality varieties that melt well. Store cheese in the original packaging or airtight containers to maintain its freshness. If dairy is a concern, vegan cheese options can be used instead, though they may not melt in the same way.

Hoagie Rolls: The right bread makes or breaks your cheesesteak. Soft hoagie rolls are ideal, as they can hold the filling without breaking apart. When selecting rolls, look for ones with a slightly crusty exterior and soft interior. They should be fresh to ensure they enhance the sandwich’s overall texture. For storage, keep bread in a cool place or freeze for later use. If traditional hoagie rolls aren’t available, you can substitute with other types of bread, just make sure they are sturdy enough for the filling.

Common Mistakes to Avoid

  • Using thick slices of beef, which can result in a chewy texture instead of tender, melt-in-your-mouth bites. Always use thinly sliced beef for the best results.
  • Overcrowding the skillet may lead to uneven cooking and steaming rather than browning. Cook in batches if necessary to achieve the perfect sear.
  • Neglecting to season the beef will leave your cheesesteak bland. Don’t forget salt, pepper, and any additional seasonings for enhanced flavor.
  • Skipping the cheese melting process can lead to a dry sandwich. Make sure to layer the cheese on the hot beef and allow it to melt properly for creamy goodness.
  • Forgetting to toast the bread results in missing out on the delightful crunch that balances the soft filling. Always toast your rolls before assembling the sandwich.
  • Using low-quality ingredients will compromise the overall taste and texture. Always opt for fresh, high-quality meat, cheese, and bread.
  • Skipping the onions can result in a less flavorful sandwich. Sauté onions until caramelized for added depth.
  • Rushing the cooking process can result in tough meat and uneven flavors. Take your time to cook each component properly for a better outcome.
  • Not letting the cheesesteak rest before serving can lead to a messy sandwich. Allowing it to rest helps flavors meld and makes it easier to handle.
  • Underestimating the importance of assembly. Layering components thoughtfully can enhance both flavor and presentation.

Essential Techniques

Proper Slicing of Beef: Thinly slicing beef is crucial for a classic Philly cheesesteak. It ensures even cooking and a tender bite. Make sure your knife is sharp, and freeze the beef for about 30 minutes for easier slicing. Look for slices that are about 1/8 inch thick for the best texture.

Caramelizing Onions: This technique brings out the natural sweetness of the onions and adds depth to the sandwich. Sauté onions over medium heat, stirring occasionally, until they turn golden brown. Aim for a soft, translucent texture with a rich brown color for maximum flavor.

Pro Tips for Perfect Easy Classic Philly Cheesesteak

– Ensure your skillet is hot before adding the beef to get a good sear and excellent flavor.
– For optimal cheese melt, cover the skillet with a lid once you add the cheese to trap steam.
– Experiment with different cheese options to find your favorite flavor combination.
– Don’t be afraid to mix in different veggies, such as bell peppers or mushrooms, for added flavor and nutrition.
– If possible, use a meat slicer for super-thin cuts of beef to really elevate your cheesesteak.
– Always serve hot, as the flavors are best when enjoyed fresh out of the skillet.
– Pair with a side of fries or a fresh salad to complete your meal experience.
– Consider spicy toppings, like jalapeños or hot sauces, for an extra kick.

Variations and Adaptations

Eating the classic cheesesteak is wonderful, but there are numerous variations to suit different tastes. For example, a vegetarian cheesesteak can replace the beef with sautéed mushrooms or a veggie mix, offering similar textures without compromising on flavor. Seasonal adaptations can introduce fresh ingredients like summer zucchini or roasted red peppers to create a lighter summer version.

If you’re looking to modify the cheese, consider using smoked provolone for a deeper flavor or go with a sharp cheddar for a tangy twist. Texture variations, such as choosing crusty French bread instead of hoagie rolls, can transform the classic experience into something new and exciting. Finally, consider presenting your cheesesteak as an open-faced sandwich for a modern aesthetic.

Serving and Presentation Guide

When serving your Easy Classic Philly Cheesesteak, consider using a large platter or individual plates to showcase each sandwich. A sprinkle of chopped fresh parsley can add a pop of color and freshness to the presentation. Accompany your cheesesteak with crispy fries or a fresh side salad that complements the meal nicely.

For a gourmet touch, serve your sandwiches with dipping sauces like herb aioli or spicy mustard. It’s essential to serve your cheesesteak hot, as the flavors meld beautifully when fresh. Portion control is also key—cut the sandwich in half or into smaller pieces if serving as an appetizer.

Wine and Beverage Pairing

When it comes to pairing beverages with your Easy Classic Philly Cheesesteak, a light-bodied red wine such as Pinot Noir complements the savory flavors beautifully. If you’re looking for non-alcoholic options, consider sparkling lemonade or an iced tea to balance the richness of the sandwich.

For coffee or tea lovers, a robust dark roast coffee serves as a nice contrast to the meaty flavors. Consider serving your drinks slightly chilled for optimal enjoyment and refreshment.

Storage and Shelf Life

Storing your Easy Classic Philly Cheesesteak correctly will ensure maximum freshness. Allow any leftovers to cool completely and place them in airtight containers in the refrigerator, where they can last for up to 3 days. For longer storage, you can freeze the assembled sandwiches wrapped in plastic wrap and stored in a freezer bag for up to a month.

When reheating, try to reheat in a skillet over medium heat to revive the sandwich’s textures, or use a microwave with a damp paper towel over it to keep bread soft. Always check for signs of spoilage, such as off smells or changes in texture, before consuming.

Make Ahead Strategies

To save time on busy days, consider prepping certain elements of your Easy Classic Philly Cheesesteak in advance. You can slice the beef and marinate it a few hours ahead, ensuring great flavor and tenderness. Onions can be sautéed in advance and stored in the refrigerator for quick assembly.

Assemble your sandwiches right before eating to maintain freshness. If planning to serve them later, consider slightly undercooking the beef during preparation to avoid overcooking during reheating.

Add fresh toppings, like lettuce or tomatoes, just before serving to keep them crisp and vibrant.

Scaling Instructions

Scaling this Easy Classic Philly Cheesesteak recipe is simple. If you’re halving the recipe, maintain ingredient proportions and adjust cooking times accordingly. Doubling or tripling requires larger skillets or griddles, so be sure to cook in batches for even browning.

Timing may need adjustment as larger quantities can require more time for the beef to cook. Additionally, ensure to have enough rolls on hand and store them properly to avoid drying out when scaling up your recipe.

Nutritional Deep Dive

An Easy Classic Philly Cheesesteak typically features a satisfying macro breakdown, with considerable protein from beef and cheese. Each serving provides roughly 30 grams of protein, essential for muscle building and repair. Due to the cheese and bread, expect a moderate amount of fats and carbohydrates, making it an excellent option for a balanced meal, especially after workouts.

Micronutrient analysis reveals that incorporating vegetables can add valuable vitamins and antioxidants. With choices like sautéed peppers or fresh herbs, you can enrich the sandwich while keeping it nutritious. Keep portion sizes in check to maintain balanced intake, particularly on cheat days.

Dietary Adaptations

For a gluten-free adaptation of this Easy Classic Philly Cheesesteak, substitute traditional hoagie rolls with gluten-free bread. Keeping the filling gluten-free by ensuring all ingredients are certified is essential.

If you’re exploring dairy-free options, consider using vegan cheese or omitting cheese altogether and using a flavorful sauce instead. For those following a low-carb or keto diet, the recipe can be modified by wrapping the beef and vegetables in lettuce instead of bread, maintaining the flavors with fewer carbs.

Paleo followers can enjoy this cheesesteak by using thinly sliced sweet potatoes as a bread substitute, adding additional nutrients and flavor. For a vegetarian version, sautéed mushrooms or tempeh can serve as hearty replacements for beef, while still capturing the spirit of the dish.

Troubleshooting Guide

If your Easy Classic Philly Cheesesteak has texture issues, ensure thinly slicing your beef and sautéing it properly. Thick cuts can become tough, leading to chewy bites. Properly caramelizing onions can also help avoid a soggy sandwich.

Flavor balance is crucial; if your cheesesteak tastes bland, check your seasoning while cooking, and don’t be afraid to taste and adjust as needed. For temperature problems, keep an eye on cooking times, especially if you’re using thicker cuts of meat, which may require additional time.

If faced with ingredient substitutions, pay close attention to the cooking characteristics of what you’re using. Not all cheeses melt similarly, so ensure you’re choosing compatible replacements. Lastly, timing concerns may arise during busy meal prep; having mise en place will keep everything flowing smoothly.

Recipe Success Stories

Our Easy Classic Philly Cheesesteak has received rave reviews from readers who appreciate its simplicity and flavor. Many have shared their own versions, swapping out beef for turkey or plant-based proteins, proving how versatile this dish can be.

Photos submitted by readers excitedly showcase their colorful cheesesteak creations, illustrating personal touches like added jalapeños or unique cheeses, each telling a story of successful adaptation.

Engaging with the community sparks creativity as individuals celebrate their triumphs or troubleshoot together, proving that this fast recipe can encourage connection and fun in the kitchen.

Frequently Asked Questions

Can I use different types of cheese? Yes! While Cheez Whiz is traditional, provolone, mozzarella, or American cheese can be used to customize your cheesesteak based on your preference.

What type of beef is best for cheesesteaks? Ribeye is commonly used for its flavor and fat content, but flank steak or sirloin can also work if sliced thinly.

Can I freeze leftover Philly cheesesteak? Absolutely! After cooling, wrap the sandwiches tightly and freeze them. Just be sure to reheat thoroughly when ready to eat.

Is it possible to prepare Philly cheesesteak in advance? Yes, you can sauté the onions and prepare the beef in advance. Assemble the sandwiches just before serving to keep the bread fresh.

How do I store leftover cheesesteaks? Keep any leftovers in an airtight container in the refrigerator for up to 3 days.

Can I make a vegetarian version of cheesesteak? Yes! Substitute the beef with mushrooms, tempeh, or even jackfruit for a plant-based option.

Are there gluten-free options available? Certainly! Use gluten-free rolls or lettuce wraps to enjoy a gluten-free cheesesteak.

What toppings can I add? You can add various toppings such as sautéed peppers, mushrooms, jalapeños, or different sauces for added flavor.

What’s the best way to reheat a Philly cheesesteak? Reheat in a skillet over medium heat to maintain the texture and melty cheese, or microwave it for a quick option.

How can I enhance the flavor of my cheesesteak? Season the beef well, use quality ingredients, and don’t skip on the caramelized onions for added depth of flavor.

Additional Resources

If you loved this Easy Classic Philly Cheesesteak recipe, you’ll also want to explore our related recipes, including gourmet sandwiches and quick grill recipes. We provide informative technique guides to help you master basic culinary skills.

Delve deeper into ingredient information to inspire your next cooking adventure, and explore equipment recommendations for your kitchen essentials. Seasonal variations can offer a fresh twist on classic recipes, so don’t forget to check those out, too!

Join the Conversation

We’d love for you to share your experiences with this Easy Classic Philly Cheesesteak on social media. Snap a photo of your creations and share your unique twists in the comments below.

Engage with our community by reviewing your success stories, swap tips, or suggest variations that you’ve tried. Let’s celebrate the joy of cooking together and continue to explore this delicious sandwich in all its forms!

The Recipe

Easy Classic Philly Cheesesteak

Serves: 4

Prep Time: 10 mins

Cook Time: 15 mins

Total Time: 25 mins

Kitchen Equipment Needed

  • Skillet or griddle
  • Sharp knife for slicing
  • Spatula for flipping
  • Airtight containers for storage

Ingredients

  • 1 lb ribeye beef, thinly sliced
  • 4 ounces Cheez Whiz or your choice of cheese
  • 4 hoagie rolls
  • 1 medium onion, sliced
  • 2 tablespoons olive oil
  • Salt and pepper to taste

Directions

  1. Heat olive oil in a skillet over medium heat.
  2. Add sliced onions and sauté until caramelized, about 5-7 minutes. Remove and set aside.
  3. In the same skillet, add sliced beef, season with salt and pepper, and cook until browned, about 5-7 minutes.
  4. Layer the cheese on top of the beef and cover for a minute to let it melt.
  5. Toast the hoagie rolls in the skillet if desired.
  6. Assemble the sandwiches by placing the beef and melted cheese mixture in the rolls, topping with caramelized onions.
  7. Serve hot and enjoy!

Recipe Notes

  • Feel free to add peppers or mushrooms for more flavor.
  • For a spicier kick, add jalapeños or hot sauce as a topping.
  • Keep any leftovers in the fridge for up to three days.

Easy Greek Chicken Bowls with Fresh Tzatziki Sauce

Greek Chicken Bowls: A Flavorful Journey to the Mediterranean

⚖️
Difficulty
Easy

⏲️
Prep Time
20 mins

🕒
Cook Time
30 mins

⏱️
Total Time
50 mins

🍽️
Servings
4 servings

Indulge your senses with these Greek Chicken Bowls that take you straight to the sun-kissed shores of the Mediterranean. This vibrant dish combines marinated grilled chicken with a delightful array of fresh vegetables, creamy feta cheese, and a zesty dressing. Perfect for a weeknight dinner or meal prep, these bowls are not just about taste, they also bring a splash of color and nutrition to your table.

With a perfect balance of protein, carbs, and healthy fats, Greek Chicken Bowls are a wholesome meal that satisfies your hunger while tantalizing your taste buds. The savory chicken, crisp greens, and bright flavors of lemon and herbs create an unforgettable experience that will have your family asking for seconds. Let’s dive into this fun and straightforward recipe that promises to bring the essence of Greek cuisine into your home.

Quick Recipe Highlights

  • Flavor Profile: Expect a harmonious blend of savory grilled chicken, tangy feta cheese, and a refreshing yogurt dressing that brings everything together.
  • Texture: Enjoy a delightful mix of textures from the tender chicken, crisp fresh vegetables, and creamy feta, offering a satisfying overall mouthfeel.
  • Aroma: The aromatic herbs like oregano and garlic create an inviting fragrance that will have everyone coming to the table.
  • Visual Appeal: These bowls are a feast for the eyes, featuring a colorful medley of greens, reds, and whites that make each serving pop.
  • Skill Level Needed: This easy recipe is perfect for both novice cooks and seasoned chefs, requiring only basic cooking techniques.
  • Special Equipment: You will need a grill or grill pan for the chicken, and a cutting board for preparing the fresh ingredients.

Recipe Overview

  • Difficulty Level: This recipe is easy to follow, making it accessible for anyone looking to whip up a delicious meal without spending hours in the kitchen.
  • Category: These Greek Chicken Bowls fit perfectly into the category of healthy meals, ideal for lunch or dinner.
  • Cuisine: Rooted in Greek culinary traditions, this dish celebrates fresh ingredients, bold flavors, and the Mediterranean diet.
  • Cost: The ingredients are budget-friendly, typically costing around $15 for four servings, making this a cost-effective choice.
  • Season: Perfect for spring and summer, when fresh vegetables are plentiful, but can be enjoyed year-round.
  • Occasion: These bowls serve well for casual family dinners, meal prep for the week, or even for entertaining guests during gatherings.

Why You’ll Love This Recipe

These Greek Chicken Bowls are a flavor-packed delight with tender, marinated chicken that melts in your mouth, complemented by fresh, crunchy vegetables that add the perfect crunch. The creamy feta breaks through the robust flavors, adding a layer of richness that enhances every bite. Their colorful presentation not only makes your meal visually appealing but also excites the palate.

Convenience is key with this recipe, as it comes together quickly, making it ideal for busy weeknight dinners. You can prep ingredients in advance, making weeknight cooking as simple as assembling the bowls and serving. This meal allows for versatility; adjust the components to suit your tastes or what you have on hand.

These bowls are not only delicious but also packed with nutritional benefits. The grilled chicken is an excellent source of lean protein, vital for muscle health and satiety. Paired with nutrient-rich veggies and a yogurt-based dressing, it provides a balanced meal that fuels your body right.

Serving these bowls can create a fun and interactive dining experience. Encourage guests or family members to customize their bowls with their choice of vegetables and toppings. It invites conversations and connections as everyone shares their preferences, making mealtime more memorable.

Lastly, this dish represents a cost-effective way to make healthy food choices. With affordable ingredients readily available in most grocery stores, you can enjoy a fulfilling meal without breaking the bank. These Greek Chicken Bowls are not just a treat for your taste buds but also great for your budget.

Historical Background and Cultural Significance

The origins of Greek cuisine can be traced back to the ancient Greeks who believed in the concept of “philotimo,” which emphasizes gratitude and care through food. Greek Chicken Bowls embody this cultural significance as they bring together wholesome ingredients that celebrate a communal way of dining.

Food in Greece often highlights the importance of fresh, local ingredients, reflecting both the geography and climate of the region. Dishes are meant to be shared, promoting connection and cultural exchange among people, which these Greek Chicken Bowls perfectly exemplify in a modern context.

Over the years, this dish has evolved, becoming a popular choice in various Mediterranean-inspired restaurants around the world. It showcases the adaptability of Greek flavors, appealing to diverse palates and dietary preferences.

Regional variations of this dish exist throughout Greece, with each area infusing its local ingredients and flavors, making every version unique. For example, some regions may add different herbs or additional toppings like olives or roasted red peppers, showcasing local agricultural offerings.

Ingredient Deep Dive

Chicken: Chicken has been a staple in Greek cuisine due to its versatility and flavor. It is a good source of protein and contains essential vitamins and minerals. When choosing chicken, look for organic or pasture-raised options for the best quality. Store it in the fridge for up to two days or freeze for prolonged freshness.

Feta Cheese: Feta cheese is a brined cheese that is made from sheep’s milk or a mixture of sheep and goat’s milk. It is rich in calcium and adds a savory element to any dish. Opt for a block of feta over pre-crumbled varieties for better flavor and quality. Keep it refrigerated and use within a week of opening.

Common Mistakes to Avoid

  • Overcooking the chicken, which can lead to dryness. Always use a thermometer to check the internal temperature.
  • Not marinating the chicken long enough, which can result in less flavorful meat. Aim for at least 30 minutes for optimal flavor.
  • Skipping the resting time after cooking, as this helps retain the juices and improves texture. Rest for five minutes before slicing.
  • Using stale herbs and spices, which can diminish flavor. Always use fresh herbs for the best results.
  • Chopping vegetables too small, which can affect the texture. Cut them into bite-sized pieces for a good crunch.
  • Assembling bowls without proper ingredients balance, leading to uneven flavor distribution. Aim for a mix of proteins, veggies, and toppings.
  • Forgetting to adjust seasoning after cooking—taste before serving to ensure the perfect flavor.
  • Not using enough olive oil, which adds flavor and moisture to both the chicken and sauce.

Essential Techniques

Grilling Chicken: Grilling is essential for flavor infusion, creating that classic charred crust. Master this by keeping the grill preheated and avoiding crowding the chicken to ensure even cooking. Look for grill marks as a visual cue.

Marinating: This technique is vital for tenderizing meat and enhancing flavor. Use acid-based marinades for the best results—typically, a good rule of thumb is marinating for one hour to overnight. Watch for over-marination, as certain acids can break down proteins excessively.

Pro Tips for Perfect Greek Chicken Bowls

1. If time allows, marinate the chicken overnight for a deeper flavor penetration.

2. Use a variety of colorful vegetables for visual appeal and increased nutrients.

3. Try grilling or roasting vegetables for added flavor and texture.

4. Serve the bowls with a generous drizzle of tzatziki sauce for freshness.

5. Experiment with grains—quinoa or couscous can add a unique twist.

6. Consider adding fresh herbs as a garnish for additional flavor and freshness.

7. Always taste before final assembly to adjust seasonings to personal preference.

8. Make extra chicken for meal prep to save time during busy weekdays.

Variations and Adaptations

Regional variations can introduce diverse vegetables such as roasted eggplant, artichoke hearts, or various greens depending on what’s in season. Seasonal adaptations mean adding fresh spring peas or sweet corn in summer for a sweet crunch. For dietary modifications, opt for tofu or chickpeas in place of chicken for vegetarian options. Change the feta to a vegan cheese alternative to cater to plant-based diets. Additionally, add more spices like paprika for heat, or use different grains such as brown rice for added earthiness.

Serving and Presentation Guide

Plating your Greek Chicken Bowls can enhance the dining experience. Start with a base of grains or greens, then artfully arrange chicken and vegetables. Garnish with fresh herbs or a sprinkle of feta to elevate the look. Pair with lemon wedges on the side for brightness. For sophisticated dining, consider individual bowl presentations and personalized toppings, allowing guests to customize their servings.

Wine and Beverage Pairing

A crisp white wine like Sauvignon Blanc complements the zesty flavors of Greek Chicken Bowls beautifully. For a non-alcoholic option, consider icy sparkling water with a splash of lemon or cucumber for a refreshing touch. If you’re a coffee lover, a light roast coffee can provide a surprising contrast to the meal. Serve wines chilled and ensure all beverages are at the right temperature for optimal enjoyment.

Storage and Shelf Life

Store your Greek Chicken Bowls in airtight containers in the refrigerator for up to three days. For longer storage, the components can be frozen separately—especially ideal for the chicken, which maintains its flavor better this way. Always check for signs of spoilage like off-smells or discoloration. When reheating, microwave until warm, but avoid overcooking to keep the chicken tender.

Make Ahead Strategies

Prep chicken and marinate it a day in advance to enhance flavors. Chop vegetables and store them in the refrigerator to streamline the assembly process when you’re ready to serve. Consider cooking extra chicken or grains, so you have leftover components to mix with new flavors later in the week. For freshness and flavor, add delicate toppings like herbs just before serving.

Scaling Instructions

To half the recipe, simply adjust all ingredients accordingly, and reduce cooking time slightly. For larger gatherings, doubling or tripling the ingredients is straightforward. Ensure your cooking equipment can accommodate larger quantities to avoid uneven cooking times. Keep in mind that the total time may vary depending on batch size, so plan accordingly.

Nutritional Deep Dive

This recipe offers an impressive macro breakdown, with a balanced focus on protein from chicken, healthy fats from olive oil and feta, and carbohydrates from vegetables. Micronutrients thrive in this dish, particularly through fresh vegetables, providing vitamins and antioxidants crucial for overall health. Portion analysis ensures you enjoy satisfying meals without excess, perfect for those managing their weight.

Dietary Adaptations

For gluten-free diets, use rice or quinoa instead of any grain-based components. Substitute chicken with tofu or tempeh for vegan alternatives, and opt for dairy-free cheese. For low-carb options, increase the veggie portion and decrease grains accordingly. Keto adaptations could involve adding more fats, like avocado, while reducing carbs found in grains. The possibilities for dietary adaptions are extensive and cater to a multitude of preferences.

Troubleshooting Guide

If your chicken turns out dry, ensure you marinate appropriately and monitor cooking time closely. If the flavors seem off, consider adjusting the seasoning after cooking. For equipment challenges, verify that your grill or pan is of adequate quality for the best sear. If using substitutions, test new ingredients first to gauge their compatibility with the recipe, especially regarding timing and flavor balance.

Recipe Success Stories

Community feedback on this dish has been overwhelmingly positive, with many praising its simplicity and robust flavor. Readers frequently share their variations, noting how they incorporated seasonal ingredients, which highlights the dish’s versatility. Suggestions for enhancing this recipe come from home cooks eager to put their twist on it, contributing to a growing collection of ideas and adaptations.

Frequently Asked Questions

Can I prepare these bowls ahead of time? Absolutely! You can prep the chicken and chop vegetables in advance to save time during meal assembly. They can be stored separately and mixed before serving.

How long can I store the leftovers? Greek Chicken Bowls can be kept in the refrigerator for up to three days in airtight containers. You can freeze the chicken separately for longer storage.

What can I use instead of chicken? For a vegetarian or vegan alternative, consider grilled tofu, chickpeas, or tempeh as protein options that work well with this dish.

Is this recipe suitable for meal prep? Yes! This recipe is perfect for meal prep as it holds up well when stored in separate containers, allowing you to mix and match throughout the week.

Can I use frozen chicken for this recipe? Yes, but make sure to thaw it completely before marinating and grilling for the best texture and flavor.

What type of rice is best for this dish? Choose a fluffy rice, such as basmati or jasmine, which is light and complements the other ingredients well.

Can I add different types of cheese? Certainly! While feta is traditional, other crumbly cheeses like goat cheese can provide similar flavors if desired.

How spicy is this dish? This recipe is not inherently spicy, but you can add red pepper flakes or hot sauce for an extra kick if you prefer a spicier flavor.

What toppings do you recommend? Fresh herbs like parsley or mint elevate the dish’s flavor, along with olives or roasted red peppers for added complexity.

Can I make this dish low-carb? Yes! Increase the amount of vegetables and use a smaller serving of rice or grains to keep the carb count low.

Additional Resources

For more Mediterranean-inspired recipes, check out our collection on Greek salads and tzatziki sauces that perfectly complement this dish. Explore ingredient guides for how to select the best chicken or discover techniques for grilling vegetables. Don’t forget to browse our seasonal variations to keep your meals fresh and exciting all year long!

Join the Conversation

We invite you to share your experiences with Greek Chicken Bowls! Post your creations on social media using our hashtag, and don’t hesitate to give us feedback or engage with our community. Photograph your unique variations and help spread the joy of cooking with others. Your insights and adaptations can inspire fellow cooks eager to try this delightful recipe!

The Recipe

Greek Chicken Bowls

Serves: 4 servings

Prep Time: 20 mins

Cook Time: 30 mins

Total Time: 50 mins

Kitchen Equipment Needed

  • Grill or grill pan
  • Cutting board
  • Chef’s knife
  • Mixing bowls
  • Measuring spoons and cups

Ingredients

  • 1 lb boneless, skinless chicken thighs
  • 2 tablespoons olive oil
  • 2 cloves garlic, minced
  • 1 teaspoon dried oregano
  • Salt and pepper to taste
  • 2 cups cooked quinoa or rice
  • 1 cup cherry tomatoes, halved
  • 1 cucumber, diced
  • 1 bell pepper, diced
  • 1/2 cup feta cheese, crumbled
  • 1/4 cup kalamata olives, sliced
  • For the sauce: 1/2 cup Greek yogurt, juice of 1 lemon, salt, and pepper to taste

Directions

  1. In a bowl, combine the olive oil, minced garlic, oregano, salt, and pepper. Add chicken and marinate for at least 30 minutes.
  2. Preheat the grill over medium heat. Cook the marinated chicken for about 6-7 minutes per side until cooked through.
  3. While the chicken is grilling, prepare the sauce by mixing Greek yogurt with lemon juice, salt, and pepper in a small bowl.
  4. Once cooked, let the chicken rest for a few minutes, then slice.
  5. Assemble the bowls by placing a base of quinoa or rice, topped with sliced chicken, cherry tomatoes, cucumber, bell pepper, feta, and olives.
  6. Drizzle with the yogurt sauce and serve immediately.

Recipe Notes

  • Feel free to customize your bowl with additional toppings like avocado or fresh herbs.
  • Leftover chicken can be stored in the fridge and added to salads or wraps.
  • Substituting chicken for grilled shrimp or tofu can provide delicious alternatives.

Best Cranberry Brie & Mozzarella Grilled Sandwich Recipe

Cranberry Brie & Mozzarella Grilled Sandwich: A Flavorful Delight

⚖️
Difficulty
Easy

⏲️
Prep Time
10 mins

🕒
Cook Time
15 mins

⏱️
Total Time
25 mins

🍽️
Servings
2 sandwiches

If you’re looking for a sandwich that transforms ordinary ingredients into a gourmet delight, look no further than the Cranberry Brie & Mozzarella Grilled Sandwich. This scrumptious creation brings together creamy Brie and melty mozzarella enveloped in crisp, golden-brown bread, perfectly complemented by the tart sweetness of cranberry sauce. Every bite is a harmonious fusion of flavors that will tantalize your taste buds and leave you longing for more.

Perfectly suitable for any meal of the day, this gourmet grilled sandwich can be enjoyed for breakfast, lunch, or even as a late-night snack. The blend of textures—from the gooey cheese to the crunchy toasted bread—creates a satisfying experience that’s as comforting as it is indulgent. Whether you’re serving it for a cozy family dinner or as an impressive addition to a brunch spread with friends, this recipe is bound to impress and satisfy!

Quick Recipe Highlights

  • Flavor Profile: The combination of rich Brie cheese with the sweetness of cranberry sauce offsets the savory mozzarella, making for an unforgettable taste experience.
  • Texture: The crunchy exterior of the toasted bread contrasts beautifully with the creamy and gooey interior of the cheeses.
  • Aroma: As it cooks, the rich aromas of melting cheese mingled with the sweet tartness of cranberries will fill your kitchen, creating a delectable invitation.
  • Visual Appeal: Golden-brown, crispy sandwiches ooze with melted cheese, bountiful cranberry sauce, and a sprinkle of fresh herbs for an eye-catching presentation.
  • Skill Level Needed: With simple steps and minimal equipment, this grilled sandwich is perfect for beginners and seasoned cooks alike.
  • Special Equipment: You’ll need a skillet or a panini press to achieve that perfect crispy crust.

Recipe Overview

  • Difficulty Level: This recipe is easy to prepare, making it suitable for cooks of all experience levels.
  • Category: Ideal as a lunch option or a light dinner, it’s perfect for any time you crave comfort food.
  • Cuisine: This sandwich melds classic American flavors with a touch of gourmet sophistication, inspired by traditional grilled cheese recipes.
  • Cost: Approximately $10, making it an affordable option for a satisfying meal.
  • Season: Enjoy it year-round, but particularly as a festive treat during the holidays when cranberries are in season.
  • Occasion: Perfect for casual gatherings, cozy family dinners, or as a unique offering at brunch.

Why You’ll Love This Recipe

The Cranberry Brie & Mozzarella Grilled Sandwich delivers a delightful taste experience that balances savory and sweet elements. The creamy cheese, accented by the tart cranberry, creates a delicious contrast that leaves you craving more. Every bite provides an indulgent mouthfeel that merges well with the crunchy toasted bread, making it a comforting meal option.

This recipe also offers convenience and quick preparation, as it requires minimal ingredients and time to cook. With just 10 minutes for prep and 15 minutes to cook, you can whip up these delicious sandwiches in no time. Whether you’re feeding a hungry family or treating yourself to a solo meal, this sandwich is a win-win for busy lifestyles.

In terms of nutrition, this sandwich can be a balanced meal that provides a fulfilling dose of protein from the Brie and mozzarella cheese. Pairing it with a side of fresh salad or fruits can enhance its nutritional profile, making it a wholesome choice for every meal.

Socially, this recipe shines during gatherings including family events, brunch dates, or picnic outings. Its gourmet flair makes it a conversation starter, while simultaneously being simple enough that everyone can devour in seconds, ensuring satisfaction all around!

Lastly, the cost-effectiveness of this dish cannot be overlooked. With a handful of affordable ingredients, you can create a restaurant-quality meal at home without breaking the bank. It’s an accessible option for anyone looking to elevate their cooking game while sticking to a budget.

Historical Background and Cultural Significance

The origins of grilled cheese sandwiches can be traced back to ancient times, where bread and cheese met in various cultures. The specific pairing of Brie and cranberry sauce, however, is a more modern twist that has gained popularity in recent culinary trends. With roots in classic French cuisine, Brie cheese has become a beloved ingredient across the globe.

Cranberries, native to North America, were historically valued for their medicinal properties and natural sweetness. Combining these two staple ingredients highlights the cultural significance of merging traditional French flavors with American ingredients, creating a culinary masterpiece that resonates with a wide audience. This sandwich is a beautiful example of how food evolves through culture and innovation.

This recipe has evolved over the years from simple cheese toast to more sophisticated iterations involving gourmet ingredients and pairings. Food enthusiasts have embraced variations of the classic, experimenting with additional flavors and textures to enhance the experience further.

Ingredient Deep Dive

Brie Cheese: This soft cheese originates from the Île-de-France region of France. Rich in flavor and creamy in texture, Brie is often referred to as the “Queen of Cheeses.” It’s high in calcium and protein while being lower in lactose compared to other cheeses, making it suitable for many individuals. When selecting Brie, look for a wheel that is soft to the touch and has an earthy aroma. Store it in the refrigerator wrapped in parchment to maintain freshness, and serve it at room temperature for the best flavor.

Cranberry Sauce: Cranberries are small, round berries that grow on low shrubs and are rich in vitamins and antioxidants. The tartness of fresh cranberries balances the richness of the Brie, making them a perfect pairing. Look for whole-berry cranberry sauce to enhance texture and flavor. Fresh cranberries can be stored in the freezer, while opened sauce should be kept in the refrigerator. For alternatives, consider using different berry jams or fruits for varied taste profiles!

Common Mistakes to Avoid

  • Overheating the Pan: Cooking on too high a heat can burn the bread before the cheese melts. Keep the heat on medium for even cooking.
  • Using Cold Ingredients: Make sure your cheeses are at room temperature to ensure a smooth melt. Cold cheese will lead to uneven melting.
  • Skipping Butter: A generous layer of butter on the bread creates a deliciously crispy crust. Don’t skimp on this step!
  • Not Preheating Your Skillet: Always preheat your cooking surface to ensure even toasting and melting.
  • Crowding the Pan: If making multiple sandwiches, cook them in batches to prevent steaming and ensure proper browning.
  • Using Dull Bread: Choosing stale or low-quality bread affects the overall taste and texture; opt for fresh and hearty artisanal bread instead.
  • Skipping Herbs or Seasoning: Seasoning your fillings adds depth of flavor; don’t forget to sprinkle a touch of salt or aromatic herbs!
  • Cutting Too Soon: Let the sandwich rest for a minute or two after cooking to maintain shape and fill; it keeps all the delicious melted cheese intact.
  • Not Cleaning Your Grill or Skillet: Residue can stick to your sandwiches; ensure your cooking surface is clean before grilling.
  • Ignoring Presentation: How you present your sandwich adds to the eating experience; consider assembling beautifully on a plate!

Essential Techniques

Toasting: Toasting develops flavor and texture. To master it, apply even pressure while grilling and ensure your pan is at the correct temperature—failing to do so can result in uneven browning or soggy bread.

Melting Cheese: Melting cheese evenly is crucial to achieve that gooey texture. Use low to medium heat and cover the pan briefly to trap heat around the sandwich while it cooks.

Pro Tips for Perfect Cranberry Brie & Mozzarella Grilled Sandwich

1. Opt for a high-quality, crusty bread like sourdough or ciabatta for the best crunch.

2. Experiment with different cheeses—adding sharp cheddar can elevate the flavor profile.

3. Layer fresh herbs like basil or thyme inside the sandwich for an aromatic twist.

4. Use homemade cranberry sauce for enhanced flavor and freshness.

5. Try adding some cooked turkey or chicken for extra protein and heartiness.

6. Serve with a side salad or soup to round out the meal.

7. Finish with a drizzle of balsamic glaze for added sweetness and visual appeal.

8. For a twist, incorporate spicy elements like jalapeño or sriracha to cater to heat lovers!

Variations and Adaptations

Consider regional variations by swapping out traditional flavors for local ingredients. For example, using creamy goat cheese instead of Brie can impart a tangy flavor that complements cranberry beautifully.

Seasonal adaptations can also be fun! In fall, consider adding a slice of apple to enhance the sweetness or in winter, adding candied pecans for a crunchy element that adds depth.

Dietary modifications are simple. Make it gluten-free by substituting gluten-free bread or vegan by using dairy-free cheeses and cranberry spreads!

For flavor variations, try using different jams or spreads—fig jam or apricot can provide an interesting twist to suit your taste.

Texture modifications may be added by choosing spicier cheeses for a fuller mouthfeel or adding crispy bacon for crunch.

Presentation changes can include cutting the sandwich into smaller portions for appetizers, perfect for gatherings or parties!

Serving and Presentation Guide

For serving, aim for a simple yet elegant presentation. Place the sandwich diagonally on a plate with a small green salad beside it for contrast.

Garnish with fresh herbs like basil or microgreens to add a pop of color and freshness.

Traditional accompaniments could include a side of homemade potato chips or roasted vegetables for a rustic touch.

Modern serving suggestions could include a side of dips such as pesto or hummus for extended flavor dimensions.

Temperature should always be warm when served—melted cheese creates the ultimate indulgence, and thus should be consumed immediately for best results!

Portion control is essential; consider cutting larger sandwiches into quarters for sharing, keeping in mind how hungry your guests are!

Wine and Beverage Pairing

For wine pairings, a crisp white like Sauvignon Blanc complements the richness of the Brie and tartness of the cranberry beautifully. Or try a rosé for a touch of fruity freshness!

For non-alcoholic alternatives, consider sparkling water or a light herbal iced tea that refreshes the palate without overpowering the dish.

If coffee or tea is more your style, a medium-roast coffee or chai latte could enhance the flavors through their bold yet complementary profiles.

Ensure that any beverages served are at optimal temperatures; chilled whites and warm coffees create an inviting experience.

Serving suggestions could be as simple as offering a small detail, such as a slice of lemon or a fresh herb sprig as a garnish!

Storage and Shelf Life

Store leftover sandwiches in an airtight container in the refrigerator for up to 3 days.

If you prefer to freeze sandwiches, wrap them tightly in plastic wrap or aluminum foil to maintain their integrity. They can last in the freezer for up to 2 months.

Signs of spoilage include an off smell or mold forming on the bread. Always check for freshness before reheating.

Reheating can be achieved in an oven or air fryer for best results—set it to a low temperature to warm through without drying out.

If reheating from frozen, allow them to thaw in the refrigerator overnight for optimal quality before warming.

Make Ahead Strategies

To prepare in advance, mix the cranberry sauce and cheese filling a day ahead and store separately in the refrigerator to deepen the flavors.

Keep the bread wrapped in a dry place to maintain freshness until ready for assembly. Avoid assembling until the cooking day to prevent sogginess!

Monitor quality; flavors can develop when ingredients meld, so be cautious about adding overly wet ingredients ahead of time.

Assembly tips recommend prepping all ingredients beforehand to streamline the cooking process on the day of serving. This will make it quick and effortless!

Add fresh ingredients like greens or tomatoes just before serving to maintain their crispness.

Scaling Instructions

To halve the recipe, simply reduce the ingredient quantities accordingly, without sacrificing the flavor profile.

Doubling or tripling involves ensuring ample cooking space to avoid overcrowding. Adjust timing if using larger cooking apparatus.

Equipment adjustments may be necessary varying by ingredient proportions; for instance, using larger pans for increased yields.

Consider the timing when scaling recipes—watch the cooking process closely to prevent any burning or overcooking.

Storage considerations become crucial when scaling; ensure that each portion is stored properly to extend shelf life.

Nutritional Deep Dive

Analyzing the macros, this grilled sandwich provides a good balance of carbs, protein, and fats, largely from the bread and cheese elements.

Micronutrient analysis reveals it’s a decent source of calcium, vitamins A, C, and minerals. The cranberries also contribute antioxidants, making it a more wholesome choice.

Health benefits can include improved mood from comfort food, along with nutritious ingredients that support overall wellness—when enjoyed in moderation!

Dietary considerations should be taken carefully, especially for those with lactose sensitivity or gluten allergies; options exist to adapt recipes safely.

Portion control ensures that while satisfying the hunger, it also supports weight management goals; consider serving with a side to bulk up the meal sustainably without overindulgence.

Dietary Adaptations

To accommodate gluten-free diets, switch to gluten-free bread and check all sauces or additional ingredients for gluten content.

Dairy-free versions can employ dairy-free cheeses or spreadable options like hummus and avocado for additional creaminess without using animal products.

Vegan adaptations are achievable by opting for plant-based cheeses and omitting any dairy-based elements, ensuring that flavors remain intact through careful choice of jam or sauces.

Low-carb and keto variations can utilize cloud bread or lettuce wraps to replace traditional bread, significantly lowering the carb count.

For those following the paleo diet, ingredients should focus on whole foods without grains or dairy; choose compliant substitutes to retain the essence.

Those on Low-FODMAP diets may prefer lactose-free cheeses and limited amounts of fresh vegetables for tolerance compatibility.

Each specialized adaptation enables enthusiastic consumption without sacrificing the thrill of indulgence in distinct flavor profiles.

Troubleshooting Guide

Common texture issues arise from improperly toasted bread, leading to sogginess; ensure proper butter distribution and heat levels to combat this.

Flavor balance can become off if any ingredient is under or over-salted; taste while preparing to adjust flavors as you go to ensure a delightful release!

Temperature problems often stem from uneven heating; it’s important to preheat pans and monitor closely while cooking for even results.

Ingredient substitutions may alter the expected taste; be mindful to adjust flavors and quantity ratios when needed to achieve a well-rounded final product.

Timing concerns can affect the final outcome; following step-by-step timing while keeping a close watch on visual cues ensures all elements excel in cooking.

Recipe Success Stories

Community feedback shows a trend in making this simple yet sophisticated sandwich for gatherings and special occasions, with rave reviews about its taste and ease of preparation.

Variations brought to light by readers have included additions like caramelized onions or spinach, each providing enriching flavor profiles that enhance the original recipe.

Adaptation stories from budding culinary enthusiasts indicate how this sandwich opens avenues for creativity in the kitchen while providing essential cooking skills.

Photography tips from readers emphasize the importance of lighting; natural light enhances the vibrant colors of the ingredients, crucial for beautiful food photography.

Frequently Asked Questions

Can I use other types of cheese? Absolutely! Feel free to experiment with different cheeses such as Gouda, cheddar, or even blue cheese for varied flavors.

What can I serve alongside the sandwich? A light salad, fresh fruit, or hearty soup pairs beautifully with this grilled sandwich, creating a well-rounded meal.

How do I prevent the sandwich from getting soggy? Be sure to use thick slices of bread and ensure your cheese is adequately melted before adding any condiments or sauces.

Can I make these sandwiches ahead of time? Certainly! Assemble but do not cook them. Store in the fridge and grill them just before serving for best results.

Is this recipe suitable for small children? Yes, just be mindful of any choking hazards with cranberry seeds or cuts from crispy edges when serving.

What’s the best way to reheat? The oven or air fryer works best; it will ensure the bread stays crispy while the cheese melts perfectly.

How can I make this dish gluten-free? Simply swap the bread for gluten-free alternatives while ensuring all other ingredients are also gluten-free.

Can I add meats like turkey or ham? Yes! Adding cooked turkey, ham, or chicken can enhance protein while making the sandwich heartier.

Can I freeze the sandwiches? Yes, but wrap them tightly to prevent freezer burn, and consume within two months for best flavor and texture!

What bread works best for this sandwich? A crusty, flavorful bread elevates the sandwich; sourdough or whole grain breads are excellent choices.

Additional Resources

Explore related recipes, such as gourmet grilled cheese variations or dips to serve alongside your sandwich.

Check out technique guides for mastering the art of toasting and achieving perfect melted cheese every time you cook.

Delve into ingredient information to better understand nutritional values and origins of the cheeses and jams you choose.

For the best results, consider investing in equipment recommendations, such as a stovetop griddle or high-quality non-stick skillet for even cooking.

Utilize seasonal variations for ideas on creating fresh summer sandwiches or hearty winter baking using similar principles!

Join the Conversation

Share your sandwich successes on social media and don’t hesitate to tag friends or family who might enjoy trying this delightful recipe!

Photography tips include inviting natural light into your kitchen; capturing the process and final product can enhance your cooking experience.

Recipe reviews showcase what others enjoy about this dish; feel free to leave feedback or alterations that worked for you!

Community engagement in the kitchen encourages sharing experiences, successes, and ideas that only strengthen the communal love for good food!

The Recipe

Cranberry Brie & Mozzarella Grilled Sandwich

Serves: 2 sandwiches

Prep Time: 10 mins

Cook Time: 15 mins

Total Time: 25 mins

Kitchen Equipment Needed

  • Skillet or Panini Press
  • Spatula
  • Knife and Cutting Board
  • Measuring Cups and Spoons

Ingredients

  • 4 slices of bread (sourdough or whole grain)
  • 4 oz Brie cheese, sliced
  • 4 oz mozzarella cheese, shredded or sliced
  • 1/2 cup cranberry sauce (store-bought or homemade)
  • 2 tablespoons unsalted butter, softened

Directions

  1. Spread butter on one side of each slice of bread.
  2. On the unbuttered side, layer Brie and mozzarella cheese evenly.
  3. Spread cranberry sauce on top of the cheese.
  4. Top with another slice of bread, buttered side out, creating a sandwich.
  5. Heat a skillet over medium heat and add the sandwich, cooking until golden brown (about 4-5 minutes).
  6. Carefully flip and cook the other side until golden and cheese is melted (another 4-5 minutes).
  7. Once cooked, remove from heat, slice in half, and serve warm.

Recipe Notes

  • Feel free to utilize different cheeses for varied taste.
  • Adding spices or herbs can add depth to the flavor.
  • For a twist, try adding some cooked meats like turkey or ham.

Easy Creamy Garlic Butter Chicken and Rigatoni Pasta

Creamy Garlic Butter Chicken and Rigatoni in Parmesan Sauce: A Hearty Delight

⚖️
Difficulty
Easy

⏲️
Prep Time
15 mins

🕒
Cook Time
20 mins

⏱️
Total Time
35 mins

🍽️
Servings
4

Indulge in a delightful culinary experience with our Creamy Garlic Butter Chicken and Rigatoni in Parmesan Sauce. This dish combines succulent chicken pieces coated in a rich, velvety garlic butter sauce, perfectly complementing the hearty rigatoni pasta. The addition of parmesan creates a creamy texture while enhancing the flavor profile, making this recipe an irresistible choice for family dinners or intimate gatherings.

The combination of garlic and creamy parmesan elevates this chicken dish to new heights, tantalizing your taste buds with each bite. This recipe is not only easy to prepare but offers a comforting meal that warms the soul. Whether you’re a seasoned cook or a beginner, this creamy garlic butter chicken is a dish you’ll want to add to your weekly rotation.

Quick Recipe Highlights

  • Flavor Profile: A balance of savory garlic, rich creaminess from butter and parmesan, with a hint of freshness from herbs.
  • Texture: Creamy and luscious sauce enveloping tender chicken and al dente rigatoni for a delightful mouthfeel.
  • Aroma: Aromatic garlic and butter create an inviting scent that fills the kitchen as it cooks.
  • Visual Appeal: Beautifully plated with vibrant green herbs over a creamy golden sauce, it’s feast for the eyes.
  • Skill Level Needed: Suitable for all skill levels; easy steps make it approachable for everyone.
  • Special Equipment: Standard kitchen tools including a skillet, pot, and knife.

Recipe Overview

  • Difficulty Level: This recipe is categorized as easy, perfect for busy weeknights while still impressing your guests.
  • Category: Ideal for quick dinners or family meals, it serves well as a comforting main dish.
  • Cuisine: Drawing influences from Italian-American cooking, this dish balances creamy pastas with rich meats.
  • Cost: A budget-friendly recipe with readily available ingredients, keeping your expenses low.
  • Season: Enjoy this dish any time of year but especially comforting in the colder months.
  • Occasion: Perfect for family dinners, casual gatherings, or even date nights at home.

Why You’ll Love This Recipe

Combining the comforting flavors of garlic and butter, this Creamy Garlic Butter Chicken and Rigatoni in Parmesan Sauce offers a taste that awakens the senses. Each mouthful delivers a rewarding blend of creamy texture and savory goodness, making it a beloved dish among all ages. Whether served on a weeknight or at a casual get-together, the dish resonates warmth and familiarity, appealing to the heart and stomach alike.

Additionally, the convenience of preparation is a standout feature. With straightforward steps and minimal prep, you can have this satisfying meal on the table in just about 35 minutes. The quick execution ensures that even the busiest families can enjoy a homemade dish without hours in the kitchen.

Nutritionally, the inclusion of chicken as a lean protein source allows for a well-rounded meal. Pairing it with carbohydrates from rigatoni makes for a balanced dinner that provides energy and sustenance.

When hosting, this dish shines as a crowd-pleaser. The creamy sauce, abundant flavors, and eye-catching presentation make it suitable for entertaining guests or keeping up with family meal traditions.

Lastly, being economical without sacrificing taste and quality, this recipe presents an accessible option for all home cooks. Ingredients are typically found at your local grocery store, making it a user-friendly choice for everyone.

Historical Background and Cultural Significance

Creamy garlic butter chicken and pasta dishes like rigatoni have roots in both Italian and American cuisines. Pasta has been enjoyed in Italy for centuries, with regional variations representing various cultural influences. The introduction of cream sauces in American cooking has led to the creation of unique pasta dishes that showcase bold flavors and hearty ingredients.

In Italian cuisine, garlic plays a pivotal role, often paired with olive oil and fresh herbs for vibrant flavor profiles. The incorporation of butter, however, adds a richness that caters more towards American taste preferences. This blending of culinary traditions showcases how recipes evolve through cultural exchanges.

The evolution of this dish reflects the modern kitchen’s adaptability. Eager home cooks constantly seek comfort foods that are both satisfying and uncomplicated, leading to the popularity of creamy pasta dishes with protein options like chicken.

Many regions now boast their own iterations, celebrating local ingredients while maintaining the core flavors of garlic, butter, and cheese. This dish is a delightful example of how cultural histories converge in a universally loved meal.

Ingredient Deep Dive

Chicken
Chicken is a versatile protein that has been a staple in global diets for centuries. In this recipe, it provides a nutrient-dense source of lean protein essential for muscle repair and overall health. When selecting chicken, look for fresh pieces with no bruising or discoloration, and opt for organic or free-range varieties when possible for better flavor and ethical considerations. For storage, keep raw chicken refrigerated and use it within 1-2 days or freeze for extended shelf life.

Rigatoni
Rigatoni pasta, a staple in Italian cooking, is known for its cylindrical shape and ridges which hold onto sauces effectively. This makes it perfect for creamy sauces like our parmesan mixture. Nutritionally, whole wheat or gluten-free varieties can provide additional dietary benefits. When purchasing rigatoni, choose brands that offer a variety made with durum wheat for the best texture. Store in a dry place to maintain its longevity.

Parmesan Cheese
Parmesan is celebrated for its nutty flavor and granular texture, crucial for adding depth to sauces. Rich in calcium and protein, it’s a healthier cheese option. Choose a block of authentic Parmigiano-Reggiano for the best quality, and shred it fresh for optimal flavor. Store it in the refrigerator wrapped in wax paper to maintain freshness over time.

Common Mistakes to Avoid

  • Overcooking the chicken can lead to dryness; ensure it’s cooked just until done.
  • Not allowing the pasta to cook al dente can cause a mushy texture; follow package instructions closely.
  • Skipping the fresh herbs reduces flavor depth; use fresh for the best outcome.
  • Using pre-grated Parmesan often lacks flavor and texture; grate fresh for optimal results.
  • Rushing the sauce preparation may prevent proper flavor melding; allow ingredients to develop before serving.
  • Not saving pasta water can limit the sauce’s creaminess; reserve a cup to adjust consistency.
  • Neglecting to season layers throughout cooking can make the dish bland; season as you go.
  • Forget to check for doneness; tasting is essential to achieve perfection.

Essential Techniques

Cooking chicken properly ensures it retains juiciness. Start with a preheated pan to achieve a beautiful sear and avoid overcrowding the skillet, which maintains the pan’s temperature and avoids steaming. Use an instant-read thermometer to check doneness, removing it from heat at 165°F.

Simmering the sauce allows flavors to meld perfectly. After adding ingredients such as garlic and cream, maintain a low heat while stirring continuously. The visual cue is when the sauce thickens to a velvety consistency; this should take just a few minutes.

Cooking pasta al dente is vital for the right texture in the final dish. Taste the pasta a minute or two before the package directions to ensure it maintains some bite; it will continue cooking in the sauce.

Pro Tips for Perfect Creamy Garlic Butter Chicken and Rigatoni

1. For added depth, sauté minced garlic in the butter until fragrant before adding the cream.
2. Experiment with different proteins like shrimp or mushrooms for a unique twist.
3. Incorporate seasonal vegetables like spinach or peas for added nutrition and color.
4. Use freshly grated parmesan as it enhances the dish’s flavor profile significantly.
5. If you love heat, add a pinch of red pepper flakes to the sauce for a subtle kick.
6. Taste and adjust seasoning throughout the cooking process for the best flavor.
7. Allow the sauce to sit for a few minutes after cooking to thicken before serving.
8. Always keep a little pasta water on hand to adjust the sauce consistency if needed.

Variations and Adaptations

If you’re looking for regional variations, consider substituting chicken with Italian sausage or pancetta to imbue the dish with a different flavor profile. For seasonal adaptations, add roasted butternut squash in autumn for sweetness or julienned zucchini in summer for a refreshing twist.

For dietary modifications, you can easily make the dish gluten-free by using gluten-free rigatoni. If you’re looking for vegan options, substitute chicken with tofu and use non-dairy cream and cheese alternatives. Enhance the flavor further with herbs like thyme or oregano, adapting to your preference for more aromatic notes.

When it comes to texture modifications, consider adding crushed nuts like pine nuts or walnuts for a crunchy element that contrasts beautifully with the creaminess. Lastly, for presentation alternatives, serve this dish in individual ramekins topped with fresh herbs or edible flowers for a beautiful dining experience.

Serving and Presentation Guide

Plating this creamy garlic butter chicken requires attention to detail: use a large, shallow bowl to allow the rigatoni to nestle comfortably in the sauce. Garnish generously with freshly chopped parsley or basil to add vibrant color, and a sprinkle of additional parmesan cheese elevates the visual appeal.

Consider traditional accompaniments like garlic bread or a side salad for a complete meal experience. With modern trends, serve with a glass of wine to enhance the dining atmosphere. Pay attention to the temperature; this dish is best enjoyed warm, ensuring creamy textures remain intact.

Lastly, practice portion control by serving individual bowls for balanced servings and a more intimate dining experience.

Wine and Beverage Pairing

For a wine pairing, consider a light Chardonnay or Sauvignon Blanc that complements the richness of the creamy sauce without overpowering the dish. If you prefer red, a light Pinot Noir can also harmonize well with the flavors.

For non-alcoholic alternatives, a sparkling water with lemon can cleanse the palate between bites. Tea fans may enjoy a herbal tea such as chamomile, which complements the flavors beautifully, enhancing the overall dining experience.

Cold temperatures for white wines are ideal, serving around 45-50°F, while a short chill is appropriate for lighter reds, served at around 55°F to allow their nuances to express fully.

Storage and Shelf Life

To store your leftover creamy garlic butter chicken and rigatoni, place it in an airtight container and refrigerate. This dish can be safely stored in the fridge for up to three days. If you plan on enjoying it later, freezing is an option as well; just ensure it is in a freezer-safe container.

For signs of spoilage, check for off odors or unusual textures before reheating. When reheating, do so gently on the stove over low heat, adding a splash of milk or reserved pasta water to restore creaminess. Avoid microwaving, as it can lead to uneven heating and change the texture negatively.

If frozen, use the dish within three months for optimal flavor quality, thawing it overnight in the refrigerator before reheating.

Make Ahead Strategies

Prepare components of the creamy garlic butter chicken ahead of time to streamline your cooking process. The sauce can be made a day in advance and stored in the refrigerator, allowing flavors to develop.

Cook the chicken and rigatoni only when you are ready to serve, maintaining freshness. If making ahead, be sure to cool ingredients quickly and store correctly to preserve taste and quality.

For quality impact assessments, it’s best to reheat the sauce gently, ensuring not to break the emulsion. Assembly is straightforward; combine the cooked pasta with the sauce just before serving, garnishing with fresh herbs for added vibrancy.

Scaling Instructions

Scaling the creamy garlic butter chicken recipe is straightforward; halving ingredients will produce two servings comfortably, while doubling will yield eight without changing the cooking method.

For adjustments beyond doubling, ensure your cooking vessels can accommodate the increased volume, especially for the sauce to maintain its consistency. Timing may need to be slightly adjusted in larger batches; monitor the chicken cooking supply for doneness and sauce thickness appropriately.

For storage considerations, use larger containers, ensuring the entire dish is covered to retain moisture and flavors.

Nutritional Deep Dive

Analyzing the macro breakdown of this dish, you can expect a substantial source of protein from chicken, hearty carbs from rigatoni, and healthy fats from butter and cheese. On average, one serving offers around 30 grams of protein, essential for muscle building and repair.

Micronutrient analysis reveals that the dish is rich in calcium from parmesan and vitamins A and B through the garlic and herb ingredients. Including this dish in a balanced diet can support overall health and wellbeing.

Considering dietary benefits, the combination of protein, fats, and carbs facilitates sustained energy levels and keeps you feeling satiated. Analyzing portion sizes can assist in adhering to dietary goals, as each serving provides adequate nutrients without excessive calories.

Dietary Adaptations

For a gluten-free adaptation, opt for gluten-free rigatoni made from lentils or chickpeas; they typically provide a similar texture without the gluten content.

For those following a dairy-free or vegan diet, substitute regular cream with coconut cream or cashew cream, and use nutritional yeast in place of parmesan for a cheesy flavor without dairy.

If you’re low-carb or adhering to a keto diet, substitute rigatoni with spiralized zucchini (zoodles) or cabbage for a lighter option that still holds the sauce well.

Options for paleo eaters can include swapping traditional pasta with spaghetti squash, offering a nutrient-dense and low-carb experience while retaining flavor.

Troubleshooting Guide

If you find the sauce too oily, it may have been cooked at too high a temperature; lower the heat and whisk in reserved pasta water to re-emulsify. For texture issues, if the chicken is overcooked, ensure proper use of a thermometer next time for precise donor understanding.

For flavor balance problems, consider adding a splash of lemon juice or a touch of vinegar to brighten the overall richness. If ingredients don’t seem to blend well, patience during simmering allows flavors to harmonize effectively.

Common equipment challenges include uneven cooking due to overloaded pans; ensure adequate space for all ingredients for even heating. Lastly, if timing is a concern, prep all ingredients beforehand to reduce last-minute rush.

Recipe Success Stories

Countless home cooks have shared their love for this creamy garlic butter chicken, highlighting its ease in preparation and satisfying flavors. Community feedback emphasizes how the dish becomes a family favorite, especially among children who adore creamy pasta.

Readers have experimented with variations, incorporating seasonal vegetables, or swapping proteins while maintaining satisfaction across the board. Photography of the finished dish showcases its creamy allure, inviting more cooks to try their hand at this delightful recipe.

Some readers have even sent in adaptations they’ve tried, ranging from adding spices to enhance the flavor to unique garnishing techniques that enhance visual appeal. These stories inspire others to join in the culinary adventure this dish provides.

Frequently Asked Questions

Can I use a different type of pasta?

Absolutely! While rigatoni works wonderfully, feel free to substitute it with any pasta shape you prefer, such as penne, fusilli, or farfalle. Just keep in mind the cooking time may vary slightly.

How can I make this dish lower in calories?

To reduce calories, consider using less butter and cream, or replacing them with Greek yogurt or a lighter non-dairy milk. Also, serve smaller portions or increase vegetable content to add volume without many calories.

Can I prepare this ahead of time?

Yes! The sauce can be prepared ahead of time and stored in the refrigerator. Just reheat it gently when you’re ready to serve and cook the pasta fresh for the best texture.

What if I have leftovers?

Store any leftovers in an airtight container in the refrigerator for up to three days. Reheat on the stove over low heat, adding a little milk or water to bring back creaminess.

Is this dish suitable for freezing?

Creamy sauces can separate when frozen, but this dish can still be frozen in portions. Just ensure it is in a freezer-safe container for up to three months. Thaw overnight in the fridge before reheating.

How do I make it vegetarian?

To make a vegetarian version, replace chicken with mushrooms, tofu, or chickpeas. Maintain the sauce ingredients for a creamy texture while keeping the heartiness intact.

Can I add spices to the recipe?

Absolutely! You can boost the flavor by adding spices like paprika, red pepper flakes, or Italian seasoning to enhance the dish’s overall taste.

How do I prevent the sauce from curdling?

To avoid curdling, ensure the cream is added slowly to the pre-heated pan and kept on low heat. Stir continuously to help emulsify the sauce.

What’s the best way to reheat the leftovers?

Reheat leftovers gently on the stove over low heat, adding a splash of pasta water or milk to return to its creamy texture. Avoid microwave reheating as it can change the dish’s texture.

How can I make the dish spicier?

Add red pepper flakes or finely minced jalapeños to the sauce while cooking for a punch of heat that will enhance your creamy garlic butter chicken.

What other proteins can I use?

Feel free to experiment with different proteins such as shrimp, salmon, or even a meat alternative like plant-based nuggets for a unique twist to the dish.

Additional Resources

If you’re looking for more delicious recipes, consider trying a classic spaghetti carbonara or a vibrant chicken alfredo for perfect pasta fare. For technique guidance, check out various methods for sautéing, pasta cooking tips, and ingredient knowledge to help enhance your cooking skills.

There are also plenty of equipment recommendations available to help you make the most out of your kitchen tools. During seasonal transitions, explore recipes that incorporate seasonal produce, maximizing freshness and flavor year-round.

Lastly, our ingredient-focused posts can provide insights into selecting fresh produce, herbs, and proteins to upgrade your every meal experience.

Join the Conversation

We love to hear from you! Share your successful experiences with our creamy garlic butter chicken and rigatoni recipe. Tag us on social media with your dish photos and variations, and let us know how it turned out for you.

For those with tips or suggestions, please interact with our community in the comments. Recipe reviews are a great way to understand how others have enjoyed or modified the dish, encouraging an engaging discussion around cooking and food preparation.

Let’s create a vibrant cooking community together, exchanging ideas and perfecting the art of making this comforting pasta dish even better!

The Recipe

Creamy Garlic Butter Chicken and Rigatoni in Parmesan Sauce

Serves: 4

Prep Time: 15 mins

Cook Time: 20 mins

Total Time: 35 mins

Kitchen Equipment Needed

  • Large skillet
  • Pot for boiling pasta
  • Knife
  • Cutting board
  • Serving bowls

Ingredients

  • 1 lb chicken breast, diced
  • 12 oz rigatoni pasta
  • 3 tbsp unsalted butter
  • 4 cloves garlic, minced
  • 1 cup heavy cream
  • 1 cup grated parmesan cheese
  • Salt and pepper to taste
  • 1 tbsp chopped fresh parsley (for garnish)

Directions

  1. In a large pot, boil salted water and cook rigatoni according to package instructions until al dente. Drain and set aside.
  2. In a large skillet, melt butter over medium heat. Add minced garlic and sauté until fragrant, about 1 minute.
  3. Add the diced chicken to the skillet and season with salt and pepper. Cook until golden and cooked through, about 5-7 minutes.
  4. Reduce heat to low and stir in the heavy cream, cooking until warmed through.
  5. Gradually add parmesan cheese, stirring until melted and creamy.
  6. Combine the cooked rigatoni with the sauce and chicken, mixing well.
  7. Serve hot, garnished with fresh parsley and extra parmesan if desired.

Recipe Notes

  • Feel free to add vegetables like spinach or sun-dried tomatoes to the skillet for added nutrition.
  • This dish can be made gluten-free with the right pasta and substitutions.
  • For a bit of heat, add red pepper flakes while cooking the garlic.