End your day with a delicious, comforting, and satisfying dinner! Whether you’re looking for quick and easy weeknight meals, cozy comfort food, or elegant dishes for special occasions, we have the perfect recipes for you.
From hearty casseroles and one-pan wonders to savory pastas, juicy meats, and flavorful vegetarian options, our collection is designed to make dinnertime effortless and enjoyable.
Busy schedule? No problem! Try our slow cooker meals, sheet pan dinners, and 30-minute recipes to save time without sacrificing flavor. Whatever your craving, these recipes will bring warmth and joy to your table every night. 🍽️✨
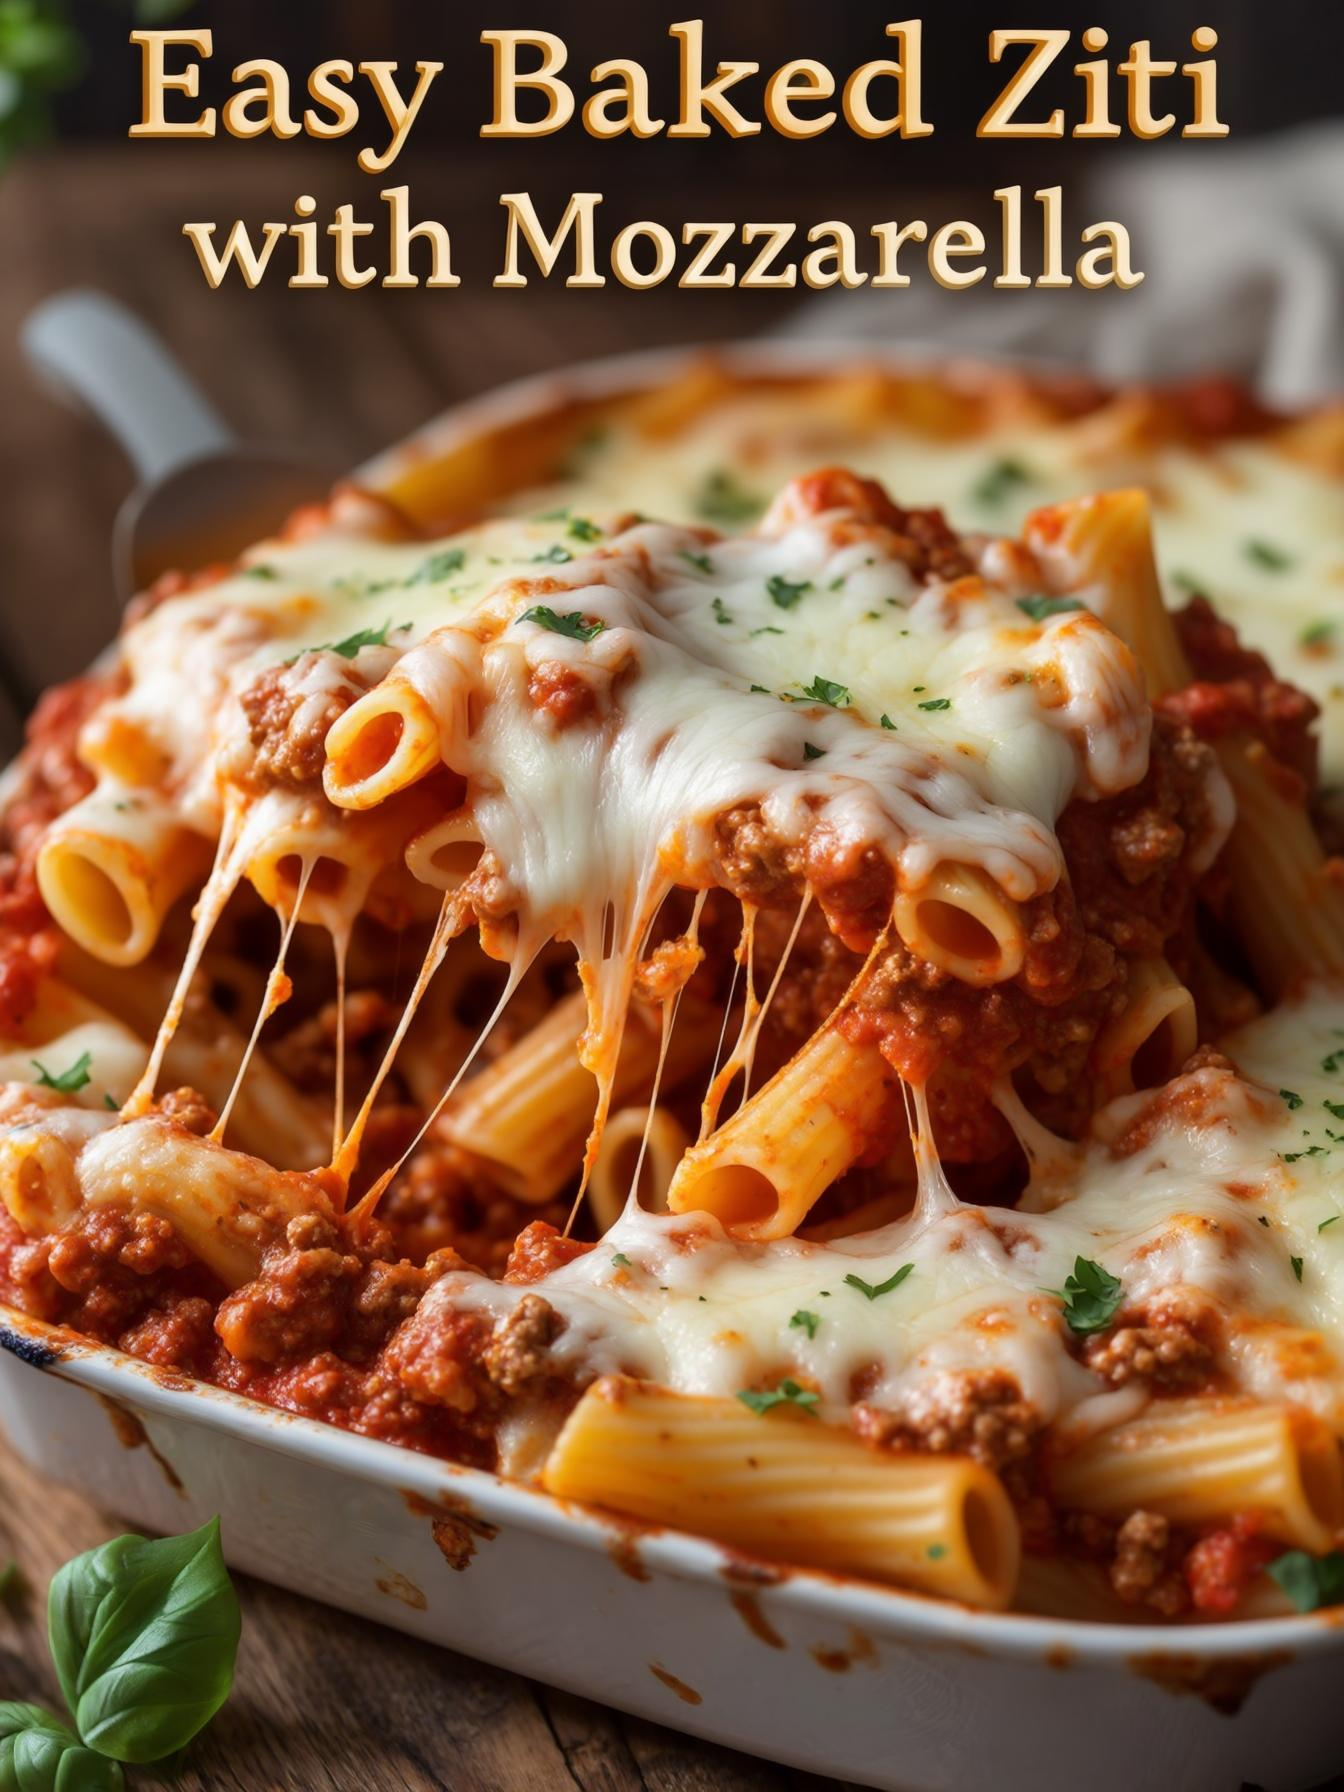
Easy Baked Ziti with Mozzarella – The Ultimate Comfort Food!
Craving a cheesy, saucy, and totally comforting pasta bake? This Easy Baked Ziti with Mozzarella is the answer! It’s loaded with tender pasta, a rich marinara sauce, creamy ricotta, and plenty of gooey melted mozzarella—baked to golden perfection.
This dish is perfect for weeknights, potlucks, or when you just need some serious comfort food. It’s super easy to make, and you can even prep it ahead of time!
Why You’ll Love This Recipe
✔ Simple Ingredients – Pantry staples = easy & delicious! ✔ Super Cheesy & Flavorful – A perfect balance of sauce, cheese, and pasta. ✔ Feeds a Crowd – Perfect for family dinners or meal prep. ✔ Make-Ahead Friendly – Assemble it ahead and bake when ready!
Ingredients You’ll Need
For the Pasta & Sauce:
1 lb ziti pasta (or penne)
1 tablespoon olive oil
1 small onion (chopped)
3 cloves garlic (minced)
1 lb ground beef or Italian sausage (optional, for a meaty version)
1 (24 oz) jar marinara sauce (or homemade)
1 teaspoon Italian seasoning
½ teaspoon salt
½ teaspoon black pepper
¼ teaspoon red pepper flakes (optional, for a little heat)
For the Cheese Layer:
1 cup ricotta cheese
1 egg
¼ cup grated Parmesan cheese
1 teaspoon dried basil
For Topping:
2 cups shredded mozzarella cheese
¼ cup grated Parmesan cheese
Fresh basil or parsley (for garnish)
How to Make Easy Baked Ziti with Mozzarella
Step 1: Cook the Pasta
Bring a large pot of salted water to a boil.
Cook ziti pasta until 1-2 minutes less than al dente (it will finish cooking in the oven).
Drain and toss with a little olive oil to prevent sticking.
Step 2: Make the Sauce
In a large skillet, heat olive oil over medium heat.
Add onions and garlic, sauté for 2 minutes until fragrant.
If using ground beef or sausage, add it now and cook until browned.
Stir in marinara sauce, Italian seasoning, salt, pepper, and red pepper flakes.
Simmer on low for 5-10 minutes while you prep the cheese mixture.
Step 3: Mix the Cheese Layer
In a small bowl, mix ricotta cheese, egg, Parmesan, and dried basil until smooth.
Step 4: Assemble the Baked Ziti
Preheat oven to 375°F (190°C).
Spread 1 cup of sauce in the bottom of a 9×13-inch baking dish.
Toss the cooked ziti with the remaining sauce and half of the mozzarella cheese.
Layer half of the pasta in the baking dish.
Spread the ricotta cheese mixture evenly on top.
Add the remaining pasta, then top with remaining mozzarella and Parmesan cheese.
Step 5: Bake!
Cover with foil and bake for 20 minutes.
Remove foil and bake for 10-15 more minutes, until cheese is golden and bubbly.
Let rest for 5 minutes, then sprinkle with fresh basil or parsley before serving.
Tips for the Best Baked Ziti
✔ Cook pasta slightly underdone – It will soften more in the oven. ✔ Use quality marinara sauce – A good sauce makes all the difference! ✔ Want extra cheesy goodness? – Add an extra ½ cup mozzarella inside the pasta mixture. ✔ Let it rest before serving – This helps the layers set for perfect slices.
Variations & Add-Ins
Make It Meaty 🍖
Use ground beef, sausage, or shredded rotisserie chicken.
Make It Vegetarian 🥦
Add sautéed mushrooms, spinach, or zucchini for extra veggies.
Make It Extra Creamy 🧀
Stir in ½ cup heavy cream into the sauce for a rich, velvety texture.
How to Store & Reheat
Storing Leftovers
Keep in an airtight container in the fridge for up to 4 days.
Reheating
Oven: Cover with foil and bake at 350°F for 15 minutes.
Microwave: Heat in 30-second intervals, stirring between each.
Freezing
Before Baking: Assemble, cover tightly, and freeze for up to 3 months. Bake from frozen at 375°F for 50-60 minutes.
After Baking: Cool completely, slice, and freeze in portions for easy reheating.
FAQs About Baked Ziti
Q: Can I use a different pasta? A: Yes! Penne, rigatoni, or rotini work just as well.
Q: What’s the difference between baked ziti and lasagna? A: Ziti is easier and faster—no layering pasta sheets, just mix and bake!
Q: Can I make this ahead of time? A: Yes! Assemble up to 24 hours in advance, cover, and refrigerate until ready to bake.
Q: What can I serve with baked ziti? A: Garlic bread, Caesar salad, or roasted vegetables pair perfectly!
Q: How do I make this extra cheesy? A: Add extra ricotta or a layer of provolone slices for more gooey cheese goodness.
Final Thoughts
This Easy Baked Ziti with Mozzarella is the ultimate cheesy, comforting, and crowd-pleasing pasta bake. It’s perfect for busy nights, potlucks, and meal prepping—plus, it’s SO easy to customize!
Try it out and let me know how you like it! What’s your favorite pasta bake? Let’s chat in the comments! 🍝✨
This Easy Baked Ziti with Mozzarella is the ultimate comfort food! Hearty pasta, rich marinara sauce, and a generous amount of melted mozzarella come together in this simple yet delicious dish that’s perfect for any occasion.
Ingredients
Scale
For the Ziti:
1 lb ziti pasta (or penne)
2 cups marinara sauce (store-bought or homemade)
1 1/2 cups shredded mozzarella cheese
1/2 cup grated Parmesan cheese
1/2 cup ricotta cheese (optional for extra creaminess)
1 tbsp olive oil
1 tsp dried basil
1 tsp garlic powder
Salt and pepper, to taste
For Garnish:
Fresh basil or parsley, chopped (optional)
Instructions
1. Cook the Ziti:
Preheat your oven to 375°F (190°C).
Cook the ziti pasta according to package instructions, until al dente (about 8-10 minutes). Drain and set aside.
2. Prepare the Sauce:
In a large bowl, combine the marinara sauce with dried basil, garlic powder, and a pinch of salt and pepper.
Add the cooked pasta to the sauce and stir to coat evenly.
3. Layer the Ziti:
In a greased 9×13-inch baking dish, add half of the pasta and sauce mixture.
Sprinkle with half of the mozzarella cheese, Parmesan cheese, and ricotta cheese (if using).
Add the remaining pasta and sauce on top and finish by layering with the rest of the mozzarella and Parmesan cheese.
4. Bake:
Cover the baking dish with foil and bake in the preheated oven for 20 minutes.
After 20 minutes, remove the foil and bake for an additional 10-15 minutes, or until the cheese is melted, bubbly, and golden brown.
5. Serve & Enjoy:
Let the baked ziti rest for 5 minutes before serving.
Garnish with fresh basil or parsley for a pop of color.
Notes
This Easy Baked Ziti with Mozzarella is an incredibly satisfying meal that’s perfect for feeding a crowd or for a cozy family dinner. With minimal prep and a ton of flavor, it’s sure to be a favorite!
One-Pot Creamy Chicken and Rice – Easy & Comforting!
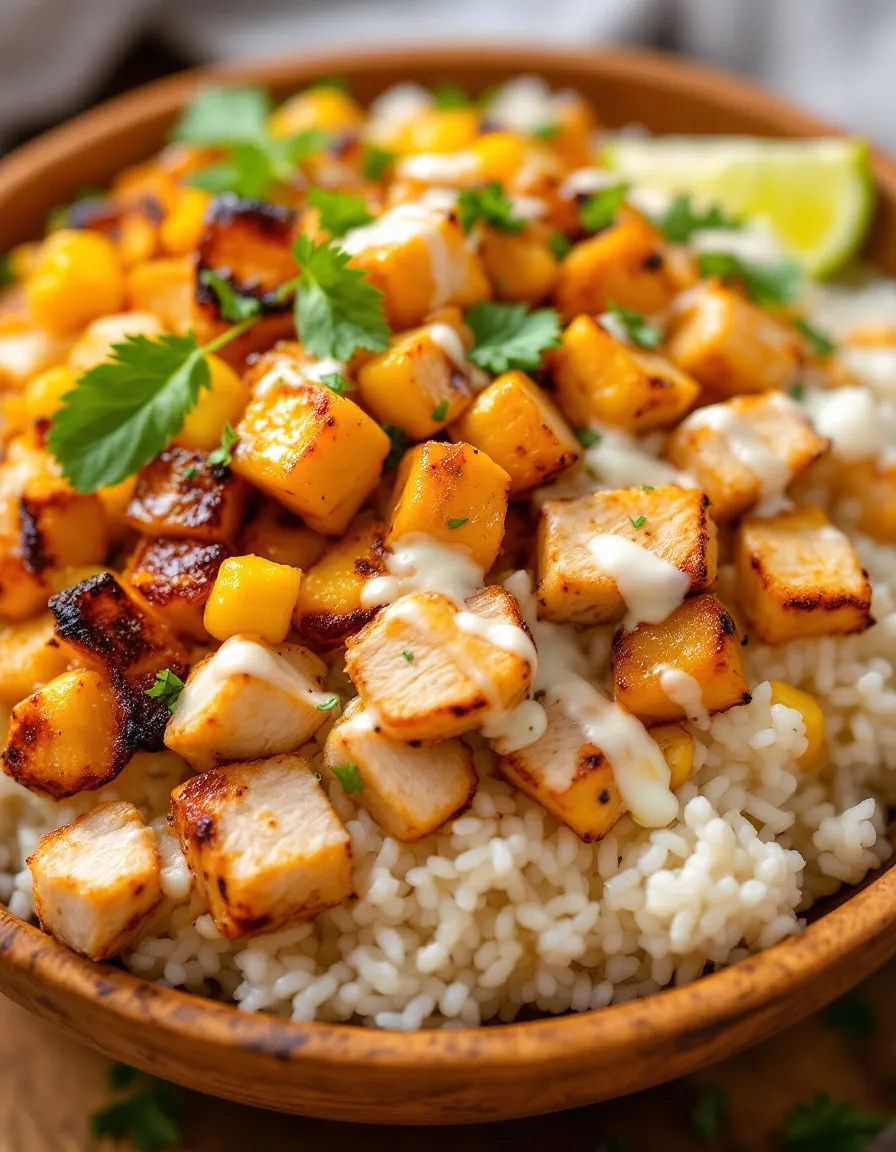
When you need a cozy, hearty meal that’s easy to make, this One-Pot Creamy Chicken and Rice is the perfect answer! Juicy chicken, fluffy rice, and a rich, creamy sauce all cook together in one pan for the ultimate comfort food.
This dish is quick, budget-friendly, and family-approved, making it a great choice for weeknight dinners. Plus, no extra dishes to wash—everything cooks in one pot for maximum flavor and minimal effort!
Why You’ll Love This Recipe
✔ One-Pot Wonder – Easy cleanup, no extra dishes! ✔ Ultra Creamy & Flavorful – A rich, comforting dish with simple ingredients. ✔ Kid-Friendly – A guaranteed family favorite. ✔ Customizable – Works with different proteins, veggies, and seasonings!
Ingredients You’ll Need
For the Chicken & Rice:
2 large boneless, skinless chicken breasts (or 4 chicken thighs)
1 tablespoon olive oil
½ teaspoon salt
½ teaspoon black pepper
½ teaspoon garlic powder
½ teaspoon onion powder
½ teaspoon smoked paprika (optional, for extra flavor)
1 small onion (chopped)
3 cloves garlic (minced)
1 cup long-grain white rice (uncooked)
2 cups chicken broth
½ cup heavy cream or milk
1 teaspoon Worcestershire sauce
½ cup frozen peas (optional)
½ cup shredded carrots (optional)
For the Creamy Sauce:
1 cup shredded cheddar cheese (or Parmesan for a sharper taste)
½ cup sour cream
1 teaspoon dried parsley
How to Make One-Pot Creamy Chicken and Rice
Step 1: Season & Sear the Chicken
Season the chicken breasts with salt, pepper, garlic powder, onion powder, and smoked paprika.
Heat olive oil in a large skillet or Dutch oven over medium-high heat.
Sear the chicken for 3-4 minutes per side until golden brown. Remove and set aside (it will finish cooking later).
Step 2: Sauté the Aromatics
In the same pan, add onions and garlic. Sauté for 2 minutes until softened.
Stir in the uncooked rice and cook for 1 minute, letting it absorb the flavors.
Step 3: Add the Broth & Simmer
Pour in chicken broth and Worcestershire sauce, stirring to combine.
Nestle the seared chicken back into the pot.
Cover and reduce heat to medium-low, letting everything simmer for 15-20 minutes, or until the rice is tender.
Step 4: Make It Creamy
Stir in heavy cream, shredded cheese, and sour cream until melted and smooth.
Add frozen peas and shredded carrots, stirring to combine.
Simmer for another 2-3 minutes until everything is warmed through.
Step 5: Garnish & Serve
Sprinkle with dried parsley and extra cheese if desired.
Serve warm and enjoy your deliciously creamy chicken and rice!
Tips for the Best Creamy Chicken & Rice
✔ Use long-grain white rice – It absorbs flavor well without getting mushy. ✔ Don’t overcook the chicken – It should reach 165°F (75°C) for juicy, tender meat. ✔ Want extra creaminess? – Stir in 2 tablespoons cream cheese with the sour cream. ✔ More flavor? – Add a dash of hot sauce or Cajun seasoning for a kick!
Variations & Add-Ins
Make It Healthier 🥦
Use brown rice (increase broth to 2 ½ cups and cook longer).
Swap Greek yogurt for sour cream.
Add extra veggies like broccoli, spinach, or zucchini.
Swap the Protein 🍗
Use chicken thighs for more flavor.
Try turkey, shrimp, or tofu instead!
Make It Spicy 🌶
Stir in ½ teaspoon red pepper flakes or a dash of hot sauce.
How to Store & Reheat
Storing Leftovers
Keep in an airtight container in the fridge for up to 3 days.
Reheating
Stovetop: Heat over medium-low with a splash of milk to keep it creamy.
Microwave: Warm in 30-second intervals, stirring in between.
Freezing
Freeze for up to 2 months in a sealed container.
Thaw overnight in the fridge before reheating.
FAQs About One-Pot Creamy Chicken & Rice
Q: Can I use instant rice? A: Yes, but reduce the liquid by ½ cup and cook for a shorter time.
Q: What can I use instead of heavy cream? A: Try half-and-half, whole milk, or evaporated milk for a lighter version.
Q: Can I add mushrooms? A: Absolutely! Sauté ½ cup sliced mushrooms with the onions for extra depth.
Q: What sides go well with this dish? A: Garlic bread, roasted veggies, or a simple side salad pair perfectly!
Final Thoughts
This One-Pot Creamy Chicken and Rice is simple, satisfying, and packed with flavor—a perfect weeknight dinner that the whole family will love. Plus, with endless variations, you can make it exactly how you like it!
Try it out and let me know how you customize it! What’s your favorite one-pot meal? Let’s chat in the comments! 🍛✨
This One-Pot Creamy Chicken and Rice is the ultimate comfort food! Tender chicken, creamy rice, and a rich sauce all cooked together in one pot for a hearty, easy-to-make meal that’s perfect for busy nights.
Ingredients
Scale
Ingredients:
For the Chicken & Rice:
4 boneless, skinless chicken breasts (or thighs)
1 cup long-grain white rice
2 tbsp olive oil
1 medium onion, diced
3 cloves garlic, minced
2 cups chicken broth
1 1/2 cups heavy cream
1 tsp garlic powder
1/2 tsp onion powder
1/2 tsp dried thyme
Salt and pepper, to taste
For the Topping (Optional):
1/2 cup grated Parmesan cheese
1/4 cup chopped fresh parsley (optional, for garnish)
Instructions
Directions:
1. Brown the Chicken:
Heat olive oil in a large, deep skillet or Dutch oven over medium-high heat.
Season the chicken breasts with salt, pepper, garlic powder, and onion powder.
Add the chicken to the skillet and cook for 5-6 minutes per side, until golden brown and cooked through (internal temperature should reach 165°F/75°C).
Remove the chicken from the skillet and set it aside.
2. Sauté the Onions & Garlic:
In the same skillet, add diced onion and cook for 3-4 minutes, until softened.
Add minced garlic and cook for another 30 seconds, until fragrant.
3. Cook the Rice:
Add rice to the skillet, stirring to coat it with the oil, onions, and garlic.
Pour in chicken broth and heavy cream, and stir in dried thyme.
Bring the mixture to a simmer, then reduce the heat to low.
Cover the skillet and cook for 15-20 minutes, or until the rice is tender and the liquid has been absorbed. Stir halfway through to ensure even cooking.
4. Combine Chicken & Rice:
Once the rice is cooked, return the cooked chicken to the skillet, placing it on top of the rice.
Sprinkle with Parmesan cheese (if using) and cover the skillet to let the cheese melt for 2-3 minutes.
5. Serve & Enjoy:
Garnish with fresh parsley (optional) before serving.
Serve the creamy chicken and rice hot for a satisfying and comforting meal.
Notes
This One-Pot Creamy Chicken and Rice is perfect for busy nights—everything cooks together in one pot, making cleanup a breeze and flavor a guarantee!
Ultimate Grilled Cheese Burrito with a Crispy Cheese Crust
Delicious Grilled Cheese Burrito: The Ultimate Comfort Food Fusion
⚖️
Difficulty
Easy
⏲️
Prep Time
10 mins
🕒
Cook Time
15 mins
⏱️
Total Time
25 mins
🍽️
Servings
2 burritos
As you explore culinary delights, the Grilled Cheese Burrito emerges as an irresistible contender. This unique recipe seamlessly blends the gooey richness of traditional grilled cheese sandwiches with the handheld convenience of burritos. Picture it: melty cheese cascading between warm tortillas, each bite a harmonious marriage of textures and flavors. Perfect for quick meals or comforting weekends, this dish transforms the ordinary into an extraordinary experience that elevates your taste buds to new heights.
In the first bite, you’ll be greeted by the delightful crunch of the toasted tortilla, giving way to an indulgent, cheesy filling that embodies comfort food at its best. Enhancements like zesty jalapeños or savory bacon bring a new dimension to this dish, creating layers of flavor that keep your palate excited. Imagine sharing these warm, cheesy burritos with friends or family, making memories around the table.
Quick Recipe Highlights
Flavor Profile: The Grilled Cheese Burrito boasts a cheesy, slightly smoky flavor combination, enhanced by the toasty tortilla and optional spices.
Texture: Experience the satisfying crunch of the toasted exterior softly yielding to the gooey cheese interior.
Aroma: Aromas of melted cheese and fresh spices create an inviting atmosphere that draws everyone into the kitchen.
Visual Appeal: Golden-brown tortillas, with hints of melted cheese peeping out, create an appetizing visual feast.
Skill Level Needed: This recipe is beginner-friendly, making it easy for aspiring cooks to master the process.
Special Equipment: You’ll just need a skillet or griddle for perfect cooking.
Recipe Overview
Difficulty Level: This Grilled Cheese Burrito is easy to prepare, making it suitable for all skill levels, from novice cooks to seasoned chefs.
Category: Best enjoyed as a quick lunch, snack, or casual dinner option, it’s perfect for any time of day.
Cuisine: This recipe is a delightful fusion of classic American grilled cheese and Mexican-inspired burritos, providing a taste for every palate.
Cost: Typically, this dish can be made for around $5-7, depending on ingredient choices and local prices.
Season: Enjoy the Grilled Cheese Burrito year-round, as its comforting qualities are perfect in any season.
Occasion: Ideal for lunch or casual gatherings, these burritos are a hit in both family dinners and game days.
Why You’ll Love This Recipe
The Grilled Cheese Burrito tantalizes your taste buds with its rich, cheesy allure. The combination of crispiness from the tortillas and the melting characteristics of gooey cheese creates a delightful sensory experience. Additionally, you can personalize your burrito with various fillings, such as bacon, avocado, or spices, ensuring it meets everyone’s preferences. This recipe is a nostalgic nod to childhood comfort food, evoking warm memories with every bite.
The convenience of this dish cannot be overlooked. With a quick prep and cook time, it’s a perfect solution for busy weeknights or lazy weekends. Within 25 minutes, you can whip up a satisfying meal that feels indulgent with minimal effort. Not only are these burritos fast to prepare, they also allow for a great deal of creativity, making them suitable for any meal or occasion.
From a nutritional standpoint, the Grilled Cheese Burrito can be enhanced with fresh vegetables or proteins, offering a balanced meal option. Whether you choose to include leafy greens or rich proteins, you can boost the nutritional profile without compromising taste. This flexibility is key for maintaining a healthy lifestyle while satisfying cravings.
Socially, this dish brings people together, perfect for sharing and discussing flavors. Whether you’re throwing a casual party or enjoying a quiet meal at home, these enticing burritos create a sense of community over food. Their fun format encourages sharing and pairing with various dips, making it an excellent choice for entertaining.
Moreover, the Grilled Cheese Burrito is incredibly cost-effective. With just a few staple ingredients, you can serve a satisfying meal that feels indulgent and fulfilling. This makes it an accessible and budget-friendly option, fitting into various dining occasions without breaking the bank.
Historical Background and Cultural Significance
The Grilled Cheese Burrito showcases the beauty of culinary evolution, merging classic American comfort food with vibrant Mexican flavors. Its origin traces back to the American grilled cheese sandwich, which has been a staple for generations, symbolizing warmth and nostalgia. The tortilla’s integration into American cuisine mirrors the evolving ways in which cultures blend and share their culinary traditions.
In Mexico, burritos have long been cherished for their versatility, often filled with various ingredients to meet personal tastes and dietary needs. The addition of grilled cheese into this traditional format pays homage to both American and Mexican roots, celebrating the fusion of flavors. This marriage of culinary techniques invites diners to enjoy a unique bite that honors both cultures.
Over time, variations of the grilled cheese burrito have emerged, showcasing regional preferences and available ingredients. Whether made with spicy jalapeños in the Southwest or featuring creamy guacamole in California, each iteration highlights local flavors while keeping the essence of the original dish intact.
The Grilled Cheese Burrito is not only a delightful fusion but a reflection of shared culinary journeys and the community that food fosters. As we connect through flavors and experiences, this dish stands as a testament to the power of food to unite diverse traditions around the table.
Ingredient Deep Dive
Tortillas
Tortillas are a staple in Mexican cuisine, believed to have originated over 10,000 years ago with the use of corn. They serve as the foundation of many dishes, providing a versatile vessel for various fillings. Nutritionally, they offer carbohydrates and fiber, making them a valuable part of a well-balanced meal while being perfect for gluten-free diets when made from corn. When selecting tortillas, choose fresh ones from local markets for optimal taste and texture, and for storage, keep them in a cool, dry place. If necessary, consider using whole grain or cauliflower tortillas for a healthier alternative.
Cheese
Cheese is a central component of the Grilled Cheese Burrito, adding richness and flavor to the dish. With origins dating back thousands of years, cheese has evolved into numerous varieties, providing diverse flavors and textures. Nutritionally, cheese is an excellent source of protein and calcium, essential for muscle health and bone density. When selecting cheese for this recipe, opt for high-quality options like cheddar, Monterey Jack, or Mexican blend for the best melting qualities. Store cheese in the refrigerator to maintain freshness and allow for easy substitution; try using vegan cheese alternatives if desired.
Common Mistakes to Avoid
Using stale tortillas: Fresh tortillas provide the best texture and flavor. Always opt for tortillas that are pliable and soft.
Overloading with fillings: While more can seem enticing, overstuffing can lead to bursts and leaks. A moderate amount of filling keeps things manageable.
Not preheating your skillet: A hot skillet ensures the tortillas crisp up nicely. Always preheat your skillet to achieve that perfect golden-brown surface.
Using the wrong type of cheese: Not all cheeses melt well. Stick to cheese types known for their melting properties, like cheddar or mozzarella.
Skipping the cover: Covering your burrito while cooking helps to melt the cheese evenly and keeps the moisture inside.
Not letting it sit: Allowing the finished burrito to sit for a few minutes before cutting helps the cheese set slightly, preventing all the goodness from spilling out.
Cooking at too high a heat: This can lead to a burnt exterior while the inside remains unmelted. A medium temperature is ideal for even cooking.
Not seasoning enough: Don’t forget to season your fillings. A little salt and pepper can greatly enhance the flavors.
Essential Techniques
Toasting the Tortilla
Toasting the tortilla is a crucial step in achieving a delightful crunch. This technique enhances the flavor and prevents the burrito from becoming soggy. To master toasting, preheat your skillet and place the tortilla over medium heat for 1-2 minutes on each side until golden. Common pitfalls include using too high heat, which can burn the tortilla before it cooks through. Watch for a light golden color as your visual cue for success.
Melting the Cheese
Melting the cheese properly is essential for that gooey texture. For optimal results, shred your cheese for quicker melting and layer it evenly in the burrito. Once wrapped, place the burrito in a hot, preferably non-stick skillet, and cover to trap the heat. Look for the cheese to become fully melted—usually within 3-5 minutes. Avoid rushing the process by cooking at too high of a temperature, which can burn the tortilla while leaving the cheese intact.
Pro Tips for Perfect Grilled Cheese Burrito
1. Use a mixture of cheeses for a more complex flavor profile; combining sharp cheddar and creamy mozzarella can be heavenly.
2. For extra flavor, consider adding herbs or spices to your cheese mixture, such as garlic powder or smoked paprika.
3. Reverse the cooking order by first melting the cheese on the skillet before wrapping it in the tortilla.
4. Experiment with different fillings such as sautéed mushrooms or roasted vegetables for added depth.
5. Serve with a side of salsa or guacamole to elevate the experience even further.
6. For a spicy kick, add jalapeños or hot sauce to the cheese filling mixture.
7. If you have time, allow your burritos to cool slightly before cutting; this helps maintain structure.
8. For extra richness, brush your tortillas with a little butter before toasting.
Variations and Adaptations
One delightful variation of the Grilled Cheese Burrito is the Southwest-style, which includes black beans, corn, and a spicy cheese blend. This adaptation not only diversifies the flavor but also adds nutritional value. Another option is the breakfast burrito, where cheese is combined with scrambled eggs and crispy bacon for a hearty start to your day.
Seasonal adaptations can also be made by incorporating fresh ingredients depending on what’s available. In the summer, consider adding grilled zucchini or bell peppers, while in the winter, roasted butternut squash can enhance warmth and flavor.
For those with dietary restrictions, creating a vegan version using dairy-free cheese and whole grain or corn tortillas is easy and just as delicious. Modifying the texture of the burrito by adding crunchy toppings like fried onions or fresh sprouts can also elevate the dish further.
Lastly, presentation can be adapted by cutting burritos into bite-sized pieces for entertaining—a perfect appetizer for parties and gatherings.
Serving and Presentation Guide
Plating your Grilled Cheese Burrito can significantly enhance its appeal. Consider cutting the burritos at an angle to showcase the fluffy, melted cheese filling inside. Drizzling with a creamy sauce or salsas will not only taste great but also look sophisticated.
Garnishing with fresh herbs such as cilantro or a sprinkle of queso fresco elevates the visual element. Traditional accompaniments include pickled jalapeños or fresh guacamole, offering contrasting flavors while also adding to the visual interest of the plate.
Serve your burritos warm for the best experience, as the cheese and fillings are most enjoyable when hot. Portion control is essential, considering an average of one burrito per person is appropriate during casual settings, allowing for leftovers or additional side dishes.
Wine and Beverage Pairing
For the Grilled Cheese Burrito, a crisp white wine such as Sauvignon Blanc complements the richness while cutting through the creaminess of the cheese. Alternatively, a light lager or pale ale pairs beautifully with the cheesy goodness, enhancing the overall experience.
For non-alcoholic alternatives, a fresh lemonade or sparkling water with lime adds a refreshing contrast. If you’re considering warm beverages, serve with a spiced chai or an herbal tea which can enhance the meal with aromatic notes. When choosing beverages, always consider serving them chilled or at room temperature to match the components of this vibrant dish.
Storage and Shelf Life
To store leftover Grilled Cheese Burritos, wrap them tightly in plastic or place them in an airtight container to maintain freshness. They can be refrigerated for up to 3 days. For longer storage, these burritos freeze well; simply wrap tightly and store in freezer-safe bags, where they can last for up to 2 months.
When it comes to reheating, the best method is to use an oven at 350°F (175°C) for about 15 minutes. This ensures that the tortilla remains crispy while the cheese thoroughly melts. Avoid microwaving as this can result in a soggy tortilla. Always look for signs of spoilage, such as off-smells or mold, before consuming leftovers.
Make Ahead Strategies
To prepare in advance, consider assembling the burritos without cooking them ahead of time. Once you have filled your tortillas, tightly wrap each one in plastic wrap and store them in the refrigerator for up to 24 hours. This allows the flavors to meld while making it easy to cook just before serving.
If you won’t be serving the burritos immediately, cooking them halfway can also be beneficial. After a few minutes on the heat, cool them down, wrap them, and store them in the refrigerator. When ready to eat, simply finish cooking for updated warmth and texture.
It’s also worthwhile to add fresh elements just before serving if preparing ahead. Fresh herbs or avocado can enhance texture and freshness, making your dish enjoyable for all.
Scaling Instructions
Halving the Grilled Cheese Burrito recipe is straightforward; simply divide the ingredients in half. For those looking to serve more people, doubling or tripling the ingredients is possible without extensive equipment changes. For larger batches, you can use a griddle to cook multiple burritos simultaneously.
Timing modifications may be necessary; cook multiple burritos in batches, ensuring each is toasted perfectly without overcrowding your skillet. When adjusting the recipe, also consider storage, as larger quantities will need ample room in both your cooling and cooking areas.
Nutritional Deep Dive
When examining the nutritional profile of the Grilled Cheese Burrito, its macro breakdown includes carbohydrates from the tortilla, fats from cheese, and protein that supports muscle maintenance. On a micronutrient scale, calcium from dairy options plays a crucial role in bone health while added vegetables contribute vitamins and minerals essential for various bodily functions.
Including protein-rich fillings like beans or chicken amplifies the nutritional advantage while keeping the meal balanced. Portion size is vital; being aware of serving sizes helps with weight management while enjoying the dish without excess.
Dietary Adaptations
Creating a gluten-free version of the Grilled Cheese Burrito is easy with alternatives like corn tortillas. Additionally, swapping in dairy-free cheese options provides a vegan version that maintains the cheesy integrity of the dish.
Those following low-carb or keto diets can use cauliflower tortillas as a base, transforming this comfort food into a diet-friendly option. Similarly, for paleo adherents, adhering to whole, unprocessed ingredients ensures the recipe meets dietary guidelines.
Low-FODMAP variations are also feasible by opting for lactose-free cheese and ensuring no high-FODMAP ingredients are included, enabling enjoyment for those with dietary restrictions while still indulging in delicious flavors.
Troubleshooting Guide
For texture issues, if tortillas become too soggy, try using firmer tortillas and ensure the filling isn’t over-saturated with sauces. If flavor balance is off, adjusting the seasoning with salt or spices can bring everything into harmony.
If there are temperature problems, preheating your skillet properly prevents uneven cooking, ensuring a consistent outcome. Should you run into equipment challenges, make sure your non-stick skillet is in good condition, or alternatively, use a cast iron pan for excellent heat distribution.
In terms of ingredient substitutions, always consider using fresh ingredients that are in season while still maintaining the character of the recipe. With timing concerns, keep an eye on the cooking process since various factors can affect how quickly your burritos cook.
Recipe Success Stories
Community feedback on the Grilled Cheese Burrito highlights its accessible nature and ability to please diverse palates. Many home cooks have shared their unique variations, showcasing how personal touches can lead to delightful results.
Some readers have reported success with adding unique toppings or ingredient swaps that remain true to their dietary guidelines, inspiring others to try new combinations. Photography tips shared within the community emphasize plating and presentation, enhancing the visual appeal of their burritos.
Through feedback and stories, it’s clear that this dish not only satisfies hunger but also ignites creativity in the kitchen, proving that the Grilled Cheese Burrito serves as a platform for both comfort and innovation.
Frequently Asked Questions
1. Can I freeze the Grilled Cheese Burrito? Yes, you can freeze the assembled burritos. Wrap them tightly in plastic wrap and store them in freezer-safe bags for up to 2 months. 2. What is the best way to reheat burritos? The best method is to heat them in the oven at 350°F (175°C) for 15 minutes to maintain crispness and ensure even warmth. 3. How can I spice up my Grilled Cheese Burrito? For added spice, consider including jalapeños or a dash of hot sauce in your cheese mixture. 4. Is this dish suitable for kids? Absolutely! The cheesy flavor is generally a hit among kids, and you can adjust the spice level to cater to their taste. 5. Can I make different variations of the burrito? Yes, feel free to experiment with various ingredients, such as adding veggies or proteins to create unique flavor profiles. 6. What cheese melts best for this recipe? Cheddar, Monterey Jack, and mozzarella are excellent choices for their melting qualities and flavor. 7. How can I make these burritos healthier? Incorporate fresh vegetables, use whole grain tortillas, or opt for lower-fat cheese alternatives for a healthier twist. 8. Can I use gluten-free tortillas? Yes, corn tortillas are a great gluten-free alternative for making the burrito. 9. How long does it take to prepare? The total time for preparing and cooking the Grilled Cheese Burrito is approximately 25 minutes. 10. What are some good accompaniments for serving? Serve your burritos with guacamole, salsa, or a fresh salad to balance the richness of the cheese.
Additional Resources
Explore related recipes such as classic grilled cheese sandwiches or innovative burrito variations to expand your culinary repertoire. If you’re looking to refine your techniques, consider guides on perfecting your tortilla-making skills or enhancing your cheese knowledge.
You may also want to dive into ingredient information, focusing on types of cheese suitable for melting or best practices for seasoning your dishes. Lastly, check out equipment recommendations for maximizing your kitchen efficiency while preparing your delicious Grilled Cheese Burrito.
Join the Conversation
We encourage you to share your experiences and variations of the Grilled Cheese Burrito on social media, connecting with fellow food enthusiasts. If you’ve made any adaptations or discovered new techniques, provide feedback and photographs to inspire others in the community.
Exploring different styles and ingredients further enhances the recipe, and your input can guide future home cooks. Together, we can enjoy the delicious journey of culinary creativity, one Grilled Cheese Burrito at a time.
Heat a skillet over medium heat and add a small amount of butter or oil.
Place the tortilla in the pan and sprinkle half of the cheese on half of the tortilla.
Add any optional fillings on top of the cheese.
Fold the tortilla over and press down gently with a spatula.
Cook until golden brown, about 2-3 minutes, then carefully flip and brown the other side.
Remove from heat and let cool slightly before cutting in half to serve.
Recipe Notes
You can personalize your fillings based on preferences.
Feel free to adjust the cheese blend to your liking.
For a smoky flavor, try adding a pinch of smoked paprika or using smoked cheese.
Easy Creamy Tomato Garlic Pasta – Ready in 30 Minutes
Creamy Tomato Garlic Pasta: A Comforting Delight
⚖️
Difficulty
Easy
⏲️
Prep Time
10 mins
🕒
Cook Time
20 mins
⏱️
Total Time
30 mins
🍽️
Servings
4
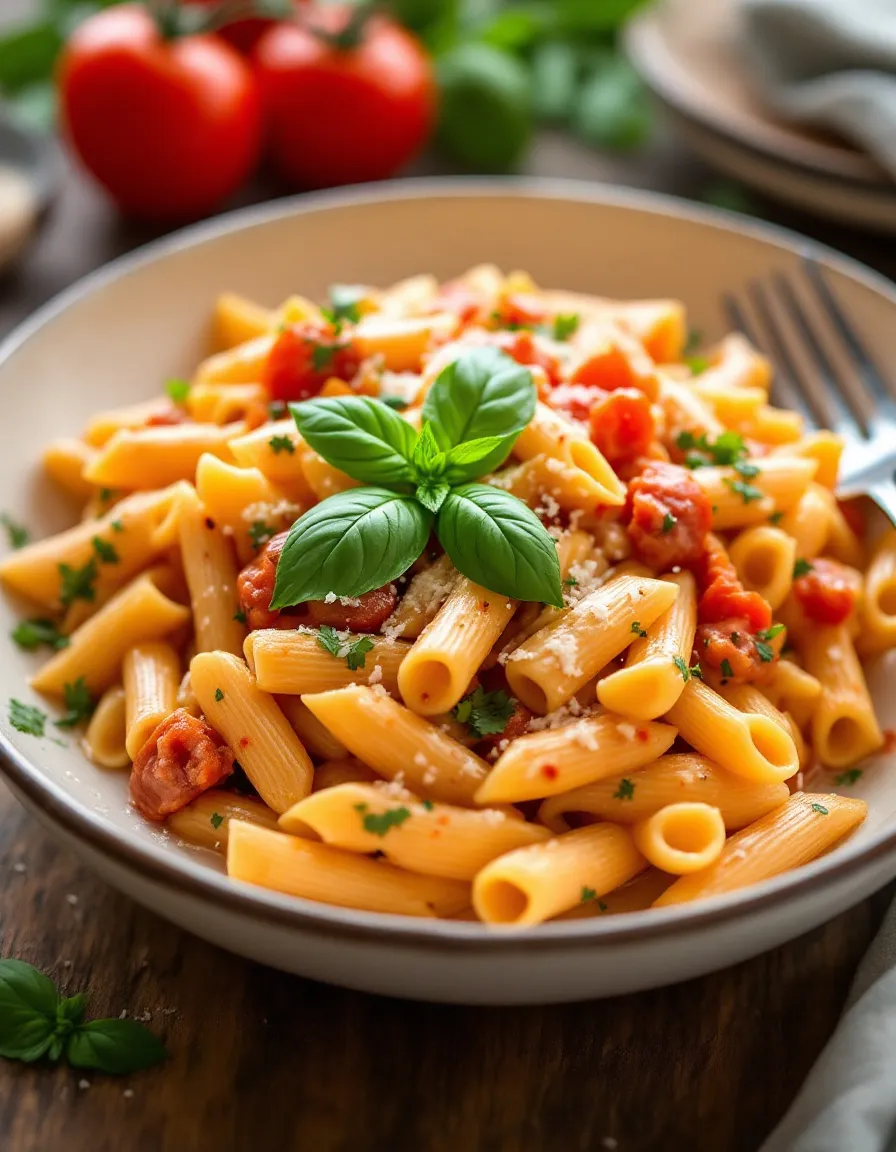
Experience the luxurious flavors of Creamy Tomato Garlic Pasta, an ideal dish for a cozy weeknight dinner or an impressive meal for guests. This recipe combines the richness of cream with the tangy zest of tomatoes and the aromatic allure of garlic, creating a symphony of flavors that dance on your palate. Perfectly cooked pasta serves as the base, enveloping each bite in a creamy, savory sauce that’s both indulgent and comforting.
From the first whiff of simmering garlic to the sight of luscious, tomato-swathed pasta twirling on your fork, this dish promises an unforgettable dining experience. It’s the kind of meal that evokes warmth and nostalgia, bringing family and friends together around the table. Whether you’re a seasoned chef or a kitchen novice, you’ll appreciate how easy it is to create this gourmet-like dish in less than an hour.
Quick Recipe Highlights
Flavor Profile: A perfect balance of creamy, tangy, and savory flavors, complemented by the sweetness of garlic and tomatoes.
Texture: The pasta is al dente, while the sauce is smooth and rich, offering a delightful contrast that enhances each bite.
Aroma: The fragrant notes of sautéed garlic mingle with the fresh scent of tomatoes for an aroma that fills your kitchen.
Visual Appeal: The vibrant red of the tomatoes with the creamy sauce creates a stunning visual that’s appealing and appetizing.
Skill Level Needed: This easy recipe requires basic cooking skills, making it accessible for anyone.
Special Equipment: A medium pot for cooking pasta and a skillet for making the sauce are the only tools needed.
Recipe Overview
Difficulty Level: This dish is rated as easy due to its straightforward preparation steps and minimal cooking techniques.
Category: Creamy Tomato Garlic Pasta falls into the main course category, perfect for lunch or dinner.
Cuisine: This recipe draws inspiration from Italian cuisine, known for its fresh ingredients and simple yet flavorful dishes.
Cost: The ingredients for this recipe are affordable and can be found in any grocery store, making it budget-friendly.
Season: This pasta dish is a delightful choice year-round, but it particularly shines in late summer when tomatoes are at their peak.
Occasion: Ideal for family dinners, romantic meals, or even entertaining, this dish suits any gathering beautifully.
Why You’ll Love This Recipe
Indulging in Creamy Tomato Garlic Pasta is a treat for the senses. The first forkful delivers a creamy consistency that perfectly coats the pasta, while the flavors meld beautifully with every bite. You’ll find that the comforting creaminess is beautifully paired with the vibrant, tangy tomatoes, offering a wholesome balance that feels indulgent yet satisfying. Garlic intensifies the flavor profile, leaving an inviting aroma wafting through your home.
The preparation of this pasta is remarkably convenient, allowing you to whip it up in under 30 minutes. Ideal for a busy weeknight or a last-minute dinner party, this recipe is a lifesaver for those needing a delicious meal in no time. Plus, it allows for flexibility; you can easily customize the ingredients based on what you have on hand, making it an essential go-to in your culinary repertoire.
From a nutritional standpoint, the main ingredients in this recipe provide valuable vitamins and minerals. Tomatoes are rich in antioxidants like lycopene, while garlic has been known for its health benefits, including heart health and immune support. This pasta not only satisfies your hunger but also nourishes your body, contributing to overall wellness.
When it comes to entertaining, Creamy Tomato Garlic Pasta makes a showstopper. It’s a dish that appeals to all ages, satisfying both children and adults alike. Serve it with a side salad and crusty bread, and you have an impressive meal ready for your guests, without the stress of complicated steps.
Affordability is another appealing factor. This recipe calls for common kitchen staples, making it accessible to everyone. With minimal investment, you can create a restaurant-quality dish that brings people together, showcasing that delicious food doesn’t have to be expensive.
Historical Background and Cultural Significance
The origins of pasta date back thousands of years, with roots tracing to ancient civilizations across Asia and Europe. Italy, however, embraced this culinary art, refining it into various shapes and sizes, each with regional significance. Creamy sauces became a hallmark of Italian cuisine, marrying the simplicity of pasta with rich flavors that tantalize the taste buds.
Cultural significance lies not just in the flavor but also in the communal aspect of enjoying a shared meal. Italian culture emphasizes family and togetherness, and pasta dishes often serve as a centerpiece for gatherings. The aromatic sensations of Creamy Tomato Garlic Pasta evoke memories of family dinners and celebrations, making it more than just a meal—it’s an experience.
As culinary traditions evolved, recipes like Creamy Tomato Garlic Pasta transformed to incorporate seasonal ingredients and global influences. Today, this dish holds its place in both traditional Italian kitchens and modern households, highlighting its versatility and enduring appeal.
Regional variations of this pasta dish might include different styles of tomatoes or locally sourced herbs. Each variation tells a story of its origin, adapting traditional flavors to suit local tastes and ingredients while remaining true to its roots.
Ingredient Deep Dive
Tomatoes: Rich in cultural significance, tomatoes are a staple in Italian cuisine, celebrated for their robust flavor. They provide essential nutrients, including vitamins C and K, and are a great source of dietary fiber. When selecting tomatoes, choose firm and vibrant specimens for optimal flavor. Store them at room temperature to maintain freshness, and consider using canned tomatoes for convenience in a pinch. If fresh tomatoes aren’t available, canned or sun-dried tomatoes can serve as excellent substitutes.
Garlic: Garlic is revered in various cultures for its unique flavor and impressive health benefits, including antimicrobial and anti-inflammatory properties. To select garlic, look for firm bulbs without sprouting. Store it in a cool, dry place, and consider mincing or slicing to release maximum flavor. Substitutions can include garlic powder, though fresh garlic is always recommended for best results.
Heavy Cream: Cream adds richness and luxury to the dish. While it enhances the sauce’s creamy texture, it’s essential to use it sparingly for those watching their caloric intake. Heavy cream can be substituted with half-and-half or even non-dairy alternatives like coconut cream. It’s best stored in the refrigerator and should be used within a week of opening.
Common Mistakes to Avoid
Overcooking the pasta: This can lead to mushy noodles; always aim for al dente.
Not seasoning the water: Salting the pasta water helps enhance the overall flavor of the dish.
Using low-quality ingredients: Fresh, quality ingredients make a significant difference in flavor and texture.
Skipping the garlic: Garlic is the flavor powerhouse; avoid overcooking it to prevent bitterness.
Neglecting to toss: Ensure that the pasta is well-coated in the creamy sauce for even distribution.
Forgetting to taste: Regularly tasting while cooking allows for necessary adjustments in seasoning.
Not letting the sauce thicken: Give the sauce ample time to develop flavor and thickness over low heat.
Using cold cream: Ensure the cream is at room temperature before adding it to the sauce for better integration.
Essential Techniques
Cooking Pasta: It’s essential to use ample water and salt when boiling pasta. This technique prevents the pasta from sticking and enhances flavor. Remember to taste for doneness; al dente pasta should have a slight bite. When draining, reserve a bit of pasta water to adjust sauce consistency.
Sautéing Garlic: Mastering the art of sautéing garlic is crucial. Start with a cold pan, then gradually increase the heat. Pay attention to visual cues; garlic should turn golden without burning. This step releases its aromatic oils, creating a fragrant base for the sauce.
Pro Tips for Perfect Creamy Tomato Garlic Pasta
1. **Use fresh herbs:** Adding fresh basil or parsley at the end enhances flavor and presentation.
2. **Incorporate cheese:** A sprinkle of Parmesan can elevate the dish, adding a nutty undertone.
3. **Consider protein:** Adding grilled chicken or shrimp can boost the dish’s heartiness, making it more satisfying.
4. **Experiment with spices:** A pinch of red pepper flakes can bring a delightful kick to the creamy sauce.
5. **Make it vegetarian:** Swap heavy cream for a plant-based alternative to cater to dietary preferences.
6. **Serve immediately:** This pasta is best enjoyed fresh; reheat gently if saving any leftovers to prevent overcooking.
7. **Use high-quality olive oil:** A drizzle over before serving can bring depth and enhance flavors.
8. **Unique toppings:** Crushed nuts or seeds can add an unexpected crunch and nutritional boost.
Variations and Adaptations
Creamy Tomato Garlic Pasta is incredibly adaptable. For a regional twist, consider incorporating sun-dried tomatoes or olives, which add a salty punch reminiscent of Mediterranean flavors. Seasonal adaptations may involve adding sautéed zucchini or asparagus, allowing for a fresh, vibrant dish that highlights seasonal produce.
Dietary modifications could include using whole-grain pasta for added fiber or gluten-free alternatives for those with dietary restrictions. For a lower-calorie version, consider using Greek yogurt instead of heavy cream, still yielding a creamy texture while cutting fat.
Flavor variations can easily emerge from the addition of herbs like thyme or oregano, offering a bouquet of flavors. For texture, consider adding toasted breadcrumbs or nuts as a crunchy topping, adding an exciting contrast to the creamy sauce. Presentation can become artistic with a garnish of microgreens or edible flowers, transforming a simple plate into an elegant meal.
Serving and Presentation Guide
For an impressive presentation, twirl the pasta high in the center of the plate, allowing the sauce to cascade beautifully. Experiment with garnish, using fresh basil leaves or edible flowers to introduce vibrant colors. Consider serving with toasted garlic bread on the side, enhancing the dining experience.
Alternatively, use bowls for a more casual approach, and offer an array of grated cheeses for guests to sprinkle on top. Temperature is key; serve immediately while warm for the best experience. For portion control, use a pasta fork to help manage serving sizes without cooking too much.
Wine and Beverage Pairing
A glass of Chianti complements the flavors of Creamy Tomato Garlic Pasta beautifully. Its acidity matches the sauce’s richness, enhancing the overall meal experience. For those preferring white, a crisp Pinot Grigio provides a refreshing counterbalance.
For non-alcoholic options, sparkling water with a squeeze of lemon can cleanse the palate beautifully. Those who enjoy coffee can consider a lighter roast for a delightful finish to the meal, balancing the creamy dish superbly.
Storage and Shelf Life
Proper storage methods for Creamy Tomato Garlic Pasta include refrigerating any leftovers in an airtight container immediately. Ensure it’s consumed within 3-4 days. For longer storage, consider freezing individual portions; just be aware that cream-based sauces may alter in texture upon thawing.
When reheating, do so gently on low heat, adding a splash of water or broth to adjust consistency. Signs of spoilage include off smells or mold, so always check before consumption. Reheat only as much as needed to enjoy maximum freshness and flavor.
Make Ahead Strategies
To prepare in advance, you can cook the pasta and store it separately from the sauce. This method avoids mushiness and helps maintain texture. Consider making the sauce up to 2 days prior and refrigerating it for quick assembly later.
When assembling, simply reheat the sauce and combine with freshly cooked pasta. This method helps to keep flavors vibrant while minimizing cooking time during busy weeknights. Adding fresh herbs or cheese just before serving maintains a fresh taste.
Scaling Instructions
Scaling up can be easily achieved by doubling or tripling the recipe. Ensure you have a larger pot and pan to accommodate increased quantities. Timing may require slight adjustments, mainly in boiling pasta, but monitor closely for doneness.
For halving, utilize precise measurements while ensuring the same flavor quality is maintained. Consider using smaller equipment if needed, and always taste throughout to keep the balance of flavors consistent.
Nutritional Deep Dive
A macro breakdown of Creamy Tomato Garlic Pasta reveals that carbohydrates primarily come from pasta, while healthy fats stem from cream and olive oil. Protein can be increased by adding chicken or shrimp, providing a satisfying and balanced meal.
Micronutrient analysis shows tomatoes are rich in vitamins and antioxidants, contributing to heart health. Garlic contains compounds linked to reducing inflammation. With conscious portion sizes, this dish can fit into various dietary plans, supporting weight management effectively.
Being mindful of serving sizes can help balance indulgence with health. Pairing the dish with a side of vegetables increases fiber intake, aiding in digestion and wellness.
Dietary Adaptations
Whether individuals require gluten-free, dairy-free, or vegan options, Creamy Tomato Garlic Pasta can be easily adapted. Gluten-free pasta ensures inclusivity, while nut or soy milk can act as a substitute for cream, catering to vegan diets.
Low-carb variations can emerge from using spiralized vegetables instead of traditional pasta, maintaining the dish’s essence while lowering carbs. For those on a paleo diet, opting for homemade tomato sauce without preservatives keeps the meal clean and wholesome.
By considering dietary needs and preferences, this pasta dish remains versatile and enjoyable for everyone around your table.
Troubleshooting Guide
Texture issues can arise if pasta is overcooked; always aim for al dente consistency. If the sauce appears too runny, consider simmering it longer to reduce liquid content. For flavor balance, add salt or more garlic gradually, tasting throughout cooking.
Temperature problems can occur if the sauce is too hot or cold; reheating gently to a warm serve is key. Equipment challenges, such as insufficient pot sizes, can be remedied by portioning batches correctly to avoid overwhelming your cookware.
Ingredient substitutions like using non-dairy milk can slightly alter flavor; adjust seasonings as needed without compromising the dish. Monitoring timing, especially in multi-tasking kitchens, can prevent missteps.
Recipe Success Stories
Our community has created numerous delightful experiences with Creamy Tomato Garlic Pasta. Feedback often highlights how easily it came together, making it a staple in home kitchens. Variations have included adding spinach or mushrooms, amplifying its nutritional value while maintaining deliciousness.
Adaptation stories showcase families sharing this meal, accompanied by stories and laughter—a true testament to the dish’s ability to bring people together. Many have also shared their photography tips, transforming traditional meals into visually stunning masterpieces.
Readers’ suggestions to incorporate local vegetables reflect how this recipe allows personal touch, enhancing its appeal in various households and communities.
Frequently Asked Questions
Can I make this pasta dish vegan?
Yes, simply substitute heavy cream with full-fat coconut milk or a plant-based alternative, and use vegan pasta.
How can I store leftovers properly?
Store any leftovers in an airtight container in the refrigerator for up to 3-4 days, or freeze for longer preservation.
What can I use instead of heavy cream?
You can use half-and-half, Greek yogurt, or a non-dairy alternative like almond milk for a lighter version.
Is there a gluten-free option available?
Absolutely! Use gluten-free pasta to make the dish accessible for those with gluten sensitivities.
Can I add vegetables to this dish?
Definitely! Sautéed spinach, mushrooms, or bell peppers can be delicious additions, adding nutrition and color.
How do I prevent pasta from sticking together?
Make sure to use plenty of salted boiling water, and stir the pasta occasionally as it cooks.
Can I make this recipe ahead of time?
Yes! Prepare the sauce in advance and refrigerate it, then combine it with cooked pasta just before serving.
What wines pair well with creamy tomato garlic pasta?
Chianti or a light Pinot Grigio complements the flavors nicely; choose based on your taste preference.
How spicy can I make this pasta dish?
You can add red pepper flakes or fresh chili to suit your heat preference; start small and adjust to taste.
What cheese is best to sprinkle on top?
A sprinkle of grated Parmesan or pecorino cheese adds a delightful umami flavor to finish the dish.
Additional Resources
Explore our collection of related recipes, featuring seasonal favorites and essential cooking techniques. We provide comprehensive ingredient information, including tips on selecting the freshest produce for optimal taste. Equipment recommendations are also available to help elevate your cooking experience, whether you’re a novice or a seasoned chef.
Stay updated with seasonal variations that enhance your weekly meal prep and incorporate delicious, fresh ingredients into your schedule. Our community-driven platform offers a space for shared learnings and culinary inspiration.
Join the Conversation
We encourage you to connect with us by sharing your experiences with Creamy Tomato Garlic Pasta on social media. Post photographs of your creations and tag us to inspire others! Engaging in recipe reviews fosters community interaction, while suggesting your variations adds a personal touch to our recipe database.
We love hearing your feedback, and your contributions help us grow our culinary community. Share your tips and tricks, and continue to find joy in creating and sharing delicious meals around your table.
The Recipe
Creamy Tomato Garlic Pasta
Serves: 4
Prep Time: 10 mins
Cook Time: 20 mins
Total Time: 30 mins
Kitchen Equipment Needed
Medium pot for cooking pasta
Large skillet for sauce
Wooden spoon for stirring
Measuring cups and spoons
Colander for draining pasta
Ingredients
12 ounces spaghetti or pasta of choice
2 tablespoons olive oil
4 cloves garlic, minced
28-ounce can crushed tomatoes
1 cup heavy cream
Salt and pepper, to taste
Fresh basil, for garnish
Directions
Boil salted water in a medium pot. Cook pasta according to package instructions until al dente. Drain and set aside.
In a large skillet, heat olive oil over medium heat. Add minced garlic and sauté until fragrant, about 1 minute, being careful not to burn it.
Stir in the crushed tomatoes and simmer for 5-7 minutes, allowing flavors to meld.
Reduce heat and pour in the heavy cream, stirring gently to combine. Let simmer for another 5 minutes.
Toss the cooked pasta into the sauce, mixing well to coat the pasta evenly. Season with salt and pepper to taste.
Serve immediately, garnished with fresh basil. Enjoy!
Recipe Notes
For extra flavor, add a pinch of red pepper flakes while sautéing the garlic.
Feel free to substitute pasta with your favorite gluten-free or whole grain options.
Store leftovers in an airtight container in the refrigerator for up to 4 days.
This dish can be easily doubled for larger gatherings.
Easy Chicken Parmesan Pasta Skillet – One-Pan Dinner
Chicken Parmesan Pasta Skillet: A Quick and Delicious Family Meal
⚖️
Difficulty
Easy
⏲️
Prep Time
10 mins
🕒
Cook Time
20 mins
⏱️
Total Time
30 mins
🍽️
Servings
4 servings
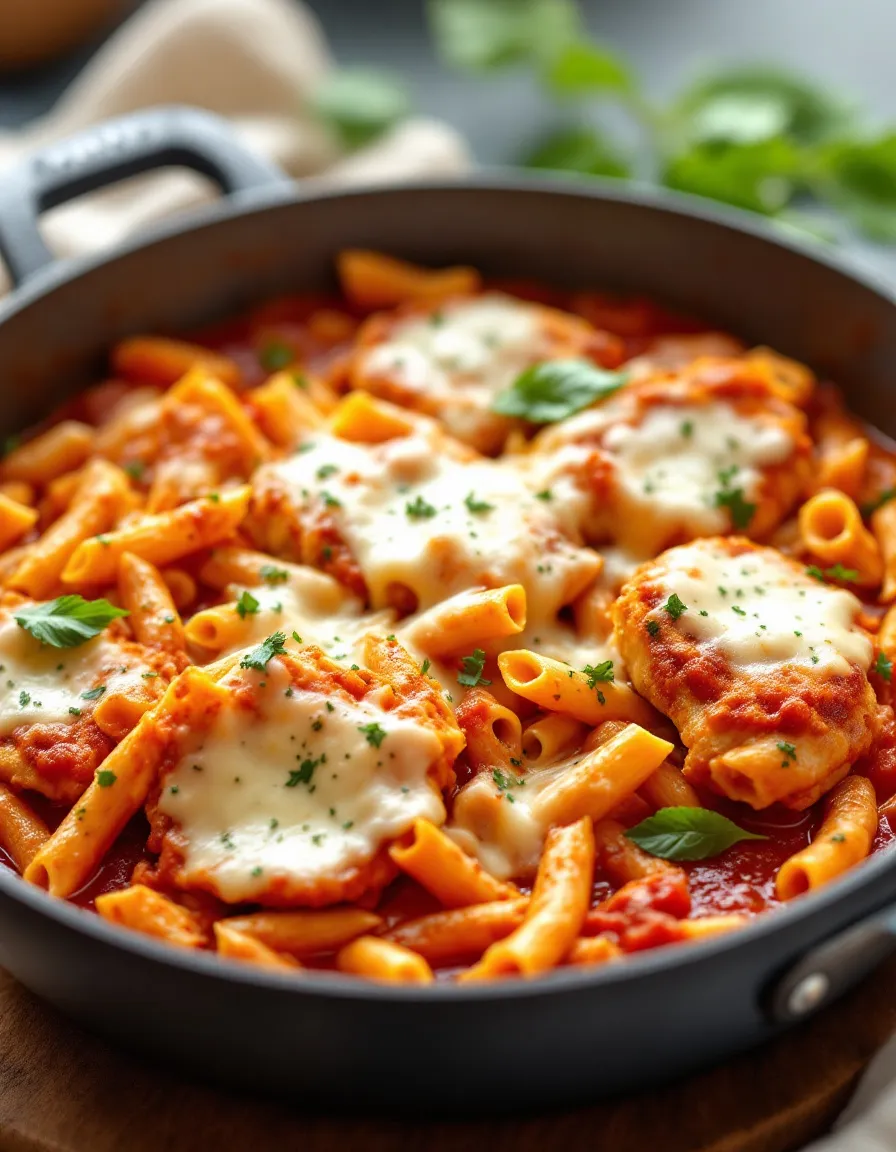
Chicken Parmesan Pasta Skillet is a mouthwatering dish that combines the beloved flavors of chicken Parmesan with the ease and comfort of pasta. Ideal for busy weeknights, this one-pan meal is packed with savory elements that appeal to all ages. The tender chicken, gooey melted cheese, and rich tomato sauce blend beautifully with perfectly cooked pasta, making every bite an experience to savor. Whether served as a family meal or at a gathering with friends, this dish guarantees satisfied appetites and happy faces.
Imagine the aroma wafting through your kitchen as the chicken is sautéed to a golden brown, mingling with the vibrant scent of fresh basil and the tangy aroma of tomatoes. With a delightful blend of textures—from the crisp-tender vegetables to the creamy melted cheese—this Chicken Parmesan Pasta Skillet is not just food; it’s a delightful occasion eagerly awaited by your loved ones.
Quick Recipe Highlights
Flavor Profile: This dish delivers a savory explosion with hints of garlic and basil, balanced by the richness of parmesan and mozzarella cheese.
Texture: Expect a delightful contrast between the tender chicken, al dente pasta, and bubbly melted cheese that creates a truly satisfying mouthfeel.
Aroma: Enjoy the enticing blend of seasoned chicken, fresh herbs, and inviting marinara that fills your home with a warm greeting.
Visual Appeal: The vibrant red of the sauce paired with the golden cheese and green basil delivers a feast for the eyes that beckons to be tasted.
Skill Level Needed: This recipe is beginner-friendly, teaching essential skills like sautéing, boiling, and simmering without overwhelming the cook.
Special Equipment: Just a large skillet and a wooden spoon are needed for this easy and enjoyable cooking experience.
Recipe Overview
Difficulty Level: This easy recipe is perfect for novice cooks or anyone looking to whip up a fuss-free dinner without sacrificing flavor.
Category: This Chicken Parmesan Pasta Skillet fits seamlessly into categories like weeknight dinners, comfort food, and family favorites.
Cuisine: Drawing from Italian-American culinary traditions, this dish showcases bold flavors and hearty ingredients that are renown in homes around the world.
Cost: With affordable ingredients like pasta, chicken, and cheese, this recipe offers an economical solution for satisfying meals that don’t break the bank.
Season: While ideal for all seasons, it shines especially bright during cooler months when hearty meals are craved most.
Occasion: Perfect for family dinners, potlucks, or simply anytime you want to bring everyone together with delicious comfort food.
Why You’ll Love This Recipe
There are so many reasons to adore this Chicken Parmesan Pasta Skillet! First, the taste and texture appeal are unbeatable—juicy chicken, tender pasta, and gooey cheese all come together to create a harmonious dish that is both scrumptious and satisfying. Each forkful provides layers of flavor and comforting textures that leave you eager for more.
Moreover, the convenience of this recipe cannot be overstated. With minimal prep and cook time, you can have a delicious meal on the table in just about 30 minutes. The one-skillet preparation means fewer dishes to wash, allowing you more time to relax and enjoy with loved ones.
Nutritionally, this dish offers a balanced meal featuring protein from chicken, carbohydrates from pasta, and essential vitamins from vegetables. Using whole-wheat or veggie pasta can elevate the nutritional profile even further, making it a wholesome choice suitable for various diets.
For social gatherings, this meal has great social and entertaining value. It’s easy to double the recipe for larger crowds and can be served right from the skillet, inviting guests to serve themselves and enjoy a homey atmosphere filled with warmth and good cheer.
Finally, the cost-effectiveness and accessibility of this Chicken Parmesan Pasta Skillet make it a staple recipe in many households. With affordable ingredients and straightforward instructions, it’s a dish everyone can master, and it fits well within a family budget.
Historical Background and Cultural Significance
The origins of Chicken Parmesan can be traced back to Southern Italy, where eggplant parmigiana became a staple dish among families. Over the years, Italian immigrants brought this delicious recipe to America, with chicken becoming a popular substitute. The adaptation reflects a fusion of Italian traditions with American culinary practices, transforming it into a beloved comfort food across the nation.
In terms of cultural importance, Chicken Parmesan has woven its way into the fabric of American dining experiences. It is commonly found in pizzerias, restaurants, and family kitchens alike. The dish evokes a sense of nostalgia for many, symbolizing familial love and the joy of shared meals.
The evolution of the Chicken Parmesan recipe has been influenced by regional variations across the United States. For instance, in the Midwest, it’s often served with marinara sauce over spaghetti, while in the South, it’s common to find it served over grits. These variations highlight the adaptability of the dish to local tastes, making it unique to various culinary scenes.
Several variations of Chicken Parmesan exist around the world, including the use of different proteins, such as eggplant or turkey, which maintain the core characteristics of the dish while offering a new twist. This adaptability ensures that Chicken Parmesan remains relevant and cherished in diverse cultural contexts.
Ingredient Deep Dive
Chicken: Chicken is not only a primary ingredient in this dish but also a significant source of protein in diets globally. Lean protein like chicken breast helps to build muscle, repair tissues, and maintain overall body functions. When selecting chicken, look for bright pink, moist flesh with no odor. Storage should be done in the refrigerator, ideally consumed within 1-2 days after purchase. If you need a substitute, turkey cutlets can work well.
Pasta: Pasta serves as the comforting base of this dish. From whole wheat to gluten-free varieties, pasta can cater to various dietary preferences. It’s rich in carbohydrates, which are essential for energy. When selecting pasta, consider choosing varieties that contain whole grains, as they are higher in dietary fiber. Store in a cool, dry place, and if you find yourself out of regular pasta, alternatives such as zucchini noodles or spaghetti squash add a fresh twist.
Cheese: Cheese is where the dish shines, especially with the use of Parmesan and mozzarella. Parmesan not only enhances flavor but also offers calcium and protein. When purchasing cheese, opt for freshly grated for the best flavor and meltability. Store cheese tightly wrapped in the refrigerator for longevity. If you want to adapt the dish, vegan cheese options are available for a dairy-free alternative.
Tomato Sauce: Tomato sauce adds richness and acidity to the dish. Tomatoes are packed with vitamins like C and K, as well as antioxidants like lycopene. Choose unsweetened sauces to avoid unnecessary sugars. When storing, keep in the fridge once opened. For a homemade twist, consider blending fresh tomatoes, garlic, and basil for a fresher sauce alternative.
Common Mistakes to Avoid
Overcooking the Chicken: Overcooked chicken can become dry and tough. Aim for an internal temperature of 165°F (75°C) for juicy results.
Using Cold Ingredients: Cold chicken straight from the fridge can lead to uneven cooking. Bring ingredients to room temperature before starting.
Not Seasoning Properly: Failing to season layers as you cook can result in bland flavors. Season chicken, pasta, and sauce throughout the process.
Overcrowding the Skillet: Cooking too many ingredients at once can lead to steaming instead of searing. Cook in batches to achieve a nice browning.
Neglecting Pasta Cooking Time: Cooking pasta to al dente prevents it from becoming mushy when combined with the sauce. Follow package instructions closely.
Choosing Low-Quality Cheese: Using pre-grated cheese often lacks flavor. Fresh cheese melts better and enhances taste.
Making Too Much Sauce: A watery sauce can make the dish unappealing. Balance sauce with pasta for perfect consistency.
Skipping the Simmer: Allowing the dish to simmer enables flavors to meld together beautifully. Don’t rush this crucial step!
Essential Techniques
Sautéing Chicken: Sautéing is vital to develop flavor through caramelization. To master this technique, heat oil until shimmering, then add chicken in a single layer. Avoid overcrowding. Look for a golden brown color to signal successful searing.
Boiling Pasta: Boiling pasta correctly ensures optimal texture. Use a large pot of salted water and follow package directions for timing. The pasta should be al dente, meaning it has a bit of bite to it. Taste a piece midway to gauge readiness.
Simmering Sauce: Simmering allows complex flavors to develop. After combining sauce ingredients, adjust heat to maintain a gentle bubbling. Stir occasionally and check for thickening, which indicates the sauce is ready to combine with the pasta.
Melt Your Cheese: Achieving perfectly melted cheese requires gentle heat. Add cheese to your skillet during the last few minutes of cooking. Cover to trap steam, ensuring it melts without burning, and creates that irresistible gooey layer.
Pro Tips for Perfect Chicken Parmesan Pasta Skillet
1. Use fresh herbs for the best flavor impact, elevating the overall taste with basil or parsley added just before serving.
2. Consider adding some sautéed vegetables like bell peppers or spinach for extra nutrition.
3. For a spicy kick, sprinkle red pepper flakes into your sauce while it simmers.
4. If you wish for a crunchy topping, use panko breadcrumbs mixed with parmesan cheese and broil for a few minutes before serving.
5. Opt for whole grain pasta to add more fiber and nutrients to the dish while also enhancing heartiness.
6. To make it dairy-free, substitute with plant-based cheese options and nutritional yeast for an extra umami flavor.
7. For leftover sauce, use it in a variety of dishes such as baked chicken or as a dip for breadsticks.
8. Store any leftovers in an airtight container and consider reheating them in the oven for optimal texture preservation.
Variations and Adaptations
Explore regional variations by adding classic Italian flavors. Consider a Caprese version with fresh tomatoes and basil, or even chicken Alfredo for a creamy twist. Seasonal adaptations can include adding roasted butternut squash during fall or fresh asparagus in spring.
For dietary modifications, gluten-free pasta can be substituted, and the cheese can be replaced with vegan alternatives for a plant-based dish. Flavor variations like adding pesto or sundried tomatoes can create delightful new profiles, while texture modifications, such as using crispy, baked chicken, add another layer of indulgence.
Presentation alternatives could include serving from the skillet for a rustic touch or plating with garnishes like chopped parsley, adding a vibrant contrast and freshness to the meal.
Serving and Presentation Guide
Plating techniques can enhance the enjoyment of your Chicken Parmesan Pasta Skillet. Consider twirling the pasta in a nest shape in the center of the plate, then topping it with sliced chicken and a drizzle of sauce. Garnishing with freshly chopped parsley adds a bright color contrast that makes for an inviting presentation.
Garnishing ideas extend to a sprinkle of grated Parmesan or a drizzle of balsamic reduction for a sophisticated touch. Traditional accompaniments would include garlic bread or a light salad, balancing the richness of the dish with fresh flavors.
Modern serving suggestions could involve placing the skillet directly on the table for a family-style dining experience, allowing guests to help themselves. Temperature considerations are essential; serve this dish immediately for the best quality, as both chicken and cheese lose their appeal when cooled.
Portion control tips include using smaller plates to provide a visually rich experience while preventing overeating.
Wine and Beverage Pairing
For the perfect wine pairing, consider a medium-bodied red such as Chianti or Zinfandel. These wines’ acidity complements the tomato-based sauce beautifully and enhances the dish’s overall flavors.
Non-alcoholic alternatives might include sparkling water with a splash of lemon or a refreshing iced tea, delivering a crispness that pairs well with the richness of the pasta.
For coffee or tea lovers, a robust espresso can serve as a delightful contrast after your meal, rounding off the dining experience on a satisfying note. Ensure all beverages are served chilled or at optimal temperatures to maximize enjoyment.
Storage and Shelf Life
To store your Chicken Parmesan Pasta Skillet, cool the dish to room temperature and transfer it to an airtight container. It should be consumed within 3-4 days when stored in the refrigerator.
For best preservation, store in separate components if possible. Pasta and sauce can be refrigerated in separate containers to maintain texture quality. Signs of spoilage include an off odor, slimy texture, or discoloration, particularly in chicken.
Reheating can be done in the oven for about 20 minutes at 350°F (175°C) for better texture or utilize a microwave, although the pasta may soften slightly. For longer storage, freezing is possible; simply allow the dish to cool completely, store in freezer-friendly containers, and consume within 2-3 months.
Make Ahead Strategies
Planning ahead can make your Chicken Parmesan Pasta Skillet even easier to prepare. Start by chopping vegetables and marinating the chicken the day before; this way, flavors will infuse and enhance the dish.
You can partially cook the pasta in advance and store it chilled, then combine with the sauce on the day of serving to save time. If you plan to store between steps, keep sauce in one container and cooked chicken in another.
Assess the quality of ingredients beforehand to ensure optimal flavor when combining. Reheating guidelines are straightforward; just ensure all components are heated through before serving to maintain safety.
To keep the dish fresh, consider adding delicate elements such as basil or shredded cheese just before serving to ensure vibrancy and avoid wilting during storage.
Scaling Instructions
To halve the recipe, simply divide all quantities in half while maintaining flavor proportions. For doubling or tripling, ensure your skillet has adequate space, or split into batches to prevent overcrowding.
Equipment adjustments may include using large stockpots for larger quantities, and timing may need adjustment for slower cooking. When scaling, pay attention to cooking times as they may slightly decrease when increasing quantities.
Storage considerations involve ensuring you have enough containers for larger batches, as this may also impact how quickly you can consume leftovers, keeping food safety in mind.
Nutritional Deep Dive
Examining the nutritional makeup of Chicken Parmesan Pasta Skillet reveals a balanced dish. A typical serving can provide approximately 25 grams of protein, essential for muscle health, thanks to the chicken and cheese.
In terms of micronutrients, this dish offers vitamins A and C from tomatoes and calcium from cheese, contributing to bone health and immune function. It’s also essential to consider your portions; enjoy this hearty meal while monitoring carb intake, as pasta can be calorie-dense.
Weight management tips include balancing this dish with salads or vegetables to increase fiber intake, promoting fullness without excessive calories. Overall, this dish provides a wholesome experience suited for family meals.
Dietary Adaptations
For those following a gluten-free diet, use gluten-free pasta and ensure sauces don’t contain gluten-based thickeners. A dairy-free version can replace cheese with vegan cheese or nutritional yeast for flavor without dairy.
If you follow a low-carb or keto diet, consider using zucchini noodles or shirataki noodles as a pasta substitute. A paleo version can adapt by using almond flour for breading the chicken instead of traditional breadcrumbs.
For those on a low-FODMAP diet, use specific cheese varieties such as cheddar and be cautious with onion and garlic, opting for infused oils instead. Each modification allows the flavors and experience of Chicken Parmesan Pasta Skillet to be enjoyed without dietary constraints.
Troubleshooting Guide
When facing texture issues, such as overly mushy pasta, ensure you cook noodles only to al dente before combining with the sauce. If your dish tastes bland, seasoning throughout the cooking process is key; don’t forget to adjust salt levels for each layer.
If the cheese doesn’t melt as expected, consider using cheese that has higher moisture content or shredding it yourself. Equipment challenges, like a skillet that isn’t non-stick, can be mitigated by properly seasoning it before use to prevent sticking.
When substitutions lead to an unexpected flavor profile, take notes for future reference. Timing concerns may crop up if you find chicken undercooked; ensure you always use a meat thermometer for accuracy.
Recipe Success Stories
Community feedback for this Chicken Parmesan Pasta Skillet has been overwhelmingly positive, with readers praising its simplicity and flavor. There have been numerous variation successes, where home cooks have successfully swapped chicken for eggplant or added seasonal vegetables.
Readers often share their adaptation stories, such as using spiralized zucchini for a lighter twist, turning this dish into a revitalizing summer meal. Additionally, many have taken to heart photography tips shared from the blog, capturing the vibrant colors and textures that make this meal truly inviting.
Feedback about how this meal has become a family favorite for weeknight dinners illustrates its versatility and comfort appeal. Recipes shared in family gatherings recount the shared joy and satisfaction that this dish brings to all around the table.
Frequently Asked Questions
Can I use chicken thighs instead of chicken breast? Absolutely! Chicken thighs are juicy and flavorful, making a delicious alternative. Just ensure they are cooked thoroughly, reaching an internal temperature of 165°F (75°C).
Is it possible to make this dish vegetarian? Yes! You can swap the chicken for eggplant or portobello mushrooms and use plant-based cheese to create a delightful vegetarian meal.
How should I store leftovers? Leftovers can be stored in an airtight container in the fridge for 3-4 days. Reheat thoroughly before serving to ensure safety.
Can I freeze this meal for later? Yes! Cool completely and store in freezer-friendly containers. It can be frozen for up to 2-3 months. Thaw overnight in the fridge before reheating.
What type of pasta can I use? You can use a variety of pastas such as penne, rotini, or even gluten-free options to suit dietary needs. Each type will absorb flavor and add texture in its own way.
How can I enhance the flavor of my sauce? Consider adding fresh herbs like basil and oregano, or even a splash of balsamic vinegar to elevate the taste. Cooking the sauce longer allows flavors to meld beautifully.
What should I do if the cheese isn’t melting? If cheese fails to melt, consider using a cheese with higher moisture or try covering the skillet during the final few minutes of cooking to trap heat.
Can this be adapted for meal prep? Definitely! Prepare the pasta and sauce in advance, and combine them just before serving. This makes for quick weeknight dinners without loss of flavor.
Is it necessary to use fresh garlic? While fresh garlic enhances the flavor, you can substitute garlic powder if necessary. Aim to use fresh wherever possible for the best taste.
What are some good side dishes to serve with it? Garlic bread, a simple arugula salad, or steamed vegetables pair excellently, providing balance to the richness of the pasta skillet.
Additional Resources
If you’re looking to expand your culinary repertoire, consider trying related recipes like Spinach and Ricotta Stuffed Shells or a Classic Baked Ziti. For technique guides, check out our articles on perfect pasta cooking, chicken sautéing, and mastering marinara sauce from scratch.
Ingredient information resources detail storing techniques for herbs and cheeses, ensuring your dishes stay fresh and flavorful. For equipment recommendations, look into reliable non-stick skillets which simplify cooking and cleanup.
Seasonal variations can introduce fresh, local ingredients into your kitchen, adjusting to the changing landscape of flavors throughout the year.
Join the Conversation
We love to hear from you! Share your experiences cooking this Chicken Parmesan Pasta Skillet on social media using our hashtags, and post photographs of your incredible dishes. Your recipe reviews help guide others on their culinary journeys, encouraging them to try new variations.
Engage with our community by sharing your favorite adaptations, offering photography tips for presenting your dish beautifully, or letting us know any twists you’ve added that have made the recipe your own.
Delve into the joy of cooking, and let’s create a wonderful network of passionate home cooks!
The Recipe
Chicken Parmesan Pasta Skillet
Serves: 4 servings
Prep Time: 10 mins
Cook Time: 20 mins
Total Time: 30 mins
Kitchen Equipment Needed
Large skillet
Wooden spoon
Meat thermometer
Serving utensils
Ingredients
1 lb chicken breast, cut into bite-sized pieces
8 oz pasta (your choice)
2 cups marinara sauce
1 cup mozzarella cheese, shredded
½ cup Parmesan cheese, grated
2 tbsp olive oil
2 cloves garlic, minced
Salt and pepper to taste
Fresh basil for garnish
Directions
Heat olive oil in a large skillet over medium-high heat. Add chicken and season with salt and pepper. Cook until golden brown and cooked through, about 6-8 minutes.
Add garlic and cook for an additional minute until fragrant.
Meanwhile, cook pasta according to package directions until al dente. Drain and set aside.
Pour marinara sauce over the cooked chicken, stirring to combine. Allow simmering for about 5 minutes.
Add cooked pasta to the skillet and toss to combine with the chicken and sauce.
Sprinkle mozzarella cheese and Parmesan over the top. Cover the skillet to melt the cheese for about 3-4 minutes.
Remove from heat and garnish with fresh basil before serving.
Recipe Notes
For a spicier dish, add red pepper flakes to the cooking chicken.
To save time, consider using rotisserie chicken.
Feel free to add your favorite vegetables, like spinach or zucchini, to enhance the dish further.
Easy Street Corn Chicken Rice Bowl – A Flavorful Dinner
Street Corn Chicken Rice Bowl: A Flavorful Fiesta in Every Bite
⚖️
Difficulty
Easy
⏲️
Prep Time
15 mins
🕒
Cook Time
20 mins
⏱️
Total Time
35 mins
🍽️
Servings
4
The Street Corn Chicken Rice Bowl is a vibrant dish that brings together all of the enticing flavors of traditional street corn with succulent chicken and fluffy rice. Picture tender grilled chicken, sweet corn, tangy lime, and fresh cilantro blended together in a harmonious medley that awakens your taste buds. Each bite is a burst of flavor that transports you to lively streets, filled with the sounds of sizzling grills and laughter. It’s no wonder that this dish has become a favorite among food lovers seeking a fulfilling and tantalizing meal.
This recipe not only satisfies your hunger but also offers a comforting yet lively dining experience, perfect for gatherings, weeknight dinners, or meal prep for the week. With its colorful presentation and delightful combination of textures, this bowl is sure to impress family and friends alike, making it a must-try in your culinary repertoire.
Quick Recipe Highlights
Flavor Profile: The dish features the sweetness of corn complemented by zesty lime and seasonings, rounding off with creamy cotija cheese.
Texture: Enjoy a mix of tender chicken, crunchy corn, and smooth rice that creates a delightful mouthfeel.
Aroma: The dish is aromatic with the fresh notes of lime, cilantro, and grilled chicken that will draw you in.
Visual Appeal: The colorful contrast of bright yellow corn, green cilantro, and white rice makes this bowl visually stunning.
Skill Level Needed: An easy recipe suitable for beginners, requiring only basic cooking techniques.
Special Equipment: No specialized tools required, just standard kitchen utensils and a grill or stovetop skillet.
Recipe Overview
Difficulty Level: This dish is categorized as easy, making it ideal for novice cooks and busy weeknights alike. The simple steps involved can quickly lead to delicious results.
Category: The Street Corn Chicken Rice Bowl is perfect as a main course and suitable for lunch or dinner, providing a balanced meal that can be enjoyed any time of day.
Cuisine: Inspired by traditional Mexican street food, this dish combines classic flavors and ingredients that honor the rich culinary heritage of South America.
Cost: The ingredients are affordable and easily found in most supermarkets, allowing this dish to stand out as both delicious and budget-friendly.
Season: This recipe shines in the summer months when sweet corn is in season, but it can be enjoyed year-round thanks to frozen corn options.
Occasion: Perfect for casual family meals, barbecues, or even festive gatherings, this bowl brings people together in a celebration of flavors.
Why You’ll Love This Recipe
The Street Corn Chicken Rice Bowl is a gastronomic delight, appealing to all your senses. The layering of flavors starts with the grilled chicken, juicy and perfectly season, and the corn that adds a touch of sweetness to each bite. The tangy lime drizzle and fresh cilantro bring brightness, cutting through the richness of the cheese and creating a balanced flavor explosion in your mouth.
Not only is this bowl delicious, but it also provides immense convenience. With preparation and cooking time of less than an hour, this recipe is easily integrated into any busy weeknight. Simply grill the chicken while the rice cooks, and in under 35 minutes, you’ll have a wholesome meal that families can love and enjoy together.
Additionally, the nutritional value of this dish is notable. It packs protein from the chicken, alongside fiber and vitamins from the corn, offering a healthy meal that’s also filling. This recipe is not just an indulgence; it’s a nourishing option, making it perfect for those mindful of their health.
Sharing this dish with loved ones can create memorable moments and lively gatherings; it’s perfect for family dinners, casual brunches, or festive barbecues. Serve it in vibrant bowls filled with colorful ingredients, allowing everyone to customize their portions. The Street Corn Chicken Rice Bowl offers not just a meal but an experience that brings community and joy to the table.
Lastly, cost-effectiveness cannot be ignored. With easily accessible ingredients and a modest budget, this recipe can be made for four generous servings without breaking the bank. This accessibility lets you enjoy gourmet flavors effortlessly, making it a worthwhile addition to your recipe collection.
Historical Background and Cultural Significance
The origins of street corn, or elote, can be traced back to the streets of Mexico, where vendors serve grilled corn on the cob. This dish reflects the country’s vibrant food culture, characterized by bold flavors, fresh ingredients, and rich traditions. The combination of spices and toppings transforms the humble corn into an irresistible snack enjoyed by locals and tourists alike.
Street vendors continue to play a vital role in the social fabric of Mexican communities, offering more than just food but experiences. These gatherings around street food create a sense of belonging and cultural exchange, fostering friendships over shared meals. The Street Corn Chicken Rice Bowl draws on these traditions, marrying the simple yet profound flavors of elote with wholesome ingredients.
As the recipe evolved outside of Mexico, adaptations emerged, introducing new influences and presentations. Today, many variations exist that merge culinary techniques from diverse cultures, showcasing how food continually evolves while respecting its roots. This dish captures that spirit, inviting a global audience to enjoy its flavors.
The Street Corn Chicken Rice Bowl not only tastes incredible but serves as a reminder of food’s ability to connect people and cultures across borders. By enjoying this preparation, you partake in a global tradition that promotes community, friendship, and love for good food.
Ingredient Deep Dive
Chicken
The primary protein source in this dish, chicken, is valued for both its versatility and nutritional profile. Traditionally, domesticated around 2000 years ago, chicken has become a staple in numerous cuisines around the world. Packed with protein, it supports muscle growth and provides essential nutrients like B vitamins. When selecting chicken, look for fresh, minimally processed options without additives for the best flavor and health benefits.
To store chicken, ensure it’s kept in a refrigerator at 32°F to 40°F, and consume it within a few days of purchase. If you wish to use a frozen chicken, it can last for several months. For substitutions, turkey is a suitable alternative that mirrors the taste and texture of chicken, while plant-based options like tofu could work well for vegetarian adaptations of this recipe.
Corn
Corn has a rich history in many cultures, particularly in Mesoamerica, where it was cultivated over 10,000 years ago. As a staple food, it offers not only sustenance but also cultural significance. Corn provides dietary fiber, vitamins, and minerals, making it a nutritious component in any meal. When purchasing corn, choose bright, plump cobs with green, crisp husks for optimal freshness.
In terms of storage, fresh corn should be kept in a cool, dark place, preferably in the refrigerator, and should be consumed within a few days. Frozen corn is a convenient alternative that provides the same flavor and nutrients. If fresh corn isn’t an option, canned corn can serve well in this recipe but be sure to drain and rinse it to reduce sodium content.
Common Mistakes to Avoid
Overcooking the chicken: Ensuring your chicken is juicy can be easily mishandled. Use a meat thermometer to check for an internal temperature of 165°F for perfect results.
Neglecting seasoning: Chicken and corn both benefit from adequate seasoning. Don’t shy away from herbs and spices; they elevate the dish significantly.
Inadequate cooking of rice: Undercooked rice can disrupt the texture of your bowl. Always check for doneness as you follow the cooking instructions closely.
Forgetting to grill the corn: While some may use canned corn, grilling enhances flavor. If fresh corn is available, don’t miss out on this step.
Skipping acid: Adding lime or lemon juice is crucial to brighten flavors. Omitting acidity can result in a flat-tasting dish.
Ignoring presentation: Taking the time to arrange your ingredients can enhance your dining experience. Invest in plating for an appetizing presentation.
Overcrowding the grill: Allow sufficient space to ensure even cooking. Avoid the urge to put too many items on the grill at once.
Not allowing flavors to meld: After cooking, let the dish sit for a few minutes before serving. This allows the flavors to integrate for a more harmonious taste.
Not balancing textures: Ensure you have a good combination of creamy, crunchy, and tender ingredients for an enjoyable mouthfeel.
Skipping garnishes: Garnishes like cilantro and cheese are not just for looks; they enhance both flavor and texture, making your dish inviting.
Essential Techniques
Grilling Chicken
Grilling chicken provides a fantastic smoky flavor and sear that can’t be replicated by other cooking techniques. To master this technique, ensure your grill is preheated, and avoid pressing down on the meat as it cooks. Watch for visual cues such as clear juices running from the chicken instead of pink, indicating doneness.
Cooking Rice
Perfectly cooked rice is fluffy and non-sticky. Rinse the rice before cooking to remove excess starch and follow the ratio of water to rice required. Visual cues such as steam bubbles breaking through the surface can help you determine when to lower the heat or when it’s finished cooking.
Pro Tips for Perfect Street Corn Chicken Rice Bowl
– Marinate the chicken for at least 30 minutes before grilling; this infuses flavor and ensures moisture.
– Use fresh lime juice instead of bottled for a brighter flavor profile.
– When grilling corn, rotate it every few minutes to ensure even charring.
– Reserve some grilled corn to sprinkle on top for additional texture.
– Experiment with different cheeses like feta or queso fresco for variety.
– Let the dish rest for a few minutes after cooking to allow flavors to meld.
– Pair with avocado slices for creaminess that enhances every bite.
– Store leftovers separately to maintain texture and freshness.
Variations and Adaptations
For a regional twist, consider using spice blends like adobo or chili powder to marinate your chicken, adding a Southwest flair. Seasonal adaptations can include ingredients like bell peppers in summer or roasted squash in autumn. If dietary concerns arise, creating a vegan version with chickpeas or jackfruit can maintain flavor while offering plant-based benefits.
Flavor variations, such as the addition of chipotle for smokiness or mango for sweetness, provide endless creativity. Texture modifications can involve using crunchy toppings like toasted pepitas to elevate the sensory experience. Presentation alternatives, like serving in lettuce cups instead of bowls, also create a fresh and exciting take on the traditional presentation.
Serving and Presentation Guide
For an appealing presentation, consider stacking the components in layers within each bowl. Start with the rice as a base, followed by grilled chicken, corn, and finishing with garnishes. Brightly colored ingredients encourage an inviting experience that enhances appetite.
Garnishing options such as fresh cilantro, lime wedges, or crumbled cheese can add decorative flair and complement flavor beautifully. Traditional accompaniments may include black beans or a side of spicy salsa to enhance the dish further. Present the bowls on a rustic wooden board for a homely feel, or use bright dinnerware to complement the vibrant colors of the dish.
Wine and Beverage Pairing
When it comes to wine pairings, a chilled Sauvignon Blanc complements the citrus notes while balancing the meal’s richness. If you prefer red, a light Pinot Noir works well without overpowering the dish.
For non-alcoholic alternatives, a refreshingly crisp cucumber limeade can be an excellent option alongside the smoky flavors. The versatility of this dish also lends itself well to coffee or flavored tea pairings if you’re looking for a unique twist. Consider how beverage temperatures enhance the overall dining experience, serving wines chilled and non-alcoholic drinks over ice.
Storage and Shelf Life
Proper storage extends the life of your Street Corn Chicken Rice Bowl. Store in an airtight container in the refrigerator for up to three days. Keeping components separated can preserve individual textures, especially if reheating.
Signs of spoilage include off odors or changes in texture, particularly in the chicken and corn. When reheating, aim for an internal temperature of 165°F, ensuring food safety. If you wish to freeze portions, it’s best to separate the chicken and rice, which can keep well for several months, preserving flavor and quality.
Make Ahead Strategies
For an efficient cooking process, marinate the chicken the night before and keep it refrigerated; this enhances flavor and saves time. You can prepare grilled corn ahead of time and simply reheat when ready to serve.
Quality is maintained by storing each ingredient separately until assembly; this prevents sogginess. When ready to serve, a quick reheat on the grill or stovetop can bring everything back to temperature. Consider adding fresh herbs and garnishes just before serving to maintain their vibrant freshness.
Scaling Instructions
Scaling this recipe is a straightforward process. For halving, simply divide all ingredients and adjust cooking times slightly if necessary. For doubling or tripling, ensure you have adequate cooking equipment, as larger quantities may require additional pans or an extended cooking timeframe.
It’s important to monitor timing closely when scaling up, as increased volume can change the required cooking duration. Ensure leftovers are stored for proper quality; larger batches will last just as long in the refrigerator or freezer.
Nutritional Deep Dive
This dish provides a balanced macro breakdown with healthy carbohydrates from rice, protein derived from chicken, and a mix of fibers from vegetables. The nutritional analysis reveals vitamins A and C from corn, contributing to your daily recommended intake, while also providing minerals such as potassium crucial for heart health.
Health benefits include supporting digestion due to fiber content and providing a meal options suitable for physically active individuals seeking to refuel. As part of a balanced diet, this dish fits well into dietary considerations focusing on protein intake and complex carbohydrates that provide energy.
For portion analysis, the recommended serving suggests an appropriate calorie intake without compromise to quality. Adjusting portion sizes can cater to dietary plans or calorie-counting needs, allowing flexibility while enjoying delicious meals.
Dietary Adaptations
Creating a gluten-free version of the Street Corn Chicken Rice Bowl is easy by ensuring all ingredients, including sauces, are labeled as gluten-free. For those seeking a dairy-free alternative, vegan cheese or omitting cheese altogether can maintain the dish’s integrity while accommodating dietary restrictions.
For low-carb or keto adaptations, replacing rice with cauliflower rice or spinach can keep the dish enjoyable while reducing carb intake. Additionally, a paleo version could use grilled chicken atop a salad of arugula for a fresh twist. Each of these adaptations showcases the versatility and cultural significance of the original recipe.
Troubleshooting Guide
If your chicken turns out dry, ensure it isn’t overcooked; using a meat thermometer can prevent this common issue. If you find your rice too sticky, rinsing it before cooking helps remove excess starch for fluffier grains.
In case you struggle with flavor balance, adding acidity can brighten and enhance other flavors; a simple squeeze of lime can transform the overall taste profile. If your dish lacks crunch, consider adding toasted nuts or seeds as a finishing touch for textural contrast.
If facing equipment challenges, like an inconsistent grill temperature, preheating and using a lid can help regulate heat and ensure even cooking. Adjusting timing and temperature to suit your grill model can also prevent these common pitfalls.
Recipe Success Stories
Many home cooks have shared the joys of making the Street Corn Chicken Rice Bowl, praising its vibrant flavors and simple preparation. Variations such as adding different proteins or experimenting with toppings have proven successful among readers, emphasizing the recipe’s adaptability.
Adaptation stories showcase how individuals have personalized the dish, whether by adding their favorite spices or incorporating seasonal vegetables. Readers often suggest photographing the final presentation to inspire others to try this colorful recipe, highlighting its appealing aesthetics.
Food lovers have shared their enthusiasm for this dish on social media platforms, creating a community around it and spurring conversations on family traditions and memories associated with similar flavors.
Frequently Asked Questions
Can I use leftover chicken for this recipe?
Yes, using leftover chicken is a great way to save time and add flavor. Simply warm the chicken before serving to enjoy a delicious meal without all the prep work.
Is this recipe spicy?
No, the Street Corn Chicken Rice Bowl is not inherently spicy. However, you can easily add your favorite hot sauce or spices to heat things up if desired.
What if I can’t find cotija cheese?
If cotija cheese isn’t available, feta or queso fresco can be great substitutes that still provide a similar texture and flavor element.
Can I make this recipe vegan?
Absolutely! You can replace the chicken with grilled tofu or spiced chickpeas and use a non-dairy cheese option for a delicious vegan meal.
How do I store leftovers?
Store leftovers in an airtight container in the refrigerator for up to three days. It’s best to keep the chicken, rice, and corn separate to maintain texture.
Can I prepare it ahead of time?
Yes, you can grill the chicken and corn ahead of time. Simply reheat and assemble when ready to serve for a quick meal.
What type of rice should I use?
Long-grain or basmati rice works best in this recipe as they remain fluffy and separate after cooking.
Can this recipe be doubled for a larger gathering?
Yes, feel free to double or triple the recipe. Just ensure your cooking equipment can accommodate the larger quantities.
Is this dish gluten-free?
Yes, all ingredients used in the Street Corn Chicken Rice Bowl can be gluten-free, making it a suitable option for those with gluten sensitivities.
What beverage pairs well with this dish?
Sauvignon Blanc or a fresh cucumber limeade can complement the flavors beautifully, enhancing the dining experience.
Additional Resources
If you want to explore more about Mexican cuisine, check out our recipe for delicious homemade salsa or learn how to make authentic guacamole to elevate your meals. For those interested in mastering grilling techniques, our guide offers insights into achieving the perfect char on meats and vegetables alike.
Additionally, consider experimenting with seasonal variations of the Street Corn Chicken Rice Bowl by incorporating local produce or fresh herbs that bring out the dish’s natural flavors. Equip your kitchen with essential utensils to make cooking easier and more enjoyable, while also considering gadget recommendations that can enhance your cooking experience.
Join the Conversation
We invite you to share your creations of the Street Corn Chicken Rice Bowl with us on social media! Use the hashtag #StreetCornChickenBowl to showcase your unique variations and engage with other food lovers. While you’re at it, drop us a comment or review to let us know how you adapted the recipe to suit your palate.
Your feedback not only helps fellow cooks but also inspires us to bring more delectable recipes to your kitchen. We appreciate our community and the creativity you bring to your meals, so let’s continue sharing culinary delights together!
The Recipe
Street Corn Chicken Rice Bowl
Serves: 4
Prep Time: 15 mins
Cook Time: 20 mins
Total Time: 35 mins
Kitchen Equipment Needed
Grill or stovetop skillet
Rice cooker or pot
Meat thermometer
Cutting board
Chef’s knife
Mixing bowls
Serving bowls
Ingredients
1 lb chicken breast, boneless and skinless
1 cup rice (long-grain or basmati)
2 cups corn (fresh or grilled)
1 lime, juiced
1/2 cup cotija cheese, crumbled
1/4 cup fresh cilantro, chopped
1 tablespoon olive oil
1 teaspoon chili powder
Salt and pepper to taste
Lime wedges for serving
Directions
Preheat the grill to medium-high heat. While the grill heats, marinate the chicken with olive oil, chili powder, salt, and pepper.
Cook the rice according to package instructions. Set aside once done.
Grill the chicken for about 6-8 minutes on each side or until the internal temperature reaches 165°F. Let it rest for a few minutes before slicing.
If using fresh corn, grill it alongside the chicken for 10-15 minutes, turning occasionally until lightly charred.
In a bowl, combine grilled corn, lime juice, and cilantro. Mix well.
To assemble, place a serving of rice in each bowl, top with sliced chicken, grilled corn mixture, and crumbled cotija cheese.
Garnish with additional cilantro and lime wedges before serving.
Recipe Notes
For extra flavor, consider marinating the chicken a few hours ahead or overnight.
Feel free to swap chicken for grilled shrimp or tofu for a different protein option.
Can be made gluten-free by ensuring all products used are gluten-free.
Easy Shrimp and Sausage Jambalaya – Classic Cajun Flavor
Savory Shrimp and Sausage Jambalaya: A Southern Classic Delight
⚖️
Difficulty
Medium
⏲️
Prep Time
15 mins
🕒
Cook Time
30 mins
⏱️
Total Time
45 mins
🍽️
Servings
4 servings
Indulge your senses with the rich flavors of Shrimp and Sausage Jambalaya, a traditional Louisiana dish that combines the zest of the South with a delightful mix of textures. This one-pot meal brings together succulent shrimp and spicy sausage, simmered to perfection in a hearty dish characterized by savory rice, colorful bell peppers, and aromatic spices. Each spoonful bursts with flavor, inviting you to experience a taste of the Bayou right at your dinner table.
As the warm aroma of gumbo spices wafts through your kitchen, the vibrant colors of the shrimp and vegetables create an inviting visual feast. The harmony of flavors and textures in this jambalaya create a satisfying comfort food experience that’s perfect for family gatherings or cozy dinners. Whether you are revisiting a classic or trying this dish for the first time, Shrimp and Sausage Jambalaya is a recipe that resonates with love, tradition, and culinary craftsmanship.
Quick Recipe Highlights
Flavor Profile: The combination of spicy sausage, tender shrimp, and a well-seasoned tomato base brings together a sweet and smoky flavor that is truly addictive.
Texture: Each bite delivers the satisfying chew of sausage, the delicate softness of shrimp, and the fluffy consistency of perfectly cooked rice, creating a delightful mouthfeel.
Aroma: The aromatic blend of garlic, onion, and Cajun spices fills the air, invoking a homey feeling reminiscent of Southern cookouts.
Visual Appeal: Bright hues of red from the tomatoes and green from the bell peppers make this dish visually enticing, showcasing the vibrant essence of Creole cuisine.
Skill Level Needed: This recipe falls under the medium skill level, requiring a bit of chopping and stirring but is generally straightforward for any home cook.
Special Equipment: You will need a large skillet or Dutch oven to accommodate the ingredients, ensuring even cooking and easy stirring.
Recipe Overview
Difficulty Level: This jambalaya recipe is ideal for cooks with some experience. While it requires patience with the cooking process, the steps are uncomplicated.
Category: Jambalaya is categorized as a main dish, perfect for lunch or dinner and suitable for varied occasions, from casual meals to festive gatherings.
Cuisine: Stemming from the rich culinary heritage of Creole and Cajun cooking, jambalaya embodies the heart and soul of Southern food culture.
Cost: Making a jambalaya can be quite economical, with shrimp and sausage being relatively affordable proteins that can feed multiple people.
Season: This dish is enjoyed year-round but shines brightly during the spring and summer months when fresh shrimp is in season.
Occasion: Shrimp and Sausage Jambalaya is perfect for family reunions, parties, or any festive occasion that calls for hearty, comforting food.
Why You’ll Love This Recipe
The delightful taste and texture of Shrimp and Sausage Jambalaya create a sensory experience that transports you to the heart of Louisiana. The sweet shrimp pairs beautifully with the spiciness of the sausage, while the seasoned rice absorbs all the flavors, ensuring every bite is packed with deliciousness. It’s a dish that feels both elegant and homey, perfect for impressing guests or comforting loved ones.
Jambalaya is also incredibly convenient, often coming together in one pot, which means less cleanup time and minimal fuss. Preparing this dish is an excellent option for busy weeknights or meal prep, as it reheats beautifully and can be made ahead for easy dinners throughout the week.
From a nutritional standpoint, shrimp provides lean protein, essential omega-3 fatty acids, and various vitamins, while the variety of vegetables adds fiber and nutrients, making this dish a wholesome meal option. Adding this jambalaya recipe to your rotation is a delicious way to incorporate more seafood into your diet.
This jambalaya is not just food; it’s a social centerpiece. The communal nature of sharing a pot of jambalaya encourages storytelling and bonding over a good meal, making it an ideal dish for entertaining.
Finally, cost-effectiveness is a significant advantage. With readily available ingredients, this recipe allows for feeding a crowd on a budget. The combination of shrimp and sausage ensures a hearty meal that doesn’t require breaking the bank.
Historical Background and Cultural Significance
Shrimp and Sausage Jambalaya has origins rooted deep within Louisiana’s cultural melting pot. Influenced by the Spanish and French settlers’ culinary practices, it emerged as a communal dish that showcased the use of rice and available proteins. Similar to paella, jambalaya reflects the creativity of cooks who utilized what was at hand, evolving over centuries.
Culturally, jambalaya is more than just a dish; it’s a symbol of celebration and togetherness found in Southern history. Traditionally made for large gatherings and festivities, it encapsulates the joy of sharing meals and the love infused in Southern hospitality.
Over time, jambalaya has evolved into various iterations, from the classic Creole version with tomatoes to the spicier Cajun style. Each version tells a story of regional influences and the personal touches brought by families across generations, preserving the essence of this beloved dish.
Today, regional variations continue to thrive, showcasing the adaptability of jambalaya. Variants may incorporate different proteins, vegetables, or even spices, ensuring that this dish remains relevant while preserving its historical roots.
Ingredient Deep Dive
Shrimp is not only a crowd-pleaser but an ingredient rich in heritage and flavors. Originating from coastal regions, shrimp has been a staple in Southern cooking. Nutritionally, shrimp is low in calories yet high in protein, omega-3 fatty acids, and antioxidants, making it a heart-healthy option. When selecting shrimp, look for firm, pink shells and a mild smell. Store them in the coldest part of your refrigerator and consume within a day or two, or freeze for longer storage. For substitutions, consider using other seafood like scallops or crab.
The sausage adds a robust flavor and heartiness to jambalaya. Traditionally, Andouille sausage is favored for its spiced flavor, but any smoked sausage can work well. Nutritionally, sausage can vary in fat and calorie content, so choose lower-fat varieties if desired. Look for sausages that contain quality ingredients and spices. Store unopened sausage in the fridge, and once opened, consume within a week. For a healthier twist, turkey or chicken sausages can be great substitutes in this recipe.
Common Mistakes to Avoid
Overcooking shrimp can lead to a rubbery texture. Aim for perfectly tender shrimp that turns pink and opaque.
Not letting the rice rest can lead to a gooey texture. Allowing it some time post-cooking helps enhance the overall consistency.
Using under-seasoned water will result in bland rice. Ensure that seasoning is adjusted as you cook each layer of the dish.
Skipping the sautéing of the vegetables can compromise flavor development. The initial step is crucial for building a robust flavor base.
Rushing the cooking time can prevent the dish from achieving optimal flavor absorption. Let the jambalaya simmer for the full time recommended.
Using an incorrect type of rice can affect the final texture. Long-grain rice is recommended for the best absorption and fluffiness.
Not measuring ingredients accurately can lead to a poorly balanced dish. Use precise measurements for spices and liquids to ensure the best results.
Cooking on high heat can lead to burning the bottom. Adjust the heat to allow even cooking and avoid any burnt flavor.
Not having all ingredients prepped beforehand can create chaos. Measure and chop everything ahead to make cooking smoother.
Ignoring the resting time after cooking can lead to uneven texture. Allow the dish to sit covered for a bit before serving.
Essential Techniques
To ensure your jambalaya turns out perfectly, mastering the art of sautéing is key. This technique builds flavor, allowing the onions, bell peppers, and spices to release their aromatic oils. To master this, use medium heat and stir frequently, watching for the vegetables to become tender and translucent without browning excessively—common pitfalls include high heat that may char ingredients instead.
Cooking the rice properly is another vital technique. It’s important to use a ratio of liquid to rice that suits the type of rice you are using. For long-grain rice, 1 part rice to 2 parts liquid is typically recommended. Common pitfalls include not allowing the rice enough time to absorb the liquid or uncovering the pot prematurely, which can lead to unevenly cooked rice. Look for the liquid to be fully absorbed and the rice to be fluffy and tender.
Pro Tips for Perfect Shrimp and Sausage Jambalaya
Use high-quality ingredients. Choosing fresh shrimp and flavorful sausage ensures a vibrant dish brimming with flavor.
Prep all ingredients before starting. Having everything chopped and measured can streamline the cooking process, making it far less chaotic.
Maintain the right heat during cooking. A little patience is necessary for ensuring all ingredients meld perfectly without burning.
Experiment with spices. While the traditional recipe calls for Cajun flavors, adding a splash of hot sauce or smoked paprika can elevate your jambalaya.
Don’t skip the resting time. Allowing the dish to sit covered for 10 minutes after cooking helps the flavors settle together.
Serve with fresh herbs. Chopped parsley or green onions added as a garnish can enhance the visual appeal and freshness of the dish.
Variations and Adaptations
Numerous regional variations of jambalaya exist, with each version emphasizing local flavors and ingredients. Some areas incorporate seafood like crab or crawfish, enhancing the dish with an unmistakable coastal flair. Others opt for chicken or even vegetarian adaptations, allowing for broader appeal while maintaining the core essence of the dish.
Seasonal adaptations might include using any fresh vegetables available, such as zucchini or corn during the summer months for an extra burst of flavor. Choosing vegetables based on availability showcases the dish’s versatility and creativity.
For dietary needs, jambalaya can easily be modified. Substituting brown rice for white offers a healthier option, while ensuring proper cooking times may be necessary. To accommodate vegans, replace shrimp with plant-based proteins and ensure the sausage is omitted or replaced with a suitable vegan sausage.
Flavor variations can include different spice blends to suit individual preferences. From adding cayenne pepper for heat to incorporating herbs like thyme and bay leaves, experimentation is encouraged to create a personalized dish.
For texture modifications, consider adding beans for a hearty element, creating a more varied mouthfeel. Presentation alternatives like serving jambalaya in individual bowls garnished with fresh herbs or alongside cornbread can elevate your dining experience.
Serving and Presentation Guide
Plating is essential for showcasing your jambalaya’s vibrant colors and rich textures. Serve it in a large bowl or platter to capture the communal spirit. For added aesthetic appeal, use a shallow bowl and mound the rice in the center, allowing the shrimp and sausage to peek through.
Garnishing ideas include freshly chopped herbs like parsley or cilantro, providing a pop of green against the warm rice. A squeeze of lemon or lime just before serving adds a refreshing touch that lifts the flavors beautifully.
Traditional accompaniments may include crusty French bread or cornbread, perfect for soaking up the delicious juices. For a modern twist, serve with a side salad featuring citrus vinaigrette to balance the richness of the jambalaya.
Temperature is essential—traditionally served hot, allowing it to rest for a few minutes ensures it’s at the perfect serving temperature. Portion control can be managed by serving in individual bowls, ensuring everyone receives a delightful mix of shrimp, sausage, and rice.
Wine and Beverage Pairing
Pairing wine with Shrimp and Sausage Jambalaya can elevate your dining experience. A crisp Sauvignon Blanc complements the spiciness of the dish, providing a refreshing contrast that balances the flavors. Alternatively, a medium-bodied Chardonnay can add a creamy richness that works well with the dish’s complexity.
For those who prefer non-alcoholic beverages, consider serving iced tea or a sparkling water infused with citrus. The brightness of these drinks harmonizes with the assertive flavors of the jambalaya, enhancing the overall meal experience.
Coffee or tea are not typically paired with jambalaya but can be delightful after a meal as a digestif. A light herbal tea can cleanse the palate beautifully, offering a gentle conclusion to a satisfying meal.
Temperature considerations are essential. Cold beverages are ideal for offsetting the heat from the spices, keeping your meal balanced and enjoyable.
Storage and Shelf Life
Proper storage methods are crucial for maintaining the freshness of your leftover jambalaya. Store any uneaten portions in an airtight container in the refrigerator for up to three days. If you plan to keep it longer, freezing is effective; use a freezer-safe container and consume within three months.
Temperature requirements for storage should be adhered to strictly; leaving food at room temperature can lead to spoilage. Signs of spoilage include off-smells or changes in texture, indicating that it should not be consumed.
When reheating, do so gently to avoid drying out the shrimp. A low setting on the stove or a microwave can be effective, but be cautious not to overcook. Adding a splash of water or broth during reheating can help retain moisture.
For freezing guidelines, it’s best to freeze before adding any creamy components or fresh herbs, as these may not withstand the freeze-thaw process well.
Make Ahead Strategies
Making Shrimp and Sausage Jambalaya ahead of time can deepen the flavors, allowing them to meld beautifully. Prepare components like chopping vegetables and measuring spices the night before to streamline your cooking process.
Storage between steps can be achieved by refrigerating the prepped ingredients separately until ready to cook. This allows you to manage your time efficiently on the day of serving while ensuring freshness.
Quality impact assessment indicates that while you can serve the jambalaya the next day, the flavors improve over time, making it an excellent option for meal prep.
During assembly, cook the jambalaya as per directions and allow it to cool before storing in the fridge. Adding freshly cooked shrimp right before serving ensures they remain tender and flavorful.
Reheating guidelines recommend warming in a large pot on low heat, stirring frequently until heated through. For the best results, serve with fresh herbs added last minute to enhance the dish’s brightness.
Scaling Instructions
When halving the jambalaya recipe, be mindful of cooking times, as smaller volumes often cook faster. Adjust seasonings accordingly to maintain flavor clarity, as spices may require fine-tuning.
Doubling or tripling the recipe can be done efficiently; just ensure that your pot is large enough to accommodate the increased volume. Pay attention to liquid-to-rice ratios, watching for potential adjustments.
Equipment adjustments may be necessary for larger batches, such as utilizing a larger pot or splitting the cooking across two pots if needed for even cooking.
Timing modifications should be noted carefully; larger volumes may need a longer simmer time for the rice to cook evenly, while smaller batches will require closer monitoring.
Storage considerations increase with larger recipes; ensure adequate container sizes for refrigerator storage and consider portioning into smaller containers for freezing.
Nutritional Deep Dive
Analyzing the macros of Shrimp and Sausage Jambalaya reveals a healthy balance—high in protein and moderate in carbohydrates, making it a filling yet nutritious option. With shrimp serving as a lean protein source and rice providing carbs, this dish meets energy needs without excessive calories.
Micronutrient analysis shows prominent vitamins and minerals, especially from the vegetables used. Bell peppers and onions contribute vitamins A and C, while shrimp provides zinc and selenium, boosting overall health.
The health benefits of this dish include supporting heart health from the omega-3s in shrimp and fiber from rice and vegetables, creating a wholesome meal that is both satisfying and nutritious.
In terms of dietary considerations, the dish can be made using brown rice for increased fiber content, which aids in digestion. Portion analysis is also essential, with controlled servings helping manage caloric intake effectively while savoring rich flavors.
For those mindful of weight management, using lighter sausage varieties or replacing some rice with additional vegetables can help maintain a balanced diet without compromising flavor.
Dietary Adaptations
For gluten-free versions, this Shrimp and Sausage Jambalaya is naturally adapted by using gluten-free sausage options and ensuring that all spices are gluten-free.
Dairy-free adaptations require no special considerations since this recipe is inherently dairy-free, making it suitable for those avoiding lactose.
For a vegan or plant-based version, replace shrimp with tofu or tempeh, and select a vegan sausage to maintain the jambalaya spirit while accommodating plant-based diets.
Low-carb enthusiasts may substitute rice with cauliflower rice, offering a similar texture while reducing carbohydrate content.
Paleo followers can enjoy this dish by using organic sausage and omitting any added fillers, aligning the recipe with clean eating principles.
Other specific diets, such as low-FODMAP, can be accommodated by ensuring that all vegetables used are low-FODMAP, ensuring compatibility with dietary needs while enjoying a classic dish.
Troubleshooting Guide
Addressing texture issues is key; overcooked rice can be a problem. If this occurs, try to salvage it by adding a small amount of broth to the pot and allowing it to sit covered for a few minutes to absorb moisture.
Flavor balance is crucial; if the dish is too salty, it can be offset by adding a splash of acidity with lemon juice or additional vegetables to dilute the saltiness.
Temperature problems arise when shrimp is cooked too fast. Cook at a lower temperature to avoid overcooking and achieve that perfect tender bite.
Equipment challenges can occur if your pot is too small. In such cases, cook in batches to ensure even cooking and avoid steam loss.
Ingredient substitutions may affect flavor; when altering the sausage type, be mindful of seasoning to maintain the dish’s character.
Timing concerns may crop up if the cooking time is misestimated. Always start checking for doneness a few minutes before the stated time to avoid overcooking ingredients.
Recipe Success Stories
Community feedback on Shrimp and Sausage Jambalaya reveals a love for its flexibility. Readers often share their variations, from adding local spices to adjusting vegetable mixes based on what’s in season.
Many readers recount their success stories with this recipe, noting that it’s a favorite for gatherings, often leading to compliments and requests for the recipe.
Adaptation stories also highlight how personal touches, such as family secret spices, elevate the dish, turning it into a family tradition with new life.
Photography tips shared by readers emphasize capturing the vibrant colors of the dish, encouraging garnishing with fresh herbs for that perfect Instagram-worthy shot.
Frequently Asked Questions
Can I make jambalaya in advance?
Yes, jambalaya can be prepared in advance. Cook it, allow it to cool, then store in an airtight container in the fridge for up to three days or freeze for longer storage. Reheat gently to ensure the shrimp doesn’t overcook.
What type of rice is best for jambalaya?
Long-grain white rice is best for jambalaya due to its ability to remain fluffy and absorb flavors without becoming mushy. Brown rice can also be used for a healthier option but may require adjustments in cooking time.
How do I store leftover jambalaya?
Leftover jambalaya should be stored in an airtight container in the refrigerator for up to three days. Alternatively, it can be frozen in portions for up to three months. Just ensure to cool it completely before storing.
Can I use frozen shrimp for this recipe?
Absolutely! Frozen shrimp is a convenient option but should be thawed completely before cooking. To thaw quickly, place shrimp in a colander and run under cold water for a few minutes.
What can I serve with jambalaya?
Jambalaya pairs beautifully with crusty French bread, cornbread, or a fresh side salad. You can also serve it with hot sauce for those who like extra heat.
Is jambalaya a one-pot meal?
Yes, jambalaya is typically a one-pot meal, allowing for great flavors to meld together. This makes it an excellent dish for minimal cleanup and maximum flavor.
Can I make jambalaya without sausage?
Yes, you can make jambalaya with only shrimp or even switch to a vegetarian option by using a plant-based sausage or tinned beans for protein.
How spicy is jambalaya?
The spiciness of jambalaya can be adjusted based on personal preference. Traditional recipes may have a kick from andouille sausage, but you can control the heat by using milder sausage or adjusting spicy ingredients.
Can I add other proteins?
Definitely! Jambalaya can be customized by adding other proteins like chicken, duck, or even crawfish, making it incredibly versatile.
What is the difference between jambalaya and gumbo?
The key difference lies in the base. Jambalaya is primarily rice-based and served as a main dish, while gumbo is a thick soup served over rice, often with a roux base.
Additional Resources
If you enjoyed making Shrimp and Sausage Jambalaya, you might also like exploring related recipes such as classic gumbo, red beans and rice, or blackened fish. Each of these dishes offers a unique glimpse into Southern cuisine.
Consider diving deeper into technique guides for mastering one-pot meals or efficient cooking strategies. Understanding the basics of well-seasoned rice and how to cook shrimp confidently will elevate your culinary skills.
Explore ingredient information, including seasonal seafood guides, to keep your cooking fresh and exciting. Knowing when and how to source quality shrimp can enhance your recipes.
For those keen on kitchen tools, recommendations include heavy-bottomed pots for even heat distribution and suitable cutting boards for efficient food prep.
Don’t forget about seasonal variations—embracing the freshness of local ingredients can create an even more vibrant and delicious jambalaya.
Join the Conversation
Engage with fellow food lovers by sharing your Shrimp and Sausage Jambalaya masterpiece on social media. Encourage friends and family to post their own versions, discussing variations and techniques that make the dish uniquely theirs.
Share photography tips focusing on capturing the colorful elements of the dish. Encourage others to highlight the vibrant shrimp and hearty sausage, complemented by fresh herbs.
If you enjoyed this recipe, leave a review or share your thoughts. Community engagement enriches the cooking experience and encourages recipe sharing among enthusiasts.
Whether you prefer a traditional approach or adding personal twists, let the conversation thrive. Your experiences with this recipe may inspire others to try making their own jambalaya joyfully.
The Recipe
Savory Shrimp and Sausage Jambalaya
Serves: 4 servings
Prep Time: 15 mins
Cook Time: 30 mins
Total Time: 45 mins
Kitchen Equipment Needed
Large skillet or Dutch oven
Cutting board
Sharp knife
Measuring cups and spoons
Wooden spoon for stirring
Ingredients
1 lb shrimp, peeled and deveined
12 oz andouille sausage, sliced
1 medium onion, diced
1 bell pepper, chopped
2 stalks celery, diced
3 cloves garlic, minced
1 cup long-grain rice
1 can (14.5 oz) diced tomatoes
2 cups chicken broth
2 tsp Cajun seasoning
Salt and pepper to taste
2 tbsp olive oil
Chopped parsley for garnish
Directions
In a large skillet or Dutch oven, heat olive oil over medium heat. Add diced onion, bell pepper, and celery; sauté until softened, about 5 minutes.
Stir in garlic and andouille sausage; cook for an additional 3-4 minutes until the sausage is browned.
Add the rice, canned tomatoes, chicken broth, Cajun seasoning, salt, and pepper. Bring to a boil, then reduce heat to low, cover, and simmer for 20 minutes.
After 20 minutes, stir in the shrimp and cook covered for another 5 minutes until the shrimp are pink and cooked through.
Remove from heat and let rest for 10 minutes. Fluff the rice with a fork, adjust seasoning if needed, and garnish with chopped parsley before serving.
Recipe Notes
For added heat, include a pinch of cayenne or crushed red pepper flakes when cooking.
This recipe can easily be doubled for a larger crowd or family gathering. Ensure you have a large enough pot.
Feel free to swap shrimp for chicken or add other seafood like crab or crawfish.
Best Crab Cake Stuffed Shrimp Recipe for Seafood Lovers
Crab Cake Stuffed Shrimp: A Delightful Seafood Fusion
⚖️
Difficulty
Intermediate
⏲️
Prep Time
30 mins
🕒
Cook Time
20 mins
⏱️
Total Time
50 mins
🍽️
Servings
4 servings
Crab Cake Stuffed Shrimp is a culinary masterpiece that offers a delightful blend of succulent shrimp and rich crab cake flavors. Imagine tender shrimp that cradle a savory crab cake filling, bursting with flavors while providing a satisfying contrast of textures. This dish not only represents the essence of coastal cuisine but also brings together the inviting aroma of seafood, fresh herbs, and zesty seasoning, making it perfect for both casual gatherings and special occasions.
The combination of fresh shrimp and seasoned crab creates an appealing dish that pleases the palate with every bite. When baked to golden perfection, the crispy exterior contrasts beautifully with the tender, flavorful stuffing. Visualize a platter of these beautiful stuffed shrimp, garnished with fresh herbs and served with a tangy dipping sauce – it’s an impressive dish that will elevate any dining experience.
Quick Recipe Highlights
Flavor Profile: The crab cake mixture complements the natural sweetness of the shrimp, providing a delightful burst of flavors with hints of Old Bay seasoning and lemon zest.
Texture: The dish presents a contrast of textures, with a crispy outer layer and a moist, hearty crab meat filling.
Aroma: The delightful aroma of sautéed onions and garlic combined with seafood will tantalize your senses.
Visual Appeal: Beautifully stuffed shrimp elegantly plated make a stunning addition to your dining table.
Skill Level Needed: This intermediate-level recipe is perfect for those who want to challenge their cooking skills while creating a show-stopping dish.
Special Equipment: You will need a baking dish, mixing bowl, and cooking utensils to prepare this mouthwatering treat.
Recipe Overview
Difficulty Level: The combination of stuffing the shrimp and achieving the perfect cook can be tricky but rewarding. Mastering this dish will impress your guests and bolster your culinary repertoire.
Category: Seafood Dish – an ideal addition to any seafood-themed meal or dinner party.
Cuisine: This recipe draws inspiration from coastal culinary traditions, where the freshness of seafood reigns supreme and local spices add depth to flavors.
Cost: With moderate prices for fresh seafood and pantry staples, it ranks as an approachable dish for special occasions.
Season: While crab can be enjoyed year-round, summer is particularly delightful due to preferences for lighter fare.
Occasion: Perfect for festive gatherings, holiday meals, or a romantic dinner for two, Crab Cake Stuffed Shrimp delivers on flavor and presentation.
Why You’ll Love This Recipe
Crab Cake Stuffed Shrimp delivers a unique taste combination that is sure to impress. The marriage of sweet shrimp and flavorful crab cake stuffing creates a delightful palate experience, marrying textures and tastes for a dynamic dish. The slight crispness from baking ensures a satisfying mouthfeel, while the infusion of spices provides a zesty kick that enhances the seafood flavors.
Convenience plays a significant role in the appeal of this recipe. Its straightforward preparation and cooking process mean you can easily make it even on a weeknight or for last-minute guest appearances. Moreover, it can serve as both an elegant appetizer and a rich main dish, offering versatility that adds to its charm.
In terms of nutrition, shrimp is an excellent source of protein and low in calories, making this dish a healthful option for seafood lovers. Combined with crab, which is rich in omega-3 fatty acids, this recipe not only satisfies but nourishes.
Entertaining becomes a breeze with this dish as it appeals to a wide range of palates. The delightful presentation will captivate your guests, and the flavors are sure to spark culinary conversations at the table. Alongside an enjoyable dining experience, Crab Cake Stuffed Shrimp adds a touch of sophistication to any gathering.
Lastly, the cost-effectiveness of this recipe shouldn’t be overlooked. Though it may seem gourmet, it can be crafted from accessible ingredients and serves multiple guests, making it a wise choice for your culinary endeavors.
Historical Background and Cultural Significance
Crab cakes have a long history on the Eastern Seaboard of the United States, particularly in the Chesapeake Bay area, where blue crabs are abundant. The dish originally emerged as a resourceful way to use leftover crab meat and has evolved into a cherished regional favorite, often served as an appetizer in local restaurants.
The significance of seafood in coastal cultures cannot be overstated, serving both as a staple and an integral part of social dining experiences. The blending of different seafood ingredients, such as shrimp and crab, showcases the versatility and richness of the ocean’s bounty.
As culinary practices have evolved, the crab cake’s popularity has spread well beyond its regional roots, leading to various interpretations and adaptations involving diverse flavors and spices, including the delicious fusion found in our Crab Cake Stuffed Shrimp recipe.
Regional variations abound, with different areas favoring local fish or preparations; some versions emphasize richness with cream sauces while others maintain a more straightforward baking method. This recipe honors the classic approach while adding a twist that makes it unique and appealing in contemporary dining.
Ingredient Deep Dive
Shrimp
Shrimp is not only versatile within many cuisines but also has deep roots in coastal communities around the world. It is rich in protein, low in calories, and provides vital nutrients such as selenium and vitamin B12. When selecting shrimp, look for firm, translucent shells with a mild ocean-like scent. To maintain freshness, store shrimp in the coldest part of your refrigerator and consume within a day or two.
Crap Meat
Crab meat is prized for its delicate texture and sweet, briny flavor. It has been a mainstay in various coastal cuisines and is linked to several traditional dishes. Crab is a great source of high-quality protein and essential omega-3 fatty acids that benefit heart health. When choosing crab meat, opt for fresh or pasteurized varieties, and check for any strong fishy smell as a sign of spoilage. For storage, keep it refrigerated and consume within a few days after opening.
Common Mistakes to Avoid
Using overcooked shrimp: Overcooked shrimp can lead to a rubbery texture, so ensure they are cooked just right before stuffing.
Not seasoning adequately: A bland stuffing can ruin the dish; be generous with spices and seasoning for a flavor boost.
Overstuffing the shrimp: This can lead to uneven cooking; aim for a balanced amount of stuffing in each shrimp.
Skimping on binder ingredients: The crab cake mixture needs the right balance of binders to hold together, so don’t overlook this step.
Skipping preheating the oven: This can result in uneven cooking; always preheat to ensure the shrimp cook properly.
Neglecting to chill the stuffing: Chilled stuffing helps in handling; otherwise, it may become too sticky when forming.
Using low-quality seafood: The key flavors in this dish stem from quality seafood; choose fresh and high-quality ingredients for best results.
Ignoring flavor pairings: Don’t hesitate to experiment with spices that complement seafood, such as Old Bay seasoning or citrus zest.
Not testing for doneness: Overlooking cooking times can lead to either undercooked or overcooked shrimp. Use a food thermometer for precision.
Failure to let cool slightly before serving: Letting shrimp rest allows for a better texture and easier handling when serving.
Essential Techniques
To create perfect Crab Cake Stuffed Shrimp, mastering the art of stuffing seafood is crucial. It is essential to pack the stuffing just right—too little and it will fall apart, too much and it will be difficult to cook evenly. Ensuring the shrimp are properly deveined and cleaned enhances not just the presentation but also the overall flavor by removing any bitter aftertaste.
Baking is the technique used in this recipe, ensuring the dish comes together well while developing a pleasing texture on the outside. The key is preheating your oven adequately and using an appropriate temperature to achieve that golden brown finish without burning.
Pro Tips for Perfect Crab Cake Stuffed Shrimp
1. Always use fresh shrimp for the best flavor and texture. Avoid pre-cooked shrimp for stuffing as they will not absorb the flavors well.
2. To elevate the dish, consider adding chopped herbs like basil or parsley to the crab cake mixture for added freshness.
3. Let your stuffing sit for about 30 minutes in the fridge to help it firm up, making it easier to handle.
4. Experiment with specialty seafood sauces as a drizzling option about cooked shrimp for added flavor.
5. Try setting aside a small amount of the crab mixture to use as a topping for each shrimp just before serving for an impressive touch.
6. Serve with lemon wedges to enhance flavors; the acidity can elevate the dish significantly.
7. Get creative with garnishes; use microgreens or edible flowers for a stunning presentation.
8. For a tad more zest, a sprinkle of smoked paprika can add a beautiful smoky note to the final dish.
Variations and Adaptations
The basic Crab Cake Stuffed Shrimp recipe can easily adapt to regional variations. For instance, swap out the traditional crab meat for local shellfish, such as lobster or scallops, to create a unique twist that reflects your local cuisine.
Seasonal adaptations work wonders for this dish. During summer, consider incorporating fresh corn or bell peppers into the stuffing to balance flavors and add a fresh crunch. In the autumn months, a hint of fall spices like pumpkin spice or nutmeg can create a cozy touch.
Dietary modifications can also be made for those with specific needs. You can prepare a gluten-free version by substituting breadcrumbs with gluten-free alternatives like crushed rice crackers. For a lower-carb adaptation, omitting the breadcrumbs entirely can yield a delicious dish that’s still satisfying.
Variations in flavor can come from changing the spices used in the crab cake mixture. Experiment with different herbs or regional spices to bring new exciting profiles each time you prepare this dish. Try different cheese types in crab stuffing for added creaminess.
As for presentation, consider serving the stuffed shrimp on a bed of risotto or a vibrant salad to impress your guests visually. Adding colorful microgreens or fresh herbs can elevate the overall dining experience.
Serving and Presentation Guide
Plating techniques are vital for showcasing your Crab Cake Stuffed Shrimp. Start by arranging the shrimp on a serving platter, then garnish with a sprinkle of chopped parsley for a pop of color. Consider drizzling with a tangy sauce or a homemade remoulade to enhance the visual appeal and provide extra flavor.
Garnishing ideas can include using citrus wedges besides the platter or placing microgreens around the base for a fresh, upscale look. Traditional accompaniments, such as a light salad of mixed greens or coleslaw, can offer balance and complement the richness of the dish.
For a modern touch, consider serving individual shrimp in small, elegant dishes or on skewers. Pay attention to temperature, ensuring the stuffed shrimp are served warm for the best dining experience. Portion control is essential as well; 2-3 stuffed shrimp per serving strikes the right balance for appetizers or a main course.
Wine and Beverage Pairing
For a successful pairing, consider crisp white wines such as Sauvignon Blanc or a light Chardonnay. These selections harmonize with the seafood, allowing the delicate flavors of the crab and shrimp to shine.
Non-alcoholic alternatives like sparkling water with lime or a homemade lemonade can refresh the palate while brightening the meal. These options can be delightful during the warmer months, offering a balance between flavor and freshness.
Coffee or tea pairings may not apply directly to this seafood dish, but you might consider robust herbal teas that complement seafood without overwhelming its subtleties. If serving an evening gathering, keeping wines chilled until serving will enhance the overall dining experience.
Storage and Shelf Life
Storage methods for Crab Cake Stuffed Shrimp are crucial in maintaining its flavor and freshness. It’s best to store any leftovers in an airtight container in the refrigerator and aim to consume them within 1-2 days to ensure the best quality.
For temperature requirements, ensure that the shrimp are cooled to room temperature before transferring them to the refrigerator. Additionally, avoid leaving cooked seafood out for over two hours to minimize the risk of foodborne illnesses.
Container recommendations include using glass or BPA-free plastic containers, as they provide airtight seals that maintain moisture and flavor. Signs of spoilage often include an off smell or discoloration; trust your senses when deciding to discard any leftovers.
When reheating, aim for an oven temperature of 350°F to dry out any excess moisture, ensuring they remain crispy. For freezing, store them in an airtight bag, ensuring as much air is removed as possible, and consume within a month for best results.
Make Ahead Strategies
Make ahead strategies for this recipe can significantly streamline the cooking process. Prep the crab cake stuffing in advance and store it covered in the refrigerator for up to 24 hours before using. This step allows flavors to meld beautifully.
When assembling the shrimp, consider chilling them before baking, which solidifies the stuffing and prevents leaking during the cooking process. If you want to bake them later, store unbaked stuffed shrimp on a parchment-lined tray and cover tightly with plastic wrap.
Quality impact assessment is essential; while some freshness may be lost after a day, it is generally safe to refrigerate stuffed shrimp. Focus on using fresh ingredients to maximize quality when preparing in advance.
For the final touches, consider adding fresh herbs or garnishes just before serving to maintain their vibrance and appeal. Reheating previously baked shrimp can be done on a low temperature to preserve tenderness while achieving that crispy exterior once again.
Scaling Instructions
Scaling instructions for Crab Cake Stuffed Shrimp make it feasible for various occasions. For halving the recipe, simply divide each ingredient measurement in half, making sure to adjust seasoning to taste.
In instances of doubling or tripling the recipe, be mindful of equipment adjustments; a larger baking tray or multiple trays may be necessary to ensure even cooking. Additionally, timing modifications might be needed to accommodate various trays or larger quantities.
Storage considerations are crucial when scaling recipes; ensure that each portion is securely stored to maintain freshness. For large gatherings, consider preparing in stages, allowing for adequate cooling and storage for unused shrimp.
When preparing larger quantities, ensure to make adjustments for flavor intensity too, as seasoning can sometimes mellow when larger batches are prepared.
Nutritional Deep Dive
The macro breakdown of Crab Cake Stuffed Shrimp reveals a balanced dish. Each serving provides an ample amount of protein from shrimp and crab while being lower in carbohydrates, making it a satisfying choice for those watching their intake.
Micronutrient analysis shows that this dish delivers essential vitamins and minerals, such as vitamin B12 and selenium, which are critical for energy production and immune health. The omega-3 fatty acids found in crab provide additional health benefits, including heart health improvements.
Health benefits extend to satisfying hunger with relatively low calories, supporting weight management while providing high-nutrient options. It likely aligns with diet preferences like low-carb or keto approaches.
Portion analysis is vital; moderate servings help maintain balance within your meal plan while providing a heartening seafood experience. Depending on individual requirements, adjusting serving sizes can tailor the recipe to various dietary goals.
Lastly, for healthy weight management tips, integrating more seafood recipes into your regular plan can enhance overall nutrition while offering various flavor profiles to keep meals exciting.
Dietary Adaptations
For gluten-free options, substitute standard breadcrumbs with gluten-free alternatives like crushed rice crackers, ensuring texture remains pleasant and flavors intact. This ensures everyone can enjoy the deliciousness of Crab Cake Stuffed Shrimp.
Dairy-free variants can be created by omitting ingredients like cream or cheese in the crab cake stuffing. Incorporating avocado can add creaminess without dairy, supporting a diverse range of dietary preferences.
To convert this recipe into a vegan option, substitutable ingredients for shrimp and crab could consist of seasoned tofu or jackfruit, combined with plant-based flavors to create an entirely new dish inspired by the classic.
For low-carb and keto diets, consider omitting breadcrumbs and using almond flour or ground flaxseed as a binding agent, preserving flavor while reducing carb intake.
Paleo-friendly adaptations include using natural ingredients without processed additives, focusing on pure seafood and fresh produce for gourmet results that align with this lifestyle.
Low-FODMAP adjusted versions can be made by avoiding specific high FODMAP ingredients, allowing more individuals to enjoy this dish without digestive discomfort while still retaining seafood delight.
Troubleshooting Guide
Texture issues are common when tackling stuffed seafood recipes. If you find the texture is too dense, consider adding an egg into the crab filling to lighten it. Additionally, ensuring the shrimp are not overcooked is essential to prevent them from becoming chewy.
Flavor balance is vital; if the dish tastes bland, increase the seasoning step-by-step, and consider adding zesty ingredients like lemon juice to brighten the overall profile. Properly taste-testing throughout the preparation process can enhance the final result.
Temperature problems arise when baking; if shrimp seem undercooked, ensure that your oven settings are accurate. Using an oven thermometer for precision can prevent undesired results and ensure perfectly cooked shrimp.
Equipment challenges can also be tricky. If possibilities or volume increases, ensure that your baking dish is large enough to accommodate without overcrowding the ingredients. Overpacked baking trays lead to uneven cooking.
Ingredient substitutions should be made thoughtfully to preserve texture and flavor. If crab meat is unavailable, a firmer fish like cod can be used; however, adapt cooking time accordingly to maintain quality.
Timing concerns can affect results; setting timers for both preparation and baking ensures no overcooked or undercooked ingredients. Building in a buffer time before serving helps maintain the dish’s integrity.
Recipe Success Stories
The community feedback surrounding Crab Cake Stuffed Shrimp varies with glowing reviews highlighting how entertaining guests with this dish proved memorable and engaging. Many have marveled at how impressed guests are with homemade crab cakes, blending nostalgia with modern flair.
Variation successes have come from incorporating local seafood favorites. Adaptations resonate strongly with those who enjoy innovative twists while keeping treasured family taste preferences—many may share their stories about the successes they’ve had.
Readers have suggested pairing alternatives that have led to delightful meals. From substitutions in the stuffing to additional sauces, the willingness to experiment has resulted in proud culinary triumphs.
Photography tips shared within the community emphasize the importance of color and plating. A tip about using vibrant garnishes, like microgreens, enhances not just taste but helps anyone to present the dish impressively.
The stories of adapting the dish for dietary restrictions or preferences have shown the flexibility in the recipe. New chefs can discover innovative ways while cultivating culinary creativity—making the recipe approachable for various lifestyles.
Frequently Asked Questions
Can I use frozen shrimp for this recipe?
Yes, frozen shrimp can be used, but it’s important to fully thaw them in the refrigerator overnight. Pat them dry to avoid excess moisture that can affect the stuffing’s consistency.
How do you prevent the stuffing from falling out during baking?
To prevent the stuffing from falling out, ensure the shrimp are tightly packed with the filling. Additionally, you can use toothpicks to secure the shrimp if necessary while baking.
What is the best way to store leftovers?
Store leftovers in an airtight container in the refrigerator for up to two days. Reheat in the oven at a low temperature to maintain texture.
Can I prepare the shrimp a day ahead of time?
Absolutely! You can prepare the stuffed shrimp and store them in the refrigerator before baking. Just ensure they’re properly covered to prevent drying out.
What sides pair well with Crab Cake Stuffed Shrimp?
Fresh salads, roasted vegetables, or a light pasta dish work wonderfully as sides, enhancing the meal without overpowering the shrimp.
How can I adjust the spice level?
To adjust the spice level, you can increase or decrease the amount of seasoning in the crab mixture. Adding a few dashes of hot sauce can also provide a nice kick.
Is there a vegetarian alternative for stuffed shrimp?
Indeed! Consider using firm tofu or a mixture of vegetables, grains, and spices to create a stuffing that satisfies a vegetarian palate while maintaining texture.
Can I freeze the unbaked stuffed shrimp?
Yes, you can freeze unbaked stuffed shrimp. Arrange them on a baking sheet, freeze until solid, then transfer to a freezer-safe bag or container for up to a month.
What kind of wine pairs best with this dish?
Crisp white wines such as Sauvignon Blanc or a light-bodied Chardonnay complement the seafood flavors beautifully.
Can I make the crab filling without mayonnaise?
Absolutely! You can use Greek yogurt or sour cream as alternatives to mayonnaise while still achieving a creamy consistency.
Additional Resources
The journey to mastering Crab Cake Stuffed Shrimp can be enhanced by exploring related recipes that showcase seafood creatively. For those interested in more seafood delights, consider trying shrimp scampi or classic crab cakes.
Technique guides offer insights into perfecting your stuffing and baking methods. Resources on selecting seafood can help you navigate purchasing fresh ingredients for optimal flavor. Understanding seasonal variations helps appreciate how recipes can evolve throughout the year.
For equipment recommendations, look into durable baking dishes, which can elevate the cooking process and ensure consistent results. Learning about the best cooking tools can add efficiency in the kitchen and improve overall experience while preparing meals.
Join the Conversation
Engage with our community of food enthusiasts by sharing your own experiences with Crab Cake Stuffed Shrimp. Consider tagging us in your culinary creations on social media, showcasing your unique plating styles or variations of our recipe.
We welcome your thoughts on what worked well and any adaptations you made. Take the time to leave a review or comment; connecting with fellow cooks helps elevate everyone’s culinary journey.
Whether you’re inspired to try this dish for the first time or are a seasoned cook who enjoys experimenting, your voice is valuable in shaping the ongoing conversation around seafood recipes. Share those helpful photography tips or suggest what sides worked best alongside, cultivating a network of culinary creators eager to learn and grow.
The Recipe
Crab Cake Stuffed Shrimp
Serves: 4 servings
Prep Time: 30 mins
Cook Time: 20 mins
Total Time: 50 mins
Kitchen Equipment Needed
Baking dish
Mixing bowl
Cooking utensils (spatula and spoon)
Oven
Ingredients
1 lb large shrimp, peeled and deveined
8 oz lump crab meat
1/2 cup breadcrumbs
1/4 cup mayonnaise
1 egg
1 tsp Old Bay seasoning
1 tbsp lemon juice
Salt and pepper to taste
Fresh parsley for garnish
Directions
Preheat your oven to 375°F (190°C) and prepare a baking dish with non-stick spray.
In a mixing bowl, combine crab meat, breadcrumbs, mayonnaise, egg, Old Bay seasoning, lemon juice, salt, and pepper.
Gently mix the ingredients until well combined.
Carefully stuff the mixture into the shrimp, ensuring not to overstuff.
Place the stuffed shrimp on the prepared baking dish and drizzle with olive oil if desired.
Bake for 20 minutes, until the shrimp are cooked through and slightly golden brown on top.
Remove from the oven and garnish with fresh parsley before serving.
Recipe Notes
Feel free to substitute the crab meat with any leftover fish options for a creative twist.
For added spice, consider including diced jalapeños in the stuffing mix.
This dish pairs perfectly with a fresh garden salad or roasted vegetables.
Best Antipasto Pasta Salad – A Flavor-Packed Side Dish
Antipasto Pasta Salad: A Flavorful Taste of the Mediterranean
⚖️
Difficulty
Easy
⏲️
Prep Time
20 mins
🕒
Cook Time
10 mins
⏱️
Total Time
30 mins
🍽️
Servings
4 servings
Pasta salad is a wonderful dish that offers a burst of flavors in every bite, and our Antipasto Pasta Salad does just that! As an inviting dish for get-togethers and picnics, it features a delightful combination of textures and tastes that will make your taste buds sing. The combination of hearty pasta with vibrant vegetables, savory meats, and tangy cheese creates a wonderfully balanced meal that showcases the best of Mediterranean culinary traditions.
This salad is not only easy to prepare but also highly customizable, ensuring it can cater to various dietary preferences and occasions. Whether you’re hosting a summer BBQ, preparing food for a potluck, or simply need a quick weekday meal, this antipasto pasta salad is the perfect solution. The fresh ingredients and vivid colors make it a feast for the eyes, while the combination of flavors and textures ensures it will be a hit among friends and family alike.
Quick Recipe Highlights
Flavor Profile: This salad is a marvelous mix of salty, tangy, and sweet flavors from olives, sun-dried tomatoes, and Italian meats that dance together on your palate.
Texture: The firm pasta contrasts beautifully with the crunchy vegetables and soft cheese, giving each bite a delightful mouthfeel.
Aroma: A warm Mediterranean aroma fills the air with notes of garlic, oregano, and the rich scent of olive oil.
Visual Appeal: Bright red cherry tomatoes, green bell peppers, and golden pasta create a stunning visual presentation that is perfect for entertaining.
Skill Level Needed: A beginner-friendly recipe that requires no specialized skills, just chop, mix, and enjoy!
Special Equipment: A large mixing bowl and a pot for boiling pasta are all you need to whip up this delicious salad.
Recipe Overview
Difficulty Level: This Antipasto Pasta Salad is considered easy due to its straightforward preparation method, making it perfect for novice cooks.
Category: It serves well as a main dish or side dish and is a fantastic addition to lunch spreads or party platters.
Cuisine: Drawing upon influences from Italian cuisine, this salad highlights classic antipasto ingredients that are beloved around the world.
Cost: The recipe is budget-friendly, featuring ingredients widely available at grocery stores without breaking the bank.
Season: Enjoy this dish year-round, but it’s especially refreshing in warmer months when fresh vegetables are in abundance.
Occasion: This pasta salad is ideal for picnics, barbecues, or potlucks, making it a crowd-pleaser at any gathering.
Why You’ll Love This Recipe
One of the best parts about this Antipasto Pasta Salad is its remarkable taste and texture appeal. The flavors blend beautifully, with the crunch of fresh vegetables balancing the tender pasta. Each ingredient adds a unique element, from the sweetness of the cherry tomatoes to the saltiness of the olives, ensuring an exciting taste experience in every mouthful.
In addition to its delightful flavors, preparation is incredibly convenient. You can make this dish in under 30 minutes, allowing for quick assembly when time is tight. Whether you prepare it on a busy weeknight or ahead for the weekend, it’s a straightforward recipe that fits easily into any routine.
From a nutritional perspective, this salad packs a healthy punch. The pasta provides a source of carbohydrates for energy, while the plethora of vegetables and meats add fiber, vitamins, and minerals essential for a balanced diet. Olives and olive oil provide healthy fats that contribute to heart health and overall wellness.
The social aspect of this dish cannot be understated. It is designed for sharing, making it perfect for gatherings and celebrations. The vibrant combination of colors and textures invites guests to dig in, and it sparks conversation as everyone enjoys the meal together.
Finally, the cost-effectiveness of this recipe is impressive. Featuring affordable ingredients that you can often find in your pantry or local market, creating this antipasto pasta salad won’t strain your budget even if you’re entertaining multiple guests. This combination of value and flavor makes it a staple recipe in anyone’s collection.
Historical Background and Cultural Significance
The origins of antipasto can be traced back to ancient Rome, where it was typically served as an appetizer to stimulate the appetite before the main meal. The word “antipasto” literally means “before the meal” in Italian, reflecting its role in Italian dining culture. Traditionally, antipasto platters would include cured meats, cheeses, and pickled vegetables, which have now evolved into modern interpretations like our pasta salad.
In Italy, sharing food is deeply rooted in cultural significance. Antipasto platters and dishes are often presented at gatherings, reinforcing community bonds and family values through food. Each ingredient is selected not just for flavor but for the story it tells and the memories attached to it. This practice exemplifies the Italian concept of “la dolce vita,” or the sweet life, emphasizing taking time to enjoy meals with loved ones.
Over the years, the evolution of antipasto has embraced regional ingredients and local culinary practices. With variations across Italy, such as the addition of regional cheeses or local vegetables, antipasto dishes can vary widely, reflecting their unique cultural backgrounds. The dish has made its way into various cuisines around the globe, adapted to local tastes and ingredients, and influencing countless recipes, including our pasta salad.
The regional variations of antipasto not only highlight Italy’s diverse culinary landscape but also suggest that food is an art form subject to personal interpretation. Each cook can present their unique touch while maintaining the essence of what antipasto stands for—communal enjoyment and delicious flavor combinations.
Ingredient Deep Dive
Pasta
Pasta is a staple in Italian cuisine, with a rich history dating back centuries. It is made from wheat, providing essential carbohydrates that are a primary energy source in many diets. When selecting pasta for antipasto salad, opt for high-quality options, such as whole grain or semolina varieties, which have nutty flavors and provide greater nutrition. Proper storage involves keeping it in an airtight container in a cool, dry place. For gluten-free variations, consider using rice, quinoa, or chickpea pasta as alternatives.
Olives
Olives are a fundamental element of Mediterranean cooking, historically symbolizing peace and prosperity. They come in a variety of types, each offering distinct flavors and nutritional benefits, such as healthy fats and antioxidants. Look for plump, brined olives at the store, and pay attention to their labels to avoid additives. Store them in a cool place or in the refrigerator once opened, but consume within a few weeks for optimal freshness. For those with a dislike for olives, consider substitutes like capers or marinated artichokes.
Cheese
Cheese is an iconic component of the antipasto experience and can add depths of flavor and creamy textures. Cheeses like mozzarella, provolone, or feta contribute essential proteins and calcium. When choosing cheese for your pasta salad, fresh varieties will provide the best taste; look for those with simple ingredients. Cheese should be stored in a cool environment, preferably in its original packaging or wrapped tightly to maintain freshness. If you’re looking for dairy-free options, consider using nut-based cheeses or nutritional yeast for a cheesy flavor.
Common Mistakes to Avoid
Overcooking pasta is a common mistake that leads to mushiness. Always cook pasta al dente to maintain structure and texture.
Skipping the rinsing step after cooking pasta can lead to a clumpy salad. Rinse with cold water to stop cooking and remove excess starch.
Not tasting the dressing before adding it to the salad can result in unbalanced flavors. Always adjust seasoning according to taste.
Cutting vegetables too large can result in uneven bites. Aim for uniform sizes for a more enjoyable texture.
Using low-quality ingredients can ruin the intended flavor. Choose fresh, high-quality ingredients for the best outcome.
Ignoring the marination time can lead to bland flavors. Allow the salad to sit for at least 30 minutes to let the flavors meld.
Not serving promptly can diminish the freshness of the ingredients. Make sure to serve it soon after preparation for optimal taste.
Omitting acid like vinegar or lemon juice can make the salad taste flat. A splash of acidity enhances the dish’s flavor profile.
Overstuffing the salad with too many ingredients can make it unwieldy. Keep your ingredient list balanced for a harmonious blend.
Forgetting to garnish can lead to a less appealing presentation. A sprinkle of fresh herbs or grated cheese can elevate the look.
Essential Techniques
Cooking Pasta
Cooking pasta properly is crucial to achieving the perfect texture for your salad. Start with a large pot of boiling salted water, as this will flavor the pasta while it cooks. Stir the pasta occasionally to prevent sticking and monitor for doneness, aiming for al dente. This means it should have a slight bite when tasted. Once cooked, drain and rinse the pasta under cold water to stop the cooking process and cool it down quickly.
Mixing Ingredients
When mixing the salad, layer your ingredients for even distribution. Start with the pasta base in a large bowl, followed by vegetables and meats. Mix gently to avoid breaking pieces. The timing when you add dressing is essential; it should be added to a cool pasta to prevent wilting fresh ingredients. Allow the mixture to rest for at least 30 minutes after mixing to enhance flavor absorption.
Pro Tips for Perfect Antipasto Pasta Salad
1. Choose a variety of vegetables for a unique flavor palette; elements like bell peppers, artichokes, and sundried tomatoes add color and taste complexity.
2. Use a high-quality extra virgin olive oil for your dressing, as it provides a richness that enhances all the other ingredients.
3. Chill the salad in the refrigerator for at least an hour before serving to let the flavors meld and develop a more intense taste.
4. Experiment with different pasta shapes to change up the texture and visual appeal of the dish; fun shapes like fusilli or farfalle can add character.
5. Consider adding protein like grilled chicken or chickpeas for a heartier version of the salad, suitable for a main dish.
6. Garnish with fresh herbs such as basil or parsley for a pop of freshness and extra color to your presentation.
7. When designing your antipasto salad, keep in mind seasonal ingredients, as they often have the best flavors and nutritional content.
8. Don’t hesitate to incorporate leftover ingredients from your fridge; this dish is wonderfully adaptable and makes for a great way to minimize waste.
Variations and Adaptations
For regional variations of antipasto salad, consider integrating local ingredients. For example, in Southern Italy, adding roasted eggplant or zucchini can provide a rich, smoky flavor, while using local cheeses can personalize the dish. Seasonal adaptations could include fresh corn in the summer or roasted squash in the autumn, which can enhance the salad’s heartiness and nutritional profile.
Dietary modifications are easy with this recipe; you can make it gluten-free by opting for gluten-free pasta alternatives or utilize lentils for a protein-rich base. A vegan version is also simple; substitute cheese with cashew-based alternatives or nutritional yeast to keep the cheesy flavor while remaining dairy-free. Flavor variations can come from incorporating diverse spices or dressings that reflect your palate, such as adding an Italian herb blend or a spicy red pepper flake kick.
Presentation alternatives can also make a difference. Consider serving the antipasto salad in a whole bell pepper or inside a hollowed-out cucumber for an eye-catching serve that’s sure to impress your guests. This can elevate a simple dish into a gourmet experience while still aligning with casual dining.
Serving and Presentation Guide
For serving and presentation, consider a large, colorful platter to make your antipasto pasta salad stand out. Layer the ingredients artistically, showcasing the vibrant colors of each component. To add an elegant touch, use fresh herbs as a garnish or drizzle a high-quality olive oil and balsamic glaze over the top just before serving.
Traditional accompaniments include crusty Italian bread or focaccia, making it easy for guests to scoop and enjoy the dish. Additionally, consider offering small bowls of olives or marinated vegetables as side options to enhance the dining experience. Temperature plays an important role; serve this pasta salad cold or at room temperature for the best taste and freshness.
Portion control is essential when serving; consider using serving cups or small bowls to offer individually plated options. This not only adds a sophisticated touch but also makes it easy for guests to serve themselves while controlling their portions.
Wine and Beverage Pairing
When it comes to wine pairings, a crisp white wine like Pinot Grigio or a light-bodied red like Chianti complements the fresh flavors of antipasto pasta salad beautifully. These wines enhance the dish’s savory notes without overwhelming them. For those seeking non-alcoholic options, a sparkling water with a hint of lemon or a refreshing iced tea would work well to cleanse the palate.
Coffee or tea can also serve as suitable post-meal beverages, especially a smooth espresso, which pairs excellently with the Mediterranean flavor profile of the dish. Ensure all drinks are served chilled to enhance the refreshing qualities of the salad.
Temperature is a vital consideration when serving beverages; chilled wines and drinks will best complement the cool, fresh nature of the antipasto pasta salad and keep the dining experience enjoyable.
Storage and Shelf Life
Proper storage of antipasto pasta salad is crucial to maintain its flavor and freshness. Store any leftovers in an airtight container in the refrigerator, ensuring they remain sealed to prevent spoilage. The salad can typically last for 3-4 days, but be mindful that the freshness of ingredients may start to decline after the first day.
It’s important to keep components like dressings separate if possible; this can help prevent sogginess in the pasta and greens. For any signs of spoilage, such as an off smell or discoloration, it’s best to err on the side of caution and discard the salad.
If you decide to freeze the salad, note that it may lose some textural qualities when thawed, so it is generally not recommended. However, if you do freeze it, portion it out in individual servings for easier meal prep and reheating.
Make Ahead Strategies
To make this antipasto pasta salad ahead of time, you can prepare all components individually and store them in the fridge. Cook the pasta and let it cool, slice the vegetables, and prepare your dressing separately; then combine everything just before serving. This process will ensure the freshest salad possible while allowing your flavors to meld together.
For optimal flavor, the dressing should be added shortly before serving, but if you have to mix it earlier, use less dressing and adjust before serving time. Make sure to keep the salad in the fridge when not in use, and add a fresh element, like herbs or cheese, right before serving for that delightful extra touch.
Assess the quality of your ingredients during preparation; if certain components are more prone to spoilage, assemble them close to serving times. For example, including softer cheeses or delicate greens may require later integration to prevent wilting or sogginess.
Scaling Instructions
Scaling this antipasto pasta salad recipe can be easily managed depending on your crowd size. If you are halving the recipe, adjust the ingredient quantities accordingly and remember to taste and adjust seasonings as needed. For larger gatherings requiring doubling or tripling, use larger mixing bowls and consider the available storage in your fridge beforehand.
Culinary timing adjustments may also be necessary; allow more time for cooking larger quantities of pasta and ensure that mixing ingredients is done thoroughly so that all flavors combine well. Keep in mind that the appearance may differ with scalability; larger salads may require more effort to present attractively.
When scaling up, consider the amount of dressing and whether you’ll need to increase it proportionally; often, taste testing will guide you to the right amount. Also, be aware of your serving equipment as larger batches may require larger platters for presentation.
Nutritional Deep Dive
In terms of macronutrients, this Antipasto Pasta Salad offers a variety of carbohydrates from pasta, protein from meats and cheeses, and healthy fats from olives and olive oil. It makes for a balanced meal option ideal for lunch or dinner. The serving size can impact daily caloric intake, making it crucial to portion out servings appropriately to meet dietary goals.
Micronutrient analysis reveals a wealth of vitamins and minerals; colorful vegetables contribute essential nutrients such as vitamins A, C, and K, along with potassium and magnesium. The incorporation of olives and olives oil ensures heart-healthy fats, which can benefit overall health and wellness.
For health considerations, this pasta salad can fit into various diet plans, thanks to the array of ingredients that can cater to different nutritional needs. For individuals managing weight, being mindful of portions and ingredient selections is key; opting for whole grains and adding more vegetables can enhance nutritional value without significantly increasing calorie counts.
Dietary Adaptations
If gluten-free dining is a concern, consider substituting traditional pasta with alternatives made from quinoa or lentils, allowing those with dietary restrictions to safely enjoy the flavors of the dish. For a dairy-free experience, replace traditional cheeses with nut-based options or omit cheese altogether in favor of extra vegetables.
A vegan adaptation can include removing all animal products and embracing plant-based alternatives for meats, such as tempeh or marinated tofu. Adjustments can also be made for those following low-carb or keto diets by swapping out pasta for spiralized vegetables like zucchini or broccoli, reducing overall carbohydrate intake.
Low-FODMAP adaptations can be tackled by avoiding certain high-FODMAP ingredients like garlic and using suitable substitutes like chives or infused oils for flavor. By making the right substitutions, this versatile salad can accommodate a wide range of dietary needs.
Troubleshooting Guide
If your antipasto pasta salad ends up with a texture that feels off, it’s crucial to ensure pasta is cooked al dente, providing the right firmness. If it’s mushy, it may be overcooked. Always follow timing instructions and taste during cooking to achieve the desired consistency.
Flavor balance is important; if the salad tastes bland, consider revisiting the dressing or adding a splash of acid such as lemon juice or vinegar to brighten up the flavors. A pinch of salt can make a significant difference as well.
Temperature problems can arise if the ingredients have been stored improperly. Allow the salad to chill adequately in the refrigerator and serve cold for the best flavor. Conversely, if it’s too cold, let it sit out for a few minutes before serving.
Equipment challenges may occur with large quantities; ensure that you have adequate mixing bowls and tools. When scaling, use appropriately sized utensils to guarantee even mixing and seasoning distribution.
Ingredient substitutions can occasionally lead to unexpected results; always taste test when altering components, and this ensures the recipe remains balanced.
Timing concerns can arise if components are not prepped in advance, leading to incorrectly cooked ingredients. Plan preparation activities, communal gatherings, and cooking times ahead of schedule.
Recipe Success Stories
The Antipasto Pasta Salad has garnered rave reviews from communities on social media, with many sharing their unique twists on the classic recipe. Readers have reported great success with adding seasonal vegetables like asparagus or spring peas, showcasing the salad’s adaptability and the ability to reflect changing culinary trends.
Several readers have adapted the recipe to include grilled chicken or shrimp as additional protein sources, and they have shared that these variations make for a heartier dish suitable as a main meal. Others have taken to heart the suggestions for presenting the salad in creative ways, such as in edible bowls made from large vegetables, which consistently create excitement at gatherings.
Feedback from photography enthusiasts in the community emphasizes the importance of bright, natural lighting to highlight the vibrant colors of the ingredients for posting to social media. Preparing and serving the salad in a family-style bowl or platter allows for great visual representation and amplifies the communal aspect of dining.
Overall, the ability to customize and modify the antipasto pasta salad lends itself to personal stories, serving as a reminder of how food connects individuals with their heritage, culture, and creativity.
Frequently Asked Questions
Can I make the salad ahead of time?
Yes, it is recommended to prepare the Antipasto Pasta Salad a few hours in advance to allow flavors to meld. Just keep the dressing separate and mix it in when ready to serve for best results.
What can I use to replace pasta?
For gluten-free options, consider using gluten-free pasta made from rice, quinoa or lentils, or you can substitute pasta with spiralized vegetables like zucchini for a low-carb option.
How do I store leftovers?
Store the salad in an airtight container in the refrigerator. It’s best consumed within 3-4 days for optimal freshness.
Can I omit the cheese?
Absolutely! You can omit cheese entirely for a dairy-free version or substitute it with plant-based cheese alternatives if you still desire that cheesy flavor.
Is this salad suitable for meal prep?
Definitely! This Antipasto Pasta Salad is ideal for meal prep; just assemble it in individual containers for a convenient meal option throughout the week.
Can I add protein to my salad?
Certainly! Adding grilled chicken, shrimp, or chickpeas provides additional protein and makes this salad more filling, transforming it into a main dish if desired.
What dressing works best?
A light vinaigrette made from olive oil, red wine vinegar, and Italian herbs is perfect for this pasta salad, enhancing the flavors without overpowering them.
Is it necessary to cook the pasta?
Yes, cooking pasta is essential for this dish—raw pasta will not provide the same texture, so boil it according to package instructions until al dente.
Can I freeze the salad?
Freezing the salad isn’t recommended as fresh ingredients may lose their textures and flavors. If you must freeze it, keep ingredients like greens and tomatoes separate until ready to consume.
Can this Salad be served warm?
While typically served cold, you can enjoy it warm if you prefer. Just remember, serving it cold allows flavors to develop more intensely.
Additional Resources
If you’re interested in exploring similar recipes, check out our collection of Mediterranean-inspired dishes, including classics like Caprese salad and vegetable antipasto platters. Additionally, we provide comprehensive guides on pasta cooking techniques, how to select the freshest ingredients, and suggested cooking equipment to enhance your culinary experience.
For additional salad inspiration, explore ingredient-specific articles on seasonal produce, including benefits and preservation methods for optimal use throughout the year. By gathering culinary knowledge, you can expand both your cooking skills and your understanding of the vibrant ingredients used in dishes like the Antipasto Pasta Salad.
Join the Conversation
We encourage you to share your Antipasto Pasta Salad experiences on social media! Post your pictures, tag us, and let us know what unique twists you’ve added to the recipe. Engaging with our community will inspire others to try this delicious dish and contribute their creativity.
Additionally, we invite you to leave a review or comment on your favorite modifications or suggestions. Participating in this conversation allows for a shared culinary journey, enabling us all to enhance our knowledge of food and its rich cultural heritage together.
The Recipe
Antipasto Pasta Salad
Serves: 4 servings
Prep Time: 20 mins
Cook Time: 10 mins
Total Time: 30 mins
Kitchen Equipment Needed
Large pot for boiling pasta
Strainer for draining pasta
Large mixing bowl
Cutting board and knife
Spoon or spatula for mixing
Ingredients
12 ounces pasta (fusilli or penne)
1 cup cherry tomatoes, halved
1 cup cucumber, diced
1/2 cup black olives, sliced
1/2 cup green olives, sliced
1/2 cup salami, diced
1/2 cup provolone cheese, diced
1/4 cup red onion, thinly sliced
1/4 cup fresh basil, chopped
1/4 cup olive oil
2 tablespoons red wine vinegar
1 teaspoon Italian seasoning
Salt and pepper to taste
Directions
Cook pasta according to package instructions. Drain and rinse with cold water until cool.
In a large mixing bowl, combine pasta, cherry tomatoes, cucumber, olives, salami, provolone, red onion, and basil.
In a small bowl, whisk together olive oil, red wine vinegar, Italian seasoning, salt, and pepper.
Pour dressing over the pasta salad and mix until well combined.
Let the salad sit for at least 30 minutes in the refrigerator for flavors to meld.
Serve chilled, garnished with extra herbs if desired.
Recipe Notes
Feel free to add or replace ingredients based on your personal preferences—antipasto salad is incredibly versatile!
For a vegetarian version, omit the meats or substitute with additional vegetables or chickpeas.
Store leftovers in an airtight container for up to 3-4 days in the fridge.
Easy Air Fryer Garlic Parmesan Fries – Crispy & Flavorful
Air Fryer Garlic Parmesan Fries: Crispy, Flavorful Perfection
⚖️
Difficulty
Easy
⏲️
Prep Time
10 mins
🕒
Cook Time
20 mins
⏱️
Total Time
30 mins
🍽️
Servings
4
The Air Fryer Garlic Parmesan Fries are the ultimate side dish or snack that packs a crispy punch, satisfying your cravings while remaining healthy. These fries balance the rich, umami flavor of Parmesan cheese with the zesty kick of garlic, making each bite irresistibly savory. When cooked in the air fryer, they retain a crispy exterior while staying fluffy inside, allowing you to indulge guilt-free. This recipe is perfect for those who love the idea of traditional fries but want a lighter, healthier alternative.
Air frying these fries results in a deliciously crispy texture with less oil than deep-frying. The garlic adds a fragrant aroma that fills your kitchen and heightens the dish’s beauty. Whether served alongside a meal or enjoyed as a standalone snack, these Air Fryer Garlic Parmesan Fries never fail to impress. Serve them with your favorite dipping sauce for an extra flavor boost that will leave everyone asking for more.
Quick Recipe Highlights
Flavor Profile: The Garlic Parmesan Fries offer a delightful blend of savory, cheesy goodness enhanced by fragrant garlic.
Texture: Enjoy a perfect crunch on the outside with a soft, pillowy interior that contrasts beautifully.
Aroma: The intoxicating scent of roasted garlic and melting cheese wafts through the air, making it irresistible.
Visual Appeal: Golden-brown fries sprinkled with fresh parsley create a mouthwatering presentation.
Skill Level Needed: This easy recipe is great for novice cooks and requires minimal techniques.
Special Equipment: All you need is an air fryer and basic kitchen utensils to bring this recipe to life.
Recipe Overview
Difficulty Level: The Air Fryer Garlic Parmesan Fries are easy to make with straightforward steps; perfect for beginners and experienced cooks alike.
Category: This recipe falls into the snack or side dish category, fitting perfectly with burgers, steaks, or as a stand-alone treat.
Cuisine: While fries are popular in many cultures, this version takes inspiration from American and Italian culinary traditions with its cheesy, garlicky twist.
Cost: The ingredients in this recipe are budget-friendly, making it an economical choice for delicious snack time.
Season: Fries can be enjoyed year-round; however, they shine during BBQ season and friendly gatherings.
Occasion: Perfect for parties, movie nights, or a cozy family dinner at home.
Why You’ll Love This Recipe
Enjoying Air Fryer Garlic Parmesan Fries is a sensory delight! The balance of rich cheese and aromatic garlic creates a mouthwatering flavor experience that leaves your taste buds dancing with joy. Not only are these fries tasty, but they also provide a healthier alternative to traditional fried options. With the air fryer, you can cut down on oil without sacrificing the crispiness and satisfying texture you crave.
Preparing these fries requires minimal effort, allowing you to whip them up in no time. The air fryer significantly reduces cooking time compared to traditional methods while elevating the flavor profile thanks to even heat distribution. Plus, they are incredibly versatile; pair them with various dipping sauces or main dishes, catering to every guest’s preference.
Additionally, these Garlic Parmesan Fries feature nutritional advantages, especially when made with fresh ingredients. Potatoes provide a good source of potassium and fiber, while garlic boasts antioxidant properties. Combined with Parmesan cheese, this makes for a dish that’s both enjoyable and beneficial when consumed in moderation.
These fries also shine at social gatherings, making them an excellent conversation starter. Everyone loves a crispy snack that dazzles the senses, allowing for easy mingling at parties. The shared experience of cooking and enjoying these fries together enhances the value of gatherings.
Lastly, their cost-effectiveness makes them an accessible comfort food option. Using simple pantry staples, you can treat yourself and your loved ones to delicious homemade fries, making it perfect for everyday meals or special occasions.
Historical Background and Cultural Significance
Fries have a long and storied history that traces back to the 17th century in Belgium, where they were originally made from whole fish. Over the years, their evolution led to the beloved French fry we know today. The introduction of various toppings, including cheese and garlic, showcases the adaptability of fries within different culinary cultures.
Garlic, a staple in many cuisines, has been revered for its health benefits and flavor enhancement. Paired with Parmesan cheese, a cornerstone of Italian cooking, this combination shows the interconnectedness of flavors that spans across cultures and creates rich culinary traditions.
The evolution of fries has sparked countless adaptations, with countries creating unique versions such as poutine in Canada or loaded fries in American fast food culture. This creativity reflects the versatility of fries, allowing them to adapt and thrive in various culinary landscapes.
In contemporary cooking, fries have remained a go-to comfort food, treasured for their satisfying crunch and ability to pair well with a variety of dishes, translating their cultural significance into our daily lives.
Ingredient Deep Dive
Potatoes: The cornerstone of any fry, potatoes have a rich history starting from their domestication in the Andean Mountains of South America. They are versatile and can be stored for extended periods, making them staples in cuisines worldwide. Nutritionally, they are high in carbohydrates and vitamins like vitamin C and B6, providing energy and nourishment. When selecting potatoes, opt for firm ones without blemishes. Store them in a cool, dark place to maintain freshness, and consider varieties like russet for crispier fries.
Garlic: Known for its medicinal properties, garlic has been used since ancient times in various cultures for its health benefits, including boosting immunity. In terms of nutrition, garlic is low in calories and packed with nutrients like manganese and vitamin B6, making it an excellent flavor enhancer. When choosing garlic, look for firm bulbs with tight, dry skins. It can be stored in a dark, cool place for several months, adding flavor and health benefits to various dishes.
Parmesan Cheese: Hailing from Italy, Parmesan cheese is celebrated for its sharp and salty flavor. Traditions of cheese-making have been passed down for generations, with parmesan being a staple in Italian cuisine. Nutritionally, it’s a source of protein and calcium, offering health benefits when consumed in moderation. When buying Parmesan, opt for wedge forms for the best flavor and freshness, avoiding pre-grated options. Store cheese wrapped in parchment paper in the fridge for optimal quality.
Common Mistakes to Avoid
Not soaking the fries: Failing to soak potatoes before cooking can result in less crispy fries since soaking removes excess starch.
Overcrowding the basket: Placing too many fries in the air fryer can lead to uneven cooking; fry in batches instead.
Not preheating the air fryer: Skipping this step can cause inconsistent cooking and longer cook times.
Using frozen fries: Frozen fries may not have the same texture or flavor as freshly made ones; always use fresh potatoes for the best results.
Incorrect seasoning: Under-seasoning can lead to bland fries; season generously to enhance flavor.
Skipping the oil: While air frying requires less oil, using a little enhances crispiness and flavor.
Cooking at the wrong temperature: Ensure the air fryer is set to the correct temperature for optimal cooking; too low can result in soggy fries.
Neglecting to shake the basket: Not shaking the fries halfway through cooking can lead to uneven crisping.
Not allowing the fries to cool: Giving the fries a few minutes to cool before serving allows them to firm up and improves texture.
Using stale ingredients: Ensure your garlic and cheese are fresh for the best flavor results.
Essential Techniques
Soaking Potatoes: Soaking potatoes in cold water for at least 30 minutes helps remove excess starch, resulting in crispier fries. The key to mastering this technique is ensuring you rinse thoroughly, and the longer you soak, the better the texture. Look for fries that are golden brown and crisp before serving.
Preheating Air Fryer: Preheating the air fryer is crucial as it prepares the cooking environment for optimal crispiness. It helps seal the outside of the fries quickly, creating that sought-after crunch. To avoid undercooked or soggy fries, ensure that the air fryer reaches the desired temperature before placing your fries inside.
Pro Tips for Perfect Air Fryer Garlic Parmesan Fries
1. Always use fresh garlic for the best flavor—mincing your own will yield a more potent taste compared to pre-minced options.
2. For extra flavor, consider adding a pinch of smoked paprika or cayenne for a spicy kick.
3. Use a mixture of Parmesan and a bit of mozzarella for an even cheesier and gooey result.
4. If you prefer a healthier version, opt for olive oil instead of butter to maintain that garlic flavor without the extra calories.
5. Don’t forget fresh herbs like parsley or chives for garnish—they add color and brightness to your presentation.
6. When serving, pair these fries with dipping sauces like aioli or spicy ketchup for an exciting flavor contrast.
7. Always check the fries halfway through cooking to ensure even crispiness; a quick shake is often all that’s needed.
8. If making for a crowd, consider doubling the recipe and keeping the first batch warm in the oven while the second one cooks.
Variations and Adaptations
For regional variations, consider adding Mexican-style toppings such as cotija cheese, lime juice, and cilantro for a zestier take on your fries. During the fall, try using pumpkin spice seasoning combined with Parmesan for a unique seasonal twist that’s extra festive. If dietary considerations arise, feel free to swap regular potatoes for sweet potatoes to create a healthier version, packed with vitamins and a sweet flavor profile. For those looking to ramp up the flavor, marinating the fries in spices or sauces ahead of time can yield deliciously spiced results, allowing for a new flavor experience each time.
Serving and Presentation Guide
When plating Air Fryer Garlic Parmesan Fries, consider using a rustic wooden board for a casual and appealing presentation. Garnishing with fresh parsley adds a pop of color and a fresh flavor. Dipping sauces can be served in small, colorful bowls alongside the fries for added interest. Ensure the fries are served hot and crisp, perhaps with a sprinkle of sea salt and extra cheese for a gourmet touch. Consider serving them in a cone made from parchment paper for a fun twist that is both functional and visually appealing, perfect for gatherings or casual dinners.
Wine and Beverage Pairing
When it comes to pairing beverages with Air Fryer Garlic Parmesan Fries, a crisp white wine such as Sauvignon Blanc complements the garlic’s richness perfectly. For a non-alcoholic option, consider a sparkling water with lime for refreshing contrast. Dark beers like stouts also work wonderfully, amplifying the umami flavor of the fries. If you prefer something warm, a robust coffee or a herbal tea after your meal can round off the flavor beautifully, creating a harmonious dining experience.
Storage and Shelf Life
To store leftover Air Fryer Garlic Parmesan Fries, allow them to cool completely before placing them in an airtight container, where they can last for up to 3 days in the fridge. When reheating, using the air fryer again will help restore crispness; simply reheat at 350°F for about 5-10 minutes. For longer storage, these fries can be frozen; just ensure they are laid out on a baking sheet to freeze individually before transferring to a freezer-safe bag. This ensures they don’t clump together and can be enjoyed later.
Make Ahead Strategies
To save time, pre-cut your potatoes and soak them earlier in the day. When ready to cook, just remove them from the water, pat dry, and season! You can also prepare the garlic butter mixture ahead of time, storing it in the fridge to infuse flavor before cooking. For the best quality, it’s recommended to fry them fresh; however, par-cooking the fries and finishing them off in the air fryer before serving offers a great option for busy schedules, ensuring maximum taste with minimal stress.
Scaling Instructions
To halve the recipe, simply divide the amount of potatoes and other ingredients by two, and maintain the same cooking technique. If you’re looking to double the or triple the recipe, ensure you cook in batches instead of overcrowding the air fryer basket to preserve crispness. Also, avoid overcooking; keep an eye on the fries as the cooking time may slightly change based on quantity, and adjust to ensure they remain golden and crispy.
Nutritional Deep Dive
When evaluating the nutritional aspects of Air Fryer Garlic Parmesan Fries, a serving contains a healthy balance of macronutrients, primarily carbohydrates from potatoes, proteins from Parmesan cheese, and essential fats from a minimal amount of oil. Garlic boosts the dish with antioxidant properties and numerous health benefits, while potatoes offer potassium and dietary fiber that aid in digestion. Portion control is key; enjoying a calculated serving sizes will help regulate calorie intake while still indulging in this delectably crispy side dish.
Dietary Adaptations
For those adhering to a gluten-free diet, this recipe is naturally free from gluten. To make it dairy-free, opt for nutritional yeast instead of Parmesan cheese, which provides a cheesy flavor without dairy. Vegan alternatives can include plant-based cheese options that melt well. For anyone on low-carb diets like keto, try substituting the potatoes with zucchini or cauliflower, offering fewer carbs while still achieving a delicious crunch. Other adaptations can include adjusting seasonings or including more vegetables for added nutrition, ensuring that everyone can enjoy this delicious side dish.
Troubleshooting Guide
If your fries turn out soggy, check that you’ve adequately soaked and dried the potatoes, avoiding excess moisture. For flavor balance, over-seasoning can lead to an overpowering taste; always taste before adding more spices. If your air fryer isn’t cooking the fries evenly, ensure not to overcrowd the basket and rotate if necessary. Should you encounter problems with burning, reduce the heat or cooking time slightly while keeping an eye on the fries. Ingredient substitutions can also affect texture and flavor; be cautious when replacing key components.
Recipe Success Stories
Our community has shared numerous delightful experiences making Air Fryer Garlic Parmesan Fries, showcasing various adaptations and personal touches. One user noted their family loved the addition of truffle oil for a gourmet touch that elevated the fries significantly. Others shared success stories from hosting gatherings where these crispy delights disappeared within minutes, garnering rave reviews. Photography tips have surfaced too, with readers suggesting natural light for the best visuals, allowing the fries’ golden color to shine through. Each story uniquely enriches the lore of this beloved recipe.
Frequently Asked Questions
Can I use sweet potatoes instead of regular potatoes? Yes, sweet potatoes make a great alternative and offer their own unique flavor and nutritional profile. Adjust the cooking time as needed, as they may cook faster than regular potatoes.
What dipping sauces pair well with these fries? Garlic aioli, spicy ketchup, or even a creamy ranch dressing complement these Garlic Parmesan Fries perfectly.
How do I make them spicier? Add cayenne pepper or crushed red pepper flakes to the seasoning mix for added heat.
What air fryer do you recommend? Any quality air fryer will work, but those with adjustable temperature controls and a large capacity can be beneficial for making larger batches.
Can I make these fries ahead of time? While it’s best to serve them fresh, you can prep the potatoes earlier in the day and cook them just before serving.
How do I store leftover fries? Store them in an airtight container in the refrigerator for up to 3 days; reheat them in the air fryer for the best texture.
Is it necessary to peel the potatoes? No, you can leave the skin on for added texture and nutrients.
Can I use pre-cut frozen fries? While possible, fresh fries yield the best overall texture and flavor. If you must use frozen, ensure they are unseasoned.
How can I ensure they stay crispy? Drying the potatoes thoroughly after soaking and cooking them in batches helps maintain crispiness.
What if I don’t have an air fryer? You can bake the fries in the oven at a high temperature, though results will differ slightly regarding crunchiness.
Additional Resources
Expand your culinary repertoire with additional recipes like Loaded Nacho Fries or Classic Sweet Potato Fries. For technique guides, consider exploring frying tips or seasoning blends to enhance your comfort food creations. Understanding various types of potatoes and their uses is essential for mastering recipes, while proper kitchen equipment can further improve your cooking experience. Seasonal variations such as Herb Roasted Fries during the summer add freshness to your table, incorporating seasonal flavors.
Join the Conversation
Your experience matters! Share your Air Fryer Garlic Parmesan Fries photos on social media using the hashtag #AirFryerFries. Connect with fellow cooking enthusiasts by exchanging tips and adaptations that have made this dish personal to you. Leave feedback and reviews on what worked best and what you loved, inspiring others to whip up their crispy delights at home. Let’s build a community that celebrates the love for flavorful, indulgent recipes!
The Recipe
Air Fryer Garlic Parmesan Fries
Serves: 4
Prep Time: 10 mins
Cook Time: 20 mins
Total Time: 30 mins
Kitchen Equipment Needed
Air fryer
Knife
Cutting board
Mixing bowl
Measuring cups and spoons
Ingredients
2 large russet potatoes, cut into fries
2 tablespoons olive oil
4 cloves garlic, minced
1/2 cup grated Parmesan cheese
Salt and pepper to taste
Fresh parsley, chopped (for garnish)
Directions
Soak cut potatoes in cold water for at least 30 minutes, then drain and pat dry.
Preheat the air fryer to 400°F (200°C).
In a mixing bowl, toss the potatoes with olive oil, minced garlic, salt, and pepper until evenly coated.
Transfer the fries to the air fryer basket in a single layer.
Cook for 15-20 minutes, shaking the basket halfway through, until golden and crispy.
Remove fries from the air fryer and toss with grated Parmesan cheese immediately.
Garnish with fresh parsley and serve hot with your favorite dipping sauce.
Recipe Notes
Feel free to experiment with additional seasonings, such as paprika or Italian herbs.
For a truly indulgent experience, drizzle fries with truffle oil before serving.
These fries can be made in batches; just keep the first batch warm in the oven while the second cooks.
Hi I'm Emy
I’m passionate about sharing a diverse collection of sweet and savory recipes that I’ve meticulously tested and perfected in my own kitchen.