Delicious Apple Butter Cookies: A Perfect Fall Treat Recipe

Delicious Apple Butter Cookies: A Fall Favorite

⚖️
Difficulty
Easy

⏲️
Prep Time
15 mins

🕒
Cook Time
10 mins

⏱️
Total Time
25 mins

🍽️
Servings
24 cookies

Apple Butter Cookies are not just your average treats; they’re a wonderful blend of spices and sweet apple flavor that evoke the warmth of autumn. As you bite into these cookies, you’ll be welcomed by a soft, chewy texture perfectly complemented by the rich undertones of apple butter. Ideal for sharing at gatherings or keeping all for yourself, these cookies bring a touch of home-baked bliss into any kitchen.

With their delightful aroma that fills your kitchen, these cookies are perfect for those cozy fall days. Imagine the scent of cinnamon and nutmeg weaving through your home as they bake! Each cookie is a reminder of the childhood joy found in baking and sharing sweets with loved ones. They’re simple to make, require minimal ingredients, and are sure to impress anyone who tastes them.

Quick Recipe Highlights

  • Flavor Profile: These cookies feature a delightful combination of sweet and spicy flavors, highlighting the essence of fall with apple butter, cinnamon, and just a hint of nutmeg.
  • Texture: The chewy texture combined with a lightly crisp edge creates a perfect bite that melts in your mouth.
  • Aroma: Baking these cookies fills your home with the inviting scents of cinnamon and warm apples, creating an irresistible appeal.
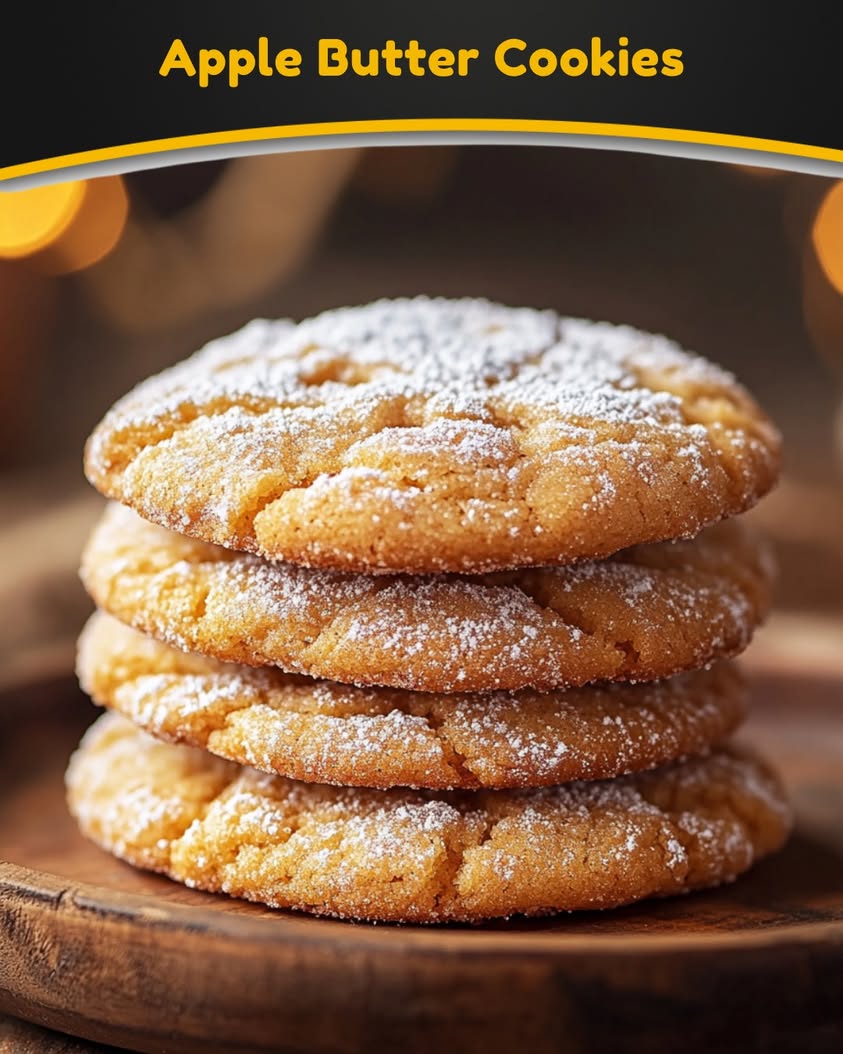
  • Visual Appeal: Golden brown cookies with soft peaks and a sprinkle of cinnamon sugar on top make for an attractive dessert.
  • Skill Level Needed: This recipe is easy enough for beginners yet rewarding for experienced bakers, thanks to its straightforward steps.
  • Special Equipment: You will need a mixing bowl, baking sheet, and parchment paper for easy cleanup.

Recipe Overview

  • Difficulty Level: This recipe is classified as easy, making it perfect for novice bakers looking to try something new.
  • Category: These cookies can be served as a snack, dessert, or even at tea time, making them versatile for any occasion.
  • Cuisine: Inspired by classic American baking traditions, Apple Butter Cookies echo the comfort associated with homemade treats.
  • Cost: Budget-friendly ingredients make these cookies a cost-effective choice for gatherings or gifting.
  • Season: Ideal for fall, but they can be enjoyed year-round with the right spicing.
  • Occasion: Perfect for holiday celebrations, family gatherings, or simply sharing with friends over coffee.

Why You’ll Love This Recipe

These Apple Butter Cookies are a magic blend of flavor and nostalgia that delight everyone who tries them. Each bite bursts with flavor, combining the sweetness of apple butter with warming spices. The taste is reminiscent of fall baking traditions, leaving a lasting impression. Their soft texture creates a comforting mouthfeel that makes you reach for one more, transforming any snacking moment into a cozy experience.

Additionally, the convenience of this recipe allows for a quick preparation, enabling you to whip up a batch in just 25 minutes. With minimal equipment required, even the most inexperienced bakers can get involved without stress, making it a fun family activity. The joy of baking and the delicious outcome will surely inspire you to make them again and again.

Nutritionally, these cookies offer a balance between indulgence and wholesome ingredients. With apple butter packed with vitamins and the use of whole grains, they can be a smarter sweet treat option. The spices not only enhance flavor but also come with health benefits, making you feel good about enjoying this dessert.

Sharing these cookies becomes a social experience as you watch friends and family enjoy the flavors and aromas that fill the air. They are perfect for gatherings, potlucks, or simply to brighten someone’s day. Their delightful taste can easily spark conversations and create memories among those you love.

Cost-effective and easy to make, these cookies provide a great way to treat both yourself and others. The simple ingredients mean you likely have everything on hand. They make for delightful homemade gifts that show you care without breaking the bank.

Historical Background and Cultural Significance

Originating from the time when apples were a staple in American households, the apple butter cookie embodies home-cooked traditions. Apple butter itself dates back to early American settlers in the 18th century, who would preserve apples in its sweet, rich form. Over the years, recipes have evolved to incorporate this delightful spread into baking.

The cultural importance of apple butter cookies highlights the communal aspect of baking, where families would gather to bake and celebrate harvest time. These traditional cookies often show up at potlucks and family reunions, representing the warmth and love of homemade treats shared among loved ones.

Over time, variations of the original recipe have emerged, showcasing regional twists and different spice combinations. Today, many families may have their own version, passed down through generations, symbolizing their unique culinary heritage.

As different regions put their spin on apple butter cookies, local ingredients or flavorings get incorporated, resulting in a colorful array of cookie types while keeping the spirit of the original alive. From adding nuts to creating gluten-free alternatives, the versatility of this cookie continues to evolve while retaining its comforting roots.

Ingredient Deep Dive

Apple Butter: This sweet spread has deep roots in American culinary tradition and is made by slow-cooking apples to concentrate their natural sugars and flavors. Nutritionally, apple butter provides dietary fiber, antioxidants, and vitamins such as A and C. When selecting apple butter, look for options with no added sugars for a healthier choice. Store your apple butter in a cool dark place, and consume it within a year for the best flavor.

Flour: The main structure in cookies, flour contributes to their texture. All-purpose flour is the most commonly used, but whole wheat flour can add nutrition and flavor. It is important to use fresh flour stored in a cool, dry place, as stale flour can affect texture. Substituting with gluten-free varieties such as almond or oat flour can create variations suited for different dietary needs.

Common Mistakes to Avoid

  • Overmixing the dough: Mixing too much can lead to tough cookies. Mix just until ingredients are combined.
  • Using cold ingredients: Ingredients should be at room temperature for better incorporation. Cold butter and eggs can lead to uneven texture.
  • Not chilling the dough: Skipping this step may result in flat cookies. Chilling helps maintain their shape and enhance flavors.
  • Baking at incorrect temperatures: Always preheat your oven. Baking at the wrong temperature can lead to burnt edges or doughy centers.
  • Skipping parchment paper: Using parchment prevents sticking and promotes even baking. It’s an easy way to ensure perfect cookies.
  • Not measuring ingredients accurately: Baking is a science. Use proper measuring tools to ensure the right ratios for success.
  • Not giving enough space on the baking sheet: Cookies spread during baking, so leave enough space to prevent them from merging.
  • Underbaking or overbaking: Keep a close eye on your cookies. They should be lightly golden on the edges and set in the center when done.

Essential Techniques

Mixing the Dough: An essential step that greatly influences the cookie’s final texture. Use a gentle hand, mixing just to combine wet and dry ingredients. Overmixing incorporates too much air, leading to denser cookies. Aim for a cohesive dough with visible flour still present before proceeding.

Chilling the Dough: This technique is crucial for cookies like these. Chilling allows flavors to meld and helps prevent excessive spreading during baking. Allow at least 30 minutes in the fridge for optimal results. Visual cues include a firm dough that holds its shape when formed into balls.

Pro Tips for Perfect Apple Butter Cookies

1. Use homemade apple butter for the best flavor. It’s easy to make and elevates your cookies considerably.

2. Add a pinch of sea salt to enhance the sweetness and balance flavors.

3. Experiment with spices by adding ginger or cloves for an extra kick.

4. If you prefer crispier cookies, bake them a minute or two longer.

5. Consider adding nuts for a crunch and deeper flavor.

6. For festive presentations, roll the cookies in cinnamon sugar before baking.

7. Let the cookies cool on the baking sheet for a few minutes before transferring to a rack for better texture.

8. Store cookies in an airtight container to keep them fresh longer.

Variations and Adaptations

The joy of Apple Butter Cookies lies in their adaptability. Consider regional variations by adding local nuts or fruits that align with your area’s seasonal offerings. For example, chopped pecans or walnuts can add a delightful crunch, lending a nutty flavor that complements the sweet spices.

Seasonal adaptations can include pumpkin spice or maple flavoring, which resonate well during the fall or winter months. For dietary modifications, substituting with almond flour or other gluten-free options can cater to those with dietary restrictions while maintaining the delightful taste of apple butter.

Serving and Presentation Guide

For an appealing presentation, try stacking a few cookies on a plate with a sprig of mint for a pop of color. Dusting them lightly with powdered sugar enhances their visual appeal while adding a sweet finish. Serve alongside a cup of hot tea or coffee to complement the flavors beautifully, making your serving even more enjoyable.

Temperature considerations are key; serve these cookies slightly warm for a delightful, gooey center, or at room temperature for a firmer bite. For portion control, cut larger cookies into halves or thirds, allowing everyone to enjoy without overindulging.

Wine and Beverage Pairing

Pair these cookies with a light dessert wine, such as a Riesling or Muscat, which complements the sweetness and fruitiness of the apple butter. If you prefer non-alcoholic options, consider serving with a spiced hot apple cider or a creamy vanilla chai latte, enhancing the flavor profile of your cookies beautifully.

Temperature is important; ensure your wines are chilled or served at room temperature, depending on the varietal. For seasonal gatherings, spiced cider served warm creates a cozy atmosphere, perfect for enjoying with apple butter cookies.

Storage and Shelf Life

Store your Apple Butter Cookies in an airtight container at room temperature for up to a week. For longer preservation, you can freeze them by placing them in a single layer on a baking sheet until frozen, then transferring to a freezer-safe container. They can last up to three months in the freezer, maintaining their delightful flavor and texture well.

If you notice any cookies hardening, you can revive their texture by placing a slice of bread in the container with them, which will help retain moisture. When reheating, place cookies in a microwave for a few seconds to regain warmth.

Make Ahead Strategies

To make the preparation even smoother, consider making your dough a day in advance. You can refrigerate it overnight, which allows flavors to intensify. Simply shape the cookies before baking, and you’ll have fresh cookies ready in no time.

Storing components separately can also maintain freshness. Ensure to keep your apple butter and a cookie dough in separate containers until you’re ready to combine them. For the best quality, bake your cookies fresh right before you intend to serve them, preserving their delightful texture and flavor.

Scaling Instructions

If you’re looking to halve this recipe, easily do so by cutting all ingredient quantities in half while following the same mixing and baking instructions. For doubling or tripling, you may require additional baking sheets and increased prep time, depending on your oven space.

Timing modifications may be necessary when scaling up, especially if you’re baking multiple trays at once. Be sure to rotate trays halfway through baking for even results. Store any extras in an airtight container or freeze in batches to keep them fresh.

Nutritional Deep Dive

The macro breakdown of these cookies reveals a nice balance of carbohydrates, fats, and proteins, primarily from the flour and apple butter. While these cookies are a treat, moderation is key for maintaining a balanced diet.

Micronutrient analysis shows that the spices used also contribute beneficial antioxidants while the apple provides dietary fiber. For those looking into portion analysis, consider enjoying one or two cookies at a time and incorporating them into a balanced diet for weight management.

Dietary Adaptations

For gluten-free options, swap all-purpose flour for a 1:1 gluten-free flour blend, ensuring you enjoy the same delightful texture without the gluten. Dairy-free alternatives can be achieved by using coconut oil in place of butter for a rich, plant-based twist.

Vegans can substitute egg by using applesauce or a flaxseed mixture, allowing for a fully plant-based version without sacrificing flavor or texture. Low-carb adaptations could involve using almond flour and a sugar substitute, making these cookies accessible to a wider audience.

Troubleshooting Guide

If your cookies turn out too dry, it may be a result of overbaking or too much flour. Check your measurements and adjust baking times accordingly. If they spread too much, chilling the dough for a bit longer may help maintain their shape during baking.

For any overly sweet cookies, consider reducing the sugar in the future or adding a touch of salt to balance the flavors. If your cookies aren’t golden enough, ensure your oven temperature is accurate and consider adding a couple of minutes to the bake time.

Recipe Success Stories

Community feedback reflects enthusiastic praises for this recipe as a go-to fall treat. Many have taken to sharing their personal twists, like adding different spices or using various nut butters instead of apple butter. Readers share their excitement at how they’d gift these cookies, especially during the holidays, showcasing their interactive nature.

Some have even experienced success by baking these cookies with kids, creating lasting memories while introducing the joy of baking to a younger generation. The result is not just tasty cookies but a delightful experience that fosters family bonding.

Frequently Asked Questions

Can I use store-bought apple butter?

Absolutely! Store-bought apple butter will work just fine. Look for options without high fructose corn syrup for an authentic taste.

Can I freeze the dough?

Yes, you can freeze the dough. Shape it into balls, freeze them, and bake them right from frozen, adding a couple of minutes to the bake time.

What if I don’t have apple butter?

If you don’t have apple butter, you can make a quick substitute by blending unsweetened applesauce with spices like cinnamon and nutmeg.

How do I know when the cookies are done?

Look for a slight golden color on the edges, and when lightly pressed, the center should still be soft but not raw. They continue to cook slightly outside the oven.

Can I substitute the flour?

Yes! While all-purpose flour is ideal, you can use gluten-free flour blends or whole wheat flour for a heartier texture.

How long do these cookies stay fresh?

Stored in an airtight container, these cookies will maintain their optimal freshness for up to a week at room temperature.

What can I pair with these cookies?

These cookies are delicious on their own but pair beautifully with coffee, hot apple cider, or a sweet dessert wine.

Can I add mixes to the dough?

Absolutely! Chocolate chips, nuts, or dried fruits can be added to enhance flavor and create a fun variation on the classic recipe.

Is this recipe kid-friendly?

Yes! It’s simple enough for kids to help with. Supervise them, especially during baking, for a fun family activity.

What should I do if dough is too sticky?

If your dough is too sticky, try chilling it for a little longer or adding a small amount of flour to adjust the consistency.

Additional Resources

For more delightful recipes like Apple Butter Cookies, consider browsing our collection of autumn-inspired treats. Find technique guides that cover everything from mixing to baking essentials to enhance your skills further. Ingredient information can help you select the best produce for rich flavors, while equipment recommendations ensure you have the right tools for baking success.

Join the Conversation

We love seeing your takes on recipes, so don’t forget to share your experiences on social media! Post photos of your Apple Butter Cookies and share personal adaptations. Engage with our community by leaving comments and suggestions on how you made this recipe your own, and inspire others to join in the fun of baking.

The Recipe

Apple Butter Cookies

Serves: 24 cookies

Prep Time: 15 mins

Cook Time: 10 mins

Total Time: 25 mins

Kitchen Equipment Needed

  • Mixing bowl
  • Baking sheet
  • Parchment paper
  • Measuring cups and spoons
  • Electric mixer (optional)

Ingredients

  • 1 cup apple butter
  • 1/2 cup sugar
  • 1/4 cup brown sugar
  • 1/2 cup butter, softened
  • 1 large egg
  • 2 cups all-purpose flour
  • 1 tsp baking soda
  • 1 tsp cinnamon
  • 1/4 tsp nutmeg
  • 1/4 tsp salt
  • Cinnamon sugar, for sprinkling

Directions

  1. Preheat your oven to 350°F (175°C) and line a baking sheet with parchment paper.
  2. In a mixing bowl, cream together apple butter, sugar, brown sugar, and softened butter until smooth.
  3. Add the egg and mix until fully incorporated.
  4. In a separate bowl, combine flour, baking soda, cinnamon, nutmeg, and salt.
  5. Gradually add the dry ingredients to the wet mixture and stir until just combined.
  6. Using a spoon or cookie scoop, drop dough onto the prepared baking sheet, leaving space between each cookie.
  7. Optional: Sprinkle cinnamon sugar over the top before baking.
  8. Bake for 10-12 minutes or until the edges are lightly golden and the center is set.
  9. Allow cookies to cool on the baking sheet for a few minutes before transferring to a wire rack to cool completely.

Recipe Notes

  • Store in an airtight container for up to a week.
  • Freeze for longer storage, up to three months.
  • Feel free to add mix-ins like chocolate chips or nuts as desired.

Heart-Shaped Chocolate Chip Cookies: A Sweet Valentine’s Day Treat

Perfect Heart-Shaped Chocolate Chip Cookies for Valentine’s Day

⚖️
Difficulty
Easy

⏲️
Prep Time
15 mins

🕒
Cook Time
10 mins

⏱️
Total Time
25 mins

🍽️
Servings
12 cookies

These **Perfect Heart-Shaped Chocolate Chip Cookies** are the ultimate sweet treat for Valentine’s Day. With their whimsical heart shape, they not only satisfy your sweet tooth but also make a delightful gift for your loved one. Each bite offers a heavenly combination of rich chocolate chips melted into a buttery cookie base, evoking feelings of warmth and love. The delightful sweetness paired with just a hint of vanilla creates a memorable flavor experience that is simply irresistible.

As you bake these heart-shaped cookies, your kitchen will fill with the delightful aroma of freshly baked dough, while the sight of those warm, gooey chocolate chips oozing from the cookies will make your mouth water. Gather your loved ones around as you share this perfect Valentine’s Day treat; each bite will remind you of sweet moments spent together and the love you celebrate.

Quick Recipe Highlights

  • Flavor Profile: A blend of buttery sweetness with rich chocolate undertones that create an indulgent flavor experience.
  • Texture: Soft and chewy on the inside with slightly crispy edges, providing a wonderful contrast in each bite.
  • Aroma: The inviting scent of vanilla and melted chocolate wafting throughout your home will awaken your senses.
  • Visual Appeal: Heart-shaped cookies with glistening chocolate chips are visually stunning, perfect for gifting or sharing.
  • Skill Level Needed: Basic baking skills required; perfect for both novice and experienced bakers.
  • Special Equipment: A heart-shaped cookie cutter and baking sheets are essential for shaping and baking your cookies.

Recipe Overview

  • Difficulty Level: This recipe is classified as easy, making it accessible for bakers of all levels. It requires simple techniques that yield impressive results.
  • Category: These cookies are a perfect dessert or snack for any occasion, especially on Valentine’s Day.
  • Cuisine: This recipe is inspired by classic American baking traditions, reflecting the rich culture of homemade desserts.
  • Cost: The ingredients are affordable, typically totaling less than $10, making these cookies a budget-friendly treat.
  • Season: While perfect for Valentine’s Day, these cookies are delightful any time of year, especially when celebrating love.
  • Occasion: Ideal for romantic gestures, parties, or simply enjoying cozy moments with family and friends.

Why You’ll Love This Recipe

The taste and texture of these **Perfect Heart-Shaped Chocolate Chip Cookies** will leave your taste buds wanting more. The balance of sweetness from the sugar and the deep, rich flavor of the chocolate is simply delicious. The soft, chewy center contrasted with a slight crispness on the edges creates an enjoyable mouthfeel that will satisfy any cookie lover. Each cookie embodies the warmth of home baking, making them the perfect treat for sharing or indulging in yourself.

The convenience of this recipe is another reason it stands out. With just a few ingredients, you can whip up a delightful batch of cookies in under 30 minutes. Whether you’re baking for a loved one or wanting to treat yourself, this quick recipe fits seamlessly into any schedule. Moreover, the heart shape adds a special touch that transforms an ordinary treat into a heartfelt gift.

Nutritionally, while indulging in chocolate chip cookies is a treat, using quality ingredients allows for a better balance. You can enjoy the nostalgia of homemade cookies while knowing you’re using fresh ingredients without additives or preservatives often found in store-bought versions.

Socially, these cookies are ideal for gatherings and events. They spark conversations about baking, nostalgia, and love, making them a wonderful addition to any Valentine’s Day party or get-together. Sharing these cookies can also create memorable moments with loved ones as you bond over baking or enjoying your treats together.

Finally, the cost-effectiveness of this recipe makes it appealing. With basic ingredients commonly found in your pantry, you can create an impressive and tasty dessert without breaking the bank. This encourages creativity in the kitchen and allows you to personalize your cookies with different mix-ins or toppings.

Historical Background and Cultural Significance

The origin of cookies can be traced back to ancient times, with variations found in many cultures. However, the American chocolate chip cookie is believed to have been invented in the 1930s by Ruth Wakefield, who created the delicious treat using a chocolate bar broken into pieces. Since then, chocolate chip cookies have evolved into a beloved dessert worldwide.

Culturally, cookies symbolize warmth, love, and comfort, often associated with family gatherings and celebrations. Sharing cookies, especially homemade ones, signifies affection and thoughtfulness, making them an integral part of celebrations like Valentine’s Day. The act of baking for someone can also express deep feelings and personal connections.

Over the years, the chocolate chip cookie has inspired countless variations, from different types of chocolate to unique mix-ins, showing its adaptability over time. This evolution has led to the heart-shaped addition for special occasions, highlighting the significance of love and care in these treats.

Different regions often interpret cookies in their local context; for instance, adding nuts in the U.S. or incorporating spices in other cultures signifies a blend of traditions from different culinary backgrounds.

Ingredient Deep Dive

Flour is the backbone of the cookie, providing structure. Historically, flour has been a staple in many cultures, serving as a basis for countless recipes. Nutritionally, flour contains carbohydrates and fiber, offering energy and sustaining fullness. When selecting flour, look for all-purpose flour for versatility, and consider storing it in a cool, dry place to maintain freshness. If you need alternatives, gluten-free flour blends can work well for those with dietary restrictions.

Brown sugar adds depth and moisture to the cookies, contributing to their chewy texture. Its history dates back to early sugar production, embodying the rich flavors associated with caramelization. In terms of nutrition, brown sugar contains trace minerals like calcium and potassium. When choosing, always opt for fresh, moistened sugar to prevent clumping. If unavailable, a mix of white sugar with molasses can serve as an effective substitution.

Butter brings richness and flavor to the cookies. Its importance stretches back to traditional European baking, often symbolizing comfort in various recipes. Butter contains fats that create tenderness and enhance flavor. Always opt for unsalted butter for baking precision, and store it in the refrigerator for freshness. In case of a dairy-free diet, coconut oil or vegan butter can provide a suitable alternative.

Chocolate chips are the star of the show, melting beautifully into the cookie dough. They originated in the U.S. in the 1930s and have become a hallmark of baking everywhere. Chocolate offers antioxidants and a bit of caffeine, adding to the cookie’s appeal. When selecting chocolate chips, consider high-quality brands for better melting and flavor. If desired, chunks of dark chocolate can enhance the taste experience.

Common Mistakes to Avoid

  • Overmixing the dough can result in tough cookies. Mix only until ingredients are combined to maintain a soft texture.
  • Using cold butter straight from the fridge may hinder the creaming process, leading to denser cookies. Let it soften at room temperature for optimal results.
  • Measuring flour incorrectly can lead to dry or dense cookies. Always spoon flour into the measuring cup and level it off for accuracy.
  • Baking cookies on a warm baking sheet can cause them to spread too much, resulting in flat cookies. Ensure sheets are cool before placing dough on them.
  • Skipping chilling the dough can affect the final texture; chilled dough prevents excessive spreading and contributes to chewy cookies.
  • Not preheating the oven impacts the overall baking time and texture, so always wait until it’s hot before starting your batch.
  • Using high-quality chocolate chips is crucial; low-quality chips may not melt properly or create the desired flavor.
  • Not spacing out the cookies on the baking sheet can lead to them merging together; leave adequate space for spreading.
  • Ignoring the cooling time can lead to overbaked cookies; allow them to rest on the sheet before transferring to a wire rack.
  • Lastly, underestimating the power of freshness—always use fresh ingredients, as old flour and expired chocolate can ruin your cookies.

Essential Techniques

Creasing the butter and sugar is crucial for texture; it incorporates air into the mix, helping create a light and fluffy cookie. To master this technique, use room temperature butter and a hand mixer. Be cautious not to over-cream, aiming to achieve a pale color and fluffy consistency. Look for a slight increase in volume as a cue for success.

Chilling the dough is vital for improving flavor and texture. Allowing the dough to rest in the refrigerator lets the flour hydrate and the flavors meld. This ensures the cookies maintain their shape during baking. A good rule of thumb is to chill for at least 30 minutes. Check for slight firmness as a visual indicator that the process is working.

Pro Tips for Perfect Perfect Heart-Shaped Chocolate Chip Cookies

When baking these cookies, always start with room temperature ingredients for better blending and smoother dough. Remember to cool your baking sheets between batches to prevent spreading and maintain cookie shape. For added flavor, experiment with different types of chocolate chips or mix in nuts. To enhance the heart shape, press a few extra chocolate chips on top before baking. For a gourmet touch, sprinkle sea salt on top after baking to contrast the sweetness. Always use parchment paper to ensure easy cleanup and prevent sticking.

Variations and Adaptations

For regional variations, try adding spices such as cinnamon or nutmeg, which infuse warmth into your cookies. Seasonal adaptations can include adding peppermint extract during the winter months for a festive twist. For those with dietary requirements, consider creating gluten-free cookies using almond or coconut flour. You can also adjust the sweetness by experimenting with dark chocolate, or for texture modifications, try adding oatmeal to the dough. For presentation, consider dusting with powdered sugar or drizzling melted chocolate over the cooled cookies.

Serving and Presentation Guide

When serving your heart-shaped cookies, consider using decorative plates or a tiered cake stand to create an attractive display. Garnishing with fresh berries or edible flowers can add a romantic touch. Traditional accompaniments like milk or tea pair well, while modern suggestions might include pairing with ice cream for a dessert sandwich. Serve at room temperature, as this allows for the best texture and flavor. When serving at parties, cut cookies into smaller portions for sharing and allow guests to enjoy without feeling too indulgent.

Wine and Beverage Pairing

For wine pairings, consider a rich, fruity red like Pinot Noir to complement the sweetness and chocolate well. If you prefer non-alcoholic options, a raspberry infused sparkling water would enhance the romantic feel while providing refreshing contrast. For coffee lovers, opt for espresso or a mocha-flavored beverage, enhancing the chocolate richness. Always serve these beverages chilled or at room temperature, allowing the flavors to shine alongside your cookies.

Storage and Shelf Life

To store your cookies, keep them in an airtight container at room temperature to maintain freshness for up to one week. For longer storage, consider freezing them. Place cookies in a single layer in a freezer-safe bag, removing air before sealing. Signs of spoilage include a stale smell or dry texture. Reheating cookies in a microwave for 10-15 seconds can revive their softness; however, avoid excess heat as this can lead to further drying.

Make Ahead Strategies

To better manage your baking, prepare the dough up to 48 hours in advance and refrigerate it until ready to shape and bake. Allow it to soften slightly before rolling out for heart shapes. After baking, cookies freeze well, maintaining flavor and texture; simply defrost at room temperature before serving. If using frosting or glaze, consider applying it just before serving to preserve the presentation and flavor freshness.

Scaling Instructions

If you need to half the recipe, adjust each ingredient proportionally, while keeping an eye on baking time to ensure perfect cookies. When doubling or tripling, ensure you use larger mixing bowls and baking sheets to accommodate larger batches. Keep cooking times consistent but monitor closely, as larger quantities may require additional cooking time. Consider the size of your kitchen equipment and make spacing adjustments as necessary to avoid overcrowding during baking.

Nutritional Deep Dive

These **Perfect Heart-Shaped Chocolate Chip Cookies** offer a delightful treat while also providing some nutritional benefits. Each serving delivers a macro balance of carbohydrates from the sugar and flour, protein from the eggs, and fats from the butter and chocolate. Understanding the micronutrient content, these cookies contain small amounts of calcium and iron, offering some health value despite being a dessert. Consuming in moderation is key to enjoying treats like these while managing weight and health, allowing you to savor each bite.

Dietary Adaptations

For gluten-free adaptations, use almond flour instead of all-purpose flour or a gluten-free blend to achieve the desired texture. Dairy-free versions can be created using coconut oil and dairy-free chocolate chips, enhancing flavor while meeting dietary restrictions. Vegan cookies can be made by substituting egg with flaxseed meal or applesauce, yielding a slightly different texture while still being delicious. For those on low-carb or keto diets, consider using almond flour and sugar alternatives like erythritol. Always test the texture and flavor of adaptations to ensure satisfaction.

Troubleshooting Guide

If your cookies turn out flat, ensure your butter is at room temperature; if it’s too soft, it can lead to spreading. If the texture is too dry, consider reducing the flour measure slightly or adding a touch more butter. Flavor imbalances typically come from insufficient sugar or vanilla; adjust these in future iterations to achieve richer flavor. If your cookies are overbaked, check the baking time consistently and remove them promptly when edges start to brown slightly. Lastly, if incorporating mix-ins, do so sparingly to avoid disrupting the dough’s structure.

Recipe Success Stories

Community feedback surrounding these cookies often reveals viewers’ enjoyment of their adorable heart shape and wonderful flavor. Many share their variations, including adding nuts or dried fruit, enhancing their experience. Readers have suggested using unique ingredients like caramel chips or sea salt, resulting in exciting adaptations. Photography tips emphasize capturing the warm, gooey cookies as they come fresh from the oven, presenting the inviting melted chocolate as the star of the show.

Frequently Asked Questions

Can I use dark chocolate instead of semi-sweet? Absolutely! Dark chocolate adds a rich flavor and pairs beautifully with the sweetness of the cookie.

How should I store the cookies? Keep them in an airtight container at room temperature for up to a week. They can also be frozen for longer storage.

Can I freeze cookie dough? Yes, you can freeze the rolled dough. Just thaw it before baking for fresh cookies anytime.

What can I use instead of a heart-shaped cutter? A regular round cutter works well too, or you can shape them by hand for a rustic look!

How do I make them less sweet? Reduce the sugar slightly or use a dark chocolate with a higher cocoa percentage.

Can I make these cookies vegan? Yes, substitute with a flax egg, coconut oil, and dairy-free chocolate chips for a vegan-friendly option.

Is there a gluten-free option for this recipe? Yes, almond flour or a gluten-free all-purpose blend can be used as substitutes for regular flour.

How thick should the dough be when rolled out? Aim for about ¼-inch thickness for a chewy cookie; thinner may get too crispy.

How long should I cool the cookies after baking? Allow them to cool on the baking sheet for 5 minutes, then transfer to a wire rack to cool completely.

What if I don’t have chocolate chips? Chopped chocolate bars work great or any chunk-style chocolate can be substituted.

Can I add nuts to this recipe? Definitely! Chopped walnuts or pecans can enhance the texture and flavor.

Additional Resources

Explore related recipes that enhance your dessert table, such as classic sugar cookies or chewy oatmeal raisin cookies. Technique guides on how to best achieve the perfect cookie texture can further improve your baking skills. Ingredient information, particularly on quality chocolate, can guide your selections for future baking. Equipment recommendations for optimal outcomes, such as using non-stick baking sheets or silicone mats, will aid in cookie perfection. Seasonal variations, like adding spices during the holidays, also provide delightful twists.

Join the Conversation

We encourage you to share your experiences with these cookies on your social media platforms! Post your delicious results and tag us for a chance to be featured. Photography plays a significant role in this sharing—highlight the warmth and gooeyness in your photos for optimal appeal. Your reviews and suggestions not only help others but create an engaged community united by a love for baking and sharing delicious treats. Let’s celebrate creativity in the kitchen together!

The Recipe

Perfect Heart-Shaped Chocolate Chip Cookies

Serves: 12 cookies

Prep Time: 15 mins

Cook Time: 10 mins

Total Time: 25 mins

Kitchen Equipment Needed

  • Mixing bowl
  • Hand mixer or whisk
  • Heart-shaped cookie cutter
  • Baking sheets
  • Parchment paper
  • Cooling rack

Ingredients

  • 1 cup unsalted butter, softened
  • 3/4 cup brown sugar
  • 3/4 cup granulated sugar
  • 2 large eggs
  • 1 teaspoon vanilla extract
  • 2 1/4 cups all-purpose flour
  • 1 teaspoon baking soda
  • 1/2 teaspoon salt
  • 2 cups semi-sweet chocolate chips

Directions

  1. Preheat the oven to 350°F (175°C) and line baking sheets with parchment paper.
  2. In a mixing bowl, cream together the softened butter, brown sugar, and granulated sugar until light and fluffy.
  3. Add eggs one at a time, followed by vanilla extract; mix until well combined.
  4. In another bowl, whisk together flour, baking soda, and salt; gradually add to the wet ingredients.
  5. Fold in the chocolate chips until evenly distributed.
  6. Chill the dough for at least 30 minutes, then roll out to 1/4-inch thickness on a floured surface.
  7. Cut with a heart-shaped cookie cutter and place on the prepared baking sheets.
  8. Bake for 8-10 minutes or until edges are lightly golden. Let cool for a few minutes before transferring to a wire rack.

Recipe Notes

  • For softer cookies, slightly underbake.
  • Cookies can be stored in an airtight container for up to a week.
  • For a fun twist, try adding nuts or dried fruit.

Delightful Easy Strawberry Puff Pastry Hearts for Any Occasion

Easy Strawberry Puff Pastry Hearts: A Sweet Delight for Every Occasion

⚖️
Difficulty
Easy

⏲️
Prep Time
20 mins

🕒
Cook Time
15 mins

⏱️
Total Time
35 mins

🍽️
Servings
4

Indulge in the delightful taste of Easy Strawberry Puff Pastry Hearts, perfect for any occasion. Whether it’s a romantic evening, a festive celebration, or simply a sweet treat to brighten your day, these charming pastries are sure to steal the show. The flaky, buttery layers of puff pastry complement the fresh, vibrant strawberries, creating a beautiful balance of flavors that is simply irresistible. Each bite encapsulates the joys of spring, with its bright red fruit that bursts with sweetness, making them not just a treat for the palate but also a feast for the eyes.

The preparation process itself is a rewarding experience, as you watch the dough transform into heart-shaped wonders. With only a few ingredients required, including fresh strawberries and powdered sugar, you can create a gourmet dessert in the comfort of your home. The scent of baked pastry mingling with fruity sweetness will fill your kitchen, inviting everyone to gather around to enjoy these delicious creations.

Quick Recipe Highlights

  • Flavor Profile: Experience the luscious sweetness of ripe strawberries paired with the buttery richness of flaky pastry.
  • Texture: Enjoy a contrast between the light, crisp pastry and the juicy, tender strawberries bursting within each heart.
  • Aroma: The warm, inviting aroma of baked pastry combined with fresh fruit creates an atmosphere of comfort.
  • Visual Appeal: These heart-shaped pastries are adorned with a dusting of powdered sugar, making them a stunning centerpiece.
  • Skill Level Needed: This recipe is easy enough for beginners, requiring just basic pastry handling skills.
  • Special Equipment: You will need a rolling pin, a baking sheet, and a heart-shaped cookie cutter.

Recipe Overview

  • Difficulty Level: The Easy Strawberry Puff Pastry Hearts are simple to make, making them a fantastic option for novice bakers. The most technical aspect involves working with puff pastry, but with a little patience, you’ll master it.
  • Category: This dessert recipe falls under pastries and can be served as a dessert, snack, or even breakfast treat.
  • Cuisine: Inspired by European pastry traditions, these hearts blend classic puff pastry techniques with a fresh fruit twist.
  • Cost: The ingredients are relatively inexpensive, typically totaling around $10 for a batch adequately serving four people.
  • Season: Strawberry Puff Pastry Hearts are best enjoyed during strawberry season, bringing fresh flavor to your celebration.
  • Occasion: Perfect for Valentine’s Day, anniversaries, or any occasion where you want to express love and affection through delicious food.

Why You’ll Love This Recipe

The taste and texture of Easy Strawberry Puff Pastry Hearts are unmatched. The sweet, juicy strawberries melt in your mouth while the delicate, flaky pastry provides a satisfying crunch. When fresh strawberries are in season, their flavor becomes even more pronounced, elevating the overall dessert experience.

Convenience is another advantage of this recipe. With minimal preparation and cooking time, you can whip these up impressively fast, allowing you to spend more time enjoying the moment rather than stuck in the kitchen. This dessert is also an excellent opportunity for family involvement; kids can help cut out the hearts and sprinkle powdered sugar.

Nutritionally, strawberries are rich in vitamins, antioxidants, and dietary fiber, making these pastries a somewhat healthier indulgence. By using whole strawberries, you’re not only creating a delicious dessert but also adding a touch of wholesome nutrition.

Socially, Strawberry Puff Pastry Hearts are perfect for entertaining guests. They not only taste fantastic but also look beautiful on any table. Their eye-catching appearance adds an elegant touch to parties and gatherings, encouraging compliments from your friends and family.

Lastly, this recipe is cost-effective. With few ingredients and straightforward steps, you can create a delightful dessert without breaking the bank. It’s accessible for anyone, enabling even beginner bakers to create stunning results with ease.

Historical Background and Cultural Significance

The origin of puff pastry can be traced back to ancient Greece, where flatbreads were made layered with oils and fats. However, the modern puff pastry we know today was perfected in France during the Renaissance. This technique involves repeatedly folding and rolling the dough to create multiple layers, resulting in the signature flakiness.

Culturally, pastries have held a special place in many traditions across the world. In France, for example, pastries are not just desserts but a significant aspect of their culinary identity. The incorporation of fruits, such as strawberries, into pastries symbolizes the celebration of spring and harvest.

Over time, the Easy Strawberry Puff Pastry Hearts have evolved from a classic dessert to a beloved treat among many cuisines. Chefs and home cooks alike have embraced the simplicity of puff pastry, allowing for creative variations that feature seasonal fruits.

Regional adaptations of this dessert are also common, with countries across Europe putting their spin on fruit-filled pastries. The addition of spices, alternative fruits, or even chocolate showcases the flexibility of puff pastry in diverse culinary traditions.

Ingredient Deep Dive

Strawberries: Strawberries are not only delicious but also rich in nutrients. They are an excellent source of vitamin C, manganese, and folate. When selecting strawberries, look for bright red fruit with a shiny surface, as this indicates ripeness. They can be stored in the refrigerator in a breathable container to maintain freshness. Substituting with other berries, like raspberries or blueberries, can provide a delightful twist.

Puff Pastry: Puff pastry is a rich pastry dough made with layers of butter and dough folded together to create a light, flaky texture. The cultural significance of puff pastry extends back to European baking traditions, particularly in France. For best results, ensure your puff pastry is cold when baking. It can be found in frozen sections of supermarkets. If you prefer homemade, it can be prepared with time and patience.

Powdered Sugar: This delightful sugar is used to sweeten and beautifully dust pastries. Beyond its aesthetic appeal, powdered sugar is often used in frostings for added texture. It can be made by blending granulated sugar finely or purchased readily available. Proper storage in an airtight container keeps it dry and clump-free.

Common Mistakes to Avoid

  • Not Preheating the Oven: Proper oven temperature is crucial for puff pastry to rise correctly. Always preheat your oven to the required temperature before baking.
  • Using Warm Dough: Puff pastry needs to be cold when working and baking. If the dough warms up, it won’t create the desired flakiness and puffiness.
  • Overworking the Dough: While you may be tempted to knead the dough, too much handling can lead to tough pastries instead of light, flaky ones.
  • Skipping Egg Wash: An egg wash gives your pastries a beautiful golden color and glossy finish. Don’t skip this important step for visual appeal.
  • Choosing Unripe Strawberries: Always select ripe, bright red strawberries for the best flavor. Unripe berries can result in a dull taste.
  • Having Inconsistent Puff Pastry Thickness: Rolling the pastry to different thicknesses can result in uneven baking; aim for uniform levels to ensure even cooking.
  • Not Allowing the Pastry to Chill: Chilling the pastry (especially after shaping) allows the layers to retain their integrity and rise properly.
  • Omitting the Powdered Sugar: This detail enhances the sweetness and visual appeal. A light dusting can take your pastries from ordinary to extraordinary.
  • Ignoring Storage Recommendations: After baking, store pastries in a cool, dry place to prevent them from becoming soggy.
  • Not Experimenting with Variations: While this recipe shines on its own, do not be afraid to try different fillings or flavorings to make it your own.

Essential Techniques

Rolling Out Puff Pastry: Rolling out puff pastry is crucial to achieve the right thickness. Aim for an even surface to ensure uniform baking. Mastering this technique involves light pressure and frequent turns to aid in achieving the right texture.

Using a Cookie Cutter: Perfecting the use of a cookie cutter ensures your pastries are neatly shaped. Gently press down without twisting to prevent the edges from sealing closed, which can inhibit puffing during baking.

Dusting with Powdered Sugar: Dusting pastries with powdered sugar is more than just appearance; it adds a light sweetness. Sift lightly from a height to create an even coating, avoiding clumps that can detract from visual appeal.

Creating Heart Shapes: Cutting heart shapes adds a romantic touch to your pastries. Press gently and reposition the cookie cutter as needed, ensuring a clean cut without tearing the dough. This technique is best done with chilled pastry for precise results.

Pro Tips for Perfect Easy Strawberry Puff Pastry Hearts

– Always keep your ingredients, especially the butter and dough, chilled until ready to use. This practice ensures maximum flakiness and layers.
– When it comes to strawberries, less is more. Avoid overfilling the pastries to prevent leaks while baking.
– Use fresh strawberries as much as possible for not only flavor but also to maintain the best texture and sweetness level in the finished product.
– Consider brushing with melted butter before adding the powdered sugar for a richer flavor and enhanced visual appeal in the finished pastry.
– If you want to enhance the flavor of the strawberries further, consider marinating them for a short time with a little sugar and lemon juice before using them in the recipe.
– To really impress, serve these pastries warm with a scoop of vanilla ice cream or a dollop of whipped cream.
– Experiment with jam or cream cheese as a base in addition to fresh strawberries for an unexpected twist.
– Chill the pastries for about 10 minutes after shaping before baking to help them maintain their shape while cooking.

Variations and Adaptations

The beauty of Easy Strawberry Puff Pastry Hearts is their adaptability to various flavors and fillings. Consider using other seasonal fruits, such as peaches or raspberries, to create delightful alternatives. For a more decadent touch, add a layer of chocolate or almond paste between the pastry and fruit for richness.

When adapting the recipe for special diets, try using gluten-free puff pastry to accommodate those with gluten sensitivities. You can also replace fresh fruits with high-quality fruit preserves for a more condensed flavor burst. For a heartier option, consider incorporating cream cheese or mascarpone to balance the sweetness of the strawberries.

During different seasons, you can swap out strawberries with other fresh fruits like blueberries in late summer or apples in the fall to give a seasonal twist to the recipe. For a unique presentation, consider glazing the top with a fruit syrup or drizzle for added color and flavor.

Serving and Presentation Guide

Plating your Easy Strawberry Puff Pastry Hearts beautifully can elevate the dining experience. Consider serving them on a simple white plate to highlight their color. A sprinkle of powdered sugar can enhance their appeal while keeping the design minimal.

Garnishing with a few fresh mint leaves adds a pop of green and a hint of freshness. A dollop of whipped cream or a scoop of ice cream beside the pastry can provide a gorgeous contrast. When presenting, arrange the pastries in a heart shape on the plate for a lovely touch.

For temperature considerations, serve these pastries warm for the best texture, as they tend to soften slightly upon cooling. Portion control is essential; ensure each serving is accompanied by the same number of hearts for a well-balanced presentation.

Wine and Beverage Pairing

Pairing drinks with Easy Strawberry Puff Pastry Hearts can enhance the overall taste experience. A light, fruity white wine such as Moscato or Prosecco complements the sweetness of the strawberries and the flaky pastry. Their bubbly nature works seamlessly with the lightness of the dish.

If you prefer non-alcoholic alternatives, consider sparkling water with a hint of raspberry for a refreshing marriage with the dessert. A sweet tea with hints of lemon also creates a delightful pairing that complements the strawberries nicely.

For coffee enthusiasts, a mild latte or cappuccino would harmonize well, balancing the sweetness while complementing the pastry’s buttery notes. Always serve beverages slightly chilled for wines or warm for coffees to create an inviting atmosphere for your guests.

Storage and Shelf Life

Proper storage is key to preserving the quality of your Easy Strawberry Puff Pastry Hearts. Ideally, enjoy these pastries fresh; however, if you need to store them, place them in an airtight container in the fridge for about 1-2 days.

For extended shelf life, consider freezing them before baking. This method allows you to pop them in the oven directly from the freezer for about 10-15 minutes longer, resulting in freshly baked pastries on-demand. When reheating, avoid the microwave, as it can make the pastry soggy—opt for an oven instead.

Signs of spoilage include a change in texture, a comprehensive softening, or the emergence of an off smell. Always check pastries for freshness before consumption to ensure a delightful experience.

Make Ahead Strategies

To make your life easier, consider preparing the pastry hearts ahead of time. You can cut the pastry, fill it with strawberries, and assemble your hearts, then place them in the refrigerator for up to a few hours before baking. This readiness can be particularly helpful for parties or special gatherings.

Another strategy is to prepare the strawberries by slicing and mixing them with sugar in advance, letting them sit for a bit to develop their juices. This step not only enhances flavor but also shortens the final preparation time.

When making ahead, be mindful of the final bake time, as you may need to adjust based on whether they have been chilled before baking. Allow about 10-15 minutes extra for baking if they start from a refrigerated state rather than room temperature.

Scaling Instructions

Scaling the Easy Strawberry Puff Pastry Hearts recipe is straightforward. If you want to halve the recipe, simply adjust the amount of each ingredient accordingly—this works well for smaller gatherings or a trial run.

To double or triple the recipe, ensure you have an adequately sized workspace and plan for more baking trays. Stagger your baking sessions if your oven space is limited, to maintain quality and ensure even cooking.

When scaling, also consider timing modifications for preparation—ensure you have enough time to assemble and chill, especially when doubling the recipe. Proper storage containers are necessary to adequately store any finds, especially if you opt to freeze extra pastries.

Nutritional Deep Dive

Analyzing the health benefits of Easy Strawberry Puff Pastry Hearts reveals several nutritional advantages. Strawberries, with their high vitamin C content, play an essential role in immune support and skin health. They also provide essential antioxidants that combat free radicals.

The puff pastry contributes energy through carbohydrates, and when prepared with butter, it adds a small amount of healthy fats. Balancing the portion sizes is crucial, as the high butter content can increase the caloric density of the dish.

To assess dietary considerations, be mindful of portions if monitoring caloric intake. You can enjoy this dessert without consuming excessive calories by serving smaller hearts or pairing them with lighter accompaniments such as yogurt or fresh fruit.

Dietary Adaptations

For those following gluten-free diets, using gluten-free puff pastry allows everyone to enjoy Easy Strawberry Puff Pastry Hearts. Ensure that the other ingredients, such as strawberries and powdered sugar, are also gluten-free certified.

Dairy-free alternatives can be incorporated by using plant-based butter for the puff pastry, while almond or coconut yogurt can substitute layers or be served alongside the heart.

For vegan options, replace traditional puff pastry with a vegan type and use a plant-based sweetener, keeping the overall preparation delicious and suitable for various dietary preferences.

Low-carb adaptations might include using almond flour puff pastry, coupled with sugar substitutes to keep the sweetness level balanced.

Troubleshooting Guide

Some common texture issues arise when the puff pastry doesn’t puff up. Ensure your dough is cold and your oven is properly preheated. If there’s a lack of rising, check for over-kneading or rolling too thinly.

Flavor balances might require adjustments. If the strawberries are too tart, increase sugar slightly or opt for a sweeter alternative. Conversely, a bit of lemon juice can enhance sweetness if the dessert is overly rich.

If you encounter temperature problems, ensure that your oven thermometer is accurate. If pastries bake unevenly, rotate the baking tray halfway through the baking process for even heat distribution.

For ingredient substitutions, be cautious—some ingredients interact differently during baking. Always test with less impact on the final result whenever you experiment with replacements or modifications.

Recipe Success Stories

Readers have shared wonderful feedback about their experiences with Easy Strawberry Puff Pastry Hearts. Many found that experimenting with various fillings transformed this simple dessert into a unique family favorite. Recipes shared included variations with chocolate ganache or fresh mint, further enhancing the flavor profile.

Community feedback often mentions how fulfilling and enjoyable it is to make these pastries as a family. Parents note how their kids love to help cut and assemble the hearts, providing a delightful bonding activity while teaching essential baking skills.

Several readers have successfully adapted the recipe for gluten-free or vegan diets, showcasing how this recipe can cater to diverse guests without losing the essence of the dish.

Photographers have reported capturing stunning shots of their pastry creations, highlighting the bright colors and pretty presentation ideas that resonate on social media.

Frequently Asked Questions

Can I use frozen strawberries? Yes, while fresh strawberries are preferred, frozen strawberries can also work. Ensure they are well-drained before using to prevent excess moisture in the pastries.

How do I make puff pastry from scratch? Making puff pastry requires a bit more time and dedication. You will need flour, butter, water, and salt, repeatedly folded to create layers. There are many resources available for step-by-step methods.

Can I make these pastries ahead of time? Absolutely! You can prepare and fill the pastries a few hours in advance, storing them in the refrigerator until you are ready to bake.

How long do these pastries stay fresh? These pastries are best enjoyed within 1-2 days. Store any leftovers in an airtight container in the refrigerator.

What if my puff pastry is too soft to work with? If your dough is too soft, it may be warm. Chill it in the refrigerator for about 30 minutes, then try again.

Can I substitute different fruits in this recipe? Yes! Feel free to experiment with other fruits like blueberries, raspberries, or even peaches depending on seasonal availability.

Will these pastries freeze well? Yes, you can freeze unbaked pastries. Allow them to thaw slightly before baking, but they can go directly from the freezer to the oven with a slight increase in baking time.

What’s the best way to serve these pastries? Serve them warm, optionally topped with whipped cream or vanilla ice cream, for an indulgent treat!

Can I add spices to my fillings? Absolutely! Adding spices like cinnamon or nutmeg can enhance the flavor and offer a delightful twist on the traditional recipe.

Do I need to grease the baking pan? Generally, no; puff pastry releases its oils while baking and should prevent sticking. However, you can line with parchment paper for easier cleanup.

Additional Resources

For those interested in further exploring the world of pastries, consider checking out related recipes that highlight seasonal fruits and flavorful desserts. Technique guides on working with puff pastry can help refine your baking skills, from rolling to filling and folding.

Ingredient guides discussing the nuances of selecting fresh produce can enhance your cooking experience. Equip yourself with knowledge about kitchen tools ensuring you’re prepared for beautiful presentations and efficient baking processes.

Dive into seasonal variations to explore how different ingredients can yield exciting new recipes, adapting themes of this sweet treat throughout the year.

Join the Conversation

We encourage readers to share their experiences with Easy Strawberry Puff Pastry Hearts. Have you tried this recipe, or do you have a variation worth sharing? Comments and feedback not only enhance community interaction but also provide insight for future bakers.

Engagement on social media is also welcomed—don’t forget to tag your culinary creations! Share photos of your pastry masterpieces and inspire others to embrace the joy of baking. Your suggestions and stories are essential to enriching the shared culinary journey.

The Recipe

Easy Strawberry Puff Pastry Hearts

Serves: 4

Prep Time: 20 mins

Cook Time: 15 mins

Total Time: 35 mins

Kitchen Equipment Needed

  • Rolling pin
  • Baking sheet
  • Heart-shaped cookie cutter
  • Mixing bowl
  • Knife or pastry cutter

Ingredients

  • 1 sheet of puff pastry, thawed
  • 2 cups fresh strawberries, hulled and sliced
  • 2 tablespoons granulated sugar
  • Powdered sugar for dusting
  • 1 egg, beaten (for egg wash)

Directions

  1. Preheat your oven to 400°F (200°C).
  2. Roll out the puff pastry sheet to about 1/8-inch thickness on a floured surface.
  3. Using a heart-shaped cookie cutter, cut out hearts from the pastry and place them on a baking sheet lined with parchment paper.
  4. In a bowl, mix the sliced strawberries with granulated sugar and let sit for about 10 minutes.
  5. Place a small amount of the strawberry mixture in the center of half of the cut-out hearts.
  6. Brush the edges of the hearts with the beaten egg for sealing.
  7. Top with the remaining heart cutouts and press to seal the edges.
  8. Brush the top of the pastries with egg wash and make a small slit in each to allow steam to escape.
  9. Bake in the preheated oven for 15 minutes or until golden brown.
  10. Once baked, allow to cool slightly, then dust with powdered sugar before serving.

Recipe Notes

  • Substitute strawberries with other berries for a different flavor profile.
  • Option to add cream cheese for a richer filling!
  • Enjoy them warm, or serve them at room temperature.

Irresistible Sweet Potato Pie Bars for Festive Holiday Celebrations

Best Sweet Potato Pie Bars – Perfect for Holiday Desserts

⚖️
Difficulty
Easy

⏲️
Prep Time
20 mins

🕒
Cook Time
45 mins

⏱️
Total Time
65 mins

🍽️
Servings
12 bars

Sweet potato pie bars combine the warmth of fall flavors with the ease of a bar dessert, making them perfect for holiday gatherings. These delightful treats feature a creamy sweet potato filling wrapped in a tender, buttery crust. As you bite into these bars, you’ll savor the sweet, spiced notes of cinnamon, nutmeg, and a dash of vanilla, creating a sensation that feels like a cozy, festive hug. The combination of textures is incredibly satisfying, as the soft filling contrasts with the crisp crust.

Why not elevate your holiday dessert table? These sweet potato pie bars are visually stunning, showcasing vibrant orange hues that are reminiscent of autumn leaves. Not only do they taste amazing, but they also present beautifully, making them an excellent choice for parties. With minimal preparation, you can whip these up in no time, leaving plenty of space for you to enjoy the festivities.

Quick Recipe Highlights

  • Flavor Profile: Sweet and spiced, with rich notes from sweet potatoes and warm spices.
  • Texture: A perfect contrast between soft, creamy filling and a buttery, flaky crust.
  • Aroma: Inviting scents of sweet potatoes, cinnamon, and nutmeg fill the air as they bake.
  • Visual Appeal: Bright orange filling with a golden crust makes each bar tempting and festive.
  • Skill Level Needed: Perfect for beginners; easy steps ensure success for everyone.
  • Special Equipment: Only a baking pan and mixing bowl needed for this straightforward recipe.

Recipe Overview

  • Difficulty Level: These bars are easy to make, featuring simple steps that anyone can follow.
  • Category: Perfect for desserts, these bars fit effortlessly into holiday meals.
  • Cuisine: While rooted in American traditions, variations can reflect Southern culinary influences.
  • Cost: Generally inexpensive; sweet potatoes and pantry staples won’t break the bank.
  • Season: Ideal during the fall and winter months, showcasing seasonal favorites.
  • Occasion: Perfect for Thanksgiving, Christmas, or any festive gathering that calls for dessert.

Why You’ll Love This Recipe

When you sink your teeth into these sweet potato pie bars, you’ll instantly appreciate the warmth and familiarity of home baking. The creamy filling, made from the freshest sweet potatoes, offers a delightful sweetness balanced with warming spices that evoke the holiday spirit. You get the joy of a pie without the fuss of traditional crust making, allowing you more time to enjoy with family and friends.

Preparing these bars is a breeze, with straightforward instructions that lend themselves to novice bakers. Just mix, layer, and bake. You can even involve the kids or your friends in the process, sharing laughter and stories as the delicious aroma fills your kitchen. They come together quickly, leaving you ample time for festivities or even just to relax after the hustle of meal prep.

Nutritionally, sweet potatoes are a fantastic choice. They are rich in vitamins A and C, as well as fiber, making these bars somewhat wholesome despite being a treat. You can enjoy them with a bit less guilt, knowing that they contain ingredients that offer health benefits alongside sweetness.

These sweet potato pie bars don’t just fill your plate; they also bring people together. Imagine hosting a gathering where everyone raves about your dessert and asks for the recipe—a sure sign of success. Their festive look and the delightful flavors create lasting memories around the table.

Not to mention, they are cost-effective, providing a crowd-pleasing dessert that won’t dominate your holiday budget. Sweet potatoes are affordable and widely available, making this recipe accessible for everyone. Enjoy a delicious treat without overspending while still impressing your guests.

Historical Background and Cultural Significance

Sweet potatoes have been a part of American cuisine for centuries, originating from Native American diets. Early settlers learned cooking methods from indigenous peoples, leading to the beloved sweet potato pie becoming a staple in Southern households. Over time, the simple ingredients evolved into a festive centerpiece often saved for special occasions, particularly during the fall and winter holidays.

In various cultures, sweet potatoes represent prosperity and comfort. They’ve been featured in celebrations and harvest festivals worldwide, symbolizing abundance and gratitude. The adaptation of these ingredients into desserts like pie bars reflects the blending of culinary traditions and community values.

This beloved recipe has continued to evolve. Variants of sweet potato desserts showcase regional influences—from maple syrup in New England to spices found in Southern cooking. The contemporary adaptation of these flavors into bar form presents a practical and delicious option for holiday gatherings.

Throughout the years, sweet potato pie has undergone numerous transformations, yet those who cherish the traditional recipes often find joy in recreating them in modern forms, like sweet potato pie bars. Each version reflects a rich heritage of flavors and techniques passed down through generations.

Ingredient Deep Dive

Sweet potatoes are the star of this recipe and have an interesting history. Native to Central and South America, they have spread across the globe, becoming a dietary staple in many cultures. Their bright orange flesh is not just visually appealing but also rich in beta-carotene and antioxidants, contributing to better vision and skin health.

When selecting sweet potatoes, look for firm, smooth ones without blemishes; this ensures the best flavor and texture. Store them in a cool, dark place, away from sunlight, to prolong their freshness. If you have leftovers, sweet potatoes can last for weeks if stored correctly. You can puree leftover sweet potatoes for use in soups, pancakes, or even smoothies.

The second key ingredient is the pie crust, which serves as the comforting blanket for the sweet potato filling. Traditional pie crusts offer a buttery taste and flaky texture that compliments the creamy filling well. Homemade crust can be significantly better than store-bought, but if you’re short on time, high-quality prepared crusts can also yield delicious results.

If you opt to make your own, chill your butter before blending to ensure the right flakiness. Remember that an undercooked crust will be soggy; check for a golden brown color. For storage, keep it in the fridge if not using immediately, and consider pre-baking it if you need to assemble ahead of time.

Common Mistakes to Avoid

  • Overcooking the sweet potatoes can lead to watery filling. Instead, steam or bake until fork-tender, allowing for better flavor.
  • Neglecting to chill the pie crust can result in a tough texture. Always refrigerate before rolling out for the best results.
  • Using canned sweet potato puree when fresh is available may compromise flavor. Fresh sweet potatoes offer a richer taste.
  • Skipping the spices can make your bars bland. Remember, spices are essential for enhancing the sweet potato’s natural flavor.
  • Not allowing the bars to cool completely will result in messy slices. Patience is key to perfect presentation.
  • Using low-quality ingredients can affect the final taste. Opt for high-quality butter and fresh spices for best results.
  • Cutting the bars too soon will make them fall apart. Let them set up properly to maintain structural integrity.
  • Underestimating the need for measurements can lead to unexpected results. Accurate measuring can significantly affect the outcome.

Essential Techniques

One of the essential techniques in making these sweet potato pie bars is properly cooking the sweet potatoes. This step is crucial because it greatly impacts the flavor and texture of the filling. The best method is to bake or steam them until tender, allowing sugars to develop, which enhances sweetness. A common pitfall is overcooking, which can introduce excess moisture—using a fork to test for doneness will help you achieve the best results.

Another key technique is ensuring your pie crust is properly prepared. Chilling the dough helps create that desired flaky texture. When rolling out, flour your surface adequately to prevent sticking. A common error is using warm butter, which can make the dough tough. Instead, ensure your butter is cold and mix it just until combined to maintain the finest texture. Look for a dough that holds together but isn’t sticky for the best outcome.

Pro Tips for Perfect Sweet Potato Pie Bars

Start with fresh sweet potatoes for maximum flavor; their natural sweetness is unmatched compared to canned alternatives. Toasting your spices briefly before adding them can also enhance their flavor.

Chilling your pie crust for at least 30 minutes before baking can ensure a perfect texture; don’t rush this step. When preparing the filling, blend until smooth and avoid overmixing to prevent air bubbles.

Using parchment paper to line your baking pan makes lifting out the bars easy for cutting and serving. Always let your bars cool thoroughly in the pan to achieve clean slices when serving.

Incorporating a pinch of salt into your filling can help balance sweetness; this makes flavors pop even more. If you want a creamier texture, add a little heavy cream to your filling—just don’t overdo it.

Always taste your filling before pouring it into the crust; this step ensures the flavor is to your liking before baking. Finally, make a large batch; these bars store well, and you’ll be glad to have extras for snacking!

Variations and Adaptations

For a classic take, try substituting half the sweet potatoes with pumpkin to create a rich, spiced bar that’s irresistible. Seasonal adaptations, such as adding cranberry sauce alongside the filling, can provide an eye-catching contrast and additional tartness.

If you want to cater to dietary restrictions, consider swapping traditional crust with gluten-free options made from almond or coconut flour. This allows even more people to enjoy the deliciousness. You can also make them dairy-free by using coconut oil in the crust and substituting with coconut cream in the filling.

Flavor variations can include adding maple syrup for a sweeter profile or adjusting spice levels depending on taste preference. You could also experiment with texture by adding finely chopped nuts into the crust or topping for extra crunch. For something truly unique, consider drizzling with a caramel sauce before serving for added sweetness.

Serving and Presentation Guide

For a stunning presentation, serve your sweet potato pie bars on a decorative platter, garnished with a sprinkle of cinnamon and a dollop of whipped cream. Cut them into uniform pieces to ensure a neat look, and consider utilizing colored parchment paper for an added festive touch.

Plating can be elevated by placing a bar on individual dessert plates, accompanied by a small spoonful of spiced yogurt or whipped cream on the side. This not only enhances presentation but also provides a creamy complement to the bars.

Serving temperature is essential; these bars are best enjoyed at room temperature or slightly chilled. If you’re serving them later in the day, keep them covered to prevent drying. For portion control, particularly during parties, consider cutting them into smaller squares for guests to enjoy without overindulging.

Wine and Beverage Pairing

Wine pairings for sweet potato pie bars can enhance the overall dining experience. A well-chilled Riesling or a late-harvest Chardonnay complements the sweetness of the bars beautifully, balancing richness with acidity.

For a non-alcoholic option, consider spiced apple cider; the warm spices will echo flavors in the bars while offering a comforting drink. Additionally, a vanilla-infused latte pairs splendidly, adding creaminess that matches dessert without overwhelming it.

Always serve these beverages at appropriate temperatures—white wines chilled, and warm beverages steaming hot—to create the best tasting experience.

Storage and Shelf Life

To ensure your sweet potato pie bars stay fresh, store them in an airtight container at room temperature for up to three days. If you want to extend their shelf life, consider refrigerating them, where they can keep for up to a week.

Keep an eye on the signs of spoilage; look for changes in texture or any unusual odors. To reheat, place bars in the oven at a low temperature until warmed through, as microwaving may lead to a soggy texture.

For longer storage, freeze the bars by wrapping them tightly in plastic wrap and then aluminum foil, which can last up to three months in the freezer. Let them thaw overnight in the refrigerator when you’re ready to enjoy again.

Make Ahead Strategies

To prepare these sweet potato pie bars ahead of time, you can make the crust a day in advance and refrigerate it. Once you’re ready to bake, simply roll it out and follow the rest of the recipe instructions.

You can also prepare the sweet potato filling in advance. Store it in an airtight container in the fridge until you’re ready to assemble and bake. This allows for minimal last-minute effort on the day of an event.

Consider baking the bars early in the week for an event and storing them properly, allowing the flavors to meld even better over time. Just remember to bring them to room temperature before serving for the best taste.

Scaling Instructions

If you want to halve the recipe, simply divide the ingredients accordingly and use a smaller baking pan. Keep an eye on cooking time, as baking smaller batches may require less time.

To double or triple the recipe, use a larger pan and ensure an even layer of filling. Adjust the baking time as needed, ensuring to monitor for doneness with a toothpick or knife in the center.

Increased quantity may require rotating the pan halfway through baking to ensure even cooking. Always check for doneness regularly, especially when scaling up.

Nutritional Deep Dive

Sweet potato pie bars can provide a well-rounded macro breakdown, featuring carbohydrates from the sweet potatoes and the crust, beneficial fats from butter, and some protein as well.

Micronutrient analysis shows these bars can be rich in vitamins A and C, crucial for immune function and skin health. The fiber content from sweet potatoes also contributes positively to digestive health and can aid in weight management.

However, portion control is essential. While they are a more nutritious treat compared to others, moderation is key for maintaining a balanced diet. Enjoy their sweetness, but be mindful of your overall intake.

Dietary Adaptations

For those who need a gluten-free option, substitute the traditional pie crust with almond or gluten-free flour for your crust. This will provide the necessary foundation without compromising flavor.

If you’re vegan, swap butter with coconut oil and use plant-based alternatives for cream in the filling. Additionally, there are options to make them dairy-free by omitting any cream and replacing it with almond milk or similar.

Keto dieters can reduce the sweeteners or use a sugar substitute in the filling to align with their dietary preferences, while still allowing for a delicious dessert experience. Each adaptation allows for diverse dietary needs to be met while enjoying the comfort of sweet potato pie bars.

Troubleshooting Guide

If your bars turn out too dry, it may be a result of overbaking; make sure to check for doneness at the lower end of the baking time. Additionally, ensure that you’re using fresh sweet potatoes for moisture.

If you notice a bland flavor, it’s often due to inadequate seasoning; don’t shy away from adding enough spices. Remember, sweet potatoes can dominate, so enhance surrounding flavors boldly.

Temperature issues arise often—bars that are too warm might not hold their shape. Always allow them to cool completely before slicing. For crust issues, ensure you’re chilling the dough adequately to avoid tough textures.

Ingredient substitutions can also present challenges. When swapping syrups or sweeteners, adjust quantities, as they may vary in sweetness, which can impact the final flavor.

Recipe Success Stories

Many bakers have praised these sweet potato pie bars for their ease of preparation as well as their delightful taste. From family gatherings to potlucks, they’ve become a requested favorite among friends and family alike.

One memorable adaptation involved adding chocolate chips to the filling, which resulted in rave reviews; this version is now a beloved variation shared within many circles. Readers have shared their thoughts on how easy they are to modify, making them versatile for many occasions.

Photography tips for showcasing these bars highlight their stunning color—consider using natural lighting and simple backgrounds to let their richness shine. Attendees at events have even noted how the bars encouraged conversations about traditional recipes and adaptations, further enriching the experience.

Frequently Asked Questions

Can I use canned sweet potatoes instead of fresh?
Absolutely! However, fresh sweet potatoes provide a better texture and flavor. If you use canned, ensure to drain them well to avoid excess moisture.

Can I freeze sweet potato pie bars?
Yes, they freeze well for up to three months. Wrap them tightly in plastic wrap and then foil before freezing for optimal freshness.

How do I prevent the crust from getting soggy?
Pre-bake the crust for a few minutes before adding the filling. This method helps create a barrier that prevents moisture from soaking the crust.

What can I substitute for butter in the recipe?
You can use coconut oil or vegan butter as a substitute for a dairy-free or vegan alternative. Just ensure it’s solid when mixing.

How do I store leftover sweet potato pie bars?
They should be stored in an airtight container at room temperature for up to three days or in the refrigerator for up to a week.

Can I make these bars ahead of time?
Yes, you can prepare the filling and crust a day in advance, keeping them in the refrigerator and combining them right before baking for freshness.

What spices can I add for more flavor?
Cinnamon, nutmeg, and ginger are classic choices. You can also get creative with allspice or cardamom for an exciting twist.

Do these bars need to be served warm?
They are delicious at room temperature, making them perfect for serving ahead of time at gatherings.

Can I double the recipe?
Yes, doubling the recipe is straightforward—just ensure to use a larger baking pan and adjust the baking time as necessary.

How can I make these bars gluten-free?
Substitute the all-purpose flour in the crust with a gluten-free flour blend, and ensure all other ingredients are free of gluten.

Additional Resources

For those eager to explore more, check out other delicious dessert recipes that highlight seasonal ingredients. Techniques like crust-making can also be learned from various guides available online. Explore ingredient information for sweet potatoes to deepen your understanding, along with recommendations for high-quality kitchen equipment for successful baking.

Join the Conversation

We encourage you to share your experiences with this recipe on social media. Remember to include your personal photography tips, as well as any adaptations you’ve attempted. Engage with our community by sharing your variations and join us in celebrating the diverse ways to enjoy sweet potato pie bars!

The Recipe

Best Sweet Potato Pie Bars

Serves: 12 bars

Prep Time: 20 mins

Cook Time: 45 mins

Total Time: 65 mins

Kitchen Equipment Needed

  • 9×13-inch baking pan
  • Mixing bowl
  • Food processor or blender
  • Whisk
  • Knife for cutting
  • Measuring cups and spoons

Ingredients

  • 2 cups mashed sweet potatoes (cooked and cooled)
  • 1 cup brown sugar
  • 3 large eggs
  • 1/2 cup heavy cream
  • 1 tsp vanilla extract
  • 1/2 tsp nutmeg
  • 1 tsp cinnamon
  • 1/4 tsp salt
  • 1/2 cup melted butter
  • 1 pie crust (homemade or store-bought)

Directions

  1. Preheat your oven to 350°F (175°C).
  2. Prepare the pie crust by pressing it into the bottom of the baking pan and pre-baking for 10 minutes.
  3. In a large bowl, combine the mashed sweet potatoes, brown sugar, eggs, cream, vanilla, nutmeg, cinnamon, and salt, mixing until smooth.
  4. Pour the sweet potato filling into the pre-baked crust, spreading evenly.
  5. Bake for 45 minutes or until the filling is set in the center.
  6. Remove from the oven and allow to cool before cutting into bars.

Recipe Notes

  • For a richer flavor, consider adding a tablespoon of maple syrup to the filling.
  • Ensure the sweet potatoes are fully cooked and cooled before mashing for best texture.
  • These bars can also be topped with candied pecans for added crunch.

Delicious No-Bake Oreo Mud Pie Recipe for Any Occasion

Easy No-Bake Oreo Mud Pie – A Decadent Delight for Every Occasion

⚖️
Difficulty
Easy

⏲️
Prep Time
20 mins

🕒
Cook Time
0 mins

⏱️
Total Time
20 mins

🍽️
Servings
8 servings

Indulging in a slice of Easy No-Bake Oreo Mud Pie is akin to diving into a cloud of creamy chocolate bliss. This dessert is an effortless masterpiece, bringing together rich chocolate, sweet cream, and that iconic Oreo cookie crunch in each bite. If you’re looking for a crowd-pleasing dessert that doesn’t require turning on the oven, then this recipe is perfect for you. It’s quick to assemble and requires only a few ingredients, making it ideal for any occasion, from casual family dinners to elegant parties.

As you prepare to delight your guests, imagine the satisfaction on their faces as they taste this luscious creation. The layers of crushed Oreos, creamy filling, and whipped topping meld together into a decadent treat that is sure to be the highlight of any gathering. The versatility of this pie allows you to serve it at birthdays, holidays, or simply when you crave something sweet. The simplicity of the no-bake method ensures that you spend less time in the kitchen and more time enjoying life.

Quick Recipe Highlights

  • Flavor Profile: This dessert boasts a perfect balance of sweetness and chocolatey goodness, amplified by the rich flavor of cream.
  • Texture: The contrast of smooth, creamy filling with the crunchy Oreos creates a delightful mouthfeel.
  • Aroma: The irresistible aroma of chocolate and vanilla wafts through the air as this pie sets in the fridge.
  • Visual Appeal: Plated up with a dollop of whipped cream and a sprinkle of crushed Oreos, this pie is as visually enticing as it is delicious.
  • Skill Level Needed: No prior baking experience is required, making it accessible to all home cooks.
  • Special Equipment: You’ll need a mixing bowl, a pie dish, and a hand mixer to whip the cream.

Recipe Overview

  • Difficulty Level: This Easy No-Bake Oreo Mud Pie is uncomplicated, making it a great beginner-friendly dessert.
  • Category: It falls under the dessert category, often enjoyed at the end of a hearty meal.
  • Cuisine: This recipe draws inspiration from American dessert traditions, where no-bake pies are a hit.
  • Cost: The ingredient cost is modest, mainly involving cookies, cream cheese, and whipped topping.
  • Season: Perfect for all seasons, though it’s particularly refreshing in warmer months.
  • Occasion: Ideal for any occasion, from family dinners to festive celebrations.

Why You’ll Love This Recipe

This Easy No-Bake Oreo Mud Pie thrills the taste buds with its rich, chocolatey flavor and smooth, creamy texture. With every slice, you are met with a satisfying crunch from the layered Oreo crust, perfectly complemented by the sweet filling. The layers not only add depth to the flavor but also create an exciting contrast between the rich and light attributes of the pie.

One of the most appealing aspects of this dessert is the convenience it offers. With minimal preparation and chilling time, busy home cooks can craft an impressive treat without spending hours in the kitchen. This no-bake recipe requires no special techniques—just mix and chill. It’s perfect for those unexpected guests or last-minute gatherings.

Nutritionally, while this pie may not be a health food, it can be enjoyed in moderation. The key ingredients can provide a quick energy boost due to the sugar content and the delightful taste can satisfy sweet cravings, making it a fun treat now and then in a balanced diet.

Hosting friends or family becomes a more enjoyable experience when you have delightful desserts like Oreo Mud Pie on the table. The visual appeal and deliciousness are perfect conversation starters, making your dessert a centerpiece of enjoyment and sharing among loved ones.

Finally, the accessibility of this recipe is a significant advantage. With ingredients easily found at grocery stores and no extensive cooking knowledge required, anyone can bring the joy of homemade desserts to their table, enhancing their culinary repertoire without complexity.

Historical Background and Cultural Significance

The origins of pie-making date back centuries, with variations being produced across cultures. In the United States, no-bake desserts evolved in response to the needs of busy families looking for quick and satisfying treats. The combination of Oreos in dessert recipes became popular in the late 20th century, gaining a loyal following every year.

Culturally, Oreo cookies themselves have become an iconic American brand, and their integration into recipes reflects the love for innovative dessert-making. This no-bake Oreo Mud Pie celebrates both the indulgent creamy flavors and the nostalgia associated with a beloved cookie, making it a unique contribution to American dessert culture.

Over time, recipes like Oreo Mud Pie have adapted to include various ingredients or methods, reflecting flavor preferences and dietary needs. The evolution from traditional baked pies to simplified no-bake versions marks a shift toward convenience in home cooking.

Regional variations often include additional elements, such as peanut butter, caramel, or extra toppings, showcasing the versatility of this dessert. Each adaptation retains the essence of the original while adding unique twists from localized tastes and trends.

Ingredient Deep Dive

  • Oreo Cookies: These widely loved cookies are known for their unique chocolate flavor and creamy filling. Historically, Oreos have been a staple in American households since their introduction in 1912, symbolizing comfort and indulgence. Nutritionally, they contain sugar, cocoa, and fats, making them a treat best enjoyed in moderation. When selecting Oreos, look for those with fresh cream filling. Store in a cool, dry place to maintain crispness. Substitutions can include gluten-free chocolate cookies or homemade cookie options.
  • Cream Cheese: The key to a silky filling, cream cheese has its roots in the United States since the late 19th century. It adds richness and a slight tanginess balancing the sweetness of the pie. This ingredient is a good source of protein and calcium. Choose full-fat cream cheese for the best texture and flavor. It should be stored in the refrigerator and used within a couple of weeks after opening. Alternatives like mascarpone or Greek yogurt provide lighter options.
  • Whipped Topping: This fluffy, sweet topping adds a luxurious finish to the pie. It became popular in the mid-20th century with the advent of convenience foods. While it serves primarily as a decorative element, it also lightens the texture of the dessert. Look for options with minimal additives. Store unopened containers in the fridge, using them within a week after opening. Homemade whipped cream is a delightful alternative, adding natural flavor without preservatives.

Common Mistakes to Avoid

  • Overmixing the Filling: Overmixing can lead to a grainy texture in the filling. Mix just until combined for a smooth result.
  • Skipping the Chilling Time: Not chilling the pie long enough results in a less-set texture. It’s essential to let it cool adequately.
  • Using Stale Cookies: Old Oreos can compromise the flavor and texture of the crust. Always use fresh ingredients for the best results.
  • Uneven Assembly: Layering the pie unevenly can cause it to fall apart. Ensure a consistent distribution of layers for stability.
  • Improper Measuring: Not measuring ingredients correctly can affect the balance of flavors and textures. Use precise measurements for success.
  • Choosing Low-Quality Toppings: Subpar whipped topping can impact the flavor. Choose high-quality products for the best experience.
  • Forgetting to Pipe Decoratively: An unappealing presentation can detract from the dessert. Take time to make it visually attractive with garnishes.
  • Leaving it at Room Temperature: It’s essential to store the pie in the refrigerator to prevent spoilage. Always keep it chilled when not serving.

Essential Techniques

  • Mixing Ingredients: This technique is crucial for achieving a creamy filling. Use a hand mixer at low speed to blend, gradually increasing speed until just combined to avoid overmixing.
  • Chilling the Pie: Proper chilling time is vital to set the pie correctly. Allow it to chill for at least four hours to ensure it holds its shape when sliced.
  • Layering: This technique involves carefully adding each component in order. Start with the crust, then the cream layer, and finish with toppings, ensuring thorough coverage is key.
  • Garnishing: The final touch for presentation. Use a piping bag for whipped cream or crushed Oreos to enhance the visual appeal of the dessert.

Pro Tips for Perfect Easy No-Bake Oreo Mud Pie

  • Use a food processor to crush Oreos quickly and uniformly for the crust.
  • Let cream cheese soften at room temperature for easier mixing and smoother texture.
  • Experiment with different flavored whipped toppings to elevate the taste.
  • Chill the pie overnight for a more developed flavor and firmer setting.
  • Top with chocolate shavings or drizzled chocolate for an elegant look.
  • Incorporate layers of fudge or caramel sauce between the cream layers for added richness.
  • Always taste the filling before adding it to the crust to adjust sweetness.
  • Make mini versions in cupcake liners for individual servings.

Variations and Adaptations

  • Seasonal Adaptations: In summer, consider adding fresh berries to the filling or as a topping to enhance flavors and freshness.
  • Dairy-Free Option: Use dairy-free cream cheese and whipped topping to accommodate those with lactose intolerance or vegan preferences.
  • Flavor Variations: Swap Oreos for other cookies, such as chocolate mint or peanut butter cookies, to change the flavor profile.
  • Texture Modifications: Add crushed nuts or chocolate chips to the crust for an interesting crunch and flavor contrast.
  • Regional Variations: In some regions, adding a layer of fruit preserves can enhance the pie’s sweetness without overwhelming it.
  • Presentation Alternatives: Serve in glasses as a layered dessert for a modern twist that showcases the beautiful layers.

Serving and Presentation Guide

  • Plating Techniques: Opt for a beautiful pie dish that complements the pie’s visual appeal and serves slices neatly.
  • Garnishing Ideas: Fresh fruit, mint leaves, or chocolate curls can enhance the aesthetic charm and elegance of the pie.
  • Traditional Accompaniments: Pair with a scoop of vanilla ice cream for a classic dessert combination.
  • Modern Serving Suggestions: Serve in clear cups to showcase the layers while making it easy for guests to help themselves.
  • Temperature Considerations: Ensure the pie is thoroughly chilled before serving for the best texture.
  • Portion Control Tips: Use a sharp knife dipped in hot water for clean slices, ensuring each serving is visually appealing.

Wine and Beverage Pairing

  • Wine Pairings: A rich port or sweet dessert wine pairs beautifully with the chocolate and cream flavors.
  • Non-Alcoholic Alternatives: Offer a chilled chocolate milk or mocha iced coffee for a decadent, complementary drink.
  • Coffee/Tea Pairings: Pair with a rich espresso, which sharpens the pie’s sweetness and complements its chocolatey components.
  • Temperature Considerations: Ensure beverages are served chilled alongside the pie to enhance the overall experience.
  • Serving Suggestions: Present paired beverages alongside the pie for a cohesive dessert offering that tempts the palate.

Storage and Shelf Life

  • Store leftovers in the refrigerator covered with plastic wrap; it will keep for 3-5 days while maintaining quality.
  • Airtight containers can also help preserve freshness, but check for spoilage signs such as off odors or discoloration.
  • For freezing, slice before placing in a freezer-safe container, ensuring layers are separated with parchment paper to prevent sticking.
  • When reheating any toppings or added layers, use the microwave in small intervals to avoid overheating.
  • Thaw frozen portions in the refrigerator overnight for best texture and flavor retention.

Make Ahead Strategies

  • Prepare the crust and filling a day ahead to allow flavors to meld together, enhancing overall taste.
  • Store each component separately if possible to ensure optimal freshness, then assemble right before serving.
  • Feel free to prepare the pie the night before, ensuring it’s fully chilled prior to serving for optimal texture.
  • Consider waiting to add delicate toppings until just before serving to keep them looking fresh.
  • Assess any garnishes that could be added last-minute, like fresh fruit or chocolate drizzle for an elegant touch.

Scaling Instructions

  • Halving the recipe works well if you’re looking for a smaller serving without compromising flavor.
  • To double or triple, consider using larger baking dishes or multiple pans, ensuring even layering.
  • Equipment adjustments may be needed for larger quantities, such as bigger mixing bowls or more powerful mixers.
  • Timing modifications for chilling shouldn’t change; however, monitoring may be necessary to ensure proper set.
  • Store any additional pie in a suitable manner, ensuring it’s sealed tightly to prevent freezer burn during freezing.

Nutritional Deep Dive

  • Macro breakdown reveals a balance of carbohydrates from the Oreos, fats from cream, and protein from cream cheese.
  • Micronutrient analysis shows contributions of calcium and iron, yet it’s essential to enjoy in moderation due to high sugar and fat content.
  • The dessert’s health benefits include satisfaction from a treat that can curb cravings when portion-controlled.
  • Dietary considerations should be made for those with allergies or dietary restrictions, adjusting ingredients as needed.
  • Portion analysis helps manage intake, with slices suitable for satisfying sweet cravings without overindulgence.
  • For weight management, smaller portions can help enjoy the dessert without exceeding daily caloric intake.

Dietary Adaptations

  • Gluten-free: Choose gluten-free Oreo alternatives to craft a delicious treat without gluten.
  • Dairy-free: Use non-dairy cream cheese and whipped topping to satisfy dairy-free needs without sacrificing flavor.
  • Vegan: Swap in plant-based ingredients for a fully vegan-friendly pie that remains indulgent.
  • Low-carb: Substitute with keto-friendly cookies to create a lower carb version of this beloved dessert.
  • Keto: Use sweeteners like erythritol to assist with maintaining a ketogenic lifestyle without missing out.
  • Paleo: Consider using nuts and natural sweeteners for a paleo-compliant version of the mud pie.
  • Low-FODMAP: Ensure ingredients are selected carefully; gluten-free and lactose-free components support this diet.
  • Other specific diets: Variations exist to cater specifically to those with nut allergies or other dietary needs.

Troubleshooting Guide

  • Texture issues often arise from overmixing; keep mixing to a minimum once the filling ingredients are combined.
  • Flavor balance can be adjusted by tweaking sugar content or incorporating additional flavors like vanilla or espresso.
  • Temperature problems can stem from improper chilling; ensure the pie maintains consistent refrigeration throughout.
  • Equipment challenges may surface with mixers; use the correct attachment for desired textures and thickness in fillings.
  • Ingredient substitutions that alter final taste need adjustment; taste and adjust as necessary for balance.
  • Timing concerns can often be resolved by preparing ahead, ensuring you are organized and ready before gatherings.

Recipe Success Stories

  • Readers have shared heartwarming feedback about their experiences making this recipe for family gatherings.
  • Some creative adaptations have led to unique versions of this mud pie that inspired further variations.
  • Photographers have suggested tips for capturing the vibrant layers visually, enhancing social media sharing.
  • Success stories often involve how families come together to enjoy this simple but impressive dessert, making it memorable.

Frequently Asked Questions

Q1: Can I use homemade whipped cream instead of store-bought?

Absolutely! Homemade whipped cream adds a fresher taste and can be sweetened to your liking, enhancing flavor as well.

Q2: How long does the pie need to set?

For optimal texture, it’s best to let the pie set in the fridge for at least four hours and preferably overnight.

Q3: What should I do if I can’t find Oreos?

You can substitute Oreos with similar chocolate sandwich cookies or make your own chocolate cookie crust from scratch.

Q4: Can I freeze the Oreo Mud Pie?

Yes! You can freeze the pie for up to two months. Thaw it overnight in the refrigerator before serving.

Q5: How should I store leftovers?

Cover the pie tightly with plastic wrap and store it in the fridge for up to 5 days for the best freshness.

Q6: Is it necessary to use cream cheese?

Cream cheese is essential for the creamy filling, but you can also use mascarpone or a non-dairy cream cheese alternative for a different flavor.

Q7: Can I add other flavors to the filling?

Certainly! You can mix in flavors like peanut butter, mint, or even espresso powder for added depth to your pie.

Q8: How can I make this recipe gluten-free?

Use gluten-free Oreo cookies or any suitable gluten-free alternative to maintain the flavor profile.

Q9: What toppings work well with this pie?

Crushed Oreos, chocolate shavings, or even fresh berries work beautifully to enhance both the flavor and presentation.

Q10: Is it okay to let the pie sit out before serving?

For best results, keep the pie refrigerated until just before serving to ensure it retains its structure and taste.

Additional Resources

  • Check out other no-bake dessert recipes for quick and delightful ideas that thrill the senses.
  • Explore technique guides on whipping cream and making homemade toppings for enhanced culinary skills.
  • Learn more about the nutritional benefits of key ingredients used in this pie for a healthier approach.
  • Equip yourself with recommendations for essential kitchen tools needed to simplify dessert preparation.
  • Discover seasonal variations to keep your culinary repertoire exciting throughout the year.

Join the Conversation

  • Share your version of the recipe on social media to inspire others to create their own Easy No-Bake Oreo Mud Pie.
  • Capture your creations with beautiful photographs and connect with our community through comments and reactions.
  • Provide feedback or suggestions based on your experience to help others refine their recipes.
  • Engage with fellow enthusiasts to discuss variations and personal twists you’ve added to this classic dessert.

The Recipe

Easy No-Bake Oreo Mud Pie

Serves: 8 servings

Prep Time: 20 mins

Cook Time: 0 mins

Total Time: 20 mins

Kitchen Equipment Needed

  • Mixing bowl
  • Pie dish
  • Hand mixer or stand mixer
  • Spatula
  • Measuring cups and spoons

Ingredients

  • 24 Oreo cookies, crushed
  • 1/4 cup unsalted butter, melted
  • 8 oz cream cheese, softened
  • 1 cup powdered sugar
  • 1 cup whipped topping (Cool Whip)
  • Additional crushed Oreos for topping

Directions

  1. In a mixing bowl, combine crushed Oreos and melted butter. Press mixture into the bottom of a pie dish to form the crust.
  2. In a separate bowl, beat together the cream cheese and powdered sugar until smooth and well combined.
  3. Gently fold in the whipped topping until fully incorporated, creating a creamy filling.
  4. Spread the filling evenly over the Oreo crust, smoothing it out with a spatula.
  5. Top the pie with additional crushed Oreos for garnish.
  6. Cover and refrigerate for at least four hours or overnight before serving.
  7. Slice and enjoy your delicious Easy No-Bake Oreo Mud Pie!

Recipe Notes

  • Feel free to add variations by incorporating other flavors, such as mint or peanut butter.
  • Store leftover slices in the refrigerator, covered tightly for up to five days.
  • This pie can also be frozen for up to two months. Thaw in the fridge before serving.

Delicious High-Protein Cheesecake Recipe for Healthy Indulgence

High-Protein Cheesecake: A Deliciously Healthy Indulgence

⚖️
Difficulty
Moderate

⏲️
Prep Time
20 mins

🕒
Cook Time
50 mins

⏱️
Total Time
70 mins

🍽️
Servings
8 servings

Cheesecake lovers rejoice! This High-Protein Cheesecake not only satisfies your sweet tooth but also packs a nutritious punch. Imagine a creamy, luscious texture balanced perfectly by a subtle sweetness that doesn’t overwhelm. Each bite is a delightful blend of silky cheese and a hint of vanilla, making it the perfect guilt-free dessert. Ideal for health enthusiasts or anyone looking to enjoy a delicious treat while maintaining a balanced diet, this cheesecake is a must-try.

The appeal doesn’t stop at flavor; the nutritional benefits are equally impressive. With a higher protein content than traditional cheesecake, this recipe supports muscle growth and recovery, making it an excellent post-workout treat. Every slice is rich in taste while being lower in sugar and calories, allowing you to indulge without compromising your health goals.

Quick Recipe Highlights

  • Flavor Profile: This cheesecake features a balanced sweetness complemented by a rich vanilla undertone.
  • Texture: The creamy base contrasts beautifully with a slightly crunchy crust, creating a satisfying mouthfeel.
  • Aroma: The inviting scent of baked vanilla combined with hints of buttery crust fills your kitchen.
  • Visual Appeal: A beautifully set cheesecake with a golden crust and smooth surface, often topped with fresh berries.
  • Skill Level Needed: Moderate—requires careful mixing and baking techniques for best results.
  • Special Equipment: A springform pan and a food processor are essential for creating the perfect texture.

Recipe Overview

  • Difficulty Level: While this cheesecake takes some preparation, it is accessible to home bakers who’ve handled basic baking techniques before.
  • Category: Ideal as a dessert or sweet snack, perfect for casual family dinners or special occasions.
  • Cuisine: This High-Protein Cheesecake draws inspiration from classic American desserts with a modern twist, emphasizing health-conscious ingredients.
  • Cost: Overall, this recipe is economical, with most ingredients being pantry staples, making it budget-friendly.
  • Season: This cheesecake is suitable year-round, but it pairs especially well with fresh summer fruits for seasonal flair.
  • Occasion: A delightful centerpiece for birthdays, holidays, or simply as a sweet way to celebrate any day.

Why You’ll Love This Recipe

The flavor and texture of this High-Protein Cheesecake are incredibly appealing. With each bite, you experience the creamy sweetness complemented by a crunchy crust. It’s a dessert that feels indulgent while being packed with nutrition. Rich in protein, it supports energy levels and muscle retention, making it a preferred choice for those with active lifestyles.

Convenience is another key advantage of this cheesecake. With straightforward steps and minimal prep time, it’s an approachable dessert that anyone can whip up. The ingredients are common, and the tools are standard, making it easy for cooks of all levels to create this delicious dish.

When it comes to nutrition, this cheesecake wins hands down. The high-protein content helps satisfy hunger and provides essential nutrients without the excess calories found in conventional desserts. It’s a great way to meet dietary needs while enjoying a treat.

Social gatherings are also an opportunity to shine with this dessert. It’s a crowd-pleaser that fits perfectly in any social setting, whether you’re serving family or friends. Sharing a slice often elicits compliments and questions about the recipe, creating memorable moments.

Lastly, the cost efficiency of this High-Protein Cheesecake is noteworthy. Most ingredients are affordable and widely available, making it an accessible option for anyone looking to craft a nutritious dessert without breaking the bank.

Historical Background and Cultural Significance

The origin of cheesecake dates back to ancient Greece, where it was served to athletes at the first Olympic Games. With over two thousand years of history, this dessert has evolved across cultures, adapting to local tastes and preferences. The incorporation of protein-rich ingredients in this High-Protein Cheesecake reflects modern dietary trends and an increased focus on health.

Culturally, cheesecake symbolizes celebration and indulgence. It’s often featured at birthdays, weddings, and holidays, representing a shared experience of joy. The evolution of cheesecake recipes mirrors changes in dietary habits and culinary innovations, adapting to include lighter, healthier options while maintaining its beloved status.

Over time, regional variations of cheesecake emerged, from the rich New York-style version to the lighter, mousse-like Italian counterpart. This High-Protein Cheesecake can be considered a modern interpretation that caters to health-conscious eaters, combining the essence of traditional recipes with contemporary nutritional needs.

The cultural significance also extends to the way cheesecakes are showcased at events. They have become a favorite dessert globally, symbolizing not only celebration but also the creativity involved in culinary arts. This High-Protein Cheesecake continues this tradition, offering a delightful, nutritious option that resonates with today’s health-focused cuisine.

Ingredient Deep Dive

The primary ingredient in this High-Protein Cheesecake is cream cheese, a staple in many dessert recipes throughout the globe. Its creamy texture and mild flavor contribute significantly to the dessert’s overall richness. Historically, cream cheese dates back to the 1700s, and it has become a key player in the world of cheesecakes. Nutritionally, it’s a source of calcium and provides healthy fats that can contribute to a balanced diet. When selecting cream cheese, look for brands that prioritize quality and freshness. Proper storage means keeping it refrigerated and consumed by the expiration date.

Greek yogurt is another powerhouse ingredient in this recipe. Known for its creamy mouthfeel, Greek yogurt is higher in protein compared to regular yogurt. It has gained popularity due to its versatility and health benefits, including probiotics that promote gut health. Opt for plain, unsweetened varieties to maintain low sugar content. Store it in a tightly sealed container to prolong freshness, and it can also be a fantastic substitute for sour cream in various dishes.

Lastly, the base ingredients for the crust usually include a combination of oats or almond flour, and sweeteners like honey or maple syrup. These ingredients not only add flavor and texture but also lend nutritional benefits such as fiber and healthy fats. When selecting the oats or flours, ensure they are organic and free from additives. Store these dry ingredients in a cool, dry place to maintain their quality, and they can be modified to cater to gluten-free diets by using almond flour or gluten-free oats.

Common Mistakes to Avoid

  • Overmixing the Batter: This can introduce too much air, leading to cracks during baking.
  • Not Softening Cream Cheese: Ensure it’s at room temperature; otherwise, you’ll get lumps in the batter.
  • Baking at Too High a Temperature: This can cause the cheesecake to crack; stick to a lower setting for even cooking.
  • Skipping the Water Bath: Using a water bath prevents the top from overcooking while the center remains undercooked.
  • Not Cooling Gradually: A sudden temperature change can cause cracks, so allow it to cool slowly in the oven.
  • Ignoring Storage Instructions: Improper storage can lead to spoilage; always refrigerate after cooking.
  • Cutting Too Soon: Cheesecake needs time to set after baking; cutting it too early can ruin the texture.
  • Using Sweeteners Recklessly: Balance sweeteners to avoid overpowering natural flavors; taste as you go.
  • Not Adjusting for Altitude: In high-altitude areas, additional adjustments in cooking times may be needed.
  • Neglecting Optional Toppings: Don’t forget to add fresh fruits or sauces for added flavor and presentation.

Essential Techniques

One essential technique for perfecting this High-Protein Cheesecake is the water bath method. This technique is crucial because it helps regulate the temperature around the cheesecake while it bakes, preventing the edges from cooking too quickly. Mastering this technique involves wrapping your springform pan tightly in foil to prevent water seepage. The visual cue for success is a cheesecake that has puffed slightly in the middle but remains firm around the edges.

Another key technique is tempering the cream cheese. This involves allowing cream cheese to come to room temperature before mixing. This crucial step ensures a smooth, lump-free batter, which is vital for the overall texture of the cheesecake. To master this, simply take the cream cheese out of the refrigerator 30 minutes before starting. Visual cues for success include a smooth, creamy mixture with no lumps remaining after mixing.

Pro Tips for Perfect High-Protein Cheesecake

Start with room temperature ingredients to ensure a smooth batter.

For a rich flavor, consider adding a splash of vanilla or lemon zest to enhance the overall taste profile.

Use a high-speed blender to achieve a creamy consistency, especially if you are incorporating Greek yogurt.

Allow the cheesecake to cool slowly in the oven after baking to prevent cracks.

When cutting the cheesecake, use a warm knife to create clean slices.

Top your cheesecake with fresh fruits or berry sauces just before serving for a stunning presentation.

Consider chilling the cheesecake overnight for the best flavor development.

Experiment with different flavored extracts like almond or coconut for unique twists.

Variations and Adaptations

This High-Protein Cheesecake can be easily adapted to suit various preferences. For regional variations, you could add spices such as cinnamon or nutmeg for a warm touch, reminiscent of certain cultural desserts. Seasonal adaptations might include pumpkin puree or fresh apple slices during autumn, appealing to the fall palate.

For those with dietary restrictions, this recipe can be modified to be dairy-free by using vegan cream cheese alternatives. Similarly, for a low-carb version, substitute sweeteners and use almond or coconut flour for the crust.

Flavor variations are limitless—try adding cocoa powder to make a chocolate version or incorporate peanut butter for a nutty twist. Texture modifications might involve blending in chia seeds for a bit of crunch or folding in whipped egg whites for an airier finish.

Finally, presentation alternatives can include drizzling with chocolate ganache or serving individual mini cheesecakes in small jars, adding a modern flair to this classic dessert.

Serving and Presentation Guide

When it comes to serving your High-Protein Cheesecake, presentation is key. Consider using a clean, sharp knife to slice portions, ensuring each piece is neat. For garnishing, fresh fruits—such as strawberries or blueberries—add a pop of color and a hint of additional flavor, enhancing the visual appeal.

Plating techniques may include placing a slice on a decorative plate, drizzling with a fruit coulis, or adding a dollop of Greek yogurt to the side for a creamy touch. Traditional accompaniments like coffee or tea pair beautifully, providing a complementary flavor balance.

Modern serving suggestions can include individual servings in mason jars, which are not only visually appealing but also easy for guests to take home. Temperature considerations are essential; serve the cheesecake chilled for the best texture and flavor. Lastly, portion control is important—consider serving smaller slices if you’re entertaining many guests to ensure everyone can indulge without overdoing it.

Wine and Beverage Pairing

When pairing beverages with this High-Protein Cheesecake, a light dessert wine, such as a Moscato or Prosecco, works well, offering a sweet contrast without overwhelming flavors. If you prefer non-alcoholic options, consider serving a sparkling fruit juice or flavored iced tea, which complements the richness of the cheesecake.

Coffee enthusiasts may enjoy a cup of properly brewed espresso, as its robust flavor pairs beautifully with the creamy dessert. When serving coffee, consider presenting it at a slightly warm temperature, allowing it to be the perfect companion to your cheesecake.

Storage and Shelf Life

To store your High-Protein Cheesecake properly, ensure it’s kept refrigerated in an airtight container. This method will help maintain its creamy texture and delicious flavor. The cheesecake is best consumed within 5 to 7 days after baking, as it will stay fresh and tasty for this duration.

Should you need to store it longer, consider freezing it. Wrap the cheesecake tightly in plastic wrap followed by foil to prevent freezer burn. When ready to enjoy again, allow it to thaw in the refrigerator overnight for the best results. It’s essential to check for signs of spoilage before consuming; a change in texture or off smell indicates that it should be discarded.

Reheating the cheesecake is not recommended; rather, serve cold or at room temperature for the most enjoyable experience.

Make Ahead Strategies

Make ahead strategies for this High-Protein Cheesecake can greatly enhance your baking experience. Consider prepping the crust a day in advance and storing it in the refrigerator to streamline the assembly process. This saves time on the day of serving and allows the flavors to meld.

Once the cheesecake is baked, it’s best to chill it in the refrigerator for several hours or overnight. This cooling period helps it stabilize and improves the texture, making it easier to slice while enhancing the flavor profile.

If you plan to add fresh toppings, such as fruit or sauces, consider preparing those separately a few hours before serving to maintain their freshness. This approach ensures that your dessert looks and tastes its best when presented to guests.

Lastly, label any stored portions with the date, allowing you to manage your timing and enjoy it at its peak quality for tasty indulgence.

Scaling Instructions

If you wish to halve the High-Protein Cheesecake recipe, simply divide all ingredients by two and adjust the baking time as necessary. A smaller cheesecake may require slightly less time, so keep a close eye on it towards the end of the baking process.

To double or triple the recipe, ensure your mixing bowl is large enough to accommodate the increased volume, as this will affect how thoroughly the ingredients combine. Larger springform pans or multiple smaller ones can be used for batch preparation.

Timing modifications are also essential; larger cheesecakes will demand a longer cooking time compared to smaller counterparts. Use a toothpick to check for doneness, confirming it comes out clean from the center.

Finally, consider the storage space needed when scaling up your recipe. Larger batches will require more room in the refrigerator or freezer, so plan accordingly to avoid any clutter.

Nutritional Deep Dive

Looking at the macro breakdown, this High-Protein Cheesecake offers a balanced finish with substantial protein, healthy fats, and moderate carbohydrates. Each slice typically contains a higher protein content than standard cheesecake, courtesy of the Greek yogurt and cream cheese—providing about 15-20 grams of protein per serving, depending on your specific ingredients.

A micronutrient analysis reveals the beneficial minerals and vitamins present in this dessert. Calcium from the dairy ingredients supports strong bones, while yogurt contributes live cultures that are great for gut health.

The health benefits extend beyond simply being a tasty treat; the combination of protein and healthy fats can promote satiety, helping to reduce cravings between meals. This cheesecake can fit well within various dietary considerations where protein intake is prioritized.

When analyzing portions, it’s crucial to consider an appropriate serving size to manage caloric intake effectively, especially if weight management is a goal. Each slice should be enjoyed mindfully, contributing to overall nutrition when included in a balanced diet.

Dietary Adaptations

For gluten-free diners, this High-Protein Cheesecake can be made using gluten-free oats or almond flour in the crust, ensuring a delicious dessert without compromising dietary needs.

For those following a dairy-free lifestyle, a variety of plant-based cream cheese alternatives are available that can maintain the richness expected in cheesecake. Additionally, coconut yogurt can be used to substitute Greek yogurt without sacrificing flavor.

Vegans can enjoy this dessert by utilizing a combination of silken tofu and plant-based cream cheese, combined expertly to achieve the desired texture while adhering to vegan principles.

Low-carb and keto enthusiasts can modify the recipe further by using almond flour and opting for sugar substitutes like erythritol or monk fruit, ensuring their diet remains on track.

For paleo adherents, consider swapping in natural sweeteners like honey and using wholesome, nutrient-dense ingredients.

Lastly, if you’re following a low-FODMAP diet, focus on lactose-free ingredients to enjoy this delicious cheesecake without difficulties.

Troubleshooting Guide

If the texture of your High-Protein Cheesecake turns out grainy, it may be due to under-mixing or not allowing cream cheese to soften adequately. To remedy this, ensure cream cheese is at room temperature and integrate using a high-speed mixer until smooth.

Flavor balance can be an issue if the cheesecake tastes overly sweet or bland. To correct, adjust your sweeteners gradually, and add a pinch of sea salt to enhance the overall flavor profile.

Temperature problems often stem from inadequate cooling. A slow, gradual cooling process in the oven is essential to prevent cracks and promote an even texture throughout.

For those facing equipment challenges, ensure your baking equipment is properly calibrated. An oven thermometer can help verify temperatures and prevent discrepancies during baking time.

Ingredient substitutions also warrant attention; if swapping sweeteners or flours, small tweaks in measurement or baking time may be necessary to achieve optimal results.

Timing concerns can be a challenge when baking. Use an internal thermometer; your cheesecake should center at 150°F for optimal doneness.

Recipe Success Stories

Community feedback around this High-Protein Cheesecake has been overwhelmingly positive, with many praising its delicious taste and texture. Home bakers consistently express their delight at how easy it is to prepare while still impressing guests, encouraging others to try their hand at this recipe.

Variation successes often emerge in the comments, showcasing unique ingredient swaps and flavor additions. Readers frequently share their adaptations, whether it be incorporating chocolate chips or fruit purees, showing the versatility of this dessert.

As readers attempt the recipe, they provide valuable details through images and stories that enhance the community’s cooking experiences. Some offer up tips that have improved their baking, creating a supportive network of culinary exploration.

Photography tips often accompany success stories, with many showcasing their cheesecakes beautifully plated and decorated, emphasizing the aesthetic appeal that this dessert can bring to any table.

Ultimately, the dialogue around this High-Protein Cheesecake empowers individuals to experiment and celebrate their own baking journeys, inspiring newcomers and experienced bakers alike to create their own versions of this delightful treat.

Frequently Asked Questions

Can I use a different type of sweetener in this recipe?
Absolutely! You can substitute with agave syrup, maple syrup, or monk fruit sweetener according to your taste preferences. Just adjust the quantity based on the sweetness level.

How long does the cheesecake need to set before serving?
For the best flavor and texture, it’s advisable to chill the cheesecake overnight. If you’re in a hurry, a minimum of 4 hours is adequate.

Can I bake this cheesecake in a different type of pan?
While a springform pan is recommended for easy removal, you can use other pans like a glass baking dish; just be cautious while serving.

Is this cheesecake suitable for freezing?
Yes, this High-Protein Cheesecake can be frozen. Ensure it’s wrapped tightly to avoid freezer burn, and it will keep well for up to 2 months.

How do I know when my cheesecake is done?
The cheesecake should be set around the edges and have a slight jiggle in the center. An internal thermometer reading around 150°F indicates doneness.

What can I do if I don’t have Greek yogurt on hand?
While Greek yogurt enhances protein content, you can substitute it with sour cream or plain yogurt; however, the protein content will decrease.

Can I add protein powder to the cheesecake?
Yes! Adding a scoop of your preferred protein powder can enhance the protein content, but be mindful of adjusting other ingredients to maintain texture.

What toppings can I add to my High-Protein Cheesecake?
Fresh fruits, chocolate drizzle, or a dollop of Greek yogurt work well as toppings. Get creative with flavors that suit your palate!

Is it necessary to use a water bath while baking?
A water bath helps create a moist environment during baking, which can reduce the chances of the cheesecake cracking. However, if you’re short on time, you can skip it with careful baking.

Can I make this cheesecake dairy-free?
Yes, there are plant-based cream cheese options available that can maintain the desired creamy texture, and coconut yogurt could substitute Greek yogurt.

Additional Resources

If you’re intrigued by this High-Protein Cheesecake, consider exploring related recipes that keep nutrition and flavor in harmony. Delightful alternatives include protein-rich smoothies and healthy muffins.

For those eager to learn more about baking techniques, in-depth guides on handling different types of creams and secret tips for crust perfection can be found online. These resources help demystify the process and enhance your confidence in the kitchen.

Ingredient information is also crucial; familiarize yourself with the best brands for low-fat dairy and gluten-free options to achieve the best results in your cooking.

Finally, seasonal variations can provide inspiration, with recipes that adapt favorite ingredients for different times of the year, encouraging culinary exploration and fun in the kitchen.

Join the Conversation

We encourage you to share your experiences with the High-Protein Cheesecake! Your feedback on social media can inspire others, providing them with valuable insights and tips. Whether you take stunning photos of your cheesecake or have fun adaptation stories, we would love to see and hear about your culinary journey.

Joining conversations around recipe reviews creates a community of engaged foodies rallying together to share their love for healthier desserts. Feel free to comment and engage on blog posts, fostering connections with fellow baking enthusiasts as you explore variations and discoveries within this delightful recipe.

The Recipe

High-Protein Cheesecake

Serves: 8 servings

Prep Time: 20 mins

Cook Time: 50 mins

Total Time: 70 mins

Kitchen Equipment Needed

  • Springform pan
  • Food processor
  • Mixing bowl
  • Measuring cups and spoons
  • Spatula

Ingredients

  • 2 cups cream cheese, softened
  • 1 cup Greek yogurt
  • 1/2 cup honey or preferred sweetener
  • 3 large eggs
  • 1 teaspoon vanilla extract
  • 1 cup almond flour or gluten-free oats for crust
  • 1/4 cup melted coconut oil
  • 1/4 teaspoon salt

Directions

  1. Preheat your oven to 325°F (160°C).
  2. Grease the springform pan and set it aside.
  3. In a mixing bowl, combine almond flour and melted coconut oil to form the crust, then press it into the bottom of the pan.
  4. In a food processor, blend the softened cream cheese, Greek yogurt, honey, eggs, and vanilla until smooth and creamy.
  5. Pour the cheesecake filling over the prepared crust, smoothing the top with a spatula.
  6. Place the springform pan into a large baking dish and fill with hot water halfway up the sides of the springform pan (water bath).
  7. Bake for 50 minutes or until the center is set but slightly jiggly.
  8. Turn off the oven and leave the cheesecake inside to cool gradually for at least an hour.
  9. Once cooled, remove from the oven and chill in the refrigerator for at least 4 hours or overnight.
  10. Serve chilled with your choice of toppings.

Recipe Notes

  • For a chocolate version, add 1/4 cup of cocoa powder to the filling.
  • You can use different sweeteners according to your dietary preferences.
  • For best flavor, let the cheesecake sit overnight in the refrigerator before serving.

Deliciously Creamy Pink Hot Chocolate Recipe for Cozy Nights

Delightful Pink Hot Chocolate: A Sweet Treat for All Occasions

⚖️
Difficulty
Easy

⏲️
Prep Time
5 mins

🕒
Cook Time
10 mins

⏱️
Total Time
15 mins

🍽️
Servings
4

The delightful Pink Hot Chocolate is not just a drink; it’s an experience that pleases the senses. This luscious beverage combines the classic warmth of hot chocolate with a playful splash of pink, making it as visually captivating as it is delicious. With each sip, you will enjoy the rich flavors of creamy cocoa, complemented by a hint of sweetness from whipped cream and the light touch of strawberry or raspberry flavoring. This drink is perfect for cozy evenings, holiday gatherings, or simply as a delightful treat to brighten your day.

Imagine wrapping your hands around a warm mug, the aroma of melted chocolate mingling with gentle fruity notes wafting through the air. As you lift the mug, the vibrant pink color invites you in, making it impossible to resist indulging. The Pink Hot Chocolate is not only a feast for the palate but also a beautiful beverage that appeals to the eyes, promising smiles with every sip.

Quick Recipe Highlights

  • Flavor Profile: This drink features a perfect blend of rich chocolatey goodness with a hint of fruity sweetness, creating a harmonious flavor explosion.
  • Texture: Creamy and velvety, the Pink Hot Chocolate flows smoothly, enhanced by the lightness of whipped cream topping.
  • Aroma: A delightful, inviting aroma of warm cocoa combined with fruity accents fills the air, drawing everyone in.
  • Visual Appeal: The vibrant pink color, often topped with fluffy white whipped cream and colorful sprinkles, makes it a showstopper.
  • Skill Level Needed: This recipe is easy, making it perfect for novice cooks and children to join in the fun.
  • Special Equipment: All you need is a saucepan, a whisk, and your favorite mug to serve these delightful beverages.

Recipe Overview

  • Difficulty Level: The Pink Hot Chocolate is straightforward to make, requiring just a few simple steps that anyone can follow.
  • Category: A beloved choice, this drink belongs to the dessert or snack category, ideal for satisfying your sweet cravings.
  • Cuisine: Though rooted in traditional hot chocolate recipes, this drink draws inspiration from various cultures that embrace creativity in their beverages.
  • Cost: The ingredients for this delightful drink are cost-effective, making it an accessible treat for everyone.
  • Season: Perfect for winter and the holiday season, the Pink Hot Chocolate brings warmth and cheer during chilly months.
  • Occasion: Great for cozy nights, holiday parties, or brunch gatherings, it adds a festive touch to any occasion.

Why You’ll Love This Recipe

The Pink Hot Chocolate is an irresistible blend of sweetness and warmth that tantalizes your taste buds. Each serving delivers an enveloping sensation that makes you feel comforted and happy. The rich chocolate flavor is further enhanced by the delicate notes of berries, creating a drink that is both indulgent and refreshing. You can enjoy it on its own or pair it with your favorite pastry for an elevated treat.

Another advantage of this delightful recipe lies in its incredibly simple preparation. With just a few minutes and readily available ingredients, anyone can whip up a batch of Pink Hot Chocolate. This ease of preparation makes it an ideal choice for spontaneous gatherings or a cozy night in, ensuring that you can enjoy the delightful flavors without fuss.

Beyond its deliciousness, this drink offers a unique nutritional profile. Depending on your choice of ingredients, you can sneak in a bit of healthiness by using low-fat milk or substituting creamy toppings with healthier options. It’s a happy balance of indulgence and mindful eating.

When it comes to socializing, the Pink Hot Chocolate shines. Its vibrant color is a conversation starter, and serving it at parties creates an inviting atmosphere. Guests will appreciate the effort and creativity behind this sweet treat!

Moreover, the Pink Hot Chocolate is remarkably cost-effective. With basic pantry staples and a couple of flavorful additions, you’ll create a luxurious beverage that feels premium without breaking the bank. Its accessibility ensures that anyone can bring a touch of sweetness to their lives anytime.

Historical Background and Cultural Significance

The origins of hot chocolate date back to the ancient civilizations of Mesoamerica, where cacao was revered as a divine gift. This delightful beverage evolved from bitter drinks enjoyed by the Aztecs to the sweet chocolate we know today. The Pink Hot Chocolate, while a modern twist, still draws from these rich traditions, celebrating the cultural love of warm, comforting beverages.

In many cultures, chocolate drinks have been tied to celebrations and special occasions. Whether it’s a cold winter night or a festive gathering, hot chocolate has become a staple that brings people together. The addition of pink hues to this classic beverage adds a contemporary flair, appealing particularly to younger generations and festive parties.

As the Pink Hot Chocolate has gained popularity, it has sparked a variety of adaptations throughout different regions. The incorporation of fruit flavors reflects a broader trend in culinary experimentation while honoring traditional elements. This trend of adding berries is now common in many seasonal drink menus.

From cafes to home kitchens, this pink-tinted treat symbolizes joy and warmth. Every mug captures the essence of love, creativity, and sharing, which is at the heart of culinary traditions worldwide.

Ingredient Deep Dive

– Milk: A key ingredient in any hot chocolate, milk provides a creamy base that enhances flavor and texture. Choose whole, low-fat, or dairy alternatives based on your dietary preferences. Rich in calcium and vitamins, milk adds nutritional value to this decadent drink.

– Cocoa Powder: The heart of any hot chocolate, cocoa powder is where the intense chocolate flavor derives. Look for high-quality unsweetened cocoa powder to avoid excessive sugar. Cocoa is rich in antioxidants, making it a delightful treat that comes with added health benefits.

– Sugar: This sweetener balances the bitterness of cocoa, making the drink pleasant. You can adjust the sugar amount to personal taste, or opt for alternatives like honey or maple syrup for a unique flavor twist.

– Whipped Cream: A must-have topping, whipped cream adds a delightful, light texture to the hot chocolate. You can make homemade whipped cream or choose store-bought versions. For a lighter option, consider using coconut cream or a dairy-free whipped topping.

– Flavored Syrup: The choice of flavored syrups is what transforms traditional hot chocolate into a pink delight. Strawberry or raspberry syrup works beautifully. These enhance not only the flavor but also provide vibrant color, making every sip a treat for the senses.

Common Mistakes to Avoid

  • Using low-quality cocoa: Always opt for high-quality cocoa powder for the best flavor profile. Cheap varieties can taste chalky and overly sweet.
  • High heat: Heating milk too quickly can cause it to scorch. Always use low to medium heat and stir regularly to prevent burning.
  • Neglecting sweetness: Balancing sweetness is crucial. Taste as you go to achieve the perfect balance for your palate.
  • Skipping ingredients: Omitting key ingredients such as vanilla, flavor syrup, or whipped cream can result in a less enjoyable drink.
  • Cold milk: For a smoother texture, use milk at room temperature to prevent clumping when mixed with cocoa.
  • Poor mixing: To avoid lumps, dissolve cocoa powder in a small amount of heated milk before combining with the whole mixture.
  • Overheating whipped cream: If making homemade whipped cream, be mindful not to over-whip, which can turn it into butter.
  • Stale ingredients: Always check ingredient freshness; expired cocoa or syrup can compromise the flavor of your Pink Hot Chocolate.

Essential Techniques

– Stirring: Proper stirring ensures even mixing of cocoa and milk, preventing lumps. Use a whisk for best results, ensuring a smooth consistency throughout.

– Melting: Slowly melting high-quality chocolate into the mixture can enhance depth of flavor. Monitor temperature closely to avoid burning.

– Tasting: Regularly taste as you add sugar or syrup to make necessary adjustments, achieving the perfect level of sweetness for your preference.

Pro Tips for Perfect Pink Hot Chocolate

– Use high-quality cocoa for a richer chocolate flavor, enhancing the overall experience of your hot chocolate.
– Experiment with flavored syrups to create unique combinations; vanilla can complement chocolate beautifully.
– For an added indulgence, mix in a spoonful of peanut butter or Nutella for a twist.
– Top with colorful sprinkles or edible glitter to elevate the presentation for parties.
– Serve in clear mugs to showcase the vibrant color of your Pink Hot Chocolate.
– Consider using marshmallow fluff instead of whipped cream for a fun twist on the classic topping.
– Add a dash of cinnamon or nutmeg for a warm, spiced flavor.
– Offer various toppings on a serving station, letting guests customize their hot chocolate experience.

Variations and Adaptations

– Regional Variations: Different regions add their own twist. In Europe, spiced variants often include chili, while in the Americas, peppermint flavors are common during the holidays.
– Seasonal Adaptations: During summer, consider making a frozen version by adding crushed ice and blending for a refreshing treat.
– Dietary Modifications: For a vegan alternative, substitute dairy milk with almond or oat milk and use non-dairy whipped cream.
– Flavor Variations: Experiment with flavors like coconut, almond, or hazelnut syrup for exciting new takes on the classic.
– Texture Modifications: For a richer texture, blend in melted chocolate along with cocoa powder.
– Presentation Alternatives: Serve in mason jars with colorful straws for a rustic and appealing aesthetic.

Serving and Presentation Guide

When serving Pink Hot Chocolate, consider plating techniques that highlight its visual appeal. Use clear or vibrant mugs to showcase the pink color and the rich toppings. Garnish with a swirl of whipped cream and a sprinkle of edible glitter or colorful sprinkles for an inviting touch.

Traditional accompaniments such as biscotti or cookies pair beautifully. For modern flair, serve alongside mini donuts or fruit skewers. Ensure that the drink is served hot for the best flavor experience, and provide options for guests to customize their toppings.

For portion control, consider serving smaller-sized mugs, especially if paired with desserts. This encourages guests to enjoy multiple flavors, creating a fun tasting experience.

Wine and Beverage Pairing

When it comes to pairing beverages with Pink Hot Chocolate, opt for a creamy dessert wine like a late-harvest Riesling. The sweetness complements the chocolate and fruity notes perfectly. If you’re looking for non-alcoholic alternatives, consider pairing with a fruity mocktail or sparkling juice for a refreshing balance.

For coffee lovers, a light cappuccino can balance the richness of hot chocolate, elevating the coffee experience while enhancing flavor notes. It’s always best served warm, retaining that comforting appeal. Pair with light bites or pastries to create a harmonious snack board.

Storage and Shelf Life

For leftover Pink Hot Chocolate, allow it to cool completely before transferring to an airtight container. It can be stored in the refrigerator for 2–3 days.

When reheating, warm gently on the stove or in the microwave, adding a splash of milk if necessary to restore creaminess. Be sure to stir well to ensure a consistent texture. Avoid reheating multiple times as this can lead to spoilage.

If making large batches for later enjoyment, consider freezing the prepared drink. Allow it to cool, then pour into freezer-safe containers, leaving space for expansion. Consume within one month for the best quality.

Make Ahead Strategies

The Pink Hot Chocolate can be prepped in advance, allowing you to focus on enjoying your time with guests. Prepare all dry ingredients in advance and store them in an airtight jar for easy access. The mixture can be made a day or two ahead, stored in the refrigerator.

On the day of serving, simply reheat the drink. If using a slow cooker, keep the hot chocolate warm throughout your event, allowing guests to serve themselves while ensuring it maintains its perfect texture.

For optimal freshness, add toppings like whipped cream just before serving. This keeps them airy and delightful, enhancing the overall experience.

Scaling Instructions

Scaling the Pink Hot Chocolate recipe is simple, whether you wish to halve or double it. For smaller batches, adjust the quantity of cocoa powder and milk proportionally.

When doubling, use a larger saucepan to accommodate the increased volume without making a mess. Keep in mind that cooking time may need slight adjustments for larger quantities, ensuring the milk heats evenly.

For groups, prepare a big batch and serve it in beverage dispensers, making it easy for guests to help themselves. Store any leftovers using storage recommendations provided above.

Nutritional Deep Dive

The Pink Hot Chocolate can vary significantly in nutrition based on ingredients. A typical serving provides a comforting blend of carbohydrates, fats, and proteins. To assess the macro breakdown, consider the milk used—whole enhances creaminess but adds fat, while lower-fat options cut calories.

Micronutrients are also essential; cocoa provides magnesium and antioxidants, while milk contributes calcium and vitamin D. For a nutritious twist, consider incorporating protein-rich alternatives or using fortified plant milks.

In mindful portioning, the drink serves well in moderation, combining indulgence with pleasure. Adjusting recipes to include healthier options makes it accessible for varying dietary preferences while maintaining enjoyment.

Dietary Adaptations

For those needing gluten-free adaptations, the Pink Hot Chocolate naturally fits into this category, as it relies on cocoa, milk, and sugar, all gluten-free ingredients.

Dairy-free options are easily accessible through almond, soy, or coconut milk, appealing to vegan diets. With dairy-free whipped toppings now available, everyone can enjoy this delightful drink.

For a low-carb version, substitute regular sugar with erythritol or stevia, ensuring sweetness while adhering to dietary restrictions.

For keto enthusiasts, using unsweetened cocoa and heavy cream enhances flavor without carbs, making it a perfect indulgence.

Seasonal considerations include introducing pumpkin spice during fall or peppermint flavoring for a Christmas twist, allowing versatility across preferences without sacrificing taste.

Troubleshooting Guide

Texture issues may arise if the milk burns; always monitor heat closely to prevent this from happening. If lumps form, whisk vigorously or use an immersion blender to restore a smooth consistency.

For flavor balance, always taste as you go. Additional sugar or flavors can be adjusted according to preference, ensuring personal satisfaction. If the drink is too sweet, a touch of salt or unsweetened cocoa can help balance the flavors.

In terms of ingredient substitutions, ensure they are compatible with the overall texture and taste. Some ingredients may impact creaminess or sweetness—adjust accordingly.

Timing concerns can arise if guests arrive early; keeping the hot chocolate warm in a slow cooker helps ensure it’s ready when they are.

Recipe Success Stories

Many community members have shared their successes with the Pink Hot Chocolate, praising its delightful flavor and ease of preparation. One reader mentioned using it as a fun party drink, customizing it with different toppings, allowing kids and adults alike to create their perfect drink.

Others have experimented with variations, like adding different syrups or using dark chocolate for a richer taste. Feedback often highlights how adaptable the recipe is while maintaining its comforting essence.

Photographers within the community have found that the vibrant colors make it an eye-catching subject, leading to impressive Instagram-worthy shots. Suggestions have also flowed in about hosting seasonal events featuring this delightful beverage.

Frequently Asked Questions

Can I make Pink Hot Chocolate vegan?

Yes! Simply use plant-based milk such as almond, soy, or coconut milk and opt for dairy-free whipped cream for a delicious vegan version of this delightful drink.

How can I store leftovers?

Allow your Pink Hot Chocolate to cool completely, then transfer it to an airtight container. It can be kept in the fridge for up to 2-3 days.

What is the best way to reheat it?

Reheat over low heat on the stove, stirring frequently, or use the microwave. If the consistency seems thick, add a splash of milk when reheating.

Can I use flavored cocoa powder?

Absolutely! Flavored cocoa powders can add an exciting twist to your Pink Hot Chocolate. Suitable options include white chocolate or caramel flavors.

Is it possible to make a sugar-free version?

Yes, you can substitute regular sugar with sugar alternatives such as stevia or erythritol, creating a delicious low-sugar indulgence.

What occasions are best for serving Pink Hot Chocolate?

This drink is perfect for winter gatherings, cozy movie nights, holiday parties, or as a sweet treat for special occasions.

Can I make this in a slow cooker?

Yes! You can combine all ingredients in a slow cooker on low heat for about 1-2 hours. Stir occasionally, and enjoy a hassle-free beverage experience.

What toppings can I use?

Various toppings work wonderfully, including whipped cream, colorful sprinkles, drizzle of chocolate syrup, or crushed candy canes for a festive flavor.

Can I adapt the flavors?

Definitely! Feel free to experiment with different flavored syrups or add spices such as cinnamon or nutmeg to customize it to your liking.

What if my hot chocolate is too thick?

If your Pink Hot Chocolate turns too thick, simply stir in a little extra milk until the desired consistency is achieved.

Is there a non-chocolate version?

While the Pink Hot Chocolate is traditionally chocolate-based, you can create a pink milk version using flavored syrups for a fun non-chocolate option!

Additional Resources

For those who love hot chocolate, consider trying related recipes such as a classic hot chocolate or spiced chai latte for added variety. Technique guides on how to whip cream perfectly or create flavored syrups can enhance your beverage-making knowledge.

Learning about ingredient substitutions helps you customize your recipes based on dietary needs. Furthermore, investing in good-quality kitchen tools can elevate your cooking game, paving the way for endless delightful treats.

Exploring seasonal variations throughout the year also encourages culinary creativity, allowing you to enjoy different flavors as the seasons change.

Join the Conversation

We’d love for you to share your experiences, tips, and photos of your own Pink Hot Chocolate creations! Engage with us on social media and showcase your unique presentations and flavor variations.

Your feedback not only inspires others but helps improve our recipes for the entire community. Feel free to leave reviews, suggestions, or questions, as we love connecting with our fellow food enthusiasts.

Encourage your friends to try this delightful Pink Hot Chocolate and join the fun in creating beautiful, flavorful memories together.

The Recipe

Pink Hot Chocolate

Serves: 4

Prep Time: 5 mins

Cook Time: 10 mins

Total Time: 15 mins

Kitchen Equipment Needed

  • Medium saucepan
  • Whisk
  • Mugs or cups for serving

Ingredients

  • 2 cups milk of choice
  • 1/2 cup cocoa powder
  • 1/4 cup sugar (adjust to taste)
  • 1/2 teaspoon vanilla extract
  • 1/4 cup pink flavored syrup (strawberry or raspberry)
  • Whipped cream for topping
  • Sprinkles (optional)

Directions

  1. In a medium saucepan, heat the milk over medium heat until warm, but not boiling.
  2. Whisk in cocoa powder and sugar until fully dissolved.
  3. Stir in the pink flavored syrup and vanilla extract, mixing well.
  4. Continue to heat the mixture for 5-8 minutes, ensuring it doesn’t boil.
  5. Remove from heat and pour into mugs.
  6. Top generously with whipped cream and sprinkles before serving.

Recipe Notes

  • Feel free to adjust the sweetness to your preference by adding more or less sugar.
  • This recipe can easily be doubled or halved, depending on your serving needs.
  • Experiment with different flavored syrups for exciting variations!

Deliciously Fluffy Blueberry Cottage Cheese Pancakes Recipe

Blueberry Fluffy Cotton Cake: A Delightful Treat

⚖️
Difficulty
Easy

⏲️
Prep Time
15 mins

🕒
Cook Time
25 mins

⏱️
Total Time
40 mins

🍽️
Servings
8

The Blueberry Fluffy Cotton Cake is an irresistible dessert that captivates with its light and airy texture, making it the perfect choice for any occasion. This cake is infused with the delightful sweetness of fresh blueberries, creating a harmonious balance between flavor and fluffiness. Each slice delivers a bite of indulgence that feels like a cloud on your palate, transforming simple ingredients into something truly spectacular.

Imagine serving this beautiful cake at a summer gathering, where it not only satisfies sweet cravings but also adds a pop of color to your dessert table. The aromatic notes of the blueberries combined with a hint of vanilla create an inviting scent that will draw people in. Best enjoyed warm, the cake’s fluffy texture makes it an unforgettable treat that leaves everyone wanting more.

Quick Recipe Highlights

  • Flavor Profile: The Blueberry Fluffy Cotton Cake offers a balance of sweetness and tartness, thanks to the fresh blueberries, which perfectly complement the gentle sweetness of the cake.
  • Texture: This cake is incredibly light and fluffy, reminiscent of a delicate soufflé, creating a delightful mouthfeel that melts in the mouth.
  • Aroma: The aroma of baked blueberries and vanilla fills the air, making it an enticing treat that whets the appetite even before the first bite.
  • Visual Appeal: A stunning visual with its vibrant blue specks against a pale golden crust, the Blueberry Fluffy Cotton Cake is as pleasing to the eyes as it is to the taste buds.
  • Skill Level Needed: This recipe is approachable for beginners yet offers enough finesse to excite experienced bakers looking to create a crowd-pleaser.
  • Special Equipment: A simple mixing bowl, whisk, and a cake pan are all the tools needed to create this delightful dessert.

Recipe Overview

  • Difficulty Level: This recipe is rated easy, allowing novice bakers to build confidence while crafting a show-stopping dessert.
  • Category: This Blueberry Fluffy Cotton Cake fits perfectly as a sweet treat, ideal for brunches, afternoon teas, or casual dessert gatherings.
  • Cuisine: This dish draws inspiration from Japanese cotton cakes, known for their airy consistency and lightness, combined with Western flavors of blueberry.
  • Cost: The ingredients for this delicious dessert are budget-friendly, with blueberries being the most significant expense, especially if sourced fresh.
  • Season: Summer is the best season for this cake when blueberries are in abundance, making it a perfect seasonal dessert.
  • Occasion: This cake is great for birthday parties, picnics, or even a cozy family gathering, bringing joy and delight to every celebration.

Why You’ll Love This Recipe

The taste and texture appeal of the Blueberry Fluffy Cotton Cake is unmatched, providing a unique dessert that feels indulgent without being heavy. Each bite showcases the delightful flavors of fresh blueberries paired with a light, whipped cake texture. This delightful blend makes it a perfect sweet choice for any occasion. Convenience plays a significant role in this recipe, requiring minimal preparation and just a few ingredients that most bakers have on hand. It comes together quickly, allowing you to whip it up with little fuss.

From a nutritional standpoint, this cake includes fruit, providing vitamins and antioxidants that make it a healthier choice compared to traditional desserts. Its fluffy nature also reduces the calorie count, allowing for guilt-free enjoyment. Socially, the Blueberry Fluffy Cotton Cake serves as a conversation starter. Its striking appearance and delightful aroma create opportunities for sharing and laughter around the table.

Economically speaking, this recipe is cost-effective. Since it utilizes simple ingredients, you can easily make a larger batch without breaking the bank. Accessibility is also key; fresh blueberries are available in summer months at local markets, and alternatives are easy to substitute, making this cake easy to create in various regions and seasons.

Historical Background and Cultural Significance

The origin of the Blueberry Fluffy Cotton Cake can be traced back to Japanese dessert traditions, which prioritize lightness and airiness in baked goods. This cake represents a fusion of Eastern and Western culinary practices, showcasing the versatility of preparing desserts that suit various palates. Cultural importance lies in the celebration of seasonal ingredients, particularly blueberries, which are celebrated in numerous regions for their flavor and health benefits.

Over time, this recipe has evolved, adapting to local tastes and ingredient availability, and has seen a rise in popularity as people embrace lighter desserts. Regional variations are notable; in some countries, other fruits may replace blueberries, but the lightness of the cake remains a key feature.

Ingredient Deep Dive

Blueberries are the star of this recipe, carrying both history and cultural significance as they have been enjoyed for centuries across North America. Considered a superfood, they are packed with antioxidants, vitamins, and minerals that offer numerous health benefits. When selecting blueberries, look for firm, plump berries without wrinkles, and store them in the refrigerator to maintain freshness. If fresh blueberries aren’t available, frozen varieties can serve as a decent substitute.

Flour also plays a critical role in this cake. It provides the structure while contributing to the fluffy, airy texture when combined with the right amount of moisture. When selecting flour, opt for cake flour for the best results, as its lower protein content yields an overall lighter structure.

Eggs bind the ingredients together, creating a cohesive structure in the cake. They add moisture and richness while also contributing to the fluffy texture due to the air incorporated during whipping. For optimal results, use room-temperature eggs to ensure better incorporation.

Sugar is essential for sweetness, enhancing the cake’s flavor profile and helping to stabilize the airy texture. Utilizing granulated sugar is standard, but consider experimenting with alternatives like honey or maple syrup for different flavor dimensions.

Common Mistakes to Avoid

  • Overmixing the batter can lead to a dense cake. Gently fold the ingredients together until just combined to achieve that desired fluffy texture.
  • Not allowing the eggs to reach room temperature can affect the mixing process. Room temperature eggs integrate better, helping to create a smoother batter.
  • Using insufficient leavening agents, such as baking powder, can result in a flat cake. Ensure your leavening agents are fresh for maximum lift.
  • Baking at the wrong temperature can lead to uneven cooking. Always preheat your oven and ensure it maintains the correct temperature during baking.
  • Opening the oven door too early can cause the cake to sink. Avoid peeking until the cake is near the end of its cooking time.
  • Failing to cool the cake properly can affect texture and presentation. Allow it to cool in the pan for the required time before transferring it to a wire rack.
  • Using old or expired ingredients can diminish the flavor and texture of your cake. Always check the expiry dates of your ingredients to ensure freshness.
  • Neglecting to adjust baking time for variations in pan sizes can result in undercooked or overcooked cake. Always monitor baking closely regardless of pan used.
  • Not preparing the pan properly can lead to sticking. Grease and flour the pan adequately to ensure easy release after baking.
  • Rushing the cooling process can lead to a gummy texture. Patience is key to achieving the perfect fluffy consistency.

Essential Techniques

Whipping the egg whites is a crucial technique for achieving that light, fluffy structure in your Blueberry Fluffy Cotton Cake. It is important to ensure that your mixing bowl and beaters are completely clean and dry, as any fat can hinder the whipping process. Whip the egg whites until they form stiff peaks; this is the point at which they hold their shape and create the necessary lift. Avoid overwhipping, as this can lead to dry, grainy textures.

Folding is another technique that is vital to maintain the airiness in the cake. Gently incorporate the whipped egg whites into the batter using a spatula, employing a figure-eight motion until well combined. Avoid aggressive stirring, which can deflate the mixture and compromise texture. Knowing the visual cue of just combined is key here; you want no visible streaks of egg whites, leading to a homogeneous batter without losing too much volume.

Pro Tips for Perfect Blueberry Fluffy Cotton Cake

1. Use fresh blueberries for optimal flavor; if they’re not in season, frozen blueberries can work as a substitute, but don’t thaw them before mixing.
2. Sift your flour beforehand to remove clumps, enhancing the lightness of the flour and overall cake texture.
3. For a touch of elegance, drizzle the cake with a simple icing made from powdered sugar and lemon juice after cooling.
4. To impress your guests visually, consider layering the cake with whipped cream and fresh blueberries for a lovely presentation.
5. Experiment with different flavored extracts; almond or lemon extracts can add a delightful twist to the flavor profile.
6. Ensure all your ingredients are room temperature for better incorporation, resulting in a lighter and fluffier cake.
7. To enhance moisture, consider adding sour cream or yogurt to the batter for extra richness and flavor.
8. Serve your cake with a dollop of whipped cream or a scoop of vanilla ice cream for a touch of decadence.

Variations and Adaptations

Blueberry Fluffy Cotton Cake lends itself well to seasonal adaptations. Substitute blueberries for other berries like raspberries or strawberries for a colorful twist. You can also incorporate seasonal spices, such as cinnamon or nutmeg, into the batter during fall months to enhance flavors. For dietary modifications, can be easily made gluten-free by using a suitable almond or coconut flour blend, maintaining moisture and fluffiness.

Flavor variations are endless; consider adding lemon zest or replacing part of the sugar with a flavored syrup to elevate the taste. Texture modifications are possible too; adding a handful of chopped nuts can introduce a delightful crunch, while a coconut milk batter can offer a tropical twist. Enhance presentation by dusting the cake with powdered sugar or serving it with fresh fruit compote for an eye-catching finish.

Serving and Presentation Guide

For plating, consider using a large white platter to highlight the colors of the cake. Serve it in generous slices, ensuring each piece showcases the beautiful blueberry flecks. If garnishing, fresh mint leaves or edible flowers (like pansies or nasturtiums) can add a pop of color and sophistication. While traditionally served at room temperature, enjoying this cake fresh out of the oven provides a delightful warmth that complements the blueberries beautifully.

Pair with vanilla ice cream or a light fruit coulis for added flavor and aesthetic appeal. Maintaining proper portion control ensures guests enjoy this decadent dessert without overindulging. While this cake is best served fresh, it remains delicious on the second day and can be reheated gently in the microwave for a warm treat.

Wine and Beverage Pairing

For a refreshing pairing, consider serving your Blueberry Fluffy Cotton Cake with a light, fruity white wine, such as a Moscato or Riesling; both complement the sweetness of the dessert without overpowering it. If you prefer a non-alcoholic option, a sparkling lemonade or fruit-infused iced tea can provide a lovely balance to the cake’s flavors.

Coffee options are delightful as well; a medium roast brew, either hot or cold brew, pairs perfectly for coffee lovers, enhancing the sweetness of the cake. When pairing beverages, aim for those with bright acidity to contrast the cake’s sweetness, making every bite an enjoyable experience.

Storage and Shelf Life

To store your Blueberry Fluffy Cotton Cake, wrap it tightly in plastic wrap or place it in an airtight container to maintain its moisture and freshness. Stored properly, the cake can last for up to three days at room temperature or up to a week in the refrigerator.

When reheating, use the microwave for individual slices or place the whole cake in a preheated oven at a low temperature until warmed through. Keep an eye on it to prevent drying out. Signs of spoilage include an off-smell or unusual texture; if you experience either, it’s best to discard the cake. Freezing is an option as well—slice first, then wrap each piece in plastic wrap before placing them in a freezer bag. Defrost in the refrigerator overnight when desired.

Make Ahead Strategies

Making the Blueberry Fluffy Cotton Cake ahead of time can save you stress during busy days. Consider preparing the batter in advance and storing it in the fridge for up to a day before baking; just be sure to bring it to room temperature before cooking.

You can also bake and cool the cake a day ahead; store it tightly wrapped in the fridge, which enhances the flavors as they meld overnight. When ready to serve, bring the cake to room temperature or gently warm it before presenting. For additional freshness, add whipped cream or fresh blueberries just before serving to brighten up the cake.

Scaling Instructions

To halve this Blueberry Fluffy Cotton Cake recipe, easily divide all ingredient amounts by two, and adjust your baking time, checking for doneness slightly earlier. For doubling or tripling, ensure your mixing bowl is large enough to accommodate the increased batter volume and be prepared for longer baking times.

Keep in mind that larger batches may require deeper pans or multiple pans to ensure even baking. Timing modifications must be observed carefully; always check the internal temperature or cake bounce to determine doneness accurately.

When preparing larger batches, consider investing in additional kitchen tools such as larger mixing bowls and measuring cups to streamline your baking process.

Nutritional Deep Dive

The Blueberry Fluffy Cotton Cake offers a balanced treat, containing essential macronutrients—primarily carbohydrates from sugar and flour, along with protein from eggs. It’s relatively low in fat, which is appealing for those looking to indulge without the calorie overload.

Micronutrient analysis reveals the presence of vitamin C and antioxidants from blueberries, contributing to health benefits. Each slice can make a nutritious addition to your dessert options while maintaining flavor and texture. Monitoring portion sizes is important for weight management, as with any dessert; consider savoring smaller portions to enjoy the flavors guilt-free.

This cake can be a part of a balanced meal when aptly paired with proteins or enjoyed alongside healthy sides, bringing a delightful finish to any meal without compromising dietary goals.

Dietary Adaptations

The Blueberry Fluffy Cotton Cake can be easily modified to fit various dietary needs. For a gluten-free version, replace the all-purpose flour with a certified gluten-free flour blend, ensuring moisture retention for the fluffy texture.

To create a dairy-free cake, substitute regular milk with almond or oat milk, and use a dairy-free butter alternative. Vegan adaptations can replace eggs with flax eggs or aquafaba, allowing you to maintain the cake’s structure and lightness without animal products.

For those following low-carb or keto diets, consider using almond flour and a sweetener like erythritol as substitutes for a healthier cake option. Paleo dieters can substitute traditional flour with coconut flour and use honey or maple syrup for sweetening.

Low-FODMAP adaptations involve using lactose-free milk and ensuring all sweeteners meet dietary guidelines, maintaining the balance of flavor while being gut-friendly.

Troubleshooting Guide

If your Blueberry Fluffy Cotton Cake turns out too dense, it could be the result of overmixing the batter or not whipping the egg whites adequately. Focus on gently folding your ingredients to maintain a light structure is critical for the cake’s success.

Taste issues can arise from improperly adjusted sweetness; if the cake is too bland, consider adding a hint of salt to enhance flavors. For overly sweet cakes, scaling back the sugar next time can help achieve better balance.

If the cake sinks in the center after baking, it might result from a sudden temperature change, such as opening the oven door too early. To prevent this, ensure you don’t disturb the oven while baking.

Sticking problems commonly occur with inadequate greasing; ensure that you properly butter and flour the pan before adding the batter. Additionally, cooling in the pan for too long can lead to unwanted moisture accumulation causing a soggy bottom.

Lastly, if you notice cracks on the surface, that may indicate a temperature too high or not enough steam during baking. Adjusting the oven temperature gradually can remedy this.

Recipe Success Stories

Readers have raved about the Blueberry Fluffy Cotton Cake, showcasing varying adaptations and personal touches that enhance this already delicious dessert. Many share success stories of serving this cake at family gatherings where it quickly became a favorite among children and adults alike.

Variations suggested in the comments, such as adding lemon zest or using seasonal berries, have received positive feedback for improving flavor and freshness. Photography enthusiasts showcase their creations, highlighting the beautiful texture and mesmerizing color of the cake, inspiring others to try it out.

As the recipe circulates, readers express gratitude for its simplicity and deliciousness, often relating how stress-free the baking process was, leading to successful outcomes.

Frequently Asked Questions

Can I use frozen blueberries for this recipe?

Yes, you can use frozen blueberries. Just make sure to fold them in straight from the freezer to prevent the batter from turning blue. They may need a minute or two longer to bake.

How can I replace eggs in this recipe?

You can replace eggs with flax seeds or chia seeds mixed with water. Use one tablespoon of seeds mixed with three tablespoons of water for each egg and let it sit to thicken before adding it to the mix.

Can I make this cake in advance?

Absolutely! You can bake the cake a day in advance and store it in the fridge. Just remember to bring it to room temperature before serving for the best flavor and texture.

What can I do if my cake collapses?

A collapsed cake is often a result of sudden changes in temperature or overmixing. Ensure your oven is preheated correctly and mix your ingredients gently to maintain that airy texture.

Is this cake suitable for kids?

Yes, this cake is light and fluffy, which makes it a delightful option for children. The natural sweetness of the blueberries adds appeal without being overly sugary.

What should I serve with this cake?

Consider serving it with some whipped cream or a dollop of yogurt on the side. Fresh fruits or fruit compote also pair excellently to enhance the flavor.

How should I store leftovers?

Wrap the cake tightly with plastic wrap or place it in an airtight container. It can last for up to three days at room temperature or about a week in the refrigerator.

Can this cake be doubled for a larger crowd?

Yes! Simply double the ingredients and prepare. Just ensure you have an appropriate-sized oven-safe dish to accommodate the larger volume.

How do I avoid a dry cake?

To keep your cake moist, avoid overbaking it. Keep an eye on it and conduct a toothpick test about five minutes before the recommended bake time.

What flavor variations can I try?

You can add extracts like almond or lemon for an extra twist. Experimenting with different fruits, such as strawberries or peaches, can also yield delicious results!

Additional Resources

For those who want to explore related recipes, check out other delightful cakes showcasing fruit flavors, or delve into technique guides for mastering cake baking. Finding the right equipment can make all the difference; consider investing in high-quality baking pans and mixers to improve your baking experience.

If you’re interested in seasonal variations, reviewing recipes that incorporate fall-inspired spices or frosting can inspire your next baking adventure. Be sure to take note of the ingredients used, as they can often be swapped without compromising the integrity of the dish.

Join the Conversation

We encourage you to share your experiences making the Blueberry Fluffy Cotton Cake in the comments below! Post your beautiful creations on social media using our designated hashtag to inspire others who might want to try their hand at this delightful dessert.

Engage with a community of fellow bakers, exchanging tips, tricks, and variations to this beloved recipe. Recent feedback showcases readers swapping stories about their modifications, and we love seeing all the creative ways people make this recipe their own!

The Recipe

Blueberry Fluffy Cotton Cake

Serves: 8

Prep Time: 15 mins

Cook Time: 25 mins

Total Time: 40 mins

Kitchen Equipment Needed

  • Mixing bowl
  • Whisk
  • Spatula
  • Measuring cups and spoons
  • Cake pan (9-inch)
  • Electric mixer (optional)

Ingredients

  • 1 cup all-purpose flour
  • 1 teaspoon baking powder
  • 1/4 teaspoon salt
  • 3 large eggs
  • 1/2 cup granulated sugar
  • 1/4 cup milk
  • 1/4 cup unsalted butter, melted
  • 1 cup fresh blueberries
  • 1 teaspoon vanilla extract

Directions

  1. Preheat the oven to 325°F (160°C). Grease and flour a 9-inch round cake pan.
  2. In a bowl, whisk together flour, baking powder, and salt. Set aside.
  3. In another bowl, beat the egg yolks and sugar until light and fluffy. Stir in the milk, melted butter, and vanilla.
  4. Gradually mix in the dry ingredients until just blended.
  5. In a separate bowl, whip the egg whites until stiff peaks form. Gently fold the egg whites into the batter until no streaks remain.
  6. Fold in the blueberries carefully to avoid breaking them.
  7. Pour the batter into the prepared cake pan and smooth the top.
  8. Bake for 25-30 minutes or until a toothpick inserted in the center comes out clean.
  9. Allow the cake to cool in the pan for 10 minutes, then transfer to a wire rack to cool completely.

Recipe Notes

  • This cake is best served fresh but can be stored for up to three days.
  • Feel free to experiment with different berries or add spices for unique flavors.
  • For an elegant twist, top with whipped cream or serve with a berry coulis.

Bake Historic Peanut Cookies from Jimmy Carter’s Grandmother

Classic Peanut Butter Cookies: A Taste of History from Jimmy Carter’s Grandmother

⚖️
Difficulty
Easy

⏲️
Prep Time
15 mins

🕒
Cook Time
10 mins

⏱️
Total Time
25 mins

🍽️
Servings
24 cookies

Baking is not just about following a recipe; it is about creating connections, memories, and a sense of history. This classic peanut butter cookie recipe, handed down from Jimmy Carter’s beloved grandmother, captures the essence of Southern baking traditions in every bite. Whether you grew up savoring warm cookies fresh from the oven or are trying them for the first time, the flavor of rich peanut butter combined with a hint of sweetness evokes nostalgia and comfort.

As you prepare these cookies, imagine the warmth of a Southern kitchen, the sounds of laughter, and the love infused into every scoop of dough. The aroma of peanut butter mingling with sugar will transport you to a bygone era, making these cookies perfect for any occasion, from casual family gatherings to holiday celebrations. Each bite is a testament to the timeless appeal of homemade treats that have been cherished across generations.

Quick Recipe Highlights

  • Flavor Profile: These cookies bring together the earthy richness of peanut butter with the sweet notes of brown sugar, creating a uniquely satisfying taste experience.
  • Texture: Expect a pleasantly crumbly exterior that gives way to a chewy interior, offering an enjoyable contrast with each bite.
  • Aroma: The warm, nutty scent of roasting peanuts dances through your kitchen, leaving a lasting impression that is simply irresistible.
  • Visual Appeal: Golden brown and with characteristic fork prongs pressed into the tops, these cookies are as inviting to the eyes as they are to the palate.
  • Skill Level Needed: With simple steps and minimal techniques required, this recipe is perfect for bakers of any skill level.
  • Special Equipment: All you need is a mixing bowl, baking sheet, mixing spoon, and a fork—no fancy gadgets necessary!

Recipe Overview

  • Difficulty Level: This recipe is rated easy, making it ideal for beginner bakers or anyone looking to whip up a quick treat without stress.
  • Category: Perfect as a dessert or snack, these cookies can also serve as a delightful addition to lunch boxes or coffee breaks.
  • Cuisine: Rooted in Southern cuisine, these cookies reflect the warmth and hospitality often associated with this rich culinary tradition.
  • Cost: The ingredients are budget-friendly, generally costing under $10 for a yield of 24 cookies, making it an economical choice.
  • Season: These cookies are a year-round treat, but they shine during holidays and family gatherings, bringing loved ones together.
  • Occasion: Whether you’re hosting a casual get-together or a festive celebration, these cookies are sure to please any crowd.

Why You’ll Love This Recipe

Biting into a freshly baked peanut butter cookie is like receiving a warm hug, bringing a comforting blend of taste and nostalgia with each mouthful. The creamy peanut butter melds with the sweet and buttery notes, creating a flavor combination that delights both children and adults alike. The chewiness of the cookies adds an inviting texture that encourages you to savor every bite, ensuring your cravings are thoroughly satisfied.

Convenience is one of the highlights of this peanut butter cookie recipe. It requires minimal ingredients and simple steps, making it accessible and quick to put together, even on a busy afternoon. In mere minutes, you can go from gathered ingredients to pulling warm cookies from the oven, ready to enjoy with family or friends.

Not only are these cookies a treat for your taste buds, but they also pack in nutritional benefits. Peanut butter is high in protein and healthy fats, making these cookies a more wholesome option than many other sweets. This is especially important for families looking to strike a balance between indulgence and health.

Sharing food is a vital part of social gatherings, and these peanut butter cookies are perfect for fostering connections. Whether you’re bringing them to a potluck or sharing with friends during a casual coffee break, they create an opportunity to bond over homemade goodness. The joy of baking and sharing cookies is a tradition that contributes to cherished memories with loved ones.

Finally, this recipe is remarkably cost-effective. Given the straightforward ingredients and the minimal time required, you can create a delightful treat without breaking the bank. Making these cookies at home not only saves money but also allows you to enjoy the loving satisfaction of homemade baking.

Historical Background and Cultural Significance

Peanut butter cookies have a long-standing history deeply woven into American culinary traditions. Most famously, this recipe comes from Jimmy Carter’s grandmother, showcasing the significant role that food plays in family heritage and Southern culture. The combination of peanuts—a native crop that gained popularity in the South—and the baking methods of the time reflects a delightful blend of agricultural success and family values.

The cultural importance of peanut butter cookies lies in their representation of not only comfort food but also the notion of hospitality that is prevalent in Southern life. Sharing cookies gently signifies an invitation to connect and create memories, reinforcing communal ties that strengthen through generations. Southern kitchens have long been a place where stories are shared over food, making these cookies a perfect embodiment of such values.

Over the years, this recipe has evolved, with households putting personal spins on the classic version. From adding chocolate chunks to incorporating oats or even swapping out peanut butter for almond butter, the possibilities have been endless. Each variant tells its own story, revealing the unique adaptations that families have embraced while keeping the spirit of the recipe alive.

Regional variations of peanut butter cookies can be found throughout the United States, each influenced by local ingredients and baking techniques. Some versions incorporate molasses for a deeper flavor, while others might see a sprinkle of sea salt on top to enhance the sweetness. These adaptations not only honor the original recipe but also reflect the diverse palettes of Americans across the country.

Ingredient Deep Dive

Peanut Butter
Peanut butter is the star of this recipe, offering a deliciously rich flavor that defines these cookies. Its history dates back to the ancient Incas, who utilized peanuts for various purposes, including culinary uses. The nutritional benefits of peanut butter include high amounts of protein, healthy fats, and essential vitamins, making it a suitable option for both children and adults. When selecting peanut butter, it’s advisable to look for natural varieties that contain minimal added sugars or oils. For storage, keep peanut butter sealed in a cool, dry place; it can also be refrigerated for extended freshness.

Granulated Sugar
Granulated sugar is a sweetening agent that plays a critical role in balancing the flavors in peanut butter cookies. Besides its role in taste, sugar contributes to the texture, ensuring that the cookies are soft and chewy. When choosing sugar, you want to ensure that it is of high quality and free from impurities, which can affect the final product. Store granulated sugar in a cool, dry place to maintain its integrity. For those concerned about sweetness levels or looking for alternatives, options like coconut sugar or honey can serve as substitutes in the recipe, although they may alter the flavor slightly.

Common Mistakes to Avoid

  • Not measuring correctly: Baking is a science, and precise measurements are crucial for success. Use measuring cups and spoons for accuracy.
  • Overmixing the dough: Mixing too much can create tough cookies. Aim for just combined ingredients for a tender texture.
  • Skipping the chilling step: Chilling the dough helps cookies hold their shape better during baking. Don’t skip it if the recipe suggests it.
  • Using cold ingredients: Room temperature ingredients mix more thoroughly and contribute to the right cookie texture.
  • Baking on an ungreased sheet: Always prepare your baking sheet with parchment paper or a light coating of grease for easy removal.
  • Baking at the wrong temperature: Make sure your oven is correctly calibrated; too hot can lead to burnt cookies.
  • Ignoring oven placement: Make sure the baking sheet is placed in the center of the oven for even cooking.
  • Not letting cookies cool: Allow cookies to cool on the baking sheet briefly before transferring to a wire rack; this prevents crumbling.

Essential Techniques

Measuring Ingredients
Correctly measuring ingredients is essential for achieving the desired texture and flavor in your cookies. Use accurate measuring cups for dry ingredients and liquid measuring cups for liquids. The spoon-and-level method for flour, in particular, prevents the addition of too much flour, which can lead to dry cookies. A kitchen scale is also handy for precise measurements, especially in baking.

Mixing Techniques
Creaming butter and sugar together until light and fluffy introduces air into the dough, which is crucial for lighter cookies. It’s essential to mix in peanut butter until fully incorporated for an even flavor throughout. Avoid overmixing once you add the flour, as it can make your cookies tough. These visual cues are indicators of when to stop mixing: you’ll want a smooth, cohesive dough without dry flour pockets.

Pro Tips for Perfect Classic Peanut Butter Cookies

1. Use high-quality, natural peanut butter for the best flavor and texture. Avoid additives and unnecessary sugars.
2. Chill the dough for at least 30 minutes before baking; this helps the cookies maintain their shape and ensures a chewy center.
3. For a classic look, use a fork to create a crisscross pattern on the cookie dough before baking.
4. Experiment with mixing in chocolate chips or chopped nuts for a delightful twist on the classic recipe.
5. Keep an eye on your cookies as they bake; they can go from perfectly baked to overcooked in just a minute or two.
6. Let the cookies cool completely on a wire rack after baking to maintain their texture and prevent sogginess.
7. Store cookies in an airtight container to keep them fresh; they freeze well for a longer shelf life.
8. For a touch of sweetness, sprinkle a little sea salt on top before baking to balance the flavors beautifully.

Variations and Adaptations

Peanut butter cookies are incredibly versatile, allowing for a range of adaptations to suit various palates. For a regional twist, consider adding chopped pecans or walnuts to the dough for a crunchy texture that complements the peanut flavor beautifully. Seasonal adaptations can also shine through; mix in festive spices like cinnamon or nutmeg during the fall and winter months to warm up the flavors.

For dietary modifications, you can substitute regular flour for gluten-free flour blends, making these cookies suitable for those with gluten sensitivity. If you want to reduce sugar, you can use powdered erythritol or other sugar substitutes, ensuring that the balance in taste remains intact. Chocolate lovers can mix cocoa powder into the dough or dip half of each cookie in melted dark chocolate for an indulgent treat.

Presentations can be enhanced by pairing these cookies with homemade jams or fruit spreads, creating delightful flavor combinations. You can stack them in a jar, complete with a ribbon for an elegant gift presentation, or arrange them on a decorative platter during holiday gatherings.

Serving and Presentation Guide

When serving peanut butter cookies, presentation is key to enhancing their appeal. A classic way to plate them is to stack several cookies on a decorative plate, perhaps with a few scattered chocolate chips or crushed peanuts for added visual interest. Adding a sprig of mint or a light dusting of powdered sugar can elevate the appearance even further.

Garnishing options include a drizzle of melted chocolate or a slight sprinkle of sea salt for a sophisticated touch. Traditional accompaniments, like a glass of cold milk or a mug of coffee, complement the flavors beautifully and create a satisfying experience. For modern serving suggestions, consider pairing the cookies with artisanal ice cream for a delightful dessert sandwich or crumbling them over yogurt for a quick snack or breakfast option.

Temperature considerations play an important role; serve cookies warm right out of the oven for the ultimate indulgence, or allow them to cool for a hearty treat that pairs well with hot beverages. For portion control, serve cookies individually wrapped in parchment paper, allowing guests to enjoy them without feeling overwhelmed.

Wine and Beverage Pairing

Pairing wine with peanut butter cookies can be a delightful experience. A rich dessert wine, such as a Port or a Muscat, complements the nuttiness of peanut butter perfectly. Their sweetness enhances the cookie’s flavor while providing a lovely contrast to the rich texture.

Non-alcoholic alternatives include a creamy vanilla or chocolate milkshake, which echoes the indulgence of the cookies without overwhelming them. For a tea option, a warm chai or spiced latte with its aromatic spices might also create a delightful pairing that resonates with the warmth of home baking.

Temperature considerations are important for both the cookies and the accompanying beverages. Ensure that the cookies are served slightly warm or at room temperature while your drinks match that warmth to create a soothing, satisfying snack break.

Storage and Shelf Life

Storage methods play a crucial role in preserving the deliciousness of peanut butter cookies. Store them in an airtight container at room temperature to maintain softness for up to a week. If you want them to last longer, consider refrigerating them; just make sure to separate layers with parchment paper to prevent sticking.

For longer preservation, freezing is a fantastic option. Place cooled cookies in a freezer-safe container separated by layers of parchment paper, and they can last up to three months. To thaw, simply leave them at room temperature for a short while or warm them in the oven briefly.

Watch for signs of spoilage, including noticeable changes in texture or smell. If the cookies begin to dry out or develop an off-flavor, it’s time to dispose of them. Reheating can breathe new life into previously refrigerated cookies; simply warm them for a couple of minutes in a preheated oven until just warm.

Make Ahead Strategies

Planning ahead can enhance your baking experience with peanut butter cookies. Consider preparing the dough and refrigerating it, wrapped tightly in plastic wrap, for up to a couple of days. This not only simplifies last-minute baking but also allows flavors to meld beautifully.

If you want to prepare a larger batch, you can freeze the cookie dough in individual scoops. This way, you can bake off fresh cookies at your convenience without compromising quality. Just thaw the dough in the refrigerator before baking.

For the assembly process, ensure your ingredients are at room temperature; this makes mixing easier and contributes to a better final product. Reheat instructions are straightforward: a quick par bake may be appropriate for frozen or chilled dough, as it can bring the flavors back to life.

Scaling Instructions

Scaling this recipe is easy, whether you want to make a smaller batch or double the yield for a large gathering. To halve the recipe, simply divide the ingredients by two, taking care to adjust the timing in case you’re using smaller baking sheets.

Doubling or tripling involves careful consideration of your mixing capacity; ensure your mixing bowl is large enough to accommodate the increased volume. In terms of baking, keep a close eye on timing, as larger batches may require an additional minute or two in the oven.

For storage considerations, ensure that you have sufficient container space to hold the increased quantity. Keeping cookies separate with parchment paper will help maintain their quality, regardless of the size of your batch.

Nutritional Deep Dive

Peanut butter cookies can fit neatly into various dietary lifestyles, yet understanding their macro breakdown is essential. One serving typically contains about 100 calories, with significant contributions from healthy fats due to the peanut butter. Carbohydrates mainly stem from sugar, providing energy, while protein content is relatively high too, thanks to the nuts.

Micronutrient analysis reveals beneficial vitamins and minerals within peanut butter, including vitamin E, magnesium, and potassium. These nutrients play crucial roles in maintaining overall health. Limiting portion sizes may aid in weight management, allowing you to indulge without going overboard.

For those with specific dietary considerations, you might explore options for reducing sugar or using low-fat peanut butter, although they may alter the traditional flavor and texture. Balancing snacks like these with fresh fruits or vegetables can create a well-rounded eating experience that satisfies sweet cravings.

Dietary Adaptations

1. **Gluten-Free:** Substitute all-purpose flour with a gluten-free flour blend to accommodate those with gluten sensitivities while maintaining the cookie’s flavor.
2. **Dairy-Free:** Ensure that any margarine used in place of butter is dairy-free; coconut oil can also work well for a vegan version.
3. **Vegan:** Use maple syrup or coconut sugar as a sweetener and replace eggs with ground flaxseed or chia seeds mixed with water.
4. **Low-Carb:** Almond flour can replace all-purpose flour for a low-carb option, but this may require adjustments in ratios.
5. **Keto:** Utilize natural sugar substitutes such as erythritol or stevia and almond flour for an ideal keto-friendly peanut butter cookie.
6. **Paleo:** Consider honey or maple syrup for sweetening and use almond flour instead for a recipe that aligns with paleo principles.
7. **Low-FODMAP:** Ensure peanut butter is free from added sugars, and check the allowed sugar content in any sweeteners used.

Troubleshooting Guide

If your peanut butter cookies are not turning out as expected, here are solutions for common issues.

Texture issues can stem from overbaking or adding too much flour. If cookies come out cakey, reduce flour next time to achieve that desired chewiness. If cookies are too crumbly, consider adding a bit more peanut butter or butter for moisture.

Flavor balance may be off if the cookies are overly sweet; ensure you’re using the right measurement for peanut butter and sugar. For saltier tastes, try adding a touch more salt to enhance the flavor profile.

Temperature problems often arise from variations in oven temperatures. If cookies don’t spread correctly, it could be due to chilled dough, so make sure the dough warms to room temperature before baking.

Equipment challenges can emerge through poor-quality baking sheets; consider investing in a heavy-duty one to ensure even baking. If cookies stick, parchment paper or silicone mats are excellent non-stick solutions that can help.

Timing concerns can occur with smaller ovens or varying baking sheets—always check cookies a minute or two before the suggested time to avoid overbaking.

Recipe Success Stories

Numerous home bakers have fallen in love with this peanut butter cookie recipe, sharing their experiences and adjusting their variations. From adding chocolate chips to experimenting with spices and nut combinations, readers have discovered ways to personalize the cookies, often leading to delightful surprises.

Community feedback emphasizes how this recipe evokes cherished memories, especially for those who grew up enjoying homemade treats from family members. Variations celebrated include switching out peanut butter for other nut butters, showcasing the recipe’s flexibility and appeal.

Adaptation stories often highlight kitchen adventures where families involved children in mixing and shaping, fostering not only cooking skills but also connecting generations through shared experiences. Photography tips from readers emphasize natural lighting and close-ups to capture the inviting golden hues of the cookies perfectly.

Frequently Asked Questions

Can I use crunchy peanut butter instead of creamy?

Yes, crunchy peanut butter can be substituted in this recipe, resulting in a delightful texture variation. Just ensure that the volume remains consistent.

How should I store leftover cookies?

Store the cookies in an airtight container at room temperature to maintain their texture. If needed, freeze them for longer preservation.

Can I substitute the sugar in the recipe?

Yes, you can use natural sugar substitutes like coconut sugar or erythritol. Just be aware that different sweeteners may alter the flavor or texture slightly.

How do I know when my cookies are done baking?

When the edges are golden brown and the centers look slightly underbaked, they are ready to come out. They will continue to firm up as they cool.

What other mix-ins work well with this dough?

You can add chocolate chips, chopped nuts, or even dried fruits like raisins or cranberries to elevate the cookies’ flavor and texture.

Can I freeze the cookie dough for later use?

Absolutely! Shape the dough into balls and freeze them on a baking sheet. Once firm, transfer to a pouch or container for up to three months.

How can I make these cookies more flavorful?

Experiment with adding spices like cinnamon or vanilla extract to deepen the flavor profile while maintaining the essence of the classic recipe.

Is there an egg-free version of this recipe?

Yes, replace the egg with a mixture of ground flaxseed and water, or use unsweetened applesauce for an effective binder.

What should I do if my cookies spread too much?

If your cookies spread too much during baking, try chilling the dough longer before baking or adding a bit more flour for structure.

Can this recipe be doubled easily?

Yes, you can easily double this recipe; just make sure you have a large enough mixing bowl to accommodate! Adjust baking times as needed.

Additional Resources

For those eager to expand their baking repertoire, consider exploring related recipes such as chocolate chip cookies, oatmeal cookies, and no-bake desserts. Technique guides that focus on proper mixing, measuring, and baking skills can enhance your baking know-how.

Ingredient information can also be valuable, particularly regarding nut butters and their health benefits. When investing in baking equipment, look for quality mixing bowls, silicone spatulas, and baking sheets to complement your baking experience effectively.

Seasonal variations throughout the year can inspire creative twists on your favorite recipes, perfect for celebrating holidays or introducing new flavors into your kitchen.

Join the Conversation

We love to hear from you! Share your peanut butter cookie experiences and adaptations on social media. Don’t forget to tag us in your photos, showcasing your baking triumphs! Engage with our community through recipe reviews, sharing tips, and suggestions to improve this beloved classic even further.

Explore different variations, and be sure to connect with fellow bakers to exchange ideas and inspirations, enhancing your cookie-making skills while fostering new friendships. Let’s celebrate the joy of baking together!

The Recipe

Classic Peanut Butter Cookies

Serves: 24 cookies

Prep Time: 15 mins

Cook Time: 10 mins

Total Time: 25 mins

Kitchen Equipment Needed

  • Mixing bowl
  • Baking sheet
  • Silicone spatula
  • Fork for marking
  • Oven

Ingredients

  • 1 cup peanut butter
  • 1 cup granulated sugar
  • 1 egg
  • 1 tsp baking soda

Directions

  1. Preheat your oven to 350°F (175°C).
  2. In a mixing bowl, combine the peanut butter and sugar until well blended.
  3. Add the egg and baking soda, mixing until smooth.
  4. Using a spoon, scoop out dough and roll into balls, then place them on a baking sheet lined with parchment paper.
  5. Press down each ball gently with a fork, creating a crisscross pattern.
  6. Bake in the preheated oven for 10 minutes or until lightly golden.
  7. Let them cool on the baking sheet for a few minutes before transferring to a wire rack to cool completely.

Recipe Notes

  • Store cookies in an airtight container at room temperature for up to one week.
  • Chill the dough for 30 minutes for better shaping if desired.
  • Feel free to add chocolate chips or nuts for an extra treat.

Best Healthy Smoothie with 5 Simple Ingredients

Healthy Smoothie: A Refreshing and Nutritious Delight

⚖️
Difficulty
Easy

⏲️
Prep Time
10 mins

🕒
Cook Time
0 mins

⏱️
Total Time
10 mins

🍽️
Servings
2

Experience the blend of flavor and health with our delicious healthy smoothie. This vibrant and refreshing drink is packed with nutrients, making it the perfect choice to start your day or recharge in the afternoon. The marriage of fruits and greens provides not only a symphony of tastes but also a host of wellness benefits that will leave you revitalized and ready to take on anything.

With its creamy texture and delightful sweetness, the healthy smoothie caters to both your taste buds and your wellness goals. Using fresh ingredients, this recipe can be easily tailored to your preferences. From the first sip, you’ll be captivated by the harmony of flavors, making it hard to believe that something so delicious can also be so good for you.

Quick Recipe Highlights

  • Flavor Profile: A delightful mix of sweet and tangy flavors, with hints of creaminess from yogurt and natural sweetness from fruits.
  • Texture: Creamy and smooth, creating a satisfying mouthfeel that glides effortlessly down.
  • Aroma: Fresh and fruity, with aromatic notes of ripe banana and sweet berries that invigorate your senses.
  • Visual Appeal: A stunning burst of color from vibrant fruits, creating an eye-catching presentation that is as pleasing to look at as it is to drink.
  • Skill Level Needed: Even a beginner in the kitchen can whip up this smoothie with minimal effort and time.
  • Special Equipment: A quality blender is essential for achieving the creamy texture that this smoothie boasts.

Recipe Overview

  • Difficulty Level: This healthy smoothie is classified as easy, requiring minimal preparation and no advanced cooking techniques. It’s perfect for those who want a quick, nutritious boost.
  • Category: Ideal for breakfast or as a post-workout refreshment, this smoothie fits perfectly into both snack and meal categories.
  • Cuisine: Influenced by various culinary traditions that celebrate fresh produce, this smoothie embodies a health-conscious approach to diet.
  • Cost: Extremely budget-friendly, with ingredients typically costing around $10-$15 for multiple servings.
  • Season: Fresh fruits are available year-round, making this smoothie delicious no matter the season. It can be particularly refreshing during hot summer days.
  • Occasion: Perfect for breakfast, as a healthy snack, or even a light dessert after dinner.

Why You’ll Love This Recipe

The combination of fruits in this healthy smoothie offers a deliciously tempting taste while delivering an array of vitamins and minerals essential for your daily health. Ingredients like bananas provide potassium and energy, while spinach adds iron and fiber, giving you a smoothie that truly nourishes. The smooth texture makes it easy to enjoy, even for those who may be hesitant to consume greens.

Convenience is key with this quick and easy recipe, perfect for busy mornings. Simply toss ingredients into your blender, and in less than 10 minutes, you’ll have a nourishing smoothie ready to go. It can even be prepped the night before, saving you time without compromising on fresh flavors.

Nutritionally, this smoothie stands out as a powerhouse, offering a balance of macronutrients and essential vitamins. It’s an excellent way to pack in crucial nutrients without the extra calories, making it a great choice for those focused on weight management or healthy eating habits.

Socially, it’s a great way to introduce family and friends to healthier options. Hosting a smoothie party can be a fun interactive experience where everyone customizes their recipe, providing an engaging way to enjoy nutrition together.

Finally, the cost-effectiveness of this recipe cannot be overstated. With basic and affordable ingredients commonly found in your pantry, you can create a delicious drink that rivals expensive smoothies from cafés.

Historical Background and Cultural Significance

Often attributed to the health food movement of the late 20th century, smoothies have roots in various cultures that utilize blended fruits and vegetables for nourishment. The modern smoothie as we know it became popular in the United States in the 1960s and 70s, aligning with the rise in interest towards holistic natural health.

Culturally, smoothies reflect a shift towards incorporating more whole foods into our diets. They signify a growing awareness of health and wellness, making them a staple in many modern diets. This trend has transcended borders, influencing various cultures to integrate their native fruits and vegetables into smoothie recipes.

As people began experimenting with flavors and textures, regional variations of the smoothie emerged, allowing for local ingredients to shine. This evolution leads to the introduction of superfood ingredients such as acai and spirulina, which are now popular in smoothies worldwide.

In many regions, smoothies are not just a food trend but a cultural statement on diet and lifestyle choices, celebrating health, vitality, and a connection to natural foods.

Ingredient Deep Dive

Banana: A staple fruit in many diets, bananas are rich in potassium and provide natural sweetness. When choosing bananas, look for those that are slightly speckled, indicating ripeness. Store them at room temperature, but refrigerate if overripe to prolong freshness. As a substitute, frozen bananas can offer a similar texture in smoothies.

Spinach: This leafy green is often overlooked but holds significant nutritional value. Packed with iron, vitamins A and C, spinach contributes a subtle earthy flavor to smoothies. When selecting spinach, choose vivid green leaves that are crisp and free from blemishes. Store in the fridge wrapped in a damp paper towel to maintain freshness. For those avoiding greens, alternatives like kale or even lettuce work well.

Common Mistakes to Avoid

  • Overloading on frozen fruit can lead to an overly thick smoothie. Aim for balance by incorporating fresh fruits.
  • Neglecting to wash greens thoroughly could introduce unwanted flavors or impurities into your smoothie.
  • Not using ripe bananas may result in a less sweet smoothie; always check for ripeness.
  • Using too much ice can dilute flavors significantly. Consider using frozen fruits instead.
  • Forgetting to adjust sweetness according to personal taste can lead to disappointing results.
  • Not blending long enough can leave chunks; ensure a smooth consistency by blending thoroughly.
  • Ignoring the balance of flavors could mean the smoothie ends up too tart or sweet—find your perfect mix.
  • Using old or expired ingredients can add unpleasant flavors. Always check ingredient freshness.
  • Not preparing ingredients to the right sizes can strain your blender and affect the smooth texture.
  • Leaving out liquid can create a smoothie that’s too thick to drink; always adjust according to desired texture.

Essential Techniques

Blending: This technique is critical for achieving the smooth consistency that defines a great smoothie. To master it, start with liquids at the bottom, followed by softer fruits, and finish with firmer ingredients to ensure even blending. Avoid common pitfalls by stopping occasionally to scrape down the sides for a uniform mix.

Prepping Ingredients: Preparing your ingredients in advance can save time and effort. Investing in storage containers to keep your fruits and greens fresh allows you to quickly assemble your smoothie. Be mindful of how you store greens, as they wilt quickly; use airtight containers when possible to extend shelf life.

Pro Tips for Perfect Healthy Smoothie

1. Always use ripe bananas for optimal sweetness and creaminess.

2. A splash of lemon or lime juice can enhance flavors and prevent browning in fruits.

3. Consider using coconut water or almond milk for added nutrition and flavor.

4. Add protein powder for a more filling breakfast option.

5. Experiment with different greens, like kale or swiss chard, for varied nutrition.

6. Use honey or maple syrup instead of sugar for a natural sweetener.

7. Try adding nut butter for a creamy texture and extra protein.

8. Garnish with nuts or seeds for a satisfying crunch.

Variations and Adaptations

This healthy smoothie can be adapted for regional flavors by incorporating seasonal fruits. In the summer, berries like strawberries or blueberries can shine. In the fall, spice it up with pumpkin puree or apple sauce for a comforting twist.

Dietary modifications are also possible—replace yogurt with a plant-based alternative for a vegan version, or add oats for extra fiber and sustenance. For texture changes, options like chia seeds or flaxseeds can add thickness while boosting nutritional content.

Serving and Presentation Guide

For an appealing presentation, serve your smoothie in tall, clear glasses to showcase its vibrant colors. Garnish with fresh fruit on top or a sprig of mint for a touch of elegance. Pairing with small portions of granola or healthy baked goods beside the glass can create a balanced visual.

Wine and Beverage Pairing

For those seeking a refreshing pairing with dessert, consider a sparkling white wine that complements the fruitiness of the smoothie. Non-alcoholic options include herbal teas or flavored sparkling waters that can enhance the smoothie experience. If enjoying in the morning, a light roast coffee might also pair well, adding a contrasting flavor.

Storage and Shelf Life

Store any leftover smoothie in an airtight container in the refrigerator for up to 24 hours. If you want to freeze portions, consider using ice cube trays or freezer-safe jars. To maintain freshness, consume your smoothie within a few days, and always look for signs of separation or off smells that may indicate spoilage.

Make Ahead Strategies

Preparing smoothies in advance is possible by pre-portioning ingredients into freezer bags. This not only saves time but also helps in maintaining the flavor without degradation. Just blend the contents directly from the freezer without thawing.

Scaling Instructions

When scaling recipes, remember that doubling ingredients may not require exactly double the liquid. Adjust to achieve the right consistency, especially when considering volume increases. A larger blender may be necessary for bigger batches, and always taste as you combine to maintain desired flavor balance.

Nutritional Deep Dive

This healthy smoothie is rich in macronutrients, providing a balanced profile of carbohydrates from fruits, protein from yogurt, and healthy fats if nut butter is added. Micronutrient-wise, it offers a wealth of vitamins and minerals essential for energy and metabolism. With minimal added sugars, it stands as a suitable option for those monitoring their caloric intake.

Dietary Adaptations

By substituting yogurt with a dairy-free version, this smoothie can easily cater to vegan or lactose-intolerant individuals. The use of alternate sweeteners, such as agave or stevia, also allows for a low-sugar variant. Gluten-free modifications are naturally met by using pureed fruit without any gluten-containing ingredients.

Troubleshooting Guide

In case of a too-thick consistency, simply add more liquid gradually until the ideal texture is achieved without sacrificing flavor. If the flavor is too bland, consider incorporating more spices or citrus to enhance the overall taste.

Recipe Success Stories

Many readers share their success stories of discovering healthier habits through this smoothie. From experimenting with various fruit combinations to sharing adaptations for dietary preferences, it has become a favorite among families looking to enhance their health without sacrificing flavor.

Frequently Asked Questions

Can I make this smoothie ahead of time?
Yes, you can definitely prepare smoothie ingredients in advance and store them in the freezer for quicker assembly in the morning.

Can I use frozen fruits?
Absolutely! Frozen fruits are a great option and will actually provide a creamier texture.

Is this smoothie kid-friendly?
Yes, children generally love smoothies, and you can involve them in the preparation process.

What if I don’t like spinach?
You can substitute spinach with kale or omit greens altogether for a fruit-only smoothie.

How can I sweeten my smoothie naturally?
Consider adding honey, maple syrup, or even a medjool date for natural sweetness.

Can I add protein powder to this recipe?
Definitely! Adding protein powder can turn this smoothie into a complete meal replacement.

How long will this smoothie last in the fridge?
It’s best consumed within 24 hours for optimal freshness and flavor.

What are some topping ideas for my smoothie?
Try topping your smoothie with granola, seeds, or sliced fruits for added texture and nutrients.

Are smoothies good for weight loss?
When made with whole, nutritious ingredients, smoothies can support weight loss goals as part of a balanced diet.

How can I make my smoothie creamier?
Use ripe bananas or add yogurt for creaminess, or try adding nut butter for an added texture boost.

Additional Resources

For more delicious and healthy recipes, check out our collection of smoothie recipes, as well as guides on nutrition and ingredient selection for healthy eating. Explore seasonal variations to keep your smoothie game fresh while using what’s currently in season.

Join the Conversation

We invite you to share your smoothie successes and photos on social media! Join our community of health-conscious individuals and feel free to drop your feedback and adaptations for this healthy smoothie. Let’s inspire each other to create delicious and nutritious meals!

The Recipe

Healthy Smoothie

Serves: 2

Prep Time: 10 mins

Cook Time: 0 mins

Total Time: 10 mins

Kitchen Equipment Needed

  • High-speed blender
  • Measuring cups
  • Cutting board
  • Knife
  • Storage containers (if making in advance)

Ingredients

  • 1 ripe banana
  • 1 cup fresh spinach leaves
  • 1 cup frozen mixed berries
  • 1 cup yogurt (preferably Greek)
  • 1 cup almond milk (or any preferred liquid)
  • 1 tablespoon honey (optional)

Directions

  1. Gather all ingredients and place them in your blender in the order listed.
  2. Blend on high until the mixture is completely smooth, stopping to scrape down the sides if necessary.
  3. Taste the smoothie and adjust sweetness by adding honey if desired. Blend again to incorporate.
  4. Pour into glasses and serve immediately, garnishing with fresh fruits or seeds if desired.
  5. Enjoy your healthy smoothie as a nourishing start to your day or a refreshing afternoon treat!

Recipe Notes

  • Feel free to swap the yogurt for a dairy-free alternative to cater to dietary restrictions.
  • If you’re in a rush, you can prep your ingredients in advance and freeze them in portions.
  • Try experimenting with nut butters or chia seeds for added nutrition and flavor.
  • For different flavor profiles, switch up the fruits based on what you have available.