Indulge in Festive Delight with Christmas Cookie Lasagna Recipe

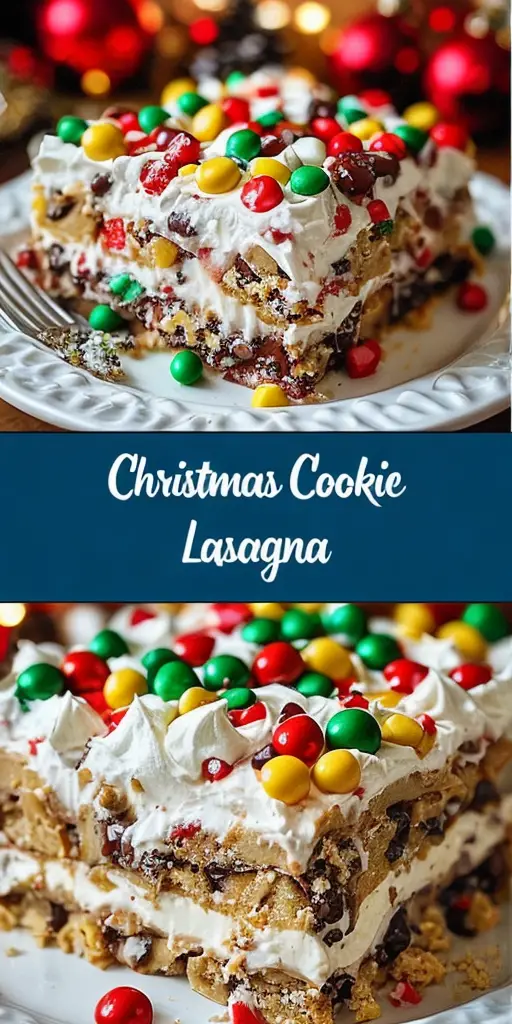
Delicious Christmas Cookie Lasagna: A Festive Treat

⚖️
Difficulty
Easy

⏲️
Prep Time
20 mins

🕒
Cook Time
10 mins

⏱️
Total Time
30 mins

🍽️
Servings
8

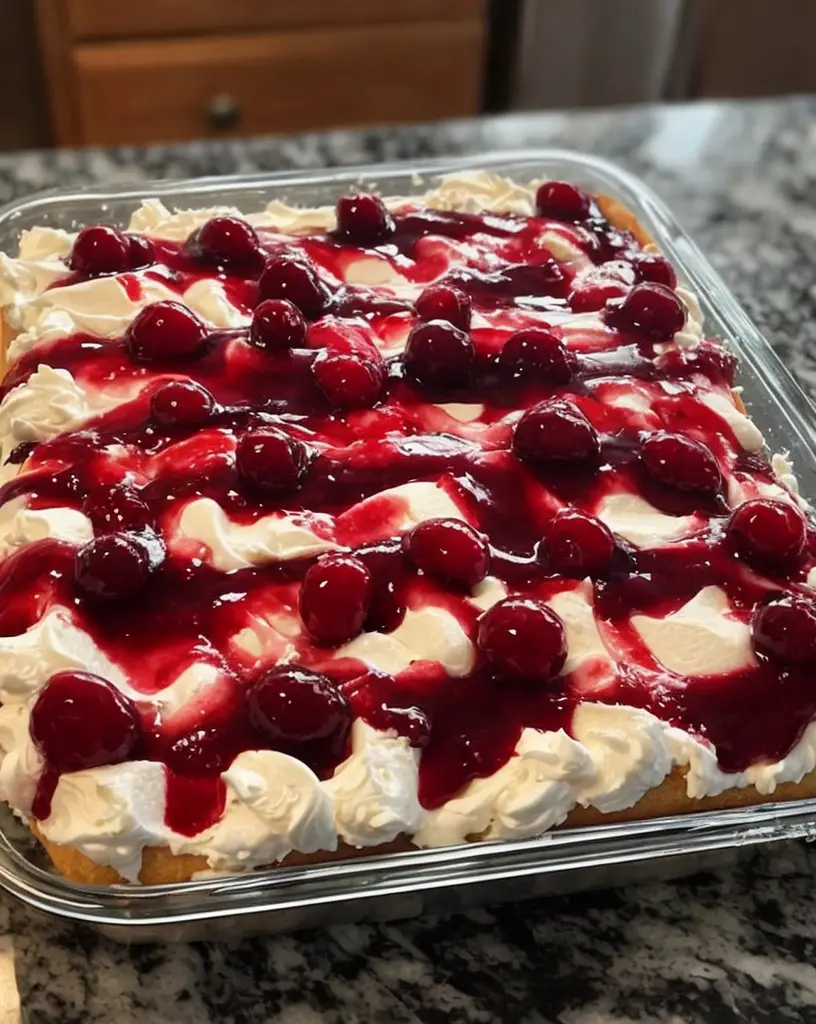
Imagine the sweet aroma of sugar cookies wafting through your kitchen as you prepare the delightful Christmas Cookie Lasagna. This festive dessert blends layers of crunchy holiday cookies with smooth cream and a hint of spiciness to captivate your senses. The vibrant colors and textures make it as visually appealing as it is delicious, perfect for impressing guests at holiday gatherings.

Christmas Cookie Lasagna is not just another dessert; it’s a celebration of flavors and textures layered together to create a culinary masterpiece. Each bite reveals a harmonious blend of spicy nutmeg, creamy vanilla, and decadent chocolate, all encased in soft and crisp cookie layers. Prepare for a dessert experience that appeals not only to your taste buds but also to your love for festive culinary creations.

Quick Recipe Highlights

  • Flavor Profile: This Christmas Cookie Lasagna features the warm spices of nutmeg and cinnamon combined with creamy vanilla and rich chocolate for an indulgent holiday flavor.
  • Texture: The combination of crunchy cookies and smooth cream provides a delightful contrast, making each bite a textured delight.
  • Aroma: Enjoy the intoxicating aromas of holiday spices and fresh-baked cookies that fill the air as you create this memorable dessert.
  • Visual Appeal: Beautifully layered with vibrant colors, this dish is perfect for enhancing the festive spirit and impressing your guests.
  • Skill Level Needed: Perfect for both beginners and seasoned bakers, this easy recipe requires minimal baking skills, ensuring a stress-free cooking experience.
  • Special Equipment: A baking dish and a mixer are all you need, making the preparation straightforward and accessible.

Recipe Overview

  • Difficulty Level: Designed to be easy and accessible, this recipe doesn’t require extensive baking knowledge, making it suitable for everyone.
  • Category: This dish falls under the dessert category, specifically targeting festive and holiday occasions with its rich flavors.
  • Cuisine: Inspired by traditional holiday baking, it marries contemporary methods with classic festive flavors.
  • Cost: Affordable and made with readily available ingredients, it is budget-friendly while still offering gourmet satisfaction.
  • Season: Best enjoyed during the winter holiday season when rich, warming flavors are most appreciated.
  • Occasion: Ideal for Christmas parties, family gatherings, or any festive celebration where a special dessert is needed.

Why You’ll Love This Recipe


The taste and texture of Christmas Cookie Lasagna are perfectly balanced, offering a satisfying crunch alongside a creamy filling. Each layer provides a different flavor experience, from spicy cookies to sweet vanilla cream, ensuring each bite is unique and delicious.

Convenience is key here, with a straightforward preparation process that doesn’t involve lengthy baking times. The ability to prepare components ahead of time allows for efficient assembly during busy holiday schedules.

Nutritionally, this dessert offers a treat without excessive guilt. It has the creamy indulgence we crave during the holidays while allowing portion control through the layered design, making it easier to enjoy in moderation.

In terms of social and entertaining value, this dish is a conversation starter. Its beautiful presentation and delicious taste make it a hit at any holiday table, encouraging friends and family to share recipes and experiences.

Cost-effectiveness and accessibility are evident with ingredients that are both budget-friendly and easy to source. This recipe allows you to create a stunning dessert without breaking the bank, making it accessible to anyone wanting to try something new this holiday season.

Historical Background and Cultural Significance


The concept of lasagna-like desserts hails from innovative twists on classic savory dishes, redefining comfort food for sweet tooths. Over time, variations of layered desserts became synonymous with special occasions and celebrations.

Christmas Cookie Lasagna embodies the holiday spirit by infusing traditional flavors associated with yuletide baking, creating a modern classic cherished by families. Its cultural importance lies in its ability to adapt and incorporate diverse holiday flavors, from gingerbread to peppermint.

The evolution of this recipe reflects our desire for both tradition and innovation, marrying beloved holiday cookies with new dessert formats. Each family’s take adds a unique twist to the ever-growing tapestry of holiday desserts.

Regional variations abound, with some versions incorporating regional spices or local confections, demonstrating the versatility and adaptability of this festive treat.

Ingredient Deep Dive


The central ingredient in this Christmas Cookie Lasagna is the spiced holiday cookie, which not only brings rich flavors but also a delightful thickness to the layers. Historically, these types of cookies have been part of holiday traditions, with their comforting spices enhancing winter celebrations.

Nutritionally, these spiced cookies may indulge your sweet tooth, but they also include essential spices like cinnamon, which has been associated with numerous health benefits. Additionally, selecting high-quality butter and sugar ensures a premium taste that resonates through the dessert.

When choosing cookies, it’s crucial to opt for those with strong structural integrity to balance with the creamy layers. Store them in a cool, dry place to maintain their crispness until assembly.

Substitution options abound; you can experiment with different cookie flavors to personalize your lasagna further. Consider gluten-free or low-sugar varieties to cater to dietary needs without compromising taste.

Common Mistakes to Avoid

  • Rushing the layering process can lead to uneven distribution. Take time to smooth each layer for consistent texture.
  • Using too soft a cookie results in a mushy lasagna. Ensure your cookies have enough firmness to maintain structure.
  • Not chilling the dessert can cause it to fall apart. Allow ample time in the refrigerator for proper setting.
  • Overly sweetening each layer can overwhelm the palate. Balance the sweetness across components for a harmonious flavor blend.
  • Ignoring the proportions may lead to an unstable dish. Adhere to recommended measurements for each layer to ensure proper balance.
  • Skipping the use of a firm spatula can affect the layering process. A sturdy tool helps achieve smooth and even layers.
  • Not planning for enough chilling time will make slicing difficult. Patience is key to achieving clean, well-defined portions.
  • Neglecting ingredient quality affects the final product. Invest in higher quality ingredients for improved taste and texture.

Essential Techniques


Layering is the cornerstone of this Christmas Cookie Lasagna, requiring attention to detail to ensure each layer is distinct yet cohesive. Mastering this technique enhances texture and presentation, offering a visually appealing cross-section when served.

Chilling the dessert is also crucial, as it allows layers to set properly, making cutting and serving seamless. The cold helps the cream layers gel together, preventing them from becoming runny when sliced.

Assembly tips include gently pressing down each cookie layer to help secure it within the cream, ensuring a stable, stackable structure that won’t topple when serving.

Using a mix of traditional holiday spices, like cinnamon and nutmeg, is essential for achieving the dessert’s distinct festive flavor. Carefully measure these warming spices to maintain a balanced profile, avoiding an overpowering taste.

Pro Tips for Perfect Christmas Cookie Lasagna


Ensure optimal flavor by allowing the dessert to rest overnight in the refrigerator. This resting period enables flavors to meld together, enhancing its overall taste profile.

To achieve clean cuts when serving, dip your knife in hot water before slicing through the lasagna. This technique ensures neat edges and helps separate the layers without sticking.

Experiment with a combination of cookie varieties for a richer taste experience. Mixing ginger snaps with sugar cookies can add depth and complexity to your lasagna.

Incorporate high-quality vanilla extract for an authentic and aromatic cream layer that complements the spicy cookie base.

Present your dessert with a dusting of powdered sugar and a sprinkle of cinnamon just before serving. This finishing touch elevates both taste and presentation, highlighting the festive theme.

Consider adding a chocolate drizzle or peppermint bark pieces to personalize the dish’s final look, enhancing the holiday feel.

Prepare your cream a day in advance and store it in the fridge for a thicker consistency that’s easier to spread and layer.

Variations and Adaptations


Introduce regional variations by incorporating locally popular holiday spices or cookies. This customization allows you to honor local festive traditions while enjoying the dessert.

Seasonal adaptations might include swapping gingerbread cookies for the winter months or incorporating lemon zest in the cream for a springtime freshness, showcasing the recipe’s adaptability.

For dietary modifications, gluten-free cookies serve as a perfect base, while dairy-free cream substitutes ensure everyone at your table can enjoy this treat. Opting for these adaptations allows inclusion without sacrificing taste.

Consider flavor variations with additional extracts like almond or anise in the cream, offering unique preferences to those seeking bolder tastes in their dessert.

Texture modifications can be achieved by alternating layers with nut brittles or fruit preserves, offering a playful contrast to the existing surprise element.

Presentation alternatives include serving individual portions in glass jars or cups, allowing guests to admire the intricate layers, perfectly suited for more casual gatherings or entertaining.

Serving and Presentation Guide


Plating techniques count significantly when serving Christmas Cookie Lasagna. Use a sharp knife for precision cuts, ensuring layers remain intact and visible.

Garnishing ideas enhance visual appeal; consider sprinkling crushed candy canes or grated chocolate atop for a festive finish. This garnish adds color and texture to each serving.

Traditional accompaniments include a dollop of whipped cream or a scoop of vanilla ice cream, augmenting the dessert’s creamy elements and delighting those with a sweet tooth.

Modern serving suggestions involve pairing with spiced coffee or a velvet hot chocolate, providing a warm and cozy finish, ideal for wintery settings.

Temperature considerations ensure the dessert remains chilled until just before serving, maximizing flavor and maintaining structural integrity.

Portion control tips suggest slicing smaller, even pieces, arranging them decoratively on your serving platter to please both the eyes and the palate.

Wine and Beverage Pairing


Pair this indulgent dessert with a light, fruity dessert wine, such as Moscato, which complements the sweet and spicy layers without overpowering the palate.

For non-alcoholic alternatives, a mulled apple cider offers a warm, spiced beverage choice that echoes the cookies’ holiday flavors.

Consider coffee or tea pairings with a robust dark roast or a chai tea, highlighting the warm spices featured in the lasagna and offering a satisfying finish to your meal.

Ensure beverages are served at the appropriate temperature; chilled wines act as a refreshing counterbalance while hot drinks offer a pleasing contrast.

Serving suggestions include presenting drinks in holiday-themed mugs or glasses, complementing the festive spirit of your dessert display.

Storage and Shelf Life


Proper storage enhances the longevity of your Christmas Cookie Lasagna, keeping it fresh for up to 3 days when refrigerated in an airtight container.

Adjust your storage methods to account for temperature requirements. A consistently cold environment prevents separation of the cream layers, maintaining its texture and taste.

Opt for sturdy containers that withstand the fridge’s cold without transferring outside smells to your dessert, ensuring its flavors remain pure and undisturbed.

Signs of spoilage include changes in texture or smell, signaling fermentation. If observed, discard to maintain food safety standards.

Reheating instructions include avoiding conventional ovens that may dry out the dessert. Instead, allow it to reach room temperature for a fresh-from-the-fridge flavor.

Freezing guidelines suggest avoiding full lasagnas due to potential textural changes, but consider freezing individual cookie components to keep them on hand for future dessert creations.

Make Ahead Strategies


Adopt a prep timeline that focuses on constructing different components in advance. Baking cookies earlier saves time, while cream can be mixed and chilled the day before.

Storage between steps involves maintaining the integrity of each layer; place wax paper between layered cookies to prevent sticking when stored.

Assess the quality impact when making ahead. Note that chilling the assembled lasagna overnight dramatically enhances its flavor, satisfying both impatience and preparation needs.

Assembly tips focus on gently layering and pressing to avoid breaking cookies. Maintaining consistent pressure ensures a smooth surface ready for the next layer.

Reheating guidelines favor avoiding any heat; instead, enjoy your dish cooled, keeping the creamy consistency unchanged and favorably maintained.

Include fresh element additions just before serving, such as decorative garnishes, to achieve a just-made appearance for presentation, enhancing its holiday draw.

Scaling Instructions


Halving the recipe provides flexibility for smaller gatherings, maintaining ingredient ratios for consistent results while ensuring necessary equipment matches the reduced volume.

Doubling or tripling requires proportional ingredient adjustments and determining if additional or larger equipment is needed for successful scaling.

Embrace equipment adjustments by using larger baking dishes or dividing mixtures among several smaller ones when increasing batch size, ensuring thorough cooking and presentation.

Timing modifications help maintain quality; adjust relative cooking times for layers and chilling directives according to increased quantity.

Storage considerations should anticipate larger yield; plan adequate refrigerator space or find effective portion storage for freshness retention, embracing abundance without wastage.

Nutritional Deep Dive


Achieving a balanced macro breakdown lets you enjoy this Christmas Cookie Lasagna responsibly, reflecting a mix of carbs, fats, and proteins that satisfy festive cravings.

Micronutrient analysis highlights the inclusion of nutrient-rich spices like cinnamon, lending antioxidant properties to this crowd-pleasing dessert.

These health benefits ensure that while indulging, you also experience some nutritional advantages, making this dessert a bit more guilt-free.

Dietary considerations include utilizing alternative ingredients for specific needs, optimizing your lasagna for both flavor and wellness potential.

Portion analysis guarantees that serving recommendations gain nutritional insight, allowing you to enjoy the treat alongside a satisfying meal.

Weight management tips recommend indulging reasonably, balancing your lasagna experience with healthier alternatives throughout the day.

Dietary Adaptations


For gluten-free adaptation, opt for compatible cookies, achieving delectable taste without wheat-based elements. The cream layer needs no modifications, offering consistent enjoyment.

Dairy-free variations suggest coconut cream or dairy-free whipped toppings as luscious alternatives, matching creamy indulgence with lactose-free satisfaction.

Incorporate vegan choices by selecting plant-based cookies and creams, achieving alluring taste and texture without animal products for inclusive festive celebrations.

Low-carb variations adopt reduced-sugar or nut-based cookie choices, crafting your layers with keto-friendly creams that minimize carbohydrates, perfect for mindful indulgence.

Keto modifications continue with ketogenic-friendly ingredients, ensuring adherence to dietary preferences while tasting irresistible—the balance between festivity and health is paramount.

Paleo alternatives utilize grain-free cookies and natural sweeteners for primal adherence, offering a naturally indulgent dessert option during the seasonal gathering.

Low-FODMAP versions focus on specific inclusions and modifications, avoiding problematic ingredients while allowing merry enjoyment during your holiday feast.

Troubleshooting Guide


Texture issues such as sogginess result from insufficient chilling or overly moist components. Rectify by ensuring proper cooling and balancing liquid additions.

Flavor balance challenges may arise from excessive spices or sweetness. Achieve harmony by methodically measuring each component, tasting and adjusting as necessary.

Temperature problems usually require careful monitoring; notice warming signs affecting cream, using extra chilling practices for bisected control.

Equipment challenges, such as undersized baking options or faulty mixing tools, affect overall results. Invest in sturdy, appropriately sized tools to enhance seamless preparation.

Ingredient substitutions require knowledge; improve ingredient familiarity to maximize recipe adaptability, retaining both texture and taste.

Timing concerns result from underestimated prep or chill periods. Allocate generous time slots for layering with patience to achieve optimal outputs, satisfying both visual and flavor expectations.

Recipe Success Stories


Delight in community feedback praising this Christmas Cookie Lasagna’s visual appeal, noted by readers who loved showcasing it as their dessert centerpiece.

Variation successes highlight the versatility many readers enjoy, sharing photos of their own adaptations with awe-inspiring outcomes, perfecting the balance between creativity and flavor.

Adaptation stories circulate, with shared insights into dietary substitutions that yielded successful—and delectable—festive options, accommodating various preferences and family traditions.

Reader suggestions fuel ongoing creativity by offering inventive variations and detailed assembly tips that expand the dessert’s appeal and foster community involvement.

Photography tips advise setting ample lighting and utilizing versatile angles to capture garnished beauty, encouraging social sharing and inspiring engagement among dessert enthusiasts.

Frequently Asked Questions

Can I use homemade cookies for this recipe?

Absolutely! Homemade cookies will enhance this lasagna’s flavor and texture, providing a personal touch that resonates through each layer.

What if my cream layer is too runny?

Ensure that your cream is thoroughly chilled before using. If still runny, a mild thickening agent like cornstarch can help achieve the right consistency.

How far in advance can I prepare this lasagna?

Prepare it up to two days in advance to allow flavors to meld. Keeping it refrigerated ensures optimal freshness when it’s time to serve.

What types of garnishes pair well with this dessert?

Crushed candy canes, chocolate shavings, or a dusting of cinnamon complement your lasagna’s festive flair and enhance presentation.

How should I store leftover lasagna?

Store leftovers in an airtight container in the refrigerator, maintaining quality for up to three days without compromising texture.

Is it possible to freeze this dessert?

While possible, freezing may alter texture. For best results, freeze individual cookie components rather than the whole lasagna.

Can I make this recipe gluten-free?

Certainly, by using gluten-free cookies and verifying cream components adhere to dietary needs, you can enjoy the dessert without gluten.

Which spices work best in this dish?

Cinnamon and nutmeg bring warmth and festive flair, while cardamom or allspice are excellent alternatives to explore varying depth of taste.

How can I achieve a cleaner slice?

Use a hot knife, dipping it in warm water before slicing to ensure smooth edges and preserve the lasagna’s visual layering effect.

Why is my lasagna falling apart?

Insufficient chilling or rushed layering results in instability. Ensure ample chill time and gently press down layers to maintain structure.

What is the best way to serve this dessert?

Serve portions on colorful dessert plates, adding garnishes just before presentation for a professional appearance and taste delight.

How do I adjust the sweetness level?

Control sweetness by altering sugar in the cream and opting for mild cookies. Adjustments allow personalized levels without overwhelming flavors.

Additional Resources


Explore related recipes like spiced trifle or peppermint mousse, expanding your holiday dessert repertoire with equally convivial and merry selections.

Technique guides introduce best practices in layering and chilling, crucial for mastering multi-layered desserts, ensuring inviting presentation and taste standards.

Ingredient information offers deeper insights into optimum cookie choices and cream stability, transforming your knowledge base into culinary success stories.

Equipment recommendations involve investing in a reliable mixer and quality baking tins, assisting your dessert assembly with tools tailored for ease and precision.

Seasonal variations encourage experimenting with festive flavors, combining traditional and contemporary elements to invigorate your culinary creations down to every last enchanting crumb.

Join the Conversation


Embrace community engagement by sharing your experiences on social media platforms, using #ChristmasCookieLasagna to connect with fellow bakers and inspire holiday spirit.

Photography tips entice visual sharing; aim for natural lighting and hearty garnishing to excite followers, breathing lively festivity into each frame.

Encourage recipe reviews, inviting constructive feedback to evolve family desserts, ensuring every attempt adds happiness and flavor to your celebrations.

Experiment with community-assisted recipe variations, enriching diverse flavors in your lasagna through collaborative baking and sharing culinary legacies.

Whether you prefer a traditional approach or innovative twist, exchange ideas to ensure this Christmas Cookie Lasagna warms your kitchen and hearts alike, crafting memories beyond delectable bites.

The Recipe

Christmas Cookie Lasagna

Serves: 8

Prep Time: 20 mins

Cook Time: 10 mins

Total Time: 30 mins

Kitchen Equipment Needed

  • Mixing bowls
  • Hand or stand mixer
  • Baking dish (9×13 inch)
  • Spatula
  • Measuring cups and spoons

Ingredients

  • 24 holiday spice cookies
  • 8 oz cream cheese, softened
  • 1 cup powdered sugar
  • 2 teaspoons vanilla extract
  • 2 cups heavy cream
  • ¾ cup chocolate chips, melted

Directions

  1. Beat cream cheese and powdered sugar in a bowl until smooth. Add vanilla extract and mix well.
  2. In another bowl, whip heavy cream until peaks form. Gently fold into the cream cheese mixture.
  3. Spread a thin layer of cream mixture at the bottom of a 9×13 baking dish.
  4. Layer half of the cookies over the cream in a single layer, covering the bottom of the dish.
  5. Top with half of the remaining cream mixture, then melted chocolate, as desired.
  6. Repeat layers, ending with a cream layer on top.
  7. Chill in the refrigerator for at least 4 hours or overnight, allowing it to set.

Recipe Notes

  • For a richer flavor, substitute dark chocolate chips.
  • Experiment with your family’s favorite holiday spices for a personalized touch.
  • For a decorative finish, top with crushed candy canes before serving.

Irresistible Heaven On Earth Cake: A Layered Dessert Masterpiece

Heaven On Earth Cake: A Treat for the Senses

⚖️
Difficulty
Medium

⏲️
Prep Time
20 mins

🕒
Cook Time
30 mins

⏱️
Total Time
50 mins

🍽️
Servings
8-10

Indulge in the sheer bliss of Heaven On Earth Cake, a luscious dessert that’s sure to satisfy your sweet tooth. This delightful treat marries the rich flavors of cream and cherries with the light, airy texture of angel food cake. The taste is nothing short of divine, evoking the pleasures of a summer picnic on a golden afternoon.

Imagine each bite, where the creamy layers are interspersed with pockets of tart cherries, melting effortlessly in your mouth. Whether you’re a seasoned baker or a novice in the kitchen, this recipe delivers heavenly results with its straightforward yet rewarding process. For those seeking the joy of homemade desserts without the hassle, Heaven On Earth Cake is your answer.

Quick Recipe Highlights

  • Flavor Profile: This cake bursts with the sweet-tart medley of cherries and the velvety richness of cream, counterbalanced by the subtle sweetness of angel food cake.
  • Texture: The contrasting textures of smooth cream and tender cake create a delightful interplay on the palate.
  • Aroma: A fragrant wave of cherries and vanilla greets your senses upon slicing.
  • Visual Appeal: The vibrant red of cherries layered against soft cream creates a visually stunning dessert.
  • Skill Level Needed: While this cake is simply constructed, mastering its layering technique is key to perfection.
  • Special Equipment: A springform pan helps achieve the ideal shape and structure for this cake.

Recipe Overview

  • Difficulty Level: This is a medium-difficulty dessert, suitable for those comfortable with basic baking and willing to try layering and arranging ingredients with care.
  • Category: Heaven On Earth Cake falls into the dessert category, making it an excellent centerpiece for after-dinner delight.
  • Cuisine: Rooted in American cuisine, this cake combines classic flavors in an innovative format.
  • Cost: Relatively affordable, the primary costs involve fresh cherries and quality cream, with total expenses manageable for most budgets.
  • Season: Best enjoyed in late spring through summer when cherries are at their peak, offering natural sweetness and juiciness.
  • Occasion: Ideal for birthdays, family gatherings, or any event where you wish to impress guests with minimal effort.

Why You’ll Love This Recipe


Heaven On Earth Cake offers a pleasurable contrast of flavors and textures, which makes for a satisfying bite each time. The tartness of cherries against the smooth coolness of whipped cream provides a refreshing experience. Moreover, the cake’s preparation is a breeze, easily assembled without needing intensive involvement or specialized techniques.

The dessert not only scores high on indulgence but also brings nutritional benefits to the table with its light, low-calorie angel food base offsetting the richness of the cream, making it a sensible choice for dessert lovers. Additionally, the recipe’s flexibility allows it to shine as a centerpiece for social gatherings—its beauty is sure to be a conversation starter.

The ingredient accessibility makes Heaven On Earth Cake an attractive option; all components can be found in local stores, ensuring convenience. The monetary savings achieved when making this dessert at home instead of buying gourmet options is an added advantage, offering high-end taste without high costs.

Historical Background and Cultural Significance


While the exact origin of Heaven On Earth Cake is somewhat nebulous, it draws on classic American dessert traditions by reimagining the angel food cake—a staple on many a table since the late 19th century. This cake exemplifies creativity in layering, a common practice in American households seeking to refresh classic recipes with contemporary twists.

Culturally, desserts like the Heaven On Earth Cake serve as symbols of celebration and community, invoking gatherings where joy and connection are paramount. The evolution of this recipe reflects the adaptability of home cooks, inspired by both nostalgia and innovation for unique, comforting flavors in dishes.

Regionally, variations exist, with some preferring to swap cherries for other fruits like strawberries or blueberries, creating new iterations while maintaining the fundamental appeal of the dessert’s construction. This adaptability enhances the cake’s stature as a beloved culinary delight within American homes.

Ingredient Deep Dive


Cherries bring a vibrant color and sweet-tart flavor that defines the Heaven On Earth Cake. Historically, cherries have been celebrated as a summer fruit, full of vitamins and providing a subtle antioxidant boost thanks to their anthocyanin content. When selecting cherries, opt for those that are firm and plump, indicating optimal freshness. Store them in the fridge to extend their shelf life, but if replacements are needed, berries such as strawberries offer a comparable taste profile.

Cream is the luxurious element binding this cake together. It contributes to the richness that defines its decadent experience. Opt for heavy whipping cream to ensure the most stable and voluminous texture. Given its sensitivity, cream must be stored in a cold environment. Non-dairy options like coconut cream can be substituted for those avoiding lactose, preserving the indulgent texture with a hint of tropical flavor.

Common Mistakes to Avoid

  • Overbeating the cream, which can transform it into butter—aim for soft peaks.
  • Using canned cherries without proper draining can result in a soggy cake.
  • Not allowing the cake adequate time to chill, which compromises structural integrity.
  • Incorrect layering, leading to uneven distribution of ingredients.
  • Using a knife instead of a serrated blade when slicing can flatten the layers.
  • Selecting out-of-season cherries, which lack the necessary sweetness and flavor.
  • Skipping the resting period, reducing the melding of flavors.
  • Neglecting to test the cake’s stability before plating may result in collapse.

Essential Techniques


Layering precision is vital for the Heaven On Earth Cake; it ensures the cake holds together and maintains aesthetic appeal. Always start with heavier, stable layers and carefully transition to softer ones. This stacking process allows for even distribution of weight and optimal flavor integration.

Pro Tips for Perfect Heaven On Earth Cake


For a flawless cake, chill the bowl before whipping cream—a cold environment fosters better aeration. Additionally, when layering, use a spoon rather than pouring the cream to maintain even distribution without breaking the cake apart. Incorporate a hint of almond extract into the whipped cream for an elevated flavor profile.

Variations and Adaptations


Regional variations include using locally available berries or adding a layer of crushed nuts for enhanced texture. Seasonal adaptations might introduce a layer of lemon curd during spring for brightness. For dietary modifications, consider gluten-free angel food cake for gluten-sensitive individuals.

Serving and Presentation Guide


Beautifully present the Heaven On Earth Cake by garnishing with fresh cherry halves and mint leaves for a pop of color. Serve on white plates to let the vibrant red stand out, ensuring the beauty of each slice is showcased.

Wine and Beverage Pairing


Pair this cake with a light-bodied Riesling wine, enhancing its aromatic complexity. Non-alcoholically, a sparkling water with a hint of lemon maintains the cake’s refreshing quality. Both complement the dessert’s light creaminess perfectly.

Storage and Shelf Life


Store leftovers in an airtight container in the refrigerator for up to three days. Ensure the cake is wholly covered to avoid drying. For longer storage, consider freezing individual portions, wrapped tightly in plastic and foil, for up to two months.

Make Ahead Strategies


Prepare the cake layers a day ahead, allowing them to firm up before assembly. This advanced preparation ensures flavors meld and develop, creating a stronger, more cohesive structure.

Scaling Instructions


For larger gatherings, doubling the recipe is feasible; use larger pans and adjust cooking times slightly to accommodate the increased volume. Conversely, for a scaled-down version, use ramekins for individual servings, adjusting baking times accordingly.

Nutritional Deep Dive


With a light angel food cake base, the Heaven On Earth Cake keeps the calorie count moderate while providing necessary energy. Incorporating cream adds calcium and fat-soluble vitamins. Portion control is recommended to enjoy its full flavor without overindulgence.

Dietary Adaptations


Create a gluten-free version with almond flour in the angel food cake. For a more vegan-friendly adaptation, use a coconut cream base and a vegan cake mix. Exploring low-carb versions could involve sugar substitutes for the whipped cream.

Troubleshooting Guide


If the cake is too dense, verify that egg whites in the angel food cake batter are whipped to stiff peaks. A watery cream could be due to under-beating—ensure to whip until soft peaks form. Adjusting oven temperature by 5-10 degrees can address a cake that’s browning too quickly.

Recipe Success Stories


Our community has embraced the Heaven On Earth Cake, with many sharing their own takes—adding flavors like cinnamon or almond for warmth. Readers suggest serving the cake with fresh, seasonal fruits for added freshness, which pairs beautifully with its classic taste.

Frequently Asked Questions

Q: Can I make the cake layers ahead of time?
A: Yes, you can prepare the layers a day in advance, ensuring they are stored properly to maintain freshness.

Q: What if I can’t find fresh cherries?
A: Canned cherries are a viable substitute; ensure they are well-drained to prevent excess moisture from seeping into the cake.

Q: How do I prevent my whipped cream from separating?
A: Use chilled equipment and whip until soft peaks form, avoiding over-whipping which causes cream to break down.

Q: Is there a non-dairy cream alternative?
A: Absolutely, coconut cream offers a great dairy-free option and adds a subtle flavour twist.

Q: Can this cake be frozen?
A: Yes, slice and wrap in plastic followed by foil; it keeps well in the freezer for up to two months.

Q: Which cake pan should I use?
A: Springform pans work well for easy release and presentation.

Q: How should I store leftovers?
A: In the refrigerator, covered, for up to three days to maintain freshness and texture.

Q: Can I add nuts to this cake?
A: Adding a layer of crushed nuts can enhance texture, providing a lovely crunch contrast to the creaminess.

Q: What’s the best way to cut the cake?
A: A serrated knife provides clean cuts, maintaining the integrity of the layered structure.

Q: How can I adjust the sweetness level?
A: Adjust the sugar in the cream or consider using diverse fruits for natural sweetness.

Additional Resources


For further culinary explorations, explore other dessert recipes that highlight seasonal fruits and creams. Dive into guides on mastering the perfect meringue for angel food cakes or discover the array of culinary techniques employed in cake decoration to impressively elevate your presentation skills.

Join the Conversation


We invite you to share your Heaven On Earth Cake creations on social media using our dedicated hashtag. Celebrate your baking journey with us by posting photos, sharing tips, and engaging with fellow dessert enthusiasts. Join our community dedicated to celebrating the joys of homemade desserts, where your feedback and pictures can inspire others.

The Recipe

Heaven On Earth Cake

Serves: 8-10

Prep Time: 20 mins

Cook Time: 30 mins

Total Time: 50 mins

Kitchen Equipment Needed

  • Springform pan
  • Mixing bowls
  • Whisk or electric mixer
  • Serrated knife

Ingredients

  • 1 pre-baked angel food cake
  • 1 can (21 oz) cherry pie filling
  • 1 package (3.4 oz) instant vanilla pudding mix
  • 1 1/2 cups cold milk
  • 1 cup heavy whipping cream
  • 1/4 cup sliced almonds (optional)
  • Fresh cherries and mint leaves for garnish (optional)

Directions

  1. Cut angel food cake into cubes and set aside.
  2. In a separate bowl, whisk together milk and pudding mix until unerringly smooth.
  3. In yet another bowl, whip cream to soft peaks and gently fold into pudding mixture.
  4. Layer half of the cake cubes in a springform pan, followed by half of the cherry pie filling and half of the pudding mixture.
  5. Repeat the layers with remaining ingredients, smoothing the top.
  6. Refrigerate for at least two hours or until set, allowing flavors to meld.
  7. Garnish with sliced almonds, fresh cherries, and mint leaves if desired before slicing and serving.

Recipe Notes

  • For extra flair, sprinkle a pinch of cinnamon into the pudding mix.
  • Ensure the pudding is thoroughly mixed for consistency.

Delicious Strawberry Shortbread Recipe: Discover Soft and Crisp Perfection

Strawberry Shortbread: When Soft Meets Crisp in Dessert Delight

⚖️
Difficulty
Medium

⏲️
Prep Time
30 mins

🕒
Cook Time
15 mins

⏱️
Total Time
45 mins

🍽️
Servings
8

Indulge your taste buds in the delightful fusion of textures with this Strawberry Shortbread recipe. The creamy softness of ripe strawberries perfectly complements the rich, buttery crumb of shortbread, creating an experience that both soft dessert lovers and those preferring a little crisp will adore. Whether you’re planning a sunny afternoon picnic or a cozy family gathering, there’s nothing quite like the aroma of freshly baked shortbread mingled with sweet strawberries to create a memorable moment.

Quick Recipe Highlights

  • Flavor Profile: A perfect blend of sweetness from strawberries and buttery richness in every bite of shortbread.
  • Texture: The dessert combines creamy strawberries with the crunchy texture of shortbread, offering a delightful eating experience.
  • Aroma: You’ll enjoy the inviting buttery scent of baking shortbread, enhanced by the sweet, fruity fragrance of strawberries.
  • Visual Appeal: With its vibrant red strawberries atop golden shortbread, this dessert looks as good as it tastes.
  • Skill Level Needed: While the recipe requires some baking skills, it is accessible to home bakers with a bit of experience.
  • Special Equipment: A rolling pin, baking sheet, and an oven are essential for creating the perfect shortbread texture.

Recipe Overview

  • Difficulty Level: This Strawberry Shortbread recipe is considered medium difficulty. It demands precision in measurement and timing to achieve the perfect shortbread texture without overbaking or undercooking the delightful strawberries.
  • Category: This recipe falls into the category of classic baking, combining beloved elements into a timeless dessert.
  • Cuisine: While rooted in traditional shortbread recipes from Scottish origins, the addition of strawberries adds a modern twist popular in contemporary cuisine.
  • Cost: These ingredients are generally affordable, with strawberries fluctuating in price based on the season, making it a cost-effective dessert for fulfilling indulgence.
  • Season: Ideal for spring and summer when strawberries are at their peak in freshness and flavor, providing the best taste.
  • Occasion: Perfect for picnics, family gatherings, or served as a lovely after-dinner dessert that will delight guests.

Why You’ll Love This Recipe


Strawberry Shortbread stands out with its dynamic combination of softness and crispness. The shortbread provides a buttery foundation that contrasts beautifully with the lush sweetness of ripe strawberries. It’s a tantalizing dance of flavors and textures in every bite. The preparation process is streamlined, allowing you to spend more time savoring the results than working in the kitchen.

Besides being a treat for the senses, this recipe has healthful bonuses. Strawberries, with their vitamin C and antioxidant content, add a nutrition factor that’s welcome in any dessert. Plus, the moderate use of sugar lets the natural sweetness of the fruit shine through.

Socially, this recipe is a crowd-pleaser, providing the elegance of a classic dessert with the freshness of seasonal fruit. Whether served at a tea party or a family meal, it never fails to impress.

Economically speaking, the recipe is budget-friendly, using simple ingredients that are easily accessible. The opportunity to showcase fresh strawberries at their best adds value during strawberry season, making it an affordable yet sophisticated choice.

Historical Background and Cultural Significance


The origins of shortbread trace back to medieval times in Scotland, where it began as a medieval “biscuit bread.” Over time, it evolved into the sweet, crumbly cookie we cherish today. Strawberry Shortbread brings a contemporary twist to this classic, integrating the juicy fruit often associated with summer treats.

Across cultures, strawberries are seen as a symbol of love and freshness. In the culinary world, they have been celebrated for their balance of sweetness and slight tartness. The blend with shortbread introduces the eternal comfort of buttery pastry, enhancing both ingredients’ appeal.

Over the years, strawberry desserts have been a hallmark of summer, with regional variations adapting the basic theme to local fruits and tastes. From strawberry pies to tarts and cakes, the pairing of strawberries with a buttery base is an enduring tradition.

In some regions, including the U.S. and Europe, Strawberry Shortbread has enjoyed a renaissance in recent years, with home bakers bringing creative nuances to this timeless combination. Our version stays true to its essential components while allowing for personal expression through variable flavor and texture adjustments.

Ingredient Deep Dive


Flour holds a central role in defining the texture of this shortbread. It acts as the essential ingredient that brings all the flavors and structures together. As a staple in countless recipes, flour’s role in creating a crispy shortbread cannot be understated. When selecting flour, choose all-purpose for its balance, unless noted otherwise for gluten-free needs. Storing in a cool, dry place in an airtight container will keep it fresh longer.

Butter brings richness to the shortbread, creating that melt-in-your-mouth experience. Opt for unsalted butter to control the seasoning in your recipe. Its nutritional value includes healthy fats, but using it moderately keeps the recipe balanced. Substitutions could include plant-based margarine for a vegan adaptation.

Strawberries are the stars of the recipe, offering bright flavor and color. Besides their appeal, they provide a wealth of vitamins and antioxidants. Select firm, ripe strawberries for optimal sweetness and store them in the refrigerator, consuming them within a few days for best freshness. Frozen strawberries can be a substitute but may alter the texture slightly upon thawing.

Common Mistakes to Avoid

  • Avoid over-mixing the shortbread dough, leading to a tough texture rather than the desired crumbly crust.
  • Ensure strawberries are dry before adding to prevent the dough from becoming too moist and soggy.
  • Don’t skip chilling the dough, as it’s crucial for maintaining the shortbread shape during baking.
  • Use the proper baking temperature and time; underbaking or overbaking affects both texture and flavor.
  • Be cautious with substituting ingredients, as this can alter the final output significantly.
  • Measure flour accurately. Too much or too little will disturb the balance of the final texture.
  • Cut the shortbread with a consistent thickness to ensure even baking and texture throughout.
  • Allow the shortbread to cool on a wire rack to maintain crisp bottoms and edges.

Essential Techniques


Shortbread mixing is pivotal for the recipe’s success. Proper mixing incorporates all ingredients without overworking, ensuring a light and fluffy texture. Mastery involves recognizing when the dough maintains shape but isn’t overly dense. Watch for the dough to come together with small crumbs rather than a solid mass.

Chilling the dough solidifies butter content, preventing spreading during baking and aiding texture. This step often overlooked, can make or break the shortbread’s integrity.

Baking times require attentiveness, as shortbread should be lightly golden at the edges. Understanding visual cues, rather than relying solely on time, assures the best results.

Pro Tips for Perfect Strawberry Shortbread


Select strawberries that are bright red and fragrant, as they indicate ripeness and flavor that will enhance your shortbread beautifully.

Chill the shortbread dough adequately before rolling, making it easier to handle and cut, preserving its shape during baking.

Consider slice-and-bake methods for uniform shortbread thickness and easy storage–a step that simplifies busy preparation schedules.

To elevate the flavor, incorporate a hint of vanilla or almond extract into the dough, offering a fragrant aroma alongside the natural strawberry sweetness.

Aim for uniform strawberry size when slicing to ensure even distribution and flavor consistency across your baked goods.

For an extra touch of luxury, sprinkle a touch of sea salt onto the shortbread just before baking, which complements the sweetness of strawberries.

Variations and Adaptations


Regional interpretations might involve local fruits like raspberries or blueberries, adding a twist to traditional strawberry shortbread while maintaining that fresh, buttery essence.

To align with seasonal changes, consider pairing the shortbread with autumn spices like cinnamon or nutmeg, which provide warmth to the cooling months.

Dietary adjustments include using gluten-free flour blends or plant-based butter to accommodate those with specific dietary needs, ensuring everyone can enjoy this treat.

For a flavor twist, try incorporating lemon zest or a drizzle of balsamic reduction over strawberries to deepen the dessert’s complexity.

Adjusting the texture would mean experimenting with a slightly nutty crumble by adding ground almonds to the dough mix.

Impressively present your shortbread dessert with a drizzle of chocolate or a dollop of whipped cream for a modern wow factor.

Serving and Presentation Guide


Plate your Strawberry Shortbread using a simple white dish, allowing the vibrant reds and golds to shine in contrast, making it visually stunning.

Use finely chopped fresh mint or a dusting of powdered sugar as a garnish, adding a touch of elegance and an extra hint of sweetness.

Traditionally served with light whipped cream or a dollop of crème fraîche, complementing the rich, buttery shortbread base.

For modern presentation, consider stacking shortbread slices in a tower or layering alternately with strawberries to form a delightful parfait.

Serve at room temperature to ensure the shortbread retains its crunch while enhancing the strawberry flavor.

In terms of portion control, two generous pieces per serving usually suffice, leaving room for them to admire the flavors rather than feeling overwhelmed.

Wine and Beverage Pairing


Pairing with a light, fruity dessert wine such as a Moscato brings out the sweetness and fruitiness of the strawberries, offering a harmonious balance.

Non-alcoholic pairings include a refreshing iced tea, subtly flavored with lemon or ginger, complementing the buttery richness of shortbread.

A floral or citrusy coffee pairs nicely, playing on the natural zest of strawberries while contrasting the decadent butter flavor.

For temperature, ensure beverages are served chilled, elevating the freshness of the dessert pairing beautifully.

Serving wine in smaller, rounded glasses allows the fruity notes to fully showcase and entwine perfectly with each bite taken.

Storage and Shelf Life


Store Strawberry Shortbread in an airtight container at room temperature, protecting it from becoming soggy or too dry, thus sustaining freshness.

An ideal storage temperature prevents the buttery shortbread from becoming too soft or oily, keeping its desired textural integrity intact.

Opt for glass containers for storage, as they help maintain the shortbread’s intended aroma and deter any outside odors.

Watch for signs of spoilage such as discoloration, off odor, or a change in texture which would indicate the shortbread is past its prime.

Reheating leftovers can be done gently in an oven, restoring a hint of the shortbread’s original crispness.

For longer preservation, consider freezing individual slices of shortbread, protecting them from freezer burn using foil or waxed paper.

Make Ahead Strategies


Prepare dough in advance and store wrapped in cling film, allowing for several days of storage in the refrigerator, making the baking process timely.

To maintain the shortbread’s freshness between steps, keep sliced strawberries separate until serving, combining at the last moment.

Assess any quality impact when preparing in stages, taking note of texture preservation as key to successful taste.

Assemble just before serving to maintain the crispiness of the shortbread, giving the strawberries the spotlight they deserve.

Reheat carefully to ensure shortbread does not become too soft. Keeping a close eye on time and temperature during this step is crucial.

Add any decorative or fresh elements such as fresh mint or berries at the last possible moment, ensuring vibrancy and flavor.

Scaling Instructions


To halve the recipe, simply reduce each ingredient proportionally, maintaining the original ratio of dry to wet ingredients.

Doubling or tripling amounts works best with shortbread but be mindful of oven space and capacity limitations.

Adjust equipment as needed, ensuring sufficient baking sheet space and oven circulation when increasing batch sizes.

Modify baking times slightly if necessary, but keep a close eye on the first batch to make further adjustments if required.

Consider storage capacities when making larger batches to ensure freshness is maintained and the shortbread has ample space to cool.

Nutritional Deep Dive


Providing a balanced macro breakdown, this dessert offers the right touch of carbohydrates from flour and sugar, along with healthy fats from butter.

Strawberries add noteworthy micronutrients such as vitamin C, enhancing the recipe’s health benefit claims.

Health-wise, the recipe delivers antioxidants and nutrients beneficial for a balanced diet without the drawbacks of heavier desserts.

For dietary considerations, this dessert can accommodate different restrictions by replacing key ingredients respectfully like gluten-free flour blends.

Portion control is crucial; serving appropriate sizes avoids unnecessary intake of sugars and fats while still providing delightful flavors.

Weight management is supported by its richness, encouraging moderate consumption which aligns with balanced, enjoyable eating habits.

Dietary Adaptations


For gluten-free, replace traditional flour with a reliable gluten-free alternative, ensuring similar flavor and texture.

Create a dairy-free version by using high-quality plant-based butter or coconut oil, maintaining the fat-rich core of original shortbread.

A vegan-friendly variation involves substituting butter and potential egg washes with plant-based counterparts like margarine or flax egg.

Lowering carbs means experimenting with almond flour alternatives, while carefully adjusting for moisture and baketime.

Adapting to keto involves maximizing healthy fats and minimizing sugars, often using sugar substitutes like erythritol.

Paleo followers can opt for nut and seed flours, ensuring adherence while indulging in a treat reminiscent of traditional shortbread.

For a low-FODMAP-friendly approach, ingredients such as lactose-free butter promotes continued enjoyment with dietary mindfulness.

Troubleshooting Guide


Solving crumbly dough issues requires slight adjustments in moisture, ensuring even texture before rolling and baking.

Balancing flavors involves careful measurement and potential testing of batch sizes to achieve the right sweetness and rich buttery taste.

When confronted with temperature concerns, check oven calibration, ensuring even heat distribution for consistent baking results.

Equipment challenges often arise from inadequate rolling pins or uneven baking sheets, resulting in off texture or appearance.

Ingredient substitutions need consideration, as each responds differently in texture or taste, requiring fine-tuning and trial.

Timing concerns mean precise attention during baking, avoiding extremes that affect texture and overall presentation integrity.

Recipe Success Stories


Our Strawberry Shortbread recipe continues to garner acclaim from our community, with many sharing images of their own delightful creations.

Successful variations often include additional flavors such as lemon zest or spices, adding personalized touches to a classic favorite.

Reader adaptations frequently explore alternative flour varieties, proving the recipe’s flexibility while maintaining core flavors.

Photography tips shared encompass lighting for vibrant strawberries and capturing the textural contrast for stunning results.

Engagement through social media showcases enthusiasm and innovation, fostering a creative space for countless inspired home bakers.

Frequently Asked Questions

Can I substitute different fruits for strawberries?
Yes, other berries like raspberries or blueberries can be used, adjusting the taste but maintaining similar preparation methods.

What’s the best way to achieve perfect shortbread consistency?
Ensure accurate measurement and mixing, focusing on a balance between moist and crumbly before chilling the dough adequately.

How can I store the shortbread to keep it fresh?
Store in an airtight container at room temperature or freeze for extended freshness, preventing it from drying out or becoming soggy.

Can I use frozen strawberries if I don’t have fresh ones?
While fresh is preferred, frozen strawberries can work; ensure complete defrosting and draining to limit excess moisture in the shortbread.

What flour works best for gluten-free shortbread?
A reliable gluten-free flour blend tailored for baking yields the best results, ensuring consistency throughout.

Should I stick with unsalted butter in the recipe?
Yes, unsalted butter provides control over seasoning while ensuring rich, uncontaminated flavors align perfectly with the shortbread.

Will adding nuts change the texture?
Nuts can introduce a satisfying crunch; adjust texture by ensuring even distribution and finely chopping to complement the shortbread.

Reheating – oven or microwave?
Reheating in an oven restores crispness while the microwave is less recommended due to potential sogginess; monitor both methods’ timing closely.

How can I avoid overbaking shortbread?
Follow visual cues like light browning at edges and sound cues of a slightly soft center gently firming as the shortbread cools outside the oven.

What prevents the shortbread from rising?
Shortbread generally maintains shape due to lack of rising agents and depends on chill time, impacting its form more than altering texture or taste.

Additional Resources


Explore other recipes such as Lemon Shortbread and Chocolate Dipped Shortbread for diverse flavor profiles and techniques.

Techniques such as dough handling and chilling in-depth are covered within various baking forums, enhancing your confidence through practice.

Ingredient guides for strawberries include an understanding of acidity levels and balancing flavors effectively in complementary dishes.

Equipment recommendations highlight tools that enhance consistency, efficiency, and success in baking, worthy of daily applications.

Seasonal variations provide insights into matching fruits with shortbread, escalating your explorations into new territories.

Join the Conversation


Engage with our baking community by sharing stunning images of your Strawberry Shortbread creations on social media platforms.

Utilize photography tips for transcending amateur pictures, capturing your dessert’s allure with optimal lighting and angles.

Offer recipe reviews, adding your personal take or adjustments, and receive feedback or further adapted suggestions in return.

Encourage community involvement through active participation, responding to queries, and sharing experiences relating to our delicious recipe variations.

The Recipe

Delicious Strawberry Shortbread

Serves: 8

Prep Time: 30 mins

Cook Time: 15 mins

Total Time: 45 mins

Kitchen Equipment Needed

  • Rolling pin
  • Baking sheet
  • Oven

Ingredients

  • 2 cups all-purpose flour
  • 1 cup unsalted butter, softened
  • 1/2 cup granulated sugar
  • 1 cup fresh strawberries, sliced
  • Optional: vanilla extract, for added flavor

Directions

  1. Preheat your oven to 350°F (175°C) and line a baking sheet with parchment paper.
  2. In a large mixing bowl, beat the softened butter with sugar until light and fluffy. Add vanilla extract, if using.
  3. Gradually add flour to the mixture, stirring until just combined. Form the dough into a ball and chill for 20 minutes.
  4. On a floured surface, roll out the dough to about 1/4 inch thickness. Cut into desired shapes using a cookie cutter.
  5. Arrange the shortbread on the prepared baking sheet. Top each with sliced strawberries, pressing them lightly into the dough.
  6. Bake for 12-15 minutes, or until the edges are lightly golden. Cool on a wire rack before serving.

Recipe Notes

  • For a vegan option, substitute butter with plant-based margarine.
  • Chilling the dough is crucial to prevent spreading during baking.
  • Experiment with fruit variations like blueberries or raspberries for different flavors.

Delicious Lemon Ricotta Cookies Recipe: A Zesty Dessert Delight

Lemon Ricotta Cookies: A Citrusy Indulgence

⚖️
Difficulty
Easy

⏲️
Prep Time
15 mins

🕒
Cook Time
20 mins

⏱️
Total Time
35 mins

🍽️
Servings
24 cookies

Indulge your taste buds with the vibrant flavor of lemon ricotta cookies. These confections are a delightful treat that combines the zesty brightness of lemon with the creamy texture of ricotta. Whether you’re enjoying them with afternoon tea or as a sweet end to a meal, these cookies will charm every palate.

The lemon ricotta cookie recipe delivers a delightful balance of sweetness and tangy lemon zest. The ricotta cheese not only adds richness to the dough but also imparts a soft and moist texture to the cookies. In every bite, you’ll experience the undeniable freshness of lemon, making these cookies perfect for spring and summer gatherings.

Quick Recipe Highlights

  • Flavor Profile: A delightful mix of tangy lemon and subtle sweetness with a rich, creamy undertone from ricotta cheese.
  • Texture: Soft and pillowy with a slight crumbly exterior, creating a melt-in-the-mouth experience.
  • Aroma: Bright and citrusy, with a fragrant lemon zing that perfuses the kitchen.
  • Visual Appeal: Pale golden cookies adorned with a light dusting of lemon zest or glaze for an inviting presentation.
  • Skill Level Needed: Ideal for baking novices, requiring basic techniques like mixing and forming simple dough.
  • Special Equipment: A hand mixer makes the process easier, though not necessary, for achieving the perfect dough consistency.

Recipe Overview

  • Difficulty Level: Simple and straightforward, suitable for bakers of all levels. The steps mainly involve mixing ingredients and baking, requiring no complex techniques.
  • Category: These lemon ricotta cookies fall into the dessert category, perfect for adding a sweet touch to any meal.
  • Cuisine: Rooted in Italian cuisine, where ricotta is a staple ingredient, these cookies bring Mediterranean flavors to life.
  • Cost: Economical to make, with most ingredients being pantry staples aside from fresh lemons and ricotta cheese.
  • Season: Best enjoyed in spring and summer when lemons are fresh and the desire for light desserts prevails.
  • Occasion: Suitable for a variety of occasions from casual tea parties to festive holiday gatherings, these cookies are sure to impress.

Why You’ll Love This Recipe


The taste and texture of lemon ricotta cookies are simply heavenly. The combination of tangy lemon and the creamy, moist crumb creates an irresistible treat that feels luxurious and homey. These cookies capture the essence of a sunny day, bringing warmth and cheer to any occasion.

Convenience is another strong point of this recipe. With just a few simple steps and minimal preparation time, these cookies come together easily. Whether you’re a seasoned baker or a newbie in the kitchen, this foolproof recipe ensures delicious results every time.

Nutritionally, these cookies offer a lovely indulgence with less guilt. Ricotta provides a source of protein and calcium, while the use of lemon zest contributes a dose of vitamin C, making each bite more than just a treat for the tastebuds.

Socially, these cookies are perfect for gatherings. Serve them at a brunch or party, and watch as guests are drawn to their delightful flavor and texture. They are a conversation starter, sparking discussions about Italian desserts and citrusy treats.

Lastly, this recipe is cost-effective and uses accessible ingredients found in most local grocery stores. You don’t need to break the bank for a high-quality treat. These cookies exemplify how simplicity can create gourmet experiences.

Historical Background and Cultural Significance


The origin of lemon ricotta cookies can be traced back to Italian kitchens where ricotta cheese is a fundamental ingredient in both savory and sweet dishes. Italians have long used ricotta to add moisture and texture to their confections, often pairing it with bright citrus to balance flavors.

Culturally, these cookies symbolize the Italian appreciation for fresh, quality ingredients. They represent the tradition of baking during spring and summer months when citrus fruits, particularly lemons, are abundant. The Italians’ love for using fruits to enhance desserts is brilliantly showcased in this recipe.

Over time, lemon ricotta cookies have evolved, adapting to various regional preferences. In some areas, variations incorporate local spices or a drizzle of lemon glaze, each offering a unique twist while maintaining the classic lemon and ricotta harmony.

In regions outside Italy, these cookies have gained popularity as people embrace the delightful combination of creamy textures with citrusy flavors. Their versatility has allowed bakers worldwide to adapt the recipe to local tastes, ensuring lemon ricotta cookies remain a beloved dessert across cultures.

Ingredient Deep Dive


Ricotta cheese, a cornerstone of Italian cuisine, is prized for its creamy texture and mild flavor. It originated from the need to efficiently use leftover whey from cheese production. Its versatility allows it to blend seamlessly into dishes like these cookies, offering creaminess without overpowering.

Lemons, celebrated for their refreshing zest and juice, not only brighten dishes with their flavor but also offer health benefits, packed with vitamin C and antioxidants. When selecting lemons for this recipe, choose firm ones with a bright, unblemished peel for maximum zest and juice.

To properly store ricotta, keep it chilled in the refrigerator in a sealed container to maintain freshness. For lemons, refrigeration extends their shelf life, preserving their vibrant zest and juiciness.

Should substitutions be needed, mascarpone can replace ricotta for a richer, denser texture, while lime or orange zest may serve as alternatives to lemon for a different citrus experience.

Common Mistakes to Avoid

  • Overmixing the dough can lead to tough cookies. Mix until just combined to maintain a soft texture.
  • Using cold ricotta right from the fridge might result in a lumpy dough. Allow it to reach room temperature first.
  • Skipping the lemon zest reduces the cookie’s citrus impact. Ensure zest is finely grated for maximum flavor.
  • Not using parchment paper causes cookies to stick to the baking sheet, hampering presentation.
  • Baking at incorrect temperatures can lead to uneven baking. Ensure the oven is properly preheated.
  • Storing them improperly leads to dryness. Keep cookies in an airtight container.
  • Ignoring variations in lemon size affects the flavor concentration. Adjust zest and juice to taste.
  • Rushing cooling before serving can affect the texture. Allow proper cooling time for ideal consistency.

Essential Techniques


Mastering the creaminess of ricotta involves beating it until smooth for easy incorporation into the cookie mix. The key is to blend gently to avoid overworking the dough, which could compromise its fluffy texture. Use a hand mixer for best results.

Achieving the perfect zest is critical for flavor. Use a microplane grater to finesse the zest without reaching the bitter pith. The zest should be fine enough to blend seamlessly into the dough, ensuring consistent lemony notes throughout each cookie.

Pro Tips for Perfect Lemon Ricotta Cookies


Ensuring creamy ricotta requires starting with a smooth, whisked product. Room temperature works best to avoid a clumpy mix, allowing seamless incorporation with the other ingredients.

Always opt for fresh lemons over bottled juice. The zest holds essential oils that deliver the vibrant citrus flavor these cookies are loved for.

Experiment with a touch of vanilla extract to deepen the flavor profile, highlighting the delicate balance of lemon and ricotta.

For a vibrant finish, consider a light lemon glaze brushed over cooled cookies, boosting both flavor and visual appeal without overwhelming the palate.

To maintain the soft texture, avoid over-baking. The cookies should just start to turn a light golden color when they’re ready.

Avoid densely packing the flour; instead, gently spoon it into measuring cups to prevent a heavy, dense dough.

Variations and Adaptations


Italian regions sometimes replace lemon with bergamot or blood orange, offering a distinct flavor twist while preserving the recipe’s integrity. These regional variations celebrate local citrus fruits.

For seasonal adaptations, incorporate spices like nutmeg or cinnamon during colder months, adding warmth to the citrusy flavor, aligning with winter festivities.

Dietary adjustments are feasible, with almond flour for gluten-free needs, or plant-based ricotta for a vegan option, ensuring no compromise on taste or texture.

Explore flavor variations by introducing poppy seeds for a delightful crunch or adjusting the sugar levels to achieve your preferred sweetness.

Texture modifications can be made with a gentle almond meal inclusion, providing a nutty undertone that highlights the lemon’s brightness.

Presentation alternatives like sanding sugar or edible flowers make these cookies visually captivating, suitable for special occasions or gifting.

Serving and Presentation Guide


To achieve a beautiful plate presentation, serve lemon ricotta cookies stacked with a light dusting of powdered sugar or a drizzle of lemon glaze. The soft, buttery hue will pop against a white platter, enhancing visual appeal.

Garnish with lemon zest curls or edible flowers for an elegant touch, ensuring the presentation reflects the freshness of the ingredients used in the recipe.

Accompany the cookies with fresh fruit, such as raspberries or blueberries, to balance out the citrus punch, adding dimension to your platter.

Serve at room temperature for the best texture, allowing the cookies’ natural moisture and softness to shine through, while ensuring that flavors are at their peak.

Portion control can be managed by shaping the dough into uniform balls using a scoop. This not only aids in even baking but also provides a consistent serving size.

For a modern twist, serve with a tangy lemon curd as a dipping option, enhancing citrus notes and offering a sophisticated dining experience.

Wine and Beverage Pairing


Pair these lemon ricotta cookies with a crisp, chilled white wine, such as a Riesling or Sauvignon Blanc, that complements the citrusy notes without overpowering them. The wine’s acidity will match the lemony tang, creating a harmonious taste experience.

For non-alcoholic options, a citrus-infused iced tea or a refreshing lemon-mint soda echoes the cookies’ bright flavor, making for a delightful pairing.

Consider serving with a mild herbal tea, such as chamomile or lemongrass, which provides a soothing backdrop to the bold lemon flavors in the cookies.

Beverage temperatures should be cool to highlight the fresh, light nature of these cookies, enhancing their natural appeal.

For a festive touch, pair with a lemon-flavored mocktail or simple lemon water with a sprig of rosemary, offering complementary flavors while remaining refreshingly subtle.

Storage and Shelf Life


Proper storage is key to maintaining the texture and flavor integrity of lemon ricotta cookies. Use an airtight container at room temperature, away from direct sunlight, to keep them fresh for up to five days.

If humid conditions are present, refrigerate the cookies to prevent moisture buildup, though this may slightly harden the texture.

For extended storage, freeze the cookies in a single layer, then transfer them to an airtight container or freezer bag. Label with the date to ensure optimal freshness up to two months.

To check for spoilage, watch for changes in color or texture and any off-putting smell as signs the cookies are past their prime.

Reheat in a 300°F (150°C) oven for a few minutes to revive their softness, making them enjoyable even days after baking.

Freezing both dough and finished cookies is possible. Thaw the dough for a few hours before baking or allow cookies to come to room temperature before serving.

Make Ahead Strategies


For stress-free preparation, make the cookie dough in advance and store it in the refrigerator for up to two days, allowing for easy baking at a moment’s notice.

Early preparation also allows the lemon flavors to infuse the dough more deeply, enhancing the cookies’ zestiness once baked.

Maintain quality between steps by cooling each batch on wire racks, preventing excess moisture buildup that may cause sogginess.

Assemble ingredients and measuring tools beforehand to streamline the baking process, ensuring no steps are overlooked during preparation.

Utilize a circular baking rotation if making multiple batches, yielding consistent results without overworking any dough portion.

Introduce fresh garnishes, such as zest or glaze, just before serving, ensuring the presentation remains vibrant and visually appealing.

Scaling Instructions


When halving the recipe, particularly mind the egg and lemon measurements, ensuring precision to maintain the recipe’s intended balance and flavor.

To double or triple the recipe, incorporate the ricotta and sugar gradually, preventing overmixing while ensuring consistency across a larger batch.

Adjust kitchen equipment such as baking sheets or oven racks for larger quantities, preventing overcrowding and promoting even air circulation for baking.

Timing modifications may be needed for larger batches. Consistently check for golden hues and perform toothpick tests to confirm baking equality across cookies.

Storage innovations, such as separate smaller containers for large batches, help maintain freshness and avoid staleness.

Nutritional Deep Dive


Each lemon ricotta cookie offers a macro balance of carbohydrates from flour and sugars, proteins from ricotta, and fats from butter, creating a satisfying treat.

Micronutrients from the lemon zest provide vitamin C, while ricotta contributes calcium, making each cookie a modest source of nutritional goodness.

These cookies can fit into various dietary considerations, offering portion-friendly indulgence with controlled calorie input, promoting enjoyment without excess.

Consider adjusting portion sizes for individuals with specific dietary needs, ensuring enjoyment of this treat without disrupting nutritional goals.

Active pursuit of weight management benefits involves using a cookie as a post-meal treat, satiating dessert cravings without overindulging.

Dietary Adaptations


For gluten-free adaptations, substitute almond flour while maintaining the original recipe ratios for texture preservation.

Creating dairy-free versions involves using plant-based ricotta alternatives, ensuring vegan-friendly enjoyment without sacrificing flavor.

Low-carb alterations might include almond flour and powdered keto sweeteners, subtly transforming the recipe for those on carb-restrictive diets.

Explore keto options by replacing lemons with limes and using stevia or erythritol, preserving taste while adhering to nutritional confines.

Incorporating the paleo lifestyle, choose coconut flour and natural sweeteners like honey or pureed dates, respecting dietary lines while celebrating taste.

Consider a low-FODMAP approach by moderating lemon use, balancing flavor while aligning with dietary requirements for digestive wellness.

Troubleshooting Guide


For texture issues like excessive crumbling, subtly increase ricotta content or adjust baking time, aiming for moist, delicate, and uniform cookies.

Maintaining flavor balance if cookies are overly sweet can be corrected by introducing an extra dash of lemon juice or zest pre-baking.

Temperature problems such as burnt edges call for adjusted oven calibration or shifted baking sheet placement, ensuring uniform heat distribution.

Tackle equipment challenges by testing oven thermometers for accuracy or using parchment paper consistently, especially on worn baking surfaces.

Addressing ingredient substitutions involves pre-testing alternative flours or sweeteners, ensuring fidelity to the recipe’s textural and flavor promises.

Timing concerns like inconsistent baking times require careful monitoring, introducing periodic checks with an interim toothpick test.

Recipe Success Stories


Enthusiastically embraced by communities, variations have included creative twists like gluten-free almond versions that surprised and delighted tasters.

Adaptation stories show enthusiastic shifts, including layering flavors with orange zest or glazing with a rosemary-lemon concoction for mixed events.

Readers suggest replacing zest with dried lavender or thyme for herbal nuances that beautifully complement the original citrus orientation.

Photography tips highlight capturing the cookies in natural light, emphasizing lemon’s bright hue and allowing ricotta’s creaminess to take center stage.

Engagement with photography hints at showcasing the cookies’ dimensions by grouping, demonstrating their softness through visual storytelling techniques.

Frequently Asked Questions

Q: Can I use low-fat ricotta in lemon ricotta cookies?
A: Yes, low-fat ricotta can be used, though the cookies may be slightly less creamy. The change won’t significantly impact flavor, so it’s a reasonable adjustment for dietary needs.

Q: How do I keep my cookies from spreading too much?
A: To minimize spread, chill the dough for about 30 minutes before baking. This firms the dough, helping to maintain its shape as it cooks.

Q: Are there gluten-free alternatives for this recipe?
A: Absolutely! Almond flour or a quality gluten-free baking blend can substitute for all-purpose flour. Ensure consistent ratios to retain a pleasant texture.

Q: What’s the best way to zest a lemon?
A: Use a microplane, gently running the lemon over it while avoiding the white pith. Consistent strokes help collect zest efficiently, ready for mixing.

Q: Can I make these cookies vegan?
A: Yes, substitute plant-based ricotta and use a flaxseed egg replacement. This method preserves both texture and flavor for those following a vegan diet.

Q: How do I achieve a more pronounced lemon flavor?
A: Increase both the zest and juice quantities. Opt for Meyer lemons for a sweeter, more intensified lemon profile that elevates these cookies’ citrus character.

Q: Can I freeze lemon ricotta cookie dough?
A: Yes, freezing the dough is effective. Shape the dough into balls pre-freeze, defrosting slightly before baking to ensure even cooking consistency post-thaw.

Q: Should I flatten the cookies pre-baking?
A: Gently flattening keeps them from puffing excessively. Use your palm or a spoon to create a uniform texture, optimizing for even baking and perfect presentation.

Q: How long should these cookies cool before moving them?
A: Allow them at least five minutes on the baking sheet to set, then transfer to a wire rack for complete cooling. This stabilizes structure while retaining softness.

Q: Can I add nuts to the batter?
A: Nuts, like almonds or walnuts, are lovely additions, adding texture while accentuating the lemon’s refreshing flavor. Consider chopping them finely for even distribution.

Additional Resources


For more dessert inspirations, discover our highly-rated lemon bars and Italian ricotta tart recipes that carry similar flavor motifs, catering to citrus-lover desires.

Explore technique guides on achieving perfect cookie consistency and bespoke tips on maximizing citrus zest, ramping up your baking repertoire.

Ingredient information delves deeper into the versatility of ricotta and its culinary prowess, proving why it pairs so well with citrus notes.

Equipment recommendations reveal hand mixer choices and microplane variations that streamline baking processes, optimizing time and effort.

Seasonal variations in our lemon-themed recipe collection inspire year-round enjoyment, turning these delectable cookies into perpetual favorites.

Join the Conversation


Share your lemon ricotta cookie creations with us on social media, using #LemonRicottaJoy to showcase your baking prowess and inspire others.

Photography tips encourage using natural light and vibrant backgrounds to highlight the cookies’ creamy texture and lively zest, bringing them to life visually.

Contribute recipe reviews, sharing your adaptations and experiences, fostering a community of bake enthusiasts keen on improving their culinary skills.

Engage with community-driven variations and betterment strategies — your suggestions could spark new baking ideas and creative adaptations for others.

Encourage active dialogue around the recipe, with participants dissecting flavor nuances and cookie creations, enriching communal learning and enjoyment.

The Recipe

Lemon Ricotta Cookies

Serves: 24 cookies

Prep Time: 15 mins

Cook Time: 20 mins

Total Time: 35 mins

Kitchen Equipment Needed

  • Hand mixer
  • Microplane grater
  • Baking sheets
  • Parchment paper
  • Mixing bowls

Ingredients

  • 2 cups all-purpose flour
  • 1 teaspoon baking powder
  • 1/2 teaspoon salt
  • 1/2 cup (1 stick) unsalted butter, softened
  • 1 cup granulated sugar
  • 1 cup ricotta cheese
  • 1 egg
  • 1 tablespoon lemon zest
  • 3 tablespoons lemon juice

Directions

  1. Preheat your oven to 350°F (180°C) and line baking sheets with parchment paper.
  2. In a bowl, combine flour, baking powder, and salt. Set aside.
  3. Cream the butter and sugar together until light and fluffy. Add the ricotta, mixing until smooth.
  4. Beat in the egg, followed by lemon zest and juice, ensuring a well-blended mix.
  5. Gradually incorporate the dry ingredients, mixing until just combined.
  6. Drop tablespoons of dough onto the prepared baking sheets, spacing them adequately.
  7. Bake for 15-20 minutes or until the cookies are lightly golden around the edges.
  8. Cool on the baking sheets for 5 minutes before transferring to a wire rack.

Recipe Notes

  • For enhanced lemon flavor, consider adding a simple lemon glaze post-baking.
  • Storing cookies in an airtight container maintains their softness longer.
  • Experiment with different citrus zests for unique flavor profiles, like orange or lime.

Irresistible Maraschino Cherry White Chocolate Fudge for Holiday Bliss

Maraschino Cherry White Chocolate Fudge – Holiday Bliss

Experience the joy of holiday indulgence with our Maraschino Cherry White Chocolate Fudge. This delectable treat combines the creamy sweetness of white chocolate with the vibrant, tangy bursts of maraschino cherries. Perfect for festive gatherings or a special homemade gift, this fudge will delight both young and old with its luxurious flavor profile. With just a bit of preparation time, you’ll have a stunning dessert ready to impress.

Quick Recipe Highlights

  • Flavor Profile: Rich sweetness from white chocolate balanced with the slight tartness of maraschino cherries
  • Texture: Smooth, creamy fudge punctuated by bits of chewy, succulent cherries
  • Aroma: Sweet vanilla notes with subtle cherry undertones
  • Visual Appeal: A stunning contrast of snowy white fudge speckled with ruby-red cherries
  • Skill Level Needed: Beginner-friendly, perfect for those new to candy-making
  • Special Equipment: A reliable candy thermometer ensures perfect consistency

Recipe Overview

  • Difficulty Level: Easy; minimal steps and skills required make this an approachable recipe for novices
  • Category: Dessert, Candy
  • Cuisine: Classic American with a festive twist
  • Cost: Economical; common pantry staples with a few special additions
  • Season: Winter; particularly popular during the festive holiday season
  • Occasion: Ideal for Christmas, holiday parties, and special gift-giving occasions

Why You’ll Love This Recipe

The Maraschino Cherry White Chocolate Fudge offers a perfect blend of taste and texture, making it a holiday favorite. The luscious richness of white chocolate pairs beautifully with the bright, juicy pops of maraschino cherries, creating a taste sensation that’s both classic and refreshing. This recipe’s simplicity is its greatest asset; you can create a gourmet treat with minimal effort and time, making it an ideal choice for busy holiday schedules.

The ingredients are not only easy to find but also affordable, ensuring you can make a batch (or two) without breaking the bank. Plus, this fudge’s eye-catching appearance makes it an excellent choice for entertaining, as it adds a festive touch to any dessert spread. Due to its balanced combination of creamy and fruity flavors, this fudge appeals to a wide range of taste preferences, delighting both kids and adults alike.

Nutritionally, this fudge can be a more mindful indulgence compared to traditional holiday cookies, as it allows for smaller portions that pack a lot of flavors into every bite. As a socially engaging treat, it encourages shared experiences, whether you’re making it with loved ones or offering it as a heartfelt gift.

Historical Background and Cultural Significance

Fudge has a storied history in sweet treats, dating back to the late 19th century. Originating in the United States, it became popular at women’s colleges where students experimented with confectionery recipes. The basic fudge recipe evolved over time, adapting to include a variety of flavors and inclusions.

Adding maraschino cherries, which were named after Marasca cherries from Croatia, is a nod to both American innovation and European culinary traditions. This particular variety of fudge embodies the creative fusion of American candy-making traditions with a hint of old-world charm brought by preserved fruit.

Today, Maraschino Cherry White Chocolate Fudge is a beloved holiday treat, embraced for its nostalgic charm and impressive appearance. It serves as a testament to how traditional sweets can continually evolve, reflecting changes in availability, tastes, and culinary creativity.

Ingredient Deep Dive

The white chocolate in this recipe provides an irresistibly creamy base. When selecting white chocolate, choose high-quality bars or chips with a high cocoa butter content for a smoother texture. Store it in a cool, dry place to maintain its quality before use. If white chocolate isn’t available, you can substitute with a blend of milk and dark chocolate, although this will alter both the color and taste.

Maraschino cherries add bursts of color and tart sweetness. Look for cherries that have a vibrant color and firm texture, ensuring they will stand out beautifully against the fudge. Their long shelf life makes them a great pantry staple, perfect for spontaneous baking adventures.

Common Mistakes to Avoid

  • Using low-quality white chocolate which may not melt smoothly
  • Skipping the candy thermometer, leading to incorrect fudge consistency
  • Not drying the cherries adequately, which can cause the fudge to become soggy
  • Overheating the mixture, risking a grainy texture
  • Not preparing your pan with parchment paper, making it difficult to remove the fudge
  • Cutting the fudge before it’s fully set, leading to misshaped pieces
  • Failing to mix thoroughly, resulting in uneven distribution of cherries
  • Using overly large cherry pieces, affecting the fudge’s structure

Essential Techniques

Melting white chocolate requires gentle, even heat, so use a double boiler or microwave on low power to prevent burning. Stirring the mixture constantly helps achieve a uniform creamy texture, while the incorporation of cherries should be done delicately to prevent crushing them. Monitoring the mixture’s temperature with a candy thermometer is crucial for achieving the perfect set in your fudge.

Pro Tips for Perfect Maraschino Cherry White Chocolate Fudge

1. Always use a candy thermometer to reach the right consistency.
2. Dry maraschino cherries on a paper towel to prevent excess moisture.
3. Line your pan with parchment for easy removal and clean cuts.
4. Gently fold in cherries to keep them intact.
5. Allow ample cooling time; refrigeration speeds up the process but can affect texture.
6. Use high-quality vanilla extract to enhance the overall flavor.
7. Consider mixing in crushed nuts for added texture.
8. Cut fudge into even squares using a knife dipped in hot water for clean edges.

Variations and Adaptations

This versatile fudge can be customized to fit various tastes and dietary needs. Regional adaptations might include adding locally available nuts or dried fruit. Seasonal variations could incorporate cranberries during fall, while a spring-inspired version might include dried apricots. For dietary modifications, opt for vegan white chocolate to accommodate plant-based diets.

Serving and Presentation Guide

For an elegant presentation, arrange your fudge pieces on a decorative platter. Garnish with whole maraschino cherries for a pop of color, or dust with powdered sugar for a wintry effect. Serve alongside coffee or tea during dessert time or consider packaging them in festive boxes as thoughtful gifts.

Wine and Beverage Pairing

Pair this sweet treat with a light, sparkling wine like Prosecco to contrast the rich flavors. For a non-alcoholic alternative, a fruity herbal tea or cherry-flavored kombucha complements the fudge while adding a refreshing element. Serve beverages slightly chilled to balance the richness of the fudge.

Storage and Shelf Life

To store, place fudge in an airtight container lined with wax paper, keeping layers separated. Store in the refrigerator for up to two weeks or freeze for up to three months. Before serving, allow the fudge to come to room temperature for optimum flavor and texture.

Make Ahead Strategies

Prepare and refrigerate your fudge up to several days in advance, ensuring it’s ready when needed. If making ahead, consider slicing before storing to save time on the day of serving. Assemble any decorative elements, like garnishes, just before serving to maintain freshness.

Scaling Instructions

To halve the recipe, reduce all ingredients proportionally and use a smaller pan. For doubling, ensure your pan size accommodates the extra volume and increase the cooking time slightly to ensure even heating. Always test the mixture’s doneness with a candy thermometer, as timing can vary.

Nutritional Deep Dive

Each piece of this fudge provides a rich source of simple carbohydrates, with moderate amounts of fat from chocolate. It is not a low-calorie treat, so portion control is recommended. For those watching macro intake, consider smaller pieces as a treat within a balanced diet.

Dietary Adaptations

For gluten-free adaptations, ensure all ingredients, including vanilla extract, are certified gluten-free. Those seeking a dairy-free version can opt for dairy-free white chocolate alternatives. Adjust sugar content to fit low-carb or keto guidelines, although the texture may slightly differ.

Recipe Notes

  • Substitute dark chocolate for a richer, less sweet version
  • Include finely chopped toasted almonds for added crunch
  • Consider stirring in a teaspoon of almond extract for additional flavor depth

Troubleshooting Guide

Having issues with your fudge? Here are some solutions:
– If the texture is too grainy, ensure even melting of chocolates and use a candy thermometer.
– For flavor imbalances, consider adjusting the quantity of cherries or vanilla extract.
– If fudge doesn’t set, ensure the temperature reached the required level.

Recipe Success Stories

Our community has shared numerous creative adaptations and serving suggestions, enhancing the joy of making this fudge. From adding toasted coconut to varying cherry types, each iteration brings unique flavor profiles. Snap a picture of your creation using natural lighting to highlight the fudge’s striking colors.

Frequently Asked Questions

Can I use other types of cherries?

Yes, you can use dried cherries or fresh chopped cherries, although the moisture content in fresh cherries may affect the fudge texture.

How do I prevent my fudge from being too sweet?

Consider reducing the amount of sugar or using unsweetened white chocolate to balance the sweetness.

Is there a way to make this recipe vegan?

Absolutely! Use vegan alternatives for white chocolate and ensure all other ingredients are plant-based.

How can I make my fudge more festive?

Top with holiday-themed sprinkles or edible glitter before the fudge sets for a more celebratory look.

What if I don’t have a candy thermometer?

Use the cold water test: drop a small amount of fudge mixture in cold water; it should form a soft ball when removed.

Can I use a different mold shape for my fudge?

Yes, silicone molds of various shapes can be used. Grease them lightly for easier removal.

Additional Resources

Explore related recipes such as Dark Chocolate Almond Fudge or Cherry Almond Cookies for more festive ideas. Our technique videos provide step-by-step guidance on mastering fudge-making, and ingredient guides ensure you choose the best products.

Join the Conversation

We invite you to share your creations on social media using #CherryWhiteChocolateFudge. Participate in our community challenges by posting your unique variations and enjoy photo tips to capture the beauty of your homemade fudge. Don’t forget to leave a review and share your flavor combinations with fellow readers.

Maraschino Cherry White Chocolate Fudge – Holiday Bliss

The Maraschino Cherry White Chocolate Fudge – Holiday Bliss is a must-try treat for this festive season. This decadent combination of maraschino cherries and creamy white chocolate results in a fudge that’s both visually stunning and tantalizingly delicious. Imagine enjoying the sweet cherry flavors perfectly balanced with smooth white chocolate, creating a holiday treat that’s as delightful to eat as it is to see.

This Maraschino Cherry White Chocolate Fudge is the perfect addition to your holiday cookie platter. Its eye-catching pink hue, courtesy of maraschino cherry juice, and its melt-in-your-mouth texture make it a crowd favorite. Plus, with a straightforward recipe and simple preparation, you can effortlessly create this homemade fudge to impress family and friends during your festive gatherings.

Using quality ingredients is key to achieving the luscious, creamy texture that makes this fudge an unforgettable holiday confection. Whether you’re seeking an indulgent dessert or a unique gift idea, this Maraschino Cherry White Chocolate Fudge certainly elevates any festive occasion with its blissful flavors.

Quick Recipe Highlights

  • Flavor Profile: Lush white chocolate with sweet, tangy maraschino cherry accents
  • Texture: Silky, smooth, and melt-in-your-mouth fudge
  • Aroma: Delightful blend of vanilla and cherry sweetness
  • Visual Appeal: Soft pink hue with pops of red cherries
  • Skill Level Needed: Beginner-friendly with simple steps and no complex techniques
  • Special Equipment: Only a saucepan and an 8×8 baking dish required

The Recipe

Maraschino Cherry White Chocolate Fudge – Holiday Bliss Recipe

Serves: 24 pieces

Prep Time: 10 mins

Cook Time: 10 mins

Total Time: 20 mins

Kitchen Equipment Needed

  • Saucepan
  • 8×8 inch baking dish
  • Wooden spoon
  • Baking paper
  • Sharp knife for chopping cherries

Ingredients

  • 2 ½ cups white chocolate chips
  • 1 can (14 ounces) sweetened condensed milk
  • 1 teaspoon vanilla extract
  • Pinch of salt
  • ¾ cup maraschino cherries, chopped
  • 2 tablespoons maraschino cherry juice

Directions

  1. Line an 8×8 inch baking dish with baking paper.
  2. In a saucepan over low heat, combine white chocolate chips and sweetened condensed milk. Stir continuously until melted and smooth.
  3. Remove from heat and stir in vanilla extract, salt, maraschino cherry juice, and chopped cherries.
  4. Pour the mixture into the prepared baking dish and spread evenly.
  5. Refrigerate for at least 2 hours or until set.
  6. Once set, cut the fudge into squares and serve.

Recipe Notes

  • For best results, ensure the chocolate chips are fully melted before removing from heat.
  • To make slicing easier, wipe the knife after each cut with a damp cloth.
  • Fudge can be stored in an airtight container in the refrigerator for up to two weeks.

Irresistible Lemon Raspberry Meringue Cheesecake Recipe for Dessert Lovers

Heavenly Lemon Raspberry Meringue Cheesecake

The Heavenly Lemon Raspberry Meringue Cheesecake is a delightful fusion of flavors and textures that will captivate your taste buds. This dessert masterpiece combines a creamy cheesecake base with a tangy lemon curd, a fresh raspberry layer, and a light, fluffy meringue topping. The contrast between the rich cheesecake and the tart lemon and raspberry components creates an irresistible dessert experience. Discover how to make this indulgent treat that will impress your family and friends with its stunning presentation and delectable flavors.

Quick Recipe Highlights

– Flavor Profile: A harmonious blend of creamy cheesecake, tart lemon, sweet raspberries, and caramelized meringue.
– Texture: Smooth and creamy with a crunchy biscuit base and a delicate fluffy meringue topping.
– Aroma: Inviting citrus and berry notes with hints of caramel from the meringue.
– Visual Appeal: A vibrant, multi-layered dessert with a golden meringue finish.
– Skill Level Needed: Intermediate, requiring basic cheesecake and meringue-making techniques.
– Special Equipment: Springform pan, hand mixer or stand mixer, and a kitchen torch for the meringue.

Recipe Overview

– Difficulty Level: Intermediate. While the recipe requires several steps, each is straightforward, making it accessible for home bakers familiar with basic techniques.
– Category: Dessert, Cheesecake
– Cuisine: Modern fusion, blending classic cheesecake with European influences in meringue decoration.
– Cost: Approximately $15-$20 for main ingredients like cream cheese, lemons, and raspberries.
– Season: Perfect for summer when raspberries are at their peak of freshness.
– Occasion: Ideal for celebrations, gatherings, or as a show-stopping family dessert.

Why You’ll Love This Recipe

You’ll fall in love with the Heavenly Lemon Raspberry Meringue Cheesecake for its perfect balance of flavors and textures. The smooth, creamy cheesecake is complemented by a tangy lemon curd, offering a refreshing contrast that enlivens the palate. Convenience is key, as this impressive dessert can be prepared ahead of time, making it an excellent choice for entertaining. Nutritionally, it’s a rich yet satisfying treat that can be adapted to suit various dietary needs. With accessible ingredients, it’s both cost-effective and easy to source, ensuring this cheesecake becomes a staple in your dessert repertoire.

Historical Background and Cultural Significance

The origin of cheesecake dates back to ancient Greece, with versions evolving globally into the diverse dessert we enjoy today. The incorporation of lemon and raspberries brings a modern twist to this classic, inspired by British and French patisserie traditions. Over time, meringue has become a popular topping in European baking, adding both flavor and visual drama to confections. Regional variations of this cheesecake exist, each showcasing local produce and culinary techniques. Traditionally, such desserts are served during festive occasions, emphasizing their cultural role in celebrations.

Ingredient Deep Dive

Cream cheese is the foundation of any cheesecake, offering a rich and creamy base. When choosing cream cheese, look for full-fat varieties for a smoother texture and richer flavor. Lemons provide the tart, zesty contrast essential to the curd; select firm, bright specimens for maximum juice and fragrance. Fresh raspberries infuse the dessert with sweetness and color, with frozen options serving as a convenient alternative when they’re out of season. Store each ingredient properly to maintain freshness, and consider substitutes like alternative citrus fruits or berry varieties for personalization.

Common Mistakes to Avoid

– Overmixing the cheesecake batter, leading to cracks.
– Undercooking the meringue, which may result in a runny or overly soft topping.
– Failing to let the cheesecake cool completely before adding the meringue, causing it to slide off.
– Not using a springform pan, which can make removing the cheesecake difficult.
– Using low-fat ingredients, which can affect texture and flavor.
– Rushing the chilling process, which prevents flavors from developing fully.
– Forgetting to stabilize meringue with cream of tartar or lemon juice.
– Neglecting to torch the meringue properly, resulting in uneven browning.

Essential Techniques

Mastering this recipe involves key techniques such as creating a smooth cheesecake batter by beating cream cheese until lump-free and incorporating eggs gently to avoid incorporating too much air. The citrus curd demands careful cooking to prevent curdling while ensuring the correct balance of tartness and sweetness. Meringue requires proper whipping to stiff peaks and controlled torching for a browned top. Visual cues, like the sheen of the meringue and the set texture of the cheesecake, will guide success.

Pro Tips for Perfect Heavenly Lemon Raspberry Meringue Cheesecake

– Always begin with room-temperature cream cheese for a smoother mixture.
– Use fresh lemon juice for the most vibrant flavor in the curd.
– When making meringue, ensure the mixing bowl is grease-free for optimal volume.
– Allow the cheesecake to rest overnight for enhanced flavor development.
– Employ a water bath if concerned about cracking.
– For even baking, use an oven thermometer to verify temperature.
– Toast the meringue within a few hours of serving to maintain optimal texture.
– Garnish with fresh raspberries or edible flowers for a stunning presentation.

Variations and Adaptations

This cheesecake can be adapted to suit various preferences and dietary needs. Substitute blueberries or blackberries for raspberries for a seasonal twist. Gluten-free graham crackers or almond meal can replace the biscuit base for a gluten-free version. Experiment with lime or orange zest for alternative citrus flavors. Texture modifications include swirling in fruit purees or adding chopped nuts for crunch. Present the cheesecake as individual servings in jars for a modern touch.

Serving and Presentation Guide

For an elegant presentation, use a sharp knife heated under hot water to slice the cheesecake cleanly. Plate the slices on a dessert plate, accentuating them with a drizzle of berry coulis. Enhance the dish’s visual appeal with a sprinkle of powdered sugar or fresh mint leaves. Consider serving this dessert chilled to highlight the refreshing lemon and raspberry elements. Portion control can be achieved by pre-slicing the cake into evenly sized pieces.

Wine and Beverage Pairing

A crisp, off-dry sparkling wine or a medium-sweet Riesling complements the tangy and sweet elements of this cheesecake. For non-alcoholic options, a cold raspberry iced tea or a lemon-infused sparkling water provides a refreshing pairing. Coffee or a lightly brewed green tea can accompany the dessert for a balanced conclusion to a meal. Ensure drinks are served chilled to harmonize with the cool, creamy texture of the cheesecake.

Storage and Shelf Life

Store the cheesecake in the refrigerator, covered loosely with foil or plastic wrap, to prevent drying out. It remains fresh for up to five days, though it’s best enjoyed within the first two. Signs of spoilage include an off-smell or discoloration. For reheating, bring the cheesecake to room temperature to soften the texture. While freezing is an option, note that meringue can become less stable; freeze without meringue and add it fresh before serving.

Make Ahead Strategies

This cheesecake can be prepared in stages: the base and filling a couple of days ahead and the meringue topping added just before serving. Assemble the layers, store covered in the refrigerator, and apply meringue after bringing the cheesecake to room temperature. The flavor improves with overnight refrigeration, allowing ingredients to meld harmoniously. Ensure meringue is torched shortly before serving for optimal texture.

Scaling Instructions

To scale the recipe, adjust the ingredient quantities proportionally, ensuring even distribution across layers. When doubling, use a large baking dish or multiple pans to accommodate the increased volume. Bake in batches if necessary, and adjust timing slightly to prevent overcooking. For larger batches, consider storage logistics, using airtight containers, and ensure sufficient refrigerator space.

Nutritional Deep Dive

Each slice of this cheesecake offers a balanced indulging of proteins and fats from cream cheese and eggs, combined with vitamins from lemon and raspberries. Classic dietary staples like low-fat cream cheese can substitute for a lighter version, impacting calorie counts favorably. For weight management, consider smaller portion sizes. Regular variations of this recipe fit into most balanced diets when enjoyed in moderation.

Dietary Adaptations

For gluten-free adaptations, utilize gluten-free graham cracker crumbs or an almond flour base. Dairy-free creams and cheeses accommodate lactose intolerance, while vegan alternatives include plant-based cream and egg replacements for the curd and meringue. Adjust sugar for keto or low-carb diets by incorporating suitable sweeteners like erythritol. Ensure low-FODMAP compliance with specific portion adjustments and ingredient substitutions.

Recipe Notes

– Granulated sugar used in the curd can be swapped with superfine sugar for a smoother texture.
– A kitchen torch is best for meringue browning, but a broiler can also be used with caution.
– Substitute gelatin or agar-agar if a firmer cheesecake consistency is desired.

Troubleshooting Guide

– If cheesecake cracks, use a water bath and avoid overmixing.
– For soupy curd, ensure sufficient cooking time or use cornstarch to thicken.
– Reincorporate separated meringue by whipping again with additional sugar.
– Balance overly tart lemon flavor with extra sugar or a sweet berry compote.

Recipe Success Stories

Join our vibrant community of bakers who have incorporated their creative twists on the Heavenly Lemon Raspberry Meringue Cheesecake. From unique plating techniques to flavor adaptations, discover shared insights and photos from fellow enthusiasts. Each success story brings new inspiration—be sure to share yours with us and see it featured!

Frequently Asked Questions

Can I use frozen raspberries instead of fresh?

Yes, you can use frozen raspberries. Thaw and drain excess liquid to prevent seepage into the cheesecake layers.

Is it possible to make this cheesecake without meringue?

Absolutely; replace meringue with whipped cream or omit it altogether for a classic lemon raspberry cheesecake.

Additional Resources

Explore our linked resources for technique videos on making perfect meringue, ingredient selection guides, and seasonal recipe variations. Discover related recipes like classic New York Cheesecake and Lemon Tart for further culinary experimentation.

Join the Conversation

We invite you to share your Heavenly Lemon Raspberry Meringue Cheesecake creations with us on social media using our designated hashtags. Participate in our community challenges, exchange photography tips, and contribute reviews for a chance to be highlighted in our success stories section—transform your baking journey into a shared celebration of flavors and creativity!

Heavenly Lemon Raspberry Meringue Cheesecake

⚖️
Difficulty
Intermediate

⏲️
Prep Time
45 mins

🕒
Cook Time
75 mins

⏱️
Total Time
120 mins

🍽️
Servings
8

Explore the delightful flavors of our Heavenly Lemon Raspberry Meringue Cheesecake. This mouthwatering dessert combines the tangy zest of citrus with the sweet burst of raspberries, all beautifully enveloped in a rich cheesecake. Whether you’re hosting a dinner party or simply treating yourself, this cheesecake promises to impress with its elegance and sublime taste.

Indulge in the creamy layers of this luscious lemon raspberry meringue cheesecake. The texture is a harmony of smooth cheesecake, delicate meringue, and a buttery graham cracker crust, making every bite sensational. The lively aroma of zesty lemon mingled with fresh raspberries awakens the senses, offering a tantalizing hint of what’s to come.

Visually, the Heavenly Lemon Raspberry Meringue Cheesecake is a show-stopper. Its golden-browned meringue peaks topped with vibrant red raspberries create a stunning centerpiece for any gathering. Despite its sophisticated appearance, this cheesecake recipe is manageable, making it perfect for home bakers eager to impress.

Quick Recipe Highlights

  • Flavor Profile: Tangy lemon with sweet raspberries, perfectly balanced with creamy cheesecake and a hint of vanilla
  • Texture: Silky cheesecake filling, airy meringue topping, and a crunchy graham cracker crust
  • Aroma: Citrus and vanilla mingling in the air with a hint of warm caramelized sugar
  • Visual Appeal: Golden meringue peaks with vibrant red raspberries atop a cream-colored base
  • Skill Level Needed: Intermediate; requires basic baking knowledge and precision
  • Special Equipment: Springform pan, electric mixer, and a piping bag

The Recipe

Heavenly Lemon Raspberry Meringue Cheesecake: A Divine Dessert to Delight

Serves: 8

Prep Time: 45 mins

Cook Time: 75 mins

Total Time: 120 mins

Kitchen Equipment Needed

  • Springform pan
  • Electric mixer
  • Mixing bowls
  • Spatula
  • Piping bag

Ingredients

  • 1 cup graham cracker crumbs
  • 2 tbsp sugar
  • 1/2 cup butter, melted
  • 16 oz cream cheese, softened
  • 1 cup sugar
  • 3 large eggs
  • 1/4 cup lemon juice
  • 1 tsp vanilla extract
  • 1 cup fresh raspberries
  • 3 egg whites
  • 1/4 cup sugar (for meringue)

Directions

  1. Preheat your oven to 325°F (160°C). Grease a 9-inch springform pan.
  2. In a bowl, combine graham cracker crumbs, 2 tbsp sugar, and melted butter. Press the mixture into the bottom of the springform pan to form the crust.
  3. Beat the cream cheese and 1 cup sugar in a large bowl until creamy. Add eggs one at a time, blending well after each addition.
  4. Mix in lemon juice and vanilla extract until smooth and incorporated.
  5. Pour the cream cheese mixture over the prepared crust. Scatter raspberries evenly over the top.
  6. Bake for 60 minutes or until the edges are set and the center is slightly jiggly.
  7. For the meringue, beat egg whites until soft peaks form. Gradually add 1/4 cup sugar, beating until stiff peaks form.
  8. Using a piping bag, pipe meringue over the cheesecake. Return to oven and bake for an additional 15 minutes until meringue is lightly browned.
  9. Cool the cheesecake completely, then refrigerate for at least 4 hours before serving.

Recipe Notes

  • You can substitute raspberries with blueberries or strawberries if preferred.
  • Ensure cream cheese is at room temperature for smoother mixing.
  • Lemon zest can be added for extra citrus flavor.

Irresistible Gooey Caramel Chocolate Crunch Bars Recipe for Sweet Lovers

Gooey Caramel Chocolate Crunch Bars Recipe

Craving a decadent dessert with layers of flavor and texture? This Gooey Caramel Chocolate Crunch Bars Recipe perfectly combines silky caramel, rich chocolate, and a satisfying crunch. The interplay of sweet and salty makes these bars irresistible, making them an ideal treat for chocolate lovers. Crafting this divine dessert is simpler than it appears, offering the perfect balance of luxurious flavors in every bite.

Quick Recipe Highlights

  • Flavor Profile: Rich chocolate with buttery caramel and a hint of vanilla, finished with a subtle touch of salt.
  • Texture: A great combination of gooey, crunchy, and smooth.
  • Aroma: Inviting aroma of toasted nuts and melted chocolate.
  • Visual Appeal: Contrasting dark and golden layers with a slight sheen from the caramel.
  • Skill Level Needed: Intermediate, with some attention to caramelizing sugar.
  • Special Equipment: A candy thermometer, baking dish, and silicone spatula.

Recipe Overview

  • Difficulty Level: Intermediate due to the caramel-making process, which requires temperature control.
  • Category: Dessert (Bars, Chocolates)
  • Cuisine: Modern American with European chocolate influences.
  • Cost: Moderate, with chocolate and nuts as primary expenses.
  • Season: Best during fall and winter when cozy desserts are in demand.
  • Occasion: Ideal for holidays, parties, or as a weekend treat.

Why You’ll Love This Recipe

Indulge in these Gooey Caramel Chocolate Crunch Bars, where each bite offers a harmonious blend of flavors and textures. The caramel’s buttery richness complements the deep notes of chocolate, while the crunch adds an exciting contrast. Despite their luxurious flavor, these bars are convenient and make for a delightful surprise at gatherings. Nutritionally, they provide a source of antioxidants from dark chocolate and beneficial fats from nuts. Economically, these bars are crafted from easily accessible ingredients, ensuring a budget-friendly indulgence.

Historical Background and Cultural Significance

Originally inspired by traditional European caramel and chocolate desserts, this recipe has evolved into a beloved American classic. These bars reflect the innovation of combining favorite confections into a single, decadent dessert. The art of caramel-making traces back centuries, and this recipe revives these traditions with modern flair. Regional variations across the US include different nut types and spice hints, adding unique touches to each iteration.

Ingredient Deep Dive

Explore the essence of each component in the Gooey Caramel Chocolate Crunch Bars:

Caramel: Caramel holds a deep history in European confectionery. It’s essential to use sugar with a reliable melting point and butter for richness. Select quality vanilla to enhance its aromatic profile. Store caramel in a cool, dry place to maintain consistency. If needed, maple syrup can substitute caramel’s sweetness.

Chocolate: A staple with roots in ancient Mesoamerican cultures, dark chocolate packed with antioxidants is critical. For optimal flavor, choose chocolate with 70% cacao. To preserve its texture, keep in a cool area. Milk chocolate can substitute for milder taste preferences.

Nuts: Almonds or walnuts add traditional crunch and nutrition. Packed with omega-3s, these nuts should be fresh to highlight their buttery notes. Stored in airtight containers, they offer extended shelf life. Pecans can serve as an alternative.

Common Mistakes to Avoid

  • Overcooking caramel: Avoid burning by closely monitoring temperatures using a candy thermometer.
  • Skipping nut toasting: For deeper flavor, don’t skip the toast.
  • Chocolate seizing: Melt slowly over low heat to avoid clumping.
  • Uneven layering: Spread each layer thoroughly for balanced flavor.
  • Not greasing the pan: Prevent sticking by adequately preparing pans.
  • Ignoring ingredient quality: Prioritize fresh and high-quality components.
  • Rushing cooling time: Allow full setting to maintain bar structure.
  • Using outdated nuts: Freshness ensures optimal taste and texture.
  • Improper storage: For longevity, store in cool, dry conditions.
  • Skipping salt sprinkle: Enhances flavors, don’t omit.

Essential Techniques

Master these techniques for Gooey Caramel Chocolate Crunch Bars:

Caramelizing: Control heat and observe color changes for perfect caramel. It’s key for flavor depth.

Chocolate Tempering: Achieves a glossy finish and prevents blooming, crucial for visual appeal.

Layering: Ensures even distribution and balance of ingredients. Use a spatula for precision.

Nut Toasting: Enhances flavor and crunch. Toast until fragrant but not burnt.

Pro Tips for Perfect Gooey Caramel Chocolate Crunch Bars

1. Use unsalted butter to control salt levels throughout.
2. Temper chocolate over a double boiler for consistent texture.
3. Toast nuts slightly longer for added depth of flavor.
4. Allow freshly-made caramel to cool slightly before incorporating.
5. Balance salt to enhance overall taste without overwhelming sweetness.
6. Refrigerate fully before cutting to ensure clean, defined slices.
7. Consider a silicone baking mat for easy release.
8. Experiment with various vanilla extracts for nuanced flavor layers.

Variations and Adaptations

Regional variations, seasonal themes, and dietary needs cater to diverse preferences:

Add spices like cinnamon for autumn flair. Swap pecans for almonds as a seasonal nut variety. Create vegan adaptations using plant-based alternatives: coconut oil instead of butter and vegan chocolate. For a low-carb option, use sugar-free chocolate. Innovate using sea salt flakes for a gourmet twist or enrich flavors with a touch of bourbon in caramel.

Serving and Presentation Guide

Serve these bars with aesthetic appeal:

Slice uniformly for tidy presentation. Consider garnishing with a chocolate drizzle or crushed nuts for elegance. Traditional or artisan coffee makes a classic pairing. For modern appeal, pair with fresh berries or mint sprigs. Serve at room temperature for maximal flavor and texture experience. Balance portion sizes to accommodate varying appetites.

Wine and Beverage Pairing

Match these bars with beverages for enhanced tasting experiences:

Opt for robust red wines like Cabernet Sauvignon. Offer non-alcoholic choices like spiced chai. Chocolate desserts pair beautifully with espresso. Serve wines slightly chilled and factor room temperature for teas. Consider complementary flavors; ensure beverages accentuate and not overshadow bars.

Storage and Shelf Life

To maintain freshness, follow these methods:

Store bars in airtight containers at room temperature to preserve texture. Refrigerate if keeping longer than a week. Use parchment paper layers to prevent sticking. Watch for stale or funky smells. Reheat by letting them sit at room temperature briefly. Bars can be frozen in airtight bags for up to a month. Thaw slowly to prevent texture changes.

Make Ahead Strategies

Make preparation seamless with advance measures:

Prepare caramel and chocolate layers a day ahead, store separately. Refrigerate assembled but uncooked bars for quick finishing. Understand that assembled bars hold quality for up to 3 days chilled. When reheating, cover loosely with foil to maintain texture. Fresh garnishes lend that touch of newness even when pre-prepped.

Scaling Instructions

Adjust this recipe easily for any occasion:

Halve to create a smaller, personal batch. Double or triple for event-scale use. Bigger batches may need additional refrigeration for setting. Understand cook times often adjust only slightly, depending on spreading thickness. Ensure adequate storage for leftovers with correct portioning.

Nutritional Deep Dive

Gain insight into what makes this recipe beneficial:

Macronutrients: Primarily consists of carbohydrates and fats, providing long-lasting energy. Chocolate offers antioxidants, promoting heart health. Almonds provide healthy fats and protein.

Dietary considerations include monitoring portions for balance, especially if conscious of sugar intake. A single bar balances indulgence with moderation, fitting well into a treat-based food plan.

Dietary Adaptations

Custom-tailor this recipe for various diets:

Gluten-free by using appropriate chocolate and non-contaminated nuts. Dairy-free via exchange of coconut oil or margarine for butter. Vegan with thorough substitution of all animal-based components. Adapt low-FODMAP choices by substituting triggers with suitable alternatives.

Recipe Notes

  • Swap almonds with hazelnuts for a richer taste.
  • Use muscovado sugar for a deeper caramel flavor.
  • Add cayenne for a hint of heat in chocolate.

Troubleshooting Guide

Navigate the usual hiccups for success:

Troubles with gooeyness often stem from undercooked caramel. Correct flavor imbalances by adjusting salt and vanilla. Ensure chocolate remains in temper to handle temperature issues. Switch ingredients carefully to maintain intended texture. Factor in batch timing for each recipe size.

Recipe Success Stories

Engage in our community’s delight:

Read feedback featuring adaptation ideas like adding sea salt caramel sauce. Share gained insights like using distinct chocolate origins for varied tastes. Delight in social sharing, trying presentation styles shared by peers. Discover how simple nametags and sprinkles can add photo perfection.

Frequently Asked Questions

How can I prevent my caramel from burning?

Monitor the caramel closely with a candy thermometer, maintaining medium-low heat and constant stirring to ensure even cooking.

What should I do if my chocolate seizes?

Seized chocolate can often be saved by adding a small amount of warm milk or cream and stirring smoothly until smooth again.

How can I make my bars chewier?

Extend cooking time slightly while keeping a watchful eye on texture development. Additionally, ensure that caramel is thoroughly cooled.

Can I use white chocolate in this recipe?

Yes, white chocolate can offer a sweeter twist, but it may alter the richness typically associated with dark chocolate varieties.

Why are my bars crumbling?

Ensure that each layer is evenly spread and compacted, especially the base layer, for structural integrity during cutting.

What can replace nuts for a nut-free version?

Sunflower seeds or oats offer a similar texture without introducing nut allergens, suitable for sensitive individuals.

How do I store leftover bars to keep them fresh?

Arrange in a single layer within an airtight container, separated by parchment paper layers to avoid sticking and maintain freshness.

What is the best way to melt chocolate evenly?

Employ a double boiler technique, ensuring slow and continuous stirring to avoid burning. Using a microwave in short bursts is an alternative.

Why did my caramel turn out hard?

Excessive cooking times or temperatures result in hardening. Re-calibrate timing and watch caramel closely for optimal texture.

What traditional nuts are best for this recipe?

Almonds or walnuts contribute traditionally beloved crunch for these bars, enhancing taste and nutritional balance.

Additional Resources

Explore related culinary insights through these suggestions:

– Check out our “Ultimate Guide to Making Caramel” video.
– Discover seasonal chocolate pairings with our detailed infographic.
– Familiarize yourself with baking essentials and least-used techniques.

Join the Conversation

Be a part of our thriving foodie community:

Capture and share your Gooey Caramel Chocolate Crunch Bars on social media using #DecadentDesserts. Join our monthly baking challenge to explore new recipes aligned with current trends. Share your reviews or challenges on our blog, where reader insights are truly valuable.

Gooey Caramel Chocolate Crunch Bars Recipe

⚖️
Difficulty
Medium

⏲️
Prep Time
20 mins

🕒
Cook Time
25 mins

⏱️
Total Time
45 mins

🍽️
Servings
12 bars

Welcome to an indulgent journey into the world of gooey caramel chocolate crunch bars. These delectable treats offer a perfect combination of rich chocolate and smooth caramel, enhanced by a delightful crunch. Whether you’re looking to impress guests at a gathering or indulge in a sweet treat yourself, this recipe delivers on flavor and texture.

These bars combine layers of luscious chocolate with a gooey caramel center, all wrapped up in a crispy crunch. With each bite, you’ll experience the luxurious combination of flavors and textures that make these bars unforgettable. Prepare yourself to be whisked away to dessert heaven.

Quick Recipe Highlights

  • Flavor Profile: Rich chocolate, creamy caramel, and a hint of vanilla
  • Texture: A perfect harmony of gooey, crunchy, and smooth layers
  • Aroma: Sweet, inviting scents of chocolate and caramel
  • Visual Appeal: Layers of golden caramel and deep chocolate hues
  • Skill Level Needed: Moderate; requires layering and caramel preparation
  • Special Equipment: Baking pan and double boiler for the chocolate

The Recipe

Gooey Caramel Chocolate Crunch Bars

Serves: 12 bars

Prep Time: 20 mins

Cook Time: 25 mins

Total Time: 45 mins

Kitchen Equipment Needed

  • Baking pan (8×8 inches recommended)
  • Double boiler or microwave-safe bowl
  • Mixing bowls
  • Spatula
  • Knife for slicing bars

Ingredients

  • 1 cup semi-sweet chocolate chips
  • 1 cup caramel sauce
  • 1 cup crushed pretzels
  • 1/2 cup butter
  • 1/2 cup brown sugar
  • 1 teaspoon vanilla extract
  • Pinch of salt

Directions

  1. Preheat your oven to 350°F (175°C) and grease your baking pan.
  2. In a mixing bowl, combine crushed pretzels, melted butter, and brown sugar. Press the mixture into the bottom of the prepared pan to form the crust.
  3. Bake the crust for 10 minutes and let it cool slightly.
  4. Melt chocolate chips using a double boiler or microwave until smooth. Spread half of the melted chocolate over the cooled crust.
  5. Pour the caramel sauce over the chocolate layer and spread evenly.
  6. Top the caramel with the remaining chocolate. Smooth the surface with a spatula.
  7. Refrigerate the bars for at least 2 hours to set.
  8. Once set, slice into 12 bars and serve chilled.

Recipe Notes

  • For an extra crunch, sprinkle sea salt flakes on top before setting.
  • Store the bars in an airtight container in the fridge for up to a week.
  • Experiment with different types of chocolate for varied flavors.

Irresistible Decadent Carrot Cake Bars Topped with Cream Cheese Frosting

Decadent Carrot Cake Bars with Cream Cheese Frosting

If you’re looking for a dessert that combines moist texture with rich creaminess, look no further than these Decadent Carrot Cake Bars with Cream Cheese Frosting. This delightful treat is a modern twist on the classic carrot cake, offering an easy way to enjoy those familiar flavors in a more convenient form. Packed with fresh carrots, warm spices, and a luscious cream cheese frosting, these bars are sure to be a hit at any gathering. Perfectly portioned and irresistibly tasty, they’re the ultimate carrot cake experience with your favorite espresso or tea.

This recipe captures everything you love about traditional carrot cake but in a bar that’s simple to make and share. The addition of walnuts and raisins brings both texture and natural sweetness, complementing the creamy, tangy frosting. Whether it’s a casual family get-together or a special occasion, these carrot cake bars promise to deliver deliciousness with every bite.

Quick Recipe Highlights

  • Flavor Profile: A rich blend of sweet, earthy carrots, cinnamon warmth, and creamy, tangy richness from the frosting.
  • Texture: Soft and moist cake crumb with crunchy walnuts and a smooth, creamy frosting.
  • Aroma: Inviting notes of cinnamon and nutmeg with a hint of citrus from the frosting.
  • Visual Appeal: A beautifully frosted carrot cake with specks of orange and brown, topped with walnut crumbles.
  • Skill Level Needed: Intermediate baking skills with basic frosting application.
  • Special Equipment: Mixer for the batter and frosting, and a baking dish for even cooking.

Recipe Overview

  • Difficulty Level: Intermediate due to the precise mixing and frosting techniques required for perfect textures and flavors.
  • Category: Desserts, Bars
  • Cuisine: A blend of traditional American baking with European influence in styling and presentation.
  • Cost: Budget-friendly; main costs include cream cheese, walnuts, and fresh carrots.
  • Season: Ideal for spring and autumn when carrots are at their sweetest.
  • Occasion: Birthdays, Easter, Potlucks, and Coffee Mornings.

Why You’ll Love This Recipe

These Decadent Carrot Cake Bars are a celebration of taste and texture. The satisfying blend of sweet, spiced flavors, and the textural contrast of moist cake and creamy frosting will surely please any dessert lover. The bars are conveniently sized, making them an ideal choice for easy serving at gatherings or as a delightful personal treat.

With preparation streamlined through straightforward steps, these bars provide the flavors of a classic carrot cake without the fuss of multi-layer baking. Nutritionally, the presence of fresh carrots lends a boost of beta-carotene and fiber, making each indulgent bite a bit more wholesome.

Hosting a gathering? These bars not only impress with taste but also add elegance to your dessert spread. The cost-effectiveness of ingredients and their wide availability mean everyone can enjoy crafting this recipe. Whether paired with a hearty breakfast or served as a sweet afternoon delight, these bars will remain a favorite.

Historical Background and Cultural Significance

Carrot cake’s origins trace back to the Middle Ages, when sugar was scarce, and carrots provided a sweet alternative in desserts. Its popularity surged during the World Wars due to rationing, and by the 1960s, it had become a beloved treat in America. Over the years, numerous variations emerged, with these bars representing an adaptation for easy sharing.

This treat holds a place of honor in spring celebrations, particularly around Easter, symbolizing renewal and freshness with the season’s arrival. Regions worldwide have embraced carrot cake, adding local ingredients to enhance its appeal. Traditionally, it’s served at special occasions, its rich flavors and comforting qualities making it a favorite for celebrations.

Ingredient Deep Dive

Carrots:
Carrots are a staple in this recipe, known for their natural sweetness and vibrant color. They’re rich in beta-carotene, an antioxidant beneficial for eye health. Choose firm, bright-orange carrots for the best flavor and texture. Store them in the refrigerator, ideally in a perforated bag, to maintain freshness. If needed, grated zucchini can be a substitute for a different twist.

Walnuts:
Walnuts contribute nuttiness and crunch. They’re packed with omega-3 fatty acids and add depth to the bars. Look for fresh, unshelled walnuts without a bitter smell. Store them in an airtight container in the refrigerator to prevent rancidity. Pecans or almonds can be alternative options.

Cream Cheese:
The cream cheese frosting is the crowning glory of these bars, providing a tangy contrast to the sweet cake. Ensure it’s softened before mixing to achieve a smooth consistency. Opt for full-fat varieties for the richest flavor, though low-fat versions can be used too. Store leftover cream cheese in its original packaging, tightly wrapped, in the fridge.

Common Mistakes to Avoid

  • Overmixing the batter, which leads to a dense cake. Mix until just combined.
  • Using cold cream cheese for the frosting. Allow it to reach room temperature first.
  • Skimping on spice, resulting in a bland cake; measure spices generously.
  • Skipping the parchment lining in your baking dish, risking sticking.
  • Overbaking, which dries out the bars. Start checking a few minutes before the timer ends.
  • Not properly spacing the baking dish in the oven, leading to uneven baking.
  • Grinding nuts too finely; they should be coarsely chopped for optimal texture.
  • Frosting bars when warm, causing the frosting to melt and slide.

Essential Techniques

Creaming method:
Mix the sugar and butter well to introduce air, ensuring a light crumb structure.

Grating carrots:
Utilize the fine side of a box grater for uniform carrot strands that meld into the batter.

Frosting application:
Use a spatula to evenly spread chilled frosting, enhancing the dessert’s aesthetic and keeping flavors balanced.

Visual cues:
The cake should spring back when gently pressed and skewer inserted should emerge clean.

Pro Tips for Perfect Carrot Cake Bars

For enhanced flavor depth, toast walnuts lightly before mixing into batter.

Use freshly grated nutmeg for a heightened spice profile.

Give the frosting an extra creamy texture by whipping it after the initial mixing.

Incorporate orange zest into the frosting for added citrus brightness.

Wilt carrots slightly beforehand to alleviate moisture in the batter.

Allow bars to cool completely post-baking to set flavors prior to frosting.

Dust bars with cinnamon before serving, enriching the spicy notes.

Pair with candied ginger pieces for an intriguing taste twist.

Variations and Adaptations

Regional variations:
Incorporate local spices or flavors, such as cardamom in Scandinavian versions.

Seasonal adaptations:
For a winter take, add cranberries or dried fruits.

Dietary modifications:
Use gluten-free flour blends or lactose-free cream cheese for dietary needs.

Flavor variations:
Experiment with spices like ginger or allspice for a unique flavor profile.

Texture modifications:
Blend in shredded coconut for an interesting texture change.

Presentation alternatives:
Create smaller squares for finger-food events or larger rectangles for sharing.

Serving and Presentation Guide

Plating techniques:
Cut bars in uniform shapes using a sharp knife for a clean edge.

Garnishing ideas:
Decorate with additional walnut pieces and a light dusting of powdered sugar.

Traditional accompaniments:
Serve with spiced tea or hot coffee for a well-rounded experience.

Modern serving suggestions:
Present atop a wooden serving board for rustic charm.

Temperature considerations:
Serve at room temperature for the best texture; chill if storing for later.

Portion control tips:
Offer in smaller sizes for mindful indulgence without excessive calorie intake.

Wine and Beverage Pairing

Wine pairings:
Opt for a sweet Riesling or a Moscato, enhancing the carrot cake’s sweetness and spice.

Non-alcoholic alternatives:
A spiced apple cider complements the cake’s warm notes.

Coffee/tea pairings:
Pair with a robust espresso or chai tea to amplify the spice elements.

Temperature considerations:
Chilled beverages offer refreshing contrast to the cake’s richness.

Serving suggestions:
Serve beverages in clear glassware to highlight their appealing colors.

Storage and Shelf Life

Detailed storage methods:
Store bars in an airtight container, layering parchment paper between stacked bars to prevent sticking.

Temperature requirements:
Keep refrigerated to maintain frosting integrity and prevent spoilage.

Container recommendations:
Use a glass or plastic resealable container for optimal freshness.

Signs of spoilage:
Mold growth or off odors indicate spoilage; discard if present.

Reheating instructions:
Warm slightly in microwave for seconds if desired, balancing between meltiness and flavor preservation.

Freezing guidelines:
Freeze unfrosted bars individually wrapped for up to 3 months; thaw overnight before frosting fresh.

Quality expectations:
Bars can dry over extended storage; consume within five days for best quality.

Make Ahead Strategies

Detailed prep timeline:
Carrot grating and nut chopping can be done a day ahead; store in fridge.

Storage instructions between steps:
Keep batter chilled if prepared ahead, to be used within 24 hours for optimal rise.

Quality impact assessment:
Slight textural shifts may occur with advanced pre-making; fresher the better.

Assembly tips:
Frost once cooled, ensuring even coverage, right before serving.

Reheating guidelines:
If served warm, gently warm unfrosted squares before applying frosting anew.

Fresh element additions:
Garnish just before serving for the freshest presentation.

Scaling Instructions

How to halve the recipe:
Use half the quantity of all ingredients; adjust baking time; monitor baking closer.

How to double or triple:
Prepare in larger baking sheets; ensure oven space is evenly distributed.

Equipment adjustments needed:
Multiple baking pans may be required; increase mixing bowl size for batter preparation.

Timing modifications:
Slightly extend bake time for scaled recipes; keep close watch for overbaking concerns.

Storage considerations:
Consider freezing extras to maintain freshness over larger batches.

Nutritional Deep Dive

Detailed macro breakdown:
Carbs: Predominantly from flour and carrots; sugars balanced by cream cheese.

Micronutrient analysis:
High in Vitamin A and antioxidants from carrots; calcium from cream cheese.

Health benefits:
Contains heart-healthy fats from nuts; carrots promote skin health.

Dietary considerations:
Mind portions if monitoring sugar intake or calorie count.

Portion size analysis:
Standard bar offers a balance of energy yield appropriate for snacks.

Weight management tips:
Opt for half portions to savor flavors without overindulgence.

Dietary Adaptations

Gluten-free:
Substitute with almond or coconut flour alternatives.

Dairy-free:
Utilize plant-based cream cheese substitutes; almond milk for moisture.

Vegan:
Employ flaxseed egg substitutes; vegan-friendly cream cheese.

Low-carb:
Shift to almond flour; use sugar alternatives like erythritol.

Keto:
Incorporate more fats via butter; adjust frosting with cream cheese blend to match macros.

Paleo:
Focus on unrefined sugars like honey or maple syrup; flour substitutions.

Low-FODMAP:
Limit serving size; adjust fructose levels by reducing carrot amounts.

Recipe Notes

  • Substitute other nuts if allergies are a concern, like sunflower seeds.
  • Incorporate fresh ginger for an added zing in both batter and frosting.
  • Adjust sugar quantities based on personal sweetness preference.

Troubleshooting Guide

  • Texture issues: Ensure correct flour measurement; weigh for precise amounts.
  • Flavor balance: Default spices key; adjust if overpowering or bland.
  • Temperature problems: Use stable oven temperatures; monitor with a reliable thermometer.
  • Equipment challenges: Prepare all utensils and appliances beforehand.
  • Ingredient substitution impacts: Note textural and glutinous changes in flour swaps.
  • Timing concerns: Start checking a few minutes early as oven variances affect bake time.

Recipe Success Stories

Join our community feedback section as individuals share their unique variations and serving ideas. From inventive plating to dietary modifications, discover how others have made this recipe their own. Photography enthusiasts showcase vibrant desserts, complete with lighting tips to capture your bars at their best. Share your own successes and become part of our growing community.

Frequently Asked Questions

What makes these carrot cake bars unique compared to a traditional cake?

These bars offer an easy-to-serve option with the same rich taste. Their texture is slightly denser, allowing for easy handling and portability without sacrificing flavor or moisture.

Can I make these bars ahead of time and freeze them?

Yes, these bars can be frozen without frosting for up to three months. Wrap each bar individually in cling film to maintain quality and thaw overnight before decorating.

How can I enhance the flavor profile of these bars?

Consider adding freshly grated ginger or a touch of cardamom for an exotic twist. A dash of citrus zest in the frosting can also heighten its creamy tang.

Is it possible to make a vegan version of these carrot cake bars?

Absolutely! Use flaxseed meal in place of eggs and coconut oil instead of butter. Opt for vegan cream cheese for a plant-based frosting solution.

What is the best method to store these bars for optimal freshness?

Store in an airtight container in the fridge. For best quality, consume within 5 to 7 days. If freezing, ensure bars are unfrosted and tightly wrapped.

Can I use pre-shredded carrots for this recipe?

While convenient, pre-shredded carrots may lack moisture and flavor. Freshly grating ensures the best results, both in texture and taste.

What modifications can help reduce the sugar content?

Replace sugar with alternatives like stevia or erythritol to reduce sugar levels. Another option is to use honey or maple syrup sparingly for natural sweetness.

How can I ensure the frosting doesn’t become too runny?

Ensuring the cream cheese is at room temperature before mixing is crucial. Add powdered sugar gradually, and if needed, a touch of cornstarch to stabilize texture.

Does the baking time differ with different pan sizes?

Yes, adjusting pan size affects thickness and requires time adaptation. Thinner bars may cook faster; thicker batches might need a longer duration. Monitor cooking towards the end closely.

What are some creative garnishing ideas for presentation?

Consider topping with finely grated orange zest or sprinkling toasted coconut. Edible flowers or freeze-dried fruit powders can also enhance visual charm.

Additional Resources

Explore related recipes for variations like carrot cupcakes or other spice-based desserts. Access detailed instructional videos focusing on mastering basic cake techniques or dive into ingredient guides for understanding substitutions. Seasonal variations offer tips for maximizing flavors across different times of the year.

Join the Conversation

We invite you to share your carrot cake creations with us! Use the hashtag #CarrotCakeBars on social media. Participate in community challenges or post reviews and feedback to refine and celebrate this recipe. Connect with other enthusiasts, exchange tips, and showcase your baking endeavors.

Decadent Carrot Cake Bars with Cream Cheese Frosting

If you’re looking for a dessert that marries the wholesome goodness of carrots with the irresistible creaminess of frosting, these Decadent Carrot Cake Bars with Cream Cheese Frosting are your perfect match. These gourmet bars combine rich flavors and textures into a delightful treat that’s ideal for any occasion. From the finely grated carrots to the smooth, luscious cream cheese frosting, every bite delivers a luxurious taste experience.

Indulge your senses with the warm spice blend that these carrot cake bars have to offer. The subtle sweetness of carrots paired with cinnamon, nutmeg, and a hint of ginger makes a flavor profile that is both classic and unique. Topped with a creamy layer of cream cheese frosting, these bars are perfect for those who appreciate a balance of sweet and savory.

Whether you’re hosting a dinner party or simply need a treat for yourself, these bars are straightforward to prepare yet impressive enough to earn a spot on your dessert table. Read on to explore the full recipe and bring this sweet delight to life in your kitchen.

Quick Recipe Highlights

  • Flavor Profile: An exquisite blend of sweet carrots, rich cream cheese frosting, and warm spices
  • Texture: Soft, chewy bars with a smooth, creamy topping
  • Aroma: Inviting notes of cinnamon, nutmeg, and vanilla
  • Visual Appeal: Layers of vibrant orange spiced cake topped with a creamy white frosting
  • Skill Level Needed: Beginner-friendly with straightforward techniques
  • Special Equipment: Grater for carrots, mixing bowls, and baking pan

The Recipe

Decadent Carrot Cake Bars: A Spiced Delight Topped with Creamy Frosting

Serves: 12

Prep Time: 20 mins

Cook Time: 25 mins

Total Time: 45 mins

Kitchen Equipment Needed

  • Mixing bowls
  • Electric mixer
  • Baking pan (9×13 inches)
  • Grater
  • Spatula

Ingredients

  • 1 cup of all-purpose flour
  • 1/2 cup of granulated sugar
  • 1/2 cup of brown sugar
  • 1 teaspoon of baking powder
  • 1/2 teaspoon of baking soda
  • 1/2 teaspoon of salt
  • 1 teaspoon of ground cinnamon
  • 1/2 teaspoon of ground nutmeg
  • 1/4 teaspoon of ground ginger
  • 2 large eggs
  • 1/2 cup of vegetable oil
  • 1 teaspoon of vanilla extract
  • 1 1/2 cups of grated carrots
  • 8 oz of cream cheese, softened
  • 1/2 cup of unsalted butter, softened
  • 2 cups of powdered sugar
  • 1 teaspoon of vanilla extract (for frosting)

Directions

  1. Preheat your oven to 350°F (175°C) and grease a 9×13 inch baking pan.
  2. In a large bowl, combine flour, granulated sugar, brown sugar, baking powder, baking soda, salt, cinnamon, nutmeg, and ginger.
  3. Add the eggs, vegetable oil, and vanilla extract, mixing until well blended.
  4. Fold in the grated carrots until evenly distributed.
  5. Pour the batter into the prepared baking pan and spread evenly.
  6. Bake for 25 minutes or until a toothpick inserted into the center comes out clean.
  7. Allow the bars to cool completely in the pan.
  8. For the frosting, beat together cream cheese and butter until smooth and creamy.
  9. Gradually add in the powdered sugar and vanilla extract, continuing to beat until the frosting is light and fluffy.
  10. Spread the frosting evenly over the cooled carrot cake bars.
  11. Slice the bars into squares and serve.

Recipe Notes

  • For a nutty twist, consider adding 1/2 cup of chopped walnuts to the batter.
  • Ensure the cream cheese is at room temperature before making the frosting for a smoother texture.
  • Store any leftovers in an airtight container in the refrigerator for up to 5 days.

Delicious No-Bake Mini Banana Cream Pies for Easy Desserts

No-Bake Mini Banana Cream Pies Recipe

If you’re looking for a delightful no-bake dessert that’s both easy to make and irresistibly delicious, then this No-Bake Mini Banana Cream Pies Recipe is exactly what you need. With its creamy texture, sweet banana flavor, and crunchy crust, this dessert will quickly become a favorite in your household. Whether you’re an experienced baker or a kitchen novice, you’ll find this recipe simple and rewarding, making it perfect for any occasion.

Quick Recipe Highlights

  • Flavor Profile: Sweet, creamy bananas with a hint of vanilla.
  • Texture: Smooth and creamy filling with a crunchy graham cracker crust.
  • Aroma: Inviting banana and vanilla with a slight nuttiness.
  • Visual Appeal: Deliciously creamy with a golden crust and fresh banana slices.
  • Skill Level Needed: Easy—ideal for beginners and quick dessert solutions.
  • Special Equipment: Mini pie tins or muffin tins.

Recipe Overview

  • Difficulty Level: Easy. This no-bake dessert requires minimal prep work and no complex techniques.
  • Category: Dessert, No-Bake.
  • Cuisine: American, featuring classic banana cream pie flavors.
  • Cost: Economical, with most ingredients being pantry staples.
  • Season: Perfect year-round, with bananas being a perennial fruit.
  • Occasion: Ideal for family gatherings, potlucks, and casual dinners.

Why You’ll Love This Recipe

These No-Bake Mini Banana Cream Pies offer the perfect blend of creamy and crunchy textures, combined with the natural sweetness of bananas. Quick to assemble, they provide a convenient dessert option without the need for baking, saving you both time and effort. Bananas are an excellent source of nutrition, offering fiber and essential vitamins, making this dish not just tasty but beneficial. Whether as a solo treat or shared during social gatherings, these mini pies bring joy and satisfaction in every bite. Furthermore, the accessible ingredients ensure you won’t break the bank, while still impressing with taste and presentation.

Historical Background and Cultural Significance

Banana cream pies have their roots deeply embedded within American culinary tradition, celebrating the widespread popularity of bananas in the early 20th century. As a beloved dessert, it evolved from historic custard and cream pies. Regionally, this treat varies, with some opting for pudding bases or additional tropical flavors. Traditionally served at family dinners and holiday feasts, banana cream pies have become a symbol of classic comfort food, cherished across generations for their simple pleasure.

Ingredient Deep Dive

Bananas play a central role, providing sweetness and a creamy texture. Select ripe bananas with a few brown spots for optimal flavor. Nutritionally, they offer potassium, vitamin C, and dietary fiber. Store bananas at room temperature and refrigerate once ripe to extend freshness. For alternatives, consider plantains or even mangoes for a tropical twist. The graham cracker crust provides a crispy base, binding the creamy filling and adding a nutty undertone. Consider digestive biscuits or gluten-free options for variations.

Common Mistakes to Avoid

  • Overripe bananas leading to a mushy texture—choose medium-ripe.
  • Using whipped cream that’s too soft; always chill before folding.
  • Insufficient chilling time resulting in runny filling; allow ample refrigeration.
  • Skipping crust shaping, which might lead to crumbling; firmly press into tins.
  • Over-mixing the filling, yielding a loss of volume; fold gently.
  • Omitting crust pre-refrigeration, causing disintegration; chill crust first.
  • Not slicing bananas evenly, affecting texture uniformity.
  • Ignoring fresh lemon juice to prevent banana browning; a light brush suffices.
  • Wrong pie tin size leading to overflow; adjust portions accordingly.
  • Filling pies too early, risking sogginess; assemble closer to serving time.

Essential Techniques

One crucial technique is creating a stable whipped cream base; ensure cream is chilled and equipment cold for optimal peaks. Mastering the art of folding the cream prevents deflation and maintains a light texture. Pressing the crust firmly into tins ensures a compact structure, avoiding crumbling on serving. Recognizing visual cues for perfect texture, like filling glossiness and peak stability in whipped cream, helps ascertain readiness and quality in no-bake pies.

Pro Tips for Perfect No-Bake Mini Banana Cream Pies

Maximize flavor by adding a tablespoon of banana liqueur to enhance the banana taste. For a smoother filling, sift your sugar before incorporating. Stabilize your whipped cream with a touch of gelatin for a firmer hold in warm conditions. Add a sprinkle of grated nutmeg to the crust for an extra depth of flavor. Chill your ingredients beforehand to expedite setting. To prevent crust sogginess, lightly brush with melted chocolate and let it set before filling. Prepare a day in advance for a firmer consistency and richer taste. Finally, garnish with mint leaves or sliced almonds for an elevated presentation.

Variations and Adaptations

Explore regional variations by incorporating coconut flakes for a tropical flair, or maple syrup for a rustic twist. Seasonal adaptations can include fresh berries during summer or a dusting of cinnamon in fall. Dietary modifications like coconut cream for non-dairy needs make it accessible without sacrificing taste. Enhance flavor with a peanut butter swirl or a hint of chocolate in the filling for diversity. Modify the texture with a layer of caramel or cheesecake base alternative, offering a unique twist. Present individual pies on floral-patterned plates with a drizzle of caramel sauce for a modern serving style.

Serving and Presentation Guide

For optimal elegance, serve these mini pies on a tiered dessert stand as a centerpiece. Garnish with finely chopped nuts or chocolate shavings to add texture contrasts. Traditionally complemented by lightly sweetened whipped cream, modern servings might include a custard sauce drizzle. Aim to serve slightly chilled to retain their shape and flavor. Consider portion control by arranging well-spaced, so guests enjoy a perfectly portioned dessert experience.

Wine and Beverage Pairing

Pair these delightful pies with a light, crisp Moscato that complements the banana and cream tones without overpowering. Non-alcoholic alternatives like a chilled vanilla chai latte or spiced ginger brew complement the dessert perfectly. If coffee is preferred, a smooth, mild blend balances the sweetness. Serve beverages at a cold temperature to refresh and cleanse the palate. Consider the playful addition of an iced banana smoothie to echo the main flavor.

Storage and Shelf Life

Store these mini pies in an airtight container in the refrigerator to maintain freshness. Keep at a cool temperature to preserve the texture and prevent melting. Use glass containers to avoid moisture accumulation. Watch out for changes in color or smell, indicating spoilage. For reheating crust prior to serving, a quick oven blast revives the crunch. Freezing is not recommended due to filling separation; consume fresh within 2-3 days.

Make Ahead Strategies

Prepare the crust and filling separately up to two days in advance, storing them airtight in the fridge. Assemble shortly before serving for pinnacle freshness. Prioritize chilling the crust fully to prevent breakdown. Gauge filling taste and add freshly sliced bananas right before serving to retain integrity. Reheat crust slightly for a freshly baked sensation. Balance by adding fresh cream or zest just prior to serving for a lively finish.

Scaling Instructions

For fewer servings, halve the ingredient quantities, ensuring the crust remains compact. Doubling the recipe obliges larger mixing bowls and additional tins for even distribution. Adjust chilling times based on volume, letting batter rest sufficiently. For larger batches, stagger refrigeration, maintaining coolness throughout. Consider space and airflow when scaling up, preventing overcrowding in storage conditions, which may lead to inconsistency.

Nutritional Deep Dive

Each serving of these mini pies offers a blend of carbohydrates from bananas and the crust, providing energy. Find beneficial potassium and vitamins aiding heart health and digestion improvements. Moderate cream and sugar content ensures a balanced dietary indulgence. Suitable for discretion, these pies allow inclusion within a healthy diet. Segment appropriate serving sizes to manage intake and appreciate in moderation.

Dietary Adaptations

Adapt for gluten-free needs by selecting certified gluten-free graham crackers. Utilize dairy-free whipped topping for lactose intolerant preferences. Replace cream with coconut alternatives to suit vegan diets. Implement sugar substitutes for reduced-calorie sweetness in keto adaptations. Paleo dieters can explore nut-based crusts instead. Cater to low-FODMAP conditions with consideration for ripe banana quantities and restrictions.

Recipe Notes

  • Substitution: Digestive biscuits can replace graham crackers for a maltier crust.
  • Preference: Substitute plain yogurt for a tangier, lighter outcome in the filling.
  • Adjustment: Skim milk can be used in place of heavy cream to reduce fat content.
  • Alternative: Experiment with different fruits like peaches or mango for a seasonal twist.

Troubleshooting Guide

  • Texture Issues: Consider cream stabilizers for firmness.
  • Flavor Imbalance: Verify banana ripeness to optimize sweetness.
  • Temperature Concerns: Ensure refrigeration; warming accelerates filling softening.
  • Equipment Challenges: Use chilled metal bowls for whipping components to bolster stability.
  • Ingredient Substitution Impacts: Confirm substitutes preserve always-consistent ratios.
  • Timing Concerns: Avoid premature assembly, which may loosen the crust.

Recipe Success Stories

Discover how others have succeeded in customizing their No-Bake Mini Banana Cream Pies with delightful outcomes. Readers frequently report triumphs in adapting flavors to seasonal fruits and credit community inspiration for presentation enhancements. Follow photography improvement tips to capture your culinary achievements at their most enticing. Join in sharing your story and delight in the possibilities unlocked by this versatile recipe.

Frequently Asked Questions

Can these mini pies be frozen?

Unfortunately, freezing is not recommended as it can cause the cream filling to separate and the crust to become soggy.

How can I make this recipe vegan?

Use coconut cream instead of dairy and ensure your graham crackers are free of animal products for a fully vegan version.

What can I substitute for graham crackers?

You can use digestive biscuits or crushed oats for a healthy twist while maintaining the pie’s structural integrity.

What is the best way to serve these pies?

Serve slightly chilled with a garnish of fresh bananas and a dollop of whipped cream for an impressive presentation.

Can I use a different fruit for this recipe?

Yes, fruits like strawberries, mangoes, or peaches are excellent alternatives adding varied flavors and colors.

How can I make my whipped cream firmer?

Adding a touch of gelatin or cornstarch to your whipped cream will help it hold shape longer, particularly in warmer climates.

Is it possible to lower the sugar content?

Use sweeteners such as stevia or monk fruit to reduce sugar while maintaining sweetness in the filling.

How do I keep the bananas from browning?

Prevent oxidation by lightly brushing banana slices with lemon juice to maintain their bright appearance.

What’s the best way to shape the crust?

Firmly press the crust mixture into tins ensuring even thickness for stability and optimal crunch.

How do I avoid making the filling too runny?

Ensure cream is whipped to stiff peaks and allow ample chilling time before serving to achieve the ideal consistency.

Can I use premade pie crust?

While you can use store-bought crusts, making your own offers superior flavor and customized taste.

What’s the ideal whipping cream type I should use?

Heavy whipping cream offers the best volume and holds peaks well, critical for the filling’s structure.

Additional Resources

Explore more no-bake desserts like our classic No-Bake Cheesecake or watch technique videos detailing the perfect whipped cream. Ingredient guides provide insights into selecting the best bananas, ensuring sweet success. Consider equipment recommendations to bolster your culinary toolkit and peruse seasonal variations for fresh inspiration.

Join the Conversation

Share your experiences with the No-Bake Mini Banana Cream Pies on social media using #BananaCreamDelight. Discover photography tips that make your dessert look as irresistible as it tastes. Engage in community challenges and participate in recipe review discussions to enhance baking knowledge, providing satisfaction and creativity at every step.

Irresistible No-Bake Mini Banana Cream Pies Recipe

Welcome to my culinary corner, where today we’re diving into the creamy, dreamy world of No-Bake Mini Banana Cream Pies. These delightful treats bring luscious banana flavors into perfect harmony with a rich, silky cream filling. Whether you’re a banana dessert aficionado or just in the mood for something sweet that’s a breeze to prepare, these mini pies will surely enchant your taste buds.

Our No-Bake Mini Banana Cream Pies are a testament to how simplicity in the kitchen can still yield gourmet results. With layers of vanilla wafer crust, velvety banana pudding, and a crown of whipped cream, these pies promise a taste journey that’s both decadent and refreshing. Get ready to experience the tropical aroma of bananas infused with a hint of vanilla.

Quick Recipe Highlights

  • Flavor Profile: Indulgent banana with a creamy vanilla kick
  • Texture: Creamy filling paired with a crunchy crust
  • Aroma: Fresh banana essence mixed with smooth vanilla
  • Visual Appeal: Charming mini desserts with layered elegance
  • Skill Level Needed: Easy; suitable for beginner cooks
  • Special Equipment: Muffin tin, electric mixer

The Recipe

No-Bake Mini Banana Cream Pies: The Ultimate Easy Dessert!

Serves: 12

Prep Time: 20 mins

Cook Time: 0 mins

Total Time: 20 mins

Kitchen Equipment Needed

  • Muffin tin
  • Mixing bowls
  • Electric mixer
  • Spatula

Ingredients

  • 1 pack vanilla wafers (about 25-30 wafers)
  • 2 large bananas, sliced
  • 1 package instant vanilla pudding mix
  • 2 cups cold milk
  • 1 cup heavy whipping cream
  • 2 tablespoons sugar
  • 1 teaspoon vanilla extract
  • Whipped cream, for topping (optional)

Directions

  1. Begin by crushing the vanilla wafers into fine crumbs. Divide them evenly into the bottom of a muffin tin, pressing them down gently to form crusts in each cup.
  2. In a large mixing bowl, prepare the instant vanilla pudding by whisking it with 2 cups of cold milk until it starts to set.
  3. Arrange banana slices on top of the wafer crusts, reserving some for garnish.
  4. Spoon the prepared pudding mixture over the bananas, filling each muffin cup almost to the top.
  5. Using an electric mixer, whip the cream with sugar and vanilla extract until it forms stiff peaks.
  6. Top each pie with a dollop of freshly whipped cream and a slice of banana for garnish.
  7. Refrigerate for at least one hour before serving to set the flavors.

Recipe Notes

  • Customize with chocolate shavings or a sprinkle of cinnamon for added flavor.
  • Ensure bananas are ripe for the sweetest and most flavorful results.
  • The recipe can be adapted using gluten-free wafers for those with dietary restrictions.

Indulge in Irresistible Vanilla Bean Crème Brûlée Cheesecake Cupcakes

Vanilla Bean Crème Brûlée Cheesecake Cupcakes

Prepare to indulge in a symphony of creamy textures and decadent flavors with these Vanilla Bean Crème Brûlée Cheesecake Cupcakes. Infused with real vanilla bean and topped with a perfectly caramelized sugar crust, this dessert is a sophisticated twist on the classic cheesecake, seamlessly merging with the irresistible allure of crème brûlée. Perfect for a special occasion or an exquisite treat at home, these cupcakes promise to bring elegance and a gourmet touch to your dessert table.

Whisk yourself away to a world where crème brûlée and cheesecake unite to create a heavenly cupcake experience. The smoothness of cream cheese blended with the aromatic richness of genuine vanilla, enshrined within a delicate crispy sugar crust, captivates with every bite. Whether you’re a keen baker or new to the kitchen, follow our comprehensive guide to master these Vanilla Bean Crème Brûlée Cheesecake Cupcakes.

Quick Recipe Highlights

  • Flavor Profile: Rich vanilla bean essence with a sweet and slightly burnt aftertaste from the caramelized sugar
  • Texture: Creamy cheesecake filling with a contrasting crunchy sugar topping
  • Aroma: Intense vanilla with a hint of caramelized sugar
  • Visual Appeal: Elegant golden-brown sugar crust atop a smooth ivory cheesecake
  • Skill Level Needed: Intermediate – requires basic baking skills and attention to sugar caramelization
  • Special Equipment: Kitchen torch for sugar caramelization, muffin tin, baking liners

Recipe Overview

  • Difficulty Level: Intermediate due to the precision needed in caramelizing sugar without burning
  • Category: Dessert, Cupcake
  • Cuisine: Fusion of French and American influences
  • Cost: Moderately priced; key ingredients include cream cheese and vanilla beans
  • Season: Suitable for year-round enjoyment, particularly festive during holidays
  • Occasion: Ideal for celebrations, special occasions, or sophisticated dinner parties

Why You’ll Love This Recipe

Experience the perfect combination of taste and texture with these Vanilla Bean Crème Brûlée Cheesecake Cupcakes. The rich flavor of vanilla beans paired with the creamy texture of cheesecake and the satisfying crunch of caramelized sugar creates a sensory delight that’s as enjoyable to eat as it is to prepare.

Convenience is another aspect you’ll appreciate. While achieving the perfect sugar crust requires a bit of technique, our detailed guide ensures you achieve culinary success, transforming these cupcakes into an attainable luxury.

Nutritionally, these cupcakes provide a delightful indulgence, balancing indulgence with the natural aromatic properties of vanilla. They work wonderfully as a show-stopping dessert for dinner parties or a sweet little treat during an intimate gathering.

The accessibility of ingredients, readily available in most grocery stores, ensures these cupcakes can be crafted without hassle, while the cost remains reasonable. Offering an opportunity to impress without extravagant spending speaks to the versatile joy of baking.

Historical Background and Cultural Significance

These cupcakes celebrate the marriage of two beloved desserts: crème brûlée, with French roots dating back to the 17th century, and cheesecake, cherished globally. The crème brûlée element, marked by its divine sugar crust, signifies elegance and sophistication, making it a staple in French cuisine, often reserved for special occasions.

Cheesecake, with origins traced to ancient Greece, has evolved over centuries through various cultures, each adding its unique twist. Its popularity exploded in America, leading to endless variations and interpretations.

By combining cheesecake with the exquisite elements of crème brûlée, this recipe offers not just a dessert but a story of cultural fusion. Regional variations often adapt dessert favorites to local taste preferences, blending classic techniques with modern culinary innovation.

Ingredient Deep Dive

Vanilla Beans: Known for their aromatic depth, vanilla beans elevate desserts from ordinary to extraordinary. Nutritionally, they offer antioxidants, and selecting plump, moist pods ensures quality. Store them in an airtight container, away from light and heat.

Cream Cheese: A cheesecake staple, its creamy texture and subtle tanginess provide the perfect base. Opt for full-fat versions for the richest flavor and smoothest consistency. It’s best stored refrigerated and wrapped securely to maintain freshness.

Eggs: Essential for structure and richness in cheesecakes, use fresh, room-temperature eggs to achieve a cohesive batter. Consider organic or free-range for the best flavor profile. Storage should always be in the fridge to maintain safety and quality.

Common Mistakes to Avoid

  • Over-beating the batter: Prevents cracks by gently folding ingredients.
  • Ignoring room temperature ingredients: Ensures a smooth, lump-free batter.
  • Skipping water bath: Helps provide gentle, even cooking.
  • Over-caramelizing the sugar: Only caramelize until just golden.
  • Undercooking cupcakes: Check for a slight wobble in the center when baking.
  • Using inferior vanilla: Compromises the complex flavor profile.
  • Incorrect storage: Always refrigerate leftovers promptly.
  • Forgetting to cool properly: Ensures texture consistency and flavor development.
  • Not using a torch: Gives the signature caramelized crust from proper scorching.
  • Opening the oven door too often: Maintains even temperature and texture.

Essential Techniques

Mastering the water bath method is vital in this recipe, creating the even, gentle heat necessary for preventing cracks and ensuring an incredibly creamy texture. To do this, place a pan of water on the lowest oven shelf below the cupcakes, inducing a moist environment.

Caramelizing sugar neatly requires practice. Start by sprinkling an even sugar layer over the cooled cupcakes, then torch it evenly until just golden brown, avoiding any excessive burning. This technique creates both the protective crust and a striking taste contrast.

Pro Tips for Perfect Vanilla Bean Crème Brûlée Cheesecake Cupcakes

– Use high-quality vanilla beans for the richest flavor and aromatic essence.
– Mix the batter just until combined to avoid incorporating excess air, which can prevent cracking.
– Ensure your cream cheese is at proper room temperature for a smooth batter texture.
– Avoid baking at excessively high heat to prevent drying and cracking.
– Allow the cupcakes to cool slowly in the oven with the door slightly ajar.
– Torch the sugar just before serving for maximum texture contrast.
– Serve chilled for optimal flavor development and texture integrity.
– Pair with a hint of citrus zest for additional flavor complexity.

Variations and Adaptations

Explore regional variants by incorporating local spices or essences into the cheesecake batter, such as cardamom, nutmeg, or lavender, for a regional flair.

Seasonal adaptations can include fresh summer berries or spiced winter nuts atop the sugar crust, imparting a seasonal vibe to the dish.

Adapting to dietary needs, you can create gluten-free versions using almond or oat-based crusts or low-carb variations by substituting traditional sugar with low-glycemic alternatives.

For a flavor twist, consider infusing caramel or chocolate into the cheese mixture, adding layers of complexity to every bite. The texture can also be altered by including a chewy cookie crust instead of classic graham crackers.

Serving and Presentation Guide

For serving, refrigerate cupcakes overnight to set flavors, then bring to room temperature before caramelizing the sugar. Consider garnishing with a sprig of mint or fresh berries for a pop of color.

For plating, use brightly colored or intricately designed dessert plates to enhance the aesthetic appeal of the caramel crust. Serve with a complementary sauce, such as raspberry coulis or chocolate ganache, for added indulgence.

Take advantage of individual portions to simplify presentation and portion control, ensuring an effortlessly elegant presentation with each delightful serving.

Wine and Beverage Pairing

Complement these cupcakes with a dessert wine such as Sauternes or a late-harvest Riesling, where the sweetness and acidity accentuate the vanilla notes while balancing the sugar’s caramelized richness.

For non-alcoholic alternatives, vanilla or chai-spiced tea highlight the cupcakes’ warm notes, while a creamy espresso complements the cheesecake’s depth and richness.

If serving with coffee, choose a light to medium roast, balancing the dessert’s richness with a clean, aromatic finish, or an iced coffee for refreshing contrast.

Storage and Shelf Life

Store them in an airtight container in the refrigerator for up to 4 days. Be cautious of humidity, which may dissolve the caramelized sugar topping, causing textural changes.

For pre-reheating instructions, ensure cupcakes reach room temperature before enjoying, as this preserves the flavor body and palate experience. The sugar topping should always be torched fresh to maintain its crispy shell.

For extended storage, wrap cupcakes individually in plastic wrap, place in a freezer-safe bag, and freeze up to 3 months. Avoid freezing the caramelized topping; prepare fresh after defrosting for best results.

Make Ahead Strategies

Prepare the cupcakes in advance, baking and cooling as directed, then refrigerate without caramelizing the sugar. Just before serving, apply sugar to the surface and torch for a freshly prepared appearance.

To offer fresh elements, consider adding zest or garnishes immediately before serving to maintain vibrancy and sensory appeal, without disruptive preparation before guests arrive.

Carefully plan each step, utilizing a prep timeline, to coordinate process efficiencies. Plan for adequate cooling time, ensuring optimal flavor and aesthetic appeal upon completion.

Scaling Instructions

To halve the recipe, adjust ingredient amounts and proportions accordingly, ensuring roux mixtures and flavor components remain balanced. For equipment, smaller bowls and reduced baking times may optimize efficiency.

Doubling or tripling requires proportional analysis to maintain perfected ingredient ratios. Increased equipment, such as additional pans or mixing bowls, may be needed to accommodate larger quantities.

Storage for larger batches should consider both individual wrapping and group freezer-friendly packaging, preserving freshness without negatively impacting quality during extended holding times.

Nutritional Deep Dive

These cupcakes balance lush decadence with nutritional value through key vitamin-rich ingredients. While offering high satisfaction, each serving provides calcium, aiding in bones’ health, and anti-inflammatory properties from vanilla.

Their unique nutritional profile requires attention to portion size to support dietary management, ensuring balanced enjoyment without overindulging. Practicing mindful portion serving empowers individuals while still delighting in rich cheesecake and its caramel crust.

Engaging glycemic alternatives, such as natural sweeteners, may allow adaptation into specialized nutritional regimens, alongside traditional health food options.

Dietary Adaptations

To adapt for gluten-free needs, substitute graham cracker crumbs with a blend of certified gluten-free oats and ground almonds, ensuring the decadent crust retains its pleasurable crunch.

For dairy-free, vegan alternatives, consider using coconut cream and cashew blends in lieu of traditional cream cheese, aligning with plant-based dessert preferences while maintaining creamy integrity.

Low-carb adjustments naturally stem from substituting all-purpose flour within crusts and swapping sweetener with erythritol or stevia, allowing low-glycemic enjoyment without carbohydrate concerns.

Recipe Notes

  • Substitute vanilla bean paste if fresh pods are unavailable, ensuring aromatic richness.
  • Adjust sugar topping thickness based on individual preference for crunch.
  • For added flavor complexity, infuse citrus oils into sugar crust before torching.
  • Add complementary spices, such as cardamom, for a warm, exotic undertone.
  • For environmental considerations, select recyclable baking papers and materials.
  • Catering to nuts, incorporate finely chopped pecans or walnuts into crusts.
  • Consider fair trade or organic vanilla products for enhanced ethical sourcing.

Troubleshooting Guide

Address texture issues, such as cracking, by ensuring even baking temperature and avoiding over-beating mixtures.

Achieve flavor balance by tasting as you go, carefully controlling vanilla infusion for ideal aromatic engagement.

Temperature problems often stem from uneven preheating or sudden changes, so maintain stability throughout procession to maximize uniform heat exposure.

Overcome equipment challenges by ensuring reliable, well-maintained kitchen appliances, avoiding torches with insufficient heat or variable output.

Handle ingredient substitutions with precision, balancing individual properties for seamless integration into existing recipes.

Refine timing concerns through dedicated practice, timing carefully for optimal consistency and flavor preservation.

Recipe Success Stories

Explore community triumphs as fellow bakers share adaptations and presentation enhancements, each achieving their own vibrancy. Revelations range from pistachio-infused variations to striking raspberry toppings, demonstrating remarkable innovation.

Witness photography feats, where dessert displays flourish, capturing the intricate depth afforded by captivating garnishes and creative décor.

Amplify interactive engagement through participative kitchen challenges, fostering encouragement and camaraderie in shared victories amid sweets’ collaborative culinary adventure.

Frequently Asked Questions

Can I make these cupcakes without a torch?

Absolutely, simply utilize the broiler setting on your oven, carefully watching to achieve the caramelization on top. Timing and position are crucial, ensuring you don’t burn the sugar topping, which can be adjusted for slight golden hues.

How do I prevent my cupcakes from sinking in the middle?

Start by ensuring all ingredients are at room temperature, thus achieving consistent batter texture, promoting even rising. Oven temperatures factor into this as well, where stability and prevention of temperature fluctuations reduce sinking risks.

What’s a suitable substitute for vanilla beans?

In substitution scenarios, vanilla bean paste offers a realistic alternative, maintaining depth of flavor while balancing quantity proportions. Pure vanilla extract can work too, though nuanced aroma may slightly differ from original pods.

How soon should I torch the sugar topping before serving?

Ideally, torch the sugar within an hour of serving to ensure crisp texture and subtle flavor development, preventing moisture absorption into sugar crystals, which might disrupt its integral texture characteristic.

Can I use non-dairy cream cheese?

Yes, various non-dairy cream cheese options function well, providing creamy alternatives catering to vegan preferences, yet delivering familiar consistency and ample flavor properties within dairy-free models.

Additional Resources

Explore an array of linked guides including related recipes for additional pastry inspiration, technique videos offering visual foundations on mastering challenges, ingredient selection tips emphasizing quality perceptions, and seasonal variations appearing as playful adaptations.

Join the Conversation

Engage with your fellow dessert enthusiasts using #CrèmeBrûléeCupcakeCreations across social media platforms. Share photography showcasing your masterpieces, enter community-driven challenges, and contribute reviews highlighting transformative experimentation with this luxurious treat.

Vanilla Bean Crème Brûlée Cheesecake Cupcakes

Indulge in the exquisite flavor of Vanilla Bean Crème Brûlée Cheesecake Cupcakes, a dessert that combines the rich, creamy taste of cheesecake with the caramelized excellence of crème brûlée. These individually portioned delights provide a perfect symphony of textures and flavors, making them an irresistible treat for any occasion.

Imagine the perfect blend of velvety cheesecake, infused with the aromatic essence of vanilla bean, topped with a delicate layer of caramelized sugar. This delectable combination results in a melt-in-your-mouth experience that is both sophisticated and utterly satisfying. Whether you are hosting a dinner party or seeking a sweet indulgence, these Vanilla Bean Crème Brûlée Cheesecake Cupcakes will surely impress.

Preparing these cupcakes is a rewarding experience, offering you a chance to master the art of creating both cheesecake and crème brûlée in a delightful, bite-sized form. With a detailed step-by-step guide, even novice bakers can achieve remarkable results.

Quick Recipe Highlights

  • Flavor Profile: A harmonious blend of creamy cheesecake and rich vanilla, topped with a caramelized sugar crunch.
  • Texture: Smooth and creamy interior with a crispy, caramelized top layer.
  • Aroma: Inviting notes of vanilla bean complemented by the subtle scent of caramelized sugar.
  • Visual Appeal: Elegant and individual-sized desserts, with a beautifully golden caramel top.
  • Skill Level Needed: Intermediate, requiring basic baking skills and familiarity with a culinary torch.
  • Special Equipment: Blender or food processor, muffin tin, culinary torch.

The Recipe

Vanilla Bean Crème Brûlée Cheesecake Cupcakes: An Elegant Sweet Treat

Serves: 12

Prep Time: 30 mins

Cook Time: 40 mins

Total Time: 70 mins

Kitchen Equipment Needed

  • Muffin tin
  • Blender or food processor
  • Culinary torch
  • Mixing bowls
  • Whisk
  • Measuring cups and spoons

Ingredients

  • 1 cup graham cracker crumbs
  • 4 tablespoons unsalted butter, melted
  • 16 ounces cream cheese, softened
  • 1/2 cup granulated sugar
  • 1 vanilla bean, split and seeds scraped
  • 2 large eggs
  • 1/2 cup sour cream
  • 2 tablespoons all-purpose flour
  • 1/4 cup granulated sugar (for topping)

Directions

  1. Preheat the oven to 325°F (160°C). Line a muffin tin with cupcake liners.
  2. In a bowl, mix graham cracker crumbs and melted butter until well combined. Press about 1 tablespoon of the mixture into the bottom of each cupcake liner to form the crust.
  3. In a blender or food processor, blend the cream cheese, sugar, and vanilla bean seeds until smooth. Add the eggs one at a time, blending well after each addition. Blend in the sour cream and flour until smooth.
  4. Divide the cheesecake batter evenly among the prepared crusts. Bake for 18-20 minutes, or until the centers are set and the edges are lightly golden.
  5. Remove from the oven and let them cool completely in the pan. Then, refrigerate for at least 2 hours or until fully chilled.
  6. Before serving, sprinkle about 1 teaspoon of granulated sugar evenly on top of each cheesecake. Use a culinary torch to caramelize the sugar until golden brown and crispy.

Recipe Notes

  • Ensure the cream cheese is at room temperature to avoid lumps in the batter.
  • For a stronger vanilla flavor, add an extra half vanilla bean or a splash of vanilla extract.
  • Use caution while using the culinary torch to avoid burning the sugar or overheating the cupcakes.