Irresistible Strawberry Crunch Cheesecake Bites Recipe for Dessert Lovers

Strawberry Crunch Cheesecake Bites: A Delightful Indulgence

⚖️
Difficulty
Medium

⏲️
Prep Time
30 mins

🕒
Cook Time
15 mins

⏱️
Total Time
45 mins

🍽️
Servings
12

Strawberry Crunch Cheesecake Bites bring together the fresh brightness of strawberries with the creamy richness of cheesecake, all wrapped up in a bite-sized delight. Perfect for summer gatherings, these cheesecake bites are light, refreshing, and irresistibly delicious. The sweet and tangy notes of strawberry jam blend seamlessly with the buttery crumble, creating a dessert that’s both indulgent and memorable. Whether you’re looking to charm guests or simply treat yourself, these bites are a must-try.

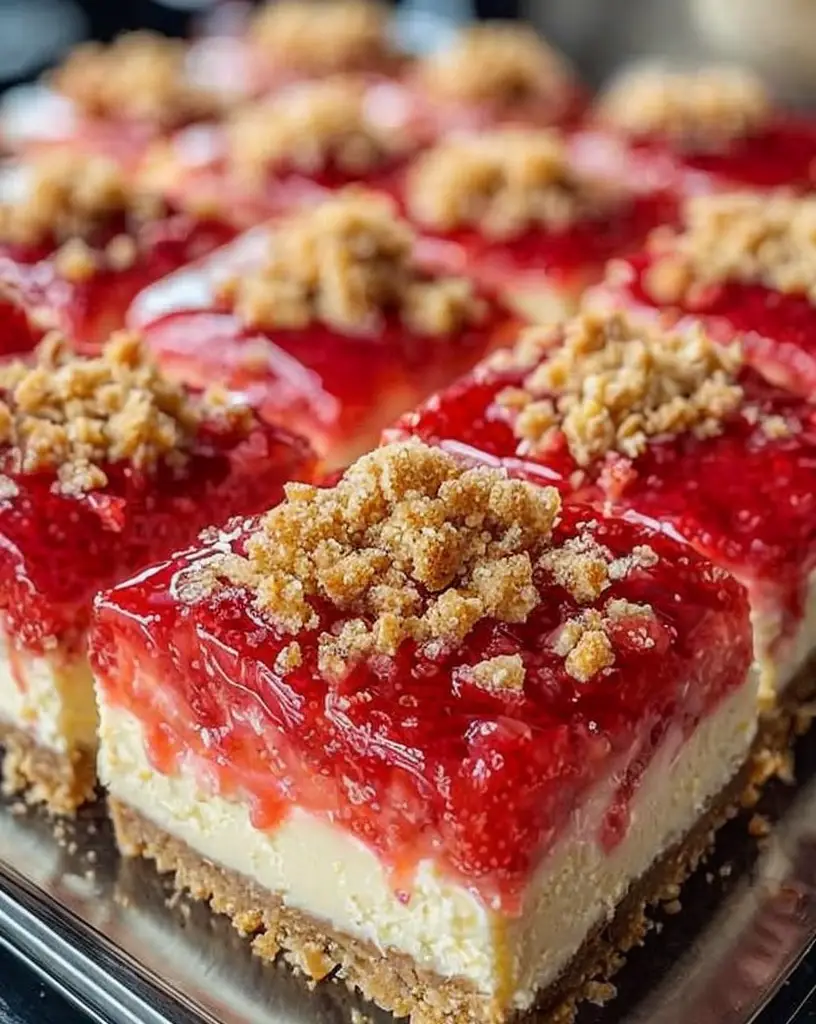
Immersed in a golden crust and crowned with a crumbly streusel, every Strawberry Crunch Cheesecake Bite is a burst of flavor. With their simple preparation and stunning appearance, they effortlessly bridge the gap between casual and gourmet. The vibrant pop of red from the strawberries is as visually striking as it is tantalizing to the palate.

Quick Recipe Highlights

  • Flavor Profile: A delightful blend of sweet, creamy cheesecake and juicy, tangy strawberries.
  • Texture: Creamy cheesecake paired with a crunchy top and a smooth fruity center.
  • Aroma: Inviting scent of baked pastries with a hint of strawberry freshness.
  • Visual Appeal: Bright red strawberry topping paired with a golden, crunchy crust.
  • Skill Level Needed: Basic baking skills with a focus on assembling layers neatly.
  • Special Equipment: Mini muffin tin, food processor, and hand mixer recommended.

Recipe Overview

  • Difficulty Level: This medium-difficulty recipe requires patience when layering and a gentle hand when assembling the base and filling.
  • Category: Serves as a delightful dessert, perfect for any festive occasion or casual afternoon treat.
  • Cuisine: A modern take on classic cheesecake, highlighting the fresh fruity flavors typical of contemporary American treats.
  • Cost: Relatively inexpensive, with most ingredients being pantry staples and strawberries being the primary fresh component.
  • Season: Ideally enjoyed in spring and summer, when strawberries are at their peak sweetness.
  • Occasion: Perfect for afternoon teas, bridal showers, and summer picnics, offering both elegance and ease of serving.

Why You’ll Love This Recipe


From the first bite, Strawberry Crunch Cheesecake Bites captivate with their layered textures and sublime flavors. The creamy, velvety cheesecake balances beautifully with the sweet-tart strawberries. This recipe is a canvas for sensory delight, with contrasts that are both complex and harmonious.

For those who love to entertain, these bites are a dream. Easy to prepare in advance, they enable you to focus on enjoying the occasion. You can savor the rich textures and vibrant flavors while your guests marvel at their delightful presentation. They are conveniently portioned for mess-free enjoyment.

Nutritiously, while these bites are a treat, they incorporate strawberries—a source of vitamin C and antioxidants—making them a relatively lighter choice for indulgence. The inherent portion control of bite-sized treats also aids in avoiding overindulgence while still savoring luxurious flavors.

Serving these cheesecake bites can uplift any gathering, offering a touch of joy and indulgence. They can easily be adapted to fit different themes or tastes, making them a versatile choice for any host. Additionally, their visual appeal makes them a picture-perfect offering.

Affordability and ease of preparation mean that you can indulge without stretching your budget. Many of the ingredients are pantry staples, and the preparation only requires minimal equipment. This accessibility makes these treats attainable and truly rewarding.

Historical Background and Cultural Significance


Cheesecake itself boasts a rich history, evolving from ancient Greek roots as a savory dish into the luxurious sweet versions known today. It traversed multiple cultures, with each leaving its unique mark—Italian ricotta cheesecakes, New York’s creamy style, and beyond. This evolution highlights the cultural importance of transforming simple ingredients into beloved classics.

Over time, as refrigeration became widespread, the creamy, cold cheesecake style became increasingly popular in North America. The tradition of incorporating fresh, seasonal fruits with cheesecake echoes historical practices, as early versions often included natural sweeteners and decorations.

Modern variations, like the Strawberry Crunch Cheesecake Bites, draw on both the storied past and today’s culinary advancements. They reflect a cultural appreciation for classic flavors combined with a modern approach to presentation and serving size, making them a staple in both traditional and contemporary kitchens.

Regional variations abound, with flavors and methods differing across continents. In the U.S., it’s not uncommon to find local fruits used in cheesecake creations, inspired perhaps by a bounty of country fairs and summer markets, each region showcasing its specialty crop in a new dessert form.

Ingredient Deep Dive


Cheesecake Crust: This essential component provides the foundational texture and flavor, often utilizing graham crackers for their nostalgic taste and reliable crunch. This staple in American pies retains its status for versatility, easily adapted with nuts or spices for depth.

The richness of cream cheese forms the heart of any cheesecake, offering both creamy texture and tangy taste. Originating from the development of fresh cheeses in the 19th century, this key ingredient remains unchanged, a testament to its perfect balance and durability.

Strawberries serve as the star, chosen both for their vivid hue and sweet, refreshing taste. Seasonally celebrated, they’re packed with vitamins, turning this dessert into a joyous nod to summer’s bounty. Selecting ripe, fragrant berries ensures the best outcome in both taste and appearance.

Sweeteners like granulated sugar play a dual role—enhancing the inherent sweetness of the strawberries while balancing the tang of cream cheese. Use sparingly to ensure the natural profiles shine without being overpowered, maintaining an ideal equilibrium.

Even the addition of vanilla extract merits attention—this nuanced flavor brings warmth and complexity, subtly elevating the other flavors without dominating them. Use pure extract to truly make the delicate balance of cheesecake layers shine.

Common Mistakes to Avoid

  • Overmixing the cheesecake batter can lead to a dense texture. Mix just until combined to maintain airiness.
  • Failing to properly chill the bites can result in difficulty removing them from the tin. Allow adequate cooling time.
  • Using unripe strawberries will provide lesser flavor impact. Always select ripe and fragrant berries.
  • Not pressing the crumb base firmly enough may cause crumbling. Use moderate pressure for a solid foundation.
  • Skipping the parchment liners could lead to difficult removal and presentation issues. Prepare the tin with liners.
  • Ignoring ingredient temperatures can affect texture and flavor balance. Ensure cream cheese is softened before use.
  • Underestimating the baking time may yield under-set centers. Use a toothpick to test readiness before removing from oven.
  • Adding too much sugar may overshadow the fruit’s natural sweetness. Stick to recommended quantities for balance.

Essential Techniques


Perfecting the crust involves achieving the right degree of firmness. Pressing the crumbs with an even, firm hand ensures a stable base without becoming too compacted, a common pitfall. Watch for slight browning as an indicator of doneness, providing a necessary crispness.

Proper cheesecake batter mixing is vital. Overblending can introduce excess air, leading to cracking. Use a gentle, consistent folding motion to combine ingredients smoothly, focusing on a creamy consistency without overworking.

Monitoring baking time prevents overcooking. Keep a close eye on the toaster oven and use visual cues, such as a faint browning on the edges and a slight jiggle in the center, to perfect doneness and texture.

Using a food processor helps achieve uniform consistency when making the crust, avoiding larger chunks which can disrupt the bite-sized format. This tool, though not mandatory, greatly enhances outcome precision.

Refrigeration time is key. Allowing at least two hours, preferably overnight, facilitates setting and enhances the melding of flavors. Rushing this last step can compromise both texture and flavor profile.

Pro Tips for Perfect Strawberry Crunch Cheesecake Bites


Ensure cream cheese is at room temperature for easy blending and smooth texture. Cold cream cheese will clump and negatively affect the cheesecake’s final consistency.

Use parchment liners in the mini muffin tin to help with effortless removal and maintain neat presentation. This avoids frustration and enhances appeal.

Select strawberries based on color and scent. The redder and more fragrant they are, the better they will taste in the final product, and this also boosts visual quality.

Craft the perfect crumb using equal parts melted butter and crushed crackers or cookies, ensuring just enough moisture to hold together without becoming greasy.

Chill fully before slicing or serving. This step is essential; it allows the cheesecake to firm up sufficiently and develop its signature creamy texture.

Consider experimenting with extracts—almond or lemon can offer unique undertones that highlight the freshness of strawberries, personalizing your bites with subtle twists.

Variations and Adaptations


Regional adaptations can include replacing strawberries with other local fruits such as raspberries or blackberries for a different flavor profile. Each berry offers unique sweetness and acidity, which can inspire whole new flavor experiences.

To fit seasonal themes, consider topping each bite with a dollop of whipped cream flavored with spices like cinnamon or nutmeg in colder months, adding warmth and complexity to the base flavors.

Dietary modifications might involve substituting standard graham crackers with gluten-free alternatives, keeping the crust’s essential roles while accommodating gluten sensitivities.

Experiment with different flavors by incorporating citrus zest into the cheesecake batter, or swirl in chocolate or caramel for a rich, decadent variation.

Textural modifications can be achieved through crust variations—experiment with adding chopped nuts for additional crunch or seeded jams for a unique mouthfeel.

When considering presentation alternatives, play with slicing for unique serving options—carve each bite into halves or quarters for a more sophisticated offering, enhancing your guests’ tasting experience.

Serving and Presentation Guide


Opt for simple yet elegant plating techniques. Arrange the bites on a porcelain platter to highlight their colorful strawberry top, keeping them visually appealing.

For garnishing, consider a drizzle of white chocolate or a sprinkle of powdered sugar, enhancing the visual flair without overpowering the primary flavors.

Traditionally, these bites can be served with additional strawberries on the side, offering guests a chance to explore complementary textures.

Embrace modern serving suggestions like placing each bite in a cupcake liner, enhancing both hygiene and convenience, especially for buffet-style service.

Mind temperature by serving these bites chilled, preserving their creamy consistency and ensuring optimal flavor delivery in each bite.

For portion control, pre-plate single servings with small dessert forks, subtly guiding your guests to appropriate portions and enhancing your event’s flow.

Wine and Beverage Pairing


For wine pairings, a chilled glass of Prosecco or Moscato complements the sweetness of the bites, offering a crisp counterpoint to the creamy base.

Non-alcoholic alternatives include a refreshing strawberry lemonade or lightly spiced iced tea, both enhancing the fruity undertones without overwhelming subtler notes.

For larger gatherings, consider coffee or tea pairings—lightly brewed green tea offers a cleansing contrast, while silky, rich coffee accentuates the dessert’s sweetness.

Serve beverages at optimal temperatures to maximize their pairing effectiveness—ensure wines are lightly chilled, and teas are at a palatable warmth to enhance each bite.

Strong emphasis on enjoying each drink alongside the desserts lies in prompt, considerate serving understood through attentive hospitality and insight into guest preferences.

Storage and Shelf Life


Store these bites in an airtight container in the refrigerator, ensuring prolonged freshness and ideally maintaining their texture for up to five days.

Maintain the refrigerator temperature consistently around 35-40°F to prevent any spoilage or flavor degradation, ensuring every bite retains its intended notes.

Appropriate container selection, such as shallow, lined in a single layer or with parchment to separate layers, prevents smudging and damage to the bites’ appearance.

Look for signs of spoilage, such as discoloration or off odors, and discard any affected pieces, prioritizing safety and quality in your kitchen.

For reheating or serving, allowing these bites to sit at room temperature for 10 minutes lets flavors and consistency stabilize, optimizing your dessert experience.

Strong guidelines emphasize avoiding freezing, as this can alter both texture and quality, diminishing the tasting experience when thawed from frozen.

Make Ahead Strategies


Consider a make-ahead strategy by preparing and chilling the bites a day before, saving valuable time on the day of your event.

Store components separately until the final stages—prepare the crust and filling and assemble prior to serving, maintaining a fresh and appealing presentation.

Assess and plan your prep timeline around chilling stages, allowing the cheesecake sufficient time to set while keeping work manageable and enjoyable.

Enhance quality by acting on assembly tips, like uniformly distributing strawberries across each bite, ensuring every portion receives the intended flavor mix.

Utilize controlled stages for reheating slightly chilled bites to enhance flavor experience, mindful of not over-servicing a fresh dessert soundly engineered for enjoyment.

Conclude with fresh additions such as delicate herbs or edible flowers to embolden the visual promise of your dessert, surprising guests with unexpected flourishes.

Scaling Instructions


Scaling down by halving the recipe is easily achieved by adjusting ingredient quantities without altering equipment needs or preparation techniques and recipes.

Doubling or tripling can call for larger or additional mini muffin tins but poses few challenges, given each batch can be managed and assembled similarly.

Equipment adjustments like additional muffin pans or expanded workspace may facilitate production when scaling up, ensuring smooth handling of increased portions.

Timing modifications should calculate additional chill stages, ensuring optimal result achievement while remaining flexible with space and timing demands.

Storage considerations for larger batches rely on coordinating setups like multiple trays and extra containers to maintain organized freshness.

Every scaling maneuver reflects back on a well-devised plan; execute confidently from your close understanding of both recipes and guest demands.

Nutritional Deep Dive


Explore the macro breakdown: cream cheese provides fats for satiety, strawberries offer carbohydrates, and eggs and dairy contribute proteins, creating a balanced dessert choice.

Micronutrient analysis highlights vitamin C from strawberries, calcium from cream cheese and dairy, and essential minerals like phosphorus within the ingredient list, providing nutritional bonuses.

Dessert’s health benefits arise from its combination of indulgence with natural fruit, allowing a treat that’s less sugar-laden than comparable choices when proportioned adequately.

Portion analysis shows effective weight management through bite-sized servings, aiding conscious enjoyment for you or hosting guests.

Strategize dietary considerations around knowing your guests or personal preferences, always opting towards mindfulness in serving suggestion preparation.

Greater insight into balanced offerings enhances your cooking grasp, nuanced by empathy in your dessert creation outreach for those in your circle.

Dietary Adaptations


Adapting to a gluten-free diet might involve swapping regular graham biscuits with similarly flavored gluten-free varieties, keeping all texture highlight opportunities intact.

For dairy-free renditions, explore vegan cream cheese options and dairy-free yogurt, upkeeping the essential creamy base without loss of cheesecake’s iconic texture.

Vegan adaptations could involve exploring aquafaba as egg replacement, incorporating plant-based margarine so that key traits within the bites remain effortlessly embodied.

Consider a low-carb approach by swapping traditional sweetness with alternatives, staying ahead on your sweetness game while maintaining favored flavor outcomes.

Keto-style explorations can pivot on coconut flour crusts or syrups like monk fruit’s unique, versatile profile, broadening your reach in creative dessert interpretations.

True emphasis on dietary respect enhances welcoming dessert exchanges, branching into thoughtful adaptations that reflect evolving desires and joys.

Troubleshooting Guide


Texture issues, such as crust disintegration, often root in poor compacting of crust elements. Ensure good pressure when forming each base.

Flavor imbalances might stem from either over- or underuse of sugar. Measure accurately and taste test along the process, aiming to keep prominent elements clear.

Temperature problems can emerge if the cheesecake sets unevenly, always chilling evenly and tweaking times for consistent internal firmness.

Equipment challenges often lie in lack of liners resulting in stuck bites. Plan ahead and line each tin cavity smartly, avoiding a frustrating experience.

Ingredient substitutions like instant whip cream best replaced with a slightly higher ratio for plant-based thickeners to maintain needed fluff characteristics.

Timing concerns reflect improper scheduling or chilling, but stricter date plan adherence and step-by-step readiness sees avoiding this pitfall first.

Recipe Success Stories


Engage with community feedback, celebrating reinterpretations or adjustments to recipe structures based on shared ingredient finds—a robust platform of global flavor play.

Variation successes convey reader triumphs bringing flavor additions or replacements into joyous reviews, ensnaring newfound celebrations shared through digital reach.

Adaptation stories arise, often born from needing dairy-free solutions, allowing gratifying tales of cookbook diversions and empathy-adhering outcome explorations.

Reader suggestions amplify recipe integrity, noting alternate preparation pathways that reframe once-static protocols into dynamic soul-infused dessert chronicles still adapting.

Real photography tips emerge from visual storytellers—akin to you—offering garnishing, lighting, and framing cues, with each serving moment seamlessly encapsulated and reposted.

Frequently Asked Questions

Q: Can I prepare these bites in advance?
A: Absolutely! You can make them a day ahead; just ensure they are kept chilled until ready to serve.

Q: What if I don’t have mini muffin tins?

A: You can use a standard muffin tin but adjust baking times accordingly and be prepared for larger-sized portions.

Q: Can I freeze these cheesecake bites?

A: Freezing is not recommended as it might alter the cheesecake’s creamy consistency and flavor balance.

Q: How can I make these bites less sweet?

A: Reduce the sugar quantity in both the batter and crust slightly for milder sweetness.

Q: What’s the best way to soften cream cheese?

A: Leave it at room temperature for about 30 minutes before use, or microwave on low in short bursts if in a rush.

Q: Could I use frozen strawberries?
A: Fresh strawberries are best for this recipe due to their vibrant flavor and texture.

Q: What can I use instead of Graham crackers?

A: Digestive biscuits or Oreos work well as alternatives, providing diverse flavor morphs suitable within crust offerings.

Q: Is there a particular type of vanilla extract best used?

A: Pure vanilla extract provides a more robust flavor, ensuring your bites carry authentic underlying warmth.

Q: Can these bites be colored differently?
A: Using natural food coloring or alternative jams allows diverse color ideas without altering the essential recipe’s core joys.

Q: Might dehydration affect strawberry flavor?
A: Pay heed to strawberry freshness, keeping refrigerated until needed thereby preventing dehydrating exposure, ensuring vibrant results remain intact.

Additional Resources


Explore our related recipes highlighting quick dessert fixes that charm, ideal companions when Strawberries bridge other seasonal confections.

Dive into technique-specific guides on crust making and filling techniques, perfect for refining your entrance into cheesecake innovation realms.

Maximize daily cooking successes validated from closely sourced, up-to-date ingredient information, broadening how different components heighten shared dishes.

Equipment recommendations reflect ideal results matched through controlled measurements and impactful cooking routines.

Seasonal recipe variations speak to colorful gardener palettes noted in fruit placements conveniently accessible around your basin.

Through knowledge, practical or experiential gleaned, passions lead styling’s true discoveries—holding more than taste alone satisfied.

Join the Conversation


Connect to broader dessert narratives across social media platforms. Classic recipes like these excite followers globally, recalling fond memories or sharing heartfelt inspiration.

Photography skills enhance your depicted baking tales, with style tips unlocked via pointed garnishing endeavors that neat frames joy onlookers visualize alongside you.

See enduring recipes celebrated through enthusiastic reviews, where communal engagement arises from each shared bite’s loving admiration.

Online forums offer a venue for recipe variations, where insights capture collective creativity portrayed genuinely and widely expressed.

Within a vibrant shared community, your experiences grow through supportive engagement—friends aligned in discovering joy across ever-stretching favorite flavor pursuits.

The Recipe

Strawberry Crunch Cheesecake Bites

Serves: 12

Prep Time: 30 mins

Cook Time: 15 mins

Total Time: 45 mins

Kitchen Equipment Needed

  • Mini muffin tin
  • Food processor
  • Hand mixer
  • Parchment liners
  • Mixing bowls

Ingredients

  • 1 cup graham crackers, crushed
  • 1/3 cup butter, melted
  • 2 tablespoons sugar
  • 1 package (8 oz) cream cheese, softened
  • 1/4 cup sugar
  • 1 teaspoon vanilla extract
  • 1 egg
  • 1/2 cup strawberry jam
  • Fresh strawberries for topping

Directions

  1. Preheat your oven to 350°F (175°C) and line a mini muffin tin with parchment liners.
  2. In a food processor, combine crushed graham crackers, melted butter, and sugar until well mixed.
  3. Press about a tablespoon of the crumb mixture into each muffin cup, firmly pressing into the base.
  4. In a mixing bowl, beat softened cream cheese with sugar and vanilla until smooth.
  5. Stir in the egg and mix until just combined. Do not overmix to keep the texture light.
  6. Spoon cream cheese mixture evenly over the crumb bases in each muffin cup.
  7. Bake in the preheated oven for 10-15 minutes, or until the centers are set. Let cool completely.
  8. Spoon a small amount of strawberry jam over each cheesecake. Top with a fresh strawberry slice.
  9. Chill bites in the refrigerator for at least 2 hours before serving for best results.

Recipe Notes

  • For a citrus twist, add zest of one lemon to the cream cheese mixture.
  • Ensure cream cheese is at room temperature for optimal mixing results.
  • Store bites in an airtight container in the fridge for up to five days.

Irresistible Heavenly Cinnamon Sugar Cream Muffins for Sweet Mornings

Heavenly Cinnamon Sugar Cream Muffins: Sweet Delight for Every Occasion

⚖️
Difficulty
Easy

⏲️
Prep Time
15 mins

🕒
Cook Time
18 mins

⏱️
Total Time
33 mins

🍽️
Servings
12 muffins

There’s something magical about the aroma of freshly baked muffins wafting through your home, especially when it involves the comforting scent of cinnamon sugar. Introducing our Heavenly Cinnamon Sugar Cream Muffins, a perfect blend of soft, fluffy texture and rich, buttery flavor. These muffins are ideal for breakfast, a delightful snack, or a sweet treat to impress your guests. The secret lies in the luxurious cream that adds a moist, tender crumb, enriched by a generous dusting of cinnamon sugar for a touch of warmth and spice.

Strongly embracing the sweet and spicy notes, these cinnamon sugar cream muffins promise to become a family favorite. Every bite offers a harmonious combination of tastes, with the lush, velvety cream balancing the bright cinnamon. This exquisite recipe is not only about taste but also about awakening the senses—bringing warmth and joy with every mouthful. Whether served hot out of the oven or cooled to perfection, these muffins are a testament to the beauty of simple, home-baked goods.

Quick Recipe Highlights

  • Flavor Profile: Each bite combines the classic, warm sweetness of cinnamon with a subtle hint of vanilla, creating a muffin that’s rich in flavor yet delicately balanced.
  • Texture: Expect a muffin that is soft and moist inside with a slightly crispy, sugary top for a contrast that will delight your taste buds.
  • Aroma: Cinnamon and vanilla together bring an irresistible and inviting aroma, reminiscent of cozy kitchens and home-baked goodness.
  • Visual Appeal: Lightly golden with a sugary top, these muffins look as tempting as they taste, perfect for any occasion.
  • Skill Level Needed: This recipe is straightforward, perfect for beginners or anyone looking for a quick but satisfying baking project.
  • Special Equipment: A standard muffin tin and a mixing bowl are all you need, making this recipe accessible to every home baker.

Recipe Overview

  • Difficulty Level: Designed with simplicity in mind, these muffins require no special techniques or equipment, making them easy enough for anyone to master on their first try.
  • Category: Ideal for a breakfast treat, afternoon snack, or a sweet addition to any party spread.
  • Cuisine: Rooted in American baking traditions, this recipe pays homage to the classic flavors of cinnamon and sugar.
  • Cost: Budget-friendly ingredients make this an economical choice for a quick and indulgent homemade snack.
  • Season: While perfect year-round, the warming spices make these muffins especially popular during the cooler fall and winter months.
  • Occasion: Perfect for any occasion from casual family gatherings to more formal brunches and everything in between.

Why You’ll Love This Recipe

Heavenly Cinnamon Sugar Cream Muffins are a delightful combination of creamy richness and spicy sweetness, making them a staple for any sweet tooth. Their unique texture—a moist, tender crumb accented by a sugary crust—creates a satisfying contrast that elevates the simple pleasure of a muffin. The convenience of this recipe is unparalleled; minimal prep time and common pantry ingredients mean you can whip these up whenever the craving strikes. Not only are they quick to prepare, but they also bring the nutritional benefits of cinnamon, known for its antioxidant properties.

The social value of these muffins cannot be understated. Whether served at a brunch, as an after-school snack, or a friendly gift, they are sure to be remembered and appreciated. The cost-effectiveness of the ingredients ensures that anyone can enjoy the luxury of home baking without breaking the bank. With such accessibility, these muffins invite everyone to experience a homemade treat that combines the feeling of warmth with the elegance of subtle flavors.

Historical Background and Cultural Significance

The origin of cinnamon sugar treats can be traced back to ancient times, where spices were valued commodities and incorporated into many traditional dishes. Over the years, muffins themselves have evolved as a form of quick bread, gaining popularity in American kitchens for their convenience and versatility. Cinnamon, with its sweet yet spicy profile, has remained a cherished flavor, celebrated across cultures for its rich history and its ability to symbolize warmth and comfort.

These Heavenly Cinnamon Sugar Cream Muffins are the modern result of centuries of culinary evolution. As regional traditions mingled, the recipe adapted, integrating local ingredients and preferences, yet the essence—the beloved blend of cinnamon and sugar—remained a constant. Each variation, from different types of cream to unique spice ratios, reflects the rich tapestry of regional influences that have shaped this timeless treat.

Ingredient Deep Dive

Flour is the foundation of any muffin recipe, providing structure and substance. Opt for all-purpose flour to achieve a light and airy crumb, though whole wheat can add a nutritious twist. Cinnamon, known for its exotic origins and health benefits, brings warmth and sweetness, balancing out the richness of the cream. Fresh cinnamon delivers the best flavor—ground at home if possible.

Cream plays a crucial role in these muffins, offering moisture and a subtle sweetness. Choose heavy cream for the richest texture, or experiment with light cream or even plant-based alternatives to suit dietary needs. Proper storage is key; use an airtight container to keep all ingredients fresh and potent until ready to bake. Substitutions such as almond milk can offer a lactose-free alternative without compromising flavor or texture.

Common Mistakes to Avoid

  • Improperly measuring ingredients can drastically alter the outcome—always use precise measurements for best results.
  • Overmixing the batter leads to dense muffins; mix just until combined to maintain a fluffy texture.
  • Skipping the cream or using low-fat versions can diminish the muffin’s moistness—use full-fat options for best results.
  • Not preheating the oven can affect the rise and texture—always ensure your oven is fully warm when you begin baking.
  • Using stale cinnamon can mute the muffins’ flavor—opt for fresh spices for maximum aroma and taste.
  • Underbaking or overbaking can ruin texture—keep a close eye on baking times and use a toothpick test for doneness.
  • Filling muffin tins inconsistently may lead to uneven baking—use a scoop to ensure even portions.
  • Forgetting to grease the muffin tin, even when using liners, can result in stuck pastries—always grease for easy removal.

Essential Techniques

Achieving the perfect muffin involves mastering a few key techniques. Creaming the sugar and butter introduces air into the batter, which is essential for creating a light and fluffy texture. Be gentle when folding in the flour to avoid gluten development, which leads to a denser crumb. Recognize the visual cues—a smooth batter and a golden, puffed top—that indicate a successful bake.

Timing is equally crucial; removing the muffins from the oven at just the right moment is vital to preventing dryness. Let them cool briefly in the pan before transferring to a wire rack to prevent sogginess from steam. These steps, while simple, elevate your muffins from good to irresistible, ensuring they come out perfectly every time.

Pro Tips for Perfect Heavenly Cinnamon Sugar Cream Muffins

Invest in quality cinnamon for the best flavor outcome; Saigon or Ceylon varieties are highly recommended for their unique profiles. Always bring your cream to room temperature to ensure it incorporates smoothly into the batter. For an extra flavor boost, consider adding a pinch of nutmeg or a splash of vanilla extract.

Don’t rush the cooling process; allowing the muffins to sit for a few minutes after baking helps the flavors meld together harmoniously. Customize to your taste by adjusting the ratio of cinnamon to sugar in the topping. Finally, serve them warm to enjoy the full spectrum of textural contrast and aroma.

Variations and Adaptations

Heavenly Cinnamon Sugar Cream Muffins can be adapted to suit any palate or dietary need. Explore regional variations by adding nuts or dried fruits commonly found in different cuisines. Seasonal adaptations, like incorporating fresh berries or pumpkin puree, offer a delightful twist. For a dietary modification, experiment with gluten-free flours or dairy-free cream alternatives.

Enhance flavor by experimenting with spices—cardamom or ginger can add an exotic touch, while adjusting the sugar levels can cater to those who prefer a less sweet option. Presentation is key; consider mini muffins or loaves for variety or add a decorative icing drizzle for visual flair. No matter the adaptation, these muffins remain a delightful centerpiece for any occasion.

Serving and Presentation Guide

When it comes to serving, consider the occasion and desired impression. For an elegant touch, present these muffins on a tiered stand, perhaps garnished with a cinnamon stick for décor. Pair with a dollop of whipped cream or a sprinkle of confectioner’s sugar for added appeal.

Traditionally enjoyed warm, these muffins are wonderfully complemented by honey or a fruit compote on the side. While the classic rustic look is appealing, modern presentations using individual ramekins or decorative paper wraps can add an extra layer of sophistication. Achieving balance in portion sizes ensures that each serving is satisfying yet not overly indulgent.

Wine and Beverage Pairing

To elevate your muffin experience, pair them with a light and fruity wine, such as a Moscato or a semi-sweet Riesling, which complements the cinnamon’s warmth. Non-alcoholic alternatives such as apple cider or a rich chai tea can offer a comforting and aromatic pairing, enhancing the spices’ depth.

For coffee lovers, a medium roast with cinnamon or vanilla notes pairs beautifully, while those who prefer tea might opt for a cinnamon-infused black tea for cohesive flavor profiling. Temperature matters; both the muffins and beverages should be served fresh and at their optimal warmth for the fullest flavor experience.

Storage and Shelf Life

Proper storage ensures these muffins remain fresh and delicious for up to five days. Store them in an airtight container at room temperature, away from direct sunlight to prevent drying out. For longer storage, these muffins freeze exceptionally well—simply wrap them individually in plastic wrap and place in a freezer bag, where they can last for up to three months.

When ready to eat, reheating them gently in the oven or toaster oven will bring back their freshly baked aroma and texture. Watch for signs of spoilage, such as an off smell or change in moisture level, to ensure you’re always enjoying them at their best.

Make Ahead Strategies

Preparing these muffins in advance can be a game-changer for busy weeks and special occasions. Mix your dry ingredients ahead of time and store them in a sealed container. You can prepare the batter the night before—ensure it’s in a sealed bowl in the refrigerator for freshness.

Assemble and fill the muffin tins when you’re ready to bake, guaranteeing fresh-from-the-oven enjoyment that minimizes hassle. If pre-baking, allow them to cool fully before sealing for storage, maintaining their texture and taste. Reheat them gently just before serving for that fresh-baked experience.

Scaling Instructions

This recipe can be easily scaled to suit your needs, whether baking for a crowd or a cozy family brunch. To halve the recipe, simply divide all ingredient quantities by two and adjust baking time slightly, checking regularly for doneness.

Doubling or tripling is also feasible; use larger mixing bowls and ensure uniform mixture distribution to maintain even baking across larger batches. Consider freezer space if preparing in advance, as larger quantities require more storage. Adjust equipment as necessary to accommodate more volume, like using larger or additional muffin pans.

Nutritional Deep Dive

A standard batch of these muffins provides a balance of macronutrients with a focus on carbohydrates and fats from the flour and cream. Rich in cinnamon, they offer antioxidant benefits, while incorporating whole ingredients keeps the recipe relatively natural.

Mindful portion management enables you to indulge without overwhelming calorie intake, and small adjustments—like using less sugar or substituting some of the cream with lower-fat alternatives—can fine-tune the muffins’ nutritional profile to fit specific dietary goals. The presence of fiber and essential vitamins offers a wholesome treat that satisfies both taste and health considerations.

Dietary Adaptations

These muffins can easily adapt to various dietary needs without sacrificing flavor. A gluten-free version can use almond or coconut flour, though adjusting liquid ratios may be necessary. To make them dairy-free, substitute the cream with coconut milk or a nut-based alternative, which provides creaminess without lactose.

For a vegan adaptation, replace eggs with flax or chia egg substitutes, ensuring the mixture remains moist and cohesive. Low-carb versions can incorporate almond and coconut flours alongside sugar alternatives like stevia. Each modification maintains the muffin’s essence while allowing diverse diets to enjoy the indulgence.

Troubleshooting Guide

Achieving perfect muffins might sometimes require addressing common issues. If the texture is too dense, check your mixing method; folding gently preserves air bubbles. Flavor imbalances can often be adjusted by revisiting your spice measurements, ensuring freshness and adequate amounts.

Temperature plays a crucial role; ensure consistent oven heat to avoid uneven cooking or burning. When working without all traditional ingredients, substitutions must be balanced—consider ratios carefully to maintain the muffin’s core properties. Accurate timing is key to prevent overbaking, which leads to dryness.

Recipe Success Stories

Our community has embraced these muffins wholeheartedly, with countless stories of successful adaptations and creative presentations. One reader transformed the traditional muffin into a loaf cake, adorned with a cinnamon glaze, creating an adaptable treat fit for various celebrations. Others have experimented with adding fruits like blueberries or dried cranberries, enhancing the muffins’ natural sweetness.

Readers have shared their experiences of serving these muffins at events, garnering compliments and requests for the recipe! Vibrant photos showcasing personalized touches, such as drizzles or dustings, reflect the versatility and joy these muffins bring to bakers and their loved ones alike.

Frequently Asked Questions

Can I make these muffins ahead of time? Yes, they can be prepared a day in advance, stored in an airtight container to retain their freshness, and gently reheated before serving.

How do I store these muffins? Keep them in a sealed container at room temperature for up to five days, or freeze for longer storage.

What can I substitute for cream? Alternatives like coconut milk or a nut-based cream work well, though slight flavor differences may occur.

Are these muffins gluten-free adaptable? Certainly, using almond or coconut flour with adjusted liquid ratios can create a gluten-free version.

What spices can I add for variation? Nutmeg, ginger, or cardamom make excellent companions to cinnamon, providing a nuanced flavor profile.

Can I make mini muffins? Absolutely, reduce the baking time and use mini muffin tins for smaller portions or variation.

How can I prevent dryness? Avoid overbaking and ensure your wet ingredients, like cream, are full-fat for optimal moisture.

What should I do if my muffins sink? This can result from overmixing or underbaking; ensure proper mixing techniques and check oven temperature consistency.

Is there a low-sugar version? Reduce the sugar by half or use a sugar substitute, adjusting for any sweetness variation.

Can I add nuts? Certainly, chopped walnuts or pecans can enhance texture and flavor.

What type of flour is best? All-purpose flour is recommended for a light crumb, though whole wheat can be used for a denser muffin.

Do I need to line the muffin tin? While not necessary, liners make cleanup easier and prevent sticking.

Additional Resources

Explore similar recipes that complement the flavors and textures of these muffins, such as cinnamon rolls or spiced quick breads. Delve into technique guides that focus on mastering spice ratios and the art of creaming. Ingredient information sources can provide insights into the benefits of spices like cinnamon and vanilla.

Consider equipment recommendations that suit muffin baking, including high-quality pans and scoops for even portioning. Seasonal variations can inspire recipe adaptations with the changing climates and available ingredients, keeping the baking experience fresh and exciting.

Join the Conversation

Your engagement in the culinary community not only enhances your own cooking skills but also fosters a rich dialogue among fellow enthusiasts. Share your muffin photography tips on social media, invite feedback, and unravel new ideas on how to adapt this recipe to match seasonal ingredients or personal preferences.

Encourage fellow bakers to share their experiences with these muffins in the comments section. Sharing reviews enhances community knowledge and provides opportunities for budding bakers to experiment and innovate with confidence. Plus, exploring variations can lead to delightful new discoveries within the world of baking.

The Recipe

Heavenly Cinnamon Sugar Cream Muffins

Serves: 12 muffins

Prep Time: 15 mins

Cook Time: 18 mins

Total Time: 33 mins

Kitchen Equipment Needed

  • Muffin tin
  • Mixing bowl
  • Whisk
  • Measuring cups and spoons
  • Oven

Ingredients

  • 2 cups all-purpose flour
  • 1 cup granulated sugar
  • 2 teaspoons baking powder
  • 1/2 teaspoon baking soda
  • 1/2 teaspoon salt
  • 1 cup heavy cream
  • 2 large eggs
  • 1/4 cup unsalted butter, melted
  • 2 teaspoons vanilla extract
  • 2 teaspoons ground cinnamon
  • 1/4 cup brown sugar, for topping

Directions

  1. Preheat your oven to 375°F (190°C) and prepare a muffin tin with liners.
  2. In a large mixing bowl, whisk together the flour, granulated sugar, baking powder, baking soda, and salt.
  3. In a separate bowl, combine the heavy cream, eggs, melted butter, and vanilla extract, mixing well.
  4. Pour the wet ingredients into the dry ingredients and gently fold until just combined, being careful not to overmix.
  5. Divide the batter evenly among the muffin tin cups.
  6. In a small bowl, mix the ground cinnamon with the brown sugar, then sprinkle generously over the top of each muffin.
  7. Bake for 18 minutes or until a toothpick inserted into the center of a muffin comes out clean.
  8. Allow the muffins to cool in the tin for 5 minutes before transferring them to a wire rack to cool completely.

Recipe Notes

  • For added depth of flavor, mix a teaspoon of nutmeg into the batter.
  • For a heartier muffin, substitute half of the flour with whole wheat flour.
  • If desired, drizzle with a simple glaze made from powdered sugar and milk once cool.

Indulge in This Almond Crust Caramel Banana Cheesecake Delight

Almond Crust Caramel Banana Cheesecake: A Delightful Dessert Experience

⚖️
Difficulty
Moderate

⏲️
Prep Time
30 mins

🕒
Cook Time
50 mins

⏱️
Total Time
80 mins

🍽️
Servings
12

Embark on a journey of rich flavors with this Almond Crust Caramel Banana Cheesecake. Combining the nutty charm of an almond crust with gooey caramel and ripe bananas, this cheesecake is a sensory delight that promises a satisfying finish to any meal. With just the right balance of sweetness and a hint of salt, the caramel mingles perfectly with creamy banana cheesecake filling, providing a taste that lingers.

Baking this decadent dessert is more than cooking; it’s about crafting an experience. You’ll savor each moment — from crushing the almonds for the golden crust to the first luscious bite of banana cheesecake. Designed with love for those special occasions or an indulgent treat at home, this cheesecake will warm your heart and dazzle your senses.

Quick Recipe Highlights

  • Flavor Profile: The Almond Crust Caramel Banana Cheesecake presents a delightful harmony, where the sweet notes of caramel are elegantly balanced by creamy banana undertones.
  • Texture: With a perfectly crispy almond crust and a smooth, silky cheesecake filling, every bite is a textural contrast elevating its deliciousness.
  • Aroma: The kitchen fills with inviting aromas, from the nutty almond base to the luscious scent of ripened bananas and caramel.
  • Visual Appeal: A symphony of colors — golden crust, creamy filling, and rich caramel topping — make this cheesecake as pleasing to the eye as it is to the palate.
  • Skill Level Needed: Ideal for moderately skilled bakers, it requires attention to detail in layering textures and maintaining consistent baking temperatures.
  • Special Equipment: A springform pan and a blender or food processor for smooth blending are essential for preparation.

Recipe Overview

  • Difficulty Level: With moderate complexity, this recipe necessitates precise layering and timing for a flawless finish.
  • Category: This dessert is a staple choice for those seeking a sweet, indulgent end to any meal or celebration.
  • Cuisine: Rooted in American dessert tradition, it brings contemporary twists with classic cheesecake elements.
  • Cost: Reasonably affordable, with ingredients available at most grocery stores, making it a cost-effective indulgence.
  • Season: Best enjoyed year-round, but especially comforting in cooler months when a warm, sweet dessert is most welcomed.
  • Occasion: Perfect for celebrations, gatherings, or a special home indulgence, wherever delightful desserts are appreciated.

Why You’ll Love This Recipe


The Almond Crust Caramel Banana Cheesecake is a celebration of taste and texture, merging rich flavors in every bite. The crispy almond crust provides a satisfying crunch that perfectly complements the creamy, smooth banana cheesecake filling. Overlain with a caramel topping, each slice is a perfect balance of textures and tastes, making it irresistible.

Preparation is straightforward with key steps like crust formation and layering. Ingredients are accessible, and with careful following of the instructions, a successful bake is virtually guaranteed. It’s a showstopper dessert that dazzles with just the right amount of effort, making it suitable for both special occasions and everyday surprise treats.

This cheesecake is more than a sweet confection; it’s a mindful indulgence. Almonds bring heart-healthy fats, while bananas offer potassium and natural sweetness, reducing the need for added sugar. Each component is thoughtfully chosen to enhance flavor while being mindful of dietary balance, making this a guilt-free pleasure.

Serving this cheesecake is sure to spark joyful conversation and shared experiences. Its beautifully layered slices are conversation starters that showcase your dedication to excellent cuisine. It’s bound to become a favorite at any social gathering, leaving a lasting impression on every guest with its stunning combination of flavors and textures.

The recipe’s cost efficiency is an added bonus. Most ingredients are pantry staples or easily available, meaning you don’t have to break the bank for gourmet-level satisfaction. This recipe is a perfect mix of premium taste and budget friendliness, proving that you don’t need to spend a fortune to create something truly special.

Historical Background and Cultural Significance


Cheesecake has a rich history, tracing back to ancient Greece, where it was considered a classic delicacy at significant gatherings and celebrations. Our modern take weaves these classical elements into an almond crust that harks to European traditions of nutty desserts. Blending these techniques results in a recipe that respects its roots while exploring new textures and flavors through modern creativity.

Almonds have historically symbolized prosperity and divine favor. Their inclusion in the crust not only adds a crunchy texture but carries forward cultural significance by infusing the dessert with a touch of elegance and heritage designed to impress and satisfy even the most discerning palates.

As cheesecake recipes have evolved, the addition of caramel and banana brings forth American influences shaped by innovation. Bananas, laden with sweet tropical overtones, infuse this dessert with fresh vibrancy while caramel lends a modern sweetness acknowledged within contemporary culinary trends, reflecting our dynamic food culture.

Throughout regions and cultures, cheesecake adapts, reflecting local tastes and available ingredients. The Almond Crust Caramel Banana Cheesecake integrates these cultural adaptations, resulting in a versatile dessert that’s both familiar and exciting for diverse palates, providing a sweet conclusion universally celebrated through varied culinary landscapes.

Ingredient Deep Dive


Almonds, a central ingredient in this cheesecake’s crust, hold deep cultural roots dating back to ancient times. Revered for their numerous health benefits, they provide healthy fats and essential nutrients like vitamin E and magnesium. When purchasing, select fresh, unsalted almonds, ideally translucent and fragrant. They should be kept in an airtight container away from moisture to maintain freshness, with optional substitutions like pecans or walnuts for those with specific preferences.

Bananas, the star of the cheesecake filling, are historically rich and nutritious, providing significant levels of potassium and dietary fiber. For maximum flavor, choose bananas that show a slight ripeness, ensuring they are firm yet yield to gentle pressure. Refrigeration can extend their shelf life; however, overripe bananas may be frozen for later use, retaining their sweet appeal in the cheesecake.

Common Mistakes to Avoid

  • Overbaking the crust can lead to a harder texture than desired, so ensure it is golden but not darkened.
  • Using overripe bananas can overwhelm the cheesecake with an overly sweet taste, so choose slightly ripe fruits.
  • Avoid under-mixing the filling to prevent lumps; blend until completely smooth for the best creamy texture.
  • Lack of cooling can cause the cheesecake to crack; allow sufficient room temperature rests before refrigerating.
  • Failing to grease the springform pan can result in sticking; ensure thorough greasing for easy release.
  • Not preparing the caramel topping adequately can lead to texture issues; cook until a thick consistency is achieved.
  • Neglecting to evenly spread layers can cause uneven slices; focus on smooth, uniform layers for consistency.
  • Using low-quality ingredients will compromise flavor and texture, so invest in fresh and premium options.

Essential Techniques


Achieving the perfect consistency in cheesecake necessitates mastering the art of mixing. Well-blended ingredients ensure a smooth texture, and avoiding air incorporation prevents collapsing when baking. Keeping the oven at temperature and avoiding unnecessary opening can ensure even cooking, resulting in a cheesecake that maintains texture and integrity throughout.

Layering is another crucial technique, requiring patience and attention to detail. Each layer should be spread evenly to ensure consistent flavor and texture distribution. Visual cues such as a smooth, mirror-like surface for the topping and a resilient but tender crust are signs of process mastery, aligning appearance and taste in a harmonious ensemble.

Pro Tips for Perfect Almond Crust Caramel Banana Cheesecake


Start by pre-roasting almonds to bring out their natural oils and deepen the flavor of the crust. This will enhance the nutty undertones and complement the sweet caramel and banana filling, providing a more robust flavor profile with every bite.

To achieve an ultra-smooth cheesecake filling, consider passing the banana mixture through a fine-mesh sieve before baking. This adds an extra layer of refinement in texture, ensuring any lumps are eliminated for a pure, smooth consistency synonymous with expertly crafted cheesecakes.

Let the cheesecake base cool slightly before adding the caramel topping to avoid a soggy crust. This ensures the layers maintain integrity and texture, allowing each element to shine while avoiding unwanted moisture that could compromise the structural balance.

Patience is key when cooling your cheesecake. A gradual temperature reduction prevents the filling from cracking, working in harmony with the cheesecake’s natural setting process. Aim for a gradual cool-down, moving from room temperature to refrigeration for ideal results.

Variations and Adaptations


Regional variations can enhance the dessert’s appeal, such as adding coconut or pineapple for a tropical twist, lending a refreshing change to the traditional recipe. Seasonal adaptations, such as incorporating pumpkin or spices during autumn months, can perfectly align with the season’s flavors, making the cheesecake harmonious with the time of year.

To suit dietary preferences, consider gluten-free alternatives by substituting the crust with oatmeal or rice flour. For those mindful of their sugar intake, optimizing sweetness with natural honey or agave syrup can offer a lighter dessert alternative without sacrificing flavor intensity.

Serving and Presentation Guide


Presenting the Almond Crust Caramel Banana Cheesecake can be an art form in itself. Consider using a sleek, white serving platter that contrasts with the golden hues of the dessert. Sliced bananas or almonds can be artfully arranged on top as a garnish, adding visual interest and a preview of the flavors hidden beneath.

Pair the cheesecake with crème fraîche or lightly whipped cream for added depth. These accompaniments contribute a creamy, tactile counterpoint to the cheesecake, balancing its richness with a touch of elegance and sophistication.

Wine and Beverage Pairing


To complement the Almond Crust Caramel Banana Cheesecake, consider serving a glass of Prosecco or a light Riesling. These wines’ light effervescence and subtle sweetness enhance the dessert’s flavors, offering a refreshing counterbalance to the caramel and banana notes.

For a non-alcoholic option, consider offering chilled sparkling water with a dash of citrus or a ginger infusion. These selections cleanse the palate between bites, enhancing the appreciation of textures and aromatic hints throughout the cheesecake slice.

Storage and Shelf Life


This cheesecake is best stored in the refrigerator, where it retains its freshness for up to five days. An airtight container will preserve the flavors and prevent the cheesecake from absorbing unwanted odors within the fridge, ensuring each slice remains pristine and enjoyable.

For longer storage, freezing is an option. Slice the cheesecake and wrap each portion individually in plastic wrap, followed by aluminum foil, preventing freezer burn and retaining its decadent charm. Thaw in the refrigerator overnight before serving for the best texture.

Make Ahead Strategies


Prepare your cheesecake base and crust up to two days in advance, storing them separately to maintain freshness and texture. Assemble the layers shortly before serving to capture the dynamic contrast in flavors and textures, showcasing the efforts of your culinary craftsmanship.

When reheating, allow the cheesecake to warm slightly at room temperature, ensuring the crust remains crisp and the filling smooth. Garnish freshly before serving, adding an element of freshness and lightness with each platter presentation.

Scaling Instructions


This recipe is easily scalable for larger gatherings. To double or triple the ingredients, ensure your baking tin and oven have the necessary capacity. Adjustments in baking time may be required to accommodate the additional volume, so use visual cues to guide doneness, such as a slight jiggle in the center with set edges.

For smaller crowds, the recipe can be halved. However, reduce oven timing cautiously to avoid underdone components. The proportions of key ingredients like eggs and cheese should remain consistent, requiring minor adaptions for balanced flavor profiles.

Nutritional Deep Dive


This cheesecake offers a balanced spread of macronutrients, providing energy and satisfaction in equal parts. Healthy fats from almonds and monounsaturated oils complement protein from cheese, while bananas contribute fiber and micronutrients, resulting in an indulgence mindful of health perspectives.

Each slice brings both pleasure and sustenance, making it an ideal treat that aligns with both emotional enjoyment and nutritional aspirations. For those mindful of calorie intake, portion control can aid enjoyment without potential guilt, allowing this dessert to remain a guilt-free indulgence.

Dietary Adaptations


For gluten-free adaptations, switch to almond or oat flour in the crust, maintaining a pleasing texture without the presence of gluten. Those requiring dairy-free options can explore almond or soy-milk-based cream cheeses, ensuring all dietary needs are met without flavor compromise.

Vegan adjustments include utilizing a blend of cashew and coconut milk for the filling, offering a rich alternative that retains decadence and creamy textures while adhering to plant-based lifestyle choices. The caramel can be swapped with agave syrup and coconut cream for those seeking entirely vegan substitutions.

Troubleshooting Guide


If you experience issues with texture, ensure ingredients are at room temperature before incorporation, promoting smooth blending. For flavor balance, a touch of vanilla or freshly squeezed lemon juice can provide both depth and brightness for a harmonious tone.

Temperature challenges, such as cracking, can be mitigated by allowing the cheesecake to cool gradually and ensuring even baking conditions. Above all, consistent monitoring and adherence to the recommended steps ensure the recipe’s success and culinary satisfaction.

Recipe Success Stories


Community feedback for this cheesecake overwhelmingly celebrates its combination of flavors and textures. Readers have shared variations including added chocolate drizzles or nut toppings that enhance its allure. Photography tips suggest capturing the luscious caramel reflections atop creamy cheesecake for an appetizing visual.

Adaptations have included multicultural influences, such as spices or additional fruits for personalized renditions that reflect local tastes and individual flair. The versatility of ingredients allows personal interpretations, celebrating the joy of creativity within a framework of proven success.

Frequently Asked Questions

Can I use walnuts instead of almonds for the crust?
Yes, walnuts can substitute for almonds, offering a distinct flavor and texture.

Can I make this cheesecake without bananas?
Yes, simply exclude bananas or replace with another fruit like berries for variation.

Is it possible to make a no-bake version?
While different in consistency, a gelatin-based filling can serve as a substitute.

How do I prevent my cheesecake from cracking?
Cool gradually, avoid over-mixing, and use a water bath during baking.

What if I don’t have a springform pan?
Use a regular cake tin but ensure complete cooling before removal.

Can I add chocolate to this cheesecake?
Yes, swirl melted chocolate into the filling or use as a decorative topping.

Is it okay to use pre-made caramel sauce?
Absolutely, pre-made caramel sauce is convenient and effective.

What’s the best way to serve the cheesecake cold or at room temp?
Serving chilled enhances the creamy texture; however, room temperature unveils the full flavor.

Is there a way to reduce the sugar content?
Use natural sweeteners like honey or reduce sugar to personal taste preference.

Can I make this cheesecake for a small family gathering?
Yes, the recipe can be halved for smaller servings.

Additional Resources


Explore related recipes such as a classic New York-style cheesecake with variations in toppings, offering a straightforward dessert with elegant simplicity. Technique guides can further enhance baking skills, exploring crust techniques and alternative cheesecake layers.

Ingredient information delves deeper into selecting the finest almonds and bananas, ensuring the freshest and most flavorful addition to your desserts. Equipment recommendations include useful insights into maintaining your baking tools, emphasizing care and quality for optimal results.

Join the Conversation


Engaging in social media sharing allows you to join a global community of baking enthusiasts who revel in recipe success. From shared photos to inventive variations, these virtual connections foster creativity and culinary exchange. Recipe reviews and community engagement encourage exploration and experimentation, ensuring every cheesecake baked is a personalized masterpiece.

The Recipe

Almond Crust Caramel Banana Cheesecake

Serves: 12

Prep Time: 30 mins

Cook Time: 50 mins

Total Time: 80 mins

Kitchen Equipment Needed

  • Springform pan
  • Blender or food processor
  • Mixing bowls
  • Spatula
  • Measuring cups and spoons

Ingredients

  • 2 cups almonds, finely ground
  • 1/4 cup melted butter
  • 3 ripe bananas, mashed
  • 16 oz cream cheese, softened
  • 1 cup granulated sugar
  • 1 tsp vanilla extract
  • 3 large eggs
  • 1/2 cup caramel sauce

Directions

  1. Preheat your oven to 350°F (175°C). Grease a springform pan.
  2. In a bowl, combine ground almonds and melted butter. Press into the bottom of the pan to form the crust.
  3. Bake the crust for 10 minutes until lightly golden. Let it cool while you prepare the filling.
  4. In a blender, combine bananas, cream cheese, sugar, and vanilla extract until smooth.
  5. Add the eggs one at a time, blending just until incorporated.
  6. Pour the banana mixture over the cooled crust, spreading it evenly.
  7. Bake for 50 minutes, or until the center is set but still jiggles slightly.
  8. Cool at room temperature, then refrigerate for at least 4 hours.
  9. Before serving, drizzle caramel sauce over the cheesecake and let it set.

Recipe Notes

  • Fresh bananas are essential for flavor; avoid those that are too ripe.
  • Caramel sauce can be homemade or store-bought for convenience.
  • For best results, ensure cream cheese is at room temperature for smoother blending.

Indulge in the Irresistible Honey Butter Sweet Alabama Pecanbread Delight

Honey Butter Sweet Alabama Pecanbread: A Southern Delight

⚖️
Difficulty
Easy

⏲️
Prep Time
15 mins

🕒
Cook Time
50 mins

⏱️
Total Time
65 mins

🍽️
Servings
8

There’s nothing quite like biting into a slice of warm, freshly-baked honey butter sweet Alabama pecanbread. This Southern classic combines the rich, nutty flavor of pecans with the sweet, creamy goodness of honey butter, making it an irresistible treat for any occasion. The delightful aroma that fills your kitchen as the bread bakes is just the beginning of this heavenly experience.

Homemade pecanbread has a soulful charm that’s hard to resist. The lush, buttery taste of the honey butter glaze perfectly complements the crunchy texture of pecans, creating a mouthwatering treat that melts in your mouth. Perfect for breakfast, a snack, or even a comforting dessert, this recipe brings a touch of Southern hospitality to your table.

Whether you’re a seasoned baker or just starting out, this honey butter sweet Alabama pecanbread is incredibly simple to make. With just a few staple ingredients and a little patience, you can whip up a loaf that’s sure to become a favorite in your household. It’s a true testament to Southern culinary traditions, celebrated and enjoyed by generations.

Quick Recipe Highlights

  • Flavor Profile: Experience the sweet harmony of honey butter enveloping the rich, nutty flavor of Alabama pecans.
  • Texture: Soft, moist bread that contrasts beautifully with crunchy pecan pieces in every bite.
  • Aroma: Inviting scents of honey and roasted pecans that warm the heart and soul.
  • Visual Appeal: A golden-brown crust with rustic pecan pieces scattered across the top.
  • Skill Level Needed: Beginner-friendly, ideal for cooks of all skill levels looking to impress.
  • Special Equipment: A loaf pan and mixing bowls are all that’s required to get started.

Recipe Overview

  • Difficulty Level: This recipe is categorized as easy because it requires minimal ingredients and straightforward steps, perfect for novice bakers.
  • Category: The honey butter sweet Alabama pecanbread falls under bread and dessert categories due to its sweet flavor and bread-like texture.
  • Cuisine: Rooted in Southern cuisine, this dish is a homage to Alabama’s rich pecan-producing heritage and love for sweet, comforting foods.
  • Cost: Economical and budget-friendly using common pantry staples and pecans, costing approximately $10-$12 depending on pecan prices.
  • Season: Best enjoyed in autumn when pecan harvesting is at its peak, offering the freshest nuts and a cozy comfort during cool weather.
  • Occasion: Perfect for family gatherings, holiday celebrations, or as a gift to share Southern warmth and hospitality with friends and neighbors.

Why You’ll Love This Recipe


This honey butter sweet Alabama pecanbread is a treat for the senses, delivering a delightful blend of sweet and nutty flavors in every bite. The rich, buttery glaze coats the bread with a subtle sweetness, enhancing the natural richness of the pecans. Its moist texture makes for an incredibly satisfying mouthfeel that both adults and kids will enjoy.

The recipe’s simplicity adds a layer of convenience, requiring just a handful of basic ingredients and minimal hands-on time. Perfect for those spontaneous baking urges or when you need a quick homemade treat without spending hours in the kitchen. The easy process makes it an ideal choice for introducing young bakers to the joys of homemade bread.

Nutritionally, pecans are a powerhouse of healthy fats, protein, and dietary fiber, making this pecanbread not just delicious, but also a wholesome snack option. The use of honey instead of refined sugar lends natural sweetness and offers antioxidants and antibacterial properties for a more health-conscious indulgence.

Social gatherings and family meals become more special with a loaf of honey butter sweet Alabama pecanbread. Its delightful aroma and homemade charm are sure to spark conversations and create lasting memories. Whether served warm or at room temperature, it’s bound to be a crowd-pleaser.

Economically, this recipe proves cost-effective, using mainly pantry staples and making full use of seasonal pecans. The ability to make a high-quality, bakery-style bread at home without breaking the bank is part of its enduring appeal, offering great value that you won’t find buying pre-made from the store.

Historical Background and Cultural Significance


The origins of pecanbread can be traced back to the Southern United States, where pecans have been a staple ingredient due to the region’s favorable growing conditions. Alabama, known for its extensive pecan orchards, lends its specialty to this beloved bread, celebrating local agricultural bounty.

In Southern culture, pecan treats are more than just a delight; they’re a tradition, often shared at gatherings and family events. The addition of honey butter in pecanbread elevates its sweetness, creating a combination that’s cherished in Southern households and forever linked to hospitality and warmth.

Over the years, pecanbread recipes have evolved, with variations including different kinds of sweeteners or nuts. However, the honey butter glaze remains a treasured aspect, highlighting the classic Southern inclination towards comfort foods that are both decadent and homely.

Regional variations exist across different Southern states, each adding its unique twist to the pecanbread recipe. Be it through the choice of honey varieties or additional spices, the core of pecanbread remains a celebration of regional heritage and culinary creativity.

Ingredient Deep Dive


Pecans are central to this recipe, deeply connected to Southern cooking. As a native nut to North America, pecans have historical significance, serving as a symbol of sustenance and richness. They offer a wealth of nutrients, including healthy fats, fiber, and antioxidants that support heart health and overall wellness.

Selecting fresh pecans is crucial. Look for nuts without cracks or blemishes for optimal freshness. Store them in an airtight container in the fridge to maintain their flavor and texture. If pecans are unavailable, walnuts or almonds can serve as substitutes, each bringing its unique twist to the bread.

Honey is another star ingredient, renowned for its natural sweetness and nutritional benefits, including anti-inflammatory properties. When selecting honey, consider opting for local, raw honey for enhanced flavor complexity and health benefits. Store honey in a cool, dry place to prevent crystallization, or gently warm it if it hardens.

Butter provides the creamy base for the glaze, delivering richness and a smooth texture to the bread. For a lactose-free option, consider substituting butter with a high-quality margarine or coconut oil. Maintain the buttery flavor by choosing options with suitable fat content.

Common Mistakes to Avoid

  • Avoid overmixing the batter, which can lead to dense and tough bread. Mix until ingredients are just combined.
  • Ensure your baking pan is properly greased or lined with parchment to prevent sticking.
  • Don’t substitute margarine for butter in the glaze straight away; it may affect the flavor profile significantly.
  • Using stale pecans can diminish flavor impact; always check freshness before baking.
  • Ensure your oven is preheated to the correct temperature to achieve a perfect bake.
  • Don’t skip cooling the bread on a wire rack; this prevents too much moisture from building up in the pan.
  • Overcooking the bread will dry it out; keep a close eye on it in the final minutes of baking.
  • Neglecting to sift dry ingredients can result in clumps and uneven distribution.
  • Be cautious with honey measurements; too much can cause the bread to become overly sweet and dense.
  • Failing to test for doneness with a toothpick can result in underbaked bread.

Essential Techniques


One crucial technique in making honey butter sweet Alabama pecanbread is toasting the pecans. This step enhances their natural oils and intensifies their nutty flavor, giving the bread a richer taste profile. Toast pecans evenly in a dry skillet or oven, stirring occasionally and watching carefully to avoid burning.

Mastering the honey butter glaze is another key technique. Mix your softened butter thoroughly with honey to achieve a smooth, creamy consistency. A perfectly blended glaze will spread easily on the bread, providing an even layer of sweetness in each slice without overpowering the natural flavors.

Bringing ingredients to room temperature before mixing ensures even blending, which impacts the final texture of the bread. This simple technique helps the batter mix more smoothly and leads to a consistent crumb structure throughout the loaf.

Knowing when the bread is perfectly done is crucial. Visual cues such as a golden-brown top and a firm, springy touch are good indicators. You can also insert a toothpick into the bread; when it comes out clean or with small crumbs, the bread is ready. Avoid letting it overbake to maintain moisture and softness.

Pro Tips for Perfect Honey Butter Sweet Alabama Pecanbread


Ensure your ingredients are fresh, particularly your baking powder and pecans, as this greatly affects the bread’s texture and flavor. Fresh ingredients yield a loaf that’s aromatic and flavorful, sticking true to the Southern roots.

Use whole milk or buttermilk to provide the bread with a richer texture; swap it for plant-based milk if you are aiming for a dairy-free version. Buttermilk in particular adds a tangy note, balancing sweetness and enhancing moistness.

Allow the pecans to cool before adding to the batter. Incorporating hot nuts may affect the batter consistency and cause uneven baking. Cool pecans ensure all ingredients are balanced correctly for a perfect loaf.

Experiment with local honey varieties to uncover different flavor nuances. Each type of honey offers distinct floral notes that can uniquely complement the pecanbread’s taste, allowing you to personalize the recipe.

When glazing, brush the honey butter mixture on top while the bread is still warm. The initial warmth helps the glaze to soak in, ensuring every slice is lusciously coated and flavorful.

Consider adding a dash of cinnamon or nutmeg to the batter for an autumnal twist. These spices elevate the warmth and depth of flavor, perfectly suited to cozy seasonal spreads or holiday brunches.

If gifting or serving at gatherings, bake mini loaf versions for individual servings that are easier to share. Smaller loaves can also be presented aesthetically with a rustic piece of twine and a handwritten label.

Variations and Adaptations


Regional variations of pecanbread might include the addition of sorghum or molasses, both traditional sweeteners in Southern baking. This alteration introduces a deeper, richer sweetness, reminiscent of old-fashioned Southern desserts.

Incorporate seasonal fruits such as fresh blueberries or diced apples into the batter for a fruity twist. This adaptation adds bursts of acidity and moisture, transforming the texture and adding complexity to every bite.

For a more diet-friendly version, replace all-purpose flour with whole wheat or spelt flour, offering a denser, nuttier texture and enhanced nutritional profile. Ensure gluten-free options by substituting with almond or coconut flour.

Consider flavoring the bread with citrus zest, such as orange or lemon, to bring a refreshing brightness that offsets the rich creamy notes, perfect for summer variations or afternoon tea breaks.

Texture modifications can involve leaving the pecans whole for more pronounced crunch or processing them into finer bits for a uniform texture that mimics store-bought bread.

Modern presentation alternatives could include serving slices topped with mascarpone or cream cheese spread, garnished with fresh fruits and a drizzle of extra honey for a refined, cafe-style dessert.

Serving and Presentation Guide


For plating, consider arranging pecanbread slices artfully on a wooden board, adding warmth and rustic charm to the presentation. Layer slices slightly overlapping, resembling a fan, for an inviting and visually appealing platter.

Garnishing with whole pecans, a sprig of fresh mint, or edible flowers enhances visual appeal. Dusting lightly with powdered sugar or cinnamon powder adds a touch of elegance, perfect for celebratory feasts or holidays.

Traditional accompaniments include a selection of jams, whipped butter, or cream cheese for customizable spreads that guests can enjoy. For modern flair, offer an assortment of nut butters, honey varieties, or even a hint of chili-infused spreads for a surprising kick.

Consider serving with additional wedges of seasonal fruits or a small bowl of compote to add vibrance and contrasting colors to the platter, balanced visually with colorful linens or ceramics.

Temperature considerations suggest serving the bread either cooled to room temperature to enhance its sweetness or slightly warm for a comforting, melt-in-the-mouth experience.

Portion control tips can involve slicing the bread into manageable, bite-sized pieces, particularly when featuring it on a breakfast buffet or as hors d’oeuvres, encouraging sampling alongside an array of complementary dishes.

Wine and Beverage Pairing


Wine pairings should highlight the nutty and sweet elements, such as a nicely chilled Chardonnay or a Moscato. These wines offer notes of fruit and subtle acidity, complementing the buttery, nutty richness of the pecanbread.

For non-alcoholic alternatives, serve with apple cider, either chilled or warmed, ideal for highlighting and complementing the honey’s sweetness and the pecans’ natural flavors, especially during autumn gatherings.

For afternoon tea pairings, match with a delicately aromatic tea such as Earl Grey or a light herbal blend that doesn’t overpower but enhances the bread’s subtle honeyed notes.

Maintain optimal temperature considerations of pairings, ensuring wines are chilled appropriately and teas brewed to perfect steeping times to enhance their flavors when paired with the pecanbread.

Serve wine in appropriate glassware, allowing guests to savor both the wine and the bread’s intricate flavors luxuriously. Offer non-alcoholic beverages in matching glassware to maintain a cohesive and elegant presentation.

Storage and Shelf Life


Store leftover honey butter sweet Alabama pecanbread by wrapping it tightly in plastic wrap or aluminum foil, ensuring it stays fresh and retains moisture. It can be kept at room temperature in a dry, cool place for up to 3 days.

For longer storage, keep the bread in the refrigerator in an airtight container, prolonging its life for up to a week. Ensure the bread is fully cooled before refrigerating, preventing condensation and unwanted sogginess.

Signs of spoilage include mold, off smells, or a significantly dried-out texture. Always check these signs before consuming leftover bread to ensure freshness and safety.

To reheat, briefly heat slices in the oven at a low temperature to retain moistness, or toast lightly for a crispy exterior and soft interior. Avoid microwaving, as it can toughen the texture and dry the bread out rapidly.

Freezing guidelines include wrapping the loaf or slices in plastic wrap and then foil to prevent freezer burn. Label and date the packages, keeping them for up to 2 months. Thaw fully at room temperature before reheating for best results.

Make Ahead Strategies


An effective make-ahead strategy is to prepare all dry and wet ingredients separately a day before baking. Combining them freshens the batter without compromising texture, saving considerable time on the baking day.

Store the unbaked batter in the refrigerator for up to 24 hours in a tightly covered bowl. Stir thoroughly before pouring into the baking pan for a quick-bake option that preserves flavor and rise.

Quality impact assessments reveal that pecanbread maintains its delightful flavors and texture when baked a day ahead, making it perfect for stress-free events where baking the same day isn’t feasible.

Strategically assemble all garnish elements such as whole pecans and herbs in advance, ensuring a swift and seamless presentation when ready to serve. This approach minimizes last-minute tasks and potential mishaps.

Reheating guidelines suggest prepping the bread in advance, wrapping, and reheating before serving to revitalize its moist texture and aromatic profile.

Enhance freshness by brushing with additional honey butter glaze just before serving, adding a newly baked aroma and elevating its appeal at the table.

Scaling Instructions


Halving the recipe is effortless and sustainable for smaller gatherings, reducing ingredient measures proportionately for consistent results. Exceptionally useful when aiming to test variations prior to full-sized bakes.

Doubling or tripling the recipe is seamless with systematic adjustments to ingredient amounts. Employ larger mixing bowls and baking pans, adjusting cooking times accordingly without detracting from bread quality.

Equipment adjustments align with recipe scaling, ensuring even baking. Utilize multiple loaf pans or one large loaf pan with extended baking time, all while monitoring from awkward placement in the oven to avoid uneven cooking.

Timing modifications include thorough testing for doneness with a toothpick, ensuring scaled recipes receive adequate time for thorough baking throughout without hastening or compromising the outcome.

Address storage considerations by separating excess portions and freezing, enabling extended enjoyment without risking spoilage or reduced quality, particularly after batch baking for larger events.

Nutritional Deep Dive


The honey butter sweet Alabama pecanbread presents a balanced macro breakdown including proteins, fats, and carbohydrates, essential for a sustaining treat and energizing snack option across varied daily routines.

Delve into the micronutrient analysis to discover magnesium, manganese, and vitamins A and E in pecans, all contributing positively to bone health, immunity, and skin while supporting overall nutritional goals.

Health benefits are augmented by the use of natural sweeteners like honey, easing the glycemic load, and leveraging its healing properties, allowing for indulgence without unnecessary added sugars.

Embrace dietary considerations by recognizing potential allergens such as gluten, dairy, or tree nuts, acknowledging lifestyle choices, and options like substitutes and adaptations to cater broader dietary needs.

Portion analysis reveals the bread’s reasonable caloric provisions, perfect for integrating moderate servings into a balanced diet without excessive caloric excess, especially suitable for snack or dessert curations.

Implement weight management tips focused on savoring moderation, passionate about incorporating the bread into controlling weight without forfeiting the pleasure and flavor of delicious homemade baking.

Dietary Adaptations


For a gluten-free version, replace traditional flour with a 1:1 gluten-free blend, ensuring the bread retains its delightful texture without compromising taste, perfect for gluten-intolerant diets.

Adapt to a dairy-free version by using plant-based butter alternatives and milk substitutes without sacrificing that rich buttery flavor signature of traditional pecanbread offerings.

For a vegan approach, substitute eggs with flaxseed or chia seed gels, showcasing vegan-friendly elements that cherish animal-free principles while staying true to this classic Southern dessert.

Incorporate low-carb modifications by reducing carbohydrate-heavy sweeteners and opting for almond or coconut flour, mindful of those prioritizing balanced blood sugar levels in cuisine planning.

Keto enthusiasts can enjoy this pecanbread by emphasizing nut-based flours, reducing carbs, and embellishing with high-fat additions like coconut milk or oils that jumpstart ketosis compatibility in a delicious slice.

Paleo variations transition smoothly by substituting with natural sweeteners, nut flours, and primal-friendly dairy alternatives that align with Paleo preferences, cherishing wholesome history foundations.

Adjust to low-FODMAP standards by employing suggested low-FODMAP honey alternatives and flour choices, perfect for those navigating digestive sensitivities without forgoing beloved swirl pecanbread slices.

Troubleshooting Guide


Encounter texture issues when the bread becomes overly dense or crumbly? Ensure precise ingredient measurement and control mixing times, maintaining an ideal smooth batter consistency.

Achieve flavor balance by accurately measuring ingredients and experimenting with complementary spices like cinnamon for unexpected warmth. Avoid overwhelming sweet or nutty gustatory experiences.

When tackling temperature problems, calibrate your oven regularly, maintaining accuracy for harmonious baking. Move pans as necessary for even exposure to heat without undue cooking time adjustment.

Prevent equipment challenges by investing in high-quality loaf pans, ensuring nonstick surfaces and strong supportive structures for dependable bakes when confronted with irregular oven.

Resolve ingredient substitutions intelligently, using proportional replacements that match consistency and moisture levels, guaranteeing unified outcomes through new interpretation.

For timing concerns, keep vigilant watches on baking durations, adjusting as scent and appearance suggest nearing completion, ensuring no overdone or unfinished products emerge from the oven.

Recipe Success Stories


Community feedback celebrates the honey butter sweet Alabama pecanbread as a cozy family favorite, often gracing tables from breakfast to dessert, affirming its adaptable pleasure across various meals.

Variation successes emerge from inspired submissions, showcasing unique takes with creative touches that complement traditional formulas beautifully, proving its dynamic versatility in the baking sphere.

Adaptation stories illustrate flexibility, adjusting the core recipe to meet specific personal or dietary conditions without sacrificing the Southern classic’s much-loved taste and texture.

Reader suggestions spring inspiration, specifically shared treasured tips and right pairings that unfurl deeper bread enjoyment validation from countless fellow home-bakers who share this passion.

Photography tips delight with intricate angles and lighting setups shared by enthusiasts, capturing the vibrant glow of pecanbread during golden-hour eats to heighten the appeal through social media feeds.

Frequently Asked Questions

Q: Can I use different nuts other than pecans?

A: Yes, walnuts or almonds are excellent substitutes for pecans, each imparting a nuanced flavor while maintaining this bread’s essential texture. Adjust measurements and toast accordingly for optimal results.

Q: How do I store the bread without it getting dry?

A: Store the bread in an airtight container or wrap firmly in foil, keeping at room temperature, or refrigerating for up to a week. Toast or warm to revitalize its soft, tender crumb before serving.

Q: Is there an alternative to butter in the glaze?

A: For a non-dairy option, use plant-based margarines or coconut oil. These alternatives deliver creamy consistency and agreeable flavor, accommodating lactose intolerances with additive ease.

Q: Can I prepare the batter ahead of time?

A: Absolutely, store batter in a covered bowl within a refrigerator for up to 24 hours. Stir before baking to maintain texture consistency without accruing unwanted separation or thickening.

Q: What’s the best way to thaw frozen pecanbread?

A: Optimal thawing involves allowing the bread to defrost gradually at room temperature before reheating in the oven on low heat. This method preserves moisture, retaining fresh-baked essence.

Q: Can I add chocolate chips?

A: Indeed! Chocolate chips lend additional sweetness and creamy richness. Fold evenly into the batter, yielding pockets of smooth chocolate alongside its nutty pecan counterparts.

Q: How do I prevent pecans from sinking?

A: Coating pecans in flour before incorporation disperses them uniformly, preventing downward migration and guaranteeing bites full of well-distributed crunch embedded throughout.

Q: Does the type of honey impact the flavor?

A: Yes, varieties offer distinct floral profiles contributing subtle depth to the bread. Explore local honey releases or harvests for interesting experiments, tailored perfectly to your taste preference.

Q: Can I use gluten-free flour?

A: Certainly! Use a quality 1:1 gluten-free baking flour blend. These provide essential structure and binding capability, ensuring consistent success for gluten-free bakers desiring luscious pecanbread.

Q: What makes buttermilk preferable?

A: Buttermilk recipes yield tender crumb and fuller flavor thanks to inherent acidity, which catalyzes ingredient reactions, producing airy, moist consistency that resounds in every pecan-enriched bite.

Additional Resources


For those angling to dive deeper into baking, explore related recipes like honey muffins or pecan pie bars, perfect companions to pecanbread indulgence, expanding your repertoire seamlessly.

Technique guides cover essential bread-making steps and specifics on handling dough textures, skillfully connecting the foundations required to match this celebrated bread form’s expectations.

Ingredient information hubs illuminate alternative nuts and honey options, expounding their unique characteristics and preferences while encouraging exploration through locally sourced variants and organic origins.

For precision in execution, rely on equipment recommendations such as weight-verifications for proofed scales, bringing heightened accuracy to ingredient prep and successful pecanbread results.

Investigate seasonal variations, sharing tree nut harvest timelines, and exchange honey varietal potentials from different regional producers, enriching ingredient narratives for ample fall and spring adoption stories.

Join the Conversation


Share your creations on social media with dedicated hashtags, celebrating honey butter sweet Alabama pecanbread across platforms and exchanging feedback on presentation, creativity, or personal flair stories.

Photography tips inspire professional-grade visuals, illuminating the bread’s enticing glow under bespoke lighting scenarios and seasonally inspired table settings, offering multifaceted arrays through social shares.

Recipe reviews invite community dialogue, sparking further enhancements, nuanced flavor profiles, and comprehensive exploration of this classic through collaborative discussions with fellow enthusiasts.

Community engagement thrives through interactive touchpoints, embracing feedback loops and reader-requested adaptational features defining pecanbread within evolving baking traditions worldwide.

Venture into recipe variations, compiling compilations of regional, contemporary and alternative dietary modifications that recycle its dynamic adaptability, suited to endless interpretations, yet steeped in Southern tradition.

The Recipe

Honey Butter Sweet Alabama Pecanbread

Serves: 8

Prep Time: 15 mins

Cook Time: 50 mins

Total Time: 65 mins

Kitchen Equipment Needed

  • Mixing bowls
  • Loaf pan
  • Whisk
  • Spatula
  • Skillet for toasting pecans

Ingredients

  • 1 cup pecans, chopped
  • 1 1/2 cups all-purpose flour
  • 1 teaspoon baking powder
  • 1/4 teaspoon baking soda
  • 1/4 teaspoon salt
  • 1/2 cup unsalted butter, softened
  • 1/2 cup honey, plus more for glazing
  • 1/2 cup buttermilk
  • 2 large eggs
  • 1 teaspoon vanilla extract

Directions

  1. Preheat your oven to 350°F (175°C). Grease a loaf pan.
  2. Toast the chopped pecans in a skillet over medium heat until fragrant, about 2-3 minutes. Allow them to cool.
  3. In a large bowl, whisk together the flour, baking powder, baking soda, and salt.
  4. In a separate bowl, cream the butter and 1/2 cup honey until smooth and fluffy.
  5. Add the eggs one at a time, beating well after each addition. Stir in the vanilla extract.
  6. Alternate adding the flour mixture and buttermilk to the creamed mixture, starting and ending with the flour. Mix until just combined.
  7. Fold in the toasted pecans gently.
  8. Pour the batter into the prepared loaf pan, spreading evenly.
  9. Bake for 45-50 minutes, or until a toothpick inserted into the center comes out clean.
  10. While the bread is still warm, brush the top with additional honey for a nice glaze. Allow to cool on a wire rack before slicing.

Recipe Notes

  • For a twist, add a pinch of cinnamon or nutmeg to the dry ingredients.
  • Use almond milk for a dairy-free option.

Indulge in Decadent Caramel Banana Pecan Cake for Ultimate Delight

Decadent Caramel Banana Pecan Cake 🍌🥜🍰 – A Rich & Moist Delight!

⚖️
Difficulty
Medium

⏲️
Prep Time
30 mins

🕒
Cook Time
50 mins

⏱️
Total Time
80 mins

🍽️
Servings
8

Bananas and caramel come together in this Decadent Caramel Banana Pecan Cake, offering a moist, rich dessert that’s perfect for any occasion. The harmony of flavors is enhanced by the crunch of pecans, making each bite an indulgent treat. With a soft crumb infused with the sweetness of ripe bananas and an irresistible caramel glaze, this cake is sure to become a family favorite.

Imagine the moment you cut into a slice, revealing a tender inside with golden caramel dripping down the sides. It’s a cake that not only delights but also impresses. Whether you’re baking for a special gathering or treating yourself to a weekend indulgence, this banana cake recipe won’t disappoint.

Quick Recipe Highlights

  • Flavor Profile: This cake balances the natural sweetness of bananas with the deep, buttery notes of caramel.
  • Texture: Expect a moist crumb that’s perfectly complemented by the crunchy bite of pecans.
  • Aroma: Each slice is a fragrant blend of warm banana and caramelized sugar with a hint of nutty depth.
  • Visual Appeal: The golden caramel topping creates a stunning sheen, making this cake a true centerpiece.
  • Skill Level Needed: Perfect for intermediate bakers ready to impress with their caramel-making skills.
  • Special Equipment: A springform pan for easy release and even baking is recommended.

Recipe Overview

  • Difficulty Level: Moderate, as it involves making caramel from scratch, which requires attention to avoid burning.
  • Category: A dessert offering that could easily serve as a show-stopping cake or a sweet brunch treat.
  • Cuisine: Inspired by Southern American baking traditions, highlighting the versatility of pecans and bananas.
  • Cost: Relatively low-cost, with pecans being the most expensive ingredient.
  • Season: While available year-round, this cake truly shines in the fall when warm, comforting flavors are in vogue.
  • Occasion: Ideal for family gatherings, holiday feasts, or afternoon teas, promising to elevate any event.

Why You’ll Love This Recipe


Your guests will marvel at the moist texture and rich flavor of the Decadent Caramel Banana Pecan Cake. Its tender consistency pairs beautifully with a thick, glossy caramel topping, leaving a memorable impression. Perfectly balancing sweet banana with nutty pecans, each slice promises a luxurious experience.

Baking this cake is time-efficient and straightforward, making it suitable for both planned events or spontaneous gatherings. There’s no need for extravagant decorations, as the natural charm of caramel and pecans provide ample eye-candy.

Nutritionally, bananas offer a source of potassium, making this dessert a slightly healthier indulgence than most. You can also adjust the sweetness level to your preference by moderating the amount of caramel drizzled on top.

Social events get an upgrade with this cake as your centerpiece. It’s easy to slice and serve, allowing everyone to enjoy that first bite in sync. The cake holds up well over time, ensuring it stays fresh throughout your event.

Economically friendly, the ingredients are common, keeping the cost manageable. Bananas can be sourced year-round and can be substituted with other fruits if needed, ensuring accessibility for every baker.

Historical Background and Cultural Significance


Banana cakes have their roots embedded in the heart of Southern comfort food, where sweet and savory often collide in the most delightful ways. The Southern United States has long revered pecans, offering a natural melding of flavors in many traditional desserts.

Evolving from simple banana bread recipes, this cake marries caramel—a classic staple all its own—with the moisture and richness of bananas. As caramel became a beloved ingredient in recipes across regions, this cake’s popularity soared.

Bananas themselves have an intriguing journey, often being seen in the 1930s as a symbol of luxury due to their exotic nature and limited availability. Now, they’re a common household staple, celebrated in both savory and sweet dishes.

Across the globe, bakers have adapted the banana cake to suit local flavors, such as adding tropical fruits or spices. However, the combination of pecans and caramel remains uniquely American.

Ingredient Deep Dive


Bananas are more than just a breakfast fruit. In baking, they contribute moisture, natural sweetness, and a mellow flavor that complements other dessert elements beautifully. Originating from Southeast Asia, they bring a historical touch of exotic flavor to Western baked goods.

Pecans, native to North America, are prized for their buttery taste and impressive antioxidant content. They’re a heart-healthy nut that possesses a cultural significance in Southern culinary traditions, often seen in pies and festive dishes.

Select delicately speckled bananas for the best mashable texture and flavor, while integrating grade-A pecans for their size and quality. Store bananas at room temperature until ripe, then refrigerate to extend their shelf life. Pecans should be kept in an airtight container to maintain freshness.

If needed, walnuts can replace pecans, while other sweeteners, like honey, can supplement caramel for a quicker topping alternative.

Common Mistakes to Avoid

  • Overmixing the batter can lead to a dense cake, so fold gently to retain air.
  • Using under-ripe bananas can compromise the sweetness, so wait until they’re heavily speckled.
  • Forgetting to toast pecans may result in a less flavorful crunch.
  • Rushing the caramel may cause burning; patience ensures a smooth, golden finish.
  • Not aligning the cake pan properly can lead to uneven baking.
  • Skipping the cooling time can cause structural issues; let the cake set completely.
  • Improper mixing of caramel can lead to sugar crystallization.
  • Using cold eggs can prevent even mixing of ingredients, so bring them to room temperature first.
  • Incorrect oven temperature can affect the rise and texture; always preheat your oven.
  • Overcooking the cake may result in dryness, so check doneness with a toothpick.

Essential Techniques


Mastering caramel involves watching for the sugar’s color change. It should turn a medium amber, not too dark, to prevent bitterness, and not too light, to avoid blandness. Monitor closely to maintain the perfect hue.

Proper banana mashing ensures an even distribution of flavor. Use a fork or potato masher, focusing on a smooth consistency with small chunks for texture contrast.

Layer mixing should integrate dry and wet ingredients in intervals to balance dough consistency without overworking the batter. Look for a thick, yet pourable consistency.

Cake release is key; greasing and flouring your springform pan is essential for clean cake removal. Consider parchment lining for added security.

Pro Tips for Perfect Decadent Caramel Banana Pecan Cake


Toast pecans before incorporating them into the cake to enhance their nutty flavor significantly. Ten minutes at 350°F should suffice.

Always use overripe bananas for a naturally sweet, rich flavor. These add more moisture and require less sugar.

Incorporate a touch of vanilla extract to highlight the caramel and banana notes, amplifying the overall depth of flavor.

Let the caramel cool slightly before pouring over the cake to prevent soaking in, ensuring a glossy topping instead.

Creating variations? Add spices like cinnamon or nutmeg to the batter for a warming twist.

If you’re making the cake ahead, reserve caramel drizzling for just before serving to maintain its glossy finish.

Variations and Adaptations


Regionally, you might encounter this dessert with toasted coconut in Hawaiian adaptations, bringing a tropical spin to the classic.

For a seasonal touch, adding pumpkin puree to the banana mixture can result in a moist, fall-inspired cake.

Health-conscious bakers can swap granulated sugar with coconut sugar for a lower glycemic index without compromising taste.

Those with dietary restrictions might prefer almond milk or coconut cream in the batter for a dairy-free version.

For a textural twist, adding dried cranberies or raisins can enhance both the chew and sweet-savory balance.

Swirl chocolate or coffee-infused caramel on top for an elegant twist, elevating the cake’s visual and flavor profile.

Serving and Presentation Guide


To plate, consider slicing the cake into neat wedges, allowing the rich colors to captivate. Present each slice on a white plate, making the caramel glisten and the pecans pop.

For garnish, a light dusting of powdered sugar adds a touch of elegance, while fresh banana slices or pecans arranged on top can hint at the cake’s star ingredients.

Traditionally, this cake is wonderful when complemented by a scoop of vanilla ice cream or whipped cream, cutting through the richness with creamy balance.

For modern presentations, serve with a drizzle of dark chocolate sauce and embellish with candied pecans for added sophistication.

The cake is best enjoyed at room temperature, offering the right consistency and flavor balance. A small serving can offer maximum satisfaction, so be mindful of portion sizes in formal settings.

Wine and Beverage Pairing


Pairing this caramel banana pecan cake with a dessert wine like Sauternes or a rich port can enhance its nutty nuances and highlight the caramel’s sweetness.

For non-alcoholic options, consider a spicy chai tea or cold brew coffee to bring out the rich flavors without overwhelming the palate.

For those indulging in an afternoon cake, a strong espresso or cinnamon latte provides a balanced bitterness to counteract the sugar.

Temperature is key for beverages; serve coffee and tea piping hot to contrast delightfully with the cake’s cool caramel draping.

A frothy cappuccino with almond milk can amplify the nutty tones of the pecans, while a chilled almond milk blend can offer refreshment on warmer days.

Storage and Shelf Life


Store your caramel banana pecan cake covered at room temperature for up to two days, ensuring it stays moist and fresh-tasting.

If refrigerating, place it in an airtight container to avoid absorbing unwanted fridge flavors, extending freshness up to a week.

Avoid plastic wrap directly on the cake to prevent texture changes; parchment paper is a better wrap choice due to its breathing quality.

Check for any signs of spoilage, such as an off aroma or mold, especially when stored longer than a week.

Reheat in a microwave for a few seconds or serve at ambient temperature to maintain the cake’s moist texture.

For longer storage, slice and wrap individual portions in plastic before freezing. Defrost in the fridge overnight, allowing for easy on-hand indulgence.

Make Ahead Strategies


Prepare the cake base a day in advance and store it in the refrigerator, then add the caramel topping shortly before serving for freshness.

When assembling, refrigerate between caramel and banana application layers, maintaining a solid structure.

If made in batches, slice and keep in the freezer, save for when a quick dessert is needed. This also ensures natural crowd dispersing over occasions.

To retain quality, wrap separated slices in parchment before refrigerating, keeping texture and taste consistent.

Distribute fresh elements like the caramel just prior to serving to maintain the perfect drip and luxurious appearance.

Scaling Instructions


Halve the recipe easily by reducing each ingredient proportionally, perfect for smaller gatherings or intimate dinners.

When doubling, ensure you distribute the batter evenly in two pans or adjust your oven temperature slightly lower to maintain even baking.

Consider using multiple pans instead of enlarging a single batch to prevent interference with bake time and cake integrity.

Adjust equipment when necessary, using larger mixing bowls and cake pans when tripling to safeguard ingredient integration.

Storing extra batter can be precarious, so bake immediately and freeze the second cake for an easy dessert later.

Nutritional Deep Dive


This cake provides a delightful balance of carbs from the bananas and flour, protein from the pecans, and fats from the butter, achieving a rounded macronutrient profile.

Addition of bananas contributes vitamins B6 and C, where pecans enhance the vitamin E spectrum, offering nutritional benefits alongside indulgence.

The high fiber content from bananas and whole grain substitutes in flour forms can bolster digestive health when consumed in moderation.

Consider portioning wisely to prevent caloric spikes, balancing delicious indulgence with mindful eating habits.

For weighting concerns, while energy-dense, this caramel banana pecan cake supports healthy portions post-exercise or between meals.

Capitalizing on natural fruit sugars may help reduce added sugars typically present in dessert recipes.

Dietary Adaptations


For a gluten-free version, replace regular flour with almond or coconut flour, which offers additional nutty undertones plus necessary gluten-free benefits.

Dairy-free adaptation is straightforward: substitute butter for coconut oil or margarine and use plant-based milk alternatives.

Vegan adaptations can be achieved with egg replacements, such as chia or flaxseed mixtures, and plant-based coconut cream in caramel.

For low-carb adjustments, consider reducing sugar and substituting flour with almond meal, maintaining satisfaction with lower glycemic impact.

Keto-friendly adaptations involve heavier almond butter and sweeteners like erythritol, aiming for a high fat and low carb ratio.

Tailor the recipe for paleo tastes by using paleo-approved sweeteners like maple syrup and fully relying on nut-based flours.

Each diet adaptation can maintain flavor integrity while addressing personal health needs or preferences.

Troubleshooting Guide


If your cake turns out dense, ensure you’re not overmixing the batter. Gentle folding keeps air in, promoting a light bake.

Too sweet or too bland? Adjust banana ripeness accordingly, using fully ripe bananas for natural sweetness.

If the caramel seizes, stir gently over low heat or add a bit of cream to encourage smoothness without reboiling.

Possible uneven baking? Rotate your cake halfway through the cooking time to counteract potential hot spots in the oven.

If specific ingredients are missing, research suitable substitutions in advance. Greek yogurt can serve in place of buttermilk in many cases.

Runny caramel could be a result of overheating cream; allow it to come to room temperature by gradually mixing.

Timing troubles are best resolved by adjusting pre-baking dough rest. Letting ingredients sit momentarily aids moisture distribution.

Recipe Success Stories


Readers have personalized their Decadent Caramel Banana Pecan Cake with cinnamon swirls and rave about the added spice note blending beautifully.

Our community cherished this recipe as a holiday baking classic, where guests inevitably ask for more.

Several readers commend the cake’s adaptability, noting how easy it is to swap ingredients for dietary restrictions without losing flavor.

Feedback praises its visual appeal, suggesting dusting the cake with cocoa powder for added artistic charm.

Photography provided by subscribers showcases imaginative servings; enhancements like retractable pecan placements on top create an artistic display.

Frequently Asked Questions

What makes this cake so moist?
This cake’s moistness comes from ripe bananas which add natural sweetness and moisture, assisted by the buttermilk in the batter.

Can I make the caramel ahead of time?
Yes, prepare caramel in advance and store it refrigerated in an airtight container. Reheat gently before application.

Is it possible to substitute nuts?
Absolutely, walnuts or almonds can substitute for pecans, each providing unique complementary notes.

Does freezing affect the cake’s consistency?
Freezing maintains the cake’s texture when wrapped properly, avoiding icicles and moisture loss during defrosting.

What should I do if my caramel is too thick?
Thin caramel by heating it gently with a bit of cream, stirring gradually to achieve the desired consistency.

Are there low-sugar options?
Yes, reduce sugar without significantly affecting the taste by relying on overripe bananas for sweet resonance.

Is the cake vegan adaptable?
Certainly, swap dairy and eggs for plant-based alternatives such as oat milk and flax eggs.

How long does it keep fresh?
The cake remains fresh for up to a week in the refrigerator if properly stored, extending its appeal beyond initial presentation.

What complements this cake when served?
Try serving with a dollop of crème Fraiche or a twist of lemon zest for a fresh contrast to its richness.

Can alternative sweet toppings be used?
Drizzle a simple sugar glaze or use a refined chocolate ganache for new flavor dimensions your audience will savor.

Additional Resources


Explore more banana and nut-based recipes within our dessert category, including banana bread and pecan tart.

Our guides on caramel techniques will enhance your confidence in creating silky, gorgeous drizzles every time.

Refer to ingredient lists emphasizing staple pantry items, ensuring easy access and cost-conscious alternatives.

Consider our recommended baking equipment for optimal results, improving yield efficiency and reliability.

Seasonal variations inspire experimenting with available ingredients, guided by our collection of browse-friendly seasonal baking recipes.

Join the Conversation


Engage on our social media platforms using hashtags to showcase your take on Decadent Caramel Banana Pecan Cake. We love seeing unique spins.

Photographers are invited to share tips for capturing the golden hues and glossy finishes of this delightful showstopper.

Encouraging recipe reviews helps us improve and allows us insight into how these recipes fit into your culinary routines.

The community thrives on adaptation stories; share how you’ve tailored this cake for family traditions or dietary needs.

Your feedback and input contribute to our collective repertoire—each version evolves, thanks to your creative contributions.

The Recipe

Decadent Caramel Banana Pecan Cake

Serves: 8

Prep Time: 30 mins

Cook Time: 50 mins

Total Time: 80 mins

Kitchen Equipment Needed

  • Springform pan
  • Mixing bowls
  • Hand mixer or stand mixer
  • Baking sheet
  • Whisk
  • Spatula

Ingredients

  • 1 1/2 cups ripe bananas, mashed
  • 1 1/2 cups flour
  • 1 teaspoon baking soda
  • 1/4 teaspoon salt
  • 1/2 cup unsalted butter, softened
  • 1 cup sugar
  • 2 eggs
  • 1 teaspoon vanilla extract
  • 1/2 cup buttermilk
  • 1 cup pecans, toasted and chopped
  • Caramel topping made from 1 cup sugar, 1/4 cup water, and 1/2 cup cream

Directions

  1. Preheat the oven to 350°F (175°C).
  2. Grease and flour a springform pan.
  3. In a medium bowl, whisk together flour, baking soda, and salt.
  4. In a separate large bowl, cream butter and sugar until light and fluffy.
  5. Beat in eggs one at a time, followed by the vanilla extract.
  6. Mix mashed bananas into the butter mixture.
  7. Add dry ingredients alternately with buttermilk, stirring until just combined.
  8. Fold in chopped pecans.
  9. Pour batter into prepared pan and smooth the top with a spatula.
  10. Bake for 50 minutes or until a toothpick inserted into the center comes out clean.
  11. Let cake cool in the pan for about 10 minutes, then remove to a wire rack.
  12. For the caramel, mix sugar and water in a saucepan, boiling until golden.
  13. Remove from heat and slowly stir in cream until smooth.
  14. Drizzle caramel over cooled cake before serving.

Recipe Notes

  • To make this cake nut-free, simply omit the pecans.
  • The cake can be stored at room temperature for up to two days.
  • For added richness, serve with a scoop of vanilla ice cream.

Irresistible Chocolate Pecan Turtle Clusters: A Delightful Homemade Treat

Decadent Chocolate Pecan Turtle Clusters: A Classic Delight

⚖️
Difficulty
Easy

⏲️
Prep Time
15 mins

🕒
Cook Time
10 mins

⏱️
Total Time
25 mins

🍽️
Servings
24 clusters

Imagine the rich, smooth taste of chocolate complementing the buttery crunch of pecans, all wrapped in a luscious caramel embrace. Chocolate Pecan Turtle Clusters create a bite-sized indulgence that resonates with every sweet tooth’s dream. This easy-to-make treat captivates with its trio of flavors and textures, rendering it impossible to resist.

Crafted with simplicity and elegance, Chocolate Pecan Turtle Clusters offer a delicious escape from daily routine. Each cluster unveils a masterpiece of culinary balance where the caramel weaves together the earthy tones of pecans and the bittersweet delight of chocolate. They are perfect for festive gatherings, gifts, or a little self-indulgence.

These turtle clusters bring not only flavors but stories with them. Memories of holiday kitchens filled with laughter and warmth or quiet afternoon treats shared with loved ones. A sensory delight, chocolate pecan turtle clusters will leave a lasting impression.

Quick Recipe Highlights

  • Flavor Profile: The union of chocolate and caramel offers a harmonious blend of sweet and nutty flavors.
  • Texture: A delightful crunch from whole pecans encased in smooth chocolate and gooey caramel.
  • Aroma: Tempting with the inviting scents of toasted nuts and melted chocolate.
  • Visual Appeal: Gourmet clusters with a shiny chocolate coat and visible pecan halves.
  • Skill Level Needed: Simple preparation suitable even for beginners in the kitchen.
  • Special Equipment: Requires just a baking sheet and microwave-safe bowl.

Recipe Overview

  • Difficulty Level: This recipe is easy for beginners but appeals to seasoned cooks with its mouth-watering results.
  • Category: Ideal for dessert or sweet snacks; a perfect ending to any meal.
  • Cuisine: Rooted in classical American confection, these treats have a touch of Southern charm.
  • Cost: Affordable; main ingredients such as chocolate and pecans are modestly priced especially when buying in bulk.
  • Season: Perfect for winter holiday gatherings due to its rich, comforting flavors.
  • Occasion: Great for parties, holiday gifts, or simply as an everyday sweet treat.

Why You’ll Love This Recipe


The taste and texture of Chocolate Pecan Turtle Clusters bring together the perfect harmony of sweet, crunchy, and smooth elements. The balance of quality chocolate enveloping crisp pecans and the chewy caramel core offers a dynamic sensory experience. Each bite evokes a sense of indulgence.

Beyond taste, the convenience factor shines. This recipe requires minimal effort and basic equipment, making it accessible to everyone—from busy parents to busy professionals. Quick preparation time ensures you can relish these treats without dedicating an entire day.

Nutritionally, pecans are a source of heart-healthy fats and antioxidants, while using dark chocolate can add a slight health edge if you opt for chocolate with a high cocoa percentage. Indulgence has its perks when managed wisely.

Socially, Chocolate Pecan Turtle Clusters are a favorite gift. Neatly packaged in a mason jar or decorative tin, they make delightful presents that speak volumes. Their elegance transforms any party table, acting as a conversation-starting centerpiece.

Lastly, the recipe is affordable and easily accessible in terms of ingredients. With simple and common pantry staples, you don’t have to break the bank to enjoy these decadently rich clusters. Even substitutions, like using walnuts or almonds, can keep costs under control.

Historical Background and Cultural Significance


The origin of the turtle cluster dates back to the early 20th century in the United States, when a chocolatier was inspired by the shape of actual turtles. Crafting this delicious treat from pecans, caramel, and chocolate, they would later become a beloved classic.

Culturally, turtle clusters capture a snapshot of American confectionery innovation, particularly popular in Southern cuisine. Pecans also hold a historical significance as a native tree nut of North America, often found in traditional Southern dishes.

Over decades, the simple pecan cluster evolved with modern twists including various nuts and chocolates. Fine chocolate producers and artisanal chocolates have added their spin, each guarding their secret recipes which enhance the candy’s allure.

Today’s expansion into gourmet markets showcases how this American classic treats have adapted to contemporary palates. Regional variations, inspired by local ingredients, illustrate the adaptability and global reach of this sweet delicacy.

Ingredient Deep Dive


Pecans are the heart of this recipe. Historically, they’ve been a staple in American cuisine, often associated with Southern cooking. Nutritionally, pecans offer healthy fats, making them a frequent choice for hearty meals and desserts.

When selecting pecans, look for those that are free from damage and plump. Fresh pecans should be stored in sealed containers to maintain their flavor. A quick toast in the oven can heighten their natural nuttiness.

Caramel adds timeless decadence. Its rich sweetness counterbalances the slightly bitter edge of dark chocolate, producing a harmonious flavor profile loved across generations. Homemade caramel offers supreme control over texture and sweetness but pre-made options suffice for convenience.

Chocolate—not just any kind, but high-quality chocolate—is vital. Its history in desserts is legendary, offering both depth and luxury of flavor. Dark chocolate containing at least 60% cocoa solids is ideal for adult palates, whereas milk chocolate offers smoother sweetness.

Common Mistakes to Avoid

  • Overheating chocolate can lead to it seizing; melt gradually in the microwave or double boiler for best consistency.
  • Neglecting toasting pecans can result in a lack of flavor depth; a brief toast improves aroma and taste.
  • Rushing the caramel cooking process causes burnt sugar; ensure slow and controlled heating.
  • Using low-quality chocolate compromises taste; invest in a good brand for unmatched flavor.
  • Ignoring expiry dates on nuts; stale nuts affect both taste and texture.
  • Improper storage—exposure to air can make clusters soggy. Store in airtight containers.
  • Crowding clusters on a baking sheet can cause irregular shape; space them evenly for neat results.
  • Not allowing caramel to cool enough can cause messy results; patience ensures picture-perfect clusters.

Essential Techniques


Melting chocolate is pivotal. Use a microwave-safe bowl or set up a double boiler. Heat gently, stirring frequently to avoid scorching. Proper melting ensures smooth, clump-free chocolate ideal for coating.

Caramel should be handled delicately. Slow cooking sugar results in perfect caramelization. Visual cues include a golden-brown hue and smooth, lump-free texture. Avoid high heat; it leads to burnt, bitter caramel.

Layering is a straightforward but important technique. Arrange pecans neatly before adding caramel and chocolate, ensuring visual appeal and flavor distribution. Practice patience during assembly for polished bites.

Pro Tips for Perfect Chocolate Pecan Turtle Clusters


Toasting pecans intensifies their flavor, making the clusters irresistibly nutty. Do not skip this step for the most impact. Use fresh chocolate for maximum shine and taste; older chocolate tends to produce a dull finish.

Try experimenting with different nuts, like almonds for a softer crunch or walnuts for a nuanced flavor. Explore various caramel types—from salted to bourbon-infused—for a unique twist on this classic.

Staying organized is key. Prepare all ingredients before starting to ensure smooth execution. Speed and precision come easier, resulting in cookie sheets filled with temptingly uniform clusters.

If packages are a priority, consider using smaller wax paper squares to wrap each cluster individually. It extends freshness and adds a gift-like touch perfect for sharing.

Double-boiling chocolate ensures even heat distribution. If opting for a microwave, stirring periodically prevents overheating and encourages even, glossy results.

Variations and Adaptations


Regional variations might include using local nuts. Swap American pecans with the hazelnuts of Europe or macadamias from the Pacific for a fresh take. Seasonal fruits or spices can also be added for holiday twists.

Seasonal adaptations include using dried cranberries or apricots with the pecans in winter or coconut shavings in summer. Each season can inspire a new flavor profile perfect for gifting.

Dietary modifications are feasible—substitute the caramel with a low-sugar variant for mindful eating. Vegan versions can utilize dairy-free chocolate and plant-based caramel solutions for those on specialized diets.

Throughout recipe evolution, alternative textures can be sculpted. Experiment with adding crisped rice for a crunchy element. Presentation can shift from rustic clusters to refined, individual molds.

Serving and Presentation Guide


When serving, consider arranging the clusters on an elegant platter lined with parchment paper. This adds a sophisticated touch, complementing the rustic nature of the clusters themselves.

Consider garnishing with a sprinkle of flaky sea salt or edible gold leaf to elevate appearance. These extra touches create excitement and increase each cluster’s perceived value.

Traditional accompaniments – think after-dinner coffee or dessert wines – can enhance each bite’s depth and complexity. A balance of flavors elevates ordinary moments into memorable experiences.

Plating in a mosaic, with clusters arranged in concentric patterns, adds a visual feast for the eyes. Complement with natural elements like whole pecans or berries for an added pop of color and texture.

Wine and Beverage Pairing


Pair the clusters with a robust dessert wine, like Port or Madeira, to echo the rich caramel and chocolate tones. These beverages balance the clusters’ sweetness and provide an alcoholic warmth.

Non-alcoholic alternatives include nutty herbal teas or cappuccinos. These selections cleanse palates without overshadowing dessert flavors. Temperature considerations encourage serving drinks warm, particularly on colder days.

Coffee and tea also stand as natural complements. Their inherent bitterness and acidity offset the sweet richness of the clusters, making each bite more pleasing.

Temperature consideration extends beyond the drink’s warmth to serving the clusters slightly chilled. Again, balance comes into focus for a curated sensory symphony.

Storage and Shelf Life


Store the turtle clusters in a cool, dry place in an airtight container. This protects them from moisture and helps preserve their crisp texture longer.

Refrigeration is acceptable but not necessary. If storing in the refrigerator, allow clusters to come to room temperature before serving to restore optimal texture.

Signs of spoilage include an off taste or change in texture. Be cautious of humidity which makes clusters soggy, while overly dry environments can lead to stale nuts.

Freezing is another viable option, though it’s best done without chocolate coating to maintain quality. To thaw, let clusters sit at room temperature unobstructed by lids or wrappers to avoid condensation.

Make Ahead Strategies


Planning to impress with treats? Chocolate Pecan Turtle Clusters can be prepared ahead up to three days before serving. Store without chocolate coating to ensure freshness.

A prep timeline involves making caramel and setting pecans hours before entertaining. Store these components separately, assembling them with the chocolate shortly before serving.

Consider a compromise on quality impact when making these in advance. Longer storage affects the nuts’ crunch, demanding fresh pecans close to serving for prime satisfaction.

Finished clusters benefit from a drying period; let them cool completely to form firm layers and ideal texture. This step is crucial for impeccable presentation and dining enjoyment.

Scaling Instructions


Scaling the recipe up for large gatherings? Doubling the total ingredients won’t necessarily double the time—instead, anticipate additional sticking points with volume.

Consider investing in two cookie sheets for efficient cooling. Larger quantities warrant space management with plenty of room for effective drying while keeping clusters neat.

Timing modifications generally need attention only slightly. Ideal waiting times between steps enhance slices of quality, ensuring clusters remain appetizing.

Additional storage considerations involve knowledge of ideal conditions. Anticipating heat and humidity when making larger batches can adversely affect clusters, warranting ample precautions.

Nutritional Deep Dive


Macros in this recipe reveal a rich balance. Moderate protein and carb content harmonize with low sugar and fat for satisfying treats. Such balance marks a healthy indulgence.

Nuts deliver micronutrients, like magnesium and phosphorus, bringing unique metabolic support to each cluster. Dark chocolate brings with it potential boosts in cognitive function.

Portion control ensures moderation, a key dietary consideration in enjoying indulgent desserts wisely. Each cluster provides an estimated 150-200 calories—a mindful option.

Health benefits from these ingredients transform chocolate pecan turtle clusters into more than just treats, offering doses of energy, protection, and antioxidants in indulgent form.

Dietary Adaptations


Gluten-free varieties easily adapt by ensuring caramel and chocolate are certified gluten-free. They stand as indulgent options for consumers with gluten sensitivity or Celiac Disease.

Dairy-free modifications include using plant-based chocolate and replacing any milk solids with alternatives like almond or oat milk.

Vegan versions omit traditional butter from caramel, instead sourcing plant-based fats. Rich coconut oil satisfies buttery needs with sophisticated flair.

Low-carb adaptions emphasize using high cocoa percentage chocolate, moderated caramel portion, and potential nut flour usage, upholding richly rewarding clusters.

Low-FODMAP solutions recommend swapping high-fructose corn syrup from caramel with reserved caramel or maple syrup.

Other diets, including paleo or keto, demand ingredient prudence. Nut butters, coconut flour, or naturally derived sweeteners often support dietary needs while retaining this recipe’s integrity.

Troubleshooting Guide


Texture issues arise with uneven chocolate melting. Employ gradual heating techniques as necessary to yield smooth, glossy results ideal for coating.

When flavor balance is off, it might suggest inadequate nut roasting or misaligned caramel sweetness. Adjust according to taste, careful not to overdo sugar.

Frequent temperature problems stem from inconsistent chilling or overheating—adjust accordingly to balance immediate and predictable outcomes.

Equipment challenges frequently appear illusionary yet yield resolutions with specific tactic adjustments—from numerous spoons to extra cookie sheets.

Ingredient substitutions still yield impeccable results. Swap pecans for walnuts; explore salted caramel’s depth. Remember, balance is key to solder harmonious flavors.

Timing concerns suggest inadequate caramel cooling exposure. Be generous here with additional cooling time, avoiding boundless distractions toward a glued system.

Recipe Success Stories


Community feedback glorifies familiarity, stressing its ideal nature during holidays or parties. Baking love shared impacts friends and families equally.

Variation successes highlight people using hazelnuts or swapping chocolate for personalized twists, enjoying them as universally loved additions.

Personality shines in adaptation stories—recipes modified through culinary prowess to encapsulate particular memories beautifully retold.

Reader suggestions abound, celebrating interactive design in recreating these addictive delicacies. Share moments with those remaining respectful of shared wonder.

Photography tips emphasize all-friendly light characteristics—using natural light or grouping placements for ease. Capture the romance of these slices in publications.

Frequently Asked Questions

  • What type of chocolate is best for these clusters?
  • Dark chocolate containing at least 60% cocoa is recommended for its rich flavor. Milk chocolate provides a sweeter alternative.

  • Can I use pre-made caramel?
  • Yes, pre-made caramel is convenient and effective. Ensure it’s of good quality to achieve the desired mouthfeel.

  • What nuts can I substitute for pecans?
  • Walnuts, almonds, or hazelnuts make excellent substitutes, each imparting their unique flavor profile.

  • How do I prevent my chocolate from seizing?
  • Melt chocolate slowly using a microwave-safe bowl or double boiler to avoid overheating or introduction of moisture.

  • What’s the optimal way to store these clusters?
  • Store clusters in an airtight container, cool and dry for the best texture and flavor.

  • Can these clusters be frozen?
  • Yes, without chocolate coating. Thaw at room temperature; condensation can affect chocolate quality.

  • What’s the shelf life of chocolate pecan turtle clusters?
  • Clusters remain at their best for up to two weeks, though earlier enjoyment is recommended for peak freshness.

  • Are there vegan versions available?
  • Yes, substitutes like dairy-free chocolate and plant-based caramels create vegan-friendly clusters.

  • What should I do if my caramel burns?
  • Achieve appropriate heat control by cooking over low heat, using visual cues to determine readiness without burning.

  • Is there a way to adjust sweetness?
  • Sugar levels can be adjusted through caramel preparation. Balance dark chocolate and caramel ratios for desired sweetness.

  • How can I add flavor variations?
  • Introducing spices, like cayenne or cinnamon, to caramel infuses flavor variation while maintaining core integrity.

    Additional Resources


    Dive deeper into related chocolate recipes, mastering fundamental techniques like tempering chocolate through our guides. Enhance your chocolate-pecan repertoire with nut-specific recipe ideas.

    For seasonal variations, consult our festive flavor combinations resource, aligning turtle clusters alongside other festive favorites.

    Supplement beneficial reading through ingredients in vanilla extraction methodology. Learn about proper preparation techniques for creating stunning, restaurant-quality desserts.

    Our equipment recommendations guide highlights critical utensils. Smooth sailing comes when preparation lacks burdened focus—ghosting you to perfection.

    Delve into authenticity through seasonal cuisine adaptations. From sentiments of gift America’s turtle offerings on the global family table. Enjoy its sweet legacy, appreciated privately beneath one of life’s delectable moments.

    Join the Conversation


    Share your creations on social media, tagging our account for a feature. Review variations that resulted in stunning photos shared across community platforms.

    Offer photography tips, showcasing enticing results. Capture interest by arranging visually appealing presentations, shifting this age-old confection’s perception toward modern creativity.

    Encourage community engagement, allowing readers to contribute to the conversation. Showcase reader suggestions in capturing communal creativity, engaging through adaptive sharing.

    Participate by offering recipe reviews. Offer your take on timeless variations, ensuring direct insight post-patial interaction is met with broader comprehension.

    Seek opportunities to bridge traditional and modern elements—interpret shared cultures within chocolate pecan turtle clusters timelessly.

    Irresistible Salted Caramel Chocolate Chunk Muffins Recipe for Dessert Lovers

    Salted Caramel Chocolate Chunk Muffins: A Decadent Delight

    ⚖️
    Difficulty
    Intermediate

    ⏲️
    Prep Time
    15 mins

    🕒
    Cook Time
    20 mins

    ⏱️
    Total Time
    35 mins

    🍽️
    Servings
    12

    Sink your teeth into the delectable fusion of salted caramel and rich chocolate chunks with our irresistible Salted Caramel Chocolate Chunk Muffins. Perfect for breakfast, a midday treat, or an indulgent dessert, these muffins combine a soft, moist crumb with pockets of gooey caramel and melted chocolate. Each bite brings a harmonious balance of sweet and salty flavors that tantalize your taste buds, leaving you longing for more.

    Quick Recipe Highlights

    • Flavor Profile: A balanced blend of sweet caramel and rich chocolate, enhanced by a hint of salt.
    • Texture: Soft and moist muffin base with delightful pieces of chewy caramel and chunks of chocolate.
    • Aroma: A warm, inviting blend of caramelized sugar and deep cocoa notes.
    • Visual Appeal: Golden-brown muffins dotted with dark chocolate and caramel swirls.
    • Skill Level Needed: Perfect for those with basic baking skills looking to explore more complex flavors.
    • Special Equipment: You will need a muffin tin and a mixing bowl.

    Recipe Overview

    • Difficulty Level: Intermediate due to the integration of caramel and chocolate chunks requiring careful mixing to ensure even distribution.
    • Category: Ideal as a dessert, snack, or even a sweet breakfast option.
    • Cuisine: A modern twist on classic American muffins with European influences from salted caramel.
    • Cost: Moderate cost with affordable ingredients like chocolate, flour, and caramel sauce.
    • Season: Perfect all year round, particularly inviting during the colder months for a cozy treat.
    • Occasion: Suitable for casual gatherings, potlucks, or special celebrations like birthdays or holidays.

    Why You’ll Love This Recipe

    The Salted Caramel Chocolate Chunk Muffins offer an indulgent taste with a delightful contrast between sweet and salty notes. The combination of gooey caramel and decadent chocolate provides a satisfying bite, while the soft muffin base adds a comforting texture. Enjoying these muffins is like experiencing a beloved homemade treat with a gourmet touch.

    Not only are these muffins scrumptious, but they are also convenient to make. With a straightforward preparation process and limited equipment needed, you can whip up a batch in under an hour. The ingredients are easy to find, making these muffins perfect for unexpected guests or a spontaneous baking session.

    From a nutritional perspective, these muffins offer balance. The use of quality dark chocolate provides antioxidants, while homemade or high-quality caramel means fewer preservatives than store-bought sweets. Moderation is key, allowing these muffins to be part of a balanced diet.

    With delicious taste and easy preparation, these muffins are fantastic for sharing. Whether you’re hosting a brunch or bringing a snack to the office, their delightful flavor combinations are sure to impress. The elegant presentation makes them suitable for display at any event.

    Cost-wise, these muffins are an economical choice compared to bakery options. Buying ingredients in bulk or on sale can lower costs, and the homemade factor offers savings and better-quality results than store-bought muffins.

    Historical Background and Cultural Significance

    Muffins have a storied history, originating in England as a staple for afternoon tea. The sweet treat found its way to American kitchens, where it gained popularity with the addition of fruit and later more adventurous ingredients like chocolate and caramel. Salted caramel, famed for its French roots, adds an international twist to these classic muffins.

    Salted caramel has become a staple in modern cuisine, offering a sophisticated blend of sweet and savory that is beloved worldwide. Known for its versatility, it pairs beautifully with chocolate, enhancing both comfort and elegance in baked goods like muffins.

    As regional ingredients evolved, muffins turned into a cultural canvas, featuring local flavors and adaptations. Our recipe elevates this traditional treat with a balance of salted caramel and chocolate, making it a universal favorite that’s also deeply rooted in cultural culinary exploration.

    Regional variations of muffins now abound, with ingredients from seasonal fruits to international flavors like caramel and chocolate. The mingling of these elements reflects the universal appeal and adaptability of muffins as a baking staple.

    Ingredient Deep Dive

    Salted caramel plays a key role, offering a luxurious blend of sweet and salty flavors that transform the muffins from ordinary to extraordinary. The caramel’s history as a high-end confection dates back to the French, and its recent resurgence in popularity highlights its timeless appeal.

    Chocolate chunks, particularly dark chocolate, provide a rich, bold flavor that complements the sweet caramel. Known for its mood-enhancing properties and antioxidants, choosing a good quality chocolate ensures both health benefits and a superior taste experience.

    Selecting ripe, fresh eggs will improve texture and binding, while choosing unrefined sugars and quality flour will enhance the overall flavor profile. Ensure storage in a cool, dry place, and look for substitutions like vegan chocolate for dietary needs.

    Using fresh butter lends richness, while a touch of vanilla extract heightens the muffin’s aroma. Proper storage of these ingredients ensures freshness and better baking results. Opt for unsalted butter to maintain control over salt levels.

    Common Mistakes to Avoid

    • Overmixing the batter can lead to tough muffins. Mix just until flour is incorporated.
    • Not properly folding in the chocolate chunks and caramel can result in uneven distribution.
    • Baking at incorrect temperatures may cause overcooking or undercooking.
    • Using low-quality chocolate and caramel can affect the overall flavor and texture.
    • Neglecting to grease the muffin tin will result in stuck muffins.
    • Storing muffins improperly, leading to loss of freshness.
    • Using expired baking powder can hinder the rise of the muffins.
    • Not allowing muffins to cool will make topping them with additional caramel difficult.

    Essential Techniques

    Mastering the folding technique is essential when incorporating delicate ingredients like chocolate and caramel into a muffin batter. Gently fold using a spatula until just combined to maintain the batter’s lightness and ensure even distribution of chocolate chunks and caramel swirls.

    Achieving the perfect muffin dome relies on precise oven temperatures and timing. Start baking at a slightly higher temperature for the first few minutes, then reduce the heat for even cooking. This creates a beautiful rise and the coveted muffin top.

    Pro Tips for Perfect Salted Caramel Chocolate Chunk Muffins

    Use high-quality cocoa in your chocolate chunks for a deeper, richer flavor profile. Adjust salt based on the caramel’s saltiness for a well-balanced taste.

    Allow your muffins to cool slightly before removing them from the tin to avoid crumbling. Wrapping muffins loosely in foil traps moisture, preserving their tenderness.

    If using homemade caramel, ensure to cool it before adding to batter to prevent melting. Customize muffin size by adjusting baking times for mini or jumbo versions.

    Variations and Adaptations

    For regional variations, try adding a touch of cinnamon for a Mexican-inspired twist or use white chocolate chunks for a sweeter, less intense flavor.

    Adapt seasonally by incorporating spices like ginger in the winter or citrus zest in spring. For dietary needs, use gluten-free flour or non-dairy substitutes for butter.

    Enhance flavor by adding espresso powder for a mocha twist or incorporating nuts like pecans for added texture. Change presentation by drizzling tops with melted chocolate for a gourmet touch.

    Serving and Presentation Guide

    Display your muffins on a tiered stand for a stunning brunch centerpiece, or place them in decorative liners for an elegant touch. Garnishing with a drizzle of sea salt caramel adds visual interest and flavor.

    Pair these muffins with warm drinks, like a rich coffee or spiced tea, and serve slightly warmed for the best taste experience. For portion control, consider making mini versions for buffet-style servings.

    Wine and Beverage Pairing

    Pair with a rich, dessert wine like a Port or a Tawny to complement the chocolate and caramel undertones. Non-alcoholic options include chai tea or a spiced hot chocolate to mirror the muffin’s flavors.

    For coffee pairings, try an espresso or a flat white to balance the sweetness of the muffins with a robust caffeine kick. Serve beverages slightly hotter to withstand the richness of the muffins.

    Storage and Shelf Life

    Store muffins in an airtight container at room temperature for up to three days to maintain freshness. For longer storage, freeze individually wrapped muffins and reheat in an oven for freshness.

    Watch for dryness as a spoilage indicator, and ensure to cool muffins completely before storing to prevent condensation. Proper storage containers help preserve their soft texture and flavor.

    Make Ahead Strategies

    Prepare the chocolate and caramel mixture beforehand, storing it separately until ready to bake. Assemble dry ingredients in advance to streamline the baking process when time is of the essence.

    Ensure muffins are fully baked before freezing, and reheat gently for the best result. When making in advance, add caramel topping just before serving to maintain its consistency.

    Scaling Instructions

    To halve the recipe, adjust ingredient measurements and reduce baking time slightly. When doubling, scale up equipment, such as a larger mixing bowl, and bake in batches if necessary.

    Consider oven capacity when scaling, ensuring even heat distribution for multiple muffin pans. Maintain precise ingredient ratios for successful muffins.

    Nutritional Deep Dive

    These muffins offer a hearty balance of macronutrients, with carbohydrates from flour and sugars and fats from chocolate and butter. Dark chocolate provides iron and magnesium, benefiting overall health.

    While decadent, moderation allows for enjoyment without compromise to daily nutritional goals. Emphasize balanced portions and enjoy these muffins as part of a varied diet.

    Dietary Adaptations

    For gluten-free adaptation, use a gluten-free baking blend and test for rise and texture adjustments. Vegan modifications include plant-based butter and egg replacements like flax eggs.

    To suit low-carb diets, consider almond flour and sugar substitutes adjusted to taste. For other dietary needs like paleo, adapt with natural sweeteners and compatible flours.

    Troubleshooting Guide

    For dense muffins, ensure accurate baking soda measurement and avoid overmixing. If the chocolate or caramel sinks, try lightly coating them in flour before mixing.

    Flavor balance issues may arise from improperly measured salt or sugar, requiring careful adherence to the recipe. Equipment challenges can be mitigated by maintaining accurate oven calibration and using non-stick bakeware for optimal results.

    Recipe Success Stories

    Readers have praised this recipe for its rich combination of flavors and straightforward execution. From family gatherings to personal indulgences, these muffins have inspired home bakers to explore further culinary delights.

    Community feedback often highlights successful adaptations, such as the use of alternative chocolate varieties or the addition of additional flavor elements like nutmeg or cardamom for a spiced version.

    Frequently Asked Questions

    Can I substitute milk chocolate for dark chocolate?

    Yes, milk chocolate can be used for a sweeter taste, though it may affect the rich flavor profile and overall sweetness balance. Consider adjusting sugar levels accordingly.

    How do I prevent muffins from sticking?

    Ensure proper greasing of the muffin tin or use quality non-stick liners. Allow the muffins to cool slightly before attempting to remove them.

    What’s the best way to reheat frozen muffins?

    Place frozen muffins in an oven preheated to 350°F for about 10-15 minutes until warmed through. Avoid microwaving as it can alter texture.

    How can I reduce the sugar content?

    Consider using natural sweeteners like stevia or reducing the chocolate amount. However, this may alter taste and texture slightly.

    Do these muffins contain nuts?

    The recipe as written does not contain nuts; however, nuts can be added for extra texture or omitted for those with allergies.

    Can I make these muffins dairy-free?

    Yes, use dairy-free butter alternatives and ensure chocolate is free from milk products. Many caramel sauces also have dairy-free versions.

    Why did my muffins not rise?

    Check the freshness of your baking powder and avoid overmixing the batter, as these are common causes of poor rise in baked goods.

    What is the best caramel sauce to use?

    Homemade caramel sauce is ideal for flavor, but store-bought can work if high quality. Choose sauces with fewer artificial ingredients for the best results.

    How long do these muffins last?

    Stored properly in an airtight container, these muffins can remain fresh up to three days at room temperature or longer if frozen.

    What size chocolate chunks should I use?

    Choose medium to large chunks for a pronounced chocolate presence in each bite. Adjust based on personal preference for texture.

    Additional Resources

    Related recipes like classic chocolate chip muffins or salted caramel brownies can inspire further exploration into similar flavor profiles and textures. Explore technique guides to master the folding technique and tips on selecting the best baking ingredients.

    Procedure equipment recommendations include quality muffin tins and proper mixing tools to enhance your baking experience. Checking seasonal adaptations for different ingredients provides variety throughout the year.

    Join the Conversation

    Engage with other recipe enthusiasts by sharing photos of your Salted Caramel Chocolate Chunk Muffins on social media. Exchange tips about baking techniques and adapt the recipe to suit personal taste preferences.

    Your feedback helps improve and inspire future recipe creations, contributing to a community of passionate home bakers. Encourage others to try new variations of the recipe and share their successes online.

    The Recipe

    Salted Caramel Chocolate Chunk Muffins

    Serves: 12

    Prep Time: 15 mins

    Cook Time: 20 mins

    Total Time: 35 mins

    Kitchen Equipment Needed

    • Muffin tin
    • Mixing bowls
    • Spatula
    • Measuring cups and spoons
    • Whisk

    Ingredients

    • 2 cups all-purpose flour
    • 1/2 cup granulated sugar
    • 1/2 cup packed brown sugar
    • 1 tsp baking powder
    • 1/2 tsp baking soda
    • 1/2 tsp salt
    • 1 cup buttermilk
    • 1/2 cup melted unsalted butter
    • 2 large eggs
    • 1 tsp vanilla extract
    • 1 cup dark chocolate chunks
    • 1/2 cup salted caramel sauce

    Directions

    1. Preheat your oven to 350°F (175°C). Grease or line your muffin tin.
    2. In a large bowl, whisk together flour, sugars, baking powder, baking soda, and salt.
    3. In another bowl, combine buttermilk, melted butter, eggs, and vanilla extract.
    4. Pour wet ingredients into the dry and fold gently until just combined.
    5. Fold in chocolate chunks and caramel sauce, ensuring even distribution.
    6. Spoon batter into the muffin tin, filling each cavity about 3/4 full.
    7. Bake for 18-20 minutes, or until a toothpick inserted into the center comes out clean.
    8. Allow muffins to cool in the tin for 5 minutes before transferring to a wire rack.

    Recipe Notes

    • For an extra caramel touch, drizzle muffins with sauce after baking and cooling slightly.
    • Mix in nuts for additional texture and flavor complexity.
    • Best enjoyed warm; reheat briefly in the oven before serving.

    Irresistible Salted Caramel Chocolate Chunk Muffins Recipe for Sweet Lovers

    Salted Caramel Chocolate Chunk Muffins: A Sweet Indulgence

    ⚖️
    Difficulty
    Medium

    ⏲️
    Prep Time
    20 mins

    🕒
    Cook Time
    25 mins

    ⏱️
    Total Time
    45 mins

    🍽️
    Servings
    12 muffins

    Imagine sinking your teeth into a warm Salted Caramel Chocolate Chunk Muffin, where the rich chocolate chunks melt beautifully, blending perfectly with the decadent salted caramel swirls. These muffins are a perfect combination of sweet and savory, with a fluffy texture that will have everyone reaching for seconds. Whether you’re a seasoned baker or just diving into the world of home baking, these muffins are an irresistible treat.

    These Salted Caramel Chocolate Chunk Muffins deliver a flavor bomb in every bite. The sweet and salty taste sensation, combined with the luscious chocolate chunks, creates a burst of indulgent flavors that linger on your taste buds. The muffins have a moist and tender crumb, crowned with a delightful caramel crunch that adds depth and richness to every bite. The captivating aroma of chocolate mixed with the buttery caramel is enough to draw anyone in, making it hard to resist.

    Quick Recipe Highlights

    Flavor Profile: These muffins boast a sweet, rich chocolate flavor balanced by a subtle hint of salty caramel, creating an irresistible taste.

    Texture: Soft and moist with gooey chocolate chunks, complemented by a lightly crisp caramelized topping.

    Aroma: The delightful scent of melted chocolate with nuances of sweet caramel fills your kitchen as they bake.

    Visual Appeal: Golden-brown tops drizzled with caramel, dotted with chocolate chunks – visually inviting and certainly appetizing.

    Skill Level Needed: Intermediate bakers will find this recipe approachable with rewarding results.

    Special Equipment: You’ll need a muffin tin, liners, and a whisk for a smooth batter and perfect baking.

    Recipe Overview

    Difficulty Level: Medium. This recipe requires attention to detail with ingredients and timings but is easily achievable with some baking experience.

    Category: Perfect for dessert or a sweet breakfast treat, these muffins serve as a versatile addition to any brunch spread.

    Cuisine: With influences from classic American baking, these muffins highlight the love of sweet and salty combinations in modern pastry.

    Cost: Moderately priced, most ingredients can be found at your local store, making it a budget-friendly indulgence.

    Season: Ideal for cooler months when comfort food craves hit, but delicious any time of year.

    Occasion: Great for brunch gatherings, holiday breakfasts, or an indulgent afternoon snack.

    Why You’ll Love This Recipe

    Taste and texture appeal with gooey chocolate and caramel. The muffins offer a balance of textures – soft centers with slightly crunchy tops, making them a treat for your pallet. The convenience of preparation comes from simple steps and common ingredients, ensuring you can whip these up anytime. Nutritionally, while these muffins are an indulgence, the use of dark chocolate adds some antioxidants. They are a crowd-pleaser, perfect for social gatherings or family breakfasts, where the comforting allure of warm muffins pleases everyone.

    Historical Background and Cultural Significance

    The combination of salted caramel and chocolate is a relatively modern pairing, yet it has taken the culinary world by storm. With roots in French pastry, salted caramel became widely popular thanks to its unique balance of flavors. Over the years, bakers worldwide have incorporated this into various sweets, making genres like muffins irresistible and universal favorites.

    The incorporation of rich chocolate comes from American baking traditions, where chocolate chip muffins have been a staple. The idea of combining these flavors emphasizes how different cultures influence modern baking. The delightful blend seen in these muffins signifies how ingredients transcend borders, creating globally cherished treats. These muffins represent a beautiful confluence of culinary traditions and flavor innovations that have become widely adopted.

    Ingredient Deep Dive

    Chocolate Chunks: Known for intense flavor, chocolate is beloved in desserts. Opt for high-quality dark chocolate with a balance of sweet and bitter notes for maximum impact. Store in a cool, dry place to maintain freshness and consider chocolate chips as a simple substitute.

    Salted Caramel: Initially a French specialty, caramel gains complexity with added sea salt. It enhances the sweetness and adds a unique twist to classic recipes. Make in batches and store in airtight containers to prolong shelf life. Use store-bought versions for convenience, ensuring they’re of good quality.

    Common Mistakes to Avoid

    Overmixing the batter can lead to dense muffins rather than light and fluffy. Be gentle to ensure tenderness. Forgetting to line the muffin tin may cause the muffins to stick, making removal difficult or leading to crumbly results. Skimping on caramel drizzle can affect the sweetness and overall balance of flavors.

    Essential Techniques

    Mixing: Proper mixing ensures a uniform crumb. Focus on gently combining ingredients to maintain airiness. Avoid overworking the batter to reduce gluten formation.

    Pro Tips for Perfect Salted Caramel Chocolate Chunk Muffins

    Use room temperature ingredients for a smoother batter. Allow muffins to cool slightly before drizzling additional caramel on top.

    Variations and Adaptations

    Explore flavor additions such as nuts for extra texture or switch out chocolate for berries to change the profile slightly. Consider seasonal pumpkins in fall for a special twist.

    Serving and Presentation Guide

    Serve warm muffins to accentuate their gooey centers. Accompany with fresh fruits or whipped cream for an elevated presentation.

    Wine and Beverage Pairing

    Pair with a rich, dark roast coffee to enhance the chocolate notes or enjoy with a glass of milk for a classic pairing. A smooth dessert wine might also complement the caramel flavors.

    Storage and Shelf Life

    Store in an airtight container at room temperature for up to three days. Reheat briefly in the oven to refresh the texture.

    Make Ahead Strategies

    Prepare components like caramel in advance or freeze muffins for quick access later, allowing for convenient indulgence whenever desired.

    Scaling Instructions

    For smaller batches, half the ingredients, while doubling still yields successful results if you maintain baking times and temperatures consistently.

    Nutritional Deep Dive

    Each muffin offers a balance of carbohydrates and fats, with dark chocolate providing antioxidants. Moderation ensures enjoyment without excess.

    Dietary Adaptations

    Consider gluten-free flour blends for those with celiac concerns or dairy substitutes for caramel to adhere to a lactose-free diet.

    Troubleshooting Guide

    Ensure ingredients measurements are accurate to avoid imbalanced results. Sticky tops may need additional baking for the desired texture.

    Recipe Success Stories

    Bakers worldwide have celebrated the adaptability and crowd-pleasing nature of these muffins, often sharing their creative twists.

    Frequently Asked Questions

    How can I store leftovers? Keep in a sealed container.

    Can I replace caramel sauce with something else? Honey can be a delightful alternative.

    What’s the ideal muffin pan size? A standard 12-cup muffin pan works perfectly.

    Additional Resources

    Explore other muffin recipes and flavor combinations in our baking guide, offering insights into varieties of baking methods.

    Join the Conversation

    Share your delicious muffin creations on social media using #SaltedCaramelMuffin for a chance to be featured in our community stories.

    The Recipe

    Salted Caramel Chocolate Chunk Muffins

    Serves: 12 muffins

    Prep Time: 20 mins

    Cook Time: 25 mins

    Total Time: 45 mins

    Kitchen Equipment Needed
    – Muffin tin
    – Muffin liners
    – Whisk
    – Mixing bowls

    Ingredients
    – 1 cup all-purpose flour
    – 1 cup whole wheat flour
    – 1 tsp baking powder
    – 1/2 tsp baking soda
    – 1/2 tsp sea salt
    – 1/2 cup unsalted butter, melted
    – 1 cup sugar
    – 2 large eggs
    – 1 cup buttermilk
    – 2 tsp vanilla extract
    – 1 cup chocolate chunks
    – 1/2 cup salted caramel sauce

    Directions
    1. Preheat the oven to 350°F (175°C) and line a muffin tin with paper liners.
    2. In a bowl, mix the flours, baking powder, baking soda, and sea salt.
    3. In another bowl, whisk melted butter and sugar until well combined. Add eggs, one at a time.
    4. Stir in buttermilk and vanilla extract until the mixture is consistent.
    5. Gradually fold in dry ingredients, being careful not to overmix.
    6. Add chocolate chunks, gently folding to distribute evenly.
    7. Fill the muffin tin with batter, about 3/4 full, and drizzle a little caramel sauce on each muffin.
    8. Bake for 20-25 mins or until a toothpick comes out clean.
    9. Let the muffins cool slightly before drizzling more caramel on top.

    Recipe Notes
    – Substitute chocolate chunks with chips if needed.
    – For a richer caramel taste, add extra drizzle before serving.

    Irresistible Luscious Lemon Cream Cheese Muffins Recipe for Sweet Success

    Luscious Lemon Cream Cheese Muffins: A Zesty Delight to Brighten Your Day

    ⚖️
    Difficulty
    Easy

    ⏲️
    Prep Time
    15 mins

    🕒
    Cook Time
    25 mins

    ⏱️
    Total Time
    40 mins

    🍽️
    Servings
    12

    Embark on a culinary journey with these Luscious Lemon Cream Cheese Muffins, a perfect blend of tangy lemon and rich cream cheese that will leave you craving more. These muffins are an aromatic delight with their citrusy burst, making for an exquisite treat any time of the day. Whether you’re after a breakfast boost or a delightful afternoon snack, the combination of flavors and the creamy texture will surely captivate your senses.

    Their light, fluffy crumb mingled with a zesty lemon aroma fills your kitchen with sunshine and warmth. As you sink your teeth into the muffin’s velvety center, the contrast between the cream cheese filling and the lemony muffin base creates a symphony of irresistible flavors. With a preparation process that’s straightforward and rewarding, these muffins are also perfect for those who appreciate the art of quick baking delights.

    Quick Recipe Highlights

    • Flavor Profile: These muffins strike a balance between the tang of fresh lemons and the creaminess of cheese, offering a refreshing yet indulgent taste.
    • Texture: Expect a beautifully moist crumb with a creamy center that contrasts perfectly with the soft, tender outer layer.
    • Aroma: The muffins emit a captivating lemony aroma that wafts through your kitchen, creating an inviting atmosphere.
    • Visual Appeal: With a slightly golden exterior and cheerful lemon zest scattered on top, these muffins are a feast for the eyes.
    • Skill Level Needed: Perfect for beginner bakers, these muffins require basic mixing techniques and minimal kitchen equipment.
    • Special Equipment: You’ll need a muffin tin and liner, a whisk, and a zester to achieve the perfect lemon zing.

    Recipe Overview

    • Difficulty Level: These muffins are marked ‘easy’ due to their straightforward ingredients and simple method, allowing even novice bakers to create something delicious.
    • Category: Ideal as both a sweet breakfast option or an afternoon delight, they fit nicely into brunch menus or casual gatherings.
    • Cuisine: While rooted in cozy American baking traditions, the addition of lemon offers a touch of Mediterranean influence.
    • Cost: With accessible ingredients like cream cheese, flour, and lemons, this recipe is budget-friendly without compromising on taste.
    • Season: Best enjoyed in spring and summer when lemons are at their peak, infusing the muffins with natural brightness.
    • Occasion: Serve these at brunch parties, as a holiday treat, or anytime you want to impress without fuss.

    Why You’ll Love This Recipe


    The Luscious Lemon Cream Cheese Muffins are more than just a recipe; they are an experience of indulgence and simplicity. Taste these delightful treats and marvel at how the tartness of lemon effortlessly pairs with the rich undertones of cream cheese, creating a well-rounded flavor profile that both adults and children adore.

    Besides their delectable taste, these muffins are a breeze to make. With a total preparation time that may take under an hour, they fit well into busy schedules and spontaneous cravings. Their straightforward ingredient list makes them a convenient and appealing solution for last-minute baking sessions.

    Nutritionally, these muffins provide a perfect balance of carbs and fats, making them a reasonably guilt-free indulgence. The ingredient list is simple, ensuring you know exactly what goes into your delectable creation. These muffins serve as a sweet yet satisfying pick-me-up.

    When it comes to entertaining, these muffins are a crowd-pleaser. They are perfect for sharing at picnics, brunch gatherings, or as a delightful surprise for a friend. The versatility and widely appreciated flavors make them a must-have addition to your recipe repertoire.

    Finally, the cost-effectiveness and ease of sourcing ingredients mean you can indulge in these muffins without breaking the bank. They are an excellent choice for anyone looking to whip up something impressive yet affordable, applying flavors that are universally revered and accessible.

    Historical Background and Cultural Significance


    Muffins, as we know them today, have a rich history tracing back to 10th century Wales. Originally cooked over an open flame, modern muffins have evolved considerably and are now baked in ubiquitous forms across the Western world. Throughout history, lemons have also been highly prized, dating back to ancient Asia and later becoming popular in European cuisines for their fresh flavor.

    The cultural significance of lemon-infused baked goods emerged as lemons traveled from the Mediterranean to North America, where their bright flavor quickly caught on in a variety of desserts. The combination of cream cheese with lemon established these muffins as a staple in continental breakfast offerings, admired for their pleasing contrast and refined taste.

    From street vendor delicacies to coveted cafe treats, muffins have undergone an expansive evolution. Today, the Lemon Cream Cheese Muffin represents a confluence of historic baking traditions with contemporary flavor pairings, solidifying its place as a breakfast and tea time essential.

    Regional variations of lemon muffins exist, each reflecting its unique cultural context—for instance, incorporating poppy seeds in the United States or honey in the Mediterranean regions, showcasing the versatile nature of this beloved treat.

    Ingredient Deep Dive


    The main star—lemon—is cherished for its health benefits and rich vitamin C content. Originating from Asia, lemons have traveled extensively and have been adopted in culinary practices worldwide. When selecting lemons, look for ones with bright, smooth skin indicating freshness. Store in a cool, dry place or refrigerate for extended shelf life.

    Cream cheese, while providing a delectable texture, also bridges a cultural gap, beginning its commercial journey in America in the late 1800s. Its creamy consistency is key to the mouthfeel of the muffins. It is best stored in its original packaging in the refrigerator and should be brought to room temperature for easy incorporation into batters and fillings.

    Refined flour serves as the structure for the muffins but can be substituted with gluten-free alternatives for dietary needs. To maintain a light and airy crumb, sift flour before measuring. For a healthy twist, whole wheat flour can provide more fiber and nutrients, although it may slightly alter the texture.

    Sugar balances the tartness of lemons while ensuring a caramelized exterior on baking. Experiment with coconut sugar or honey as natural sweeteners. Brown sugar can be used for a deeper, molasses-like flavor, adding complexity to each bite.

    Common Mistakes to Avoid

    • Not using room-temperature cream cheese can cause lumps in your batter, so plan ahead and allow it to soften.
    • Overmixing the batter can result in dense muffins. Mix until just combined to maintain a tender crumb.
    • Using old baking powder may lead to flat muffins. Always check the expiration date and replace as needed.
    • Filling muffin cups to the brim can cause overflowing. Fill to about 2/3 full to give room for rising.
    • Skipping the lemon zest can leave the muffins with less burst of flavor. Always opt for fresh lemon for zesting.
    • Not preheating the oven can lead to uneven baking. Ensure your oven reaches the recommended temperature before baking.
    • Ignoring muffin liners can cause muffins to stick to the pan, making removal difficult.
    • Impatience in the cooling process affects muffin texture; allow them to cool slightly before serving.

    Essential Techniques


    Achieving the perfect balance of sweetness and tang requires careful attention to the incorporation of lemon zest. This technique ensures that the fresh citrus oils fully interact with the other ingredients, offering robust flavor without overpowering the palate.

    Mastering the creaming method is essential for creating light, airy muffins. This involves incorporating air into the mixture, ensuring that each component emulsifies properly to give the batter a seamless texture.

    Visual cues such as the “toothpick test” are indispensable; inserting a toothpick into the center of muffins should result in a clean extraction, indicating doneness. Always use this technique to ensure muffins are perfectly cooked through.

    Whipping cream cheese until smooth is crucial to avoid lumps. Proper consistency in the batter ensures an even rise and a satisfying, uniform texture in the final product.

    Pro Tips for Perfect Luscious Lemon Cream Cheese Muffins


    Enhance flavor by allowing grated lemon zest to sit in sugar for a few minutes, unlocking full aromatic potential. This “maceration” process intensifies the lemon essence throughout the batter.

    Pre-chill the cream cheese fillings for easy spooning and a centered filling within the muffins. This trick ensures professionally stuffed muffins every time.

    Experiment with half oat flour for a healthier alternative without sacrificing texture. Oat flour adds a subtle nuttiness while retaining lightness.

    Short on fresh lemons? Substitute with 100% pure lemon extract for a similar taste profile.

    Portable for picnics and lunches, these muffins retain flavor over time. Store wrapped individually or in airtight containers to maintain freshness.

    Using parchment paper liners can enhance non-stick properties, heightening the muffins’ professional appearance.

    Variations and Adaptations


    Embrace regional variations by incorporating poppy seeds for an added crunch and visual interest. This transformation keeps the essence but introduces a twist on the classic recipe.

    Make seasonal adaptations; adding cardamom during winter months provides warmth, while fresh berries in summer elevate brightness, providing a harmonious blend with the citrusy undertones.

    For dietary modifications, explore gluten-free baking mixes available in most grocery stores, keeping an eye on package instructions for successful swaps for a celiac-friendly option.

    Flavor variations abound with the addition of vanilla extract for a hint of sweetness, or almond essence for a subtle nutty aroma that complements the tang of the lemon.

    Incorporate texture modifications such as a crumb topping with brown sugar and nuts, introducing complexity and additional visual appeal.

    For a creative presentation, bake mini versions for adorable tea party treats. Alternatively, creating a giant single muffin cake allows for a show-stopping centerpiece.

    Serving and Presentation Guide


    Consider elegant plating by placing muffins atop serving platters with lemon slices or edible flowers for a burst of color and charm. This kind of presentation enhances the dining experience and adds a touch of sophistication.

    Explore garnishing ideas such as dusting with powdered sugar or drizzling with a light lemon glaze, offering visual allure and a touch of sweetness.

    Pair with traditional accompaniments like a dollop of whipped cream or clotted cream to serve reminiscent of a classic Cream Tea setup.

    For modern serving suggestions, try pairing with a cold brew coffee or a citrusy herbal tea, striking a balance between bold flavors and subtle undertones.

    Temperature considerations are key: baked goods continue cooking from residual heat, so allowing them to rest ensures even flavor distribution.

    Portion control tips ensure satisfaction without surplus: use approximately 1/4 cup of batter per muffin cup to maintain consistent size and shape for an attractive presentation.

    Wine and Beverage Pairing


    Pair the bright flavors of lemon muffins with a crisp, dry white wine such as Sauvignon Blanc or Pinot Grigio. These selections complement the fresh lemon notes while not overshadowing the delicate cream cheese filling.

    Consider non-alcoholic alternatives like a spritzer with sparkling water infused with lemon slices and fresh mint, refreshing the palate between bites.

    If evening calls for warmth, a rich black tea or robust coffee beautifully complements these citrus-laden desserts, balancing acidic notes.

    Temperature considerations are vital in pairing; chilled wines and spritzers counterbalance the muffins’ baked warmth, enhancing the overall dining pleasure.

    For serving suggestions, consider elegant glassware for beverages to match the sophistication of presentation, enhancing the sensory experience and enjoyment.

    Storage and Shelf Life


    To maintain freshness, muffins should be stored at room temperature in an airtight container for up to three days, allowing them to remain moist and flavorful.

    For optimal temperature control, wrap muffins individually in plastic wrap before refrigerating to prevent drying and maintaining taste integrity.

    Choose containers with sealed lids and moisture-lock bands to prolong freshness and ensure muffins don’t lose their signature flavors.

    Signs of spoilage include a hardened top, unusual discoloration, or off-putting aroma. Paying attention to these details helps keep your muffins at their best.

    Reheat muffins in a preheated oven at a low temperature, making them taste freshly baked every time. Avoid microwaving to prevent rubbery texture.

    Freezing guidelines suggest individually wrapping and securing in freezer bags, allowing easy single-portion thawing as desired, retenuating taste and moisture.

    Make Ahead Strategies


    Plan by preparing ingredients and cream cheese filling a day prior, offering an expedited assembly and baking process the following day.

    When storing between steps, refrigerate batter immediately to maintain leavening properties and ensure muffins rise beautifully during baking.

    Quality impact assessment includes checking mixing order; too much delay could risk the reaction of baking agents, affecting the muffins’ texture.

    For assembly tips, evenly divide cream cheese mixture for portions that have a consistent, indulgent center in each muffin.

    Guidelines for reheating maintain muffin quality—15 seconds on medium heat in the microwave revives its freshness without sacrificing texture.

    Include fresh elements like a dash of freshly grated lemon zest before serving, delivering a burst of invigorating citrus aroma and taste.

    Scaling Instructions


    When halving the recipe, use precise measurements for each ingredient to maintain proper balance and consistency in flavor and texture.

    For doubling or tripling, consider using larger equipment such as bigger mixing bowls to conveniently manage greater batter quantities.

    Adjust baking time by testing doneness earlier than usual, preventing overbaking when cooking larger batches that may require more time to set.

    Adapt storage considerations by using multiple airtight containers to prevent muffins from touching and absorbing each other’s moisture.

    Nutritional Deep Dive


    These muffins offer a satisfying blend of macronutrients with their balance of carbs and fats. The inclusion of lemons adds an extra dose of vitamin C, supporting immune health and wellness.

    Micronutrient analysis reveals notable concentrations of essential vitamins and minerals, notably calcium from the cream cheese and the fiber from whole wheat flour alternatives.

    Health benefits include supporting a balanced diet with moderate consumption, offering both indulgence and essential nutrients.

    Dietary considerations should take allergens into account, such as gluten and dairy, exploring suitable substitutions as necessary.

    Portion analysis focuses on recommended serving sizes, ensuring a satisfying indulgence without overconsumption.

    For those attentive to weight management, these muffins provide a wholesome alternative to richer dessert options, offering indulgence without excess.

    Dietary Adaptations


    For a gluten-free adaptation, replace all-purpose flour with a gluten-free blend designed for baking. This ensures the texture remains fluffy and light while adhering to dietary restrictions.

    Create a dairy-free version by replacing cream cheese with coconut yogurt or a similar non-dairy alternative, ensuring those with lactose intolerance can enjoy this treat hassle-free.

    Vegan adaptations incorporate plant-based cream cheese and a flaxseed “egg” to bring plant-loving individuals a muffin experience just as delectable as the original.

    Low-carb versions seek almond flour as a substitute for conventional flour, focusing on reducing carbs while increasing the nutty flavors that harmonize well with lemon.

    Keto enthusiasts can explore coconut flour as an option, paired with erythritol for unsweetened indulgence. Monitor proportions for the right texture.

    Paleo followers can adopt almond milk instead of cow’s milk, plus coconut sugar instead of refined sugars for a recipe more aligned with ancestral eating practices.

    For low-FODMAP considerations, use lactose-free cream cheese and gluten-free flours, maintaining digestive health requirements seamlessly integrated into the delicious treat.

    Troubleshooting Guide


    Texture issues may arise from overmixing; ensure gentle folding of ingredients to retain lightness and aeration, correcting density problems.

    For flavor balance, adjust sweetness by either reducing or increasing sugar based on personal preference, ensuring muffins suit all taste buds while maintaining original zest.

    Temperature problems stem from baking without a thermometer; invest in reliable oven thermometers to ensure accurate conditions and optimal muffin rising.

    Address equipment challenges by selecting non-stick muffin tins, avoiding mishaps with sticking and ensuring perfect muffin cups every time.

    Ingredient substitutions should factor possible flavor and texture differences, such as choosing coconut oil in place of butter, providing moisture without compromising flavor.

    Timing concerns arise when batter rests too long before baking; once mixed, promptly fill tins and bake for even rising and texture.

    Recipe Success Stories


    Readers have recreated our Luscious Lemon Cream Cheese Muffins on countless occasions, sharing fond memories of brunches, birthdays, and quiet Sunday mornings.

    Feedback regularly reflects satisfaction with the muffins’ delightful marriage of bright citrus and creamy filling, cultivating a community of enthusiastic bakers.

    Variation successes include delightful stories of blackberry additions or thyme-infused versions, illustrating the creativity and personalization our audience brings to their baking ventures.

    Adaptation stories celebrate gluten-free and vegan transformations, underscoring the versatility these muffins possess and the joy they bring to all dietary needs.

    Reader suggestions range from increasing lemon zest for bold flavor to innovative topping ideas, creating an engaging dialogue and exchange.

    Photography tips emphasize natural lighting and overhead angles for showcasing the vibrant yellow zest and clean muffin cuts, illustrating enticing visual representation.

    Frequently Asked Questions

    Can I use other citrus fruits instead of lemon? Yes, absolutely! Orange or lime can be used in place of lemon, giving distinct but equally delightful results.

    How should I store leftover muffins? Store in airtight containers at room temperature for up to three days or refrigerate for longer freshness.

    Is lemon zest necessary for this recipe? While optional, lemon zest amplifies flavor intensity and provides the quintessential lemon scent and taste.

    How can I make these muffins healthier? Reduce sugar or substitute with natural sweeteners like honey or agave syrup for a more health-conscious approach.

    What is the best way to ensure muffins don’t stick to the pan? Use non-stick muffin liners or spray the muffin tin liberally with baking spray to prevent sticking.

    Can I freeze the muffins? Yes, wrap individually before placing them in freeze-safe bags for easy grab-and-go options straight from the freezer.

    What if my muffins turn out dense? This could result from overmixing. Next time, gently fold wet ingredients into dry until just combined.

    How do I know when the muffins are done? When a toothpick inserted into the center comes out clean or with a few crumbs, they are properly baked.

    Can I add other spices to the batter? Certainly! Consider a pinch of nutmeg or cinnamon as subtle, warm accents to the flavor profile.

    What kind of muffin tin should I use? Tins with non-stick coating or silicone options both work well to avoid batter stickiness and ensure easy release.

    Are there vegan options for this recipe? Yes, vegan cream cheese and flax eggs can replace traditional ingredients, maintaining taste and texture.

    What makes these muffins stand out? The balance of zesty lemon with creamy cheese filling ensures a sophisticated, irresistible dessert every time.

    Additional Resources


    Discover related recipes such as Lemon Poppy Seed Bread or Lemon Cake Pops, diversifying your citrus-infused baking repertoire and delighting in related flavors.

    Technique guides such as proper zesting of lemons enhance culinary skills, focusing on maximizing the natural oils and impacting the overall flavor depth of your dishes.

    Gain further ingredient insights about complementary spices such as cardamom or ginger when paired alongside lemon for innovative, unexpected taste dynamics.

    Equip yourself with recommendations on essential bakeware like muffin tins, ensuring your kitchen is ready for adventure and experimentation, advancing skills proficiency.

    Seasonal variations insightful recipes like a Lemon Blueberry Muffin during peak harvest times, encouraging exploration according to fruit availability and peak ripeness.

    Join the Conversation


    Engage across social media platforms with your personal renditions of the Luscious Lemon Cream Cheese Muffins using #LemonCreamCheeseMuffins, sharing beauty and creativity.

    Photography tips elevate presentation by capturing the vibrancy of fresh ingredients and the richness of cream cheese swirls with various lighting and angle techniques.

    Encourage readers to review and provide feedback on the recipe, fostering enhanced community interaction, idea exchanges, and culinary inspiration contributions.

    Stimulate community engagement through polls or Q&As focusing on flavor modifications, encouraging collaborative gastronomy and sharing within an enthusiastic baking network.

    Share recipe variations at community gatherings or family meals, exploring collective creativity in capturing the essence of lemon-infused delight across different tastes.

    The Recipe

    Luscious Lemon Cream Cheese Muffins

    Serves: 12

    Prep Time: 15 mins

    Cook Time: 25 mins

    Total Time: 40 mins

    Kitchen Equipment Needed

    • Muffin Tin
    • Muffin Liners
    • Whisk
    • Zester
    • Mixing Bowls
    • Spatula

    Ingredients

    • 1 3/4 cups all-purpose flour
    • 1/2 cup granulated sugar
    • 2 teaspoons baking powder
    • 1/2 teaspoon salt
    • 1 cup milk
    • 1/3 cup vegetable oil
    • 1 egg
    • 1 tablespoon lemon zest
    • 4 oz cream cheese, softened
    • 1 tablespoon powdered sugar
    • 1 teaspoon vanilla extract

    Directions

    1. Preheat oven to 375°F (190°C) and line a muffin tin with paper liners.
    2. In a large bowl, whisk together flour, granulated sugar, baking powder, and salt.
    3. In another bowl, combine milk, oil, egg, and lemon zest. Mix well.
    4. Pour the wet ingredients into the dry ingredients and stir until just combined.
    5. In a small bowl, mix softened cream cheese, powdered sugar, and vanilla extract until smooth.
    6. Spoon the muffin batter into the liners, filling each 2/3 full.
    7. Add a dollop of the cream cheese mixture to each muffin cup.
    8. Bake in preheated oven for 20-25 minutes or until a toothpick inserted in the center comes out clean.
    9. Allow muffins to cool slightly before transferring to a wire rack to cool completely.

    Recipe Notes

    • Ensure cream cheese is at room temperature for easy mixing with sugar and vanilla.
    • Add 1 tablespoon of poppy seeds to the batter for an added crunch and visual appeal.
    • For extra lemon flavor, increase lemon zest to 1 1/2 tablespoons.

    Irresistible Pistachio Fudge Recipe for Nut Lovers Everywhere

    Pistachio Fudge 💚: Creamy, Nutty Delight

    ⚖️
    Difficulty
    Medium

    ⏲️
    Prep Time
    10 mins

    🕒
    Cook Time
    20 mins

    ⏱️
    Total Time
    30 mins

    🍽️
    Servings
    16 pieces

    Imagine indulging in a slice of decadence with this Pistachio Fudge 💚. Irresistibly creamy and featuring the delightful crunch of pistachios, this treat is perfect for those with a penchant for sweet, nutty flavors. Whether you’re looking to impress your guests or simply satisfy a sweet craving, this Pistachio Fudge promises to deliver an exquisite sensory experience.

    Start your culinary journey into the world of fudges with this rich and easy Pistachio Fudge recipe. Imagine the soft, luscious texture melting in your mouth, perfectly balanced with the subtle yet compelling crunch of pistachio bits. Engage your senses as the aroma of roasted pistachios wafts through your kitchen, teasing your tastebuds and drawing you closer to this delightful confection.

    This Pistachio Fudge recipe is not just about taste, but it’s also a feast for the eyes. The vibrant green hue of pistachios contrasts beautifully with the pale creaminess of the fudge, making it as visually appealing as it is delicious. Suitable for both novice and seasoned choco-enthusiasts, whipping up this fudge is easier than you think, requiring minimal equipment and expertise.

    Quick Recipe Highlights

    • Flavor Profile: The Pistachio Fudge offers a rich and creamy flavor balanced with the earthy, sweet nuttiness of pistachios.
    • Texture: This fudge is smooth and creamy with a delightful, crunchy contrast from the pistachios.
    • Aroma: Expect a subtle nutty aroma with hints of creaminess, making this a delight for the senses.
    • Visual Appeal: The creamy swirls paired with chopped pistachios create a stunning visual contrast that is both rustic and elegant.
    • Skill Level Needed: Perfect for beginner cooks, this recipe doesn’t require advanced techniques but achieves a professional finish.
    • Special Equipment: A saucepan and a square pan are all the special tools you’ll need for this delightful treat.

    Recipe Overview

    • Difficulty Level: The recipe’s medium difficulty level reflects its straightforward process, though it requires attention to detail when heating the fudge mix.
    • Category: Typically categorized as a dessert, this Pistachio Fudge is ideal for after-dinner indulgence or as a sweet afternoon snack.
    • Cuisine: While fudge is a popular American confection, the infusion of pistachios gives it a delightful twist, incorporating Mediterranean influences.
    • Cost: Pistachios can be pricy, but this dessert is cost-effective, requiring only small amounts for profound flavor.
    • Season: Best enjoyed in cooler months, but equally rewarding year-round for fudge lovers.
    • Occasion: Ideal for festive occasions such as holidays or celebrations, adding a luxurious touch to your dessert spreads.

    Why You’ll Love This Recipe

    Delve into the divine taste of Pistachio Fudge 💚 and savor the luxurious combination of soft fudge and crunchy nuts. The harmonious balance of creamy and nutty elements tantalizes your tastebuds, making each bite a memorable experience. Not only is it a delicious delight, but it’s also a timeless recipe that fits seamlessly into any dessert repertoire.

    Convenience is another reason you’ll adore this recipe. With a short prep and cook time, this Pistachio Fudge integrates seamlessly into busy schedules. The ingredients are simple yet impactful, allowing you to create a gourmet treat without excessive effort or expertise. Whip up this fudge for last-minute gatherings or to gift friends and family a homemade delight.

    Nutritionally, pistachios are a source of heart-healthy fats and a rich source of protein, making them a worthwhile addition to this sweet treat. While this isn’t a health-food recipe, the inclusion of nutritious pistachios adds a layer of guilt-free indulgence. Moderation is key, but there’s comfort in knowing your sweet treat offers some redeeming benefits.

    Socially, pistachio fudge makes for an excellent conversation starter. Its luxurious appearance and remarkable taste are bound to impress guests, making it a perfect addition to any party or social event. Indulge in entertaining friends and family with this irresistible fudge, or spark culinary curiosity by sharing your own variations.

    Cost-wise, pistachios might wear a slightly steeper price tag, but the minimal amounts required make this recipe budget-friendly. The presence of these premium nuts elevates the fudge without breaking the bank, delivering an impressive dessert experience on a dime. Whether you’re catering to a crowd or enjoying a moment to yourself, Pistachio Fudge is an investment in deliciousness that you won’t regret.

    Historical Background and Cultural Significance

    The origin story of fudge is shrouded in delightful uncertainty, believed to have been a sweet accident. Emerging during the late 19th century in America, fudge became a beloved confection, celebrated for its rich texture and versatility. Adding pistachios brings a fresh twist, infusing traditional recipes with a modern Mediterranean flair.

    Culturally, fudge has become a symbol of tradition and celebration, especially in the U.S. Associated with coastal towns and artisanal candy shops, it inspires nostalgia for generations. The addition of pistachios speaks to a growing culinary global awareness, showing how even traditional recipes evolve with newer influences.

    Over the years, the recipe for fudge has diversified, embracing various regional preferences. From chocolate to butter pecan, each version tells a part of fudge’s evolving narrative. The inclusion of pistachios adds to this story, enriching the flavor profile and representing international culinary unions of taste.

    Regional variations abound with fudge, with each locality boasting its specialty. While chocolate remains a mainstay, pistachios offer an exquisite variation, appealing to those who appreciate refined, sophisticated tastes. From coast to coast and beyond, pistachios add a welcome crunch and unmistakable flavor, enriching the narrative of fudge.

    Ingredient Deep Dive

    At the heart of this Pistachio Fudge 💚 recipe lie its key ingredients—the pistachios and the creamy fudge base. Historically, pistachios have graced tables in ancient civilizations, celebrated for their unique flavor and vibrant color. Used in a variety of dishes, pistachios have stood the test of time, heralded for their culinary and health benefits.

    Nutritionally, pistachios are a powerhouse. Rich in healthy fats, protein, and fiber, they provide a satisfying crunch and contribute a luscious, buttery taste. They pair wonderfully with the creamy fudge base, offering a balance of flavors that’s at once comforting and indulgent.

    When choosing pistachios, seek those that are fresh, vibrant, and have a distinct, nutty aroma. Proper storage is crucial; sealed containers in cool, dry places are ideal to preserve their distinct flavor and texture. While fresh is best, roasted pistachios can be an aromatic alternative, adding toasted notes to your fudge.

    If pistachios are out of reach, consider hazelnuts or almonds as substitutes. These nuts bring their character to the dish, yet still complement the creamy fudge. Storage is similar, keeping them away from light and moisture for optimal freshness. Substitutions open new avenues for flavor exploration, offering diversity in your dessert making.

    Common Mistakes to Avoid

    • Overcooking the fudge can lead to a grainy texture. Be mindful of cooking time and temperature.
    • Using stale pistachios can ruin the flavor. Always check freshness before use.
    • Not letting the fudge set properly before cutting can lead to uneven squares.
    • Skipping the greasing of the pan can cause sticking issues.
    • Underestimating the importance of measuring ingredients accurately can alter consistency.
    • Substituting with unsalted butter without adjusting the salt content can affect flavor balance.
    • Rushing the mixing step may result in a poorly integrated fudge.
    • Ignoring deviations in complexion; excessively dark fudge could be overcooked.
    • Leaving pistachios in large chunks instead of a more manageable size can cause uneven distribution.
    • Skipping cooling time to room temperature can lead to a premature soft fudge set.

    Essential Techniques

    Achieving the perfect consistency in fudge-making is pivotal and begins with mastering temperature control. Use a candy thermometer to monitor the cooking temperature precisely, avoiding overheating, which can crystallize sugar undesirably.

    Precision in cutting pistachios ensures their even distribution and enhances the fudge’s overall texture. Regularly blended sizes add varied crunch, and maintaining a constant knife or food processor technique is beneficial.

    Greasing and lining your pan is essential, preventing the fudge from sticking, which ensures smooth extraction and cutting. Non-stick parchment paper is a preferred lining choice for easy removal and quick clean-up.

    Combining ingredients requires patience as you achieve homogeneity for a smooth fudge texture. Stir consistently and meticulously, avoiding remaining streaks or clumps. Proper integration vouches for even cooking and a balanced flavor.

    Successful fudge demands attention to cooling techniques. Allocate time for proper cooling before cutting, facilitating optimal consistency and structure. This patience mitigates risks like breaking or soft sogginess, promoting a polished finish.

    Pro Tips for Perfect Pistachio Fudge

    Always toast your pistachios before incorporation to ramp up their flavor profile. Their enhanced aroma and slight crunch elevate the fudge exponentially.

    When melting chocolate for the fudge base, consider using a double boiler to oversee gradual melting. This method prevents scorching and ensures a perfectly smooth blend.

    Involve vanilla extract towards the end of the cooking process for richer aroma and amplified taste. Vanilla subtly complements pistachios and enriches the overall palate.

    Sprinkle flaky sea salt on your set fudge for a balanced, gourmet flair. This garnish highlights sweetness and nutty richness in every bite.

    To ensure even fudge cubes, use a sharp knife pre-dipped in hot water. Effortlessly slice through the cooled fudge, preventing breakage and achieving professional aesthetic.

    When storing your fudge, separate layers using parchment paper to avoid sticking. This maintains the fudge’s pristine condition, even during transport.

    Embrace patience with these techniques, and you’ll master the art of Pistachio Fudge creation, whether for personal enjoyment or shared delicacies.

    Variations and Adaptations

    Regional Variations: Travel the world through taste by incorporating spices like cardamom or saffron for a Middle Eastern flourish. These nuanced spices dance alongside pistachio, diversifying your fudge’s flavor.

    Seasonal Adaptations: Adjust ingredients with the seasons, such as adding cranberries in winter for tartness or citrus zest in summer for a refreshing lift.

    Dietary Modifications: Experience vegan delight by replacing dairy components with coconut-based alternatives. Almond milk or vegan butter proves beneficial to the fudge’s creamy constitution.

    Flavor Variations: Introduce complimentary flavors by infusing your fudge with essences of rose or orange blossom. These elements harmonize with the nuttiness, introducing tantalizing dimensions.

    Texture Modifications: If chunkiness is favored, keep pistachios whole or halve. For smoother blends, pulse nuts in a processor to fine consistency before incorporation.

    Presentation Alternatives: Embrace creativity in presentation, such as shaping your fudge into logs, slabs, or individual pieces in silicone molds, offering a modern twist on traditional serving.

    Serving and Presentation Guide

    Plating Techniques: Elevate fudge’s presentation by serving on elegant dessert stands or chic platters, accentuating its visual allure.

    Garnishing Ideas: Top off with additional chopped pistachios, edible floral petals, or dustings of confectioner’s sugar for aesthetic enhancement.

    Traditional Accompaniments: Pair with berries or fresh fruit compotes as a refreshing counterpoint and enriched flavor profile.

    Modern Serving Suggestions: Try fudge skewers as novel party fare or individually wrap pieces for a thoughtful takeaway treat.

    Temperature Considerations: Ensure fudge is served at room temperature for ideal consistency and texture exposure.

    Portion Control Tips: Pre-cut into squares to maintain uniform servings, ensuring an even distribution across gatherings or events.

    Wine and Beverage Pairing

    Wine Pairings: Complement with late-harvest Reisling or sherry, whose fruity notes and balanced sweetness enhance the fudge’s nutty essence.

    Non-alcoholic Alternatives: Experience pistachio fudge alongside a rich, spiced chai tea, harmoniously merging nuttiness and spice.

    Coffee/Tea Pairings: Opt for espresso with robust characteristics that balance the fudge’s richness and enhance its flavors.

    Temperature Considerations: Offer beverages slightly chilled or warmed, supporting fudge’s texture and presenting a cohesive culinary narrative.

    Serving Suggestions: Display drinks and fudge together in beautifully cohesive setups, inviting guests into an immersive taste experience.

    Storage and Shelf Life

    Storage Methods: Securely sealed containers prevent moisture onslaughts, ensuring fudge remains fresh and avoids spoilage.

    Temperature Requirements: A cool, dry storage area is sufficient, while refrigeration is advisable for extended longevity.

    Container Recommendations: Glass or airtight plastic, lined with parchment, offers protection and neat stackability in fridges or cupboards.

    Signs of Spoilage: Monitor for color shift, any off-odors, or sugar crystallization, retiring outdated fudge.

    Reheating Instructions: Embark on gentle reheating phases in microwaves or ovens with low power settings, if needed, to refresh texture.

    Freezing Guidelines: Fudge accommodates freezing well, separating pieces by wax paper layers to maintain quality upon thawing.

    Make Ahead Strategies

    Prep Timeline: Craft your fudge a day or two before to alleviate stress during event preparations, ensuring freshness remains.

    Storage Between Steps: Store cooled fudge blocks in an airtight place, preserving aroma and taste over storage intervals.

    Quality Impact Assessment: Flavor maturation over a day enhances depth, with pistachio oils infusing further into the fudge profile.

    Assembly Tips: Assemble fully before serving, ensuring optimum presentation and integral taste consistency.

    Reheating Guidelines: Retrieve from refrigeration before serving; room temperature yields best texture and flavor continuity.

    Fresh Element Additions: Add any fresh garnishes short-term, maintaining vibrancy alongside the fresh presentation.

    Scaling Instructions

    Halving the Recipe: Reduce ingredients by exact half measures for smaller gatherings, maintaining proportional calculations.

    Doubling or Tripling: Increase the batch prudently, considering whether your existing equipment can accommodate larger volumes.

    Equipment Adjustments: Utilize larger pans or prep additional batches to avoid compromising fudge’s uniform cook.

    Timing Modifications: Adjust cooking and cooling durations according to volume increments, ensuring consistent results.

    Storage Considerations: Scale storage solutions per yield, employing additional containers as necessary for expended batches.

    Nutritional Deep Dive

    Macro Breakdown: Enjoy a balance of fats, proteins, and carbohydrates, present through pistachios and polished fudge elements.

    Micronutrient Analysis: Pistachios introduce beneficial micronutrients, such as potassium and vitamin B6, complementing the fudge.

    Health Benefits: Embrace the whip of pistachios’ nutrients through every savory bite, alongside fudge luxury indulgence.

    Dietary Considerations: While decadent, moderation ensures fudge consumption aligns compatibly with varied dietary regimes.

    Portion Analysis: Observe portion sizes to accommodate against diet targets and recommendations, mindful of decadent calorie content.

    Weight Management Tips: Personal discretion and balanced indulgence keep weight management goals front and center, ensuring competitive diet adherence.

    Dietary Adaptations

    Gluten-Free: Utilize gluten-free chocolate and ensure substitutive ingredients comply for a seamless gluten-free delight.

    Dairy-Free: Replace traditional dairy options with almond or oat milk alternatives for equal creaminess sans dairy.

    Vegan: Opt for plant substitutes within fudge components, embracing vegan butter and sugars for perfect imitation.

    Low-Carb: Explore sweetener alternatives for the fudge base to complement ketogenic or low-carb diets without compromise.

    Keto: Adapt recipe through high-fat, low-carb sweeteners and adjustments, achieving ketogenic sweetness with pancacity.

    Paleo: Keep to natural sweeteners; consider honey or maple varieties, while ensuring pistachio compliance within a paleo theme.

    Low-FODMAP: Remain selective with added elements, keeping base ingredients fundamental and apt for those observing low-FODMAP diets.

    Troubleshooting Guide

    Texture Issues: Investigate ingredients’ measurements and preparation processes if fudge exhibits crumbliness or vagueness.

    Flavor Balance: Reassess sweeteners and salt usage within recipes, calibrating additive influence over pistachio dominance.

    Temperature Problems: Remain vigilant with thermometer use, avoiding excessive or low temperatures that undermine integrity.

    Equipment Challenges: Evaluate pot or pan selections, striving for adequate volume mixing and adherence with tool recommendations.

    Ingredient Substitutions: Double-check substitutive semantics to align new adaptations against traditional flavor preservation.

    Timing Concerns: Precise attention to cooking times and methodology alleviates premature or delayed fudgest formations.

    Recipe Success Stories

    Community Feedback: Our readers laud the Pistachio Fudge for its perfect balance of creamy sweetness and nutty crunch, praising its nostalgic flavors and beautiful presentation.

    Variation Successes: Many have successfully added a touch of citrus, like orange zest, elevating this treat to culinary excellence.

    Adaptation Stories: Vegan friends have triumphantly swapped standard ingredients with vegan alternatives, reporting delightful results that maintain fudgy appeal.

    Reader Suggestions: We encourage sharing your creative adaptations for seasonal changes, with cranberry or pumpkin infusions welcomed happily.

    Photography Tips: Style your fudge’s natural beauty with contrasting backgrounds and daytime lighting, capturing its enchanting charm effortlessly.

    Frequently Asked Questions

    What type of chocolate works best for this fudge?

    Using a good-quality white or milk chocolate will yield the creamiest results and amplify the nuts’ texture contrast.

    Can I use salted pistachios?

    While possible, it may alter the sweetness balance. Adjust the fudge’s additional salt content if opting for salted pistachios.

    Is there an alternative to using a candy thermometer?

    While possible, a candy thermometer ensures precision. Explore the cold water method, but results may vary.

    Can I replace pistachios with another nut?

    Yes, almonds or hazelnuts present great alternatives. Their flavor pairs well with the fudge’s creamy qualities.

    How long does the fudge last?

    Stored properly, fudge stays fresh for up to two weeks. Extend its shelf life through refrigeration and airtight containment.

    Can this recipe be made ahead of time?

    Absolutely. Preparing a day or more before serving can enhance the flavor depth and pistachio infusion.

    What happens if I overcook the fudge?

    Overcooking risks crystalizing sugars, resulting in a gritty texture. Precise monitoring avoids this mishap, ensuring creamy outcomes.

    Is a double boiler necessary?

    It’s recommended but not essential. A sturdy saucepan and low heat supervision often suffice for proper chocolate melting.

    Can I freeze the fudge?

    Fudge accommodates freezing well. Individual wrap portions or separate with parchment to preserve quality during thawing.

    What should I do if my fudge is too soft?

    Ensure adequate cooling before cutting. If under-set, return to cooling stages and liberate from temperature inconsistencies.

    Additional Resources

    Explore more dive into related recipes with chocolate variations or nut array integrations, offering similar richness with contrasting angles.

    Technique guides elaborating on finesse fudging or precise chocolate melting bear merit for connoisseurs pursuing expertise.

    Ingredient information spotlights pistachio origins, nutritional analyses, and global cultivation insights for enriched awareness.

    Equipment recommendations showcase preferred kitchen tools, aligning their functional use with exquisite confections and assembly leadership.

    Seasonal variations contribute to continual experience development, driving inclusive creativity in aligning ingredients with yearly cycles.

    Join the Conversation

    Share your own experiences and variations of this Pistachio Fudge on social media, tagging our community to connect with fellow culinary enthusiasts.

    Impress your audience by incorporating our photography tips, highlighting the visual allure of your creation and drawing engagement from like-minded tastes.

    Submit your recipe reviews and feedback, offering input that shapes future culinary experiences and encourages community recommendations.

    Engage with our community in celebrating the diverse approaches to Pistachio Fudge, discovering and sharing inspirations that add flavor flourishes.

    Experiment with adaptations and connect with others who embrace culinary creativity, discovering new explorations grounded within Pistachio Fudge foundations.

    The Recipe

    Pistachio Fudge 💚

    Serves: 16 pieces

    Prep Time: 10 mins

    Cook Time: 20 mins

    Total Time: 30 mins

    Kitchen Equipment Needed

    • Saucepan
    • Square baking pan (8×8 inches preferred)
    • Spatula
    • Knife
    • Parchment paper

    Ingredients

    • 2 cups white chocolate chips
    • 1 can (14 oz) sweetened condensed milk
    • 1 tsp vanilla extract
    • 1 cup chopped pistachios
    • A pinch of salt

    Directions

    1. Line an 8×8 inch baking pan with parchment paper, leaving some overhang for easy fudge removal.
    2. In a saucepan over low heat, combine the white chocolate chips and sweetened condensed milk. Stir constantly until completely melted and combined.
    3. Remove from heat and mix in the vanilla extract and salt until evenly distributed.
    4. Fold in the chopped pistachios, reserving some for garnish if desired.
    5. Pour the mixture into the prepared pan, spreading evenly with a spatula.
    6. Sprinkle the reserved pistachios over the top, gently pressing them into the surface.
    7. Allow the fudge to set at room temperature, or refrigerate for quicker setting, for about 2 hours or until firm.
    8. Once set, use parchment overhang to lift the fudge out of the pan and cut into squares.

    Recipe Notes

    • For a festive touch, consider adding a dash of food coloring to personalize your fudge’s appearance.
    • Store leftover fudge in an airtight container at room temperature or refrigerate for extended freshness.
    • Feel free to experiment with other flavored extracts, such as almond or rose, to create unique taste profiles.