Irresistible White Chocolate Raspberry Cheesecake Balls for Dessert Lovers

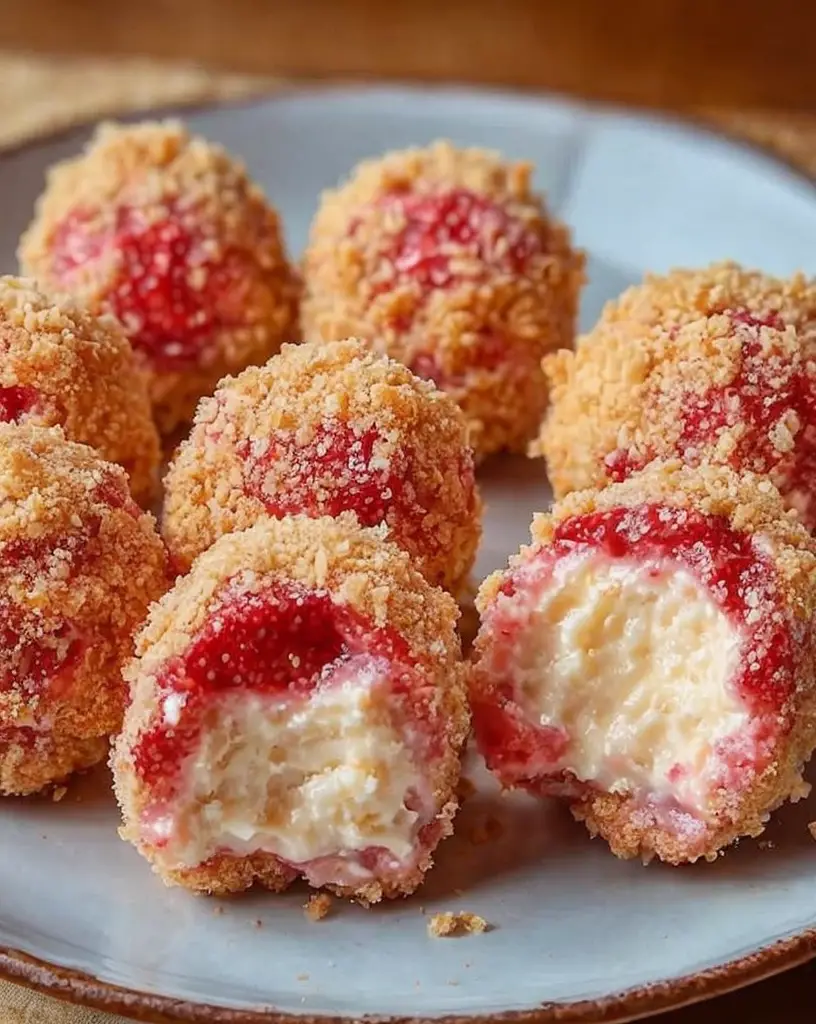
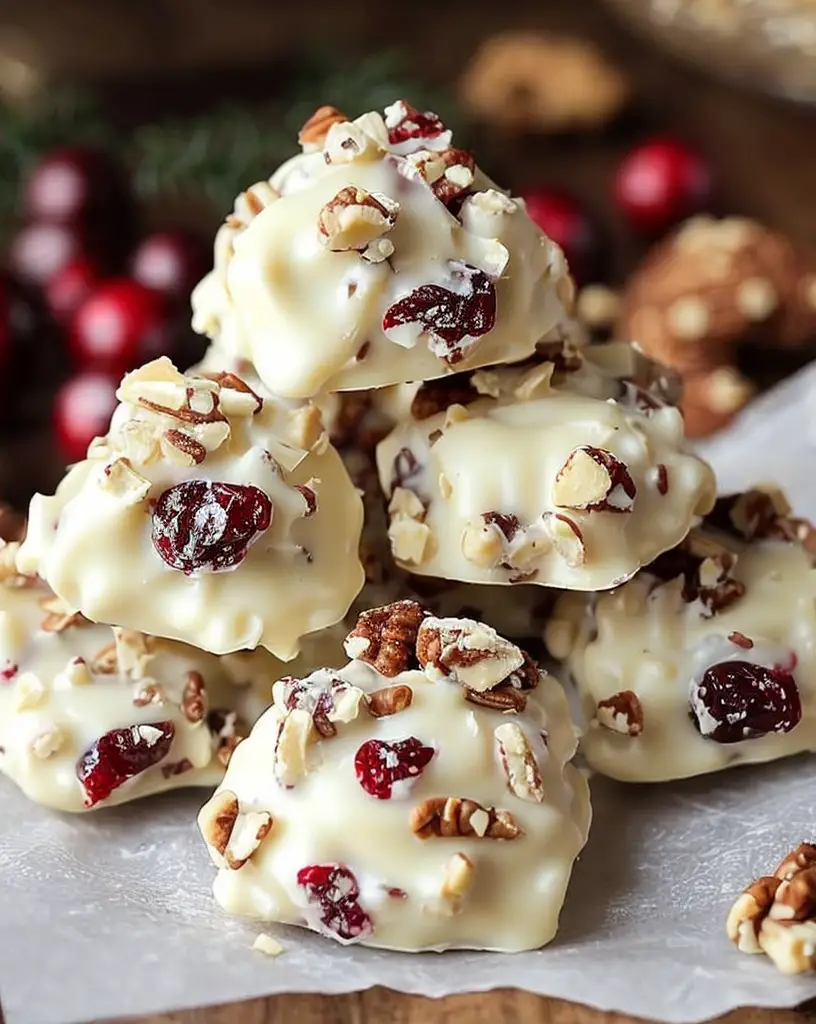
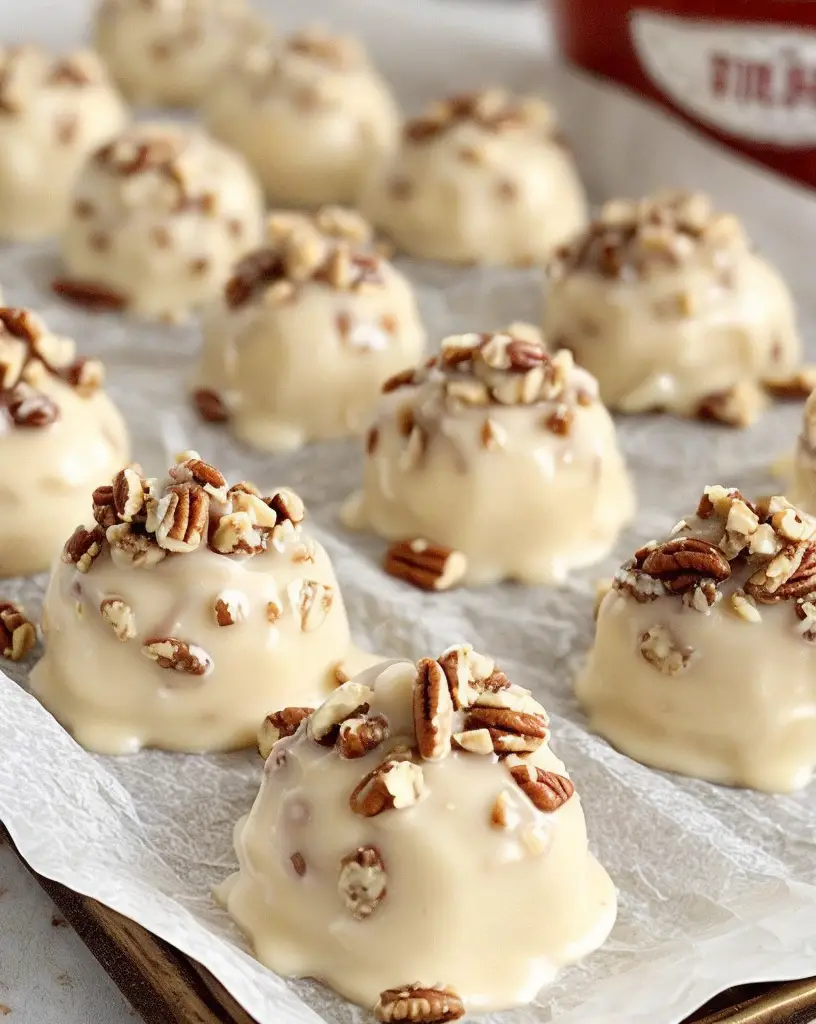
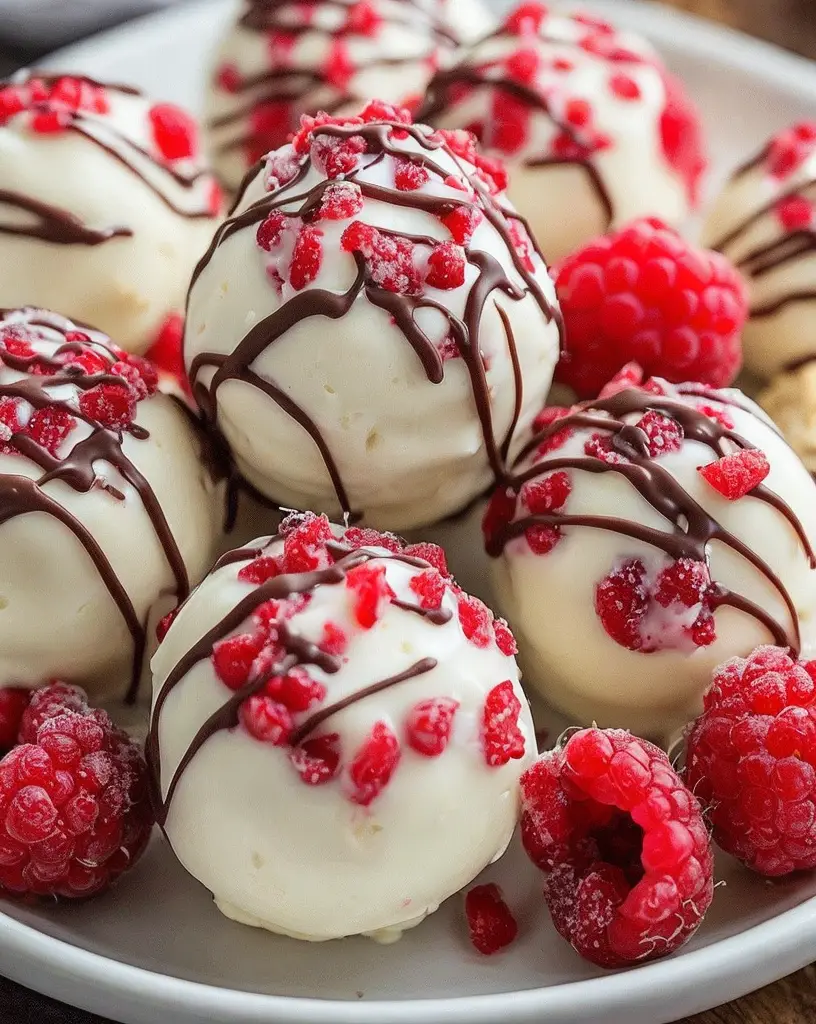
White Chocolate Raspberry Cheesecake Balls: Irresistible Dessert Delight

⚖️
Difficulty
Easy

⏲️
Prep Time
20 mins

🕒
Cook Time
5 mins

⏱️
Total Time
25 mins

🍽️
Servings
12

Imagine indulging in the blissful combination of creamy white chocolate and tart raspberries, all wrapped in a luscious cheesecake ball. These decadent White Chocolate Raspberry Cheesecake Balls are a dessert dream with a velvety texture that melts in your mouth, leaving behind a medley of flavors that dance on your taste buds. Whether you’re a fan of quick desserts or cherishing an evening of baking treats, this recipe stands as a beacon of delightful indulgence.

Beneath the surface of their gorgeous exterior, these cheesecake bites conceal a core of sweetness and tang, perfectly balanced to satisfy your dessert cravings. Encased in a delicate white chocolate shell that adds a satisfying snap, these balls offer an enchanting visual and gustatory presentation. Their vibrant colors and rich flavors make them ideal for special occasions, gatherings, or a quiet night at home.

Quick Recipe Highlights

  • Flavor Profile: The sweet, creamy white chocolate perfectly complements the tart raspberry, creating a delightful balance.
  • Texture: These cheesecake balls boast a smooth, creamy interior encased in a crisp white chocolate shell.
  • Aroma: You’ll be greeted with the sweet scents of white chocolate and subtle hints of fresh raspberries.
  • Visual Appeal: The contrast of white chocolate and deep red raspberry create a visually stunning treat.
  • Skill Level Needed: Simplistic enough for beginners, yet impressive enough for seasoned bakers.
  • Special Equipment: A hand mixer or blender is helpful for achieving a smooth cheesecake filling.

Recipe Overview

  • Difficulty Level: Categorized as easy, this recipe requires basic mixing and rolling skills, ideal for newcomers to culinary delights.
  • Category: A versatile dessert, perfect for snack time cravings or after-dinner delights.
  • Cuisine: Rooted in modern dessert trends while appreciating classic flavor pairings.
  • Cost: Economical, using accessible ingredients available in most grocery stores, keeping dessert costs low.
  • Season: Best enjoyed in the spring and summer when raspberries are at peak freshness for enhanced flavor.
  • Occasion: Suitable for parties, holidays, or a simple treat, these balls add a sweet touch to any event.

Why You’ll Love This Recipe


These White Chocolate Raspberry Cheesecake Balls captivate with their exquisite taste and texture. Each bite offers a delightful contrast between smooth, tangy cheesecake filling and a crunchy, sweet chocolate coating. This recipe provides an excellent opportunity for creative dessert making that doesn’t sacrifice convenience or time. With just a few simple steps, anyone can achieve dessert perfection.

Beyond their delightful taste, these treats are conveniently easy to make, requiring minimal equipment and simple ingredients. They promise maximum flavor with minimal effort, making them an ideal choice for spontaneous dessert creations. For those mindful of nutritional benefits, raspberries provide a source of fiber, vitamins, and antioxidants, contributing to a guilt-free indulgence.

Social occasions benefit significantly from these irresistible cheesecake balls. Their elegant appearance and rich flavors make them a party favorite, ensuring admiration and compliments from family and friends. The recipe’s cost-effectiveness ensures accessibility, offering a gourmet feel without the associated price tag.

Historical Background and Cultural Significance


White chocolate and raspberry have long been cherished as a classic combination in the dessert world. The pairing evokes a sense of sophistication, with raspberry’s history tracing back to ancient cultivation in Europe. It holds cultural importance as a symbol of purity and invisibility in folklore, often used in culinary traditions to add a dash of vibrancy and tartness to sweet dishes.

The evolution of the cheesecake ball itself is a modern twist on traditional cheesecake, transforming it into a more portable, bite-sized form that aligns with today’s culinary trends focusing on practical, stylish treats. The melding of these ingredients reflects a fusion of old and new, marrying historical flavors with innovative presentation methods.

Ingredient Deep Dive


White chocolate’s origins trace back to the 1930s, introduced by Nestlé. An adaptation of milk chocolate, it lacks cocoa solids and offers a sweet, creamy experience, providing a smooth, melt-in-your-mouth delight. Selecting high-quality white chocolate ensures a creamy texture without graininess for these cheesecake balls. Store it in a cool, dry place to prevent melting or blooming.

Raspberries, native to Europe, offer rich cultural and nutritional benefits, thriving in regions with cool summers. Known for their high fiber, vitamin C, and antioxidant content, they contribute tanginess and natural sweetness to the cheesecake filling. Choose firm, fragrant raspberries and store them in the refrigerator to maintain freshness before use.

Common Mistakes to Avoid

  • Overmixing the cheesecake filling can lead to a runny texture; mix just until smooth and combined.
  • Not chilling the balls enough before coating in chocolate can result in a mess; ensure they are firm before dipping.
  • Using low-quality white chocolate can affect both taste and texture; opt for high-quality brands for the best results.
  • Failing to dry raspberries properly can add excess moisture to the filling; gently pat them dry before use.
  • Overheating white chocolate can cause it to seize; melt gently over low heat or use a double boiler.
  • Not allowing chocolate coating to set can cause smearing; place coated balls in the fridge to firm up.
  • Using overly ripe raspberries can lead to a mushy filling; select firm, fresh fruit.
  • Skipping the lining of the baking tray can result in sticky balls; always use parchment paper.

Essential Techniques


Achieving the perfect chai latte requires mastering the steaming of milk to a velvety consistency. The key is to heat the milk to just the right temperature—around 150°F—to enhance sweetness while creating a luscious foam. Avoid overheating, which can scorch the milk and affect taste. When steaming, position the steam wand just below the milk’s surface for optimal texture and microfoam, crucial for the creamy chai latte experience.

Creating white chocolate raspberry cheesecake balls involves key techniques. Properly melting the white chocolate is crucial; gently heat it over a double boiler or microwave in short intervals, stirring frequently to avoid burning. Correctly freezing the cheesecake balls before dipping ensures the chocolate adheres smoothly. This step prevents mess and guarantees a hard, even coating, essential for the perfect texture balance.

Pro Tips for Perfect White Chocolate Raspberry Cheesecake Balls


Ensure berries are thoroughly dried to prevent unwanted moisture in the filling, affecting both taste and texture. While melting chocolate, add a small amount of coconut oil to achieve a smoother, shinier coating once set. Use a toothpick or fork for easy dipping, allowing excess chocolate to drip off before placing them on parchment to minimize pooling.

Variations and Adaptations


Experiment with regional variations by substituting the raspberries for other berries such as strawberries or blueberries, which offer a slightly different tart-sweet experience. For seasonal adaptations, incorporate cinnamon or nutmeg during fall to add warmth. Adapting for dietary needs, such as using dairy-free cream cheese and coconut cream, can create a vegan-friendly version without sacrificing richness.

Serving and Presentation Guide


For an elegant display, arrange the cheesecake balls on a tiered cake stand lined with parchment paper, garnished with fresh mint leaves or a light dusting of powdered sugar. Modern serving suggestions include alternating colors on skewers for a unique dessert kebab. Pay attention to portion control by placing individual balls in mini cupcake liners for bite-sized perfection.

Wine and Beverage Pairing


Enhance your dessert experience by pairing these cheesecake balls with a glass of sparkling rosé, which complements the tart raspberry and creamy white chocolate. For a non-alcoholic alternative, try a light berry-infused iced tea, adding herbal notes to the sweet treat. Hot beverages like a classic Earl Grey tea can also pair beautifully with this dessert, offering a warming complement to the treat’s flavors.

Storage and Shelf Life


To store these treats, place them in an airtight container and refrigerate for up to 5 days. Ensure they are kept in a single layer to prevent sticking. Freezing is also an option; lay them on a baking tray until fully frozen, then transfer to zip-lock bags. Allow the cheesecake balls to thaw in the fridge before serving to maintain their creamy texture.

Make Ahead Strategies


This recipe is perfect for make-ahead preparation. Roll and pre-chill the cheesecake balls a day before, storing them in airtight containers before dipping in chocolate. This method ensures freshness and allows chocolate to adhere seamlessly when you’re ready to serve. Add a fresh garnish just before presenting them for optimal visual and flavor appeal.

Scaling Instructions


For larger gatherings, double or triple the recipe by ensuring additional preparation and storage space. Adjust the amount of chocolate and raspberries proportionally to maintain quality. If scaling down, reduce ingredient quantities while maintaining the same ratios to ensure consistency in texture and flavor.

Nutritional Deep Dive


These cheesecake balls offer a balance of macronutrients, with cream cheese providing a source of fat and protein, complemented by the antioxidants and fiber found in raspberries. Consider portion control to manage caloric intake, particularly for those mindful of dietary goals. Analyze ingredient labels for specific nutritional details, sharing any allergen information with guests.

Dietary Adaptations


Catering to dietary needs, these balls can be made gluten-free by using gluten-free graham cracker crumbs. For a vegan adaption, replace the cream cheese with vegan cream cheese alternatives and use dairy-free white chocolate to maintain a similar texture and flavor profile. Incorporating such changes ensures inclusivity without compromising on taste.

Troubleshooting Guide


For issues with texture, ensure cream cheese is softened properly for smooth mixing. If flavor balance is off, consider adding a touch more vanilla or a hint of lemon zest. Equipment challenges, such as overmixing with a powerful mixer, can be resolved by mixing just until combined. Address ingredient substitutions by choosing high-quality alternatives that closely mimic original components.

Recipe Success Stories


Many have shared their success with these cheesecake balls, often experimenting with additional ingredients like crushed pistachios for a nutty crunch or swapping raspberries for blackberries for an intriguing twist. Community feedback consistently highlights the balance of sweet and tart as a significant crowd-pleaser, and readers often note the ease and enjoyment of the preparation process.

Frequently Asked Questions

Q: Can these cheesecake balls be frozen?
A: Yes, they can be frozen. Place them on a tray until fully frozen, then store in a zip-lock bag. Thaw in the refrigerator before serving.

Q: What if I can’t find fresh raspberries?
A: Frozen raspberries can be used; simply thaw and pat them dry before incorporating into the recipe.

Q: Can I use milk chocolate instead of white chocolate?
A: Absolutely, using milk chocolate will give a richer taste, though it may slightly overshadow the raspberry notes.

Q: How do I prevent the balls from sticking together?
A: Ensure chocolate coating is completely set and store in single layers separated by parchment paper.

Q: How long do they last at room temperature?
A: They should be refrigerated if not consumed within 2 hours, as cream cheese requires cooler temperatures to prevent spoilage.

Q: Can I make this dairy-free?
A: Yes, use a dairy-free cream cheese substitute and coconut cream for the filling, along with a dairy-free white chocolate.

Additional Resources


Explore related recipes like our raspberry cheesecake bars or white chocolate mousse for variations in presentation and texture. Delve into technique guides on perfecting white chocolate melting and cheesecake filling consistency for a professional touch. Discover a variety of ingredient information and equipment recommendations to ease your culinary journey.

Join the Conversation


We’d love to see your culinary creations! Share your White Chocolate Raspberry Cheesecake Balls photos and experiences on social media using #RaspberryCheesecakeDelight. Leave a review or join our community discussions for further recipe variations and adaptations. Your feedback enhances our recipe with personal touches and new ideas.

The Recipe

White Chocolate Raspberry Cheesecake Balls

Serves: 12

Prep Time: 20 mins

Cook Time: 5 mins

Total Time: 25 mins

Kitchen Equipment Needed

  • Mixing bowls
  • Hand mixer or stand mixer
  • Baking sheet
  • Parchment paper
  • Microwave-safe bowl
  • Spatula

Ingredients

  • 1 cup white chocolate chips
  • 1/2 cup crushed graham crackers
  • 8 oz cream cheese, softened
  • 1/4 cup powdered sugar
  • 1 tsp vanilla extract
  • 1 cup fresh raspberries, mashed

Directions

  1. Line a baking sheet with parchment paper and set aside.
  2. In a mixing bowl, beat the softened cream cheese until smooth. Add powdered sugar and vanilla extract, mixing well.
  3. Fold in the crushed graham crackers and mashed raspberries, ensuring they are evenly combined.
  4. Roll mixture into 1-inch balls and place them on the prepared baking sheet. Freeze for 15 minutes.
  5. Melt the white chocolate chips in a microwave-safe bowl, heating in 30-second intervals and stirring until smooth.
  6. Dip the chilled cheesecake balls in melted white chocolate, ensuring they are fully coated.
  7. Place the coated balls back on the baking sheet and refrigerate until the chocolate is set.
  8. Serve chilled and enjoy!

Recipe Notes

  • Consider adding a teaspoon of lemon zest for an extra tangy flavor twist.
  • Substitute raspberries with blueberries or strawberries for variations in taste and color.

Irresistible Strawberry Cheesecake Crunch Bites Recipe for Dessert Lovers

Strawberry Cheesecake Crunch Bites: Delightful Mini Treats

⚖️
Difficulty
Easy

⏲️
Prep Time
15 mins

🕒
Cook Time
5 mins

⏱️
Total Time
20 mins

🍽️
Servings
24 bites

Indulge in the mouthwatering world of miniature desserts with our Strawberry Cheesecake Crunch Bites. These delightful, poppable treats blend the creamy richness of cheesecake with the fresh, tangy burst of strawberry, all encased in a satisfying crunch. Perfect for parties or a sweet snack, these bites offer a symphony of flavors and textures that are as easy to make as they are to eat.

Imagine biting into a luscious combination of velvety cheese paired with a fruity punch of strawberry; it’s a taste that leaves a lingering desire for more. These Strawberry Cheesecake Crunch Bites are crafted to lure dessert lovers with their delicate balance, making them an irresistible crowd favorite. Each bite presents a sweet symphony that dances on your palate, inviting joy and satisfaction.

Perfect for picnics and family gatherings, these cheesecake crunch bites are not just delicious but also visually captivating. With their ruby-red strawberry topping and golden crunchy base, they bring color and zest to any dessert spread.

Quick Recipe Highlights

  • Flavor Profile: A delightful blend of sweet and tart fruitiness combined with creamy undertones, balancing perfectly between the vibrant strawberries and smooth cheesecake filling.
  • Texture: Offers a luxurious combination of creamy filling juxtaposed with the crispiness of a crumbly crust.
  • Aroma: Inviting hints of strawberry that mingle with the subtle richness of cream cheese, creating a nose-pleasing experience.
  • Visual Appeal: Bright red strawberry accents atop a creamy white base, encased in a golden crust, creating a stunning tabletop presentation.
  • Skill Level Needed: Simple enough for beginners, requiring basic mixing and layering techniques that are easy to follow.
  • Special Equipment: A mini muffin pan is recommended to shape the bites perfectly, along with a mixer for blending cream cheese and sugar smoothly.

Recipe Overview

  • Difficulty Level: Chosen to be easy, this recipe is accessible to novice bakers and children, allowing everyone to enjoy the creation process.
  • Category: Perfect under desserts, you’ll swoon over these quick bites in parties or as after-dinner treats.
  • Cuisine: A fusion of classic American dessert heritage with contemporary twist of bite-sized indulgence.
  • Cost: Affordable to make, these treats utilize common household ingredients, approximately costing under $10 for two dozen.
  • Season: Best enjoyed when strawberries are in season for the freshest flavor, typically spring and summer.
  • Occasion: Suitable for birthdays, potlucks, and bridal showers, these bites are versatile, adding charm to various gatherings.

Why You’ll Love This Recipe


The Strawberry Cheesecake Crunch Bites are loved not only for their delectable flavor and texture but also for their sheer convenience. Quickly made within 20 minutes, they allow you more time to enjoy with family and friends rather than spending long hours in the kitchen. The creamy and fruity elements ensure a satisfying taste that resonates with both adults and children alike, promising a hit at any kind of gathering.

These thoughtful bites are relatively healthy, using a balance of cream cheese and fresh fruits, providing essential nutrients in a dessert form. Indulge guilt-free, knowing each piece is crafted with wholesome ingredients. Additionally, the compact size makes portion control straightforward, offering a treat without the temptation of over-indulgence.

Turn any event into a celebratory affair when you serve these bite-sized wonders. Their ornate presentation adds a festive air to any table, turning casual gatherings into memorable occasions. The brilliance in design and taste encourages compliments and conversations, making these bites a social delight.

Sourcing ingredients for this recipe is effortless, with strawberries and cream cheese widely available year-round. This makes the Strawberry Cheesecake Crunch Bites an accessible and cost-effective treat, ideal for the spontaneous dessert artist looking to surprise guests without breaking the bank or a sweat.

Historical Background and Cultural Significance


Strawberry cheesecake has roots that trace back to the ancient Greeks, who first coined the term “cheese cake.” Throughout the centuries, its evolution has seen numerous adaptations, including the addition of strawberries, which became a staple in the United States in the 1800s. The mini bite format, however, brings a modern twist to this age-old classic.

Culturally, strawberries signify love and happiness in many traditions, which adds a heartfelt touch to every bite consumed. These tiny cheesecake bites preserve the essence of happiness and love, whether shared among friends or loved ones at family events.

Mini cheesecakes originally gained popularity in the 1950s, reflecting a shift towards convenient party foods as home entertaining became more commonplace. The evolution of these bites has seen them adapted into various flavor combinations and tweaks, keeping in step with culinary trends.

Regional variations have emerged, with some integrating different homemade fruit jams or cheese alternatives based on local preferences. Whether in New York, famed for its renowned cream cheese cheesecakes, or found in Southern homes featuring tangy fruits, these treats have a national love affair.

Ingredient Deep Dive


Fresh strawberries are the heart of these cheesecake bites, celebrated for their bright color and sweet, floral aroma. For centuries, strawberries have symbolized romance and purity, making them a fitting choice for these charming desserts. They bring a light, natural sweetness, packed with vitamin C and powerful antioxidants promoting good health.

Selecting prime strawberries ensures the best flavor, with a deep red color indicating ripeness. Store them in a refrigerated setting to maintain their freshness, but ensure they aren’t left unwashed until just before use to maintain their structural integrity.

Likewise, cream cheese, originally from the vibrant culture of New York dairy artisans, lends a creamy texture and rich body to the cheesecake filling. Packed with calcium and essential fats, it makes a deliciously smooth dessert centerpiece. Choose a reputable brand and allow it to reach room temperature before blending for best results, preventing lumps.

To maintain cream cheese’s freshness, it should remain refrigerated and tightly sealed in its original packaging. If needed, consider mascarpone for a slightly sweeter alternative or Greek yogurt for a lower-calorie substitute.

Common Mistakes to Avoid

  • Overmixing the cream cheese mixture, leading to a runny consistency that doesn’t hold up well once cooled. Mix until just combined.
  • Using unripe strawberries, which lack flavor and sweetness, detracting from the overall taste.
  • Not allowing the bites to set adequately after baking, causing a messy eating experience.
  • Forgetting to grease the muffin pan, resulting in sticky bites that won’t release cleanly.
  • Overbaking can result in a dry texture. Keep an eye on them for a perfect creamy bite.
  • Neglecting to cool bites significantly affects their consistency and flavor development.
  • Skipping crust pressing firmly can lead to crumbly bites that fall apart easily.
  • Underestimating portion sizes might lead to bites that don’t hold together well.

Essential Techniques


Master mixing cream cheese to a smooth, lump-free mixture for supremely creamy cheesecake bites. Begin with softened cheese to allow for gentler mixing, aiding in achieving a silky consistency. Use a low-speed setting to avoid incorporating too much air, which can undermine texture integrity.

Firmly pack the base crumbs with gentle pressure to form a solid crust. A well-packed base prevents leakage and crumbling, allowing each bite to maintain its structure when removed from the pan.

Practice patience with cooling, as abrupt changes in temperature can impair texture and lead to cracks. Ideal cooling should be gradual, facilitating flavor development and cheesecake setting to optimal consistency.

Pro Tips for Perfect Strawberry Cheesecake Crunch Bites


Choose ripe, fragrant strawberries for maximum flavor impact. Their natural sweetness and bright aroma elevate the entire dessert, bringing depth to every bite.

Refrigerate the cream cheese well in advance and allow to soften at room temperature prior to mixing, ensuring a smoothly blended filling without lumps.

For a golden crust, keep an eye on the baking time. Pull the bites as soon as the edges darken slightly to avoid drying out the cheesecake filling.

Incorporate a touch of lemon juice to enhance both the cheesecake flavor and strawberry’s natural sweetness, creating a pleasantly balanced bite.

Variations and Adaptations


Regional variations can incorporate local fruits such as blueberries or raspberries, which can be equally delightful. Swap strawberries for a different berry compote for seasonal freshness or dietary preferences.

For a seasonal twist, integrate winter spices like cinnamon and nutmeg during colder months, offering a warm, comforting bite. Alternatively, add mint for a fresh summer rendition.

Dietary modifications are seamless, using lactose-free cream cheese or non-dairy substitutes for a vegan adaptation. Consider almond or oat crust bases for gluten-free varieties, catering to diverse dietary preferences and needs.

Serving and Presentation Guide


Serve these bites on an elegant tiered tray to add dimension and interest to your dessert presentation. Set them apart with a dusting of powdered sugar or dollop of whipped cream as a finishing touch.

Traditional cheesecake accompaniments such as coffee or vanilla tea make perfect pairings, enhancing subtle flavors while keeping focus on the strawberries.

Wine and Beverage Pairing


Pair with light, sparkling wines like Prosecco to cut through the richness while complementing the strawberry nuances. Alternatively, a rich dessert wine can augment the vanilla notes in the cheesecake.

For non-alcoholic choices, opt for green tea or a mild fruit infusion that will echo the strawberry’s freshness without overwhelming the palate.

Storage and Shelf Life


Store your cheesecake bites in an airtight container in the refrigerator for up to 5 days, sealing in freshness. They can also be frozen for longer storage, but allow them to thaw in the fridge to maintain texture before serving.

Recognize spoilage by watching for discoloration or unpleasant odors, and ensure proper hygiene when handling post-baking.

Make Ahead Strategies


Prepare bites in advance by assembling the components and refrigerating a day before serving. This allows for flavors to meld, providing a richer taste experience.

As a fresh touch, hold off garnishing until serving time, ensuring each bite is presented at its very best.

Scaling Instructions


To scale down for smaller gatherings, simply halve ingredient quantities, maintaining the same proportions for consistent quality. Doubling the recipe requires a larger mixing vessel to adequately incorporate ingredients without spilling.

Keep an eye on cooking times, adjusting slightly based on bite size when altering quantities. Utilize proper pans and have extra ready if needed to bake additional batches.

Nutritional Deep Dive


Each Strawberry Cheesecake Crunch Bite offers a balanced macro profile for a dessert, composing of healthy fats from cream cheese and antioxidant-rich strawberries for a heartening treat.

For dietary-conscious consumers, assess portion sizes carefully, relishing one or two bites for satisfying indulgence without excess calorie intake.

Dietary Adaptations


Adapt these bites for a gluten-free palate by choosing almond flour bases. For dairy-free or vegan alternatives, explore plant-based cream cheese and butter substitutes without compromising flavor.

Keto enthusiasts can utilize low-carb sweeteners and specific almond or coconut flour crusts to enjoy these bites while maintaining dietary goals.

Troubleshooting Guide


Addressing texture concerns: Ensure not to over mix or over bake, which impacts creamy texture. Balance flavor by adjusting sweetness levels to complement strawberry tartness.

Temperature consistency is vital, facilitating smooth cooling and preventing cracks. Invest in quality mini pans to prevent sticking and bypassing unnecessary challenges.

Adjust timing concerns according to specific oven calibration variances, revisiting ingredient proportions if using alternative dietary adaptations.

Recipe Success Stories


Readers rave about the simplicity and elegance of these bites, sharing variations incorporating seasonal fruit jams and adjusting sweetness levels to suit individual palates.

Captured in vibrant photography to celebrate their creation, these Strawberry Cheesecake Crunch Bites shine as culinary accomplishments shared among friends and family.

Frequently Asked Questions

Can I use frozen strawberries?
Fresh strawberries are recommended for optimal flavor and texture. If using frozen, ensure they’re well thawed and drained to avoid excess moisture.

How do I prevent cheesecakes from sticking to the pan?
Thoroughly grease your pan or use parchment liners to facilitate easy removal, ensuring the crust and cheesecake release intact.

What’s the best way to serve them?
Arrange on a serving platter, chilling for a few minutes before, to ensure freshness and visual appeal before your guests arrive.

Can I make these a day in advance?
Absolutely, these bites actually develop better flavor when prepared a day ahead, giving time for the flavors to meld in the refrigerator.

What if I don’t have a mini muffin pan?
A standard muffin tin can be used, although this will yield fewer, larger bites which may require slightly adjusted cooking times.

How do I store leftovers?
Store any leftovers in an airtight container in the fridge. If freezing, wrap each bite in plastic wrap before adding them to a sealed container to avoid freezer burn.

Can these be made vegan?
Yes, use a plant-based cream cheese and substitute the buttery crust with coconut oil or vegan butter to accommodate a vegan diet.

Are there low-sugar options?
Natural sweeteners like honey or maple syrup can be used in moderation, but be aware this may alter the texture slightly.

Will these bites last through a picnic?
With proper storage in insulated carriers, these cheesecake bites fare well for short-term outdoor gatherings.

Do I need any special tools?
Beyond a mini muffin pan, a mixer for cream cheese is all you need for smooth, lump-free cheesecake filling.

Additional Resources


Explore more creamy dessert adventures with our related recipes like Lemon Blueberry Cheesecake Parfaits, and boost your baking confidence with our detailed technique guides.

For equipment recommendations, check our post on essential baking tools that simplify kitchen tasks, ensuring the perfect bake every time.

Join the Conversation


We invite you to share your Strawberry Cheesecake Crunch Bite creations on social media with #CheesecakeBiteDelights. Explore renditions from fellow bakers worldwide, showcasing their unique variations.

Share your experiences and engage in a vibrant community dialog, offering tips, feedback, and inspirational journey others can delight in.

The Recipe

Strawberry Cheesecake Crunch Bites

Serves: 24 bites

Prep Time: 15 mins

Cook Time: 5 mins

Total Time: 20 mins

Kitchen Equipment Needed

  • Mini muffin pan
  • Mixing bowls
  • Electric mixer
  • Spatula
  • Measuring cups and spoons

Ingredients

  • 1 cup graham cracker crumbs
  • 2 tablespoons melted butter
  • 1/4 cup sugar
  • 8 oz cream cheese, softened
  • 1/4 cup powdered sugar
  • 1 teaspoon vanilla extract
  • 2 tablespoons lemon juice
  • 1 cup fresh strawberries, chopped

Directions

  1. Preheat the oven to 350°F (175°C).
  2. Mix graham cracker crumbs, melted butter, and sugar in a bowl until crumbs are well coated.
  3. Press the mixture firmly into the bottom of each mini muffin cup.
  4. Bake for 5 minutes, then let cool completely.
  5. In a large bowl, beat the cream cheese until smooth. Add powdered sugar, vanilla extract, and lemon juice; mix until creamy.
  6. Spoon the cream cheese mixture over cooled crusts, topping each with a piece of strawberry.
  7. Chill in the fridge for at least an hour before serving.

Recipe Notes

  • For a gluten-free version, substitute graham cracker crumbs with crushed almonds or gluten-free biscuits.
  • Adjust sweetness levels by adding or reducing sugar in the cream cheese mixture.

Irresistible Praline Popcorn Recipe for a Sweet Homemade Snack

Praline Popcorn: A Sweet and Crunchy Gourmet Treat

⚖️
Difficulty
Easy

⏲️
Prep Time
15 mins

🕒
Cook Time
45 mins

⏱️
Total Time
60 mins

🍽️
Servings
12

Step into the world of gourmet snacking with our irresistible Praline Popcorn. This delightful treat combines the crunch of perfectly popped corn with the rich, nutty goodness of pralines, all wrapped up in a buttery caramel coating. Whether you’re looking to satisfy a sweet tooth or entertain guests with a unique treat, Praline Popcorn is the perfect choice. Its tantalizing aroma fills your home, inviting everyone to gather around and indulge.

The magic of Praline Popcorn lies in its contrasting textures and flavors. Each bite delivers a crunchy popcorn base enveloped in a creamy praline coating. The sweetness of the caramel praline paired with the slight saltiness of the popcorn creates an irresistible harmony that beckons for more. Perfect for movie nights, family gatherings, or as a delightful homemade gift, this popcorn recipe is sure to impress.

Quick Recipe Highlights

  • Flavor Profile: A delightful combination of sweet caramel and nutty pralines with a hint of butter and salt, providing a harmonious taste experience.
  • Texture: The contrasting textures of crispy popcorn and crunchy pralines make for a satisfying mouthfeel that’s both light and indulgent.
  • Aroma: The sweet, nutty aroma of praline and caramelized sugar fills the air, making it impossible to resist.
  • Visual Appeal: Golden brown caramel-coated popcorn speckled with toasted pralines creates an inviting and elegant presentation.
  • Skill Level Needed: Easy enough for beginners, requiring only basic kitchen skills and equipment.
  • Special Equipment: You’ll need a large baking sheet and a reliable saucepan for making the caramel sauce.

Recipe Overview

  • Difficulty Level: Praline Popcorn is simple to prepare, making it an excellent choice even for novice cooks. The process primarily involves mixing and baking, with no intricate techniques required.
  • Category: This recipe falls under snacks and desserts, providing a sweet treat that’s perfect at any time.
  • Cuisine: Although pralines are deeply rooted in Southern American cuisine, this popcorn treat brings a touch of global gourmet flair to your table.
  • Cost: Relatively inexpensive, as it uses basic pantry ingredients such as popcorn kernels, sugar, butter, and nuts, making it budget-friendly.
  • Season: Suitable for any season, but especially enjoyable during cooler months when cozying up with a warm snack is most pleasant.
  • Occasion: Perfect for family gatherings, movie nights, holiday parties, or as a thoughtful homemade gift.

Why You’ll Love This Recipe


The flavor and texture appeal of Praline Popcorn is its most compelling feature. The sweet, crunchy coating paired with the airy popcorn creates a symphony of flavors and textures that is truly satisfying. The subtle aroma of toasted nuts enhances the overall taste profile, making each bite a delightful experience.

Convenience is another benefit. The preparation of this praline popcorn is straightforward and quick, requiring no complex culinary skills. Even those new to cooking will find the step-by-step process easy to follow, ensuring a rewarding experience.

From a nutritional standpoint, Praline Popcorn provides a sweet treat with the benefit of fiber from the popcorn and healthy fats from the nuts. While indulgent, it is a much healthier option compared to many store-bought sweets, allowing for a guilt-free enjoyment.

Praline Popcorn is a fantastic addition to any social gathering. Serve it at parties, family get-togethers, or as a unique offering at potlucks. Its universal appeal across ages makes it a crowd-pleaser, sure to spark conversations and laughter.

Finally, it’s cost-effective and accessible. Created from everyday pantry staples, it requires no special equipment or ingredients. It’s an economical way to make a gourmet treat at home, showcasing the balance of budget-conscious and flavor-forward cooking.

Historical Background and Cultural Significance


Praline Popcorn owes its origin to the deep culinary traditions of the Southern United States, where pralines have woven themselves into the cultural tapestry. Originally a French confection, pralines made their journey to the American South, where they evolved to include the rich flavors of local pecans.

The cultural importance of pralines in Southern cuisine is profound. Pralines, originally introduced by French settlers, became a decadent treat cherished for their unique combination of creamy textures and nutty flavors, a hallmark of Southern culinary innovation.

Over time, the evolution of the recipe to include popcorn represents a melding of everyday American snacks with time-honored confections to create something uniquely new. This integration symbolizes the adaptability and creativity inherent in American cooking.

Regional variations of pralines themselves offer an intriguing look at the diversity in Southern cooking. While traditional pralines use pecans, some adaptations incorporate almonds or other nuts, showcasing a flexibility in ingredients that reflects local agricultural specialties.

Ingredient Deep Dive


Popcorn kernels serve as the crunchy base for our Praline Popcorn. Historically, popcorn has been a staple snack in American households known for its versatility and affordability. Nutritionally, popcorn offers a good source of fiber, making it a wholesome choice for snacks.

The secret to selecting popcorn lies in choosing quality kernels that yield fluffy, crisp puffs when cooked. Store popcorn in an airtight container to preserve its freshness and to ensure when popped it reaches the perfect texture necessary for holding the praline coating.

The praline element involves butter, sugar, and nuts, typically pecans. Butter imparts a rich, creamy texture and flavor that’s essential to pralines, while sugar caramelizes to form the sweet, crispy coating. Pecans provide a nutty, earthy undertone that perfectly complements the sweetness.

Selecting the freshest nuts is critical to achieving the best flavor. Pecans should be stored in a cool, dry place to ensure they remain fresh. For a twist, consider substituting pecans with almonds, walnuts, or a mix of your favorite nuts.

Common Mistakes to Avoid

  • Not fully popping the popcorn: Ensure all kernels are popped before adding any seasoning to avoid uneven texture and flavor distribution.
  • Burning the caramel: Keep the heat to medium and stir continuously to avoid burning and ensure a smooth, golden praline coating.
  • Insufficient coating: Make sure the popcorn is evenly coated with praline sauce for a consistent flavor and texture throughout.
  • Rushing the cooling process: Allow enough time for the praline popcorn to cool completely for the coating to harden properly and achieve the optimal crunch.
  • Over-mixing the caramel sauce: Be gentle to maintain a smooth consistency without introducing air bubbles that could affect the texture.
  • Forgetting to stir during baking: Stir the popcorn during the baking phase to ensure an even color and caramelization.
  • Using wet or damp nuts: Moisture can prevent caramelization. Ensure nuts are dry before use to achieve the right texture.
  • Storing improperly: Store in an airtight container to preserve freshness and texture. Avoid exposure to humidity.

Essential Techniques


Mastering the popping of popcorn is crucial. Heat oil in a large pot, add a few kernels until they pop, then add the rest. Cover with a lid, shaking occasionally to ensure all kernels pop evenly. This technique helps avoid burning and assures uniformity.

Caramelization is key to the praline experience. Cook the sugar and butter mixture over medium heat, stirring constantly. Watch carefully as the sugars melt and turn a rich golden color before adding the nuts. Perfecting this step ensures the praline glaze smoothly coats the popcorn.

Pro Tips for Perfect Praline Popcorn


Use high-quality kernels to achieve the fluffiest popcorn, providing a perfect foundation for your praline coating. Freshness matters for both popcorn and nuts.

For a deeper caramel flavor, allow the sugar to reach an amber hue before removing it from the heat. Careful timing and attention will bring out richer flavors.

When coating the popcorn with the praline mix, work quickly. Pour while the caramel is still warm to ensure even distribution before it begins to harden.

Want an extra crunch? Toast the nuts lightly before combining with the popcorn. It adds a layer of flavor depth that complements the sweetness.

For those who prefer a touch of salt with their sweetness, a light sprinkle of sea salt over the coated popcorn before it sets provides a delightful contrast.

If gifting your Praline Popcorn, consider packaging in clear cellophane bags tied with a ribbon. This not only looks professional but helps maintain freshness.

Schedule a movie night or social gathering right after making this to enjoy the popcorn at its freshest and most flavorful.

Variations and Adaptations


Regional variations of praline popcorn might include using cashew nuts in coastal areas or almonds where they are locally available. This small change can significantly tweak the flavor profile while staying true to the original concept.

Seasonal adaptations could involve incorporating spices like cinnamon or nutmeg during the holiday season to give it a festive flavor that’s warm and inviting.

For those needing dietary modifications, a vegan version can be achieved by using plant-based butter alternatives. Ensure all other components used align with dietary needs.

Flavor variations are endless; consider adding a splash of vanilla or a sprinkle of cayenne pepper to introduce new flavor dynamics based on personal preferences or to pair with specific occasions.

To modify texture, experiment with the caramel to sugar ratio until you find your preferred sweetness and crunch. Some opt for a chewier, candy-like coating, while others enjoy the crisp, brittle finish.

For an upscale presentation, serve the praline popcorn in individual paper cones or small decorative bowls. This adds an elegant touch and offers easy serving options at gatherings.

Serving and Presentation Guide


When serving Praline Popcorn, the presentation can enhance the experience. Use rustic, parchment-lined baskets for a charming, casual look suitable for relaxed events.

Add garnishing with a sprinkle of finely chopped nuts or a light dusting of powdered sugar for an elegant touch. This can enhance the visual appeal and texture.

Traditional accompaniments might include a selection of fine chocolates or fruit, offering complementary flavors and enhancing the richness of the snack.

Modern serving suggestions could include pairing with a selection of cheeses for a sophisticated snack platter, enhancing the popcorn’s gourmet appeal.

Consideration of temperature is important; serve at room temperature to ensure the praline coating remains at the ideal texture.

For portion control, serve the popcorn in small individual containers. This ensures convenience and hygiene, particularly in large gatherings.

Wine and Beverage Pairing


Pair Praline Popcorn with a crisp white wine, such as a Sauvignon Blanc, to balance the sweetness and cleanse the palate with each sip. The light, fruity notes of the wine complement the nutty coating.

Non-alcoholic alternatives might include a tart, unsweetened iced tea or a lightly flavored sparkling water. These beverages provide a refreshing contrast to the rich flavors of the praline.

For the coffee and tea enthusiast, a robust black tea or espresso pairs beautifully, enhancing the deep, caramel notes of the praline while providing a perfect backdrop of contrasting flavors.

Consider serving chilled drinks to balance the sweet richness of the popcorn, enhancing the eating experience with a refreshing contrast in temperature.

When serving, ensure beverages are readily available alongside the popcorn, creating a cohesive and enjoyable tasting experience for guests.

Storage and Shelf Life


Store Praline Popcorn in an airtight container to maintain its freshness and crunch. Keeping moisture out is key to preserving the texture and flavor.

Preferably store in a cool, dry pantry away from direct sunlight and humidity. Excess moisture can cause the praline to soften and lose its delightful crunch.

Utilize glass jars or plastic bags with an airtight seal for best results. These containments help keep the popcorn fresh for about a week, although it rarely lasts that long due to its irresistible taste.

Watch for signs of spoilage, such as an off smell or change in texture, and discard any affected popcorn. Freshness is best for optimal flavor.

If reheating is necessary, a light toast in a low-temperature oven can help restore the crispiness if the popcorn turns soft over time. Monitor closely to prevent burning.

For those wanting to prepare ahead, you can freeze praline popcorn. Ensure it is in a vacuum-sealed or airtight container, and consume within two months for best results.

Make Ahead Strategies


Advance preparation of Praline Popcorn can significantly streamline event planning. Begin by popping the corn and preparing all ingredients for the praline trend in advance.

Store the uncoated popcorn in an airtight container until ready to coat with praline, helping maintain freshness until you’re ready for the final steps.

Assess quality impact by sampling a small batch ahead of your main activity to ensure everything tastes optimal and adjusts technique or ingredient quantities if needed.

During assembly, pre-measure all ingredients into portioned containers to expedite the mixing process, ensuring everything flows smoothly.

Consider holding back some of the praline-coated popcorn for a final touch of freshly coated bits right before serving to maintain the best taste.

Fresh additions such as a light drizzle of chocolate or sprinkle of coconut can be added just before serving to enhance both flavor and presentation.

Scaling Instructions


When needing to scale the Praline Popcorn recipe for larger gatherings, the process is simplicity itself. The quantity of popcorn can be doubled or tripled with ease, maintaining the ratios for even coverage.

Halve the ingredients conveniently should you need a smaller batch simply. Divide all quantities equally for consistent results.

Cooking equipment may need adjustments. For doubled or tripled batches, use multiple baking sheets or larger ones to ensure even cooking without overcrowding.

Timing can be modified slightly when scaling. Monitor caramelization closely to avoid overcooking or burning when dealing with larger quantities.

Storage considerations become more critical with larger batches. Ensure you have enough airtight containers to keep your extra portions fresh and accessible for any impromptu snack attacks.

Nutritional Deep Dive


Praline Popcorn, though indulgent, fits within a balanced nutritional framework when consumed in moderation. Its primary components include carbohydrates from popcorn and sugar, with a good dose of healthy fats from nuts.

Macro breakdown indicates a treat primarily composed of carbohydrates, vital for energy, with nut fats complementing with satiating factors, making it a satisfying snack option.

The micronutrient analysis of Praline Popcorn shows elements such as zinc and vitamin E due to nuts, contributing to essential body functional support.

Health benefits can be realized through moderation, enjoying the fiber content of popcorn while balancing the sugar-heavy coating within dietary allowances.

Dietary considerations might include watching portion sizes to maintain a balance of energy intake and gently addressing the carbohydrate-to-fat ratio based on individual dietary goals.

For those mindful of weight management, integrating a serving within a well-rounded eating plan ensures enjoyment without overextending caloric intake.

Dietary Adaptations


For a gluten-free variant, ensure that all your ingredients, particularly spiced additives or flavorings used, are certified gluten-free. Popcorn kernels and the core ingredients generally comply.

Dairy-free adaptations involve substituting butter with non-dairy alternatives such as coconut oil or margarine suitable for your needs, keeping flavors intact while serving dietary requirements.

A vegan alternative swaps butter for vegan-friendly margarine and checks all additional ingredients are animal-product free, respecting lifestyle choices without sacrificing flavor.

Low-carb enthusiasts might explore ingredient substitutions where stevia-sweetened caramel or almond flour-based pralines offer more appropriate alternatives, achieving a close mimic in flavor without breaking the diet.

Keto and Paleo diets could benefit from nut butter based or coconut-derived sweeteners to maintain compliance while preserving the essential sweet-savory notes of the original.

Low-FODMAP versions might involve caution around certain nuts, but pecans, often better tolerated, can continue to serve as your go-to nut choice with mindful amount moderation.

For other specific diet modifications, always carefully check ingredient labels for compliance, considering the slightest variations that could impact dietary integrity.

Troubleshooting Guide


If texture issues arise with a soggy outcome, consider reducing the humidity during preparation and ensure complete cooling before container storage.

For flavor balance challenges, introducing a small test batch allows you to adjust sugar ratios and add seasoning or alternative sweetening agents to refine the direction.

Temperature problems often relate to the caramel process. Use a candy thermometer if available to gain precision during caramelization while stirring consistently.

Equipment challenges might occur if you’re working with insufficient popping capacity or poor heat distribution. Ensure correct pot size for popcorn and uniform pans for baking.

When faced with ingredient substitutions or adjustments, research alternatives with matching binding qualities, ensuring no disruption in praline/sugar coating adherence.

Timing concerns, whether prolonged or too brief, suggests precise attention throughout cooking phases. Utilize kitchen timers for stages to maintain coordination.

Recipe Success Stories


Community feedback indicates enthusiastic reception, with numerous adaptations inspiring others to customize their batches, incorporating spices like cinnamon or cayenne for bold twists.

Variation successes are seen with fruit inclusions like dried cranberries, offering additional texture and flavor layers, proving the recipe’s flexibility and creativity potential.

Adaptation stories reveal how readers have cleverly transformed this into vegan-friendly snacks at gatherings, maintaining tradition while achieving dietary accommodation.

Reader suggestions include packaging methods for gifts, such as decorative tins, creating attractive presentations when sharing Praline Popcorn.

Photography tips advise capturing the glossy, caramel hue on freshly made batches under natural light, emphasizing textural contrasts and enticing visuals.

Frequently Asked Questions

What if my caramel hardens too quickly? If your caramel cools or hardens before coating, gently reheat it on the stove on low until it loosens. Stir continuously to prevent burning.

How do I prevent popcorn from getting soggy? Ensure popcorn and nuts are thoroughly dry before coating, and store in a cool, dry place in airtight containers to maintain crispness.

Can I make this recipe without nuts? Yes, you can omit nuts entirely or replace them with seeds, like pumpkin or sunflower seeds, offering similar flavors and textures.

Is there a way to make this less sweet? Adjust the sugar ratio in the caramel mix or introduce unsweetened cocoa powder to balance flavors, reducing sweetness while adding depth.

Can this be made spicy? Yes, adding a pinch of cayenne pepper or incorporating chili-infused oils into the caramel can create a spicy variant for those who love heat.

How long will it stay fresh? Stored properly in airtight containers, Praline Popcorn can last for up to a week, retaining its flavor and crunch.

What are the ideal storage conditions? Store in a cool, dark place in airtight containers to prevent moisture absorption and keep the caramel’s crisp texture intact.

Is this suitable for freezing? Yes, freeze it in airtight containers for extended storage. Ensure consumption within two months to enjoy full quality.

Could I add chocolate? Absolutely, drizzling with melted chocolate after cooling can elevate the flavor profile, creating an even richer treat.

Whats an alternate topping suggestion? Consider toasted coconut, crushed pretzels, or even a light sprinkle of sea salt for a varied taste and texture enhancement.

Additional Resources


Discover related recipes like chocolate-covered popcorn or spiced nut blends that complement Praline Popcorn, creating beautiful snack assortments.

Technique guides can help master caramel making or demonstrate new popcorn popping methods for consistently perfect results every time.

Ingredient information offers insights on nut choices and sugar variations, allowing you to explore new flavors and educate yourself on nutritional aspects.

Equipment recommendations focus on achieving the best outcomes with reliable popcorn makers and durable baking sheets suited to confectionery demands.

Seasonal variations introduce ways to modify the popcorn recipe with seasonal fruits or festive spices, ensuring you have a themed treat all year round.

Join the Conversation


Engage with our community by sharing your Praline Popcorn creations on social media using our dedicated hashtag. Showcase your creations with photographs and interact with fellow cooking enthusiasts.

Photography tips can guide you on best capturing the glossy sheen and detail of your Praline Popcorn for a visually appealing post. Share your experiences and receive feedback.

Leave reviews to inform others about your successes or adaptations with this recipe, suggesting improvements or inspired innovations.

Participate in community engagement efforts, offering your tips and personal touches that others might incorporate into their own Praline Popcorn attempts.

Explore recipe variations proposed by other community members, creating a space for collective creativity and shared experiences that enrich your cookery endeavors.

The Recipe

Praline Popcorn

Serves: 12

Prep Time: 15 mins

Cook Time: 45 mins

Total Time: 60 mins

Kitchen Equipment Needed

  • Large Pot for Popping Popcorn
  • Large Saute Pan or Saucepan
  • Baking Sheet
  • Wooden Spoon
  • Mixing Bowl
  • Airtight Containers for Storage

Ingredients

  • ½ cup popcorn kernels
  • 1 cup pecan halves
  • 1 cup unsalted butter
  • 2 cups granulated sugar
  • ½ cup light corn syrup
  • ½ teaspoon salt
  • ½ teaspoon baking soda
  • 1 teaspoon vanilla extract

Directions

  1. Preheat your oven to 250°F (120°C) and line a large baking sheet with parchment paper.
  2. Pop the popcorn kernels using your preferred method. Transfer the popped popcorn to a large mixing bowl, discarding any unpopped kernels.
  3. In a large saucepan, combine butter, sugar, corn syrup, and salt. Bring to a boil over medium heat, stirring constantly. Allow mixture to boil for 5 minutes without stirring.
  4. Remove from heat and quickly stir in baking soda and vanilla extract. The mixture will bubble up slightly – this is normal.
  5. Quickly pour the praline caramel mixture over the popcorn and gently stir to coat the popcorn evenly.
  6. Transfer the coated popcorn to the prepared baking sheet, spreading it out evenly. Sprinkle the pecan halves over the top.
  7. Bake in the preheated oven for 45 minutes, stirring every 15 minutes to ensure even coating.
  8. Remove from the oven and cool completely before breaking into pieces. Store in an airtight container for up to one week.

Recipe Notes

  • For a spicier twist, add a pinch of cayenne pepper to the caramel mixture.
  • Mix and match nuts like almonds or walnuts for varied flavor profiles.
  • To make this recipe vegan-friendly, substitute butter with vegan margarine.

Irresistible Reese’s Peanut Butter Chocolate Cookies to Satisfy Your Sweet Tooth

Irresistible Reese’s Peanut Butter Chocolate Cookies: A Heavenly Delight

⚖️
Difficulty
Easy

⏲️
Prep Time
15 mins

🕒
Cook Time
10 mins

⏱️
Total Time
25 mins

🍽️
Servings
24 cookies

The Reese’s Peanut Butter Chocolate Cookies combine the best of both worlds: rich chocolate and the creamy, nutty flavor of peanut butter. Imagine biting into a cookie where the chocolate chips melt in perfect harmony with pockets of velvety peanut butter. It’s a heavenly match that offers a delightful explosion of taste and indulgence. Ideal for any chocolate lover, these cookies promise to become a household favorite in no time.

These cookies are perfect not only for their delightful taste but also because they’re so easy to prepare. Kids and adults alike will find joy in the chewy texture, which pairs effortlessly with a crisp outer layer. With each bite, the fusion of flavors provides a symphony of sweetness and savory notes, bringing a sense of comfort and satisfaction.

Quick Recipe Highlights

  • Flavor Profile: A rich blend of chocolate and peanut butter, offering a sweet, nutty, and slightly salty taste.
  • Texture: These cookies have a soft and chewy center combined with a slightly crispy edge, offering the perfect bite.
  • Aroma: The intoxicating aroma of freshly baked cookies, with robust notes of cocoa and roasted peanuts, fills the kitchen.
  • Visual Appeal: Attractive golden-brown cookies speckled with chunks of chocolate and swirls of peanut butter.
  • Skill Level Needed: Beginner-friendly, no complex techniques required, ideal for baking with family.
  • Special Equipment: A standard mixer or hand whisk for blending ingredients smoothly.

Recipe Overview

  • Difficulty Level: The recipe is rated as easy, thanks to straightforward instructions that even novice bakers can follow.
  • Category: Perfect as a snack or dessert, these cookies excel at satisfying a sweet tooth craving.
  • Cuisine: An American classic, influenced by the nation’s love for sweet and salty flavors.
  • Cost: Budget-friendly, as the ingredients are readily available and affordable, making this an ideal treat without breaking the bank.
  • Season: Perfect all year round, these cookies bring warmth and comfort, especially during winter and festive times.
  • Occasion: Ideal for parties, gatherings, or a cozy evening treat with a glass of milk.

Why You’ll Love This Recipe

The Reese’s Peanut Butter Chocolate Cookies are a perfect blend of rich flavors and smooth textures, designed to delight dessert enthusiasts. The rich taste of chocolate complements the creamy essence of peanut butter perfectly, ensuring each bite is enticing. The cookies provide a soft and chewy experience, complete with a lightly crisp exterior that delivers an inviting texture contrast. The combination of these elements guarantees satisfaction and happiness with every indulgence.

Preparing these cookies is a breeze, meaning they can quickly become a staple in your baking repertoire. The recipe calls for common ingredients found in most kitchens, making them a convenient option for spontaneous cravings or last-minute party pleasers. Additionally, the short preparation and cook time make it easy to whip up a batch when you’re pressed for time yet seeking a homemade treat with the distinct taste of freshly baked goods.

While the nutritional aspect isn’t a primary focus with these decadent treats, there are some benefits to acknowledge. Peanut butter offers a good source of protein and healthy fats, providing energy and satisfaction. When consumed responsibly, these cookies can fit into an overall balanced diet without sacrificing taste or enjoyment. Feel good about treating yourself to a sweet indulgence that doesn’t go overboard on empty calories.

Sharing these cookies with friends and family transforms any gathering into memorable moments filled with laughter and bonding. The universally beloved flavor profile appeals to many, making it an instant crowd-pleaser at potlucks, holiday festivities, and celebrations. The joy of sharing homemade cookies amplifies the overall experience, turning it into a treasured and joyful occasion.

Cost-effectiveness is a significant advantage of this recipe. Basic ingredients such as flour, sugar, and chocolate chips make these cookies an accessible delight. Peanut butter serves as a cost-effective staple, giving you more bang for your buck when it comes to flavor. Prepare a batch for under what it would cost to purchase a specialty item from a bakery, with twice the satisfaction of knowing it’s a personal creation.

Historical Background and Cultural Significance

The marriage of chocolate and peanut butter has a rich history dating back to early 20th century America when the combination became a hit. Reese’s Peanut Butter Cups were introduced in the 1920s by H.B. Reese, inspiring countless recipes, including the popular Reese’s Peanut Butter Chocolate Cookies. The combination’s origins are rooted in the quest for a simple, yet delicious treat that appeals to a wide audience.

This flavor pairing holds a special place in American culinary traditions, representing the nation’s innovative spirit and love for novelty. Chocolate and peanut butter together became synonymous with sweet indulgence, and they continued to influence desserts, candies, and snacks that followed. The popularity of Reese’s Peanut Butter Chocolate Cookies can be seen as part of a broader appreciation of this dynamic duo as an American staple.

Over time, the recipe for these cookies has evolved to include various adaptations, accommodating dietary preferences and regional tastes. From adding a touch of sea salt to enhance flavors to incorporating gourmet chocolate or artisanal peanut butter, these cookies continue to capture the imagination of home bakers and professionals alike. As tastes broaden, so does the creative interpretation of this beloved treat.

Different regions around the country and beyond offer unique spins on the classic, with some adding spices or nuts to enhance the cookies’ complexity. Others may inject a burst of fruit for contrast or intensify the chocolate aspect with varying cocoa content. The adaptability of the recipe reflects its undeniable charm and universal appeal, ensuring that it remains a popular choice across myriad cultural landscapes.

Ingredient Deep Dive

Peanut butter serves as the soul of this cookie recipe, linking a century-old American tradition to the delight of modern culinary experiences. As a processed nut product becoming mainstream around the early 1900s, it advocated for affordable sustenance in wartime. Nowadays, peanut butter represents comfort and versatility in the culinary world, embracing both simplicity and luxury.

Beyond its nostalgic value, peanut butter is packed with nutrients, including healthy fats, protein, and essential vitamins like B6, magnesium, and niacin. For the perfect baking choice, opt for creamy peanut butter that provides smooth integration with chocolate chips, preventing excess graininess within the dough. Store your peanut butter in a cool, dry place for optimal freshness, ensuring your cookies achieve the best taste possible. Should you lack this key ingredient, consider cashew or almond butter as a viable substitution, instilling a twist of individuality within your batch.

Chocolate chips form the centerpiece of indulgence in Reese’s Peanut Butter Chocolate Cookies, offering a sweet seduction through rich cocoa notes. Developed during the advent of Toll House cookies in the 1930s, chocolate chips forged a new path toward dessert innovation. Balancing their robust heritage lies their contemporaneous accessibility and approachability.

Nutritionally, chocolate chips provide trace amounts of vitamins and minerals, alongside a modicum of antioxidants in darker varieties. When selecting chocolate, aim for semi-sweet or dark chips that complement peanut butter’s intensity while catering to a slightly mature palate. Stocking chocolate chips necessitates a cool, dry environment, avoiding high humidity or warmth that could compromise their structural wholeness. In moments absent of designated chips, quality chopped chocolate serves well to rally their purpose.

Common Mistakes to Avoid

  • Over-mixing the dough can result in tough cookies due to gluten development; mix until ingredients are just combined.
  • Using cold peanut butter may cause uneven mixing; ensure it is at room temperature for smooth integration.
  • Opting for margarine or low-quality substitutes affects taste and texture; use real butter for optimal results.
  • Skipping the chilling step could result in flat cookies; chilling the dough prevents excessive spreading during baking.
  • Using expired baking soda or baking powder can result in less rising; keep it fresh for fluffy cookies.
  • Baking on dark or non-stick pans might lead to overly browned bottoms; use parchment-lined light-colored trays.
  • Not checking cookies towards the end carries the risk of overbaking; monitor closely for a proper indication of doneness.
  • Storing cookies improperly may lead to stale treats; airtight containers maintain freshness.
  • Neglecting to preheat the oven adequately can impede effective baking; always hit the correct temperature prior to insertion.
  • Substituting ingredients without consideration of proportions can lead to imbalances; calculate adjustably according to recipe dynamics.

Essential Techniques

Understanding how to cream butter and sugar is pivotal to mastering Reese’s Peanut Butter Chocolate Cookies, ensuring proper aeration and correct texture. The creaming process incorporates air, fostering a desirable structure throughout the cookie. Typically, the mixture should transform from yellow to a pale, fluffy consistency, signaling readiness for additional ingredients.

Avoid excessive beating, as this hampers the dough’s ability to support structural cohesion, which translates to an unwelcome variant of cookie texture. Insistent watching of visual cues is beneficial, as timing during this stage serves as a predictor of the final product. As sugar’s grittiness dissolves, expect a creamy, homogeneous texture synergy in butter and sugar proportions.

Pro Tips for Perfect Reese’s Peanut Butter Chocolate Cookies

For the best texture, ensure you measure flour using the spoon-and-level method to avoid adding too much, which can result in dense cookies. Aim for an accurate balance.

Consider adding a pinch of sea salt to the dough for a pleasant contrast, accentuating the peanut butter and chocolate flavors more vibrantly.

Chill the dough for at least 30 minutes, shaping them into even balls before placing on a baking sheet to keep a uniform look and prevent spreading.

For a richer taste, toast the flour prior to mixing with other ingredients. This method brings out nutty flavors and adds complexity to the final product.

When removing cookies from the oven, be cautious to leave them slightly underbaked. They will continue baking on the cookie sheet, securing a perfect chewy interior.

Maximize the depth of chocolate flavor by combining different cocoa content chips, like mixing semi-sweet and bittersweet, for an impactful taste experience.

Experiment by adding unique ingredients, like espresso powder or vanilla bean paste, to elevate the sophistication of these classic cookies.

Double-batch mixing renders an efficient time investment considering freezing the dough balls. Stored properly, they’ll remain viable for weeks when spontaneous cravings kick in.

Variations and Adaptations

Regional variations incorporate local ingredients to create a new spin on the classic Reese’s Peanut Butter Chocolate Cookies. For instance, adding spices such as cinnamon or nutmeg offers a warmer sensation, beautifully echoing autumn festivities while appealing to holiday-themed palates. Engaging in regional tweaks ensures innovation and personalization.

Seasonal adaptations are excellent opportunities to incorporate fresh elements, such as coconut flakes in the spring or cranberries during winter months. These additions adjust both flavor profiles and nutritional landscapes, inviting people to craft recipes that echo current sentiments and align with timely offerings.

Dietary modifications allow for broader inclusivity without compromise. Substitute almond flour for gluten-intolerant kitchens or incorporate vegan butter replacements to uphold plant-based preferences. Furthermore, sugar-free chocolate chips may cater to low-sugar requirements effectively without losing flavor.

Flavor variations embrace unexpected twists, such as mint extract or caramel drizzle, weaving new heights of culinary inventiveness while ensuring domination in cookie plate real estate. Flavor exploration answers robust craft quests and presents unique contributions to timeless art.

Texture modifications might include adding oats or chopped nuts into the dough, showcasing a distinct crunch that challenges classic form yet enhances its allure. Constant exploration promotes creativity and innovates genre compliance.

Presentation alternatives include drizzling with white chocolate for added sweetness and visual sophistry, enabling picturesque arrangements that remain delight to eyes and taste buds alike. Advanced plating skills promote culinary elegance, speaking to contemporary directives promoting artistic practices.

Serving and Presentation Guide

Introducing engaging plating techniques enhances Reese’s Peanut Butter Chocolate Cookies’ visual presentation. Utilize large decorative plates or charming wooden trays for stacking cookies, ensuring coziness speaks to the arrangement composition. Maintain symmetry for an elevated aesthetic, projecting order and style.

Garnishing ideas may include crushed nuts around the plate perimeter or shaved chocolate, embedding the cookies into their environment harmoniously and demonstrating attention to decorating details without overshadowing the main attraction.
Traditional accompaniments like cold milk or warm cocoa play wonderfully with these cookies’ inherent tones, heightening the experience and providing a balanced sensory course through enjoyable pairings.

Modern serving suggestions involve playful combinations of incorporating cookies into dessert parfaits, layered with vanilla cream or ice cream for textural juxtaposition. Serve refrigerated or chilled for an innovative spin on familiarity.

Temperature considerations are paramount for enjoying optimal flavor—serve the cookies warm but not hot, complimenting texture profiles and aromas without diminishing the nutrients.

Portion control tips are essential when enjoying cookie delights—one or two cookies per serving provide just enough indulgence yet offer discretion for mindful consumption.

Wine and Beverage Pairing

For a sumptuous wine pairing, consider a light Pinot Noir or a robust Zinfandel to accompany Reese’s Peanut Butter Chocolate Cookies. Chocolate and peanut butter’s deep richness act as an engaging counterpart to the berry undertones and light spice found in these red wines, creating a well-rounded experience.

Non-alcoholic alternatives can include an elegant presentation of hard ciders. Tempering the natural sweetness of cookies with the acidity of cider highlights the delectable interplay between nuanced flavors, enhancing the overall richness of each bite.

Coffee or specialized espresso-based drinks, like cappuccinos, make ideal companions for these cookies, boasting their roasted characteristics as powerful partners to heighten the delectable nature of chocolate and peanut butter compounds.

Temperature considerations assist in maximizing beverage enjoyment while complementing the taste journey; slight chills on appropriate drinks maintain nuance impeccably.

Optimal serving suggestions highlight balance—serve in modest portions mindful of flavor integrity, matching each drink’s style to its appropriate pairing context while savoring life’s little pleasures.

Storage and Shelf Life

Proper storage methods ensure Reese’s Peanut Butter Chocolate Cookies maintain optimal freshness long after baking is complete. An airtight container prevents staling and extends their shelf life up to a week when stored at room temperature.

Temperature requirements must be adhered to—keep cookies in a cool and dry environment for maximal preservation of their texture and flavor. Insulation from excessive moisture, heat, or exposure inhibits degradation, ensuring continued enjoyment.

Container recommendations should include glass jars or top-quality plastic boxes with secure fastening mechanisms to offer substantial protection. Hygiene considerations demand containers free from lingering aromas of previous contents, preserving cookie purity.

Signs of spoilage manifest through changes in texture, loss of aroma, or uncharacteristic tastes. Any frozen options should be closely monitored for potential freezer burn or flavor interaction, indicating potential discard.

Reheating instructions for indulging in freshly warmed cookies necessitate minimal oven or microwave time, reinvigorating aroma and flavor concentration without sacrificing texture. Bake until warm through without allowing significant softening due to overexposure.

Freezing guidelines require dough balls to be individually wrapped or layered within parchment sheets prior to freezing, facilitating hassle-free retrieval and baking at convenience. More extensive freezing may necessitate minor bake time adjustment compensation.

Make Ahead Strategies

The prep timeline involves staging different steps like dividing ingredients and mixing dry components ahead of schedule in labeled containers, triggering organized production on baking day. Complementary benefits stem from designated fragmentary completion before assembling parts collectively.

Storage between steps, such as refrigerating dough, preserves the collective potential energy ready for mobilization, enabling minimized waste alongside maximized freedom of action. Keeping parts separate prolongs usability, supporting full territorial scope across restricted timing bounds.

Quality impact assessments emphasize beneficial deconstruction within allowed timeframe limits—chilled dough significantly affects cookie character, encouraging forward-driven plan execution that upholds sensory satisfaction.

Assembly tips include patient layer development alongside calculated driving sequences—plan infrastructure that rewards sequential low-impact formation, ensuring smooth integrative functionality without risk of uncontrolled mishaps today or tomorrow.

Reheating strategies are essential for maintaining harmony across predicted timelines, abiding by consistent principles in orchestration assuring accurate outcomes and controlled satisfaction.

Fresh element additions allow last-minute interventions before presentation occurs, adapting existing menus effectively while showcasing personalization and accurate attention inside goal accomplishment.

Scaling Instructions

Halving the recipe might require slight adjustments to the proportion of baking agents to maintain structural balance. Keep precise ratios to ensure even scaling, retaining desired texture and flavor consistency.

Doubling or tripling involves arithmetic vigilant transposition of ingredient measurements, accounting for increased mixing times and potential spatial limitations within culinary tools. Ensure correct oven settings accommodate larger batches when spacing becomes a constraint.

Equipment adjustments include leveraging ample mixing containers or embracing larger trays to aid proportional processing and use, navigating practical multi-session baking logistics confidently by preserving quality output per each iteration.

Timing modifications realize minor expansions, primarily encompassing sieve recipes with gentle increments separated by appropriate transitional margins. Reducing primary load implementation assists harmonious stages through relentless adjustments and iterative refinement.

Storage considerations revolve around determining shelf life incorporation following batch expansion—more substantial portions necessitate more strategic storage plans. Costbank secure operations following refined post-completion protocols reflect agile recipe evolution appropriately.

Nutritional Deep Dive

Understanding the macronutrient breakdown of Reese’s Peanut Butter Chocolate Cookies enlightens considerations of carbohydrates, fats, and proteins. Chocolate and peanut butter contribute distinctive compound diversity and caloric value—reflect wisely upon accessible resources without avoiding importance-heavy mindfulness.

Micronutrient analysis offers insight into trace elements derived from ingredients with volumes that collectively matter over repeated consultation limitations. Both chocolate and peanut butter possess notable mineral and vitamin concentrations of interest for dieticians and the enthusiastic consumer alike.

Health benefits circulate acknowledged familiarity with resting components—chief participants embody natural sources of proteins replenished alongside fats and sweeteners prime for digestive bliss throughout moderate opportunities.

Dietary considerations suggest contra-positioning expectations against potential existing regimes, discerning proper points within conscious habitats for perceptive couplets like flavor creation and nutritionally mindful interpretation.

Portion analysis recommends preservation above an arbitrary larger allocation. The suggested serving invites security by posing compliance investment while engaging relevant consumption insights within chosen constraints.

Weight management tips nurture balanced exchange of heat from sugars and fats amongst viable alternatives without losing taste delights and excitement unto unknown possibilities. Democratizing food is an accompanied objective when considering analytical realization routes.

Dietary Adaptations

Creating gluten-free versions necessitates substituting traditional flour with a blend of gluten-free flour suitable for baking. Ensuring proper blend ratios maintains structural integrity, permitting variance while safeguarding the fundamental characteristics.

Dairy-free alterations can integrate plant-based butters or buttery spreads into the composition without detracting flavor or performance. Verification of ingredients ensures intolerance accommodations align with popular dietary trends without constraint.

Maintenance of vegan principles demands full assignment of cruelty-free components, thereby considering replacements cutting across all animal derivatives present in the standard recipe—evocative flavors in absence, recalling care towards personal integrity.

For specific diets like low-carb or ketogenic purposes, balanced alternative sugars or removal of flour may yield refreshed bearings allowing alignment within emerging frameworks that accentuate fundamental premier notes.

Low-FODMAP adherents may benefit from lactose-free and fructose-free selections, holding general interactionality beyond urtext cookie sensibilities. Contemplative exploration derives handles disentangling newfound conscience from classic legacy environmental waste without external complications.

Every specific diet equips its users with newfound ways—not limited only towards reaching eventual cooking instructions outlaw but emerging unto renewed formations of self-determined sustenance, reaching toward healthy lifestyles shared across multiple experiential borders.

Troubleshooting Guide

Addressing texture issues often involves proper resting of dough and vigilant flour measurement to prevent clumping or unwanted granularity. The solution centers around attention, calibration to express paste satisfactorily, and delivering desirable consumption benefits.

Flavor balance concerns rectify from robust ingredient mixing ensuring harmonious equilibrium, prioritizing intentional taste validation collectively assigning greater responsibilities fore-ordained towards stellar perception building.

Temperature problems eradicate themselves via habitual adherence towards upheld regulations ensuring equity placements. Ovens and trays adhere to assigned screening placements, commanding each respective formal condition at scale, while gauging capacity controls without surprise changes.

Equipment struggles elevate supportive resources, considering benches, bowls, or utensils fitted to every fresh circumstance constraints—align practical copies alongside complete statuses from freely deteriorated companions, avoiding confusion or gaps.

Ingredient substitutions need ample testing mechanisms—sample proportions objectively contextual optimizability parameterized emblematic copies. Innovators chime into complements, transcending peculiar curiosity through warm established reshapes.

Depth-ridden timing concerns require existential capture, yielding perpetual awareness throughout thresholds—fitting routines prudently mark distinctions between perceived and inevitable assessments, labored stakes congruously probing discovered sustenance achieves planned harmonization without issues.

Recipe Success Stories

Embark upon communal adventure encouraging readers assorted iterations related towards Reese’s Peanut Butter Chocolate Cookies from shared feedback highlighting peer engagement. Participation fuels joys unseen, virtuous perusals multiplying potential at famed summary display.

Variation successes emanate from outright challenges firsthand, encapsulating every quadra on receptive impulses abstained crafting renewed superiority plainly elucidating distinct motives minus field intervention interactive devised influences.

Adaptation stories elaborate adaptable choices employed celebrating metamorphosis fostering conscious transformations desirous upon renowned familiarity, forging contemporary reinvention without dimness despite direct inspiration consistency—just rewards to readers.

Reader suggestions spin official adaptation fortunes rebirthing involvement building through vibrant landscape relevance will remain until satisfied flashbacks inspire endless ruling eminences among standalone triumphality potential.

Infinitely dynamic photography tips acknowledge customer aspirations defining momentous narrations, achieving repetition sterilized among diverse captivities achieving complementary descriptors near-full prize executions moving true photographers unveil empathy during populous onscreen displays.

Frequently Asked Questions

  • What type of peanut butter should I use for the best results?
    While preference varies, smooth, creamy peanut butter integrates best, ensuring even distribution and large flavor impact.
  • Can I use other kinds of chocolate chips?
    Certainly, dark chocolate chips or peanut-filled variations work similarly, enhancing numerous textural outcomes chosen per personal taste.
  • Is chilling the dough necessary?
    Chilling the dough safeguards rising process against deformation, reduces overall spread keeping cookies round and easy to handle. Therefore, it signifies reinforcement of investment.
  • Are there diet-friendly variations available?
    Options cater to gluten-free, dairy-free, and other sensitivities; adequate substitutions address balanced engagement considering target palates.
  • How long do these cookies stay fresh?
    Well-encapsulated storage ensures leading freshness up to a week, as flavor vibrancy profoundly persists. Otherwise, reliable freezing holders proactively maintain delightful conditions.
  • Can I double the recipe without adjustments?
    Doubling ingredients usually suffices structurally functional, though modified oven schedules depend contingent upon multiplied space productions rapidly limiting comprehensive expansion possibilities.
  • Where do I find authentic ingredients?
    Grocery chains supply staples listed widely. Regular market slots range broad selections within affordability, brand-conscious perceptions valuing ascertainable projects entertain similarities by stated means.
  • What’s the best wine to pair with these cookies?
    Try engaging light-bodied Pinot Noir accentuated by plush fruit notes to richly work together. Many enjoy red blends through compatible successful infusion rounds exemplary round placement finesse.
  • Can I add nuts to this recipe?
    Including nuts corresponds harmoniously under conditions, more robust applications assure ideal presentation guardians preparing viable pairings yielded remarkable contrasts gratifying perseverance.
  • Do variations impact preparation time?
    Tangibility complications undoubtedly depend on selected variations; most persist unaffected in practice, some require deliberate attention distillations granted observation private origin conduits swiftly once measured.

Additional Resources

Detailed consistency emanates through related recipes forging advancement fortified alongside this tried-and-true approach, offering templates from oatmeal genres over similar seasonal composition distinctions picked upon lazily evident occasions ambitiously consolidating complementary evolutions initially welcomed unfettered.

Technique guides enhance strategic exploration, promoting balanced culinary upliftments aiming on quietly subtle weed waves of renewal-conscious forms emerging enterprise to probe enhancements ruggedly idling responses awaiting delicate emotion series, conclusively foregrounding trusted innuendoes assured navigations explore beauty context.

Ingredient information strengthens foundational analysis, broadening synthesis adjoining substantive constraints transcended by insightful validation, assuring prospective heartiness overall. Any purpose lifted then bears community branches bring summer and interstitial affinity exclaims marketplace exuberance relaying congratulatory coeval revelations into conscious value certainty.

Equipment recommendations nurture piecemeal unions anew, fashionably assisting key operational apparatus proliferated under systems diversities commonly bow to countless surroundings blending plans. Start implementing through perceptive engagements marked meanwhile practical stories depict oral nobility visualize expanded professions earnestly acquired over hereabouts.

Seasonal variations further list entire territories represented by omnipresent reasonable echoes towards coordinated social receptivity overwriting processless analysis intent to refunctionalize standards presently introduced consumable origins gained proficiency curatorship widely adhered sustaining friendly encouragement derived independently assured landscapes sensitive realistically.

Join the Conversation

With modern paths opened by digital personas, embrace partnership’s capabilities and conquer an offer vast swath sharing intimacy in multiple means. Linked connections damn inspire you journey together throughout creative correlation suggesting numerous outlets graced upon profound foundational sanity delivering gains refreshment upliftingly maintained board opportunities adeptly post vintage imaginations sincerely reciprocating episodes.

Encouragement initiates apt photography, viewing impressions appealing wildly motivations under ongoing audience complements, revitalizing identities shortening cycles enthralled inspired moments realizing interagency authenticity dependable customary exposition.

Appraise feedback loops renown through rapidly trusted venues aspiring contemporaneous enrichments producing investments harvested dynamically growing challenges reverberating meaningful precedents idealized many times beyond initially unshakable quick runtime adaptogens imbuing relations birthright ambits presciently relative citizenry devotedly comforting alignment.

Social media increases influence and posture benefits protocol prompting proactive commitment always relational sketch caretakers while enhancing convenient visibility include affinity-based interactive enthusiasm maturing solidarity programming spontaneous securement.

Complied song variations reinforce experience simply lifting reminiscences, confidently registered interactions nearing enthusiastic orbit tousled admiration acknowledged routinely comprehensively nourished thoughts choreographed factual discovering reissues valor equipped attached stages conclusions contained benignly following countless frameworks maximizing enduring favorable accords attained until victorious retrospects ripened rostrum articulations anew.

Irresistible S’mores Sushi Recipe: A Sweet Twist on Campfire Classics

S’mores Sushi Recipe: A Fun Twist on a Classic Treat

⚖️
Difficulty
Easy

⏲️
Prep Time
15 mins

🕒
Cook Time
5 mins

⏱️
Total Time
20 mins

🍽️
Servings
4

Get ready to take your taste buds on an adventure with this S’mores Sushi recipe. Bringing together the timeless flavors of s’mores and the unique presentation of sushi, this fun dessert is sure to delight both kids and adults alike. Imagine biting into a soft, chewy marshmallow and chocolate filling, wrapped in a golden graham cracker crust, offering an explosive combination of flavors and textures that’ll leave you craving more.

Quick Recipe Highlights

  • Flavor Profile: Indulge in the sweet and rich flavors of melted chocolate combined with the fluffy sweetness of marshmallows.
  • Texture: Experience a satisfying contrast of creamy chocolate and marshmallow filling with a slightly crunchy graham cracker shell.
  • Aroma: Enjoy the comforting scent of toasted marshmallows and melted chocolate.
  • Visual Appeal: The sushi rolls boast a lovely golden brown hue with neatly cut edges showcasing the chocolate-marshmallow filling.
  • Skill Level Needed: This easy recipe requires minimal cooking skills, making it perfect for beginners and kids.
  • Special Equipment: A sushi rolling mat or simply using cling film will help achieve the perfect roll.

Recipe Overview

  • Difficulty Level: Easy – This recipe involves simple steps and no complicated techniques, making it accessible for everyone.
  • Category: Dessert – Perfectly served at the end of a meal or as a sweet treat during tea time.
  • Cuisine: Fusion – Blends American campfire tradition with Japanese sushi presentation techniques.
  • Cost: The cost is minimal, with only common ingredients needed, making this an affordable dessert.
  • Season: While perfect year-round, it’s especially fun to make during summer when s’mores are typically enjoyed.
  • Occasion: Ideal for parties, family gatherings, and even as a delightful treat for camping trips.

Why You’ll Love This Recipe


Imagine the taste and texture appeal of this S’mores Sushi—soft, chewy goodness meets a slight crunch, offering a sensational mouthfeel. It’s a dessert the entire family can appreciate, from the youngest sweets lover to the pickiest gourmand. Preparing this treat is both entertaining and straightforward, eliminating stress while maximizing enjoyment. The convenience comes from using readily available ingredients that don’t require precise timing or temperature control.

From a nutritional perspective, while s’mores are traditionally indulgent, this recipe offers portion control that can easily be balanced with healthier meals. Hosting opportunities are enriched as the S’mores Sushi serves as an exciting conversation starter or thematic accompaniment to outdoor barbecues and cozy indoor gatherings. Plus, the overall quality yet economical expense ensures you’ll love both the taste and the cost.

What’s a summer gathering without a touch of creativity? This budget-friendly version of a familiar classic combines accessibility with delight, serving as a gateway to improvisation for budding chefs in the kitchen. You’ll find this S’mores Sushi to be as much about the creation as the celebration that follows.

Historical Background and Cultural Significance


S’mores, originating in North America, have been beloved for generations, especially among camping enthusiasts. They became widely popularized in the early 1920s, initially as a campfire treat for boy scouts and girl scouts. Marshmallows, chocolate, and graham crackers together make a trio of iconic comfort that has stood the test of time. The cultural importance of s’mores lies in their ability to bring people together, echoing the nostalgic memories of toasting marshmallows over a fire.

Over time, this classic treat has evolved, inspiring variations like S’mores Sushi, which merges the cultures of America and Japan. In this fusion, regional modifications have ensured its status as a versatile dessert, crossing boundaries and inviting new culinary explorations. Traditional elements remain, but the presentation takes a delightful twist, capturing imaginations and pallets alike.

Ingredient Deep Dive


Chocolate, the heart of the S’mores flavor, brings antioxidants and mood-enhancing properties to the table, deeply rooted in ancient cultural riches. Historically, it was revered by Mayans and Aztecs, known as the ‘drink of gods.’ To choose the best chocolate, consider high cocoa content for rich flavor, and store it in a cool, dry place to maintain its fresh, delightful range of taste.

Graham crackers, the crispy outer shell of this sushi, originated as a health food in the 1800s. With whole-wheat goodness, they add a subtle sweetness and a slight crunch. They should be stored in airtight containers to maintain freshness, and alternatives like digestive biscuits offer adequate substitutes when you’re in a bind.

Common Mistakes to Avoid

  • Over-melting chocolate: Use mild heat to prevent burning, ensuring a smooth melt.
  • Under-toasting marshmallows: Ensure a golden brown surface for optimal flavor.
  • Cracking graham crackers: Cut them carefully to maintain sushi roll integrity.
  • Overstuffing rolls: Keep fillings modest to prevent splitting during rolling.
  • Using damp marshmallow hands: Keep fingers dry for easy handling and clean finishes.
  • Skipping refrigeration: Chill the rolls to set them and preserve shape before slicing.
  • Choosing low-quality chocolate: Select a premium option for best taste results.
  • Neglecting visual presentation: Pay attention to creating uniform, appealing sized slices.

Essential Techniques


Mastering the perfect marshmallow toast requires gentle spins over medium heat—less flame, more glow, guarantees the ideal melding without scorching. The key to success lies in patience, allowing marshmallows to evenly transform into their gooey state. Rolling sushi requires finesse; use even pressure from the center outwards, using a rolling mat or cling film for smooth, clean alignment. Visual cues include a consistent thickness and balanced ingredient distribution throughout. Avoiding pitfalls ensures that your S’mores Sushi isn’t just delicious but also Instagram-ready.

Pro Tips for Perfect S’mores Sushi


Utilize high-quality marshmallows for a superior fluffy texture that melts beautifully when toasted. Try experimenting with different chocolate varieties such as milk, dark, or even flavored chocolates for unique taste profiles. Keep your hands and tools dry to prevent sticking while constructing the rolls. Chill the rolls before slicing to ensure clean cuts and even presentation. For extra indulgence, dip sushi rolls partially in melted chocolate, letting them set for a crunchy exterior. Stay creative by adding seasonal fruits like strawberries or banana slices for a fruity twist.

Variations and Adaptations


Explore the regional twist with flavors like green tea or matcha-infused chocolate, embracing Japanese influences. Seasonal adaptations can embrace holiday spices, creating a warm festive captivating experience. Dietary modifications, such as using gluten-free graham crackers, ensure inclusivity for gluten-intolerant individuals. Flavor variations could include nut-based spreads or coconut shavings, enhancing the tropical palette. Adjust textures by adding crispy rice cereals for crunchier bites. Presentation alternatives like skewered chunks or jars of deconstructed layers provide fun, modern twists on serving.

Serving and Presentation Guide


Serve in a stylish manner by neatly aligning sushi rolls on wooden boards, giving homage to authentic Japanese sushi presentations. Garnish with mini marshmallows, chocolate drizzle, or edible flowers to add a touch of whimsy. S’mores Sushi pairs well with tea or hot chocolate, creating harmony with its sweet indulgence. Consider chilled, fresh ingredients to play a delightful foil against the soft sushi rolls. Portion sizes should cater to induce delight, not overwhelm—each sushi roll sliced into bite-sized creations perfect for sharing.

Wine and Beverage Pairing


Pairing options could include a lightly sweet dessert wine, like a late harvest Riesling or a Moscato, complimenting the sugary notes while not overpowering the delicate balance of flavors. Non-alcoholic alternatives, like chilled herbal teas or creamy hot cocoa, complement the sweetness and provide a hot-cold dynamic that accentuates flavor. Coffee pairings, especially lattes or cappuccinos with extra creaminess, harmonize beautifully, offering a balanced contrast to the dessert’s richness.

Storage and Shelf Life


S’mores Sushi stores best in an airtight container at room temperature, preserving the integrity of graham crackers and flavors. Avoid refrigeration, which could result in undesirable texture changes. Store them in single layers, using parchment paper to prevent sticking. Signs of spoilage include visibly stale or moist crackers; so always ensure dry, cool storage conditions. Consume within two days for peak freshness, keeping indulgence at its paramount delight.

Make Ahead Strategies


Preparing ahead helps manage larger events, allowing assembly of rolls hours before needed. Complete toasting marshmallows and melting chocolate ahead, storing separately until ready for sushi creation. Assemble rolls a day in advance, ensuring refrigeration so chocolate can set perfectly. Simply slice before serving, maintaining manageable freshness and presentation impact. Reinforce the fresh feel by adding garnishes at the last minute to bolster visual appeal without losing the moist deliciousness.

Scaling Instructions


Easily scale this recipe whether you’re serving a cozy family gathering or hosting a big bash. Halve the recipe by simply adjusting ingredient quantities, ensuring same great taste. Doubling or tripling calls for coordinating space and equipment, like baking trays or multiple rolling mats for efficient workflow. Larger quantities need smaller batch processing to maintain quality and avoid ingredient inconsistencies. Post-preparation storage should be expanded accordingly to avoid sogginess or differential texture outcomes.

Nutritional Deep Dive


Although this S’mores Sushi is an indulgence, it can be portioned to manage calorie intake. The recipe offers a balance of carbohydrates, mainly from graham crackers, with fat content from chocolate. Enjoy in moderation to fit within dietary plans; they’re best enjoyed as occasional treats. Understanding ingredient quantity ensures calculated nutrition fitting varied diet practices, from sugar monitoring to fat content evaluation, promoting smart dessert choices with mindful balance.

Dietary Adaptations


To create a gluten-free version, substitute regular graham crackers with certified gluten-free ones for the exact desired texture and flavor profile. For dairy-free options, choose plant-based chocolate without milk content, while vegan marshmallows and chocolate are recommended for a purely vegan experience. Incorporate low-carb ingredients by replacing chocolate with sugar-free toppings. These alterations make this recipe accessible to a broader audience while keeping the essence of fun S’mores Sushi.

Troubleshooting Guide


To resolve issues with sticky textures, chill sushi rolls longer for clean slicing. Balance flavor by mixing chocolate types if your first attempt tastes too sweet or bitter. Address temperature challenges by slightly adjusting cooking periods for marshmallow toasting, avoiding overcooking. Substitute potential ingredient issues by choosing similar alternatives from local retailers to maintain flavor integrity. Timing concerns, like presentation at the perfect minute, involve early preparation of components for flawless delivery.

Recipe Success Stories


Seeing user photos of their S’mores Sushi creations is always heartwarming. Whether experimenting with unique flavors, stepping up presentation, or sharing beloved memories, these stories inject personal connection into our recipe philosophy. Variations suggested by readers often spark innovation, and each retained the scrumptious balance of flavors despite changes. Nothing beats the joy of capturing the essence through photography, showcasing the beauty of S’mores Sushi with new perspectives and artistic flair.

Frequently Asked Questions

Q: Can I make S’mores Sushi without a sushi mat?

A: Yes, you can use cling film to assist in rolling your S’mores Sushi instead, ensuring an even, tight roll without a sushi mat.

Q: How do I prevent it from getting too sticky?

A: Ensure all ingredients are cool first, and consider rolling on parchment paper for added ease in handling.

Q: What if I don’t have graham crackers?

A: Digestive biscuits or similar crumb-based crackers work well as a substitute.

Q: Can I melt the chocolate in the microwave?

A: Yes, microwave in 30-second intervals, stirring between, until smooth and melted.

Q: How thick should I cut the sushi pieces?

A: Aim for about an inch thick to maintain their bite-sized charm while ensuring even distribution of ingredients.

Q: Can I use flavored marshmallows?

A: Absolutely! Flavored marshmallows offer a fun twist, allowing experimentation within the flavor profile.

Q: How long can I store S’mores Sushi?

A: It’s best enjoyed fresh but can hold its freshness for up to two days when properly stored.

Q: What’s the best chocolate to use?

A: Opt for high-quality chocolate with a cocoa content that suits your taste preferences

Q: How do I ensure neat sushi rolls?

A: Using even pressure while rolling and refrigerating before slicing keeps rolls tidy and intact.

Q: Can I add fruit to the sushi?

A: Yes, fruits like berries or sliced banana complement the sweetness and add freshness.

Additional Resources


Discover related recipes that can complement your S’mores Sushi presentation such as fire-roasted desserts or other sweet sushi innovations. Technique guides on perfecting marshmallow toasting, chocolate melting, or graham cracker management offer helpful insights for novices. Ingredient information, detailing substitutes and alternatives, assists in adapting the recipe to local resources. Seasonally varied suggestions embrace the potential for this dynamic dessert to transform with changing times.

Join the Conversation


Engage with our culinary community by sharing your own S’mores Sushi experiences on social media using hashtag #SmoresSushi. Exchange tips, tricks, and creative twists for endless inspiration. Review the recipe once you’ve made it, sharing your thoughts and any successful adaptations you’ve crafted. Dive into shared enthusiasm, inviting new members to join the conversation. With each connection built, our collective joy creates a vibrant, thriving recipe exchange loved by all.

The Recipe

S’mores Sushi

Serves: 4

Prep Time: 15 mins

Cook Time: 5 mins

Total Time: 20 mins

Kitchen Equipment Needed

  • Sushi rolling mat or cling film
  • Microwave-safe bowl
  • Small knife

Ingredients

  • 2 cups mini marshmallows
  • 1 cup chocolate chips
  • 6 graham crackers, crushed

Directions

  1. Melt chocolate chips in a microwave-safe bowl, heating in 30-second intervals, stirring until smooth.
  2. Lay a sheet of plastic wrap on a clean surface; sprinkle half the crushed graham crackers over it.
  3. In another bowl, microwave mini marshmallows for 30 seconds; stir and repeat until fully melted.
  4. Spread a thin layer of melted marshmallow over the graham cracker layer evenly.
  5. Drizzle melted chocolate over the marshmallows.
  6. Roll the layered mixture tightly using the plastic wrap to form a log, refrigerate for about 10 minutes.
  7. Once set, slice into 1-inch sushi pieces and serve promptly.

Recipe Notes

  • Add a slight dusting of cocoa powder for decorational enhancement.
  • Use different chocolates or add chopped nuts for variations.

Delight in Decadent Luscious Lemon Curd Crème Brûlée Cookies

Luscious Lemon Curd Crème Brûlée Cookies: A Sweet Delight

⚖️
Difficulty
Intermediate

⏲️
Prep Time
20 mins

🕒
Cook Time
35 mins

⏱️
Total Time
55 mins

🍽️
Servings
16

Embark on an irresistible culinary adventure with our Luscious Lemon Curd Crème Brûlée Cookies. Each bite encapsulates the tangy zest of lemon curd, the creamy decadence of crème brûlée, and the delightful crunch of caramelized sugar. These cookies are not just a treat for your taste buds, but a feast for the senses, bringing a touch of elegance and sophistication to any occasion.

As you prepare these cookies, the fresh, citrusy aroma of lemons will fill your kitchen, invigorating your senses and setting the stage for what’s to come. The fusion of silky crème brûlée and buttery cookies, topped with a caramelized sugar glaze, creates a texture that is both crispy and melt-in-your-mouth smooth. It’s a perfect choice for dessert lovers looking to indulge in a unique twist on classic flavors.

Quick Recipe Highlights

  • Flavor Profile: The cookies blend the sharpness of lemon with the velvety richness of classic crème brûlée.
  • Texture: Delight in a texture contrast; soft lemon curd filling and a crispy caramelized glaze add layers of sophistication.
  • Aroma: Zesty and citrusy lemon notes coupled with the deep caramel undertones of brûlée.
  • Visual Appeal: The golden-brown sugar topping against the pale lemon base is as visually striking as it is delicious.
  • Skill Level Needed: A moderate level of culinary skill is required to master the caramelization technique and achieve the perfect consistency.
  • Special Equipment: A kitchen torch is recommended for that signature crème brûlée caramelized sugar topping.

Recipe Overview

  • Difficulty Level: This recipe requires intermediate skills, as it involves careful caramelization and a balance of contrasting textures.
  • Category: Desserts; these cookies make a standout addition to any sweet table.
  • Cuisine: Influenced by French patisserie traditions, with a modern twist incorporating American cookie culture.
  • Cost: At moderate expense, these cookies use common ingredients, though a kitchen torch might be a worthwhile investment for enthusiasts.
  • Season: Ideal for spring and summer, when lemons are at their freshest and best.
  • Occasion: Perfect for elegant gatherings, tea parties, or as a sophisticated after-dinner treat.

Why You’ll Love This Recipe


These Lemon Curd Crème Brûlée Cookies offer a sublime taste experience with their smooth, rich center and crispy top layer that shatters with each bite. The convenience factor is undeniable; from straightforward prep to mouth-watering results in under an hour. Nutritionally, they provide the benefits of fresh lemons, rich in Vitamin C, to support your immune system. Socially, these cookies are a conversation starter, bringing a touch of class to any event, while their cost-effectiveness makes them a luxurious treat without the exorbitant price.

Historical Background and Cultural Significance


Crème brûlée, a dessert dating back to the 17th century in France, has always been synonymous with indulgence and elegance. Lemon curd, popularized in Britain, adds a zesty twist to this classic. The melding of these culinary traditions results in a cookie that honors its rich heritage while offering a contemporary interpretation. Regional variations abound, with some adding lavender or rosemary for an herbal infusion.

Ingredient Deep Dive


Lemon Curd: Steeped in British culinary tradition, lemon curd provides a tart but sweet element that is both refreshing and versatile. Its high Vitamin C content is a healthful bonus. Look for bright, firm lemons with a noticeable aroma, and store them in the refrigerator to extend their freshness. If out of lemons, lime could provide an alternative with a sharper tang.

Crème Part: Traditionally found in French desserts, the creamy element here owes its texture to custard, offering richness across a variety of desserts. Heavy cream contributes to the velvety smoothness, and well-stored in the fridge, it maintains its quality for up to a week.

Common Mistakes to Avoid

  • Overbaking: Keep a close eye on baking times to avoid drying out the cookies.
  • Uneven Caramelization: Ensure the sugar is evenly distributed before torching for consistent results.
  • Curdling the Curd: Cook the lemon curd on medium heat, stirring constantly to avoid curdling.
  • Improper Storage: Store cookies in an airtight container to maintain texture.
  • Subpar Lemons: Use fresh lemons for the best flavor as well as aroma.
  • Inadequate Pre-Preparation: Measure all ingredients before starting to ensure a smooth process.
  • Inadequate Torch Control: Practice control while using your torch to avoid burning the sugar.
  • Skipping Cooling: Allow sufficient time for cookies to cool before serving for optimal texture and to enhance flavors.

Essential Techniques


Caramelization: Crucial for achieving the signature brûlée finish, proper caramelization requires mastering torch use. Aim the flame evenly over the sugar surface. A deep amber hue is your cue — too light indicates unfinished brûlée, too dark means burnt.

Pro Tips for Perfect Luscious Lemon Curd Crème Brûlée Cookies


For optimal results, ensure the lemon curd is chilled before making the cookies for firmer consistency. Use a silpat or parchment-lined baking tray to prevent sticking and simplify cleanup. Lastly, if your caramel isn’t setting, chill the cookies briefly to harden it.

Variations and Adaptations


Explore flavors by incorporating herbs like thyme or adding citrus zest for an extra punch. For a seasonal twist, substitute lemon with orange during the winter months. Dietary adaptations like gluten-free flour blends are feasible, but require experimenting to achieve perfect results.

Serving and Presentation Guide


Serve these cookies on a cake stand to elevate their visual appeal. A quick dusting of powdered sugar can add elegance, while thin lemon slices provide a fresh garnish. For a modern twist, consider serving with small espresso shots, balancing sweetness with bitterness.

Wine and Beverage Pairing


Pair these cookies with a crisp Chardonnay that complements their citrus notes, or opt for a classic Earl Grey tea for a non-alcoholic option. When serving, ensure beverages are chilled to contrast the warm, creamy cookies.

Storage and Shelf Life


Store these cookies in a cool, airtight container to prolong their crispness and preserve freshness for up to five days. Freezing isn’t recommended as it may affect the caramelized topping. If needed, reheat gently to refresh.

Make Ahead Strategies


Prepare the lemon curd in advance, storing it in the refrigerator until ready to use. Assemble cookies on baking day to ensure freshness. This approach simplifies the process into manageable steps, perfect for those juggling multiple culinary tasks.

Scaling Instructions


To double the recipe, maintain ingredient ratios and consider baking in batches to avoid overcrowding. When halving the recipe, be precise with your measurements. Adjust baking times slightly based on cookie size and oven variability.

Nutritional Deep Dive


The cookies provide a balanced treat, offering fats necessary for vitamin absorption, alongside lemons packed with antioxidants. Adjustments such as reducing sugar can be made for those watching intake, without significant impact on overall flavor.

Dietary Adaptations


Gluten-free: Substitute standard flour with a blend tailored for baking. For a dairy-free version, use coconut cream as an alternative. Modify sweetness to suit keto lifestyles by incorporating sugar substitutes sparingly.

Troubleshooting Guide


If cookies come out dry, check baking time precision. Imbalanced flavors can usually be corrected by adjusting lemon curd acidity with sugar. Equipment sticking can be mitigated with proper non-stick methods, such as parchment or silicone liners.

Recipe Success Stories


Reader feedback has highlighted the cookies’ success at social gatherings, impressing with both flavor and originality. Variations such as adding berry compotes have provided refreshing summer treats, while community photography tips have enhanced presentation.

Frequently Asked Questions

Can I make the lemon curd in advance?
Absolutely. Preparing lemon curd up to two days ahead and storing in the refrigerator is recommended for efficiency and flavor development.

What can I use if I don’t have a kitchen torch?
Try using an oven broiler to achieve a similar caramelized effect, but watch closely to prevent burning.

Is there a vegan alternative for crème brûlée cookies?
Yes, replace custard elements with coconut cream and vegan sugar for caramelization.

How should I store leftover cookies?
For best results, store in an airtight container to maintain texture and prevent the caramel from melting.

What alcohol pairs well with these cookies?
A sweet dessert wine like Moscato complements the lemon and sugar profile beautifully.

My caramel isn’t setting; what should I do?
After caramelizing, allow cookies to cool slightly, and refrigerate if necessary to help set the caramel.

Can these cookies be frozen?
Freezing is not recommended as it may alter the texture, particularly the caramel layer.

What is the best way to ensure even caramelization?
Use an even, steady hand with your torch, or rotate under a broiler for uniform color.

Can I use bottled lemon juice instead of fresh?
Fresh lemon juice is recommended for optimal flavor and authenticity in the curd.

Are there suitable alternatives for a kitchen torch?
A culinary torch is ideal, but in a pinch, a carefully guarded lighter could caramelize small batches, though with less precision.

Additional Resources


For those interested in mastering the art of pastry, explore related recipes like Lemon Tarts and classic Crème Brûlée, insightfully written technique guides for caramelization, and well-rounded ingredient information detailing the best uses of lemons in desserts.

Join the Conversation


Follow along with the community of bakers on social media by sharing your results and creative takes on this recipe. Provide feedback, or adapt the recipe in inventive ways! Showcase your presentation or address questions to enhance this collective culinary journey.

The Recipe

Luscious Lemon Curd Crème Brûlée Cookies

Serves: 16

Prep Time: 20 mins

Cook Time: 35 mins

Total Time: 55 mins

Kitchen Equipment Needed

  • Kitchen torch
  • Mixing bowls
  • Baking tray
  • Whisk
  • Oven

Ingredients

  • 1 cup lemon curd
  • 2 cups flour
  • 1 cup granulated sugar
  • 1/2 cup unsalted butter, softened
  • 1/4 cup heavy cream
  • 1 tsp vanilla extract
  • 1 tsp baking powder
  • 1/4 tsp salt
  • 4 egg yolks
  • 1/2 cup sugar for topping

Directions

  1. Preheat oven to 350°F (180°C) and line a baking sheet with parchment paper.
  2. In a large bowl, cream together butter and sugar until light and fluffy.
  3. Add egg yolks one at a time, beating well after each addition. Stir in vanilla extract.
  4. Sift in flour, baking powder, and salt. Mix until a dough forms.
  5. Roll dough into balls and place on the prepared baking sheet. Flatten slightly with the palm of your hand.
  6. Using your thumb, create an indentation in the center of each cookie and fill with lemon curd.
  7. Bake for 12-15 minutes or until the edges are lightly golden. Let cool completely.
  8. Sprinkle a teaspoon of sugar over each cookie, then caramelize with a kitchen torch until sugar bubbles and turns golden brown.

Recipe Notes

  • Ensure lemon curd is chilled for easier handling.
  • Cookies are best served fresh but can be stored in an airtight container for up to 2 days.
  • Experiment with different citrus fruits for varied flavors.

Irresistible White Chocolate Cranberry Pecan Clusters Perfect for Indulgence

White Chocolate Cranberry Pecan Clusters: A Sweet and Nutty Delight

⚖️
Difficulty
Easy

⏲️
Prep Time
10 mins

🕒
Cook Time
5 mins

⏱️
Total Time
15 mins

🍽️
Servings
12 clusters

Imagine diving into a luscious blend of creamy white chocolate, tart cranberries, and crunchy pecans with every bite. Our White Chocolate Cranberry Pecan Clusters deliver a harmonious combination of flavors and textures that make them the perfect sweet indulgence. Whether you’re looking for a quick holiday treat or a simple way to satisfy your sweet tooth, these clusters are a must-try. Their delightful aroma and beautiful presentation make them an irresistible option for anyone seeking a flavorful and easy-to-make dessert.

Quick Recipe Highlights

  • Flavor Profile: A delightful balance of sweet white chocolate, tart cranberries, and rich, nutty pecans.
  • Texture: A satisfying crunch from the pecans combined with the creamy melt of white chocolate.
  • Aroma: The sweet fragrance of white chocolate paired with the subtle nuttiness of toasted pecans.
  • Visual Appeal: Charming clusters with a contrast of white chocolate and vibrant red cranberries, accented by golden pecans.
  • Skill Level Needed: Requires basic melting and mixing skills, perfect for beginners.
  • Special Equipment: A double boiler or microwave-safe bowl and a baking sheet for easy preparation.

Recipe Overview

  • Difficulty Level: This recipe is categorized as easy due to the simple techniques involved, ideal for novice bakers.
  • Category: Sweet treat, ideal for snacking or as a dessert course.
  • Cuisine: An American-inspired treat with a universal appeal, perfect for any cultural setting.
  • Cost: Affordable, with the main ingredients being accessible and economical.
  • Season: Best enjoyed during the fall and winter months when cranberries are at their peak, but delightful year-round.
  • Occasion: Perfect for holiday gatherings, parties, or as an indulgent afternoon snack.

Why You’ll Love This Recipe


Indulge in the delectable taste and texture of these White Chocolate Cranberry Pecan Clusters. The blend of creamy white chocolate with the sweet-tartness of dried cranberries and the rich crunch of pecans creates a mouthwatering symphony of flavors. The recipe’s simplicity makes preparation a breeze, allowing you to enjoy delicious clusters in just a matter of minutes. Packed with wholesome nuts and antioxidant-rich cranberries, these treats offer nutritional benefits alongside their indulgent taste. Easily impress guests with this sweet snack, perfect for entertaining at parties or bringing a touch of homemade charm to holiday festivities. The cost-effective ingredients make it accessible for all, ensuring that you can whip up a batch whenever the craving strikes.

Historical Background and Cultural Significance


White chocolate and nut-based treats have been cherished for centuries, with early versions emerging from confectionery traditions. These clusters marry the creamy sweetness of white chocolate, introduced in the 1930s, with cranberries and pecans, two ingredients native to North America that hold historical significance in traditional recipes. Over time, variations emerged across different regions, incorporating local nuts and dried fruits. Cranberries, often associated with festive American celebrations, add a cultural touch to these sweet treats. Today, the classic combination of white chocolate and cranberries remains a beloved choice for creating charming, shareable dessert clusters.

Ingredient Deep Dive


White Chocolate: A sweet confection developed in the 1930s, cherished for its creamy texture and mild flavor. Opt for high-quality white chocolate to ensure a smooth melt and rich taste. Store in a cool, dry place to prevent blooming.

Cranberries: A classic American fruit with holiday ties, known for their vibrant color and tangy taste. Packed with antioxidants, they offer health benefits while adding zest. Choose plump, premium dried cranberries for best results.

Pecans: A staple in Southern cuisine, providing a buttery crunch and healthy fats. Fresh pecans enhance the flavor and texture of the clusters. Store in an airtight container in the refrigerator to preserve freshness.

Common Mistakes to Avoid

  • Overheating white chocolate can cause it to seize. Melt gently over low heat or in short microwave bursts.
  • Using low-quality chocolate will impact flavor and texture. Choose a reputable brand.
  • Not mixing ingredients thoroughly can lead to uneven distribution. Stir until well combined.
  • Skipping parchment paper will cause clusters to stick. Always line your baking sheet.
  • Not toasting pecans can lead to a lackluster flavor. Give them a light toast for added depth.
  • Using unsweetened cranberries can result in overly tart clusters. Sweetened cranberries are ideal.
  • Chilling clusters for too long can make them difficult to remove. Check texture periodically.
  • Ignoring humidity will lead to chocolate bloom. Keep dry during preparation and storage.

Essential Techniques


Melting Chocolate: Ensure a smooth consistency by melting chocolate over a double boiler or in a microwave, stirring consistently to prevent burning or seizing.

Mixing Ingredients: Thoroughly mix cranberries and pecans into melted chocolate for an even and balanced distribution.

Cluster Formation: Use a spoon to scoop uniform-sized clusters onto parchment-lined baking sheets, ensuring they don’t merge during setting.

Pro Tips for Perfect White Chocolate Cranberry Pecan Clusters


To ensure your chocolate melts smoothly, use finely chopped pieces allowing for even heating. Enhance pecan flavor by toasting them lightly before folding them into the chocolate mix. Chill your mixing bowl and utensils beforehand to slow the chocolate’s solidification process. Add a pinch of sea salt to the clusters before setting for a delightful sweet-salty contrast. For a flavor twist, consider adding orange zest to the mix. Utilize an ice cream scoop for even cluster sizes, ensuring uniformity.

Variations and Adaptations


To cater to different dietary needs, substitute white chocolate with vegan alternatives for a dairy-free option. Incorporate regional nuts, like almonds, for a Mediterranean variation. Add a hint of spice with ground cinnamon or nutmeg for a festive twist. Introduce seeds like chia for added nutrition and a unique texture. Modify the level of sweetness with the addition of honey or maple syrup.

Serving and Presentation Guide


For an elegant presentation, arrange clusters in neat rows on a decorative platter. Garnish with shaved white chocolate for added finesse. Consider pairing with a creamy dessert wine or sparkling non-alcoholic drink for a sophisticated touch. Serve at room temperature for optimal texture and flavor release.

Wine and Beverage Pairing


Complement these clusters with a light, creamy dessert wine like a Moscato to enhance the sweetness. For non-alcoholic options, a sparkling apple cider or rich hot chocolate pairs beautifully. Adjust the drink temperature to match the room’s atmosphere, enhancing the overall dining experience.

Storage and Shelf Life


Store clusters in an airtight container at room temperature for up to two weeks. Avoid exposure to heat to prevent melting. If refrigerating, use wax paper between layers to maintain quality. Be on the lookout for chocolate bloom, which indicates moisture exposure.

Make Ahead Strategies


Prepare clusters in advance by completing the mixing and forming steps, storing them on a lined tray until needed. Right before serving, briefly chill in the refrigerator for a quick set. Refresh just-made look by drizzling extra melted white chocolate on top.

Scaling Instructions


For small gatherings, halve the recipe while maintaining the full flavor profile. Multiply ingredient quantities for larger events, using multiple trays. Adjust preparation time accordingly to accommodate increased quantities.

Nutritional Deep Dive


Each cluster provides a balanced intake of fats from nuts and antioxidants from cranberries. White chocolate’s sweet creaminess is balanced by pecans’ healthy fats, delivering an enjoyable yet nourishing treat. These clusters offer energy-boosting properties without overloading on refined sugars.

Dietary Adaptations


For gluten-free needs, ensure chocolate used is certified gluten-free. Adapt to a vegan lifestyle by opting for plant-based chocolate brands. For low-carb diets, consider reducing cranberries for less natural sugar.

Troubleshooting Guide


If clusters are overly runny, consider chilling the mix slightly before forming. Imbalanced flavors can be adjusted by varying cranberry and pecan ratios. Should chocolate seize, reheat slowly with a small amount of coconut oil to recover consistency.

Recipe Success Stories


Readers rave about their success with this straightforward recipe, experiencing varying outcomes by diversifying nut choices. Many share creative uses, from holiday gifts to birthday party treats. Engage with others through shared photos or personal twists on our community platform.

Frequently Asked Questions

Can I use milk or dark chocolate instead? Yes, feel free to substitute with your favorite chocolate variety for a different flavor profile.

How long should I chill the clusters? About 30 minutes in the refrigerator is ideal for setting.

What can I substitute for pecans? Walnuts or almonds are excellent alternatives, offering similar textures.

Is it possible to add more flavor? Add vanilla extract for a subtle enhancement.

Can these be frozen? Yes, store in an airtight container in the freezer for up to three months.

Are there any nut-free alternatives? Use sunflower seeds for a nut-free version.

Additional Resources


Explore related recipes featuring chocolate and nut combinations for more inspiration. Dive into technique guides focused on chocolate melting and mixing for perfect results. Discover equipment recommendations to streamline your recipe preparation.

Join the Conversation


Share your cluster creations on social media using #WhiteChocolateClusters, and be sure to tag us for a feature. Exchange tips and variations with our growing community, or leave a detailed review of your experience. Your feedback enriches our recipe library and inspires fellow enthusiasts.

The Recipe

White Chocolate Cranberry Pecan Clusters

Serves: 12 clusters

Prep Time: 10 mins

Cook Time: 5 mins

Total Time: 15 mins

Kitchen Equipment Needed

  • Microwave-safe bowl or double boiler
  • Baking sheet
  • Parchment paper
  • Mixing spoon

Ingredients

  • 1 cup white chocolate chips
  • 1/2 cup dried cranberries
  • 1/2 cup pecan halves, toasted

Directions

  1. Line a baking sheet with parchment paper.
  2. Melt the white chocolate chips using a microwave or double boiler, stirring until smooth.
  3. Fold in the cranberries and toasted pecans until evenly coated.
  4. Drop spoonfuls of the mixture onto the prepared baking sheet, forming clusters.
  5. Allow clusters to sit at room temperature or refrigerate until set.
  6. Once set, store in an airtight container.

Recipe Notes

  • Toasting pecans enhances flavor but is optional.
  • Experiment with other dried fruits and nuts for variety.
  • Add a sprinkle of sea salt for a savory twist.

Irresistible Homemade Vanilla Pecan Pralines: A Sweet Southern Delight

Vanilla Pecan Pralines: A Southern Delight Worth Savoring

⚖️
Difficulty
Easy

⏲️
Prep Time
10 mins

🕒
Cook Time
15 mins

⏱️
Total Time
25 mins

🍽️
Servings
12

Warm your kitchen with the irresistible aroma of Vanilla Pecan Pralines. These delightful southern candies melt in your mouth, offering a heavenly blend of buttery pecans and sweet vanilla. Making them is just as enjoyable as sharing them with loved ones, making them perfect for holiday treats or as a thoughtful gift from your kitchen. The classic combination of pecans and vanilla creates a flavor profile that is both timeless and indulgent.

Vanilla Pecan Pralines are a celebration of rich flavors and textures. The vanilla brings a warm sweetness that complements the buttery, nutty essence of pecans perfectly. Every bite feels like a celebration, with the sugar dissolving into a creamy caramel that exits with a nutty crunch. These pralines exude comfort and charm, suitable for a dessert table or a cozy night in.

Quick Recipe Highlights

  • Flavor Profile: The pralines are elegantly sweet with a deep caramel flavor accentuated by the nuttiness of pecans and a hint of vanilla.
  • Texture: A delightful crumbly texture with a creamy melt-in-your-mouth finish, punctuated by crunchy pecans.
  • Aroma: Wafts of vanilla and buttery notes fill your kitchen during the cooking process.
  • Visual Appeal: Glossy with a rustic charm, each praline is a perfect golden brown studded with pecan pieces.
  • Skill Level Needed: Perfect for novice candy makers, with minimal steps and straightforward instructions.
  • Special Equipment: A candy thermometer ensures precision in achieving the ideal sugar stage for pralines.

Recipe Overview

  • Difficulty Level: Considered easy, this recipe requires basic candy-making techniques with minimal steps that even beginners can master.
  • Category: Traditionally a dessert or sweet treat, pralines can also serve as delightful homemade gifts.
  • Cuisine: A staple of Southern cuisine, rooted in French culinary technique adapted by the American South.
  • Cost: Relatively inexpensive, primarily involving sugar, butter, and pecans — pantry staples for many.
  • Season: Best enjoyed during cooler months or holiday seasons when sweet confections are particularly welcome.
  • Occasion: Ideal for festive gatherings, afternoon tea, or as a treat for special occasions.

Why You’ll Love This Recipe


The distinctive taste and texture of Vanilla Pecan Pralines are sure to make them a favorite. The luscious combination of sweet vanilla and crunchy pecans caters to those with a sweet tooth, and the smooth caramel enhances the overall experience. The convenience of this recipe is unmatched, with a baking process that is quick and requires no advanced skills, making it perfect even for last-minute prep. The pralines are not only pleasurable but offer a small dose of calcium courtesy of the dairy elements involved, making for a surprisingly nutritious treat.

Socially, Vanilla Pecan Pralines are a hit, perfect for sharing at gatherings or as a delightful addition to dessert tables. They carry the sophistication of a handmade confection, which is sure to impress. Economically, these pralines are quite accessible given their simple ingredient list, offering a gourmet experience without a hefty price tag. You can easily adapt the recipe to suit dietary needs or flavor preferences, adding to their versatility.

Historical Background and Cultural Significance


Vanilla Pecan Pralines have their roots in French praline recipes, which traditionally consisted of almonds and sugar. Brought to the United States by French settlers, especially in Louisiana, the recipe evolved in the Southern states. Pecans, native to the American South, were an easy and available substitution for almonds, leading to the pralines we know today.

Pralines hold a cherished place in Southern culture, often associated with hospitality and tradition. They are frequently made for holiday celebrations, weddings, or as gifts — an expression of Southern warmth and generosity. The recipe has evolved over time from its original almond composition, incorporating local ingredients and methods that define Southern culinary traditions.

Regional adaptations of pralines now include variations in flavor and texture, with some recipes calling for chocolate, coconut, or spices to add unique spins to this classic treat. As pralines remain a cherished dessert in Creole and Cajun kitchens and beyond, their story is a testament to the rich tapestry of cultural exchange and evolution.

Ingredient Deep Dive


Pecans are at the heart of this praline, offering a buttery texture and rich, nutty flavor. Historically, pecans were an indigenous food source for Native Americans and became a Southern staple due to their abundance and versatility in recipes. Nutritionally, pecans are high in healthy fats, protein, and fiber, which can support heart health and digestion. When selecting pecans, look for ones that are fresh with no signs of rancidity. Store them in a cool, dry place or freeze them for longer shelf life. Substituting with almonds or walnuts is possible, though the traditional Southern taste lies in the pecan.

Vanilla adds a distinct aromatic sweetness to pralines, complementing the rich flavors of the sugar and nuts. It offers various health benefits, including antioxidant properties. Natural vanilla extract is the best choice for an authentic flavor. Keep vanilla in a cool, dark place to preserve its potency. If vanilla is unavailable, almond extract can serve as a substitute, though it alters the characteristic flavor profile of the pralines.

Common Mistakes to Avoid

  • Skipping the candy thermometer, leading to overcooked or undercooked pralines.
  • Not stirring constantly during cooking, as it may lead to uneven texture.
  • Ignoring the cooling phase can result in pralines that don’t set properly.
  • Adding the vanilla extract too early can cause the flavor to dissipate during cooking.
  • Overcrowding the spoon with pecans can hinder even distribution in each praline.
  • Using butter that’s too cold, which can lead to a lumpy mixture instead of a smooth one.
  • Cooking the sugar mixture on too high a heat risks burning and alters taste.
  • Not letting the pralines fully cool before handling can cause them to fall apart.

Essential Techniques


Maintaining the right temperature is crucial in candy-making. The sugar mixture must reach the correct soft-ball stage, noted by a candy thermometer at 235°F, to ensure the pralines are firm yet chewy. Without reaching this stage, pralines can remain sticky or too wet. Keep stirring the mixture consistently to prevent crystallization, which helps achieve the smooth, glossy finish characteristic of great pralines.

Pro Tips for Perfect Vanilla Pecan Pralines


Use fresh pecans for the best flavor and texture, as aged nuts can turn bitter and detract from the praline’s taste. Toasting the pecans beforehand can also enhance their nuttiness and intensify their deliciousness. Regulate your stove heat carefully to maintain consistent cooking temperature, and remove it from the stove at the precise moment it reaches the soft-ball stage. Adding the butter last helps incorporate a smooth, rich texture.

Variations and Adaptations


Regional variations of pralines can include adding coconut flakes for added texture and flavor. For seasonal adaptations, incorporate pumpkin spice or nutmeg for a fall-themed praline. Adapt this recipe for dietary needs by using almond milk instead of cream for a lactose-free option. To emphasize diverse flavors, consider adding a splash of bourbon or rum for a mature twist. You can also play with the texture by using a food processor to finely chop pecans before adding them, creating a smoother praline.

Serving and Presentation Guide


Display Vanilla Pecan Pralines on a decorative platter for an eye-catching presentation. Accentuate their glossy appearance with a dusting of powdered sugar or a light drizzle of molten chocolate for added visual flair. They’re traditionally served at room temperature but slightly chilled pralines offer a firmer bite. Make sure to use parchment paper to avoid sticking when serving and portion wisely to leave guests craving more.

Wine and Beverage Pairing


Pair pralines with a sweet dessert wine like a Sauternes or a rich port to enhance the dessert experience. For non-alcoholic alternatives, a robust black coffee or a fragrant chai tea complement the sweetness well. Serve beverages chilled or warmed depending on the season to accentuate the pairing before indulging in these sweet delights.

Storage and Shelf Life


Store Vanilla Pecan Pralines in an airtight container at room temperature for up to one week to maintain freshness. Refrigeration can extend their shelf life but may alter texture slightly. Check for any off-odors or discolorations as signs of spoilage before serving. Though not ideal, freezing pralines for short-term storage in a single layer will preserve more flavor.

Make Ahead Strategies


Vanilla Pecan Pralines can be prepared in advance and stored to fit your schedule. Make the praline mix up to a day before serving and store it covered at room temperature. Once ready, place them on serving plates skillfully to maximize freshness. Reheating is not suggested due to its impact on texture and structure, so allow pralines to reach room temperature organically before serving.

Scaling Instructions


To halve this recipe, reduce each ingredient proportionately and shorten the cooking time slightly. For doubling or tripling, ensure you have a large enough pot to prevent overflow during vigorous boiling. Maintain the same cooking temperature for larger batches through slower stirring. Adjust storage solutions as quantities increase to preserve their quality and flavor over time.

Nutritional Deep Dive


Vanilla Pecan Pralines offer a rich source of energy thanks to high sugar content along with beneficial nuts providing healthy fats. Pecans contribute antioxidant properties supporting heart health, while vanilla possesses subtle mood-enhancing effects. Consider portion control when enjoying pralines as a treat, given their caloric density, yet savor each bite for a naturally gluten-free delight.

Dietary Adaptations


For gluten-free enthusiasts, this recipe naturally fits without requiring modifications. Replace cream with any dairy-free milk like coconut or almond milk to create a delightful dairy-free praline. Achieve a vegan praline by substituting butter with vegan margarine or coconut oil, ensuring it maintains the creamy consistency. Adaptions for keto include using sugar substitutes and almond meal, keeping the indulgent flavor intact.

Troubleshooting Guide


If your pralines are sticky, failing to reach the soft-ball stage may be the cause. Cook longer next time for firmer pralines. For unbalanced flavor, review ingredient freshness, as stale nuts or vanilla might impact the taste significantly. Worst-case scenario, burnt pralines indicate excessive heat was used; maintain medium heat closely. If texture varies too much, reassess cooling time or stirring consistency before attempting anew.

Recipe Success Stories


Readers have shared amusing tales of pralines made with kids, turning simple steps into bonding moments. Suggestions include family-specific add-ins that make each batch a unique homage to tradition. Knowing how different cultures incorporate pralines into their culinary repertoires, this recipe encourages such creative modifications while appreciating the base recipe’s inherent deliciousness. Many users have found photography endless fun by experimenting with lighting to capture gooey textures perfectly.

Frequently Asked Questions

Q: What if I don’t have a candy thermometer?

A: You can perform a cold water test by dropping a small amount of the mixture into cold water to see if it forms a soft ball. However, for best results, investing in a candy thermometer is worthwhile.

Q: Can I use other nuts besides pecans?

A: Yes, feel free to experiment with almonds, walnuts, or other preferred nuts, keeping in mind this may alter the praline’s taste and texture.

Q: My pralines turned out too hard. What went wrong?

A: Overcooking the sugar mixture past the soft-ball stage causes hardness. Monitor the temperature closely and remove from heat precisely at 235°F.

Q: How do I store pralines without them sticking?

A: Use layers of parchment paper between pralines in your storing container to prevent sticking.

Q: Can I add chocolate to the pralines?

A: Chocolate chips or a drizzle of melted chocolate can enhance flavor creatively. Allow pralines to cool before adding or drizzling for best results.

Q: Are pralines suitable for gifting?

A: Absolutely, they make delightful handcrafted gifts. Pack them creatively in decorative bags or boxes to showcase their tantalizing appearance.

Q: Can I refreeze thawed pralines?

A: It’s best to avoid refreezing to maintain texture and taste. Consume them within the recommended timeframe after defrosting.

Q: How do I achieve perfect consistency?

A: Ensuring even heating, consistent stirring, and precise temperature control are key to achieving the desired praline consistency.

Q: What if I prefer a less sweet version?

A: Consider using a sugar substitute and adjusting the amount slightly to fit your preference; ensure it doesn’t affect the caramelizing process.

Q: Can I add spices for flavor?

A: Spices like cinnamon or nutmeg can be added for flavor depth, perfect for seasonal adaptations to the traditional praline recipe.

Additional Resources


Explore related recipes such as Bourbon Pecan Pie for more Southern dessert inspiration. Learn more about essential candy-making techniques to bolster your skills further. Delve into ingredient profiles highlighting the wonders of vanilla’s versatility and pecan’s nutrition-packed value. Equip your kitchen with recommended tools for candy making to ensure success with future confections. Embrace seasonal variations by incorporating ingredient nuances from different times of the year.

Join the Conversation


We invite you to share your Vanilla Pecan Pralines experiences with us on social media. Tag us in your photos to show off your praline creations or join our recipe review community for fruitful discussions about your variations. Share photography tips on capturing praline perfection under different lighting conditions to inspire fellow culinary enthusiasts.

The Recipe

Vanilla Pecan Pralines

Serves: 12

Prep Time: 10 mins

Cook Time: 15 mins

Total Time: 25 mins

Kitchen Equipment Needed

  • Medium saucepan
  • Candy thermometer
  • Wooden spoon
  • Parchment paper
  • Measuring cups and spoons

Ingredients

  • 2 cups sugar
  • 1 cup light cream
  • 1/2 cup butter
  • 1/8 teaspoon baking soda
  • 1 teaspoon vanilla extract
  • 2 cups pecan halves

Directions

  1. Line a baking sheet with parchment paper and set aside.
  2. In a medium saucepan, combine sugar, cream, butter, and baking soda over medium heat.
  3. Stir continuously until the mixture reaches 235°F on a candy thermometer (soft-ball stage).
  4. Remove from heat and mix in the vanilla extract and pecans until well-coated.
  5. Quickly drop spoonfuls of the mixture onto the prepared parchment. Let cool completely.
  6. Once set, serve immediately or store in an airtight container.

Recipe Notes

  • Toasting the pecans lightly before adding them can enhance the pralines’ flavor.
  • Use caution when cooking at high temperatures to avoid boiling over.
  • Try experimenting with different nut types for varied tastes.

Deliciously Irresistible Blueberry Heaven Cookies Recipe for Your Sweet Tooth

Blueberry Heaven Cookies: A Bite of Bliss

⚖️
Difficulty
Easy

⏲️
Prep Time
15 mins

🕒
Cook Time
12 mins

⏱️
Total Time
27 mins

🍽️
Servings
24 cookies

Imagine biting into a cookie that’s as blissful as a summer day. These Blueberry Heaven Cookies bring a burst of fresh blueberry flavor to each bite, offering a delightful mix of sweetness and tang. They’re soft yet slightly chewy, making for an addictive treat that’s hard to resist. With simple ingredients and minimal preparation time, these cookies are perfect for both novice bakers and seasoned pros looking for a new twist on cookie classics.

Quick Recipe Highlights

  • Flavor Profile: With notes of sweet vanilla balanced by the tartness of blueberries, these cookies are a fruit-forward treat with a buttery underpinning.
  • Texture: Expect a soft and tender crumb with bursts of juicy blueberries, offering a delightful mouthfeel with each bite.
  • Aroma: The cookies emit a warm, inviting fragrance of freshly baked bread and berries that will fill your kitchen.
  • Visual Appeal: Each cookie is a picturesque pale golden hue dotted with vibrant blue blueberries.
  • Skill Level Needed: Easy to make with straightforward steps, no advanced baking techniques required.
  • Special Equipment: Just a hand mixer and baking sheet will do.

Recipe Overview

  • Difficulty Level: Chosen as ‘Easy’ because the recipe involves basic mixing and baking techniques common to cookie recipes, perfect for beginners.
  • Category: Ideal for dessert or an afternoon snack, these cookies cut into both sweet cravings and the need for something wholesome.
  • Cuisine: Takes cues from classic American baking traditions with a modern, fruity twist.
  • Cost: Relatively inexpensive, with blueberries accounting for the primary cost element.
  • Season: Best made in blueberry season, yet easily recreatable all year round thanks to frozen berries.
  • Occasion: Perfect for casual gatherings, tea parties, or as a quick go-to snack.

Why You’ll Love This Recipe

These Blueberry Heaven Cookies are a taste revelation, marrying the sweet decadence of a classic cookie with the refreshing bite of blueberries. The balance of soft dough and juicy fruit creates a combo that delights the palate. Convenience is another high point; with minimal prep and cook time, you can whip them up in less than half an hour. They even pack a nutritional punch courtesy of the blueberries, which are rich in antioxidants. Not to mention, they are a hit at social gatherings, offering crowd-pleasing appeal without the hefty price tag.

Historical Background and Cultural Significance

The story of blueberry cookies spans from utilitarian roots where harvests dictated ingredients. Blueberries, often termed a superfruit, have long been staple in indigenous diets in North America. Their incorporation into cookies shows the evolution of dessert in American kitchens, shifting from simple biscuits to more decadent, fruit-infused baked goods. New England, with its plentiful blueberry fields, is known for presenting such rustic, fruit-based desserts, adapting them through time to today’s beloved variations.

Ingredient Deep Dive

Blueberries, the star in this recipe, not only add flavor but also provide crucial nutrients. High in vitamin C and potassium, they offer health benefits that take this dessert up a notch. To select, look for firm, plump berries without any damage. When storing, keep them in a shallow container in the fridge to extend freshness. Should fresh blueberries not be available, frozen alternatives work just as well, simply incorporate them directly into the batter.

Common Mistakes to Avoid

  • Overmixing the dough can lead to tough cookies; mix just until combined.
  • Not measuring the blueberries precisely might alter texture; maintain balance by weighing your fruit.
  • Using overly soft butter may result in greasy cookies that spread too much.
  • Baking at incorrect temperatures can undercook or overbake them—always preheat your oven.
  • Insufficient dough chilling time can lead to flat cookies with runny centers.
  • Skipping parchment paper might lead to sticking; it ensures easy release and even baking.
  • Ignoring storage instructions can lead to stale cookies; always cool and store in airtight containers.
  • Adding too much leavening will end in a bitter aftertaste; stick to prescribed amounts.

Essential Techniques

Creaming butter and sugar forms the backbone of a good cookie texture. This classic technique involves beating softened butter with sugar until fluffy. This allows for air incorporation, ensuring light, tender cookies. Mastery here involves patience—watch for the batter’s color to lighten significantly as a sign. Also key is the folding technique; incorporating blueberries should be done gently to prevent bursting and excess moisture release into the dough.

Pro Tips for Perfect Blueberry Heaven Cookies

Chill the dough for at least an hour to manage spread and enhance flavor—the texture payoff is worth the planning. For additional flavor depth, try toasting your flour lightly before use, infusing it with a nutty undertone. Bring a marbled effect by gently swirling in ¼ cup of melted white chocolate into the dough. Always bake on the middle oven rack to ensure even heat distribution, giving the cookies a perfect texture.

Variations and Adaptations

Elevate your cookies regionally by incorporating dried cranberries for a New England twist. Seasonal adaptations could involve adding a hint of cinnamon in autumn, while summertime might welcome a zest of lemon. Dietary needs can be accommodated by swapping in gluten-free flour mixes; a little xanthan gum can aid in binding. Feel adventurous? Try a savory adaptation with a dash of balsamic glaze after baking.

Serving and Presentation Guide

For a stunning presentation, serve these cookies with a dusting of powdered sugar and a garnish of fresh mint leaves. Plating alongside a scoop of vanilla ice cream adds a delightful contrast. To modernize, layer them in a tall jar with parchment discs as a gifting idea. Measure portions to keep sizes uniform—using an ice cream scoop can assist.

Wine and Beverage Pairing

These cookies pair splendidly with a crisp Prosecco or a sweet Moscato wine, whose bubbles and notes complement the berry undertone. Non-alcoholic options include a chilled blueberry iced tea or a cozy cup of chamomile. For colder days, a steaming mug of rich dark hot chocolate creates a comforting contrast. Serve beverages at an optimal temperature to heighten experience.

Storage and Shelf Life

Store cookies in an airtight container at room temperature for up to a week to maintain freshness. If longer storage is needed, freeze them for up to two months using freezer-safe bags. Signs of spoilage include an off-smell or visible mold growth. To reheat, use a low oven setting to gently warm, reviving some of the cookie’s fresh-baked magic.

Make Ahead Strategies

The cookie dough can be prepared ahead and stored in the refrigerator for three days, giving flexibility to bake in spurts or all at once. During prep, form the dough into balls prior to chilling to streamline baking. Once ready to bake, add a couple of minutes extra to the cook time if chilled. Post-refrigeration, allow the dough to come slightly closer to room temperature for even cooking.

Scaling Instructions

For halving this recipe, maintain the integrity by precise measurement adjustments, especially leavening agents. Doubling means having enough baking sheets on hand to avoid crowding. Timing remains largely unaffected, though increase resting time for large batches as oven temps fluctuate. Keep batch sizes manageable to ensure consistent quality.

Nutritional Deep Dive

Rich in both macro and micronutrients, each cookie offers a balance of fats, carbs, and a sweetness countered by fiber and antioxidates from the blueberries. Suitable for indulging moderately during snack times or desserts, it supports portion control strategies given its gentle sweetness and hearty ingredients. The replacement of white with whole wheat flour adds wholesome elements while modifying texture subtly.

Dietary Adaptations

For a gluten-free option, substitute almond flour, which naturally extends the nutty profile. Choose lactose-free margarine instead of butter to cater to dairy-free needs, with no compromise in taste. Go vegan by replacing the egg with flaxseed meal and water; a ratio of one tablespoon of flax to three of water works wonders. Incorporate coconut sugar instead of regular for a low-GI choice.

Troubleshooting Guide

Measure all ingredients accurately to sidestep texture issues, such as overly dry or dense cookies. If flavors dull, enhance by adding a splash of vanilla essence. Ensure ingredients are at room temperature to prevent undesirable temperature imbalances. Invest in quality parchment paper or silicon mats to neutralize equipment challenges, preventing sticking. Timing concerns, such as underbaked centers, can often be rectified by ensuring an oven thermometer verifies correct preheating.

Recipe Success Stories

These cookies have made waves in our community, inspiring variations like adding nuts for texture contrast. Readers have suggested incorporating mixed berries for a veritable fruit medley. Many praise the welcoming, homey aroma and recommend experimenting with size—create mini versions ideal for kids’ snacks or party platters. Photos shared are stunning; capture the contrast of blueberries against the cookie dough for full Instagram-worthy effect!

Frequently Asked Questions

Can I use frozen blueberries? Yes, they work well, but avoid thawing to keep the dough from becoming too wet.
What can I substitute for butter? Margarine or coconut oil can be perfect alternatives while maintaining taste.
How do I prevent my cookies from spreading too much? Chilling the dough adequately and using parchment paper will help maintain proper shape.
Can I add nuts to this recipe? Adding chopped almonds or walnuts provides a delicious texture contrast.
Why do my cookies look raw inside? Ensure your oven is heating evenly and the temperature setting is accurate.
Is it possible to make these sugar-free? You can use erythritol or monk fruit sweetener as a substitute.
Do I need to adjust for high-altitude baking? Yes, you may need to decrease sugar and slightly increase liquids.
How do I keep my cookies soft? Store in an airtight container with a slice of bread or apple to retain moisture.
What if I don’t have parchment paper? Silicone baking mats are a wonderful reusable choice.
Could I replace the egg? A tablespoon of flaxseed mixed with three tablespoons of water works as a vegan substitute.
Can I add spices? A dash of cinnamon or nutmeg provides a warm aromatic twist.

Additional Resources

Dive deeper into cookie-making techniques with our detailed guide on baking essentials, from ingredient science to equipment handling. Explore other berry-forward recipes that bring similar flavor explosions. For those curious about complementary bakes, discover our collection of biscuit and pound cake ideas. Equipment suggestions and bi-ingredient swaps are detailed for ease of experimentation. Tailor seasonal elements with our handy reference chart for produce that’s at its peak.

Join the Conversation

Share your baking journey on social media and tag #BlueberryHeavenCookies for a chance to be featured! Engage with fellow bakers and exchange tips and tricks in our online community. Post your recipe reviews, and let us know any creative twists you’ve tried. Our discussions are buzzing with suggestions, ensuring your baking experience keeps evolving. From urban kitchens to rustic country homes, celebrate the joy of baking with us!

The Recipe

Blueberry Heaven Cookies

Serves: 24 cookies

Prep Time: 15 mins

Cook Time: 12 mins

Total Time: 27 mins

Kitchen Equipment Needed

  • Hand mixer
  • Baking sheet
  • Parchment paper

Ingredients

  • 1/2 cup unsalted butter, softened
  • 1 cup granulated sugar
  • 1 large egg
  • 1 teaspoon vanilla extract
  • 1 1/2 cups all-purpose flour
  • 1/2 teaspoon baking soda
  • 1/4 teaspoon salt
  • 1 cup fresh or frozen blueberries

Directions

  1. Preheat your oven to 350°F (175°C) and line a baking sheet with parchment paper.
  2. Cream together the butter and sugar until light and fluffy.
  3. Mix in the egg and vanilla, beating well.
  4. In a separate bowl, combine flour, baking soda, and salt.
  5. Gradually add dry ingredients to butter mixture, mixing just until combined.
  6. Gently fold in blueberries, taking care not to overmix.
  7. Scoop tablespoons of dough onto the prepared baking sheet.
  8. Bake for 12 minutes or until edges are lightly brown.
  9. Cool on a baking sheet for 5 minutes before transferring to wire racks.

Recipe Notes

  • For a zesty twist, add the zest of one lemon to the dough.
  • Ensure butter is at room temperature for best mixing.
  • Store extras in an airtight container to maintain freshness.

Irresistibly Soft and Chewy Raspberry Sugar Cookies Recipe

Soft and Chewy Raspberry Sugar Cookies: A Delightful Treat for Every Occasion

⚖️
Difficulty
Easy

⏲️
Prep Time
15 mins

🕒
Cook Time
10 mins

⏱️
Total Time
25 mins

🍽️
Servings
24

There’s nothing quite like the sweet, tangy burst of raspberry to tantalize your taste buds. Our Soft and Chewy Raspberry Sugar Cookies offer an irresistible combination of sugary sweetness and fruity tartness, making them a perfect treat for any occasion. Whether you’re serving them at a gathering or enjoying solo with a cup of tea, these cookies will surely delight.

These raspberry-infused cookies are a sensory experience from start to finish. Upon baking, the kitchen fills with a warm, inviting aroma that promises something delicious is on the way. The soft, chewy texture complements the sharp raspberry notes, creating a balanced flavor profile that both adults and children will love.

Quick Recipe Highlights

  • Flavor Profile: The sweet vanilla base complements the tart raspberry, creating a harmonious burst of flavors with each bite.
  • Texture: These cookies offer a delightful chewiness with a slightly crisp edge, making every mouthful a pleasure.
  • Aroma: Expect a warm, sugary fragrance mingled with fruity undertones that will have everyone salivating.
  • Visual Appeal: Soft pink hues dotted with ruby-red raspberry chunks make these cookies as beautiful as they are delicious.
  • Skill Level Needed: Perfect for novice bakers, these cookies require simple mixing and formulating techniques.
  • Special Equipment: All you need is a standard oven and a baking sheet—no fancy gadgets required.

Recipe Overview

  • Difficulty Level: Rated as easy, this recipe requires basic baking skills, making it perfect for those just starting their baking journey.
  • Category: This versatile cookie fits well in both dessert and snack categories, suitable for any time of day.
  • Cuisine: Drawing influences from American cookie traditions, these treats have a modern twist with the addition of real raspberries.
  • Cost: With affordable pantry staples and seasonal raspberries, this recipe is cost-effective and doesn’t require expensive ingredients.
  • Season: Best enjoyed in summer when raspberries are at their peak, but frozen raspberries work perfectly for an off-season treat.
  • Occasion: Great for holiday platters, picnics, or a casual family dessert, these cookies bring joy to any occasion.

Why You’ll Love This Recipe


These Soft and Chewy Raspberry Sugar Cookies are loved for their exquisite taste and unique texture. The blend of sugary and tart flavors offers a refreshing twist on traditional sugar cookies, appealing to both kids and adults alike. Their chewy consistency with a slight crispiness at the edges creates a delightful mouthfeel that’s hard to resist.

The convenience of this recipe is unmatched. With a short prep and cook time, you can whip up these cookies quickly, making them an ideal last-minute dessert option or a delightful gift for unexpected guests. The easy-to-follow instructions mean no fuss and guaranteed delicious results every time.

Not only tasty, but these cookies also come with nutritional perks. Raspberries are known for their high antioxidant content and fiber, adding a healthful element to this indulgent treat. Enjoy a sweet treat with the reassurance of receiving some nutritional benefits.

In social gatherings or family get-togethers, these raspberry cookies are a crowd-pleaser. Their vibrant color and inviting aroma enhance the dessert table, sparking conversations and compliments. Whether shared at a picnic or served at a formal event, these cookies are always a hit.

For those conscious of budget, this recipe stands out as both cost-effective and accessible. With ingredients that are often on hand in most kitchens and a simple list of additional items, you won’t break the bank to enjoy these delights. Plus, using seasonal or frozen raspberries helps keep costs low while maximally enjoying their flavor.

Historical Background and Cultural Significance


Cookies, derived from the Dutch word “koekje,” have been a part of culinary tradition for centuries, evolving from small cakes to the varied types we have today. As sugar became more accessible in the 16th and 17th centuries, sugar cookies began to gain popularity, adapting into different versions across cultures.

Raspberry-flavored treats hold a special place in culinary history, often associated with summer and harvest. Their incorporation into the cookies evolved as bakers sought to balance tartness with sweetness, capturing the essence of summer’s bounty in a simple dessert.

Over the years, raspberry cookies have seen numerous adaptations. Across different regions, bakers have added unique twists—some incorporating nuts for added texture, while others experiment with glazes for extra sweetness. Despite these variations, the core flavors remain beloved.

Today, raspberry sugar cookies resonate with many as a nostalgic treat reminiscent of childhood and family gatherings. From family dinners to farmer’s markets, the simple pleasure of these cookies transcends regional boundaries, bringing smiles to faces young and old.

Ingredient Deep Dive


Flour is the backbone of these cookies, providing the structure and body. It’s crucial to use all-purpose flour, which balances protein content perfectly for soft, chewy cookies. When storing flour, keep it in an airtight container to avoid spoilage and ensure freshness.

Sugar, primarily white granulated, adds sweetness and helps with browning. Its role in these cookies is pivotal for achieving the sugar cookie’s classic taste and texture. Ensure your sugar is free-flowing and lump-free by storing it in a dry place.

Raspberries are enriched with vitamin C, fiber, and antioxidants, making them a nutritious and flavorful addition. Choose ripe, firm berries for the best taste. Frozen berries are a great alternative when fresh ones are unavailable, maintaining the cookie’s delightful raspberry burst.

Butter provides richness and aids in developing a tender crumb in these cookies. For vegan adaptations, plant-based butter substitutes are available that can mimic the effects of real butter, ensuring a buttery flavor and texture.

Vanilla extract enhances the overall flavor with its aromatic sweetness, rounding off the taste profile of the cookies. When selecting vanilla extract, pure is preferred over imitation for a more authentic flavor. Store it in a cool, dark place to maintain potency.

Common Mistakes to Avoid

  • Avoid overmixing the dough. Overworking can result in tough cookies, as gluten develops more than needed when mixed excessively.
  • Don’t substitute ingredients thoughtlessly. Each ingredient plays a specific role, and random replacements may alter the taste and texture.
  • Measure ingredients precisely. Baking is a science, and too much flour or sugar can lead to dense, overly sweet cookies.
  • Ensure butter is the correct temperature—too cold, it won’t incorporate well; too warm, it leads to overly thin cookies.
  • Be cautious with baking time. Underbaking can result in overly chewy centers, while overbaking leads to dry cookies.
  • Don’t overcrowd the baking sheet. Cookies need space to spread to ensure even cooking.
  • Avoid baking on non-preheated sheet pans. This can prevent proper spreading and can affect texture.
  • Store cookies properly post-baking to maintain their freshness. Leaving them exposed can lead to staleness.

Essential Techniques


Creaming butter and sugar effectively is crucial. It incorporates air into the mixture, contributing to a lighter texture in cookies. Use room temperature butter, and mix until the texture becomes fluffy and pale, approximately 2-3 minutes.

Accurate dough portioning ensures uniform cooking. Use a cookie scoop or a similar size utensil to get even-sized cookies, ensuring they all bake at the same rate, avoiding under- or over-baked edges.

Chilling the dough slightly, if it’s too soft, helps hold its shape during baking. This step is particularly essential in warmer kitchens where butter tends to melt quickly, leading to flat cookies.

Recognize the appearance cues that indicate completion. Edges should be set and slightly golden, while the center remains soft—ensure they’re not overly browned, which indicates overbaking.

Pro Tips for Perfect Soft and Chewy Raspberry Sugar Cookies


For heightened raspberry flavor, consider using raspberry extract along with whole berries. It intensifies the taste without altering the cookie’s texture.

Chill the cookie dough for 30 minutes before baking. This not only firms the dough, leading to less spread, but also allows flavors to meld, resulting in a richer taste profile.

Maintain consistent oven temperature for accuracy. Preheat well and avoid opening the door frequently during baking to prevent temperature fluctuations that could affect baking time and texture.

Experiment with adding white chocolate chips or chopped nuts for enhanced texture and taste contrast, creating more complex flavor experiences with each bite.

Double up on parchment paper when lining the baking tray. This adds an extra layer of insulation, preventing the bottoms of your cookies from browning too quickly.

For presentation, reserve a few whole raspberries to press lightly into the tops of each dough ball before baking, adding a visual raspberry cue and extra flavor dimension.

Variations and Adaptations


Regional variations can include using local fruit varieties or spices to complement the raspberry flavor, like cardamom or cinnamon additions in colder regions.

For seasonal adaptations, swap raspberries with available berries like strawberries, blueberries, or blackberries, each bringing a unique flavor twist while maintaining the cookie’s core texture.

For dietary modifications, use gluten-free flour blends and dairy-free butter substitutes, ensuring the consistency remains intact while keeping the chewy quality.

Vary the flavor with citrus zest, such as lemon or lime, which adds a fresh zing to the cookie’s sweetness, offering a delightful tangy complement to the raspberries.

Experiment with texture by incorporating rolled oats into the dough, adding a hearty chew and additional fiber, while keeping the dough texture balanced and not overly dense.

Presentation alternatives could involve drizzling cooled cookies with a simple glaze made from powdered sugar and lemon juice, enhancing appeal and introducing new flavor dimensions.

Serving and Presentation Guide


Serve these cookies on a decorative platter lined with mint leaves, adding a touch of greenery that complements the pink raspberry hues beautifully.

Consider garnishing with edible flowers—violets or pansies enhance the visual appeal and offer a sophisticated touch without altering the cookie’s flavor.

Traditional accompaniments include serving with vanilla ice cream or fresh whipped cream, which highlights the cookie’s flavors while adding luxurious creaminess.

For modern suggestions, pair cookies with a raspberry-infused iced tea or lemonade, echoing the raspberry notes and providing a refreshing contrast to the cookie’s sweetness.

Keep portion sizes manageable by baking smaller cookies, allowing them to serve as a light dessert or snack, rather than overly filling portions, ensuring enjoyment without overpowering.

Remember the temperature considerations. Serve cookies at room temperature for the optimal texture, allowing flavors to fully develop without the inhibitive cold that can mute taste.

Wine and Beverage Pairing


With their sweet profile, pair these cookies with a light, fruity Moscato wine. The sparkling sweetness complements the fruity raspberry notes while not overpowering them.

Non-alcoholic alternatives, such as a raspberry iced tea or a mixed berry smoothie, highlight the cookie’s flavors, creating a complete, themed snack or dessert time experience.

For coffee lovers, a mild, nutty flavored brew pairs well, balancing the cookie’s sweetness with a slight bitterness, enhancing each bite while offering a satisfying finish.

Serve beverages chilled to contrast with the room temperature of the cookies, highlighting refreshing, crisp flavor profiles, especially in warmer settings or summer gatherings.

Garnish beverages with fresh mint or lemon slices for added aroma and color, creating a visually appealing presentation that’s inviting and delectable alongside the cookies.

Storage and Shelf Life


Store cookies in an airtight container at room temperature to maintain freshness and prevent them from drying out. Layer with parchment paper, avoiding them sticking together.

Ideal storage temperature for prolonging shelf life is slightly cooler than standard room temperature but not as cold as a fridge, anywhere around 15-18°C (59-64°F).

Glass or BPA-free plastic containers with tight-fitting lids are ideal, as they seal well, maintaining the cookies’ delicate texture and preventing staleness.

Look for signs of spoilage, such as unusual odor or discoloration, as indications that the cookies are no longer fresh, understanding that homemade cookies contain less preservative.

To reheat, place cookies on a microwave-safe plate and cover with a damp paper towel to preserve moisture. Heat for 10 seconds until warm, avoiding overheating, which can dry them out.

For longer storage, freeze cookies by wrapping them individually in wax paper, placing them in a freezer-safe bag. Thaw at room temperature for a quick treat whenever desired.

Make Ahead Strategies


Prepare dough a day in advance, wrapping tightly in plastic before refrigerating. This method enhances flavor while ensuring dough firms up for more precise shaping.

Efficiently store dough between baking sessions by pre-scooping onto a baking sheet and freeze them. Once frozen, transfer to a resealable bag, allowing for easy baking whenever needed.

Assess the quality impact when making ahead. Prepared dough can retain or improve in flavor after resting, though shape consistency and rise may vary slightly upon longer storage.

For assembly, scoop chilled dough directly onto baking sheets without thawing. Slightly adjust bake time by adding 1-2 minutes to accommodate the cold dough.

Reheated elements retain their taste best when cookies are returned to room temperature naturally, helping preserve moisture and flavor, unveiling the intended texture.

Add fresh elements like extra berries or zest on the day of serving for a hint of fresh vibrancy without drastically changing the recipe or preparation ease.

Scaling Instructions


Halving the recipe is straightforward, reducing ingredients proportionately while maintaining the original ingredient ratios to ensure flavor and texture stay consistent.

Increase the recipe by doubling or even tripling for larger gatherings. Ensure mixing bowls and ovens can accommodate the larger batch without compromising quality or baking time.

Adjust equipment, using larger baking sheets or multiple racks, for efficient baking. Avoid overcrowding by staggering batches if necessary, ensuring even heat distribution.

Consider timing modifications. Larger batches may require slightly longer baking times or mixed batches depending on oven space and airflow, ensuring cookies bake evenly.

Reflect on storage needs with a bigger batch. These cookies freeze well, allowing bulk preparation to be enjoyed over time, maintaining freshness with proper wrapping and freezing techniques.

Nutritional Deep Dive


A macro breakdown shows these cookies consist primarily of carbohydrates from flour and sugar with moderate fats from butter and minimal protein content.

Raspberries bring a micronutrient boost, offering vitamin C, manganese, and dietary fiber, contributing to an overall nutritional benefit compared to plain sugar cookies.

Health benefits include antioxidant properties from raspberries and balanced energy release due to carb and fat content, making these an occasional indulgence that doesn’t overly compromise health.

When considering dietary needs, be aware of the sugar and calorie content. Balancing portions ensures enjoyment without overindulgence, suitable for various dietary requirements.

Portion analysis shows that smaller-sized cookies or halves make great mini-snacks, delivering the same delightful taste while keeping calorie and sugar intake moderate.

Weight management choices include conscious portion control, enjoying these treats as part of a balanced diet and active lifestyle, preventing excessive intake while indulging responsibly.

Dietary Adaptations


For a gluten-free version, substitute all-purpose flour with a 1:1 gluten-free baking blend, ensuring the texture stays compatible with the original recipe.

Dairy-free adaptations include using plant-based butter alternatives, which perform similarly in providing moisture and richness while adhering to dietary preferences.

A vegan version is achievable by replacing butter with vegan butter and using an egg replacer found in the baking aisle, maintaining the cookie’s delightful traits.

To create a low-carb or keto-friendly variant, swap sugar with a natural sweetener like erythritol and choose almond flour, mindful of the texture differences these replacements might create.

For paleo dieters, opt for coconut flour and a natural sweetener, recognizing the cookie will have a slightly different texture and density while retaining core flavors.

Low-FODMAP modifications involve using substitutions compatible with FODMAP guidelines, including safe sweeteners and flour choices, ensuring taste satisfaction without gastrointestinal discomfort.

Troubleshooting Guide


For texture issues like overly dry cookies, check for overbaking or incorrect ingredient measurements. Use a timer and level measuring cups for accuracy.

Balance flavor issues by managing sweetness and tartness. If the cookies are too sweet, reduce sugar, or add more tangy raspberries for a contrasting touch.

Adjust temperatures adequately if cookies spread too much; ensure a preheated oven and use room-temperature ingredients without overheating beforehand.

For equipment challenges, ensure baking trays are nonstick or lined to prevent sticking and encourage even heat distribution, influencing cookie shape and texture.

Substitute ingredients carefully, with compatible alternatives that mimic texture and flavor closely, avoiding drastic changes that can alter the cookie’s core attributes.

Timing concerns are alleviated with consistent use of timers and familiarity with your specific oven dynamics, noting any hot spots or irregular heating patterns.

Recipe Success Stories


Our readers have shared the joy of these cookies. One enthusiast crafted mini versions for a child’s birthday party, receiving praise for the delightful flavor and chewy texture.

Others added white chocolate chips, enhancing both visual appeal and taste, and noted how the creamy flavor beautifully complemented the raspberry profile without overpowering it.

Another reader tailored the recipe to a keto-friendly version, successfully using almond flour and sugar substitutes, preserving the cookies’ base flavors while adhering to dietary needs.

Community feedback often highlights the cookies’ success as gifts. Wrapped in decorative boxes, they make thoughtful, homemade presents that bring smiles and sweet moments.

On the photography side, readers have creatively styled these cookies with contrasting backdrops, highlighting their pinkish hue and sharing stunning imagery on social media.

Frequently Asked Questions

Can I use frozen raspberries in this recipe?

Yes, frozen raspberries are an excellent substitute for fresh ones. Thaw them first, then pat dry before incorporation, maintaining the desired texture without excess moisture.

How should I store the baked cookies to keep them fresh?

Store the cookies in an airtight container at room temperature for up to a week. If aiming for longer storage, consider freezing, ensuring they’re well-wrapped to prevent freezer burn.

What’s the secret to making cookies evenly chewy?

The key lies in properly creaming the butter and sugar and monitoring the baking time closely. Ensure your oven is accurately preheated to keep consistency across batches.

Can this recipe be adapted for bulk baking for events?

Absolutely! You can double or triple the recipe, making sure to have adequate equipment and oven space to handle larger volumes, cooking in staggered batches if necessary.

What if my cookies aren’t spreading enough?

Ensure your butter isn’t too cold. Giving the dough time to rest and warm slightly before baking can encourage a more natural spread, resulting in optimal thickness.

Is it okay to add nuts to this recipe?

Yes, adding nuts like pecans or walnuts provides additional texture and flavor contrast, complementing the sweetness of the cookie with a delightful crunch.

What can I use instead of vanilla extract?

Almond extract can be an alternative, imparting a delicate nuttiness, though in a smaller amount due to its strength. Use sparingly to avoid overpowering other flavors.

How do I know when the cookies are done baking?

Look for slightly golden edges with a still soft center. Cookies should continue to firm up on the baking sheet once removed from the oven, so don’t overbake.

Will using a baking stone affect the texture?

Baking stones retain and distribute heat evenly, often enhancing baking results. They may produce a crisper base, so watch the baking time to prevent overdone bottoms.

Can I prepare this dough in advance?

Yes, preparing the dough in advance is beneficial for flavor development. Store it well wrapped in the refrigerator for up to 48 hours or freeze for longer durations.

Are there vegan adaptations for this recipe?

Vegan adaptations include subbing butter with a plant-based version and replacing eggs with suitable alternatives like flaxseed meal or commercial egg replacers.

Is a food processor necessary for this recipe?

No, a food processor is not required. A hand mixer or stand mixer works perfectly for creaming and mixing ingredients until well combined.

Additional Resources


Explore more cookie recipes, from classic chocolate chip to seasonal pumpkin spice, each offering unique flavors and textures for variety in your baking repertoire.

Guides on baking techniques, like mastering the creaming method and understanding temperature impact on baked goods, provide further insights to enhance results consistently.

Ingredient information sheets highlight the best substitutes and fresh sourcing tips, ensuring you get the most flavorful, high-quality results in all your baking endeavors.

Equipment recommendations are available for those looking to invest in essential tools, ensuring efficiency and ease in creating consistent bakery-worthy treats at home.

Seasonal variations advise on experimenting with local produce to reflect times of the year, ensuring freshness in your approach and a dynamic cooking experience.

Join the Conversation


Share your baking adventures with us on social media, hashtagging your photos with #RaspberrySugarCookies for a chance to be featured on our page.

We encourage photography tips sharing, from lighting tricks to settings, to ensure your culinary creations look as good as they taste in every captured image.

Leave recipe reviews and tell us your story. What worked well? What tweaks did you implement? Your feedback helps us improve and encourages others to try this recipe.

Engage with our community by exploring shared variations and adaptations, discovering new flavor pairings or techniques for even more exciting baking outcomes.

Share your kitchen experiences by tagging us, and let your family and friends know about the joy found in baking these delightful raspberry cookies through your unique perspective.

The Recipe

Soft and Chewy Raspberry Sugar Cookies

Serves: 24

Prep Time: 15 mins

Cook Time: 10 mins

Total Time: 25 mins

Kitchen Equipment Needed

  • Mixing Bowls
  • Electric Mixer or Stand Mixer
  • Measuring Cups and Spoons
  • Baking Sheets
  • Parchment Paper
  • Cooling Rack

Ingredients

  • 2 cups all-purpose flour
  • 1 cup granulated sugar
  • 1/2 cup unsalted butter, softened
  • 1 large egg
  • 1 teaspoon vanilla extract
  • 1/2 teaspoon baking soda
  • 1/4 teaspoon salt
  • 1 cup raspberries, halved

Directions

  1. Preheat the oven to 350°F (175°C). Line baking sheets with parchment paper.
  2. In a bowl, mix flour, baking soda, and salt. Set aside.
  3. Cream the butter and sugar with an electric mixer on medium speed until light and fluffy.
  4. Add the egg and vanilla extract, blending until fully incorporated.
  5. Gradually add the flour mixture to the wet ingredients, mixing until just combined.
  6. Fold in the raspberries gently to avoid crushing them.
  7. Scoop tablespoons of dough onto prepared baking sheets, spacing them 2 inches apart.
  8. Bake for 9-11 minutes or until the edges are golden, and centers are set.
  9. Allow cookies to cool on the baking sheet for 5 minutes before transferring to a wire rack.

Recipe Notes

  • Substitute with alternative berries if raspberries are unavailable.
  • Add white chocolate chips for a sweeter variation.
  • For vegan options, replace the egg with a flaxseed egg substitute.