Indulge in Decadent German Chocolate Pecan Pound Cake Bliss

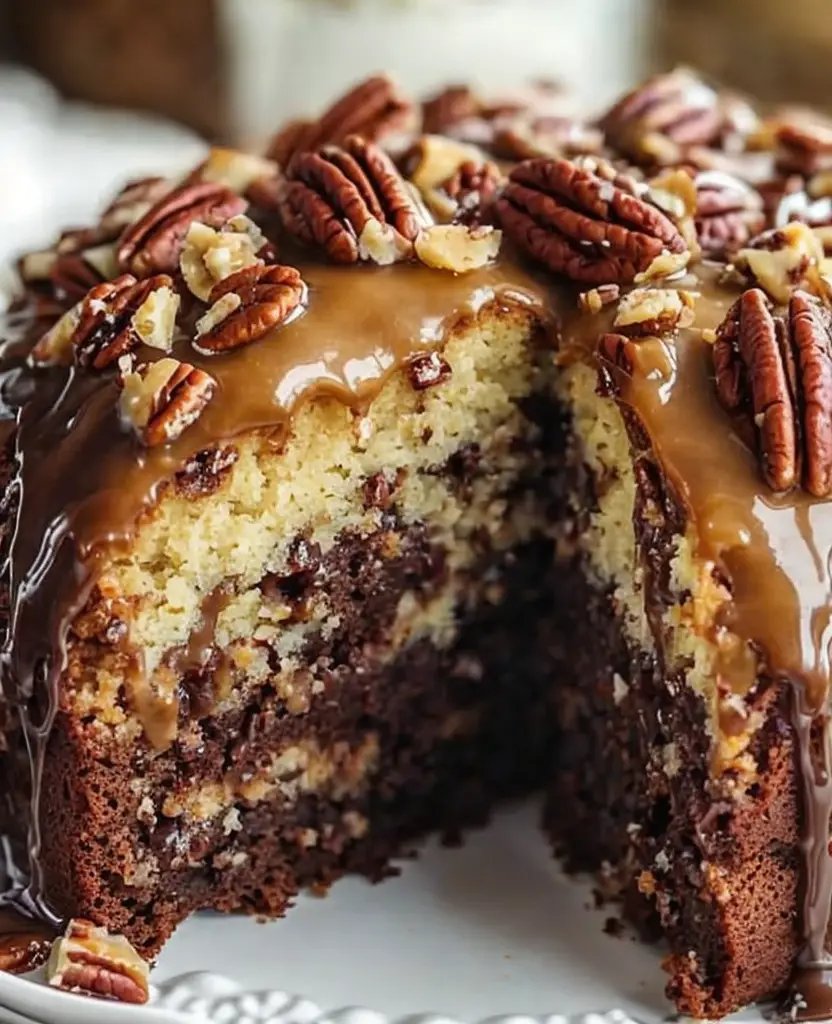
Decadent German Chocolate Pecan Pound Cake: A Sweet Indulgence for Every Occasion

⚖️
Difficulty
Medium

⏲️
Prep Time
25 mins

🕒
Cook Time
60 mins

⏱️
Total Time
85 mins

🍽️
Servings
12 slices

Are you ready to indulge in a dessert that embodies rich flavors and delightful textures? This Decadent German Chocolate Pecan Pound Cake is a true celebration of sweet culinary art, combining the deep, nutty flavors of German chocolate with crunchy pecans to create a treat that will captivate your taste buds. Every bite offers a blend of chocolatey sweetness and buttery richness that makes it perfect for gatherings or simply as a delightful afternoon treat. You’ll find that this cake doesn’t just satisfy your sweet tooth but also provides a luxurious experience that you won’t forget anytime soon!

This irresistible pound cake, with its moist and dense crumb, strikes the perfect balance between rich cocoa flavors and the crunch of toasted pecans. The deeply aromatic scent of freshly baked chocolate envelops your kitchen, enhancing the atmosphere with warmth and inviting memories of family gatherings. Whether enjoyed with a cup of coffee or served as a stunning centerpiece for an occasion, this cake is sure to win hearts and palates alike.

Quick Recipe Highlights

  • Flavor Profile: A harmonious mix of sweet chocolate, toasted pecans, and a touch of vanilla.
  • Texture: Moist and dense with a rich crumb, complemented by the crunch of pecans.
  • Aroma: The inviting scent of chocolate and butter fills the air as it bakes.
  • Visual Appeal: Beautifully garnished with chocolate curls and toasted pecans, it’s a sight to behold.
  • Skill Level Needed: While labeled as medium difficulty, it is achievable for novice bakers willing to follow instructions.
  • Special Equipment: Standard baking equipment plus a good quality bundt pan for the best result.

Recipe Overview

  • Difficulty Level: This recipe is considered medium due to the need for proper mixing techniques and baking times to achieve the desired texture.
  • Category: This cake fits perfectly as a dessert that can stand out at any celebration, from birthdays to holiday gatherings.
  • Cuisine: Rooted in German traditions but adapted by American bakers, it showcases the love for chocolate and nuts in baking.
  • Cost: With ingredients like German chocolate and pecans, the approximate cost for this recipe is moderate, yet worth every penny for a special treat.
  • Season: This cake shines year-round, but it feels particularly fitting during festive seasons when chocolate desserts are in high demand.
  • Occasion: Ideal for family celebrations, office parties, or as a comforting dessert at home to share with loved ones.

Why You’ll Love This Recipe

This Decadent German Chocolate Pecan Pound Cake is designed to please both the palate and the eye. The interplay of textures, with the velvety softness of the cake complemented by the crunchy pecans, creates a delightful experience with every bite. The rich chocolate flavor, characteristic of German chocolate, invites a touch of indulgence, making it a standout dessert for any occasion. Each slice serves as a reminder of the joy found in baking and sharing delicious treats with those you care about.

Convenience is another reason to love this recipe. It requires standard kitchen tools and ingredients that can easily be found at your local grocery store. The preparation is straightforward, making it a fantastic choice for both novice and seasoned bakers. Additionally, the cake stays fresh for days when stored properly, allowing you to enjoy it over time.

From a nutritional perspective, this cake features quality chocolate and pecans, which provide beneficial nutrients, including healthy fats, antioxidants, and minerals. While indulgent, it can be a part of a balanced diet when enjoyed in moderation, allowing you to savor the sweetness without guilt.

Social gatherings are made sweeter with this cake at the center. It sparks conversations, brings smiles, and invites nostalgia as people share memories connected to chocolate desserts. Whether you are hosting a birthday party or a casual get-together, this cake is a showstopper that enhances the overall atmosphere.

Cost-effectiveness is evident since this recipe yields multiple servings, making it a great value. Preparing a homemade pound cake is often more economical compared to purchasing elaborate desserts from bakeries. Plus, you’ll have the satisfaction of creating a dessert that is both delicious and memorable.

Historical Background and Cultural Significance

The origins of German chocolate cake can be traced back to a recipe developed by a British expat named Samuel German in 1852. His dark-baking chocolate, known as “Baker’s German’s Sweet Chocolate,” laid the groundwork for what would evolve into the German chocolate cake we know today. While the original recipe was intended for a layered cake, American bakers eventually adapted it into various forms, including the timeless pound cake.

Culturally, German chocolate cake holds a special place in American dessert traditions, especially in the Southern states. It has been a beloved treat at family gatherings and celebrations for generations. The combination of chocolate and pecans echoes the rich agricultural heritage of the South where both ingredients thrive. It symbolizes comfort and indulgence, often evoking feelings of nostalgia among those who grew up enjoying it.

Over the years, the recipe has transformed, giving rise to numerous interpretations. From elaborate layer cakes to simpler pound cakes, bakers have embraced creativity while respecting the origins of German chocolate. Each variation offers a unique taste while paying homage to the original concept of this iconic dessert.

Regional variations can be found, showcasing local ingredients and baking traditions. For instance, some recipes incorporate coconut, adding an additional layer of texture and flavor. Others might replace pecans with local nuts, making it a delightful reflection of the community it originates from.

Ingredient Deep Dive

German Chocolate: This unique chocolate is sweeter than standard dark chocolate, offering distinct flavors derived from the beans used. It has a rich history that dates back to 19th century America and is known for adding moisture and softness to baked goods. When selecting German chocolate, aim for high-quality brands for the best flavor. Store it in a cool dry place, and consider using it in other baked goods for a delicious twist.

Pecans: Pecans have long been celebrated in Southern cuisine and stand out not only for their flavor but also for their nutritional profile, which includes healthy fats, fiber, and essential vitamins. When choosing pecans, ensure they are fresh and ideally, lightly toasted to enhance their nutty taste. Storing them in airtight containers in a cool environment can prolong their freshness, and they can easily be swapped with other nuts if you’re looking for variety.

Common Mistakes to Avoid

  • Overmixing the batter can lead to a dense texture; mix just until combined.
  • Not properly measuring ingredients may alter the cake’s overall balance; use a kitchen scale for accuracy.
  • Skipping the step of greasing and flouring the pan can result in sticking; take this step seriously.
  • Underbaking or overbaking can affect texture; ensure you do the toothpick test to confirm doneness.
  • Not allowing the cake to cool before removing it from the pan can cause breakage; patience is key.
  • Using room temperature ingredients improperly can lead to an uneven batter; always follow temperature recommendations.
  • Neglecting to toast the pecans may result in a lack of depth in flavor; toasting enhances their nutty essence.
  • Inconsistent oven temperatures may skew baking time; use an oven thermometer to maintain correct baking conditions.
  • Not following the recipe step-by-step can lead to unexpected results; adhere to the method for best outcomes.
  • Using old baking soda or powder may compromise the rise; always check the freshness of your leavening agents.

Essential Techniques

Proper Creaming of Butter and Sugar: This technique is critical for achieving the right texture. Begin with room temperature butter and sugar and cream them together until light and fluffy. This process incorporates air, which helps to create a soft and tender cake. Avoid overcreaming, as it can lead to too much air incorporation, resulting in collapse during baking.

Layering Ingredients: When adding dry ingredients to the wet mixture, do so gradually. This method allows for uniform incorporation and minimizes clumping. Begin by alternating between flour and liquid additions, starting and ending with flour. Mixing gently after each addition promotes a tender crumb without overdeveloping gluten.

Pro Tips for Perfect Decadent German Chocolate Pecan Pound Cake

1. **Always Preheat Your Oven:** Make sure your oven is preheated to the proper temperature to ensure even baking throughout.
2. **Use Quality Ingredients:** Invest in high-quality chocolate and fresh pecans for a richer flavor in your cake.
3. **Opt for Room Temperature Ingredients:** Allow butter, eggs, and milk to come to room temperature to achieve better emulsion and texture.
4. **Do Not Rush Cooling:** Let the cake cool completely in the pan before inverting; this helps preserve its shape.
5. **Experiment with Flavors:** Feel free to add a dash of espresso powder to intensify the chocolate flavor in the cake.
6. **Try Different Nuts:** While pecans create a delightful texture, consider using walnuts or hazelnuts for a different taste experience.
7. **Add a Glaze:** Drizzle the cooled cake with a chocolate or caramel glaze for an extra layer of sweetness.
8. **Garnish Thoughtfully:** Use shaved chocolate or additional toasted nuts to elevate presentation and texture.

Variations and Adaptations

If you’re looking to switch things up, consider adding seasonal flavors such as fresh citrus zest for a light, bright contrast in the rich cake. You can also adapt the recipe to include different nuts or even dried fruits like cherries or cranberries for a unique twist. For vegan adaptations, substitute the eggs with flax eggs and use plant-based butter and milk for a delicious dairy-free version.

For texture modifications, try adding a layer of cream cheese frosting between the layers if you choose to make a layered version of this cake for added creaminess. The overall presentation can also be enhanced with fresh fruit arrangements or edible flowers, making it look as delightful as it tastes.

Serving and Presentation Guide

Plating your Decadent German Chocolate Pecan Pound Cake can be as simple or elaborate as you wish. For a rustic look, serve it directly from the bundt pan with a light dusting of powdered sugar. For a more elegant feel, slice the cake on a decorative platter and garnish with fresh berries or a chocolate ganache drizzle. To enhance visual appeal, consider adding candied pecans around the base or top of the cake.

Temperature plays a crucial role in enjoying your cake; serve slightly warm or at room temperature for optimal flavor release. Portioning can be done with a serrated knife for clean, even slices, ensuring guests receive equal servings of this indulgent treat.

Wine and Beverage Pairing

When it comes to pairing beverages with this decadent dessert, a rich red wine like Cabernet Sauvignon complements the chocolate flavors beautifully. Alternatively, a sweet dessert wine such as Port can amplify the sweetness, making it a fitting choice for special occasions.

For non-alcoholic options, a robust coffee or creamy chai tea can enhance the flavors of the cake. If choosing to serve with tea, opt for a black tea with hints of spice to balance the richness of the chocolate.

Storage and Shelf Life

To store your Decadent German Chocolate Pecan Pound Cake, wrap it tightly in plastic wrap or aluminum foil to keep it fresh for up to a week at room temperature. If you need to store it longer, consider freezing the cake; wrapped securely, it can last up to three months in the freezer.

For thawing, simply remove it from the freezer and let it sit at room temperature for several hours. Be mindful of signs of spoilage, such as off smells or visible mold, which indicate that it’s best to discard rather than consume.

Make Ahead Strategies

If entertaining, consider baking the cake a day or two in advance. It stores well, and some find that the flavors deepen over time. You can prepare the cake, let it cool completely, and then wrap it tightly in plastic wrap to keep it fresh until the day of serving.

When baking in advance, it’s helpful to keep frosting or ganache separate until just before serving to maintain texture. Always revisit the cake before serving to check if extra garnishes or accompaniments are desired.

Scaling Instructions

Scaling this Decadent German Chocolate Pecan Pound Cake is straightforward. If halving the recipe, a smaller bundt pan may be required, and the baking time will likely decrease. Conversely, if you decide to double or triple the recipe, ensure that you have the correct size of baking pans to accommodate the batter.

Watch the baking time closely and perform a toothpick test to ensure that the cake is baked through without being dry. Adjust storage accordingly if planning to make larger quantities as they may need more space in your refrigerator or freezer.

Nutritional Deep Dive

Examine the macros of this Decadent German Chocolate Pecan Pound Cake to help manage portion sizes effectively. A single slice offers a satisfying balance of carbohydrates from the sugar and flour base, with healthy fats coming from the pecans and butter.

In terms of micronutrients, this cake provides beneficial vitamins and minerals, including magnesium, phosphorus, and antioxidants from the cocoa and nuts. When enjoying this treat, consider its caloric content versus nutritional benefits, indulging in moderation for an enjoyable experience.

Dietary Adaptations

There are several adaptations available for this recipe to cater to different dietary needs. For a gluten-free option, substitute all-purpose flour with a gluten-free blend, ensuring other ingredients are also free from gluten.

For a vegan twist, replace eggs with flaxseed meal or commercial egg replacers and opt for dairy-free alternatives for butter and milk. Low-carb lifestyles may benefit from using almond flour and erythritol instead of traditional sugars. Meanwhile, those on a paleo diet can enjoy similar adaptations with natural sweeteners and nut-based flours.

Troubleshooting Guide

If your cake comes out dense, it may be due to overmixing or incorrect ingredient temperatures. Ensure that you follow the creaming process carefully and use room temp ingredients for optimal texture. If your cake is too dry, check your baking time; the toothpick test is key to ensuring perfection.

Should you find an uneven rise, consider the placement of the cake in the oven; it should not be too close to the heating elements. For flavor imbalances, try adding a pinch of sea salt or additional vanilla to enhance the cake’s overall profile.

Recipe Success Stories

Our readers have shared glowing feedback about their experiences making this Decadent German Chocolate Pecan Pound Cake. Community members have noted the ease of following the recipe, often remarking on the cake’s perfect balance of sweetness and richness that makes it a guest favorite.

Variations have come into play, with some readers incorporating their favorite ingredients like coconut or caramel, creating unique adaptations that remain true to the original concept. Photography has also been a highlight, with many showcasing their beautifully decorated cakes on social media, inspiring others to bake.

Frequently Asked Questions

Can I use dark chocolate instead of German chocolate?

While dark chocolate can be substituted, it will change the overall sweetness and flavor profile. German chocolate’s unique qualities add a sweetness that complements the cake well.

What is the best way to store leftovers?

Wrap the cake tightly in plastic wrap or store it in an airtight container to keep it fresh. It can be stored at room temperature or in the refrigerator for several days.

Can this cake be frozen?

Yes, this cake freezes well. Wrap it securely in plastic wrap and aluminum foil. It can be frozen for up to three months.

How do I enhance the chocolate flavor?

Add a teaspoon of instant espresso powder to the batter for an enriched chocolate flavor without making the cake taste like coffee.

Is it necessary to toast the pecans?

Toasting pecans enhances their flavor and adds a delightful crunch to the cake, making it a recommended step.

What can be used in place of eggs for a vegan version?

For each egg, you can use one tablespoon of flaxseed meal mixed with three tablespoons of water as a substitute for a vegan cake.

Can I make this cake as a layered cake?

Absolutely! You can bake the batter in multiple round pans to create layers and frost it with your choice of frosting.

What do I do if my cake sinks in the middle?

A sinking cake often results from underbaking or overmixing. Ensure the cake is fully baked before removal and avoid excessive mixing after adding dry ingredients.

Can I add chocolate chips to the batter?

Yes! Adding chocolate chips can enhance the chocolate flavor and provide delightful bursts of chocolate in every slice.

What’s the ideal temperature to serve the cake?

This cake is best served at room temperature, which allows the flavors to fully develop and the texture to shine.

Additional Resources

If you’re inspired by this Decadent German Chocolate Pecan Pound Cake, consider exploring related recipes like classic chocolate cake, pecan pie, or even nut-filled brownies. Deepen your baking knowledge with technique guides on creaming butter or mastering oil-based cakes.

For more insight, look into ingredient specifics such as a deep dive on types of chocolate or the health benefits of various nuts. Equipment recommendations can help refine your baking tools for future successes, making your baking journey even more rewarding.

Join the Conversation

We love hearing your thoughts on this Decadent German Chocolate Pecan Pound Cake! Share your own experiences, suggest variations, and engage with fellow bakers on our social media platforms. Don’t forget to tag us in your photos showcasing your creations. Your feedback and suggestions help build a community of enthusiastic bakers eager to share their culinary adventures.

The Recipe

Decadent German Chocolate Pecan Pound Cake

Serves: 12 slices

Prep Time: 25 mins

Cook Time: 60 mins

Total Time: 85 mins

Kitchen Equipment Needed

  • Bundt pan
  • Mixing bowls
  • Electric mixer
  • Measuring cups and spoons
  • Rubber spatula
  • Cooling rack

Ingredients

  • 2 cups all-purpose flour
  • 1 teaspoon baking powder
  • 1/2 teaspoon baking soda
  • 1/4 teaspoon salt
  • 1 cup unsalted butter, softened
  • 2 cups granulated sugar
  • 4 large eggs
  • 1 teaspoon vanilla extract
  • 1 cup German chocolate, melted
  • 1 cup pecans, chopped and toasted
  • 1/2 cup buttermilk

Directions

  1. Preheat your oven to 350°F (175°C). Grease and flour a bundt pan.
  2. In a medium bowl, whisk together flour, baking powder, baking soda, and salt; set aside.
  3. In a large mixing bowl, cream together softened butter and sugar until light and fluffy.
  4. Add eggs one at a time, mixing well after each addition. Stir in vanilla and melted chocolate.
  5. Gradually add dry ingredients to the wet mixture, alternating with buttermilk; stir in pecans.
  6. Pour the batter into the prepared bundt pan and smooth the top.
  7. Bake in the preheated oven for 60-65 minutes, or until a toothpick inserted comes out clean.
  8. Allow to cool in the pan for 10 minutes, then invert onto a wire rack to cool completely.

Recipe Notes

  • For an extra treat, drizzle chocolate ganache over the cooled cake.
  • This cake can be made ahead and freezes well for future enjoyment.
  • Feel free to substitute walnuts for pecans if desired.

Deliciously Gooey Pecan Pie Cookies: A Sweet Twist on Tradition

Gooey Pecan Pie Cookies Recipe: A Sweet Treat for Any Occasion!

⚖️
Difficulty
Medium

⏲️
Prep Time
15 mins

🕒
Cook Time
20 mins

⏱️
Total Time
35 mins

🍽️
Servings
24 cookies

Pecan Pie Cookies are a delightful twist on the classic dessert, merging the rich, gooey filling of traditional pecan pie with the convenience of bite-sized cookies. These treats are perfect for holiday gatherings or anytime you’re craving something sweet and comforting. Imagine sinking your teeth into a soft, buttery cookie that oozes with a luscious pecan pie filling. The combination of sweet caramel notes from the filling and the nutty crunch of pecans creates an indulgent experience that will leave everyone reaching for more.

Not only are these Gooey Pecan Pie Cookies simple to make, but they also offer a wonderful flavor profile that highlights the warmth of cinnamon and nutmeg, paired beautifully with toasty pecans. The smell of baking cookies will waft through your kitchen, inviting family and friends to indulge in these tasty bites. Their beautiful golden color, glistening with syrupy sweet goodness, makes them a stunning addition to any dessert platter.

Quick Recipe Highlights

  • Flavor Profile: These cookies combine sweet and savory elements, creating a delightful harmony of caramel, nutty pecans, and a hint of warmth from spices.
  • Texture: Each bite offers a soft cookie base with a gooey and chewy pecan filling, providing a satisfying contrast that is utterly delicious.
  • Aroma: The inviting scent of baked dough mixed with warm pecan and caramel notes will fill your home, making it hard to resist.
  • Visual Appeal: With their golden-brown edges and glossy pecan topping, these cookies are as pleasing to the eyes as they are to the palate.
  • Skill Level Needed: These cookies are medium-level in difficulty, requiring basic baking skills but rewarding you with impressive results.
  • Special Equipment: You will need standard baking tools such as a mixing bowl, baking sheets, and measuring cups for best results.

Recipe Overview

  • Difficulty Level: The medium difficulty arises from preparing the cookie dough and filling, but with clear instructions, anyone can master these treats.
  • Category: These cookies make a great dessert and are suitable for both casual snacks and formal events.
  • Cuisine: Rooted in Southern cuisine, pecan pie has been an American tradition, and this recipe puts a fun twist on its classic appeal.
  • Cost: This recipe uses budget-friendly ingredients, making it cost-effective for families and gatherings.
  • Season: Ideal for fall and winter, these cookies are perfect during Thanksgiving and Christmas when pecans are in season and holiday baking is in full swing.
  • Occasion: Perfect for holiday parties, potlucks, or as a sweet gift to impress your friends and family.

Why You’ll Love This Recipe

Cooking these Gooey Pecan Pie Cookies allows you to enjoy a nostalgic dessert in an easy-to-manage format. Each bite highlights the creamy gooeyness of the filling along with the crunch of the pecans, ensuring that every mouthful is packed with flavor. They’re not overly sweet and strike a perfect balance, making them irresistible and a go-to treat for anyone who loves pecan pie.

The convenience of these cookies can’t be overlooked. They can be prepared in under an hour and can easily be made ahead of time for parties or gatherings. Once made, these cookies can be stored away, allowing for easy snacking or dessert offerings without much fuss. This makes them a fantastic choice for busy bakers who still want to impress.

Nutritionally, pecans are a source of healthy fats and are loaded with antioxidants, which makes these cookies not just a treat but also a guilt-free option when consumed in moderation. You get to enjoy a delightful dessert without compromising on health, as the natural ingredients bring a wholesome aspect to this sweet delight.

Socially, these cookies are bound to be a hit at any gathering. Whether you serve them at a family reunion or share them with friends over coffee, they are the kind of treat that sparks conversation and brings joy. The combination of flavor, aroma, and presentation creates a joyous experience that everyone will appreciate.

Lastly, their cost-effectiveness makes these cookies accessible to everyone. Most of the ingredients are pantry staples, permitting anyone to whip up a batch regardless of their cooking budget. This accessibility makes them a beloved recipe that can be adapted to various occasions without breaking the bank.

Historical Background and Cultural Significance

Pecan pie’s origins can be traced back to early Native American tribes, who utilized the pecan nut in their diets. The beloved nut became a staple in Southern cooking, evolving into the iconic pecan pie that many cherish today. The Gooey Pecan Pie Cookies are a modern adaptation that reflects today’s busy lifestyles, allowing fans of pecan pie to enjoy its taste without the lengthy preparation that traditional pies require.

Culturally, pecans are more than just a delicious nut; they’re symbolic in Southern heritage. Pecan trees were first cultivated in the U.S. in the 18th century, and the tree has become synonymous with Southern hospitality. Serving pecan pie and now, cookies, is a way to express love and generosity, tying them closely to family gatherings and celebrations.

As recipes have evolved over the years, so too has the pecan pie. From local variations to twists on traditional recipes, each region has put its flair into creating pies, and now cookies. The transition from pie slices to bite-sized cookies has made this dessert much more shareable and approachable.

Various regional adaptations of the pecan pie influenced the creation of these cookies. Some variations incorporate chocolate chips or bourbon, which adds a dynamic twist to the deep-rooted flavors that many associate with pecan desserts, demonstrating the flexibility of this beloved culinary tradition.

Ingredient Deep Dive

Pecans

Pecans are a quintessential ingredient in this recipe, bringing a nutty flavor that perfectly complements the sweetness of the filling. Historically, pecans have been celebrated in Southern cuisine and feature prominently in various desserts. Nutritionally, they offer healthy fats, proteins, and a variety of vitamins and minerals, making them a powerhouse ingredient.

When selecting pecans, look for ones that are firm and plump with a rich aroma. Store them in a cool, dry place, or in the refrigerator for extended freshness. A great substitute for pecans in this recipe could be walnuts or hazelnuts, although they will impart a different flavor profile.

Butter

Butter provides the fat content necessary for tender cookies, imparting a rich flavor. Its significance in American baking cannot be overstated, as it binds the cookie dough and enhances overall texture. Using high-quality unsalted butter ensures a balanced flavor without excess sodium, which is crucial for this recipe.

To select butter, freshness is key. Choose blocks instead of pre-packaged options when available, and store them in the refrigerator or freezer for longer shelf life. Margarine can serve as a suitable substitute if necessary, although it may alter the taste slightly.

Brown Sugar

Brown sugar is instrumental in achieving the gooey, caramel-like texture and sweetness of the cookie filling. The molasses content in brown sugar adds depth and richness to the flavor, making these cookies incredibly appealing. Its history is tied closely to American sweets, evolving from cane sugar production.

When using brown sugar, make sure it is packed firmly in your measuring cup for accurate results. Store it in an airtight container to prevent it from hardening. If you need a substitute, a mix of white sugar and molasses can replicate brown sugar fairly closely.

Flour

Flour is the backbone of any cookie, providing structure and stability. All-purpose flour is ideal for this recipe as it absorbs moisture and creates a desirable crumb. Its popularity in baking stems from its versatility across various recipes and baking traditions.

Look for flour that is finely milled for the best texture, and store it in a cool, dry place to prevent spoilage. If gluten is a concern for you, consider using a gluten-free blend designed for cookie recipes which will allow you to enjoy these delicious treats without compromise.

Common Mistakes to Avoid

  • Overmixing the Dough: When you overmix cookie dough, you risk creating tough cookies instead of a tender crumb. Mix just until the ingredients are combined to avoid this issue.
  • Not Preheating the Oven: Skipping the preheating step can cause cookies to bake unevenly. Always ensure your oven is at the correct temperature before baking your cookies for best results.
  • Using Cold Ingredients: Using cold butter or eggs can affect the mixing process and the integrity of the final cookie. Make sure your ingredients are at room temperature for optimal incorporation.
  • Improperly Measuring Ingredients: Accurate measuring is crucial in baking. Use the spoon-and-level method for flour and always use a kitchen scale for precision when required.
  • Neglecting to Chill the Dough: If your cookie dough is too warm when baked, it can spread excessively. Chill the dough in the refrigerator for at least 30 minutes before baking.
  • Not Allowing Cookies to Cool: Letting cookies cool on the baking sheet can lead to a soggy bottom. Transfer cookies to a wire rack for uniform cooling to maintain their texture.
  • Using Old Nuts: Stale nuts can ruin the overall flavor of your cookies. Always check the freshness of your pecans before using them in this recipe.
  • Skipping the Pecan Topping: The pecan topping is not just for decoration; it adds essential texture and flavor to the cookies. Don’t skip this step!
  • Underbaking: For optimal gooeyness, make sure to bake the cookies until they are just golden around the edges. Undercooked cookies will result in a doughy center that lacks proper texture.
  • Ignoring Home Environment: Environmental factors like humidity can affect cookie dough consistency. Be ready to make minor adjustments based on how the dough feels during preparation.

Essential Techniques

Proper Mixing Techniques

It’s important to mix cookie dough correctly to achieve the right texture. Using an electric mixer can help fully incorporate ingredients without overmixing. Start at a low speed to prevent flour from flying out and gradually increase to blend until just combined.

Visual cues for success include a smooth, cohesive dough that doesn’t stick to the sides of the bowl. If the dough appears crumbly, a little milk can bring it together, but be careful not to make it too wet.

Chilling the Dough

Chilling cookie dough is crucial for the final result. It helps solidify the fats, leading to a thicker, chewier cookie that holds its shape during baking. Wrap the dough in plastic wrap and refrigerate for at least 30 minutes.

You’ll know the dough is ready when it feels firm to the touch. Chilling for too long can make it difficult to work with, so don’t let it sit for longer than recommended.

Cooling the Cookies

Allowing cookies to cool properly ensures they maintain their structure. After baking, let them set on the cookie sheet for a few minutes before transferring them to a cooling rack. This step allows the residual heat to finish cooking the cookies without overbaking.

The perfect cooling cue is to see the edges firm up while the centers remain slightly soft; this ensures gooeyness without being raw.

Pro Tips for Perfect Gooey Pecan Pie Cookies

1. Use fresh pecans for enhanced flavor; lightly toasting them can amplify their nutty richness even more.
2. Consider adding a pinch of sea salt on top after baking for a delightful sweet-salty contrast.
3. For an extra indulgent treat, drizzle melted chocolate over the cooled cookies for a decadent finish.
4. Store leftover cookies in an airtight container at room temperature for up to a week for the best freshness.
5. Experiment with different spices like espresso powder or vanilla extract to give your filling an added depth of flavor.
6. Try substituting some of the flour with oat flour for a unique flavor and added texture.
7. Don’t skip the chill time; it truly makes a difference in the final texture of your cookies.
8. Make a double batch and freeze half the dough for a quick treat anytime!

Variations and Adaptations

For a regional variation, try incorporating maple syrup in place of some brown sugar for a hint of subtle warmth and sweetness. Additionally, during the spring and summer, introducing citrus zest, like lemon or orange, can brighten the flavors and provide a refreshing twist.

Seasonal adaptations can also be made by adding cranberries or white chocolate chips for a festive touch during the holidays. For those on a diet, consider substituting brown sugar with coconut sugar for a lower glycemic index alternative without sacrificing sweetness.

Texturally, if you prefer a crunchier cookie, add shredded coconut or replace half of the pecans with crispy rice cereal for a satisfying bite. To enhance presentation, consider serving cookies with dollops of whipped cream or vanilla ice cream alongside.

Serving and Presentation Guide

Presentation is key when serving your Gooey Pecan Pie Cookies. Arrange cookies on a tiered serving platter or cake stand to create an impressive display. For a personal touch, sprinkle powdered sugar over the top for a beautiful dusting.

Garnishing with chocolate shavings, crushed nuts, or caramel drizzle can elevate the visual appeal and add an extra layer of flavor. For a modern serving suggestion, stack three cookies high and serve them with a scoop of ice cream, turning them into an indulgent dessert.

When considering temperature, these cookies are best served slightly warm, fresh from the oven. However, they are also delightful at room temperature, making them versatile for any gathering. Portion control is essential; consider serving them alongside glasses of milk or coffee for an enjoyable afternoon snack.

Wine and Beverage Pairing

Pair these Gooey Pecan Pie Cookies with dessert wines such as a late-harvest Riesling or a sweet Muscat for a delightful balance. The fruity notes in these wines complement the rich pecan filling beautifully, enhancing your tasting experience.

For non-alcoholic options, consider serving them with freshly brewed coffee or a spiced chai latte that pairs well with the warm spices in the cookies. A cool glass of milk also works wonderfully to bring out residual sweetness.

When serving wine, ensure it is chilled appropriately to enhance flavors, and for coffee, serve hot but not so that it overshadows the delicate taste of the pecan pie cookies.

Storage and Shelf Life

For optimal freshness, store your Gooey Pecan Pie Cookies in an airtight container at room temperature. They can typically last up to a week if kept sealed; however, for peak quality, it’s best to consume them within the first few days.

If you need to store them longer, you can place the cookies in the freezer. Wrap them tightly in plastic wrap, followed by foil, to prevent freezer burn, where they can last up to three months. To thaw, leave them at room temperature or pop them in the microwave for a few seconds.

Signs of spoilage include any visible mold or an off smell. If you notice either, it’s best to discard the cookies. Reheating can breathe new life into older cookies; place them in a preheated oven for a couple of minutes to regain their chewy texture.

Make Ahead Strategies

If you’re planning for a gathering, preparing the cookie dough a day in advance can save time. Simply wrap the dough tightly in plastic wrap and refrigerate. This allows the flavors to meld, creating an even tastier cookie.

Consider baking half the batch and reserving the rest of the dough in the freezer for later use. You can thaw it overnight in the fridge before baking on the same day you plan to enjoy them. This is a great way to have fresh cookies on hand without the extra effort.

When baking ahead, feel free to add a finishing touch of whipped cream or a drizzle of chocolate just before serving for an impressive presentation. Keep in mind that cooking times may differ for chilled or frozen dough and adjust accordingly for perfect results.

Scaling Instructions

If you need to halve the recipe for a smaller gathering, all measurements can be easily adjusted by simply dividing amounts by two. Remember to keep an eye on baking times, as smaller batches may require less time in the oven for perfect results.

For larger gatherings, doubling or even tripling the recipe is straightforward. Just ensure you have sufficient baking sheets and oven space. You may need to bake batches separately if your oven cannot accommodate all trays at once.

Consider the size of your mixing bowl and adjust your technique if scaling considerably. Utilize larger bowls or mixing vessels, and be mindful of how the dough texture may change with larger quantities.

Also, factor in the storage needs for larger batches, ensuring you have adequate containers to keep each batch fresh between uses.

Nutritional Deep Dive

The nutritional profile of Gooey Pecan Pie Cookies includes a balance of macronutrients: carbohydrates from flour and sugars, fats from butter and nuts, and some protein from pecans. Each cookie is a sweet indulgence but can be enjoyed in moderation as part of a balanced diet.

Micronutrient content varies depending on added ingredients, but pecans are rich in vitamin E and minerals such as magnesium, offering heart-health benefits. Each serving contributes to essential nutrient intake while satisfying dessert cravings.

For those monitoring dietary needs, consider the portion size; each cookie, while delicious, should be enjoyed with mindfulness due to its calorie density. Balancing cookies with other healthy options like fruits or nuts can help manage overall calorie consumption.

Dietary Adaptations

Gluten-free adaptations can be made by substituting wheat flour with a 1:1 gluten-free blend, maintaining the desired structure while allowing those with gluten sensitivities to enjoy these cookies.

Dairy-free options can also be achieved by replacing butter with coconut oil or a vegan butter substitute, ensuring everyone in your circle can enjoy the delicious flavors without concern.

For a vegan rendition, use flax eggs instead of regular eggs and follow the dairy substitutions mentioned. Coconut or almond milk can serve as a delightful addition to enhance the texture without compromising flavor.

Keto dieters can swap the brown sugar for erythritol or another suitable sweetener, and use almond flour instead of traditional flour, creating a low-carb version of these cookies while keeping them a tasty treat.

Troubleshooting Guide

If your cookies end up too dry, it could be due to overbaking or using too much flour. Always check your cookies a minute or two before the suggested baking time to prevent this issue.

For an unbalanced flavor, consider adjusting the amount of sugar or spices in your filling; a pinch of salt can often enhance overall flavor if sweetness becomes overpowering.

Temperature inconsistencies in baking can arise from incorrect oven calibration; investing in an oven thermometer can help ensure your oven heats correctly for precision baking.

If your cookies spread excessively during baking, ensure your dough is sufficiently chilled, and avoid overmixing ingredients, which can lead to a loss of structure.

If you find your filled cookies are not gooey enough, consider increasing cooking time slightly while keeping a close eye on them to maintain that desired texture.

Recipe Success Stories

Many bakers have shared their successful twists on the Gooey Pecan Pie Cookies, adding everything from chocolate chips to extra spices, demonstrating the versatility of this delightful recipe.

Community feedback has been overwhelmingly positive, with readers praising the simple instructions and impressive flavor; several have noted how these cookies have become a staple at their family gatherings.

Some readers have encouraged adaptations like substituting maple syrup for brown sugar to create a unique flavor twist, showcasing the recipe’s flexibility.

Photography tips shared by readers indicate that showcasing the gooey center can draw in eager bakers, encouraging more trials in perfecting this beloved recipe.

Overall, the sense of community amongst bakers trying out these recipes contributes to a growing love for sweets that bring nostalgia and joy.

Frequently Asked Questions

1. Can I make these cookies gluten-free?

Yes! You can substitute the all-purpose flour with a gluten-free flour blend. Make sure it is designed for baking to achieve the best results.

2. How should I store leftover cookies?

Store leftover cookies in an airtight container at room temperature. If you need to keep them longer, consider freezing them for up to three months.

3. Can I use different nuts?

Absolutely! While pecans are traditional, walnuts or even hazelnuts can be used as alternatives for a different flavor profile.

4. How do I know when my cookies are done baking?

Your cookies are finished when the edges are golden, but the centers remain slightly soft. They will continue to set as they cool.

5. Can these cookies be made ahead of time?

Yes! You can prepare the dough a day in advance or freeze dough balls for baking fresh cookies whenever you’d like.

6. Do I need to chill the dough?

Chilling the dough is recommended to help maintain shape and ensure the cookies don’t spread too much while baking.

7. What can I substitute for eggs?

You can use flaxseed meal mixed with water as a vegan substitute for eggs. Typically, 1 tablespoon of flaxseed meal mixed with 2.5 tablespoons of water equals one egg.

8. Can I add chocolate to my cookies?

Yes! Adding chocolate chips or chunks can complement the nutty flavor perfectly while adding an indulgent twist to the cookies.

9. How long do these cookies keep their freshness?

These cookies are best enjoyed within the first week for optimum freshness, but they can last much longer if stored properly in an airtight container.

10. Can I make these cookies bite-sized?

Sure! You can adjust the size of the scoops to create smaller cookies. Just be mindful of adjusting the baking time accordingly.

11. What drinks pair well with these cookies?

Dessert wines, coffee, or hot chocolate all pair beautifully with Gooey Pecan Pie Cookies, enhancing their sweet flavor profile.

12. Is it okay to overmix the dough?

Overmixing can lead to tough cookies. Mix the dough only until the ingredients are combined for a tender result.

Additional Resources

For those looking to expand their baking skills, consider checking out additional recipes that highlight pecans, such as traditional pecan pie or pecan pralines, for a full range of pecan-flavored treats.

You may also want to explore technique guides focused on mixing methods, baking temperatures, and ingredient substitutions for more successful baking outcomes.

Learning about ingredient specifics can help you choose the best options for your recipes, allowing you to optimize flavor and nutrition in your baking projects.

Lastly, seasonal variations to your favorites can keep your baking fresh and exciting, especially for those who love to try new takes on classic dishes throughout the year.

Join the Conversation

We invite you to share your experiences and variations with Gooey Pecan Pie Cookies on social media! Use hashtags to connect with fellow bakers and showcase your delicious creations.

Photography plays a big role in sharing food experiences; don’t be shy about posting your cookie pictures! Sharing tips and tricks with the community not only helps others but can also provide inspiration for your next baking project.

Community engagement is key; participate in recipe reviews or discussions to enhance your baking skills and connect with others who enjoy making and sharing sweet treats.

Scroll up to the recipe section and try these delightful cookies today!

The Recipe

Gooey Pecan Pie Cookies

Serves: 24 cookies

Prep Time: 15 mins

Cook Time: 20 mins

Total Time: 35 mins

Kitchen Equipment Needed

  • Baking sheets
  • Mixing bowls
  • Measuring cups and spoons
  • Electric mixer
  • Cooling rack

Ingredients

  • 1 cup unsalted butter, softened
  • 2 cups brown sugar, packed
  • 3 cups all-purpose flour
  • 3 large eggs
  • 2 cups pecans, chopped
  • 1 teaspoon vanilla extract
  • 1/2 teaspoon cinnamon
  • 1/2 teaspoon nutmeg
  • 1/4 teaspoon salt

Directions

  1. Preheat the oven to 350°F (175°C) and line baking sheets with parchment paper.
  2. In a mixing bowl, cream together softened butter and brown sugar until light and fluffy.
  3. Add eggs one at a time, mixing well after each addition, then stir in vanilla extract.
  4. In another bowl, whisk together flour, cinnamon, nutmeg, and salt.
  5. Gradually beat the flour mixture into the butter mixture until just combined.
  6. Fold in chopped pecans until evenly distributed throughout the dough.
  7. Drop dough by tablespoonfuls onto the prepared baking sheets, spacing them about 2 inches apart.
  8. Bake for 15-20 minutes, or until the edges are golden brown and the centers are set.
  9. Remove from the oven and let cookies cool on the sheets for 5 minutes before transferring to a wire rack to cool completely.

Recipe Notes

  • For extra gooey cookies, try adding a bit of corn syrup into the filling mixture.
  • These cookies can also be frozen before baking; just scoop them onto a tray and freeze until solid, then transfer them to a freezer bag.
  • Add chocolate chips for a double treat if you’re looking for something even more indulgent.

Delicious Sopapilla Cheesecake Bars Recipe for Sweet Indulgence

Sopapilla Cheesecake Bars: A Sweet Delight with a Twist

⚖️
Difficulty
Easy

⏲️
Prep Time
15 mins

🕒
Cook Time
30 mins

⏱️
Total Time
45 mins

🍽️
Servings
12 Bars

Sopapilla Cheesecake Bars are a delightful fusion of traditional Mexican flavors and classic cheesecake goodness. This recipe captures the essence of sopapillas—fluffy, sweet pastries—combined with a creamy cheesecake filling. The experience begins with the warm aroma of vanilla and cinnamon wafting through your kitchen, enticing everyone to gather around. The contrast between the buttery, flaky crust and the rich, velvety filling creates a mouthwatering treat that is perfect for any occasion.

Serving these bars warm is recommended, as the gooey filling oozes slightly when cut, revealing its enticing goodness. Each bite offers a sweet symphony, where velvety cream cheese meets a hint of cinnamon and sugar, leaving a deliciously comforting aftertaste that will have your guests coming back for more. These Sopapilla Cheesecake Bars are not just a dessert; they are a slice of happiness, making them a perfect addition to family gatherings, holidays, or simply as a sweet indulgence after dinner.

Quick Recipe Highlights

  • Flavor Profile: A delightful blend of sweet cinnamon and rich cream cheese creates a comforting dessert that feels indulgent yet familiar.
  • Texture: The buttery, flaky crust contrasts beautifully with the creamy center, making each bite a perfect balance of texture.
  • Aroma: Expect warm notes of cinnamon and sugar that fill your kitchen, inviting everyone to enjoy these bars.
  • Visual Appeal: The golden, slightly caramelized top gives way to a creamy filling, making these bars as beautiful as they are delicious.
  • Skill Level Needed: This recipe is easy enough for beginners, requiring minimal skills but yielding impressive results.
  • Special Equipment: Springform pan or baking dish is ideal for creating the perfect layered structure.

Recipe Overview

  • Difficulty Level: This Sopapilla Cheesecake Bars recipe is easy to follow. Even novice bakers can achieve delicious results, making it an accessible choice for anyone looking to sweeten their day.
  • Category: These bars are perfect for dessert, snacks, or even as a delightful breakfast treat, showcasing their versatility.
  • Cuisine: Inspired by Mexican cuisine, these bars blend traditional flavors with classic dessert elements, making them a unique offering.
  • Cost: The ingredients are affordable, making this recipe a budget-friendly choice for gatherings or everyday treats.
  • Season: Enjoy these bars year-round, but they’re particularly delightful during the fall and winter months when warm desserts are especially comforting.
  • Occasion: Great for festive occasions, family gatherings, or even a simple weeknight dessert, these bars are sure to please!

Why You’ll Love This Recipe

Sopapilla Cheesecake Bars bring together the best of both worlds—the comforting flavor of sopapillas and the creaminess of a cheesecake. The taste is incredibly satisfying; the sweetness is perfectly balanced with the hint of cinnamon, creating an irresistible flavor that will enchant your taste buds. The luxurious texture of the cheesecake filling is complemented by the light, airy crust, making each bite an experience worth savoring.

Convenience plays a key role in this recipe. With just a few simple steps, you can prepare a stunning dessert that requires minimal kitchen time. The ability to serve this dish warm or make it ahead of time adds to its appeal, making it an excellent choice for busy hosts. Whether you’re entertaining guests or treating yourself, these bars deliver with flavor without demanding too much effort.

Additionally, the nutritional aspects of this dessert shouldn’t be overlooked. While it is a treat, it includes cream cheese, which offers some protein and calcium. When prepared thoughtfully, within dietary limits, it can be a satisfying indulgence that doesn’t derail a balanced eating plan.

Socially, these bars can be a centerpiece of conversation around the table. Serving them at parties encourages sharing and connecting, as guests marvel at the delightful combination of textures and flavors. Each bite can spark stories and memories, making them a hit at any gathering.

Finally, these Sopapilla Cheesecake Bars are not only delicious but also cost-effective. Using common pantry ingredients, they are affordable to make, allowing you to create an impressive dessert without breaking the bank. This accessibility makes them an appealing choice for anyone looking to satisfy their sweet tooth.

Historical Background and Cultural Significance

Sopapillas have a rich history rooted in traditional Mexican cuisine, where they have long been enjoyed as a sweet treat. Originating from the Spanish “sopapilla,” these pastries were traditionally fried and served with honey. Over time, these delightful pastries made their way into American dessert culture, particularly in the southwestern United States, giving rise to numerous variations, including this cheesecake bar adaptation.

Culturally, sopapillas hold significance as they embody the warmth and hospitality typical of Mexican gatherings. These treats are often served during festive occasions and celebrations, symbolizing abundance and joy. The evolution of the classic sopapilla into a cheesecake bar reflects the adaptability of traditional recipes to modern tastes and preferences, bridging culinary worlds.

As the recipe for Sopapilla Cheesecake Bars has evolved, it has gained immense popularity among dessert lovers. Families have embraced this sweet treat for its unique flavor and texture while keeping the essence of its sopapilla roots intact. This delicious crossover makes it a standout dessert in modern kitchens.

Regionally, variations of sopapillas can include different fillings or toppings, displaying the diversity of flavors found in Mexican cuisine. As communities adapt recipes to suit local ingredients and tastes, Sopapilla Cheesecake Bars exemplify how culinary traditions can evolve while maintaining a connection to their origins.

Ingredient Deep Dive

  • Cream Cheese: A staple in cheesecakes, cream cheese adds richness and depth to Sopapilla Cheesecake Bars. It is on the sweeter side, which balances beautifully with the cinnamon and sugar. Nutritionally, cream cheese provides protein and calcium, making it a satisfying ingredient in desserts. When selecting cream cheese, look for full-fat versions for a creamier texture. For storage, keep it refrigerated and use it before the expiration date; it can also be frozen for longer preservation. If you’re looking for alternatives, Neufchâtel cheese or a dairy-free cream cheese can substitute effectively, but the flavor might slightly differ.
  • Sugar: Sugar is essential for sweetness and adds to the overall flavor profile of the bars. Both granulated sugar and powdered sugar play roles in enhancing taste and finish. Nutritionally, sugar should be consumed in moderation, but it does provide quick energy. When selecting sugar, opt for organic options if possible, as they are less processed. Store sugar in a cool, dry place. Substitutes like honey or maple syrup can alter the flavor profile but can be used to reduce refined sugar intake.
  • Butter: Butter serves as a key component in the crust, giving it a rich flavor and flaky texture. The use of unsalted butter is recommended to better control the overall saltiness in the recipe. Butter also contributes important fat-soluble vitamins, but it’s important to moderate intake due to its saturated fat content. Look for high-quality, grass-fed butter for the best flavor and health benefits. Store it in the refrigerator or freezer, and remember that it can be easily substituted with margarine or a plant-based alternative if needed.
  • Cinnamon: A warm spice that adds depth and complexity to the flavor of Sopapilla Cheesecake Bars, cinnamon is rich in antioxidants and has anti-inflammatory properties. When purchasing cinnamon, choose Ceylon or true cinnamon for superior flavor and health benefits. Store it in a cool, dark place to preserve its freshness. If you’re seeking flavor variations, consider using nutmeg or pumpkin spice as alternatives to the traditional cinnamon flavor profile.
  • Vanilla Extract: The aromatic addition of vanilla elevates the dessert, rounding out the flavor experience. It provides a sweet and warm essence, making it a staple in many dessert recipes. When selecting vanilla extract, opt for pure vanilla rather than imitation for better taste. It can be stored in a pantry but should be kept away from light to maintain its quality. For variations, consider almond extract to impart a unique flavor twist.

Common Mistakes to Avoid

  • Not softening cream cheese: Always allow cream cheese to come to room temperature before mixing. This ensures a smoother texture and avoids lumps in the filling.
  • Overmixing: When combining ingredients, mix just until combined to avoid a tough texture. Overmixing can incorporate too much air, leading to cracks when baked.
  • Skipping flour: Use flour in the crust preparation to create structure and prevent excess greasiness. Not using flour can result in a soggy base.
  • Not preheating the oven: Make sure the oven is preheated to the appropriate temperature. Baking in a too-cold oven can lead to uneven cooking.
  • Cutting too soon: Allow the bars to cool completely before slicing. Slicing while they’re warm can cause the filling to spill out and ruin the presentation.
  • Using too much sugar: While sweetness is key, too much sugar can overpower the other flavors and affect the texture. Measure carefully!
  • Covering while cooling: Avoid covering the bars while they cool, as it can trap steam and make the crust soggy.
  • Not adjusting oven racks: Ensure that your baking pan is in the center of the oven to allow even cooking and browning.
  • Skipping the garnish: A sprinkle of powdered sugar or cinnamon on top adds a lovely finishing touch—don’t skip this simple step for enhanced appeal!
  • Using metal pans without adjustments: If using metal pans, reduce the cooking time slightly, as they conduct heat better than glass or ceramic.

Essential Techniques

Creaming: This technique is crucial for achieving a smooth, fluffy cream cheese filling. Start by beating softened butter and sugar together until light and fluffy. This traps air and creates a lighter texture in your final bars. Be mindful not to overmix, as this can lead to a denser texture. Look for a creamy consistency with no lumps for best results.

Layering: Layering ingredients properly is essential for the structure of Sopapilla Cheesecake Bars. Start by pressing the dough into the bottom of the pan evenly, ensuring the base supports the filling without sinking. Next, spread the cream cheese filling gently to avoid disturbing the crust. Observing these layers will contribute to a beautiful final product.

Baking: Baking at the correct temperature is vital. Ensure your oven is preheated, and use the middle rack to allow even heat distribution. Watch for visual cues; the edges should be golden brown, and the center should be slightly set but still soft for that creamy texture. Overbaking can lead to dry bars, so check a few minutes early!

Cooling: Cooling the bars at room temperature before refrigerating allows the flavors to meld and the texture to stabilize. This prevents condensation that can ruin the crust. Allowing them to cool completely makes slicing easier and keeps the layers intact, so be patient!

Pro Tips for Perfect Sopapilla Cheesecake Bars

1. Use room temperature ingredients: Let your cream cheese, eggs, and butter come to room temperature before mixing. This helps achieve a smoother texture and better consistency in your bars.

2. Don’t overbake: Keep an eye during the last few minutes of baking. The cheesecake should be set but still slightly jiggle in the center for the perfect creamy texture.

3. Incorporate flavor variations: Add lemon zest for a hint of brightness or a dash of espresso powder for a coffee-infused twist.

4. Experiment with toppings: Top with fresh berries, whipped cream, or a drizzle of honey for added flavor and aesthetic appeal.

5. Use quality ingredients: Opt for high-quality cream cheese and butter for a richer taste and creamy texture.

6. Make it in advance: These bars can be prepared a day ahead; they actually taste better after chilling overnight, allowing the flavors to meld.

7. Ensure even slicing: Use a sharp, hot knife for cutting the bars into even pieces, mirroring the bars’ beautiful layered structure.

8. Store properly: Wrap the remaining bars tightly in plastic wrap before refrigerating to maintain freshness and flavor.

Variations and Adaptations

For seasonal variations, consider incorporating pumpkin puree into the cheesecake filling for a fall twist or fresh strawberries in the summer. These fruit additions not only offer vibrant color but also enhance the flavor profile of the bars.

For dietary modifications, consider creating gluten-free crust using almond flour or gluten-free flour mixtures. Substituting dairy-free cream cheese allows for a completely dairy-free dessert option without sacrificing flavor.

If you’re looking to experiment with flavor variations, add a hint of coconut extract or pecans to the crust for an extra layer of deliciousness. Adjusting the sugar levels can help cater to lower-calorie needs while still delivering on taste.

For texture modifications, consider adding a layer of chocolate ganache or a nuts topping to amplify the dessert’s richness. Each of these adaptations can create a unique experience while honoring the core of Sopapilla Cheesecake Bars.

Serving and Presentation Guide

When plating your Sopapilla Cheesecake Bars, ensure that they are beautifully arranged on a serving dish, perhaps garnished with a dusting of powdered sugar and fresh mint leaves for a pop of color. This elevates the visual appeal and entices guests even more.

Garnishing with a drizzle of caramel or chocolate sauce can enhance both flavor and presentation. Consider serving alongside a scoop of vanilla ice cream to complement the sweetness and richness of the bars.

Temperature considerations are also key; serve these bars lukewarm or at room temperature to maximize the creamy texture and flavor. When portioning, aim for uniformity to provide a pleasing aesthetic and ensure everyone gets a fair share of this delicious dessert.

Wine and Beverage Pairing

A light, sweet Riesling or a Moscato makes an excellent pairing with Sopapilla Cheesecake Bars, enhancing their creamy sweetness. Alternatively, a rich coffee, such as a dark roast or espresso, complements the dessert’s flavors beautifully.

If you’re seeking non-alcoholic options, consider a refreshing iced tea with hints of lemon or a cinnamon-infused apple cider that echoes the spices of the bars. These beverage pairings can elevate the overall dining experience and create memorable moments.

Storage and Shelf Life

Store Sopapilla Cheesecake Bars in an airtight container in your refrigerator. They will maintain their best flavor and texture for about 5 days. A layer of plastic wrap can also help to keep them fresher for longer.

If you want to store them for an extended period, freezing is an option. Wrap the bars tightly in plastic wrap followed by aluminum foil, and they can be kept in the freezer for up to 3 months. Thaw them in the refrigerator before serving to maintain the best quality.

Observe signs of spoilage, such as unusual odors or discoloration, which indicate it’s time to dispose of your bars. Additionally, when reheating, do so gently in the microwave or oven to avoid drying them out.

Make Ahead Strategies

You can efficiently prepare Sopapilla Cheesecake Bars in advance by making the crust and filling a day prior. Store each component separately in the refrigerator until you’re ready to assemble and bake.

Between steps, allow any cooled elements to stay covered to maintain freshness, ensuring optimal flavor when you’re ready to combine and bake. Post-baking, let them cool completely before refrigerating for improved texture when served.

When reheating, consider adding fresh elements, such as whipped cream or fruits, to enhance flavor and presentation, ensuring the bars taste freshly made even after a few days.

Scaling Instructions

To halve the Sopapilla Cheesecake Bars recipe, simply divide each ingredient by two while maintaining the baking time. This adjustment works well for smaller gatherings or if you want to try different variations without excess leftovers.

If doubling or tripling the recipe, be prepared for a bit longer cooking time. Ensure you adjust the pan size accordingly; larger baking dishes often require a longer bake time, while smaller pans may call for reduced time. Keep an eye out for visual cues to ensure perfectly baked bars!

When scaling, remember to use accordingly sized kitchen equipment, such as larger mixing bowls or pans, to accommodate the increased volume of ingredients, ensuring even mixing and baking.

Nutritional Deep Dive

These bars typically break down macronutrients into 23g of carbohydrates, 8g of fat, and 4g of protein per serving. This substantial carbohydrate content is due to the sugar and crust, providing quick energy while still being manageable in moderation.

Micronutrient-wise, the bars can offer calcium from cream cheese and potassium from added fruits. They can fit into various dietary considerations, allowing room for indulgence as a treat rather than a daily staple.

With the right portion analysis, Sopapilla Cheesecake Bars can be a part of a balanced diet. Moderation is key to enjoying these rich bars while keeping your nutritional goals in mind. For those mindful of their intake, this dessert can make an enjoyable occasional treat.

Dietary Adaptations

For gluten-free variations, substitute all-purpose flour in the crust with a gluten-free blend. Numerous products on the market are formulated specifically for baking, allowing you to achieve a similar texture.

If you’re aiming for a dairy-free option, use a blend of dairy-free cream cheese and coconut milk for the filling. These substitutions still yield delicious results while catering to dietary restrictions.

To make these bars vegan, replace eggs with flaxseed meal or applesauce as a binding agent and ensure all other ingredients are plant-based. Both adaptations keep the rich flavor intact while accommodating those with specific dietary needs.

Troubleshooting Guide

Texture issues often arise when the cream cheese is not properly softened. Ensure it has reached room temperature before mixing. If the bars turn out too wet, ensure they are adequately cooled in the refrigerator before serving.

Flavor balance can be a concern, particularly with too much cinnamon or sugar. Allow the ingredients to blend harmoniously during mixing; if noticed afterward, adjust with a pinch of salt to round out the flavor.

Temperature problems during baking can lead to uneven results. Make sure your oven is properly calibrated—if baked too hot or not hot enough, adjust oven settings accordingly for future batches.

If using substitutions, keep an eye on moisture content; different ingredients can lead to variations in hydration, which can affect the final bars. Experiment and document adjustments for future trials.

Recipe Success Stories

Readers often share their excitement about how this recipe has become a family favorite. Many appreciate how easy it is to customize to personal taste, adding their unique twists to the classic preparation.

Adaptations have led to successful variations, from adding fruit fillings to experimenting with different flavored fillings, creating unique treats that have delighted friends and family alike. Posts often highlight photos showcasing these beautiful desserts, making them visually appealing.

Suggestions from readers frequently include tips to make the bars even easier, such as using parchment paper to line the baking pan for easier removal. These insights bring the community together, fostering creativity in the kitchen.

Frequently Asked Questions

Can I freeze Sopapilla Cheesecake Bars? Yes, you can freeze them once completely cooled. Wrap tightly in plastic wrap and aluminum foil and freeze for up to 3 months.

How long do leftovers last in the fridge? Leftover bars can be stored in the refrigerator for up to 5 days in an airtight container.

Can I use low-fat cream cheese? Yes, but keep in mind that using low-fat cream cheese may alter the texture slightly, making it less creamy.

What can I serve alongside these bars? They are delicious on their own, but you can serve them with whipped cream, fresh fruits, or a drizzle of chocolate sauce for added taste.

Can I make the filling ahead of time? Yes, you can prepare the filling a day ahead. Just store it in the refrigerator until you’re ready to use it.

Is it necessary to use vanilla extract? While it’s not strictly necessary, vanilla adds depth of flavor that enhances the overall taste of the bars.

What should I do if the crust is too crumbly? If your crust crumbles, try adding a tablespoon of water or milk to help bind it together better.

Can I double the recipe without adjustments? Yes, you can double the recipe; just be mindful of baking time, as it may take a bit longer.

Are these bars suitable for parties? Absolutely! They are a crowd-pleaser and easy to cut into individual servings, making them perfect for gatherings.

What is the best way to cut these bars? Use a sharp knife and wipe it clean between cuts for clean edges and a tidy presentation.

Additional Resources

Explore other delectable dessert recipes to complement your baking repertoire. From traditional Mexican desserts to contemporary takes on classic sweets, there’s a treasure trove of recipes to try.

Check out technique guides which cover the essential skills needed for successful baking, such as mixing methods and understanding ingredient interactions. Understanding these techniques can elevate future baking endeavors.

Further ingredient information can help you connect with the flavors and nutritional profiles of what you cook, enabling thoughtful substitutions to cater to dietary preferences.

Join the Conversation

We encourage readers to share their experiences, adaptations, and reviews to foster a vibrant cooking community. Engage with us on social media platforms to showcase your beautiful Sopapilla Cheesecake Bars and discuss photos, tips, and tricks.

Don’t forget to leave your feedback and suggestions below! We love hearing your success stories and any variations you’ve created, as well as your photography tips to capture these beautiful treats in all their glory. Join us in celebrating the joy of cooking through this delightful dessert!

The Recipe

Sopapilla Cheesecake Bars

Serves: 12 Bars

Prep Time: 15 mins

Cook Time: 30 mins

Total Time: 45 mins

Kitchen Equipment Needed

  • 9×13 inch baking dish
  • Mixing bowls
  • Electric mixer
  • Spoon or spatula
  • Measuring cups and spoons
  • Whisk

Ingredients

  • 2 cans of crescent roll dough
  • 2 packages (8 oz each) cream cheese, softened
  • 1 cup granulated sugar
  • 1 teaspoon vanilla extract
  • 1 teaspoon ground cinnamon
  • ½ cup unsalted butter, melted
  • 1 cup powdered sugar (for dusting)

Directions

  1. Preheat the oven to 350°F (175°C).
  2. In a mixing bowl, blend together the softened cream cheese, sugar, vanilla extract, and cinnamon until smooth.
  3. Roll out one can of crescent roll dough in the bottom of a greased 9×13 inch baking dish.
  4. Spread the cream cheese mixture over the dough evenly.
  5. Roll out the second can of crescent roll dough and lay it over the cream cheese filling.
  6. Brush the melted butter over the top, and sprinkle with cinnamon and sugar.
  7. Bake in the preheated oven for 25-30 minutes or until golden brown.
  8. Allow to cool before slicing into bars and dust with powdered sugar before serving.

Recipe Notes

  • Feel free to adjust sweetness by modifying the sugar measurements to your taste.
  • Add a layer of chocolate or fruit for added flavor variations.
  • Store bars in the refrigerator for optimal freshness.

Delicious Peach Upside-Down Mini Cakes for Summer Celebrations

Irresistible Peach Upside-Down Mini Cakes: A Sweet Summer Delight

⚖️
Difficulty
Easy

⏲️
Prep Time
15 mins

🕒
Cook Time
20 mins

⏱️
Total Time
35 mins

🍽️
Servings
8 mini cakes

Peach upside-down mini cakes are the perfect treat for summer gatherings, bringing a delightful twist to your dessert table. With the sweetness of ripe peaches caramelized on top of fluffy vanilla cake, these mini cakes not only charm the eyes but also tantalize your taste buds. They are simply irresistible and ideal for any occasion, whether it’s a family barbecue or a casual picnic.

This recipe showcases the beautiful balance of textures and flavors—each bite offers a tender crumb paired with the juicy, syrupy peaches on top, creating an explosion of summer flavors. As you pull these cakes out of the oven, the aroma of sweet peaches mingling with vanilla will have everyone eagerly waiting to indulge in this delightful treat.

Quick Recipe Highlights

  • Flavor Profile: Sweet peaches combined with light vanilla cake create a harmonious burst of summer flavors that will delight your palate.
  • Texture: Each mini cake has a soft, moist texture with a slightly crisp top from the caramelized peaches, delivering a perfect bite every time.
  • Aroma: The irresistible scent of baked peaches mingling with vanilla and buttery notes will fill your kitchen, beckoning everyone to the dessert table.
  • Visual Appeal: These mini cakes are visually stunning, with the bright yellow and orange of the peaches creating an eye-catching presentation.
  • Skill Level Needed: This recipe is easy to follow, making it perfect for novice bakers while still impressive for experienced cooks.
  • Special Equipment: You will need a muffin tin or individual cake molds to create these charming little treats.

Recipe Overview

  • Difficulty Level: These mini cakes are easy enough for beginner bakers, requiring just a few basic techniques like mixing and baking.
  • Category: This peach upside-down cake falls under desserts, specifically cakes, and is perfect for summer celebrations.
  • Cuisine: Rooted in classic American baking, the upside-down cake uses locally-sourced fruit, echoing the culinary tradition of seasonal cooking.
  • Cost: This recipe is budget-friendly, requiring common pantry ingredients along with fresh peaches which can be found at local markets in summer.
  • Season: Best enjoyed during peach season (late spring to early summer), when these fruits are at their juiciest and sweetest.
  • Occasion: These mini cakes make a great addition to barbecues, birthday parties, or any summer festivity where a sweet touch will brighten the day.

Why You’ll Love This Recipe

The taste and texture of these irresistible peach upside-down mini cakes are sure to win over any audience. The bright, sunny flavor of the peaches complements the soft, airy cake, creating a cake that feels as light as it is indulgent. The caramelization of the peaches produces a delightful contrast to the vanilla base, ensuring each bite is a celebration of flavor.

The convenience of this recipe makes it a must-try for summer gatherings. With only a short prep and cook time, you can whip up these delicious mini cakes quickly. They’re easily made ahead, which means you can spend more time enjoying the company of friends and family while still serving a exquisite dessert.

Nutritionally, peaches are loaded with vitamins A and C, fiber, and antioxidants, making these mini cakes a sweeter yet healthier option compared to other desserts. The use of fresh fruit not only enhances flavor but also provides some nutritional benefits that make each bite guilt-free.

The social aspect of sharing these delightful mini cakes is undeniable. Their unique presentation and charming size make them an inviting treat for guests, sparking conversations and smiles. Whether served at a gathering or brought to a potluck, these cakes can create memorable experiences.

Lastly, the cost-effectiveness of this recipe should not be overlooked. With simple ingredients that are easily accessible, you can create an impressive dessert without breaking the bank. Plus, the ability to scale the recipe means you can adjust the serving size depending on your needs, making it perfect for any occasion.

Historical Background and Cultural Significance

The origin of upside-down cakes can be traced back to ancient practices of baking in cast iron skillets, where fruits were placed at the bottom to caramelize while being baked. This tradition evolved in American kitchens, especially during the 1920s when fruits like pineapples made a splash in desserts.

Peach upside-down cakes, specifically, highlight local produce and the bounty of fresh fruits available during the summer months. This dish resonates with the agricultural traditions of peach-growing regions, where the fruit is celebrated and showcased in various recipes.

Over the years, this recipe has undergone many evolutions, adapting to modern baking techniques while maintaining its nostalgic roots. From the original versions baked in large pans to the contemporary mini cakes, this dessert continues to capture the hearts of many.

Regional variations abound, with some adding nuances like spices or using different stone fruits. While peaches may be the star of this recipe, the adaptability of the upside-down cake allows for creativity, making it a versatile dessert spanning many cultures and kitchens.

Ingredient Deep Dive

Peaches: Peaches have a rich history, originating in China but now cultivated worldwide. They are not just delicious but also packed with vitamins, minerals, and antioxidants. When selecting peaches, look for those that are firm but yield slightly to pressure, indicating ripeness. Store them at room temperature until ripe, then refrigerate to preserve freshness. If peaches are not available, consider substituting with nectarines or plums for a unique twist.

Flour: Flour serves as the backbone of many baked goods, including cakes. The choice of flour can affect the texture; all-purpose flour is ideal for this recipe, providing the right balance for fluffy mini cakes. When selecting flour, look for freshness to avoid stale flavors. Store it in an airtight container to prolong its shelf life, and if gluten-free options are needed, almond or coconut flour can be used, keeping in mind that modifications in liquid ratios may be necessary.

Common Mistakes to Avoid

  • Choosing Overripe Peaches: Overripe peaches can turn mushy and affect the texture of the cake. Ensure to select firm peaches for optimal sweetness and texture.
  • Using Cold Ingredients: Baking requires that your ingredients, especially eggs and butter, be at room temperature to ensure even mixing and baking. Cold ingredients can lead to a dense and unevenly baked cake.
  • Skipping Measuring: Accurate measurements are crucial in baking. Skipping this step can lead to imbalances in flavor and texture, potentially ruining the cake.
  • Overmixing the Batter: While it’s tempting to thoroughly mix, overmixing can lead to tougher cakes. Mix just until the ingredients are combined for a light, fluffy texture.
  • Not Preheating the Oven: Always preheat your oven before baking. Placing the batter in a cold oven can affect the rise and overall texture of your cake.
  • Neglecting to Grease the Molds: Properly greasing your muffin tin or cake molds ensures easy release after baking. Neglecting this step can lead to broken cakes.
  • Baking at the Wrong Temperature: Each oven is different, so check that your oven is calibrated correctly. Baking at either too low or too high of a temperature can result in uneven baking.
  • Skipping the Cooling Time: Allow your mini cakes to cool slightly before removing them from the molds. Skipping this step can cause them to break apart.
  • Serving Without Toppings: While these cakes are delicious alone, adding a dollop of whipped cream or serving with ice cream can elevate your dessert to the next level.

Essential Techniques

Mixing Batter: Understanding how to properly mix your batter is crucial for ensuring that your mini cakes rise and have the right texture. Start by creaming butter and sugar until light and fluffy—it helps incorporate air into the batter. Add eggs one at a time, mixing until fully blended before adding dry ingredients. To master this technique, avoid overmixing and be gentle when folding in any additional dry ingredients.

Caramelizing Peaches: Caramelizing the peaches not only enhances their flavor but also creates a beautiful presentation. To achieve perfect caramelization, always use moderate heat and ensure that the peaches are evenly coated in butter and sugar. Watch for a golden brown color, which indicates they are ready to layer on the batter. Common pitfalls include using too high heat, which can lead to burnt peaches, or not cooking long enough for proper sweetness.

Pro Tips for Perfect Irresistible Peach Upside-Down Mini Cakes

1. Always choose ripe, but firm peaches for the best flavor. If they’re underripe, they won’t caramelize properly, and if they’re overripe, they can become mushy.
2. Line your muffin tin with paper liners for easier cleanup and to help maintain the mini cake’s shape.
3. Give the caramel a bit of extra time on the stove to enhance its depth of flavor, but keep a close watch to avoid burning.
4. After inverting the cakes, allow them to cool in the tin for a few minutes before transferring them to a wire rack; this helps prevent sticking.
5. Feel free to enhance the flavor by adding cinnamon or nutmeg to the batter for an extra layer of warmth.
6. Top your mini cakes with fresh whipped cream or a scoop of vanilla ice cream for a delicious contrast to the sweetness of the peaches.
7. Consider drizzling a simple glaze over the top once cooled for an elegant finish.
8. These cakes freeze wonderfully! Store them in an airtight container to enjoy later.

Variations and Adaptations

If you’re feeling adventurous, try replacing peaches with other fruits like plums, cherries, or even apples, creating different flavor profiles. For a seasonal twist, consider incorporating a mix of berries in addition to the peaches during summer for a vibrant look.

Dietary modifications are also possible; you can make a gluten-free version by substituting all-purpose flour with a gluten-free blend or almond flour. If you’re looking for a lower-sugar treat, consider using honey or maple syrup in place of sugar, adjusting the liquid in the batter to maintain consistency.

For those who are more health-conscious, incorporating whole wheat flour can add a nutty flavor and additional fiber to the cakes. You can also explore adding zest from lemons or limes to the batter for a refreshing citrus note that pairs beautifully with the sweetness of the peaches.

Serving and Presentation Guide

When serving these mini cakes, presentation is everything! You can use a large serving platter to showcase them, stacking them for a whimsical look. Consider garnishing each mini cake with a sprig of mint for a pop of color and freshness. A drizzle of warm caramel sauce or a scattering of toasted nuts can provide an elegant finish to the cakes.

Temperature matters; serve these mini peach cakes either warm or at room temperature. Pair them with a scoop of vanilla ice cream or whipped cream to add a rich creamy texture that complements the peaches.

For a more sophisticated touch, serve with an espresso or flavored coffee to enhance the dessert experience. And don’t forget to keep portion sizes in mind—mini cakes are rich, so a small serving per person is often enough to satisfy.

Wine and Beverage Pairing

For a delightful pairing, opt for a light, fruity white wine such as Moscato or a sparkling Prosecco. These options will complement the sweetness of the peaches beautifully. If you prefer red, a chilled Lambrusco will offer a slight fizz that balances the rich flavors.

For non-alcoholic options, consider iced tea with a hint of peach or lemonade, which will tie in the flavors of the cake while serving as a refreshing counterpart on hot summer days. A chilled herbal tea can also enhance the dessert’s warm flavors, particularly if infused with mint or vanilla.

When serving coffee or tea, consider a light roast coffee with fruity notes to enhance the peach flavor, or serve with a chai latte for a spicy contrast.

Storage and Shelf Life

To store your peach upside-down mini cakes, keep them in an airtight container at room temperature for up to three days. If you want to extend their freshness, consider refrigerating them, where they can last up to a week.

When freezing, wrap each cooled mini cake in plastic wrap and place them in a freezer-safe bag. They can be stored in the freezer for up to three months. To enjoy, simply thaw overnight in the refrigerator and warm slightly in the microwave before serving.

Signs of spoilage include a sour smell or a change in texture; always check before consuming. Reheating should be done gently to prevent the cakes from drying out—consider microwaving them in short intervals.

Make Ahead Strategies

These mini cakes can be prepped ahead of time, making them perfect for entertaining. You can prepare the batter a day in advance; simply store it in the fridge until you’re ready to bake.

If you want to assemble everything the night before, prepare the caramelized peaches and place them in the molds, then top with batter before baking. This allows the flavors to meld beautifully overnight.

For optimal freshness, avoid adding any toppings or garnishes until just before serving. This ensures that the whipped cream or ice cream maintains its texture and doesn’t become soggy.

If you plan to serve the cakes at a later date, store them fully baked, and simply reheat for a couple of minutes before enjoying with your favorite accompaniments.

Scaling Instructions

Scaling this peach upside-down mini cake recipe is easy! If you want to halve the recipe, simply reduce all ingredient measurements by half, ensuring you also account for bake times, as smaller cakes may cook quicker.

When doubling or tripling the recipe for larger gatherings, be aware that the bake time may vary slightly. Use two muffin tins to bake more at once, ensuring that there’s enough space between them in the oven for air to circulate.

If you are using larger tins for standard-sized cakes, remember that bake times will differ. Always watch for doneness indicators, such as a toothpick coming out clean, rather than solely relying on time as a measure.

Nutritional Deep Dive

Each mini cake packs a delightful combination of nutrients, with peaches offering vitamins A and C while being low in calories. An average serving provides around 150 calories, making them a reasonable treat.

When considering macronutrients, the cake is primarily composed of carbohydrates, with minimal protein found in the eggs and flour. On the other hand, using whole wheat flour can add some additional fiber and help with digestion.

For those managing weight, portion control is essential, especially since these mini cakes can be quite rich. Balancing them with a side of fresh fruit or a salad can create a satisfying meal without overindulging on dessert.

Keep in mind allergy information, too; this cake contains gluten and dairy due to the flour and butter. Always consider gluten-free flour alternatives for those avoiding gluten, and feel free to substitute with plant-based butter for a dairy-free version.

Dietary Adaptations

Transforming this recipe for specific dietary needs is achievable with a few substitutions. For a gluten-free option, replace all-purpose flour with a gluten-free flour blend, but it’s essential to adjust the liquid requirements to maintain moisture.

Dairy-free adaptations can be made by substituting butter with coconut oil or plant-based butter and using a dairy-free milk alternative. These changes will still deliver delicious results without compromising on flavor.

For vegan versions, replace eggs with flaxseed or a commercial egg substitute, ensuring to adjust the liquid for consistency. Otherwise, consider using applesauce for moisture and sweetness to maintain fluffiness in the cake.

If you’re following a low-carb or keto diet, look for low-carb flour alternatives such as almond or coconut flour, and adjust the sweetener accordingly to enhance the dessert without raising carbs excessively.

Troubleshooting Guide

If your mini cakes turn out dense, it’s likely due to overmixing the batter or using cold ingredients. Always ensure ingredients are at room temperature, and stop mixing once everything is just combined.

A flavor imbalance, perhaps too sweet, can often be fixed by balancing with a hint of citrus. Adding a touch of lemon or lime zest to the batter elevates the taste profile beautifully.

For cakes that are not rising properly, check your baking powder’s freshness; expired leavening agents can greatly affect the texture. Additionally, make sure your oven is accurately calibrated.

If you encounter ingredient substitution issues, such as needing gluten-free options, always have a reliable reference for conversion ratios and baking techniques for different ingredients.

Recipe Success Stories

Community feedback for the peach upside-down mini cakes has been overwhelmingly positive. Many readers rave about these cakes for their light texture and vibrant flavors, often sharing personal variations that they’ve tried.

Several bakers have adapted these mini cakes for different occasions, whether it’s for birthdays, family gatherings, or brunches, and loved how easy they were to customize.

Photography tips abound, with many suggesting capturing the moment when the cakes are inverted, highlighting the beautiful caramelization of the peaches.

Encouraging readers to share their successes online has fostered a sense of community within the baking space, where everyone’s variations and adventures are celebrated.

Frequently Asked Questions

1. Can I use frozen peaches instead of fresh ones? Yes, frozen peaches can work well in this recipe, especially if they are thawed and drained of excess moisture. Be mindful that frozen fruits may release more liquid during baking, which could affect texture slightly.

2. How can I tell when the cakes are done baking? Use the toothpick test! Insert a toothpick in the center of one of the mini cakes; if it comes out clean or with a few crumbs, they are finished baking.

3. Can these mini cakes be made ahead of time? Absolutely! You can prepare them a day in advance and store them in an airtight container. They can also be frozen for later enjoyment.

4. What can I use if I don’t have muffin tins? If muffin tins aren’t available, consider using small ramekins or oven-safe cups to achieve the same mini-cake effect.

5. How do I prevent the cakes from sticking to the pan? Make sure to properly grease your pans with butter or non-stick spray. You can also line the bottom with parchment paper for added insurance against sticking.

6. Are there any gluten-free options for this recipe? Yes, you can substitute all-purpose flour for a gluten-free flour blend, making sure to adjust liquid ratios as needed for consistency.

7. Can I add spices to the batter? Absolutely! Consider adding a teaspoon of cinnamon or nutmeg for warmth. These spices pair beautifully with the sweetness of the peaches.

8. How long can I store the cakes for? Stored in an airtight container, the mini cakes can last for up to three days at room temperature and up to a week in the refrigerator.

9. Can I use other fruits for this recipe? Yes, feel free to get creative! Other fruits like apricots, plums, or nectarines can be used and will give you deliciously unique mini cakes.

10. Is there a dairy-free version of this cake? Yes, use plant-based butter and a dairy-free milk substitute to create a delicious dairy-free version without compromising taste.

Additional Resources

If you enjoyed this recipe, consider exploring related dessert recipes such as classic pineapple upside-down cake, berry cobbler, or fruit tarts.

For those looking to refine their baking skills, consider checking out technique guides on cake making, from mixing batter to mastering oven temperatures.

Additionally, regular seasonal variations can keep your dessert repertoire fresh—learning to bake with seasonal fruits allows you to enjoy year-round flavor variety.

Investing in reliable kitchen equipment, like non-stick bakeware and quality mixing tools, can make a significant difference in your overall baking success.

Join the Conversation

I invite you to share your experiences with the peach upside-down mini cakes by connecting with us on social media. Showcase your beautiful photos, modifications, and any tips you’ve gained through baking these delightful treats.

Photography tips are always welcome, as capturing the vibrant colors of the cakes can inspire fellow bakers. Engaging with our community through recipe reviews helps us all connect better and learn in our culinary journeys.

Consider discussing your favorite variations or adaptations of this recipe, creating a welcoming forum for baking enthusiasts. Your input enriches our community and supports budding bakers to explore and enjoy the art of creating delicious desserts!

The Recipe

Irresistible Peach Upside-Down Mini Cakes

Serves: 8 mini cakes

Prep Time: 15 mins

Cook Time: 20 mins

Total Time: 35 mins

Kitchen Equipment Needed

  • Muffin tin or individual cake molds
  • Mixing bowls
  • Measuring cups and spoons
  • Whisk or electric mixer
  • Spatula

Ingredients

  • 4 ripe peaches, pitted and sliced
  • 1/4 cup unsalted butter
  • 3/4 cup brown sugar
  • 1 1/2 cups all-purpose flour
  • 1 cup granulated sugar
  • 1/2 cup milk
  • 2 large eggs
  • 1 teaspoon vanilla extract
  • 2 teaspoons baking powder
  • 1/2 teaspoon salt

Directions

  1. Preheat your oven to 350°F (175°C) and grease the muffin tin or line with paper liners.
  2. In a saucepan, melt the butter and brown sugar over medium heat. Stir until combined and bubbly.
  3. Pour the caramel mixture into the bottom of each mold and arrange the peach slices on top.
  4. In a mixing bowl, combine the flour, baking powder, and salt. In another bowl, mix the sugar, eggs, milk, and vanilla until well combined.
  5. Gradually add the dry ingredients to the wet ingredients, mixing until just combined.
  6. Pour the batter over the peaches in the muffin tin, filling each mold about 3/4 full.
  7. Bake for 20-25 minutes or until a toothpick inserted into the center comes out clean.
  8. Allow to cool in the pan for 5 minutes, then invert onto a serving plate.

Recipe Notes

  • For best taste, use fresh, ripe peaches during the summer months.
  • Variations: Substitute peaches with your choice of fruits like cherries or plums for a different flavor profile.
  • The cakes can be stored in an airtight container and enjoyed within three days.
  • For a fun twist, drizzle with a caramel or chocolate sauce before serving.

Zesty Mojito Lime Cheesecake Delight: A Refreshing Dessert Recipe

Zesty Mojito Lime Cheesecake Delight: A Refreshing Treat for All Occasions

⚖️
Difficulty
Medium

⏲️
Prep Time
30 mins

🕒
Cook Time
60 mins

⏱️
Total Time
90 mins

🍽️
Servings
8 servings

The Zesty Mojito Lime Cheesecake Delight is a tantalizing dessert that takes the classic cheesecake to new heights with refreshing flavors inspired by the beloved mojito cocktail. Imagine a creamy cheesecake infused with zesty lime juice and freshly chopped mint, adorned with a crumbly graham cracker crust. Each slice is a burst of flavor, transporting you to a tropical paradise with every bite. This cheesecake perfectly balances the richness of the cream cheese with the bright acidity of lime, delivering a harmonious dessert that is sure to impress family and friends.

Crafting the perfect Zesty Mojito Lime Cheesecake is not only about the flavors but also about the experience. The meticulous preparation allows for each layer to come together seamlessly. The doughy crust is complemented by the smooth, velvety filling, while a mint garnish adds a fresh touch. Ideal for balmy summer evenings or festive gatherings, this dessert reaches beyond the ordinary and creates lasting memories for those lucky enough to enjoy a piece.

Quick Recipe Highlights

  • Flavor Profile: The combination of tangy lime and refreshing mint creates a vibrant, zesty flavor that dances on the palate, making it a perfect dessert for summer.
  • Texture: The creamy filling contrasts beautifully with the crunchy graham cracker crust, providing a delightful mouthfeel that is both smooth and satisfying.
  • Aroma: The bouquet of fresh mint and citrus notes fills the air, inviting everyone to savor a slice of this delicious cheesecake.
  • Visual Appeal: With its bright lime green color and fresh mint garnish, this cheesecake is a stunning centerpiece for any dessert table.
  • Skill Level Needed: This recipe requires basic baking skills, but the detailed steps make it accessible even for novice bakers.
  • Special Equipment: A springform pan is essential for creating this luscious cheesecake, along with a mixer for achieving the perfect creaminess.

Recipe Overview

  • Difficulty Level: This Zesty Mojito Lime Cheesecake is classified as medium difficulty due to the layering of flavors and the precise cooking process involved in achieving the perfect texture.
  • Category: This dessert falls under both dessert and cake categories, making it a versatile choice for various occasions.
  • Cuisine: This dish draws inspiration from Latin American and Caribbean cuisines, where lime and mint feature prominently in drinks and desserts.
  • Cost: The estimated cost is moderate, as the ingredients are relatively affordable, making it an accessible recipe for most home bakers.
  • Season: This cheesecake is best enjoyed during the warmer months when fresh mint and limes are in season, enhancing the flavors.
  • Occasion: Perfect for summer gatherings, birthday parties, or even just a treat to enjoy at home, this cheesecake is bound to delight.

Why You’ll Love This Recipe

The Zesty Mojito Lime Cheesecake offers a delightful blend of tangy and refreshing flavors that invigorate the senses. The smooth cheesecake base provides a rich backdrop for the zingy lime, while the mint brings a vibrant freshness that complements the overall experience, making it an unforgettable dessert. Each bite is a balanced mixture of creamy and zesty, leaving your taste buds craving for more.

The preparation process is as enjoyable as the final product. With easy-to-follow steps, you can create a dessert that feels luxurious without needing expert baking skills. The result is a delectable cheesecake that will have friends and family talking about your culinary skills. Plus, the ingredients are straightforward to work with, allowing for a stress-free baking experience.

Nutritionally, this cheesecake can be considered a slightly healthier dessert option compared to other traditional cakes. It incorporates natural ingredients like fresh lime juice and mint, offering a burst of vitamin C and antioxidants. While it remains indulgent, being able to enjoy a tasty dessert that doesn’t feel overly heavy is a win.

Socially, this dessert is perfect for sharing. Whether you bring it to a potluck, a barbecue, or serve it at dinner parties, the Zesty Mojito Lime Cheesecake becomes a conversation starter. It’s a unique offering that stands out from the usual dessert fare and invites joyful exchanges about flavor combinations and recipe secrets.

Moreover, the affordability and accessibility of the ingredients make this cheesecake an excellent choice for those looking to impress without breaking the bank. With just a few key ingredients, you can create a stunning and delicious dessert that feels high-end yet is easy on your wallet.

Historical Background and Cultural Significance

The origins of the mojito cocktail date back to 16th-century Cuba, where it was enjoyed by locals and later gained international popularity. This sweet and refreshing drink is typically made with lime, mint, sugar, and rum, and its vibrant flavors make it a perfect inspiration for various culinary creations, including desserts. The melding of cheesecake with mojito elements honors this rich heritage while bringing a modern twist to a classic dish.

In culinary traditions, lime and mint are frequently used in tropical cuisines to create refreshing pairings, especially in desserts meant to be served chilled. This Zesty Mojito Lime Cheesecake taps into those flavors, reflecting the spirit of celebration that accompanies summer gatherings and festive occasions. Each bite embodies the essence of a refreshing cocktail turned into a delightful dessert.

Over the years, the cheesecake has evolved significantly from its origins. Originally, cheesecakes were made with simple, locally sourced ingredients. Today, they come in various styles and flavors, frequently incorporating creative elements that reflect a diverse culinary landscape. The Zesty Mojito Lime Cheesecake showcases this evolution by blending traditional baking techniques with innovative flavors, appealing to modern palates.

Regional variations of cheesecake can be found globally, each reflecting the local culture and available ingredients. From the classic New York-style to fruity interpretations, this Zesty Mojito Lime Cheesecake adds its unique flair to the spectrum of cheesecake flavors, inviting home bakers and dessert lovers into its refreshing world.

Ingredient Deep Dive

– **Cream Cheese:** A staple in cheesecake recipes, cream cheese adds a rich and creamy texture. Its mild flavor pairs beautifully with sweet and tangy ingredients, making it an ideal base for this dessert. Look for full-fat cream cheese for a smoother, richer result. Store cream cheese in the refrigerator, and always check the expiration date before using.

– **Lime Juice:** Fresh lime juice adds the essential tang and brightness to the cheesecake. Limes are rich in vitamin C and are known for their antiseptic properties. Choose firm, glossy limes that yield slightly when pressed, indicating freshness.

– **Mint:** Fresh mint elevates the mojito flavors in this cheesecake, bringing a refreshing aroma and taste that complements the tanginess of lime. Packed with antioxidants, mint supports digestion and overall wellness. To keep mint fresh, store it in a glass of water in the fridge.

– **Graham Crackers:** Used for the crust, graham crackers provide a sweet, crunchy texture that contrasts beautifully with the creamy filling. Look for whole graham cracker varieties for added flavor and nutrition. Store leftover crackers in an airtight container to maintain their crispness.

– **Sugar:** The sweetness in this recipe comes from granulated sugar, balancing the tartness of the lime. While sugar adds calories, using it in moderation can fit into a balanced diet. If you’re looking for alternatives, consider natural sweeteners like honey or agave nectar.

Common Mistakes to Avoid

  • Not softening the cream cheese: Always ensure your cream cheese is at room temperature before mixing; otherwise, you’ll end up with a lumpy filling that lacks the desired smoothness.
  • Overmixing the batter: Mix just until combined to avoid incorporating too much air. Overmixing can lead to cracks in the cheesecake as it bakes and cools.
  • Skipping the chilling step: Allow your cheesecake to chill properly before serving. This step is crucial for achieving the creamy texture and allows the flavors to meld beautifully.
  • Not using a water bath: For the creamiest results and to prevent cracks, bake your cheesecake in a water bath to regulate the temperature and maintain moisture.
  • Pulling the cheesecake out too soon: Always check for doneness. If it’s too jiggly in the middle, it needs more time. An undercooked cheesecake can turn runny once cooled.
  • Skimping on flavors: Use fresh lime juice and mint for the best flavor. Bottled juice lacks the vibrant taste of fresh ingredients and may result in a dull cheesecake.
  • Not cooling properly: Let the cheesecake cool gradually in the oven with the door ajar to help prevent cracks and maintain a creamy, smooth texture.
  • Not waiting to slice: The cheesecake will be very soft if you slice it too soon. Cool it in the fridge for several hours or overnight for best results.

Essential Techniques

– **Softening Cream Cheese:** It’s important to bring cream cheese to room temperature to ensure easy mixing and a smooth texture. Place it out for about 30 minutes to soften naturally, or microwave it in short 10-second bursts. Be cautious to not melt it, as this will affect the final texture.

– **Mixing Technique:** When blending the filling, mix on a low speed to combine the ingredients without incorporating too much air into the mixture. This will create a denser and creamier cheesecake. Always scrape down the sides of the bowl to ensure an even mix.

– **Water Bath Method:** Using a water bath (bain-marie) helps regulate the baking temperature, ensuring even cooking. To create this, wrap the outside of your springform pan with aluminum foil to prevent leaks, then place it in a larger pan filled with hot water.

– **Chilling Time:** Patience is key for a cheesecake. After baking, let the cheesecake cool in the oven with the door slightly open, then chill in the fridge for a minimum of four hours or overnight. This helps set the filling for a firm slice.

Pro Tips for Perfect Zesty Mojito Lime Cheesecake Delight

– Always use fresh ingredients, especially lime and mint, to achieve the best flavor profile.
– If you prefer a different crust, consider using crushed vanilla wafers or chocolate cookies for a unique twist.
– To intensify the lime flavor, add lime zest to the filling for an extra punch.
– Consider adding a layer of lime gelee on top for an added visual appeal and a burst of tanginess.
– Experiment with garnishes—candied lime slices or mint sprigs add visual appeal and a touch of elegance.
– When slicing, dip your knife in hot water for a clean cut, which helps to present a beautiful cheesecake.
– For a fun twist, try using coconut cream instead of cream cheese for a lighter, dairy-free version.
– Serve individual slices with a drizzle of lime syrup for an extra treat that looks impressive.

Variations and Adaptations

– **Regional Variations:** Add local flavors like coconut or passion fruit for a tropical spin that complements the original mojito theme.
– **Seasonal Adaptations:** Substitute fresh berries for mint during the berry season for a fruity variation that pairs well with lime.
– **Dietary Modifications:** To make it gluten-free, substitute the graham crackers with almond flour or gluten-free cookie crumbs.
– **Flavor Variations:** Infuse the cream cheese with other citrus flavors, such as grapefruit or tangerine, for a different profile while maintaining that refreshing zing.
– **Texture Modifications:** For a fluffier texture, beat egg whites separately and fold them into the filling before baking. This addition provides a lighter cheesecake.
– **Presentation Alternatives:** For a trendy look, serve mini cheesecakes in jars with layered graham cracker crumbs for an individual portion that’s easy to share.

Serving and Presentation Guide

Creating the perfect presentation for your Zesty Mojito Lime Cheesecake will make it irresistible. Consider a clean and elegant plating technique using a large spatula to gently transfer a slice onto the plate. Garnish your cheesecake with freshly whipped cream, lime slices, and a sprig of mint on the side to enhance visual appeal. The contrasting colors of the lime-green cheesecake, the golden crust, and the vibrant green mint create an eye-catching dish.

For special occasions, opt for a beautiful cake stand that elevates your cheesecake, embodying sophistication. When serving, it’s essential to allow each slice to come to room temperature for that creamy texture and full flavor profile. Remember to adjust the portion size depending on the occasion; larger slices work well for parties, while smaller portions may suit a dinner party setting.

If serving at a large gathering, consider creating a dessert buffet where guests can choose their cheesecake slice, along with other refreshing summer desserts. This interactive approach not only enhances the dining experience but allows for social interaction among guests.

Wine and Beverage Pairing

Selecting the right beverages to enjoy with your Zesty Mojito Lime Cheesecake can elevate the entire experience. A chilled sauvignon blanc, with its citrus notes and crisp acidity, pairs wonderfully with the lime flavors in the cheesecake. For a more festive option, a sparkling wine like Prosecco complements the dessert’s lightness and freshness.

For non-alcoholic alternatives, consider serving a mint limeade or lime sparkling water, which will mimic the minty and tart qualities of the cheesecake while providing a refreshing contrast. Iced tea with fresh mint or citrus-infused water also makes for delightful pairings that accommodate everyone.

If coffee is your preference, a light roast coffee blends beautifully with the cheesecake, as its subtle flavors won’t overpower the dessert. When serving these beverages, make sure they are chilled and served in elegant glassware to match the refined nature of the cheesecake.

Storage and Shelf Life

Proper storage of your Zesty Mojito Lime Cheesecake is crucial to maintain its delicate flavor and texture. Store the cheesecake in an airtight container in the refrigerator for up to one week. If you plan to keep it longer, consider freezing it to extend its shelf life up to three months.

To freeze cheesecake, allow it to cool completely, then wrap it tightly in plastic wrap followed by aluminum foil to prevent freezer burn. When ready to serve, thoroughly thaw it in the refrigerator overnight; then allow it to come to room temperature before slicing to enjoy the best texture.

Keep an eye out for signs of spoilage, such as an off smell or unusual texture. If the crust becomes soggy, or if there are any visible signs of mold, it is best to discard the cheesecake to ensure food safety.

Reheating cheesecake is generally not recommended, but if you prefer a warm dessert, slice a piece and place it in the microwave for a few seconds to achieve a slightly softened texture.

Make Ahead Strategies

Planning ahead is key when preparing your Zesty Mojito Lime Cheesecake for an event. You can make the cheesecake a day or two in advance. After baking and cooling, cover it properly and let it chill in the refrigerator. This chilling period allows the flavors to meld beautifully, enhancing the overall taste.

Consider preparing the graham cracker crust a day before. Store it in the refrigerator until you’re ready to pour in the filling. If you have any additional toppings—like whipped cream or fruit—prepare them ahead of time and store them separately to maintain freshness.

For the ultimate convenience, bake and cool the cheesecake in advance, then freeze. It will stay fresh, and you can pull it out to thaw when you need it without compromising its flavor. Just remember to finish any decorative garnishes just before serving to ensure they look their best.

Scaling Instructions

Depending on your needs, scaling this recipe can be effortlessly achieved without compromising the integrity of the Zesty Mojito Lime Cheesecake. For smaller gatherings, halve the ingredients; this should be fine, but adjust your baking time slightly to accommodate the smaller size.

For larger parties, consider doubling or tripling the recipe. Use a larger baking pan, but you will need to monitor the baking time more carefully for doneness. Test with a toothpick inserted in the center—if it comes out mostly clean, you’re good to go.

When increasing the recipe, ensure you still whip the filling in batches if you’re using a standard mixer. Overloading the mixing bowl can lead to unevenly mixed batter. Lastly, remember to adjust serving portions accordingly, as larger quantities may lead to different slice sizes.

Nutritional Deep Dive

Understanding the nutritional elements of your Zesty Mojito Lime Cheesecake can help you appreciate its benefits. Each slice provides a good source of calcium and protein due to the cream cheese, essential for bone health and muscle function. However, it’s essential to manage portion sizes, as the dessert does contain added sugars.

Vitamin C is also plentiful from the lime, supporting the immune system and skin health. The refreshing mint complements this with additional antioxidants, potentially supporting digestive health and providing a low-calorie flavor enhancer.

If you’re monitoring your dietary intake, it’s important to be aware of the macronutrient distribution in this dessert. A slice can contain around 300 calories, depending on portion size and ingredients, making it an occasional treat rather than an everyday snack.

For those managing weight, consider having smaller portions, and pairing them with fresh fruit or a light salad to round out the meal—keeping decadent desserts special and enjoyable without feeling overly indulgent.

Dietary Adaptations

Transforming the Zesty Mojito Lime Cheesecake to accommodate different dietary needs can be simple. For gluten-free versions, replace traditional graham crackers with crushed gluten-free cookies or almond meal for the crust.

If you’re catering to dairy-free preferences, creamy coconut milk or cashew cream can be used instead of cream cheese, while ensuring cohesion in texture. Similarly, opt for dairy-free whipped cream for garnishing without dairy content.

For vegans, replace eggs with flaxseed meal and use dairy-free cream cheese alternatives. The rest of the flavor profile remains intact, making it an inclusive dessert option.

Low-carb adaptations can be made by using almond flour for the crust and natural sugar substitutes like erythritol to cut down carbohydrates while keeping the sweetness intact. These modifications make this delightful cheesecake suitable for various lifestyles without sacrificing taste.

Troubleshooting Guide

– **Texture Issues:** If your cheesecake turns out too dense, consider incorporating less cream cheese, or try adding whipped cream for airiness. Avoid overmixing during preparation, as this can make it heavy.
– **Flavor Balance:** If the cheesecake lacks flavor, increase the lime juice and zest for a more pronounced tang. Add an additional splash of mint extract for enhanced freshness.
– **Temperature Problems:** If the cheesecake browns on top too quickly during baking, reduce the oven temperature to avoid an overly cooked crust while ensuring the filling sets properly.
– **Equipment Challenges:** If using a non-springform pan, line it well with parchment paper to facilitate easy removal. Consider purchasing a reliable springform pan for future cheesecakes.
– **Ingredient Substitutions:** Not having fresh lime juice? Consider using bottled juice in a pinch, but use less as it can be more concentrated. However, fresh is always best for taste.
– **Timing Concerns:** If you find the cheesecake is cooking too fast, cover the top with foil to prevent it from getting too dark while the interior continues to bake.
– **Chilling Durations:** After baking, if your cheesecake isn’t cooling well, make sure it’s not placed near warm spots in the kitchen. Let it rest on the counter before transferring it to the fridge.
– **Cracks in the Cheesecake:** If cracking occurs, ensure proper chilling is done and avoid overbaking. A water bath while baking can significantly decrease the chance of cracks.

Recipe Success Stories

Community feedback is a crucial aspect of crafting perfect recipes. Many readers have expressed their joy in making the Zesty Mojito Lime Cheesecake and have loved how refreshing it is compared to traditional desserts. A reader shared how they found that doubling the mint gave an even more impactful flavor, making it the talk of their last BBQ.

Variations have also taken off in the community. Some suggest adding a layer of raspberry on top for a beautiful contrast, while others have opted for a chocolate crust, proving that this recipe is versatile and open to personal touches. Readers often upload their creations on social media, providing inspiration and encouraging others to experiment.

Photography tips have emerged through the community, emphasizing the importance of good light when snapping your final dish. The bright colors of the cheesecake shine under daylight, making it an appealing visual treat that begs to be photographed.

Engagement in the comments section is often enthusiastic, creating a wonderful support circle among home bakers. Encouraging readers to share their adaptations, they contribute variations that inspire others to make the Zesty Mojito Lime Cheesecake their own.

Frequently Asked Questions

Can I use bottled lime juice instead of fresh?

While bottled lime juice can be used, fresh lime juice provides a brighter flavor and is recommended for the best results. Fresh juice captures the vibrant essence that makes this dessert stand out.

How do I know when my cheesecake is done baking?

Check for doneness by gently shaking the cheesecake; the edges should be set while the center remains slightly jiggly, as it will continue to set as it cools.

What should I do if my cheesecake cracks?

If you notice cracks, don’t worry! You can cover them with whipped cream or fruit to mask them, or use a ganache to create a smooth finish.

Can I freeze leftover cheesecake?

Yes! To freeze, ensure it’s completely cooled, then wrap it tightly in plastic wrap and foil. It can last in the freezer for about three months.

What can I use instead of mint?

If you don’t have mint, consider using basil for a unique twist. Alternatively, omit the herb altogether and simply enhance the lime flavor.

What’s the best way to serve the cheesecake?

Serving the cheesecake slightly chilled with a dollop of whipped cream and a garnish of lime and mint enhances its refreshing profile. Serve on elegant plates for added appeal.

Can I use other citrus fruits besides lime?

Absolutely! This recipe can be adapted to use other citrus fruits like lemon or grapefruit, just adjust the sugar level depending on the fruit’s tartness.

Is this cheesecake safe for pregnant women?

This cheesecake contains cream cheese; consult with your doctor about soft cheeses. Ensure it’s made with pasteurized products for safety.

How long does the cheesecake need to chill?

For best results, let your cheesecake chill in the fridge for at least four hours or ideally overnight to allow the flavors to meld and the texture to set.

Can I make this cheesecake ahead of time?

Yes! The cheesecake can be made a couple of days in advance and stored in the fridge until you’re ready to serve it. It tends to taste even better after chilling!

Additional Resources

As you dive into the world of cheesecakes, consider exploring other related recipes to expand your dessert repertoire. For instance, try a classic New York cheesecake, a rich chocolate cheesecake, or a fruity berry cheesecake. Each of these can provide a different experience while remaining true to the concept of creamy desserts.

Technique guides are invaluable when honing your baking skills. Understanding pie crust techniques or the perfect way to create a water bath for cheesecakes can significantly enhance your ability to create perfect desserts every time.

Ingredient information is also vital—learning about various cheese types, such as mascarpone or ricotta, can inspire you to create new flavors and textures in your cheesecakes or other desserts.

For those eager to experiment with tools, investing in a quality stand mixer and using a good springform pan can make the process easier and yield professional results.

Finally, seasonal variations can spark creativity. In fall, consider adding pumpkin to the cheesecake filling, or during winter, spice up the base with cinnamon or nutmeg for a cozy feel.

Join the Conversation

Engaging with your readers transforms your recipe blog into a vibrant community. Encourage social media sharing by creating a dedicated hashtag for the Zesty Mojito Lime Cheesecake, allowing you to compile user-generated content easily. This interaction fosters a sense of belonging, as readers can share their triumphs or adaptations.

Photography tips are essential post-baking, as many readers want to showcase their desserts. Create a beginner’s guide to food photography that highlights lighting, angles, and staging.

Invite feedback and recipe reviews, allowing readers to share their experiences and what worked for them. This valuable exchange can help others learn while strengthening the community aspect of your blog.

Encourage recipe variations by asking readers to submit their adaptations or innovative twists on the classic Zesty Mojito Lime Cheesecake. Sharing personal stories related to food can make the recipe even more meaningful.

By fostering strong community engagement, you create an enthusiastic atmosphere that makes both your blog and recipes come alive, encouraging more people to participate and share their culinary adventures.

The Recipe

Zesty Mojito Lime Cheesecake Delight

Serves: 8 servings

Prep Time: 30 mins

Cook Time: 60 mins

Total Time: 90 mins

Kitchen Equipment Needed

  • Springform pan
  • Mixer
  • Mixing bowls
  • Measuring cups and spoons
  • Rubber spatula
  • Aluminum foil (for water bath)
  • Sharp knife (for slicing)

Ingredients

  • 1 ½ cups graham cracker crumbs
  • ½ cup unsalted butter, melted
  • 2 (8-ounce) packages cream cheese, softened
  • 1 cup granulated sugar
  • 3 large eggs
  • 1 cup fresh lime juice
  • Zest of 2 limes
  • ⅓ cup fresh mint, chopped
  • 1 teaspoon vanilla extract

Directions

  1. Preheat the oven to 325°F (160°C). Prepare the springform pan by wrapping the outside with aluminum foil to prevent leaking.
  2. In a mixing bowl, combine the graham cracker crumbs and melted butter until well blended. Press firmly into the bottom of the springform pan to form the crust.
  3. In a large bowl, beat the cream cheese and sugar until smooth and creamy. Add the eggs one at a time, mixing until just blended.
  4. Stir in the fresh lime juice, lime zest, chopped mint, and vanilla extract until combined.
  5. Pour the cheesecake mixture over the crust in the prepared springform pan.
  6. Place the springform pan inside a larger pan. Fill the larger pan with hot water until it reaches halfway up the sides of the springform pan.
  7. Bake for 60 minutes or until the center is slightly jiggly but set.
  8. When done, turn off the oven and allow the cheesecake to cool inside with the door ajar for about 1 hour.
  9. Remove the cheesecake from the oven and refrigerate for at least 4 hours, preferably overnight, before serving.

Recipe Notes

  • Can replace mint with basil for a different flavor.
  • For a dairy-free version, use coconut cream instead of cream cheese.
  • Add powdered sugar to whipped cream for garnishing.

Delicious Blueberry Lemon Cheesecake Recipe for Sweet Lovers

Blueberry Lemon Cheesecake: A Delightful Dessert for Every Occasion

⚖️
Difficulty
Medium

⏲️
Prep Time
30 mins

🕒
Cook Time
60 mins

⏱️
Total Time
90 mins

🍽️
Servings
8

Blueberry Lemon Cheesecake is a delightful dessert that brings together the sweet and tart flavors of blueberries and the refreshing zing of lemon. Each bite offers a creamy cheesecake layer balanced by a buttery graham cracker crust, while the blueberry topping adds a vibrant splash of color and flavor. This cheesecake not only pleases the palate but also serves as an eye-catching centerpiece for any dessert table. Whether you’re hosting a summer barbecue or celebrating a special occasion, this cheesecake will impress your guests with its luscious texture and bright taste.

The combination of blueberries and lemon is a match made in heaven. The fresh blueberries burst with flavor, complementing the silky smooth cheesecake that melts in your mouth. The pleasant aroma of baked lemon and the sweetness of the berries waft through the kitchen, enticing everyone around. This recipe is incredibly versatile too, allowing you to enjoy it throughout the year, thanks to the availability of blueberries and lemons in various seasons.

Quick Recipe Highlights

  • Flavor Profile: Sweet, tart, and creamy with fruity undertones that blend seamlessly.
  • Texture: Creamy cheesecake layered over a crispy crust, topped with juicy blueberries.
  • Aroma: Fresh lemon and sweet blueberries create a delightful scent that fills your kitchen.
  • Visual Appeal: Stunning blue and yellow contrast that makes a beautiful presentation.
  • Skill Level Needed: Medium – requires basic baking techniques and patience.
  • Special Equipment: 9-inch springform pan, mixer, and baking sheet.

Recipe Overview

  • Difficulty Level: This recipe requires a medium skill level due to the multiple steps involved but is manageable with practice.
  • Category: Dessert – a perfect ending to any meal or festive occasion.
  • Cuisine: American – a classic dessert with a fresh twist that highlights local ingredients.
  • Cost: Moderate, as ingredients like cream cheese and blueberries can vary in price based on seasonality.
  • Season: Best enjoyed in the warmer months, when fresh blueberries are at their peak.
  • Occasion: Ideal for birthdays, family gatherings, holiday celebrations, or potluck events.

Why You’ll Love This Recipe

One bite of this Blueberry Lemon Cheesecake will show you exactly why it stands out among desserts. The balance of flavors is carefully curated, where the creamy richness of the cheesecake contrasts beautifully with the tartness of the lemon. It creates a delightful experience that is both indulgent and refreshing, making it suitable for any occasion.

This cheesecake is also incredibly convenient to prepare. It can be made ahead of time, allowing the flavors to meld and the texture to set perfectly in the refrigerator. The simple ingredients mean you won’t have to search far and wide to gather supplies, which is a great relief for busy bakers.

Nutritionally, blueberries are packed with antioxidants, offering health benefits that contribute positively to your diet. Coupled with the protein from cream cheese, this dessert can feel a tad less guilty, allowing you to enjoy without compromise.

Hosting a gathering? This Blueberry Lemon Cheesecake doubles as a social centerpiece, drawing in guests with its vibrant colors and inviting aroma. It’s a dessert that sparks conversation and compliments, making it an excellent choice for celebrations.

Financially, this cheesecake is cost-effective when you consider its yield and the satisfaction it provides. Ingredients can also be sourced at local markets, making it a deliciously accessible treat for everyone to enjoy.

Historical Background and Cultural Significance

The origin of cheesecake dates back to ancient Greece, where it was served to athletes at the first Olympic Games. Over centuries, recipes evolved around the world, refining to the creamy cheesecakes we enjoy today. With the introduction of cream cheese in the 19th century, the American version gained popularity, leading to regional variations and adaptations.

The combination of blueberries and cheesecake also has roots in America, particularly in the Northeast where blueberry harvesting is a cherished tradition. These prized berries are often featured in pies, jams, and, of course, dessert dishes, symbolizing spring and summer flavors.

As culinary trends continue to evolve, cheesecake remains a beloved dessert staple seen in various forms across the globe. With increasing dietary preferences, recipes adapt to include healthier ingredients while still delivering a beloved treat that bridges generations.

Regional and seasonal variations exist, blending local ingredients and flavors that enrich the classic cheesecake. From blueberry to pumpkin spice, these adaptations keep the dessert celebrated and relevant in today’s culinary scene.

Ingredient Deep Dive

  • Blueberries: Known for their robust flavor and deep color, blueberries are rich in antioxidants, vitamins, and minerals. When selecting, look for plump, firm berries. Store them in the refrigerator and wash just before use to maintain freshness. They can easily be substituted with other berries, such as raspberries or blackberries, for different flavor profiles.
  • Lemon: The bright and zesty citrus adds a refreshing flavor that enhances the richness of the cheesecake. Choose firm lemons with a bright yellow color for the best juice and zest. Lemons can be stored at room temperature or in the refrigerator. If you’re out of lemons, lime juice or orange zest can serve as excellent alternatives.
  • Cream Cheese: The base for any cheesecake, cream cheese provides the rich, creamy texture. When selecting, opt for full-fat varieties for the best flavor. Store it in the refrigerator, and always allow it to soften for easy mixing before use. You can substitute with mascarpone for a lighter cheesecake but expect a slightly different flavor.
  • Graham Crackers: The crunchy, sweet crust is essential for providing texture. Choose high-quality brands without artificial flavors. Store in a cool, dry place to maintain crunchiness. For gluten-free options, substitute with ground almonds or gluten-free crackers for the crust.
  • Sugar: Essential for sweetness, sugar balances out tart flavors. Granulated sugar is common, but alternatives like coconut sugar can offer different flavor undertones. Store in an airtight container to prevent clumping.

Common Mistakes to Avoid

  • Using cold cream cheese can lead to lumps in your cheesecake. Always let it come to room temperature before mixing.
  • Overbeating the batter can incorporate too much air, causing cracks during baking. Mix just until smooth.
  • Not pre-baking the crust can result in a soggy bottom. Ensure the crust is baked and cooled before adding the filling.
  • Baking at an incorrect temperature can lead to uneven cooking. Use an oven thermometer to check accuracy.
  • Skipping the water bath can contribute to cracks; it helps regulate the temperature and humidity, resulting in a smooth surface.
  • Cutting into the cheesecake while it’s warm can lead to a messy slice. Allow it to chill fully in the refrigerator before slicing.
  • Not letting the cheesecake set overnight can impact the texture and flavor. Patience pays off for the best results.
  • Overloading the cheese and lemon mixture can lead to structural issues. Follow measurements carefully for balance.
  • Ignoring the cooling steps can cause serious texture problems; always cool in the oven with the door ajar if cracks form.
  • Not using fresh blueberries or lemons can change the taste profile significantly. Choose high-quality ingredients for a better end result.

Essential Techniques

  • Mixing Cream Cheese: It’s crucial to achieve a smooth texture. Use a mixer on low to medium speed, mixing until fully creamed. Stop frequently to scrape down the sides. Visual cues include a creamy, lump-free consistency.
  • Building the Crust: Properly crushed graham crackers mixed with melted butter create the right texture. Ensure the mixture is damp but not overly wet to maintain structure while baking. Press firmly into the pan for stability.
  • Baking with a Water Bath: This technique prevents cracks and promotes even baking. Wrap the springform pan in foil to avoid water seepage, and place in a larger dish filled with hot water. Aim for consistent temperature management.
  • Cooling Gradually: A gradual cooling process prevents shrinkage and cracking. Allow it to cool in the oven with the door ajar before refrigerating. This also helps set the texture properly.
  • Garnishing: Visual appeal can be enhanced by garnishing the cheesecake with fresh fruits, whipped cream, or zest. The key is to keep it simple yet elegant.
  • Serving Cold: Always serve your cheesecake cold to maximize flavor and texture. Letting it sit at room temperature for a few minutes before serving can enhance the flavor profile.

Pro Tips for Perfect Blueberry Lemon Cheesecake

  • Use high-quality ingredients; they make a significant difference in flavor and texture.
  • Experiment with adding a touch of vanilla extract for additional depth in flavor.
  • For a different crust, try using crushed nuts mixed with the crumbs for added texture.
  • Let the cheesecake cool gradually to room temperature to ward off cracks.
  • Use a sharp knife dipped in warm water to slice clean pieces, maintaining visual appeal.
  • Top with a homemade blueberry sauce instead of whole berries for an elegant drizzle.
  • Consider adding a touch of almond extract in the batter for a unique flavor twist.
  • Allow the cheesecake to set overnight for optimal flavor and texture development.

Variations and Adaptations

  • Regional Variations: In the Midwest, you can find versions of cheesecake that incorporate local fruits, such as cherries and apples, which complement the basic flavor profile beautifully.
  • Seasonal Adaptations: During the fall, swap blueberries for pumpkin puree and adjust the spices to create a seasonal twist on the classic cheesecake.
  • Dietary Modifications: For gluten-free options, replace graham crumbs with gluten-free alternatives, ensuring all ingredients match your dietary needs.
  • Flavor Variations: Instead of blueberries, feel free to experiment with strawberries, raspberries, or even chocolate for different flavor experiences.
  • Texture Modifications: For a lighter cheesecake, you can swap some cream cheese with Greek yogurt to lighten it up without sacrificing creaminess.
  • Presentation Alternatives: Serve individual cheesecake cups or tartlets for a fun, portable dessert presentation at parties.

Serving and Presentation Guide

  • Plating Techniques: For an elegant feel, slice the cheesecake into wedges and place them on dessert plates, garnished with fresh berries or a dollop of whipped cream.
  • Garnishing Ideas: Create color contrasts by garnishing with fresh mint leaves beside the blueberry topping.
  • Traditional Accompaniments: Pair the cheesecake with a scoop of vanilla ice cream or a dollop of lemon curd to enhance flavors.
  • Modern Serving Suggestions: Consider serving in dessert jars layered with fresh blueberries and graham cracker crumbles for a modern twist.
  • Temperature Considerations: Serve your cheesecake chilled, but allow it to come slightly closer to room temperature before serving for flavor enhancement.
  • Portion Control Tips: Remember to slice the cheesecake into equal portions for balanced servings and to minimize waste during gatherings.

Wine and Beverage Pairing

  • Wine Pairings: A crisp Sauvignon Blanc complements the tartness of lemon while enhancing the flavors of blueberries perfectly.
  • Non-Alcoholic Alternatives: A refreshing sparkling water or homemade lemonade can provide a thirst-quenching counterpart to the rich cheesecake.
  • Coffee/Tea Pairings: Offer a light herbal tea or a smooth cup of coffee that complements the sweetness of the cheesecake without overwhelming it.
  • Temperature Considerations: Serve wine chilled to balance the rich flavors of the cheesecake and elevate the tasting experience.
  • Serving Suggestions: Present wine in elegant glasses alongside the cheesecake for a united and upscale dessert experience.

Storage and Shelf Life

  • Storage Methods: Store any leftovers in an airtight container to maintain freshness, preferably in the refrigerator.
  • Temperature Requirements: Always keep cheesecake cold; it should not be left out at room temperature for more than two hours.
  • Container Recommendations: Use a sturdy cake carrier or a sealed cake dome to prevent moisture loss.
  • Signs of Spoilage: Look for an off odor, discoloration, or any signs of mold as indicators that the cheesecake should be discarded.
  • Reheating Instructions: For best taste, enjoy cold. However, if desired warm, microwave in short intervals to maintain texture.
  • Freezing Guidelines: Cheesecake can be frozen if wrapped well. Thaw overnight in the refrigerator for best results before serving.

Make Ahead Strategies

  • Prep Timeline: For optimal flavor, prepare the cheesecake a day in advance to allow flavors to meld as it cools.
  • Storage Between Steps: If preparing crusts and fillings separately, cover and refrigerate them until it’s time to assemble and bake.
  • Quality Impact Assessment: Making ahead bolsters flavors; avoid last-minute assembly for the best outcome.
  • Assembly Tips: Assemble the crust and filling in the springform pan the day before baking for a more manageable prep time.
  • Reheating Guidelines: If served warm, microwave in short intervals to avoid uneven heating and maintain creaminess.
  • Fresh Element Additions: Consider adding fresh fruit toppings right before serving to maintain freshness and appearance.

Scaling Instructions

  • Halving the Recipe: If making a smaller batch, reduce all ingredients by half but remember to adjust baking time accordingly.
  • Doubling or Tripling: If serving a crowd, double the ingredients and use a larger pan; expect longer baking times.
  • Equipment Adjustments: Ensure you have enough mixing bowls and utensils on hand when scaling up the recipe.
  • Timing Modifications: As the quantity increases, monitor baking time closely to ensure it sets properly without burning.
  • Storage Considerations: Store leftovers in proportionate containers for easy access and to maintain freshness.

Nutritional Deep Dive

  • Macro Breakdown: Typical servings provide a balance of carbohydrates from the crust, fats from cream cheese, and protein; each slice is approximately 350-400 calories.
  • Micronutrient Analysis: Blueberries contribute vitamins C and K, while lemons add vitamin C, supporting immune health.
  • Health Benefits: Antioxidants in blueberries promote heart health while lemon aids digestion; both contribute to overall wellness.
  • Dietary Considerations: Create balance by enjoying this dessert occasionally as part of a varied diet; moderation is key.
  • Portion Analysis: Consider portion sizes when indulging; smaller servings can satisfy sweet cravings without excessive calorie intake.
  • Weight Management Tips: Pair this dessert with exercise and mindful eating to enjoy it as part of a healthy lifestyle.

Dietary Adaptations

  • Gluten-Free: Substitute graham crackers with gluten-free options like almond meal or gluten-free cookies.
  • Dairy-Free: Use vegan cream cheese and alternative crusts made from oats or nuts.
  • Vegan: Swap eggs for flax eggs and cream cheese for blended silken tofu or cashew cream.
  • Low-Carb: Replace sugar with a low-carb sweetener and use nut crust instead of graham crackers.
  • Keto: Focus on low-carb, high-fat ingredients while ensuring the cheesecake stays firm in texture.
  • Paleo: Use natural sweeteners like honey or maple syrup mixed with almond flour crusts for a wholesome approach.
  • Low-FODMAP: Adjust fruit choices to adhere to dietary guidelines, ensuring all ingredients align with low-FODMAP standards.
  • Other Specific Diets: Get creative with substitutions to accommodate varied dietary needs while preserving taste and texture.

Troubleshooting Guide

  • Texture Issues: If the cheesecake is too grainy, ensure all ingredients are well incorporated and at room temperature before mixing.
  • Flavor Balance: For overly sweet cheesecake, add a touch more lemon juice to offset sweetness; taste and adjust as needed.
  • Temperature Problems: If the cheesecake is under-baked, it may not set properly; continue baking in 5-minute intervals until the center is slightly jiggly.
  • Equipment Challenges: Ensure you use the right pan size; a smaller pan may lead to overflowing, while a larger one can cause uneven cooking.
  • Ingredient Substitutions: If you’ve made substitutions, be prepared for variations in texture; it’s vital to follow appropriate adjustments for different ingredients.
  • Timing Concerns: Monitor baking closely towards the end of the cooking time to prevent overcooking and spoilage of texture.

Recipe Success Stories

  • Community Feedback: Read through testimonials from fellow bakers who have successfully crafted this cheesecake, sharing tips and adaptations.
  • Variation Successes: Many have experimented with fruit varieties, yielding unique flavors; consider their suggestions for personal tweaks.
  • Adaptation Stories: Home cooks recount their experiences adapting to special dietary needs while maintaining the essence of this dessert.
  • Reader Suggestions: Implement community ideas and suggestions for improvising this recipe based on available ingredients.
  • Photography Tips: Capture its beauty by taking shots at different angles, showcasing the vibrant contrast between the blueberries and lemon.

Frequently Asked Questions

Can I use frozen blueberries for this recipe?

Yes, you can use frozen blueberries, but it is advisable to thaw and drain them beforehand to prevent excess moisture.

How long does the cheesecake last in the refrigerator?

Properly stored, the cheesecake can last in the refrigerator for up to 5 days, but it’s best consumed within 3 days for optimal freshness.

Can I substitute cream cheese with Greek yogurt?

Yes, you can substitute part of the cream cheese with Greek yogurt for a tangy flavor and lighter texture, but it may alter the richness slightly.

Is it necessary to use a water bath?

While not strictly necessary, using a water bath helps prevent cracks and promotes even baking, producing a smoother texture.

What can I do if the cheesecake cracks on top?

Don’t worry! If it cracks, simply cover it with the blueberry topping, which will disguise the imperfection beautifully.

Can this cheesecake be made gluten-free?

Absolutely! Substitute the graham cracker crust with gluten-free cookies or almond flour for a delicious gluten-free version.

How do I know when my cheesecake is done baking?

The cheesecake should be set around the edges with a slight jiggle in the center when done. It will continue to set as it cools.

Can I make mini cheesecakes instead?

Yes! Use a muffin tin lined with cupcake liners and adjust the baking time to 20-25 minutes for mini cheesecakes.

How do I prevent my crust from getting soggy?

Pre-baking the crust is essential to create a solid base and prevent sogginess once the filling is added.

What type of springform pan is best to use?

Use a high-quality, non-stick springform pan to ensure easy release and prevent sticking.

Additional Resources

Explore related recipes that offer stunning variations of classic desserts. Check out guides for perfecting your baking techniques and ingredient selections, alongside equipment recommendations that elevate your culinary creations. Experience the joy of making seasonal variations that delight throughout the year, ensuring your dessert repertoire is versatile and exciting.

Join the Conversation

Engage with your fellow cooking enthusiasts by sharing your experience on social media. Post your Blueberry Lemon Cheesecake photos, share culinary tips, and leave feedback or variations you’ve tried. Connect with the community by exchanging recipe ideas and inspiring others to embark on their culinary adventure with this delightful dessert.

The Recipe

Blueberry Lemon Cheesecake

Serves: 8

Prep Time: 30 mins

Cook Time: 60 mins

Total Time: 90 mins

Kitchen Equipment Needed

  • 9-inch springform pan
  • Mixing bowls
  • Electric mixer
  • Baking sheet
  • Rubber spatula

Ingredients

  • 1 1/2 cups graham cracker crumbs
  • 1/2 cup unsalted butter, melted
  • 4 (8-ounce) packages cream cheese, softened
  • 1 cup granulated sugar
  • 4 large eggs
  • 1/4 cup fresh lemon juice
  • 2 cups fresh blueberries
  • 1 tablespoon lemon zest

Directions

  1. Preheat your oven to 350°F (175°C).
  2. In a bowl, mix graham cracker crumbs and melted butter; press into the bottom of the springform pan to form the crust.
  3. Bake the crust for 10 minutes, then let it cool.
  4. In a large mixing bowl, beat cream cheese and sugar until smooth and creamy.
  5. Add in the eggs, lemon juice, and lemon zest, beating until combined.
  6. Pour the cheesecake batter over the cooled crust, smoothing the top.
  7. Bake for one hour in the preheated oven, using a water bath if desired.
  8. Once done, turn off the oven and let the cheesecake cool with the door ajar for an hour.
  9. Chill in the refrigerator for at least four hours, preferably overnight.
  10. Top with fresh blueberries before serving.

Recipe Notes

  • Use room temperature ingredients for a smooth batter.
  • Consider cooling the cheesecake slowly for best texture; avoid drastic changes in temperature.
  • Feel free to use low-fat cream cheese for a lighter version, but maintainwatch for taste differences.

Indulge in a Creamy No-Bake German Chocolate Cheesecake Delight

No-Bake German Chocolate Cheesecake: A Decadent Delight

⚖️
Difficulty
Medium

⏲️
Prep Time
25 mins

🕒
Cook Time
10 mins

⏱️
Total Time
35 mins

🍽️
Servings
8

Indulge in the ultimate fusion of flavors with this No-Bake German Chocolate Cheesecake, combining the rich, decadent essence of traditional German chocolate cake with the creamy, smooth texture of cheesecake. This dessert promises a delightful culinary experience that will satisfy your sweet cravings. Perfect for those who desire a taste of luxury without the need for an oven, this cheesecake is an enchanting creation that stands out at any occasion. With layers of velvety chocolate and a luscious cream cheese mixture, each bite unveils a harmonious blend of sweetness and texture.

Quick Recipe Highlights

  • Flavor Profile: Combining sweet chocolate with a subtle tang from the cream cheese, this dessert offers a perfect harmony of flavors, accentuated by notes of coconut and toasted pecans.
  • Texture: A delightful smoothness from the cream cheese layer contrasts with the slightly chewy coconut topping and the crunchy, nutty base.
  • Aroma: The alluring aroma of chocolate mingles with the inviting scent of toasted nuts and coconut, creating an irresistible sensory experience.
  • Visual Appeal: Each slice presents a beautiful layer of rich chocolate atop a creamy cheesecake, crowned with a decorative topping of pecans and coconut flakes.
  • Skill Level Needed: Intermediate—this recipe involves simple techniques but requires attention to detail and patience to achieve the perfect consistency.
  • Special Equipment: You’ll need a springform pan to achieve the characteristic cheesecake shape, along with a mixer to ensure a smooth, creamy texture.

Recipe Overview

  • Difficulty Level: This recipe is considered medium due to the required precision in mixing the cheesecake and the patience needed for the chilling process, ensuring a firm yet creamy outcome.
  • Category: A perfect dessert option for chocolate and cheesecake enthusiasts, this falls under the category of luxurious, indulgent sweets.
  • Cuisine: Inspired by German culinary traditions, this cheesecake brings the renowned flavors of German chocolate cake into a classic American dessert style.
  • Cost: Estimated at a moderate price range, accounting for quality ingredients like German chocolate, cream cheese, and pecans, contributing to its premium taste.
  • Season: Ideal for any season, though especially fitting for holiday gatherings when decadent desserts are most appreciated.
  • Occasion: Serve this at festive gatherings, birthdays, or any event where a show-stopping dessert is required to impress.

Why You’ll Love This Recipe

The No-Bake German Chocolate Cheesecake offers a sensational taste experience with its carefully layered flavors; the chocolate and cream cheese meld together for a mouthwatering delight. The convenience of a no-bake dessert simplifies preparation, making it accessible even for novice bakers while saving time. Nutritionally, it provides the joy of indulgence while offering a touch of protein from the nuts and dairy ingredients. Its presentation enhances social gatherings, adding a touch of sophistication and delight to any table setting. Furthermore, with easily accessible ingredients, it remains a cost-effective way to indulge in a lavish treat without breaking the bank.

Historical Background and Cultural Significance

The German chocolate cake, credited to Sam German in the 19th century, paved the way for this innovative cheesecake interpretation. Originally developed to celebrate luxury, this dessert has since evolved to become a staple in modern indulgence, showcasing the versatile appeal of chocolate in various forms. In the culinary landscape, this cheesecake version reflects a fusion of German innovation and American dessert traditions, showcasing the adaptability and timelessness of these flavors. Across regions, this no-bake adaptation highlights variations in technique and presentation, maintaining its cultural significance in culinary expression.

Ingredient Deep Dive

German chocolate remains the star of this dessert, renowned for its sweet, mild cocoa flavor which is historically celebrated in confections. Nutritionally, it offers an energy boost and a sense of satiety. When selecting your chocolate, opt for brands known for their rich cocoa content, and store it in a cool, dry place to maintain quality. Cream cheese, another key component, provides the cheesecake’s signature silky texture. Choose full-fat options for the creamiest outcome and store refrigerated until use to preserve freshness. Should you need alternatives, mascarpone can serve as a creamy substitute without losing richness.

Common Mistakes to Avoid

  • Overmixing the cream cheese can lead to a runny texture. Mix just until combined for the best results.
  • Not allowing the cheesecake ample time to chill can result in a less firm structure, impacting the final presentation.
  • Skipping the toasting step for the pecans and coconut can diminish the dessert’s flavor complexity.
  • Using low-fat cream cheese may alter both the consistency and flavor, leading to a less decadent experience.
  • Neglecting to line the springform pan base can make it difficult to remove the cheesecake intact.
  • Incorrect layering sequence can disrupt the balance of textures; follow the specified order for optimal results.
  • Choosing chocolate with insufficient cocoa content risks a lackluster taste. Opt for high-quality German chocolate for authenticity.
  • Improperly measuring ingredients can lead to an imbalanced flavor profile; use precise tools for accuracy.

Essential Techniques

Achieving the perfect whipped cream consistency is crucial; it adds lightness to your cheesecake layer. Ensure your cream is cold, and whisk until soft peaks form to avoid over-beating. To toast pecans, evenly spread them on a baking sheet and bake in a preheated oven until they’re aromatic and lightly browned, enhancing their nutty flavor. For a successful chill, ensure your refrigerator is set to the correct temperature—this step ensures the cheesecake sets correctly and maintains its structure.

Pro Tips for Perfect No-Bake German Chocolate Cheesecake

Ensure all dairy ingredients are at room temperature before mixing to achieve a smoother blend. Patience pays off—allow plenty of chilling time to let the flavors meld and the layers set beautifully. Use a hot knife to slice through the set cheesecake for clean, restaurant-quality slices. Enhance your topping by adding a hint of sea salt to the coconut and pecan mixture for a delightful contrast. Adjust sweetness to taste by modifying sugar quantities based on chocolate type. Consider adding a splash of vanilla extract to the cream cheese layer for depth.

Variations and Adaptations

Explore regional variations by swapping traditional pecans for macadamia nuts, adding a tropical twist. For a seasonal adaptation, incorporate fresh berries or other seasonal fruits in the topping for a refreshing contrast. Those with dietary restrictions can opt for vegan cream cheese and dark chocolate for a vegan adaptation. Consider experimenting with flavor variations by introducing almond or hazelnut extracts in the base for a nutty undertone. Modify the texture by incorporating crushed graham crackers in the base for additional crunch, or use gluten-free cookies for a coeliac-friendly alternative.

Serving and Presentation Guide

For an elegant presentation, carefully remove the cheesecake from the springform pan and place it on a decorative cake stand or plate. Garnish with a delicate sprinkle of chocolate shavings or edible gold dust for a touch of glamour. Traditional accompaniments such as freshly brewed coffee or a light Moscato wine enhance the cheesecake experience. Alternatively, consider serving with a side of mixed berries for a modern touch. Serve cold or at room temperature, slicing with a hot knife to avoid mess. Exercise portion control by pre-slicing cheesecake pieces for guests.

Wine and Beverage Pairing

Pair this decadent cheesecake with a robust red wine such as Zinfandel, which complements the rich chocolate notes beautifully. For non-alcoholic alternatives, a glass of almond milk or cold-pressed coffee would enhance the dessert’s nuances. Should you prefer a coffee pairing, opt for an espresso or Americano to balance the richness of the cake. Consider serving beverages slightly chilled or at room temperature to match the cheesecake’s creamy texture. Enjoy the dessert alongside a fragrant herbal tea like chamomile for a soothing end to your meal.

Storage and Shelf Life

Store your No-Bake German Chocolate Cheesecake in an airtight container in the refrigerator to maintain freshness for up to five days. Ensure it is kept at a constant cold temperature to prevent spoilage. To avoid flavor absorption from fridge odors, keep the dessert covered firmly. If freezing is necessary, wrap portions individually in plastic wrap and then a layer of foil, storing in a freezer-safe container for up to two months. When ready to enjoy, allow frozen portions to thaw gradually in the refrigerator before serving to retain texture quality.

Make Ahead Strategies

Prepare components separately in advance for smoother assembly when needed. Keep the chocolate base and cream cheese filling refrigerated up to two days before combining. Maintain texture and flavor quality by storing finished cheesecake in an airtight container. Remember to prepare the topping fresh to add a crisp, fresh element when ready to serve. Reheat components like the chocolate base with gentle warmth if firm due to refrigeration, ensuring even spreading. Incorporate freshly toasted nuts and coconut prior to serving to enhance flavor and texture.

Scaling Instructions

For smaller gatherings, halve the recipe while maintaining ingredient proportions as close as possible to retain balance. Larger celebrations may require doubling or tripling the recipe—consider using a larger springform pan to accommodate, adjusting chilling time if necessary. Be mindful when scaling up that baking and chilling times may vary slightly according to volume. Store excess in workable portions to maintain dessert quality over several days, serving freshly cut portions for optimal enjoyment. Always ensure appliances like mixers are compatible with scaled quantities to prevent equipment strain.

Nutritional Deep Dive

With macronutrients balancing fats from cream cheese and chocolate, the No-Bake German Chocolate Cheesecake provides a satisfying indulgence experience. Micronutrients present in nuts offer essential vitamins and minerals, enhancing overall nutritional value. Although primarily a sugary treat, this dessert provides an energy source when portioned properly within a balanced diet. Pay attention to caloric intake during dessert consumption, integrating active lifestyle habits to accommodate occasional indulgence. Recognize potential allergens and dietary restrictions, modifying ingredients where necessary to meet personal health goals without compromising taste.

Dietary Adaptations

Creating a gluten-free version requires substituting the base with crushed gluten-free cookies or biscuits. To satisfy dairy-free requirements, employ vegan cream cheese and chocolate variants, mindful of blending consistency. A vegan twist involves incorporating plant-based substitutes for all dairy components without loss of flavor integrity. For those on a low-carb regimen, consider reducing or eliminating additional sugars, favoring natural sweetness from chocolate. Adapting for a keto lifestyle involves prioritizing high-fat ingredients and moderating sweeteners to ensure dietary compliance. Paleo enthusiasts will appreciate a focus on natural components, limiting processed inclusions.

Troubleshooting Guide

Address texture issues by ensuring proper whipping of cream cheese and thorough chilling before cutting. Achieve balanced flavors through careful measurement and potential sweetener adjustments to align with chocolate bitterness. If temperature challenges arise, verify refrigeratory settings to maintain dessert integrity. When tackling equipment issues, assess compatibility and function, utilizing appropriately sized appliances for ingredient incorporation. Strategize ingredient substitutions mindfully, selecting alternatives that respect original flavor profiles. Timing inaccuracies may require a reassessment of preparation schedules, facilitating smoother workflow and ensuring optimal consistency.

Recipe Success Stories

Community feedback highlights the No-Bake German Chocolate Cheesecake’s capability to impress at social events, often praised for taste and presentation. Success stories of flavor adaptations include integrating fruit toppings and nut varieties to personalize experiences. Variations accommodate dietary restrictions, demonstrating the recipe’s versatility while preserving indulgence. Reader suggestions often involve creative uses of garnishes and decorative touches, reflecting personal culinary flair. Photography tips from the community emphasize lighting techniques to showcase the dessert’s layered structure and rich hues, enhancing visual appeal in shared images.

Frequently Asked Questions

Q: Can I substitute the cream cheese for a lighter option?
A: While a lighter cream cheese variant is an option, be aware it may affect the structure and creaminess. Different cheeses possess varying moisture levels, impacting set firmness.

Q: How far in advance can I make this cheesecake?
A: You can prepare this dessert up to two days in advance, storing it covered in the fridge to maintain freshness and taste integrity.

Q: Is a springform pan necessary?
A: While ideal for ease of removal and presentation, a springform pan is not strictly required—alternatively, use a well-lined regular baking tin for manageable removal.

Q: Can I use milk chocolate instead of German chocolate?
A: Milk chocolate can be used but be mindful of increased sweetness; consider adjusting sugar quantities in the rest of the recipe accordingly for balance.

Q: How should I store leftovers?
A: Leftover portions should be stored in airtight containers in the refrigerator to ensure freshness or wrapped carefully in the freezer for longer periods.

Q: What serves as the best nut substitute?
A: With variations in flavor and texture, walnuts or hazelnuts can replace pecans effectively, each offering unique flavor characteristics.

Q: What changes if I use low-fat ingredients?
A: Utilizing low-fat components may lead to a less rich texture and taste; experiment incrementally to maintain the ideal consistency without sacrificing satisfaction.

Q: Are there gluten-free adaptations?
A: Yes, by using gluten-free cookies or biscuits in the base, the cheesecake becomes suitable for gluten-sensitive individuals without losing its appeal.

Q: What’s essential for the perfect texture?
A: Ensure all mixing is done precisely as guided in the recipe, combined with adequate chilling times to achieve the signature smooth, firm texture expected.

Q: How can flavors be personalized?
A: Subtle flavor tweaks like adding zests or extracts allow personalization—consider orange zest with chocolate or almond extract in the base for unique dimensions.

Additional Resources

Enhance your dessert repertoire with related recipes such as classic New York Cheesecake or indulgent Chocolate Torte for cake lovers. Dive into technique guides detailing perfect chocolate melting procedures for a silky finish. Navigate ingredient options, exploring various cream cheese brands for desired fat content impacts. Consider equipment recommendations focusing on reliable springform pans for effortless dessert unmoulding. Seasonal variations advice offers fruit-based topping inspiration according to ingredient availability throughout the year.

Join the Conversation

Engage with fellow baking enthusiasts on social media, sharing your No-Bake German Chocolate Cheesecake creations. Capture and post pictures utilizing natural lighting for highlighting intricate details, inviting community feedback. Submit your reviews to contribute firsthand experiences or innovative adaptations to the shared knowledge pool. Exchange variations or suggestions through community forums, inspiring both novice and experienced bakers alike as they explore possibilities with this cherished recipe.

Delicious Blueberry Lime Cheesecake Cupcakes: The Ultimate Dessert Recipe

Irresistible Blueberry Lime Cheesecake Cupcakes: A Zesty Delight

⚖️
Difficulty
Moderate

⏲️
Prep Time
20 mins

🕒
Cook Time
30 mins

⏱️
Total Time
50 mins

🍽️
Servings
12 cupcakes

Indulge in the rich and creamy world of Irresistible Blueberry Lime Cheesecake Cupcakes, a tantalizing fusion of zesty lime and luscious blueberries nestled within smooth cheesecake. With every bite, experience the harmonious balance of tart lime, juicy blueberries, and velvety cream cheese. These cupcakes promise a delightful exploration of flavors that will captivate your taste buds and add a touch of sophistication to your dessert repertoire. Their inviting color palette and heavenly aroma will undoubtedly make them the star of any gathering.

The preparation of these blueberry lime cheesecake cupcakes is an artful blend of simplicity and decadence. Perfect for celebrations or satisfying an elegant sweet craving, these cupcakes are a testament to culinary creativity. The bold flavors and smooth textures ensure that every mouthful is a symphony of delight. Whether you’re a seasoned baker or a curious novice, the step-by-step process offers both excitement and satisfaction in creating a dessert that strikes the perfect balance between classic and contemporary.

Quick Recipe Highlights

  • Flavor Profile: The juxtaposition of tangy lime and sweet blueberries weaves a delightful flavor tapestry, underscored by the richness of cream cheese.
  • Texture: Experience a melt-in-your-mouth texture with every bite, complemented by the subtle crunch of a biscuit base.
  • Aroma: Revel in the fresh scent of lime zest mingling with the sweet, fruity fragrance of blueberries.
  • Visual Appeal: Vivid pops of blueberry against a creamy white backdrop, garnished with zesty lime curls, create an eye-catching presentation.
  • Skill Level Needed: This recipe requires moderate baking skills, focusing on precise ingredient integration and controlled baking.
  • Special Equipment: A muffin tin, liners, and an electric mixer are essential tools for best results.

Recipe Overview

  • Difficulty Level: This moderate recipe requires attention to detail and patience, ensuring ingredients are blended perfectly for a smooth consistency without overworking the mixture.
  • Category: Ideal for dessert enthusiasts, these cupcakes can be savored as both a delightful treat and a sophisticated dinner-party dessert.
  • Cuisine: This recipe embraces classic American cheesecake with a vibrant twist, celebrating the fusion of fruity and creamy elements.
  • Cost: Ingredients are reasonably priced, with fresh blueberries and quality cream cheese being the most significant investments for premium taste.
  • Season: Best enjoyed during spring and summer when blueberries are ripe, although they can be made year-round using frozen berries.
  • Occasion: These cupcakes shine at brunches, tea parties, or as a sweet finish to an intimate dinner gathering.

Why You’ll Love This Recipe

The taste of blueberry lime cheesecake cupcakes is where gourmet meets everyday delight. The delicate balance between lime’s zesty tartness and the sweetness of blueberries creates a captivating taste experience. The creaminess of the cheesecake is contrasted by the slight crunch of the biscuit base, making every bite a remarkable journey.

Preparation is straightforward and efficient, enabling the creation of an exquisite dessert without demanding lengthy hours in the kitchen. These cupcakes can be made ahead, allowing flavors to meld beautifully, making them a convenient choice for events or impromptu get-togethers.

Despite offering an indulgent treat, these cupcakes can fit into a balanced diet when enjoyed in moderation. Blueberries, known for their antioxidant properties, and the option to modify the recipe for lower sugar content, add a nutritious edge to this otherwise luxurious dessert.

In social settings, these cupcakes often become conversation starters, appreciated not only for their taste but also for their appealing presentation. They allow home bakers to showcase their skills and offer something unique, yet familiar, to guests.

Cost-wise, the recipe remains accessible, with ingredients readily available in most grocery stores. The ability to use either fresh or frozen blueberries adds to their practicality and ensures this dessert can be an affordable indulgence.

Historical Background and Cultural Significance

The concept of combining cheesecake with fruit dates back centuries, with origins in European baking traditions where creamy textures were paired with local fruits. In America, cheesecake has evolved to include various flavors, with blueberries becoming a popular choice due to their native roots and abundant seasonal growth.

The cultural significance of cheesecake in American cuisine is notable, as it represents adaptation and innovation in dessert-making. The use of lime in these cupcakes adds an international flair, showcasing how global influences can enhance traditional recipes.

Over the years, cheesecake has seen many variations, from the rich and dense New York styles to lighter, mousse-like versions. Each adaptation reflects regional tastes and ingredient availability, with blueberry lime cheesecake cupcakes embodying a lighter, seasonal approach.

Regional variations of this cheesecake cupcake can often be found substituting other local berries or citrus fruits, offering a sense of place to this beloved dessert. The adaptability and enduring appeal of cheesecake ensure its continued presence and reinvention in dessert repertoires worldwide.

Ingredient Deep Dive

Blueberries have long been esteemed in America for their vibrant color and sweet flavor. Rich in antioxidants, they offer profound health benefits and add nutritional value to desserts. When selecting blueberries, choose plump and firm fruit with a deep hue; store them in a refrigerator to maintain freshness. If needed, frozen berries can be substituted without compromising the dessert’s quality or taste.

Lime, with its bright and tangy profile, originates from exotic culinary traditions, lending an exciting twist to traditional cheesecake. Known for its vitamin C content, lime enhances flavor while offering health benefits. Select limes that are firm and heavy for their size, storing them at room temperature to maintain their juiciness. Lime zest can be substituted with lemon for a milder citrus note if desired.

Cream cheese serves as the silky foundation for the cheesecake mixture, offering a rich and savory depth. When selecting cream cheese, opt for a full-fat variety to deliver the creamiest texture and flavor. It should be refrigerated at all times and only brought to room temperature shortly before use for easier mixing. If necessary, a light cream cheese can be used, though it may slightly alter the texture.

Common Mistakes to Avoid

  • Overmixing the cheesecake batter can lead to a dense texture. Mix just until combined to ensure a smooth but airy consistency.
  • Using cold cream cheese can create lumps. It’s crucial to bring cream cheese to room temperature before mixing.
  • Baking at a high temperature can cause cracks in the cheesecake. Ensure even baking by setting the correct oven temperature.
  • Opening the oven door frequently can disrupt the baking process. Keep the door shut until required checking time.
  • Skipping the bain-marie or water bath can result in uneven cheesecake tops. The water bath promotes even baking and moisture.
  • Incorrect measurements can affect the final taste and texture. Use precise measurements for consistency and results.
  • Using overly ripe or underripe fruit can affect flavor balance. Choose blueberries that are perfectly ripe.
  • Rushing the cooling process affects texture setting. Allow the cupcakes to cool gradually to maintain their form.

Essential Techniques

Folding the Batter: Gently folding the batter ensures that air is incorporated, providing a light and fluffy texture. Mastering this technique means avoiding stirring vigorously, as that deflates air pockets.

Water Bath (Bain-Marie): Essential for preventing cracks, the water bath technique involves insulating the cheesecake in a water-filled tray while baking, ensuring even heat distribution. It’s crucial to check water levels throughout the baking process.

Creaming Method: This step involves first beating cream cheese to a creamy consistency before adding sugars and eggs. Ensuring it’s lump-free sets the foundation for a smooth batter.

Baking and Cooling: Pay attention to baking time and temperature, and allow cupcakes to cool inside the oven with the door slightly ajar. This gradual temperature reduction is key to preventing cracks.

Pro Tips for Perfect Irresistible Blueberry Lime Cheesecake Cupcakes

Ensure all refrigerated ingredients, like cream cheese and eggs, are at room temperature to achieve a flawlessly smooth batter. It aids in consistent mixing and prevents lumps.

To intensify the blueberry flavor, toss the berries with a little sugar before incorporating them into the cupcake batter. This enhances their natural sweetness and prevents them from sinking.

Add a dash of vanilla extract to the cheesecake mixture for a subtle backdrop that complements the citrus and berry notes.

Use muffin liners or baking cups to avoid sticking and ensure easy removal from the tin. This is especially helpful if transporting the cupcakes.

Experiment with garnishes like lime zest curls or fresh mint leaves for an added visual flourish.

Allow the cupcakes to chill overnight in the fridge before serving. The rest period improves flavor blend and offers a firmer texture.

Variations and Adaptations

Consider using strawberries or raspberries as an alternative to blueberries for a different berry twist. These fruits provide a similar sweetness with a unique flavor profile.

For a seasonal adaptation, try adding a hint of spices like cinnamon or nutmeg during autumn months, adding warmth to the cooling citrus.

Modify the recipe for a gluten-free diet by using gluten-free biscuit alternatives for the base while maintaining the rich cheesecake top.

Infusing the cheesecake batter with a splash of liquor such as raspberry liqueur or limoncello can offer a grown-up variation, perfect for cocktail parties.

For a softer-textured cupcake, replace half of the cream cheese with ricotta cheese, providing a lighter and less dense result.

Alternative presentation options include serving these cupcakes in glass jars for a “cake-in-a-jar” visual, ideal for picnicking or unique party favors.

Serving and Presentation Guide

For elegant plating, place the cupcakes on a dainty dessert plate with a dollop of whipped cream on the side and a few extra fresh blueberries for garnish.

Garnish possibilities are abundant. consider zesting a fresh lime over the final cupcakes just before serving for an aromatic touch.

In keeping with traditional cheesecake accompaniments, serve with crème fraîche or a simple blueberry compote for a richer Michelin-star look.

Modern serving suggestions can include creating a deconstructed version, layering crumbled cupcake along with whipped topping in parfait glasses.

Serve these cupcakes slightly chilled at room temperature to best appreciate their dense yet creamy consistency without any firmness.

Understanding portion control, consider smaller servings for more guests or decadent mini-cupcakes for an informal dessert buffet allowing guests to sample.

Wine and Beverage Pairing

Pair these cupcakes with a light and fruity white wine, such as a Riesling or a Gewürztraminer, which complements the lime’s zest and the blueberries’ richness.

For a non-alcoholic option, consider a chilled herbal tea infused with lemon and mint, enhancing the citrusy notes while staying refreshing.

If serving with coffee, opt for a softer roast with muted acidity, like a Colombian or Guatemalan blend, that rounds out the creaminess without overpowering it.

Pay attention to beverage temperatures. All should be served well-chilled, to align with the dessert’s cool nature, for a refreshing summertime finish.

For serving, present wine in delicate crystal glasses, emphasizing elegance, while herbal teas in slender tea cups evoke a quaint tea-party charm.

Storage and Shelf Life

Store leftover cupcakes in an airtight container in the refrigerator up to five days. They maintain freshness and flavor when kept cool.

Ensure consistent refrigeration by maintaining a temperature of around 40°F to prevent bacterial growth and spoilage.

Use plastic wrap to cover each cupcake individually before placing them in containers for best moisture retention.

Look out for signs of spoilage, including discoloration or an off-odor, as these are indicators to dispose of the cupcakes.

For reheating, allow them to come to room temperature naturally or use the defrost setting on a microwave to avoid over-softening.

Cupcakes can be frozen for longer storage. Wrap each tightly in plastic wrap, place in a freezer-safe bag, and store for up to three months.

Make Ahead Strategies

Begin by preparing the biscuit base and cheesecake mixture a day in advance, storing each separately in the refrigerator to save time on baking day.

Store prepared components like base and batter in the fridge, covered securely, to prevent flavor contamination from other ingredients.

While the cupcakes may lose some fresh texture, assembling them close to serving ensures that they’re still creamy and rich.

Reheat frozen cupcakes by defrosting them in the fridge overnight, allowing them to come to room temperature before serving.

Fresh elements like whipped cream or fruit garnishes should be added right before serving for a burst of vibrant color and texture.

Scaling Instructions

To halve the recipe, divide all ingredients by two, paying particular attention to egg quantities where usage of egg whites or yolks may differ.

If doubling or tripling, increase baking time slightly while maintaining careful observation to avoid over-baking or drying out the cupcakes.

Adjust equipment accordingly, using multiple muffin tins or a larger oven-safe tray for bulk baking. This ensures efficient time management in a large kitchen setting.

As proportions of liquid and solid ingredients change, reassess storage solutions, especially to accommodate larger quantities in refrigeration.

Nutritional Deep Dive

From a nutritional standpoint, these cupcakes present a modest indulgence, combining carbohydrates from sugar and crackers with the protein-rich profile of cream cheese.

Micronutrient-wise, fresh lime and blueberries bring vitamin C and antioxidants into the mix, contributing toward daily nutrient goals.

A moderate source of fats from the cream cheese, considered tackling dietary needs for a lower-fat alternative if desired, such as using light cream cheese.

For those managing dietary controls, each cupcake offers an approximate calorie count suitable within balanced meals, yet setup portion sizes accordingly.

Bearing in mind sodium content from cream cheese and biscuits is crucial, so monitoring intake is beneficial for those on specific dietary regimes.

Dietary Adaptations

Substitute the biscuit base with crushed gluten-free cookies to offer a celiac-friendly alternative while preserving the cheesecake’s flavor.

For dairy-free alternatives, use lactose-free cream cheese and ensure all ingredients like butter or milk are suitable substitutes.

Change the egg-derived structure for a vegan version using aquafaba or silken tofu mixtures to keep the cheesecake’s creamy essence.

Adaptation for a low-carb diet includes sugar substitutes like erythritol or monk fruit sweeteners, maintaining sweetness without carbohydrate load.

To meet keto preferences, a nut-based crust like almond flour with butter serves as a satisfying base, while cream cheese remains fitting in keto plans.

For a paleo-friendly dessert, utilize cashew cream as a cheese substitute and almond flour or coconut flour for the base, focusing on unprocessed ingredients.

In low-FODMAP diets, opt for lactose-free ingredients where necessary and limit citrus to the green part of the lime peel for flavoring.

Troubleshooting Guide

Texture issues often arise from overmixing the batter. Readjust folding techniques and aim for gentler mixing for a creamier consistency.

To manage flavor balance, alter sugar and lime proportions gradually, taste-testing to reach personal flavorful heights.

Temperature assessments are vital; utilize an oven thermometer to confirm correct settings and certainty for consistent baking.

For equipment challenges, substitute makeshift water bath setups if lacking proper trays or bake the cupcakes directly on sturdy racks.

Ingredient substitutions may create unexpected results; test smaller batch recipes first to evaluate taste and texture alterations.

Adjust timing and technique if the cupcakes sink. Calibrate baking times accurately and ensure even equipment heating distribution.

Recipe Success Stories

Feedback from community members highlights these cupcakes as a “refreshing twist” on classic cheesecake, appealing for their balance of sweet and tart.

Variations have flourished, with some substituting berries with made seasonal twists showcasing rhubarb or peaches for strong summery themes.

Adaptation stories include using these cakes as bases for larger, layered desserts topped with whipped cream and layered fresh fruit supreme.

Reader suggestions include adding melted white chocolate directly into the batter for a nuanced richness, finding eager success in testing this method.

Photography tips emphasize focusing on cupcake garnishes like lime curls or berries for dynamic shots that capture the dessert’s colorful appeal.

Frequently Asked Questions

Can I use frozen blueberries instead of fresh ones?
Yes, frozen blueberries can be used, ensuring they are defrosted and patted dry before folding into the batter. The texture may vary slightly, but the flavor remains intact.

How can I prevent my cupcakes from cracking on top?
Avoid overmixing the batter and ensure gradual baking and cooling. A water bath can also help maintain even moisture levels during baking.

What is the best way to store these cupcakes?
Store the cupcakes in an airtight container in the fridge for up to five days to maintain both flavor and texture. Ensure they are covered well to avoid refrigerator odor absorption.

Can I substitute lemon for lime in this recipe?
Yes, lemon can replace lime for a less tangy and slightly sweeter profile. Ensure that lemon zest and juice measurements are equivalent to maintain balance.

Is it possible to double the recipe easily?
The recipe can be doubled, though you should monitor the baking time and temperature settings closely to ensure even cooking.

What type of biscuit works best for the base?
Graham crackers or digestives can be used for their suitable crumbly texture and mild sweetness, which perfectly complements the cheesecake mixture.

Why did my cheesecake filling turn out lumpy?
Lumpy filling often results from cold cream cheese. Always let it reach room temperature before mixing to achieve a smooth consistency.

Can these cupcakes be made gluten-free?
Yes, by using gluten-free cookies for the base and verifying all other ingredients are gluten-safe, you can enjoy a gluten-free version of this dessert.

What can I do if my cupcakes are too sweet?
Reduce sugar in both the cheesecake mix and base crust slightly to align with your sweetness preference, or use fresh citrus for a sharper contrast.

How can I tell if the cupcakes are done baking?
Cheesecake cupcakes are done when the center is slightly jiggly while the edges set. A gentle touch should spring back slightly after cooling.

How can the same recipe be used to make a full cheesecake?
Multiply ingredients and adjust baking time and temperature, using a springform pan, ensuring the same classic flavor but on a larger scale.

Additional Resources

Dive into associated recipes like lime-infused pound cakes or blueberry compotes, which offer complementary flavors drawing inspiration from this recipe.

Master technique guides show step-by-step folding techniques for proper batter mixing and provide insight into setting up effective water baths.

Ingredient information focuses on blue and citrus varietals, giving background and tips for sourcing the best seasonal produce consistently.

Equipment recommendations may include silicon muffin trays or quality non-stick pans to enhance baking ease and product release.

Seasonal variations illustrate how pear or apple integrations can yield fresh autumn or winter takes on the timeless cheesecake idea.

Join the Conversation

Engage with our thriving social media community by sharing this recipe using our #BlueberryLimeCheesecake hashtag. Your photo might be featured in our monthly roundup!

Photography tips include natural lighting emphasis to highlight cupcake vibrancy, encouraging ingredient-focused or step-by-step baking story displays.

Share your thoughts in our comment sections or leave reviews with personalized twists on our classic recipe, aiding fellow bakers with newfound inspiration.

Community engagement often brings new recipe variations from around the world. Contribute your twist to this epicurean fusion of taste and texture.

Explore and taste a beautifully crafted dessert origin with universal appeal while exchanging ideas and stories through our shared baking passion.

The Recipe

Irresistible Blueberry Lime Cheesecake Cupcakes

Serves: 12 cupcakes

Prep Time: 20 mins

Cook Time: 30 mins

Total Time: 50 mins

Kitchen Equipment Needed

  • Muffin tin
  • Muffin liners
  • Electric mixer
  • Mixing bowls
  • Spatula
  • Measuring cups and spoons
  • Zester
  • Food processor

Ingredients

  • 1 cup graham cracker crumbs
  • 2 tablespoons sugar
  • 4 tablespoons unsalted butter, melted
  • 8 oz cream cheese, room temperature
  • 1/3 cup sugar
  • 1 large egg, beaten
  • 1 teaspoon vanilla extract
  • Zest of 1 lime
  • 1 tablespoon fresh lime juice
  • 1 cup fresh blueberries

Directions

  1. Preheat oven to 325°F (160°C) and prepare a muffin tin with liners.
  2. In a food processor, blend graham cracker crumbs, sugar, and melted butter until combined. Press a tablespoon of the mixture into each liner for a firm base.
  3. In a large bowl, beat cream cheese until smooth, gradually adding sugar until well blended.
  4. Mix in beaten egg, vanilla extract, lime zest, and lime juice until fully incorporated.
  5. Gently fold in blueberries with a spatula, ensuring even distribution.
  6. Pour the cheesecake mixture over each crust evenly. Tap the tray lightly to remove air bubbles.
  7. Bake for 25-30 minutes, until the cupcakes are set but slightly jiggly in the center. Avoid opening the oven door during baking.
  8. Cool in the tray for 10 minutes, then transfer to a wire rack to cool completely. Refrigerate for at least 2 hours before serving.
  9. Garnish with extra lime zest or blueberries just before serving, if desired.

Recipe Notes

  • Substitute lime with lemon for a milder flavor.
  • Store in an airtight container for up to 5 days in the fridge.
  • Frozen blueberries can be used; ensure they are thawed and excess moisture is patted dry.

Irresistible Pistachio and Raspberry Cheesecake Domes Recipe for Dessert Lovers

Pistachio and Raspberry Cheesecake Domes: A Delightful Dessert Masterpiece

⚖️
Difficulty
Moderate

⏲️
Prep Time
30 mins

🕒
Cook Time
15 mins

⏱️
Total Time
45 mins

🍽️
Servings
6

Indulge in the luscious delight of Pistachio and Raspberry Cheesecake Domes. This dessert offers a harmonious balance of flavors and textures, combining creamy cheesecake with a hint of pistachio and the tartness of raspberries. These domes are not only a treat for your taste buds but also a feast for your eyes with their stunning presentation. Whether you’re impressing guests at a dinner party or indulging your sweet tooth, these cheesecake domes are sure to elevate the occasion.

Cheesecake lovers will appreciate the rich, velvety texture complemented by crunchy pistachio bits. The vibrant raspberry coulis contrasts beautifully with the creamy filling, providing a refreshing pop of flavor and color. This recipe, though moderately complex, is a rewarding baking project that promises culinary satisfaction and aesthetic delight.

Strong

Quick Recipe Highlights

  • Flavor Profile: A perfect blend of nutty pistachios with zesty raspberries intertwined in a creamy cheesecake foundation.
  • Texture: Velvety smooth cheesecake against the crunch of pistachios and a soft raspberry layer.
  • Aroma: Sweet and nutty notes with a hint of fresh raspberry essence.
  • Visual Appeal: Chic dome shape with contrasting green and red hues from pistachios and raspberries, respectively.
  • Skill Level Needed: Suitable for home bakers with moderate experience; involves basic baking and layering techniques.
  • Special Equipment: Required tools include a silicone dome mold and a food processor for best results.

Recipe Overview

  • Difficulty Level: This recipe is moderately challenging due to layering techniques and precise presentation. However, each step is manageable for those familiar with basic baking concepts.
  • Category: Perfect for desserts, especially for gatherings and festive occasions.
  • Cuisine: Inspired by contemporary patisserie, infusing traditional cheesecake with modern flair.
  • Cost: Estimated cost is moderate, with pistachios being the priciest component, followed by raspberries.
  • Season: Best enjoyed during raspberry season in summer; however, frozen raspberries can make this treat suitable year-round.
  • Occasion: Ideal for birthdays, anniversaries, or any event that warrants a sophisticated dessert centerpiece.

Why You’ll Love This Recipe

The Pistachio and Raspberry Cheesecake Domes captivate with their luxurious combination of flavors and textures. The smooth, creamy cheesecake base perfectly complements the crunch of roasted pistachios, creating a symphony of sensations with each bite. The tangy raspberry coulis not only adds a vibrant splash of color but also balances the sweetness, making this dessert a delightful indulgence.

Convenience meets style with these domes, as they can be prepared ahead of time, allowing the flavors to meld beautifully. The recipe is detailed enough to guide you through each step with ease, making it suitable for bakers with a moderate level of expertise. By following the outlined techniques, you’ll find satisfaction in both the process and the remarkable outcome of your culinary efforts.

From a nutritional standpoint, this dessert offers nuts and fruits, which are beneficial components of a balanced diet. Pistachios provide healthy fats, protein, and fiber, while raspberries contribute vitamins and antioxidants. This, paired with indulgence, makes the dessert not only delicious but enriching in a unique way.

Socially, this dessert is a conversation starter. Its elegant appearance makes it a perfect addition to any gathering, sparking admiration and delight among diners. This adds to its value as a charming and impressive contribution to any dessert table.

Cost-wise, the ingredients are generally accessible, with the exception of pistachios, which might be considered a splurge. Nonetheless, the dessert’s elegance and the compliment it receives make it a worthy investment for special occasions or to impress your guests with culinary finesse.

Historical Background and Cultural Significance

The Pistachio and Raspberry Cheesecake Domes nod to the long-standing tradition of cheesecake, a dessert with roots that trace back to ancient Greece. Originally a simple mix of fresh cheese, honey, and flour, cheesecake has evolved over the centuries, with iterations found in countless cultures worldwide. This recipe is a testament to the dessert’s versatility and timeless appeal.

In many Middle Eastern cuisines, pistachios play a significant role in desserts. This prized nut, rich in flavor and historical significance, symbolizes wealth and happiness, often used in festive and celebratory dishes. Incorporating pistachios brings a touch of this cultural richness to the cheesecake domes.

The addition of raspberries offers a fresh twist to classic cheesecake, introducing a fruity element with a European touch. Raspberries have been cultivated in Europe for centuries and are known for their vibrant flavor that pairs exceptionally well with the creamy textures of cheesecake.

Over time, cheesecake has embraced regional variations and innovations, from the classic New York style to Japanese fluffy cheesecakes. Our Pistachio and Raspberry Cheesecake Domes are a modern twist, reflecting a blend of cultural influences and contemporary culinary creativity.

Ingredient Deep Dive

Pistachios have been treasured since ancient times and are considered a symbol of luxury. Their distinctive flavor and vibrant green hue make them a prized addition to sweet and savory dishes alike. Nutritionally, they are an excellent source of proteins, fiber, and healthy fats, making them not only tasty but also beneficial.

To ensure optimal quality, select pistachios that are bright green and free from signs of spoilage or staleness. Store them in an airtight container in a cool, dry place, or refrigerate them to extend their shelf life. Should you need a substitute, almonds or cashews can be considered for similar nutty undertones, though pistachios’ unique taste is unmatched.

Raspberries, with their juicy, tangy-sweet flavor profile, are a beloved fruit perfect for balancing richer desserts like cheesecake. Rich in vitamins, fiber, and antioxidants, raspberries are not only delicious but extremely health-promoting.

When purchasing raspberries, choose firm, brightly colored berries that show no sign of bruising. They are best kept in cool, dry environments and should be consumed shortly after purchase for optimum freshness. In a pinch, fresh strawberries or a berry blend could replace raspberries, though they’d alter the distinctive flavor.

Common Mistakes to Avoid

  • Overbeating the cream cheese causes cracks and affects texture. Beat until just smooth to avoid this.
  • Failing to temper the cream cheese results in a lumpy mixture, so ensure it’s at room temperature before use.
  • Using non-fat cream cheese alters the taste and texture; stick to full-fat for authenticity.
  • Adding sugar directly into hot raspberry coulis causes it to crystallize. Allow the mixture to cool slightly first.
  • Neglecting to line your molds can cause sticking. Use a non-stick spray or line with parchment paper.
  • Skipping the chill time for cheese filling results in poorly formed domes. Patience ensures better structure.
  • Using whole berries in coulis can lead to inconsistent flavors. Always strain for smoothness.
  • Under-toasting pistachios weakens the nutty flavor. Toast them lightly to enhance aroma and crunch.

Essential Techniques

Tempering cream cheese is an integral step to avoid lumps and ensure a smooth filling. Leave the cream cheese at room temperature until it softens. This allows it to incorporate effortlessly with other ingredients and retain a creamy texture.

To achieve beautifully smooth raspberry coulis, simmer raspberries with sugar until softened. Puree and then strain the mixture to remove seeds, ensuring only the smoothest sauce complements your cheesecake. Timing and temperature are crucial to avoid altering the sugar’s texture.

The art of dome construction relies on patience and technique. Carefully layer the ingredients in your mold, beginning with the coulis. Allow each layer to set before adding the next to achieve a neat, well-defined dome structure.

Pro Tips for Perfect Pistachio and Raspberry Cheesecake Domes

Ensure that your cream cheese is at room temperature to avoid lumps when mixing. If pressed for time, cut it into cubes to quicken the process. This little trick will drastically improve the texture of your cheesecake.

To intensify the pistachio flavor, consider adding a few drops of pistachio extract to the cheesecake mixture. This addition elevates the nutty profile without overpowering the overall taste.

Using a food processor to crush pistachios ensures uniform pieces that not only add texture but visually complement the raspberry coulis. Alternatively, you can use a mortar and pestle for a more rustic aesthetic.

Chill each layer thoroughly before assembling to ensure well-defined domes. Rushing this step could lead to mixing of layers, resulting in a less visually appealing dessert.

To easily release domes from molds, dip the bases quickly in hot water before unmolding. This slight warming helps separate the dessert from the mold without damaging its shape.

For a decorative finish, garnish with additional crushed pistachios or a light dusting of powdered sugar. Both enhance the presentation while adding flavor and texture contrast.

If time permits, make these cheesecakes a day in advance to allow flavors to meld and develop. This resting period enriches the overall taste, showcasing the pistachio and raspberry notes.

Variations and Adaptations

For a seasonal twist, consider swapping raspberries for other berries like strawberries or blueberries during their peak seasons. This adaptation ensures the cheesecake stays fresh and vibrant year-round, capitalizing on the natural sweetness of the season’s finest.

For those favoring a dairy-free version, substitute cream cheese with a plant-based alternative. This adaptation maintains the creamy texture while making the dessert suitable for dietary needs.

To embrace regional influences, incorporate spices like cardamom with pistachios for a more exotic flair. This combination adds depth and warmth, reflecting Middle Eastern dessert traditions.

If texture diversity is desired, add a thin layer of sponge cake at the base of each dome. It enhances structural integrity and provides an additional layer of flavor.

For an aesthetic presentation, serve these domes on a bed of raspberry coulis. The sauce not only complements the dessert visually but adds another dimension of flavor.

Lastly, explore serving options by cutting the domes into halves or quarters. This approach beautifully showcases the layered the structure inside and makes for a dramatic presentation.

Serving and Presentation Guide

Plating these cheesecake domes on elegant, individual dessert plates turns them into stunning centerpieces. Ensure each dome is positioned neatly in the center to draw visual attention.

Garnishing with a drizzle of raspberry coulis or a sprinkle of crushed pistachios not only enriches the taste but also enhances visual appeal. Fresh mint leaves or edible flowers can offer a lovely contrast and add a pleasing aroma.

Traditional accompaniments might include a dollop of whipped cream or crème fraîche, subtly enhancing the rich, creamy flavor of the cheesecake without overpowering it. Modern twists like a scoop of sorbet provide refreshing acidity.

Maintain serving temperatures by refrigerating until just before serving, ensuring the desserts are cold but not overly chilled to enjoy their creamy texture fully.

Pay attention to portion sizes, ensuring each dome provides a perfect individual-sized delight, reducing waste and maximizing enjoyment for every guest.

Wine and Beverage Pairing

A sweet dessert wine, such as a Moscato or a late-harvest Riesling, pairs wonderfully with these cheesecake domes, enhancing the fruity notes while balancing creaminess with acidity.

For a non-alcoholic option, consider a raspberry-infused herbal tea or a refreshingly chilled berry peppermint iced tea. Both choices highlight the fruit flavors of the cheesecake while adding a refreshing palate cleanser.

For coffee lovers, a rich, dark espresso complements the nutty and chocolatey elements, creating a sophisticated pairing. Alternatively, a mild green tea offers a lighter, contrasting brew that refreshes the palate.

Serving both warm and chilled beverages caters to diverse tastes, allowing guests to enjoy their preferred pairing style, whether it’s an invigorating brew or a soothing blend to match the dessert.

Storage and Shelf Life

Properly storing these cheesecake domes is key to extending their edible lifespan. Once prepared, keep them refrigerated in an airtight container to maintain freshness and flavor. They are best consumed within three days to enjoy their optimal taste.

To prevent any odor transfer from the fridge, use containers with tight seals or wrap each dome with plastic wrap, ensuring direct contact with their surfaces.

If freezing is necessary, wrap domes individually with parchment paper followed by aluminum foil to prevent freezer burn. Use within a month to retain the dessert’s quality and integrity.

Signs of spoilage include an off-putting smell or discoloration on the cheesecake. Always inspect them before serving if they have been stored for an extended period.

Make Ahead Strategies

Preparing these domes in stages can simplify the process. Complete the cheesecake filling and raspberry coulis a day in advance, allowing you to focus on assembly later.

Store pre-chilled components separately to enhance flavor melding without compromising structure. This strategy ensures mix-in integration and supports well-defined layers.

Reheat the raspberry coulis gently before garnishing to restore its texture and flow, adding a finishing touch that’s freshly made yet stress-free.

Delaying the addition of fresh elements like mint or pistachio garnish until the last moment guarantees a fresh and vibrant presentation.

Scaling Instructions

Wish to halve this recipe? Simply reduce ingredient quantities by 50%, ensuring to check consistency as you go to maintain the desired texture. This scale-down is perfect for smaller gatherings or intimate settings.

To double, prepare in batches rather than all at once, avoiding overcrowding of your kitchen equipment and maintaining ease of assembly.

Adjust mold quantities accordingly, preparing more or using larger alternatives if needed, and allow extra chill time if working with larger molds to ensure integrity.

Scaling up requires careful planning of storage and equipment usage, ensuring that each dome achieves the desired precision and aesthetic appeal.

Nutritional Deep Dive

This dessert, rich in macro-nutrients such as fats (from cream cheese and pistachios), carbohydrates, and proteins, provides a balanced, indulgent treat. Enjoying it in moderation allows for guilt-free culinary pleasure.

Micronutrients like vitamins C and E from the raspberries contribute to the overall health benefits of this dessert. These vitamins play critical roles in immune function and skin health.

While treated as a dessert pleasure, the recipe’s nutrition offers fiber from its fruit component and additional nut-based protein, broadening the health appeal.

For those monitoring weight, portion control remains crucial. Balance dessert enjoyment with a focus on moderation, pairing smaller servings with a balanced daily diet to maintain dietary goals.

Dietary Adaptations

For a gluten-free adaptation, ensure that all baking components and possible crust inclusions use gluten-free certified ingredients. This change keeps the dessert accessible to those with gluten sensitivities.

In a dairy-free approach, replace the cream cheese with coconut or almond-based alternatives. This adaptation creates a plant-based variation that caters to diverse dietary preferences.

Creating a vegan version calls for substituting gelatin with agar agar or pectin, providing similar textural qualities while maintaining the cheesecake’s firmness.

Classify this dessert as low-carb by reducing sugar levels and using alternative sweeteners like erythritol, making it suitable for keto enthusiasts wanting a low-sugar indulgence.

For those following a paleo diet, utilize coconut cream and cashed-based cheeses, keeping the recipe faithful to paleo guidelines whilst maintaining the traditional cheesecake charm.

Troubleshooting Guide

If you encounter issues with texture, make sure all ingredients are at the correct temperatures before mixing. This ensures uniform consistency and prevents curdling or lumping.

Balance flavors effectively by adjusting sugar or citrus elements to complement the pistachio and raspberry. Taste progressively to avoid over-sweetness or tartness.

Unexpected temperature fluctuations during cooling can harm the setting process. Always set your fridge to a consistent setting for optimal results.

Inadequately mixing the cream cheese can lead to graininess. Consistent blending keeps the texture smooth and appealing.

Ingredient substitutions require careful consideration to maintain flavor balance. Opt for lightly flavored alternatives to keep the dominant essence of pistachio and raspberry intact.

Timing concerns may arise in assembly. Allow adequate chilling time between layers to achieve neat, distinct separations for an attractive presentation.

Recipe Success Stories

Our community has shared many wonderful experiences with the Pistachio and Raspberry Cheesecake Domes, noting their success following specific tips and tricks. Readers have creatively incorporated local fruits or flavors to adapt the dessert to their regional cuisine.

Feedback highlights the impressive visual appeal when shared via social media, inspiring fellow bakers to embrace this visually stunning creation. Helping inspire creativity through photography and presentation, these domes never fail to impress.

In adaptation stories, readers have successfully altered the basic recipe to suit diverse dietary needs, widening the scope of this dessert’s accessibility and enjoyment. This feedback encourages nutritional inclusivity while appreciating timeless classic flavors.

Friendly suggestions often include trying alternative garnishes or plating methods, enhancing the dessert’s charm and adapting it to fit unique meal themes or dining experiences.

Frequently Asked Questions

Can I use frozen raspberries instead of fresh?
Absolutely, frozen raspberries work as a suitable substitute but may require additional draining to eliminate excess moisture. Adjust cooking time slightly when making coulis to achieve the desired consistency.
What is the best way to store these cheesecake domes?
To preserve freshness, store the domes in an airtight container in the fridge. Consume within three days for best flavor and texture. For longer storage, freeze wrapped in parchment paper followed by aluminum foil.
Can this recipe be made vegan?
Yes, substitute cream cheese with plant-based alternatives and use agar agar instead of gelatin. This ensures a vegan-friendly dessert without compromising on taste or structure.
How can I add more pistachio flavor?
Consider adding a few drops of pistachio extract for a more pronounced nutty taste. Toasting the pistachios before incorporating also enhances their natural aroma and flavor.
Can I make this dessert ahead of time?
Indeed, these domes are perfect make-ahead treats. The flavors develop beautifully over time, making prep a day in advance a smart choice for busy hosts or those scheduling dessert production.
What’s a good alternative to raspberry for coulis?
Blueberries or strawberries are excellent choices. Adjust the sugar to taste to manage different fruit sweetness levels, ensuring the coulis complements the cheesecake’s essence.
How do I avoid the domes sticking to the mold?
Utilizing a light coating of non-stick spray or lining with plastic wrap can facilitate easy removal. Additionally, a quick dip of the mold in warm water eases the separation process.
Are there any low-carb adaptions?
Substitute sugar with a low-carb sweetener like erythritol and use almond or coconut flour-based crusts. This integration ensures a suitable low-carb dessert option.
What’s the best way to toast pistachios?
Lightly toast pistachios in a dry pan over medium heat. Stir constantly until fragrant and lightly browned, which enhances flavor without burning the nuts.
Can these be served frozen?
While serving frozen isn’t recommended, these domes should be firm and chilled, allowing a slight warming period post-refrigeration for optimal enjoyment and texture.

Additional Resources

Explore further with related recipes that embrace similar fruity and nutty themes, such as berry almond tarts or chocolate hazelnut mousse. These recipes offer imaginative extensions of flavor pairings.

Access technique guides providing in-depth demonstrations of dome construction and coulis preparation, strengthening your foundational baking skills and enabling exciting variations.

Ingredient information delves into pistachios’ historical significance and nutritional advantages, highlighting their contribution beyond mere taste. Discover how this nut enriches culinary creations globally.

Equipment recommendations, such as silicone molds or pastry brushes, assist in achieving professional-grade results, inspiring future baking endeavors.

Seasonal variations invite creative experimentation with different fruits and complementary spices, ensuring your dessert recipes remain fresh, dynamic, and tailored to current produce availability.

Join the Conversation

Bakers and dessert enthusiasts alike can join the conversation on social media, sharing their own adaptations and photography of Pistachio and Raspberry Cheesecake Domes. Utilize platforms like Instagram or Pinterest to engage with fellow culinary creatives.

Capture the beauty of your handmade desserts through photography tips shared within our community, enhancing visuals that showcase the elegant structure and vibrant colors of these domes.

Contribute by reviewing recipes and sharing personal experiences, helping others eager to test this modern take on cheesecake while gathering ideas and constructive feedback.

Dive into recipe variations proposed by other readers, dissecting and recreating them to fit your preferences and taste perceptions. This collaborative effort fosters community growth and shared delight in successful culinary achievement.

The Recipe

Pistachio and Raspberry Cheesecake Domes

Serves: 6

Prep Time: 30 mins

Cook Time: 15 mins

Total Time: 45 mins

Kitchen Equipment Needed

  • Silicon dome mold
  • Food processor
  • Microwave
  • Refrigerator

Ingredients

  • 200g cream cheese, softened
  • 100g pistachios, shelled and toasted
  • 150g raspberries
  • 100g granulated sugar, divided
  • 100ml heavy cream
  • 1 tsp vanilla extract
  • 2 tbsp gelatin
  • Optional: Pistachio extract, for extra flavor

Directions

  1. Prepare your silicone dome mold with a light spray of nonstick cooking spray.
  2. In a food processor, blend half of the pistachios until finely ground.
  3. In a saucepan, combine raspberries and half of the sugar. Cook over medium heat until raspberries break down, about 5 minutes. Strain to remove seeds, returning smooth sauce to the pan.
  4. Whisk 1 tbsp gelatin into the coulis. Pour the mixture into the dome mold, filling each one to about 1 cm depth. Refrigerate until set.
  5. Beat cream cheese with remaining sugar until smooth and fluffy. Stir in vanilla and pistachio extract if using. Gradually beat in heavy cream until thickened.
  6. In a small bowl, dissolve the remaining gelatin in water. Microwave until melted, then slowly mix it into the cream cheese mixture.
  7. Spoon the cheesecake filling over the set raspberry layer in the dome mold, spreading evenly. Sprinkle chopped pistachios on top for texture.
  8. Chill in the refrigerator for at least 4 hours or overnight until fully set.
  9. To serve, remove the domes from the mold and place on individual plates. Garnish with remaining pistachios and fresh raspberries.

Recipe Notes

  • Ensure all ingredients are at room temperature before starting to prevent curdling.
  • Add additional raspberry coulis or fresh fruit when serving for enhanced presentation.

Decadent Chocolate Banana Bread Recipe: Sweet, Moist, and Easy to Make

Chocolate Banana Bread: A Decadent Delight

⚖️
Difficulty
Easy

⏲️
Prep Time
15 mins

🕒
Cook Time
60 mins

⏱️
Total Time
75 mins

🍽️
Servings
8

Indulge in the rich, mouth-watering combination of chocolate and banana with this Chocolate Banana Bread recipe, a perfect blend of sweetness and texture that satisfies any dessert craving. It’s moist, flavorful, and topped with melted chocolate chips that create a lush, decadent finish. Whether you’re a banana lover or a chocolate enthusiast, this delectable banana bread will quickly become your favorite go-to treat. The inviting aroma of freshly baked banana bread mingling with rich chocolate scents is irresistible, making this the ultimate comfort food to enjoy anytime.

Quick Recipe Highlights

  • Flavor Profile: A perfect combination of ripe bananas and rich chocolate, offering a blend of sweet, fruity, and deep cocoa flavors.
  • Texture: Incredibly moist and tender crumb with a slightly crisp exterior, enriched with melted chocolate chips.
  • Aroma: A tantalizing mix of banana and chocolate harmoniously combining into an inviting aroma.
  • Visual Appeal: A beautifully browned crust with an enticing, chocolaty interior.
  • Skill Level Needed: Ideal for beginners, as it requires simple mixing techniques and common baking procedures.
  • Special Equipment: Basic baking tools like a mixing bowl, loaf pan, and oven.

Recipe Overview

  • Difficulty Level: Classified as easy, this recipe saves you from complex techniques, relying on standard mixing and baking processes that ensure a delicious outcome.
  • Category: This versatile treat falls under dessert or snack categories, suitable for both morning and afternoon indulgences.
  • Cuisine: Although bananas are native to tropical regions, banana bread has become a staple in various cuisines, merging American dessert tradition with a global love for bananas.
  • Cost: Banana bread is economical, leveraging ripe bananas you might already have, making it a cost-effective yet luscious treat.
  • Season: Enjoyable year-round, but particularly comforting in fall and winter when its warm flavors provide welcome coziness.
  • Occasion: Perfect for any gathering, from casual family breakfasts to more formal brunches, or simply as a delightful personal treat.

Why You’ll Love This Chocolate Banana Bread Recipe


Unlock the delightful taste and texture of Chocolate Banana Bread, with its moist crumb and rich, chocolaty notes enhanced by naturally sweet, ripe bananas. Each bite tantalizes the palate with its harmonious blend of fruitiness and chocolate decadence. Beyond its irresistible taste, the recipe’s simplicity offers convenience—whip it up in mere minutes and enjoy the aroma as it bakes to perfection. Its nutritious balance, blending essential vitamins from bananas with satiating cocoa elements, can transform this into a guilt-free indulgence. This treat is not just a personal delight but a social magnet, impressing guests at brunches or tea times with its inviting aroma and impeccable flavor. Experience cost-effectiveness and easy accessibility—utilizing pantry staples, creating an everyday luxury without extensive trips to specialty stores.

Historical Background and Cultural Significance


The evolution of banana bread dates back to the early 20th century when baking powder gained popularity as a leavening agent. Its origins are rooted in the United States, where home bakers looked for creative ways to use overripe bananas rather than discarding them. This treat has since grown into a cultural phenomenon, with countless variations reflecting regional and familial traditions. Originally a means of reducing waste, banana bread has been elevated to a beloved dessert that showcases cultural ingenuity. It embodies a meaningful shift toward sustainability and resourcefulness—a testament to adaptive culinary creativity across generations.

Ingredient Deep Dive


Bananas: Rich in potassium and vitamins, bananas add natural sweetness and moistness. Select fully ripe bananas with brown spots for the best flavor elevation while enhancing the structural integrity of the bread. Store at room temperature until ready for use or freeze for later. Should bananas be unavailable, pureed apples or pumpkins serve as potential substitutes.

Common Mistakes to Avoid

  • Overmixing the Batter: Stir gently, as overmixing leads to dense bread. Mix only until ingredients are combined.
  • Using Unripe Bananas: The sweetness of ripe bananas is key; use those that are soft and browned for premium flavor.
  • Incorrect Baking Temperature: Always preheat your oven to ensure even baking, resulting in a perfect rise and texture.
  • Skipping Pan Preparation: Ensure the loaf pan is well-greased or lined to prevent sticking.
  • Ignoring Cooling Time: Allow the bread to cool before slicing to maintain structure and flavor.
  • Refrigerating Banana Bread: Store at room temperature to keep the crumb tender and the taste fresh.
  • Forgetting to Measure Ingredients: Accurate measurements can’t be ignored as they impact the moisture level and sweetness.
  • Substituting Ingredients Without Adjustments: Be cautious if altering the recipe; consider texture and flavor impacts.

Essential Techniques


Correct Banana Mashing: Thoroughly mash bananas to break down all chunks, ensuring a smooth batter integration that prevents inconsistency in the loaf.

Pro Tips for Perfect Chocolate Banana Bread


– Toasted Nuts: Incorporate lightly toasted walnuts or pecans for a delightful crunch that complements the soft crumb.
– Chocolate Chip Layering: Sprinkle chocolate chips on top just before baking for a rich, gooey top layer.
– Banana Bundles: Pre-measure mashed bananas and freeze them in ready-to-use portions for easy access.
– Spice it Up: Add warm spices like cinnamon or nutmeg for a comforting aroma.
– Nutty Swirls: Consider swirling peanut butter into the batter for an additional flavor layer.
– Experiment with Sugars: Swap white sugar with brown sugar to introduce a caramel note to the bread.

Variations and Adaptations


Incorporating unique ingredients such as coconut flakes or dried fruits can enhance and personalize your Chocolate Banana Bread, maintaining its adaptability across various cuisines, dietary needs, and flavor preferences. Experiment with seasonal fruits or chocolate variants, such as white or dark chocolate, to bring new dimensions to the classic recipe. For a gluten-free version, use almond flour or gluten-free all-purpose flour.

Serving and Presentation Guide


Slice thickly and present on a wooden board for a rustic charm, serving with a dollop of cream or a scoop of vanilla ice cream for an elegant touch. Create a cozy atmosphere by accompanying this serving suggestion with a steaming cup of coffee, enhancing the bread’s naturally rich flavors.

Wine and Beverage Pairing


Pair this Chocolate Banana Bread with a robust red wine that complements its chocolatey undertones. For a non-alcoholic counterpart, a strong brew of espresso or a sweet, creamy chai tea latte accentuates the dessert’s warm and rich flavors without overpowering its subtleties.

Storage and Shelf Life


Store baked banana bread at room temperature by wrapping it in airtight plastic wrap or foil for 2-3 days to maintain freshness and moisture. To extend shelf life, freeze individual slices and thaw at room temperature before serving. Remain observant for spoilage indicators like mold or unpleasant odors.

Make Ahead Strategies


Prepare the banana bread batter in advance, refrigerate for up to 24 hours before baking, allowing the flavors to meld and intensify. Assemble wet and dry ingredients separately and combine just before baking, preserving freshness and flavor integrity.

Scaling Instructions


When scaling up this recipe, maintain proper proportions by multiplying the ingredient list accordingly, ensuring consistent results. Monitor baking time closely for larger or multiple batches, adjusting as necessary but keeping within standard temperature guidelines to guarantee even cooking.

Nutritional Deep Dive


This recipe yields a nutritious blend with balanced macros—carbohydrates from fruit sugars, healthy fats from optional nuts, and fibers promoting digestive health. Consider portion adjustments to manage calorie intake as part of a balanced diet.

Dietary Adaptations


For a vegan-friendly version, replace eggs with flaxseed meal and opt for plant-based milk alternatives. Use sugar substitutes and almond flour for a keto variation, ensuring the bread responds well to these ingredient changes.

Troubleshooting Guide


– Dense Texture: Confirm baking soda freshness and ensure minimal mixing.
– Uneven Baking: Rotate the loaf midway through to ensure even heat distribution.
– Dry Outcome: Recheck ingredient ratios or baking time and introduce moisture-retaining elements like applesauce if necessary.

Recipe Success Stories


Engage with our community of bakers who have experimented with different nuts and spices, sharing vibrant variations and personal touches that redefine the classic recipe. Learn from their insights and consider sharing your creative twists.

Frequently Asked Questions

How do I know when the banana bread is done baking?
Insert a toothpick in the center—if it comes out clean or with a few crumbs, it’s ready.

Can I use frozen bananas?
Yes, ensure they’re thawed and excess moisture is drained before use to maintain batter consistency.

Why is my bread gummy?
This may result from excess banana or overmixing—measure ingredients precisely and mix minimally.

Is it necessary to use chocolate chips?
Chocolate chips are optional but add a rich layer. Substitute with nuts or dried fruit for variation.

How can I avoid sticking?
Line the pan with parchment paper or ensure even greasing—this prevents adherence.

Can I make muffins instead of a loaf?
Absolutely—adjust the baking time accordingly, as muffins will bake faster.

Does the type of chocolate matter?
Use your preferred chocolate, but remember that different cacao contents impact sweetness and texture.

Should I mash bananas manually?
While manual mashing is adequate, a mixer yields a smoother puree if preferred.

What other mix-ins work well?
Incorporate nuts, dried fruits, or coconut as delightful additions enhancing flavor and texture.

What’s the best way to soften butter quickly?
Room temperature softening is ideal, but grating cold butter accelerates the process without melting.

Additional Resources


Explore our expansive collection of related recipes, technique guides, and thoughtful variations that cater to all taste buds and dietary preferences. Our rich archives feature complete guides on ingredient usage, offering insights into their backgrounds, best uses, and substitutions.

Join the Conversation


Connect with the larger community of banana bread aficionados by sharing your experiences, tips, and photographs on social media. Encourage others by writing a review, showcasing your unique adaptations, and learning from the community’s shared feedback.

The Recipe

Chocolate Banana Bread

Serves: 8

Prep Time: 15 mins

Cook Time: 60 mins

Total Time: 75 mins

Kitchen Equipment Needed

  • Mixing bowl
  • Loaf pan
  • Spoon or mixer
  • Whisk
  • Oven

Ingredients

  • 3 ripe bananas, mashed
  • 1/2 cup melted butter
  • 1 tsp baking soda
  • Pinch of salt
  • 3/4 cup sugar
  • 1 large egg, beaten
  • 1 tsp vanilla extract
  • 1 1/2 cups all-purpose flour
  • 1/2 cup chocolate chips

Directions

  1. Preheat your oven to 350°F (175°C), and grease a 4×8-inch loaf pan.
  2. In a mixing bowl, mash ripe bananas with a fork until smooth.
  3. Stir melted butter into the mashed bananas.
  4. Add baking soda and salt to the mixture. Stir well.
  5. Mix in sugar, beaten egg, and vanilla extract.
  6. Add flour gradually and mix until fully incorporated. Avoid overmixing.
  7. Fold in chocolate chips, and pour the batter into the prepared loaf pan.
  8. Bake for 60 minutes or until a toothpick inserted into the center comes out clean.
  9. Allow to cool in the pan for 10 minutes, then turn out onto a wire rack to cool completely.

Recipe Notes

  • Store banana bread at room temperature for up to three days or freeze for later.
  • Consider adding chopped nuts for a crunchy texture.
  • For sweeter bread, increase chocolate chips to 3/4 cup.