Delicious Homemade Pistachio Cupcakes: A Perfect Treat for Any Occasion

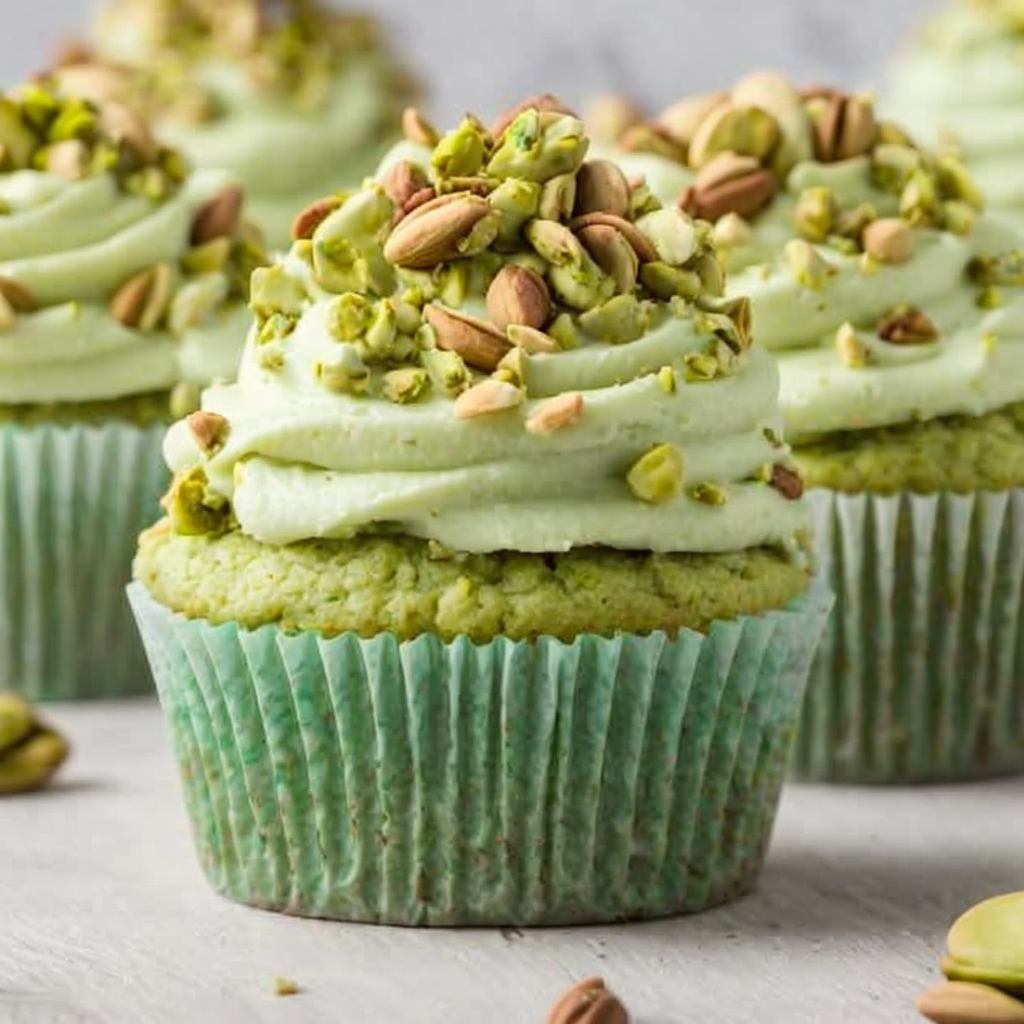
Delicious Homemade Pistachio Cupcakes: A Tasty Delight

⚖️
Difficulty
Easy

⏲️
Prep Time
15 mins

🕒
Cook Time
20 mins

⏱️
Total Time
35 mins

🍽️
Servings
12 cupcakes

Pistachio cupcakes are a sweet and flavorful treat that everyone will adore. These delicious homemade pistachio cupcakes have a wonderful nutty flavor, thanks to ground pistachios, paired with a silky frosting that elevates them to a decadent dessert. Imagine biting into a fluffy, moist cupcake that not only satisfies your sweet tooth but also gives you a delightful crunch from the pistachio nuts. This recipe harnesses the rich taste of pistachios, making it an absolute crowd-pleaser for special occasions or just a cozy treat at home.

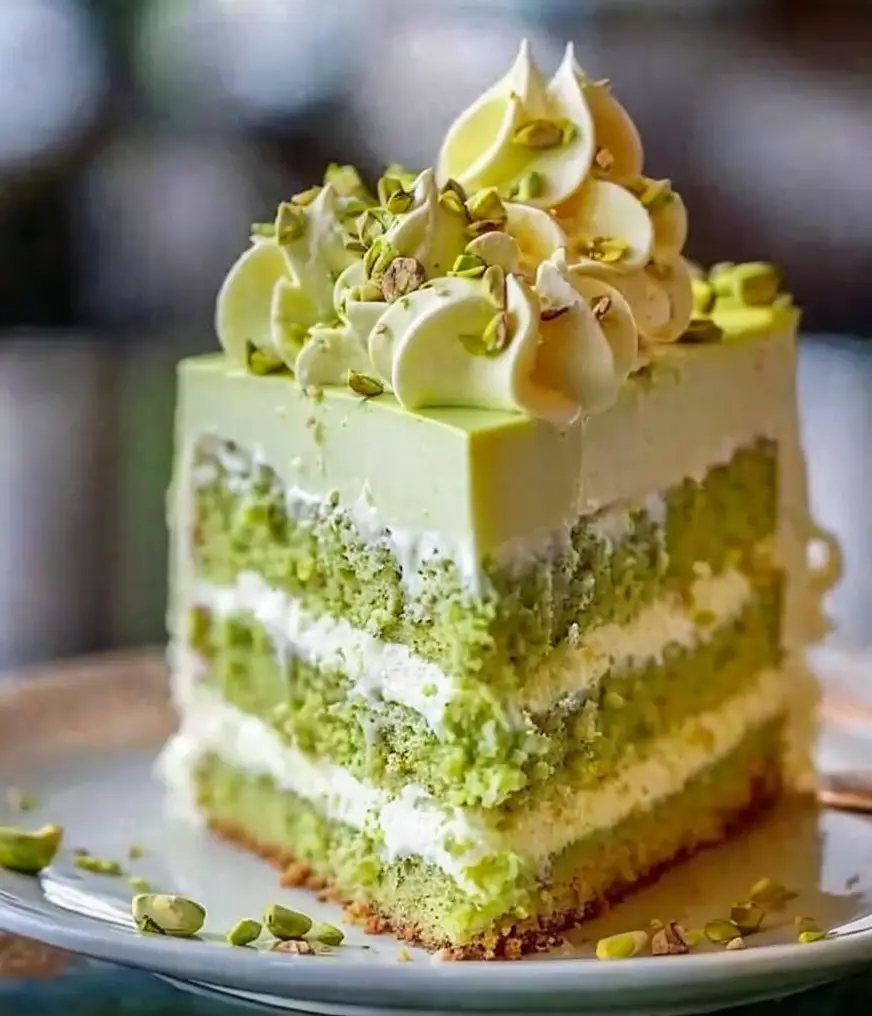
These cupcakes are not only heavenly in taste but also a feast for the eyes. Their pale green hue reminiscent of a lush pistachio grove, topped with a smooth frosting, presents beautifully on any table. Whether you’re celebrating a birthday, preparing for a tea party, or simply indulging in an afternoon snack, these pistachio cupcakes will surely impress your guests and family alike. Prepare to take your dessert game to the next level with this unique and flavorful recipe!

Quick Recipe Highlights

  • Flavor Profile: Sweet with a rich, nutty essence from the pistachios that pairs perfectly with the creamy frosting.
  • Texture: Light and fluffy cupcakes with a subtle crunch from ground pistachios.
  • Aroma: A delightful blend of fresh pistachios and vanilla that fills your kitchen with warmth.
  • Visual Appeal: Beautifully pale green cupcakes topped with silky frosting and garnished with chopped pistachios.
  • Skill Level Needed: A beginner-friendly recipe that requires no advanced baking techniques.
  • Special Equipment: Standard baking tools like a mixing bowl, cupcake pan, and an electric mixer.

Recipe Overview

  • Difficulty Level: Easy, making it suitable for novice bakers or those looking to whip up a quick dessert.
  • Category: Dessert, perfect for parties, coffee breaks, or simply indulging in at home.
  • Cuisine: Inspired by Middle Eastern flavors, highlighting pistachios as a staple in many traditional desserts.
  • Cost: Budget-friendly ingredients yield delightful results without breaking the bank.
  • Season: Enjoy these cupcakes year-round, but they shine during spring and summer with their refreshing flavor.
  • Occasion: Ideal for birthdays, weddings, or any celebration where you want to impress with a unique treat.

Why You’ll Love This Recipe

These homemade pistachio cupcakes provide a stunning balance of flavor and texture that will leave your palate satisfied and happy. The nutty and slightly sweet flavor of pistachios is elevated by the creamy frosting, creating a symphony of taste that dances on your tongue. Each bite offers a delightful mix of fluffy cake and crunchy nuts, ensuring every cupcake experience is memorable. Not only do they taste great, but they also surprise guests who are accustomed to more traditional flavors.

The convenience factor cannot be overstated; whipping up these pistachio cupcakes takes minimal time and effort, making them perfect for both spontaneous baking sessions and planned events. The simple preparation method means you can have a batch ready in just over half an hour, allowing you to satisfy cravings or entertain guests without spending hours in the kitchen. Moreover, they can be made ahead of time and stored, ensuring fresh treats are always at hand for any occasion.

These pistachio cupcakes also pack in nutritional advantages, as pistachios are a good source of healthy fats, fiber, and protein. By incorporating these nutritious nuts into your dessert, you can enjoy a guilt-free indulgence that aligns with a more mindful approach to eating. This unique dessert can awaken fond childhood memories of baking, or be a perfect addition to new family traditions during holidays or celebrations.

Socially, these cupcakes are a fantastic choice for gatherings and events. Their unique flavor and beautiful presentation make for great conversation starters, and your guests will appreciate the effort behind a homemade treat. With their soft texture and inviting aroma, they create a warm and welcoming vibe that will make any gathering more enjoyable. Their cost-effectiveness adds additional appeal, allowing you to create a dessert that feels luxurious without overspending.

In short, you’ll love these delicious homemade pistachio cupcakes for their fantastic taste, quick preparation, and the joy they bring to both baking and sharing with others.

Historical Background and Cultural Significance

The origin of pistachios can be traced back to the Middle East, where they have been cultivated for thousands of years. In many cultures, pistachios symbolize wisdom and prosperity, making them a popular choice for celebratory desserts and special occasions. Their rich history as a prized nut in various culinary traditions has influenced countless recipes, allowing these flavors to reach kitchens worldwide. As you indulge in these delicious homemade pistachio cupcakes, you partake in a heritage that has long celebrated the unique taste of pistachios.

Pistachios are often featured prominently in Middle Eastern sweets and desserts, such as baklava and halva. The cultivated appreciation for their unique taste has led to numerous adaptations and regional variations across cultures, showcasing diverse cooking techniques and flavor combinations. Understanding this historical significance can deepen the enjoyment of these cupcakes and connects the dessert to a larger culinary tradition.

Over time, the evolution of recipes featuring pistachios has led to creative interpretations that marry traditional flavors with modern techniques. Pistachio cupcakes have gained popularity as bakers seek new ways to incorporate this nut into lighter desserts, perfectly aligning with contemporary trends that value both flavor and visual appeal. This evolution reflects the versatility and adaptability of pistachios, as they have successfully transitioned from traditional dishes to modern baking favorites.

Regional variations of pistachio desserts continue to flourish, influenced by local ingredients and cultural preferences. While Western adaptations may lean towards sweeter flavors and buttercream frostings, traditional Middle Eastern pastries often incorporate honey and simpler preparations. This diversity aligns well with global culinary traditions, allowing homestyle pistachio cupcakes to evolve while honoring their rich roots.

Ingredient Deep Dive

– **Pistachios**: Rich in flavor, these nuts are packed with nutrients. They provide healthy fats, protein, and fiber, making them a healthier choice for snacking. When choosing pistachios, look for unsalted and raw varieties to retain their natural flavor and benefits. Store them in an airtight container in a cool, dry place to maintain freshness. If you’re out of pistachios, almonds or walnuts can serve as suitable substitutes, offering their unique essences to your cupcakes.

– **Flour**: Typically, all-purpose flour is the choice for cupcakes, giving them the perfect softness and lightness. Whole wheat flour can be used for a nutritious twist, though it imparts a denser texture. Choose unbleached flour for healthier baking. Ensure it’s stored in a cool, dry environment to prevent spoilage. You can substitute with gluten-free flour blends to cater to those with dietary restrictions.

– **Sugar**: Granulated sugar adds sweetness and moisture to the cupcakes. Brown sugar can be used for a deeper, caramel-like flavor if desired. Store sugar in an airtight container to keep it dry. If you’re looking for alternatives, consider coconut sugar or honey, but keep in mind they may alter the final texture of your cupcakes.

– **Butter**: Unsalted butter creates a rich flavor and tender texture in the cupcakes. Use high-quality butter for the best results. Ideally, it should be stored in the refrigerator but can be frozen for longer shelf life. For a dairy-free option, you can substitute with coconut oil or a dairy-free margarine.

– **Eggs**: Eggs add moisture and structure to the cupcakes. Fresh, cage-free eggs are often preferred for their superior quality. If you’re looking for vegan alternatives, flax eggs or unsweetened applesauce can work well but may slightly alter the texture.

– **Milk**: Whole milk provides moisture and richness. You can substitute with almond milk or oat milk for a plant-based option. Ensure it’s stored properly in the refrigerator to maintain freshness. If dairy allergies are a concern, coconut or soy milk can also work wonderfully.

Common Mistakes to Avoid

  • Not measuring ingredients accurately: Precision is key for baking success. Use measuring cups and spoons specifically designed for dry and liquid ingredients.
  • Overmixing the batter: This can lead to tough cupcakes. Mix just until combined to maintain a light and fluffy texture.
  • Using old ingredients: Check the expiration dates on your baking staples. Fresh ingredients yield better results.
  • Not preheating the oven: Skipping this step can lead to uneven baking. Ensure it’s preheated to the correct temperature before putting your cupcakes in.
  • Neglecting to line or grease the cupcake pan: This can make it difficult to remove the cupcakes later. Always use cupcake liners or grease the pan well.
  • Baking at the wrong temperature: Temperatures that are too high or low can affect the rise and texture of your cupcakes. Use a reliable oven thermometer for accuracy.
  • Frosting cupcakes too soon: Allow your cupcakes to cool completely before frosting to avoid melting the icing.
  • Skipping the taste test: Don’t skip trying the batter before baking. Adjust flavors as necessary to suit your personal preference.
  • Ignoring the cooling time: Let your cupcakes cool in the pan for a few minutes before transferring to a wire rack to prevent sogginess.
  • Not garnishing: Elevate your presentation by adding chopped pistachios or a sprinkle of powdered sugar on top of frosted cupcakes.

Essential Techniques

– **Creaming Butter and Sugar**: This technique is vital for creating a light and fluffy texture in your cupcakes. By beating the butter and sugar together until pale and fluffy, you introduce air into the mixture, helping the cupcakes rise beautifully. Aim for a light color and soft, airy consistency. Avoid overbeating, which can change the structure of the batter.

– **Proper Folding Technique**: When incorporating ingredients, such as flour into your wet mixture, use a gentle folding motion to maintain the airiness of the batter. Fold using a spatula, sweeping from the bottom of the bowl upward, until just combined. This technique is essential to avoid deflating the batter, which may affect cupcake texture.

– **Cooling Time**: Allow your cupcakes to cool completely before decorating. This helps maintain structural integrity and prevents melting frosting. Patience is key here; it’s tempting to frost warm cupcakes, but waiting ensures a better appearance and taste.

– **Decorating**: The right decorating techniques can elevate your pistachio cupcakes visually. Using a piping bag with various nozzles can allow for intricate designs. Sprinkling chopped pistachios or edible flowers can enhance presentation, adding a personal touch to your baked goods.

Pro Tips for Perfect Delicious Homemade Pistachio Cupcakes

– Use room-temperature ingredients: Allow your butter, eggs, and milk to sit at room temperature for optimal mixing.
– Choose quality pistachios: Fresh, unsalted pistachios will impart the best flavor.
– Experiment with frosting: Vanilla or cream cheese frosting complements pistachio flavor beautifully; try adding pistachio flour for an extra nutty element.
– Stay organized: Prepare all your ingredients in advance to ensure a smooth baking process.
– Keep an eye on baking time: Check for doneness a few minutes earlier than the recipe states; they’re done when a toothpick inserted into the center comes out clean.
– Allow proper cooling: Cooling on a wire rack helps maintain cupcake structure and prevents sogginess.
– Don’t rush the decorations: Take time to decorate your cupcakes beautifully; it enhances the overall eating experience.
– Try different flavors: While pistachios are stunning on their own, adding a hint of almond extract can elevate flavors further.

Variations and Adaptations

Feel free to get creative with your pistachio cupcakes! For regional variations, consider incorporating saffron or rose water for a Middle Eastern flair. Seasonal adaptations might include peppermint frosting for winter festivities or light lemon zest for a refreshing summer twist.

Dietary modifications can cater to various needs; swap out regular flour for gluten-free blends to serve guests with gluten intolerance. You can also create a vegan version by substituting flax eggs and using plant-based milk and butter alternatives. Flavor variations such as chocolate chips or orange zest can create a delightful contrast with the pistachio flavor.

Texture modifications might involve adding a layer of pistachio cream or incorporating a crunchy topping made from crushed pistachios mixed with butter and sugar. Experimenting with different frosting flavors, like chocolate ganache or coconut cream, creates unique tasting experiences. Lastly, presentation alternatives such as mini cupcakes or layered cakes can add a fun twist to your dessert spread.

Serving and Presentation Guide

For serving, consider using decorative cupcake liners that match the occasion. Arrange your pistachio cupcakes on a beautiful cake stand for an eye-catching display. Garnishing with crushed pistachios or edible flowers adds a lovely finishing touch. Smoking pistachio oil as a drizzle can also enhance flavor and appearance.

Temperature plays a significant role; serve your cupcakes at room temperature to bring out the flavors fully. Portion control is vital at gatherings; mini cupcakes can be an exciting way to offer a variety of flavors without overwhelming your guests. Also, consider pairing each cupcake with a small scoop of ice cream for an indulgent dessert experience.

Wine and Beverage Pairing

When it comes to pairing wines with your delicious homemade pistachio cupcakes, consider a light, fruity white wine like Moscato or a sparkling Prosecco. The sweetness and acidity in these beverages beautifully complement the nutty flavors of the cupcakes.

For non-alcoholic alternatives, opt for herbal teas, such as chamomile or mint, which will enhance the flavor profile without overpowering the sweetness. If you enjoy coffee, a smooth cappuccino or a light roast coffee can make for a delightful pairing, bringing out the nutty notes from the pistachios.

Temperature considerations are essential; serve white wines chilled to maintain their refreshing qualities, while the cupcakes should be at room temperature to enhance their flavor.

Storage and Shelf Life

To store your delicious homemade pistachio cupcakes effectively, keep them in an airtight container at room temperature for up to three days. For longer storage, place them in the refrigerator, where they can last up to a week. If you choose to freeze them, ensure they are properly wrapped in plastic wrap and placed in an airtight container or freezer bag to maintain freshness for up to three months.

Signs of spoilage include an off smell, hardened texture, or visible mold; discard any cupcakes that exhibit these signs. When reheating, a quick blast in the microwave for about 10-15 seconds can restore their softness without drying them out.

Make Ahead Strategies

To make your baking process smoother, consider baking your pistachio cupcakes a day in advance. Allow them to cool completely before storing them in an airtight container to retain moisture. Frosting can also be prepared ahead of time; store it in a convenient piping bag and refrigerate until just before decorating.

Assessing the quality impact reveals that while freshly baked cupcakes offer the best flavor, a day or two of resting time can enhance the interplay of flavors. If you’re making them for a special event, consider assembling them the morning of the event for maximum freshness.

Reheating previously baked cupcakes is straightforward; gently warm them in the microwave for just a few seconds before serving. You can add fresh elements like whipped cream or sliced fruit just before serving to brighten the dish and maintain that fresh taste.

Scaling Instructions

If you find yourself in need of more cupcakes, scaling up the recipe is simple. Doubling or tripling the ingredients will yield larger batches; however, ensure your mixing bowl can accommodate the increased volume without overflowing. Adjust bake times slightly if using larger pans or trays, as they may require additional cooking time to ensure even baking.

Halving the recipe is also possible if you’re looking to make a smaller batch. Just maintain the same proportions for each ingredient to keep the flavor consistent. For equipment adjustments, make sure you have additional cupcake pans on hand to manage any increased batter.

Timing modifications may be necessary, as larger or extra trays might take longer to bake through completely. It’s essential to monitor doneness using a toothpick to ensure they are fully baked.

Nutritional Deep Dive

A detailed macro breakdown reveals that each pistachio cupcake provides a balanced mix of carbohydrates, healthy fats, and protein from the pistachios and other ingredients. The wholesome fats from pistachios contribute positively to heart health, while the natural sweetness from sugar gives energy without relying heavily on processed ingredients.

Micronutritional analysis shows that these cupcakes are a source of vitamins and minerals like vitamin E, magnesium, and potassium, found in pistachios. These nutrients play crucial roles in maintaining various bodily functions, from muscle health to immune support.

In terms of health benefits, incorporating these cupcakes into a balanced diet, without excessive indulgence, can promote a nutritionally sound choice for dessert lovers. However, it’s important to be mindful of portion sizes, as consuming too many sugary treats can lead to weight gain or sugary spikes.

For those managing their weight or caloric intake, consider enjoying these pistachio cupcakes during a special occasion, serving them alongside healthier snacks, or opting for mini versions to satisfy your sweet tooth without overdoing it.

Dietary Adaptations

If you are looking for gluten-free adaptations, using a blend of gluten-free flours can yield delightful results, ensuring that gluten-intolerant family and friends can enjoy a tasty treat. For those with lactose intolerance, consider substituting dairy ingredients such as milk and butter with their non-dairy counterparts without compromising the flavor.

For a vegan twist, opt for flax eggs in place of regular eggs and vegan butter or coconut oil in place of traditional butter. These modifications keep the cupcakes plant-based, allowing more individuals to enjoy them during gatherings.

If you’re on a low-carb or keto diet, consider using almond flour instead of all-purpose flour, alongside a sugar substitute to maintain lower carbohydrate levels while delighting your taste buds.

If following a Paleo diet, ensure all ingredients are within the acceptable range for this lifestyle, opting for natural sweeteners like honey or maple syrup to enhance the flavor while adhering to clean eating.

Additionally, for those on low-FODMAP diets, adapting your ingredients can ensure that everyone can enjoy these delicious homemade pistachio cupcakes.

Troubleshooting Guide

– **Texture issues**: If your cupcakes are dense, it could be due to overmixing batter or not using room temperature ingredients. Be gentle when combining and ensure eggs and butter are at room temperature for fluffier results.
– **Flavor balance**: If your cupcakes taste lackluster, consider using fresher ingredients and adding a pinch of salt to enhance sweetness.
– **Temperature problems**: If cupcakes are overcooked, double-check your oven’s accuracy with a thermometer to avoid overly hot or cold baking.
– **Equipment challenges**: If you find your oven bakes unevenly, rotate pans halfway through baking to ensure uniform cooking.
– **Ingredient substitutions**: Be cautious when swapping ingredients; subtle differences can very much affect flavor and texture; do research before making swaps.
– **Timing concerns**: If unsure about baking time, start checking for doneness with a toothpick a few minutes before the recommended bake time.

Recipe Success Stories

Community feedback showcases how these delicious homemade pistachio cupcakes have delighted families and friends at various gatherings. Many bakers have reported successful adaptations, like using chocolate ganache instead of traditional frosting for an indulgent twist.

Certain readers have even shared their stories of successfully combining flavors, such as pairing these cupcakes with a raspberry filling for a burst of tartness, which balances the pistachio’s natural sweetness. Photography tips have also emerged from the community, with many suggesting natural lighting for capturing the beautiful pastel colors of these cupcakes.

The stories shared have also inspired new bakers to try their hands at this recipe, enriching the community with personal tweaks and creative flair. Each success story adds to this delightful recipe’s legacy, encouraging others to embark on their baking journey.

Frequently Asked Questions

Q: Can I make these cupcakes in advance?
A: Yes! You can bake the cupcakes ahead of time and store them in an airtight container for a few days. Frost them just before serving for the best flavor and freshness.

Q: How do I store leftover cupcakes?
A: Keep your cupcakes in an airtight container at room temperature for up to three days, or refrigerate them for up to a week.

Q: Can I freeze these cupcakes?
A: Absolutely! They can be frozen for up to three months. Ensure they are wrapped tightly to prevent freezer burn.

Q: What can I use as a frosting alternative?
A: Cream cheese frosting, ganache, or buttercream are excellent alternatives for those who prefer a different flavor profile.

Q: Are there gluten-free options for this recipe?
A: Yes, simply use a gluten-free flour blend in place of regular flour to create a gluten-free version of these cupcakes.

Q: Can I add other flavors?
A: Definitely! Consider adding extracts like almond or orange to enhance the pistachio flavor profile.

Q: How do I prevent my cupcakes from sticking?
A: Make sure to line your cupcake pans well with liners or grease them thoroughly before adding batter.

Q: How can I enhance the flavor of my pistachio cupcakes?
A: Adding a pinch of salt or a splash of vanilla extract can intensify flavor and elevate the overall taste.

Q: What can I do if my batter is too dry?
A: Add a splash of milk or water to your batter and mix until it’s at your desired consistency.

Q: Can I replace sugar with a sugar alternative?
A: Yes, feel free to use stevia, erythritol, or other sugar alternatives, but keep in mind it may change the texture.

Additional Resources

If you’re interested in more related recipes, consider exploring our collection of nut-based desserts, such as almond cakes and walnut brownies. These desserts highlight how versatile nuts can be in sweet recipes and provide various flavor profiles to explore.

For technique guides, our baking basics section covers everything from basic cupcake foundations to advanced decorating techniques, suitable for both novice and expert bakers. Ingredient information can also help you understand the nutritional content of your favorite items, allowing you to make informed decisions while baking.

For equipment recommendations, we offer detailed reviews on must-have tools that can enhance your baking experience, from quality mixers to efficient piping bags. Don’t forget to check out seasonal variations that celebrate holiday-specific ingredients to bring fresh twists into your favorite recipes!

Join the Conversation

We love hearing from our baking community! Share your experiences of making these delicious homemade pistachio cupcakes on social media, and tag us to join the conversation. Share your photos, and let us know your favorite variations or adaptations.

Leave reviews and suggestions to guide fellow bakers toward perfecting their treats; community feedback enriches our cooking journey. Consider sharing your thoughts on how these cupcakes turned out for your event or what flavors you paired with them.

The beauty of baking lies in sharing, and we encourage you to connect with friends and family through these delicious cupcakes that carry a rich history of flavor and tradition. Let’s inspire one another, one recipe at a time!

The Recipe

Delicious Homemade Pistachio Cupcakes

Serves: 12 cupcakes

Prep Time: 15 mins

Cook Time: 20 mins

Total Time: 35 mins

Kitchen Equipment Needed

  • Cupcake pan
  • Mixing bowl
  • Electric mixer
  • Piping bag (optional)
  • Measuring cups and spoons
  • Cooling rack

Ingredients

  • 1 cup unsalted pistachios, finely ground
  • 1 ½ cups all-purpose flour
  • 1 cup granulated sugar
  • ½ cup unsalted butter, softened
  • 3 large eggs
  • ½ cup milk
  • 2 teaspoons baking powder
  • 1 teaspoon vanilla extract
  • ½ teaspoon salt

Directions

  1. Preheat the oven to 350°F (175°C) and line a cupcake pan with liners.
  2. In a mixing bowl, cream together the softened butter and sugar until light and fluffy.
  3. Add the eggs one at a time, mixing well after each addition. Stir in the vanilla extract.
  4. In a separate bowl, whisk together the flour, baking powder, ground pistachios, and salt.
  5. Gradually add the dry ingredients to the butter mixture, alternating with the milk, and mix until just combined.
  6. Fill each cupcake liner about two-thirds of the way full with batter.
  7. Bake in the preheated oven for 20 minutes or until a toothpick comes out clean.
  8. Allow cupcakes to cool in the pan for 5 minutes before transferring to a wire rack to cool completely.
  9. Frost as desired and enjoy!

Recipe Notes

  • Feel free to adjust the amount of ground pistachios for a stronger nutty flavor.
  • If you prefer, sprinkle also some chopped pistachios on top of the frosting for added texture.
  • For a variation, try adding a splash of almond extract for more depth of flavor.

Delicious Pistachio Cream Cake Recipe for Any Occasion

Pistachio Cream Cake: A Decadent Delight for Any Occasion

⚖️
Difficulty
Moderate

⏲️
Prep Time
20 mins

🕒
Cook Time
30 mins

⏱️
Total Time
50 mins

🍽️
Servings
8 servings

Pistachio Cream Cake is the perfect blend of nostalgia and sophistication. Its origins trace back to classic baking traditions but have evolved into a favorite for both special occasions and everyday enjoyment. The stunning green hue of the pistachio cream and the delicate layers of moist cake invite you to indulge in a dessert experience that is as rich in flavor as it is in beauty. The balance of the nutty pistachio flavor, smooth creaminess, and a hint of sweetness creates a symphony that dances on your palate, making each bite a delight.

As you cut into the cake, the layers reveal themselves, each one promising a unique taste that complements the others perfectly. The soft sponge cake acts as the ideal canvas for the vibrant pistachio cream, while the topping of crushed pistachios adds a delightful crunch that enhances the overall texture. Whether served at a birthday party, an afternoon tea, or simply as a treat for yourself, the Pistachio Cream Cake is bound to impress your guests and leave them wanting more.

Quick Recipe Highlights

  • Flavor Profile: A luscious blend of nutty pistachio and creamy frosting enhances every bite of this cake. The sweetness is perfectly balanced, ensuring that it is a treat for all palates.
  • Texture: The cake layers are soft and fluffy, while the pistachio cream adds a velvety richness. Crunchy pistachios on top provide a satisfying contrast.
  • Aroma: The inviting aroma of freshly ground pistachios mingles with the sweet vanilla scent of the cake, creating a mouthwatering anticipation.
  • Visual Appeal: This cake boasts a striking green cream topping, adorned with crushed pistachios, making it a stunning centerpiece for any occasion.
  • Skill Level Needed: While moderately challenging, this recipe is manageable with basic baking skills and offers great rewards for your efforts.
  • Special Equipment: A stand mixer is recommended for optimal cream whipping, and cake pans are essential for the perfect cake layers.

Recipe Overview

  • Difficulty Level: This Pistachio Cream Cake requires some baking finesse, making it an ideal adventure for intermediate bakers. If you’ve mastered basic cakes, you’re ready to tackle this delightful recipe.
  • Category: This dessert fits perfectly into the cake category, specifically as a celebration cake or an elegant dessert for special events.
  • Cuisine: Drawn from Middle Eastern influences, pistachios play a significant role in various culinary traditions, adding both flavor and cultural significance to desserts.
  • Cost: The ingredients are relatively affordable, especially if you purchase pistachios in bulk. Expect a reasonable cost that reflects the quality of the dish.
  • Season: This cake is delightful all year round, but it’s especially popular during spring and summer when fresh flavors are most appreciated.
  • Occasion: Suitable for birthdays, anniversaries, or just a sweet treat, this cake is sure to elevate any gathering.

Why You’ll Love This Recipe

The Pistachio Cream Cake is not only delicious but also tempting in its rich characteristics. The nutty flavor of the pistachio combines beautifully with the creamy frosting, creating a cake that feels both luxurious and comforting. The sweetness is balanced perfectly, ensuring the experience is not overwhelmingly sweet, making it enjoyable for everyone, including those with meticulous palates.

Preparing this cake is straightforward and rewarding. The steps are clear, and while the cake may take a bit of time to prepare, the process is enjoyable. This is an excellent recipe for those wanting to impress friends and family without the need for complex techniques or ingredients. Once baked, the cake can easily be stored, allowing you to prepare it ahead of time for your events.

Nutrition is an essential aspect of every meal, and with the inclusion of pistachios, this cake boasts several health benefits. Pistachios are rich in antioxidants, vitamins, and healthy fats, making them a smart addition to your dessert repertoire. This cake allows you to indulge while sneaking in a bit of nutritional goodness, making it a guilt-free pleasure.

This cake is not just about eating; it’s about sharing. The Pistachio Cream Cake is sure to be a conversation starter at gatherings, making it a fantastic centerpiece for entertaining. Its stunning appearance combined with delightful taste will have your guests complimenting your culinary skills all night long.

Cost-effectiveness is another plus. This delicious cake requires only a few affordable ingredients, primarily focusing on pantry staples and pistachios. This dessert offers fabulous flavor and presentation, making it an excellent value for gatherings or personal enjoyment.

Historical Background and Cultural Significance

The origins of the Pistachio Cream Cake can be traced back to traditional Middle Eastern desserts, where pistachios have been a staple ingredient for centuries. These nuts, known for their vibrant color and unique flavor, elevate many dishes, particularly in sweets that celebrate cultural gatherings and festivities. Over time, the use of pistachios expanded globally, culminating in various adaptations of cakes and desserts, including this beloved recipe.

Culturally, pistachios hold a significant place in various regions and are often associated with wealth and prosperity due to their richness and the labor involved in harvesting them. They symbolize celebration, making their presence in desserts like this cake meaningful for both personal events and festive feasts.

As culinary practices evolved, the Pistachio Cream Cake became more accessible, allowing home bakers to incorporate this delectable flavor into everyday and special occasion desserts. The versatility of the ingredient has resulted in numerous adaptations, with variations emerging based on regional and modern tastes.

Today, this cake continues to evolve, with creative twists and versions appearing worldwide. From modern patisserie showcases to home kitchens, the Pistachio Cream Cake invites experimentation while retaining its classic charm rooted in rich cultural history.

Ingredient Deep Dive

Pistachios are not only delicious but also come packed with a variety of health benefits. They’re an excellent source of healthy fats, protein, fiber, and essential vitamins like B6 and E. When selecting pistachios, look for those that are vibrant green and air-tight packaged to ensure maximum freshness. To maintain their flavor and texture, store them in an airtight container in a cool, dry place.

For those with nut allergies, substitutes such as almond or sunflower seed flour can provide a similar consistency, while retaining some of the original flavor profile. These alternatives might alter the cake’s flavor slightly but can still result in a tasty dessert.

In addition to the pistachios, the other ingredients also play crucial roles. Flour is the backbone of the cake, giving it structure while sugar adds sweetness and moisture. Eggs act as a binding agent, ensuring that the cake rises and remains light and fluffy.

Lastly, a quality butter or margarine can enhance the cake’s richness and contribute to a satisfying mouthfeel. Remember to always use fresh ingredients for the best results, especially when it comes to the flavor of your cake.

Common Mistakes to Avoid

  • Not rotating the cake in the oven: Many bakers forget to rotate the cake to ensure even baking. This can result in uneven texture or uneven browning.
  • Using stale pistachios: Ensure your pistachios are fresh and have not passed their expiration date. Stale nuts can compromise the flavor of the cake significantly.
  • Overmixing the batter: It’s essential to mix the ingredients just until combined; overmixing can lead to a dense texture.
  • Skipping the parchment paper: Not lining the cake pans can lead to cakes sticking, making them difficult to remove.
  • Incorrect oven temperature: An oven that isn’t at the correct temperature can lead to undercooked or overcooked cakes, so always preheat your oven.
  • Ignoring cooling time: Allowing the cake to cool completely in the pan can create moisture and result in a soggy bottom.
  • Improper measuring of ingredients: Accurate measurements are crucial. Use a scale for precise baking, especially with flour and sugar.
  • Not allowing the butter to soften: Using cold butter can impact the mixing process. Always allow butter to come to room temperature before mixing.
  • Using low-quality ingredients: High-quality butter, flour, and fresh pistachios make a noticeable difference in the final taste of the cake.
  • Overbaking the cake: Keep a close eye on your cake as it bakes. A toothpick should come out clean but moist, rather than dry and crumbly.

Essential Techniques

Mixing your ingredients thoroughly is key to a well-integrated batter. Start by creaming the butter and sugar together until light and fluffy. This process introduces air into the mixture, providing a light texture. Avoid overmixing once you add the dry ingredients, as it can lead to a dense cake.

Baking the cake correctly is crucial for achieving the perfect rise and structure. Ensure that your oven is preheated to the right temperature, and avoid opening the door while the cake is baking, as this can disrupt the cooking process. Check for doneness by inserting a toothpick in the center; it should come out clean for a perfectly baked cake.

Frosting the cake requires a steady hand and patience. Start with a crumb coat, which helps to lock in any crumbs and provides a smooth base for your final layer of frosting. Use an offset spatula for even application, smoothing the frosting around the sides and over the top for a finish that looks professional.

Pro Tips for Perfect Pistachio Cream Cake

1. Invest in high-quality natural pistachio cream for the best flavor. Avoid artificial flavors that can overwhelm the cake’s beautiful essence.
2. Chill your mixing bowl and beaters before whipping cream for the frosting; cold equipment helps achieve better volume and stiffness.
3. If your cake layers are domed, level them by trimming the tops with a serrated knife for even stacking; this ensures a beautiful final presentation.
4. Garnish your cake with fresh pistachios and a dusting of powdered sugar for an elegant touch that enhances the visual appeal.
5. Experiment with adding a hint of almond extract to the batter for an additional depth of flavor that complements the pistachios beautifully.
6. Place the cake in the refrigerator for 30 minutes before cutting to ensure cleaner slices, preventing the layers from shifting.
7. Utilize a cake stand when serving; it improves presentation and allows guests to see the beautiful layers of the Pistachio Cream Cake.
8. For those who love dessert pairings, consider serving this cake with a scoop of vanilla ice cream or a dollop of whipped cream for an indulgent treat.

Variations and Adaptations

When considering regional variations, the use of different nuts can be exciting. For instance, mixing walnuts or hazelnuts with pistachios can create a flavor profile that reflects local tastes while still keeping the original essence intact. Also, consider adding a layer of raspberry or berry compote to introduce a refreshing tartness alongside the rich pistachio flavor.

Seasonal adaptations could include using citrus zest, such as lemon or orange, for a fresh and zesty twist, making it perfect for spring and summer gatherings. The vibrant flavors brighten up the cake, enhancing its versatility based on the season.

Gluten-free and vegan adaptations can be accomplished effectively. Almond flour can replace traditional flour in a gluten-free version, while a flaxseed egg or a commercial egg replacer can be used for a vegan rendition. These modifications ensure inclusivity for various dietary needs without compromising flavor.

Textural modifications could involve adding a layer of cream cheese frosting to the cake for a balance of flavors or drizzling chocolate ganache over the top for decadence. Each of these variations can transform the cake for different occasions or preferences.

Considering presentation alternatives, serving in individual portions or mini-cakes can make for an impressive display at events. Cupcakes crafted from this recipe allow serving convenience while dazzling guests with their presentation.

Serving and Presentation Guide

When serving your Pistachio Cream Cake, consider using a serrated knife for the cleanest cuts. Present it on a beautiful cake stand to elevate its appearance, making it the centerpiece of your table. Garnishing with extra crushed pistachios or edible flowers can add vibrant color and texture, creating a feast for the eyes as well as the palate.

Slicing the cake into equal portions will not only satisfy your guests but will also ensure that everyone enjoys the same delectable bites. Accompanying each slice with a dollop of whipped cream or a scoop of vanilla ice cream can enhance the overall experience, marrying the rich creaminess with soothing coolness.

For ideal temperature serving, allow the cake to sit at room temperature for about 20 minutes prior to cutting. This readiness ensures that the texture is inviting and that the pistachio cream slightly softens for optimal spreadability and flavor release.

Consider pairing with fresh tea or coffee to complement the cake’s flavors beautifully. Hot beverages can create a comforting experience, encouraging more intimate moments of sharing and entertaining.

Wine and Beverage Pairing

When it comes to wine pairing, a sweet dessert wine such as Sauternes or Moscato can enhance the cake’s nutty flavors, creating a delightful harmony between the drink and dessert. Both wines complement the sweetness of the pistachio cream and present a balanced finish that enhances the indulgence of the cake.

For non-alcoholic alternatives, opt for iced herbal teas featuring hints of mint or chamomile. These light beverages won’t overshadow the cake’s flavors while providing refreshment alongside the dessert.

Additionally, pairing with a nice cup of quality coffee can contrast beautifully with the sweetness of the cake. The rich, bold flavors of espresso or Americano can provide a pleasant counterpoint to the rich softness of the Pistachio Cream Cake, enhancing your overall dining experience.

Always serve the beverages at appropriate temperatures to respect the flavors of both the cake and the drinks. Cold beverages can enhance the flavors during warmer months while warm drinks can increase the comfort level during colder seasons.

Storage and Shelf Life

To keep your Pistachio Cream Cake fresh and delicious, it’s essential to store it properly. An airtight container is necessary to maintain the moisture of the cake while preventing it from absorbing any unwanted odors from your refrigerator. Ideally, refrigerate the cake if it’s topped with cream or frosting to maintain freshness for about 3-4 days.

If you must store it at room temperature, only do so for slices without frosting, to prevent its deterioration. Ensure that the cake is covered with plastic wrap or placed in a container that’s sealed. The shelf life for unfrosted cake layers is around 2-3 days.

Signs of spoilage include off-smells, changes in texture or significant dryness. If your cake has molded or developed an unappetizing appearance, it’s best to discard it. For a longer duration, consider freezing pieces of the cake, which can preserve flavors and textures for several months.

For reheating, gently warm slices in the microwave, using a low setting to retain moisture. Alternatively, for a firmer texture, allow the frozen slices to thaw in the refrigerator overnight before enjoying your cake again.

Make Ahead Strategies

Planning to serve Pistachio Cream Cake without the last-minute rush? Pre-baking the cake layers a day in advance can save you time. Allow the layers to cool completely, then wrap them tightly in plastic wrap before storing in the refrigerator. This process enhances flavor and moisture absorption, resulting in a more delicious cake during serving.

When you’re ready to frost the cake, prepare the pistachio cream in advance too. Store it in an airtight container for a day or up to 48 hours, maintaining its freshness and making the final assembly a breeze.

Assembling the cake closer to serving time keeps the presentation stunning. However, consider chilling the completed cake for at least an hour before serving, which can help set the frosting and make cutting cleaner.

Incorporate fresh elements like berries or mint leaves just before serving to add that last moment of freshness, enhancing the visual appeal of your beautifully layered cake. These final touches elevate the dessert experience and cater to guests’ anticipations.

Scaling Instructions

Scaling the Pistachio Cream Cake recipe can be simple and rewarding. If you want to halve the recipe, reduce all the ingredients by half while adjusting baking times accordingly; a smaller cake will typically take less time to bake.

Should you wish to double or triple the recipe for a larger gathering, ensure you have adequately sized pans to accommodate the increased volume. Be aware that baking times may need to be adjusted, particularly as extra batter may require longer cooking; always keep an eye on the cakes, checking for doneness with a toothpick.

For larger batches, be prepared to use a heavier-duty mixer since the additional batter may exceed the capacity of standard mixers. Always consider the space in the oven; you may need to bake in batches to ensure even cooking.

When it comes to storage, remember to scale the storage containers as well; larger cake pans will allow for more air exposure than smaller, tightly packed ones, impacting freshness. Plan accordingly to preserve the integrity of your flavors.

Nutritional Deep Dive

Understanding the macro breakdown of your Pistachio Cream Cake can help inform baking decisions. Each slice typically contains a balanced ratio of carbohydrates, fats, and proteins mainly due to the components of flour, butter, and pistachios. This cake packs an added protein punch thanks to pistachios, enhancing its nutrient value over traditional cakes.

In terms of micronutrients, the inclusion of pistachios contributes vitamins B6 and E, magnesium, and potassium. These nutrients play essential roles in supporting heart health, metabolism, and overall well-being, evidencing the benefits of indulging in this dessert.

Health benefits extend beyond feel-good factors since including nuts in your diet has been shown to help lower cholesterol levels and provide healthy energy sources. However, enjoy in moderation; despite its benefits, cake remains a treat and should be part of a balanced diet.

When considering portion sizes, it’s beneficial for weight management to cut smaller slices, allowing you to enjoy the delicate flavors without overindulgence. Pairing each slice with fruits or low-calorie desserts allows for a satisfying meal without excessive calorie consumption.

Dietary Adaptations

For gluten-free adaptations, consider using almond flour or gluten-free all-purpose flour as substitutes, ensuring a similar baking experience while retaining the integrity of the cake. Adjust the liquid content accordingly for the best texture comparison.

For those following dairy-free diets, plant-based butter and coconut or nut-based creams can be used as alternatives, providing richness without compromising on taste or texture. These substitutions encourage inclusivity, allowing more people to enjoy this tasty treat.

Transforming this into a vegan cake is simple too. Use flax or chia seeds as egg replacements and opt for non-dairy milk options. Ensure that any added flavors or toppings are also plant-based to maintain the integrity of the vegan diet.

For a lower-carb option, you can replace regular sugar with erythritol or other sugar substitutes to reduce the overall carbohydrate count; however, consider that this may alter the sweetness and texture slightly.

Paleo enthusiasts can effectively modify the recipe by using coconut flour and natural sweeteners such as honey or maple syrup. This variety explores new ingredients while preserving the delicious essence of the Pistachio Cream Cake.

Troubleshooting Guide

Texture issues often arise due to overmixing, leading to a gummy result. Avoid this by mixing until just combined. If underbaked, add a few minutes to the baking time in your next batch, checking doneness with a toothpick for future efforts.

For flavor balance, if a batch leans too sweet, try incorporating a pinch of salt into the cream and batter the next time to enhance overall flavor. If the pistachio taste is lacking, consider increasing the amount slightly or adding pistachio extract for a more pronounced flavor.

Temperature problems can occur if the oven is not properly preheated. Make sure to calibrate your oven for accurate readings on temperature settings; a digital thermometer can assist with this.

If you encounter equipment challenges, ensure that your mixing bowl and tools are properly cleaned and free of any residual materials that might contaminate flavors. Incorporating brands that you trust can also impact overall baking results.

When making substitutions, ensure you’re making changes that fit the overall baking environment; not all no-sugar or gluten-free products behave the same as conventional ingredients, which may require adjustments in method or proportions.

Timing concerns can affect the cake’s integrity. If you’re delayed in frosting, consider refrigerating the layers to allow the cake to firm up slightly and make the process smoother.

Recipe Success Stories

Community feedback about the Pistachio Cream Cake has emphasized how it impressively couples moistness with rich flavors that are often sought in celebratory dishes. Many home bakers have shared their success with the recipe, noting how it received rave reviews at family gatherings and parties.

Readers often mention their joy at adapting the recipe by experimenting with different flavors and fillings, leading to unique renditions of the cake. An infused layer with raspberry jam has been a favored suggestion, providing a refreshing contrast to the rich pistachio cream.

Photography tips frequently include focusing on the beautiful green colors and textures layered within the cake; natural lighting captures the vibrance of the pistachios perfectly. Showcasing the cake’s layers in cross-section adds intrigue, tempting viewers to try for themselves.

Furthermore, many share that their variations of the recipe, including mini versions for parties, have been met with enthusiasm. The excitement around personal touches allows creativity while adhering to the essence of this delicious cake.

Social media has also played a role in propagating this cake’s popularity, with influencers incorporating it into their dessert compilations, leading to a wider audience for this delectable treat.

Frequently Asked Questions

1. Can I make this cake in advance? Absolutely! You can bake the cake layers one day ahead and store them wrapped in plastic wrap in the refrigerator. Frosting can also be prepared in advance for easier assembly.

2. How should I store leftover cake? Store any leftover cake in an airtight container in the refrigerator, where it can last for about 3-4 days. If you want to keep it longer, consider freezing the slices.

3. Can I use different nuts? Yes! While pistachios are traditional, feel free to experiment with other nuts such as almonds or cashews; each will provide a unique flavor profile.

4. What can I do if my cake sinks? If your cake sinks, it may be due to underbaking or too much leavening agent. Always check for doneness with a toothpick in the center to avoid this issue in the future.

5. Can I use a different type of frosting? Definitely! Cream cheese frosting or ganache could be delightful substitutes if you wish to change things up while still enjoying the nutty cake experience.

6. Is this cake suitable for freezing? Yes, this cake freezes well. Just wrap it tightly to prevent freezer burn and enjoy it within 2-3 months for the best quality.

7. What is the best way to serve this cake? Chilling the cake for 20 minutes before serving helps clean cutting. Consider garnishing with crushed pistachios or fresh berries for a stunning look.

8. What type of flour should I use? All-purpose flour works best for this cake, providing the right structure and texture. For gluten-free options, consider a gluten-free all-purpose blend.

9. Can I adjust the sweetness level? Absolutely! Feel free to reduce the amount of sugar slightly to suit your taste, or experiment with alternative sweeteners if you prefer.

10. How do I know when the cake is done? The cake is done when a toothpick inserted into the center comes out clean or with just a few moist crumbs attached. Avoid overbaking to keep it tender.

Additional Resources

For those looking to pair their cake with other complementary recipes, an assortment of nut-based desserts can enhance the dining experience. Check out related recipes like pistachio baklava or almond cookies to round out a nut-loving dessert table.

Helpful technique guides on cake decoration and frosting techniques can also aid in achieving a professional finish. Invest time in expanding your cake-decorating skills to enhance not just this recipe but many more in your culinary journey.

Understanding the ingredients better can also improve your baking practices. Exploring the nutritional benefits of nuts or the importance of leavening agents can give you insights into baking science, leading to more successful outcomes.

If you’re looking for equipment recommendations, high-quality baking pans, mixers, and kitchen gadgets can transform your baking experience, making it smoother and more enjoyable. Invest wisely in tools that can handle the demands of your baking adventures.

Seasonal variations can change the flavors of your desserts dramatically. Explore how shifting the ingredients with the seasons can elevate your cooking, presenting another dimension to cakes and desserts you create.

Join the Conversation

We invite our readers to share their experiences with the Pistachio Cream Cake! Post your photos on social media and tag us; we love seeing how you personalize the recipe. Share feedback, tips, and successful tweaks that make it uniquely yours, as community engagement makes baking even more rewarding.

Engage in recipe reviews to help each other refine techniques or ingredients. Your insights and suggestions can assist fellow bakers in overcoming obstacles and improving outcomes.

Why not start a discussion about dessert pairings? Share what helps you serve this cake best, exploring traditions and variations. From simple afternoon tea to grand celebrations, your experiences can inspire others to bring this delightful cake to their tables too.

If you’re knowledgeable about photography, share your tips on capturing desserts beautifully. Join the conversation and help fellow bakers capture their culinary masterpieces, encouraging a sense of community and collaboration.

Don’t hesitate to suggest variations of your own! Whether it’s a twist on flavor or a different presentation style, your creativity can benefit others looking for ways to reinvent this classic cake.

The Recipe

Pistachio Cream Cake

Serves: 8 servings

Prep Time: 20 mins

Cook Time: 30 mins

Total Time: 50 mins

Kitchen Equipment Needed

  • Two 9-inch round cake pans
  • Stand mixer or hand mixer
  • Mixing bowls
  • Whisk
  • Offset spatula
  • Cooling rack
  • Measuring cups and spoons
  • Food processor (for pistachios)

Ingredients

  • 1 cup unsalted butter, softened
  • 2 cups all-purpose flour
  • 1.5 cups granulated sugar
  • 4 large eggs
  • 1 tsp vanilla extract
  • 1 tsp baking powder
  • 1/4 tsp salt
  • 1 cup unsalted pistachios, finely ground
  • 1.5 cups heavy whipping cream
  • 1/2 cup powdered sugar
  • Additional crushed pistachios for garnish

Directions

  1. Preheat the oven to 350°F (175°C). Grease and line two 9-inch round cake pans with parchment paper.
  2. In a large mixing bowl, cream together the softened butter and granulated sugar until light and fluffy.
  3. Beat in the eggs one at a time, mixing well after each addition. Stir in the vanilla extract.
  4. In another bowl, whisk together the flour, baking powder, ground pistachios, and salt.
  5. Gradually add the dry ingredient mixture to the wet ingredients, mixing until just combined.
  6. Divide the batter evenly between the prepared cake pans. Bake for 25-30 minutes or until a toothpick inserted in the center comes out clean.
  7. Remove from the oven and let cool in the pans for 10 minutes before transferring to a cooling rack to cool completely.
  8. Meanwhile, whip the heavy cream with powdered sugar until stiff peaks form.
  9. Once the cake layers have cooled, spread a thick layer of whipped cream between them and top with remaining cream.
  10. Decorate with crushed pistachios and refrigerate until ready to serve.

Recipe Notes

  • For a richer flavor, you can also add a tablespoon of almond extract.
  • The cake can be made a day ahead; just store it in the refrigerator.
  • Consider using different nuts for a unique flavor profile while keeping the foundation of the recipe intact.
  • Be sure to allow the cake to cool completely before frosting to prevent melting.

Indulge in These Easy Homemade Chocolate Truffles Today

Homemade Chocolate Truffle Recipe: A Decadent Delight

⚖️
Difficulty
Medium

⏲️
Prep Time
30 mins

🕒
Cook Time
10 mins

⏱️
Total Time
40 mins

🍽️
Servings
12 truffles

Indulging in a homemade chocolate truffle is an experience that can awaken all of your senses. These luscious morsels are a perfect blend of rich chocolate and creamy ganache, enveloped in a delicate cocoa powder or sprinkle of nuts. Each bite offers a smooth texture that melts in your mouth, releasing a burst of chocolate flavor that is irresistibly decadent. Whether you are treating yourself or creating a special gift for a loved one, this homemade chocolate truffle recipe will impress and delight everyone who tries them.

The beauty of homemade chocolate truffles lies not only in their taste but also in their charming presentation. They can be elegantly packaged in a gift box or displayed on a beautiful platter, making them the perfect addition to any celebration. With just a handful of ingredients and a little bit of love, you can create these delightful treats that bring warmth and joy to any occasion.

Quick Recipe Highlights

  • Flavor Profile: These chocolate truffles boast a deep, rich chocolate flavor, complemented by hints of vanilla, and can be customized with various fillings.
  • Texture: The smooth, velvety ganache provides a melt-in-your-mouth sensation, while the outer coating adds a delightful contrast.
  • Aroma: A heavenly aroma of melted chocolate wafts through the kitchen, inviting everyone to indulge in a bite.
  • Visual Appeal: Truffles can be rolled in cocoa powder, chopped nuts, or shredded coconut, making them visually stunning additions to any dessert table.
  • Skill Level Needed: The recipe requires a medium skill level, involving simple techniques like melting, mixing, and chilling.
  • Special Equipment: A microwave or double boiler for melting chocolate, mixing bowls, and a baking sheet for cooling are essential.

Recipe Overview

  • Difficulty Level: This recipe is classified as medium level due to the techniques involved in tempering chocolate and working with ganache.
  • Category: Chocolate truffles fall under the dessert category and are perfect for special occasions or a delightful treat.
  • Cuisine: Originating from France, chocolate truffles reflect the elegance of French patisserie while allowing for creativity.
  • Cost: The overall cost is quite manageable, usually ranging between $10 to $15 for high-quality chocolate and a few additional ingredients.
  • Season: Great for all seasons, especially during holidays like Valentine’s Day, Christmas, or as a sweet treat in fall and winter.
  • Occasion: Perfect for birthdays, anniversaries, or a get-together, these truffles add a touch of luxury to any gathering.

Why You’ll Love This Recipe

Creating homemade chocolate truffles offers a unique taste and texture that store-bought options simply can’t match. The buttery richness of the ganache melts away, mingling with the flavors you’ve chosen for a truly personalized treat. Whether you prefer classic chocolate or something more adventurous like orange zest or espresso, these truffles can adapt to your preferences.

One of the best aspects of making chocolate truffles at home is the convenience and satisfaction of crafting your confections. The recipe requires minimal time and equipment, making it ideal for a quick yet impressive dessert. Plus, the joy of sharing these delightful treats with friends and family is incredibly rewarding, elevating any gathering.

Nutritionally, chocolate does have its benefits when enjoyed in moderation. Dark chocolate, in particular, is rich in antioxidants and can contribute to heart health. While truffles are still a treat, using high-quality chocolate and natural ingredients can offer a slightly better nutritional profile.

For social gatherings, homemade chocolate truffles are a conversation starter. Guests are often drawn to the beautiful presentation and can appreciate the effort put into crafting them. They make an excellent addition to dessert tables or can be given as thoughtful gifts.

Lastly, making these chocolate truffles is a cost-effective approach to gourmet desserts. The ingredients are relatively inexpensive, especially when compared to purchasing luxury chocolates. Plus, the ability to customize flavors and coatings means you can offer an extravagant treat without breaking the bank.

Historical Background and Cultural Significance

Chocolate truffles have an intriguing origin story that dates back to the late 19th century in France. Named after the truffle fungus, these candies reflect the luxurious and opulent nature of French cuisine. They began as a simple ganache rolled into small balls, but over time, their variations expanded to incorporate various flavors and coatings.

Culturally, chocolate has been celebrated for centuries, often symbolizing indulgence and love. In many traditions, chocolate is given as a gift during special occasions, reinforcing its importance in celebrations and romantic gestures. The chocolate truffle has become a staple not only in France but worldwide, appreciated for its rich flavors and elegant presentation.

As the recipe evolved, so did the ingredients and techniques used to create these delightful bites. From the classic chocolate truffles of French patisseries to modern interpretations filled with exotic spices or fruits, the chocolate truffle has adapted while honoring its roots.

Regional variations abound, with each culture adding its touch to the classic recipe. For instance, in Italy, you might find truffles infused with espresso or limoncello, while in the United States, peanut butter and chocolate flavors have become increasingly popular. This goes to show how versatile the basic recipe can be while still capturing the essence of this beloved treat.

Ingredient Deep Dive

The primary ingredient for chocolate truffles is, of course, chocolate itself. Rich and versatile, chocolate dates back thousands of years, originating from the cacao tree in Mesoamerica. Its appeal has transcended cultures, making it a worldwide favorite. Nutritionally, high-quality dark chocolate is also rich in antioxidants, which may contribute to cardiovascular health. When selecting chocolate for your truffles, opt for a high cocoa percentage for the best flavor.

Heavy cream is the next key component, adding creaminess and enabling the chocolate to solidify into ganache. Dairy products like heavy cream have been a staple in cooking for centuries, prized for their ability to enrich dishes. It is crucial to use fresh cream, and when storing, ensure it is kept chilled to maintain its quality.

Finally, flavorings such as extracts or liquors can elevate your truffles. Vanilla extract is classic, while flavored liqueurs like Grand Marnier or Amaretto can introduce exciting notes. These ingredients should be used carefully, as too much can overpower the subtlety of the chocolate. Always look for high-quality flavorings to ensure the best taste.

Common Mistakes to Avoid

  • Using low-quality chocolate: Opt for high-quality chocolate for richer flavor; low-quality chocolate can lead to bland truffles.
  • Overheating the chocolate: Always melt chocolate gently; overheating can lead to a gritty texture and ruin your ganache.
  • Skipping the chilling step: Chilling the ganache before rolling ensures the truffles hold their shape and are easier to handle.
  • Not allowing truffles to warm slightly: If they are too cold, they can be difficult to roll; let them sit at room temperature for a few minutes.
  • Inconsistent sizing: Aim for uniform sizes when rolling for even presentation and enjoyment; using a cookie scoop can help.
  • Over-coating: While a coating is essential, excessive amounts can overwhelm the truffle; use just enough to lightly cover.
  • Inadequate flavor mixing: Ensure that you properly incorporate flavors into the ganache; uneven distribution can lead to bland spots.
  • Skipping taste tests: Always taste your ganache before rolling; it’s crucial to ensure the desired flavor profile is achieved.

Essential Techniques

Melting chocolate is one of the key techniques in this recipe. It’s vital to handle chocolate correctly to prevent it from seizing. Using a double boiler or microwave with short bursts ensures uniform melting. Look for a smooth and glossy consistency as a visual cue of success.

Another essential technique is the proper way to mix in the heavy cream. Gradually adding warm cream to melted chocolate is essential to ensure the ganache emulsifies correctly. Whisking gently but thoroughly will create a silky texture, ensuring no lumps remain.

Chilling the ganache is another important step. Once mixed, it should sit for a while in the fridge to solidify. This process makes rolling the truffles much easier. You’ll know it’s ready when the ganache is firm but still moldable.

Rolling and coating the truffles requires a gentle touch. Work quickly to prevent the ganache from melting due to the warmth of your hands. A light dusting of cocoa powder or nuts should adhere easily if the truffles are cold enough.

Lastly, storing and serving truffles correctly impacts their flavor and texture. Keep them cool but not refrigerated, as refrigeration can harden the chocolate excessively. Aim to serve at room temperature to highlight their creamy interior.

Pro Tips for Perfect Homemade Chocolate Truffles

To achieve the best results, use a high cocoa percentage chocolate for a rich and intense flavor profile. This simple choice can elevate your truffles to gourmet status.

Make sure to let the ganache cool before rolling; this ensures it holds its shape well and is not too soft to work with.

Experiment with various coatings—crushed nuts, cocoa powder, or coconut flakes—allowing you to personalize each truffle for different preferences.

If you want to include flavored liqueurs, limit to one or two teaspoons to maintain the chocolate’s integrity without overpowering it.

For a visually appealing presentation, use a variety of coatings and styles when shaping the truffles, making them more engaging for users.

Try adapting the texture by chilling some truffles longer for a firmer bite while allowing others to set less for a creamier experience.

Don’t be afraid to experiment with fillings; include fruit purees or nut butters in your ganache for added layers of flavor.

Finally, refrigerate any truffles you won’t be serving immediately to retain their freshness, but remember to bring them back to room temperature before serving.

Variations and Adaptations

Regional variations of chocolate truffles often include different fillings. In Belgium, you might encounter truffles filled with praline or ganache flavored with spices like cinnamon or cardamom. These variations showcase how diverse and adaptable chocolate truffles can be, allowing for creativity in flavors depending on local preferences.

Seasonal adaptations can also play a significant role in customizing truffles. During the winter, adding peppermint or gingerbread flavors can create a festive treat. In summer, lighter flavors, such as citrus or berries, can make for refreshing alternatives as part of a dessert assortment.

Dietary modifications can help include everyone. For vegan truffles, substituting heavy cream with coconut milk or almond milk creates a rich and creamy ganache that suits plant-based diets without sacrificing flavor.

Flavor variations allow for endless creativity. Consider incorporating unexpected ingredients like espresso, sea salt, or chili pepper for a unique twist on traditional chocolate flavors. Each addition can completely transform the truffle experience.

Texture modifications can be achieved by varying the type of chocolate used. A combination of dark and white chocolate can introduce contrasting flavors and visual interest. For crunch, you can also add crushed cookies or crispy rice inside the truffles.

Lastly, presentation alternatives can enhance the overall appeal. Using decorative molds or dipping truffles in colored chocolate can elevate your dessert for special occasions or holidays, making them not just delicious but visually stunning too.

Serving and Presentation Guide

Plating homemade chocolate truffles can be enhanced with simple yet effective garnishing techniques. Arrange them on a clean white platter to create a beautiful contrast, then sprinkle some cocoa powder or edible gold leaf for an elegant touch.

For a more casual gathering, consider placing the truffles in cupcake liners, which adds a playful element and makes them easy to grab. Alternatively, place truffles in small mason jars tied with twine to create a rustic vibe that is perfect for outdoor events.

When it comes to accompanying truffles, pairing with coffee or dessert wine can elevate the indulgence; espresso works particularly well due to its robust flavor complementing rich chocolate.

Temperature considerations are also vital for presenting truffles; serving them at room temperature allows guests to experience the creamy interior fully.

For portion control, consider offering smaller truffle sizes or cutting larger ones into halves or quarters, allowing guests to sample various flavors in one sitting while managing indulgence.

Wine and Beverage Pairing

Pairing wine with chocolate truffles can lead to an exquisite culinary experience. A rich red wine, such as Cabernet Sauvignon or Merlot, pairs wonderfully with dark chocolate truffles, enhancing the chocolate’s depth and complexities.

For those preferring white wine, consider Riesling or a late-harvest Sauvignon Blanc, which offers a contrasting sweetness that complements the richness of chocolate. These selections can enhance the flavors and provide a luxurious pairing that your guests will cherish.

Non-alcoholic alternatives can be just as enjoyable; consider a rich hot chocolate or a coffee drink like mocha to pair with your chocolate truffles. The fusion of flavors will mirror the luxurious taste of truffles, making for an indulgent experience.

When serving beverages, ensure they are at the correct temperature to enhance flavors; reds should be slightly below room temperature, while whites should be chilled.

Lastly, aim for a light serving; ensure your beverages are balanced and don’t overpower the truffles, allowing each element to shine when paired together.

Storage and Shelf Life

Proper storage of homemade chocolate truffles is key to maintaining their freshness. Ideally, store them in an airtight container at cool room temperature. This prevents the chocolate from becoming too hard or overly soft and ensures the truffles remain delectable.

When storing truffles, it’s essential to avoid direct sunlight and heat sources. A dark, cool location helps prolong their shelf life for about 1 to 2 weeks, allowing you to enjoy your treats at their best.

If you have leftover truffles and want to store them longer, consider placing them in the refrigerator. However, remember to allow them to return to room temperature before serving to regain their creamy texture.

Watch for signs of spoilage, which include an off smell or visible changes to the chocolate’s surface. These signs can indicate that it’s time to discard any truffles that are past their prime.

For those who want to preserve truffles long-term, freezing is an option. Place them in a container with parchment paper between layers to prevent sticking. Properly stored, they can last up to three months; however, the texture may slightly change upon reheating.

Make Ahead Strategies

If you’re planning ahead for a special occasion, making chocolate truffles can easily fit into your timeline. Prepare the ganache a day or two in advance, allowing the flavors to meld during refrigeration, further enhancing taste upon assembly.

Store your prepared ganache tightly covered until you’re ready to roll; this approach ensures you have a stress-free preparation, allowing more time to focus on presentation or other party elements.

When rolling the truffles, find a method to keep the surface cool, such as working in smaller batches. This will help prevent melting and ensure you create perfectly shaped truffles.

If you plan to include garnishes or coatings, prepare those beforehand as well; this helps streamline your assembly process. Having everything set up ahead of time can reduce pressure when it’s time to serve.

Finally, always aim to complete the chocolate truffles a few hours before the event to allow any finishing touches to set properly, ensuring your guests have the best experience.

Scaling Instructions

If you wish to adjust the recipe for different occasions, scaling can be quite simple. To halve the recipe, just divide all ingredient amounts by two, and be sure to adjust cooking times as necessary.

When doubling or tripling the recipe, ensure you use a large mixing bowl and double or triple the equipment needed, like rolling trays or storage containers, to accommodate a larger volume.

Timing modifications are crucial when scaling, as larger batches may require slightly more time to chill or set. Adjust your expectations based on your observations during the process.

For mixing, larger quantities may require a stand mixer for even consistency, ensuring no lumps remain in your ganache. It is essential to taste test to maintain flavor quality.

Finally, consider storage when scaling; larger batches may necessitate more containers for proper preservation, ensuring all truffles remain fresh.

Nutritional Deep Dive

Understanding the nutritional elements of your homemade chocolate truffles can help in managing indulgence while still enjoying treats. A typical serving of a chocolate truffle can contain around 70-100 calories, dependent on additional flavorings and coatings used.

In terms of macronutrients, a standard dark chocolate truffle might provide a decent balance of fats and carbohydrates, particularly if using healthier options like dark chocolate, which has a greater fat ratio than sugar compared to milk chocolate blends.

Micronutrient analysis shows that high-quality dark chocolate is also packed with essential minerals such as magnesium, iron, and copper, which provide various health benefits when consumed in moderation.

As for health benefits, dark chocolate has been linked to lower risks of heart diseases, improved cholesterol levels, and better brain function, all making your homemade truffles not just a delightful indulgence but also a nuanced treat.

While keeping an eye on portion sizes, a small chocolate truffle can bring immense satisfaction, minimizing the temptation to overindulge. Balancing indulgences with nutrient-rich ingredients can support weight management efforts while still enjoying life’s sweetest moments.

Dietary Adaptations

Creating gluten-free chocolate truffles is easy; ensure all ingredients are certified gluten-free chocolate and flavorings. Utilizing coconut flour or almond flour for added texture can create a delightful alternative for those monitoring gluten intake.

For a dairy-free option, substitute heavy cream with coconut cream or any nut-based milk to retain creaminess while avoiding any dairy products. These alternatives still yield a deliciously rich truffle that can satisfy chocolate cravings.

Vegan truffles are also achievable with plant-based inclusions. Replacing traditional chocolate with vegan chocolate and utilizing alternative sweeteners can ensure a delightful dairy-free experience that everyone can try.

For low-carb or keto diets, consider using sugar-free chocolate options while adjusting the fillings and coatings to omit sugars, making these decadent treats accessible without compromising on enjoyment.

Incorporating paleo guidelines can be simple as well; use raw cacao for intense chocolate flavor and substitute honey or maple syrup for sweetening, aligning with paleo practices while still indulging.

Lastly, consider low-FODMAP alternatives for those sensitive to specific ingredients; monitoring portion sizes and specific ingredient choices can help maintain compliance with dietary needs.

Troubleshooting Guide

If your chocolate truffle mixture seems too stiff, it may have cooled too much before rolling, requiring you to gently warm it back to proper consistency using your hands or a warm bowl.

Flavor balance can sometimes fall flat; consider adding a pinch of salt or a splash of flavor extract to brighten underlying chocolate flavors, enhancing the overall richness.

Temperature issues can affect texture; if the truffles are too soft, chilling in the fridge longer can provide a firmer texture, making them easier to roll and coat.

In cases of equipment challenges, utilizing the wrong type of chocolate may lead to an unsatisfactory finish. Always use high-quality chocolate, and opt for specific melting vessels to avoid disaster.

Ingredient substitutions can lead to different results; always test small batches when exploring alternatives to ensure flavors and textures align with your expectations.

Time concerns should also be addressed; if you find truffles need to set faster, consider spreading them thinly in a large pan to cool quicker, which can help manage your timeline better.

Recipe Success Stories

Community feedback on homemade chocolate truffles has been overwhelmingly positive, with many praised the elegant simplicity and deliverability of flavor when rolling their creations.

Readers often share their stories of successful variations, including infusing spices or experimenting with nut butters to create unique flavor experiences, showcasing their personal touches to an already beloved treat.

Adaptation stories reveal the versatility of truffles where innovative readers have modified ingredients to suit dietary restrictions without sacrificing taste, significantly expanding the recipe’s audience base.

Photography tips shared by our community emphasize the importance of natural lighting and staged setups to capture the delightful appearance of truffles, presenting them beautifully for sharing on social platforms.

Many readers provide recommendations for flavors based on seasonal availability and preferences, inspiring others to try something new or use up the chocolate on hand, fostering a sense of experimentation in the kitchen.

Frequently Asked Questions

Can I use milk chocolate instead of dark chocolate?

Yes, you can use milk chocolate, but keep in mind that it will yield a sweeter truffle. You may need to adjust other ingredients to balance the flavors accordingly.

How do I ensure my ganache is perfect?

A perfect ganache is achieved by carefully monitoring the chocolate while it melts and ensuring the cream is warmed enough to blend thoroughly without curdling.

Can I freeze chocolate truffles?

Yes, chocolate truffles can be frozen. Wrap them individually in parchment paper and store them in an airtight container for up to three months. Thaw at room temperature before serving.

What’s the best way to coat my truffles?

Coating your truffles can be done by rolling them in cocoa powder, chopped nuts, or melted chocolate. Ensure they are slightly chilled for better adherence of the coating.

How long do homemade chocolate truffles last?

Stored in a cool, dark place, chocolate truffles can last for about 1 to 2 weeks. Be sure to check for any signs of spoilage before consuming.

What flavors pair well with chocolate truffles?

Flavors that complement chocolate truffles include vanilla, coffee, hazelnut, orange zest, and even coconut. Feel free to experiment based on your palate.

Do I need a double boiler to melt chocolate?

No, a microwave can also be used to melt chocolate, but be cautious to use short bursts to avoid overheating. A double boiler is just safer for achieving a smooth consistency.

Can I make truffles without cream?

Yes, you can substitute the cream with full-fat coconut milk or nut milk for a dairy-free version, although the taste and texture may differ slightly.

How can I add some heat to my chocolate truffles?

To introduce heat, try adding a pinch of cayenne pepper or chili powder to your ganache for a spicy kick that contrasts with the chocolate sweetness.

Are chocolate truffles suitable for shipping?

Yes, when properly stored and packaged with ice packs, chocolate truffles can be shipped. Choose cooler months to avoid melting during transit.

Can I make the truffles vegan and gluten-free?

Absolutely! Use vegan chocolate and non-dairy cream, such as coconut cream, along with gluten-free coatings, and you have a delicious treat for everyone.

Additional Resources

If you enjoyed this homemade chocolate truffle recipe, you’re likely to love our other chocolate desserts, such as rich brownies or decadent chocolate mousse. Additionally, we provide technique guides for mastering chocolate tempering and ganache, as well as in-depth ingredient information on different types of chocolates.

Don’t forget to check our recommended kitchen tools to help make your dessert-making experience even more enjoyable. Also, keep an eye on seasonal variations to inspire your next truffle adventure—using fresh fruits and flavors can invigorate any recipe into seasonal delights.

Join the Conversation

We’d love for you to share your experiences with this homemade chocolate truffle recipe! Snap a picture and tag us on social media to connect with other chocolate lovers. Don’t forget to leave a review and share your favorite variations—engaging with our community can inspire others to explore their creativity.

Your suggestions and ideas may lead to exciting recipe adaptations, and your success stories can help others feel confident in trying this delightful dessert. Let’s keep the conversation going about all things chocolate!

The Recipe

Homemade Chocolate Truffles

Serves: 12 truffles

Prep Time: 30 mins

Cook Time: 10 mins

Total Time: 40 mins

Kitchen Equipment Needed

  • Microwave or double boiler
  • Mixing bowl
  • Whisk or spatula
  • Baking sheet
  • Cling film

Ingredients

  • 200g high-quality dark chocolate, chopped
  • 100ml heavy cream
  • 2 tablespoons butter
  • 1 teaspoon vanilla extract
  • Cocoa powder, for coating
  • Chopped nuts or coconut (optional)

Directions

  1. In a microwave or double boiler, melt the chopped chocolate until smooth.
  2. In a separate saucepan, heat the cream until it just begins to simmer.
  3. Remove the cream from heat and gradually whisk it into the melted chocolate until fully combined.
  4. Add the butter and vanilla extract, stirring until smooth and glossy.
  5. Cover the bowl with cling film and refrigerate for 1-2 hours until the ganache is firm.
  6. Once set, use a small scoop or spoon to portion out the ganache and roll it into balls.
  7. Roll the truffles in cocoa powder or desired toppings until they are fully coated.
  8. Store in an airtight container at room temperature or in the fridge before serving.

Recipe Notes

  • For vegan variations, use vegan chocolate and coconut cream.
  • Try different flavorings like mint or orange zest for a twist
  • Truffles can be refrigerated for up to 2 weeks.

Indulge in the Best German Chocolate Cake Recipe Ever

Delicious German Chocolate Cake: A True Classic Dessert

⚖️
Difficulty
Moderate

⏲️
Prep Time
30 mins

🕒
Cook Time
30 mins

⏱️
Total Time
1 hour

🍽️
Servings
12

Indulge in the rich flavors of a traditional German Chocolate Cake, a dessert that blends sweet chocolate, creamy frosting, and a delightful blend of pecans and coconut. This cake is not just a treat; it’s a celebration of texture and flavor that captures the essence of home baking. The layered structure of this cake offers a stunning presentation, making it perfect for birthdays, holidays, or any special occasion where you want to impress your guests.

As you slice into the cake, the moist layers reveal a luscious interior that is perfectly balanced by the crunch of toasted pecans and the chewiness of coconut. Each forkful is a heavenly experience; the rich, dark chocolate cake envelops your senses, while the sweet, nutty frosting adds a delightful contrast, creating a symphony of flavors. This German Chocolate Cake recipe is a timeless choice that embodies joy and comfort with every bite.

Quick Recipe Highlights

  • Flavor Profile: This cake features a rich chocolate flavor complemented by sugary coconut and nutty notes.
  • Texture: Expect a moist, tender crumb with a delightful crunch from the pecans and coconut flakes.
  • Aroma: The cake has a heavenly chocolate aroma enhanced by the nutty scent of toasted pecans and the freshness of coconut.
  • Visual Appeal: The rich, dark layers juxtaposed with the creamy frosting topped with toasted coconut create a stunning dessert display.
  • Skill Level Needed: Intermediate baking skills are required to master the cake layers and frosting techniques.
  • Special Equipment: A round cake pan, mixing bowls, and an electric mixer are essential for this recipe.

Recipe Overview

  • Difficulty Level: The moderate difficulty level is attributed to the multi-step process of baking and frosting, but the results are well worth the effort.
  • Category: This cake falls under the dessert category, ideal for satisfying sweet cravings.
  • Cuisine: German Chocolate Cake is rooted in American baking culture and named after a British West Indian named Samuel German, who developed a type of dark-baking chocolate.
  • Cost: Approximate costs are reasonable, making this a cost-effective choice for gatherings and celebrations.
  • Season: This dessert shines in any season, but it is especially popular during holidays like Easter and Christmas.
  • Occasion: Perfect for birthdays, anniversaries, and any festive celebration, it’s sure to be a crowd-pleaser.

Why You’ll Love This Recipe

Fall in love with the layers of flavor and texture in every bite of this German Chocolate Cake. The balance of sweetness from the chocolate cake and the nutty coconut frosting creates a perfect dessert that is both satisfying and delicious. It’s not just a cake, it’s an experience that beckons you to savor each mouthful, making it perfect for both casual family dinners and elegant celebrations.

One of the reasons this cake is so appealing is its relatively straightforward preparation. With minimal fuss, you can create a dessert that looks as beautiful as it tastes. The process can be therapeutic, allowing home bakers to immerse themselves in the art of baking. It’s a great way to spend time in the kitchen, especially when loved ones are involved in the joy of creating something delicious together.

Nutritionally, while this cake is indulgent, it offers the benefits of cocoa and nuts, both rich in antioxidants. The use of real ingredients means you can feel good about serving it to friends and family, satisfying their sweet cravings while still providing some nutritional benefits compared to mass-produced alternatives.

This cake truly shines during social gatherings. Its rich flavors and beautiful presentation make it a centerpiece dessert that people will gather around. It’s perfect for bringing people together over a sweet indulgence, sparking conversations and creating memorable moments.

Finally, German Chocolate Cake is accessible to every home baker, regardless of skill level. The ingredients are easy to find, and while it requires careful baking and assembly, the joy of creating such a classic dessert makes it worth every effort. Plus, the cost-effectiveness allows everyone to enjoy a slice of heaven without breaking the bank.

Historical Background and Cultural Significance

The origin of German Chocolate Cake dates back to the 19th century when American writer Samuel German developed dark-baking chocolate for the Baker’s Chocolate Company. The recipe featuring this chocolate was published in a Dallas, Texas newspaper in 1957, resulting in its popularity as a distinct cake. Interestingly, the name reflects the type of chocolate used rather than a direct connection to Germany itself.

German Chocolate Cake has since gained cultural importance in America, often serving as a symbol of celebration and indulgence. Over the years, it has become associated with various occasions, especially birthdays, where its decadent layers are a guaranteed hit among guests of all ages.

This cake has evolved from a mere regional novelty into a nationwide favorite, adapted by home bakers and pastry chefs alike. Every family may claim their version of the recipe, often adding a personal twist to the traditional preparation.

Regional variations of this cake can be found across the United States, from different frosting recipes to alternative additions like caramel or additional chocolate layers. Each variation tells a story of the community and influences that shape American baking traditions.

Ingredient Deep Dive

Flour: An essential ingredient that provides structure, all-purpose flour works best for this cake, offering balance between fluffiness and density. When selecting flour, ensure it’s fresh for the best results. Store it in a cool, dry place to extend its shelf life, and consider alternatives for gluten-free options.

Sugar: Sugar not only sweetens but also helps retain moisture in the cake. Granulated white sugar is the most commonly used, but for variation, brown sugar can add depth. Store sugar in a sealed container; moisture can clump it. When substituting, keep in mind that not all sugars have the same sweetness level.

Cocoa Powder: Cocoa adds the deep chocolate flavor that makes this cake irresistible. Choose high-quality unsweetened cocoa for the best flavor profile. Store cocoa powder in an airtight container away from heat. If you’re out, consider using melted chocolate as a substitute, adjusting for liquid content.

Butter: Butter provides richness and moisture to the cake. Unsalted butter is ideal for baking, allowing you to control the saltiness of your cake. Ensure it’s softened for easier mixing. Store butter in the fridge, and for long-term storage, freezing is a good option. Vegan options can include plant-based butters.

Common Mistakes to Avoid

  • Using cold ingredients: Always bring eggs and butter to room temperature for a better emulsion and texture.
  • Overmixing the batter: This can lead to a tough cake; mix just until combined.
  • Not measuring ingredients accurately: Use a kitchen scale for precise measurements to achieve consistent results.
  • Baking at the wrong temperature: Ensure your oven is preheated, as incorrect temperatures can affect baking times.
  • Skipping the cooling period: Allow layers to cool fully before frosting to prevent melting.
  • Using stale ingredients: Check the expiry dates on your chocolate and baking powder to ensure freshness.
  • Failing to line cake pans: Prevent sticking by greasing and lining your pans with parchment paper.
  • Not tasting: Adjust sweetness based on your preference before baking; not all cakes are created equal.
  • Neglecting oven rotation: To ensure even baking, rotate your cakes halfway through the cooking time.
  • Ignoring the frosting ratio: Balance the cake and frosting; too much frosting can overwhelm the cake’s flavor.

Essential Techniques

Whipping Egg Whites: This technique adds lightness to your cake batter. Ensure your mixing bowl and whisk are clean and free of grease for maximum volume. Whip to stiff peaks and fold gently into your batter to maintain the airiness without deflating the whites.

Layering a Cake: Proper layering is crucial for an appealing presentation. Use a serrated knife to level each cake layer before stacking. Frosting between layers should be even; a turntable can help achieve this. Don’t be afraid to use a generous amount of frosting to ensure a delicious bite every time.

Pro Tips for Perfect German Chocolate Cake

1. Use high-quality ingredients for the richest flavor. Freshly ground cocoa and organic butter can make a significant difference.
2. Don’t rush the mixing process; take your time to ensure ingredients are well combined to achieve the best texture.
3. Consider chilling the cake layers after baking to retain moisture while making assembly easier.
4. Optionally add a splash of vanilla extract to your frosting for an additional layer of flavor.
5. Toast the pecans lightly before incorporating them into the frosting for enhanced flavor and texture.
6. Cover the cake with plastic wrap overnight for improved moisture retention if not serving immediately.
7. Experiment with different types of nuts or coconut for unique variations; try hazelnuts or macadamia nuts to switch things up.
8. For a more chocolatey experience, drizzle melted chocolate over the finished cake for a gourmet touch.

Variations and Adaptations

Regional variations of German Chocolate Cake often include additional flavors or textures. For instance, you can incorporate coffee into your chocolate cake batter for a mocha twist. Seasonally, consider adding pumpkin puree or spice to your cake for autumn gatherings.

Dietary modifications can also be explored, such as using gluten-free flour blends or dairy-free alternatives in frosting. If you desire lighter varieties, creating a German Chocolate Cake with less sugar or using alternative sweeteners can cater to health-conscious individuals.

For a unique flavor profile, try introducing ingredients like chili powder or espresso powder, which can deepen the chocolate’s richness while adding a spicy kick. Additionally, experiment with how you present the cake; using cupcake forms can turn this classic recipe into delightful individual portions.

Serving and Presentation Guide

Plating your German Chocolate Cake can enhance the overall dining experience. Start by placing the cake on a beautiful cake stand to showcase its layers. You can garnish with extra toasted pecans and coconut on top for visual appeal.

If you prefer a more rustic look, serve the cake directly from the baking pan, but be sure it’s well-cut for neat presentation. Pair the cake with a side of vanilla ice cream or whipped cream for a delightful contrast of temperatures.

Consider the temperature of the cake; it should be slightly warm or at room temperature for the best flavor release. Portion control is essential; cut uniform sizes to ensure everyone gets an equal share of cake.

Wine and Beverage Pairing

When pairing beverages with German Chocolate Cake, consider rich, full-bodied wines like a Merlot or a zinfandel. The fruity notes of these wines complement the cake’s sweetness while balancing its richness.

For non-alcoholic options, consider serving a robust coffee or a lightly spiced chai tea that can enhance the chocolate flavors. Additionally, a cool glass of milk or a creamy milkshake serves as a classic pairing that satisfies.

It’s essential to serve beverages at the proper temperature to maintain the harmony of flavors. Wines should be slightly chilled, and teas can be served warm.

Storage and Shelf Life

To ensure your German Chocolate Cake remains fresh, store leftovers in an airtight container at room temperature for up to three days. For longer storage, it can be refrigerated for up to a week.

If freezing is necessary, wrap the cake tightly in plastic wrap, followed by aluminum foil. A well-wrapped cake can last up to three months in the freezer. When reheating, allow the cake to thaw in the refrigerator overnight before bringing it to room temperature.

Signs of spoilage include mold growth, off-smells, or changes in texture. If the cake begins to dry out, serving it with a drizzle of chocolate or cream can refresh the flavor experience.

Make Ahead Strategies

Making German Chocolate Cake ahead of time can be beneficial, especially for gatherings. You can bake the cake layers 1-2 days in advance, wrap them tightly, and store them in the fridge until you’re ready to frost. This method also allows the flavors to meld and improves the cake’s moistness.

Frosting can also be prepared well in advance; it can be refrigerated for approximately a week. When you’re ready to assemble, simply re-whip the frosting to restore its creamy texture.

Lastly, consider preparing any garnishes, such as toasted coconut and pecans, ahead of time. These elements can be stored in separate airtight containers and added just before serving to maintain freshness.

Scaling Instructions

Scaling German Chocolate Cake is straightforward. To halve the recipe, simply divide the ingredient quantities in half, taking care to adjust cooking times as they may vary.

When doubling or tripling the recipe, you may need larger pans or additional baking sheets. Make sure to monitor time closely, as larger batches can take slightly longer to bake thoroughly.

For timing modifications, keep in mind that larger cakes may require more time at lower temperatures for even baking without burning the edges. Adjust your cooling rack space accordingly and ensure that there’s enough room for your creations to breathe.

Nutritional Deep Dive

A slice of German Chocolate Cake provides a delightful mix of macronutrients; typically, each serving includes a healthy balance of carbohydrates, fats, and protein. While indulging, it’s important to be aware of portion sizes to enjoy this dessert while managing caloric intake.

Micronutrient-wise, the cake offers beneficial vitamins and minerals, particularly when made with whole ingredients like dark chocolate and nuts. These nutrients contribute positively to your well-being, provided you enjoy them in moderation.

In terms of health benefits, the use of nuts can provide heart-healthy fats and antioxidants, while dark chocolate is linked to potential benefits including improved heart health and mood enhancement. Incorporating the cake into a balanced diet allows you to savor the other nutritional advantages it offers.

Considering dietary needs is essential; traditional recipes can be high in sugar and calories. Be mindful of this when enjoying this sweet treat, and consider modifications if necessary for health-conscious diners.

Dietary Adaptations

For those with dietary restrictions, German Chocolate Cake can be tailored easily. Gluten-free options can be achieved using a combination of almond flour and coconut flour, maintaining the cake’s moist texture.

Dairy-free alternatives can include using coconut cream for the frosting and plant-based milk in the batter. For vegan adaptations, replacing eggs with flaxseed or applesauce can provide structure without compromising on flavor.

Low-carb or keto modifications can be realized using sugar substitutes like erythritol or stevia. While the texture may slightly differ, you can still achieve a decadent chocolate flavor. Each adaptation opens up opportunities to enjoy this classic dessert without guilt.

Other options can include paleo variants using almond flour and coconut oil, making the cake suitable for those following this popular dietary lifestyle without sacrificing flavor or enjoyment.

Troubleshooting Guide

If the cake turns out too dry, it may have been overbaked. Always check for doneness a few minutes before the suggested time. Similarly, if it’s too soggy, make sure not to overdo the frosting or filling between layers.

If the frosting fails to set or is too runny, consider mixing in more confectioners’ sugar gradually until the desired texture is attained. This can also apply to the cake, as incorporating less liquid into the batter can help balance the moisture when cakes feel off.

Inconsistent flavor can be remedied by ensuring all ingredients are properly balanced; taste the batter before baking to ensure it meets your sweetness preference. If it lacks flavor, consider adding a pinch of salt or a splash of vanilla extract before baking.

When working with equipment, if your cake pan is too small, the cake may not rise appropriately. Using the right size ensures even cooking, resulting in the perfect texture.

Recipe Success Stories

Community feedback on German Chocolate Cake often reflects a sense of nostalgia and love for classic recipes. Many share personal variations, often adding family secrets that enhance the richness of flavor.

Adaptation stories abound, with readers submitting photos of their stylized presentations. Many have experiment with flavors, sharing their successes with unique twist variations that often inspire others to recreate and make their own.

Photographers often capture the beauty of this cake during gatherings, suggesting tips on how to take great shots showing off the layers and intricate details of frosting.

The sense of community in sharing these recipes fosters engagement, where other aspiring bakers can learn and seek encouragement in their own baking ventures.

Frequently Asked Questions

1. Can I make this cake ahead of time?
Yes, you can bake the cake layers a day or two in advance and store them well-wrapped in the refrigerator until you are ready to frost and serve.

2. How can I tell when my cake is done baking?
A cake is done when a toothpick inserted into the center comes out clean or with a few moist crumbs, not wet batter.

3. What are the best substitutes for eggs in this recipe?
You can use flaxseed meal mixed with water or unsweetened applesauce as a replacement for eggs to make this cake vegan.

4. Can I freeze leftover cake?
Absolutely! Wrap the cake tightly in plastic wrap and foil, then freeze for up to three months. Thaw overnight in the refrigerator before serving.

5. What can I use instead of pecans?
If you’re allergic or prefer something different, walnuts or even almonds work well as substitutes for pecans in this recipe.

6. Can I add my own flavors to the batter?
Yes! Incorporating espresso powder or cinnamon can elevate the flavor profile of the cake, offering a delightful twist.

7. Is there a gluten-free version of this cake?
Yes, substitute regular flour with a gluten-free blend. Ensure all other components like baking powder are also gluten-free.

8. What is the best way to store this cake?
Store in an airtight container at room temperature for up to three days or refrigerate for a week. If frozen, ensure it’s well-wrapped.

9. How do I make the frosting more chocolatey?
You can melt some chocolate and mix it into the frosting or use cocoa powder to enhance the chocolate flavor.

10. Can I make cupcakes instead of a layered cake?
Yes, this recipe can easily be adapted for cupcakes; just adjust the baking time to about 20 minutes.

Additional Resources

If you’re interested in exploring more baking recipes, check out our other dessert blogs featuring classic favorites like carrot cake or red velvet cake. Beyond cakes, we offer technique guides that teach essential baking skills.

For ingredient information, our posts delve into the benefits of using local, organic products that elevate your baking game. We also provide recommendations for must-have baking equipment, helping home bakers outfit their kitchens better.

Seasonal variations can inspire you to adapt traditional recipes like this one for different holidays. Explore our site for exciting new takes on beloved classics!

Join the Conversation

We encourage you to share your German Chocolate Cake experiences on social media! Post photos of your baked masterpieces and tag us to showcase your lovely creations.

Engage with our community through comments and feedback. Sharing variations can inspire other bakers to try new spins on classic recipes, transforming this beloved dessert.

Whether you’ve made a unique twist or have creative garnishing ideas, we’re thrilled to celebrate your baking successes together. Join our mailing list for tips and exclusive recipes to keep your baking journey exciting.

The Recipe

German Chocolate Cake

Serves: 12

Prep Time: 30 mins

Cook Time: 30 mins

Total Time: 1 hour

Kitchen Equipment Needed

  • 2 round cake pans (9-inch)
  • Mixing bowls
  • Electric mixer
  • Rubber spatula
  • Cooling rack
  • Offset spatula for frosting

Ingredients

  • 2 cups all-purpose flour
  • 2 cups granulated sugar
  • 3/4 cup unsweetened cocoa powder
  • 1 1/2 teaspoons baking powder
  • 1 1/2 teaspoons baking soda
  • 1 teaspoon salt
  • 2 large eggs
  • 1 cup milk
  • 1/2 cup vegetable oil
  • 2 teaspoons vanilla extract
  • 1 cup boiling water
  • Frosting: 1 cup coconut, shredded
  • 1 cup pecans, chopped
  • 1 1/2 cups heavy cream
  • 1 cup confectioners’ sugar

Directions

  1. Preheat the oven to 350°F (175°C). Prepare your cake pans by greasing them and lining the bottoms with parchment paper.
  2. In a large bowl, mix together flour, sugar, cocoa, baking powder, baking soda, and salt.
  3. Add eggs, milk, oil, and vanilla to the dry ingredients and mix on medium speed until well combined. Stir in boiling water until smooth.
  4. Divide the batter equally between the prepared pans and bake for 30 minutes, or until a toothpick comes out clean.
  5. Let cakes cool in pans for 10 minutes, then turn out onto a wire rack to cool completely.
  6. For the frosting, in a medium bowl, combine coconut, pecans, cream, and confectioners’ sugar; beat until thickened.
  7. Layer the cooled cakes with frosting between and on top. Decorate with extra coconut and pecans if desired.

Recipe Notes

  • For a chocolate ganache, melt chocolate and mix it with cream for a rich topping.
  • This cake can be made ahead of time and stored in the fridge for up to a week. Frost just before serving for the best texture.

Delicious Keto LCHF Almond Cookies: Easy Low-Carb Recipe

KETO LCHF Almond Cookies: A Deliciously Low-Carb Treat

⚖️
Difficulty
Easy

⏲️
Prep Time
10 mins

🕒
Cook Time
15 mins

⏱️
Total Time
25 mins

🍽️
Servings
24 cookies

Indulge in the delightful world of KETO LCHF Almond Cookies, a perfect balance of taste and health for anyone on a low-carb diet. These cookies are not just a treat; they’re a testament to what can be created without the excess sugars and carbs that often plague traditional baking. Biting into a cookie brings an explosion of nutty flavor paired with the rich sweetness of almond extract, making for a heavenly experience with every nibble. The flavor is beautifully complemented by a subtle crunch that satisfies both the palate and the soul.

Whether you’re navigating a KETO lifestyle or simply want a healthier snack option, these cookies fit the bill flawlessly. Their crumbly yet moist texture strikes a perfect balance, leaving you feeling satisfied without the sugar crash. Plus, they’re incredibly easy to prepare with minimal ingredients, making them an ideal choice for both novice bakers and seasoned chefs looking for a quick, low-carb dessert. Dive into this delicious recipe that not only pleases your taste buds but also falls in line with your dietary goals.

Quick Recipe Highlights

  • Flavor Profile: Nutty, sweet, and pleasantly fragrant, these cookies provide a satisfying treat without the carbs.
  • Texture: Crispy on the outside with a tender bite, these cookies melt in your mouth while also providing a satisfying crunch.
  • Aroma: The delightful scent of toasted almonds mingles with the warmth of vanilla, creating an inviting kitchen atmosphere.
  • Visual Appeal: Golden-brown and perfectly round, these cookies are as beautiful as they are delicious. Topped with flaked almonds, they offer an appealing rustic charm.
  • Skill Level Needed: Suitable for all levels, making it perfect for a family baking project or a quick solo endeavor.
  • Special Equipment: All you need is a mixing bowl, baking sheet, and parchment paper—no fancy gadgets required!

Recipe Overview

  • Difficulty Level: These KETO LCHF Almond Cookies are categorized as easy due to their straightforward steps requiring minimal preparation and baking experience.
  • Category: These cookies serve as a delightful dessert, snack, or even a quick breakfast option for those seeking low-carb alternatives.
  • Cuisine: Rooted in low-carb dietary traditions, this recipe showcases the versatility of almond flour in creating satisfying, guilt-free desserts.
  • Cost: With almonds and basic pantry items as the main ingredients, this cookie recipe is budget-friendly and wallet-conscious.
  • Season: Perfect for any season, but especially delightful with a warm cup of tea or coffee during the colder months.
  • Occasion: Ideal for gatherings, holiday parties, or simply as a tasty treat for yourself or your family.

Why You’ll Love This Recipe

The taste and texture of KETO LCHF Almond Cookies are simply irresistible. The natural nuttiness of almonds brings a depth of flavor that enhances every bite, while the sweetness from low-carb sweeteners means you can enjoy them guilt-free. Each cookie has a light crunch that gives way to a soft center, perfectly satisfying to both cookie lovers and health enthusiasts.

Preparing these cookies is incredibly convenient. With just a handful of ingredients and minimal prep time, you can whip up a batch quickly. They are perfect for meal prep, allowing you to have a healthy snack readily available. Their simple mix-and-bake process makes them a go-to treat for any busy day.

Not only do these cookies satisfy your cravings, but they also offer nutritional advantages. Packed with healthy fats and protein from almonds, they fit seamlessly into low-carb and ketogenic diets. Almonds are also rich in Vitamin E, magnesium, and fiber, promoting overall health and wellness while catering to your sweet cravings.

They also hold great social and entertaining value. Whether serving friends or family, you’ll be the star of the gathering by offering a delicious cookie that everyone can enjoy. They pair wonderfully with coffee or tea, elevating your hosting game with minimal effort.

Cost-effectiveness is a significant factor with these cookies. With easily accessible ingredients that are typically available in bulk, you can make numerous batches without breaking the bank. The incredible satisfaction and taste you get from these KETO LCHF Almond Cookies far exceed the cost involved.

Historical Background and Cultural Significance

The origin of almond cookies can be traced back to ancient times in various cultures, highlighting almonds’ historical significance as a staple nut in many cuisines. As the popularity of low-carb diets surged, particularly among health enthusiasts and those looking to manage their weight, recipes like KETO LCHF Almond Cookies began to emerge, bridging traditional flavors with modern dietary needs.

Almonds have long been linked to health benefits across cultures. Historically significant for their nutrient density, almonds have been associated with longevity and vitality. This cultural importance has paved the way for their modern usage in baking, particularly in cookie recipes that aim to be healthier and more beneficial, such as these low-carb cookies.

Over time, recipes for almond cookies have evolved, especially in response to increased dietary knowledge and preferences. Traditional recipes, often laden with sugar and wheat flour, have transformed into healthier alternatives that maintain the spirit of the original while aligning with contemporary dietary trends, such as KETO and LCHF.

Regional variations can also be found, with many cultures incorporating local flavors and ingredients. The versatility of almond flour allows for creativity in recipe formulation, resulting in diverse cookie styles that still honor the nut’s distinct flavor.

Ingredient Deep Dive

Almond Flour: Almond flour is a crucial ingredient in KETO LCHF Almond Cookies, providing a gluten-free alternative to traditional flour. Rich in nutrients, almond flour is celebrated for its low carbohydrate content and high protein levels, making it a popular choice among those following low-carb and ketogenic diets. When selecting almond flour, look for finely ground options to ensure a tender texture in your cookies. Proper storage in an airtight container in a cool, dark place will ensure freshness for longer periods.

Sweetener: The choice of sweetener can significantly alter the flavor profile of your almond cookies. Many opt for erythritol or stevia, both of which are popular in low-carb baking. These sweeteners provide the sweetness we crave without the glycemic impact of sugar. When substituting, it’s essential to understand each one’s sweetness level compared to sugar to maintain the desired flavor in your cookies. Store any leftover sweetener in a cool, dry place to preserve its integrity.

Common Mistakes to Avoid

  • Overmixing the dough can lead to tough cookies. Mix just until combined for a tender texture.
  • Using improperly measured almond flour can affect the consistency. Always spoon and level your flour for accuracy.
  • Not allowing cookies to cool on the baking sheet can result in them falling apart. Let them set for a few minutes before transferring to a wire rack.
  • Using too much sweetener can overpower the delicate almond flavor. Adjust according to taste preference.
  • Skipping the parchment paper might result in sticking. Always line your baking sheet for easy removal.
  • Not preheating the oven can lead to uneven baking. Ensure your oven is hot before placing the cookies inside.
  • Overbaking can make the cookies dry. Keep an eye on them, as they continue to cook slightly once out of the oven.
  • Using cold ingredients can hinder proper mixing. Ensure eggs and butter are at room temperature for a smooth mixture.
  • Not cooling the cookies properly can lead to a soggy bottom. Allow adequate time for cooling to retain texture.
  • Storing cookies improperly may affect freshness. Keep them in an airtight container for optimal shelf life.

Essential Techniques

Mastering the art of mixing is crucial in baking cookies. Proper mixing technique ensures that the ingredients are well-combined without overworking the dough. Aim for a smooth consistency without any lumps—this prevents the cookies from becoming tough. A good visual cue is the dough holding together without crumbling.

Another essential skill is understanding oven temperatures. Each oven can behave differently, and calibration is key to perfect baking. An accurate oven thermometer can prevent baked goods from undercooking or overcooking, ensuring that your KETO LCHF Almond Cookies emerge perfectly golden every time.

Pro Tips for Perfect KETO LCHF Almond Cookies

1. Always measure your almond flour accurately using a spoon and leveling method for consistent results.

2. Freeze dough for later use. Roll into logs, wrap tightly, and store in the freezer for a quick cookie treat.

3. Experiment with different extracts like coconut or lemon to create unique flavors while keeping the base low-carb.

4. Use a cookie scoop for uniform shaping to ensure even baking across all cookies.

5. Add in sugar-free chocolate chips for a fun twist on the original recipe.

6. For a chewy texture, don’t overbake; pull them out while they are still slightly soft in the center.

7. Dust with powdered sweetener just before serving for an elegant presentation.

8. Make mini cookies to serve at parties—everyone loves bite-sized treats!

Variations and Adaptations

Experimenting with KETO LCHF Almond Cookies can yield delightful transformations. For instance, you can add spices like cinnamon or nutmeg to infuse them with seasonal flavors. Dark chocolate chips can be incorporated for chocolate lovers, providing richness with a hint of sweetness—all while keeping the carbs in check.

For those who enjoy fruity flavors, consider folding in dried unsweetened cranberries or blueberries. These additions complement the almond flavor beautifully while adding a pop of color and a nutritional boost.

Texture modifications can also enhance your cookies; try incorporating ground flaxseed for added fiber or chopped nuts for added crunch. Adjusting these elements can transform each batch into something uniquely your own.

If gluten-free modifications are needed, be sure to substitute any other necessary ingredients. Almond flour often pairs excellently with coconut flour for various experiments, allowing for delightful flavor combinations.

Serving and Presentation Guide

When it comes to serving KETO LCHF Almond Cookies, presentation is key. Opt for a beautiful cake stand or a rustic wooden platter to showcase your cookies. Dust the tops with a light sprinkling of powdered erythritol for a visually appealing touch that enhances their elegance.

Garnishing with whole almonds or drizzling melted sugar-free chocolate on top can bring an extra flair to your display. Consider serving them alongside a small card explaining that they are KETO-friendly; this can spark conversation and interest with guests.

For a modern serving suggestion, pair the cookies with a rich, dark cup of coffee or a refreshing herbal tea, enhancing the experience. Remember that these cookies maintain best texture when served at room temperature; keep that in mind during your serving process.

Wine and Beverage Pairing

Pairing KETO LCHF Almond Cookies with a lightly oaked Chardonnay can beautifully balance the nutty flavors, bringing out the sweetness of the cookies. The creaminess of the wine complements the rich texture while its acidity cuts through the sweetness perfectly.

If you prefer non-alcoholic options, a sparkling water infused with lemon or rosemary can refreshingly contrast with the almond flavors, making it an excellent pairing for a spring gathering.

For coffee lovers, a robust espresso creates a delightful contrast, enhancing the sweetness of the cookies overall. Enjoy experimenting with different beverages to find your perfect match.

Storage and Shelf Life

Properly storing your KETO LCHF Almond Cookies will maintain their freshness. Store them in an airtight container at room temperature for up to one week. If you wish to prolong their shelf life, consider freezing them; they can last up to three months in a freezer-safe bag or container.

To freeze, ensure the cookies are completely cooled, then layer them between wax paper in a container to prevent sticking. When ready to enjoy, allow them to thaw on the counter, and they will retain their delightful texture.

Check for signs of spoilage, such as off smells or changes in texture, especially if stored for extended periods. Reheating in the oven briefly can also help restore their original texture if they feel soft after thawing.

Make Ahead Strategies

Making KETO LCHF Almond Cookies ahead of time is a great strategy for busy weeks. You can prepare the dough and refrigerate it for up to three days before baking. This allows flavors to meld together beautifully while saving time on the actual baking day.

If making these cookies for an event, consider baking them the day before. This allows them to set properly and ensures fresh cookies on the day of the occasion. Just remember to store them in an airtight container to preserve their delightful texture and taste.

Additionally, you can pre-chop any nuts or prepare your ingredients ahead of time, streamlining the process even further. Taking these steps can inspire you to bake low-carb cookies more often without sacrificing time or quality.

Scaling Instructions

If you need to halve or double the KETO LCHF Almond Cookies recipe, adjustments are straightforward. Simply divide or multiply each ingredient accordingly, keeping ratios consistent. For example, if doubling, be mindful that the bake time may slightly vary, so keep a close eye on the cookies.

Equipment may also need adjusting as larger batches may require multiple baking sheets. If you’re doubling the since, wider space may prevent them from sticking together during baking.

Always consider storage requirements when scaling up a recipe; ensure enough space to contain your freshly baked cookies without compromising their quality.

Nutritional Deep Dive

Each KETO LCHF Almond Cookie is a powerhouse of nutrients. On a macro-level, they provide healthy fats from almonds, essential proteins, and fiber, making them satisfying and less likely to lead to hunger soon after consumption. This cookie provides a smart choice for a nutrient-dense snack.

Micronutritionally, almonds are a fantastic source of Vitamin E, magnesium, and antioxidants, contributing to heart health and overall well-being. Additionally, they are low in carbohydrates, making them a preferred choice for those adhering to low-carb and ketogenic diets.

Consider portion analysis when enjoying these cookies as even low-carb treats can add up if consumed in excess. Maintaining mindful eating practices can help with weight management while indulging in delicious KETO LCHF Almond Cookies.

Dietary Adaptations

These KETO LCHF Almond Cookies can easily accommodate various dietary needs. For those following a gluten-free diet, almond flour makes this cookie an effortless choice without compromising flavor or texture.

Dairy-free adaptations can also be achieved by substituting any butter with coconut oil or a dairy-free margarine. This keeps the cookies equally moist and delicious while catering to different dietary restrictions.

For vegan variations, replace eggs with flaxseed meal or chia seeds combined with water to replicate binding effects without animal products.

Low-carb, KETO, paleo, and even low-FODMAP diets can find a place within this cookie recipe, as it naturally leans towards clean, wholesome ingredients that celebrate nutrient density.

Troubleshooting Guide

If you encounter texture issues, such as being too crumbly or difficult to shape, ensure your almond flour is of high quality and properly measured. Adjusting the fat content slightly can help achieve the desired dough consistency.

Flavor balance can also present a challenge. If your cookies taste too bland, consider adding a pinch of salt or altering your sweetener to achieve a more flavorful profile.

Temperature problems often arise, leading to undercooked or overcooked cookies. Investing in an oven thermometer can ensure accurate readings, providing perfectly baked treats every time.

Common equipment challenges arise with cookie sheets that may warp during baking. Investing in high-quality, heavy pans can mitigate these issues, ensuring your cookies bake evenly and beautifully.

Recipe Success Stories

The KETO community consistently shares success stories featuring these almond cookies, with praise surrounding their nutty flavor and delightful crunch. Many readers have adapted the recipe to include various nut butters, resulting in personalized flavors that still maintain the original’s essence while accommodating personal preferences.

Share your baking experiences with the community to inspire others to indulge in these delicious treats. No two experiences should be the same!

Readers have suggested adding vanilla or experimenting with different nut flours for diverse culinary adventures. These suggestions not only highlight the adaptability of almond cookies but also foster creativity in the kitchen.

Frequently Asked Questions

Can I use different nut flours? Yes, experimenting with other nut flours such as hazelnut or coconut flour can add unique flavors, but adjustments in measurements may be required due to different absorbency levels.

How many carbs are in each cookie? The carb count largely depends on the sweetener used, but on average, each cookie contains about 1-2 grams of net carbs, making them a low-carb treat!

Can I substitute the sweetener? Absolutely! Just be cautious with sweetness levels, as each sweetener varies in potency. Taste as you go for the best results.

What if I run out of almond flour? You might be able to use sunflower seed flour or a blend of coconut flour and other nut flours, but be prepared for changes in texture and flavor.

How do I make these cookies chocolate-flavored? Simply incorporate unsweetened cocoa powder into the dough along with the almond flour, adjusting sweetness as needed.

Can I make these cookies vegan? Yes! Substitute eggs with flaxseed meal mixed with water or chia seeds to replicate binding effects without using animal products.

How should I store leftover cookies? Store in an airtight container at room temperature for up to a week, or freeze for longer storage. Thaw on the counter when ready to enjoy.

Why did my cookies spread too much? This can happen if the oven temperature is not hot enough or if the dough was too soft. Ensure your dough is firm before baking and that the oven is properly preheated.

Can I add other ingredients like nuts or chocolate chips? Yes! Feel free to mix in sugar-free chocolate chips, chopped nuts, or even dried fruits to add variety to your cookies.

How long do they take to bake? Baking typically takes about 12-15 minutes depending on the oven and desired crunchiness, so keep an eye on them towards the end!

Additional Resources

Explore related recipes that enhance your low-carb lifestyle, from decadent desserts to savory snacks. Understanding foundational baking techniques will also elevate your cooking skills, allowing you to create various delightful treats. Ingredient-specific guides provide details on the health benefits and culinary uses of almond flour, ensuring you’re knowledgeable about what you bake with.

Additionally, don’t forget to check out equipment recommendations that enhance your baking experiences, from quality mixing bowls to optimal baking sheets. Seasonal variations in flavors can also bring excitement to your cookie-making endeavors.

Join the Conversation

Share your baking creations on social media, tagging friends or family who might find pleasure in trying out KETO LCHF Almond Cookies. Photography tips can help you capture the delightful beauty of your baked goods, making every post share-worthy. Engaging with fellow bakers and sharing experiences encourages a sense of community and inspires more baking adventures!

Let your creativity shine through in variations, and gather feedback from friends and family to enhance future batches. Your voice matters in the baking community and can inspire others to experiment with such delicious low-carb options.

The Recipe

KETO LCHF Almond Cookies

Serves: 24 cookies

Prep Time: 10 mins

Cook Time: 15 mins

Total Time: 25 mins

Kitchen Equipment Needed

  • Mixing bowl
  • Baking sheet
  • Parchment paper
  • Cookie scoop
  • Wire rack

Ingredients

  • 2 cups almond flour
  • 1/2 cup erythritol or sweetener of choice
  • 1/4 cup butter, softened
  • 1 large egg
  • 1 teaspoon almond extract
  • 1/2 teaspoon baking powder
  • Pinch of salt

Directions

  1. Preheat your oven to 350°F (175°C) and line a baking sheet with parchment paper.
  2. In a mixing bowl, cream together the softened butter and sweetener until smooth.
  3. Add the egg, almond extract, and mix until well combined.
  4. Gradually incorporate almond flour, baking powder, and salt until a dough forms.
  5. Using a cookie scoop, drop rounded tablespoons of dough onto the prepared baking sheet.
  6. Bake for 12-15 minutes or until the edges are golden brown.
  7. Remove from oven and allow to cool on the baking sheet for a few minutes before transferring to a wire rack.

Recipe Notes

  • For a chocolate variation, substitute half the almond flour with unsweetened cocoa powder.
  • Add chopped nuts or sugar-free chocolate chips for extra texture and flavor.
  • Store in an airtight container at room temperature for up to a week or freeze for longer storage.

Delicious Super Easy Cream Pie: A No-Fuss Recipe You’ll Love

Super Easy Cream Pie: A Delightful Dessert for Everyone

⚖️
Difficulty
Easy

⏲️
Prep Time
15 mins

🕒
Cook Time
5 mins

⏱️
Total Time
20 mins

🍽️
Servings
8

Looking for a crowd-pleaser that doesn’t require hours in the kitchen? Look no further! This Super Easy Cream Pie is the perfect solution for your dessert cravings. The creamy filling combined with a buttery crust creates a harmonious blend of flavors, making it an irresistible treat for family gatherings, potlucks, or any special occasion. Imagine the delight of cutting into a pie, revealing a silky, smooth filling that beckons to be enjoyed with each slice—this is what this dessert offers.

This recipe is designed for everyone, whether you’re an experienced baker or a novice in the kitchen. Its simplicity and quick preparation time mean that you can have a delicious homemade dessert ready in no time. The flavor profile of the cream pie is rich yet balanced, offering a taste that is reminiscent of classic desserts while still being modern and approachable. With just a few ingredients, this dessert showcases the wonderful harmony of sweetness and creaminess that will leave your guests wanting more.

Quick Recipe Highlights

  • Flavor Profile: A delightful combination of sweet and creamy with hints of vanilla that dance on your palate.
  • Texture: A smooth and silky filling set in a crisp, flaky crust that creates a satisfying bite.
  • Aroma: Inviting and warm notes of vanilla and buttery goodness fill the kitchen as the pie sets.
  • Visual Appeal: The creamy filling topped with a dollop of whipped cream presents beautifully, drawing guests in.
  • Skill Level Needed: Perfect for beginners, with minimal techniques required making for a stress-free experience.
  • Special Equipment: You’ll need a mixing bowl, pie dish, and whisks to whip the filling to perfection.

Recipe Overview

  • Difficulty Level: This recipe is classified as easy, making it perfect for beginners or those short on time. Simply mix, pour, and chill—no complicated steps to worry about!
  • Category: As a dessert, this pie is versatile enough to fit into various meal categories, whether served after dinner or at a festive gathering.
  • Cuisine: This cream pie embodies classic American comfort food, beloved across the nation for its luscious flavor and simplicity.
  • Cost: This recipe is budget-friendly, with common ingredients that won’t break the bank—ideal for those planning gatherings without sacrificing taste.
  • Season: Enjoyed year-round, the creamy textures and flavors of this pie make it welcome on any table, be it summer BBQs or cozy winter evenings.
  • Occasion: Perfect for birthdays, holiday celebrations, or casual family dinners, this pie takes any occasion to the next level.

Why You’ll Love This Recipe

First and foremost, the taste and texture appeal of this Super Easy Cream Pie will leave a lasting impression. The creamy filling is delightful on your tongue, contrasted beautifully by the crunch of a freshly baked pie crust. You won’t just taste the love that goes into making it; you’ll also enjoy the satisfaction of creating a dessert that’s sure to impress.

Convenience and preparation are another notable feature. With just a few steps and simple ingredients, anyone can whip it up and store it in the refrigerator until serving time. This ease of preparation makes it a go-to option for those entertained on a whim, providing a homemade feel without sourcing complicated ingredients or techniques.

Nutritionally, this pie also offers some benefits. While it’s certainly a treat, using quality ingredients can help maximize flavor while keeping things balanced. You can opt for fresh dairy products and even incorporate light versions of your ingredients to yield a lighter dessert experience.

As a social and entertaining dish, it’s perfect for gatherings. The pie serves beautifully, allowing everyone to enjoy their piece while complimenting you on its taste. Sharing food brings people together, and this pie is just the thing to spark conversations and happy memories.

Finally, this recipe’s budget-friendly approach ensures that you can create a delicious dessert without overspending, which is a win for everyone. You buy standard pantry items and can easily source fresh ingredients locally.

Historical Background and Cultural Significance

The origin of cream pies can be traced back to 19th-century America, evolving as home bakers experimented with custards and various fillings. The simplicity of creating a cream pie made it a popular choice for families wanting to showcase their baking skills.

Culturally, cream pies represent comfort in many American households, often gracing tables during festive occasions. Generations have handed down variations and techniques, making it a cherished part of communal recipes across the nation.

This recipe has evolved over the years, initially showcasing flavors like coconut or chocolate, giving rise to a plethora of cream pie varieties that are staples in bakeries today. Each iteration tells a story of its creator and highlights personal tastes.

Regionally, cream pies may show preference for particular flavors based on availability of ingredients. For instance, chocolate cream pies are a classic, but many households may boast their unique fruit-based cream variations influenced by local produce.

Ingredient Deep Dive

First, let’s talk about the pie crust. Traditionally made from flour, butter, and a touch of salt, the pie crust is fundamental to achieving that flaky texture that complements the creamy filling. Its significance is rooted in its versatility—a well-made crust can elevate any filling.

When selecting a crust, look for those made with natural ingredients. Homemade pie crusts can often be stored in the freezer, providing freshness. If you’re short on time, pre-made options work well but may lack the rich flavor and texture of homemade.

Another main ingredient is heavy cream, foundational in creating that luscious filling. It brings richness and body to the pie, providing a creamy mouthfeel that everyone loves. It’s also a versatile ingredient that can be used in various culinary applications.

When buying heavy cream, opt for organic if possible for the purest taste. Ensure to store it in the coldest part of your refrigerator for maximum freshness, as its quality can significantly affect the final dish.

Common Mistakes to Avoid

  • Not chilling the filling properly: It’s essential to chill your filling before pouring it into the crust; otherwise, it may not set properly.
  • Using room temperature ingredients in the filling: Start with chilled heavy cream to achieve maximum volume and fluffiness when whipped.
  • Overmixing the filling: Mixing too aggressively can lead to a dense filling. Gently fold in your ingredients for best results.
  • Skipping ingredient measurements: Accuracy is crucial in baking, so following measurements will give you the best outcome.
  • Not blind baking the crust: Ensure your crust is pre-baked to prevent a soggy bottom, which can ruin your beautifully creamy filling.
  • Forgetting to let the pie cool: Allow the pie to chill for a few hours before slicing for the best texture and flavor.
  • Not using vanilla extract: Skimping on flavoring ingredients can lead to a bland filling. Use pure vanilla extract for the best taste.
  • Ignoring food safety: Be cautious with dairy and egg products, always checking expiration dates and ensuring proper storage.
  • Overcrowding the pie with toppings: While toppings can enhance flavor, too much can overwhelm the delicate filling.
  • Not preparing extra ingredients: Always have additional whipped cream or garnishes ready to elevate presentation.

Essential Techniques

First, mastering the art of pie crust is vital. A good crust is what separates an average dessert from an excellent one. The key is to keep your butter cold and to work the dough minimally; overworking can lead to a tough crust instead of a flaky one.

Another essential technique is whipping cream. Start with chilled equipment—the bowl and beaters must be cold to ensure the cream whips effectively. Gradually add sugar and vanilla while whipping to get to soft peaks, avoiding overwhipped, grainy textures.

Pro Tips for Perfect Super Easy Cream Pie

1. Use high-quality ingredients for the best flavor; organic heavy cream makes a noticeable difference.

2. Chill your utensils and bowls when whipping cream to achieve better volume and texture.

3. Experiment with different flavorings in the filling, such as almond or citrus zest, to add depth.

4. For a special touch, consider drizzling melted chocolate or caramel sauce atop the pie before serving.

5. Use a food processor for the pie crust to achieve a finer texture more easily.

6. Always cover the pie with plastic wrap when refrigerating to prevent it from absorbing odors.

7. If in a hurry, consider using store-bought whipped topping instead of homemade whipped cream.

8. Always let your pie sit for several hours before slicing; this helps in achieving cleaner cuts.

Variations and Adaptations

Regional variations of the cream pie can include flavored custards—like key lime or coconut—that add a unique twist to the traditional recipe. Adding fruits such as berries can enhance both flavor and presentation.

Seasonal adaptations allow you to swap ingredients based on what’s fresh or available. Consider the addition of pumpkin puree for a fall-themed version of your cream pie.

Dietary modifications could involve replacing heavy cream with coconut cream for a dairy-free option. You can also experiment with gluten-free crusts to accommodate dietary restrictions while preserving flavor.

Flavor variations can include adding extracts like root beer or peppermint to the filling or incorporating spices for unique tastes. This versatility ensures that everyone can enjoy a slice that suits their preferences.

Texture modifications, such as incorporating layers of chocolate ganache or fruit preserves between filling and crust, can elevate your pie into a gourmet creation without a great deal of additional effort.

Finally, consider presentation alternatives, such as single-serving jars, for an attractive twist to serving your cream pie, making it perfect for parties or gatherings.

Serving and Presentation Guide

For plating, aim for clean cuts that showcase the layers of pie. Use a serrated knife and serve slices on chilled plates to maintain the pie’s temperature. Consider using spatulas for lifting out slices without disrupting the pie’s structure.

Garnishing ideas might include freshly whipped cream, chocolate shavings, or fruit slices, which can add not only flavor but visual appeal to each serving. Chocolate or fruit sauces can also be drizzled on the plate for artistic effects.

Traditional accompaniments: Cream pie pairs well with a scoop of vanilla ice cream or a cup of freshly brewed coffee, enhancing the dessert experience.

Modern serving suggestions can feature mini pies or tartlets for personal portions, adding a delightful touch to a buffet or casual gathering. This gives each guest their own slice of heaven!

Temperature considerations are vital; serve cream pie chilled, as warm filling can cause the crust to become soggy. Allow for a short softening period after being in the refrigerator to enhance the flavor.

Portion control tips include using a ruler to mark portions before cutting; this is especially useful for large gatherings where uniformity matters.

Wine and Beverage Pairing

When it comes to wine pairings, a sweet dessert wine like Moscato complements the creaminess of the pie beautifully, while the acidity helps balance the richness.

For non-alcoholic alternatives, fresh lemonade with a hint of mint can provide a refreshing counterbalance to the pie’s sweet flavors.

If coffee or tea is preferred, consider serving it alongside a slice of pie for warmth and flavor contrast. A lightly roasted coffee can enhance the creamy pie experience.

Ensure beverages are served at appropriate temperatures, with wines chilled and hot drinks brewed fresh, enhancing the overall dining experience.

Storage and Shelf Life

Store your cream pie in the refrigerator, covered to maintain freshness and prevent odor absorption, up to 3 days after making. Avoid keeping it at room temperature for more than two hours to ensure safety.

For freezing, it’s best to freeze the crust and filling separately, then assemble when ready to serve. A well-wrapped pie can be stored in the freezer for up to one month but is recommended to enjoy within two weeks for best quality.

Signs of spoilage include an off smell, discoloration of filling, or a gummy texture in the crust. Always inspect before serving to avoid food safety concerns.

When reheating, if necessary, a quick thaw in the refrigerator will ensure the pie maintains its texture and flavor profile. Avoid microwaving directly, as it could affect the crust quality adversely.

Make Ahead Strategies

Prepare the crust one day in advance; wrap it well and store it in the fridge. This simple strategy saves time and ensures your crust is ready for filling. The same can be done for the filling, which can be made the day before to allow flavors to meld.

Storage between steps is key; keep the pie covered during the chilling phase to maintain its integrity and hygiene. Be mindful of how long each component is stored; the fresher your ingredients, the better your final pie.

Perform a quality impact assessment when you prepare ingredients ahead of time; for instance, make sure the cream is still fresh for the best outcome.

During assembly, layer in the whipped cream and any toppings that may wilt or spoil; add these elements just before serving for a fresh touch.

Fresh element additions can bring vibrancy to your pie—consider adding zest or fruits right before serving, enhancing the flavor and appearance.

Scaling Instructions

For halving the recipe, simply divide each ingredient’s measurements by two while keeping the same cooking times and temperatures, ensuring even distribution of flavors in your cream pie.

Doubling or tripling the recipe is equally straightforward. Just ensure that your mixing bowls are large enough to accommodate increased quantities and adjust baking time as necessary. Adjust the chilling time accordingly as more volume may take longer to set.

Equipment adjustments, such as using larger pie tins or multiple smaller tins, can make production easier when preparing for larger gatherings.

Timing modifications should incorporate additional resting time for larger recorded servings, ensuring all elements have developed their full flavor profile.

Storage considerations will likewise adapt based on volume; multiple pies will require clearing out refrigerator space ahead of time to keep things organized and manageable.

Nutritional Deep Dive

Understanding the macro breakdown of each serving is essential for those tracking nutritional intake. A slice of this cream pie typically contains carbohydrates primarily derived from the crust and sugar, with healthy fats from the cream contributing to its richness.

A micronutrient analysis reveals modest contributions from the ingredients; while this pie is predominantly a dessert, it contains calcium from dairy that could support bone health when consumed in moderation.

As for health benefits, enjoying dessert in moderation can provide joy and enhance the overall experience of meals. A slice of cream pie isn’t just sustenance; it provides comfort and pleasure.

Dietary considerations come into play for those with restrictions; adjusting components where needed can still allow the enjoyment of this dessert without compromising dietary needs.

Portion analysis helps in understanding serving sizes, allowing for responsible enjoyment. Consider cutting smaller slices to share or try alongside healthier snacks.

Weight management tips advocate for savoring a smaller piece paired with fruits or nuts to balance indulgence with wholesome choices, ensuring one enjoys life and maintains dietary goals.

Dietary Adaptations

For gluten-free adaptations, consider using almond flour or gluten-free flour blends to create the crust; this will cater to those with sensitivities while maintaining flavor.

To make the pie dairy-free, substitute heavy cream with coconut cream or cashew cream, allowing for a rich texture without traditional dairy products.

The recipe can also be modified for a vegan diet by using plant-based whipped toppings and replacing eggs with flaxseed or chia seeds as binding agents.

Low-carb variations could involve using almond flour for the crust and incorporating sugar substitutes in the filling to minimize carbohydrates.

Keto modifications would also benefit from similar changes; consider using a combination of almond and coconut flour for a sturdier crust without excessive carbs.

Paleo adaptations focus on whole food ingredients, eliminating refined sugars and flours to create a wholesome dessert experience.

If you’re considering low-FODMAP options, ensure to pick low-lactose dairy or plant-based alternatives to align with dietary restrictions.

Other specific diets can also be accommodated by exploring ingredient substitutions that suit individual health needs while preserving the essence of delicious dessert.

Troubleshooting Guide

Common texture issues can arise if the filling is over-whipped, leading to a grainy mouthfeel instead of the desired smoothness. Always beat until soft peaks form for a light finish.

If flavor balance is off, consider adjusting sugar levels; too much can overwhelm sweetness. A touch of acidity, like a squeeze of lemon, can elevate the overall flavor.

Temperature problems like a warm pie can lead to a soggy crust. Ensure pie is well-chilled before serving to maximize crispness and flavor.

Equipment challenges may arise if your bowl isn’t chilled when whipping the cream; keep your mixing bowl in the fridge for best results.

Ingredient substitutions could lead to unexpected results if ratios are off; follow guidelines carefully and utilize trusted substitutions for similar flavor profiles.

Timing concerns often stem from under-chilling. Always allow ample time for the pie to set properly, preventing a runny filling during serving.

Recipe Success Stories

Community feedback has overwhelmingly praised this Super Easy Cream Pie for its consistent results and delightful flavors. Many bakers have shared images showcasing their own versions, highlighting the pie’s versatility.

Variation successes detail how easy it is to add personalized touches. Readers often report creating variations with pumpkin pie spice or fruit fillings to cater to audience preferences.

Adaptation stories come from home cooks who have scaled the recipe for larger gatherings, appreciating its reliability and ease, ensuring that every guest leaves satisfied.

Reader suggestions often entail simple yet effective tweaks to the original recipe, enhancing less common flavors that still fit within the essence of the cream pie.

Photography tips shared by readers illustrate the visual attractiveness of this pie, encouraging others to present their culinary creations in appealing ways.

Frequently Asked Questions

Q: Can I use a different flavor for the filling?

A: Absolutely! Feel free to experiment with different flavors like chocolate, banana, or even seasonal fruit purees to personalize your cream pie.

Q: How can I prevent a soggy crust?

A: Blind baking the crust—pre-baking it before filling—is crucial to keeping the crust flaky and crisp. Ensure it’s fully cooled before adding the filling.

Q: Is this recipe suitable for freezing?

A: Yes, it can be frozen after being firmly set. It’s best to freeze the filling and crust separately and then assemble before serving.

Q: How long will the pie last in the refrigerator?

A: The pie can last up to 3 days in the refrigerator when properly stored. Cover it to prevent it from absorbing odors from the fridge.

Q: What should I do if my cream doesn’t whip?

A: Ensure your cream and equipment are cold and that you’re using heavy cream. If it still doesn’t whip, it may be past its use-by date.

Q: Can I make this pie dairy-free?

A: Yes! Substitute heavy cream with coconut cream or any nondairy cream to make delicious non-dairy versions of your cream pie.

Q: Can I add fruit to the filling?

A: Certainly! Fresh fruit purees or slices can elevate your pie. Just be mindful of the added moisture that can affect the set.

Q: What’s the best way to garnish this pie?

A: Classic whipped cream and chocolate curls are a perfect finish. Fresh berries add a lovely touch of color and flavor too!

Q: What can I do if my filling is runny?

A: If your filling doesn’t set, return it to the stove to thicken together with a touch of cornstarch or ensure you use heavy cream right from cold.

Q: Can I make this in advance?

A: Yes! You can prepare the pie ahead of time, simply store it in the refrigerator to let the flavors meld overnight.

Q: How do I avoid over-mixing the filling?

A: Take care to fold in the whipped cream gently until just incorporated; this tender handling will maintain volume and texture.

Additional Resources

Explore related recipes on the site that highlight various pie styles—like fruit pies and savory options. These recipes complement the creamy texture of pie and offer balanced menus.

Consult technique guides for mastering pie-making, including crust techniques, and proper filling handling that can be beneficial for newer bakers.

Ingredient information provides insights on selecting the best fresh ingredients, including how to differentiate between quality dairy products, ideal for any recipe.

For equipment recommendations, check listings that highlight essential tools that make baking easier, ensuring successful outcomes.

Seasonal variations also add freshness to your baking repertoire; look for fruity sticks or spice mixes that reflect the time of year and delight your palate.

Join the Conversation

We invite our readers to share their experiences! Post photographs of your pie creations and celebrate your baking success on social media platforms.

Join in recipe reviews to provide feedback or suggestions. Your input helps enhance our community and encourages others to try their hand at baking.

Engage with us about your variations or adaptations, encouraging others to experiment with their flavors and techniques while honoring their culinary creativity.

Don’t hesitate to share your photography tips for capturing the beauty of your dessert; we love to see how our recipes come to life in your kitchens!

The Recipe

Super Easy Cream Pie

Serves: 8

Prep Time: 15 mins

Cook Time: 5 mins

Total Time: 20 mins

Kitchen Equipment Needed

  • Mixing bowl
  • Whisk
  • Pie dish
  • Measuring cups and spoons
  • Plastic wrap

Ingredients

  • 1 pre-made pie crust
  • 2 cups heavy cream
  • 1/2 cup sugar
  • 1 teaspoon vanilla extract
  • Pinch of salt

Directions

  1. Begin by preparing your pie crust according to package instructions and set aside to cool.
  2. In a mixing bowl, combine heavy cream, sugar, vanilla extract, and salt.
  3. Using a whisk, whip the mixture until soft peaks form, be careful not to over-whip.
  4. Pour the whipped mixture into the cooled pie crust, smoothing the top with a spatula.
  5. Cover with plastic wrap and refrigerate for at least 2 hours to set properly.
  6. Once set, slice and serve with your favorite toppings, such as whipped cream or fruit.

Recipe Notes

  • For added flavor, experiment with different extracts like almond or citrus.
  • Store any leftovers in the refrigerator for up to 3 days.
  • Feel free to top the pie with chocolate shavings or berries for an appealing presentation.

Delicious Strawberry Crunch Cheesecake Recipe You Must Try Today

Delicious Strawberry Crunch Cheesecake: A Delightful Dessert Delight

⚖️
Difficulty
Moderate

⏲️
Prep Time
30 mins

🕒
Cook Time
60 mins

⏱️
Total Time
90 mins

🍽️
Servings
8 slices

Indulge in the creamy, fruity bliss of our Strawberry Crunch Cheesecake, a dessert that brings together the rich, velvety texture of cheesecake with a delightful crunch. This recipe features layers of luscious strawberries and a crumbly topping that transforms the classic cheesecake into an extraordinary treat. With every bite, you’ll experience the perfect balance of sweetness and tartness, making it a delightful choice for any occasion.

Picture yourself serving this stunning cheesecake at your next gathering, where its vibrant colors and captivating aroma are sure to impress. The combination of smooth cream cheese and fresh strawberries creates a mouthwatering sensation, while the crunchy topping adds an irresistible contrast that elevates each slice. The simplicity of this recipe belies its visual and culinary appeal, ensuring that it stands out on any dessert table.

Quick Recipe Highlights

  • Flavor Profile: This cheesecake features a delightful blend of rich creaminess with the bright, sweet flavor of fresh strawberries, making it a refreshing treat.
  • Texture: With a creamy filling, a hint of fluffiness, and a satisfying crunchy topping, the contrasting textures create a mouthwatering experience.
  • Aroma: The sweet aroma of baked strawberries mingles with the rich scent of cream cheese, creating an inviting atmosphere for dessert lovers.
  • Visual Appeal: The vibrant red of the strawberries against the pale cheesecake is visually stunning, making it a beautiful centerpiece at any gathering.
  • Skill Level Needed: This cheesecake requires basic baking skills, making it perfect for both novice bakers and experienced chefs alike.
  • Special Equipment: A springform pan is essential for achieving the perfect cheesecake shape and ease of serving.

Recipe Overview

  • Difficulty Level: The moderate difficulty of this Strawberry Crunch Cheesecake involves a combination of baking techniques, but the steps are straightforward and manageable.
  • Category: This dessert falls under the category of cheesecake, specifically a fruity variation that captures the essence of spring and summer desserts.
  • Cuisine: Inspired by classic American desserts, this cheesecake incorporates the freshness of strawberries, a popular choice in many culinary traditions.
  • Cost: The basic ingredients for this cheesecake are affordable, with strawberries being the most significant expense, especially if fresh.
  • Season: Best enjoyed during spring and summer when strawberries are in season and at their sweetest, this cheesecake is perfect for warm weather gatherings.
  • Occasion: Ideal for celebrations, birthdays, and potlucks, the Strawberry Crunch Cheesecake serves as a delightful ending to any festive meal.

Why You’ll Love This Recipe

The Strawberry Crunch Cheesecake stands out due to its irresistible taste and texture appeal. The creamy filling perfectly complements the sweetness of fresh strawberries, while the crunchy topping adds flair. This dessert promises satisfaction that will leave your guests asking for seconds.

Convenience is another delightful feature. The preparation involves simple steps that yield stunning results, making this cheesecake manageable for bakers of all skill levels. Plus, it’s a great make-ahead dessert, allowing you to impress without last-minute stress.

Nutritionally, strawberries provide essential vitamins, antioxidants, and fiber, making this dessert a bit healthier than many others. So, you can indulge guilt-free! Additionally, the cheesecake offers ways to adapt for various dietary preferences, such as gluten-free or vegan variations.

Socially, the Strawberry Crunch Cheesecake is a dessert that brings people together. Its visual appeal is a conversation starter, and sharing delicious food creates bonds, making it a perfect choice for gatherings.

Finally, the affordability of the ingredients ensures accessibility for everyone. You can whip up this delightful dessert without breaking the bank, allowing you to share joy with family and friends through homemade goodness.

Historical Background and Cultural Significance

The origins of cheesecake date back to ancient Greece, where it was served at the first Olympic Games as a source of energy. Over centuries, the recipe evolved, transitioning from simple cheese mixtures to the beloved cheesecake variations we know today.

In America, cheesecake gained immense popularity in the 19th century, influenced by European immigrants who brought their recipes. Today, the versatility of cheesecake allows countless adaptations, including the addition of seasonal fruits like strawberries, integrating local flavors into the dessert.

The evolution of the recipe reflects the changing culinary landscape, with cheesecakes embracing contemporary ingredients and techniques. Seasonal influences and local produce play a vital role in cheesecakes across different regions, showcasing variations that celebrate unique cultural twists.

Regionally, the love for strawberries in America makes the Strawberry Crunch Cheesecake a beloved favorite, especially during summer months. This cheesecake serves as a symbol of nostalgia, reminding us of picnics, barbecues, and family gatherings, connecting generations through shared culinary experiences.

Ingredient Deep Dive

Strawberries: Strawberries have a rich history, beloved since ancient times for their unique sweetness and vibrant color. They’re packed with vitamins C and K, and high in antioxidants, contributing to heart health and improved skin. When selecting strawberries, look for bright red, plump fruit with a fragrant aroma. Store them in the refrigerator for up to a week, and you can freeze excess strawberries for later use.

Cream Cheese: Cream cheese is a crucial ingredient in cheesecakes, contributing to the creamy texture and rich flavor. This ingredient has roots in American dairy production, originating in the 19th century. Cream cheese is also a source of calcium and protein, enhancing the nutritional profile of desserts. When purchasing, opt for full-fat for the best results and store it in the refrigerator, using it within a couple of weeks after opening.

Common Mistakes to Avoid

  • Overmixing the batter can lead to cracks in the cheesecake. To achieve the perfect texture, mix until just combined.
  • Not using room temperature ingredients can cause lumpy batter and uneven cooking, so allow cream cheese and eggs to reach room temp beforehand.
  • Baking the cheesecake too long will result in a dry texture; be sure to check doneness with a slight jiggle in the center.
  • Underestimating the chilling time can ruin the structure, so allow the cheesecake at least four hours to set properly.
  • Skipping the water bath can lead to cracked tops. Wrapping the pan with foil while baking helps maintain moisture and temperature.
  • Using low-quality chocolate for the topping can diminish flavor; always choose high-quality chocolate or berry toppings.
  • Not preparing for serving can lead to a mess. Use a hot knife for cleaner slices and an attractive presentation.
  • Forgetting to line the bottom of the springform pan can make removal difficult. Always use parchment paper for smoother lifting.
  • Forgetting to taste before baking can lead to an unbalanced flavor; always check sweetness levels with your strawberries.
  • Not allowing for the cooling period can spoil the texture; let the cheesecake cool to room temperature before refrigerating.

Essential Techniques

Baking in a Water Bath: Baking your cheesecake in a water bath helps to regulate temperature and moisture. It’s crucial for preventing cracks and achieving a smooth, creamy texture. To master this technique, wrap the springform pan in foil to prevent leaks and place it in a larger pan filled with hot water.

Proper Cooling: Allowing the cheesecake to cool slowly in the oven with the door ajar will help prevent cracks by avoiding sudden temperature changes. After baking, let it cool gradually for at least an hour before transferring to the refrigerator. This cooling method ensures an even texture and beautiful appearance.

Pro Tips for Perfect Strawberry Crunch Cheesecake

1. Always preheat your oven to ensure consistent baking temperatures, which is key for even cooking.
2. Choose ripe strawberries for the best flavor; avoid overripe fruit which can affect overall sweetness.
3. Incorporating a bit of lemon zest with the filling enhances the fresh strawberry flavor beautifully.
4. Refrigerate the cheesecake overnight for the best taste and restrained firmness.
5. Consider experimenting with graham cracker alternatives for the crust to add variety and flavor.
6. For added texture and flair, sprinkle crushed nuts or coconut on top before serving.
7. Use quality vanilla extract for an enhanced depth of flavor in the cheesecake.
8. Feel free to drizzle a homemade berry sauce over slices for an elegant presentation.

Variations and Adaptations

Substituting different fruits can create exciting new flavors for your cheesecake. For example, using blueberries or raspberries instead of strawberries provides a slightly tart twist.

Depending on the season, you can modify the cheesecake toppings to match available fruits or even use chocolate ganache for a decadent touch in colder months.

For dietary considerations, you can create a gluten-free version by using almond flour instead of graham cracker crumbs for the crust or opting for dairy-free cream cheese alternatives.

Experimenting with spices such as cinnamon or nutmeg can also elevate the flavor profile of your cheesecake, adding warmth and complexity.

Creative presentation alternatives can include layering sliced strawberries on top or forming a berry compote for a burst of color and taste.

Serving and Presentation Guide

Plating your Strawberry Crunch Cheesecake beautifully elevates the dessert. Use a slice remover to gently lift portions and present them on individual plates.

For garnishing, consider adding a sprig of mint or a dusting of powdered sugar for a refined touch. You might also decorate with additional sliced strawberries on the side or drizzle a berry sauce for added flavor.

Traditional accompaniments like whipped cream or vanilla ice cream pair exceptionally well, adding richness to the fruity cheesecake.

Serving temperature is crucial; allow the cheesecake to sit out for 10-15 minutes before serving, as it’s most flavorful when slightly softened.

Portion control can enhance the dining experience, especially with rich desserts. Cut smaller slices to allow guests to enjoy without feeling overwhelmed.

Wine and Beverage Pairing

Pairing your Strawberry Crunch Cheesecake with the right beverage can enhance the dessert experience. A sweet dessert wine, like a late harvest Riesling, complements the fruity flavors without overpowering them.

Alternatively, a sparkling rosé offers a refreshing contrast to the richness of the cheesecake, providing a balanced sip between bites.

For non-alcoholic options, a chilled hibiscus tea with a hint of lemon can add a lovely tartness that mirrors the strawberry notes.

Temperature is key; serve wines chilled and consider slight warming of hot beverages for a cozy pairing.

Incorporating a refreshing iced tea, lightly sweetened or with fresh mint, serves as an excellent alternative for warmer days.

Storage and Shelf Life

To maintain the decadent taste and texture, store your Strawberry Crunch Cheesecake in the refrigerator, ideally in an airtight container. This dessert keeps well for up to five days, ensuring you can enjoy leftovers.

If freezing, wrap the cheesecake in plastic wrap and then foil to prevent freezer burn. It can be frozen for up to three months without losing its delightful quality.

Signs of spoilage include changes in texture, an off smell, or mold formation; always inspect before enjoying stored cheesecake.

When reheating, allow gradual thawing in the refrigerator before serving to preserve consistency and flavor.

Frozen portions can be enjoyed cold or at room temperature, offering flexibility for serving.

Make Ahead Strategies

If you’re planning for a gathering, this Strawberry Crunch Cheesecake can be made a day in advance, allowing for perfect chilling time.

Store the cheesecake in the fridge overnight covered to avoid drying out or gathering unwanted odors. If preparing several days ahead, consider freezing and thawing in the fridge 24 hours before serving.

During preparation, you can prepare the crust and filling separately, storing the crust at room temperature, and the filling in the refrigerator until you’re ready to assemble.

For optimal freshness, add fresh strawberries or toppings just before serving to ensure fruits maintain their texture and flavor.

Reheating or serving fresh cheesecakes is easier and enhances the eating experience; avoid clutter before your gathering by organizing serving plates in advance.

Scaling Instructions

When scaling the Strawberry Crunch Cheesecake recipe, halving or doubling ingredients is straightforward. Keep ratios consistent for the best outcomes, particularly for the crust and filling.

For larger gatherings, consider using a larger springform pan or multiple smaller ones to ensure even baking. Ensure adjustments to cooking times based on the thickness of your cheesecake.

Monitor baking time closely, as changes can impact texture and doneness; the cheesecake should remain slightly jiggly in the center when done.

If you’re like to save portions, remember to adjust packaging sizes for freezing or serving; pack into appropriate sizes for convenience.

When planning to make multiple variations or flavors, prepare the base mixture and divide it into separate bowls to add fruit or flavorings individually.

Nutritional Deep Dive

The Strawberry Crunch Cheesecake contains a balanced macro breakdown: about 20g of fat, 30g of carbs, and 5g of protein per slice. The creamy richness from the cream cheese contributes to its fat content.

Micronutrient analysis shows it’s a source of vitamin C from strawberries, calcium from cream cheese, and beneficial antioxidants, making it an indulgence with health perks.

In moderate portions, this cheesecake aligns well with various dietary needs, but keep an eye on added sugars, especially for health-conscious consumers.

For weight management tips, consider savoring smaller portions, allowing the flavors to linger without excess calories.

Incorporating more whole ingredients and minimizing added sugars could enhance the overall nutritional profile while maintaining sweetness.

Dietary Adaptations

For those needing gluten-free desserts, replace graham crackers with almond flour or gluten-free cookie crumbs to maintain the crust’s integrity.

A dairy-free version can be achieved using vegan cream cheese and nut-based toppings to blend flavors without sacrificing texture.

For a vegan option, consider aquafaba in place of eggs in the filling, yielding a light and airy cheesecake without animal products.

Lower-carb or keto diets can utilize almond flour to create a suitable crust while minimizing sugar in the filling by using natural sweeteners like stevia.

Adaptations for paleo diets often encourage using natural sweeteners and whole food ingredients, focusing on unprocessed components.

Understanding these dietary modifications allows more people to enjoy the delightful experience of cheesecake while adhering to their personal preferences or restrictions.

Troubleshooting Guide

If your cheesecake has cracks, it could be due to rapid temperature changes; ensure your oven temperature is consistent, and cool the cheesecake slowly.

For texture issues, like a grainy or overly dense cheesecake, ensure cream cheese is at room temperature before mixing and don’t overmix ingredients.

Flavor balance problems can arise from too many or too few strawberries. Always taste the filling before baking to adjust sweetness or acidity as necessary.

If you’re encountering problems with ingredient substitutions, test out small batches to find suitable replacements that maintain the desired flavor and texture.

Timing concerns often arise; prepare for extended chilling and baking time due to variation in oven performance and ingredient temperatures.

Keeping a close eye on doneness is crucial; cakes should jiggle slightly in the center when finished rather than appearing solid.

Recipe Success Stories

Community feedback on this Strawberry Crunch Cheesecake has been overwhelmingly positive, with many raving about its lightness and burst of flavor. User stories often highlight successful adaptations and substitutions, inspiring others to try their variations.

Readers have noted how well the dessert holds up for gatherings, sharing photos that showcase their creative presentations and proud achievements.

Feedback regarding the ease of the recipe has encouraged novice bakers to venture into cheesecake-making, boosting confidence and kitchen skills.

Social media sharing has become a trend, with stunning photography capturing the vibrant beauty of this cheesecake, encouraging further engagement within cooking communities.

This dessert has transformed into a favorite for potlucks and family celebrations, consistently eliciting requests for the recipe and variations from attendees.

Frequently Asked Questions

Can I use frozen strawberries in this recipe? Yes, frozen strawberries can be used, but make sure to thaw and drain excess liquid to prevent a watery filling.

How do I know when my cheesecake is done baking? A cheesecake is done when the edges are set, but there’s a slight jiggle in the center. It will continue to firm as it cools.

Can I make this cheesecake ahead of time? Absolutely! This cheesecake can be made a day in advance or frozen for longer storage, ensuring it’s ready for your gathering.

What can I use if I don’t have a springform pan? You can use a regular pie pan, but be sure to line it well for easier removal after baking.

How can I fix a cracked cheesecake? To fix a crack, consider topping it with fresh strawberries or a fruit glaze to hide imperfections while adding flavor.

Is this recipe suitable for diabetics? The strawberry cheesecake can be adapted by using sugar substitutes and whole grain crusts, making it more diabetic-friendly.

How long can I store the cheesecake in the fridge? The cheesecake can last up to five days in the refrigerator. Keep it well covered to maintain freshness.

Can I swap cream cheese for Greek yogurt? Using Greek yogurt will change the texture and taste but can produce a lighter version of the cheesecake.

What are the best toppings for this cheesecake? Fresh whipped cream, fruit compote, or drizzled chocolate all complement the cheesecake superbly while enhancing its beauty.

Can I make mini cheesecakes with this recipe? Yes, you can use muffin tins to create mini cheesecakes. Adjust baking time accordingly to ensure they set properly.

Additional Resources

If you enjoyed this Strawberry Crunch Cheesecake, check out related recipes such as Chocolate Raspberry Cheesecake or Classic New York Cheesecake for new twists on popular desserts.

For mastering cheesecakes further, explore technique guides that delve into baking, cooling, and slicing with finesse.

Ingredient information, including seasonal produce lists, can help inspire you to make the most of what’s fresh and available for your desserts.

Consider investing in equipment recommendations for successful baking, as high-quality pans and mixers can significantly impact results.

Seasonal variations can offer exciting ideas, such as incorporating pumpkin for autumn or citrus fruits for festive winter desserts.

Join the Conversation

We’d love to see your Strawberry Crunch Cheesecake creations! Share your photos on social media, and don’t forget to tag us.

Photography tips can enhance your dessert snaps, ensuring you capture the beautiful colors and textures of your cheesecake perfectly.

Leave a review to help other bakers discover the joys of this recipe, sharing any variations or tips you found helpful.

Engage with our community by sharing your feedback, adaptations, or even failure stories, as every experience contributes to our collective growth in the kitchen.

Explore different recipe variations and let us know your favorites, as we’re excited to see how you make this cheesecake your own!

The Recipe

Strawberry Crunch Cheesecake

Serves: 8 slices

Prep Time: 30 mins

Cook Time: 60 mins

Total Time: 90 mins

Kitchen Equipment Needed

  • Springform pan
  • Mixing bowl
  • Electric mixer
  • Spatula
  • Measuring cups and spoons
  • Paring knife for slicing
  • Small saucepan (for berry sauce optional)

Ingredients

  • 1.5 cups graham cracker crumbs
  • 1/2 cup unsalted butter, melted
  • 1/4 cup sugar
  • 3 (8 oz) packages cream cheese, softened
  • 1 cup sugar (for cheesecake filling)
  • 3 large eggs
  • 2 teaspoons vanilla extract
  • 2 cups fresh strawberries, pureed and hulled
  • 1 cup strawberries, sliced for topping
  • 1 cup crushed nuts or crunchy topping (optional)

Directions

  1. Preheat your oven to 325°F (160°C). Prepare a springform pan by lining the bottom with parchment paper.
  2. In a mixing bowl, combine the graham cracker crumbs, melted butter, and sugar until evenly moistened. Press the mixture firmly into the bottom of the prepared pan.
  3. In a separate bowl, beat the cream cheese until smooth. Gradually add 1 cup sugar, continuing to mix until well combined.
  4. Add the eggs one at a time, mixing well after each addition. Stir in the vanilla extract and pureed strawberries.
  5. Pour the cream cheese mixture over the crust in the springform pan. Smooth the top with a spatula.
  6. Bake in the preheated oven for about 60 minutes or until the edges are set, and the center still slightly jiggles.
  7. Remove the cheesecake from the oven and allow it to cool to room temperature in the pan. Then refrigerate for at least 4 hours or overnight for best results.
  8. Before serving, top with sliced strawberries and optional crushed nuts for garnish. Slice and enjoy!

Recipe Notes

  • Feel free to adjust the sweetness to your liking, particularly when using fresh or frozen strawberries.
  • If desired, you can add a layer of strawberry glaze or chocolate ganache on top for added flavor.
  • Make sure to release the springform pan gently to preserve the shape of the cheesecake when removing it.
  • Consider doubling the recipe for larger gatherings and using a larger pan accordingly.

Delicious No-Bake Coconut Pecan Praline Cookies for Everyone

No-Bake Coconut Pecan Praline Cookies: A Deliciously Easy Treat

⚖️
Difficulty
Easy

⏲️
Prep Time
15 mins

🕒
Cook Time
0 mins

⏱️
Total Time
15 mins

🍽️
Servings
24 cookies

The allure of No-Bake Coconut Pecan Praline Cookies lies in their simple preparation and delightful combination of flavors. These cookies are a fantastic way to indulge your sweet tooth without any baking involved. Imagine the taste of crunchy pecans, sweet coconut, and a rich, creamy base all melded together to create a bite-sized treat that is perfect for any occasion. Whether you’re whipping them up for a holiday gathering, a special celebration, or just a cozy night in, these cookies are sure to impress.

In addition to their irresistible flavor, No-Bake Coconut Pecan Praline Cookies also offer a delightful texture experience. Each bite provides a satisfying crunch from the pecans and a chewy, sticky sweetness from the coconut. The creamy base creates a comforting mouthfeel that balances perfectly with the crunchy toppings. Plus, these cookies are incredibly quick to make—no oven required! Just mix the ingredients and let them set, making them ideal for anyone who wants a quick and delicious dessert.

Quick Recipe Highlights

  • Flavor Profile: Rich and sweet with caramel-like notes from the pecans, complemented by a chewy coconut texture.
  • Texture: A perfect blend of crunchy and chewy, making them great for savoring.
  • Aroma: A sweet, nutty aroma that wafts through your kitchen as these cookies set.
  • Visual Appeal: Golden-brown from the gorgeous pecans, speckled with white coconut flakes.
  • Skill Level Needed: Requires minimal skill, perfect for beginners or children to assist in the kitchen.
  • Special Equipment: No special equipment required—just a mixing bowl and a baking sheet lined with parchment paper.

Recipe Overview

  • Difficulty Level: These No-Bake Coconut Pecan Praline Cookies are incredibly easy to make, involving no cooking or baking techniques. They require simple mixing and preparation, making them suitable for all skill levels.
  • Category: This recipe falls under the dessert category, ideal for satisfyling sweet cravings after meals or as an afternoon snack.
  • Cuisine: Influenced by Southern dessert traditions, these cookies embrace the flavors common in southern cooking, especially the use of peanuts and coconuts.
  • Cost: The ingredients are affordable, with costs varying, but generally, you can expect to make this treat on a budget.
  • Season: These cookies are perfect year-round, but especially enjoyable during the warmer months when you don’t want to heat up your kitchen.
  • Occasion: Ideal for parties, potlucks, or as a sweet treat for gatherings with family and friends.

Why You’ll Love This Recipe

These No-Bake Coconut Pecan Praline Cookies offer a taste and texture that will excite your palate. The combination of crunchy pecans and sweet coconut creates a delightful treat that is both satisfying and indulgent. The richness of the ingredients melds beautifully, delivering a cookie that feels luxurious yet is quick to prepare.

Convenience is another great reason to love this recipe. With just a few key ingredients mixed together, these cookies require no baking time, allowing you to whip them up in a matter of minutes. After mixing, simply let them set, and you’ll have a delicious treat ready to be devoured, no fuss needed.

Nutritionally, these cookies provide a balance of flavors and textures without excess calories. Pecans are rich in healthy fats and proteins, while coconut offers fiber. This makes them a more wholesome option compared to many traditional baked goods that are often filled with sugar and unhealthy fats.

These cookies also make a great addition to social gatherings. Their decadent appearance and delightful flavor are guaranteed to capture attention and impress your guests, making you the star of any event. They invite sharing and conversation, creating memorable moments around the table.

Lastly, the cost-effectiveness of this recipe is a significant plus. You can indulge in these tasty treats without breaking the bank, and many ingredients might already be staples in your pantry. This allows you to enjoy delicious homemade cookies at a fraction of the cost of store-bought options.

Historical Background and Cultural Significance

The origins of No-Bake Coconut Pecan Praline Cookies can be traced back to Southern kitchens in the United States, where pecans and coconut are often celebrated ingredients. Both components symbolize comfort and tradition in Southern cooking. Pecans, a native American nut, have been a staple ingredient in the South for centuries, often featured in desserts.

Culturally, these cookies hold a special place in culinary traditions, especially during festive seasons. They are often enjoyed during holidays and gatherings, serving as a sweet treat to bring friends and family together. The practice of making no-bake cookies has also been embraced in households for their simplicity and ease, allowing busy families to enjoy sweet treats with minimal effort.

As time has passed, the recipe for No-Bake Coconut Pecan Cookies has evolved, with home cooks adding their unique twists or ingredients, like chocolate or additional spices, to adapt to personal tastes. This evolution reflects a broader trend in baking culture that emphasizes creativity and personal expression.

Regional variations have sprung up too, with some areas incorporating local flavors or added ingredients. For instance, tropical regions might enhance the recipe with fruits such as mango or pineapple, adding a refreshing twist to the traditional flavors.

Ingredient Deep Dive

– **Pecans**: Pecans are often associated with Southern cooking and celebrate the harvest season in many regions. They are full of healthy fats, vitamin E, and antioxidants. When selecting pecans, look for fresh, plump nuts that have a rich aroma. Store them in a cool, dry place to maintain their freshness, and consider using them within a few months to avoid rancidity. If you don’t have pecans, walnuts or almonds can serve as great substitutes.

– **Coconut**: Coconut has long been celebrated in various cuisines around the world, from tropical desserts to savory dishes. It contains beneficial medium-chain triglycerides (MCTs), making it a sought-after ingredient for health-conscious cooks. When choosing coconut, ensure you select unsweetened shredded coconut for a more natural flavor. Store it in an airtight container to prolong freshness. If you’re looking for alternatives, you can use other nuts or seeds to achieve a different flavor profile.

Common Mistakes to Avoid

  • Not measuring ingredients accurately can lead to an unbalanced flavor. Always use measuring cups and spoons for precision.
  • Forgetting to chill the mixture can result in cookies that don’t hold their shape. Be sure to allow adequate setting time in the refrigerator.
  • Using sweetened coconut can make the cookies overly sweet. Stick to unsweetened shredded coconut for a balanced flavor.
  • Not using parchment paper can result in cookies that stick to the baking sheet. Always line your tray for easy removal.
  • Overmixing the ingredients can lead to a dense texture. Mix just until combined for the best results.
  • Using stale nuts can affect the flavor dramatically. Always opt for fresh nuts and store them properly.
  • Not letting the cookies cool completely will make them too sticky and hard to lift. Patience is key when setting them.
  • Skipping flavor additions like vanilla extract can take away from the overall taste depth. Always consider adding a splash for enhancement.

Essential Techniques

– **Mixing**: Proper mixing is crucial as it ensures that all the ingredients are well combined. Overmixing can lead to dense cookies, while undermixing can leave lumps of unincorporated ingredients. A folding technique can help in achieving a light and airy texture.

– **Setting**: Allowing the cookies ample time to set in the fridge is essential for proper texture. Setting helps them firm up, making them easier to slice and serve. Look for a firm but slightly sticky texture as a sign that they’ve set correctly.

Pro Tips for Perfect No-Bake Coconut Pecan Praline Cookies

1. Consider toasting the pecans before mixing for a deeper flavor and crunchiness. Just be sure to let them cool before adding to the mixture.

2. For extra flavor, adding a pinch of salt can elevate the sweetness and balance the flavor.

3. Use a cookie scoop for even portions, ensuring they are all uniform in size and cook evenly.

4. If you prefer a chewier cookie, slightly increase the amount of coconut in the mix.

5. For a gourmet touch, drizzle melted chocolate over the finished cookies after they have set.

6. Store the cookies in the refrigerator between layers of parchment paper to prevent sticking.

7. Experiment with different nut types or additions, like dried fruits for a unique twist.

8. Leaving the mixture slightly crumbly before forming can create a textured crumb in the finished cookie.

Variations and Adaptations

If you’re looking for a twist, consider adding seasonal flavors like pumpkin spice in the fall or peppermint during the winter holidays. Adjusting the base mixture by incorporating different ingredients like almond or peanut butter can give a unique flavor. For a vegan adaptation, use coconut oil instead of any dairy-based ingredients.

If you’re aiming for a keto-friendly version, substitute regular sweeteners with a sugar-free alternative. For added texture, consider incorporating chia seeds or flaxseeds into the mixture for added nutrition. You can also try sprinkling extra coconut flakes on top for a decorative touch, or creating themed shapes according to seasonal occasions.

Serving and Presentation Guide

To beautifully present your No-Bake Coconut Pecan Praline Cookies, consider using a tiered dessert stand for height and visual interest at gatherings. Garnishing with a sprinkle of extra shredded coconut or nuts can add an appealing contrast and a fresh look.

Traditional accompaniments like a scoop of vanilla ice cream or whipped cream serve well alongside these cookies for added indulgence. Alternatively, a fresh fruit salad can offer a refreshing counterpoint to the sweetness of the cookies.

Consider serving them on decorative plates, and if desired, drizzle a chocolate sauce before serving to enhance the presentation. Always remember to serve them chilled to maintain their texture and flavor integrity.

Wine and Beverage Pairing

For drink pairings, consider a sweet dessert wine like a Moscato or a light white wine to complement the flavors of coconut and pecans beautifully. The refreshing crispness of a Prosecco also pairs well, balancing the sweetness of the cookies.

For non-alcoholic alternatives, try pairing with a creamy coconut milkshake or iced coffee for a refreshing treat. A chai latte can also be delightful, as the warm spices can mesh perfectly with the flavor of the cookies.

When serving with tea, consider a light herbal tea, such as chamomile or peppermint, to keep the palate refreshed between bites.

Storage and Shelf Life

No-Bake Coconut Pecan Praline Cookies can be stored in an airtight container in the refrigerator. When stored correctly, they can last up to a week. For longer storage, consider wrapping them in plastic wrap before placing them in an airtight container.

Ensure they are fully cooled and firm before storing to maintain their texture and prevent sticking. Avoid leaving them at room temperature for extended periods, as they may become too soft.

If planning to keep them for longer, consider freezing the cookies. Layer them with parchment paper in an airtight container for up to three months. When ready to enjoy, simply thaw them in the refrigerator.

Make Ahead Strategies

To save time, consider preparing the No-Bake Coconut Pecan Praline Cookie mixture a day in advance. After mixing, store it in the refrigerator until you’re ready to shape and set the cookies.

You can also keep formed cookies in the fridge for up to a week before they need to be served, which makes them an excellent option for parties. If you plan on traveling with them, let them set in the container you’ll transport them in to minimize handling.

When reheating, avoid using a microwave as that can alter the texture. Instead, let them come to room temperature before serving. Additionally, consider adding fresh toppings or drizzles just before serving to maintain a fresh and appealing look.

Scaling Instructions

Scaling this No-Bake Coconut Pecan Praline Cookie recipe is straightforward. To halve the recipe, simply divide all ingredients by two, adjusting the setting time if needed. If doubling or tripling, ensure you have a larger mixing bowl to accommodate the increased volume.

Adjust cooking or setting time to allow for larger quantities; they may need a little longer due to a thicker mixture. When scaling, be mindful of the container size used for storage and ensure it’s suitable for the total number of cookies you’re making.

Keep in mind the proportions of the ingredients to maintain the flavor integrity, especially if experimenting with additional ingredients or substitutions. If making larger batches, consider rotating them in the refrigerator for efficient chilling.

Nutritional Deep Dive

When enjoying your No-Bake Coconut Pecan Praline Cookies, it’s helpful to understand their nutritional composition. Each cookie provides a good source of healthy fats due to the pecans, which also offer protein and fiber.

These cookies are naturally high in sugar from the coconut and any additional sweeteners used. Understanding portion control is essential, especially if monitoring sugar intake.

The inclusion of coconut provides some micronutrients, including manganese and copper, essential for metabolism and heart health. Additionally, pecans contribute a wealth of antioxidants, supporting overall health and wellness.

Mindful consumption can suit weight management strategies, as the wholesome ingredients in moderation can be satisfying, aiding in curbing cravings for less nutritious options.

Dietary Adaptations

For gluten-free options, use gluten-free ingredients to ensure the cookies remain safe for individuals with gluten sensitivities. Dairy-free adaptations can be achieved by using coconut oil or dairy-free ingredients instead of traditional dairy products.

If vegan, make sure to select sweeteners that do not contain animal products. Low-carb or keto-friendly versions can utilize sugar substitutes like erythritol to keep carbs low while maintaining sweetness.

Those following a paleo or Whole30 diet should ensure each ingredient aligns with their dietary restrictions. There are also low-FODMAP adjustments if sensitive to certain sugars found in traditional sweeteners.

Exploring these variations opens the door for more people to enjoy the recipe without compromising dietary preferences.

Troubleshooting Guide

For texture issues, if the cookies are too crumbly or too sticky, assess your ingredient ratios; adding a little more coconut can help bind them.

Flavor balancing problems can often be fixed with a touch of salt, which elevates sweetness. If the mixture has a strong coconut taste, consider incorporating more pecans for a balanced profile.

Temperature challenges occur when cookies do not set correctly. Ensure they are stored properly in the refrigerator before serving. If cookies melt too quickly upon serving, try adjusting the fridge time before creating them.

If you encounter equipment challenges, make sure your measuring tools are accurate to avoid under or over-mixing ingredients. Timing concerns often arise; letting the cookies sit longer can help them solidify better.

Recipe Success Stories

Community feedback often highlights the ease of preparation, making these cookies a favorite among busy families. Variations abound, with readers delighted in trying different nuts and flavorings, sharing their adaptations with the community.

Many have successfully incorporated these cookies into special occasions, citing them as a hit among both adults and children alike. Visual appeal also stands out, as families share photos on social media of their beautifully presented cookies.

Readers have shared suggestions for additional ingredients, fostering an encouraging culture of creativity and experimentation. Photography tips have also circulated, enhancing people’s ability to showcase their culinary accomplishments.

Frequently Asked Questions

Can I use sweetened coconut in this recipe?
While sweetened coconut is technically usable, it may overpower the flavors of the cookies. Unsweetened coconut is recommended for a more balanced sweetness.

How long do these cookies last?
When stored properly in an airtight container, No-Bake Coconut Pecan Praline Cookies can last up to a week in the refrigerator and up to three months in the freezer.

Are these cookies gluten-free?
Yes, this recipe is naturally gluten-free provided you use gluten-free ingredients. Always check label for potential cross-contamination.

Can I substitute other nuts?
Absolutely! If you don’t have pecans on hand, feel free to use any type of nut you prefer, such as walnuts or cashews.

What is the best way to store these cookies?
Store in an airtight container in the fridge, separating each layer with parchment paper to prevent sticking.

How do I make these cookies vegan?
Ensure all ingredients are plant-based; utilize vegan alternatives for any dairy products that may be included.

Can I freeze these cookies?
Yes! They freeze beautifully and keep well for up to three months, making them a great make-ahead option.

How do I serve these cookies?
Serve chilled or at room temperature, and consider garnishing them with extra coconut or nuts for a decorative touch.

Can I adjust the sweetness?
Yes, feel free to add or reduce the sweetener to suit your preference. Monitor the mixture’s consistency as you adjust.

What equipment do I need for this recipe?
You will need a mixing bowl, measuring cups and spoons, and a baking sheet lined with parchment paper.

Additional Resources

For more delightful no-bake recipes, check our blog for variations and alternatives. Technique guides are available for mastering the art of no-bake desserts, providing tips on mixing, setting, and garnishing.

Ingredient information resources give deeper insights into each component, helping you make better selections when cooking or baking. Equipment recommendations list essential tools to simplify your food prep experience.

Lastly, seasonal variations are provided to keep your cooking fresh, bringing new flavors to the table, perfect for celebrating holidays or special events.

Join the Conversation

We would love to hear your experience with No-Bake Coconut Pecan Praline Cookies! Share your photos on social media and connect with our community for photography tips and recipe reviews.

Discuss your favorite variations with others and engage in recipe brainstorming, expanding flavor possibilities together. Participation in this culinary journey can lead to creative new versions and cherished community connections.

The Recipe

No-Bake Coconut Pecan Praline Cookies

Serves: 24 cookies

Prep Time: 15 mins

Cook Time: 0 mins

Total Time: 15 mins

Kitchen Equipment Needed

  • Mixing bowl
  • Measuring cups and spoons
  • Baking sheet
  • Parchment paper

Ingredients

  • 1 cup chopped pecans
  • 1 cup unsweetened shredded coconut
  • 1/2 cup creamy peanut butter
  • 1/2 cup honey or maple syrup
  • 1 teaspoon vanilla extract

Directions

  1. In a mixing bowl, combine the chopped pecans and shredded coconut.
  2. In a separate bowl, mix peanut butter, honey (or maple syrup), and vanilla extract until smooth.
  3. Combine the wet and dry ingredients, mixing well until evenly coated.
  4. Using a scoop or spoon, drop rounded tablespoons onto a prepared baking sheet lined with parchment paper.
  5. Refrigerate for at least 1 hour until set.
  6. Enjoy chilled or at room temperature!

Recipe Notes

  • Feel free to swap in any nuts or add chocolate chips for extra flavor.
  • For added sweetness, sprinkle some cinnamon into the mixture.
  • These cookies can be stored in an airtight container for a week or frozen for up to 3 months.

Indulge in Heavenly Banana Cake with Cream Cheese Frosting

Heavenly Banana Cake with Cream Cheese Frosting: A Sweet Slice of Bliss

⚖️
Difficulty
Medium

⏲️
Prep Time
20 mins

🕒
Cook Time
30 mins

⏱️
Total Time
50 mins

🍽️
Servings
12

Banana cake is a delightful dessert that brings comfort and joy in every bite. Packed with ripe bananas, this heavenly banana cake pairs beautifully with velvety cream cheese frosting, creating a balance of flavors that dances on your palate. From the first forkful, you’ll be enchanted by the moist crumb and the rich, sweet undertones of banana, making it a perfect choice for birthdays, potlucks, or any day that calls for a sweet treat.

This Heavenly Banana Cake is more than just dessert; it’s a deeply comforting dish that evokes nostalgia. Many of us have fond memories of baking banana bread or cake with family, and this recipe takes those beloved flavors to new heights. As the cake bakes, your kitchen will be filled with the warm, inviting aroma of caramelizing bananas, promising deliciousness. Each slice reveals its luscious cream cheese frosting, making it an eye-catching centerpiece that is as delightful to look at as it is to eat.

Quick Recipe Highlights

  • Flavor Profile: This cake showcases the rich sweetness of ripe bananas complemented by the tangy creaminess of the frosting. Each bite is a heavenly indulgence.
  • Texture: The cake itself is incredibly moist and fluffy, while the cream cheese frosting adds a smooth, creamy layer that contrasts beautifully.
  • Aroma: Expect an enticing aroma of baked bananas and a hint of vanilla that will make your mouth water as it bakes.
  • Visual Appeal: The beautiful golden color of the cake topped with a generous swirl of creamy frosting creates an inviting presentation.
  • Skill Level Needed: This is a medium-difficulty recipe, ideal for home bakers who are comfortable with basic mixing and baking techniques.
  • Special Equipment: You will need standard baking equipment such as mixing bowls, measuring cups, a spatula, and a cake pan.

Recipe Overview

  • Difficulty Level: This Heavenly Banana Cake recipe is classified as medium in difficulty, perfect for bakers who are familiar with mixing and baking practices.
  • Category: This recipe fits beautifully into the dessert category, particularly for sweet cakes or celebration desserts.
  • Cuisine: While banana cake is enjoyed in many cultures, this version draws from American baking traditions, emphasizing the use of bananas as a key ingredient.
  • Cost: This cake is budget-friendly, using modestly priced ingredients like bananas, flour, and sugar, making it accessible for any home cook.
  • Season: Ripe bananas are available all year round, but this cake is especially popular in the late summer and fall when bananas are perfectly sweet.
  • Occasion: Perfect for birthdays, family gatherings, or casual get-togethers, this cake will impress guests at any occasion.

Why You’ll Love This Recipe

The taste and texture of this cake will win over anyone who tries it. The combination of sweet, ripe bananas creates a moist, flavorful cake that is anything but ordinary. The frosting adds just the right amount of tang and sweetness, creating a luxurious feel that elevates your everyday dessert to a special occasion treat. You will find that each forkful delivers comfort, making it irresistible!

Convenience is another major selling point of this recipe. With simple ingredients and straightforward instructions, this banana cake can easily be whipped up in no time. The batter comes together quickly, allowing you to focus on the fun part: frosting and decorating the cake. Its quick preparation relative to the payoff makes it a go-to recipe for busy bakers who still want to create something incredible.

Nutritionally, bananas are a great source of potassium and vitamins, adding a slight health benefit to this indulgent cake. The addition of cream cheese offers some calcium and protein, making this delicious dessert a little more balanced. While desserts are meant to be enjoyed, this cake does provide some nutritional value that can make you feel less guilty about indulging.

When hosting gatherings or parties, this Heavenly Banana Cake will surely be a crowd-pleaser. It’s large enough to feed a group, making it an ideal choice for sharing. The delightful flavors and striking presentation will impress your guests, and their smiles of delight will make it all worthwhile.

Cost-effectiveness is always a plus when cooking, and this recipe uses simple, common ingredients that won’t break the bank. With bananas as your star ingredient, you’re making a delicious cake that makes the most of inexpensive components. It’s an accessible recipe for any home baker looking to satisfy a sweet tooth without overspending.

Historical Background and Cultural Significance

Banana cake has interesting origins tracing back to times when overripe bananas were often mashed and incorporated into batter to reduce waste. This method transformed what was once a simple fruit into a delectable dessert. Many cultures have their versions, with each adding a unique spin on texture and flavor, leading to various adaptations of the banana cake.

The cultural significance of banana cake differs around the world. In many households, banana cake is a beloved family recipe passed down through generations. It’s not just a cake; it’s a symbol of affection, homemade love, and memories baked into each slice. Its appeal spans various cuisines, showcasing how ingredients like bananas can connect us through shared desserts.

As the years went by, the evolution of this recipe saw the introduction of various frostings and additional flavorings, such as nuts, chocolate, or spices, like cinnamon and nutmeg. As the banana cake became popular, many home bakers began enhancing the flavors, transitioning it into a more versatile dessert that can fit many occasions, from formal gatherings to casual dinners.

Regional variations of banana cake exist, with some cultures opting for a denser bread-like form while others create lighter, fluffier cakes. Each version reflects local tastes and preferences, highlighting how a simple banana can shine in numerous culinary contexts while bringing friends and families together.

Ingredient Deep Dive

  • Bananas

    Bananas have a rich history, believed to have originated in Southeast Asia. Their sweetness and versatility have made them a staple in many diets worldwide. Nutritionally, bananas are high in potassium, vitamin C, and dietary fiber. When selecting bananas for baking, look for those with a few brown spots, which indicate ripeness and sweetness. Store ripe bananas at room temperature, and when they start to brown too much, transfer them to the refrigerator to slow down ripening. If fresh bananas are not available, frozen bananas can be used as a perfect substitute for baking.

  • All-Purpose Flour

    All-purpose flour is a foundational ingredient in baking, used for everything from bread to cakes. It’s milled from wheat and can vary between protein content but is suitable for a variety of recipes. Nutritionally, flour provides carbohydrates that are essential for energy. When selecting flour, choose a brand that you trust for consistent results, and store it in a cool, dry place to extend its shelf life. If you want to make this cake gluten-free, alternatives like almond flour or coconut flour can be excellent substitutes but may require adjustments in the recipe.

  • Cream Cheese

    Cream cheese has been a popular ingredient in desserts since the 18th century. It creates a rich and tangy frosting that contrasts beautifully with the sweetness of banana cake. Cream cheese is high in calcium, making it an excellent choice for those needing nutritional value. When selecting cream cheese, make sure you choose a full-fat version for the best texture. Store it in the refrigerator, and once opened, consume it within two weeks. If you’re looking for a healthier alternative, you can replace cream cheese with Greek yogurt mixed with a bit of powdered sugar to mimic the taste.

Common Mistakes to Avoid

  • Using underripe bananas: Underripe bananas can result in a less sweet, dense cake. Opt for fully ripe bananas for optimal flavor.
  • Overmixing the batter: Overmixing can lead to tough cake. Mix just until ingredients are combined for a tender texture.
  • Not measuring accurately: Baking is a science. Use a kitchen scale or measuring cups for precision to avoid discrepancies in texture.
  • Not preheating the oven: A preheated oven ensures consistent baking and helps the cake rise properly. Always check your oven’s accuracy.
  • Skipping the cooling stage: Letting the cake cool before frosting allows the frosting to set and prevents melting. Always cool cakes on a wire rack.
  • Frosting too early: Frosting a warm cake can cause the frosting to melt. Wait until the cake is completely cool before applying frosting.
  • Omitting flavorings: Vanilla extract and other flavorings enhance the overall taste. Don’t skip these important ingredients!
  • Using cold cream cheese: Cold cream cheese can be hard to blend smoothly. Bring it to room temperature for easy mixing.
  • Not adjusting for altitude: If you live at high elevations, adjustments in baking may be necessary due to lower air pressure.
  • Ignoring ingredient substitutions: Substituting ingredients can alter the taste or texture. Research alternatives to understand how they will affect the recipe.

Essential Techniques

– **Creaming Butter and Sugar**: This technique is crucial for creating a light and airy cake. The process incorporates air into the batter and establishes a tender crumb. To master this, ensure your butter is softened to room temperature and cream until the mixture is pale and fluffy. Avoid over-creaming, which can result in excessive air pockets and dryness.

– **Folding Techniques**: When incorporating banana puree or whipped cream into the batter, use a gentle folding motion to maintain airiness. This is vital for a light cake. Use a spatula and move through the batter without deflating it.

– **Checking for Doneness**: Ensure your cake is properly baked by using a toothpick inserted into the center; it should come out clean or with a few crumbs. If it comes out wet, bake for a few additional minutes.

– **Maintaining Temperature**: Always allow ingredients to reach room temperature before baking. This helps emulsify fats and gives you a smooth, consistent batter. Having eggs, butter, and cream cheese at room temperature will significantly improve your cake’s texture.

Pro Tips for Perfect Heavenly Banana Cake

– Use very ripe bananas for the best sweetness and flavor.
– For added texture, fold in chopped walnuts or chocolate chips into the batter.
– Experiment with spices like cinnamon or nutmeg for an added depth of flavor.
– If you prefer a layered cake, double the recipe and stack with frosting and fresh fruit between the layers.
– Keep the cake refrigerated if not served immediately to preserve freshness.
– Allow the frosting to come to room temperature before serving for a creamy texture.
– Garnish each slice with banana slices for added visual appeal.
– For a lighter frosting, use whipped cream cheese and reduce sugar for a less dense topping.

Variations and Adaptations

– **Regional Variations**: Some cultures incorporate coconut or vanilla extract into their batter, offering unique sights and flavors for the cake.
– **Seasonal Adaptations**: In fall, try adding pumpkin spice to the batter for a seasonal twist that complements the banana flavors beautifully.
– **Dietary Modifications**: Gluten-free bakers can substitute regular flour with a gluten-free blend. Ensure that it has a binding agent, such as xantham gum.
– **Flavor Variations**: Incorporate ripe, mashed strawberries or blueberries along with bananas for a fruity explosion.
– **Texture Modifications**: For a denser cake, try using whole wheat flour, which can add nuttiness.
– **Presentation Alternatives**: Decorate with toasted coconut flakes or crushed nuts on top of your frosting for a beautiful finish.

Serving and Presentation Guide

To plate your Heavenly Banana Cake beautifully, opt for a white or pastel-colored plate to contrast the deep yellow hues of the cake. Use a serrated knife to create clean slices, ensuring the frosting does not smear. Garnishing with fresh banana slices or a dusting of powdered sugar can elevate the visual presentation. For an elegant touch, serve with a scoop of vanilla ice cream or a dollop of whipped cream on the side. Serve at room temperature for the best experience in flavor and texture.

Wine and Beverage Pairing

When it comes to pairing beverages with your Heavenly Banana Cake, opt for a light-bodied dessert wine such as Moscato or a sweet Riesling that complements the tropical flavors perfectly. For non-alcoholic options, consider pairing with a refreshing iced tea or coconut lemonade. If you’re a coffee lover, a medium roast brewed coffee will enhance the cake’s sweetness and depth. Always serve these beverages chilled for a refreshing experience.

Storage and Shelf Life

To maximize the freshness of your Heavenly Banana Cake, store it in an airtight container at room temperature for up to four days. If you need to keep it longer, refrigeration is an option, extending its life up to a week. When refrigerating, wrap the cake properly with plastic wrap to prevent it from drying out. Signs of spoilage include an off smell or mold growth. For longer storage, consider freezing slices in an airtight container for up to three months. To enjoy, simply thaw in the refrigerator overnight.

Make Ahead Strategies

This cake can be prepared in several stages. Bake the cake a day in advance and keep it tightly wrapped. Frost it on the day of serving for best results. Alternatively, you can prepare the frosting ahead of time and store it in the refrigerator for up to five days before use. Consider making a double batch to enjoy on another occasion. Just ensure you allow the frosting to come back to room temperature before applying it to the cake.

Scaling Instructions

Should you wish to halve this recipe, simply divide all ingredient quantities by two and use a smaller cake pan. Conversely, if you’re feeling ambitious, doubling or tripling the recipe can be done easily; just make sure to increase your bake time accordingly. Always monitor the cake closely during baking, as larger quantities might require slight adjustments to timing. Ensure that if you’re using larger baking pans, they fit comfortably in your oven, allowing for even heat distribution.

Nutritional Deep Dive

The Heavenly Banana Cake provides a delicious balance of macronutrients, including carbohydrates from the bananas and flour, proteins from the cream cheese, and fats from additional ingredients. Each slice packs a punch of vitamins, particularly due to the potassium content from bananas and the calcium from cream cheese. Consider moderation in serving size, especially for weight management. If you’re trying to manage your caloric intake, pairing this dessert with a fruit salad can further enhance nutritional benefits while satisfying your sweet cravings.

Dietary Adaptations

For those needing dietary adaptations, this recipe can easily cater to various needs. To make it gluten-free, substitute all-purpose flour with a 1:1 gluten-free blend. You may also use almond milk or coconut milk instead of whole milk in the frosting for a dairy-free option. For a vegan adaptational option, use flax eggs in place of regular eggs and a dairy-free cream cheese alternative. Low-carb and keto versions can utilize almond flour combined with erythritol as a sugar substitute to make a delicious alternative without sacrificing flavor.

Troubleshooting Guide

If your cake comes out too dense, it may be due to overmixing the batter or using bananas that are not ripe enough. To fix texture issues in the future, ensure ingredients are at room temperature and do not overmix. If you find the flavor lacking, you could enhance it with spices or extracts. Should your frosting melt off the cake, ensure it’s completely cooled before icing. Always check your oven temperature to avoid baking issues. Adjust timing based on your equipment, as some ovens bake faster than others.

Recipe Success Stories

Community feedback on this Heavenly Banana Cake has been overwhelmingly positive. Many readers have shared their success with variations, such as adding chocolate chips or nuts. Adaptation stories often include families passing the recipe down through generations, reiterating how comfort food like this cake can bring people together. Photography tips abound as bakers showcase their creations online, highlighting the beautiful presentation of their cakes. Sharing recipe reviews encourages a sense of community among home bakers, driving home the charm of making this delightful dessert.

Frequently Asked Questions

Can I use frozen bananas for this recipe?

Yes, frozen bananas are a great substitute for fresh ones. Just make sure to thaw and mash them thoroughly before adding to the batter.

How should I store leftover cake?

To store leftover cake, keep it in an airtight container at room temperature for up to four days or refrigerate for up to a week.

What can I use instead of cream cheese for the frosting?

A good alternative to cream cheese could be mascarpone cheese or a dairy-free cream cheese substitute for those with dietary restrictions.

Can I make this cake in advance?

Yes! You can bake the cake a day ahead of time and frost it on the day you plan to serve it for optimal freshness.

What kind of flour can I use for gluten-free cake?

You can use a gluten-free all-purpose flour blend, but be sure to include a binding agent like xanthan gum if your mix does not contain it.

How can I tell when the cake is done baking?

Insert a toothpick in the center of the cake; if it comes out clean or with a few moist crumbs, your cake is done.

What are the best bananas to use?

The best bananas for this cake are those that are overripe with plenty of brown spots, as they provide maximum sweetness and moisture.

Can I add nuts to my batter?

Absolutely! Chopped walnuts or pecans can be added to the batter for a delightful crunch and flavor enhancement.

Is this cake suitable for freezing?

Yes, this cake can be frozen. Wrap slices in plastic wrap, then in foil and keep frozen for up to three months.

How can I enhance the flavor of my cake?

You can add vanilla extract or spices like cinnamon and nutmeg to elevate the taste profile of your banana cake.

Additional Resources

Explore related recipes that complement your Heavenly Banana Cake! Consider trying a classic chocolate chip cookie or a refreshing fruit salad for dessert. Delve into technique guides on baking fundamentals, such as mastering the art of frosting and cake decorating. Familiarize yourself with seasonal ingredients for inspiration, and check out equipment recommendations like cake pans and mixers to enhance your baking experience further.

Join the Conversation

We invite you to share your experiences and photos of your Heavenly Banana Cake creations! Engage with us on social media by tagging our handle, and don’t forget to leave a review. As you explore variations of the recipe, share your unique adaptations to help inspire other bakers. Create a community of recipe sharing and conversation; after all, food is meant to be enjoyed together!

The Recipe

Heavenly Banana Cake

Serves: 12

Prep Time: 20 mins

Cook Time: 30 mins

Total Time: 50 mins

Kitchen Equipment Needed

  • Mixing bowls
  • Measuring cups and spoons
  • Spatula
  • 9×13 inch cake pan
  • Cooling rack
  • Electric mixer (optional)

Ingredients

  • 3 ripe bananas, mashed
  • 1 ½ cups all-purpose flour
  • 1 cup granulated sugar
  • ½ cup unsalted butter, softened
  • 2 large eggs
  • 1 tsp baking soda
  • ½ tsp salt
  • 1 tsp vanilla extract
  • 8 oz cream cheese, softened
  • 4 cups powdered sugar
  • 1 tbsp milk (for thinning the frosting, if needed)

Directions

  1. Preheat the oven to 350°F (175°C) and grease your cake pan.
  2. In a mixing bowl, cream the softened butter and sugar together until fluffy.
  3. Add eggs one at a time, mixing well after each addition, then stir in the mashed bananas and vanilla.
  4. In another bowl, whisk together the flour, baking soda, and salt.
  5. Gradually add the dry ingredients to the wet mixture until just combined.
  6. Pour the batter into the prepared cake pan and smooth out the top.
  7. Bake for 30 minutes or until a toothpick comes out clean. Let cool completely.
  8. For frosting, beat the softened cream cheese and gradually add powdered sugar until smooth and creamy. If needed, add milk for desired consistency.
  9. Once the cake is cool, frost the top generously with cream cheese frosting and decorate as desired.

Recipe Notes

  • Feel free to add nuts or chocolate chips to the batter for extra flavor.
  • This cake pairs beautifully with fresh fruits or a scoop of ice cream.

Delightful Pineapple Mousse Cheesecake Recipe for a Refreshing Treat

Refreshing Pineapple Mousse Cheesecake: A Tropical Delight

⚖️
Difficulty
Medium

⏲️
Prep Time
30 mins

🕒
Cook Time
15 mins

⏱️
Total Time
45 mins

🍽️
Servings
8 servings

If you’re looking for a dessert that captures the essence of summer while bringing tropical bliss to your table, the Refreshing Pineapple Mousse Cheesecake is the perfect choice. This delightful recipe features a rich and creamy mousse layered atop a crisp, buttery crust, all accentuated by the vibrant flavor of fresh pineapples. Each bite transports you to a sunny paradise, making it an ideal treat for picnics, parties, or simply to satisfy your sweet tooth.

The combination of smooth cheesecake with the lightness of pineapple mousse creates an indulgent yet refreshing dessert that appeals to all palates. The use of fresh pineapples not only lends a gorgeous tropical flavor but also adds a beautiful color that makes the cheesecake visually inviting. Whether you’re serving this at a special occasion or enjoying it on a sunny afternoon, this dessert is bound to impress with its sophisticated taste and presentation.

Quick Recipe Highlights

  • Flavor Profile: A delightful harmony of sweet and tart flavors from the fresh pineapple, balanced with the creamy richness of the cheesecake.
  • Texture: The light and airy mousse contrasts beautifully with the dense, buttery base, creating an exciting mouthfeel.
  • Aroma: The sweet aroma of ripened pineapple mingles with the toasted notes of the crust to create an enticing scent.
  • Visual Appeal: A gorgeous golden hue from the pineapple mousse on a crisp, brown crust makes for an eye-catching dessert.
  • Skill Level Needed: Requires some baking skills, but achievable with attention to detail and patience.
  • Special Equipment: A springform pan is essential for easy removal and presentation.

Recipe Overview

  • Difficulty Level: This recipe is rated as medium difficulty and involves making the crust, preparing the mousse, and layering the two. With careful follow-through, it’s easy to master.
  • Category: Dessert—perfect for any meal, this cheesecake provides a sweet finish to lunch or dinner.
  • Cuisine: Drawing on tropical influences, this cheesecake is inspired by classic American desserts with a twist of island flare.
  • Cost: Ingredients like cream cheese, fresh pineapple, and graham crackers are reasonably priced, making this an economical choice for an impressive dessert.
  • Season: Best enjoyed during the warmer months when pineapples are in season, brightening up summer gatherings.
  • Occasion: An excellent choice for birthdays, summer barbecues, or beach-themed parties, adding a festive touch to any menu.

Why You’ll Love This Recipe

The Refreshing Pineapple Mousse Cheesecake presents an extraordinary balance of taste and texture that enchants dessert lovers. The airy mousse blends beautifully with a rich cheesecake base, making it both satisfying and light. The fresh pineapple elevates the whole experience, providing a burst of tropical flavor with every forkful. The dessert’s visual charm will draw guests in, while the special mix of flavors keeps them coming back for more.

Convenience and preparation also play a significant role in the appeal of this cheesecake. Most of the steps can be done ahead of time—allowing the mousse and crust to chill before assembly. You can even prepare the entire cheesecake a day in advance, making it an excellent option for busy hosts. The simplicity of the ingredients promotes accessibility without compromising on taste or presentation.

From a nutritional standpoint, the use of fresh pineapples offers a variety of vitamins and antioxidants, contributing to a more health-conscious dessert option. The creamy texture of the cheese provides calcium and protein, allowing you to enjoy a sweet treat that is both delicious and somewhat wholesome.

Social gatherings become all the more special when you serve this refreshing cheesecake. Its appealing layers and tropical essence make it a star dessert at parties and family functions. The versatility of the recipe means it fits seamlessly into various menus, making it easy to pair with savory dishes.

Ultimately, the cost-effectiveness of this refreshing dessert ensures that you can treat your loved ones without breaking the bank. With common ingredients easily found at your local store, you can whip up this incredible cheesecake and impress family and friends without spending a fortune.

Historical Background and Cultural Significance

The origins of cheesecake date back to Ancient Greece, where it was often served to athletes during the Olympic Games. The delightful blend of cheese, sugar, and eggs provided sustenance and energy. Over the centuries, cheesecakes transformed, and with the arrival of European settlers in America, variations emerged, including the popular New York-style cheesecake. Incorporating pineapple brings a unique twist that showcases the influence of tropical fruits in American cuisine, especially in states like Hawaii.

Pineapple has long been seen as a symbol of hospitality, infusing a sense of warmth and cheer into gatherings. Its use in desserts gained popularity in the mid-20th century, especially in America, where fruit-based desserts became trendy. This cheesecake not only reflects that cultural significance but also adds a modern twist, making it appealing to diverse taste buds.

The recipe has evolved significantly, allowing for various adaptations, including the incorporation of gelatin to achieve that light mousse-like texture. Many bakers experiment with different fruit flavors, but the bright, sweet-sour taste of pineapple remains a perennial favorite that appeals to the masses.

Regional variations can be immense, from traditional baked versions to no-bake recipes that offer ease of preparation. Various toppings and crust options can further modify individual recipes, giving each family their unique take on this classic dessert.

Ingredient Deep Dive

Graham Crackers

Graham crackers are a staple in American baking, primarily known for their use in crusts for desserts. They were originally invented by Sylvester Graham in the early 19th century as part of a health reform movement. Nutritionally, they provide a good source of carbohydrates while being relatively low in fat. When selecting graham crackers, choose those without high fructose corn syrup or artificial flavors for the best results. Store opened packages in a sealed container to maintain freshness, and substitute with crushed cookies or oatmeal if necessary.

Pineapple

Pineapple carries cultural significance as a tropical fruit representing hospitality and warmth, often featured in celebrations. Nutritionally, pineapples are rich in vitamin C and manganese, providing significant health benefits. Fresh pineapples should be fragrant, yielding slightly when pressed. To store, keep them at room temperature until ripe, then refrigerate for up to five days. If you need a substitute, you can use canned pineapple, but ensure it’s packed in juice rather than syrup to maintain a healthier profile.

Common Mistakes to Avoid

  • Overmixing the Cheese Mixture: Overmixing can lead to a dense cheesecake rather than a light, airy texture. Mix until just combined.
  • Pineapple Preparation: Be sure to remove excess moisture from the pineapples; otherwise, it can make the cheesecake soggy.
  • Crust Too Thick: A thick crust may overpower the light mousse. Aim for a balanced layer that supports but doesn’t dominate.
  • Skipping Chilling Time: Allow sufficient chilling time to set the mousse properly; skipping this step will result in a runny texture.
  • Not Adjusting Baking Time: Keep an eye on baking times; different ovens vary and affect how well the cheesecake sets.
  • Using Warm Ingredients: Cold ingredients can lead to grainy textures, so bring cream cheese and other dairy products to room temperature first.
  • Overcomplicated Flavors: While it’s tempting to add lots of toppings, keeping it simple enhances the pineapple flavor.
  • Failure to Grease the Pan: If the springform pan isn’t properly greased, it may result in a difficult removal process.
  • Ingredient Quality: Using low-quality ingredients, like imitation vanilla, can result in poor flavor—always opt for fresh, quality products.
  • Ignoring Visual Cues: Pay attention to the texture of the cheesecake as it bakes; it should jiggle slightly but not be liquid when done.

Essential Techniques

Making a Graham Cracker Crust

Creating a graham cracker crust is essential for cheesecake success, providing a firm and flavorful base. To master this, crush the graham crackers into fine crumbs until they resemble sand. Combine with melted butter and sugar, then press firmly into the bottom of your pan. A common pitfall is not compressing the crust enough; use the bottom of a measuring cup for even results. Bake until slightly golden for added flavor and structure.

Preparing the Pineapple Mousse

The preparation of the mousse is crucial for achieving that light and airy texture. Start by whipping the heavy cream to soft peaks and folding it gently into the pineapple mixture. Be careful not to deflate the whipped cream, as this will affect the final texture. Visual cues include a luscious, fluffy consistency that holds its shape. If the mousse seems too runny, consider incorporating a stabilizer such as gelatin to help it set properly.

Pro Tips for Perfect Refreshing Pineapple Mousse Cheesecake

1. Use fresh, ripe pineapples for the richest flavor and optimal sweetness.
2. Chill the mousse for at least one hour before layering it on the crust for a better texture.
3. Consider adding a splash of rum or coconut extract for a Caribbean twist.
4. Always taste and adjust sweetness; some will prefer it sweeter or less sweet.
5. Garnish with toasted coconut flakes for a lovely texture and additional flavor.
6. Serve well-chilled to ensure the best taste and texture; this dessert is refreshing when cold.
7. If using canned pineapples, ensure they’re well-drained before using them to prevent excess moisture.
8. Experiment with different types of cookies for the crust, like Nilla wafers or shortbread, for unique flavors.

Variations and Adaptations

For lunch gatherings or casual dinners, consider a no-bake variation by blending the cream cheese without baking the crust. For seasonal adaptations, try substituting fresh strawberries or mangoes when pineapples aren’t in season. If dietary restrictions require modifications, a gluten-free crust can be made using almond flour and coconut oil. Flavor variances can be introduced with a layer of passion fruit or raspberry puree for added tartness. Textural changes could include a crispy granola topping instead of a traditional crust or mousse, adding a delightful crunch to the dessert.

Serving and Presentation Guide

When serving the Refreshing Pineapple Mousse Cheesecake, aesthetic presentation is key. Use a clean knife to cut distinct slices, ensuring a polished look. Garnish each slice with slivers of fresh pineapple and a sprig of mint for a refreshing touch. For modern serving suggestions, place individual portions in mason jars for a fun twist. Ensure the cheesecake is well-chilled before serving to enhance the flavors. When portioning, keep in mind that this dessert is rich, so smaller servings may be more satisfying.

Wine and Beverage Pairing

Pair this delightful cheesecake with a crisp white wine like Sauvignon Blanc, which complements the pineapple’s acidity beautifully. If you prefer a non-alcoholic option, a sparkling water infused with lime offers a refreshing balance without overpowering the dish. For coffee lovers, opt for a light roast coffee or iced latte to create a delightful contrast to the sweetness of the cheesecake.

Storage and Shelf Life

To store the Refreshing Pineapple Mousse Cheesecake, cover it tightly with plastic wrap and place it in the refrigerator, where it will last for up to four days. For best results, enjoy the cheesecake within the first 24 to 48 hours for optimal freshness and taste. If you need to freeze leftovers, wrap individual slices in plastic and store them in an airtight container. They will keep for about two months; thaw in the refrigerator before serving.

Make Ahead Strategies

This cheesecake can be made ahead of time, making it ideal for busy schedules. You can prepare the crust and mousse a day or two ahead, allowing them to chill properly. Store the crust at room temperature and the mousse in the refrigerator until you’re ready to assemble. To maintain quality, do not layer the mousse and crust until a few hours before serving, ensuring the best texture and taste when enjoyed fresh.

Scaling Instructions

Scaling this recipe is easy and adaptable to your needs. If you’d like to halve it, reduce the ingredients by 50%, being mindful of the baking time for the crust. When doubling or tripling, confirm that your mixing bowl is large enough and adjust cook times accordingly. If you’re making larger quantities, consider using a larger springform pan or dividing the mix into individual serving dishes for flexibility.

Nutritional Deep Dive

The nutritional breakdown of this dessert is appealing, with a mix of macros that include carbs from the crust and essential fats from the cream cheese. Analyzing micronutrients reveals vitamin C from the pineapple, which boosts the immune system, along with calcium in the cream cheese. Consideration of portions is key, as one slice delivers a rich flavor while remaining moderate in calories compared to more decadent desserts. Weight management becomes achievable with balanced consumption of this refreshing treat.

Dietary Adaptations

For a gluten-free version, use gluten-free graham crackers or almond flour for the crust. If you’re seeking a dairy-free option, use a vegan cream cheese alternative combined with coconut cream for the mousse. For those following a low-carb or keto diet, opt for almond flour and erythritol as substitutes to lower the carbohydrate content while maintaining delicious flavor. Other adaptations may include a vegan approach utilizing soaked cashews for the base or a paleo version by swapping refined sugars for natural sweeteners.

Troubleshooting Guide

If your cheesecake is too runny, this is often due to excess moisture from the pineapple; ensure to strain canned or ripe pineapples. If the crust crumbles when sliced, recheck the butter-to-crumb ratio for proper binding. Flavor balance issues can arise if too much pineapple is added, so tasting throughout the process helps adjust sweetness. If the mousse does not set, revisiting the chilling time should correct this. Timing is crucial, so keep an eye on the clock to avoid overbaking or allowing the mousse to sit too long.

Recipe Success Stories

Community feedback about the Refreshing Pineapple Mousse Cheesecake highlights its reputation as a crowd-pleaser at gatherings. Variations shared by readers include the addition of coconut cream, which enhances tropical notes, while others mention successful adaptations to make it gluten-free. Many have praised the recipe for its ease, often recommending it as a go-to for beginners. The vibrant colors of the dessert often result in stunning photographs shared on social media, inspiring more home bakers to try their hand at this delightful treat.

Frequently Asked Questions

Can I use canned pineapple instead of fresh?

Yes, canned pineapple can be used as a substitute. However, ensure it is packed in juice and drained well to avoid excess moisture in the cheesecake.

How long can I store the cheesecake?

The dessert can be refrigerated for up to four days. For longer storage, wrap and freeze individual slices for up to two months.

What can I substitute for cream cheese?

For a dairy-free alternative, try using vegan cream cheese or blended silken tofu for a similar texture.

Can I make this cheesecake gluten-free?

Absolutely! Use gluten-free graham crackers or almond flour for the crust to make it gluten-free.

Is there a way to reduce the sugar content?

You can lower the sugar by using natural sweeteners, like honey or agave, to taste. Adjusting the amount of added sugar can help maintain flavor balance.

What’s the best way to cut the cheesecake?

For clean cuts, run a sharp knife under hot water before slicing and wipe it clean between cuts for polished presentation.

Do I need to bake the crust?

Yes, baking the crust for a few minutes helps to set it and enhances its flavor. Be sure to let it cool before adding the mousse.

Can I add other fruits to this recipe?

Yes, you can incorporate other fruits like strawberries or mangoes for different flavor profiles. Just remember to adjust sweetness to match the fruit.

How do I know when the cheesecake is done?

The cheesecake should jiggle slightly in the center when done but not look liquid or overcooked. Allow it to set properly in the refrigerator.

Will this cheesecake melt if left out?

Yes, as a mousse cheesecake, it is best served chilled. Avoid leaving it out for long periods in warm environments to prevent melting.

Additional Resources

For those wanting to explore more tropical-inspired dishes, consider checking related recipes such as passion fruit tart or coconut cream pie. Technique guides on making perfect cheesecakes or mastering whipped creams can further enhance your baking skills. Investigate equipment recommendations for springform pans and stand mixers that can simplify the cheesecake-making process. Seasonal variations can also inspire you to incorporate fresh, local fruits into your desserts for every season.

Join the Conversation

We encourage our readers to share their photos and experiences with the Refreshing Pineapple Mousse Cheesecake on social media. Join the community to exchange recipe tips, variations, and insights! Your feedback is invaluable, and we’d love to hear how you made this recipe your own. Don’t hesitate to leave a review and inspire future bakers to enjoy this charming dish!

The Recipe

Refreshing Pineapple Mousse Cheesecake

Serves: 8 servings

Prep Time: 30 mins

Cook Time: 15 mins

Total Time: 45 mins

Kitchen Equipment Needed

  • Springform pan
  • Mixing bowls
  • Electric mixer
  • Measuring cups and spoons
  • Rubber spatula
  • Sharp knife

Ingredients

  • 1 ½ cups graham cracker crumbs
  • ½ cup unsalted butter, melted
  • ¼ cup granulated sugar
  • 2 (8oz) packages cream cheese, softened
  • 1 cup powdered sugar
  • 1 cup fresh pineapple puree
  • 1 teaspoon vanilla extract
  • 1 cup heavy whipping cream
  • Fresh pineapple slices for garnish
  • Mint leaves for garnish

Directions

  1. Preheat the oven to 350°F (175°C).
  2. In a bowl, mix graham cracker crumbs, melted butter, and sugar until evenly combined.
  3. Press the mixture into the bottom of a springform pan and bake for 8-10 minutes until set. Cool completely.
  4. In a separate bowl, beat cream cheese with powdered sugar and vanilla until smooth.
  5. Add pineapple puree and mix until fully combined.
  6. In another bowl, whip the heavy cream to soft peaks, then fold gently into the cream cheese mixture.
  7. Spread the pineapple mousse over the cooled crust and refrigerate for at least 2 hours to set.
  8. Once set, remove from the springform pan and garnish with fresh pineapple slices and mint leaves before serving.

Recipe Notes

  • For an added crunch, consider sprinkling toasted coconut flakes on top before serving.
  • Feel free to experiment with flavors; adding coconut extract can enhance the tropical vibe.
  • Make sure all refrigerator items are at room temperature for smoother mixing.