Delicious Soft Levain Bakery NYC Cookies: A Must-Try Recipe

Soft Levain Bakery NYC Cookies: The Ultimate Cookie Experience

⚖️
Difficulty
Intermediate

⏲️
Prep Time
20 mins

🕒
Cook Time
15 mins

⏱️
Total Time
35 mins

🍽️
Servings
12 cookies

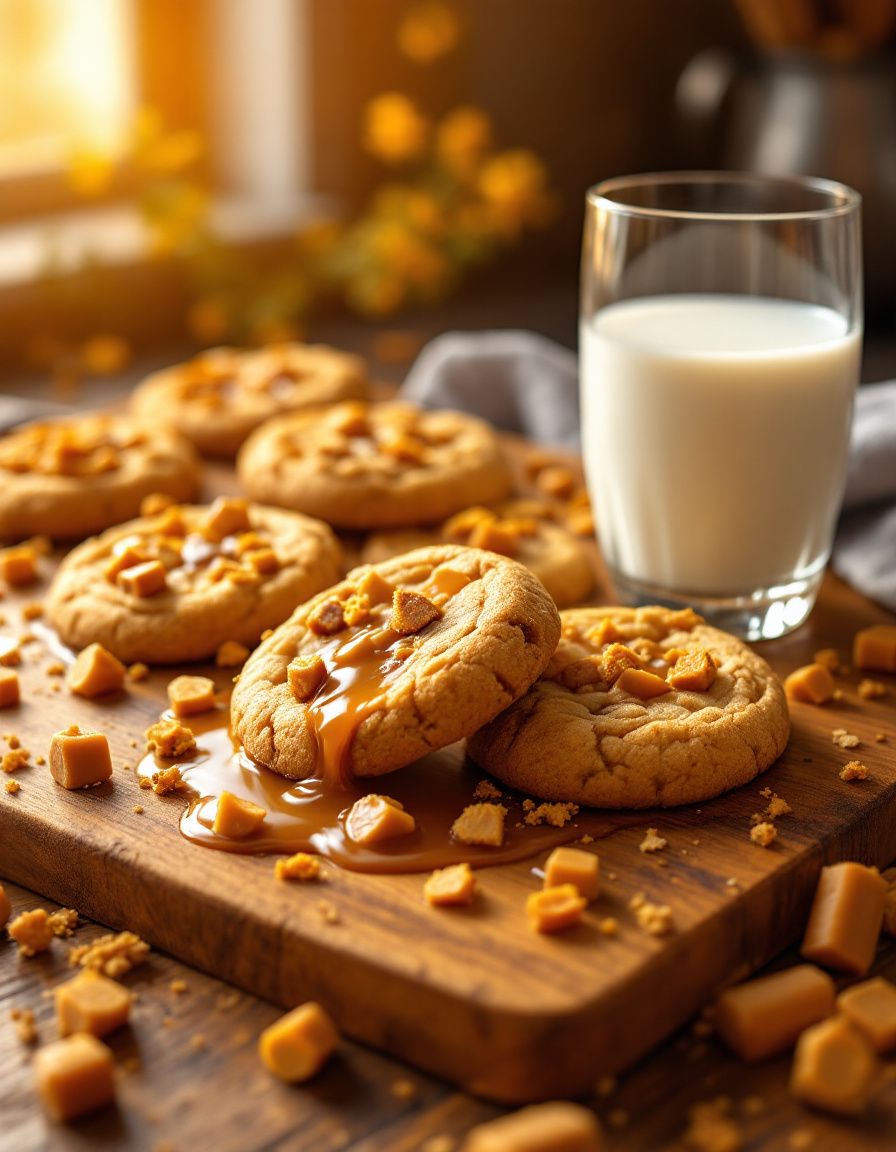
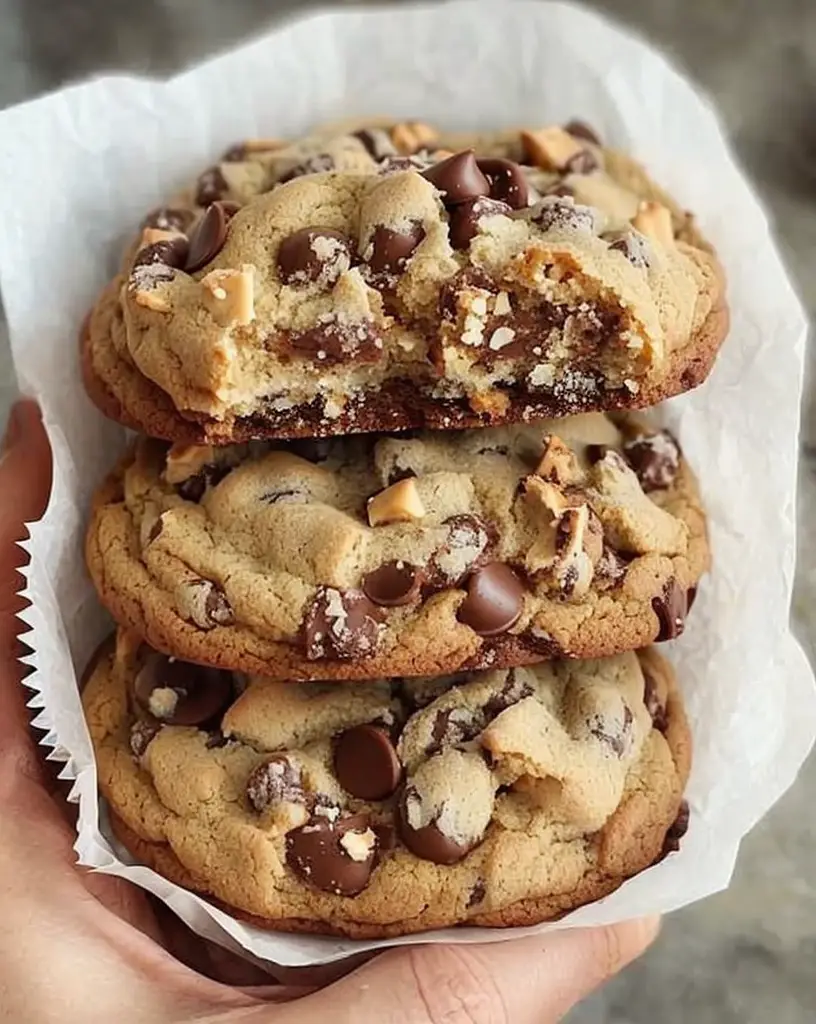
Soft Levain Bakery NYC Cookies are a delight for any cookie lover. Imagine biting into a warm, gooey chocolate chip cookie that has crisp edges and a chewy center. These cookies balance sweet and salty perfectly, evoking a feeling of comfort and nostalgia. As you pull them from the oven, the chocolate melts slightly, creating an irresistible aroma that fills your kitchen and leaves you counting the minutes until they’re cooled enough to enjoy.

The secret of these Soft Levain Bakery NYC Cookies lies not only in the incredible flavor but also in their decadent texture. The dough is thicker than your average cookie, which contributes to the delightfully soft center. Each cookie is a perfect balance of rich chocolate and buttery goodness, ensuring that every bite provides a heavenly experience. Get ready for an unforgettable treat that will become a staple in your baking repertoire.

Quick Recipe Highlights

  • Flavor Profile: These cookies boast a decadent chocolate flavor balanced with a hint of vanilla, enhanced by a light sprinkle of sea salt.
  • Texture: Expect a delightful contrast between the crispy edges and the soft, gooey center that melts in your mouth.
  • Aroma: The rich scent of butter and chocolate wafting through your home will have everyone rushing to the kitchen.
  • Visual Appeal: The cookies have a perfectly browned exterior, and the melted chocolate creates a stunning look that tempts at first glance.
  • Skill Level Needed: With just a few intermediate techniques, anyone can master these cookies and impress friends and family.
  • Special Equipment: A large mixing bowl, baking sheet, and parchment paper are all you need to create these delectable cookies.

Recipe Overview

  • Difficulty Level: This recipe is classified as intermediate due to the handling of the dough and the baking process, which requires precision.
  • Category: These cookies make a fantastic dessert or snack that can also serve as a sweet treat for gatherings.
  • Cuisine: Drawing inspiration from classic American bakeries, these cookies represent the modern cookie trend that values texture and flavor.
  • Cost: The ingredients are relatively affordable, making it a budget-friendly choice for cookie lovers.
  • Season: Perfect for any season, these cookies are particularly enjoyed in the winter months, providing warmth on chilly days.
  • Occasion: Ideal for birthday parties, holiday gatherings, or simply as a treat for a casual afternoon, they are versatile to fit any occasion.

Why You’ll Love This Recipe

The taste and texture of Soft Levain Bakery NYC Cookies are undeniably delightful. Each bite gives a satisfying crunch followed by a soft, chewy interior filled with rich chocolate chips. The combination of flavors will tantalize your taste buds, making these cookies a standout in the world of baking.

Convenience is also a significant benefit of this cookie recipe. With simple ingredients and straightforward steps, you can have freshly baked cookies ready in under an hour. This allows for quick cravings to be satisfied without a lengthy process, making baking feel achievable and enjoyable.

In terms of nutrition, while cookies are a treat, using quality ingredients such as dark chocolate can provide some antioxidant benefits. By making these cookies at home, you have control over the ingredients, allowing you to make healthier choices to some extent.

During social gatherings, Soft Levain Bakery NYC Cookies serve as a fantastic conversation starter. Sharing home-baked cookies creates an inviting atmosphere, encouraging guests to relax and mingle, while enjoying the fruits of your culinary labor.

Moreover, these cookies are cost-effective. Most of the ingredients are pantry staples, and the quantities used yield a generous batch, allowing you to share and delight others without breaking the bank.

Historical Background and Cultural Significance

Soft Levain Bakery NYC Cookies have become iconic in the world of American baking. Their origins can be traced back to the Levain Bakery established in New York City, known for its thick, indulgent cookies that have created a loyal following. Fans of the bakery often describe its cookies as the epitome of gooey deliciousness, and they have influenced many home bakers across the nation.

Culturally, the rise of artisan baking, particularly in urban areas, has brought attention to quality and experience in food. The soft, artisanal cookie represents a shift in consumer preferences toward homemade, high-quality treats over mass-produced options. This cookie has sparked a baking revolution that emphasizes the importance of quality ingredients and craftsmanship.

Over the years, the recipe has evolved from its original form into various adaptations across bakeries and homes nationwide. Many bakers experiment with ingredients and flavors, adding spices or different types of chocolate, creating personal versions of the classic cookie.

Regional variations have also surfaced, as local bakers offer their unique spins on the classic recipe. Some incorporate local flavors or ingredients, resulting in a diverse array of cookie styles within the same base recipe.

Ingredient Deep Dive

Flour: Flour is the backbone of every cookie, providing the structure that holds it together. All-purpose flour is typically used for cookies, offering a great balance of gluten for chewiness, yet light enough for a tender crumb. Nutritionally, it’s a source of carbohydrates and provides energy. When selecting flour, look for a brand that is freshly milled for optimal flavor. Store flour in a cool, dry place to maintain its quality, and use an airtight container for longer shelf life. If you need a substitute, consider almond flour for a gluten-free option.

Butter: Butter adds richness and moisture to cookies, contributing to a tender and flavorful result. It also aids in achieving that lovely golden-brown color when baked. Culturally, butter is a symbol of indulgence in many baking traditions, from French pastries to American cookies. Nutritionally, butter is high in calories but offers fat-soluble vitamins like A and D. Always choose high-quality unsalted butter for baking. Store it in the fridge and keep any unused portions wrapped. For a lighter substitute, consider using applesauce or coconut oil, but this will alter the taste and texture.

Common Mistakes to Avoid

  • Not measuring ingredients accurately: This can lead to too dry or too wet dough, which affects the final cookie texture.
  • Using cold butter: Cold butter can prevent proper mixing, resulting in dense cookies instead of light and fluffy ones.
  • Overmixing the dough: Overmixing can develop gluten too much, leading to tough cookies instead of the desired softness.
  • Not chilling the dough: Skipping this step can result in cookies spreading too much during baking.
  • Using expired ingredients: Old baking soda or flour can affect the rise and taste of the cookies.
  • Baking at the wrong temperature: An oven that is too hot or too cold can be the difference between perfect and burnt cookies.
  • Not allowing cookies to cool: Removing cookies from the baking sheet too soon can lead to them falling apart.
  • Using the wrong type of chocolate: Chocolate is a key ingredient; using low-quality chocolate can diminish the overall flavor.
  • Skipping the salt: Salt enhances the flavors in your cookies, and without it, they can taste flat.
  • Neglecting to read through the recipe: Not reading the entire recipe can lead to missing steps or misunderstandings about ingredient order.

Essential Techniques

Measuring Ingredients: Proper measuring is crucial for baking success. Use precise tools like dry measuring cups for flour and liquid measuring cups for liquids. Make sure to level off dry ingredients with a knife for consistent results. Common pitfalls include scooping flour directly from the bag, leading to packed flour and inaccurate quantities. The visual cue for success is having a well-formed dough that isn’t too wet or dry.

Creaming Butter and Sugar: This technique helps create a fluffy texture and incorporates air for leavening. Start with room temperature butter and sugar, beating until light and fluffy, which usually takes about 2-3 minutes. Pitfalls include not using softened butter, which can lead to clumps instead of a smooth mixture. A good visual cue is the mixture turning pale and airy in texture.

Pro Tips for Perfect Soft Levain Bakery NYC Cookies

1. Always use high-quality chocolate chips; they make a noticeable difference in flavor and texture.
2. Chill your dough for at least 30 minutes before baking to help prevent excessive spreading.
3. Try to use room-temperature ingredients, which allows for better mixing and texture.
4. Experiment with different types of chocolate combinations for a more complex flavor profile.
5. For added depth, incorporate nuts or spices like cinnamon into the dough.
6. Bake on parchment paper for easier cleanup and to prevent sticking.
7. Don’t overbake! Aim for a golden color around the edges and slightly underbaked centers for the best results.
8. Let cookies cool on the baking sheet for a few minutes before transferring to a wire rack to finish cooling.

Variations and Adaptations

For regional variations, consider adding local flavors such as cinnamon for a twist on the classic cookie or incorporating seasonal ingredients like pumpkin for autumn.

For seasonal adaptations, switch up mix-ins based on availability; try dried cranberries during the winter holidays or coconut shavings in the summertime.

For dietary modifications, you can make these cookies gluten-free by substituting with almond flour and using dairy-free chocolate chips for a delicious vegan option.

Flavor variations could include adding orange zest or a dash of espresso powder to enhance the chocolate flavor subtly.

Texture modifications can be achieved by using different sugars, like brown sugar for a chewier cookie compared to granulated sugar for a crispier outcome.

Presentation alternatives include drizzling melted chocolate over the cookies or garnishing them with sea salt for an added touch of flair.

Serving and Presentation Guide

For plating techniques, arrange cookies on a rustic wooden board to showcase their homemade charm. Use a few decorative elements, such as sprigs of mint or edible flowers, to enhance visual appeal.

Garnishing ideas could include a light dusting of powdered sugar or chocolate shavings for a touch of elegance.

Traditional accompaniments like a cold glass of milk or a cup of coffee complement the cookies while contrasting flavors create an engaging experience.

In modern serving suggestions, consider serving them warm with scoops of ice cream for an indulgent dessert.

Be mindful of temperature considerations; enjoy cookies at room temperature for optimal softness.

For portion control, one cookie per serving is perfect for satisfying a sweet craving without overindulging, especially in social settings.

Wine and Beverage Pairing

A red wine like a merlot or Cabernet Sauvignon pairs exceptionally well with chocolate chip cookies, enhancing the rich flavors and offering a contrasting taste experience.

For non-alcoholic alternatives, consider pairing with hot chocolate or milk to balance the sweetness of the cookies.

Ketogenic dieters may enjoy a cup of herbal tea that complements the chocolate without overwhelming it.

Ensure beverages are served at the right temperature; hot drinks can amplify the delightful experience of enjoying warm cookies.

Presentation suggestions include serving beverages in fun, colorful mugs alongside a plate of the warm cookies for a cozy and inviting look.

Storage and Shelf Life

To store cookies, place them in an airtight container at room temperature to keep them fresh for up to one week, depending on moisture levels.

For long-term storage, consider freezing cookies in an airtight container or sealed freezer bag, which can extend their lifespan to about three months.

Be cautious of signs of spoilage; cookies will become hard and dry or might develop mold if left too long.

Reheating instructions are simple—pop them in the microwave for a few seconds for a warm delight, or place them back in a preheated oven briefly.

Also, avoid thawing frozen cookies at room temperature; instead, reheat from frozen for the best texture.

Make Ahead Strategies

To simplify baking, prepare your cookie dough ahead of time and store it in the refrigerator. This allows you to bake fresh cookies whenever a craving hits.

Consider freezing cookie dough scoops so you can take out only what you need, leaving the rest ready to bake at a later time.

Assess the quality impact of this method; freshly baked cookies are unbeatable, but pre-made dough can save time and minimize mess.

When assembling, ensure to shape the cookies before freezing, as the dough may require more time to bake from frozen.

Add fresh elements like sea salt or chocolate drizzle right before serving to enhance your cookies’ appeal without requiring additional time during preparation.

Scaling Instructions

For halving the recipe, use smaller amounts of each ingredient while keeping ratios the same for successful results.

Doubling or tripling the recipe is feasible; use larger mixing bowls and baking sheets to accommodate the increased volume.

Adjust your equipment based on the quantity; smaller batches may need to bake in separate rounds to ensure even cooking.

Timing modifications can vary; larger cookies may need additional minutes in the oven, while smaller ones may cook faster.

Lastly, remember that storing larger quantities requires appropriate container sizes to avoid spoilage.

Nutritional Deep Dive

Each cookie offers a delicious balance of macros, featuring carbohydrates from sugar and flour, a source of protein from eggs, and healthy fats from butter.

In terms of micronutrients, ingredients like eggs provide essential vitamins while chocolate contributes minerals like magnesium and iron.

Considering health benefits, dark chocolate offers antioxidants, making these cookies a slightly more nutritious treat when enjoyed in moderation.

Dietary considerations include the high sugar levels; adjusting portion sizes can help with weight management.

For those keeping calorie counts, enjoying smaller portions or sharing with friends can make indulgence feel less hefty.

Dietary Adaptations

To make these cookies gluten-free, utilize almond flour or a gluten-free baking blend while maintaining the same ratios for success.

For a dairy-free version, substitute regular butter with coconut oil or a vegan butter alternative that works well in baking.

A vegan twist is possible by replacing eggs with flaxseed or applesauce, ensuring the cookie’s structure remains intact.

Low-carb options can incorporate almond flour and erythritol or another sugar substitute for those following a keto diet.

Other specific diets, such as paleo, can also adapt this recipe using coconut sugar in place of refined sugars without losing the cookie essence.

Troubleshooting Guide

Common texture issues may arise from ingredient ratios being off; ensure accurate measuring for consistent results.

Flavor balance problems can often be resolved with a simple add of salt; it magnifies sweetness while reducing flat tastes.

Temperature problems, like cookies spreading too much or not cooking through, often relate to oven calibration or ingredient temperatures, so ensure room temperature items.

If using substitute ingredients, keep in mind they can alter the final cookie significantly; be cautious with swaps for best results.

Timing concerns during baking can be alleviated with regular checks on cookies, shortening every couple of minutes if they are baking unevenly.

Recipe Success Stories

The community’s enthusiasm for these Soft Levain Bakery NYC Cookies is palpable, with readers sharing feedback on their delightful experiences and love for the flavor.

Variation successes abound, as bakers post photos and ideas on how they have adjusted the recipe to include nuts or enjoy them gluten-free.

Adaptation stories often highlight unique ingredients that readers have experimented with, showcasing the flexible nature of the cookies to fit various tastes.

Many readers provide insightful photography tips, emphasizing the importance of presentation and light to showcase the beautifully baked cookies.

These success stories create a vibrant community around the iconic cookie recipe, fostering a sense of camaraderie among bakers.

Frequently Asked Questions

Can I freeze the cookie dough?

Yes, you can freeze cookie dough! Simply scoop dough into balls and place them in a freezer bag. They can be baked directly from frozen, adding a minute or two to the bake time.

How long do these cookies stay fresh?

These cookies generally stay fresh for up to one week at room temperature when stored in an airtight container. They can also be frozen for longer storage.

What can I use instead of chocolate chips?

Feel free to substitute with chopped chocolate bars, white chocolate chips, or even dried fruits like cranberries for a different twist!

What should I do if my cookies are too flat?

If your cookies turn out flat, often it’s due to using melted butter or not enough flour. Ensure butter is at room temperature and measure carefully next time.

Can I make these cookies vegan?

Yes! To make the cookies vegan, substitute butter with coconut oil and eggs with flaxseed meal mixed with water or applesauce for binding.

Is it necessary to chill the dough?

Chilling the dough helps prevent spreading and enhances the flavor. It’s quite recommended for the best texture.

Can I add nuts to the dough?

Absolutely! Chopped nuts like walnuts or pecans add a nice crunch and flavor to the cookies. Just combine them with the chocolate chips.

How do I know when they are done baking?

The cookies should be golden brown around the edges and slightly underbaked in the center. They will continue to cook on the baking sheet after removing them from the oven.

Which kind of flour is best for cookies?

All-purpose flour works great for cookies, providing the perfect balance of structure and texture. For gluten-free options, consider almond or oat flour.

Do I need any special tools for baking these cookies?

No special tools are required, but a quality baking sheet, mixing bowls, and good measuring tools will greatly enhance your baking experience.

Additional Resources

For those interested in baking, check out other cookie recipes that focus on various themes and flavors. Look for technique guides that delve deeper into baking science and principles behind each technique.

Explore ingredient guides for in-depth information about different types of flours and chocolates to elevate your baking skills.

For anyone new to baking, consider investing in reliable, top-quality equipment recommendations based on particular needs.

Finally, seek out seasonal variations to keep your baking fresh and relevant throughout the year, adding exciting twists to perennial favorites.

Join the Conversation

We encourage readers to share their recreations of Soft Levain Bakery NYC Cookies on social media to build a community filled with creative bakers.

Photography tips can help showcase your cookie masterpieces, encouraging engagement with fellow baking enthusiasts.

Don’t forget to leave reviews on your baking experience with this recipe to assist and inspire others.

Join the conversation about variations and experiments readers might have embarked upon, adding your unique twist to this beloved recipe.

Together, we can cultivate a community that celebrates every delicious byte of this amazing cookie experience!

The Recipe

Soft Levain Bakery NYC Cookies

Serves: 12 cookies

Prep Time: 20 mins

Cook Time: 15 mins

Total Time: 35 mins

Kitchen Equipment Needed

  • Mixing bowl
  • Baking sheet
  • Parchment paper
  • Measuring cups and spoons
  • Electric mixer
  • Cooling rack

Ingredients

  • 2 cups all-purpose flour
  • 1 cup unsalted butter, softened
  • 1 cup brown sugar
  • ½ cup granulated sugar
  • 2 large eggs
  • 2 teaspoons vanilla extract
  • 1 teaspoon baking soda
  • ½ teaspoon salt
  • 2 cups chocolate chips

Directions

  1. Preheat your oven to 350°F (175°C) and line a baking sheet with parchment paper.
  2. In a large mixing bowl, cream softened butter, brown sugar, and granulated sugar until fluffy.
  3. Add the eggs, one at a time, and vanilla, mixing until fully incorporated.
  4. In another bowl, whisk together flour, baking soda, and salt.
  5. Gradually add the dry ingredients to the wet mixture, mixing until just combined.
  6. Fold in chocolate chips, ensuring even distribution throughout the dough.
  7. Using a cookie scoop, portion out the dough onto the prepared baking sheet, leaving space between each cookie.
  8. Bake for 12-15 minutes until golden brown on the edges. Let cool on the baking sheet for 5 minutes, then transfer to a wire rack to cool completely.

Recipe Notes

  • Chill the dough for extra thickness if preferred.
  • Feel free to mix in nuts for added crunch.
  • Adjust bake times based on your oven’s accuracy.
  • Experiment with different types of chocolate for varied flavor.

Indulge in Delicious Raspberry Rose Chocolate Truffles Recipe

Elegant Raspberry Rose Chocolate Truffles Recipe: Delightful Indulgence for Your Sweet Tooth

⚖️
Difficulty
Medium

⏲️
Prep Time
30 mins

🕒
Cook Time
10 mins

⏱️
Total Time
40 mins

🍽️
Servings
24 truffles

Indulge in the luxurious flavors of our Elegant Raspberry Rose Chocolate Truffles Recipe. Perfect for any occasion, these delectable truffles combine rich chocolate with the delicate taste of raspberries and floral notes of rose, creating a symphony of flavors that will delight your senses. Whether you’re celebrating a special event or simply treating yourself to something extraordinary, these truffles will elevate your dessert experience.

With each bite, you’ll be captivated by the velvety richness of the chocolate ganache contrasted by the bright and tangy raspberries. The essence of rose adds a sophisticated touch, making these truffles not just a treat but a true masterpiece. The dip into cocoa powder or crushed nuts further enhances their visual appeal, making them a feast for both the eyes and the palate.

Quick Recipe Highlights

  • Flavor Profile: Revel in the sweet and tart combination of fresh raspberries blended with smooth chocolate and fragrant rose.
  • Texture: Experience the luxurious creaminess of chocolate contrasted with the delicate crunch of cocoa or nut coatings.
  • Aroma: The delightful aroma of fresh raspberries mingles perfectly with hints of floral rose, creating an enticing scent.
  • Visual Appeal: Wonderfully rich and decadent, these truffles boast a beautiful deep color, inviting you to indulge.
  • Skill Level Needed: This recipe is accessible for both novice and experienced cooks, requiring basic melting and rolling techniques.
  • Special Equipment: A thermometer for precise temperature control and a double boiler or microwave for melting chocolate are recommended.

Recipe Overview

  • Difficulty Level: With a medium difficulty rating, this Elegant Raspberry Rose Chocolate Truffles Recipe requires careful handling of chocolate but is straightforward enough for anyone willing to try.
  • Category: Perfect for dessert or as a sweet gift, these truffles make an excellent choice for a luxurious finish to any meal.
  • Cuisine: This recipe draws inspiration from European confectionery traditions, highlighting the art of chocolate-making.
  • Cost: With ingredients like chocolate and raspberries, this recipe can be made at a low to moderate cost, making it accessible for home bakers.
  • Season: These truffles are particularly delightful in the spring and summer when raspberries are at their peak ripeness.
  • Occasion: Ideal for weddings, anniversaries, or even as a delightful surprise for a loved one, these truffles are sure to impress.

Why You’ll Love This Recipe

The taste and texture of these truffles are undeniably appealing. Each bite offers a luscious, creamy chocolate experience that gently envelops the bold flavors of raspberry, creating a harmonious balance. The slight crunch from the coating adds to the overall satisfying mouthfeel, making each truffle a mini celebration in itself.

In addition to the irresistible flavor, the convenience of preparing these truffles makes them a standout choice. With minimal cooking time and straightforward steps, you can whip up a batch in less than an hour. Prepare them ahead of time and allow them to chill, making them perfect for last-minute gatherings or relaxing evenings at home.

From a nutritional standpoint, dark chocolate, when used in moderation, holds numerous health benefits, including antioxidants and heart health properties. Coupled with fresh raspberries, you’ll also gain fiber and vitamins, making these truffles somewhat of a guilt-free indulgence.

The social aspect of sharing these truffles cannot be overlooked. Perfect for entertaining, they are conversation starters at parties and make delightful gifts for friends and family. Bringing a box of these elegant treats will surely spread joy and appreciation.

Lastly, considering the cost of ingredients, these truffles are quite economical compared to purchasing gourmet chocolates. With just a few high-quality ingredients, you can create an elite dessert without breaking the bank, proving that luxury can be both delicious and affordable.

Historical Background and Cultural Significance

The invention of chocolate truffles is believed to date back to the late 19th century in Europe. Named for their resemblance to the prized underground fungi, these confections have evolved into a symbol of luxury and indulgence. The combination of chocolate and fruit, such as raspberries, has always been popular due to its balancing elements, accentuating the sweetness while providing a refreshing counterpart.

Culturally, chocolate has been revered since ancient civilizations. The rich, decadent flavor is often associated with celebrations and special occasions. Rose, commonly used in Middle Eastern desserts, brings a unique twist, making these truffles a bridge between different culinary traditions.

Over the decades, the basic truffle recipe has seen countless adaptations. Today, you can find variations infused with spices, liqueurs, or alternative flavors, showing how versatile this treat can be. Our Elegant Raspberry Rose Chocolate Truffles add an innovative spin, merging the classic with the contemporary.

Regionally, variations exist as different countries use local fruits or flavorings. For instance, the Italian “tartufo” often showcases nuts, while French versions may incorporate liquors. Our recipe pays homage to these influences while crafting a unique experience with raspberries and rose.

Ingredient Deep Dive

Dark Chocolate: Rich in antioxidants, dark chocolate has been celebrated for its potential health benefits, such as improving heart health and lowering cholesterol levels. To select the best quality, look for chocolate with a cocoa content of at least 70%. Store it in a cool place away from direct sunlight to maintain its quality. For those who prefer a sweeter truffle, you can substitute semi-sweet chocolate, but keep in mind this will affect the overall taste.

Raspberries: Raspberries are loaded with vitamins, minerals, and antioxidants, making them a nutritious choice for your recipes. When selecting, opt for plump, firm berries with a vibrant color. Store them in the refrigerator and consume them within a few days for peak freshness. If fresh raspberries are unavailable, you can use frozen ones but ensure they are thawed and drained before incorporating them into the recipe.

Rose Water: A quintessential ingredient in many Middle Eastern cuisines, rose water has gained popularity for adding an elegant floral note to desserts. It’s important to look for high-quality rose water to ensure you get the best flavor. Typically stored in a cool, dark place, rose water has a long shelf-life. In case you can’t find rose water, consider using a few drops of vanilla extract as an alternative, although it will change the profile slightly.

Cocoa Powder/Nuts Coating: Cocoa powder adds an extra chocolatey element to the truffles, while crushed nuts can provide a delightful crunch. For a richer taste, opt for unsweetened cocoa powder. Nut coatings should be finely chopped to best adhere to the truffles. Both options can be stored in airtight containers and are widely available, enhancing the truffles’ overall aesthetic and flavor.

Common Mistakes to Avoid

  • Using Low-Quality Chocolate: Always choose high-quality chocolate, as it directly influences the flavor and texture of your truffles.
  • Overheating the Chocolate: When melting chocolate, do so gradually to avoid scorching. Use a double boiler or microwave at low increments with frequent stirring.
  • Skipping Tempering: If you plan to coat the truffles in chocolate, ensure it’s tempered for a glossy finish and snapping texture.
  • Not Chilling Enough: Insufficient refrigeration can lead to crumbly truffles. Always allow them to set completely before rolling.
  • Ignoring Measurements: Be precise with ingredient measurements, especially when it involves flavoring agents like rose water.
  • Forgetting to Sift: When using dry ingredients like cocoa or powdered sugar, sift them to avoid lumps.
  • Overmixing: When combining chocolate and cream or fruit, mix just until blended to maintain a smooth consistency.
  • Neglecting Coatings: Don’t forget to roll your truffles in cocoa or nuts to enhance both flavor and visual appeal.

Essential Techniques

Melting Chocolate: This technique involves gently heating chocolate until smooth. It’s vital to ensure it melts evenly, preventing scorching. Use a double boiler or microwave method, stirring frequently. Visual cues for success include a shiny, lump-free texture.

Chilling the Truffles: After forming the truffles, chilling them helps to set the ganache, making it easier to roll and coat. If they are too soft, they will melt and lose shape during coating. A good rule of thumb is to refrigerate for at least 30 minutes.

Coating Techniques: Rolling truffles requires practice for consistency. You can use your hands or a fork. Visual cues for success involve an even and consistent coating; no bare spots should be visible. Ensure coatings are dry before placing them in an airtight container.

Flavor Infusing: Incorporating flavor like rose water requires precision. Too much can overpower the truffle, while too little might not yield the desired taste. Start with small measurements and adjust according to your preference.

Pro Tips for Perfect Elegant Raspberry Rose Chocolate Truffles

1. Use a silicone spatula when stirring to prevent the ganache from sticking, ensuring a smooth texture.
2. For a contrasting flavor, consider adding a pinch of sea salt to the chocolate mixture.
3. Experiment with different coatings such as shredded coconut or colored sprinkles to enhance visual appeal.
4. Ensure your hands are cool while rolling to prevent melting the ganache.
5. Chill the truffles for longer to firm up if you plan to work in a warm kitchen.
6. For a burst of flavor, add chopped candied ginger to the raspberry mixture.
7. Use a digital thermometer to gauge the chocolate melting temperature accurately.
8. Plan ahead by preparing the truffles the night before serving for a hassle-free dessert option.

Variations and Adaptations

Regional variations of chocolate truffles often include local ingredients, such as incorporating orange zest for a zesty twist or lavender for a more aromatic flavor. Seasonal adaptations could involve using seasonal fruits like strawberries or cherries when they’re at their best.

For dietary modifications, consider creating vegan versions by substituting dairy with coconut cream and ensuring the chocolate is dairy-free. Low-carb adaptations can include using sugar-free chocolate and reducing fruit content for a guilt-free indulgence.

Experimenting with flavors such as espresso or chili pepper can create unique versions that offer a spice or stronger taste profile. Presentation alternatives can vary from using decorative boxes to arrange truffles on a beautiful platter, making them suitable for gifting or serving.

Serving and Presentation Guide

When serving, consider plating the truffles on a beautiful cake stand or decorative platter to elevate their visual appeal. Garnishing them with fresh mint leaves or crushed raspberries can add a vibrant touch to the presentation.

Traditional accompaniments might include a side of whipped cream or a drizzle of raspberry sauce to enhance the dessert experience. For modern touches, consider pairing the truffles with a scoop of artisan ice cream or a dollop of gelato.

Temperature is key; serving them slightly chilled accentuates their flavor while maintaining their shape. When considering portion control, offering an assorted platter with other sweets allows guests to enjoy a variety without overeating.

Wine and Beverage Pairing

Pair these elegant truffles with a rich, full-bodied red wine like a Cabernet Sauvignon or a light rosé to complement the chocolate and raspberry flavor profiles. Alternatively, consider sparkling wines, such as Prosecco, which can enhance the dessert’s sweetness.

For non-alcoholic options, try pairing with a berry-infused iced tea or a refreshing raspberry lemonade to mirror the truffle’s flavor. When serving coffee or tea, a dark roast coffee can harmonize well with the chocolate, offering a delightful contrast.

Temperature considerations are essential; serve wines chilled to balance the sweetness. Detail how to prepare drinks that are garnished with raspberry or rose petals to make the experience more luxurious.

Storage and Shelf Life

Store your Elegant Raspberry Rose Chocolate Truffles in an airtight container in the refrigerator to maintain freshness. Ideally, they should be consumed within one week, but they can last up to two weeks under proper storage conditions.

To prevent spoilage, keep them away from sunlight and sources of moisture. If you notice any changes in texture or if they develop an off smell, it’s best to discard them.

Reheating is unnecessary since they are best served chilled; however, taking them out of refrigeration a few minutes before serving can enhance flavor. For longer storage, consider freezing the truffles in a single layer, then transferring them into a freezer-safe container. They can keep for up to three months in the freezer.

Make Ahead Strategies

You can prepare your Elegant Raspberry Rose Chocolate Truffles in advance, making them an excellent choice for busy hosts. Begin by making the ganache the day before and refrigerating it overnight.

For the best flavor and texture, assemble the truffles the day of serving. If time allows, let them sit at room temperature for about 15 minutes before serving to enhance softness.

Consider dividing your truffle mixture into sections so you can roll and coat them on different days, maintaining freshness. For an extra pop of flavor, add fresh garnish like mint or additional raspberry just before serving.

Scaling Instructions

When halving the Elegant Raspberry Rose Chocolate Truffles Recipe, maintain the same ratios by using half the amount of each ingredient. This is simple and ensures no loss in flavor or texture.

If doubling or tripling the recipe, consider the size of your mixing bowl. Use larger bowls or mix in batches, as the ganache may be challenging to blend evenly in tight spaces. Timing adjustments are essential; ensure chilling times are sufficient for larger batches.

When storing excess truffles, ensure ample space in the container to prevent them from sticking together, presenting a neat appearance when served.

Nutritional Deep Dive

This Elegant Raspberry Rose Chocolate Truffles Recipe is rich in nutrients thanks to dark chocolate and raspberries. The macro breakdown reveals a focus on healthy fats from chocolate while providing wholesome carbohydrates from the fruit.

Micronutrient analysis shows an abundance of vitamins C and K from raspberries, while dark chocolate provides minerals like iron and magnesium. The health benefits of consuming dark chocolate include improved heart health and reduced stress levels, adding a wholesome element to these indulgent treats.

Consider dietary guidelines for portion control. Each truffle provides a sweet treat without excessive calories, making them suitable for those mindful of their intake but still wishing to indulge occasionally.

Dietary Adaptations

Creating gluten-free Elegant Raspberry Rose Chocolate Truffles is easily achieved since the primary ingredients do not contain gluten. Ensure that any added ingredients, like coatings, are also gluten-free.

For vegan adaptations, use coconut cream instead of heavy cream and select dairy-free chocolate. Low-carb variations can be crafted using sugar substitutes and minimal fruit content for diabetic-friendly indulgence.

Keto and paleo-friendly options are also available by ensuring all ingredients align with those meal plans, such as opting for dark chocolate with low sugar content. For those following a low-FODMAP diet, be cautious with the amount of raspberry used.

Troubleshooting Guide

If you encounter texture issues with your truffles, it could be due to over or under-chilling. Adjust the chilling time accordingly to achieve the desired consistency.

For flavor balance, if the truffles taste too sweet, consider adding a hint of sea salt in the ganache preparation to elevate the overall flavor profile.

Temperature problems may arise if the kitchen is too warm, causing the ganache to melt too quickly when rolling. Ensure your working environment is cool, or chill the mixture longer before handling.

Should you face equipment challenges, ensure your tools, like the thermometer, are functioning correctly. For ingredient substitutions, always consult alternatives that complement the original flavor profile without overpowering it.

Recipe Success Stories

Community feedback for the Elegant Raspberry Rose Chocolate Truffles has been overwhelmingly positive. Many have enjoyed the refreshing taste and sophisticated flavor combination, especially during festive gatherings.

Variations shared by readers demonstrate creativity, with others adding different flavored extracts or opting for various coatings, proving that this recipe can adapt to personal preferences beautifully.

Adaptation stories highlight how simple it is to modify the recipe for dietary needs while maintaining the luxurious essence of the truffles.

Photography tips have encouraged aspiring cooks to capture the beauty of their creations, showcasing their truffles in various settings, which in turn inspires others to try their hand at making these elegant treats.

Frequently Asked Questions

Can I use fresh raspberries instead of puree?

Absolutely! You can incorporate fresh raspberries directly into the chocolate ganache. However, ensure to mash them to release their juices for better flavor integration.

How long will these truffles keep?

Properly stored in the refrigerator, they should last up to two weeks. Ensure they’re in an airtight container to maintain moisture and freshness.

What if my ganache is too runny?

If your ganache is too runny, allow it to chill longer or gradually add more melted chocolate to thicken it up before rolling.

Can I make these truffles vegan?

Yes! Substitute the heavy cream with coconut cream and ensure your chocolate is dairy-free to enjoy vegan truffles.

What kind of chocolate should I use?

Use high-quality dark chocolate with a cocoa content of at least 70% for the best flavors and health benefits. Semi-sweet chocolate also works well if you prefer a sweeter taste.

Can I freeze the truffles?

Yes, these truffles freeze well. Place them in a single layer, wrap carefully, and store in a freezer-safe container. Enjoy them within three months for the best quality.

Is it okay to use a different fruit?

Yes, you can experiment with different fruits! Strawberries, cherries, or even mango can provide delightful variations, but be mindful of balancing sweetness and acidity.

Is rose water necessary?

While rose water adds a distinct flavor, it’s not strictly necessary. You can substitute it with vanilla extract if preferred.

Can I use other kinds of nuts for coating?

Yes! Feel free to use any nuts you enjoy, such as pistachios, almonds, or hazelnuts, to coat your truffles for a unique texture and flavor.

How do I know when my chocolate is melted perfectly?

Perfectly melted chocolate should be smooth and glossy without any lumps. A digital thermometer should read between 110°F and 115°F for ideal results.

Additional Resources

If you enjoyed this Elegant Raspberry Rose Chocolate Truffles Recipe, check out related recipes such as chocolate ganache tarts and raspberry pavlova. These desserts share similar flavor profiles and can impress guests during any gathering.

Also, explore technique guides for advanced chocolate-making processes or ingredient information about making the most out of different chocolates. Recommendations for equipment can help improve your dessert-making experience, ensuring you have the right tools at hand for epic indulgences.

Seasonal variations can introduce delightful options that showcase fresh ingredients, turning your dessert table into a seasonal celebration.

Join the Conversation

We invite you to share your thoughts on this Elegant Raspberry Rose Chocolate Truffles Recipe! Feel free to share your pictures and experiences through social media.

Photography tips can enhance your presentation, so don’t hesitate to engage with fellow bakers and share your creative variations. Share reviews if you’ve tried this recipe, as community feedback encourages new bakers to give these elegant truffles a try!

Be part of our growing community, and let’s inspire each other with culinary creations!

The Recipe

Elegant Raspberry Rose Chocolate Truffles

Serves: 24 truffles

Prep Time: 30 mins

Cook Time: 10 mins

Total Time: 40 mins

Kitchen Equipment Needed

  • Double boiler or microwave-safe bowl
  • Mixing bowls
  • Spatula
  • Airtight container for storage
  • Digital thermometer (optional)

Ingredients

  • 8 oz (225g) dark chocolate, chopped
  • ½ cup (120ml) heavy cream
  • ¾ cup (100g) fresh raspberries, pureed
  • 1 tsp rose water
  • Cocoa powder or crushed nuts for rolling

Directions

  1. In a double boiler or microwave, gently melt the chocolate until smooth.
  2. Heat the heavy cream separately until just boiling, then pour it over the melted chocolate.
  3. Stir gently with a spatula until fully combined, then mix in the raspberry puree and rose water.
  4. Cover the bowl with plastic wrap and refrigerate for about 2 hours, or until firm.
  5. Once firm, use a melon baller or spoon to scoop out portions of the ganache and roll them into balls.
  6. Roll the truffles in cocoa powder or crushed nuts until evenly coated.
  7. Place the coated truffles on a baking sheet lined with parchment paper and refrigerate for another 30 minutes.
  8. Serve chilled or at room temperature and enjoy!

Recipe Notes

  • Feel free to adjust the rose water to suit your taste.
  • These truffles can be frozen; just ensure they are tightly packed in an airtight container.
  • Experiment with different types of chocolate for varied flavors.

Easy Salted Caramel Banana Bread Recipe for Delicious Indulgence

Easy Salted Caramel Banana Bread Recipe: A Deliciously Sweet Twist

⚖️
Difficulty
Easy

⏲️
Prep Time
15 mins

🕒
Cook Time
50 mins

⏱️
Total Time
65 mins

🍽️
Servings
10 slices

When you think of comforting baked goods, nothing quite compares to the delightful flavor of banana bread—except when you elevate it with a luscious salted caramel swirled through the batter! This Easy Salted Caramel Banana Bread Recipe combines the natural sweetness of ripe bananas with the rich, buttery goodness of salted caramel, creating a loaf that is as indulgent as it is satisfying. It’s perfect for breakfast, brunch, or even a sweet afternoon treat with a cup of coffee.

The beauty of this banana bread lies in its simplicity. With just a few basic ingredients and minimal prep time, you can craft a delectable dessert that your family and friends will rave about. Each slice is moist and fluffy, complete with delightful caramel pockets that melt in your mouth, making it hard to resist grabbing a second piece. Whether you’re using up overripe bananas or celebrating a special occasion, this recipe will be a go-to favorite.

Quick Recipe Highlights

  • Flavor Profile: The combination of sweet bananas and savory salted caramel creates a harmonious balance that is absolutely irresistible.
  • Texture: This banana bread is incredibly moist with a tender crumb, while the caramel adds a sticky sweetness that enhances each bite.
  • Aroma: The smell of baked bananas mingled with warm caramel wafts through your kitchen, inviting everyone to come and enjoy.
  • Visual Appeal: A golden-brown crust with flecks of caramel running through the loaf makes this banana bread a true standout.
  • Skill Level Needed: Perfect for bakers of all levels, this recipe requires no special techniques or equipment.
  • Special Equipment: All you need is a mixing bowl, a whisk, a loaf pan, and an oven to create this masterpiece!

Recipe Overview

  • Difficulty Level: This Easy Salted Caramel Banana Bread is designed for anyone to master. With straightforward steps and common ingredients, even novice bakers can create a delicious treat.
  • Category: Banana bread is a cherished breakfast item but also doubles as a wonderful dessert or snack option for any time of day.
  • Cuisine: Inspired by classic American baking traditions, this recipe adds a twist with a touch of gourmet salted caramel.
  • Cost: With affordable ingredients, you can whip up this banana bread without breaking the bank—it’s a budget-friendly option for deliciousness!
  • Season: While this banana bread can be enjoyed year-round, its comforting flavors make it especially appealing in the fall and winter months.
  • Occasion: Ideal for brunch gatherings, holiday celebrations, or simply a cozy evening at home, this loaf caters to various occasions.

Why You’ll Love This Recipe

The taste of this easy salted caramel banana bread is what makes it truly special. The sweetness of the bananas pairs perfectly with the salty notes of the caramel, creating a flavor explosion that dances on your palate. Every bite is a tantalizing blend of moist banana goodness and a caramel drizzle that leaves you craving more. You won’t have to worry about bland or dry banana bread; this one delivers on taste and texture in every slice!

Convenience also plays a huge role in why this recipe is so loved. The prep time is minimal, allowing you to mix everything in one bowl with simple measuring and stirring. There’s no need for complicated techniques, making it perfect for busy bakers or those who simply want to enjoy a quick treat at home. You can have fresh banana bread in under an hour, which is unbeatable for a baking recipe.

Additionally, this recipe offers nutritional advantages as bananas are high in potassium and provide natural sweetness. They are a great source of fiber, which is beneficial for digestion. When combined with minimal added sugar from salted caramel, this bread strikes a balance between indulgence and health, making it a better choice than many store-bought treats.

Social gatherings are the perfect backdrop for this Easy Salted Caramel Banana Bread. It serves as a heartwarming gift to friends or a delightful dish to bring to gatherings, showcasing your baking prowess without the overwhelm. It encourages sharing and brings a sense of comfort to any occasion, making it an instant hit with guests.

Cost-effectiveness is another standout feature of this recipe. Most ingredients are simple pantry staples that are generally inexpensive, plus you can use overripe bananas that you might otherwise discard. Instead of splurging on gourmet treats from the bakery, you can create a delicious homemade version that captures all the flavor and charm.

Historical Background and Cultural Significance

The origins of banana bread are deeply rooted in American baking history. During the Great Depression, creative bakers sought to make the most of their ingredients, leading to the invention of banana bread as a delicious waste-not dish. Using overripe bananas that might have otherwise been thrown away, bakers created a moist loaf that could last for days. Its simplicity and sustainability became deeply embedded in American culture.

As banana bread gained popularity, it evolved into numerous variations worldwide, with different cultures adding their own flair. From adding nuts in the United States to the use of coconut in South American recipes, banana bread became a blank canvas for flavor experimentation. This evolution reflects a broader trend in baking, where home cooks adapt recipes based on regional tastes and available ingredients.

The cultural importance of banana bread continues today, as it is often made during family gatherings, potlucks, and celebrations. It signifies hospitality and warmth, often shared among friends and loved ones. In many homes, it has become a rite of passage for new bakers to learn the craft by mastering this beloved recipe.

Variations of banana bread, such as adding chocolate chips or spices, have also gained popularity over the years. The influx of dietary modifications—think gluten-free or vegan banana bread—shows how adaptable this recipe remains in modern kitchens, bridging tradition and contemporary baking needs.

Ingredient Deep Dive

  • Bananas: The star ingredient of our recipe, bananas provide natural sweetness and moisture. They are a great source of potassium, which is critical for heart health and muscle function. When selecting bananas, look for ones that are ripe but not overly brown, as they would be too mushy for bread. For storage, keep them at room temperature until ripe and then refrigerate to extend their shelf life.
  • All-Purpose Flour: A versatile staple in baking, all-purpose flour is responsible for the structure of the banana bread. It’s often enriched with nutrients, providing essential vitamins and minerals. When measuring flour, spoon it into the cup rather than scooping to avoid packing it down. Store it in a cool, dry place and consider refrigeration for longer shelf life.
  • Salted Caramel: This ingredient not only adds decadence to the banana bread but also complements the sweetness of the bananas. The combination of sugar and butter creates a rich, smooth sauce that elevates the dish. Homemade salted caramel is easy to make, but pre-packaged versions can also serve in a pinch. Keep any leftover caramel for drizzling over other desserts!
  • Sugar: Sugar plays a pivotal role in enhancing flavor, providing sweetness while also contributing to the browning effect during baking. Brown sugar is commonly used in banana bread for added moisture and depth of flavor. To store sugar, keep it in an airtight container to prevent clumping due to moisture.
  • Eggs: Essential for binding the ingredients and providing structure, eggs also add moisture and richness to banana bread. When choosing eggs, consider organic or free-range options for better flavor and nutritional value. Store them in the refrigerator for maximum freshness and use them within a few weeks.

Common Mistakes to Avoid

  • Overmixing the batter can lead to a tough texture. Mix just until the ingredients are combined for a tender loaf.
  • Not using ripe enough bananas will result in less sweetness. Aim for bananas that are at least spotted with brown for maximum flavor.
  • Forgetting to preheat the oven can lead to uneven baking. Ensure your oven is at the right temperature before putting in your loaf.
  • Using too much flour can make the bread dense and dry. Measure flour correctly to maintain the right balance in your batter.
  • Not allowing the banana bread to cool before slicing can result in a gummy texture. Let it rest for at least 15 minutes before cutting.
  • Underbaking the loaf can lead to a wet center. Always check for doneness with a toothpick in the center before removing it from the oven.
  • Using cold eggs can affect the mixing process. Let eggs come to room temperature for better incorporation into the batter.
  • Skipping the caramel drizzle can minimize flavor—the caramel adds a beautiful finish and delicious sweetness.
  • Storing baked banana bread improperly can lead to spoilage. Keep it wrapped in plastic wrap to maintain moisture and freshness.
  • Not experimenting with add-ins may lead to missed flavor opportunities. Consider walnuts, chocolate chips, or spices for an added twist.

Essential Techniques

The creaming method is crucial for this banana bread. This technique involves beating sugar and butter until smooth and fluffy, which helps to incorporate air into the batter, resulting in a lighter texture. Mastering this method requires patience; always start with room temperature butter and mix at medium speed to avoid over-creaming.

Proper measuring techniques are essential for consistent baking results. Using the spoon and level method for flour prevents packing, which can yield dense bread. Invest in a kitchen scale for more precise measurements, especially for dry ingredients, and always measure wet ingredients in clear measuring cups to ensure accuracy.

Pro Tips for Perfect Easy Salted Caramel Banana Bread

1. Use overripe bananas for maximum sweetness—don’t toss those brown ones!
2. Adjust the salt level in the caramel sauce to balance the sweetness; a bit more salt can enhance flavors significantly.
3. Experiment with spices like cinnamon or nutmeg for an extra warming flavor profile.
4. Add chopped nuts for added texture; walnuts or pecans work beautifully.
5. For a richer caramel flavor, you can use brown sugar in the caramel recipe.
6. If using frozen bananas, ensure they are thawed and drained before incorporating into the batter.
7. Let the banana bread sit for a few hours before slicing for the best texture.
8. Cover the loaf in plastic wrap while cooling to retain moisture and keep it from drying out.

Variations and Adaptations

For those looking to switch it up, there are numerous ways to modify this Easy Salted Caramel Banana Bread. Regional variations might include adding coconut for a tropical twist, while chocolate chip banana bread introduces a decadence that pairs wonderfully with caramel. Seasonal adaptations may include adding pumpkin spice in the fall to embrace autumn flavors.

For dietary modifications, gluten-free flours or almond flour can replace regular flour without losing moistness. If you’re aiming for vegan options, you can substitute eggs with flaxseed meal or applesauce, ensuring that the banana bread remains deliciously moist and flavorful.

When it comes to texture modifications, consider adding oats for a hearty bite or substituting some of the flour with almond flour to introduce a nuttier flavor. Presentation alternatives, such as serving with a dollop of whipped cream or icing drizzles, can elevate your banana bread for special occasions.

Serving and Presentation Guide

Plating techniques for banana bread can transform it into a stunning centerpiece. Serve slices on a rustic wooden board with fresh fruit or edible flowers for a spring-inspired aesthetic. Garnishing with chopped nuts or a drizzle of salted caramel sauce heightens visual appeal.

Traditional accompaniments often include butter or cream cheese spread, adding flavor and richness. For modern suggestions, pair your banana bread slices with Greek yogurt to introduce a tangy element, enhancing the overall taste.

Temperature considerations play an important role; serving banana bread slightly warm enhances its aroma and encourages enjoyment. Portion control can be managed with resealable bags for storage, ensuring you can savored over several days without losing freshness.

Wine and Beverage Pairing

For a delightful pairing, consider serving your Easy Salted Caramel Banana Bread with a sweet dessert wine such as Moscato, which complements the flavors beautifully. A rich coffee, like a dark roast or espresso, also works wonderfully, enhancing the natural sweetness of the bread.

Non-alcoholic alternatives might include a spicy chai tea, adding warmth and depth. If opting for a fruity accompaniment, a sparkling apple cider can elevate your dining experience, adding a refreshing contrast to the sweetness of the banana bread.

Temperature considerations are essential for your drink pairings; ensure that coffee is served hot, while chilled beverages like sparkling cider offer a crisp refreshment that enhances the bread’s moisture.

Storage and Shelf Life

Proper storage methods for your banana bread will greatly affect its shelf life. Wrap the loaf tightly in plastic wrap to avoid drying out and store it at room temperature for up to three days. For longer storage, consider placing it in the refrigerator, where it can last up to a week.

Temperature requirements for optimal freshness dictate keeping the banana bread away from direct sunlight or heat sources. Use an airtight container for best results.

Signs of spoilage include an off smell or visible mold. If you plan to freeze, slice the bread first and wrap individual pieces in plastic wrap for easy access later. Reheating can be done in the microwave for a few seconds or a toaster oven for a warm snack.

Make Ahead Strategies

Planning is key for make-ahead strategies with your Easy Salted Caramel Banana Bread. You can prepare the batter a day in advance and store it in the refrigerator. This minimizes last-minute prep while enhancing flavors as the mixture marinates.

For storage between steps, ensure that your prepared ingredients are measured and organized ahead of time to streamline the baking process. Assess the quality impact of making ahead; flavors may deepen overnight, enhancing the final product.

Assembly tips include preparing the caramel sauce one day ahead, as it can easily be reheated for a fluid drizzle. Add nuts just before baking to maintain their crunch.

Scaling Instructions

If you’re looking to feed a larger crowd, you can double or triple this Easy Salted Caramel Banana Bread recipe quite easily. However, remember to adjust your loaf pan size accordingly and increase baking time, checking for doneness with a toothpick.

Halving the recipe can also work if you’re looking for a smaller portion. Use smaller loaf pans or muffin tins to create indulgent banana bread muffins for individual servings.

Equipment adjustments may include using multiple mixers or larger bowls when scaling up. Always keep timing modifications in mind; larger loaves will need more time than the original recipe suggests.

Nutritional Deep Dive

A nutritional breakdown of the Easy Salted Caramel Banana Bread demonstrates its balance of macros. With carbohydrates primarily from bananas and flour, it provides a quick energy boost. The fats from butter or oil contribute to satiety, making it a satisfying choice for breakfast or snacks.

Micronutrient analysis reveals that bananas bring important vitamins such as Vitamin B6 and C, as well as potassium. While sugar adds sweetness, moderation is key; the salted caramel sauce should be enjoyed mindfully as part of an overall balanced diet.

Dietary considerations for this banana bread may highlight the use of whole-grain flour for added fiber and nutrient density, making it a heartier choice. Portion analysis showcases that enjoying a slice can provide energy without excessive calories, a perfect fit for weight management.

Dietary Adaptations

For those looking for gluten-free options, substitute all-purpose flour with a gluten-free blend specifically formulated for baking. This ensures similar texture and flavor, allowing everyone to enjoy this delightful treat.

Dairy-free adaptations can be achieved through the use of almond milk or coconut oil instead of butter. Additionally, using flax eggs can effectively replace eggs for a vegan-friendly option without compromising taste.

The low-carb approach can incorporate almond flour and erythritol as sugar substitutes. These modifications allow for delicious indulgence even for those following strict dietary restrictions.

For a paleo-friendly version, all-purpose flour can be replaced with almond or coconut flour, while sweetener options such as honey or maple syrup can replace refined sugar, aligning with paleo principles.

Troubleshooting Guide

Common texture issues may arise if the batter is overmixed, resulting in a dense loaf. Always mix just until combined for the best outcome. If you find the banana bread too dry, consider adding more mashed bananas or checking your oven temperature for accuracy.

Flavor balance can be adjusted by modifying the saltiness of the caramel, ensuring the sweet and salty notes enhance your banana bread experience. If your caramel sauce is too thin, return it to heat to cook down further.

Temperature problems may occur if you take the loaf out of the oven too soon; always perform the toothpick test to confirm doneness. Equipment challenges could arise from the type of baking dish used; metal pans conduct heat more efficiently than glass, potentially affecting baking time.

Ingredient substitutions like using fruit puree instead of bananas can lead to texture issues; always stick to the core ingredients for best results. Timing concerns may emerge when scaling the recipe; keep an eye on larger loaves for adequate baking time.

Recipe Success Stories

Community feedback around the Easy Salted Caramel Banana Bread has been overwhelmingly positive, with many praising its delightful taste and moist texture. Readers have shared their variations, such as adding chocolate chips or experimenting with different nuts, creating a sense of camaraderie among bakers.

Variation successes have come from those who’ve utilized seasonal ingredients, like pumpkin in the fall, making the recipe versatile and appealing for every season. The adaptability of this recipe means it continues evolving, reflecting the tastes and preferences of those who try it.

Photography tips shared by readers emphasize capturing the caramel drizzle in a way that showcases its rich texture. Many recommend using natural light to highlight the bread’s golden-brown crust and inviting aroma, turning every loaf into an Instagram-worthy moment.

Not only does the Easy Salted Caramel Banana Bread satisfy taste buds, but it also becomes a canvas for expression, with users finding their unique ways of decorating and sharing their endeavors.

Frequently Asked Questions

Can I use frozen bananas?

Absolutely! Frozen bananas work great for banana bread. Just make sure to thaw them and drain any excess moisture before using.

How do I know when my banana bread is done?

A toothpick inserted into the center of the loaf should come out clean or with a few moist crumbs. If it comes out wet, it requires more baking time.

Can I make this recipe vegan?

Yes, you can replace the eggs with flaxseed meal mixed with water or use unsweetened applesauce for a perfect vegan alternative.

How long can I store banana bread?

In a sealed container at room temperature, banana bread can last about three days. For longer storage, refrigerate it for up to a week.

Is there a gluten-free option?

Yes! Substitute all-purpose flour with a gluten-free flour blend to enjoy this recipe gluten-free.

What’s the best way to reheat banana bread?

The microwave works best for individual slices, while a toaster oven can warm the entire loaf without drying it out.

Can I add nuts to the recipe?

Definitely! Adding walnuts or pecans can provide a nice crunch and may enhance the flavor significantly.

Do I need to use salted caramel?

While salted caramel is recommended for flavor contrast, you can use regular caramel if preferred. Just keep in mind the balance of sweetness.

Can I double the recipe?

Yes, you can double the recipe! Just make sure to adjust your baking time accordingly and use larger loaf pans if necessary.

What’s the difference between light and dark brown sugar?

Light brown sugar contains less molasses, resulting in a milder flavor. Dark brown sugar has a richer, deeper flavor due to more molasses. Both can be used in this recipe.

Additional Resources

If you enjoyed making Easy Salted Caramel Banana Bread, check out related recipes like pumpkin bread or zucchini bread for inspiration. Technique guides on mastering banana bread recipes provide even more options, ensuring you can vary flavors and textures.

For ingredient information, it’s essential to understand the benefits of using fresh produce versus dried or canned. Equipment recommendations can help enhance your baking experience—consider investing in quality bakeware for better outcomes.

Seasonal variations for celebrating each part of the year with unique banana bread flavors can broaden your horizon in baking, from adding cranberries around the holidays to infusing spices in the fall.

Join the Conversation

Engage with us on social media by sharing your Easy Salted Caramel Banana Bread creations! Use the hashtag #SaltedCaramelBananaBread to connect with others and showcase your baking achievements.

Photography tips can help capture your delicious results; consider focusing on close-ups of the caramel drizzle. Recipe reviews are always appreciated—let us know what you loved about the process and the final product.

Join the community by sharing your own variations or suggestions. We love seeing what creative twists fellow bakers can come up with, ensuring that the tradition of this recipe continues to grow!

The Recipe

Easy Salted Caramel Banana Bread

Serves: 10 slices

Prep Time: 15 mins

Cook Time: 50 mins

Total Time: 65 mins

Kitchen Equipment Needed

  • Mixing bowl
  • Whisk
  • Loaf pan
  • Rubber spatula
  • Measuring cups and spoons

Ingredients

  • 3 ripe bananas, mashed
  • 1/3 cup melted butter
  • 1/2 cup sugar
  • 1/4 cup brown sugar
  • 1 large egg
  • 1 teaspoon vanilla extract
  • 1 teaspoon baking soda
  • 1/4 teaspoon salt
  • 1 cup all-purpose flour
  • 1 cup homemade or store-bought salted caramel

Directions

  1. Preheat your oven to 350°F (175°C) and grease a loaf pan.
  2. In a large mixing bowl, mix the melted butter with the mashed bananas until well combined.
  3. Add the sugars and mix until incorporated. Stir in the egg and vanilla extract.
  4. Sprinkle baking soda and salt over the mixture, then mix until combined.
  5. Gently fold in the flour until just combined; be careful not to overmix.
  6. Pour half of the banana batter into the prepared loaf pan and drizzle half of the salted caramel over it.
  7. Pour the remaining batter on top, followed by another drizzle of salted caramel.
  8. Bake in preheated oven for 50-60 minutes, or until a toothpick comes out clean.
  9. Let the bread cool in the pan for about 15 minutes before transferring to a wire rack to cool completely.

Recipe Notes

  • Make sure your bananas are fully ripe for maximum flavor and sweetness.
  • This recipe works well with freeze-dried fruit or nut add-ins, creating your personalized flavor.
  • Store leftover banana bread tightly wrapped to keep it moist and fresh.

Indulge in Gooey Butterfinger Caramel Crunch Cookies Today!

Butterfinger Caramel Crunch Cookies – Delicious & Gooey!

⚖️
Difficulty
Easy

⏲️
Prep Time
15 mins

🕒
Cook Time
12 mins

⏱️
Total Time
27 mins

🍽️
Servings
24 cookies

If you are searching for a cookie recipe that combines the rich flavors of chocolate, peanut butter, and caramel, look no further than these Butterfinger Caramel Crunch Cookies. These cookies are an absolute delight, guaranteed to satisfy your sweet tooth! With each bite, you will experience the perfect mix of soft, chewy cookie, and crunchy Butterfinger bits, creating a texture and flavor explosion that is nothing short of heavenly.

The best part about these Butterfinger Caramel Crunch Cookies is their gooey centers filled with melted caramel, providing a warm and indulgent experience. Whether you’re baking these cookies for a holiday gathering, a birthday celebration, or simply as a delightful treat for yourself, they are sure to impress everyone who gets a taste. They’re perfect for sharing—or keeping all to yourself!

Quick Recipe Highlights

  • Flavor Profile: Sweet, nutty, and decadent with a chocolatey taste from the Butterfingers and the rich flavor of caramel.
  • Texture: Soft on the inside with a satisfying crunch from the Butterfinger pieces and a gooey caramel surprise.
  • Aroma: Warm, inviting aromas of baking cookies with hints of chocolate and caramel waft through your kitchen.
  • Visual Appeal: Golden brown cookies speckled with pieces of Butterfinger and a glossy caramel drizzle make for an enticing presentation.
  • Skill Level Needed: Perfect for beginners and expert bakers alike, there are simple steps to follow for stunning results.
  • Special Equipment: No fancy tools required—just basic baking utensils like mixing bowls and a baking sheet!

Recipe Overview

  • Difficulty Level: This is an easy recipe suitable for bakers of all skill levels. The process is straightforward, making it a fun baking project for all.
  • Category: These cookies fall under desserts and are ideal for parties, after-school snacks, or cozy evenings at home.
  • Cuisine: This recipe is an American classic, inspired by the beloved Butterfinger candy bar that many enjoy.
  • Cost: The cost for ingredients is relatively low, making this a budget-friendly treat that everyone can enjoy.
  • Season: These cookies are perfect for any season, but especially delightful during the winter holidays when comfort foods are in high demand.
  • Occasion: Ideal for gatherings, birthday parties, bake sales, and as a sweet surprise to cheer up your friends!

Why You’ll Love This Recipe

The combination of taste and texture is unmatched with these Butterfinger Caramel Crunch Cookies. The sweetness of the buttery cookie dough pairs beautifully with the saltiness of the peanut butter in the Butterfinger pieces, creating a perfect balance that will have your taste buds tingling. Each cookie offers a delightful contrast of soft chewiness and crunchy bits, with bursts of caramel enhancing every mouthful.

Convenience is another reason to love this recipe. Preparation is quick, with minimal clean-up required. Just mix, bake, and enjoy! The ease of making these cookies means you can whip them up unexpectedly for a friend dropping by or for a last-minute get-together, making them a go-to recipe for those sweet moments.

Nutritionally, while these cookies are certainly a treat, they also contain straightforward ingredients that are easy to recognize. While enjoying them in moderation, you can savor the flavors without worrying about overly processed additives, as they’re made with simple pantry staples!

When entertaining, these cookies bring a delicious touch to any gathering. They are perfect for sharing, and the gooey caramel in each one is sure to spark joy and conversation. Whether placed on a dessert platter or wrapped in a charming box for a gift, these cookies are bound to impress.

Lastly, the accessibility and cost-effectiveness of this recipe truly make it a winner. With ingredients that are commonly found or easily obtainable, you can indulge in baking without stretching your budget. Plus, with only a handful of ingredients, you’ll find that this cookie recipe can work within various dietary preferences as well!

Historical Background and Cultural Significance

The Butterfinger candy bar has a rich history that dates back to 1923. Originally introduced by the Curtiss Candy Company, it has grown to become a favorite with its unique combination of flavors and crispy peanut butter core. The recipe for these cookies pays homage to this classic treat, harnessing the sweet nostalgia of childhood snacks and desserts.

In many American households, cookies are a staple of comfort food. They often bring back memories of family gatherings, celebrations, and simple moments shared over a homemade treat. The integration of Butterfinger into cookies not only showcases a beloved candy bar but also highlights the creativity in American baking traditions.

As this recipe has evolved, various adaptations have appeared, showcasing regional differences in baking styles and ingredient availability. Many bakers experiment by adding new elements, like different chocolates, or swapping out the caramel for other fillings. This constant evolution keeps the recipe exciting and allows individuals to tailor it to their taste.

Regional variations can also lead to unique ingredients being used, reflecting local culinary preferences. For instance, some may incorporate spices or different types of nuts that are favored in their area, creating an entirely new flavor profile while maintaining the beloved Butterfinger essence.

Ingredient Deep Dive

Butterfinger Candy Bars: These are the stars of the recipe, providing a unique flavor and texture that make the cookies special. Made of crunchy peanut butter and coated with chocolate, Butterfingers deliver both nostalgia and sweetness. A major strength of Butterfingers is their shelf stability, allowing you to stock up and use them as needed. Look for store-bought options, or you can even make homemade versions if you’re feeling adventurous!

Caramel: Gooey, sweet, and rich, caramel takes these cookies to a whole new level. It is traditionally crafted from sugar, butter, and cream, resulting in a decadent ingredient loved across various desserts. For baking, choose soft caramels for melting and drizzling, ensuring they integrate smoothly into the cookies. It is vital to store caramel in cool, airtight containers to maintain its consistency and flavor.

All-Purpose Flour: The foundation of cookie recipes, all-purpose flour provides structure and stability. By balancing texture while allowing the other ingredients to shine, it is essential in cookie baking. When selecting flour, opt for brands that are unbleached for a more natural flavor, ensuring freshness by storing it in cool, dry places.

Brown Sugar: This adds moisture and a slight chewiness to the cookies, enhancing the caramel flavor profile. Brown sugar is a mixture of granulated sugar and molasses, yielding a richer taste compared to white sugar. For optimal results, consider using light brown sugar for subtle sweetness or dark brown sugar for deeper flavors, storing it in airtight containers to prevent hardening.

Butter: The richness of butter is crucial for creating cookies that are crisp on the edges yet chewy in the middle. While unsalted butter is typically recommended for recipes, using salted butter can add an additional layer of flavor complexity. Always ensure butter is at room temperature for even mixing, and keep it stored correctly in the refrigerator or freezer based on your short-term usage needs.

Common Mistakes to Avoid

  • Skipping the chilling step: If you rush the chilling process, the cookies may spread too much, resulting in flat cookies instead of the desired thicker texture.
  • Overmixing the dough: Mixing too much can lead to tough cookies. Keep the mixing to a minimum once you add the flour to retain a tender texture.
  • Not measuring ingredients correctly: Using too much flour or sugar can drastically alter the outcome. Always measure accurately, ideally by weight for precision.
  • Using cold eggs or butter: Starting with room temperature ingredients allows for proper creaming, which helps create a light texture. Always let your butter and eggs warm up before mixing.
  • Baking on a cold tray: Ensure that your baking tray is heated before placing the dough. A cold tray could lead to uneven baking.
  • Ignoring the oven temperature: An uncalibrated oven can lead to baking times that are too short or too long. Use an oven thermometer for accuracy.
  • Not letting cookies cool on the tray: Removing cookies too early can cause them to fall apart. Let them cool on the tray for a few minutes before transferring them to a wire rack.
  • Choosing stale ingredients: Always check for freshness, especially with baking soda and baking powder, as this can affect how well your cookies rise and taste.
  • Forgetting to line the baking sheet: Not using parchment paper can result in cookies sticking, losing their shape, and making clean-up more difficult.
  • Using too cold butter: Cold butter won’t cream properly, and will lead to dense cookies. Be sure to let butter soften to room temperature before mixing.

Essential Techniques

Creaming Butter and Sugar: This essential technique allows air to mix into the dough, which contributes to a lighter texture in the final product. To master this technique, using room temperature butter is critical. Mix until the mixture is light and fluffy, usually around 3 minutes. Watch for a pale color change and texture transformation for the best results.

Chilling the Dough: Chilling your cookie dough before baking is crucial as it prevents the cookies from spreading too much. It helps solidify the fat in the dough, resulting in thicker cookies. Aim for at least 30 minutes in the refrigerator for optimal texture. Pay attention to your dough; if it’s too soft, give it extra time in the fridge.

Pro Tips for Perfect Butterfinger Caramel Crunch Cookies

1. Use high-quality chocolate and Butterfinger bars for the richest flavor. Splurging a little on good ingredients can elevate your cookie game significantly.
2. Play with the baking time to achieve your desired cookie texture. For a softer center, take them out slightly earlier than suggested.
3. Experiment with additional add-ins like nuts, chips, or even a sprinkle of sea salt to enhance both flavor and aesthetics.
4. Consider using a cookie scoop for uniform size, which helps in achieving even baking and a consistent look.
5. Always preheat your oven to ensure evenly baked cookies from the first batch to the last.
6. If you live in a humid climate, be prepared to adjust the moisture content by adding a little more flour if necessary.
7. Allow cookies to cool completely before storing; this prevents them from becoming soggy.
8. Store cookies in an airtight container at room temperature to maintain their freshness for longer periods.

Variations and Adaptations

If you’re looking to switch things up, try incorporating seasonal flavors by adding pumpkin spice or cinnamon during the fall. These flavors blend beautifully with the sweetness of caramel and Butterfinger, creating a cozy vibe.

For those who enjoy different textures, consider swirling in peanut butter into the cookie dough for an extra creamy, nutty element. Alternatively, adding crushed pretzels or nuts can introduce a lovely saltiness that balances the sweetness.

Dietary modifications are possible too. With a few adjustments, you can create gluten-free or dairy-free versions of these cookies, using almond or coconut flour and dairy-free chocolate to make them more inclusive for varying diets.

Changing the presentation can also be fun! Try using cookie cutters to shape your cookies into different forms for special occasions or for kids’ parties. Decorate them with colorful icing or additional candy toppings to make them visually appealing.

Lastly, for a richer flavor, consider browning the butter before mixing it into the dough; this adds a nutty depth that pairs splendidly with the chocolate and caramel.

Serving and Presentation Guide

When it comes to serving, aim for a rustic yet elegant presentation. Place a stack of cookies on a decorative plate or cake stand to impress your guests. Drizzling some extra melted caramel or chocolate over the cookies before serving adds a touch of indulgence and makes for stunning visuals.

For garnishing, a sprinkle of flaky sea salt can elevate the flavors while enhancing the overall appearance. Pairing your cookies with a scoop of vanilla ice cream transforms them into an exquisite dessert that everyone will love.

Consider offering these cookies alongside a warm beverage such as coffee, hot chocolate, or a spiced chai. The warmth of these drinks complements the gooeyness of the cookies, creating a cozy and inviting experience.

Remember, temperature matters. Serve cookies slightly warm for the best gooey texture, and ensure they are at room temperature before storing to ensure they retain their chewy goodness.

Finally, cut each cookie into halves or quarters if serving as part of a larger dessert spread. This allows everyone to sample and indulge without overwhelming portions.

Wine and Beverage Pairing

When considering wine pairings, look for a dessert wine with sweetness to match these cookies, such as a late-harvest Riesling or a fruity Moscato. These will complement the caramel and chocolate flavors beautifully, enhancing the overall experience.

For those avoiding alcohol, consider pairing these cookies with a glass of milk or a rich nut milk, such as almond or cashew, which can bridge flavors and provide a comforting accompaniment.

If you’re a coffee lover, opt for an espresso to cut through the sweetness while accentuating the chocolate notes in the cookies. Alternatively, a mocha or a fresh brew of dark roast coffee can be fitting companions.

When serving hot beverages, ensure they are at optimal temperature and prepared in advance to create a seamless and luxurious tasting experience.

Storage and Shelf Life

To store your Butterfinger Caramel Crunch Cookies, place them in an airtight container at room temperature, where they will maintain their texture for up to a week. Ensure that they are fully cooled before storing to prevent moisture buildup.

For longer storage, you can freeze the cookies by placing them in freezer-safe bags or containers, separating layers with parchment paper. They can last up to three months in the freezer. When you’re ready to enjoy, thaw them at room temperature or briefly warm them in the oven for a freshly baked taste.

Keep an eye out for signs of spoilage, like an off-smell or noticeable texture changes, to ensure you’re enjoying them at their best.

For reheating, pop them in the microwave for about 10-15 seconds, or use the oven at a low temperature to maintain their freshly baked quality.

Make Ahead Strategies

If you plan to bake these cookies ahead of time, consider preparing the dough a day in advance. Chill the dough in the refrigerator to enhance the flavors and make it easier to work with when you’re ready to bake.

Pre-scooping the dough and freezing individual cookie portions lets you enjoy freshly baked cookies at a moment’s notice. Just place the frozen dough directly onto your baking sheet without thawing when baking; however, add a couple of minutes to the baking time.

Assembly can be a breeze by prepping extra ingredients, such as chopped Butterfinger and caramel, ahead of time, enabling a quick baking session when the craving hits.

When planning for quality, it’s vital to freeze and store correctly to preserve the cookies’ flavor and texture. Just be aware that the longer you store them, the more they may lose their softness.

Lastly, consider adding fresh elements, like flaked sea salt or chocolate drizzle, right before serving. This way, they will have a fresh appearance and enhanced flavor just when you need them.

Scaling Instructions

When scaling this Butterfinger Caramel Crunch Cookies recipe, halving or doubling the quantities is a straightforward process. To halve, simply divide all measurements in the ingredient list by two.

For doubling or tripling, be aware that mixing time and baking times may vary. A larger batch often requires a bit more time in the oven, so be sure to keep an eye on them while they bake.

Equipment adjustments may be necessary if you’re creating a large batch. Ensure your mixing bowls and baking sheets can accommodate the quantities without overflowing.

Always allow extra time for mixing and chilling if you increase the batch size, as larger amounts will take longer to chill adequately.

If you have leftover dough, consider storing it in the refrigerator for up to three days or freezing for up to three months, allowing you to bake in smaller portions whenever desired.

Nutritional Deep Dive

Each cookie has a unique nutritional profile, delivering a balance of macros with carbohydrates from sugar and flour, fats from butter and peanut butter, and proteins from eggs and Butterfinger. Understanding these elements aids in fathoming their role in a balanced diet.

While these cookies are delicious, they should ideally be consumed in moderation due to their higher sugar content. Understanding portion sizes can help integrate these treats into a balanced diet without exceeding daily sugar recommendations.

The ingredients in these cookies also provide some micronutrients. For example, brown sugar offers trace minerals, and the nutty flavors of peanuts deliver healthy fats and proteins.

If you’re focused on dietary considerations, be mindful of alternative ingredients to enhance nutritional value, such as replacing regular flour with whole wheat or almond flour for added fiber and nutrients.

Understanding serving sizes and how they contribute to total daily intake is essential for anyone looking to enjoy this cookie recipe within a balanced lifestyle.

Dietary Adaptations

There are several ways to adapt these cookies to fit particular dietary needs. For a gluten-free version, substitute the all-purpose flour with a suitable gluten-free flour blend, ensuring the texture remains consistent.

For those needing a dairy-free cookie, swaps such as coconut oil or dairy-free margarine can replace the butter, and use vegan chocolates to maintain the delicious flavor without the milk.

A low-carb or keto adaptation can be achieved by using almond flour combined with sugar replacements such as erythritol or monk fruit, allowing you to enjoy a guilt-free treat.

If you’re following a paleo diet, opt for almond flour as a base and natural sweeteners like honey or maple syrup instead of the refined sugars.

Exploring these adaptations not only accommodates various dietary preferences but also encourages creativity in the kitchen, allowing everyone to enjoy these flavorful Butterfinger Caramel Crunch Cookies.

Troubleshooting Guide

For texture issues, like cookies being too dry, check your flour measurement and make sure you’re using the right type. Likewise, if they’re too gooey, it may require a few more minutes in the oven for better structure.

Balancing flavors might also cause concern. If your cookies taste overly sweet, consider adding a sprinkle of salt during baking to counteract the sweetness.

When an oven runs too hot or too cold, it can affect baking times significantly. Investing in an oven thermometer will help ensure correct temperatures leading to evenly baked cookies.

If you encounter equipment challenges, verify that your mixing tools are in working order. A malfunctioning mixer can disrupt your dough consistency, leading to unexpected results.

When substituting ingredients, be aware that texture and flavor can vary significantly, so conduct small-scale tests prior to larger batches to find a balance that works.

Timing concerns can be remedied by keeping a close eye on dough while it chills and then adjusting your baking time according to the size of your cookie dough balls.

Recipe Success Stories

Community feedback has highlighted these Butterfinger Caramel Crunch Cookies as a go-to favorite among bakers of all skill levels. Delightful stories recount successful attempts to share them during family gatherings and parties, often resulting in requests for the recipe!

Many have experimented with variations, such as adding mini chocolate chips or swapping in different candy bars, allowing these cookies to shine even more. Their ability to adapt while remaining delicious has made them popular across various culinary circles.

Readers have suggested baking tips and tricks, like using different nut types or incorporating spices, showing the community’s creativity and engagement with the recipe. These adaptations have become part of the evolving story of the cookies, showcasing their versatility.

Photography tips are frequently shared among bakers as they capture the beauty of these cookies for social media. The blend of colors and textures makes for eye-catching food photography, often leading to additional recipe interests from onlookers.

Encouragement from the baking community adds to the recipe’s success, emphasizing the joy that comes from sharing creations and connecting through food. Whether enjoyed in solitude or among friends, these cookies leave a lasting impression.

Frequently Asked Questions

Can I freeze the dough? Yes! You can freeze the dough for up to three months. Just scoop the dough into balls and store in an airtight container or freezer bag. Bake them directly from frozen, adding a couple of extra minutes to the baking time.

What can I use instead of Butterfinger? You can substitute any candy of your choice, such as Reese’s Pieces, Snickers, or Milky Way, providing a unique taste to the cookies.

Can I make these cookies gluten-free? Absolutely! Use a gluten-free flour blend, which will work well in this recipe without altering the sweet flavor profile.

How do you store leftover cookies? Keep them in an airtight container at room temperature for up to a week. You can also refrigerate them to extend their shelf life.

Are these cookies safe to eat raw? While the ingredients are relatively safe, we recommend baking the dough for food safety, especially as it contains raw eggs.

Can I add nuts to the cookies? Yes! Chopped nuts, such as pecans or walnuts, give these cookies an additional crunch and deeper flavor.

What should I do if my cookies turn out dry? Overbaking can cause dryness. Ensure you check your cookies a couple of minutes before the suggested baking time.

Can I use a vegan substitute for butter? Yes! Options like coconut oil or vegan butter will work nicely, allowing you to maintain the flavors without dairy.

How long do these cookies keep? Properly stored in an airtight container, they can last up to a week. You can also freeze them for longer storage.

What drinks pair well with these cookies? They pair beautifully with milk, coffee, or even dessert wines like Moscato for a lovely culinary experience.

Additional Resources

Looking for more delicious recipes? Check out our collection of cookie recipes, including classics like chocolate chip and oatmeal raisin. We also provide technique guides on creating the perfect cookie texture and understanding essential baking terms.

For insight on ingredient information, we cover the benefits of various sugars and flours used in desserts. Our equipment recommendations section focuses on must-have tools for your kitchen to elevate your baking experience.

Seasonal variations are also available, offering dessert inspiration tailored to each time of year, ensuring you’re always able to create something delightful no matter the season.

Join the Conversation

We encourage our readers to share baking pictures, successes, and variations of their Butterfinger Caramel Crunch Cookies! Join us on social media to show off your culinary creations and engage with fellow bakers.

Recipe reviews and tips from the community are essential, and we love seeing how our readers adapt and play with recipes. Share your experience, and let us know what worked well for you!

Don’t forget to leave feedback on this recipe if you’ve tried it! Your insights help others navigate their baking journey and inspire new recipes. Celebrate your creative baking endeavors with us and inspire others to whip up these delicious cookies as well!

The Recipe

Butterfinger Caramel Crunch Cookies

Serves: 24 cookies

Prep Time: 15 mins

Cook Time: 12 mins

Total Time: 27 mins

Kitchen Equipment Needed

  • Mixing bowls
  • Baking sheets
  • Parchment paper (optional)
  • Cookie scoop
  • Whisk
  • Spatula

Ingredients

  • 1 cup unsalted butter, softened
  • 1 cup brown sugar, packed
  • 1/2 cup granulated sugar
  • 2 large eggs
  • 2 teaspoons vanilla extract
  • 3 cups all-purpose flour
  • 1 teaspoon baking soda
  • 1/2 teaspoon salt
  • 2 cups crushed Butterfinger candy bars
  • 1 cup caramel bits, melted

Directions

  1. Preheat your oven to 350°F (175°C) and line baking sheets with parchment paper.
  2. In a large mixing bowl, cream together the softened butter, brown sugar, and granulated sugar until light and fluffy.
  3. Add eggs one at a time, mixing well after each addition before stirring in the vanilla extract.
  4. In another bowl, whisk together the flour, baking soda, and salt.
  5. Gradually add the dry mixture to the butter mixture, blending well until fully combined.
  6. Stir in the crushed Butterfinger pieces, distributing them evenly throughout the dough.
  7. Using a cookie scoop, place balls of dough onto the prepared baking sheets, leaving space between each cookie.
  8. Bake in the preheated oven for 10-12 minutes, or until the edges are golden brown. Do not overbake!
  9. Once baked, allow cookies to cool on the tray for a few minutes before transferring them to a wire rack to cool completely.
  10. Drizzle melted caramel over the cookies for an attractive finish before serving.

Recipe Notes

  • For a richer flavor, consider browning the butter before mixing it in.
  • You can substitute semisweet chocolate chips for a different chocolate flavor.
  • Store baked cookies in an airtight container to keep them fresh for up to a week.
  • Feel free to play around with different types of candy in place of Butterfinger, depending on your flavor preferences.

Irresistible Boston Cream Pie Cupcakes: A Deliciously Simple Recipe

Irresistible Boston Cream Pie Cupcakes: Delightful Bites of Heaven

⚖️
Difficulty
Medium

⏲️
Prep Time
30 mins

🕒
Cook Time
20 mins

⏱️
Total Time
50 mins

🍽️
Servings
12 cupcakes

Indulge in the delightful decadence of these Irresistible Boston Cream Pie Cupcakes, a perfect treat for any occasion. Each cupcake is a heavenly bite of fluffy vanilla cake, filled with rich pastry cream, and topped with a glossy chocolate ganache. Imagine taking a bite and experiencing the smoothness of the cream paired with the soft cake and the melted chocolate. It’s a multi-layered taste sensation that’s sure to please anyone who loves classic desserts.

These cupcakes bring together gourmet elegance and comfort food, making them an ideal dessert for celebrations or a special treat for yourself. The homely flavors of vanilla and chocolate are beautifully balanced, creating a cupcake that feels both nostalgic and luxurious. You’ll find them not only visually stunning but also comforting and familiar, reminiscent of the classic Boston Cream Pie in a more bite-sized form.

Quick Recipe Highlights

  • Flavor Profile: These cupcakes feature a harmonious combination of sweet vanilla, rich chocolate, and creamy textures that enchant the taste buds.
  • Texture: Expect a delightful contrast with soft vanilla cake, creamy filling, and a smooth chocolate topping, making each bite an experience.
  • Aroma: The enticing smell of baking vanilla and chocolate wafts through the kitchen, inviting everyone to indulge.
  • Visual Appeal: With their glossy chocolate ganache and delicate cream filling peeking through, these cupcakes are a feast for the eyes.
  • Skill Level Needed: While the technique may seem complex, it is manageable for anyone with moderate baking experience.
  • Special Equipment: A piping bag will help in achieving a professional finish for the filling and ganache.

Recipe Overview

  • Difficulty Level: This recipe is rated medium due to the variety of steps involved, including making pastry cream and ganache, but don’t let that deter you!
  • Category: These cupcakes serve as a delightful dessert option perfect for parties, gatherings, or as a sweet finish to a meal.
  • Cuisine: The Boston Cream Pie Cupcake is inspired by American culinary traditions, bringing a twist on the classic pie dessert.
  • Cost: The ingredients are affordable, typically ranging from $15 to $20, making it a budget-friendly baking choice.
  • Season: Any time of year is perfect for these cupcakes, especially during festive occasions or gatherings.
  • Occasion: They are ideal for birthdays, anniversaries, or when you simply want to impress friends and family with your baking skills.

Why You’ll Love This Recipe

The taste and texture of these Irresistible Boston Cream Pie Cupcakes are an absolute joy to behold. Each component contributes to a delightful experience, with the soft vanilla cake serving as the perfect backdrop for the creamy pastry filling. The rich chocolate ganache topping adds an elegant finish, ensuring that every bite is balanced with sweetness and a touch of indulgence.

Convenience is key with this recipe, as the cupcakes can be made ahead of time and stored, making them perfect for parties. The individual serving sizes also allow for easy distribution, ensuring everyone gets their share of this decadent treat without the fuss of slicing a pie.

Nutritionally, while these cupcakes are indulgent, they can be a part of a balanced diet when enjoyed in moderation. The vanilla and chocolate flavors provide an emotional comfort that many seek in dessert, making them not just a treat, but a source of happiness.

Socially, these cupcakes serve as the perfect conversation starter and can elevate any gathering. Homemade desserts often make people feel special, and sharing these cupcakes will surely create lasting memories.

Cost-effectiveness is another great feature; with minimal ingredients yet impressive results, they provide great value. You’ll find that making these cupcakes turns out to be more economical than purchasing gourmet desserts from a bakery.

Historical Background and Cultural Significance

The origins of Boston Cream Pie date back to the 19th century, famously created by chef M. C. Nutt in Boston’s Parker House Hotel. While the name suggests a pie, it’s actually a cake; this playful naming showcases the creativity in American baking history.

Culturally, Boston Cream Pie is not just a dessert but a part of New England’s culinary heritage. It’s often celebrated and enjoyed during special events, keeping the tradition alive as part of the region’s identity.

As the recipe evolved, various adaptations emerged, contributing to its popularity across the United States. The creation of cupcakes as a version brings a modern twist, making it easier to enjoy this classic in a more casual format.

Today, regional variations exist, with bakers adding their own flair to the recipe or incorporating local ingredients. Each adaptation offers a new layer of creativity while honoring the classic version.

Ingredient Deep Dive

Vanilla extract: This essential ingredient adds aromatic sweetness to baked goods. When selecting vanilla, opt for pure extract over artificial flavoring for better taste and quality.

Butter: The richness of butter enhances flavor and texture in cupcakes. Look for unsalted butter for better control over sweetness; it can be stored in the refrigerator for about 1 month.

Pastry cream: A custard-like filling that’s creamy and flavorful. It is crucial for providing the classic taste of a Boston Cream Pie, and can be made ahead and refrigerated.

Chocolate ganache: Made from chocolate and cream, this adds a luxurious finish. You can experiment with different types of chocolate for a unique taste.

Common Mistakes to Avoid

  • Skipping the cooling steps: Allowing the cupcakes to cool completely before frosting is essential to prevent melting the ganache.
  • Overmixing the batter: This can lead to dense cupcakes. Mix just until ingredients are incorporated.
  • Using cold ingredients: Ensure all refrigerated items, especially eggs and butter, are at room temperature for better results.
  • Improper measuring: For baking, accuracy is crucial. Always use a kitchen scale or proper measuring cups and spoons to avoid imbalances.
  • Not piping the filling correctly: Use a piping bag or a fine tip to properly fill each cupcake without creating messes.
  • Ignoring ganache consistency: If your ganache is too thick, warming it slightly can help achieve the desired pourable texture.
  • Baking at the wrong temperature: Always preheat your oven and check that it matches the required temperature for even baking.
  • Not tasting as you go: Always taste for flavor balance, especially with sweet elements like frosting and pastry cream.

Essential Techniques

Making Ganache: This is a crucial skill as the ganache brings a glossy finish to your cupcakes. Start by heating cream and pouring it over chopped chocolate, then let it sit. Stir until smooth; mastering this technique ensures a silky texture and a beautiful look.

Filling Cupcakes: Use a piping bag with a long nozzle to fill the cupcakes for a professional touch. Create a small hole in each cupcake and insert the nozzle, gently squeezing the filling inside. This helps you avoid overfilling or underfilling.

Pro Tips for Perfect Irresistible Boston Cream Pie Cupcakes

Create a rich flavor by toasting the flour lightly before mixing; this adds a nutty undertone to your cupcakes.

Chill your pastry cream for at least a few hours; the cooler temperature helps it firm up, making it easier to fill the cupcakes.

Use high-quality chocolate for the ganache; the better the chocolate, the richer and more intense the final flavor.

Consider adding a pinch of salt to the ganache; this enhances the chocolate flavor and balances the sweetness.

Maintain even cupcake size by using an ice cream scoop for portioning; this ensures uniform baking.

Decorate with chocolate shavings or a dusting of powdered sugar for an elegant finish right before serving.

Variations and Adaptations

Try different fillings such as flavored whipped cream or fruit preserves instead of pastry cream for a refreshing twist.

Seasonal adaptations can include spices like cinnamon or pumpkin puree in fall, adding a festive flavor to your cupcakes.

For dietary modifications, explore gluten-free flour options or alternative sweeteners to adapt the recipe to various diets.

If you want to change up the flavor, use different chocolates; dark chocolate, white chocolate, or even flavored chocolate can create unique variations.

Modify the texture by adding crushed nuts to the ganache for some crunch, or include different cake layers for added dimension.

Presentation alternatives include serving them in cupcake wrappers that fit a theme, such as seasonal decorations or colors.

Serving and Presentation Guide

For plating, consider placing the cupcakes on a tiered stand to create an impressive visual display at gatherings.

Garnish with fresh berries or mint leaves to add a pop of color and freshness that contrasts beautifully with the rich chocolate.

Consider pairing with a scoop of vanilla ice cream or a dollop of whipped cream for an extra special treat during serving.

Serve at room temperature, as this offers the best flavor profile and texture for the cupcake and ganache.

When controlling portions, consider serving each guest one cupcake with a side of additional ganache for dipping.

Wine and Beverage Pairing

These cupcakes pair beautifully with a sweet dessert wine like a Moscato or Riesling, which complements the chocolate without overpowering it.

For non-alcoholic options, a rich hot chocolate or creamy coffee would work wonderfully alongside these sweet treats.

Tea drinkers might enjoy a lightly flavored tea like earl grey, which offers a refreshing contrast to the sweetness of the cupcakes.

When serving wine, consider chilling it slightly to enhance the flavors without muddling them.

Storage and Shelf Life

Store your cupcakes in an airtight container at room temperature for up to 2 days; they can also be refrigerated for up to a week.

If you need to keep them longer, freezing is an option. Place them in an airtight container and consume them within 2 months for best quality.

Keep an eye out for signs of spoilage, such as off odors or unusual textures, to ensure you don’t consume any expired items.

When reheating, place them in a microwave for a few seconds or allow them to come to room temperature before serving.

Make Ahead Strategies

Prep the components in advance: the batter and pastry cream can be made a day ahead, maximizing convenience when you’re short on time.

Store each element separately until ready to assemble; this ensures the best texture and avoids sogginess in the cupcakes.

Consider preparing the ganache ahead too, as it can sit covered at room temperature until you’re ready to frost.

If you’re short on time, consider baking the cupcakes a few days ahead and freezing them until you’re ready to fill and frost.

Scaling Instructions

To halve the recipe, divide all ingredients by two and adjust bake times accordingly to prevent overbaking.

When doubling or tripling, ensure you have enough baking trays and adjust the mixer speed to accommodate larger batches.

Monitor the baking time closely, as larger quantities may require extra time to cook through, but keep an eye out to prevent overbaking.

For equipment adjustments, use multiple pans or a larger mixing bowl to blend the ingredients thoroughly when scaling up.

Nutritional Deep Dive

Each cupcake offers approximately 250 calories, with a balanced mix of carbohydrates, fats, and proteins perfect for an indulgent treat.

Sugar content will be higher due to the frosting and filling; however, it can be managed with careful adjustments in the recipe.

The cupcakes provide a source of essential vitamins from eggs and dairy, which play a role in overall nutritional balance.

Enjoy in moderation, as the sweetness can be fairly rich; consider pairing with a lighter meal to balance your dietary intake.

Dietary Adaptations

To make these cupcakes gluten-free, substitute all-purpose flour with a gluten-free blend, maintaining the same measurement.

For a dairy-free version, use coconut milk instead of regular milk and a dairy-free butter alternative to achieve similar tastes.

Those following a vegan diet can utilize egg replacements like flaxseed meal and plant-based cream for the filling to keep the flavors intact.

If you want a low-carb option, consider using almond flour and a sugar substitute to keep carbs minimal while adding flavor.

Troubleshooting Guide

If your cupcakes are dry, ensure you’re not overbaking. Check your oven temperature with a thermometer for accuracy, and use an accurate timer.

For flavor balance, not tasting the batter could lead to unexpected sweetness; adjust sugar ratios accordingly as you mix.

Temperature issues may arise; make sure to let the cupcakes cool completely before frosting to maintain integrity.

If your ganache is separating, using high-quality chocolate and ensuring the cream doesn’t boil can help prevent texture problems.

Recipe Success Stories

Many home bakers have shared their experiences of impressing guests with these cupcakes. The smooth filling delights adults, while the chocolate ganache captures the hearts of children.

Community feedback highlights how modifiable the recipe is, with many trying unique flavor infusions and sharing their adaptations with great success.

One reader discovered that substituting some vanilla with almond extract gave the cupcakes a delicious twist, making them her family’s new favorite.

For photography, ensuring good lighting while capturing the shiny ganache will enhance your cupcake presentations, contributing to the shareability of your baked goods.

Frequently Asked Questions

Can I make these cupcakes ahead of time? Yes, you can prepare the components in advance, freeze the cupcakes, and assemble them the day you plan to serve.

What can I substitute for pastry cream? You can use vanilla pudding mix for a quick alternative or a whipped cream frosting if you prefer a lighter filling.

How do I store leftover cupcakes? Store in an airtight container at room temperature for 2 days or refrigerate for up to a week.

Can I freeze these cupcakes? Absolutely! Wrap them tightly and they will last in the freezer for about 2 months.

What’s the best chocolate to use for ganache? Use high-quality semisweet or bittersweet chocolate for the richest flavor in your ganache.

Can I halve the recipe? Yes, simply divide all ingredient amounts in half, and adjust the baking time as necessary.

What should I serve with these cupcakes? These cupcakes are delicious on their own but pair well with coffee, tea, or a scoop of vanilla ice cream.

Can I customize the flavors? Yes! Feel free to experiment with different extracts or chocolate types to create unique variations of this classic.

How do I fix cupcakes that sunk in the middle? This usually indicates overmixing or underbaking. Make sure to properly measure ingredients and bake until set.

What if my ganache is too thick? If too thick, gently heat it until it reaches a pourable consistency before frosting your cupcakes.

Additional Resources

Explore delicious chocolate recipes or discover techniques for making various types of frosting to enhance your baking repertoire. Check out seasonal variations that couple well with the flavors of these cupcakes for exciting new ideas.

Join the Conversation

We encourage you to share your baking experiences with us on social media! Post pictures of your beautifully crafted Boston Cream Pie Cupcakes, and don’t hesitate to tag us. Your feedback and adaptations can inspire others in our baking community, so feel free to share tips and variations that worked for you!

The Recipe

Irresistible Boston Cream Pie Cupcakes

Serves: 12 cupcakes

Prep Time: 30 mins

Cook Time: 20 mins

Total Time: 50 mins

Kitchen Equipment Needed

  • Mixing bowls
  • Hand mixer or stand mixer
  • Piping bags
  • Measuring cups and spoons
  • Oven
  • Cooling rack

Ingredients

  • 1 ½ cups all-purpose flour
  • 1 cup granulated sugar
  • ½ cup unsalted butter, room temperature
  • 2 large eggs
  • 1 cup milk
  • 1 tablespoon vanilla extract
  • 2 teaspoons baking powder
  • ¼ teaspoon salt
  • 1 cup pastry cream
  • 1 cup semi-sweet chocolate chips
  • ½ cup heavy cream

Directions

  1. Preheat the oven to 350°F (175°C) and line a muffin tin with cupcake liners.
  2. In a large mixing bowl, cream the butter and sugar until light and fluffy.
  3. Add in the eggs, one at a time, mixing until fully incorporated.
  4. Mix in the milk and vanilla extract until smooth.
  5. In another bowl, whisk together the flour, baking powder, and salt; gradually add to the wet ingredients until just combined.
  6. Divide the batter evenly among the cupcake liners, filling them about 2/3 full.
  7. Bake for 15-20 minutes or until a toothpick inserted comes out clean. Let cool on a rack.
  8. While cooling, prepare the ganache by heating cream and pouring over the chocolate chips; let sit and then stir until smooth.
  9. Once the cupcakes are cool, fill each with pastry cream using a piping bag.
  10. Top each cupcake with chocolate ganache and let set before serving.

Recipe Notes

  • Pastry cream can be made one day in advance and chilled until ready to use.
  • Feel free to experiment with different chocolate types in the ganache for varied richness.
  • For a lighter version, use whipped cream instead of ganache on top.

Indulge in Chocolate-Enrobed Berry Gelee Delights Today

Chocolate-Enrobed Berry Gelee Delights: A Luxurious Dessert Experience

⚖️
Difficulty
Moderate

⏲️
Prep Time
30 mins

🕒
Cook Time
15 mins

⏱️
Total Time
45 mins

🍽️
Servings
12 servings

Berry gelee delights, enveloped in rich chocolate, are the epitome of dessert indulgence. Each bite offers a delightful burst of juicy fruit flavor, harmonizing beautifully with the luscious chocolate coating. Picture the vibrant hues of strawberries, raspberries, and blueberries, all balanced by the deep, velvety richness of dark chocolate. This elegant treat isn’t just about taste; it’s about the experience—each gelee is designed to excite the senses, making it the perfect end to any meal.

The combination of refreshing berries and smooth chocolate creates a symphony of flavors that will impress your guests at any gathering, be it a casual brunch or a sophisticated dinner party. The smooth and silky texture of the chocolate contrasts wonderfully with the tender, wobbly nature of the fruit gelee, making for a textural marvel that’s sure to leave a lasting impression. This recipe is not just a dessert; it’s a celebration of flavors and textures that delight the palate and brighten the table.

Quick Recipe Highlights

  • Flavor Profile: The delightful mix of sweetness from the berries and the bitterness of dark chocolate creates a perfect balance, making every bite a flavor sensation.
  • Texture: The smooth and glossy chocolate contrasts with the soft and gelatinous gelee, providing an exciting mouthfeel.
  • Aroma: The fragrant berry notes combined with the seductive scent of melting chocolate create an irresistible aroma.
  • Visual Appeal: With their vibrant colors and shiny chocolate coating, these gelee delights are as beautiful as they are delicious.
  • Skill Level Needed: Moderate skill is required, predominantly in the preparation of the berry gelee and chocolate tempering process.
  • Special Equipment: A saucepan, a heatproof bowl, a whisk, a mold for gelée, and a thermometer are essential for this recipe.

Recipe Overview

  • Difficulty Level: This chocolate-enrobed berry gelee delight recipe requires moderate culinary skills due to the necessity of preparing a stable gelee and correctly tempering chocolate.
  • Category: This dessert fits perfectly into the category of confectionery, showcasing both fruit and chocolate as key ingredients.
  • Cuisine: This recipe blends elements of both French and modern pastry techniques, combining traditional ingredients with innovative presentation.
  • Cost: The approximate cost for this recipe will be moderate, primarily due to the quality of chocolate and fresh berries used.
  • Season: Ideal for spring and summer when berries are fresh and in season, allowing for the best flavor and freshness.
  • Occasion: These gelee delights are perfect for celebrations like anniversaries, birthdays, or any gatherings that call for an elegant dessert.

Why You’ll Love This Recipe

The taste and texture of these Chocolate-Enrobed Berry Gelee Delights make them a standout dessert. The juicy berries provide a refreshing burst of flavor, while the rich, glossy chocolate coating adds a velvety smoothness that envelops your senses. Each component shines distinctly yet harmoniously, captivating your taste buds and making this dessert a true delight.

Convenience plays a significant role in its appeal. Despite the elaborate appearance, this recipe is straightforward. With easy steps that create stunning results, you can impress guests without spending hours in the kitchen. The berry gelee can be prepared ahead of time, streamlining your dessert preparation.

This dessert offers nutritional advantages, as berries are loaded with antioxidants and vitamins. The use of quality dark chocolate also adds health benefits, such as improved heart health when consumed in moderation. This balance between indulgence and nourishment is a key element of the allure.

Socially, these delightful treats are conversation starters. Their extraordinary presentation means guests will be eager to share their experience. They add elegance to any occasion, encouraging appreciation for your culinary efforts and creativity.

Cost-effectiveness makes this recipe even more inviting. While it may seem gourmet, a simple breakdown reveals that it’s achievable. With seasonal fruits and quality chocolate, you’ll create a dessert that looks extravagant without breaking the bank.

Historical Background and Cultural Significance

The origins of gelee date back to ancient times when natural gelatin from animal bones and skins was used to create jelly-like textures in various cultures. The incorporation of fruits into this genre emerged in Europe during the 18th century, where berry jellies became a popular offering at fine dining establishments. Berries represented seasonal abundance and were celebrated for their vibrant flavors and colors.

Culturally, berry desserts have held significance across many societies. In regions like North America and Northern Europe, berry picking is a cherished tradition that not only highlights the importance of local harvests but also fosters community spirit and conservation. Such desserts are often featured in festivals celebrating the harvest, reinforcing their cultural importance.

Over time, the evolution of recipes has introduced modern techniques and ingredients, enabling the creation of sophisticated dessert presentations. The marriage of chocolate with berry-based items has been embraced in many contemporary culinary practices, celebrated for their balance of sweetness and acidity.

Certain regions have variations of chocolate-enrobed fruit, each with unique local influences. For instance, in Switzerland, chocolate-covered local berries are a popular confection, while in Thailand, similar presentations are made using tropical fruits, showcasing how different cultures interpret this delightful dessert form.

Ingredient Deep Dive

– Berries: Berries like strawberries, raspberries, and blueberries are rich in vitamins, antioxidants, and fiber, essential for maintaining a healthy diet. They also represent seasonal joy and are often associated with summer festivities. When selecting berries, look for plump, fragrant, and vibrant specimens. Store them in the refrigerator and consume them within a few days for optimal freshness. If fresh berries aren’t available, frozen alternatives can be used, although they may release more juice during preparation.

– Dark Chocolate: Dark chocolate is celebrated for its health benefits, including heart health and improved brain function due to its high antioxidant content. Historically, chocolate was considered a luxury item, often utilized in ceremonial contexts. When choosing chocolate, opt for high-quality brands with at least 70% cocoa for a rich flavor. Store chocolate in a cool, dry place and avoid exposure to heat. White or milk chocolate can be used as substitutions, though they will alter the flavor profile.

Common Mistakes to Avoid

  • Not measuring ingredients accurately—Precision is key in achieving the right consistency.
  • Using chocolate that’s not tempered—Improperly tempered chocolate can result in a dull finish and poor texture.
  • Skipping the cooling step for the gelee—Allowing the gelee to set properly ensures a firm, sliceable dessert.
  • Overheating the chocolate—Chocolate should never be overheated; it can scorch and ruin the dish.
  • Inadequate cleaning of utensils—Cocoa fat can prevent proper adherence if equipment is greasy.
  • Using overly ripe berries—Overly ripe berries can lead to a mushy texture and off flavors.
  • Not using a water bath—Why this is important? It prevents overheating and ensures smooth melting of the chocolate.
  • Crowding the cooling rack—Ensure proper space between each piece to avoid sticking.
  • Cutting gelee before it is fully set—This can lead to a messier presentation.
  • Neglecting to taste as you go—Always taste to adjust flavors as necessary before final assembly.

Essential Techniques

Tempering chocolate is critical for finishing the gelee delights with a shiny appearance and crisp texture. This technique prevents the chocolate from blooming and gives a satisfying snap when bitten. To master this, gently heat chocolate gradually, stirring constantly, until it reaches the required temperature without burning.

Gelatin preparation is similarly vital for achieving the correct texture in your gelee. When dissolving gelatin, ensure you properly hydrate it in cold liquid before heating to achieve a smooth incorporation. Common pitfalls include not allowing enough time for the gelatin to bloom, which could prevent the dessert from setting correctly.

Pro Tips for Perfect Chocolate-Enrobed Berry Gelee Delights

Use high-quality chocolate for an outstanding flavor that stands out against the fresh fruit. Properly temper chocolate for a glossy finish and crisp bite. Select berries at their peak to ensure maximum flavor impact. Allow the gelee ample time to cool completely in the refrigerator to set properly. For an extra touch, consider adding a hint of citrus zest to the gelee for brightness. Experiment with different combinations of fruits to customize your dessert. When serving, a light dusting of cocoa powder or finely chopped nuts can elevate the presentation beautifully.

Variations and Adaptations

For regional variations, consider using locally sourced fruits that are in season for your area. Seasonal adaptations include using stone fruits like peaches in the summer or citrus zest added in winter months for an aromatic boost. Dietary modifications may involve using vegan dark chocolate options or substituting gelatin with agar-agar for a plant-based recipe. Flavor variations can be achieved by infusing the chocolate with chili powder or sea salt for an unexpected kick. Presentation alternatives include serving the gelee delights in individual shot glasses for a modern twist or garnishing with mint leaves for added freshness.

Serving and Presentation Guide

When plating your chocolate-enrobed gelee, use a clean white plate to highlight the vibrant colors. Consider arranging them in a spiral or linear pattern for visual appeal. Garnish with fresh mint or edible flowers to elevate the dish further. Traditional accompaniments such as a dollop of whipped cream or a side of vanilla ice cream can create a delightful contrast. These desserts are best served chilled, maintaining that refreshing essence while showcasing the layers of flavor and texture for a memorable experience.

Wine and Beverage Pairing

For wine pairings, a sparkling rosé complements the sweetness of the berries while enhancing the chocolate’s richness. If you prefer non-alcoholic options, herbal teas infused with lemon or fruity strawberry lemonade serve as refreshing matches. Coffee can also be a delightful accompaniment, especially espresso, as its bold flavor balances the sweetness of the dessert. Serve beverages slightly chilled or at room temperature to maintain a pleasant palette balance.

Storage and Shelf Life

Store the chocolate-enrobed berry gelee delights in an airtight container in the refrigerator to preserve freshness. They can last up to 5 days if kept properly. To maintain quality, avoid stacking too many layers or using plastic wrap directly on the chocolate, as it can create condensation. Signs of spoilage include visible moisture on the surface or off scents. If you plan to store them longer, consider freezing them; however, reshape them for best results once thawed.

Make Ahead Strategies

You can make the gelee a day in advance, allowing enough time for it to set completely and save you stress on the day of your event. Store it in the fridge until it’s time to enrobe in chocolate. Use an airtight container to minimize exposure to air. For convenience, temper the chocolate just before assembling and serving; this ensures freshness and the best texture. Quality is key, so only assemble when ready to serve for optimal impact.

Scaling Instructions

Scaling this recipe can be as simple as adjusting the quantities of ingredients. If halving or doubling, keep the same proportions and adjust your cooking times accordingly. For larger gatherings, consider preparing multiple batches at once while ensuring your kitchen equipment can handle increased volumes. You may need to allow separated gelee times to cool adequately, especially if space is limited.

Nutritional Deep Dive

Each serving of these delights provides a delicious balance of macronutrients, with healthy fats from chocolate and complex carbohydrates from the berries. The high antioxidant level from both ingredients contributes to discovered health advantages, including improved cardiovascular health and boosted immunity. The rich flavor allows small portions for satisfying sweetness, aiding in mindful eating practices. For overall dietary considerations, being aware of sugar content and moderation in enjoying these treats supports a balanced lifestyle.

Dietary Adaptations

Gluten-free adaptations of this recipe require no adjustments, as the main ingredients are naturally devoid of gluten. For a dairy-free alternative, opt for dark chocolate labeled as dairy-free or vegan. A vegan version can also be achieved by using agar-agar for the gelee, enhancing its plant-based properties. Low-carb and keto followers can experiment with reducing sugar content or utilizing sugar substitutes for the gelee while maintaining flavor balance. Other specific diets can explore variations that suit individual preferences without compromising on the delight of the recipe.

Troubleshooting Guide

If you encounter texture issues with your gelee, the most common fix is to ensure the gelatin is properly dissolved and thoroughly mixed in. For flavor balance, be mindful of the amount of sweetener versus the natural sweetness of the fruit; adjustments should be made to create a more harmonious profile. Temperature problems arise if hot chocolate isn’t tempered correctly, resulting in a dull finish; thus, practicing the correct techniques is crucial. Should you face equipment challenges due to unsuitable kitchen tools, improvise by using alternative utensils while maintaining consistency in your process.

Recipe Success Stories

Community feedback highlights the impressive presentation quality of these delights, often prompting rave reviews from friends and family alike. Variations suggest community adaptations like infusing mint or lavender into the gelee, demonstrating authentic culinary creativity. Reader suggestions on pairing these desserts with specific wines or incorporating sauces have led to intriguing discussions. Also, those sharing photography tips offer insights into capturing the glossy finish beautifully, enhancing the visual appeal of the final product.

Frequently Asked Questions

Can I use frozen berries for the gelee?

Yes, you can use frozen berries. Just thaw them before use, noting that excess juice may be released during preparation.

How do I store leftovers?

Leftovers should be stored in an airtight container in the refrigerator, where they will last up to five days.

What kind of chocolate is best for this recipe?

High-quality dark chocolate with at least 70% cocoa content is recommended for a rich flavor that complements the berries.

Can I make this recipe vegan?

Yes, use vegan chocolate and agar-agar in place of gelatin for a completely plant-based dessert.

Do I need special tools for this recipe?

While you can manage with basic kitchen tools, having a thermometer for chocolate tempering and molds for the gelee enhances outcomes.

How can I enhance the flavor of my berry gelee?

Consider adding a splash of citrus juice or zest for brightness, or use flavored extracts like vanilla or almond.

Is this recipe suitable for kids?

Yes, this dessert is suitable for all ages, but be mindful of potential allergies to chocolate or specific fruits.

What if my gelee didn’t set properly?

If your gelee didn’t set, you can reheat it gently, add more gelatin, and allow it to cool again.

What’s the best way to serve these delights?

Serve chilled and plated attractively. Garnish with mint leaves or edible flowers for an elevated presentation.

Can I make these in advance?

Absolutely! The gelee can be prepared a day ahead. Just enrobe in chocolate shortly before serving for best results.

Additional Resources

If you’re looking for more berry-focused recipes, try our refreshing berry pavlova or berry smoothie bowls. For technique guides, consider checking out our chocolate tempering and dessert plating tutorials for improved skills. Ingredient information on the health benefits of berries and chocolate can further enhance your understanding of food dynamics. Lastly, explore equipment recommendations for pastry-making essentials to elevate your baking experience.

Join the Conversation

We would love to hear how you enjoyed making your Chocolate-Enrobed Berry Gelee Delights! Share your photos on social media and tag us, or leave a review to inspire others in the community. Consider sharing your variations or unique pairing ideas to continue enhancing our collective culinary experiences. Join our community for discussions, tips, and recipes that will inspire your next baking adventure!

The Recipe

Chocolate-Enrobed Berry Gelee Delights

Serves: 12 servings

Prep Time: 30 mins

Cook Time: 15 mins

Total Time: 45 mins

Kitchen Equipment Needed

  • Heatproof bowl
  • Saucepan
  • Whisk
  • Mold for the gelee
  • Thermometer

Ingredients

  • 2 cups mixed fresh berries (strawberries, raspberries, blueberries)
  • 1/4 cup granulated sugar
  • 1/2 cup water
  • 1 tablespoon gelatin powder
  • 1 cup dark chocolate (at least 70% cocoa)
  • 1 tablespoon coconut oil (optional, for shine)

Directions

  1. In a saucepan, combine water and sugar over medium heat, stirring until dissolved.
  2. Add fresh berries to the mixture, bringing it to a light simmer, allowing it to cook for 5 minutes.
  3. Remove from heat, strain the mixture, and reserve the berry juice.
  4. In a small bowl, sprinkle gelatin over 2 tablespoons of cold water. Let it sit for 5 minutes to bloom.
  5. Once bloomed, add the gelatin to the warm berry juice, mixing well until fully dissolved.
  6. Pour the mixture into molds and refrigerate for at least 3-4 hours to set completely.
  7. Once set, melt the dark chocolate with coconut oil in a heatproof bowl over simmering water, stirring frequently.
  8. Remove the gelee from the molds, dipping each piece into the melted chocolate to coat evenly.
  9. Place chocolate-coated gelee on a cooling rack to set. Refrigerate until serving.
  10. Enjoy your Chocolate-Enrobed Berry Gelee Delights!

Recipe Notes

  • For a sweeter touch, adjust the sugar based on your berry sweetness.
  • For a more vibrant color, you can add a few drops of natural food coloring to the gelee mixture.
  • Experiment with different fruits such as peaches or mango for a tropical twist.

Master the Art of Tres Leches Cake: A Delicious Recipe

Tres Leches Cake: A Heavenly Dessert You’ll Adore

⚖️
Difficulty
Medium

⏲️
Prep Time
30 mins

🕒
Cook Time
25 mins

⏱️
Total Time
55 mins

🍽️
Servings
10-12

Tres Leches Cake, or “Three Milk Cake,” is a beloved dessert that hails from Latin America, particularly Mexico. This luscious cake is soaked in a delightful mixture of three types of milk—evaporated milk, sweetened condensed milk, and whole milk—creating a moist and rich dessert that is hard to resist. The cake’s light texture, combined with the creamy milk mixture, makes it a delicious treat that melts in your mouth. As you take your first bite, the sweetness of the milks mingles with a hint of vanilla, transporting you to a world of culinary bliss.

This cake is not only delicious but also visually stunning. Traditionally topped with fluffy whipped cream and a sprinkle of cinnamon or fresh fruits, Tres Leches Cake makes an ideal centerpiece for any gathering. Whether you’re celebrating a birthday, hosting a potluck, or simply indulging your sweet tooth, this cake is sure to impress your family and friends. With a preparation time of just 30 minutes and a cook time of under 30 minutes, you can whip up this irresistible dessert in no time.

Quick Recipe Highlights

  • Flavor Profile: The blend of three milks creates a unique flavor that balances sweetness and creaminess, making each bite decadent.
  • Texture: A soft, tender cake base soaked in creamy milk creates a spongy, melt-in-your-mouth texture.
  • Aroma: The inviting aroma of vanilla and freshly whipped cream adds to the overall experience, enticing guests even before the first slice is served.
  • Visual Appeal: The cake is elegantly layered and topped with whipped cream, garnished with fresh fruit or cocoa, making it a treat for the eyes.
  • Skill Level Needed: This is a medium-difficulty dessert, requiring basic baking skills and attention to detail during the soaking process.
  • Special Equipment: You’ll need basic baking equipment such as a mixing bowl, a baking dish, measuring cups, and an electric mixer for the best results.

Recipe Overview

  • Difficulty Level: Medium—the technique involved in soaking the cake properly and preparing the frosting requires some practice but is achievable.
  • Category: Dessert—this cake is ideal for sweet treats after meals, fitting perfectly in the dessert category.
  • Cuisine: Latin American—its roots are predominantly Mexican, showcasing the region’s culinary finesse through rich flavors.
  • Cost: The ingredients are relatively inexpensive, making it a budget-friendly dessert option.
  • Season: Perfect for any season, but particularly delightful during festive occasions and family gatherings.
  • Occasion: Birthdays, weddings, and holidays are ideal opportunities to showcase this stunning cake.

Why You’ll Love This Recipe

Taste and texture come together beautifully in Tres Leches Cake, offering a delightful treat that satisfies your sweet cravings without being overwhelmingly rich. The cake absorbs the three types of milk, ensuring that every bite is infused with flavor. Not only does it boast an impressive moisture level, but it also has a lovely spongy texture that contrasts beautifully with the creamy frosting.

The convenience of this recipe is another significant advantage. The straightforward steps require minimal effort, making it a perfect dessert for novice bakers or anyone looking for a quick yet impressive treat. Additionally, the ingredients are usually pantry staples, allowing you to whip it up any time you have a craving.

Nutritionally, while Tres Leches Cake is indulgent, the use of milk and eggs provides a good source of protein, calcium, and essential nutrients. When moderated as part of a balanced diet, it can still be enjoyed healthily.

This dessert holds great social value, often served at celebrations and gatherings, making it a fantastic option for entertaining guests. It’s sure to be a hit, prompting compliments and requests for the recipe.

Finally, the cake’s affordability ensures that it is accessible to everyone. Its delightful presentation and delicious taste allow it to rival any gourmet dessert without breaking the bank.

Historical Background and Cultural Significance

The origin of Tres Leches Cake is somewhat ambiguous, with various countries in Latin America claiming to have invented it. However, it’s believed that this cake’s history dates back to the early 20th century, becoming popular in Mexico during the 1930s. Its rise to fame can be attributed to the addition of sweetened condensed milk, making it a rich dessert option appealing to those with a sweet tooth.

Culturally, Tres Leches Cake holds a special place in the hearts of many Latin Americans. It is often served at birthday parties, weddings, and festivals, symbolizing joy and celebration. The cake’s presence at significant life events reflects its role in nurturing community bonds and shared cultures among families and friends.

Over the years, the recipe has evolved. While the traditional version remains popular, creative adaptations have also emerged, incorporating different flavors or toppings to customize the cake. Such variations showcase regional preferences while keeping the essence of the Tres Leches intact.

Regional variations also highlight the cake’s versatility. For example, in some areas, bakers add a hint of coconut or chocolate, showcasing the creativity of different cultures while maintaining the original cake’s integrity.

Ingredient Deep Dive

Main ingredients used in Tres Leches Cake include flour, eggs, sugar, butter, and the star trio of milks: evaporated milk, sweetened condensed milk, and heavy cream.

Flour is essential in giving the cake its structure. When choosing flour, all-purpose flour works best. Make sure to store flour in a cool, dry place to prevent clumping or spoilage. You can substitute other flours, like cake flour, but avoid using gluten-free options as they may not yield the spongy texture desired.

Eggs contribute richness and moisture, while providing valuable proteins. Always opt for fresh eggs, as they not only improve flavor but also impact the cake’s texture. When not using, store eggs in the refrigerator for extended shelf life.

The three milks elevate the cake’s flavor profile significantly. Evaporated milk provides creaminess without excessive sweetness, while sweetened condensed milk is incredibly rich. Heavy cream is crucial for the cake’s decadent soak, adding an irresistible wetness. It’s best to use full-fat versions of these products to achieve optimal taste and texture.

Common Mistakes to Avoid

  • Not letting the cake cool completely before soaking. This can cause the cake to fall apart or become too mushy.
  • Forgetting to poke holes in the cake before adding the milk mixture, which helps the cake absorb the liquid properly.
  • Using low-fat or non-fat milk options, which won’t provide the same richness as full-fat alternatives.
  • Being too impatient during the soaking process; letting the cake absorb the milk mixture overnight offers the best results.
  • Over-whipping the cream, which can lead to a grainy texture instead of a smooth frosting.
  • Using a pan that is too small, causing the cake to rise too much and spill over.
  • Not sifting dry ingredients before mixing, which can result in a dense cake.
  • Skipping the flavor enhancements, such as vanilla or cinnamon, which elevate the overall taste experience.
  • Neglecting to serve the cake chilled; allowing it to rest in the refrigerator enhances its overall flavor.
  • Not considering garnishes—a sprinkle of cocoa powder or fresh fruit can enrich the cake’s presentation and taste.

Essential Techniques

A key technique when making Tres Leches Cake is the soaking process. This step is vital because it ensures the cake absorbs the three types of milk uniformly. Master it by thoroughly poking holes throughout the cooled cake with a skewer or fork, allowing the liquid to permeate without weighing down the cake. Common pitfalls to avoid include rushing the process or skimping on the soaking time, which can result in a less moist cake.

Another crucial technique is whipping the cream for the frosting. This adds a light and airy contrast to the dense and creamy soaked cake. To master this, aim for soft peaks before gently folding in any additional flavors like powdered sugar or vanilla. Watch out for over-whipping, which can lead to a grainy consistency. Visual cues include the cream becoming thick while still easily spreading over the cake.

Pro Tips for Perfect Tres Leches Cake

One of the best tips for perfect Tres Leches Cake is to allow the cake to soak overnight; this dramatically improves the moisture and flavor penetration. Additionally, consider baking the cake in a glass dish to easily monitor the soaking process.

Additionally, infusing your milk mixture with flavors such as vanilla bean or a hint of rum will add depth to the cake that takes it to the next level. Always use room temperature ingredients when mixing, as this helps achieve a better batter consistency.

Utilizing a serrated knife to cut the cake will yield cleaner slices, making for an elegant presentation. Don’t forget to chill the cake before serving; it tastes best when cold, refreshing, and inviting on a warm day.

Lastly, garnishing the cake with fresh berries or a sprinkle of cinnamon creates not only a beautiful presentation but also elevates the flavor, enticing your guests even before their first bite.

Variations and Adaptations

Tres Leches Cake has countless variations that enhance its flavor and presentation. For a tropical twist, consider adding a layer of coconut milk to the milk mixture, creating a coconut Tres Leches Cake that will transport your taste buds to a beach paradise.

Seasonal adaptations can be introduced as well. During the holidays, incorporating caramel or pumpkin spice into the milk mixture can yield a festive dessert perfect for celebrations. Alternatively, during summer, a refreshing berry version using strawberry or raspberry purée will delight your guests.

For dietary modifications, a low-carb or keto version can be created using almond flour instead of regular flour and sugar-free condensed milk. This ensures those watching their carbs can still indulge in this beautifully moist cake.

Flavor variations can include adding lemon or orange zest to the milk mixture for a citrusy boost. Texture modifications, such as folding in toasted nuts or shredded coconut, can add delightful unexpected crunches to each bite.

Finally, present the cake in unique ways, perhaps served in individual mason jars, allowing for cute personal servings that also make for delightful gifts.

Serving and Presentation Guide

When serving Tres Leches Cake, presentation is key. Consider plating the cake on a decorative serving platter and topping it with freshly whipped cream and fresh fruits, such as strawberries or kiwi, to enhance its visual appeal.

Garnishing with a light dusting of cinnamon or cocoa powder adds an extra touch of elegance. If you prefer a modern twist, consider individual portions served in clear glass cups for a rustic feel.

Temperature plays a critical role; the cake must reach a chilled can be more refreshing, especially during warm weather. Serving with a scoop of vanilla ice cream on the side amplifies the indulgent experience.

Portion control is also essential—cut into small squares to allow guests to try other desserts or simply enjoy a smaller, satisfying treat that still feels indulgent. Pair it with a hot cup of coffee or a sweet herbal tea for a complete experience.

Wine and Beverage Pairing

When it comes to wine pairings, a light and fruity white such as Moscato complements the sweetness of the Tres Leches Cake perfectly. Alternatively, a sparkling wine can elevate the dessert experience, providing a refreshing contrast to the rich cake.

For non-alcoholic alternatives, a zesty lemonade or a refreshing iced tea made with mint offers a delightful pairing that balances the cake’s creaminess.

Coffee or tea pair nicely as well; a medium roast coffee or a smooth chai tea can harmonize with the cake’s flavors without overwhelming them.

Temperature considerations are also important when serving beverages alongside the cake; ensure that wines are chilled, while hot beverages should be served steaming to create an inviting contrast in temperatures.

Storage and Shelf Life

Keeping Tres Leches Cake fresh is easy when stored properly. Once cooled and soaked, cover the cake with plastic wrap or store in an airtight container in the refrigerator to maintain its moisture.

For optimal freshness, consume the cake within 3-5 days of preparation; however, it can be safely refrigerated for up to a week if stored correctly. Pay attention to signs of spoilage, which include off-smells or changes in texture.

If freezing is necessary, slice the cake into individual portions, wrap them securely in plastic wrap, and then place them in a freezer-safe container. This helps prevent freezer burn. Thaw in the refrigerator prior to serving; avoid reheating as this can alter the desirable texture.

Reheating the entire cake is not recommended, as it may become soggy. Instead, consider serving chilled slices directly from the refrigerator for the best experience.

Make Ahead Strategies

To ensure efficiency in making Tres Leches Cake, consider preparing the cake and allowing it to soak a day in advance. This not only enhances the flavor but also saves time on the actual day of serving.

Keep each component separate until ready to serve; this means baking the cake and preparing the milk mixture beforehand but only assembling it just before presentation. This keeps the cake from becoming overly wet.

Assemble the cake by pouring the milk mixture over it and topping with whipped cream on the day you plan to serve, ensuring it retains its delightful creaminess.

If you wish to add fresh fruit toppings, prepare those the day you serve to maintain freshness and vibrant color. Avoid making whipped cream too early, as it can weep or lose its volume if stored for extended periods.

Lastly, consider adding fresh elements, like zested citrus or berries, right before serving for a bright, refreshing taste.

Scaling Instructions

When considering scaling your Tres Leches Cake recipe, halving the ingredients can easily yield a smaller cake perfect for intimate gatherings. Simply adjust baking times, keeping an eye out for doneness using a toothpick test.

Doubling or tripling the recipe is also manageable—with larger baking dishes, ensure even baking by rotating the pans halfway through cooking. It may also require slightly longer baking times due to the increased volume, so always check for texture.

Be mindful of equipment adjustments too; larger mixing bowls or multiple baking pans will be necessary to accommodate the increased batter.

Timing should also be adjusted—while the soak time remains the same, preparation may take longer with larger quantities. Ensure appropriate storage considerations are observed if making in advance.

Nutritional Deep Dive

When analyzing the nutrition of Tres Leches Cake, it’s important to consider its macro breakdown. Each serving contains essential proteins from eggs and dairy, combined with carbohydrates from flour and sugars, providing a balanced but indulgent sweet treat.

Micronutrient elements include calcium and vitamin D, primarily derived from the milk content, supporting bone health. Other vitamins such as A and B12 are present, adding to its nutritional profile.

Health benefits must be approached with moderation in mind; while it is a dessert rich in flavor, enjoying it as a part of a well-balanced diet is essential for maintaining health.

Portion analysis suggests that enjoying a smaller slice allows recognition of the cake’s richness while still satisfying sweet cravings. For those mindful of calorie intake, pairing it with fresh fruits can provide a fiber boost.

For those managing weight, consider a mindful approach to portion sizes and serve it alongside fresh herbal teas, providing a fulfilling experience without excess calories.

Dietary Adaptations

For those seeking a gluten-free version of Tres Leches Cake, using almond flour or a gluten-free baking blend can provide an alternative while maintaining a similar taste.

Dairy-free adaptations can be achieved by substituting all three types of milk for coconut-based milks; the result is a deliciously tropical twist that preserves the original concept of the cake.

Vegan modifications can follow the same coconut milk substitutes while replacing eggs with aquafaba to mimic the airy texture of the cake.

For those on low-carb or keto diets, using almond or coconut flour and sugar alternatives can allow enjoyment without compromising dietary goals.

Individuals following the paleo approach can utilize natural sweeteners like honey or maple syrup in place of refined sugars, while ensuring all ingredients align with paleo guidelines.

Troubleshooting Guide

In the pursuit of perfection, you may encounter texture issues such as a dry cake. This often happens when the soaking process lacks thoroughness. Ensure you adequately poke holes in the cake and give it enough time to soak completely.

Flavor balance can sometimes skew too sweet; adding a pinch of salt to the cream mixture can help cut through the sweetness, enhancing overall flavor.

Temperature problems, such as an underbaked center, can be identified using a toothpick. A clean toothpick indicates doneness, while wet batter shows the need for more baking time.

Equipment challenges like mixer malfunctions can hinder the ability to adequately whip cream or mix batter. Keep extra hand tools available to maintain momentum in case of electrical failures.

Ingredient substitutions can occasionally lead to dissatisfaction in flavor. Always check that alternative ingredients have similar characteristics to their original counterparts to prevent unexpected outcomes.

Timing concerns such as soaking too long can lead to a mushy cake. A well-timed soaking strategy rests at around 2-3 hours to achieve the ideal texture without sogginess.

Recipe Success Stories

Readers frequently share success stories about their Tres Leches Cake adventures. Many delight in the ease of preparation, with several noting that family members request boosts of creaminess through added flavors such as espresso.

Variations such as chocolate Tres Leches have emerged as popular adaptations, allowing creativity to flourish while keeping the essence of the original recipe intact.

Adaptation stories often focus on gluten-free or dairy-free adaptations, proving that with the right substitutions, everyone can enjoy this delicious dessert.

Photography tips for showcasing Tres Leches Cakes often highlight the contrast between the layer of cream and fruits on top against the fluffiness of the cake, enticing food-lovers to try their hands at the recipe.

Readers express appreciation for the cake’s ability to freeze well, creating opportunities for batch cooking as they ready their freezers in anticipation of future celebrations.

Frequently Asked Questions

Q1: Can I make Tres Leches Cake ahead of time?
Yes, it’s best to prepare the cake a day in advance, allowing it to soak overnight for optimal flavor.

Q2: How do I know if my cake is done baking?
Use a toothpick inserted into the center; if it comes out clean, the cake is done.

Q3: Can I use different types of milk?
Absolutely! You can customize your milk mixture with coconut or other non-dairy options.

Q4: Is Tres Leches Cake hard to make?
No, it’s relatively easy; just follow the steps carefully for best results.

Q5: How should I store leftover cake?
Cover it tightly and refrigerate. It’s best enjoyed within 3-5 days.

Q6: Can I freeze the cake?
Yes, slice and wrap it tightly before freezing. Thaw in the fridge when ready to eat.

Q7: What flavors can I add to the milk mixture?
Consider vanilla, cocoa, or even citrus zest for added flavor depth.

Q8: Can I make a mini version of the cake?
Yes! Just halve the ingredients and bake in smaller pans.

Q9: How do I prevent the cake from being too soggy?
Ensure to soak it properly but don’t overdo it—around 2-3 hours is perfect.

Q10: Can I replace the whipped cream topping?
Yes, whipped coconut cream works as a delicious dairy-free alternative.

Additional Resources

Explore more related recipes that embrace the richness of Latin American desserts, such as Flan or Churros to complement your Tres Leches Cake.

Technique guides on whipping cream and making sponge cakes will enhance your baking skill set further and support upcoming dessert endeavors.

Ingredient information about the various types of milk and their substitutes can deepen your understanding of achieving the best results in baking.

Consider investing in high-quality kitchen equipment such as a stand mixer or measuring cups for precision in measurements, crucial for the perfect cake.

Seasonal variations allow you to adapt your Tres Leches Cake within the context of holidays or family gatherings, giving new life to a classic recipe.

Join the Conversation

Consider sharing your baking journey through social media by tagging photos of your Tres Leches Cake and engaging with food-loving communities.

Photography tips can enhance your shot, highlighting the cake’s height and creamy layers. Experiment with different lighting and angles for the best visuals.

Sharing recipe reviews can also help foster community engagement, allowing fellow bakers to offer their support and suggestions based on their experiences.

Explore variations as suggested by fellow bakers—their unique twists might inspire your next baking adventure!

The Recipe

Tres Leches Cake

Serves: 10-12

Prep Time: 30 mins

Cook Time: 25 mins

Total Time: 55 mins

Kitchen Equipment Needed

  • Mixing bowl
  • Electric mixer
  • Baking dish
  • Measuring cups and spoons
  • Whisk
  • Toothpick for testing doneness

Ingredients

  • 1 cup all-purpose flour
  • 5 large eggs
  • 1 cup granulated sugar
  • 1/3 cup unsalted butter, melted
  • 1 cup evaporated milk
  • 1 cup sweetened condensed milk
  • 1 cup whole milk
  • 1 tsp vanilla extract
  • 1 cup heavy cream (for topping)
  • Fresh fruit for garnish (optional)
  • Cinnamon for garnish (optional)

Directions

  1. Preheat your oven to 350°F (175°C). Grease a 9×13 inch baking dish.
  2. In a mixing bowl, whisk together flour and sugar until combined.
  3. Add eggs, melted butter, and vanilla extract. Mix well until smooth.
  4. Pour the batter into the prepared baking dish and bake for about 25 minutes or until a toothpick comes out clean.
  5. Once baked, let the cake cool completely.
  6. In a separate bowl, combine evaporated milk, sweetened condensed milk, and whole milk.
  7. Poke holes all over the cooled cake with a fork and gradually pour the milk mixture over, allowing it to soak in.
  8. For the topping, whip heavy cream until soft peaks form and spread it over the soaked cake.
  9. Chill the cake for at least 2 hours or overnight before serving.
  10. Garnish with fresh fruit or cinnamon before slicing and enjoying.

Recipe Notes

  • For a chocolate twist, add cocoa powder to the batter.
  • Ensure the cake is completely cool before soaking to prevent it from falling apart.
  • Feel free to experiment with different flavors by adding citrus zest or flavored extracts to the milk mixture.

Indulge in Decadent Hot Fudge Brownie Bread Today!

Decadent Hot Fudge Brownie Bread: A Chocolate Lover’s Dream

⚖️
Difficulty
Moderate

⏲️
Prep Time
30 mins

🕒
Cook Time
50 mins

⏱️
Total Time
80 mins

🍽️
Servings
12 slices

Indulge your chocolate cravings with our Decadent Hot Fudge Brownie Bread! This deliciously rich loaf combines the fudgy texture of brownies with the comforting goodness of bread, resulting in a sweet treat that’s perfect for any chocolate lover. Imagine slicing into this luscious creation to uncover its warm, gooey fudge center, giving each bite a melt-in-your-mouth sensation. Whether enjoyed as a dessert or a special treat for breakfast, this hot fudge brownie bread promises to satisfy your cravings with every slice.

This recipe is not just about flavors, but also about the experience of baking something truly special. Buzzing with the aroma of fresh chocolate baking in the oven, nothing beats the feeling of pulling this creation from the oven and watching as the chocolate ooze from its depths. It’s soul-soothing, reminiscent of cozy family gatherings where dessert is the highlight. So prepare your taste buds for an extraordinary experience that’s easy to share and even easier to love!

Quick Recipe Highlights

  • Flavor Profile: This brownie bread features rich chocolate and a hint of vanilla, creating a deep flavor that is both comforting and indulgent.
  • Texture: Expect a dense and fudgy interior with a slightly crisp crust that provides the perfect contrast to the ooey gooey center.
  • Aroma: The heavenly scent of baking chocolate mixed with vanilla wafts through the air, captivating everyone in the kitchen.
  • Visual Appeal: This bread presents beautifully with a glossy top and visible fudge swirls throughout, making it enticing for anyone who sees it.
  • Skill Level Needed: This moderate recipe requires basic baking skills and a little love to create a heavenly treat.
  • Special Equipment: You’ll need a standard loaf pan and some mixing bowls along with measuring cups and spatulas for easy preparation.

Recipe Overview

  • Difficulty Level: This loaf requires intermediate baking skills, as achieving the right texture while ensuring the fudge remains gooey can be tricky but very rewarding.
  • Category: This delectable dish falls under the dessert category, specifically as a rich bread that blurs the lines between bakery and confectionery.
  • Cuisine: While drawing inspiration from classic American desserts, this recipe takes brownie traditions and turns them into a unique bread format.
  • Cost: The approximate cost of making this recipe is quite reasonable, primarily accounting for cocoa, butter, and eggs.
  • Season: Ideal for any season, this bread brings warmth on chilly days and sweetness on sunny brunch tables.
  • Occasion: Perfect for birthdays, holidays, or as a delightful afternoon snack, this bread is versatile for various celebrations.

Why You’ll Love This Recipe

One of the standout features of this Decadent Hot Fudge Brownie Bread is its blend of taste and texture. The rich, chocolatey flavor tantalizes your taste buds while the fudgy texture ensures each bite is a chocolatey delight. You’ll savor the contrast of the soft, moist bread with its gooey center, making it hard to resist coming back for that second slice.

This brownie bread is also surrounded by the convenience of preparation – it requires no special techniques beyond basic mixing and baking. With a hands-on time of less than 30 minutes, it’s the perfect choice for a last-minute treat that looks and tastes like it took hours to prepare. Your friends and family will be begging for seconds!

On the nutritional front, the use of eggs and cocoa powder lends a surprising amount of beneficial nutrients—iron from cocoa and protein from eggs—fitting well within a balanced diet when enjoyed in moderation.

Socially, this recipe shines when it comes to entertaining. Arriving at a gathering with a fresh loaf of hot fudge brownie bread will undoubtedly impress guests and is perfect for sharing. This dessert sparks conversation and laughter as everyone delights in its rich, sweet goodness.

Lastly, you’ll find this recipe cost-effective when compared to many store-bought desserts or extravagant pastries. Utilizing common pantry staples, anyone can whip up this delightful treat without breaking the bank. Enjoying such rich flavors at home fosters a sense of creativity and satisfaction.

Historical Background and Cultural Significance

The origins of brownie bread can be traced back to early American cooking, where adaptations of classic desserts evolved to suit home baking methods. Brownies, which first gained popularity in the early 20th century, have always been infused with chocolate and often baked quickly in a pan. However, as the baking world became more innovative, bakers began to experiment by creating hybrid recipes, such as this brownie bread.

Culturally, brownies and baked bread have long been staples at celebrations and family gatherings. Their ability to be made ahead of time and served warm resonates with many traditions that emphasize family and togetherness over shared meals.

As time progressed, variations of brownies shifted from simple recipes to more elaborate creations, often incorporating additional flavors and textures. The introduction of hot fudge into the brownie concept represents a fusion of iconic American flavors, elevating this dish to something truly special.

Ingredient Deep Dive

One of the key ingredients in hot fudge brownie bread is cocoa powder, which has a rich history dating back to ancient civilizations, where it was revered for its flavor and energizing properties. When selecting cocoa powder, opt for high-quality brands that offer a rich chocolate flavor. Store it in a cool, dark place to retain its potency longer. If you run out, you can substitute with unsweetened chocolate, though adjustments in sugar will be necessary.

An equally important ingredient is butter, a crucial component that adds richness and depth to the flavor while contributing to the moisture of the bread. Originating from historical dairy farming, butter transforms recipes by adding creaminess. When choosing butter, look for unsalted options to control the overall salt content of your dish. If you’re out of butter, margarine can serve as a substitute, though the flavor will differ slightly.

Common Mistakes to Avoid

  • Overmixing the Batter: This can lead to dense bread instead of the intended fudgy texture. Ensure you mix until just combined.
  • Underbaking: Not cooking the bread long enough will leave it too gooey in the middle. Always check for doneness using a toothpick, ensuring it comes out with a few moist crumbs.
  • Using Low-Quality Chocolate: Poor quality cocoa can impact flavor significantly. Always use a good quality cocoa powder.
  • Incorrect Oven Temperature: A too hot or too cold oven can affect baking time and texture. Use an oven thermometer to check accuracy.
  • Skimping on the Fudge: Adding insufficient hot fudge to the mixture may result in a disappointing bread. Be generous!
  • Not Prepping the Pan: Failing to grease and flour your pan can lead to sticking. Always ensure your baking dish is prepared.
  • Ignoring Ingredient Temperature: Using cold eggs or butter can affect how well they mix together. Aim for room temperature ingredients.
  • Skipping the Cooling Time: Letting the bread cool completely allows the flavors to meld beautifully. Slicing too soon can ruin the texture.

Essential Techniques

Mixing Your Dry and Wet Ingredients: It’s essential to mix your dry and wet ingredients separately before combining. This ensures a more even distribution of the cocoa and baking powder, preventing clumps. Master this technique by using different bowls to keep your process organized.

Testing for Doneness: Knowing when your brownie bread is done is crucial. Stick a toothpick or knife into the center; it should come out with moist crumbs but not wet batter. This little check can save you from turning a delicious creation into a dry disappointment.

Pro Tips for Perfect Decadent Hot Fudge Brownie Bread

1. Use high-quality cocoa powder for a richer chocolate flavor—opt for Dutch-processed cocoa for a deeper taste.

2. Don’t be afraid to add additional chocolate chips or nuts into the batter for extra texture and flavor depth.

3. If you enjoy a sweeter loaf, consider adding a bit more sugar to complement the bitterness of the cocoa.

4. Let your bread cool before slicing to ensure clean cuts and to preserve the fudgy texture.

5. Serve the bread warm, drizzled with extra hot fudge sauce for an indulgent treat.

6. Make use of leftover chocolate by melting it down and drizzling it over the top for added sweetness and decoration.

7. Experiment with different extracts like almond or peppermint for unique flavor variations.

8. Consider adding a sprinkle of sea salt on top right before baking to enhance flavors significantly.

Variations and Adaptations

Food is always evolving, and so can your brownie bread! For a seasonal adaptation, consider throwing in fresh raspberries or strawberries during the summer months for a refreshing twist. In the autumn, incorporating spices like cinnamon or nutmeg can add warmth and flavor.

If you’re looking for dietary modifications, you can substitute gluten-free flour for all-purpose flour to create a gluten-free version. Additionally, swapping traditional sugar for coconut sugar can offer a lower glycemic alternative.

Flavor variations are limitless. Try adding a layer of caramel sauce for a salted caramel brownie bread or add orange zest to create a chocolate orange fusion. When serving, think about modern presentation alternatives like individual mini loaves, perfect for gifting or parties.

Serving and Presentation Guide

To make your Decadent Hot Fudge Brownie Bread truly shine, consider plating it with finesse. A simple wooden cutting board is an ideal base, showcasing its texture. Drizzle some hot fudge over the top and dust with powdered sugar for an elegant finish. Fresh berries can add a pop of color and freshness to contrast the rich bread.

Garnishing with mint or a dollop of whipped cream can elevate the dessert to the next level. Remember to serve this delicious bread warm, complemented by a cold scoop of vanilla ice cream for a blissful pairing. Additionally, controlling portion sizes can offer a sense of indulgence without overwhelming your guests.

Wine and Beverage Pairing

The rich flavors of decadent chocolate pair beautifully with certain wines. A sweet dessert wine such as a late harvest Riesling enhances the sweetness of the bread and balances out the chocolate’s richness. For something red, a Merlot will highlight the cocoa notes while complementing the fudge.

For non-alcoholic options, consider serving a creamy chocolate milkshake or premium cold brew coffee. The bold flavors in both beverages make for a balanced pairing. Ensure the beverages are served at the right temperature—cold drinks juxtaposed against warm bread are simply divine!

Storage and Shelf Life

To keep your brownie bread fresh, store it in an airtight container at room temperature for up to three days. For longer storage, wrapping the loaf tightly in plastic wrap and aluminum foil can allow you to freeze it for up to three months. Always label your storage containers with dates for easy tracking.

When inspecting for spoilage, look for signs such as dried-out bread or a sour odor. For the best taste, allow frozen bread to thaw completely and reheat it gently in the oven to restore its fudgy texture.

Make Ahead Strategies

To streamline your baking process, you can prepare the batter a day in advance and store it in the fridge. Just give it a good stir before pouring into the pan and baking. This also allows the flavors to develop further, enhancing your final product.

Alternatively, you can bake the bread ahead of time and store it in an airtight container. When it’s time to serve, simply warm up the slices in the oven for a rustic touch and maximum flavor.

Scaling Instructions

If you wish to share your delicious brownie bread creation, doubling or even tripling the recipe is straightforward. Use larger loaf pans or smaller, individual-shaped bakeware to cater to crowd sizes. Ensure you adjust the baking time accordingly, particularly for smaller loaf versions.

For those who want to reduce the recipe, halving the ingredients and using a smaller loaf pan works beautifully. Monitor your baking time closely, as less batter may cook faster than the original recipe indicates.

Nutritional Deep Dive

This Decadent Hot Fudge Brownie Bread is not just a delightful treat; it can also be part of a mindful eating approach when consumed in moderation. One slice approximately contains 250 calories, with a good balance of carbs and fats from chocolate and butter. The presence of protein from eggs also supports a balanced diet while enjoying this indulgent dessert.

Micronutrients found in cocoa, such as magnesium and iron, contribute beneficial health aspects, while the richness of the ingredients provides a satisfying treat that can curb cravings effectively. Keep portion sizes in check, and enjoy responsibly for a guilt-free dessert experience!

Dietary Adaptations

For those needing gluten-free options, substituting wheat flour with almond meal or a gluten-free blend works wonders without compromising on taste. Similar adjustments can be made for a dairy-free option using coconut oil and dairy-free chocolate alternatives, catering to a broader audience.

For vegan adaptations, consider swapping eggs for flax seeds or applesauce, while maintaining the rich flavor with coconut sugar and dairy-free products. These adjustments allow everyone to enjoy the deliciousness of brownie bread, no matter their dietary restrictions!

Troubleshooting Guide

Should your brownie bread turn out too dry, it’s possible you overbaked it. Test your oven’s temperature with an accurate thermometer, as ovens can vary significantly. For overly sweet flavors, reducing the sugar content next time can help balance the chocolate’s richness.

If you find the center is not fudgy enough, consider decreasing the baking time slightly for a gooier texture. Consistent checks can save a loaf from a dry fate!

Recipe Success Stories

Reader feedback on this brownie bread has been overwhelmingly positive, with many sharing their successful baking stories. Some have added layers of caramel or nuts, resulting in unique versions that maintain the delicious base. Community members also share their experiences capturing stunning photos of their creations, encouraging others to try the recipe.

Several readers have suggested making mini loaves as gifts, often leading to rave reviews at holiday gatherings. No matter how you make it, the essence of community surrounds this recipe, making it even more special.

Frequently Asked Questions

1. Can I use different types of chocolate? Absolutely! While dark chocolate provides a deep richness, milk chocolate can create milder sweetness. Experimenting here can yield delicious results!

2. How do I store leftover brownie bread? Keep it in an airtight container at room temperature. For longer storage, wrap it and freeze it. Thawing in the fridge is ideal before serving.

3. Can I add nuts to the recipe? Yes! Chopped walnuts or pecans add a delightful crunch. Just fold them in gently after batter preparation.

4. What can I substitute for eggs? Flaxseed meal mixed with water or applesauce are great egg alternatives. Use 1 tablespoon of flaxseed meal mixed with 2.5 tablespoons of water for each egg.

5. Can I use a different sized pan? Yes, you can use cupcake trays for individual servings or a larger pan if you double the recipe. Adjust the baking time accordingly.

6. What’s the best way to reheat this bread? Reheat in the oven at 350°F (175°C) for about 5-10 minutes. This restores the warm, gooey texture.

7. Can I make this recipe in advance? Yes! The batter can be made a day ahead, and it also freezes well, making it easier to serve fresh treats later.

8. How do I know when it’s done baking? A toothpick inserted into the center should come out with a few moist crumbs but not wet batter. Check it a few minutes before the recommended baking time.

9. Can I use flavored extracts? Definitely! Try adding almond or mint extract for an exciting twist on the classic flavors.

10. Is this recipe easily adaptable for dietary needs? Yes, it’s easily customizable for dairy-free, gluten-free, and vegan diets. Substitute ingredients as mentioned for specific needs.

Additional Resources

For more delicious recipes, check out our cake section for similar dessert inspirations and our baking technique guides to refine your skills. Also, consider exploring our ingredient guides to understand how to make the most out of your pantry staples. Seasonal adaptations can elevate your holiday baking, bringing joy and flavor into every occasion!

Join the Conversation

Don’t hesitate to share your experience in the comments! Join our community on social media and tag us in your creations. We love to see how you make this Decadent Hot Fudge Brownie Bread your own. Engage with other bakers to exchange tips, variations, and photography techniques!

The Recipe

Decadent Hot Fudge Brownie Bread

Serves: 12 slices

Prep Time: 30 mins

Cook Time: 50 mins

Total Time: 80 mins

Kitchen Equipment Needed

  • Loaf pan
  • Mixing bowls
  • Measuring cups
  • Spatula
  • Whisk

Ingredients

  • 1 cup unsalted butter
  • 2 cups granulated sugar
  • 4 large eggs
  • 1 cup unsweetened cocoa powder
  • 1 tsp vanilla extract
  • 1 cup all-purpose flour
  • 1 tsp baking powder
  • 1/2 tsp salt
  • 1 cup hot fudge sauce (store-bought or homemade)

Directions

  1. Preheat your oven to 350°F (175°C). Grease a loaf pan and set aside.
  2. In a large mixing bowl, melt the butter and mix it with sugar until well combined.
  3. Add eggs one at a time, whisking well after each addition, followed by vanilla extract.
  4. In another bowl, sift together cocoa powder, flour, baking powder, and salt.
  5. Gradually add the dry ingredients into the wet mixture, stirring until smooth.
  6. Gently fold in half of the hot fudge sauce into the batter.
  7. Pour the batter into the prepared loaf pan and swirl in the remaining fudge sauce on top.
  8. Bake for 45-50 minutes or until a toothpick comes out with moist crumbs.
  9. Allow the bread to cool in the pan for 10 minutes before transferring to a wire rack.

Recipe Notes

  • Store in an airtight container at room temperature for up to 3 days or freeze for up to 3 months.
  • Feel free to add chocolate chips or nuts for added texture.
  • Drizzle cold vanilla ice cream over warm slices for a delightful treat!

Indulge in Decadent Caramelized Pear Cheesecake Slice Delight

Caramelized Pear Cheesecake Slice: A Luxurious Dessert Experience

⚖️
Difficulty
Medium

⏲️
Prep Time
25 mins

🕒
Cook Time
50 mins

⏱️
Total Time
1 hr 15 mins

🍽️
Servings
10 slices

Indulge in the rich, decadent flavors of Caramelized Pear Cheesecake Slice, a dessert that perfectly balances creamy richness with the natural sweetness of caramelized pears. This magnificent cheesecake offers a seamless blend of textures, featuring a smooth, velvety filling atop a buttery crust that crunches delightfully with every bite. Imagine a slice that melts in your mouth, leaving a lingering taste of caramel and spice that sparks joy with each delicious forkful. Ideal for any occasion, this dessert not only pleases the palate but also adds elegance to your dining table.

From festive gatherings to cozy family dinners, the Caramelized Pear Cheesecake Slice leaves a memorable impression. Picture the vibrant golden hue of the caramelized pears glistening on top of the cheesecake, inviting guests to indulge in its heavenly flavor. Each slice is a testimony to culinary skill yet is straightforward enough for home bakers to create. Gather your friends and family and prepare for compliments as this dessert takes center stage with its mesmerizing aroma and visually stunning presentation.

Quick Recipe Highlights

  • Flavor Profile: The cheesecake balances sweet and tangy notes, beautifully complimented by the fragrant caramelization of the pears, creating a delightful harmony.
  • Texture: With a smooth, creamy filling and a crisp crust, each bite delivers a satisfying contrast that is both luxurious and comforting.
  • Aroma: Infused with hints of vanilla and cinnamon, the dessert emanates a warm, inviting scent that enhances the entire experience.
  • Visual Appeal: The glossy caramelized pears atop the rich cream layer create a stunning visual treat, making this cheesecake a showstopper.
  • Skill Level Needed: This recipe is rated medium, requiring basic baking skills and an appreciation for flavor layering and presentation.
  • Special Equipment: You will need a springform pan to create the ideal cheesecake shape and a food processor for smooth ingredient blending.

Recipe Overview

  • Difficulty Level: With a few key techniques such as caramelizing the pears and baking the cheesecake, this recipe is ideal for a moderate-level home baker looking to impress.
  • Category: This dish falls under desserts, particularly as a sophisticated option for special occasions or holiday feasts.
  • Cuisine: Inspired by classic cheesecake recipes and enhanced with seasonal fruits, this dessert represents both contemporary and traditional baking techniques.
  • Cost: The ingredients are typically affordable, yet the addition of fresh pears and quality cream cheese may raise the total cost slightly, making it a worthwhile investment.
  • Season: Best enjoyed during fall and winter when pears are in season, this cheesecake is perfect for cozy gatherings.
  • Occasion: Suitable for birthdays, anniversaries, or holiday celebrations, this dessert adds a touch of elegance to any dessert table.

Why You’ll Love This Recipe

The Caramelized Pear Cheesecake Slice is not just another dessert; it’s a delightful combination of taste and texture that speaks to the heart of food lovers. The sweetness of the caramelized pears contrasts beautifully with the tangy cheesecake filling, creating a rich taste that leaves you wanting more. The creamy consistency adds to a succulent mouthfeel that is ideal for indulgence after a hearty meal. Each slice tells a sweet story, blending beloved flavors perfectly.

Convenience is another reason this recipe shines. It can be prepared in advance and stored in the refrigerator, allowing for easy serving at gatherings or dinner parties. With straightforward, step-by-step instructions, even less experienced bakers can whip up this stunning dessert, leaving ample time to enjoy the company of family and friends. Preparing this cheesecake is a rewarding experience that fills your home with warmth and sweet aromas.

Health benefits also come into play. Pears are a great source of dietary fiber and essential vitamins, while the cheesecake component provides calcium and protein. With a slice of this dessert, you engage in an indulgent culinary experience that still allows you to appreciate nutritional value. Such a balance of flavors and health can truly enhance your enjoyment and satisfaction.

Socially, this cheesecake is a timeless crowd-pleaser, making it a perfect choice for entertaining. As you cut into the dessert, the beautiful layers are an impressive sight that encourages conversation and connection. Friends and family will surely gather around the table, sharing stories and savoring every exquisite bite of this cheesecake.

Lastly, the cost-effectiveness of the Caramelized Pear Cheesecake Slice is noteworthy. Many ingredients are common in most kitchens, making it relatively affordable. While the final product is undeniably gourmet, the simplicity of the ingredients allows you to achieve a great dessert without breaking the bank. The satisfaction of creating a stunning cheesecake at home adds to its allure.

Historical Background and Cultural Significance

The origins of cheesecake can be traced back to ancient Greece, where it was prepared for special occasions. Notably, it was served to athletes during the first Olympics. Over time, different cultures have adapted the recipe, each adding unique ingredients that reflect local tastes and traditions. The integration of fruits, such as the pear in this recipe, showcases an evolution that marries sweet and creamy textures beautifully.

In consideration of modern dessert culture, cheesecake has become a staple in many culinary repertoires. It is often associated with celebration, embodying festivities with its decadent nature. Maintaining its prestige, the variety of toppings and flavors, such as caramelized pears, signifies a contemporary twist on this classic favorite, making it versatile for today’s palates.

The evolution of cheesecake has led to myriad recipes and regional variances. From New York-style dense cheesecake to French-style light and airy varieties, the Persian influence of fruit toppings adds a luxurious element worth celebrating. The Caramelized Pear Cheesecake Slice exemplifies how tradition meets innovation, becoming a cherished delight in homes and restaurants alike.

Culturally, desserts like cheesecake play significant roles in social gatherings. They often represent unity and joy, bringing families and friends together for celebrations. The sight of a richly topped cheesecake draws people in, making it a centerpiece at parties, holidays, and milestones alike.

Ingredient Deep Dive

Pears: Pears are not only delicious but also carry cultural significance in various cuisines. In different regions, they symbolize prosperity and health. Nutritionally, they are high in fiber, known for promoting digestive health and providing essential vitamins. When choosing pears, opt for those with a firm texture and a fragrant aroma. Store them at room temperature until ripe, then transfer to refrigeration. For substitutes, consider using apples or peaches for similar sweetness.

Cream Cheese: A cornerstone of cheesecake recipes, cream cheese is beloved in desserts. In addition to its creamy taste, it provides essential calcium and protein. To select the best cream cheese, look for a smooth consistency and freshness. Proper storage requires keeping it sealed in the refrigerator to maintain quality. For those avoiding dairy, vegan alternatives such as cashew cream can be effective substitutes, yielding great results.

Common Mistakes to Avoid

  • Overmixing the cheesecake batter: This can lead to a cracked top, so mix just until ingredients are combined.
  • Skipping the water bath: Using a water bath during baking helps prevent cracking and uneven baking, producing a creamier texture.
  • Not letting the cheesecake cool gradually: Rapid temperature changes can lead to cracks, so cool the cheesecake slowly at room temperature before refrigerating.
  • Improperly preparing the crust: Ensure the crust is tightly packed and baked before adding the filling for structural integrity.
  • Using warm ingredients: Ensure that cream cheese and eggs are at room temperature for a smoother batter.
  • Rushing the cooling process: Always refrigerate the cheesecake for at least 4 hours to set properly before slicing.
  • Incorrect oven temperature: Always preheat your oven and use an oven thermometer to ensure accurate temperatures, preventing underbaking or overbaking.
  • Crowding the pan: Ensure enough space between cheesecakes in the oven to allow proper heat circulation.
  • Not greasing the pan well: A light coating of non-stick spray or butter can help ensure easy release and presentation.
  • Overbaking: Keep a close eye; cheesecake should be slightly jiggly in the center when done, firming as it cools.

Essential Techniques

To achieve a perfectly baked cheesecake, mastering the water bath technique is essential. This method involves placing your cheesecake pan in a larger baking dish filled with hot water, allowing for an even distribution of heat during baking. It prevents the edges from cooking too quickly compared to the center, reducing the risk of cracks on the surface. To master it, ensure you wrap the cheesecake pan in aluminum foil to water-proof it, preventing water from seeping in.

Another crucial technique is cooling your cheesecake correctly. After baking, turn off the oven and crack the door, allowing your cheesecake to cool gradually. This important step helps prevent sudden temperature changes that can lead to cracks. Aim for a delicate approach during this step, paying attention to the cheesecake’s consistency as it begins to tighten. Visual cues for success include a slightly jiggly center when you remove it from the oven, which will firm up as it cools.

Pro Tips for Perfect Caramelized Pear Cheesecake Slice

Focus on selecting ripe, seasonal pears to enhance the flavor of your cheesecake. Wait until they have a slight give when pressed to capture their maximum sweetness. Keep the slices uniform in size for even cooking, allowing the caramel to coat them perfectly.

Use high-quality cream cheese for the filling to achieve a rich and creamy taste. Avoid low-fat options, as they can compromise flavor and texture. Always allow your ingredients like cream cheese, butter, and eggs to come to room temperature before mixing; this incorporates air more effectively and creates a smoother batter.

If you want an echo of the caramelized pear flavor throughout the cheesecake, consider adding a touch of pear puree to the filling. This step elevates the taste and intensifies the overall experience.

For a dazzling presentation, reserve some of the caramelized pears to decorate the top just before serving. This not only makes for a stunning visual but also invites your guests to enjoy the flavors of the topping first.

When slicing the cheesecake, run a knife under hot water before cutting each piece. This method helps ensure clean, professional-looking slices, enhancing the overall presentation when serving.

Lastly, make your cheesecake a day in advance. This waiting period allows flavors to meld beautifully, providing a more balanced taste and ensuring a delightful experience for your guests.

Variations and Adaptations

Experimenting with flavors can lead to delicious variations of Caramelized Pear Cheesecake Slice. For a seasonal twist, add a sprinkle of nutmeg or ginger to the caramelized pears to complement the warmer spices of the season. Similarly, you can swap out pears for apples or even peaches, each bringing its own unique sweetness and character to the dessert.

Adjust the recipe to accommodate dietary preferences by making a gluten-free crust, using almond flour instead of traditional flour, to create a nutty base that pairs wonderfully with the creamy filling. For those following a vegan diet, substitute cream cheese with cashew-based cream or tofu combined with coconut cream for a rich texture sans dairy.

For a change in presentation, consider making mini cheesecakes in muffin tins, perfect for parties and easier portion control. This adaptation allows guests to enjoy a bite-sized cheesecake without the need for slicing.

Lastly, you could enhance the texture by folding in finely chopped nuts into the crust or adding a crunchy topping of caramelized hazelnuts for additional bite and flavor complexity.

Serving and Presentation Guide

Presenting your Caramelized Pear Cheesecake Slice can elevate the dining experience significantly. Begin by slicing the cheesecake using a sharp, clean knife; warm the knife in hot water for perfect cuts. Transfer each slice to a pre-chilled dessert plate to keep it cool as you serve.

For garnishing, consider a light dusting of powdered sugar or a drizzle of caramel sauce to enhance visual appeal. Fresh mint leaves can add a vibrant color contrast and playful touch. Additionally, serve the cheesecake with a scoop of vanilla bean ice cream to offer a delightful temperature contrast that enhances the flavors.

When it comes to traditional accompaniments, a dollop of whipped cream can complement the rich cheesecake and add a creamy lightness. Alternatively, fresh fruit such as berries creates a beautiful color pop and balances the richness of the dessert.

In modern dining, serving individual slices on dessert boards with assorted fruits, nuts, and chocolates encourages communal sharing and creates a festive atmosphere. Be mindful of serving temperatures; cheesecake is best served chilled for optimal texture and flavor.

Wine and Beverage Pairing

Wine pairing can enhance the dessert experience of Caramelized Pear Cheesecake Slice. A satisfying match would be a late-harvest dessert wine or a medium-bodied Pinot Grigio, both of which complement the sweetness of the pears without overpowering the creaminess of the cheesecake.

For those preferring non-alcoholic options, consider pairing with a lightly chilled herbal tea like chamomile or peppermint, which can cleanse the palate and balance out richness. Alternatively, serve a sparkling apple cider for a refreshing choice that still resonates with the autumnal theme of pears.

Coffee enthusiasts might enjoy pairing this dessert with a smooth cappuccino or a light roast coffee. The contrast between the creamy dessert and the robust coffee flavor creates an exquisite tasting experience, especially when topped with a sprinkle of cinnamon.

Temperature matters as well; serve the cheesecake chilled and beverages slightly below room temperature to create a refreshing contrast when tasted together.

Storage and Shelf Life

To store your Caramelized Pear Cheesecake Slice, ensure it is completely cooled before placing it in the refrigerator. A sealed container will keep it fresh for up to five days. For the best results, store slices separately, covered with plastic wrap or in airtight containers, to preserve their moistness and prevent them from absorbing odors from the fridge.

If you plan to keep it longer, consider freezing cheesecake slices. Wrap each slice in plastic wrap, followed by aluminum foil for optimal protection against freezer burn. Properly stored, your cheesecake can last for up to two months in the freezer. Be sure to label the containers with dates for easy management.

When it comes to reheating, avoid the microwave as it can create a rubbery texture. Instead, allow slices to thaw overnight in the refrigerator. If you prefer to serve them slightly warmed, place slices in a preheated oven at around 300°F (150°C) for about 10 minutes.

Pay close attention to signs of spoilage, such as changes in texture or off-putting smells. These indicators suggest it’s time to dispose of the cheesecake, ensuring food safety.

Make Ahead Strategies

Preparing the Caramelized Pear Cheesecake Slice ahead of time allows for a stress-free serving experience. Start by gathering your ingredients and, if time permits, caramelize the pears at least a day in advance. Their flavors deepen over time, enhancing the overall taste of the cheesecake.

You can also bake the cheesecake a day before serving it. This allows it to fully set and chill in the refrigerator, enabling flavors to meld beautifully for a richer taste. Once cooled and sliced, store the cheesecake in the refrigerator or a sealed container to keep it fresh.

Another strategy includes prepping your crust in advance. Assemble the crust and store it in the fridge until you’re ready to add the filling. This not only saves time but also ensures that the crust is perfectly chilled before baking.

Finally, don’t forget to prepare any garnishes or sauces ahead of time. For example, caramel sauce can be made a few days prior and reheated slightly before serving. Such preparation allows you to elevate your serving game without last-minute stress.

Scaling Instructions

If you desire to scale the Caramelized Pear Cheesecake Slice recipe, consider halving or doubling it accordingly. When halving, use a 6-inch springform pan, ensuring you adjust baking time as smaller cheesecakes generally require less time in the oven.

When doubling the recipe, be cautious of the crust; ensure it remains thick and cohesive to support the extra filling. Use a larger pan, such as a 10-inch springform pan for balanced cooking. Note that you may need to increase baking time, so monitor your cheesecake closely for visual and texture cues.

For multiple cheesecakes, consider using a commercial oven, allowing for efficient baking without crowding. This makes serving large gatherings easier and more manageable while ensuring consistent results.

Timing modifications are essential as well; allow extra cooling time for larger cheesecakes to chill and set thoroughly. Always be prepared to make slight adjustments based on your kitchen’s specifics and equipment.

Lastly, remember to label your cheesecakes with baking times, sizes, and the number of ingredients used for easy tracking of variations in your future experiences.

Nutritional Deep Dive

The Caramelized Pear Cheesecake Slice is not just indulgent; it carries a range of nutritional benefits too. A typical slice contains a balance of macronutrients, including protein from cream cheese, carbohydrates from the crust, and healthy fats from butter. It typically offers a delightful energy boost, making it a suitable treat after a hearty meal.

In terms of micronutrients, pears contribute vitamin C and fiber, promoting digestive health and aiding immunity. On the other hand, the cream cheese provides essential calcium, necessary for bone health. By integrating seasonal fruits in the recipe, you’re enhancing the vitamin density further.

Health benefits extend to mood enhancement, as indulging in dessert can ignite feelings of happiness and satisfaction. Enjoying this cheesecake in moderation allows for a balanced approach to enjoying sweets, supporting overall well-being without compromising dietary goals.

Portion size plays a crucial role when assessing the nutritional value of a cheesecake slice. While it can be heavy in calories, enjoying a modest portion can make it a delightful treat in the broader context of a balanced diet. Weight management is assisted not merely by controlling portion sizes but relishing each bite mindfully, savoring the flavors without guilt.

Dietary Adaptations

Creating versions of the Caramelized Pear Cheesecake Slice that cater to specific dietary needs can enhance inclusivity among your guests. For gluten-free options, swapping traditional flour with almond or oat flour can create a delicious graham cracker-style crust without compromising texture. Be sure to check that all ingredients, especially the crust base, are certified gluten-free.

Those who need dairy-free alternatives can use coconut cream or cashew cheese as substitutes for cream cheese, achieving a similar creamy consistency. It’s essential to adjust sweetness when using alternative dairy products, as they may vary in natural sweetness levels.

Vegan adaptations are straightforward: use silken tofu blended with nutritional yeast and a plant-based sweetener for a creamy allure that mimics traditional cheesecake filling. To maintain that luxurious richness, adding a bit of coconut milk enhances flavor without adding dairy.

For low-carb dieters, consider using a combination of almond flour for the crust and a sugar-free sweetener. Other variations may enhance the recipe, such as keto-friendly substitutes, enabling a guilt-free enjoyment for those on carbohydrate-restriction diets.

Lastly, you could explore low-FODMAP options for individuals sensitive to certain carbohydrates by limiting the amount of pears used or incorporating dark chocolate for added richness without compromising dietary needs.

Troubleshooting Guide

If you experience texture issues, such as a grainy consistency, overmixing is likely the culprit. Try to mix ingredients gently or increase the initial mixing speed for cream until smooth before adding remaining ingredients.

Flavor balance is crucial for a cheesecake. If it seems too sweet, consider adding a squeeze of lemon juice or zest to provide brightness and contrast. Also, ensure that the vanilla extract you’re using is high-quality for optimal flavor enhancement.

For temperature problems, such as undercooking or overcooking, always check the center of the cheesecake for doneness. A slight jiggle indicates that it’s perfectly baked, while firm edges suggest it may have been left too long in the oven.

In case of equipment challenges, such as leaking water during the water bath method, ensure that your springform pan is tightly wrapped in foil before adding it to the larger pan. This step can prevent unwanted sogginess in your crust.

When dealing with ingredient substitutions, keep in mind that not all substitutes behave the same. If using a plant-based cream cheese, it may require additional thickening agents, such as cornstarch, to maintain the desired consistency and structure.

If you’re uncertain about timing concerns, always start checking for doneness earlier than the recipe indicates. Each oven behaves differently, and cheesecakes can quickly cross from perfectly baked to overdone.

Recipe Success Stories

Community feedback on the Caramelized Pear Cheesecake Slice has consistently been positive, with many praising its unique flavor profile and stunning presentation. Numerous bakers share their stories of creating this dessert for birthdays and holidays, often highlighting how it became the star of their gatherings.

Variation successes abound; a reader suggested using a mix of seasonal fruits, resulting in delightful compote variations, elevating the flavor while showcasing versatility. Such adaptations reflect the creative ways in which individuals engage with this cheesecake recipe.

Readers also suggest photography tips, emphasizing the importance of natural light and fresh garnishes for showcasing the cheesecake at its best. Capturing the rich textures and vibrant colors of the caramelized pears is essential for sharing the joy of making this dessert.

Adaptation stories show the broad appeal of this recipe, with expansive feedback on gluten-free and vegan versions achieving great success without sacrificing taste. Community members love sharing adjustments and personal touches, strengthening the collective culinary journey within this recipe’s framework.

Frequently Asked Questions

Can I use frozen pears instead of fresh? Yes, frozen pears can work great; just be sure to thaw and drain them well before caramelizing to avoid excess moisture in the dessert.

How long can I refrigerate the cheesecake before serving? Ideally, chill the cheesecake for at least 4 hours, but making it a day in advance allows the flavors to deepen further and enhances the taste experience.

What can I do if my cheesecake cracks during baking? If cracks appear, simply add a topping like fruit compote or whipped cream; it’s a delicious cover and enhances visual appeal.

Can I prepare the cheesecake without a springform pan? While a springform pan is recommended for easy release, you can use traditional baking dish lined with parchment paper, though it may require a little more care in removing it after chilling.

What if I have leftovers? Leftover cheesecake can be stored in an airtight container in the fridge for up to five days, or you can freeze it for up to two months.

Can I make the caramelized pears ahead of time? Yes, caramelized pears can be prepared up to two days in advance and stored in the refrigerator until ready to use.

How do I slice the cheesecake neatly? Use a warm, sharp knife to cut clean slices, wiping the blade between cuts to ensure clean lines and a beautiful presentation.

What if I don’t want to use pears? You can substitute pears with other fruits like apples or peaches, or omit them entirely and top the cheesecake with chocolate ganache for a different flavor profile.

Can I double the recipe for a larger gathering? Absolutely, just ensure you use a larger springform pan and watch closely for baking times since they may vary when increasing quantity.

Are there vegan versions of this cheesecake? Yes, you can substitute cream cheese with cashew-based or tofu alternatives, ensuring you maintain that creamy consistency while making it dairy-free.

Additional Resources

If you’re interested in exploring more delectable desserts, check out our related recipes, including various fruit tarts and creamy panna cotta, which similarly highlight seasonal fruits. For technique guides, browse articles dedicated to mastering cake baking and dessert presentation.

Ingredient-specific information can also enhance your culinary repertoire; learn how different cheeses contribute unique flavors in desserts or deepen your understanding of cooking with seasonal produce, including selecting and storing fruits.

Additionally, equipment recommendations are helpful for bakers at all levels. Discover essential baking tools like high-quality mixing bowls, silicone spatulas, and versatile food processors that can elevate your dessert-making process.

Finally, consider seasonal variations for delicious twists on classic desserts, ensuring you celebrate each season with unique flavors while maintaining a delicious dessert repertoire.

Join the Conversation

We invite you to share your own experiences with the Caramelized Pear Cheesecake Slice by posting on social media using our designated hashtags. Engaging with our community through photography tips, recipe reviews, and personal variations can foster a heartwarming connection among fellow bakers.

Your suggestions and adaptations not only inspire others but also build a rich tapestry of shared culinary adventures. Community contributions create a welcoming atmosphere, motivating newcomers and experienced bakers alike to experiment, learn, and enjoy crafting remarkable desserts.

Feel free to provide feedback or ask further questions about the recipe. Your insights help refine our offerings and create a culinary space filled with creativity and collaboration.

The Recipe

Caramelized Pear Cheesecake Slice

Serves: 10 slices

Prep Time: 25 mins

Cook Time: 50 mins

Total Time: 1 hr 15 mins

Kitchen Equipment Needed

  • 9-inch springform pan
  • Food processor
  • Mixing bowl
  • Spatula
  • Whisk
  • Knife for slicing

Ingredients

  • 2 large pears, peeled and sliced
  • 1 cup granulated sugar
  • 1/2 cup unsalted butter
  • 1 cup crushed graham crackers
  • 1/4 cup melted butter (for crust)
  • 3 packages (8 oz each) of cream cheese
  • 1 cup granulated sugar (for filling)
  • 1 teaspoon vanilla extract
  • 3 large eggs
  • 1 teaspoon ground cinnamon

Directions

  1. Preheat the oven to 325°F (160°C). Prepare the springform pan by greasing it lightly.
  2. In a skillet, melt 1/2 cup of butter over medium heat. Add sliced pears and cook until they caramelize, adding in 1 cup of sugar until dissolved. Set aside.
  3. In a mixing bowl, combine crushed graham crackers with the melted butter. Press the mixture into the bottom of the prepared springform pan to form a crust.
  4. In a large bowl, beat cream cheese and remaining sugar until smooth. Add eggs one at a time, mixing in vanilla extract and cinnamon until combined.
  5. Pour half the cream cheese filling over the crust, layer with caramelized pears, and then add the rest of the filling on top.
  6. Bake for 50 minutes, or until the center is slightly jiggly. Turn off the oven, crack the door, and allow the cheesecake to cool gradually in the oven.
  7. Chill in the refrigerator for at least 4 hours before serving. Top with extra caramelized pears just before serving.

Recipe Notes

  • For enhanced flavor, consider adding a touch of lemon juice to the pear mixture while caramelizing.
  • Store leftovers in an airtight container in the fridge for up to five days, or freeze for later enjoyment.
  • Feel free to substitute pears with seasonal fruits for a unique flavor experience.

Delicious Low-Carb Flourless Carrot Cake Recipe Without Oatmeal

Flourless Carrot Cake: A Delightfully Moist and Low-Carb Treat

⚖️
Difficulty
Easy

⏲️
Prep Time
15 mins

🕒
Cook Time
30 mins

⏱️
Total Time
45 mins

🍽️
Servings
8

The Flourless Carrot Cake is a stunning dessert that combines the sweetness of fresh carrots with a rich, moist texture. This recipe is perfect for anyone looking to indulge without the extra carbohydrates typically found in traditional cakes. With no flour or oatmeal, this cake is truly unique, allowing the natural flavors of the ingredients to shine through. It’s not only a delightful treat for your taste buds but also a wonderful option for those who follow low-carb or gluten-free diets.

As you take your first bite, you’ll be welcomed by the warm spices of cinnamon and nutmeg blended seamlessly with the luscious sweetness of carrots. Each forkful reveals a tender crumb that melts in your mouth, leaving a hint of the aromatic vanilla and the subtle warmth of brown sugar. This cake is not just about taste, it also brings a sense of comfort and homeliness, making it an ideal dessert for family gatherings or special occasions.

Quick Recipe Highlights

  • Flavor Profile: The cake features a harmony of sweet carrots and warm spices, complemented by a hint of vanilla.
  • Texture: Expect a moist and fluffy texture that feels delicate yet substantial in each bite.
  • Aroma: The scent of freshly grated carrots mingled with warm spices creates an irresistible allure.
  • Visual Appeal: The cake’s golden brown color, flecked with bits of carrot, makes for an inviting presentation.
  • Skill Level Needed: This recipe is beginner-friendly, requiring minimal baking skills to achieve a delicious result.
  • Special Equipment: A mixing bowl, whisk, and a cake pan are all you need for this simple recipe.

Recipe Overview

  • Difficulty Level: The Flourless Carrot Cake is easy to make, ideal for novice bakers. Its step-by-step instructions ensure success without the complexity of traditional recipes.
  • Category: This cake fits perfectly in the dessert category, making it an excellent choice for after meals or special celebrations.
  • Cuisine: Drawing inspiration from classic baking traditions, this recipe reflects the comforting qualities of homemade treats across various cultures.
  • Cost: The ingredients are relatively inexpensive, making this flourless cake budget-friendly for anyone.
  • Season: Carrots are in peak season during the fall and winter, making it the perfect time to enjoy this warm and spiced dessert.
  • Occasion: Ideal for birthdays, holidays, or simply a cozy afternoon snack with friends and family.

Why You’ll Love This Recipe

First and foremost, the taste and texture of this Flourless Carrot Cake will delight anyone who tries it. The combination of carrots, spices, and a touch of sweetness results in a cake that is not overly sweet, making it an ideal dessert for any palate.

This cake is incredibly convenient to prepare. With just a handful of ingredients, you can whip it up in no time. The minimal effort involved means that you can spend less time in the kitchen and more time enjoying the company of loved ones.

Nutritionally, this cake shines as well. Being flourless and low-carb, it’s perfect for those looking to indulge in dessert while keeping their dietary goals in check. The natural fibers from the carrots offer added health benefits, making this dessert feel a little less guilty.

When it comes to social gatherings, this cake is a talking point. Its unique flourless twist intrigues guests, and with each bite, it sparks conversations about dietary practices and innovative desserts. It’s a great way to impress friends and family with your baking skills.

Lastly, this Flourless Carrot Cake is cost-effective. You can access the ingredients easily at local grocery stores, and you won’t break the bank while making a delicious dessert that serves multiple people.

Historical Background and Cultural Significance

The origins of carrot cake can be traced back to the medieval periods when sugar was scarce and expensive. People utilized sweet vegetables like carrots to make desserts, leading to the creation of this sweet treat we enjoy today. Over time, recipes evolved, incorporating spices and creams to enhance flavor.

Culturally, flourless desserts represent a shift towards healthier baking practices, especially in recent years where dietary restrictions have become more prominent. Many home bakers have adapted classic recipes, leading to an increase in gluten-free and low-carb options in the culinary world.

This Flourless Carrot Cake captures the essence of tradition while also embracing modern dietary needs. It reflects a collective movement towards healthier eating without sacrificing flavor or enjoyment.

Regional variations have sprung up, with some cultures adding nuts or dried fruits, giving the cake unique twists that create a delightful exploration of flavors and textures.

Ingredient Deep Dive

Carrots are the star ingredient in this cake. They not only bring sweetness but also moisture, making for a pleasantly rich texture. Nutritionally, carrots are loaded with vitamins and antioxidants, particularly beta-carotene, which is beneficial for eye health. When selecting carrots, opt for firm, smooth ones without blemishes; store them in a cool, dark place for freshness.

Another cornerstone of this recipe is eggs. They provide structure and help bind the ingredients, contributing to the cake’s fluffiness. Eggs are also an excellent source of protein and essential nutrients. Always choose fresh eggs for the best results and store them in the refrigerator.

Common Mistakes to Avoid

  • Using old or wilted carrots can affect the flavor and texture of the cake. Always choose fresh, firm carrots.
  • Not fully grating the carrots can leave chunks that impact the cake’s consistency. Ensure they’re finely grated for even baking.
  • Overmixing the batter can lead to a dense texture. Mix just until combined for a lighter cake.
  • Underbaking the cake may result in a soggy center. Check doneness with a toothpick; it should come out clean.
  • Skipping the cooling step can affect presentation. Allow the cake to cool completely before serving.
  • Using too much sweetener can overwhelm the flavor. Balance is key; start with less, and adjust to taste.
  • Not prepping the cake pan correctly can lead to sticking. Always grease and line your pan with parchment paper.
  • Forgetting to add spices can dull the flavor. Measure spices carefully for the best taste.
  • Rushing the prep time may lead to mistakes. Take your time to prepare each step thoroughly.
  • Not checking the oven temperature can result in uneven baking. Use an oven thermometer to maintain accurate temperatures.

Essential Techniques

One important technique is properly grating the carrots. Use the finest grater or a food processor to ensure they blend well into the batter. This step affects both texture and flavor, as larger chunks can disrupt the fluffiness of the cake.

Another essential skill is mixing the batter without overmixing. For a light and airy cake, combine ingredients gently until just mixed. Overworking the batter can achieve a dense texture, which is not desirable for this recipe.

Pro Tips for Perfect Flourless Carrot Cake

1. Use fresh, high-quality ingredients for the best flavor.

2. Add nuts like walnuts or pecans for added texture and flavor.

3. Consider adding pineapple for a tropical twist.

4. Allow the cake to cool completely before frosting to prevent melting.

5. Top with a cream cheese frosting for classic flavor pairing.

6. Experiment with spices; adding ginger can enhance the depth of flavor.

7. Serve with a scoop of vanilla ice cream for a delightful contrast.

8. Store leftovers properly to maintain freshness and texture.

Variations and Adaptations

Regional variations of carrot cake often include additional ingredients like raisins or coconut for added flavor. Seasonal adaptations might see courses incorporating spices associated with holiday flavors, such as nutmeg and clove.

For dietary modifications, consider using egg substitutes for a vegan version or sweetener alternatives for a lower glycemic index dessert. Flavor variations include adding zest from oranges or lemons for a citrus twist.

Serving and Presentation Guide

For plating, consider a rustic presentation: simply dust the cake with powdered sugar or dusting of cocoa powder. A sprig of mint or edible flowers can enhance visual appeal.

Garnishing ideas include a drizzle of balsamic reduction or whipped cream for a modern touch. Traditional accompaniments like a scoop of cream cheese frosting complement the cake beautifully.

Wine and Beverage Pairing

When it comes to wine pairings, a sweet Riesling or a spicy Gewürztraminer pairs wonderfully with the cake’s flavors, enhancing the natural sweetness of the carrots.

For non-alcoholic alternatives, consider pairing with fresh-squeezed iced tea or sparkling water with a slice of lemon. These drinks refresh the palate and highlight the cake’s sweetness.

Storage and Shelf Life

The cake should be stored in an airtight container at room temperature for up to 3 days or in the refrigerator for up to a week. Consider wrapping slices in plastic wrap for longer storage.

Signs of spoilage include a change in color or a sour smell, indicating it’s time to discard. Reheating slices briefly in the microwave works well without drying out, and freezing is a great option for longer storage.

Make Ahead Strategies

To prep ahead, consider grating the carrots the night before and storing them in an airtight container in the fridge. This can save time, especially on busy baking days.

As the cake can be frozen, bake it in advance and freeze until ready to serve—just make sure to thaw it completely before decorating or serving.

Scaling Instructions

If halving the recipe, reduce the baking time slightly but keep an eye on the cake to prevent overbaking. Doubling or tripling the recipe is also easy; simply ensure your mixing bowl is large enough to accommodate the additional ingredients.

When scaling recipes, be cautious with timing as larger cakes may take longer, while smaller batches may bake faster. Always check for doneness with a toothpick.

Nutritional Deep Dive

This Flourless Carrot Cake is rich in nutrients. Each slice provides a decent amount of carbohydrates from the carrots, while still being low-carb compared to traditional cakes. Moreover, the natural sweetness of the carrots reduces the need for excess sugar.

In terms of micronutrients, the carrots contribute vitamins A and C, essential for a balanced diet. Mindful portion sizes can help with weight management while enjoying this delicious treat without overindulgence.

Dietary Adaptations

The recipe is inherently gluten-free, making it suitable for those with gluten intolerances. For a dairy-free version, simply substitute the cream cheese frosting with a coconut cream alternative.

This cake can also be adapted for vegan diets by utilizing flax eggs as an alternative to traditional eggs, yielding a similar structure without animal products. Low-carb enthusiasts can swap out sugar for erythritol or another suitable sweetener.

Troubleshooting Guide

If the cake turns out too dense, it may have been overmixed. Always mix just until combined to keep the texture light. If the flavor is off, ensure you’re using fresh spices and proper measurements to enhance the cake’s natural sweetness.

Baking temperature is crucial; an overly hot oven can dry out the cake. Always preheat your oven and use an oven thermometer for accuracy. Adjusting baking times is key, particularly with larger or smaller batches.

Recipe Success Stories

Feedback often highlights the cake’s moistness and flavor depth, motivating them to share the recipe with family and friends. Photography enthusiasts frequently share their beautifully decorated cakes, showcasing the potential for stunning presentations.

Frequently Asked Questions

Can I substitute carrots with another vegetable? Yes, zucchini or even sweet potatoes can be used to create variations of this cake with just as much moisture and flavor.

How can I make this cake vegan? Replace eggs with flax eggs, using 1 tablespoon of flaxseed meal mixed with 3 tablespoons of water per egg needed.

Can I freeze leftovers? Absolutely! Wrap slices in plastic wrap and store them in an airtight container. It can last up to 3 months in the freezer.

What should I serve with the cake? Pair it with a light whipped cream, vanilla ice cream, or a citrus-infused glaze for added flavor.

Is it necessary to frost the cake? No, it can be enjoyed plain; however, frosting adds a delightful creaminess that many find appealing.

How do I know when it’s done baking? Insert a toothpick in the center; it should come out clean or with a few moist crumbs.

Can I use store-bought carrot puree? While possible, it’s recommended to use freshly grated carrots for the best flavor and moisture content.

What makes it a low-carb dessert? The lack of flour and the use of low glycemic sweeteners contribute to the cake’s low carbohydrate content.

How do I make it sweeter? You can adjust the sweetness by adding more sweetener to taste, but be cautious not to overdo it.

Will the texture change if I skip the nuts? The cake may lose some crunch, but it will still be delicious without them.

Additional Resources

For those looking to continue their baking journey, consider exploring similar recipes like gluten-free chocolate cake or almond flour brownies. Technique guides can help enhance skills further, particularly for decorating and ingredient substitutions.

Ingredient information can also be valuable; understanding the differences between types of sweeteners can make a significant impact on baking outcomes. Seasonal variations are another fantastic way to keep recipes fresh and exciting.

Join the Conversation

We invite you to share your thoughts, adaptations, and experience with this Flourless Carrot Cake in the comments. Post your photos on social media and tag us so we can celebrate your baking achievements together!

The Recipe

Flourless Carrot Cake

Serves: 8

Prep Time: 15 mins

Cook Time: 30 mins

Total Time: 45 mins

Kitchen Equipment Needed

  • Mixing bowl
  • Whisk
  • 9-inch round cake pan
  • Parchment paper

Ingredients

  • 2 cups grated carrots
  • 4 large eggs
  • 1/2 cup melted coconut oil
  • 1/2 cup brown sugar
  • 1 tsp vanilla extract
  • 1 tsp baking powder
  • 1 tsp cinnamon
  • 1/2 tsp nutmeg
  • 1/2 tsp salt
  • 1/2 cup chopped walnuts (optional)

Directions

  1. Preheat your oven to 350°F (175°C) and prepare the cake pan by greasing and lining it with parchment paper.
  2. In a large mixing bowl, whisk together the eggs and brown sugar until well combined.
  3. Add the melted coconut oil and vanilla extract to the mixture and stir until fully incorporated.
  4. In another bowl, mix the grated carrots with the baking powder, spices, and salt.
  5. Combine the dry carrot mixture into the wet mixture until just mixed; be careful not to overmix.
  6. Fold in the chopped walnuts if using.
  7. Pour the batter into the prepared pan and smooth the top.
  8. Bake for 25-30 minutes, or until a toothpick inserted in the center comes out clean.
  9. Allow to cool in the pan for 10 minutes, then transfer to a wire rack to cool completely.

Recipe Notes

  • For added sweetness, top with cream cheese frosting.
  • Store leftovers in an airtight container at room temperature for 3 days.
  • This cake can also be frozen for later enjoyment.