Indulge in No Bake Pineapple Heaven Cheesecake Bliss

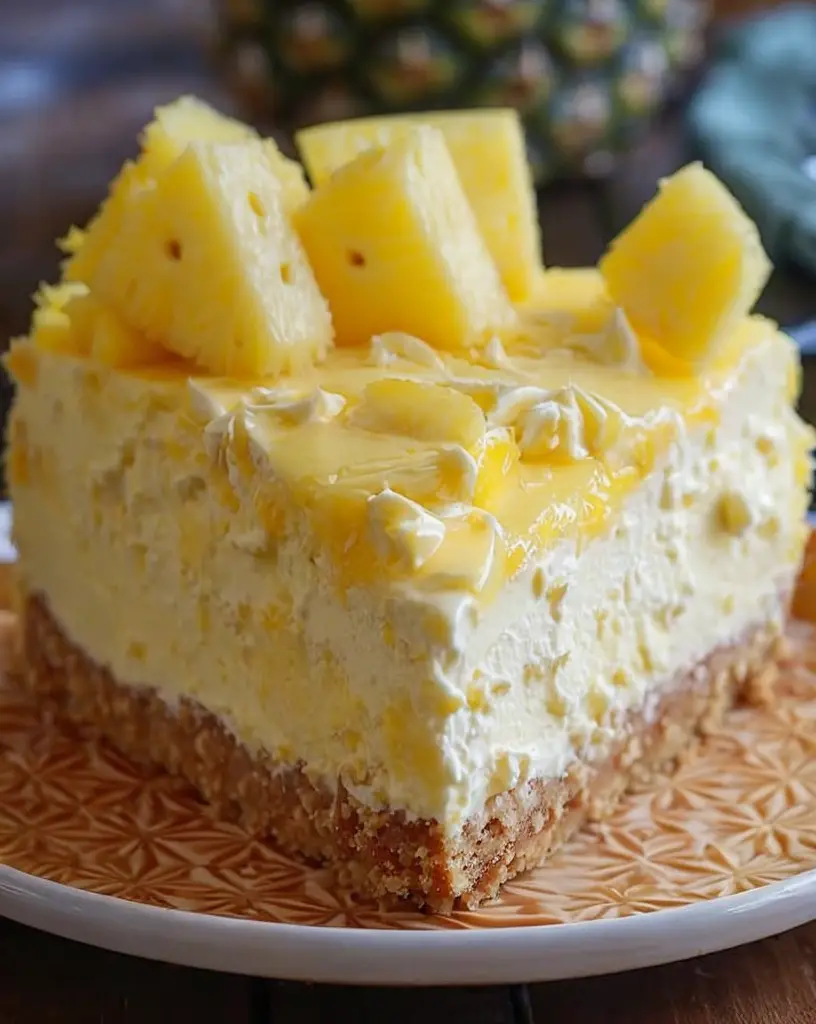
No Bake Pineapple Heaven Cheesecake: A Tropical Delight in Every Bite

⚖️
Difficulty
Easy

⏲️
Prep Time
15 mins

🕒
Cook Time
0 mins

⏱️
Total Time
15 mins

🍽️
Servings
8 servings

This No Bake Pineapple Heaven Cheesecake is a delightful escape to a tropical paradise. With its creamy consistency and fruity sweetness, each slice is a perfect balance of indulgence and refreshment. The smooth cream cheese blended with rich whipped topping creates a luscious filling, complementing the vibrant sweetness of pineapple chunks. This dessert is not just for special occasions; it’s an everyday treat that brings sunshine to any gathering.

The tropical aromas of fresh pineapple combined with the creamy cheesecake waft through your kitchen as you prepare this simple yet elegant dessert. It’s a straightforward recipe that requires no baking, making it perfect for those hot days when you want a cool, refreshing treat without heating up the kitchen. Whether for a summer barbecue, a birthday celebration, or just because, this No Bake Pineapple Heaven Cheesecake promises to impress your guests and satisfy your sweet tooth.

Quick Recipe Highlights

  • Flavor Profile: Expect a delightful mix of creamy cheesecake and fresh pineapple sweetness that dances on your palate.
  • Texture: This dessert has a smooth and creamy filling with a slight crunch from the graham cracker crust.
  • Aroma: The fragrant notes of pineapple combined with the subtle sweetness of vanilla create an inviting aroma.
  • Visual Appeal: The vibrant yellow color of the pineapple against the creamy filling offers a beautiful contrast, making it perfect for presentation.
  • Skill Level Needed: This no-bake recipe requires minimal skills, making it accessible for beginners and baking enthusiasts alike.
  • Special Equipment: All you need is a mixing bowl, a whisk, and a pie dish or springform pan.

Recipe Overview

  • Difficulty Level: Creating this cheesecake is simple, as it involves mixing and layering ingredients with no complex baking techniques required.
  • Category: This is a dessert recipe perfect for summer celebrations, gatherings, or any sweet craving moment.
  • Cuisine: The recipe draws inspiration from classic American dessert traditions, featuring tropical flavors that enhance its appeal.
  • Cost: Relatively inexpensive with basic ingredients like cream cheese, whipped topping, and pineapple, this cheesecake offers great value.
  • Season: Best enjoyed during warmer months when fresh fruits are in season, adding to the tropical vibe.
  • Occasion: Ideal for parties, potlucks, or family dinners, it translates well for various occasions, bringing smiles all around.

Why You’ll Love This Recipe

This No Bake Pineapple Heaven Cheesecake captivates both the eyes and taste buds. The refreshing taste and creamy texture are simply irresistible, making it a crowd-pleaser. It’s not just about the flavor; the fun twist of tropical ingredients brings a vacation-like feel to your home. The addition of real pineapple takes the traditional cheesecake up a notch, creating an entirely new taste sensation that is both nostalgic and exciting.

Convenience is at the heart of this recipe. With a quick prep time of just 15 minutes, you can easily whip up this dessert after a long day. There’s no need for complicated preparation or baking, allowing you to focus on enjoying time with friends and family. Just mix, layer, and chill! This no-bake cheesecake saves time and effort while still delivering a spectacular dessert that looks and tastes gourmet.

Nutritionally, this cheesecake offers some benefits as well. While it’s indulgent, using fresh pineapple adds a dose of vitamins and minerals that many desserts lack. The inclusion of cream cheese provides protein, giving you a satisfying treat without an overwhelming sugar content. It’s a delightful occasion to enjoy dessert without the guilt, perfect for health-conscious dessert lovers.

Whether you’re hosting a gathering or simply looking to treat yourself, this cheesecake serves as a beautiful centerpiece. Its colorful layers and impressive appearance invite conversation and bring joy to your table. Share it with loved ones during special occasions, or enjoy it alone while savoring every creamy bite—it’s a dessert that creates memories.

Lastly, this No Bake Pineapple Heaven Cheesecake is an affordable choice for any home baker. The ingredients are easy to find and can fit well within a modest budget. Plus, making a larger batch won’t break the bank, allowing you to enjoy it at many gatherings without financial strain. This dessert is not just delicious but also accessible; a true win-win!

Historical Background and Cultural Significance

The pineapple, once considered the ultimate symbol of hospitality, has a rich history that finds its way into countless dessert recipes. Originating from South America, it has become a global favorite, celebrated for its sweetness and lush texture. Historically, presenting a pineapple at a social gathering symbolizes warmth and welcome, adding a layer of cultural significance to desserts made with this fruit.

Cheesecake itself has origins dating back centuries, with variations appearing in ancient Greek and Roman cuisines. The concept has evolved, leading to numerous styles and flavors. The post-war era saw the emergence of no-bake cheesecakes, allowing more people to enjoy this delightful dessert without traditional baking techniques, further solidifying its place in American culture. The No Bake Pineapple Heaven Cheesecake is emblematic of this evolution—bringing the classic flavors of cheesecake together with a tropical twist.

Regional variations of cheesecake exist worldwide, each adapting to local tastes and available ingredients. In the United States, we see adaptations incorporating fresh fruits, whipped toppings, and an array of flavors that suit the diverse palates of its people. The No Bake Pineapple Heaven Cheesecake is a sweet marriage of these traditions, taking a classic dessert and infusing it with vibrant tropical flavors, resulting in a beloved recipe shared across sheets of paper and family gatherings.

As culinary traditions continue to blend and evolve, the popularity of recipes like this reminds us of the delightful interchange of flavors and customs. They reflect our ever-expanding tastes while honoring the history behind the ingredients we cherish today.

Ingredient Deep Dive

  • Pineapple: Known for its bright flavor and beautiful appearance, pineapple is a tropical fruit rich in vitamins A and C, making it a nutrient-dense choice for desserts. When selecting fresh pineapple, look for a firm fruit with a sweet aroma; avoid any that have dark spots or an overly soft texture. Store fresh pineapple in the refrigerator wrapped in plastic to prolong freshness. Canned pineapple can be used as a convenient alternative, providing the same great flavor with a longer shelf life.
  • Cream Cheese: An essential component of many cheesecakes, cream cheese adds a rich, tangy depth to this dessert. Its fat content provides a creamy mouthfeel that perfectly balances the sweetness of pineapple. Opt for full-fat cream cheese for optimal results, as low-fat versions may compromise texture. Store leftovers properly in the fridge, and consider freezing it if you won’t use it soon, although thawed cream cheese may be best for cooking rather than spreadable uses.
  • Whipped Topping: Offering a light, airy texture, whipped topping enhances the cheesecake’s creaminess without making it too heavy. Dairy or non-dairy variations are available, catering to different dietary needs. When choosing store-bought whipped toppings, be mindful of added sugars and preservatives; aim for products made with natural ingredients. If you have leftovers, store them in the refrigerator, ensuring it’s sealed tightly to maintain freshness.
  • Graham Cracker Crust: The crumbly crust adds a satisfying crunch and complements the creamy filling. A pre-made graham cracker crust saves time, but making your own allows customization of sweetness and flavor. To store crushed graham crackers for a homemade crust, keep them in an airtight container to preserve their texture. If you’re looking for gluten-free options, consider using crushed gluten-free graham crackers or almond flour as a base.

Common Mistakes to Avoid

  • Overmixing the Filling: When incorporating the whipped topping with the cream cheese, mix gently. Overmixing can lead to a runny texture rather than the desired creamy consistency.
  • Using Warm Ingredients: Make sure your cream cheese is at room temperature before mixing to avoid lumps and ensure a smooth filling.
  • Skipping the Chill Time: Proper chilling allows the cheesecake to set correctly. Skipping this step means you may have a soupy dessert when slicing.
  • Not Draining the Pineapple: If using canned pineapple, be sure to drain excess juice to avoid a watery filling.
  • Inadequate Crust: Press the graham cracker crust firmly into the pan. A loosely packed crust may fall apart when slicing the cheesecake.
  • Using Expired Ingredients: Check the expiration dates on cream cheese and whipped topping to ensure freshness, as stale ingredients can greatly affect flavor and texture.
  • Substituting Ingredients: While substitutions can work, certain elements (like full-fat cream cheese) are critical for achieving the best flavor and texture.
  • Improper Storage: Ensure the cheesecake is covered when chilling or storing to prevent it from absorbing odors from other foods.
  • Neglecting Presentation: Spend a little time on presentation—garnishing with fresh pineapple or mint can elevate the visual appeal.
  • Ignoring Allergies: Be mindful of guests’ dietary restrictions regarding allergies or intolerances, especially when serving a mixed group.

Essential Techniques

  • Mixing: Introducing air into your cream cheese while mixing is essential for a light texture. Use a hand mixer on low speed initially, then increase to medium once combined. Carefully fold in whipped topping to maintain that fluffiness. Watch for visual cues: the mixture should be smooth with no lumps for the ideal creamy texture.
  • Chilling: Allowing the cheesecake to chill is crucial for setting. Aim for at least 4 hours in the fridge, preferably overnight if time allows. This helps the flavors meld together and creates a more cohesive dessert. Check the firmness with a gentle press—if it holds its shape and is cool to the touch, it’s ready to serve.

Pro Tips for Perfect No Bake Pineapple Heaven Cheesecake

  • For an extra tropical touch, add shredded coconut to the filling or top it with toasted coconut flakes.
  • Experiment with different fruits. Mango or strawberries can be delicious alternatives to pineapple.
  • Use a food processor for quicker graham cracker crust preparation, ensuring even texture and consistency.
  • Chill your mixing bowl and beaters before whipping the topping to achieve a fluffier consistency.
  • If you want a thicker filling, consider adding gelatin or a few tablespoons of powdered sugar to stabilize it.
  • Incorporate a splash of coconut milk into the filling for a creamier, more tropical flavor.
  • Let the cheesecake sit at room temperature for 10-15 minutes before slicing for easier cutting.
  • Garnish with fresh mint or additional pineapple slices for a beautiful presentation and fresh flavor.

Variations and Adaptations

  • For a chocolate version, try adding cocoa powder to the cream cheese mixture or using chocolate wafer cookies instead of graham crackers for the crust.
  • Seasonal adaptations include using pumpkin puree during fall to create a Pumpkin Pineapple Cheesecake that’s festive and flavorful.
  • If you’re looking for dietary modifications, you can substitute coconut cream for whipped topping to create a richer texture while keeping it dairy-free.
  • For a more intense flavor, mix in pineapple juice or even rum for an adult twist on this classic dessert.
  • Texture modifications can include adding chopped nuts or cookie pieces into the crust to enhance crunchiness.
  • Presentation alternatives can range from serving in individual cups layered with pineapple chunks to making mini cheesecakes in muffin tins.

Serving and Presentation Guide

  • For an elegant display, slice the cheesecake into even portions using a hot, dry knife to achieve clean cuts.
  • Add a dollop of whipped cream or a scoop of ice cream on each plate as a classic and beloved accompaniment.
  • Garnish with freshly sliced pineapple and mint leaves for visual appeal and fresh flavor enhancement.
  • Serve the cheesecake chilled but allow it to sit for a few minutes at room temperature for optimal flavor release.
  • Consider a sprinkle of colorful edible flowers for those special occasion dinners to elevate the aesthetic appeal.
  • Portion control is vital; use small plates for servings to showcase the cheesecake in a refined manner, allowing guests to sample various desserts.

Wine and Beverage Pairing

  • A light, fruity white wine like a Sauvignon Blanc pairs beautifully with the tropical flavors of the cheesecake, enhancing the sweetness without overpowering it.
  • For non-alcoholic options, consider serving a refreshing iced tea infused with pineapple or coconut flavors to complement the dessert.
  • If coffee is at your gathering, a smooth, medium-roast coffee works well, enhancing the creamy elements of the cheesecake while balancing out its sweetness.
  • Chilled sparkling water with a twist of lime can offer a refreshing palate cleanser after indulging in the cheesecake.
  • Ensure beverages are well-chilled to maintain the dessert’s refreshing experience; warm drinks can contrast uncomfortably with the cool cheesecake.

Storage and Shelf Life

  • Store leftovers in an airtight container in the refrigerator for up to four days. Ensure it’s well-covered to prevent it from absorbing other odors in the fridge.
  • The cheesecake must remain chilled; do not leave it at room temperature for longer than two hours to prevent spoilage.
  • Signs of spoilage include discoloration, an off smell, or an unintended sour taste; discard if any of these occurs.
  • If you want to extend the life of your cheesecake, you can freeze it. Wrap it tightly in plastic wrap and foil to prevent freezer burn.
  • To reheat and enjoy, let it thaw in the fridge for several hours; do not microwave, as this can ruin the texture.

Make Ahead Strategies

  • You can prepare this cheesecake a day or two in advance. Just be sure to cover it well in the refrigerator for optimal freshness.
  • If you plan to make the crust ahead of time, assemble and refrigerate it separately to ensure it remains crispy.
  • Quality, when made ahead, can remain high if not assembled for too long prior to serving; consider making the filling fresh if time allows.
  • When reheating, avoid adding fresh toppings until right before serving to maintain their texture and appeal.
  • Chill all components before assembling for a firmer texture and better flavor integration in the final product.

Scaling Instructions

  • Halving the recipe can easily be achieved by dividing all ingredients by two, making it perfect for smaller gatherings.
  • To double or triple the recipe, use larger mixing containers and consider the additional time needed for serving sizes.
  • For equipment adjustments, a larger springform pan may be necessary when scaling up to avoid overflow during chilling.
  • Timing modifications aren’t drastic, but ensure proper chilling times remain consistent with the recipe for best results.
  • For storage, ensure each scaled batch is well-separated in its container to prevent cross-contamination of flavors.

Nutritional Deep Dive

  • Macro breakdown shows that this dessert can provide a combination of carbohydrates, fats, and a moderate protein level depending on the cream cheese used.
  • Micronutrient analysis indicates crucial vitamins from the pineapple, such as vitamin C and manganese, that contribute to overall health benefits.
  • The health benefits of utilizing fresh fruit shine through in this recipe, along with protein-rich cream cheese making it a satisfying dessert option.
  • Dietary considerations are important; be cautious with portion sizes to manage sugar intake, especially for those monitoring their health or weight.
  • Understanding portion analysis can guide appropriate serving sizes, aiding individuals in managing their caloric intake and indulgence levels.

Dietary Adaptations

  • If you’re looking for a gluten-free version, simply replace graham crackers with gluten-free cookie options or crushed almonds for the crust.
  • Dairy-free variations can easily be created with cashew cream or coconut cream to substitute for traditional cream cheese and whipped topping.
  • For a vegan option, use coconut whipped topping and a plant-based cream cheese alternative, ensuring all ingredients align with dietary needs.
  • Low-carb adaptations can benefit from using almond flour in place of graham crackers, while also limiting added sugar in the filling.
  • Keto adaptations can follow low-carb guidelines, potentially bypassing any high-sugar fruits and focusing on lower-carb alternatives.
  • The paleo diet can integrate this cheesecake by using whole food ingredients without additives, focusing on natural sweeteners.
  • Low-FODMAP modifications may include carefully selecting low-fructose fruits to reduce digestive impact for sensitive individuals.

Troubleshooting Guide

  • If your cheesecake turns out too runny, check your mixing technique—overmixing can introduce excess air, affecting texture; always fold in the whipped topping gently.
  • For flavor balance issues, consider adding a dash of lemon juice to brighten the taste; sometimes, a hint of acidity can enhance flavors.
  • In case of temperature problems during serving, allow the cheesecake to warm slightly at room temperature for improved slicing.
  • If equipment challenges arise, such as a sticky crust, ensure that you’re pressing the base firmly or consider using a non-stick pan for easy removal.
  • Ingredient substitutions can lead to unexpected results; always follow the recipe closely, especially for binding agents in the cheesecake mix.
  • Timing concerns can affect quality; remember to adjust chilling times if making smaller or larger batches to ensure even setting.

Recipe Success Stories

  • Community feedback often highlights how welcoming and refreshing this dessert is at summer gatherings, with guests frequently asking for the recipe.
  • Variation successes showcase how easily the cheesecake adapts to different seasonal fruits, with strawberries becoming a popular alternative during spring.
  • Adaptation stories reveal readers swapping out heavy cream cheese for lighter alternatives to meet their dietary preferences without sacrificing flavor.
  • Photography tips shared by fellow bakers emphasize the importance of good lighting and garnishing for making this cheesecake look mouth-watering on social media.

Frequently Asked Questions

Can I use fresh pineapple instead of canned? Absolutely! Fresh pineapple adds a vibrant flavor, but remember to drain it well to avoid excess liquid in the filling.

How do I prevent the crust from getting soggy? Ensure that your crust is packed tightly and consider pre-baking it for 10 minutes to enhance firmness before adding the filling.

Can I make this cheesecake ahead of time? Yes! This cheesecake can be made up to 2 days in advance, making it an excellent option for prepping before gatherings.

What can I substitute for cream cheese? For a lighter option, consider using Greek yogurt or a plant-based cream cheese if you want a dairy-free alternative.

Can I freeze No Bake Pineapple Heaven Cheesecake? Yes, this cheesecake can be frozen. Just wrap it tightly and store it, though the texture may change slightly after thawing.

How long will it last in the fridge? It will stay fresh in the fridge for about 4 days when stored properly in an airtight container.

Is it possible to add extra flavor? Absolutely! You can include vanilla extract or rum for added depth to the flavor profile.

How should I cut the cheesecake for serving? For clean cuts, run a knife under hot water, dry it, and then slice the cheesecake; repeat for each cut.

Can I use a different type of crust? Yes, you can get creative! Try chocolate cookies, digestive biscuits, or even a nut crust for unique flavors.

What’s the best way to store leftovers? Keep leftovers in an airtight container in the fridge for up to 4 days to maintain the best flavor and freshness.

Additional Resources

  • For more refreshing desserts, check out our Mango Mousse and Strawberry Shortcake recipes for seasonal inspirations!
  • Explore ingredient information for puff pastry and local fruits to enhance your baking skills.
  • Technique guides on making homemade whipped cream can add an interactive touch to your dessert presentations.
  • Consider recommendations for kitchen tools, like high-quality mixing bowls and spatulas, to make the process smoother and more enjoyable.
  • Seasonal changes in fruit availability are a great opportunity to try new recipe variants, keeping your dessert selections fresh and exciting.

Join the Conversation

  • Share your completed No Bake Pineapple Heaven Cheesecake on social media and tag us! We love seeing your beautiful creations!
  • For photography, ensure good lighting and a clean presentation—natural light works wonders for showcasing your dessert!
  • Engage with fellow recipe enthusiasts in the comments—ask questions, share variations, and provide suggestions for enhancing this delightful recipe!
  • Share your experiences and adaptations for others to learn from as we create a community of home bakers excited about their culinary journeys.

The Recipe

No Bake Pineapple Heaven Cheesecake

Serves: 8 servings

Prep Time: 15 mins

Cook Time: 0 mins

Total Time: 15 mins

Kitchen Equipment Needed

  • Mixing bowl
  • Whisk or electric mixer
  • Pie dish or springform pan
  • Spatula

Ingredients

  • 1 can (20 oz) crushed pineapple, drained
  • 8 oz cream cheese, softened
  • 1 cup whipped topping
  • 1/2 cup powdered sugar
  • 1 cup graham cracker crumbs
  • 1/3 cup unsalted butter, melted

Directions

  1. Combine the graham cracker crumbs and melted butter in a bowl. Press the mixture firmly into the bottom of the pie dish or springform pan.
  2. In a separate bowl, beat the cream cheese and powdered sugar together until smooth.
  3. Fold in the drained crushed pineapple into the cream cheese mixture.
  4. Gently fold in the whipped topping until combined and smooth.
  5. Pour the filling into the prepared crust and spread evenly. Cover with plastic wrap and refrigerate for at least 4 hours before serving.
  6. Garnish with fresh pineapple or mint leaves before serving, if desired.

Recipe Notes

  • Use fresh pineapple for a more vibrant flavor.
  • Feel free to add shredded coconut for a tropical twist.
  • Make ahead and store in the refrigerator for up to 4 days; it also freezes well!

Indulge in Luscious Pistachio Cupcakes with Vanilla Buttercream Frosting

Luscious Pistachio Cupcakes with Vanilla Buttercream Frosting: A Delightful Treat

⚖️
Difficulty
Medium

⏲️
Prep Time
30 mins

🕒
Cook Time
20 mins

⏱️
Total Time
50 mins

🍽️
Servings
12 cupcakes

Indulging in a delicious treat like luscious pistachio cupcakes with vanilla buttercream frosting is a true delight for any dessert lover. These cupcakes are a harmonious blend of flavors and textures, bringing the uniquely nutty and slightly sweet essence of pistachios to life in soft, fluffy cupcakes topped with creamy, rich vanilla frosting. Each bite promises a delightful contrast of soft cake and the velvety smoothness of buttercream, finished with a touch of crushed pistachios for an added crunch and flavor boost.

Whether you’re celebrating a special occasion or just treating yourself, these pistachio cupcakes are not just a feast for the palate but also a visual treat. Their stunning green hue combined with the inviting swirl of vanilla frosting makes for a show-stopping dessert that is sure to impress your guests. The appealing aroma of freshly baked cupcakes fills the air, inviting everyone to indulge in this decadent delight.

Quick Recipe Highlights

  • Flavor Profile: Expect a sweet, nutty flavor from the pistachios complemented by the richness of vanilla in the frosting.
  • Texture: The cupcakes are fluffy and moist, contrasting with the creamy, smooth buttercream on top.
  • Aroma: The charming scent of roasted pistachios mingled with sweet vanilla will fill your kitchen.
  • Visual Appeal: Vibrant green pistachio flecks in the cupcake with a glossy white frosting create an inviting look.
  • Skill Level Needed: A medium skill level is required; basic baking knowledge is sufficient for success.
  • Special Equipment: Standard kitchen equipment such as a mixer, measuring cups, and cupcake pans will be needed.

Recipe Overview

  • Difficulty Level: This recipe is rated medium, which means it’s perfect for home bakers with some experience. The steps are straightforward, but precision in measuring and mixing will enhance the outcome.
  • Category: These cupcakes fall under dessert and sweet treat categories, making them ideal for any gathering or special occasion.
  • Cuisine: Inspired by Middle Eastern desserts that often feature pistachios, these cupcakes bring a touch of that cultural richness to your baking.
  • Cost: The total cost for making these cupcakes is relatively low, as key ingredients like flour, sugar, and pistachios are commonly found in most kitchens.
  • Season: Light and sweet, pistachio cupcakes are perfect for spring and summer celebrations, but they can be enjoyed year-round.
  • Occasion: Wonderful for birthdays, weddings, or simply as a delightful surprise for friends or family during a casual gathering.

Why You’ll Love This Recipe

The first reason you’ll fall in love with these luscious pistachio cupcakes is their unique taste and delightful texture. The rich, nutty flavor of pistachios elevates these cupcakes beyond ordinary dessert, while the fluffy cake contrasts beautifully with the creamy frosting. Each bite is a wonderful harmony of flavors and textures that satisfies both the sweet tooth and the desire for something unique.

Convenience plays a significant role in this recipe. Most ingredients are easily accessible, and the preparation time is manageable, making it an excellent choice for both novice and experienced bakers. The simplicity of mixing the batter and frosting means you can whip these cupcakes up in no time, leaving you free to enjoy more time with loved ones.

Nutritionally, pistachios are a powerhouse of good fats, protein, and essential nutrients, making these cupcakes a slightly healthier sweet option compared to other indulgences. The inclusion of nuts adds fiber and a touch of protein, providing a guilt-free reason to enjoy these delightful treats.

Socially, these cupcakes are a great conversation starter when gathered with friends or family. With their stunning appearance and unique flavor, you can share your culinary creation and spark discussions about baking techniques, flavor combinations, and new ideas, creating lasting memories around the dessert table.

Lastly, the cost-effectiveness of this recipe makes it accessible. You won’t need any expensive specialty ingredients, and the yield of 12 cupcakes means you can treat a crowd for a minimal investment, ensuring that everyone gets to enjoy a slice of this delightful pistachio paradise.

Historical Background and Cultural Significance

The origin of pistachios goes back thousands of years, particularly prized in Middle Eastern and Mediterranean cultures. They are considered a symbol of good fortune and have often been incorporated into various traditional sweets and desserts. The distinct flavor of pistachios has influenced recipes in these regions, making them a popular ingredient in cakes, cookies, and many delightful pastries.

In addition to their culinary significance, pistachios hold a unique cultural importance, representing hospitality and generosity in many traditions. Serving sweets made with pistachios is a common way to honor guests and is often present during family gatherings and festivities, accentuating their emotional connection to community and celebration.

As time has gone on, the evolution of the pistachio has led to an array of adaptations in recipes around the world. From ice cream to cakes and pastries, home bakers and professional chefs alike have embraced this nut to lend a sophisticated touch to their creations.

Moreover, regional variations of pistachio desserts exist, such as baklava, which showcases how beloved this ingredient is across different cultures. Each area has a distinct way of incorporating pistachios into their culinary repertoire, highlighting their versatility and global appeal.

Ingredient Deep Dive

Pistachios: Known for their vibrant green color and unique flavor, pistachios are rich in nutrients. They provide healthy fats, protein, and important vitamins and minerals. When selecting pistachios, look for unsalted and shelled ones for a smoother cupcake texture. Proper storage is key; keep them in an airtight container in a cool, dark place to maintain freshness. If you’re out of pistachios, you can substitute with almonds or walnuts, though flavors will vary.

Flour: The backbone of any baking recipe, flour provides structure. All-purpose flour is typically used in cupcakes. When choosing flour, consider its protein content, as it affects the texture. Store in a cool, dry place, and use it within the recommended shelf life for best results. If you need a gluten-free option, almond flour could be an excellent substitute, adding a nutty note to the pastry.

Common Mistakes to Avoid

  • Overmixing the batter can lead to dense cupcakes. Mix just until the ingredients are combined.
  • Using old baking powder can result in flat cupcakes. Ensure it’s fresh to guarantee proper rising.
  • Not letting the cupcakes cool before frosting can cause the icing to melt. Always cool completely for best results.
  • Skipping the sifting of flour can lead to clumps. Sifting ensures a light and fluffy batter.
  • Not measuring ingredients accurately can alter the recipe. Invest in a kitchen scale for precision.
  • Using cold ingredients can result in a batter that doesn’t mix well. Let eggs and butter reach room temperature before mixing.
  • Ignoring the oven temperature can lead to uneven baking. Always preheat your oven and use an oven thermometer if necessary.
  • Leaving the cupcakes in the pan too long after baking can result in sogginess. Transfer them to a wire rack as soon as possible.
  • Not filling the cupcake liners correctly can lead to overflow or underfilled cupcakes. Aim for about two-thirds full.
  • Neglecting to taste the batter for sweetness can lead to unexpected results. Adjust sweetness to your preference before baking.

Essential Techniques

Measuring Flour: Proper measuring ensures the right texture for your cupcakes. Use the spoon and level method to avoid packing flour into the cup; this technique guarantees you don’t overuse the flour, resulting in dense cupcakes.

Creaming Butter and Sugar: This technique creates air pockets for fluffy cupcakes. Beat the softened butter and sugar until light and fluffy. Look for a pale color change and a fluffier texture to know you’ve mastered this step.

Pro Tips for Perfect Luscious Pistachio Cupcakes

Always use room temperature ingredients for better mixing and texture.

Toast your pistachios lightly for enhanced flavor before adding them to the batter.

Consider adding a pinch of salt to the frosting to enhance its sweetness.

Experiment with almond extract for a delightful twist alongside vanilla.

Utilize a piping bag to create beautiful swirling frostings.

Top with a whole pistachio nut for added visual appeal.

Allow your cupcakes to cool in the pan for just 10 minutes before transferring them to a rack.

Store any leftover cupcakes in an airtight container to preserve freshness.

Variations and Adaptations

For a seasonal twist, consider adding pumpkin spice to the batter during fall for a spiced pistachio cupcake.

Explore vegan adaptations by using flax eggs and dairy-free butter for the frosting.

A chocolate version could incorporate cocoa powder to give a delightful contrast to the pistachios.

If you’re a fan of citrus, a lemon zest addition can brighten the flavor profile.

For a denser texture, you can substitute part of the all-purpose flour with almond flour.

Serving and Presentation Guide

Plating your cupcakes on a decorative stand can elevate the overall dining experience. Consider garnishing with crushed pistachios or edible flowers for a modern touch. Traditional pairings like a scoop of vanilla ice cream can enhance your cupcake servings, providing a delightful contrast in temperatures. Serve the cupcakes at room temperature for the best flavor and texture.

Wine and Beverage Pairing

A light dessert wine like Moscato can complement the sweet flavors of the cupcakes wonderfully. If you’re looking for a non-alcoholic alternative, consider serving them with a fresh mint tea or a lightly brewed hibiscus iced tea, as both will enhance the pistachio flavors. For coffee lovers, a smooth latte pairs perfectly with the sweetness of these cupcakes.

Storage and Shelf Life

Store any leftover cupcakes in an airtight container at room temperature for up to three days. If you wish to keep them longer, refrigerate them for up to a week or freeze them for up to three months. When freezing, wrap them individually to maintain freshness, and allow them to thaw completely before serving.

Make Ahead Strategies

You can prepare the cupcake batter a few hours in advance and store it in the refrigerator until ready to bake. The frosting can also be made ahead and stored in the fridge. Just ensure to bring it back to room temperature and re-whip before frosting your cupcakes.

Scaling Instructions

If you need to halve the recipe, simply cut all ingredients in half for 6 cupcakes. Doubled quantities will yield 24 cupcakes but may require baking in batches, so ensure your oven can accommodate the pans.

Nutritional Deep Dive

Each cupcake offers a rich source of healthy fats from pistachios, delivering a balanced form of nutrients. High in protein, these cupcakes can serve as a satisfying snack. Be mindful of your portion size, as these treats are calorie-dense due to the butter and sugar content.

Dietary Adaptations

For gluten-free options, consider almond flour or a gluten-free flour blend to make delicious cupcakes. You can also make these dairy-free by using coconut oil or vegan butter and almond milk in the frosting.

Troubleshooting Guide

If your cupcakes are too dry, ensure you’re not overbaking and check your oven temperature with a thermometer. For flavor balance, taste the batter before baking and adjust sweetness or add a pinch of salt if necessary.

Recipe Success Stories

Community feedback has shown that these luscious pistachio cupcakes have become a favorite for special occasions. Many bakers love experimenting with different frostings, sharing ideas and pictures of their beautifully decorated cupcakes on social media. A few readers have also suggested adaptations, like adding a chocolate layer between the cupcake and frosting.

Frequently Asked Questions

Can I make these cupcakes ahead of time?Absolutely! You can prepare the cupcakes a day or two in advance and frost them right before serving.

How can I store leftover cupcakes?Store any leftovers in an airtight container at room temperature for up to three days or refrigerate for up to a week.

Can I freeze these cupcakes?Yes! These cupcakes freeze beautifully. Wrap each cupcake individually and store them in a freezer-safe container for up to three months.

What can I replace pistachios with?You can substitute almonds or walnuts if necessary, but it will change the flavor profile slightly.

Is there a way to make these cupcakes more chocolatey?Yes! You can add cocoa powder to the batter for a delicious chocolate pistachio fusion.

What other frosting would go well with these cupcakes?Cream cheese frosting or chocolate ganache would be delightful alternatives to vanilla buttercream.

Can I use self-rising flour instead of all-purpose flour?Yes, but you may want to reduce the baking powder used in the recipe, as self-rising flour contains it already.

How can I achieve a smoother frosting consistency?Be sure your butter is at room temperature and whip the frosting for a few extra minutes.

What temperature should I store them at?Room temperature is best for storing frosted cupcakes; refrigerate only if necessary.

Are these cupcakes suitable for kids?Yes! With their sweet flavor and fun colors, kids often love these cupcakes.

Additional Resources

For those interested in more pistachio-based recipes, consider checking out pistachio muffins or an easy pistachio ice cream recipe. Finding the right baking equipment can significantly enhance your baking process, so explore our recommendations for mixing bowls and measuring tools to ensure your success!

Join the Conversation

Share your experience making these luscious pistachio cupcakes on social media! Post your photos and tag us to join a community of baking enthusiasts. We love seeing your adaptations and celebrating your successes, so provide tips on what you tried differently to make the recipe your own!

The Recipe

Luscious Pistachio Cupcakes with Vanilla Buttercream Frosting

Serves: 12 cupcakes

Prep Time: 30 mins

Cook Time: 20 mins

Total Time: 50 mins

Kitchen Equipment Needed

  • Mixer
  • Measuring cups and spoons
  • Cupcake pans
  • Piping bag
  • Cooling rack

Ingredients

  • 1 cup all-purpose flour
  • 1 cup sugar
  • ½ cup unsalted butter (softened)
  • 2 large eggs
  • 1 teaspoon vanilla extract
  • ½ cup finely chopped pistachios
  • ½ cup milk
  • 1 teaspoon baking powder
  • For the Vanilla Buttercream Frosting:
  • 1 cup unsalted butter (softened)
  • 4 cups powdered sugar
  • ¼ cup milk
  • 1 teaspoon vanilla extract
  • Crushed pistachios for garnish

Directions

  1. Preheat your oven to 350°F (175°C) and line a cupcake pan with liners.
  2. In a mixing bowl, cream together the softened butter and sugar until fluffy.
  3. Add eggs one at a time, beating well after each addition. Stir in the vanilla extract.
  4. In a separate bowl, mix together the flour, baking powder, and chopped pistachios.
  5. Gradually add the dry mixture to the wet mixture, alternating with milk until just combined.
  6. Divide the batter evenly among the cupcake liners, filling each about two-thirds full.
  7. Bake for 20 minutes or until a toothpick inserted in the center comes out clean. Allow to cool on a wire rack.
  8. For the buttercream, beat the softened butter until creamy. Gradually add powdered sugar and mix until smooth.
  9. Add milk and vanilla extract, beating until desired consistency is reached.
  10. Frost the cooled cupcakes and sprinkle with crushed pistachios for garnish.

Recipe Notes

  • For a different flavor profile, try adding almond extract alongside vanilla.
  • These cupcakes can be frozen for later enjoyment; just frost when ready to serve.
  • Feel free to experiment with different nuts for topping or batter additions.

Mouthwatering Raspberry Lemon Heaven Cupcakes Recipe You’ll Love

Raspberry Lemon Heaven Cupcakes: A Delightful Citrus Treat!

⚖️
Difficulty
Medium

⏲️
Prep Time
20 mins

🕒
Cook Time
15 mins

⏱️
Total Time
35 mins

🍽️
Servings
12 cupcakes

Indulge in the divine flavors of Raspberry Lemon Heaven Cupcakes, a confection that embodies the perfect balance of tangy and sweet. These cupcakes are not just a treat; they are an experience of zesty lemon paired with juicy raspberries, creating a flavor explosion with every bite. The addition of a light frosting rounds off this delightful dessert beautifully, making them an ideal choice for various occasions.

Baking these raspberry lemon delights is a fantastic way to bring a summery vibe to any gathering. Their vibrant colors and fresh flavors are perfect for spring and summer parties, birthdays, or simply a sweet treat for yourself. As you bite into these moist cupcakes, the lemon zest tantalizes your taste buds, while the raspberries add a beautiful burst of fruitiness, leaving you yearning for more.

Quick Recipe Highlights

  • Flavor Profile: Bright and tangy lemon paired with sweet, tart raspberries makes for an irresistible flavor combination.
  • Texture: Moist and fluffy cupcakes with a light and airy frosting create a joyful mouthfeel.
  • Aroma: The uplifting citrus scent will fill your kitchen, promising something special.
  • Visual Appeal: Their soft yellow hue adorned with vibrant pink raspberry topping makes these cupcakes visually stunning.
  • Skill Level Needed: Even novice bakers can tackle this recipe, as the steps are straightforward and fun.
  • Special Equipment: A standard muffin tray and an electric mixer will ensure your cupcakes are perfectly baked and frosted.

Recipe Overview

  • Difficulty Level: While this cupcake recipe has a medium difficulty level, it is manageable for all skill sets. The layering of flavors requires attention but is achievable with patience.
  • Category: These cupcakes fall into the dessert category and are perfect for tea times or festive gatherings.
  • Cuisine: This recipe draws inspiration from classic Western pastry traditions, particularly the use of seasonal fruits in desserts.
  • Cost: The ingredients for these cupcakes are relatively inexpensive, with fresh fruits being the primary cost.
  • Season: Best enjoyed in the spring and summer, when both lemons and raspberries are in peak season.
  • Occasion: Ideal for birthday parties, bridal showers, or any festive occasion calling for a sweet, refreshing treat.

Why You’ll Love This Recipe

The taste and texture of Raspberry Lemon Heaven Cupcakes will delight anyone with a sweet tooth. The blend of lemony zest and fruity sweetness creates a refreshing sensation that is perfect for warm days. The moist cupcake base is incredibly satisfying, allowing the frosting to shine as the finishing touch. This balance of flavors and textures makes every bite memorable.

With this recipe, convenience is just around the corner. Ready in under an hour, these cupcakes can be whipped up easily for last-minute gatherings. You can glaze them with your favorite icing or enjoy them plain for a simple, yet delicious treat. Prepare a batch in advance, and you’ll always have a special dessert ready when celebration calls.

Not only are these cupcakes delicious, but they also offer nutritional benefits. Raspberries are rich in vitamins and antioxidants, adding a healthful twist to your dessert. Paired with the refreshing lemon, this treat does not just fill your belly but also nourishes your body. A dessert that tastes good and is good for you? Count me in!

Socially, Raspberry Lemon Heaven Cupcakes are a win-win for any gathering. Their stunning appearance will impress guests while the flavors will keep them coming back for more. Sharing these cupcakes creates moments that connect friends and family, making every occasion more memorable.

From a cost perspective, these cupcakes are budget-friendly. With ingredients that can be found in most kitchens and local markets, they are accessible to everyone. Plus, since they yield twelve servings, it is a low-cost dessert option that still feels indulgent.

Historical Background and Cultural Significance

The history of cupcakes dates back to the late 18th century when recipes for cakes baked in small cups first appeared. As time progressed, these individual portions became known as “cupcakes,” offering a delightful single-serving alternative. Raspberry Lemon Heaven Cupcakes are a modern twist on this classic dessert, celebrating seasonal fruits that connect people to nature’s bounty.

Culturally, cupcakes represent celebration and joy. They often grace birthdays, weddings, and other significant events. The vibrant colors of our Raspberry Lemon cupcakes symbolize happiness, making them a fitting choice for any gathering.

Over the years, cupcakes have evolved from simple baked goods to intricate desserts adorned with sophisticated toppings and fillings. This particular recipe honors traditional baking while incorporating fresh, fruity elements, showcasing how classic recipes can adapt and thrive in modern kitchens.

Regional variations of cupcakes include unique twists that reflect local ingredients and preferences. While our version combines raspberry and lemon, other cultures may opt for chocolate or spice-filled delights. This recipe stands as a reminder of how versatile and beloved cupcakes truly are across the globe.

Ingredient Deep Dive

Raspberries

Raspberries are an integral part of our Raspberry Lemon Heaven Cupcakes, offering a burst of tart sweetness. Each berry is packed with vitamins C and K, fiber, and powerful antioxidants that promote optimal health. When selecting raspberries, look for vibrant, plump berries that give slightly when pressed, indicating freshness. Store them in a breathable container in the fridge for optimal longevity, and consume within a few days for the best flavor.

For substitutions, consider using strawberries or blueberries if raspberries are unavailable. These alternatives will offer a similar sweetness and texture, ensuring your cupcakes maintain their delicious appeal.

Lemon

Lemon adds that bright, zesty kick, elevating the overall flavor profile. Rich in vitamin C, lemons are known for boosting immunity and enhancing skin health. When selecting lemons, choose ones that are heavy for their size, as these contain more juice. Store them at room temperature or in the refrigerator, depending on their ripeness.

If you’re out of fresh lemons, lemon juice or zest from a bottled source can serve as a suitable substitute, though fresh is always preferable for optimal flavor.

Common Mistakes to Avoid

  • Overmixing the batter: Mixing too much can lead to dense cupcakes. Combine until just incorporated for fluffier results.
  • Not preheating the oven: Failing to preheat can result in uneven baking. Always allow your oven to reach the desired temperature before putting in the tray.
  • Incorrect oven temperature: An oven thermometer can help ensure your baking temperatures are accurate, preventing over or under-baked cupcakes.
  • Ignoring cupcake liners: Using liners makes for easier removal and cleanup. Greasing the pan alone may not be enough.
  • Not letting cool completely: Frosting warm cupcakes can cause the frosting to melt. Allow them to cool on a wire rack before icing.
  • Addition of cold ingredients: Always bring your eggs and butter to room temperature for better emulsification in the batter.
  • Too much batter in each liner: Fill each liner only two-thirds full to allow room for rising.
  • Skipping the frosting: The cupcake’s flavor is magnified by the frosting. Don’t skip this step—it adds a sweet touch.
  • Failing to taste as you go: Adjust sweetness or tartness by sampling your batter and frosting before completing the recipe.
  • Not checking for doneness: Use a toothpick or knife to check if your cupcakes are baked through; remove them from the oven as soon as they pass the test.

Essential Techniques

Mastering the art of cupcake baking involves a few key techniques that elevate your results. First, understand the importance of creaming butter and sugar. This technique incorporates air into the mixture, creating a light and fluffy texture. It’s essential to creamy until pale and fluffy.

Secondly, learn how to properly fold in ingredients. Whether you’re adding flour or berries, folding preserves the air developed during mixing. Use a spatula to gently combine, ensuring you do not deflate your batter.

Also, mastering oven temperature control cannot be overstated. Use an oven thermometer to monitor the heat accurately and avoid baking disasters. Familiarize yourself with your oven’s hot spots and rotate your pans halfway through baking for even results.

Pro Tips for Perfect Raspberry Lemon Heaven Cupcakes

1. Use high-quality ingredients for the best flavor and texture. Fresh berries and real lemon zest make a noticeable difference.
2. Experiment with different frostings; cream cheese or lemon buttercream can add a unique twist.
3. If time allows, let cupcakes cool fully before frosting for a more appealing presentation.
4. For added flavor, drizzle with lemon glaze after frosting for an extra zesty kick.
5. Decorate with grated lemon zest or edible flowers to enhance visual appeal.
6. Make mini versions by using a mini muffin tin for bite-sized treats.
7. Play with flavor by adding a dash of almond extract for unique depth.
8. Store your cupcakes in an airtight container to keep them moist and fresh.

Variations and Adaptations

You can create variations on Raspberry Lemon Heaven Cupcakes by exploring regional adaptations. For instance, incorporating local fruits like blueberries or blackberries can add a unique spin.

Seasonal adaptations can also enliven your recipe; try adding pumpkin spice for fall or peppermint for the winter season. For dietary modifications, swapping regular flour for almond or coconut flour caters to gluten-free diets while maintaining similar textures.

Flavor variations might include infusing the batter with lavender or using citrus-lime in place of lemon for a tropic breeze. When it comes to texture, consider adding crushed nuts for a satisfying crunch or using granola for a delightful topping.

Lastly, presentation alternatives can include serving the cupcakes in jars or atop a platter adorned with fresh fruits and mint for an elegant display.

Serving and Presentation Guide

When serving Raspberry Lemon Heaven Cupcakes, take the time to enhance their visual appeal. Use vibrant colored platters and scatter edible flowers to brighten up your presentation. A light dusting of powdered sugar adds a touch of elegance, making them inviting for guests.

Garnishing is also key; consider employing lemon zest sprinkled on top of the frosting or fresh raspberries perched delicately on each cupcake.

Traditional accompaniments could include refreshing beverages like lemonade or iced tea that pair well with the cupcakes’ flavors. For modern serving suggestions, consider a dessert table filled with a variety of cupcakes and snacks.

Temperature management is important; serve at room temperature for the best flavor and texture, and consider using chilled frosting for an extra refreshing bite. Lastly, guide guests in portion control; one cupcake is often satisfying, but providing small plates enables attendees to try other treats.

Wine and Beverage Pairing

For an enjoyable culinary experience, consider wine pairings that complement the flavors of Raspberry Lemon Heaven Cupcakes. A light sparkling wine, such as Prosecco, enhances the citrus notes beautifully without overwhelming the palate.

If you prefer non-alcoholic options, lemonade or a mint-infused iced tea can refresh your taste buds between bites. Coffee lovers may enjoy a mild, fruity coffee brewed with a light roast, matching the sweetness of the dessert while balancing the flavors.

Temperature considerations are crucial; serve the wine chilled and the cupcakes at room temperature for the best overall experience.

For tea pairing, a delicate chamomile or fruity tea can complement the flavors while providing a warm warmth to the palate.

Storage and Shelf Life

Ensure your Raspberry Lemon Heaven Cupcakes stay delicious by using proper storage methods. Store in an airtight container at room temperature for up to three days; this keeps them moist and flavorful. If you need to extend their shelf life, consider refrigerating them, where they can last for up to a week.

For freezing, wrap the cupcakes individually in plastic wrap and place them in a freezer-safe container. This can prolong their freshness for up to three months. When you’re ready to enjoy, allow them to thaw at room temperature.

Watch for signs of spoilage, such as changes in texture or an off smell, which indicate it’s time to discard them. If reheating is necessary, do so gently in the microwave for 10-15 seconds or enjoy them at room temperature.

Make Ahead Strategies

Planning to bake your cupcakes ahead of time? Here’s a useful timeline to maximize freshness. Bake your cupcakes a day in advance and keep them in an airtight container until your event. This gives them ample time to cool completely, ensuring you can frost them just before guests arrive.

Storage between steps is critical; keep your batter and frosting chilled if you’re preparing them in advance to ensure optimal quality. For combined elements, assess the quality impact; sometimes, frosting the cupcakes too soon can lead to unwanted moisture.

When assembling on the event day, freshly grate some lemon zest or add fresh raspberries for a touch of brightness and flavor that elevates your dessert.

Reheating guidelines are straightforward; allow any chilled cupcakes to come to room temperature before serving for the best texture and flavor.

Scaling Instructions

If you wish to adjust your Raspberry Lemon Heaven Cupcakes for larger gatherings, scaling is easy. To halve the recipe, simply divide all ingredients by two, ensuring uniform ratios. For doubling or tripling, double-check your mixing bowl size and baking pan capacity to accommodate the larger quantities.

Timing modifications may be needed; keep an eye on baking times, as larger batches may require additional time. Finally, consider storage options; more cupcakes will demand larger containers or multiple storage solutions.

Nutritional Deep Dive

When it comes to nutrition, Raspberry Lemon Heaven Cupcakes provide a deliciously healthy twist. These cupcakes generally contain macronutrients, including carbohydrates from flour and sugar, providing energy.

Examining the micronutrient content, these cupcakes feature vitamin C from lemons and fiber from raspberries, adding nutritional value to your dessert. In moderation, enjoying these cupcakes can fit into a balanced diet, allowing for indulgence without complete guilt.

For health-conscious individuals, it’s essential to consider portion sizes. Enjoying one cupcake provides a satisfying sweetness without excessive caloric intake, making it easier to maintain weight management goals.

Incorporating substitutions or healthier options, like almond flour or coconut sugar, can further enhance their nutritional profile without sacrificing taste.

Dietary Adaptations

Accommodating diverse dietary needs is essential in today’s culinary landscape. For gluten-free options, explore specialty flours such as almond or chickpea flour that maintain texture while ensuring a delicious outcome.

Dairy-free adaptations can be achieved by using coconut cream or almond milk butter as substitutes in frosting and batter. For a vegan version, replace eggs with flax egg (ground flaxseed and water) while opting for plant-based butter.

Low-carb variations can utilize almond flour and sugar alternatives like erythritol to create a cupcake that is both satisfying and low on carbohydrates, in line with keto lifestyles.

Paleo dieters may enjoy these cupcakes by using natural sweeteners like honey and unprocessed ingredients, ensuring they remain in tune with their dietary commitments.

Troubleshooting Guide

When baking, it’s common to encounter issues that can be easily remedied. If your cupcakes are too dense, consider checking your mixing techniques. Overmixing can lead to a heavy texture, so incorporating dry ingredients gently is key.

Flavor balance can be adjusted by tasting your batter before baking; if it’s too sweet, a bit of salt can help bring flavors in line. For temperature problems, invest in an oven thermometer to ensure accurate and even baking.

If you’ve faced equipment challenges, confirm your oven is correctly preheated and your baking pans are not overcrowded, as this can lead to uneven baking.

For ingredient substitutions, ascertain that you’re maintaining a balance between dry and wet elements to ensure the final product mimics your original intent.

Timing concerns often arise; check your cupcakes a few minutes earlier than your stated baking time to avoid dryness or burning.

Recipe Success Stories

Readers who have tried Raspberry Lemon Heaven Cupcakes rave about their delicious flavor and beautiful presentation. Many have shared their experiences of serving them at gatherings, where they quickly disappear, leaving guests impressed.

Adaptation stories show that others have successfully replaced ingredients with what they had on hand—from switching raspberries for strawberries to experimenting with lemon zest and extracts.

Community suggestions often include various frosting ideas, with many sharing their creations on social media and receiving enthusiastically positive feedback.

For those tasked with photography, readers have provided tips on capturing the vibrant colors of the cupcakes, ensuring that they look as delectable as they taste.

Frequently Asked Questions

Q1: Can I make these cupcakes ahead of time?

A1: Yes! You can bake the cupcakes a day in advance and store them in an airtight container. Frost them right before serving for the best flavor and freshness.

Q2: What’s the best way to store leftover cupcakes?

A2: Keep them in an airtight container at room temperature for 2-3 days, or refrigerate for up to a week. To freeze, wrap them individually in plastic and store in a freezer-safe container.

Q3: Can I substitute raspberries with other fruits?

A3: Absolutely! You can use blueberries, strawberries, or blackberries. Adjust the sweetness based on the fruit’s natural sugars.

Q4: How do I get my cupcakes to rise properly?

A4: Ensure your baking powder is fresh and measure your flour accurately to avoid dense cupcakes. Don’t forget to preheat your oven.

Q5: Can I use a gluten-free flour blend?

A5: Yes, many gluten-free flour blends work well. Just ensure they have xanthan gum or other stabilizers to help with structure.

Q6: How can I make frosting less sweet?

A6: If your frosting is too sweet, add a pinch of salt or incorporate a little lemon juice to enhance flavor while cutting the sweetness.

Q7: Do I need to use unsalted butter for the frosting?

A7: While unsalted butter is recommended, salted butter can be used if you prefer a hint of saltiness in your frosting. Adjust other salts in the recipe accordingly.

Q8: How do I prevent my cupcakes from sticking to the liners?

A8: Make sure to use high-quality cupcake liners and lightly grease them if needed. Allowing the cupcakes to cool completely before removing them can also help.

Q9: Can I use frozen raspberries?

A9: Yes, frozen raspberries work, but don’t thaw them before mixing into the batter as they may make it too watery. Gently fold them in while still frozen.

Q10: What’s the best way to add lemon zest?

A10: Use a microplane for finely grating the zest. This technique ensures you capture just the aromatic outer layer of the lemon without the bitter white pith.

Additional Resources

If you enjoyed making Raspberry Lemon Heaven Cupcakes, here are some related recipes you might love! Try out our Lemon Blueberry Muffins for breakfast or explore our decadent Chocolate Raspberry Cake for a special occasion.

For technique guides, our baking basics section offers tips on perfecting cupcake frosting and flavor infusion. To dive deeper into ingredient information, we have in-depth articles on the benefits of using seasonal fruits in your baking.

For equipment recommendations, we detail essential kitchen tools for any baker, ensuring you have the right gadgets for your dessert-making adventures. Finally, if you love to bake seasonally, check out our collection of fall-inspired recipes.

Join the Conversation

We invite you to share your baking journey with Raspberry Lemon Heaven Cupcakes! Tag us on social media and share your photography tips for capturing those beautiful colors.

We’d love to hear your feedback or any variations you made on this recipe. Community engagement makes our baking experiences richer, so don’t hesitate to share your stories and ideas with us!

The Recipe

Raspberry Lemon Heaven Cupcakes

Serves: 12 cupcakes

Prep Time: 20 mins

Cook Time: 15 mins

Total Time: 35 mins

Kitchen Equipment Needed

  • Oven
  • Muffin tray
  • Mixing bowls
  • Electric mixer
  • Measuring cups and spoons
  • Wire rack for cooling

Ingredients

  • 1 ½ cups all-purpose flour
  • 1 cup sugar
  • ½ cup butter, softened
  • 2 large eggs
  • ½ cup milk
  • 1 teaspoon vanilla extract
  • 1 teaspoon baking powder
  • ½ teaspoon baking soda
  • Zest of 1 lemon
  • 1 cup fresh raspberries

Directions

  1. Preheat your oven to 350°F (175°C) and line your muffin tray with liners.
  2. In a large mixing bowl, cream together the softened butter and sugar until light and fluffy.
  3. Add in the eggs, one at a time, mixing well after each addition. Stir in the milk and vanilla extract.
  4. In another bowl, combine the flour, baking powder, baking soda, and lemon zest.
  5. Gradually add the dry ingredients into the wet mixture, mixing just until combined. Fold in raspberries gently.
  6. Divide the batter evenly among the cupcake liners, filling each about two-thirds full.
  7. Bake for 15-18 minutes or until a toothpick inserted in the center comes out clean.
  8. Allow to cool in the tray for 5 minutes before transferring to a wire rack to cool completely.
  9. Frost with your choice of icing once cooled, and enjoy your Raspberry Lemon Heaven Cupcakes!

Recipe Notes

  • For frosting, consider lemon buttercream or cream cheese frosting for a delightful pairing.
  • Leftover cupcakes can be stored in an airtight container at room temperature for up to 3 days.
  • Feel free to substitute raspberries with other berries or fruits for variation.

Indulge in Gooey Caramel Chocolate Crunch Bars Delight

Gooey Caramel Chocolate Crunch Bars: A Decadent Delight

⚖️
Difficulty
Medium

⏲️
Prep Time
30 mins

🕒
Cook Time
25 mins

⏱️
Total Time
55 mins

🍽️
Servings
16 bars

Indulge in the rich, decadent world of Gooey Caramel Chocolate Crunch Bars! This recipe marries the intense flavors of chocolate with the soft, chewy texture of caramel, topped with a delightful crunch that will make every bite unforgettable. Perfect for satisfying your sweet tooth, these bars are ideal for parties, picnics, or simply as a treat after a long day. The combination of sweet and salty, soft and crunchy makes for an irresistible dessert that everyone will love.

These bars are not just a tasty treat but also a feast for the senses. Picture the gooey caramel oozing between layers of rich chocolate, crushed cookies adding a satisfying crunch, and a sprinkle of sea salt balancing the sweetness. Each time you take a bite, you’ll be treated to a delightful textural contrast that keeps you coming back for more. Whether you’re looking for a dessert to impress your guests or a comforting snack for yourself, these Gooey Caramel Chocolate Crunch Bars will tick all the boxes!

Quick Recipe Highlights

  • Flavor Profile: A perfect blend of rich chocolate and sweet caramel with a hint of sea salt enhances every bite.
  • Texture: Soft and gooey caramel combined with a crunchy cookie base creates a delicious contrast.
  • Aroma: The sweet aroma of melting chocolate mingles with buttery caramel fills your kitchen as you bake.
  • Visual Appeal: Layers of dark chocolate and golden caramel topped with cookie crumbs create an enticing dessert.
  • Skill Level Needed: This dessert requires moderate baking skills, suitable for both novice and experienced bakers.
  • Special Equipment: You will need a baking dish, mixing bowls, and a saucepan for melting ingredients.

Recipe Overview

  • Difficulty Level: While the recipe is considered medium because of the layered preparation, the steps are straightforward, making it accessible for most home cooks.
  • Category: The Gooey Caramel Chocolate Crunch Bars can be classified as dessert bars, perfect for any sweet occasion.
  • Cuisine: This dessert has an American influence, showcasing the classic combination of chocolate and caramel that is beloved across the country.
  • Cost: The ingredients are relatively affordable, estimating around $15-$20 total, depending on brand choices.
  • Season: These bars are delightful year-round but shine during colder months when comfort foods are particularly craved.
  • Occasion: Ideal for parties, celebrations, or as a rewarding treat during family gatherings, these bars never disappoint!

Why You’ll Love This Recipe

First and foremost, the taste and texture of Gooey Caramel Chocolate Crunch Bars are simply irresistible. The smoothness of the melted chocolate pairs beautifully with the luscious caramel for a flavor harmony that defines indulgence. Biting into a bar unveils a surprise of textures—soft caramel, crunchy cookie pieces, and rich chocolate create an experience that delights the palate. With every bite, you’ll feel transported to dessert heaven!

Convenience is another reason why this recipe continues to be a favorite among bakers. The preparation is simple, requiring just a handful of common ingredients. You can whip up these bars in under an hour, from start to finish. Whether you need a last-minute dessert or a sweet treat to prepare in advance, these bars fit the bill perfectly.

Moreover, there are nutritional advantages to this dessert. While it is a dessert, the use of quality chocolate can provide some health benefits, like antioxidants. Paired with cookie crumbles, these bars serve not only as a delicious treat but also as a source of joy that can be enjoyed guilt-free in moderation. Choose dark chocolate for a richer flavor with added nutritional perks!

Socially, these bars are a fantastic gathering treat. Whether you’re hosting a party, a casual get-together, or simply inviting friends over, Gooey Caramel Chocolate Crunch Bars are always a hit. They encourage sharing and conversation, as each person savors the rich flavors and textures—making them the perfect addition to any occasion.

Finally, cost-effectiveness is key. Making dessert bars at home saves money compared to buying from bakeries or cafes, and with this recipe yielding sixteen pieces, it provides excellent value for the effort. The ingredients are easily accessible, allowing you to enjoy gourmet flavors without breaking the bank.

Historical Background and Cultural Significance

The origins of caramel and chocolate desserts can be traced back to European confectionery traditions, with the combination of these ingredients becoming widely popular in the United States in the 20th century. Chocolate itself dates back to ancient Mesoamerican cultures, while caramel has evolved through generations to find its place in numerous desserts, including cakes and bars.

Culturally, chocolate and caramel desserts represent indulgence and celebration in many societies. Special occasions, such as birthdays and holidays, often call for sweet treats, and combining chocolate with caramel elevates these moments. Such desserts have become staples at social events, family gatherings, and potlucks, enhancing connections through shared experiences.

This recipe, like many others, has evolved over time, with personal touches and variations becoming common. The fundamental layers of chocolate and caramel have inspired countless adaptations, each reflecting the preferences and creativity of the baker, making every batch unique.

Regional variations exist, with different cultures putting their spin on the classic combination. From chocolate-covered caramel candies to bars with added nuts or fruits, each variation speaks to local tastes and traditions, ensuring that the love for chocolate and caramel continues to thrive globally.

Ingredient Deep Dive

Chocolate serves as the primary flavor in our Gooey Caramel Chocolate Crunch Bars. Rich in antioxidants, dark chocolate is a healthier choice, providing a more complex flavor profile. When selecting chocolate, opt for high-quality brands that contain at least 70% cocoa for a deep, rich taste. To store chocolate, keep it in a cool, dry place wrapped in its original packaging to maintain its flavor and texture.

Caramel is the next star of our recipe. This delightful confection has a rich history and cultural significance, often associated with sweet treats and indulgent desserts. Caramel is high in sugar, providing a quick source of energy, but it’s best consumed in moderation. When making or working with caramel, ensure it’s stored in an airtight container away from moisture to maintain its gooey consistency.

Common Mistakes to Avoid

  • Not using quality chocolate: Low-quality chocolate can lead to a lackluster flavor. Always go for high-quality chocolate to ensure rich flavor.
  • Overcooking the caramel: Caramel can turn from silky to burnt quickly. Keep a close eye on it and remove it from the heat as soon as it’s golden brown.
  • Not letting the bars cool properly: For perfect texture, allow the bars to cool completely before cutting. This helps them hold together better.
  • Skipping the salt: A sprinkle of sea salt enhances the sweetness of the caramel. Don’t skip this step for a balanced flavor.
  • Using the wrong pan size: Ensure you use the correct pan size as this affects cooking time and final texture. A smaller pan may lead to thicker bars.
  • Not measuring ingredients accurately: Baking is a science. Measure your ingredients to avoid ruining your dessert.
  • Inadequate mixing: Ensure you mix well to combine all ingredients thoroughly, especially when making the cookie base.
  • Ignoring resting time: Allowing the bars to rest after baking helps improve the flavors and texture, leading to a more enjoyable experience.
  • Cutting bars too soon: For neat slices, wait until the bars are cold before cutting. This prevents them from falling apart and improves presentation.

Essential Techniques

One fundamental technique for this recipe is melting chocolate. Understanding how to melt chocolate properly is crucial to achieving a smooth, glossy finish. Use a double boiler or microwave in short bursts while stirring to prevent overheating. Common pitfalls include burning the chocolate or getting water in it, which causes it to seize. Aim for a smooth, even texture without clumps.

Another important skill is caramel making. Caramel requires careful attention—you must allow the sugar to melt on medium heat, swirling occasionally until it transforms into a golden syrup. To master this, watch for the color change and be prepared to remove it from heat once it reaches the desired hue. Look for a deep amber color and avoid stirring too much, as this can cause crystallization.

Pro Tips for Perfect Gooey Caramel Chocolate Crunch Bars

1. Use room temperature ingredients: Ensure butter and eggs are at room temperature for better mixing and texture. This aids in creating a smooth batter.

2. Chill the bars before slicing: For cleaner cuts, refrigerate the bars for at least an hour after baking. This makes slicing easier and helps them hold shape.

3. Experiment with chocolate varieties: Don’t hesitate to mix dark chocolate with milk chocolate for a more balanced sweetness, giving you a richer flavor experience.

4. Add nuts for crunch: Consider folding in nuts such as pecans or walnuts into the cookie base for added texture and flavor contrast.

5. Utilize parchment paper: Line your baking dish with parchment paper for easy removal and cleanup. This prevents the bars from sticking.

6. Store leftovers properly: Keep the bars in an airtight container at room temperature for up to a week or in the fridge for longer freshness.

7. Top with extra caramel: Drizzling some extra melted caramel on top before serving adds visual appeal and enhances flavor.

8. Adjust sweetness: Taste your caramel before mixing it in; adjusting sugar will ensure your bars match your sweetness preference.

Variations and Adaptations

Regionally, you can find variations of these bars; try adding in local favorites such as crushed peppermint candies for a holiday twist or even hints of orange zest to brighten the flavors. During festive seasons, integrating seasonal ingredients, such as pumpkin spice or apple chunks, can also provide a unique seasonal adaptation.

For dietary modifications, consider using gluten-free cookie crumbles and dairy-free chocolate options to cater to various dietary needs. This recipe can easily adapt to fit a range of dietary preferences while maintaining that indulgent flavor profile.

Flavor variations can also enhance the traditional recipe; incorporate different extracts, like raspberry or almond, to create an exciting twist. Similarly, flavoring the caramel with vanilla or bourbon can elevate your bars to a whole new level.

For texture modifications, additional toppings such as crushed pretzels or popcorn can give your bars an exciting crunch and added saltiness, complementing the sweetness perfectly.

Lastly, presentation alternatives can enhance your serving style. Serve your bars on a beautiful platter drizzled with chocolate sauce or swirl in some whipped cream for an inviting dessert experience.

Serving and Presentation Guide

When presenting your Gooey Caramel Chocolate Crunch Bars, consider using a clean, white platter to make the rich colors pop. Allow the bars to cool thoroughly before cutting them into neat squares or rectangles for a polished look. You could dust the top with powdered sugar or cocoa powder for an elegant touch.

Garnishing ideas can enhance your dessert experience—try drizzling some melted chocolate or caramel over the top for an eye-catching focal point. Fresh berries, like strawberries or raspberries, served on the side can also provide a refreshing contrast to the rich flavors of the bars.

While traditional accompaniments such as ice cream or whipped cream can elevate the experience, modern serving suggestions could also include a scoop of yogurt or a side of fresh fruit for a lighter touch. Consider the temperature of your bars—they’re best enjoyed slightly warm with gooey caramel oozing from the center!

Portion control is essential, especially if serving at gatherings. Aim for smaller squares for guests to sample, encouraging them to enjoy the bars without feeling overwhelmed by the richness. Presentation matters!

Wine and Beverage Pairing

When it comes to pairing wines with Gooey Caramel Chocolate Crunch Bars, consider dessert wines such as Tawny Port or a rich, creamy dessert wine. These selections complement the sweet, chocolatey nature of your bars wonderfully and enhance the layers of flavor without overshadowing them.

For a non-alcoholic alternative, a delicious cup of coffee or rich hot chocolate can enhance the indulgence of the bars. The bitterness of the coffee beautifully balances the sweetness of the caramel.

If you’d like to make it a tea time experience, consider pairing with a strong Earl Grey or Chai tea—both complement the sweet elements while providing cut-through with their bold flavors.

Temperature considerations are also important. Serve your beverages warm to match the gooey texture of the bars, creating a comforting dessert experience.

Storage and Shelf Life

For optimal storage, place your Gooey Caramel Chocolate Crunch Bars in an airtight container, ensuring they are at room temperature to avoid moisture. They will typically last about a week at room temperature but can be refrigerated for extended freshness.

When it comes to container recommendations, consider using glass or silicone containers that offer a good seal while also being easy to clean. This not only preserves the taste but also maintains the texture of the bars.

Be on the lookout for signs of spoilage; if the bars develop an off smell or a change in texture, it’s best to discard them. For reheating, simply microwave for a few seconds or enjoy them cold—both ways are delightful!

If you want to extend the shelf life even further, freezing is a great option. Wrap individual bars tightly in plastic wrap and then place them in a freezer-safe bag. They can be frozen for up to three months, allowing for sweet treats anytime.

Make Ahead Strategies

To prepare ahead of time, consider making the chocolate and cookie layers one day, letting them cool overnight. Assemble your bars and let them set just before you plan to serve them. This strategy allows the flavors to meld beautifully without sacrificing quality.

Storage between steps is important—keep each layer separately stored in airtight containers in the fridge, preventing them from becoming stale or compromising in flavor before assembly.

Assess the quality impact of make-ahead preparation; you might notice flavors combining beautifully after resting, resulting in an overall enhancement of the taste. Ensure you check the texture when assembling, as components should be cooled but manageable to work with.

Whenever possible, allow for quick assembly tips—measure and prepare your ingredients in advance. This will streamline your workflow and help reduce kitchen stress before serving.

Additionally, when reheating after making ahead, take care to warm the bars gently. This maintains the luscious texture of the caramel while still offering warm, gooey enjoyment. Consider adding fresh elements, like whipped cream, just before serving for a delightful finishing touch!

Scaling Instructions

Halving the recipe is simple. Use a smaller baking pan while ensuring you adjust the cooking time accordingly, checking for doneness to avoid overbaking.

Doubling or tripling the recipe can be done easily with the same ingredients and steps. Just ensure you have ample mixing space and consider baking in batches if your kitchen tools can’t accommodate the larger quantity.

Equipment adjustments should be minimal unless scaling dramatically changes quantities; you might need to increase the size of your mixing bowls or use multiple pans in some cases.

Timing modifications may be necessary, as larger batches or different pan sizes could influence how quickly they bake. Keep an eye on your bars as baking times vary depending on your oven and tools.

Storage considerations will also affect your planning; larger quantities mean more space needed. Plan accordingly to ensure your bars stay fresh.

Nutritional Deep Dive

With a focus on macros, a typical bar might contain around 200-250 calories, depending on portion size and ingredient choice. These calories mainly come from carbohydrates and fats, with a smattering of protein from eggs and chocolate.

Micronutrient analysis reveals that these bars offer some beneficial nutrients, especially if you choose dark chocolate. This variety boasts minerals like magnesium, iron, and zinc, contributing to a balanced dessert option.

Health benefits can include mental satisfaction from enjoying a well-made dessert, along with moderate indulgence leading to a joyful experience. The combination of flavors and textures provides not just a treat, but also a mood lifter.

When considering dietary considerations, enjoy these bars as an occasional treat rather than a daily indulgence. Moderation is key. Portion analysis is vital; cut smaller squares to satisfy cravings without derailing nutritional goals.

For weight management, enjoy these bars alongside physical activity. They can serve as an excellent post-workout treat or reward after a successful day, creating a positive relationship with food.

Dietary Adaptations

For a gluten-free version, simply substitute traditional cookie crumbles with gluten-free options made from almond flour or gluten-free cookies. This adaptation allows everyone to enjoy the bars without compromising on taste.

Dairy-free options can be accommodated as well; choose dairy-free chocolate and coconut cream for a delicious alternative that maintains the decadence while being suitable for those with dairy sensitivities.

If you’re aiming for vegan, replace eggs with flaxseed meal or applesauce and ensure all products—including chocolate—are dairy-free. The resulting bars are just as rich and satisfying.

For low-carb or keto variations, opt for low-carb chocolate and sugar substitutes in the caramel. While the texture may differ, you can still enjoy the essential flavors without the carbs.

Those following a paleo diet might use almond butter in place of traditional caramel and sweeten using natural sweeteners like honey or maple syrup for a more health-conscious approach.

Low-FODMAP adaptations are possible by choosing lactose-free products. Ensure your cookie base uses acceptable ingredients to keep everyone feeling great while enjoying these treats.

Troubleshooting Guide

If you encounter texture issues, such as bars being too crumbly, make sure that the wet and dry ingredients are mixed in the right proportions. Adding a little extra melted butter can help bind them better.

Flavor balance can be a common challenge; if the bars taste overly sweet, adding a pinch of salt can help cut through the sweetness and enhance depth.

Temperature problems may arise if you over-bake your bars. Always keep a close eye on them and start checking a few minutes before the suggested bake time to catch them at their best.

Equipment challenges could include issues with your oven, such as uneven heating. An oven thermometer can ensure accurate temperatures, leading to perfect results every time.

If needing to adjust ingredient substitutions, remember that not all substitutions behave the same way. When in doubt, look for specific guidelines on each ingredient to better understand how they will impact your final product.

In terms of timing concerns, if you’re tight on time, consider prepping ingredients ahead or decreasing the recipe size. You’ll still get to enjoy these bars without much delay!

Recipe Success Stories

Community feedback on Gooey Caramel Chocolate Crunch Bars has been wonderful, with many bakers sharing how these bars have become their go-to dessert for gatherings and special occasions. Readers often comment on the joys of customizing the bars according to personal preferences and dietary restrictions.

Variation successes include bakers adding their adventures with different flavors, such as infused caramel or exploring unique toppings that surprise and delight their guests, enhancing their overall experience. This creativity encourages others to branch out with their own versions.

Adaptation stories reveal how people have transformed this classic recipe for their needs; from healthier versions to gluten-free adaptations, seeing how this recipe shapes and molds to different lifestyles and celebrations is inspiring.

Readers often share photography tips, highlighting the beauty of their finished bars. Aesthetics play a role in dessert enjoyment; the visual element enhances the appeal, prompting excited bites and community sharing!

Frequently Asked Questions

Q: Can I make these bars ahead of time?

A: Absolutely! You can prepare these bars a day or two in advance. Just ensure they are properly stored in an airtight container to maintain freshness.

Q: How do I achieve the perfect layer of caramel?

A: To achieve a perfect layer of caramel, ensure your sugar is melted evenly and lightly swirled without becoming crystallized. Remove it from heat just when it reaches a golden brown color.

Q: What if I don’t have a double boiler?

A: If you don’t have a double boiler, simply melt chocolate in a microwave-safe bowl in short bursts, stopping to stir often to avoid burning.

Q: Can I substitute the chocolate with something else?

A: Yes, you can use milk chocolate or even white chocolate, depending on your taste preference. Just note that it will change the flavor profile of the bars.

Q: How should I store any leftovers?

A: Store leftovers in an airtight container at room temperature for about a week or in the refrigerator for a longer shelf life.

Q: Can I freeze these bars?

A: Yes! Wrap individual bars tightly in plastic wrap and place them in a freezer-safe bag. They can be frozen for up to three months.

Q: What is the best way to cut these bars?

A: For neat slices, chill the bars in the fridge for about an hour before cutting. A sharp knife will give you clean edges.

Q: Can I use non-dairy alternatives for this recipe?

A: Absolutely! You can use dairy-free chocolate and even coconut milk for caramel to make it a vegan-friendly treat.

Q: What’s the best way to serve these bars?

A: Serve them at room temperature alone or with a scoop of your favorite ice cream for a decadent dessert experience!

Q: How do I know when the bars are done baking?

A: The bars should be set around the edges while the center remains slightly soft. They’ll firm up as they cool down.

Additional Resources

If you enjoyed these Gooey Caramel Chocolate Crunch Bars, check out our related recipes for more indulgent desserts, such as Chocolate Chip Cookie Bars and Salted Caramel Brownies. You can also delve into our technique guides to perfect your baking skills, ensuring you become a master of chocolate and caramel desserts.

For ingredient information, we provide tips on purchasing the best chocolate and caramel components, as well as equipment recommendations for successful baking. Exploring seasonal variations can give your dessert a fresh twist—be sure to check back for new fun ideas throughout the year!

Join the Conversation

We’d love to hear your stories about these Gooey Caramel Chocolate Crunch Bars! Share your photos on social media, tag us, and let us know how your baking went. Your variations and feedback inspire our community and help others recreate this delicious recipe.

Your reviews and comments are vital. Engage in the conversation by sharing your experiences, tips, and any clever ideas that you discovered while making these bars. Let’s keep the joy of baking alive together!

The Recipe

Gooey Caramel Chocolate Crunch Bars

Serves: 16 bars

Prep Time: 30 mins

Cook Time: 25 mins

Total Time: 55 mins

Kitchen Equipment Needed

  • Baking pan (9×13 inches)
  • Mixing bowls
  • Double boiler or microwave-safe bowl
  • Spatula
  • Measuring cups and spoons

Ingredients

  • 1 cup unsalted butter, melted
  • 2 cups graham cracker crumbs
  • 2 cups chocolate chips (dark or semisweet)
  • 1 cup heavy cream
  • 1 cup granulated sugar
  • 1 cup sweetened condensed milk
  • 1 teaspoon vanilla extract
  • Sea salt for sprinkling

Directions

  1. Preheat your oven to 350°F (175°C) and grease the baking pan.
  2. In a bowl, mix graham cracker crumbs with melted butter until combined, then press into the bottom of the prepared pan.
  3. In a saucepan over medium heat, combine sugar, heavy cream, and sweetened condensed milk. Stir until the mixture thickens and turns golden brown, about 10 minutes.
  4. Remove from heat and stir in vanilla extract. Pour the caramel over the crust layer in the baking pan.
  5. Melt the chocolate chips using a double boiler or microwave. Once smooth, pour over the caramel layer evenly.
  6. Sprinkle with sea salt, then let the bars cool to set completely. Cut into squares once set.

Recipe Notes

  • Feel free to experiment with different types of chocolate for varied flavors.
  • For a nutty crunch, consider adding chopped pecans or walnuts into the crust.
  • Store any leftovers in an airtight container at room temperature or in the fridge for longer-lasting freshness.

Irresistible Strawberry Cream Cheese Crumble Cookies You Must Try

Heavenly Strawberry Cream Cheese Crumble Cookies Recipe: A Delightful Treat for Any Occasion

⚖️
Difficulty
Medium

⏲️
Prep Time
20 mins

🕒
Cook Time
15 mins

⏱️
Total Time
35 mins

🍽️
Servings
24 cookies

Indulge your senses with these Heavenly Strawberry Cream Cheese Crumble Cookies! The combination of sweet strawberries, creamy cheese, and a buttery crumble will leave you craving more after just one bite. As you sink your teeth into these cookies, the luscious strawberry filling bursts forth, complemented perfectly by the cream cheese layer that adds a delightful tang. The textured crumble topping adds a sweet crunch that contrasts beautifully with the soft cookie base, making these cookies not only a treat for your taste buds but also a feast for your eyes.

These cookies are perfect for any occasion, whether you’re hosting a gathering, enjoying a cozy night in, or just want to treat yourself and your loved ones. The vibrant red hue from the strawberries against the light golden cookie creates an inviting visual appeal, making them a showstopper on any dessert table. As you navigate through the recipe, you’ll discover how simple it is to bring this bakery-style delicacy into your own kitchen, ensuring that you can whip up a batch whenever the craving strikes!

Quick Recipe Highlights

  • Flavor Profile: Fresh strawberry sweetness melded with creamy cheese and buttery crumble.
  • Texture: Soft and chewy cookies topped with a crunchy crumble, creating a delightful mouthfeel.
  • Aroma: The enticing scent of baked strawberries and rich cream cheese wafts through your kitchen.
  • Visual Appeal: Beautifully presented cookies with vibrant colors and textured layers that catch the eye.
  • Skill Level Needed: A moderate skill level is required, perfect for both novice and experienced bakers.
  • Special Equipment: Just a mixing bowl, baking sheet, and a hand mixer are all you need.

Recipe Overview

  • Difficulty Level: The recipe strikes a balance between simple steps and flavorful outcomes; perfect for those looking to expand their baking skills without feeling overwhelmed.
  • Category: These cookies can be categorized as a dessert or snack, ideal for any time of day.
  • Cuisine: This recipe is influenced by American baking traditions, bringing a modern twist to classic flavors.
  • Cost: Making these cookies is relatively affordable, with common ingredients that won’t break the bank.
  • Season: Strawberry season enhances the flavor, but these cookies can be enjoyed year-round.
  • Occasion: They are perfect for picnics, tea parties, and as sweet treats for celebrations or holidays.

Why You’ll Love This Recipe

These Heavenly Strawberry Cream Cheese Crumble Cookies are a delight for anyone who loves the sweet balance of flavors. The refreshing taste of ripe strawberries pairs perfectly with the creamy tang of the cream cheese, resulting in a delicious treat that stands out. Each bite offers a remarkable texture experience, from the tender cookie to the crunchy topping, making them addictive and satisfying.

Convenience is key with this cookie recipe, as it requires simple ingredients and straightforward steps. The ease of combining the components means you can whip up a batch with minimal effort, perfect for unexpected guests or when you need a quick dessert. You’ll be amazed at how quickly these cookies come together and how quickly they disappear!

From a nutritional standpoint, strawberries are packed with vitamins and antioxidants, while cream cheese offers a source of calcium and protein. You can enjoy these cookies as a treat while appreciating the healthier elements of fresh fruit. The balance of indulging while nourishing your body makes these cookies an ideal option for mindful bakers.

When it comes to serving, these cookies are great for sharing. They are a stunning addition to any dessert table and can be paired with coffee or tea for a delightful afternoon treat. Prepare to impress your friends and family with your baking prowess as you serve these delicious cookies that everyone will rave about.

Lastly, cost-effectiveness is always a bonus in the kitchen. Most of the ingredients are pantry staples that are easy to source, making this recipe accessible for all. Whether you’re baking for a crowd or simply enjoy baking for pleasure, you’ll find that these cookies are worth every ounce of effort.

Historical Background and Cultural Significance

The origin of crumble cookies can be traced back to various cultures that celebrate baked goods, each bringing their distinct twist. While it might be difficult to pinpoint a singular origin, the combination of sweet fillings in desserts has roots in many traditions worldwide. The use of berries aligns with North American culinary practices where community gatherings celebrate seasonal fruits.

Within American cuisine, the evolution of cookies has seen many flavor adaptations, incorporating fruits, nuts, and different types of cheese. The addition of cream cheese in desserts became more popular in the late 19th century, reflecting a blend of flavors that enhance texture and richness in baked goods.

Regional variations of cookie recipes often incorporate local fruits or ingredients, celebrating the diversity of each area. For instance, regions that pride themselves on berry farms may produce cookies featuring fresh, juicy berries all year long, highlighting their local produce.

Today, crumble cookies, like the Heavenly Strawberry Cream Cheese version, echo creativity and nostalgia, providing a modern twist on traditional recipes. They serve as a reminder of home baking and shared moments that foster community around a table filled with treats.

Ingredient Deep Dive

Strawberries: The star of this recipe, strawberries are not only delicious but also rich in vitamin C, manganese, and antioxidants. When selecting strawberries, look for bright red ones with a fresh smell. Store them in the refrigerator and wash them just before consumption to maintain freshness. Frozen strawberries can also be substituted, though fresh ones yield a better flavor.

Cream Cheese: Cream cheese adds a luscious texture and creamy flavor to these cookies. It is a versatile ingredient used in both savory and sweet dishes. When buying cream cheese, opt for full-fat for the best results, and store it in the refrigerator. You may substitute with mascarpone or a dairy-free cream cheese for a vegan option, but results will vary.

Butter: Essential for adding richness and flavor, butter helps create a tender cookie. Using unsalted butter allows you to control the saltiness of your baking. Make sure it’s softened at room temperature for best results when creaming with sugar. Storing butter in the fridge maintains freshness, and it can be frozen for long-term storage.

Flour: All-purpose flour is the foundation of many baking recipes. When measuring flour, always spoon it into the measuring cup and level it off for accuracy. Store it in a cool, dry place in an airtight container to prevent spoilage. If looking for alternatives, almond or coconut flour can be used, but adjustments in ratios may be necessary for texture.

Common Mistakes to Avoid

  • Not softening butter: Using cold butter can lead to poor mixing, resulting in dense cookies. Always let butter sit at room temperature.
  • Overmixing dough: Mixing too long can develop gluten, leading to tough cookies. Mix just until ingredients are combined.
  • Using stale ingredients: Check expiration dates on baking powder, flour, and baking soda to ensure optimal results.
  • Skipping chilling: Chilling the cookie dough helps the cookies maintain their shape and enhances flavor, so don’t skip this step.
  • Not measuring carefully: Baking is a science, and precise measurements are crucial for successful outcomes. Use a kitchen scale for accuracy.
  • Ignoring oven temperature: Always preheat your oven. Baking at the wrong temperature can yield cookies that are too dry or undercooked.
  • Not testing for doneness: Cookies should be golden brown around the edges but may seem soft in the middle; they will continue to firm as they cool.
  • Using a warm baking sheet: Cold dough placed on a hot pan can cause spreading. Ensure your baking sheets cool down between batches.
  • Choosing flavor over balance: While experimenting is fun, make sure to maintain a balance in flavors; less can be more.
  • Storing improperly: Baked cookies should be stored in airtight containers at room temperature; otherwise, they may become stale or dry.

Essential Techniques

Creaming butter and sugar: This technique incorporates air into the mixture, creating light and fluffy cookies. Beat at medium speed until the mixture is pale and fluffy; this usually takes about 3-5 minutes. Watch for a light texture as a cue that you are on the right track.

Measuring flour accurately: Accurate measurement is critical for achieving the desired texture in cookies. Use the spoon and level method; spoon the flour lightly into your measuring cup and level it off with a knife. This prevents compacted flour, which can lead to dry cookies.

Chilling cookie dough: Chilling allows flavors to meld and prevents excessive spreading while baking. Each recipe might require different chilling times, but typically 30 minutes to 2 hours achieves great results. Look for a firm texture that is easy to scoop.

Baking in batches: Bake cookies in batches by giving sufficient space between them on the baking sheet to allow for even baking and spreading. Use parchment paper or silicone mats to prevent sticking and ensure easy removal after baking.

Pro Tips for Perfect Heavenly Strawberry Cream Cheese Crumble Cookies

1. Use room temperature ingredients for better incorporation, which leads to a uniform dough.

2. Add a pinch of salt to enhance flavors even if using salted butter—it elevates sweetness!

3. For a decadent touch, consider drizzling melted dark chocolate over cooled cookies before serving.

4. Use fresh strawberries when in season for optimal flavor; frozen ones may alter texture slightly.

5. Mix in some finely chopped nuts for an added crunch if you’re looking for extra texture.

6. If you want larger cookies, use a muffin scoop when portioning dough for consistent size.

7. Store uncooked dough in the fridge for a couple of days or freeze for a future baking session.

8. Experiment with different fruit combinations; blueberries or raspberries are delightful alternatives!

Variations and Adaptations

Consider experimenting with seasonal variations such as using peaches in the summer or apple cinnamon in the fall. Both fruits pair beautifully with the cream cheese and crumble components. Alternatively, for those with dietary restrictions, a gluten-free flour blend can easily replace the all-purpose flour while maintaining a similar taste profile.

If you’d like to reduce sugar, substitutes such as stevia or erythritol can offer a lower-calorie option and still provide sweetness without significantly altering the flavor. Additionally, for a vegan adaptation, opt for plant-based cream cheese and replace eggs with flaxseed or applesauce.

Serving and Presentation Guide

To present your Heavenly Strawberry Cream Cheese Crumble Cookies elegantly, use a simple white platter that allows the vibrant colors of the cookies to shine. Consider dusting them lightly with powdered sugar before serving or presenting them on a decorative cake stand for added height.

Garnishing with fresh mint leaves not only enhances the visual appeal but also adds a refreshing element. Serve with a side of fresh strawberries or a dollop of whipped cream for an extra indulgent treat. Pay attention to portion sizes for an upscale feel; small servings allow guests to savor each sweet bite without overwhelming them.

Wine and Beverage Pairing

For an elegant touch, pair these cookies with a light sparkling wine, such as Prosecco or Champagne. The effervescence balances the sweetness of the cookies, while the fruity notes complement the strawberry flavor. Alternatively, a sweet rosé wine also pairs beautifully, enhancing the berry notes.

For non-alcoholic options, consider serving with a refreshing iced tea or lemonade, both of which cleanse the palate between bites. Hot beverages like coffee or chai tea can also create a cozy pairing, especially during cooler months.

Storage and Shelf Life

To maintain the freshness and softness of your cookies, store them in an airtight container at room temperature for up to a week. If you’d like to extend their shelf life, consider freezing them. Place the cooled cookies in a freezer-safe bag or container, ensuring they are separated to prevent sticking, and they can last for up to three months.

If you notice a slight stiffness in the cookies after storage, a quick 10-second blast in the microwave will revive their softness. Always check for signs of spoilage, such as off odors or significant texture changes, before consuming.

Make Ahead Strategies

To streamline your baking process, you can make the dough ahead of time and keep it refrigerated for up to 48 hours. This allows flavors to deepen and also speeds up baking day prep. Another option is to freeze the dough in pre-portioned mounds; simply let them thaw in the fridge overnight before baking.

For events, consider preparing a double batch and gifting them to friends or storing them for future indulgence. You can also mix and bake only half, keeping the remaining dough for later, making hosting stress-free.

Scaling Instructions

If you’re looking to halve the recipe, reduce all ingredient amounts by 50%, and you’ll have enough dough for about a dozen cookies. For larger gatherings, doubling or tripling the recipe is straightforward; just make sure your mixing bowl and baking sheets are large enough to accommodate larger batches.

Adjust baking times as necessary; larger cookies may require a few extra minutes in the oven, while smaller cookies may bake faster. Keep an eye on them and use visual cues for doneness.

Nutritional Deep Dive

Each Heavenly Strawberry Cream Cheese Crumble Cookie provides a delightful blend of macronutrients, including carbohydrates, protein, and fat. With the strawberries, you gain notable micronutrients like vitamin C and fiber, enhancing the cookies’ nutritional value.

Each serving can align with a balanced diet when enjoyed in moderation. Consider the sugar content and adjust as needed if you’re mindful of caloric intake. Offering a smaller portion size can aid in satisfying your sweet tooth while keeping your overall diet in check.

Dietary Adaptations

For gluten-sensitive individuals, using a certified gluten-free flour blend ensures that everyone can enjoy these cookies without concern. Additionally, those who are dairy-free can substitute standard cream cheese with a plant-based alternative to achieve similar results.

Vegans can easily adapt this recipe by using plant-based butter and cream cheese, and replacing eggs with flaxseed meal or applesauce for binding. It’s a great way to make beloved recipes inclusive while maintaining taste and texture.

Troubleshooting Guide

If your cookies turn out too dry, it may be a sign of overbaking or using too much flour. Consider measuring flour with precision and always watch the timer closely. On the other hand, if they spread too much, the dough may need chilling longer before baking.

Don’t hesitate to adjust flavors based on personal preference; if cookies taste too sweet, reducing added sugars on subsequent attempts will balance outcomes better. If texture issues arise, checking for precise mixing can help avoid dense cookies.

Recipe Success Stories

Many bakers have shared their success stories with these Heavenly Strawberry Cream Cheese Crumble Cookies. One community baker noted how they adapted the recipe for a birthday party and received rave reviews from guests. Customization options, such as experimenting with nuts or different fruit fillings, opened the door for unique variations!

Visual appeal has also been a highlight, with readers sharing stunning photos of their cookies decorated with mint leaves or delicate powdered sugar. A few bakers even created a mini dessert bar with various toppings, taking these cookies to the next level.

Frequently Asked Questions

Can I use frozen strawberries? Yes, frozen strawberries work, but for best results, thaw and drain excess liquid to avoid soggy cookies.

How should I store the cookies? Keep cookies in an airtight container at room temperature for 5-7 days. Refrigeration can lead to dryness.

Can I make the dough ahead of time? Absolutely! The dough can be refrigerated for up to 48 hours or frozen for up to three months.

What other fruits can I use in this recipe? You can use a variety of fruits like blueberries, raspberries, or even peaches for delightful alternatives.

How do I prevent overbaking? Keep a close eye on the cookies as they approach the suggested bake time; they should be lightly golden at the edges, but soft in the middle.

Can I reduce the sugar in the recipe? Yes, feel free to adjust the sugar to your taste; using natural sweeteners can also be effective.

Is there a vegan alternative? Yes, use plant-based cream cheese and butter along with a flaxseed replacement for eggs.

What can I serve these cookies with? These cookies pair wonderfully with tea, coffee, or a glass of milk for a comforting treat.

Can I add nuts to the cookie dough? Certainly! Chopped nuts like pecans or walnuts can add delicious crunch and flavor.

Do I need to chill the dough? Chilling the dough helps improve texture and flavor; it’s recommended for the best results.

Additional Resources

For those excited to explore more, check out related recipes for berry desserts or classic cookies that can offer similar enjoyment. Technique guides on creaming butter or measuring dry ingredients can further develop your baking skills.

Ingredient information such as the health benefits of strawberries or various substitutes for cream cheese will enrich your understanding and ability to adapt recipes. Recommendations on equipment will help ensure you have the right tools for creating perfect cookies every time!

Join the Conversation

We’d love to hear your feedback on this Heavenly Strawberry Cream Cheese Crumble Cookies recipe! Join the discussion by sharing your photos and experiences on social media. Tips, variations, and community reviews will inspire newcomers and seasoned bakers alike.

Engaging with fellow baking enthusiasts fosters creativity and opens the discussion for adaptations and personal flair. Your input may also help others looking to refine their recipes or discover new dessert ideas!

The Recipe

Heavenly Strawberry Cream Cheese Crumble Cookies

Serves: 24 cookies

Prep Time

Deliciously Simple Easy Apple Turnovers Recipe to Try Today

Easy Apple Turnovers: Quick and Delicious Dessert Recipe

⚖️
Difficulty
Easy

⏲️
Prep Time
15 mins

🕒
Cook Time
20 mins

⏱️
Total Time
35 mins

🍽️
Servings
8 turnovers

Are you looking for a delightful dessert that’s both easy and quick to prepare? Look no further than these Easy Apple Turnovers! Bursting with sweet, gooey apple filling and wrapped in a flaky pastry, these turnovers are perfect for a family gathering or a cozy evening treat. The aroma of baked apples, sugar, and cinnamon will fill your kitchen, creating an inviting atmosphere that will have everyone eagerly awaiting the first bite. Whether you’re an experienced baker or just starting out, this recipe offers a simple method to create a deliciously satisfying dessert.

These Easy Apple Turnovers are not just about taste; they also offer a wonderful texture combination. The crispy, golden-brown exterior gives way to a soft, sweet apple filling, ensuring every bite is a harmonious blend of flavors and textures. Serve them warm with a scoop of vanilla ice cream, and they transform from a comforting dessert into a show-stopping dish that delights guests of all ages!

Quick Recipe Highlights

  • Flavor Profile: The turnovers feature a delightful combination of tart and sweet flavors, thanks to the apples and cinnamon that meld beautifully during baking.
  • Texture: Enjoy a perfect contrast between the flaky pastry and the soft, tender filling, creating a satisfying mouthfeel.
  • Aroma: The scent of warm cinnamon and baked apples is irresistible, evoking feelings of home and comfort.
  • Visual Appeal: These turnovers are golden-brown, with a glossy finish that makes them look as good as they taste.
  • Skill Level Needed: This recipe is beginner-friendly, requiring only basic baking skills and a few simple ingredients.
  • Special Equipment: A rolling pin and baking sheet are all that’s needed to create these delightful turnovers.

Recipe Overview

  • Difficulty Level: This easy recipe is perfect even for novice bakers, featuring straightforward steps that lead to impressive results.
  • Category: These turnovers make a fantastic dessert or snack at any time of day, ideal for brunch or tea time.
  • Cuisine: While they have a classic American touch, apple turnovers are also influenced by various European pastry traditions.
  • Cost: With ingredients typically under $10, this recipe is budget-friendly and accessible to everyone.
  • Season: Perfect for autumn, when apples are in full harvest, but delightful year-round!
  • Occasion: Great for casual family dinners, festive holidays, or even as a sweet addition to a bake sale.

Why You’ll Love This Recipe

These Easy Apple Turnovers are a treat for the taste buds, delivering an ideal balance of sweetness and spice. The combination of seasonal apples with warm cinnamon creates a nostalgic flavor reminiscent of homemade pies, inviting both comfort and joy. The flaky pastry adds a delightful crunch, while the gooey filling offers a warm, inviting texture that makes these turnovers irresistible.

Convenience is another reason to love this recipe. With simple ingredients and a quick preparation time, you can whip up a batch of turnovers in no time. This makes them perfect for unexpected guests or a spontaneous dessert craving. Plus, they can be made ahead of time and simply popped into the oven when you’re ready to serve.

Nutritional benefits come from the apples, which are a great source of dietary fiber and essential vitamins. They help promote digestive health while providing the sweetness that makes these turnovers a guilt-free treat.

Social and entertaining value is high with this recipe. Serving these delicious turnovers can impress your friends and family, creating a sense of warmth and hospitality that everyone will appreciate. They make for a great conversation starter as everyone shares their love for apple desserts.

Finally, this recipe is cost-effective. The ingredients are humble yet satisfyingly delicious, ensuring that you can indulge in this sweet treat without breaking the bank. With just a few pantry staples, you can create something extraordinary that everyone will enjoy.

Historical Background and Cultural Significance

Apple turnovers have a rich history that traces back to various cultures that have embraced the combination of pastry and fruit. Traditionally, desserts highlighting the apple have been a staple in many households, especially in the fall when fresh apples are plentiful. The concept of wrapping baked goods around sweet fillings likely originated in Europe, with pastries making their way into various cuisines over the centuries.

In the American context, the apple turnover became popular in the 19th century, paralleling the rise of the apple industry in the United States. Spanning across numerous regions, they became a beloved dessert choice, showcasing local apple varietals in different seasonal pies and pastries. They evolved to represent not just flavor but also a connection to nature and the harvest.

The recipe for apple turnovers has evolved through various iterations, inspiring countless adaptations and variations. From different filling options to unique spices and toppings, there’s an applied creativity that allows families to make them their own. This evolution reflects the changing tastes of society and the influence of global cuisines.

Regional variations have emerged, with some areas opting for additional spices or different types of fruit. This adaptability is part of what makes the apple turnover a timeless and cherished dessert across the globe, uniting different cultures through a shared love for apples and pastries.

Ingredient Deep Dive

  • Apples: Apples are central to the flavor profile of this recipe. With a history dating back to ancient civilizations, they hold significant cultural importance as symbols of knowledge and temptation. Nutritionally, apples offer dietary fiber, vitamin C, and a variety of antioxidants. When selecting apples for turnovers, opt for firm varieties like Granny Smith, Honeycrisp, or Braeburn for a perfect balance of tartness and sweetness. Store apples in a cool, dark place to prolong their freshness. If you’re out of apples, consider substitutions such as pears or berries for different, yet tasty, fillings.
  • Puff Pastry: Puff pastry is the star ingredient, essential for achieving that flaky, golden texture. The origins of puff pastry trace back to ancient Egypt and have been refined over centuries, featuring layers of dough alternated with butter. This technique creates a light, flaky result that’s sought after in many pastries. Nutritionally, it does contain fats, hence moderation is key. When buying, seek high-quality, all-butter puff pastry for the best results. If allergies prevent consumption, consider alternatives like gluten-free pastry or even homemade pie dough for a denser option.

Common Mistakes to Avoid

  • Not chilling the dough: Ensure that puff pastry is properly chilled before rolling out, as this will help maintain its flakiness.
  • Overfilling the turnovers: Too much filling can cause leakage during baking. Stick to the recommended quantity for optimal results.
  • Skipping the egg wash: An egg wash creates a beautiful golden finish on your pastries. Don’t skip this simple but essential step!
  • Not preheating the oven: A properly preheated oven is crucial for baking crispy and evenly baked turnovers.
  • Using the wrong apple type: Certain apples are better for baking than others. Choose firmer, tart varieties that hold their shape during baking.
  • Ignoring sealing techniques: Properly sealing the edges of the turnovers is vital to prevent them from bursting during baking.
  • Lack of ventilation: Make sure to cut small slits in the top before baking to allow steam to escape, maintaining the crispiness of the pastry.
  • Baking at the wrong temperature: Make sure to follow the recommended temperature for the best texture and color.
  • Not allowing them to cool: Letting the turnovers cool on a wire rack helps maintain their crisp texture instead of allowing moisture to build up.
  • Serving too warm: The filling will be very hot right out of the oven. Allow them to cool slightly before serving to prevent burns.

Essential Techniques

Chilling the Dough: Chilling puff pastry is vital for creating a flaky texture. When the dough is cold, the fat remains solid and creates the steam that lifts the layers during baking. To master this technique, allow at least 30 minutes of chilling after rolling out the pastry. A common pitfall is to skip this step; the result will be a dense turnover instead of a light and airy one. Aim to see a slight puff when they come out of the oven as a visual cue of success.

Sealing the Turnovers: Properly sealing your turnovers prevents filling from leaking during baking. To master this, press the edges tightly and crimp with a fork for a decorative look. A common mistake is using too much filling, which can compromise the seal. For visual cues, ensure edges are fully closed and no filling is visible before baking.

Pro Tips for Perfect Easy Apple Turnovers

  • Choose the right apple variety for optimal sweetness and texture—Granny Smith is a top choice for its tartness that balances the sweetness.
  • Allow the filled turnovers to rest for a few minutes before baking; this helps to enhance the flavor melds.
  • Experiment with spices like nutmeg or cardamom for a unique flavor twist on traditional apple turnovers.
  • When using frozen puff pastry, thaw them overnight in the refrigerator for the best results.
  • Brush the turnovers with a milk wash before baking for a glossy, attractive finish.
  • Consider sprinkling sugar on top before baking for an extra sweet crunch.
  • If you want added crunch, mix in some chopped nuts or even granola with the apple filling.
  • For a flavorful twist, add a tablespoon of lemon juice to the apple filling to brighten the flavor.

Variations and Adaptations

While the classic Easy Apple Turnovers are always a favorite, there are plenty of delicious variations to explore. For a regional twist, consider incorporating spices like ginger or allspice for a different depth of flavor. Additionally, during holidays, using cranberries or dried fruit as a filling can create a festive touch that changes the flavor profile while celebrating seasonal ingredients.

Make seasonal adaptations by replacing apples with seasonal fruits such as pears in the spring or peaches in the summer. These fruits retain their flavor and texture beautifully, providing a delightful alternative to the traditional recipe.

Dietary modifications are also easily attainable: use gluten-free puff pastry or create a vegan version by replacing butter with coconut oil and milk with a plant-based milk. These alterations ensure that everyone can enjoy these sweet pastries without any dietary restrictions.

Exploring flavor variations is an exciting and creative way to enjoy this recipe. Try adding chocolate chips or caramel to the apple filling for a rich twist, or infuse the apple mixture with bourbon or rum for an adult-oriented dessert. The possibilities are endless!

When it comes to texture modifications, try drizzling a sweet glaze over the baked turnovers for an appealing finish. Alternatively, bake them with a streusel topping made from oats, flour, and butter for an extra crunch.

Finally, consider presentation alternatives: cutting the turnovers into fun shapes or serving them with a drizzle of warm caramel sauce can elevate their appearance and make them truly special for any occasion.

Serving and Presentation Guide

For an eye-catching presentation, plate your Easy Apple Turnovers while they are still warm. A simple white plate will allow the golden-brown color of the pastry to stand out beautifully. For extra flair, dust the turnovers with powdered sugar or drizzle a vanilla glaze over the top for added sweetness and visual appeal.

Garnish the plate with fresh apple slices or sprigs of mint to enhance the visual presentation and add a fresh element. Serve them alongside a scoop of vanilla ice cream or a dollop of whipped cream for a decadent touch. The contrast of warm turnovers and cold ice cream creates a delightful sensory experience.

Temperature considerations are important; serve these pastries warm to enjoy the gooiness of the apple filling while maximizing flavor. To maintain their crispiness, avoid covering the turnovers after baking.

For portion control tips, consider serving each turnover whole or cutting them in half for smaller portions. This allows guests to enjoy sweet bites without overindulging. You can also offer a variety of dips, like caramel sauce or dulce de leche, for an interactive dessert experience!

Wine and Beverage Pairing

When it comes to wine pairings, a chilled Riesling or a light Pinot Grigio complements the sweetness of the apple turnovers beautifully. The fruity notes of these wines enhance the flavor while refreshing the palate. For a richer experience, consider serving a late harvest Sauvignon Blanc or an aromatic Moscato.

If you’re looking for non-alcoholic alternatives, a spiced apple cider or sparkling apple juice will enhance the apple experience while being family-friendly. The warmth and spice of such beverages perfectly match the flavors of the turnovers.

If coffee or tea is more appealing, consider pairing these pastries with a medium roast coffee or a chai latte. The spices in chai will harmonize with the cinnamon in the turnovers, creating a delightful pairing.

For temperature considerations, ensure that beverages are served at the appropriate temperature, as a warm drink alongside a freshly baked turnover can highlight its comforting nature and bring warmth to your gathering.

Storage and Shelf Life

To store your Easy Apple Turnovers, keep them in an airtight container at room temperature for 1-2 days. If you want to extend their shelf life, consider refrigerating them for up to a week. Make sure they are fully cooled before storing to prevent condensation and sogginess.

For longer storage, freezing is an excellent option. Place the turnovers in a single layer on a baking sheet until frozen solid, then transfer them to a freezer bag or airtight container. They can be stored this way for up to 2 months.

When it comes to reheating, rewarm frozen turnovers in an oven preheated to 350°F (175°C) for about 15-20 minutes, or until heated through. If you have refrigerated turnovers, they only need about 8-10 minutes in the oven to regain their crispness.

Always check for signs of spoilage; if they develop an off smell or mold, it’s best to discard them. Proper storage will help maintain their quality and ensure you can enjoy these treats later!

Make Ahead Strategies

If you want to prepare your Easy Apple Turnovers ahead of time, make the filling and pastry in advance and store them separately. The apple filling can be made up to 4 days ahead—simply refrigerate it in an airtight container. The puff pastry can also be rolled out and cut into squares for easy assembly when you’re ready to bake.

When assembling, you can prepare the Turnovers up to the point of baking, cover them with plastic wrap, and keep them in the refrigerator for up to 24 hours. This convenience means you can simply pop them in the oven when you’re ready to serve, eliminating the stress of last-minute preparations.

Quality can be affected by how long you store the filling, so always check for freshness in terms of flavor and texture before using. If freezing turnovers, remember to assemble and freeze them before baking for the best results. This allows you to enjoy freshly baked pastries whenever you crave them!

Another tip is to prepare the turnovers but allow them to cool completely before they are stored in the freezer to prevent sogginess when reheating. Adding fresh elements like a scoop of ice cream or a dusting of cinnamon sugar after reheating will enhance their flavor when it’s time to serve!

Scaling Instructions

Scaling this Easy Apple Turnovers recipe is straightforward. If you want to halve the recipe, simply divide all the ingredients by two, which is perfect for smaller gatherings or personal servings. This recipe is quite forgiving, so halving it won’t affect the texture or flavor significantly.

Doubling or tripling the recipe is equally easy, especially when you have apple lovers in the house! Just make sure to have sufficient oven space to bake them in batches if necessary. Adjusting the baking time may be required, so keep an eye on them to ensure they don’t overbake.

For equipment adjustments, use larger baking sheets or multiple sheets to accommodate the increased quantity. Timing modifications may also be necessary if you need to rotate the pans in the oven for even baking.

Storage considerations remain crucial regardless of how much you make; be sure to label and date your containers if making more than one batch, as freshness can vary depending on quantity and storage methods.

Nutritional Deep Dive

Each Easy Apple Turnover provides a delightful mix of macros, with moderate amounts of carbohydrates from the puff pastry and sugars from the apples. Depending on your filling choices, the turnovers can also deliver fiber, especially when whole apples are used, enhancing digestive health.

Micronutrient analysis shows that apple turnovers offer essential vitamins such as vitamin C, particularly when fresh apples are used. Some varieties may contain antioxidants, while the dietary fiber helps in blood sugar regulation and contributes to heart health.

This treat does come with its health considerations, particularly from the pastry aspect, which can be higher in fats and sugars. Enjoy them in moderation, especially for those concerned with caloric intake, but rest assured that occasionally indulging is perfectly fine!

When considering portion analysis, one turnover may range from 200-300 calories depending on size and specific ingredients used; mindful eating is encouraged to help manage overall intake effectively. Pairing them with fruits or lighter options can make it a balanced treat.

Dietary Adaptations

For gluten-free adaptations, use gluten-free puff pastry options available in many grocery stores, ensuring everyone can enjoy these delightful treats regardless of dietary restrictions.

Dairy-free adaptations can be achieved by replacing butter in the pastry with a dairy-free alternative like coconut oil or margarine and selecting a plant-based milk for egg washes.

For a vegan version, ensure the pastry is egg-free, and consider replacing apple filling with seasonal fruits or vegan alternatives like nuts and berries.

Low-carb or keto dieters can make turnovers with almond flour or coconut flour-based pastry recipes, reducing carbs significantly while still enjoying a satisfying dessert.

Paleo diets can also enjoy this recipe, substituting traditional ingredients with more natural, whole food options like almond flour for the pastry and lesser sweetener varieties.

For low-FODMAP diets, limit the use of apples and consider creating turnovers with permitted fruits like strawberries or oranges, ensuring a suitable substitute.


Troubleshooting Guide

If your turnovers come out soggy, it could be due to excessive filling or insufficient baking time. Ensure you’re not overstuffing and that they are thoroughly baked until golden brown. A common issue is undercooked apples; precook the filling slightly to ensure they soften adequately.

If your turnovers are burnt on the outside but uncooked inside, your oven temperature might be set too high. Lower the temperature slightly and give them extra baking time to ensure a properly cooked center.

For flavor balance issues, if your turnovers taste flat, consider adding a pinch of salt or a squeeze of lemon juice to brighten the flavors of the filling.

Equipment challenges such as difficulty rolling out the dough can stem from it being too warm or overworked. Ensure it’s chilled adequately and handle it minimally while forming your shapes for best results.

If you find dough cracks while cutting, it may be too cold. Let it sit at room temperature for a few minutes to soften slightly before using it.

Timing concerns can arise if your turnovers don’t puff up during baking; this could indicate your pastry was too warm or the oven wasn’t properly preheated. Always check puff pastry packaging for specific baking instructions.

Recipe Success Stories

Our community has enthusiastically shared numerous success stories about the Easy Apple Turnovers. Many have reported receiving rave reviews from family and friends, making them the highlight of gatherings! One reader noted that substituting different fruits led to an unexpected yet delicious outcome, showcasing the versatility of the recipe.

Another passionate home baker shared their triumph in adapting the recipe for a gluten-free audience, using almond flour for the pastry—everyone loved them! Photography tips by our followers reveal beautifully styled turnovers accompanied by vibrant dips and garnishes that entice anyone who views their culinary creations.

These turnovers also found a spot in many school bake sales, where families raised money and shared the joy of baking with the local community. The achievable nature of this recipe has empowered many novice bakers to explore their talents, resulting in numerous adaptations and variations that truly celebrate culinary creativity!

Frequently Asked Questions

Can I use frozen apples for the filling?
Yes, frozen apples can be used, but be sure to thaw them completely and drain excess moisture before adding them to your filling to avoid sogginess.

How do I know when my turnovers are done baking?
Look for a golden-brown color and toasty aroma. Use an instant-read thermometer; it should read around 200°F (93°C) inside the turnover.

Can I make these turnovers with different fruits?
Absolutely! You can use pears, plums, or berries – just adjust the sugar content based on the sweetness of the fruit.

What can I serve these turnovers with?
They pair beautifully with vanilla ice cream, whipped cream, or a drizzle of caramel sauce, enhancing their indulgent nature.

Can I freeze the turnovers before baking?
Yes! Assemble the turnovers, freeze them, and bake from frozen as instructed, adding a few extra minutes to the baking time.

Do I need to pre-bake the filling?
Not typically, but if you’re using very moist fruit, a brief sauté can help avoid a soggy pastry.

Can I add nuts to the filling?
Definitely! Chopped walnuts or pecans add a delightful crunch to the filling.

What is the best way to reheat turnover leftovers?
Reheat in a preheated oven at 350°F (175°C) for about 10 minutes to retain crispiness.

How long can I store these turnovers?
They can be stored at room temperature for 1-2 days or refrigerated for up to a week. Freezing extends their shelf life to 2 months.

What type of puff pastry is best?
Look for pre-rolled, all-butter puff pastry for the best flavor and texture.

Additional Resources

Explore related recipes such as homemade apple pie or cinnamon rolls that utilize similar flavor profiles. For technical assistance, our technique guides on making puff pastry and pie crusts provide helpful tips for success. Enjoy a seasonal apple cider alongside your turnovers, enhancing the overall apple experience. Look for equipment recommendations to simplify the pastry-making process, from good-quality pastry brushes to rolling pins that make the task a breeze. Various seasonal variations can also be explored, allowing you to keep the apple turnovers exciting throughout the year.

Join the Conversation

We’d love to see your creations! Share your culinary successes on social media, mentioning our blog, and use our unique hashtag #EasyAppleTurnoverChallenge. Share photos of your turnovers, describe your variations or adaptations, and let us know what you loved most about them. Your feedback not only helps others but enhances our community’s engagement. Try different garnishing ideas, and be innovative with plating to inspire fellow bakers! Let’s celebrate the joy of baking together!

The Recipe

Easy Apple Turnovers

Serves: 8 turnovers

Prep Time: 15 mins

Cook Time: 20 mins

Total Time: 35 mins

Kitchen Equipment Needed

  • Rolling pin
  • Baking sheet
  • Parchment paper
  • Mixing bowls
  • Sharp knife
  • Brush for egg wash

Ingredients

  • 2 large apples, peeled and diced
  • 1/4 cup granulated sugar
  • 1 tsp cinnamon
  • 1 tbsp lemon juice
  • 1 sheet puff pastry (thawed if frozen)
  • 1 egg (beaten for egg wash)
  • Powdered sugar, for dusting (optional)

Directions

  1. Preheat your oven to 400°F (200°C) and line a baking sheet with parchment paper.
  2. In a bowl, combine diced apples, granulated sugar, cinnamon, and lemon juice. Set aside.
  3. Roll out the puff pastry on a lightly floured surface and cut it into 4 squares.
  4. Add a heaping tablespoon of the apple filling to the center of each square.
  5. Fold the pastry over to create a triangle and seal the edges by pressing with a fork.
  6. Brush the tops of the turnovers with the beaten egg for a golden finish.
  7. Cut small slits in the top of each turnover to allow steam to escape.
  8. Bake for 20 minutes or until golden brown and puffed up.
  9. Allow to cool slightly before dusting with powdered sugar and serving warm.

Recipe Notes

  • Feel free to adjust the sugar based on the sweetness of your apples.
  • Try adding nuts or dried fruit to the filling for additional flavor.
  • These turnovers are best enjoyed fresh but can be kept in an airtight container for a couple of days.
  • For a gluten-free option, look for gluten-free puff pastry alternatives.

Delicious Sweet and Savory Brie-Stuffed Dates Recipe to Try

Sweet and Savory Brie-Stuffed Dates: A Perfect Flavor Combination

⚖️
Difficulty
Easy

⏲️
Prep Time
10 mins

🕒
Cook Time
15 mins

⏱️
Total Time
25 mins

🍽️
Servings
12 servings

Sweet and Savory Brie-Stuffed Dates combine the richness of creamy Brie cheese with the natural sweetness of dates, creating a delightful bite-sized appetizer for any gathering. The contrast between the savory brie and the sweet dates captures the essence of this dish, making it perfect for parties, holidays, or as an impressive starter for a dinner party. When you pop one of these decadent morsels into your mouth, the smooth, melted brie mingles with the chewy texture of the date, providing a heavenly blend of flavors and sensations.

Adding a sprinkle of chopped nuts enhances both the taste and the texture, offering a delightful crunch that complements the soft creamy cheese beautifully. With just a handful of ingredients, this quick and straightforward recipe is sure to impress your friends and family, proving that elegance can come with ease in the kitchen. Let’s dive into the details of how to create this delicious appetizer that will have everyone asking for seconds.

Quick Recipe Highlights

  • Flavor Profile: The sweet, caramel-like flavor of dates perfectly balances the rich, creamy brie, while the optional drizzle of honey adds a touch of extra sweetness.
  • Texture: Each bite offers a delightful contrast, with the smooth creaminess of the melted brie meeting the chewy texture of the dates and the occasional crunch from nuts.
  • Aroma: As these dates bake, they fill the kitchen with a warm, inviting aroma, blending notes of sweet caramel and nutty cheese.
  • Visual Appeal: Baked to a golden perfection, these dates are visually stunning, especially when garnished with fresh herbs or nuts for a pop of color.
  • Skill Level Needed: This dish requires minimal skills, making it ideal for both novice cooks and seasoned chefs looking for a quick and impressive appetizer.
  • Special Equipment: You will need a baking sheet and parchment paper for easy cleanup, plus a small knife for stuffing the dates.

Recipe Overview

  • Difficulty Level: This recipe is categorized as easy, making it accessible for beginners. With straightforward steps and little time commitment needed, anyone can whip up this delicious treat.
  • Category: Perfect as an appetizer, this dish suits various meal categories, including casual get-togethers, festive occasions, or even as a finger food for a cocktail party.
  • Cuisine: Drawing inspiration from Mediterranean and Middle Eastern cuisines, this appetizer showcases the luxurious flavors of brie cheese and dates, combining influences to create something beautifully unique.
  • Cost: The ingredients are relatively affordable, typically requiring only fresh dates, brie, and optional nuts or honey, making it a cost-effective choice for entertaining.
  • Season: Brie-Stuffed Dates are particularly delightful during the fall and winter months. They are perfect for holiday festivities, family gatherings, or cozy evenings at home.
  • Occasion: These tasty bites are suitable for various occasions, from holiday parties and potlucks to elegant dinner parties, presenting an effortlessly sophisticated option.

Why You’ll Love This Recipe

Exploring the taste and texture that the Sweet and Savory Brie-Stuffed Dates offers is a journey of indulgence. The rich creaminess of brie, when melted, combines harmoniously with the natural sweetness of the dates to create a balanced flavor experience. The addition of nuts enhances the overall crunch factor, making each bite an exciting blend of soft and crunchy textures that keeps your palate engaged.

One of the best things about this recipe is its convenience. With minimal prep time required, you can prepare these delectable bites in under half an hour. They can be made ahead of time, allowing you to enjoy your gathering without spending all your time in the kitchen. Just prepare them and pop them in the oven on your guests’ arrival.

Nutritionally, while these stuffed dates are a treat, they also come with the benefits of natural ingredients. Dates provide fiber and potassium, while brie adds calcium and protein to the mix. This means you can enjoy a delicious snack that offers some nutritional value, making it slightly guilt-free.

Socially, serving these appetizers at gatherings is a sure way to impress your guests. Whether at a casual gathering or a formal dinner, they are sure to be a conversation starter, allowing you to showcase both your culinary skills and creativity. Having these bites on hand also encourages people to mingle and create a more relaxed environment.

Finally, the cost-effectiveness of this recipe is a significant plus. With just a few simple and readily available ingredients, you can whip up a sophisticated dish without breaking the bank. This makes Sweet and Savory Brie-Stuffed Dates not only a delicious addition to your spread but also an economical choice for any occasion.

Historical Background and Cultural Significance

The use of dates in cooking dates back thousands of years, primarily in Middle Eastern cultures where they were cherished not only for their sweet flavor but also for their durability and nutritional value. Dates were considered a staple food and were often used in both sweet and savory dishes, showcasing their versatility. The addition of cheese, particularly types like brie or goat cheese, reflects the Mediterranean influences that have evolved over time, emphasizing the balance between sweet and savory flavors.

Culturally, the blending of sweet and savory has a revered place in many culinary traditions, with dishes crafted to highlight the complexity of taste. This combination encourages appreciation for diverse flavor profiles and celebrates the art of pairing complementary ingredients. By adapting these traditional elements, Sweet and Savory Brie-Stuffed Dates take on a modern twist while honoring their heritage.

As culinary practices evolved, the appreciation for gourmet ingredients like brie also grew. Once reserved for special occasions, this creamy cheese has become more accessible, allowing everyday cooks to integrate it into simple recipes. The transformation of this dish over time reflects broader culinary trends towards simple yet elegant cuisine that focuses on quality ingredients and flavor.

Regional variations of port-infused or nut-studded dates can be found across different cultures, each adding its unique twist. This showcases the adaptability of dates and cheese in various global cuisines, leading to the creation of dishes that cater to local tastes while maintaining the essence of the original components.

Ingredient Deep Dive

Brie cheese, a soft French cheese, has a rich history tied to the region of Brie, where it was first crafted. This cheese is known for its creamy texture and delicate flavors, making it an excellent candidate for pairing with sweet ingredients like dates. Nutritionally, brie is a good source of protein and calcium, though it should be consumed in moderation due to its richness. When selecting brie, look for a cheese that is soft and creamy, with a rind that is white and edible. To store brie, keep it wrapped in parchment or wax paper in the refrigerator, allowing it to breathe while retaining flavor.

Dates, often referred to as “nature’s candy,” are indeed a powerhouse of nutrition. Full of natural sugars, fiber, and several essential vitamins and minerals, they provide energy and a quick boost. When choosing dates, opt for varieties that are plump and moist, avoiding any that appear dry or too hard. Storing dates is straightforward; keep them in an airtight container in a cool, dark place. For substitutions, other dried fruits like figs or apricots can work, though the flavor profile will shift slightly.

Common Mistakes to Avoid

  • Using stale dates: Always select fresh, moist dates to ensure the best texture and flavor. Stale dates may not provide the desired sweetness and can detract from the dish.
  • Overstuffing dates: While it may be tempting to fill them to the brim, too much filling can cause the dates to burst during baking. Stick to a moderate amount of brie for the right balance.
  • Skipping the nut topping: Nuts add essential texture to the dish. They not only enhance flavor but also bring a crunch that is a critical part of the overall experience.
  • Not allowing cheese to soften: Be sure to let the brie come to room temperature before stuffing, as it will be easier to work with and will melt better during baking.
  • Not preheating the oven: Always preheat your oven to ensure even cooking. This helps to achieve the perfect melt and warm texture for the cheese.
  • Using the wrong baking ware: A parchment-lined baking sheet helps prevent sticking and makes cleanup easier. Avoid using ungreased metal pans that might increase the risk of sticking.
  • Rushing the cooling process: Allow the dates to cool a bit after baking before serving, as the cheese inside can be extremely hot and may burn the tongue.
  • Omitting the garnish: Fresh herbs or a light drizzle of honey can elevate the dish visually and flavor-wise, making it more appealing on the table.
  • Inconsistent cutting of dates: For uniform cooking, ensure all dates are similarly cut and sized when preparing them for stuffing and baking.
  • Not experimenting with flavor: Don’t be afraid to try different nuts or spices; the base of this recipe is versatile and can accommodate various ingredients for diverse tastes.

Essential Techniques

To create perfect Sweet and Savory Brie-Stuffed Dates, first consider the technique of preparing your dates effectively. Start by slicing them open lengthwise without cutting them in half. This should create a pocket for stuffing while maintaining the integrity of the date. When making these cuts, be mindful to do it gently, as you do not want the date to break apart completely.

Next, mastering the melting technique while baking is crucial. Brie should be melted but not overcooked. To achieve this, monitor the oven closely; the cheese should be bubbly and warm but still maintain its soft, creamy texture. If you notice the cheese browning too much, it may indicate that the baking time needs adjusting.

Pro Tips for Perfect Sweet and Savory Brie-Stuffed Dates

Choosing the right kind of brie is essential. Look for softer varieties that melt easily; if you can find truffle brie or other flavored types, they can add an interesting twist to the flavor profile.

Consider adding spices to the brie before stuffing the dates. A hint of cracked black pepper or fresh herbs like thyme or rosemary can enhance the savory aspect even more, balancing the sweetness of the dates.

Experiment with different types of nuts for added crunch. Walnuts, pecans, or even pistachios can bring a unique flavor and texture to the dish, adapting it to your personal taste preferences.

For an extra layer of flavor, drizzle the stuffed dates with honey or balsamic glaze before serving, enhancing both appearance and taste while providing a sophisticated touch.

If you’re serving these at a gathering, prepare them in advance and bake them just before guests arrive. This keeps the appetizers warm and ensures they are served fresh without overcooking.

Lastly, consider creating a beautiful platter with these stuffed dates alongside a selection of cheeses, fresh fruits, and crackers to offer your guests an impressive spread, showcasing your culinary creativity.

Variations and Adaptations

Regional variations are rich with opportunities for creative adaptations. For example, in Mediterranean cuisine, consider adding olives or sun-dried tomatoes to the brie mixture for a savory twist. Alternatively, cook the dates wrapped in prosciutto to integrate a saltier, umami flavor, combining sweetness and salt in a delicious contrast.

Seasonal adaptations can also keep the dish fresh. In the fall, consider mixing in pumpkin spice with the brie to give the dates a cozy autumn flavor. In contrast, summer months might call for fresh herbs or zest from citrus fruits to heighten the bright flavors.

If dietary restrictions are a concern, making a dairy-free version is feasible with cashew cheese, which can be made to mimic the creaminess of brie. Additionally, for those low on carbs, replacing the dates with a stuffed bell pepper might work as a suitable alternative.

Flavors can also be varied by experimenting with infused oils or flavored cheeses, which can add another layer of taste to the dish, appealing to diverse palates.

Finally, presentation alternatives could involve skewering the stuffed dates on toothpicks for easy serving, creating a fun finger food option at parties, which also adds to the visual appeal of the dish.

Serving and Presentation Guide

To serve your Sweet and Savory Brie-Stuffed Dates elegantly, consider arranging them in a circular pattern on a beautiful platter, garnished with fresh herbs for color contrast. Using little picket sticks can make serving easier, allowing guests to enjoy them without making a mess.

Garnishing ideas can include a drizzle of honey or a sprinkle of crushed nuts on top, which provides texture and enhances flavor, making the dates look as good as they taste. Adding a few slices of fresh apple or pear will also introduce a refreshing element and enhance the overall presentation.

Traditional accompaniments are often complements like toasted baguette slices, olives, or a small selection of cured meats, which balance the sweetness of the dates beautifully. Consider including a small bowl of balsamic reduction for an extra zing that pairs well with the rich cheese.

When serving, keep in mind that the stuffed dates are best enjoyed warm; if there’s a mix of hot and cold items on your platter, position them in a way that encourages guests to reach for the warmest bites first.

For portion control, consider serving the stuffed dates alongside smaller bites or dips to allow guests to nibble at their leisure while encouraging them to mix and match flavors at the table.

Wine and Beverage Pairing

Pairing the right beverages with your Sweet and Savory Brie-Stuffed Dates can elevate the entire dining experience. For wine, opt for a light, fruity white wine like Sauvignon Blanc or a sparkling wine, which can complement the sweetness of the dates while cutting through the richness of the brie.

Non-alcoholic alternatives may include sparkling water infused with citrus slices for a refreshing option without alcohol, which enhances the flavors without overwhelming the palate.

If coffee or tea is on the menu, a mild herbal tea can offer a lovely contrast and cleanse the palate, while a dark roast coffee can serve as a bold balance to the sweet and savory notes of the dish.

When serving, be cautious with temperature. Chilled wines should be enjoyed alongside room temperature or slightly warm stuffed dates, allowing flavors to shine more brightly without competing or muddling together.

Crafting a thoughtful beverage menu can transform your gathering and encourage guests to explore the flavors in unison, enhancing the overall enjoyment of the dish.

Storage and Shelf Life

Storing your Sweet and Savory Brie-Stuffed Dates properly ensures you can enjoy leftovers without sacrificing quality. Store them in an airtight container in the refrigerator for up to 4 days, ensuring they remain fresh and maintain their texture.

Temperature requirements are crucial; these stuffed dates are best served warm, so it’s ideal to reheat them gently in the oven rather than the microwave. To reheat, place them in a preheated oven at a low temperature until warmed through, which helps preserve the creamy consistency of the brie.

For long-term storage, consider freezing unbaked stuffed dates. To do this, arrange them on a baking sheet, freeze until solid, and then transfer to a freezer-safe airtight container. They can then be baked directly from frozen, adjusting the cooking time as necessary.

Always check for signs of spoilage before consuming leftovers. If the cheese starts to develop an off-smell or the dates appear discolored or excessively dry, they should be discarded.

To ensure optimal freshness, refresh leftovers with addition of a drizzle of honey or fresh herbs before serving and enjoy the delicious flavors restored.

Make Ahead Strategies

To streamline your preparation, consider assembling your Sweet and Savory Brie-Stuffed Dates ahead of time. Stuff the dates and store them in the refrigerator for up to 24 hours before baking, which allows the flavors to meld beautifully.

When space permits, store them on a parchment-lined baking sheet, ensuring they do not touch, which can help prevent them from sticking together and maintains their individual shape until you’re ready to bake them.

Evaluating the quality impact is important; preparing ahead can enhance the flavors, as the cheese absorbs some sweetness from the dates. Just remember to bring them to room temperature before baking for the best melting texture.

To keep them fresh while stored, cover the baking sheet tightly with film or foil. Just be cautious that moisture does not accumulate, which can lead to reducing the necessary crunch of the coated nuts.

For successful reheating, consider warming them in the oven instead of the microwave. This preserves the delightful texture of the brie and ensures a consistently enjoyable eat.

Scaling Instructions

Scaling your Sweet and Savory Brie-Stuffed Dates recipe is remarkably simple. When halving the recipe, ensure you proportionately reduce the amount of filling each date gets, maintaining their delicious balance.

Doubling or tripling the recipe is equally easy; just be aware of your baking space, ensuring there’s enough room on your baking sheet for air circulation to produce evenly baked dates. You may need to work in batches depending on your oven’s capacity.

Equipment adjustments can be minimal—consider a larger baking sheet, or multiple sheets for larger quantities, and adjust baking times accordingly based on how many are in the oven.

Timing modifications are crucial; monitor the cooking process closely if you are baking multiple sheets simultaneously, as the oven may require different timing between batches to achieve that perfect melt.

Don’t forget about storage considerations when scaling up. Ensure you have enough airtight containers for leftovers or extras should you choose to double the ingredients, particularly when storing for future enjoyment.

Nutritional Deep Dive

Examining the macro breakdown of Sweet and Savory Brie-Stuffed Dates reveals a delightful blend of carbohydrates from the dates, fats from the brie, and a decent protein contribution as well. Each serving provides a satisfying mix that can fit nicely within balanced diets.

In terms of micronutrient analysis, consider the vitamins and minerals packed within dates, such as potassium and magnesium alongside brie’s calcium and vitamin B content—offering flavors that are not only delicious but also contribute positively to your daily intake.

Health benefits include the fiber content found in dates, promoting digestive health, while the values from the cheese support bone health and can help manage satiety, making these bites a delightful yet nutritious option when enjoyed in moderation.

For dietary considerations, individuals managing blood sugar levels should be cautious due to the sweetness in dates. Alternatively, opting for smaller portions can keep the overall intake in check while still allowing you to enjoy the indulgence.

Lastly, for those focusing on weight management, understanding portion sizes becomes vital. Sharing these delectable bites among friends will allow enjoyment without excessive calorie intake, making it a delightful addition to any gathering while keeping one’s health goals in mind.

Dietary Adaptations

Adapting Sweet and Savory Brie-Stuffed Dates to fit dietary preferences can be easy and transformative. For gluten-free diets, this recipe shines as is, ensuring anyone can enjoy the flavorful treat without worry.

To accommodate dairy-free or vegan options, consider substituting traditional brie with a plant-based cheese. This allows for the integrity of the dish while ensuring those who avoid dairy can partake in the enjoyment fully.

For those following low-carb or keto diets, halving the dates or using bacon-wrapped alternatives provides the exquisite flavor punch with lesser carbs, and can maintain an indulgent experience without derailing dietary pursuits.

Paleo adherents can also swap brie for a dairy-free alternative and incorporate nuts directly into the filling for a protein-rich burst while maintaining health goals within this ancient dietary framework.

For low-FODMAP diets, substituting with lactose-free brie or using cheeses without added milk-derived ingredients maintains the integrity of this delightful recipe while ensuring it’s suitable for this specific dietary requirement.

Troubleshooting Guide

When encountering texture issues with the Sweet and Savory Brie-Stuffed Dates, a common dilemma can involve overly chewy dates. This can be tackled by selecting softer, fresher dates or gently steaming them for a short period to soften before stuffing.

Flavor balance can present challenges, especially if the dates are particularly sweet, overshadowing the brie. A simple remedy includes incorporating a sprinkle of sea salt or a dash of pepper in the cheese mixture to enhance the overall flavor profile.

Temperature problems can arise if the dates cook unevenly. Ensuring an even baking sheet arrangement without overcrowding will help prevent hotspots and promote a consistent temperature throughout the baking process.

Equipment challenges, particularly concerning oven performance, may need adjusting if your oven heats unevenly. Investing in an oven thermometer or adjusting baking times can effectively combat these issues, ensuring perfect results every time.

If experimenting with ingredient substitutions, a change in flavor might occur. Consider testing in small batches to find the perfect balance within the new substitutions instead of overhauling the entire dish.

Timing concerns can also manifest when preparing large batches. Baking in smaller groups can aid in maintaining timing accuracy while preserving dish integrity, allowing every date to reach optimum flavor.

Recipe Success Stories

Community feedback on Sweet and Savory Brie-Stuffed Dates highlights the versatility and affordability of the recipe. Many have shared their excitement in adapting it for various gatherings, commenting on how it astonishes guests without extensive preparation.

Victory stories often include unique variations, such as those who swapped ingredients to cater to specific dietary requirements. Substituting the filling has proven successful, with some readers noting that bacon incorporated into the brie enhances the savory notes beautifully.

Adaptation stories range from addressing personal preferences for flavor to accommodating seasonal fruits, sharing how these substitutions have resulted in delicious successes that keep the inspired spirit of the original dish intact.

Readers also engage with suggestions for photography, noting how elegant presentation garnishes have elevated the dish visually, increasing the anticipation for guests before they’ve even taken their first bite.

In sharing these experiences, readers inspire each other to manage their recipes creatively, allowing the expansion of this already-flexible dish into something personal and uniquely theirs.

Frequently Asked Questions

Can I use different cheese instead of brie?

Yes, other types of creamy cheeses such as goat cheese or camembert can replace brie and add unique flavors to the dish.

How do I know when the dates are done baking?

When the cheese is bubbly and slightly golden, that’s the perfect time to pull them from the oven. Keep an eye on them to avoid overcooking.

Can I prepare these dates ahead of time?

Absolutely! You can prepare them up to 24 hours in advance and store them in the refrigerator before baking them just before serving.

What nuts work best for topping?

Pecans, walnuts, and pistachios all work wonderfully, providing different flavors and textures that complement the stuffed dates.

Is it possible to make these vegan?

Yes, you can substitute the brie with a plant-based cheese to make this recipe entirely vegan while retaining the delightful flavor.

Can I freeze stuffed dates?

Yes, you can freeze unbaked stuffed dates to enjoy later. Just make sure they’re sealed tightly to prevent freezer burn.

What drinks pair well with these stuffed dates?

Light white wine, sparkling drinks, or even herbal tea can pair beautifully with the sweetness of the dates and the creaminess of the cheese.

Are these dates low in calories?

While delicious, they can be higher in calories due to cheese and dates, so it’s best to enjoy them in moderation as part of a balanced diet.

What should I serve with these dates?

They pair nicely with various accompaniments, including cheeses, crackers, and fresh fruit, creating a lovely grazing platter for guests.

How long do the leftovers last?

Stored properly in an airtight container, they can last for up to 4 days in the refrigerator.

Additional Resources

For those excited about creating more delightful dishes like Sweet and Savory Brie-Stuffed Dates, consider exploring related recipes, such as cheese platters, stuffed vegetables, or Mediterranean appetizers. Understanding techniques for working with various cheeses can enhance your skillset within the kitchen, allowing you to expand your culinary repertoire.

Ingredient information can help further refine your understanding of how to combine flavors effectively, and investing in quality kitchen equipment can drastically improve your results.

Embrace seasonal variations and dive into recipes that celebrate local produce, making your cooking experience even richer and more relatable.

Join the Conversation

We love hearing from you! Share your photos and variations of Sweet and Savory Brie-Stuffed Dates on social media. Your feedback and creativity inspire others and help build a community of passionate food lovers.

Join our discussion by leaving comments, sharing tips, or asking questions about your experience with this recipe. Whether it’s a success story or a thoughtful question, your input creates an engaging space where we can all learn from one another.

Let’s keep the conversation going around delicious recipes and share the joy of cooking together as we explore new tastes, learn from each other’s findings, and create memories through food.

The Recipe

Sweet and Savory Brie-Stuffed Dates

Serves: 12 servings

Prep Time: 10 mins

Cook Time: 15 mins

Total Time: 25 mins

Kitchen Equipment Needed

  • Baking sheet
  • Parchment paper
  • Small knife for cutting
  • Spoon for stuffing

Ingredients

  • 12 large Medjool dates
  • 8 oz brie cheese
  • 1/4 cup chopped nuts (walnuts, pecans, or almonds)
  • Honey or balsamic glaze (optional, for drizzling)
  • Fresh herbs for garnish (optional)

Directions

  1. Preheat the oven to 350°F (175°C) and line a baking sheet with parchment paper.
  2. Carefully slice the dates lengthwise without cutting all the way through and remove the pit.
  3. Cut the brie into small pieces and stuff each date with a piece of brie.
  4. Place the stuffed dates on the prepared baking sheet.
  5. Sprinkle the chopped nuts over the stuffed dates.
  6. Bake in the preheated oven for 15 minutes, or until the cheese is melted and bubbly.
  7. Remove from the oven and allow to cool slightly before drizzling with honey or balsamic glaze, if desired.
  8. Garnish with fresh herbs and serve warm.

Recipe Notes

  • Feel free to adjust the number of dates based on your serving needs.
  • Experiment with various flavored cheeses for a different twist!
  • To make ahead, assemble the dates and refrigerate until ready to bake.

Indulge in Swirled Chocolate and Vanilla Cheesecake Cookies Delight

Swirled Chocolate and Vanilla Cheesecake Cookies: A Perfect Dessert Delight

⚖️
Difficulty
Medium

⏲️
Prep Time
20 mins

🕒
Cook Time
15 mins

⏱️
Total Time
35 mins

🍽️
Servings
24 cookies

These Swirled Chocolate and Vanilla Cheesecake Cookies are a delightful treat that marries the rich flavors of chocolate with the creamy essence of vanilla cheesecake in one bite-sized delicacy. Each cookie combines the best of both worlds, presenting a heavenly contrast of flavors and a luxurious texture that will leave cookie lovers craving more. As you bite into these cookies, the chocolate and vanilla swirl reveals itself, creating a gorgeous display that is as pleasing to the eyes as it is to the palate.

The cookie base is soft and chewy, infused with a hint of cream cheese that enhances the decadent taste, while the contrasting swirls of chocolate provide a satisfying richness. This recipe is ideal for any occasion, whether you’re hosting a gathering, celebrating a special event, or simply indulging yourself with a homemade treat. The enticing aroma that fills your kitchen will undoubtedly draw family and friends in, eager to enjoy these irresistible cookies.

Quick Recipe Highlights

  • Flavor Profile: The cookies feature a luscious combination of creamy vanilla and rich chocolate, creating a balanced sweetness that appeals to all palates.
  • Texture: Enjoy a delightful chewiness from the cookie base, complemented by velvety swirls of creamy cheesecake filling.
  • Aroma: The sweet scent of vanilla blended with dark chocolate fills the air, making it hard to resist these baked delights.
  • Visual Appeal: The striking swirl pattern of dark chocolate and creamy vanilla offers a stunning and Instagram-worthy presentation.
  • Skill Level Needed: This medium-level recipe is perfect for home bakers looking to elevate their cookie game without excessive complexity.
  • Special Equipment: You’ll need a stand mixer or hand mixer and a spatula to easily blend the ingredients and create the perfect dough.

Recipe Overview

  • Difficulty Level: These Swirled Chocolate and Vanilla Cheesecake Cookies are categorized as medium difficulty, ideal for those with some baking experience. With clear instructions and manageable steps, even novice bakers can successfully achieve delicious results.
  • Category: This recipe fits perfectly within the dessert category, ideal for snack time or as an after-dinner treat.
  • Cuisine: Drawing inspiration from classic American desserts, these cookies take on a contemporary twist, making them suitable for various occasions.
  • Cost: The approximate cost of ingredients is considered budget-friendly, allowing you to make a generous batch without breaking the bank.
  • Season: These cookies can be enjoyed year-round, making them a versatile treat for any season’s celebrations.
  • Occasion: Perfect for holidays, birthday parties, or simply as a sweet addition to coffee breaks, they are sure to please any crowd.

Why You’ll Love This Recipe

Biting into a Swirled Chocolate and Vanilla Cheesecake Cookie is an experience that combines flavor and texture in every mouthful. The decadent sweetness of cream cheese paired with rich chocolate tastes creates a perfect cookie that feels indulgent yet refined. The balance of sweetness makes them appeal to both children and adults alike, ensuring your dessert table will be the highlight of any gathering.

One significant benefit of this recipe is its convenience, as it doesn’t require elaborate preparation or extensive baking skills. The ingredients are pantry staples, and the straightforward baking process ensures that you can whip up a batch swiftly, making them an excellent choice for spontaneous gatherings or busy weeknights. Plus, their ideal portion size makes them a perfect choice for sharing yet is satisfying enough for solo indulgence.

On the nutritional front, incorporating cream cheese adds a protein boost and a creamy texture that elevates these cookies above typical snacks. While they are undeniably a treat, the classic cheesecake flavor satisfies cravings without overwhelming sugar load when balanced with rich cocoa.

Moreover, these cookies make for great social snacks. They’re perfect for afternoon teas, lunchboxes, or dessert platters during events. Their inviting appearance and delicious aroma enhance any gathering’s atmosphere, encouraging sharing and conversation among attendees.

Lastly, the affordability of this recipe provides accessibility to both novice bakers and those who frequent the kitchen. With cost-effective ingredients and a simple method, you can create a batch of cookies that feels extravagant without a hefty price tag.

Historical Background and Cultural Significance

The roots of cheesecake can be traced back to ancient Greece, where it was considered a nourishing food for athletes. Cheesecake evolved as it traveled across cultures, integrating chocolate as a popular addition in the modern era. Swirled versions of cheesecake highlight the balance and harmony of competing flavors that appeal to contemporary tastes.

In the United States, cheesecake underwent significant evolution, with various styles emerging across regions. The New York-style cheesecake taking the lead as a rich and creamy variant is still a favorite today. The introduction of chocolate into this classic dessert reflects America’s love for chocolate, making these cookies a beloved fusion treat.

Swirled desserts have gained popularity over the years, showcasing the creativity of home bakers and professional chefs alike. They signify innovation in cooking, allowing chefs to blend flavors and textures seamlessly, reflecting individual tastes and preferences.

With these cookies, we celebrate the joy of baking, combining centuries-old culinary practices with contemporary flavors and techniques. They serve not only as a sweet treat but also as a testament to the continual evolution of dessert-making, highlighting the rich history behind each ingredient.

Ingredient Deep Dive

Chocolate: Chocolate holds cultural significance across numerous civilizations, from the ancient Mayans to modern times, where it has often been associated with indulgence and luxury. Nutritionally, dark chocolate is packed with antioxidants and can even have heart health benefits when consumed in moderation. When selecting chocolate for baking, opt for high-quality brands with at least 60% cocoa content for robust flavor. Store in a cool, dry place, and consider using chocolate chips or chunks for optimal melting.

Vanilla: Vanilla has a rich history as a prized spice, originally cultivated in Mexico before spreading globally. Its comforting aroma and flavor profile make it a staple in desserts. Nutritional benefits include its antioxidant properties, which make it a healthful addition. When shopping for vanilla, choose pure vanilla extract over imitation for authentic taste. Store in a cool, dark bottle, and if you prefer, substitute with vanilla bean for an upscale flavor and visual element.

Common Mistakes to Avoid

  • Overmixing the Dough: Overmixing can lead to tough cookies. Mix until just combined for the best texture.
  • Incorrect Oven Temperature: Always preheat your oven to ensure even baking. An oven thermometer can help verify temperature accuracy.
  • Using Cold Ingredients: Bring your cream cheese and egg to room temperature for smoother incorporation into the dough.
  • Skipping Chilling Time: If your dough is too soft, chilling helps firm it up for easier handling and better shape retention while baking.
  • Not Measuring Inputs Properly: Use a kitchen scale or proper measuring cups for accuracy to achieve consistent results.
  • Inadequate Baking Time: Cookies may appear soft when taken out but will continue to bake on the tray; allowing them to set is crucial.
  • Skipping Parchment Paper: Using parchment paper ensures easy release and keeps the bottoms from burning.
  • Ineffective Swirling: Use a toothpick or knife to gently swirl the chocolate and vanilla; don’t overdo it, or they’ll blend instead of swirl.

Essential Techniques

Swirling: The technique of swirling chocolate into the batter is essential for creating visual appeal. To master this, use a simple figure-eight motion with a toothpick or a knife. Aim for a gentle blend to maintain distinct layers. Be careful not to overmix, as it can lead to a unified color rather than beautiful swirls. A well-executed swirl not only enhances aesthetics but keeps the flavor profiles separate in each bite.

Proper Measuring: Accurate measurement of ingredients is crucial in baking, where precision influences the final product. For dry ingredients, use the spoon-and-level method to avoid packing flour or sugar into the cup; this maintains the right balance of moisture and texture. For wet ingredients, use a liquid measuring cup with a spout for pouring. Getting this technique mastered will improve consistency and overall baking success.

Pro Tips for Perfect Swirled Chocolate and Vanilla Cheesecake Cookies

Start with room temperature ingredients to prevent lumps in your batter, promoting a smooth texture. This includes cream cheese and eggs, which blend seamlessly together for a consistent dough.

Experiment with different types of chocolate to find your preferred flavor profile. Dark, milk, and even white chocolate can add unique twists to your cookies.

Consider adding a pinch of sea salt to enhance sweetness while balancing flavors. It can transform the overall taste experience when sprinkled on top before baking.

For added crunch, mix in finely chopped nuts such as walnuts or pecans. They add texture and a delightful contrast to the creamy cookie.

If you have leftovers, store them in an airtight container to maintain freshness for longer. Keeping them away from humidity ensures they stay chewy.

Feel free to double the batch, as these cookies are excellent for freezing! You can freeze unbaked dough balls and bake them directly from the freezer—just add a couple of extra minutes to the baking time.

Select quality cocoa powder for a more potent chocolate flavor. Natural cocoa provides a different profile than Dutch-processed; understanding this can impact your cookies’ taste.

Add a teaspoon of instant coffee to the dough to deepen the chocolate flavor without making it taste like coffee. Such subtleties can elevate your cookies from ordinary to extraordinary.

Variations and Adaptations

For a seasonal twist, incorporate autumn spices like cinnamon and nutmeg for a warm flavor reminiscent of fall baking. You can easily mix these spices into the vanilla portion to create a cozy variation.

Consider making a berry-infused version by incorporating pureed raspberries or strawberries into the vanilla dough. This adds a pop of color and tartness that beautifully complements the chocolate.

For those who prefer a crunchier texture, add crushed graham crackers to the cookie dough to evoke a cheesecake crust flavor. You can also sprinkle some on top before baking.

If you’re looking for a lower sugar option, consider using a sugar alternative such as erythritol that behaves similarly to sugar during baking.

To make these cookies even more decadent, try drizzling melted chocolate over the baked cookies, creating an extra visual element and a depth of flavor.

For gluten-free alternatives, substitute regular flour with almond or coconut flour, adjusting the proportions slightly for moisture consistency.

Experiment with different cheeses, like mascarpone, to create a different flavor base. This can yield a creamier, richer cookie experience.

For a nutty flavor, add almond or hazelnut paste instead of vanilla for a sophisticated alternative.

Serving and Presentation Guide

To enhance presentation, use a decorative plate that complements the cookies’ vibrant swirls. A contrasting backdrop, like a white plate, can really make the chocolate and vanilla pop.

Consider garnishing with fresh fruits or edible flowers to elevate the aesthetic and add freshness to each serving. A simple sprinkle of powdered sugar can add a touch of elegance.

Traditional accompaniments include a dollop of whipped cream or a scoop of vanilla ice cream, which riffs off the creaminess of the cookies, providing a delightful contrast.

When serving, consider presenting these cookies alongside a variety of other desserts for a visually appealing dessert table. Grouping them with colorful treats can create an inviting atmosphere.

For special occasions, create a dessert platter with cookies arranged in a delightful tower or circle, enhancing the visual interest while keeping it practical for guests.

Temperature is vital; serve at room temperature or slightly warmed. The cookies will remain soft, and flavors will fully unfold, creating an inviting experience for guests.

Lastly, consider portion control by breaking the cookies in half to reveal their beautiful interiors, encouraging guests to share or try more than one flavor combination.

Wine and Beverage Pairing

For a classic pairing, serve these cookies with a rich dessert wine such as Port, which naturally complements the sweetness of the chocolate and vanilla.

If you prefer something non-alcoholic, a chocolate cold brew can provide a delightful contrast while enhancing the richness of the cookies. Add a dash of cream for a silky mouthfeel that mirrors the cheesecake element.

Another excellent choice is pairing these cookies with a flavored tea such as chai. The warm spices will harmonize beautifully with the creamy base of the cookie.

A light-bodied red wine, like a Pinot Noir, can also pair well, as its berry notes can complement the chocolate without overwhelming the palate.

When serving for children, consider a creamy milk or chocolate milk option, both of which can enhance the dessert experience while appealing to younger tastes.

Coffee can serve as an invigorating choice alongside the cookies; choose a medium roast for a balanced blend of bitterness and smoothness that enhances the overall flavor of the dessert.

Storage and Shelf Life

To keep these cookies fresh, store them in an airtight container at room temperature for up to a week. This method preserves their chewy texture while preventing them from drying out.

For longer storage, consider refrigerating these cookies, which extends their freshness to about two weeks. Ensure you separate layers with parchment paper to avoid sticking.

If you wish for extended shelf life, freezing cookies is a great option. Make sure to wrap them individually in plastic wrap before placing them in a freezer bag for up to three months.

Thaw frozen cookies at room temperature or warm them in the oven for a few minutes. Avoid microwaving, as this can make them lose their delightful texture.

Watch for signs of spoilage, such as off flavors or dryness, which indicate they should be discarded. Keeping storage areas clean also helps prevent cross-contamination.

Consider reheating tips – placing them in a preheated oven ensures they regain their wonderful soft texture, making them enjoyable once again.

For the best results, do not freeze cookies with toppings or fillings that don’t freeze well, such as cream cheese frosting, to retain their textures.

Make Ahead Strategies

For easy preparation, consider making the dough a day in advance, allowing flavors to meld and enhancing the overall taste of the cookies. Chill the dough overnight for optimum results.

Rolling the dough into balls and freezing them allows for quick baking on-the-fly. You can bake them directly from frozen, just adding a few extra minutes to the baking time.

Measure and prepare all dry ingredients ahead, then store them in an airtight container until you’re ready to mix for baking day. This strategy minimizes prep time on the day of baking.

Quality impact assessment can alter; resting the dough for a few hours ensures the flavors develop richly, while providing a better texture.

When assembling the cookies, decide whether you wish to add fillings or toppings at the time of baking or if you want to frost or drizzle after they cool, allowing flexibility in flavor profiles.

Maintain perfection by only batch baking as many cookies as needed and keeping the rest of the dough cold until actively baking. This prevents spreading or overbaking.

By adding fresh elements such as fruit after thawing or before serving, you enhance flavors and provide a fresh aesthetic, keeping each bite exciting.

Scaling Instructions

To halve the recipe, simply divide each ingredient amount by two while maintaining the same baking temperatures and times to ensure consistent results.

When doubling or tripling the recipe, consider the size of your mixing bowl and baking sheets. You may need to work in batches to mix adequately and evenly.

Equipment adjustments may be necessary, particularly with larger batches requiring larger baking sheets or multiple trays in the oven. Ensure even spacing for optimal baking.

Timing modifications can be slight, as you may need to bake in batches, which could alter overall timing but will maintain the same baking temperature settings.

Store excess cookies in separate containers or bags labeled with the number of cookies and date to track freshness effectively.

When scaling recipes, it’s always best to err on the side of caution, as altering too many variables may lead to an undesired outcome. Always taste as you go.

Nutritional Deep Dive

Analyzing the macro breakdown of these cookies reveals they contain carbohydrates primarily from flour and sugar, with protein from the cream cheese. Balancing the ingredients prevents excessive sugar spikes while providing a satisfying experience.

Micronutrient analysis shows potential benefits from chocolate, which offers iron and magnesium, while ingredients like vanilla contribute antioxidants, enhancing the cookie’s nutritional profile.

Health benefits arise from using high-quality, dark chocolate and real vanilla, which not only elevate flavor but can also improve overall well-being when indulged in moderation.

In providing dietary considerations, it’s essential to remember that portion control plays a significant role. A small cookie can satisfy cravings without compromising caloric intake.

Weight management tips include enjoying these cookies as part of a balanced diet, alongside physical activity, as desserts can fit cleverly into healthy eating habits when portioned correctly.

When analyzing your intake, consider that incorporating treats with quality ingredients can boost morale and help maintain a balanced dietary lifestyle long term.

Dietary Adaptations

For gluten-free variations, swap out traditional flour for gluten-free blends or almond flour, ensuring appropriate texture and flavor without compromising taste.

If you’re pursuing dairy-free options, substitute cream cheese with vegan cream cheese alternatives and use almond or coconut milk instead of regular milk in the recipe.

Vegan adaptations are possible by replacing eggs with flax eggs or applesauce, maintaining moisture while adhering to plant-based guidelines.

For low-carb diets, consider using almond flour and erythritol as sugar substitutes, allowing a satisfying treat without excessive carbs.

Keto-friendly options can be achieved by utilizing coconut flour and avoiding sugary additives, providing a delicious cookie without derailing dietary goals.

For those on paleo diets, focus on using whole-food ingredients without refined sugars or grains, emphasizing natural sweetness from dates or maple syrup as alternatives.

Low-FODMAP adaptations are possible through careful ingredient selection, emphasizing lactose-free cream cheese and minimal sugar use to reduce gastrointestinal symptoms.

Troubleshooting Guide

If you encounter texture issues, adjust the flour content and ensure proper mixing techniques. If dough is too dry, adding a little milk can help bind it, while too wet can be corrected by flour.

Balancing flavors can be tricky; if your cookies taste too sweet, consider a pinch of salt to counteract sugar. Alternatively, adding a hint of cocoa can enhance the chocolate flavor.

If temperature problems arise, ensure you’re correctly preheating your oven; an inconsistent temperature can lead to uneven baking.

Equipment challenges may occur if you lack the right tools. Ingenuity such as using a fork for mixing can serve as a temporary fix without compromising the process.

Ingredient substitutions can occasionally alter outcomes. It’s best to research alternatives ahead of time, like using applesauce instead of butter, which can yield different textures.

Timing concerns can affect your final product, so keeping a close watch on your cookies in the last few minutes of baking ensures you get them out before overcooking.

Recipe Success Stories

Community feedback on these cookies often praises their unique flavors, with many stating they made fun and festive additions to gatherings and family dinners. The cookie’s striking appearance consistently garners compliments.

Variation successes reveal popular interpretations, such as adding spices or different chocolate types, transforming the recipe into something uniquely personal yet familiar.

Readers often share their adaptive stories, indicating a willingness to experiment with cookie flavors, showcasing the versatility and appeal of this delightful treat.

Photography tips from community members highlight the best lighting angles that showcase the beautiful swirls and contrasts of the cookies, enhancing their visual appeal.

With each batch made, bakers express satisfaction in evoking nostalgic feelings while creating new memories, emphasizing the significance of baking in connecting families and friends.

Frequently Asked Questions

Q: Can I freeze these cookies?
A: Yes! You can freeze these cookies for up to three months. Wrap them tightly in plastic wrap or use a freezer-safe container to maintain freshness.

Q: What can I use as a substitute for cream cheese?
A: You can use vegan cream cheese or mascarpone cheese as a substitute to maintain a similar creamy texture.

Q: How do I prevent my cookies from spreading too much?
A: Ensure you’re chilling the dough before baking if it’s too soft. This helps the cookies hold their shape during baking.

Q: Can I make these cookies ahead of time?
A: Absolutely! You can prepare the dough ahead of time and bake them when you’re ready. They also keep well if stored correctly.

Q: What type of cocoa powder is best for these cookies?
A: High-quality unsweetened cocoa powder is recommended. Dutch-processed cocoa can also work for a milder flavor, depending on your preference.

Q: Can the recipe be halved?
A: Yes, the recipe can easily be halved by simply dividing all ingredients in half without affecting the baking process.

Q: How can I store leftovers?
A: Store any leftover cookies in an airtight container at room temperature for up to a week or in the refrigerator for up to two weeks.

Q: Can I add nuts to the cookies?
A: Definitely! Chopped nuts such as walnuts or pecans can be added to the dough for an extra crunch and flavor enhancement.

Q: How do I keep these cookies soft after baking?
A: Keep the cookies in an airtight container, and consider adding a slice of bread or an apple wedge to maintain moisture.

Q: Can I use flavored extracts instead of vanilla?
A: Yes, feel free to experiment with almond or hazelnut extracts to create unique flavor profiles in your cookies.

Additional Resources

For those seeking related recipes, check out our collection of unique cookie varieties, including classic chocolate chip or oatmeal raisin cookies, which are great for blending flavors and textures into a cookie lineup.

Technique guides on perfecting your cookie baking skills will elevate your overall baking proficiency, ensuring your cookies always come out perfectly every time.

Ingredient information can help you discover new flavors and alternatives to use in your baking, broadening your culinary horizons to produce impressive variations on traditional recipes.

If you’re looking for equipment recommendations, consider investing in quality baking sheets and silicone mats to enhance your baking results and simplify the cleanup process.

Explore seasonal variations of this recipe, adapting it for holidays such as creating themed cookies for Halloween or Christmas by altering shapes, colors, and flavors.

Join the Conversation

We invite you to share your experiences with these Swirled Chocolate and Vanilla Cheesecake Cookies on social media, adding your unique spins and variations to the recipe and connecting with others who love to bake.

Photography tips from the community are always welcome; feel free to share your delicious snapshots, showcasing the beauty of the perfectly swirled cookies you create.

Recipe reviews are a fantastic way to engage with fellow bakers, so we encourage you to leave your thoughts and feedback on this recipe for others to see.

Incorporate your variations into the discussions, opening conversations about different flavors or adaptations you’ve tried along the way, inspiring creativity in others.

Let’s build a thriving community of home bakers passionate about sharing recipes, techniques, and updates about their baking adventures together.

The Recipe

Swirled Chocolate and Vanilla Cheesecake Cookies

Serves: 24 cookies

Prep Time: 20 mins

Cook Time: 15 mins

Total Time: 35 mins

Kitchen Equipment Needed

  • Stand Mixer or Hand Mixer
  • Mixing Bowls
  • Baking Sheets
  • Parchment Paper
  • Cookie Scoop or Tablespoon

Ingredients

  • 1 cup cream cheese, softened
  • 1/2 cup unsalted butter, softened
  • 1 cup granulated sugar
  • 1 large egg
  • 1 teaspoon pure vanilla extract
  • 1 1/2 cups all-purpose flour
  • 1/4 cup cocoa powder
  • 1 teaspoon baking powder
  • 1/4 teaspoon salt

Directions

  1. Preheat your oven to 350°F (175°C) and line baking sheets with parchment paper.
  2. In a mixing bowl, beat together the cream cheese and butter until smooth and creamy.
  3. Add the sugar, egg, and vanilla; mix until fully combined.
  4. In another bowl, mix the flour, cocoa powder, baking powder, and salt.
  5. Gradually add the dry ingredients to the wet mixture, mixing until just combined.
  6. Use a cookie scoop to drop dough onto prepared baking sheets, spacing them two inches apart.
  7. Using a toothpick or knife, swirl chocolate and vanilla together gently in each cookie.
  8. Bake for 12-15 minutes or until the edges are set. Let cool on the sheets for a few minutes before transferring to wire racks to cool completely.

Recipe Notes

  • For optimal flavor, chill the dough for about 30 minutes before baking.
  • Mix and match flavors by adding chips of white chocolate or nuts into the batter.
  • Store cookies in an airtight container for freshness; they last up to a week.

Delicious Fluffy Coconut Cake Recipe for Ultimate Moisture

Fluffy and Moist Coconut Cake: A Tropical Delight for Any Occasion

⚖️
Difficulty
Medium

⏲️
Prep Time
20 mins

🕒
Cook Time
30 mins

⏱️
Total Time
50 mins

🍽️
Servings
8-10

Coconut cake is a slice of paradise on your plate. With its fluffy texture and subtle sweetness, this Fluffy and Moist Coconut Cake is an ideal dessert for any gathering, be it a birthday, a family reunion, or even a simple afternoon tea. The tropical flavor of coconut combined with light, airy cake layers creates a delightful experience that has the ability to whisk you away to a sun-kissed beach in mere bites. Imagine sinking your fork into a generously frosted slice topped with toasted coconut flakes, as the sweet aroma envelops your senses, inviting you to indulge.

This coconut cake isn’t just a feast for the taste buds; it’s an emotional journey as well. Each bite is reminiscent of childhood memories spent at summer barbecues or dreamy vacations, enhancing the overall allure of the dessert. Made with simple yet rich ingredients, this recipe transforms the common cake into a luscious delight that brings everyone together, creating shared experiences and sweet moments. Whether served at a formal gathering or a casual get-together, this cake is bound to make an impression.

Quick Recipe Highlights

  • Flavor Profile: The cake features a rich coconut flavor enhanced by whipped cream frosting and a hint of vanilla.
  • Texture: A light and airy crumb provides a soft mouthfeel that melts in your mouth.
  • Aroma: Filled with the fragrant scent of fresh coconut and vanilla, it’s an inviting aroma.
  • Visual Appeal: A beautiful, snowy white frosting dusted with toasted coconut flakes gives it a sophisticated look.
  • Skill Level Needed: Requires basic baking skills, making it accessible for home bakers of all levels.
  • Special Equipment: Standard kitchen tools like mixing bowls, a cake pan, and an electric mixer are needed.

Recipe Overview

  • Difficulty Level: This Fluffy and Moist Coconut Cake is classified as medium, requiring careful measurement and mixing but not complex techniques.
  • Category: A delightful dessert that fits perfectly in the category of cakes for parties or celebrations.
  • Cuisine: Drawing from tropical culinary traditions, this cake highlights the use of coconut, popular in many cultures.
  • Cost: A reasonably budget-friendly dessert, largely made from staple ingredients you might already have.
  • Season: Ideal for spring and summer, this cake beautifully complements outdoor gatherings and celebrations.
  • Occasion: Perfect for birthdays, holidays, or any gathering seeking a sweet ending.

Why You’ll Love This Recipe

With its balance of sweetness and freshness, this Fluffy and Moist Coconut Cake stands out among desserts, making it a crowd-pleaser. The light and moist cake, paired with rich frosting, creates an indulgent experience perfect for any sweet craving. The integrated coconut flavor shines through without being overpowering, allowing it to appeal to both coconut lovers and those who may not usually gravitate toward this tropical flavor.

Preparing this cake can also be a fun and enjoyable experience. The steps are straightforward, allowing for a seamless baking process that anyone can manage. The anticipation builds as the aroma of baking coconut fills the kitchen, setting the stage for a delightful dessert that brings smiles to all who enjoy it. And if you’re looking for a way to impress guests without spending hours in the kitchen, this cake is your go-to recipe.

Nutrition-wise, coconut is a star ingredient — it’s rich in fiber and healthy fats, adding a nutritional boost to your dessert. Whether you’re serving up slices at a gathering or enjoying a piece with your morning coffee, you can feel good about indulging. Plus, it’s a great way to introduce friends and family to the unique flavors of coconut, making for a delightful shared experience.

Beyond just the taste, this recipe enhances social occasions, inviting friends to gather around as you showcase this beautiful cake. Its appeal lies not only in its flavor but also in its ability to unite people over delicious desserts, fostering connections during celebrations.

Moreover, cost-effectiveness is a key benefit, as the ingredients are commonly found at grocery stores. This means you can create a gourmet experience right at home without breaking the bank.

Historical Background and Cultural Significance

The origin of coconut cake dates back to various tropical regions, particularly in Southeast Asia and the Caribbean, where coconut is a staple ingredient. Over the years, coconut cake has been adopted and adapted by many cultures, developing local variations that highlight each region’s culinary preferences. The way communities embrace coconut in their baked goods speaks to its versatility and universal appeal.

Culturally, coconut represents hospitality and the spirit of sharing in many tropical countries. When served, coconut cake becomes not just a dessert but a symbol of community and celebration. It’s often featured at festive gatherings and special occasions, reinforcing bonds among friends and family while celebrating the joys of togetherness.

The evolution of the coconut cake can be seen through its many variations, with recipes evolving to incorporate local ingredients and preferences over generations. Today, many recipes include additional elements such as pineapple or lime, showcasing the creative ways this traditional cake can be adapted.

Regionally, variations of coconut cake exist worldwide. For instance, in some cultures, coconut cake may be layered with tropical fruits or infused with spices specific to the region, reflecting local agricultural products. Each adaptation tells a story of cultural exchange and culinary innovation.

Ingredient Deep Dive

Main ingredients in this Fluffy and Moist Coconut Cake include flour, sugar, eggs, coconut cream, and shredded coconut.

**Flour** is the foundation of any cake, contributing to the structure and texture. Selecting the right type of flour is crucial; all-purpose flour works best here, as it strikes a great balance between tenderness and strength. It’s advisable to store flour in a cool, dry place to maintain its freshness, and for swaps, almond flour is a suitable substitute but would require adjustments in liquid ingredients.

**Coconut Cream** infuses the cake with rich flavor and moisture. Historically, it has been celebrated for its ability to impart an exotic taste while contributing to the cake’s moistness. Nutritionally, coconut cream is high in healthy fats, making it a beneficial ingredient. Look for high-quality coconut cream for optimal taste and consistency, and if unavailable, you can use full-fat coconut milk as an alternative.

**Sugar** provides sweetness and helps with browning in the baking process, essential for achieving that light golden crust. Granulated sugar is the typical choice, but natural sweeteners like coconut sugar can add a unique flavor. Store your sugar in an airtight container, and keep an eye on moisture as it can clump over time.

**Eggs** play a critical role in structure and moisture. They help bind the batter, enhancing both flavor and texture. For those with egg allergies, flaxseed meal or applesauce can serve as alternatives, allowing you enough leavening and binding.

Common Mistakes to Avoid

  • Not measuring ingredients accurately: For a successful cake, precision is vital in ingredient measurements.
  • Overmixing the batter: This can lead to a dense cake; mix only until combined.
  • Skipping the sifting step: Sifting flour can help aerate it, leading to a lighter cake crumb.
  • Using old baking powder: Always check the expiration date, as stale baking powder won’t provide adequate lift.
  • Not letting the cake cool properly: Removing it too soon can result in collapsing; allow it to cool completely.
  • Underbaking or overbaking: Use an oven thermometer to ensure your oven is at the right temperature for optimal baking.
  • Not greasing the pan adequately: Properly grease and flour your cake pans to prevent sticking.
  • Adding too much or too little coconut: The right balance enhances flavor; too much can affect texture.
  • Using cold ingredients: Room temperature eggs and butter mix better and result in a fluffier cake.
  • Ignoring the resting time: Allowing the batter to rest can help flavors meld and create a better texture.

Essential Techniques

**Proper Mixing:** This technique is important for creating a light and fluffy cake. Begin by creaming the butter and sugar until light and airy, then gradually add eggs and incorporate dry ingredients. Overmixing can affect moisture, so mix until just combined.

**Folding in Coconut:** Gently folding in shredded coconut preserves the airiness of the batter. A spatula can help maintain volume while evenly incorporating the coconut. It’s essential not to stir vigorously, as this can lead to a denser cake.

**Whipping Cream:** When making frosting, it’s vital to whip heavy cream to soft peaks to ensure a stable texture. Start with cold cream and whisk until it thickens, but stop before it turns grainy.

Pro Tips for Perfect Fluffy and Moist Coconut Cake

1. Use room temperature ingredients for a smoother batter and a fluffier cake.
2. Toast shredded coconut before adding it to the batter for enhanced flavor.
3. If using coconut milk, shake the can well to ensure that the cream and liquid are fully combined.
4. Experiment with adding a hint of lime zest to elevate the tropical flavor profile.
5. Use a toothpick to check for doneness; it should come out clean or with a few moist crumbs.
6. Decorate with additional toasted coconut for a beautiful and flavorful presentation.
7. Allow the cake to rest for a few hours or overnight, as flavors develop over time.
8. Cover with plastic wrap or store in an airtight container to retain moisture.

Variations and Adaptations

**Regional Variations:** In some cultures, adding pineapple or mango can impart an additional tropical flavor twist, making it truly unique.

**Seasonal Adaptations:** During the holidays, incorporating spices like cinnamon or nutmeg for a festive touch can make this cake specially themed.

**Dietary Modifications:** For vegan adaptations, swap eggs for flaxseed meal or applesauce, and use plant-based butter and coconut milk.

**Flavor Variations:** Adding different extracts like almond or lemon juice can create a personalized flavor profile for enthusiasts looking for more than just coconut.

**Texture Modifications:** For extra crunch, consider folding in chopped nuts like macadamia or pecans, providing a delightful contrast to the soft cake.

**Presentation Alternatives:** Serve the cake in layers, stacking to create a dramatic effect, or opt for cupcakes topped with coconut frosting for individual servings.

Serving and Presentation Guide

Creating an inviting presentation for this coconut cake can enhance the dining experience. When plating, consider using a cake stand to elevate your creation, allowing the layers to be showcased beautifully. For garnishing, a sprinkle of toasted coconut or fresh mint leaves can add color and attract attention. Complementary flavors such as a dollop of whipped cream or fresh fruit can enhance the overall experience.

Serving the cake while still slightly warm can also heighten its flavors, allowing the frosting to soften just a bit for luscious bites. Portion control is essential; aim for slices around 2 inches by 4 inches to allow guests to enjoy multiple flavors or desserts if you’re offering more than one option.

Wine and Beverage Pairing

To elevate your dessert experience, consider pairing this cake with a chilled Riesling or moscato, both of which complement the coconut flavor beautifully. If you prefer non-alcoholic options, a tropical iced tea or coconut-infused lemonade can create a refreshing accompaniment.

Coffee lovers may enjoy this cake alongside a rich espresso, which can balance the sweet notes, while tea enthusiasts might appreciate the pairing with a light Earl Grey. Don’t forget to chill beverages appropriately before serving for the best experience.

Storage and Shelf Life

Storage methods are crucial for maintaining the freshness of your coconut cake. Should you have leftovers, wrap the cake tightly in plastic wrap and store it in the refrigerator. This will help retain its moisture and stave off any drying out.

For longer storage, consider freezing the cake. Slice it into portions and seal in airtight containers or freezer bags. It’s best enjoyed within 3 months. Always check for signs of spoilage; if you notice an off odor or mold, discard it.

When reheating, gently warm slices in the microwave for about 10-15 seconds, or let them sit at room temperature. For an added touch, consider serving with a fresh layer of whipped cream post-reheating.

Make Ahead Strategies

To streamline your baking process, consider making the cake ahead of time. The un-frosted cake can be baked up to two days in advance and stored wrapped in the refrigerator. This allows flavors to meld beautifully over time, enriching the cake’s taste.

As for frosting, you can prepare it a day in advance, storing it in the refrigerator until you’re ready to assemble. Just be sure to re-whip it slightly to regain texture. When the time comes to assemble, you can easily ice the cake without worrying about the baking process.

Add fresh elements to your cake right before serving, such as toasted coconut or a light dusting of confectioners’ sugar to keep it looking bright and appealing.

Scaling Instructions

If you need to adjust your recipe based on the number of servings required, scaling is straightforward. To halve the recipe, simply divide all ingredients by two and reduce baking time accordingly, checking for doneness earlier.

For doubling or tripling the recipe, you may need to bake in multiple pans or batches, depending on your oven capacity. Remember that larger batches might require slightly longer baking times, so check periodically.

Consider using a larger mixing bowl for increased volumes to ensure even mixing and prevent spills. Also, be aware of your storage needs post-baking, as larger cakes may require appropriate containers for freshness.

Nutritional Deep Dive

The Fluffy and Moist Coconut Cake boasts significant nutritional benefits when prepared with wholesome ingredients. The macro breakdown includes carbohydrates from flour and sugar, fats from coconut cream, and protein from eggs. The cake is not gluten-free, making it unsuitable for those with gluten sensitivities unless modifications are made.

Micronutrients such as vitamin C and potassium are present in coconut, while dietary fiber aids digestion. This dessert is best tailored to enjoy in moderation, particularly for those monitoring their caloric intake.

Understanding portion sizes is important; sharing this delightful cake ensures that everyone enjoys a taste without overindulging. Incorporating this treat into occasional celebrations creates a wonderful balance in one’s diet while allowing for the enjoyment of lovely flavors.

Dietary Adaptations

For those needing dietary accommodations, this Fluffy and Moist Coconut Cake offers versatility.

– **Gluten-free:** Substitute all-purpose flour with a gluten-free baking blend while ensuring equal liquid content is maintained.
– **Dairy-free:** Replace butter with coconut oil or dairy-free butter and utilize coconut milk in place of cream.
– **Vegan:** As mentioned before, using flaxseed or chia eggs along with plant-based cream will yield a vegan-friendly cake.
– **Low-carb:** Swapping sugar for erythritol or stevia can create a low-carb cake, and alternatives like almond flour can reduce carb content dramatically.
– **Keto:** Use coconut flour and a sugar substitute while adjusting egg quantity for balance in batter moisture.
– **Low-FODMAP:** Limit portions and ensure that the sugar is monitored to suit a low-FODMAP diet.

Troubleshooting Guide

If you experience texture issues, such as a dense cake, it could be due to overmixing or excess flour. Remember, only mix until wet and dry ingredients are just combined, and use spoon measurements for flour.

For flavor balance, if your cake is too sweet, consider reducing sugar slightly or adding a hint of salt to enhance flavors.

Temperature problems might arise if your oven runs hot; invest in an oven thermometer to check consistency.

Ingredient substitutions can lead to variations; ensure that substitutes are similar in texture and moisture as the original.

Timing concerns can affect the final product; set a timer to avoid overbaking, and always check for doneness with a toothpick.

Recipe Success Stories

The community has provided great feedback on this Fluffy and Moist Coconut Cake, praising its light texture and delicious flavor. Many bakers have shared variations, including adding chocolate ganache or fresh fruits, and readers have expressed delight in finding a cake that embodies both tropical sweetness and simplicity.

Photography tips from users often highlight the importance of natural lighting to capture the pure white of the frosting, making this cake an Instagram-worthy centerpiece. Success stories highlight how this cake has become a staple dessert for gatherings, reflecting both communal enjoyment and the beauty of homemade treats.

Frequently Asked Questions

Can I make this cake ahead of time?

Yes! You can bake the cake up to two days in advance and store it wrapped in the refrigerator. Just frost it on the day you plan to serve.

Can I use fresh coconut instead of shredded coconut?

Absolutely, using fresh coconut can elevate flavor, but be mindful of moisture content, as fresh coconut may alter the texture.

How do I know when the cake is done baking?

Insert a toothpick into the center of the cake; it should come out clean or with a few moist crumbs when ready.

Can I freeze leftovers?

Yes, you can freeze the cake. Wrap slices tightly in plastic wrap and store them in freezer-safe bags for up to three months.

Is this cake gluten-free?

This original recipe is not gluten-free, but you can substitute all-purpose flour with a gluten-free flour blend for a suitable option.

What can I replace eggs with in this recipe?

You can use flaxseed meal mixed with water or applesauce as substitutes for eggs in your coconut cake.

How can I achieve a more intense coconut flavor?

Incorporate coconut extract into the batter and use unsweetened shredded coconut for a more concentrated flavor.

Can I add other flavors to the cake?

Yes, experimenting with lime zest or almond extract can add unique notes to enhance the coconut flavor.

How should I store the frosted cake?

Keep the frosted cake in the refrigerator covered with plastic wrap to maintain freshness and moisture.

Is there a vegan option available for this cake?

Yes, you can replace eggs with flaxseed meal or applesauce and use plant-based butter and cream for a vegan-friendly version.

Additional Resources

For further baking adventures, explore related recipes such as classic vanilla cake or tropical fruit tart for delightful ideas. Technique guides on baking fundamentals, frosting tips, and ingredient conversions offer valuable information for home bakers.

Learn about the health benefits of coconut and discover equipment recommendations for both novice and experienced bakers. Seasonal variations can inspire new ideas and keep your baking game exciting all year round.

Join the Conversation

We invite you to share your own experiences baking this Fluffy and Moist Coconut Cake! Connect with us on social media, upload your mouthwatering photographs, and engage with fellow bakers by sharing adaptations and experiences. Your insights may inspire another baking adventure while contributing to a thriving community of cooking enthusiasts.

The Recipe

Fluffy and Moist Coconut Cake

Serves: 8-10

Prep Time: 20 mins

Cook Time: 30 mins

Total Time: 50 mins

Kitchen Equipment Needed

  • Mixing bowls
  • Electric mixer
  • Cake pans
  • Measuring cups and spoons
  • Spatula
  • Toothpick

Ingredients

  • 2 cups all-purpose flour
  • 1 ½ cups granulated sugar
  • ½ cup unsalted butter, softened
  • 1 cup coconut cream
  • 4 large eggs
  • 1 cup shredded coconut
  • 1 tablespoon baking powder
  • ½ teaspoon salt
  • 1 teaspoon vanilla extract
  • 1 cup heavy cream (for frosting)
  • Additional coconut for garnish

Directions

  1. Preheat oven to 350°F (175°C) and grease two 9-inch round cake pans.
  2. In a mixing bowl, cream together butter and sugar until fluffy.
  3. Add eggs one at a time, mixing well after each addition.
  4. Stir in coconut cream and vanilla extract until fully incorporated.
  5. In another bowl, mix flour, baking powder, and salt.
  6. Gradually add dry ingredients to the wet ingredients, mixing until just combined.
  7. Fold in shredded coconut gently with a spatula.
  8. Pour batter evenly into prepared pans and smooth the tops.
  9. Bake for 30 minutes or until a toothpick comes out clean.
  10. Let cakes cool in the pans for 10 minutes before transferring to wire racks.
  11. For the frosting, whip heavy cream to soft peaks and frost the cooled cakes.
  12. Garnish with additional toasted coconut before serving.

Recipe Notes

  • Use room temperature ingredients for best results.
  • Frosted cake can be stored in the refrigerator for a few days.
  • For a richer flavor, use dark rum in the frosting if desired.

Deliciously Easy Cranberry Pineapple Upside-Down Cake Recipe

Heavenly Cranberry Pineapple Upside-Down Cake: A Tropical Delight

⚖️
Difficulty
Medium

⏲️
Prep Time
20 mins

🕒
Cook Time
40 mins

⏱️
Total Time
60 mins

🍽️
Servings
8

Discover the luxurious flavors of our Heavenly Cranberry Pineapple Upside-Down Cake! This vibrant dessert combines the tartness of fresh cranberries with the sweet juiciness of pineapples, all atop a moist, buttery cake base. A classic dessert reimagined, it evokes exclamations of joy at every festive gathering, making it the perfect centerpiece for your holiday table. With its delightful balance of sweetness and tang, this cake is a celebration for your taste buds!

This stunning upside-down cake not only appeals to your palate but also to your sense of nostalgia, as it transports you to carefree family gatherings and summer picnics. The rich caramelization of the fruit under the cake creates a unique flavor profile that tantalizes the senses, making each slice an irresistible treat. Whether enjoyed at a family brunch or a potluck, this cake promises to leave your guests in awe and begging for the recipe!

Quick Recipe Highlights

  • Flavor Profile: The harmonious combination of sweet pineapple, tart cranberry, and buttery cake creates a unique balance that excites the palate.
  • Texture: This cake features a light, fluffy crumb with tender, juicy fruits that add a delightful contrast to every bite.
  • Aroma: The inviting scent of caramelized fruit and warm vanilla wafts through your kitchen, enticing everyone who enters.
  • Visual Appeal: The glossy, golden-brown top adorned with vibrant red cranberries makes this cake a showstopper on any dessert table.
  • Skill Level Needed: Intermediate baking skills are helpful, though the step-by-step instructions make it accessible to eager bakers.
  • Special Equipment: A round cake pan, parchment paper, and an offset spatula are essential for ensuring flawless presentation.

Recipe Overview

  • Difficulty Level: This cake requires attention to detail but is manageable for novice bakers with a basic understanding of cake preparation.
  • Category: This dessert fits perfectly in the category of cakes and pastries, ideal for dessert tables and special occasions.
  • Cuisine: Rooted in classic American baking traditions, this recipe reflects the joyful spirit of potluck gatherings.
  • Cost: The ingredients used in this recipe are reasonably priced, making it an affordable option for gatherings.
  • Season: The bright flavors of cranberry and pineapple make this cake particularly popular during fall and winter months.
  • Occasion: Perfect for holiday celebrations, birthdays, or any event that calls for a delightful dessert.

Why You’ll Love This Recipe

Experience the indulgent flavor of the Heavenly Cranberry Pineapple Upside-Down Cake, where each aspect has been meticulously crafted for optimal enjoyment. First and foremost, the contrasting flavors of sweet pineapple and tangy cranberries create a mouthwatering taste that appeals to a variety of palates. The cake itself is incredibly moist and fluffy, ensuring a delightful texture that pairs perfectly with the succulent fruits. It’s a dessert that feels indulgent yet remains light enough for repeated enjoyment.

Preparation of this cake is straightforward, making it an excellent choice for beginner bakers. With simple steps and readily available ingredients, this recipe doesn’t require any complicated techniques. The convenience of this recipe lies in its simplicity; it can be made ahead of time and served to guests with little fuss. Simply flip it onto a serving plate, and you have a stunning centerpiece that looks as fabulous as it tastes.

Another reason to love this cake is its nutritional benefits. Using fresh cranberries adds a vibrant flavor while packing a punch of antioxidants, and the pineapples provide vitamin C. Together, they enhance the overall health appeal of this dessert without compromising its pleasurable taste.

Socially, this dessert shines as it’s perfect for sharing at gatherings, fostering connections over its delicious slices. Celebrate with friends and family as they enjoy each bite of this impressive cake, making it an excellent conversation starter.

Cost-effectiveness is another major perk; this cake is very budget-friendly. Utilizing seasonal fruits that are frequently on sale during the holidays means you can impress your guests without overspending, leaving more room for festive surprises.

Historical Background and Cultural Significance

The upside-down cake concept dates back to the late 19th century, emerging from the creative, resourceful kitchens of America. This cake provided a delicious way to use fresh fruits in a single dish that could be prepared simply and served elegantly. The recipe’s origins are rooted deep in a culinary tradition of making do with what one has, leading to a delightful fusion of flavors.

Cultural significance is embedded in the communal experience of sharing a cake like this during family gatherings and celebrations. The upside-down cake invites family members to come together, laugh, and relish the delicious outcome of a simple baking process. It has morphed into a staple dessert during holidays, embodying a sense of warmth and togetherness.

Over the years, the recipe has evolved to incorporate various fruits, showing versatility and creativity in its preparations. While pineapple has often remained a favorite, creative cooks have experimented with other fruits, adapting the cake to many regional and seasonal palettes.

Regional variations of the upside-down cake exist, showcasing local produce and flavor preferences. For instance, in southern regions, peaches might take the place of pineapples, while cranberries may be favored in northeastern states, ensuring there’s a version that resonates with everyone’s taste!

Ingredient Deep Dive

– **Cranberries**: These vibrant berries are rich in antioxidants, helping to support overall health. They add a tartness that perfectly balances the sweetness of the cake. When selecting cranberries, look for firm, glossy berries without blemishes. Store them in the refrigerator in a sealed bag to maintain freshness for several weeks. For alternatives, consider using dried cranberries for a sweeter flavor or other berries like blueberries.

– **Pineapples**: Fresh pineapple provides a juicy sweetness that shines through in this cake. They are high in vitamin C and can aid in digestion. Choose a ripe pineapple that has a fragrant aroma and a slight give when squeezed. Store whole pineapples at room temperature, or cut pieces can be refrigerated for a few days. If fresh isn’t available, canned pineapple makes a good substitution.

– **Butter**: A key ingredient for creating a rich flavor and tender crumb, quality butter enhances the cake’s overall profile. Unsalted butter is preferred for controlled saltiness. Always store butter wrapped in the refrigerator for optimal freshness. If necessary, substitutes include margarine, although the flavor may differ slightly.

– **Flour**: All-purpose flour is the foundation for this cake, providing structure and stability. For those gluten-sensitive, alternatives like almond or oat flour can be used, adjusting the ratios accordingly.

– **Brown Sugar**: Using brown sugar adds a lovely caramel flavor and moisture to the cake. It contains molasses, giving it unique color and richness. If you don’t have brown sugar, mixing white sugar with a small amount of molasses can work as a substitute.

Common Mistakes to Avoid

  • Overmixing the Batter: This can lead to a dense cake. Mix until just combined for a lighter texture.
  • Using Cold Ingredients: Cold ingredients can prevent proper mixing. Ensure butter and eggs are at room temperature.
  • Not Preheating the Oven: A properly heated oven is crucial for the cake’s rise. Always preheat to the specified temperature.
  • Forgetting to Grease the Pan: Not greasing the pan can lead to sticking. Don’t skip this step to ensure smooth removal!
  • Using Incorrect Measurements: Baking is a science. Measure ingredients accurately for the best results.
  • Skipping the Cooling Step: Let the cake cool briefly in the pan before flipping to maintain its structure.
  • Overbaking: This can dry out the cake. Keep a close eye on the baking time to avoid this.
  • Neglecting to Let the Cake Set: Allow the cake to sit after baking to enhance flavors and make cutting easier.
  • Choosing Low-Quality Ingredients: Quality matters in baking! Always select the best ingredients for maximum flavor.
  • Ignoring the Recipe: Each step is crucial in creating the perfect cake. Follow directions precisely for the best outcome.

Essential Techniques

To create the perfect Heavenly Cranberry Pineapple Upside-Down Cake, mastery of a few essential techniques is required. First, understand the importance of caramelization. This technique involves slowly cooking sugar until it turns golden and sweet. It’s essential for creating that delicious topping, so keep a close eye—burnt sugar is no good. To master, ensure your heat is low and stir occasionally until a beautiful amber hue occurs.

Another key technique is the creaming method. This involves beating butter and sugar until light and fluffy, which incorporates air into the batter. This step is critical to achieving a light crumb. The common pitfalls include not fully creaming the mixture, leading to a denser cake, so remember: thoroughness counts! Look for a pale, fluffy mixture before adding eggs.

Pro Tips for Perfect Heavenly Cranberry Pineapple Upside-Down Cake

1. **Use Fresh Ingredients**: Whenever possible, opt for fresh cranberries and ripe pineapples to elevate the flavor of your cake.
2. **Check for Doneness Early**: Use a toothpick inserted into the center of the cake to check for doneness. It should come out clean or with a few moist crumbs.
3. **Cool Before Serving**: Allow your cake to cool properly to enhance the flavors and make it easier to slice.
4. **Invert Carefully**: When flipping the cake, perform this step over a large plate to catch any drippings and preserve its presentation.
5. **Experiment with Toppings**: Consider adding whipped cream or a scoop of vanilla ice cream to create an extra indulgent dessert.
6. **Store Properly**: If you have leftovers, store them in an airtight container in the fridge to maintain freshness.
7. **Avoid Overmixing**: Mix the batter just until combined to prevent a tough texture.
8. **Add Spices**: Don’t hesitate to incorporate spices like cinnamon or nutmeg to add depth to the flavor profile.

Variations and Adaptations

This Heavenly Cranberry Pineapple Upside-Down Cake is incredibly versatile. You can easily swap the pineapple for other fruits like peaches or plums, offering different fruity flavors while maintaining the essence of the cake. Seasonal adaptations could include adding pumpkin spice during fall or incorporating zesty citrus during the summer, bringing brightness to the dish.

For dietary modifications, replace traditional flour with gluten-free alternatives to accommodate guests with sensitivities. If you’re looking for a lower-sugar option, try using a natural sweetener like maple syrup in the batter while maintaining the usual measurement for caramelization.

Flavor variations can include adding nuts such as pecans or walnuts, providing a delightful crunch alongside the soft cake and juicy fruits. Lastly, consider presentation alternatives like serving the cake in muffin tins for individual servings or pairing it with a colorful fruit compote to enhance its visual appeal.

Serving and Presentation Guide

Plating techniques can be simple yet elegant. For a stunning presentation, place a slice of your Heavenly Cranberry Pineapple Upside-Down Cake on a beautiful dessert plate paired with a dollop of whipped cream. Garnish with fresh cranberries or a sprig of mint for a pop of color.

Garnishing ideas extend beyond just cream; consider drizzling a warm caramel sauce over each slice for an extra luxurious touch. While traditionally served at room temperature, consider warming each slice slightly in the microwave for a comforting, just-out-of-the-oven experience.

Temperature considerations are key here; serving this cake with a scoop of ice cream creates a delightful contrast in temperature and texture. Control portion sizes by cutting 1-inch slices to allow your guests to sample without feeling overwhelmed.

Wine and Beverage Pairing

Pairing drinks with your Heavenly Cranberry Pineapple Upside-Down Cake can lift the entire dining experience. A sparkling white wine, like Prosecco, complements the cake’s sweetness while enhancing its fruit flavors. For a non-alcoholic option, consider serving a refreshing cranberry spritzer with lemon-lime soda.

Coffee lovers can enjoy a smooth medium roast coffee alongside the cake, enhancing the rich flavors and offering a delightful contrast. Ensure that drinks served with dessert are chilled, enhancing the overall refreshment of your dessert pairing.

Storage and Shelf Life

For optimal storage, keep your Heavenly Cranberry Pineapple Upside-Down Cake covered in the refrigerator to extend its freshness. It can last up to 4 days when properly sealed, maintaining its delightful flavor. Use an airtight container to prevent the cake from absorbing any odors from the fridge.

When placing it in a container, it’s a good idea to place parchment paper between the cake and the lid to absorb moisture and prevent sogginess. Signs of spoilage include an off smell, discoloration, or mold, which should prompt immediate disposal.

Should you wish to freeze the cake, wrap it tightly in plastic wrap and then foil for long-term storage. It can typically be frozen for 2-3 months. Thaw in the fridge overnight before serving again.

Make Ahead Strategies

To streamline hosting, consider baking the Heavenly Cranberry Pineapple Upside-Down Cake a day prior to serving. Prepare the cake entirely and allow it to cool before storing it in the refrigerator overnight. When ready to serve, inverting it onto a platter allows for easy presentation without last-minute fuss.

If you’re making it further in advance, consider pre-measuring and storing your dry ingredients to expedite the mixing process on baking day. Quality impacts can be minimized by ensuring that the cake is kept sealed, preserving its moisture and flavor integrity until serving.

As an added bonus, fresh fruits can be added just before serving for extra flavor and presentation. Whipped cream or vanilla ice cream can also be prepared a few hours ahead of time, leaving more opportunity to enjoy your guests’ company.

Scaling Instructions

Scaling the Heavenly Cranberry Pineapple Upside-Down Cake is simple and effective for larger gatherings or meal prep. If halving the recipe, reduce each ingredient proportionately, utilizing a smaller cake pan to maintain cooking parameters. Baking time may need adjustment; check for doneness earlier as smaller cakes will typically bake faster.

Doubling or tripling the recipe can be achieved by following the same proportions, ensuring to use a larger cake pan or multiple pans simultaneously. Be mindful of the baking time, as larger cakes may take longer to bake through.

Equipment adjustments may include having extra mixing bowls and pans available, while timings might be reflected upon increasing overall quantity. For storage, consider dividing the cake into smaller portions before freezing to ensure easier servings later on.

Nutritional Deep Dive

The nutritional analysis of the Heavenly Cranberry Pineapple Upside-Down Cake reveals a delightful balance of flavors and ingredients that cater to various dietary needs. A standard slice can offer around 200-250 calories, largely derived from the cake base and natural sugars in the fruits.

In terms of micronutrients, vitamins like C and A from the cranberries and pineapples support immune health. The cake also provides a small amount of fiber, thanks to the fruit portions, which can help maintain digestive health.

For portion analysis, keep in mind that moderation is key. While this cake provides joyful indulgence, controlling portion sizes helps maintain a balanced diet. With its high sugar content, it can contribute substantially to daily sugar intake if consumed in excess; however, sharing at gatherings promotes mindful consumption.

Dietary Adaptations

The Heavenly Cranberry Pineapple Upside-Down Cake can easily accommodate various dietary needs. For gluten-free adaptations, substitute all-purpose flour with gluten-free blends—which typically perform well in baking, though adjustments may be necessary for texture.

For dairy-free versions, use plant-based butter and non-dairy milk enhancers, ensuring the cake remains moist and fluffy while catering to those avoiding dairy. Vegans can adapt the recipe by replacing eggs with flaxseed meal or chia seeds, optimizing the structure while excluding animal products.

If you’re interested in a low-carb or keto version, substitute sugars with stevia or erythritol while using almond flour instead of regular flour. Each of these alternatives has its unique flavors and textures but could yield a cake event with the essence of indulgence.

Other specific diets, like paleo or low-FODMAP, can be catered to through careful ingredient selection as well. Adaptations can maintain the core flavor while enhancing accessibility for all dietary preferences.

Troubleshooting Guide

Texture issues often arise if the batter is overmixed; this can ultimately lead to a dense cake. Pay attention to the mixing stage to prevent this. If your cake has too crumbly a texture, consider ensuring adequate fat ratios and moisture levels in your ingredients.

Flavor balance can be adjusted if your cake turns overly sweet. Adding a pinch of salt or a dash of citrus can generally help to round out flavors and enhance overall taste. Should your pineapple turn overly dominant, consider reducing the quantity in future batches.

Temperature problems may occur if your oven runs hotter than specified. Always use an oven thermometer if unsure. If your cake is baking unevenly, rotate the pan halfway through to promote uniform baking.

Equipment challenges can pop up if using an older pan; it may not heat evenly. Therefore, consider upgrading or using separate, more reliable bakeware as needed.

Ingredient substitutions can lead to unexpected results, especially if you’re replacing key elements like butter with oil. Test small portions first before committing to large batches in substitution scenarios.

Timing concerns generally occur if not accounting for variations in oven models. Always monitor bake times and adjust accordingly, checking for doneness frequently to avoid overbaking.

Recipe Success Stories

Community feedback on the Heavenly Cranberry Pineapple Upside-Down Cake has been overwhelmingly positive, with many highlighting its beautiful presentation and balanced flavors. Readers report successful baking experiences, often sharing delightful variations they’ve implemented, such as incorporating spices or switching up fruits.

Variation successes include those who have tried using different combinations of berries, turning the cake into a versatile option for any season. Readers enjoy sharing tips for achieving the most impressive fruit presentations as well, motivating others in their baking journeys.

Adaptation stories reveal how folks have customized this classic cake to fit their family’s dietary preferences, enhancing the recipe’s accessibility. Photography tips and visuals shared by those who’ve baked it have showcased the beauty of each slice, inspiring others to try their hand at recreating the enticing experience.

Frequently Asked Questions

Can I use frozen cranberries for this recipe?
Yes, frozen cranberries can work well, though they may release extra moisture. Ensure to thеm out and pat dry before using to maintain texture.

How do I store leftover cake?
To store, wrap the cake tightly in plastic wrap or place it in an airtight container in the refrigerator. It should last for up to four days.

Can I substitute other fruits for cranberries?
Absolutely! You can try using blueberries, raspberries, or peaches, tailoring the flavor to your liking.

What if I don’t have a round cake pan?
If you don’t have a round cake pan, you can use a square or rectangular pan. Just adjust the baking time as needed, keeping an eye on it for doneness.

Is this cake suitable for freezing?
Yes, you can freeze the cake for up to 3 months. Wrap it tightly in plastic and then in foil before storing.

Can I make this cake gluten-free?
Yes, you can substitute all-purpose flour with a gluten-free baking blend. It works well, though you may need to adjust the ratios slightly.

What can I serve with this cake?
This cake pairs wonderfully with whipped cream, vanilla ice cream, or a fruit compote.

Can I make this cake ahead of time?
Yes! You can prepare the cake a day in advance and store it in the fridge. Just serve it at room temperature or lightly warmed.

Is it necessary to let the cake cool before flipping?
It’s essential to let the cake cool in the pan for a short period, which helps maintain its structure during inversion.

Can I add nuts to this cake?
Definitely! Chopped nuts can add a nice crunch and flavor. Just distribute them evenly on the bottom of the pan before adding the cake batter.

Additional Resources

Looking for more delightful recipes? Check out our collection of fruit desserts, including Berry Bliss Cake and Classic Pineapple Cake. Explore technique guides that feature tips on mastering the creaming method or caramelization techniques to enhance your baking skills.

In need of ingredient information? Check our posts detailing the best seasonal fruits, their benefits, and when to buy them. Recommendations on essential baking equipment can also ensure you have the right tools for success in the kitchen.

Furthermore, explore seasonal variations that bring new life to classic desserts, allowing you to adjust flavors and ingredients based on what’s fresh and available at any given time.

Join the Conversation

We’d love to hear your thoughts and experiences with the Heavenly Cranberry Pineapple Upside-Down Cake! Share your beautiful photos on social media using #HeavenlyCakeOfJoy and connect with fellow bakers as they attempt their versions.

Photography tips for showcasing your cake include using natural light and contoured plates for dramatic effect. Don’t forget to leave feedback about your baking experience, as your insights can inspire and help fellow bakers in the community to widen their horizons.

Let us know about your own variations or adaptations—the more ideas we share, the more delicious possibilities await! Connect with us and join our vibrant community of baking enthusiasts dedicated to sharing the joy of cooking!

The Recipe

Heavenly Cranberry Pineapple Upside-Down Cake

Serves: 8

Prep Time: 20 mins

Cook Time: 40 mins

Total Time: 60 mins

Kitchen Equipment Needed

  • Round Cake Pan
  • Mixing Bowls
  • Electric Mixer
  • Offset Spatula
  • Measuring Cups and Spoons

Ingredients

  • 1 cup fresh cranberries
  • 1 cup pineapple chunks (fresh or canned)
  • 1 cup brown sugar
  • 1/2 cup unsalted butter, softened
  • 1 cup all-purpose flour
  • 1 tsp baking powder
  • 1/2 tsp salt
  • 1 cup granulated sugar
  • 2 large eggs
  • 1 tsp vanilla extract

Directions

  1. Preheat your oven to 350°F (175°C).
  2. In a small saucepan, melt the butter and brown sugar over medium heat until bubbly. Pour into the bottom of the pan and arrange the cranberries and pineapple on top.
  3. In a bowl, mix the flour, baking powder, and salt; set aside.
  4. In a separate bowl, cream together the softened butter and granulated sugar until light and fluffy. Add the eggs one at a time, mixing well after each addition.
  5. Stir in the vanilla extract and then gradually mix in the dry ingredients until just combined.
  6. Pour the batter over the fruit in the pan evenly. Bake for 35-40 minutes until a toothpick comes out clean.
  7. Let the cake cool for 10 minutes before inverting it onto a serving plate. Serve warm or at room temperature.

Recipe Notes

  • For a richer flavor, consider adding a pinch of cinnamon to the batter.
  • Leftover cake can be refrigerated for up to four days, or frozen for longer storage.
  • Experiment with other fruit combinations for a unique twist on this classic dish.