Best Coffee Caramel Cheesecake Bars – Rich and Creamy

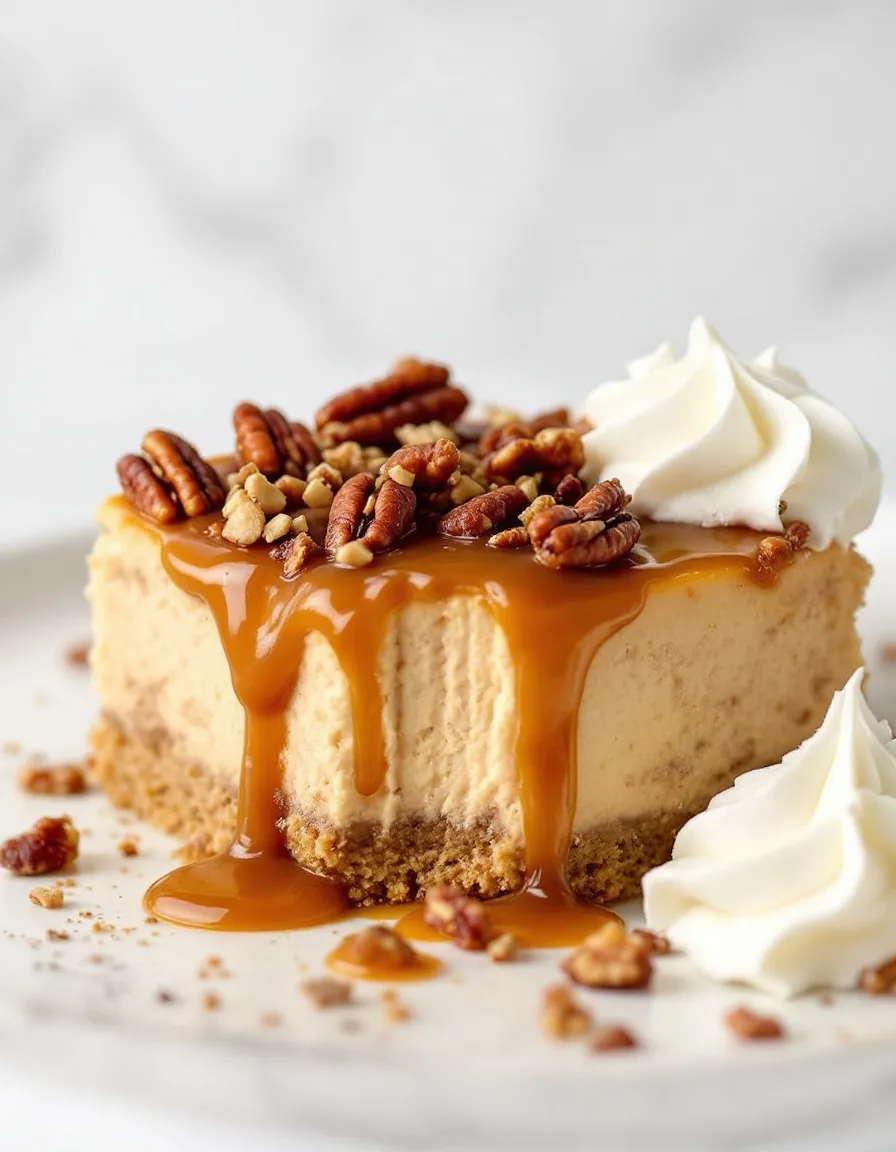
Decadent Coffee Caramel Cheesecake Bars: A Sweet Indulgence

⚖️
Difficulty
Medium

⏲️
Prep Time
30 mins

🕒
Cook Time
45 mins

⏱️
Total Time
75 mins

🍽️
Servings
12 bars

There’s nothing quite like the heavenly combination of coffee and caramel, and these Coffee Caramel Cheesecake Bars are the perfect dessert that brings your taste buds to life. Imagine a creamy cheesecake filling infused with rich coffee flavor, layered atop a buttery caramel topping and a crumbly graham cracker crust. This dessert not only satisfies your sweet tooth but also gives you a delightful caffeine kick, making it ideal for any coffee lover.

These cheesecake bars are versatile enough for casual gatherings or special celebrations. The contrasting textures of the smooth cheesecake, the gooey caramel, and the crunchy crust create a symphony of flavors that will leave your guests craving more. Whether enjoyed at a brunch or dessert table, these bars elevate any occasion, inviting conversations that linger a little longer over delicious bites.

Quick Recipe Highlights

  • Flavor Profile: A perfect blend of rich coffee and smooth caramel balanced with the slight tang of cheesecake.
  • Texture: A creamy cheesecake filling that melts in your mouth, contrasted with a crunchy base and a gooey caramel topping.
  • Aroma: The inviting scent of freshly brewed coffee combined with the sweet fragrance of caramel wafts through the air as these bars bake.
  • Visual Appeal: The gorgeous layers of golden caramel and creamy cheesecake, topped with a sprinkle of chocolate or coffee grounds, make for an eye-catching dessert.
  • Skill Level Needed: While not overly complex, a bit of patience is needed to ensure each layer is perfectly executed.
  • Special Equipment: An 8×8 baking pan and a handheld mixer are essential for achieving the best texture.

Recipe Overview

  • Difficulty Level: The medium difficulty arises mainly from the multiple layers in the recipe, but each step is simple and rewarding.
  • Category: These bars fall into the dessert category, perfect for satisfying sweet cravings after a meal.
  • Cuisine: Featuring a combination of American and café-inspired elements, this recipe embodies a popular trend in contemporary dessert making.
  • Cost: Overall, the ingredients are cost-effective, making it a delicious yet budget-friendly treat.
  • Season: Enjoy these coffee caramel cheesecake bars year-round, but especially during colder months when rich desserts are most appealing.
  • Occasion: Ideal for coffee-themed gatherings, holiday parties, and family get-togethers.

Why You’ll Love This Recipe

First and foremost, the taste and texture of these Coffee Caramel Cheesecake Bars are simply divine. With every bite, you experience a luxurious creaminess from the cheesecake paired beautifully with the sticky sweetness of caramel. The hint of coffee adds depth, tying all flavors together and creating an irresistible treat that can be enjoyed at any time of day.

In terms of convenience, these bars can be made ahead of time and stored in the refrigerator, making them perfect for busy schedules. The preparation involves simple steps, and once you’ve made them a couple of times, they become second nature. This allows you to spend less time in the kitchen and more time with your family and friends.

From a nutritional perspective, the ingredients used can be tailored slightly to fit within various dietary preferences. For example, opting for lower-fat cream cheese can lighten the dessert slightly without sacrificing too much flavor.

The social and entertaining value of these bars is considerable. Cheesecake bars are great for sharing, and they serve as a fantastic conversation starter. Bringing a tray of these to a gathering will surely impress your guests and encourage them to ask for the recipe!

Lastly, the cost-effectiveness of making cheesecake bars at home is remarkable. You can whip up a large batch for a fraction of the price compared to purchasing similar desserts from a café or bakery.

Historical Background and Cultural Significance

The origin of cheesecake can be traced back to ancient Greece, where cheesecake was enjoyed by athletes during the first Olympic Games. Over time, variations of cheesecake have emerged globally, with each culture adding its unique spin. The American version has evolved, particularly indulging in flavors like coffee and caramel, which has gained much popularity in recent years.

Coffee desserts have their roots in the global love for coffee as a beverage and culinary ingredient. The rise of café culture has coalesced with the cheesecake trend, creating beloved recipes like this one that blends the two worlds. The popularity of cheesecake bars has further solidified their place in dessert menus across the world.

As desserts continue to evolve, coffee caramel cheesecake bars illustrate how traditional recipes can be modernized. Over the years, recipe variations have included everything from fruity toppings to different crusts, making it a flexible dessert option.

Regionally, variations of cheesecake can be found in various forms, from New York-style cheesecakes to Italian ricotta-based versions. These regional distinctions speak to the adaptability of cheesecake, allowing it to fit different palates and occasions.

Ingredient Deep Dive

Cream Cheese: A staple in cheesecake recipes, cream cheese provides the creamy consistency and slight tang that makes cheesecakes special. It originated in the United States in the late 19th century and is rich in phosphorus and calcium. Always choose full-fat cream cheese for the best texture.

For storage, keep it in the refrigerator and consume it before the expiration date. If you’re looking for a lighter option, Neufchâtel cheese can serve as a good substitute, although it will alter the flavor slightly.

Caramel Sauce: This sweet sauce adds richness and depth to the bars. Caramel has origins in Europe, dating back to the 18th century, and the process of making it requires patience and precision. It contains sugar, which provides quick energy, but keep in mind that it’s high in calories.

To ensure the best flavor, avoid pre-made caramel sauces that contain additives. Homemade caramel can be stored in the refrigerator for a week, or you can make it from scratch using sugar, butter, and cream. For a fun twist, consider using flavored caramel, such as sea salt or espresso.

Common Mistakes to Avoid

  • Not allowing the cream cheese to soften before mixing, which can lead to a lumpy filling.
  • Overmixing the batter, causing air bubbles that lead to cracks.
  • Skipping the chilling time, resulting in a gooey texture rather than a firm bar.
  • Using warm caramel sauce when layering, which can melt the cheesecake layer.
  • Not using parchment paper in the baking pan, making it difficult to remove the bars.
  • Failing to measure ingredients accurately, which can alter the final flavor and texture.
  • Rushing the cooling process, as it can compromise the structure of the bars.
  • Not letting the bars sit before cutting, leading to messy slices.
  • Substituting ingredients without considering their properties, affecting the taste.
  • Ignoring the baking time, as overbaking can lead to dry bars.

Essential Techniques

To mastering the crust for your Coffee Caramel Cheesecake Bars, it’s essential to combine the graham cracker crumbs with the melted butter until fully incorporated. This ensures that every bite has that delicious buttery flavor. Common pitfalls include not pressing the crust firmly enough, which can lead to a crumbly base.

When preparing the cheesecake filling, it’s crucial to blend it at medium speed to avoid incorporating too much air. This prevents cracks during baking. Look for visual cues, such as a smooth and creamy texture without lumps, before proceeding to the next step.

Pro Tips for Perfect Coffee Caramel Cheesecake Bars

1. Always use room temperature cream cheese for a smooth texture.

2. Allow the cheesecake bars to cool slowly outside of the oven before transferring them to the refrigerator.

3. Top the bars with finely chopped espresso beans for an extra flavor kick.

4. Chill the bars for at least four hours for best results.

5. Drizzle extra caramel sauce over the top before serving for presentation.

6. Use a sharp knife to cut the bars for clean edges.

7. Serve with a dollop of whipped cream for an added creamy element.

8. Customize your crust by incorporating nuts or chocolate for variation.

Variations and Adaptations

Regional variations of these coffee caramel cheesecake bars include adding spices like cinnamon or nutmeg for a warm flavor. Additionally, consider seasonal adaptations by introducing pumpkin spice during fall or peppermint for winter holidays.

For dietary modifications, you can create a vegan version using cashew cream and coconut cream for the cheesecake layer. Low-carb options can be achieved by using almond flour in the crust and sugar substitutes in the filling, adapting to specific dietary needs.

Serving and Presentation Guide

For plating, use a clean, minimalist approach, placing the bars on a contrasting-colored plate. Garnishing with a sprinkle of cocoa powder, chocolate shavings, or a drizzle of caramel will elevate the dish’s visual appeal.

Traditional accompaniments to serve alongside these bars include fresh berries or a scoop of vanilla ice cream. Both add a refreshing contrast to the richness of the cheesecake while providing sweetness.

Wine and Beverage Pairing

For wine pairing, a sweet dessert wine or a port complements the rich flavors beautifully. If you prefer non-alcoholic options, a rich coffee or a crisp iced coffee would enhance the coffee flavor within the bars.

Additionally, pairing with tea, particularly a robust black tea, can provide a lovely balance to the sweetness. Ensure that beverages are served chilled or at room temperature for the best tasting experience.

Storage and Shelf Life

To store your Coffee Caramel Cheesecake Bars, keep them in an airtight container in the refrigerator. This will help maintain their freshness for up to a week. For longer storage, consider freezing the bars wrapped tightly in plastic wrap and foil.

When thawing frozen bars, place them in the refrigerator for a few hours or overnight to preserve their texture. Signs of spoilage include an off smell or changes in texture, such as excessive moisture.

Make Ahead Strategies

To make these cheesecake bars ahead of time, prepare the crust and filling a day in advance, storing them separately in the refrigerator. This not only saves time but also allows the flavors to meld beautifully.

When ready to bake, simply assemble and follow the recipe directions. If time permits, letting the bars sit overnight after baking enhances the flavors and texture significantly.

Scaling Instructions

For halving the recipe, simply divide all ingredients by two and use a smaller baking pan, ensuring that the baking time is adjusted accordingly. If doubling or tripling the recipe, increase pan size accordingly and check doneness with a toothpick towards the end of the baking process.

When scaling, keep in mind that cooking times and temperatures may need slight adjustments, particularly if using larger pans. Regularly check for doneness to avoid overbaking.

Nutritional Deep Dive

The macro breakdown of a single bar will typically provide a balance of carbohydrates from the crust, fats from cream cheese and butter, and protein, creating a satisfying dessert. Including coffee in the recipe offers antioxidants, providing some health benefits while indulging in a sweet treat.

It is important to consider portion sizes as these bars are rich and calorie-dense. Balance this dessert with healthier options in your diet throughout the day for weight management. Additionally, moderation is key when enjoying these delightful bars.

Dietary Adaptations

For gluten-free options, substitute traditional graham crackers with gluten-free alternatives, while ensuring that all other ingredients are labelled gluten-free. A dairy-free version can be crafted using coconut cream and dairy-free cream cheese.

If you’re considering vegan adaptations, use flax eggs or a commercial egg replacement in place of eggs, along with plant-based cream cheese and non-dairy caramel. Adjusting the sugar type can cater to low-carb or keto diets as well.

Troubleshooting Guide

If you encounter texture issues, such as cracks on the surface, it could be due to overmixing or rapid temperature changes during baking. Ensure your ingredients are at room temperature before mixing, and avoid opening the oven door frequently.

Flavor balance can be adjusted by testing for sweetness before adding caramel or consideration for salt. If the cheesecake feels too dense, reducing the baking time and checking for doneness can help create a softer texture.

Recipe Success Stories

Many have found success with this recipe, sharing their variations that include flavored crusts or different toppings like fruit or nuts. Community feedback often highlights the rich flavor and the nostalgic feel of cheesecakes, encouraging others to share their adaptations.

Through social media, fans of these bars often showcase their own creative twists, inspiring even more stories of delicious outcomes. Such engagement fosters a sense of community among dessert lovers eager to explore culinary creativity together.

Frequently Asked Questions

Can I freeze these cheesecake bars? Yes, they can be frozen! Wrap them tightly in foil and plastic wrap, and they will last for up to three months. Thaw them in the refrigerator before serving for the best flavor and texture.

What is the best way to cut cheesecake bars? Use a sharp knife and wipe it clean between cuts to maintain clean edges. This method will help you achieve perfectly sliced bars.

Can I substitute the coffee with something else? Absolutely! You can replace the coffee with strong brewed tea or omit it entirely for a traditional caramel cheesecake flavor.

Is there a way to make these bars less sweet? Reducing the sugar in the cheesecake filling or opting for less sweet toppings can help balance the flavors without sacrificing the overall taste.

Do I need to use eggs in this recipe? No, you can use flax eggs or another egg substitute if you are looking for a vegan option while maintaining the structure of the cheesecake.

What type of caramel should I use? You can use homemade caramel for the best flavor, but store-bought caramel sauce can be a faster alternative if needed.

Can I use a different kind of crust? Yes! Experiment with different crusts made from nuts, cookies, or even chocolate for a more decadent flavor.

How long do these bars last in the fridge? They can stay fresh in an airtight container in the refrigerator for about one week.

Can I make these bars dairy-free? Yes, you can substitute the cream cheese with a non-dairy alternative and use plant-based butter or margarine for the crust.

What should I serve with these bars? They pair wonderfully with fresh fruit, whipped cream, or even a scoop of ice cream for an indulgent treat.

Additional Resources

If you enjoyed making these Coffee Caramel Cheesecake Bars, you might also like related recipes such as classic cheesecake or caramel brownies with coffee flavors. Additionally, be sure to check out ingredient guides for tips on selecting cream cheese and making homemade caramel, as well as equipment recommendations for baking cheesecake bars.

Join the Conversation

We love seeing your takes on our recipes, so be sure to share your creations on social media! Use the hashtag #CoffeeCaramelCheesecakeBars, and don’t hesitate to leave a review or tips in the comments section. Join our community as we share recipes, tips, and culinary adventures inspired by the love of baking!

The Recipe

Coffee Caramel Cheesecake Bars

Serves: 12 bars

Prep Time: 30 mins

Cook Time: 45 mins

Total Time: 75 mins

Kitchen Equipment Needed

  • 8×8 baking pan
  • Mixing bowls
  • Handheld mixer
  • Parchment paper
  • Measuring cups and spoons

Ingredients

  • 1 ½ cups graham cracker crumbs
  • ½ cup unsalted butter, melted
  • 2 packages (8 oz each) cream cheese, softened
  • 1 cup sugar
  • 2 large eggs
  • ½ cup brewed coffee, cooled
  • 1 cup caramel sauce, plus extra for topping
  • ½ teaspoon vanilla extract
  • Pinch of salt

Directions

  1. Preheat your oven to 350°F (175°C) and line the baking pan with parchment paper.
  2. In a mixing bowl, combine graham cracker crumbs and melted butter, then press the mixture into the bottom of the prepared pan to form the crust.
  3. Bake the crust for 10 minutes, then remove it from the oven and set aside to cool slightly.
  4. In another bowl, beat the softened cream cheese and sugar until smooth and creamy.
  5. Add in the eggs one at a time, mixing well after each addition; then add the brewed coffee, caramel sauce, vanilla extract, and salt, blending until fully combined.
  6. Pour the cheesecake mixture over the crust and spread it evenly.
  7. Bake for 30-35 minutes or until the center is set but slightly jiggly. Allow to cool at room temperature.
  8. Drizzle additional caramel sauce over the top and refrigerate for at least 4 hours before cutting into bars.

Recipe Notes

  • For the best texture, ensure the cream cheese is at room temperature before mixing.
  • You can substitute homemade caramel for store-bought if you prefer.
  • Experiment with different toppings like chopped nuts or chocolate chips to add a new twist!

Easy Apple Fritter Bread with Cinnamon Sugar Swirl

Delicious Apple Fritter Bread: A Sweet Treat for Every Occasion

⚖️
Difficulty
Easy

⏲️
Prep Time
20 mins

🕒
Cook Time
60 mins

⏱️
Total Time
80 mins

🍽️
Servings
8

Apple Fritter Bread is a delightful fusion of flavors and textures, perfect for any time of the day. Imagine fluffy bread swirled with pieces of sweet, cinnamon-spiced apples, topped with a luscious glaze that melts in your mouth. This recipe captures the essence of traditional apple fritters but in a sliceable form, making it a fantastic choice for breakfast, brunch, or a sweet afternoon snack. The aroma of freshly baked bread mingled with the warm scent of apples and cinnamon will instantly draw everyone to your kitchen, creating a welcoming and satisfying atmosphere.

What sets this Apple Fritter Bread apart is not just its taste but its simplicity. The ingredients are straightforward, and the preparation is easy enough for novice bakers. Each bite offers a satisfying crunch from the topping, while the tender bread beneath is filled with juicy apple pieces, making it a true comfort food. It’s a wonderful choice to impress guests or to enjoy with family, bringing everyone together for a slice of warmth and nostalgia.

Quick Recipe Highlights

  • Flavor Profile: This apple fritter bread boasts a delicious blend of sweet apples, warm spices, and creamy glaze, making it a delightful treat.
  • Texture: Expect a tender, moist bread base with a crunchy topping and bursts of juicy apple pieces throughout.
  • Aroma: The baking process fills your kitchen with an intoxicating fragrance of cinnamon and baked apples, creating an irresistible scent.
  • Visual Appeal: Golden-brown edges with a shiny glaze on top make this bread visually enticing and mouth-watering.
  • Skill Level Needed: This recipe is beginner-friendly and requires minimal baking skills, making it accessible for everyone.
  • Special Equipment: A loaf pan is essential for baking, along with basic mixing tools like bowls and a whisk.

Recipe Overview

  • Difficulty Level: Apple Fritter Bread is classified as easy, making it perfect for beginner bakers. The clear instructions and simple ingredients allow you to achieve a delightful result without stress.
  • Category: This recipe fits perfectly into breakfast or brunch categories, but it can also be enjoyed as a dessert or snack due to its sweet, satisfying nature.
  • Cuisine: While rooted in American baked goods, variations of apple fritters exist in different cultures, showcasing the universal appeal of apples and sweet breads.
  • Cost: This recipe is budget-friendly, usually costing around $10, depending on seasonal apple prices and pantry staples.
  • Season: Fall is the best season for this recipe, as fresh apples are in abundance, enhancing flavor and freshness.
  • Occasion: Ideal for family gatherings, coffee dates, or holiday celebrations, this recipe brings warmth and love to any occasion.

Why You’ll Love This Recipe

Apple Fritter Bread is not only a treat for your taste buds but an experience worth savoring. The combination of soft bread interspersed with sweet, caramelized apples, blended with aromatic spices, creates an enticing taste profile that you simply cannot resist. Every slice feels like warmth wrapped in nostalgia, reminding you of comforting bakeries and cozy family kitchens.

One of the greatest advantages of this recipe is its convenience. It requires no deep frying or complicated techniques, making it accessible for bakers at any level. You can whip up the batter in mere minutes, and while it bakes, you have time to enjoy that sweet smell wafting through your home, a benefit that elevates the whole baking experience. Moreover, once it’s cooled, this bread can be easily sliced, making it perfect for serving guests or gifting to family and friends.

In terms of nutrition, apples are not just delicious; they are also packed with vitamins, fiber, and antioxidants. Incorporating them into this recipe brings a healthful aspect to an otherwise indulgent treat. So, you can indulge in a slice of this bread while knowing you’re also getting some beneficial nutrients.

Socially, nothing gathers people quite like baked goods. Sharing a loaf of freshly made Apple Fritter Bread can turn a simple coffee gathering into a special event. Its appealing look and taste can inspire conversations and connections, making it a perfect centerpiece for gatherings.

Finally, the cost-effectiveness of this recipe can’t be overstated. Using commonly found ingredients allows anyone to create a delicious, homemade treat without breaking the bank. Making your own Apple Fritter Bread is a worthwhile endeavor that ensures you have a fresh, delightful product ready to share.

Historical Background and Cultural Significance

The origins of apple fritters can be traced back to various cultures that have utilized apples, particularly in Europe. Many countries have their own versions of apple-based desserts, often celebrating local apple varieties and seasonal harvests. The apple fritter itself, fried and sweetened, can be found in culinary traditions from French beignets to Dutch apple turnovers, highlighting its widespread appeal.

Culturally, apple fritters have been a source of comfort for many families. They embody the essence of home-cooked goodness, often passed down through generations. The charm of this dish lies in its ability to evoke memories, creating a nostalgic link to family gatherings and childhood.

Over time, the evolution of the recipe has moved from deep-fried pastries to the more practical oven-baked versions like Apple Fritter Bread. This adaptation caters to modern baking preferences, focusing on ease while maintaining the flavorful essence of the original.

Moreover, regional variations have emerged as different cultures adapt the basic recipe to include unique spices, fruits, and techniques. Each version tells a story of its origin, reflecting local tastes and available ingredients, making it a rich part of global culinary tradition.

Ingredient Deep Dive

Apples

Apples hold significant cultural importance in many societies, often symbolizing health and knowledge. They are a featured ingredient in countless desserts from pies to crumbles. The nutritional benefits of apples are noteworthy; they are high in dietary fiber and vitamin C, offering various health advantages.

When selecting apples for this recipe, look for firm, sweet varieties such as Granny Smith or Honeycrisp to ensure they hold their shape during baking. Store apples in the fridge to prolong freshness, and for substitutions, consider using pears or even peaches for a twist.

Flour

Flour is the backbone of most baking projects, delivering structure and texture to baked goods. The nutritional benefits of flour, particularly whole wheat flour, include added fiber and essential nutrients.

When choosing flour, opt for all-purpose flour for a balanced texture. Proper storage involves keeping it in a cool, dry place to prevent spoilage. You can substitute with gluten-free flour blends, which yield similar results with minor adjustments.

Common Mistakes to Avoid

  • Overmixing the batter can lead to dense bread. Mix until just combined for a light, airy texture.
  • Using warm apples that release moisture can make the bread soggy. Ensure apples are cooled and well-drained after cooking.
  • Not properly greasing the loaf pan may cause sticking. Always use a non-stick spray or butter thoroughly.
  • Skipping the glaze can result in a less flavorful topping. The glaze adds sweetness and visual appeal that completes the dish.
  • Failing to check for doneness can lead to soggy or raw bread. Use a toothpick inserted into the center to check for doneness.
  • Using too much cinnamon can overpower the apple flavor. Measure spices carefully to maintain a balanced taste.
  • Not letting the bread cool before slicing can cause it to fall apart. Allow it to set to maintain its shape.
  • Forgetting to measure ingredients accurately may affect texture. Always use measuring cups and spoons for precision.
  • Rushing the process can impact flavor. Allow the bread to develop fully during baking for the best taste and texture.
  • Ignoring the need for a cooling rack can lead to a soggy bottom. Letting the bread cool properly ensures a great texture.

Essential Techniques

Mixing the Batter

Mixing the batter correctly is crucial in achieving the right texture and flavor. It’s important to combine wet and dry ingredients until just incorporated, as overmixing can make the bread tough. Visual cues for success include a thick, slightly lumpy batter with no visible dry flour.

Creating the Glaze

The glaze adds a finishing touch to your Apple Fritter Bread, enhancing its sweetness and shine. To master this technique, whisk together powdered sugar and milk until smooth. A common pitfall is adding too much liquid, which can leave you with a runny consistency.

Pro Tips for Perfect Apple Fritter Bread

1. Use fresh apples for enhanced flavor; they should be firm and sweet for best results.
2. Experiment with different types of apple to create unique flavor profiles; each variety brings something different to the bread.
3. Allow the bread to cool completely before slicing to prevent it from becoming gummy or falling apart.
4. Drizzling glaze over warm bread will allow it to penetrate slightly, enhancing flavor and keeping the bread moist.
5. Add nuts or raisins for extra texture; they complement the spices and apples beautifully.
6. Consider using a loaf pan liner for easy release and cleanup; this will help maintain the loaf’s outer appearance.
7. For added flavor, stir in a teaspoon of vanilla extract to the batter; it complements the apples wonderfully.
8. Store leftover bread in an airtight container to maintain freshness and flavor for several days.

Variations and Adaptations

There are numerous ways to put a spin on your Apple Fritter Bread. For a regional variation, try adding cranberries or pecans to relate more to fall flavors. Seasonal adaptations such as using pumpkin puree instead of apples can yield a delightful new recipe.

For dietary modifications, consider making a gluten-free version using almond flour or coconut flour. Flavor variations can include spices like nutmeg or ginger for a more robust profile. Texture modifications could incorporate banana for moisture or oats for a rustic touch.

Presentation alternatives can elevate your dish; consider serving it with a scoop of vanilla ice cream or drizzled chocolate sauce for added indulgence.

Serving and Presentation Guide

When it comes to plating your Apple Fritter Bread, consider slicing it at an angle for a visually appealing presentation. A sprinkle of powdered sugar on top or a light drizzle of glaze can enhance the look. Traditional accompaniments like whipped cream or vanilla ice cream elevate serving occasions.

For modern presentation, serve with a side of caramel sauce and garnished with fresh apple slices or a sprig of mint. Temperature matters; this treat is best enjoyed warm but can be served at room temperature for convenience. Portion control tips suggest cutting even slices to entice guests while managing sweetness effectively.

Wine and Beverage Pairing

Pair your Apple Fritter Bread with a crisp white wine, such as a dry Riesling or a sparkling Prosecco, which will complement the sweetness beautifully. Non-alcoholic alternatives such as pressed apple cider also match the flavor profile and provide a refreshing balance.

For coffee lovers, serving this bread with a rich cappuccino or a lightly spiced chai tea creates a satisfying morning experience. Ensure beverages are served warm to match the comforting ambiance of the freshly baked bread.

Storage and Shelf Life

To prolong the shelf life of your Apple Fritter Bread, store it in an airtight container at room temperature. It can last up to three days this way. For longer storage, consider refrigerating it; however, be aware it may lose some moisture.

If you notice signs of spoilage, such as mold or an off smell, discard the bread immediately. Reheating instructions include using a microwave for a quick fix or an oven to regain that warm, fresh-baked feel. Freezing can extend its life; wrap the bread in plastic wrap and store in a freezer-safe bag for up to three months.

Make Ahead Strategies

Preparing your Apple Fritter Bread ahead of time can save you effort on busy days. You can make the batter and refrigerate it for up to 24 hours before baking. This not only saves time but can enhance flavor as it melds overnight.

Store ingredients separately until you’re ready to bake to preserve their freshness. Quality can be impacted by making it too far in advance; however, freezing baked bread should not affect taste if stored properly. When reheating, reintegrate fresh elements like a drizzle of glaze or a sprinkle of powdered sugar for maximum flavor.

Scaling Instructions

If you want to halve the recipe, simply divide all ingredients by two for giant flavor in a smaller portion. Doubling or tripling is straightforward; ensure your mixing bowl is large enough to accommodate greater quantities and adjust baking time if using multiple pans.

Equipment adjustments may include using two loaf pans instead of one if making a double batch. Timing modifications will depend on the size and shape of your pans; smaller pans may bake quicker, so keep an eye on your bread.

Nutritional Deep Dive

Analyzing the nutrition of Apple Fritter Bread reveals it contains carbohydrates, fiber, and moderate amounts of sugar. The macronutrient breakdown generally includes a balanced ratio of carbohydrates from the bread and sugars from the apples.

Micronutrient analysis shows potential contributions of vitamin C and potassium from the apples. Health benefits are prevalent, especially when using whole ingredients. To manage portion analysis effectively, consider smaller slices, paired with a protein-rich food to balance the meal.

Dietary Adaptations

Making this recipe gluten-free can be achieved by substituting all-purpose flour with a gluten-free blend, ensuring a similar texture. For dairy-free adaptations, use plant-based milk and applesauce in place of butter.

Those following vegan diets can replicate the recipe using flax eggs instead of chicken eggs. Low-carb and keto modifications can be made using almond flour for a much lower carb count, while retaining flavor.

For those on a Paleo diet, simply replace refined sugars with natural sweeteners like honey or maple syrup. Low-FODMAP adjustments can be made by selecting specific apple varieties that are easier to digest.

Troubleshooting Guide

In dealing with texture issues, if your bread turns out too dense, ensure you haven’t overmixed the batter, as this can affect the rise. Additionally, if the flavors are imbalanced, double-check the apple variety for sweetness; a tart apple may require more sugar in the recipe.

For temperature problems, if the bread is unevenly baked, consider rotating the pan halfway through baking. Equipment challenges, such as sticking, can be resolved by using parchment paper or a cooking spray to ensure an easy release.

Addressing ingredient substitutions could lead to altered results; always use the suggested alternatives carefully and in appropriate ratios. Timing concerns, such as underbaking, can be avoided by checking with a toothpick to ensure a clean center.

Recipe Success Stories

Reader feedback has been overwhelmingly positive, with many sharing their own variations of the Apple Fritter Bread recipe. A common theme includes the addition of nuts or spices to enhance texture and flavor, illustrating the versatility of this dish.

Adaptation stories demonstrate how bakers have substituted ingredients based on dietary preferences yet maintained the delicious essence of the original recipe. Suggestions for photography tips abound, helping others capture the beauty of this bread for social media sharing.

Overall, the community’s engagement with the recipe has created a shared experience of taste, creativity, and belonging, reinforcing the idea that baking is a lovely act of sharing.

Frequently Asked Questions

Q: Can I use frozen apples for this recipe?

A: Yes, you can use frozen apples. Just make sure to thaw and drain them well to avoid excess moisture in the batter.

Q: How do I ensure my bread rises properly?

A: Ensure your baking powder is fresh. Always sift it with dry ingredients to incorporate it evenly into the batter.

Q: Can I make this recipe without eggs?

A: Yes, using a flax egg or applesauce can be excellent alternatives to replace eggs in this bread.

Q: How can I tell when the bread is done baking?

A: Insert a toothpick into the center. If it comes out clean or with only a few crumbs, your bread is ready!

Q: What should I serve with Apple Fritter Bread?

A: It pairs well with coffee or tea, and you can serve it with a scoop of ice cream or whipped cream for a treat.

Q: Can I add other fruits to this recipe?

A: Absolutely! Pears or berries work wonderfully as substitutes or additions to the apples in this bread.

Q: How can I store leftover Apple Fritter Bread?

A: Store it tightly wrapped in plastic wrap at room temperature for up to three days, or refrigerate for longer freshness.

Q: Can I freeze the bread?

A: Yes, you can freeze it! Just ensure it’s wrapped properly and consumed within three months for optimal taste.

Q: What’s the best way to reheat this bread?

A: Reheat individual slices in the microwave for about 15-20 seconds, or pop a piece in the oven at a low temperature until warmed.

Q: How can I make this bread more flavorful?

A: Consider adding more spices like nutmeg or ginger, or enhance the glaze with vanilla or almond extract for added richness.

Additional Resources

If you’re interested in expanding your baking repertoire, check out related recipes such as Cinnamon Roll Cake or Pumpkin Spice Muffins for more delicious baked goods. Technique guides on how to properly mix batters or measure ingredients can also elevate your baking skills.

Understanding ingredient information, like the benefits of using organic apples or specific flour types, can improve your recipes significantly. Moreover, finding the right equipment recommendations can make a world of difference in how well your bread turns out.

Lastly, exploring seasonal variations encourages creativity. Incorporate whatever fruits are in season, bringing fresh flavors to your baked goods throughout the year.

Join the Conversation

We love hearing from you! Share your experiences on social media or leave comments about your Apple Fritter Bread creations. Your photos and reviews inspire fellow bakers and create a vibrant community of enthusiastic cooks.

Engagement through recipe variations invites others to try new twists on the classic, and it’s always exciting to see how you personalize your baking. Whether you’re a baker looking to share tips or a novice seeking advice, join our conversation to enrich this shared culinary journey.

The Recipe

Apple Fritter Bread

Serves: 8

Prep Time: 20 mins

Cook Time: 60 mins

Total Time: 80 mins

Kitchen Equipment Needed

  • Loaf pan
  • Mixing bowls
  • Whisk
  • Measuring cups and spoons
  • Wooden spoon or spatula

Ingredients

  • 2 cups all-purpose flour
  • 1 cup granulated sugar
  • 1 tablespoon baking powder
  • 1 teaspoon cinnamon
  • ½ teaspoon salt
  • 2 large eggs
  • ½ cup milk
  • ½ cup melted butter
  • 1 cup peeled and chopped apples
  • 1 cup powdered sugar (for glaze)
  • 2 tablespoons milk (for glaze)

Directions

  1. Preheat your oven to 350°F (175°C) and grease the loaf pan.
  2. In a large bowl, whisk together flour, sugar, baking powder, cinnamon, and salt.
  3. In another bowl, beat the eggs and stir in milk and melted butter.
  4. Add the wet ingredients to the dry ingredients, mixing just until incorporated.
  5. Fold in the chopped apples gently until evenly distributed.
  6. Pour the batter into the prepared loaf pan and spread evenly.
  7. Bake for 60 minutes, or until a toothpick inserted comes out clean.
  8. Let the bread cool in the pan for 10 minutes, then transfer to a wire rack to cool completely.
  9. For the glaze, whisk together powdered sugar and milk until smooth, then drizzle over cooled bread.

Recipe Notes

  • Feel free to substitute the apples with other fruits like pears or berries.
  • For a spiced version, add nutmeg to the batter for deeper flavor.
  • This bread is best enjoyed fresh but can be kept for up to three days at room temperature.

Best Chocolate Espresso Ricotta Torte – Rich & Decadent

Decadent Chocolate Espresso Ricotta Torte: A Rich Dessert Delight

⚖️
Difficulty
Intermediate

⏲️
Prep Time
25 mins

🕒
Cook Time
45 mins

⏱️
Total Time
1 hour 10 mins

🍽️
Servings
10 servings

Indulge in the rich flavors of this Chocolate Espresso Ricotta Torte, a luxurious dessert that marries the deep, bold taste of espresso with the silky smoothness of ricotta cheese. As you slice through the chocolatey exterior, you’ll uncover a heavenly layer that combines the sweetness of dark chocolate with the creaminess of ricotta, creating an experience that’s both rich and satisfying. This torte is perfect for coffee lovers and dessert aficionados alike, providing a delightful way to end any meal.

The unique composition of this Chocolate Espresso Ricotta Torte not only captivates the palate but also provides a visually stunning presentation. The glossy surface and perfect slice reveal contrasting textures that offer a delightful mouthfeel, and the aroma of chocolate and espresso permeates your kitchen as it bakes. Whether you’re hosting a dinner party or simply treating yourself, this dessert promises to impress with its combination of flavors and sophisticated appearance.

Quick Recipe Highlights

  • Flavor Profile: A harmonious blend of rich chocolate and bold espresso, balanced with the subtle creaminess of ricotta.
  • Texture: Silky smooth inside with a firm crust, providing a satisfying contrast in every bite.
  • Aroma: The intoxicating scent of freshly brewed espresso mingles with the sweetness of chocolate, creating an irresistible allure.
  • Visual Appeal: A glossy chocolate finish with a dusting of cocoa, glimmering enticingly on your dessert table.
  • Skill Level Needed: Intermediate skills required; perfect for anyone ready to enhance their baking techniques.
  • Special Equipment: A 9-inch springform pan and a food processor will make preparing this torte a breeze.

Recipe Overview

  • Difficulty Level: This recipe is classified as intermediate, as it requires some precision in measuring and timing to achieve the perfect consistency.
  • Category: A dessert that can also double as a luxurious finish to a coffee afternoon or special event.
  • Cuisine: Italian, with influences from traditional tortes and contemporary dessert innovations.
  • Cost: Overall costs are moderate, primarily depending on quality chocolate and fresh ricotta, making it an accessible indulgence.
  • Season: Enjoy this torte year-round, but it makes an exquisite centerpiece for fall and winter celebrations.
  • Occasion: Perfect for birthdays, holidays, or any gathering where you want to showcase your baking prowess.

Why You’ll Love This Recipe

The incredible balance of flavors in this Chocolate Espresso Ricotta Torte makes it a standout dessert. The bitterness from the espresso gives depth to the sweetness of the chocolate, while the ricotta introduces a creaminess that complements the rich cocoa. Each bite is an explosion of taste that keeps you reaching for more.

Not only is the taste delightful, but the preparation is both simple and rewarding. The use of a food processor speeds up the process significantly, allowing you to spend less time in the kitchen and more time enjoying your guests. This torte comes together quickly and requires minimal hands-on time, making it a convenient choice for any occasion.

From a nutritional standpoint, the ricotta adds protein and calcium while still allowing you to indulge in a decadent dessert. This balance means you can feel good about enjoying a slice after a balanced meal, and the rich chocolate offers an antioxidant boost that’s hard to resist.

When entertaining, nothing draws people in quite like the aroma of baking chocolate mingled with coffee. It’s a dessert that invites conversation and brings people together, creating memories. The rich look and taste make it a conversation starter, instantly impressing guests and sparking dialogue about flavors, techniques, and favorites.

Lastly, this recipe is financially accessible. You can achieve a gourmet dessert experience without the high cost found in restaurants. With a few high-quality ingredients and a little effort, you can present a dish that looks like a million bucks but costs a fraction of that.

Historical Background and Cultural Significance

The origins of torte can be traced back to European culinary traditions, specifically in Italy where various forms of torte have been enjoyed for centuries. Traditionally made with layers of cake and filling, this Chocolate Espresso Ricotta Torte embodies both classic and modern interpretations of this beloved dessert. The use of ricotta cheese, a staple dairy product in Italian cooking, adds a twist that enhances taste and texture.

Culturally, Italian desserts signify celebration and togetherness. Recipes are often passed down through generations, bringing families together during special occasions. This torte not only highlights the Italian affinity for rich flavors but also exemplifies the importance of community and shared experiences that revolve around feasting.

Over the years, the torte has evolved, adapting to different ingredients and baking styles. The introduction of espresso not only provides an exciting flavor addition but also showcases the Italian love for coffee, transforming the dessert into a beloved treat for coffee and chocolate lovers alike.

Despite its Italian roots, variations of the chocolate torte can be found worldwide, each incorporating unique local flavors, ingredients, and baking methods. Whether it’s adding spices, different nuts, or flavors, each region adds its own signature to this classic dessert while preserving its heart.

Ingredient Deep Dive

Chocolate: Chocolate holds a special place in culinary history, often seen as a luxurious treat. Its origins date back to the ancient Mesoamerican cultures, where it was highly valued. In terms of nutritional benefits, high-quality dark chocolate is an excellent source of antioxidants, which can reduce stress and improve heart health. When selecting chocolate for this torte, opt for at least 70% cocoa content for a richer taste. Store your chocolate in a cool, dark place to maintain its quality, and consider substituting with vegan chocolate if you prefer.

Espresso: Espresso, a concentrated form of coffee originating from Italy, adds an intense flavor that pairs beautifully with chocolate. Historically, it reflects the Italian culture’s deep-rooted connection to coffee. Nutritionally, espresso contains caffeine and antioxidants but in a moderate dose. When choosing your espresso, look for fresh, whole beans and grind them just before use for the best flavor. Store your beans in an airtight container and avoid direct sunlight. If espresso isn’t available, strong brewed coffee can serve as a substitute, though the taste will differ slightly.

Ricotta: This soft cheese has a rich history in Italian cooking, known for its creamy texture and subtle flavor. Nutritionally, ricotta is high in protein and calcium. To select quality ricotta, aim for fresh, creamy varieties with a smooth texture. It should be kept refrigerated and ideally consumed within five days of opening. If you’re out of ricotta, cottage cheese can work as a stand-in, provided it’s blended until smooth for the right consistency.

Common Mistakes to Avoid

  • Using low-quality chocolate: Opting for a cheaper chocolate can drastically affect the flavor; always choose high-quality chocolate for baking.
  • Not allowing the torte to cool: Cutting into a warm torte may lead to a mess; allow it to cool completely to set properly.
  • Over-mixing the batter: Mixing too much can incorporate too much air and lead to a dense texture; mix until just combined.
  • Skipping the parchment: Not using parchment paper can lead to sticking; ensure the pan is lined for easy removal.
  • Incorrect measurements: Be precise with your ingredient measurements; baking is a science that requires accuracy.
  • Baking at the wrong temperature: Not preheating your oven can affect cooking times; always ensure your oven is at the correct temperature before baking.
  • Using room temperature ingredients: For optimal mixing and emulsification, ensure your eggs and ricotta are at room temperature.
  • Decorating too soon: Wait until the torte is fully cooled to avoid melting any delicate garnishes.

Essential Techniques

Mixing: Understanding the mixing process is vital for achieving the right texture in your torte. Proper mixing ensures that all ingredients combine evenly without incorporating excessive air. To master this technique, mix on low speed just until the ingredients are combined. Avoid overmixing to prevent a dense torte. Visual cues for success include a smooth batter without visible lumps.

Baking: Perfect baking is crucial for ensuring that your torte sets properly. The goal is to achieve a slight jiggle in the center when the torte is fresh out of the oven, indicating it will firm up upon cooling. Use an oven thermometer to ensure accurate readings, and check on your torte a few minutes before the suggested baking time for optimal results. Look for the edges to pull away slightly from the sides of the pan as a sign of readiness.

Pro Tips for Perfect Chocolate Espresso Ricotta Torte

– Always use fresh ingredients, especially for the espresso and ricotta, as they significantly impact flavor and texture.
– Let the torte cool completely before slicing to allow the flavors to meld and the texture to set perfectly.
– Consider adding a little espresso powder into the crust for an extra kick of flavor.
– Serve with a dollop of whipped cream or mascarpone cheese for an elevated touch.
– Dusting the torte with cocoa powder just before serving enhances its visual appeal and adds a rich cocoa flavor.
– Use high-quality chocolate for melting; the flavor will be richer and more complex.
– Experiment with adding a layer of fruit, such as raspberries or strawberries, between the layers for added freshness.
– If you prefer a gluten-free option, ensure your ingredients, particularly your baking powder and chocolate, are free from gluten.

Variations and Adaptations

Diving into regional variations, some Italian regions incorporate citrus zest, like orange or lemon, to the batter for a bright, aromatic twist. Seasonal adaptations can include toppings like caramelized apples or roasted pears in the fall or fresh berries in the spring. Dietary modifications could mean substituting the sugar for honey or agave syrup for a more natural sweetener.

Flavor variations might incorporate nuts, like crushed hazelnuts or almonds, either in the batter or as a topping to add crunch. For texture modifications, consider swirling in a chocolate ganache layer for added creaminess. Presentation alternatives might involve serving the torte as individual mini tortes, perfect for parties and gatherings.

Serving and Presentation Guide

For plating, use a sharp, clean knife to slice the torte, ensuring smooth edges. A beautiful presentation is as important as the dish itself; consider serving each slice on a white plate with a sprig of mint or a dusting of powdered sugar. Garnishing with berries brings a pop of color and balances the richness of the dessert.

Traditional accompaniments include a scoop of vanilla or coffee ice cream, while modern serving suggestions could involve pairing it with a rich espresso or a herbal tea for contrast. Temperature considerations are essential; serve the torte warm or at room temperature, allowing the flavors to fully develop and the textures to shine. For portion control, servings should be modest, as this dessert is quite rich.

Wine and Beverage Pairing

For wine pairings, consider a rich dessert wine like a Port or a sweet Marsala that complements the chocolate’s sweetness. Non-alcoholic alternatives could include a sparkling water with a twist of lemon to cleanse the palate. If you want to stick to coffee, a light roast brewed coffee can enhance the torte’s flavors, while a darker roast espresso can pull out the flavors beautifully. Serve all beverages at optimal temperatures: wines slightly chilled and coffees hot.

Storage and Shelf Life

Storing your Chocolate Espresso Ricotta Torte correctly will prolong its freshness. Layers of plastic wrap can keep your torte moist while refrigerated. Ideally, it should be consumed within five days for the best flavor, although it could last up to a week if stored properly. Signs of spoilage include an off smell or discoloration. For reheating, warm your individual slices in the microwave for about 10-15 seconds, ensuring it doesn’t dry out. The torte can be frozen; wrap it tightly in plastic wrap followed by aluminum foil and store for up to three months.

Make Ahead Strategies

To give your Chocolate Espresso Ricotta Torte a head start, consider preparing the batter a day in advance. You can also bake the torte ahead of time, allowing it to cool completely before storing it. For even better flavor, refrigerate overnight. To enhance the quality when you’re ready to serve, allow it to come to room temperature before slicing. Assembly tips include waiting to add any garnishes until just before serving to maintain their fresh appeal and avoid sogginess.

Scaling Instructions

If you wish to halve the recipe, simply adjust the ingredient quantities accordingly, using an 8-inch springform pan instead. Doubling or tripling the recipe is possible; however, ensure your oven can accommodate the larger quantity or bake in batches. Adjust cooking times as necessary, particularly with larger quantities, checking for doneness visually. Be cautious with your storage considerations; larger quantities might require different containers or more space in your refrigerator or freezer.

Nutritional Deep Dive

On analyzing the macros, this torte primarily contains carbohydrates from the chocolate and sugar, proteins from the ricotta, and fats from both the chocolate and cheese. The sugar intake can be moderated by inspecting the quantities used and opting for natural sweeteners. Micronutrient analysis shows that dark chocolate provides iron and antioxidants, while ricotta contributes calcium and vitamin A.

For anyone monitoring their dietary habits, paying attention to portion sizes is key as this dessert is rich and indulgent. Enjoying a small slice can satisfy cravings while allowing you to indulge responsibly. This dessert lends itself to balance, especially when paired with a protein-rich or fiber-focused meal beforehand, assisting with weight management and appetite control.

Dietary Adaptations

For gluten-free adaptations, ensure that all ingredients, especially baking powders and chocolates, are certified gluten-free. A dairy-free version can be achieved by substituting coconut cream for ricotta and using dairy-free chocolate. Those following a vegan diet can replace eggs with flaxseeds or silken tofu, ensuring the torte remains rich and satisfying.

For a low-carb or keto approach, consider using keto-friendly sweeteners and almond flour as a crust variation. Paleo-friendly options could involve using raw cacao and nut-based crusts while completely avoiding refined sugars. Other specific diets, such as low-FODMAP, may require consultation on ingredient suitability, particularly regarding sweeteners and dairy substitutes.

Troubleshooting Guide

If you find your torte is too dry, it may have been overbaked; ensure to check it a few minutes before the timer goes off. For texture issues, a dense torte may result from overmixing, while under-mixing could lead to lumps; always strive for just combined without visible flour. If the flavor balance seems off, consider adjusting your sweetener levels or adding a pinch of salt to enhance the chocolate’s depth.

Temperature problems may arise if your oven temperature is inaccurate; using an oven thermometer can help mitigate this. Equipment challenges like a springform pan leaking can be rectified by adding a layer of aluminum foil under the base before pouring in your batter. Lastly, if you run out of a key ingredient, check for substitutions in both texture and flavor compatibility.

Recipe Success Stories

Community members rave about their Chocolate Espresso Ricotta Torte experiences, with many sharing photos of their stunning presentations and recipe adaptations. Numerous bakers found successes using alternative ingredients, such as sugar substitutes or plant-based options, while others focused on achieving perfect texture through varying methods. Reader suggestions highlight ways to tweak baking times and ingredient combinations to match personal preferences, demonstrating the versatility of this recipe.

Photography tips from the community encourage styling slices with a contrasting plate color and adding seasonal fruits for vibrant visuals, making each serving look as delicious as it tastes. Many praised the recipe’s ease and effectiveness, stating it became a staple for gatherings and special occasions alike.

Frequently Asked Questions

Can I use milk instead of ricotta?

Using milk alone will not provide the desired texture in this torte; ricotta is essential for creaminess and structure. For a dairy-free option, consider using almond or cashew cream as alternatives.

How do I know when the torte is done baking?

The torte is done when the center has a slight jiggle but is set around the edges. A toothpick inserted into the center should come out with a few moist crumbs.

Can I freeze the torte?

Yes, the torte can be frozen for up to three months. Wrap it tightly to prevent freezer burn and allow it to come to room temperature before serving.

What can I substitute for espresso?

If espresso isn’t available, using strong brewed coffee works as a good substitute; however, the flavor will differ slightly from the rich espresso taste.

Is there a vegan version of this torte?

Yes! You can create a vegan version by using flaxseed meal instead of eggs and plant-based cream for the ricotta. Look for vegan chocolate as well to maintain the richness.

How long will the torte last once baked?

The torte will last up to five days when stored in the refrigerator. However, for the best flavor, it’s recommended to consume it within the first three days.

Can I use a different type of cheese?

While ricotta is preferred, mascarpone can also be used for a richer texture. Adjust the sugar slightly depending on the sweetness of the cheese.

Does the torte need to be refrigerated?

Yes, the torte should be refrigerated to keep it fresh, especially since it contains ricotta. Allow it to come to room temperature before serving for optimal taste.

Can the torte be made ahead of time?

Absolutely! The torte can be baked a day before serving. It often tastes even better the next day, as the flavors meld together; just wait to add any toppings until serving.

What is the best way to serve this torte?

Serve slices at room temperature, optionally garnished with whipped cream, fresh berries, or a dusting of cocoa powder for an extra special touch.

Additional Resources

If you’re interested in experimenting more with chocolate and coffee, check out our related recipes featuring decadent desserts that use both ingredients in innovative ways. For technique guides, consider exploring how to properly temper chocolate or whip cream to perfection.

Ingredient information can enhance your cooking, guiding you in selecting the freshest and highest quality components for dessert making. Finally, consider upgrading your equipment with high-quality baking tools, which can significantly impact your overall success and enjoyment in the kitchen.

Join the Conversation

We love hearing your thoughts on this Chocolate Espresso Ricotta Torte! Share your photos and creative adaptations on social media, using our hashtag. Connect with fellow food lovers in our community discussions about their variations and successes with the recipe.

Leave a review and let us know your favorite serving suggestions, along with any tips you discovered along the way. Your input helps us continually improve and enrich our recipes for everyone in our culinary family!

The Recipe

Chocolate Espresso Ricotta Torte

Serves: 10 servings

Prep Time: 25 mins

Cook Time: 45 mins

Total Time: 1 hour 10 mins

Kitchen Equipment Needed

  • 9-inch springform pan
  • Food processor
  • Mixing bowls
  • Measuring cups and spoons
  • Spoon or spatula for mixing
  • Toothpick for testing doneness

Ingredients

  • 8 oz. dark chocolate (at least 70% cocoa), chopped
  • 1/2 cup unsalted butter
  • 4 large eggs
  • 1 cup granulated sugar
  • 1 cup ricotta cheese
  • 1 tablespoon espresso, brewed strong
  • 1 teaspoon vanilla extract
  • 1/2 cup all-purpose flour
  • 1/4 teaspoon baking powder
  • Pinch of salt
  • Cocoa powder for dusting

Directions

  1. Preheat the oven to 350°F (175°C) and prepare your springform pan by lining it with parchment paper.
  2. Melt the chocolate and butter together in a double boiler or microwave, stirring until smooth. Let it cool slightly.
  3. In a large bowl, whisk together the eggs and sugar until frothy. Stir in the ricotta, espresso, and vanilla into the chocolate mixture until fully combined.
  4. Sift in the flour, baking powder, and salt, gently folding until just mixed.
  5. Pour the batter into the prepared springform pan and smooth the top.
  6. Bake for 40-45 minutes, or until a toothpick inserted in the center comes out clean with a few moist crumbs.
  7. Allow the torte to cool in the pan for 15 minutes before releasing the springform. Let it cool completely on a wire rack.
  8. Before serving, dust with cocoa powder, and slice into wedges to enjoy!

Recipe Notes

  • Feel free to substitute the sugar with a natural sweetener such as honey or maple syrup.
  • For a richer flavor, add a tablespoon of espresso powder directly into the batter.
  • This torte pairs beautifully with whipped cream or a scoop of vanilla ice cream.

Easy Peppermint Oreo Truffles – Perfect for the Holidays

Peppermint Oreo Truffles: A Festive Delight for Every Occasion

⚖️
Difficulty
Easy

⏲️
Prep Time
20 mins

🕒
Cook Time
0 mins

⏱️
Total Time
20 mins

🍽️
Servings
24 truffles

Peppermint Oreo Truffles are the perfect treat to bring festive cheer to any gathering, blending the delicious flavors of classic Oreo cookies with a hint of minty freshness. These truffles are not only simple to prepare but also an impressive dessert that will delight family and friends. Each bite offers rich chocolatey goodness with the refreshing kick of peppermint, making them an irresistible indulgence for the holiday season and beyond.

As you prepare these delightful truffles, the aroma of crushed Oreos combined with melted cream cheese fills your kitchen, creating a warm and inviting atmosphere. Imagine taking a bite into these creamy, minty morsels, as the smooth chocolate coating gives way to the soft, sweet filling inside. These truffles are not just a treat for the palate; they are a visual feast, elegantly adorned with sprinkles or crushed peppermint for that extra festive flair.

Quick Recipe Highlights

  • Flavor Profile: Rich chocolate complemented by the refreshing essence of peppermint.
  • Texture: Creamy interior with a smooth chocolate coating, offering a satisfying bite.
  • Aroma: A delightful mix of chocolate and mint that fills the air during preparation.
  • Visual Appeal: Dipped in vibrant chocolate and optionally garnished with peppermint pieces.
  • Skill Level Needed: Perfect for beginners; requires no baking skills.
  • Special Equipment: No special tools are required, just basic mixing and melting tools.

Recipe Overview

  • Difficulty Level: This recipe is classified as easy, ideal for all skill levels and perfect for a fun family activity.
  • Category: Decadent dessert or seasonal sweet treat, perfect for holiday celebrations.
  • Cuisine: American dessert influences with a fun twist of holiday flavors.
  • Cost: Affordable ingredients make it a budget-friendly option for dessert lovers.
  • Season: Best enjoyed during the holiday season, but delicious any time of the year.
  • Occasion: Suitable for holiday gatherings, parties, or as a delightful homemade gift.

Why You’ll Love This Recipe

These Peppermint Oreo Truffles offer a delightful combination of textures and flavors that will please any palate. The iconic chocolate-vanilla flavor of Oreos melds perfectly with cream cheese, creating a rich and creamy filling. The addition of peppermint adds a refreshing twist that makes these treats particularly festive, evoking memories of holiday cheer with every bite. Each truffle is encased in a smooth layer of chocolate, elevating the whole experience to one of pure indulgence.

Preparing these truffles is incredibly convenient; no baking is required, and the preparation time is minimal. Simply crush the Oreos, mix with cream cheese, roll into balls, and dip in chocolate. This simplicity makes it a perfect recipe for novice bakers or anyone looking to whip up a quick treat for friends and family. You can also involve children in the fun, making it a great family activity during the holidays.

These truffles offer nutritional benefits as well; Oreos provide a touch of energy while cream cheese is a source of protein and calcium. However, keep in mind that moderation is key due to their rich nature. Plus, sharing these truffles can lead to social connections, making your gatherings more enjoyable and festive.

Cost-effectiveness is another significant advantage. The basic ingredients—Oreos, cream cheese, and chocolate—are widely available and won’t break the bank. For an affordable price, you can create multiple servings of delightful treats that are bound to impress your guests.

Finally, Peppermint Oreo Truffles can fit various occasions, from holiday parties to intimate gatherings. Their playful flavor and elegant presentation make them a delightful addition that can stand out on any dessert table.

Historical Background and Cultural Significance

The origins of truffles can be traced back to France, where culinary innovators began crafting chocolate confections in the late 19th century. The idea of coating a flavorful filling in chocolate quickly spread across Europe and into the United States. Over time, American confectioners began experimenting with different flavors, leading to creative variations such as the Peppermint Oreo Truffles we know today.

In the context of holiday celebrations, these truffles embody the spirit of sharing and friendship. During the festive season, sweets like these are often exchanged among friends and family, symbolizing good cheer and togetherness. The blend of chocolate and peppermint stands as a nostalgic flavor for many, reminiscent of winter and holiday gatherings.

As the recipe evolved, American bakers sought to simplify the process by incorporating readily available ingredients like Oreo cookies. This innovation allowed more people to partake in the joy of crafting sweet treats, making the Peppermint Oreo Truffles a staple for many during the holidays.

Regional variations of truffle recipes often include local flavors and ingredients, reflecting the richness of culinary traditions. In some areas, using local chocolates or spices could give the traditional truffle a unique twist, making each variation special to its region.

Ingredient Deep Dive

  • Oreo Cookies: Originating from the United States in the early 20th century, Oreos have become an American icon. They are a beloved snack enjoyed by many, providing a delightful crunch and sweet chocolate flavor. Nutritionally, they are high in sugar but offer a source of energy. When selecting Oreos, look for fresh packages. Store them in a cool, dry place for longevity.
  • Cream Cheese: This ingredient adds a rich, creamy texture that balances the sweetness of the Oreos. It has roots in American cuisine, with variations found in Europe. Nutritional benefits include protein and calcium, but it should be consumed in moderation due to its fat content. Choose full-fat cream cheese for the creamiest truffles, and it can be stored in the refrigerator for up to two weeks.
  • Chocolate: A key player in many desserts, chocolate provides both flavor and richness. Its history dates back to ancient Mesoamerican cultures. When selecting chocolate for melting, opt for high-quality chocolate chips or bars. Proper storage in cool, dark places is essential to prevent spoilage and bloom, which can affect taste.

Common Mistakes to Avoid

  • Using stale Oreos: Always check the expiration date as stale cookies can ruin the truffle’s flavor.
  • Not chilling the mixture: Failing to chill the Oreo mixture may cause truffles to lose shape before dipping.
  • Improper chocolate melting: Overheating chocolate can cause it to seize; always melt gently using a double boiler or microwave with intervals.
  • Skipping the second chill: Allow truffles to firm up in the fridge after rolling and before coating for the best texture.
  • Overloading with toppings: Less is often more; too many toppings can overwhelm the truffles’ flavors and aesthetics.
  • Ignoring the dipping technique: Make sure to fully coat each truffle to prevent any Oreo filling from becoming exposed.
  • Using low-quality chocolate: Quality matters for melting; premium chocolate offers better flavor and consistency.
  • Not rolling evenly sized truffles: Consistency is key; varied sizes can result in uneven cooking times when placed on a platter.
  • Skimping on the peppermint: Adjusting the amount of peppermint extract can significantly alter flavor, so measure carefully.
  • Not allowing to cool completely: Ensure the chocolate sets properly for a satisfying crunch; otherwise, they can be messy to eat.

Essential Techniques

Chilling the Mixture: Chilling the Oreo and cream cheese mixture solidifies the truffles, making them easier to roll and dip. To master this, let the mixture sit in the refrigerator for at least 30 minutes before rolling into balls. Visual cues include a firmer texture that holds shape.

Melted Chocolate Coating: Properly melting your chocolate is crucial for achieving a smooth coating. Use a gentle heat source and avoid overheating. A good visual cue is that the chocolate should be silky and pourable. Stir to combine any particles lumping together.

Pro Tips for Perfect Peppermint Oreo Truffles

1. Choose high-quality chocolate for coating, as it significantly affects the overall flavor.

2. Customize your toppings with crushed candy canes or sprinkles for festive flair.

3. Ensure the cream cheese is at room temperature before mixing for a smoother consistency.

4. Use a cookie scoop for consistent truffle sizes.

5. Experiment with flavored extracts for added depth, like vanilla or almond.

6. If desired, drizzle melted chocolate over the set truffles for an elegant finishing touch.

7. Allow truffles to set in the refrigerator for the best flavor; they will taste even better the next day.

8. For a unique touch, incorporate a pinch of sea salt to balance the sweetness.

Variations and Adaptations

Regional variations can include local flavors such as adding bourbon or rum for an adult-only treat. Seasonal adaptations might involve replacing peppermint with orange extract for a fresh twist, perfect for Thanksgiving or spring gatherings. Dietary modifications include using gluten-free Oreo cookies and dairy-free chocolate to cater to lactose intolerance or gluten sensitivity. Flavor variations also exist, like substituting the chocolate coating with white chocolate for a visually striking contrast. For texture modifications, consider adding chopped nuts for a delightful crunch.

Serving and Presentation Guide

Plating Peppermint Oreo Truffles can elevate their presentation. Arrange them in a decorative box or on a platter lined with parchment paper for a rustic look. Garnish with sprigs of mint or edible glitter to enhance visual appeal. Traditional accompaniments might include coffee or hot chocolate, while modern suggestions could feature a scoop of vanilla ice cream alongside the truffles. Truffles should be served chilled, as this enhances their texture, and portion control is important as they are quite rich.

Wine and Beverage Pairing

For wine pairings, a sweet dessert wine, such as a late harvest Riesling, pairs beautifully with the chocolate and mint flavors. For non-alcoholic alternatives, consider peppermint tea, which complements the truffles’ minty essence. If enjoying them alongside coffee, a rich espresso adds depth and balances the sweetness. Temperature should be considered, serving truffles cold alongside warm beverages keeps the experience enjoyable.

Storage and Shelf Life

Peppermint Oreo Truffles can be stored in an airtight container in the refrigerator for up to two weeks. For optimal texture, avoid storing them at room temperature, as the chocolate may melt or lose its integrity. When freezing, layer the truffles between parchment paper in an airtight container, and they can last up to three months. Signs of spoilage include off smells or an unusual texture, indicating it’s time to dispose of them.

Make Ahead Strategies

These truffles can be prepared as much as three days in advance. To maintain their quality, store them in the refrigerator until ready to serve. When planning an event, consider preparing the filling a day ahead, chilling it overnight, then rolling and coating in chocolate close to serving time. This ensures that they taste fresh without sacrificing flavor. Adding fresh decorations right before serving maintains a vibrant presentation.

Scaling Instructions

If you’re aiming to adjust the batch size, halving the recipe can easily be done without affecting the flavor or consistency. For larger gatherings, doubling or tripling the ingredients ensures everyone gets to enjoy these delightful treats. Remember to adjust the size of your mixing bowl and chilling space accordingly. Timing modifications may require additional refrigeration time to achieve the desired firmness.

Nutritional Deep Dive

A macro breakdown of these treats typically reveals a rich source of carbohydrates and sugars, alongside some fats from the cream cheese and chocolate. Micronutrient analysis highlights calcium and iron from the ingredients, which can be beneficial in small amounts. The indulgent nature of these truffles requires portion management; even small servings can deliver satisfying sweetness without excess calorie accumulation. For those mindful of their dietary intake, enjoying them as a special treat on occasion is recommended.

Dietary Adaptations

For those adhering to a gluten-free diet, opt for gluten-free Oreo cookies for an equally delightful version. Dairy-free alternatives can be created using vegan cream cheese and dark dairy-free chocolate. If following keto or low-carb diets, consider using sugar-free chocolate and cream alternatives. For paleo enthusiasts, swapping conventional ingredients with healthier substitutes like nut butters and coconut flour can create an alternative while still maintaining a semblance of the original treat’s flavor and texture.

Troubleshooting Guide

If your truffles turn out too soft, they likely need more chilling time before rolling. Conversely, if they become too hard, the chocolate may have been overheated during melting. For flavor discrepancies, balancing the mint extract is key; a small addition can elevate the taste without overwhelming it. In managing equipment challenges, ensure your materials are all at proper temperatures for optimal mixing and rolling.

Recipe Success Stories

Community feedback on these Peppermint Oreo Truffles often highlights their universal appeal, with many testers praising their ease of preparation and delectable taste. Variation successes include the incorporation of alternative flavors that family members have enjoyed. Reader suggestions for presenting truffles in decorative boxes have also inspired others to create stunning visual displays for gifting. Engaging with the recipe community highlights the creative ways in which their experiences can lead to delightful adaptations.

Frequently Asked Questions

Can I use different types of cookies? Yes, you can experiment with different cookie flavors, but classic Oreos provide the best base for this recipe due to their unique flavor.

How can I make them dairy-free? Use dairy-free cream cheese and dark chocolate that does not contain milk for a vegan-friendly version of these truffles.

How long can they be stored? These truffles can be stored in the refrigerator for up to two weeks and can also be frozen for up to three months.

What can I use instead of chocolate for coating? Consider using white chocolate or even yogurt coating for a lighter option.

Can children help with this recipe? Absolutely! Rolling the truffles and decorating can be a fun activity to do together.

Are these truffles gluten-free? They can be made gluten-free by using gluten-free Oreo cookies.

What if my chocolate is too thick? If your melted chocolate is too thick, you can add a small amount of vegetable oil to thin it out for easier dipping.

Can I make these ahead of time? Yes, these truffles can be made up to three days in advance and stored in the refrigerator until serving.

How can I garnish the truffles? You can garnish with crushed peppermint, sprinkles, or even a drizzle of additional chocolate.

What is the best way to melt chocolate? The best method is to use a microwave or double boiler, melting the chocolate slowly and stirring often to prevent it from burning.

Additional Resources

If you enjoy Peppermint Oreo Truffles, you might also like recipes for other festive treats like Chocolate-Dipped Pretzels or Gingerbread Cookies. Check out technique guides for melting chocolate effectively and tips on making your own flavored chocolates for unique creations. Ingredient information about chocolates and cookies can be found online, offering deeper insights into the products you use. Equipment recommendations can include the best types of mixing bowls and chocolate melting essentials for your baking adventures.

Join the Conversation

Don’t forget to share your truffle-making experience on social media! Use the hashtag #PeppermintOreoTruffles to join our community of dessert lovers. Capture beautiful photographs of your delicious creations, and don’t shy away from sharing variations you’ve tried, as these can inspire others. Engage with your audience by leaving recipe reviews and discussing experiences; together, we can create a lively cooking community.

The Recipe

Peppermint Oreo Truffles

Serves: 24 truffles

Prep Time: 20 mins

Cook Time: 0 mins

Total Time: 20 mins

Kitchen Equipment Needed

  • Mixing bowl
  • Refrigerator
  • Cookie scoop
  • Double boiler or microwave-safe bowl
  • Wax paper or parchment paper

Ingredients

  • 1 package Oreo cookies (crushed, about 36 cookies)
  • 8 oz cream cheese (softened)
  • 12 oz chocolate chips (dark or milk)
  • 1/4 tsp peppermint extract (adjust to taste)
  • Optional toppings: crushed peppermint or sprinkles

Directions

  1. Crush the Oreo cookies in a food processor or by hand until fine crumbs form.
  2. In a mixing bowl, combine the crushed Oreos with softened cream cheese and peppermint extract. Mix until well-combined.
  3. Use a cookie scoop to portion the mixture and roll into balls. Place them on a parchment-lined baking sheet.
  4. Chill the balls in the refrigerator for about 30 minutes to firm up.
  5. In the meantime, melt the chocolate chips using a double boiler or microwave in intervals until smooth.
  6. Dip each chilled truffle into the melted chocolate and place back on the parchment paper.
  7. Sprinkle crushed peppermint on top if desired, then chill again until the chocolate sets.
  8. Serve cold and enjoy your delicious Peppermint Oreo Truffles!

Recipe Notes

  • Feel free to adjust the amount of peppermint extract to your taste preference.
  • For a creative twist, consider using white chocolate or colored candy melts for coating.
  • Storing in an airtight container can keep them fresh for up to two weeks in the refrigerator.

Best Hot Cocoa Cookies with Gooey Marshmallow Centers

Delicious Hot Cocoa Cookies: The Perfect Winter Treat

⚖️
Difficulty
Easy

⏲️
Prep Time
15 mins

🕒
Cook Time
10 mins

⏱️
Total Time
25 mins

🍽️
Servings
24 cookies

Hot Cocoa Cookies are the ultimate indulgence for chocolate lovers during the chilly winter months. Imagine biting into a soft, chewy cookie infused with rich chocolate flavors and a hint of cocoa, delivering all the nostalgia of your favorite hot cocoa. These cookies are not only delicious but they also evoke feelings of warmth and comfort, making them the perfect treat to enjoy by the fireplace or as a sweet surprise for holiday gatherings. With every bite, you’ll be transported to a world of cozy, wintery bliss.

These cookies are incredibly easy to make and require minimal ingredients, yet they are bursting with flavor. The combination of cocoa powder, dark chocolate chips, and a touch of vanilla creates a delightful balance of sweetness and richness. The addition of fluffy marshmallows on top elevates these cookies to the next level, reminding one of the traditional hot cocoa experience. Perfect for sharing or enjoying solo, your friends and family will surely rave about these irresistible hot cocoa cookies.

Quick Recipe Highlights

  • Flavor Profile: These cookies have a deeply chocolatey flavor, enhanced by the sweetness of sugar and a hint of vanilla.
  • Texture: The interior is soft and chewy, while the exterior has a slight crispiness that adds to the overall experience.
  • Aroma: They’ll fill your kitchen with an inviting and warm aroma of chocolate and vanilla that’s sure to make your mouth water.
  • Visual Appeal: The rich brown color of the cookies speckled with melted chocolate and fluffy marshmallows creates an enticing presentation.
  • Skill Level Needed: Ideal for bakers of all levels, from beginners to seasoned pros, with clear and easy steps to follow.
  • Special Equipment: All you need is a mixing bowl, measuring cups, and a baking sheet to whip up these delightful cookies.

Recipe Overview

  • Difficulty Level: Rated easy, these Hot Cocoa Cookies are perfect for anyone looking to bake sweet treats without complex techniques.
  • Category: They fall under dessert and afternoon snacks, ideal for warming up after outdoor winter activities.
  • Cuisine: Inspired by classic American baking traditions, these cookies highlight comforting and nostalgic flavors.
  • Cost: Typically inexpensive to make, the main ingredients like flour, cocoa, and sugar are pantry staples.
  • Season: Best enjoyed in the winter months, these cookies warm hearts and stomachs during the holiday season.
  • Occasion: Perfect for festive gatherings, cozy nights in, or simply as a treat to enjoy with a cup of hot cocoa.

Why You’ll Love This Recipe

Hot Cocoa Cookies not only please the palate but also create an unforgettable taste sensation. The soft, chewy texture pairs perfectly with the gooey chocolate chips and sweet marshmallows. Each cookie feels like a warm hug, bringing a sense of comfort when the temperatures drop. This satisfying dessert is sure to delight everyone, from children to adults, making it a universally adored snack.

In today’s busy world, convenience is key, and making these cookies fits seamlessly into any schedule. With just a few simple steps, you can create a batch in under half an hour, making them a spontaneous yet satisfying dessert option. With every batch, you engage in a simple yet rewarding ritual of baking, filling your kitchen with delightful scents and creating lasting memories.

Nutritionally, while they are a treat, Hot Cocoa Cookies can be balanced with the inclusion of quality ingredients. By choosing high-quality cocoa powder and dark chocolate, you can enjoy a cookie that provides an indulgent experience. Additionally, by incorporating whole grain flour, you can add a touch of fiber and nutrients to each bite.

These cookies are perfect for social interactions; they make a lovely addition to gatherings, holiday parties, and cookie exchanges. Sharing these treats with friends and family fosters connections, and the shared experience of baking them adds further joy to every bite. Plus, they can easily impress your guests and spark conversations around what makes them special.

Cost-effectiveness shines through with this recipe as well, as it allows you to create delicious cookies without breaking the bank. With simple ingredients that you likely already have at home, you’re able to whip up batch after batch, ensuring everyone can have a delightful treat whenever they desire.

Historical Background and Cultural Significance

The origins of cocoa date back thousands of years, originating from the ancient Mesoamerican cultures who first cultivated the cacao bean. The transition from drinking chocolate beverages to solid confectioneries has led to the creation of chocolate in various forms, including the cookie format we enjoy today. As chocolate became accessible, recipes evolved, leading to delightful adaptations such as Hot Cocoa Cookies.

Culturally, chocolate holds a significant place in many societies, celebrated for its luxury and treat status. During the winter months, particularly in North America, hot cocoa has long been associated with warmth, comfort, and festive spirit. Cookies embody the same sentiments, making them a cherished dessert during gatherings and holidays.

Over the years, variations of hot cocoa-infused baked goods have emerged, reflecting regional tastes and ingredients. Hot Cocoa Cookies pay homage to traditional recipes while allowing for delightful creativity in flavors and textures.

Regional adaptations show these cookies celebrated throughout various cultures, from the spiced versions in Mexican cuisine to the sweeter interpretations found in American households, illustrating how chocolate inspires global baking traditions.

Ingredient Deep Dive

Cacao is the star ingredient of Hot Cocoa Cookies and carries a fascinating history. Revered by ancient cultures, cacao was consumed primarily in liquid form and was believed to have health benefits. Today, it’s recognized not just for its delicious taste but also for its powerful antioxidants, making it a beloved ingredient in desserts. When selecting cocoa, opt for unsweetened varieties for baking, as they provide the most authentic flavor without added sugars.

Flour serves as the foundation of almost all baked goods, including cookies. The primary type of flour used in this recipe is all-purpose flour, which provides the right balance of structure and tenderness. Whole wheat flour can offer a nuttier taste and additional nutrients. It’s best stored in a cool, dry place to maintain freshness, and easier to measure using the spoon-and-level method.

Sugar not only sweetens but also amps up the cookie’s texture and aids in browning. Both granulated and brown sugar are used in this recipe, contributing to a chewy, delicious cookie. The molasses content in brown sugar adds moisture and a slight caramel flavor, rounding out the taste experience. Proper storage in an airtight container can prevent clumping and ensure longevity.

Lastly, the addition of butter enriches the flavor and affects the texture. Room temperature butter is essential for creaming with sugars, leading to a light and airy texture. While unsalted butter allows for more control over the final saltiness, alternatives such as coconut oil can also be considered for a dairy-free version.

Common Mistakes to Avoid

  • Overmixing the dough can lead to tougher cookies; mix just until the dry ingredients are incorporated.
  • Using cold butter can affect the consistency of your dough; always ensure it’s at room temperature for optimal creaming.
  • Not measuring flour correctly can result in dense cookies; spoon the flour into your measuring cup and level off without packing it down.
  • Skipping chilling the dough may lead to cookies spreading more than desired; chilling helps maintain the cookies’ shape.
  • Baking at the wrong temperature can make cookies too dry or underdone; always preheat your oven for balanced baking.
  • Overbaking can leave you with hard cookies; remove them when they are just set and allow them to cool on the baking sheet.
  • Using expired baking powder can diminish the rise; check the expiration date before starting your recipe.
  • Not allowing cookies to cool before transferring them can lead to breaking; give them a few minutes to set on the baking sheet.
  • Ignoring the need for parchment paper may result in sticking; use parchment or a silicone mat for easier cleanup.
  • Using mismatched baking sheets can affect cooking times; ensure your pans are all the same size for even baking.

Essential Techniques

One key technique in cookie making is creaming butter and sugar together. This step is crucial as it incorporates air into the mixture, leading to lighter cookies. To master this, use room temperature butter and beat until the mixture is fluffy and pale. Look for visual cues, such as a lighter color and a creamy texture, as signs of successful creaming.

Another important technique is properly measuring dry ingredients. Spoon the flour into your measuring cup and level it off rather than scooping directly. This ensures that you won’t end up with too much flour, which can create denser cookies. Pay attention to consistency and ensure you have the correct amounts for optimal results.

Pro Tips for Perfect Hot Cocoa Cookies

To enhance the chocolate flavor, consider using a combination of semi-sweet and dark chocolate chips. This adds depth and richness to your cookies. Another tip is to sprinkle a little sea salt on top of the cookies before baking, which balances the sweetness beautifully.

Adding an extra handful of chocolate chips or mini marshmallows into the dough elevates indulgence. Alternatively, you could drizzle melted chocolate on top for a decorative finish. For those who enjoy a slightly spiced flavor, try adding a pinch of cinnamon or cayenne pepper to the dough to give a subtle but interesting twist.

Chilling the dough for at least 30 minutes can significantly improve the cookie’s texture, resulting in thicker, chewier cookies. Additionally, consider lowering the oven temperature slightly to bake the cookies more evenly, which can prevent over-browning.

Experimenting with different types of flour, such as a blend of all-purpose and almond flour, can offer a unique flavor and texture. Lastly, for a more decadent treat, serve your cookies warm with a scoop of vanilla ice cream on the side.

Variations and Adaptations

Hot Cocoa Cookies can easily be transformed to cater to different tastes and dietary preferences. For a seasonal twist, incorporate peppermint extract or crushed candy canes for a festive flair. Additionally, you can replace the chocolate chips with white chocolate or butterscotch chips for various flavor profiles.

For those looking to adapt these cookies to be gluten-free, substituting all-purpose flour with a gluten-free blend works perfectly, maintaining the delightful texture. Vegan adaptations can be achieved using flax eggs and dairy-free chocolate chips to ensure no animal products are included.

Experimenting with texture variations is also fun—try adding nuts or dried fruit for an unexpected crunch or chew. For a touch of acidity, consider incorporating a splash of espresso or brewed coffee to highlight the chocolate flavors further.

Finally, presentation alternatives like shaping these cookies into fun holiday figures or serving them in decorative tins can make them more appealing for gifting during the holiday season.

Serving and Presentation Guide

When serving Hot Cocoa Cookies, consider arranging them on a festive platter to bring cheer to your gathering. If you’re crafting a dessert table, pair them with a pitcher of hot cocoa and a variety of toppings like whipped cream and chocolate shavings. For individual servings, plate them with a small scoop of ice cream, drizzled with chocolate sauce for an extra special touch.

Garnishing with freshly chopped mint or a sprinkle of powdered sugar adds a beautiful finishing touch. If you’re incorporating these cookies into a gift, consider placing them in clear cellophane bags tied with ribbons for a charming presentation.

Temperature can enhance the experience; warm cookies served straight from the oven provide comfort, while cooled cookies can maintain their shape better for decorative displays. Consider portion control by offering a small selection of different cookies to encourage tasting, making these Hot Cocoa Cookies an enjoyable treat for all.

Wine and Beverage Pairing

When it comes to pairing beverages with Hot Cocoa Cookies, rich, fruity red wines like Merlot or Zinfandel complement the chocolate beautifully without overpowering it. If you prefer non-alcoholic options, a warm cup of spiced apple cider or chai tea enhances the cozy experience.

For coffee enthusiasts, a medium roast coffee pairs delightfully, bringing out the chocolate notes and delivering a perfect afternoon pick-me-up. When serving these cookies warm, consider a glass of cold milk or chocolate milk to bring back the nostalgic feel of enjoying cookies as a child.

The key consideration for beverages is balancing sweetness with richness, so choose drinks that enhance or contrast with the cookies’ flavors. Presentation can also elevate the experience; try serving the accompanying drinks in cute mugs or decorative glassware.

Storage and Shelf Life

Proper storage of your Hot Cocoa Cookies is essential to maintain their freshness. Keep them in an airtight container at room temperature for up to one week. For longer shelf life, consider freezing them; place them in a freezer-safe container or heavy-duty freezer bag to enjoy at a later date.

If freezing, ensure the cookies are fully cooled before wrapping to avoid moisture buildup. For optimum flavor and texture, consume frozen cookies within three months. To enjoy, simply thaw or reheat them in the oven for a warm, freshly baked taste any time you crave them.

Signs of spoilage include an off smell or visible mold; if you notice either, it’s safer to discard the cookies. For reheating, a 5-minute return to a preheated oven will revive the original chewy texture, ensuring that every bite is as delightful as the first.

Make Ahead Strategies

If you’re planning to make Hot Cocoa Cookies ahead of time, you can prepare the dough in advance and refrigerate it for up to three days. Just ensure it’s well wrapped to prevent drying out. When ready to bake, simply scoop and bake as directed.

Alternatively, you can bake the cookies and freeze them. Cool completely and store them in a single layer in an airtight container, then separate layers with parchment paper to prevent sticking. Frozen baked cookies can be ready to serve in moments with a simple thaw.

Keep in mind the quality of your cookie might change slightly once frozen, so aim to serve them within two months for optimal taste. Fresh elements, like adding more marshmallows on top for a melted look, can give your cookies a new life when you’re ready to serve.

Scaling Instructions

When scaling Hot Cocoa Cookies, halving the recipe is straightforward; simply use half the amount of each ingredient and follow the same baking instructions. For doubling or tripling, ensure your mixing bowl is large enough to accommodate the increased volume to avoid overflow.

Keep in mind that baking times may vary slightly depending on the size of each cookie. Monitor closely, especially the first time you increase the recipe amount. It’s also a good idea to bake in batches to ensure even cooking.

For larger batches, you might need additional baking sheets, so prepare your space accordingly. If you have limited oven space, consider baking the cookies in rounds, keeping the dough chilled while the first batch is baking.

Nutritional Deep Dive

A serving of Hot Cocoa Cookies provides a moderate amount of calories primarily sourced from carbohydrates and fats. The macro breakdown typically features around 10g of fat, 35g of carbohydrates, and 2g of protein per cookie, making them a sweet treat rather than a primary food source for daily nutrition.

Micronutrient analysis reveals small amounts of essential nutrients such as calcium and iron, especially if you use whole grain flour. Health benefits can come from the antioxidants found in dark chocolate, contributing positively to heart health and overall wellness.

When considering portion sizes, aim for moderation, particularly if weight management is a concern. These cookies should be enjoyed as occasional treats alongside a balanced diet. Adjust your consumption based on daily activity levels to maintain overall health.

Dietary Adaptations

For those needing gluten-free options, substitute all-purpose flour with a quality gluten-free blend. Replacing traditional sugars may also cater to different dietary needs; consider using coconut sugar or a sugar alternative like erythritol for lower-calorie options.

Dairy-sensitive individuals can enjoy Hot Cocoa Cookies by utilizing plant-based substitutes like almond or coconut milk, as well as dairy-free chocolate alternatives. For vegan adaptations, the recipe can easily be modified with plant-based butter and flax eggs.

Keto enthusiasts can alter the original recipe to include almond flour and erythritol, keeping the carbohydrates low while preserving delicious flavors. For those following a paleo diet, consider substitute ingredients keeping with those guidelines for a wholesome treat.

Troubleshooting Guide

If your cookies turn out too dry, it may be due to flour measurement; ensure you are correctly leveling it off instead of packing it into the measuring cup. Adding an extra tablespoon of milk or water before baking can help hydrate dry dough.

Get the perfect flavor balance by tasting the dough before baking; adjust sweetness as necessary by adding a bit more sugar, especially if using dark chocolate which can be more bitter than semi-sweet varieties.

Temperature problems can arise if your oven runs hot or cold, regular calibration is necessary to ensure baking accuracy. Test with a separate oven thermometer to get consistent results.

If you find that your cookies spread too much, chilling the dough can help, as warm dough tends to flatten. Also, avoid greasing the baking sheet unless specified; using parchment paper can provide a non-stick surface.

In case you’re uncertain about ingredient substitutions, seek guidance or verify ratios carefully before proceeding, as certain ingredients behave differently when replaced.

Recipe Success Stories

Community feedback has praised Hot Cocoa Cookies for their nostalgic flavors and delightful textures, with many bakers sharing their successful adaptations. Individuals often highlight how the pleasant aroma while baking creates a welcoming atmosphere in the kitchen, encouraging friends and family to join in the experience.

Several users have experimented with variations, from adding peppermint chips for a festive touch to substituting chocolate with caramel, resulting in unique and delicious adaptations. Each alteration continues to provide good feedback in terms of taste and satisfaction, demonstrating the recipe’s flexibility.

Readers have also shared photography tips, encouraging new bakers to capture the gooey melted chocolate within. They suggest natural lighting for the best visual appeal and encourage adding colorful bowls or ingredients in the background for added charm.

Finally, many have noted how these cookies forge wonderful memories, whether making them with loved ones or sharing them during holiday festivities, further highlighting the joy of baking and its capacity to draw people together.

Frequently Asked Questions

Can I use milk chocolate instead of dark chocolate?

Yes, milk chocolate can be substituted for dark chocolate; however, you might want to reduce the sugar slightly as milk chocolate is generally sweeter.

Can I freeze the cookie dough?

Absolutely! You can freeze the cookie dough for up to three months. Roll it into logs, wrap tightly, and slice into rounds for fresh-baked cookies whenever you want.

How do I ensure my cookies are chewy?

To achieve chewy cookies, do not overbake them! They should be set at the edges but still soft in the center when you take them out of the oven.

Can I add nuts to the cookie dough?

Certainly! Adding nuts like walnuts or pecans will provide a delightful crunch alongside the chocolate, enhancing the overall texture of your cookies.

What can I use instead of eggs?

You can use flax eggs, applesauce, or commercial egg replacements if you’re looking for a vegan option. Each substitute varies in effectiveness, so testing for the best results is advised.

Why did my cookies come out flat?

Flat cookies can result from this happening due to too much butter, the dough being too warm, or not enough flour. Be sure to measure accurately and chill the dough if needed.

Can I use cocoa powder instead of melted chocolate?

While cocoa powder can be used, it will change the texture and taste slightly. If doing this, add some fat (like vegetable oil or butter) to maintain richness.

How long can I store my cookies?

Hot Cocoa Cookies can be stored in an airtight container at room temperature for about a week, or frozen for longer storage lengths.

What’s the best way to garnish these cookies?

Consider drizzling with melted chocolate or sprinkling with powdered sugar for a beautiful finish. Mini marshmallows can also be placed on top for that classic hot cocoa vibe.

Can this recipe be doubled or tripled?

Yes, you can easily double or triple this recipe! Just ensure your mixing bowl is large enough and adjust baking time if needed.

What should I do if my cookies burn on the bottom?

If this occurs, it suggests your baking sheets may be too dark or your oven temperature is too high. Consider using lighter-colored bakeware and lowering the temperature for future batches.

Additional Resources

For those craving more chocolate treats, check out our collection of chocolate recipes that highlight delicious brownies, cakes, and pies. There are also technique guides available that delve into the art of baking cookies perfectly every time, along with seasonal recipe suggestions to inspire your baking year-round.

Understanding the different types of chocolate can further enhance your baking experience. Find detailed ingredient information as well that can deepen your appreciation for chocolate products. You may also explore equipment recommendations that make the baking process more enjoyable and efficient.

Join the Conversation

We invite you to share your experiences baking Hot Cocoa Cookies on social media! Tag us in your delightful creations and share your feedback. Photography tips can help capture every delicious moment, while encouraging reviews allows others in the community to connect over these sweet treats.

Feel free to share your personal variations or adaptations to the recipe — we love hearing how you’re making it your own! Engage with fellow bakers, exchange tips, and spread the love of baking these scrumptious Hot Cocoa Cookies.

The Recipe

Hot Cocoa Cookies

Serves: 24 cookies

Prep Time: 15 mins

Cook Time: 10 mins

Total Time: 25 mins

Kitchen Equipment Needed

  • Mixing bowl
  • Measuring cups and spoons
  • Baking sheet
  • Parchment paper or silicone baking mat
  • Whisk or electric mixer

Ingredients

  • 1 cup unsalted butter, softened
  • 1 cup granulated sugar
  • 1/2 cup brown sugar, packed
  • 2 large eggs
  • 1 teaspoon vanilla extract
  • 1 1/2 cups all-purpose flour
  • 1/2 cup cocoa powder
  • 1 teaspoon baking powder
  • 1/2 teaspoon salt
  • 1 cup chocolate chips (semi-sweet or dark)
  • 1 cup mini marshmallows (optional for topping)

Directions

  1. Preheat your oven to 350°F (175°C) and line a baking sheet with parchment paper.
  2. In a mixing bowl, cream together the softened butter, granulated sugar, and brown sugar until light and fluffy.
  3. Add the eggs one at a time, mixing well after each addition, then stir in the vanilla extract.
  4. In a separate bowl, whisk together the flour, cocoa powder, baking powder, and salt.
  5. Gradually add the dry ingredients to the wet mixture, stirring until combined.
  6. Fold in the chocolate chips and mini marshmallows if using.
  7. Drop rounded tablespoons of dough onto the prepared baking sheet, spacing them 2 inches apart.
  8. Bake for 9-11 minutes, or until the edges are set but the center is still soft.
  9. Allow cookies to cool on the baking sheet for 5 minutes before transferring to a wire rack to cool completely.

Recipe Notes

  • For a thicker cookie, refrigerate the dough for 30 minutes before baking.
  • Feel free to substitute chocolate chips with your favorite mix-ins, like nuts or dried fruit.
  • Store baked cookies in an airtight container at room temperature for up to a week.
  • For a more indulgent cookie, drizzle melted chocolate over the tops after cooling.

Easy Christmas Cookie Bars – Perfect for the Holidays

Delicious Christmas Cookie Bars: The Ultimate Holiday Treat

⚖️
Difficulty
Easy

⏲️
Prep Time
15 mins

🕒
Cook Time
30 mins

⏱️
Total Time
45 mins

🍽️
Servings
12 bars

Are you ready to elevate your holiday baking? Our Christmas Cookie Bars are the perfect way to bring festive cheer to your kitchen. Bursting with rich flavors, these delightful bars combine a buttery base with chewy chunks of chocolate and a sprinkle of festive sprinkles. The aroma of baked cookies wafts through the air and instantly fills your home with warmth and nostalgia, promising sweet memories during the holiday season.

These delicious Christmas Cookie Bars are not only easy to make but also incredibly versatile. Whether you’re hosting a festive gathering, exchanging holiday treats with friends, or looking for the perfect dessert to conclude a Christmas meal, these bars fit the bill. They are a treat that the entire family will enjoy, and their colorful appearance makes them an attractive addition to any dessert table.

Quick Recipe Highlights

  • Flavor Profile: These Christmas Cookie Bars offer a harmonious blend of sweet and buttery flavors, enhanced by melty chocolate chunks and a hint of vanilla.
  • Texture: Enjoy the delightful contrast between the crisp edges and the soft, chewy center of each bar, creating a satisfying mouthfeel.
  • Aroma: The buttery scent mingles with the chocolate as they bake, filling your kitchen with a warm, inviting fragrance.
  • Visual Appeal: The vibrant sprinkles make these cookie bars visually appealing, perfect for holiday celebrations.
  • Skill Level Needed: This uncomplicated recipe is perfect for bakers of all levels, requiring minimal techniques for successful results.
  • Special Equipment: A baking dish, mixing bowl, and basic baking utensils are all you’ll need to whip up these festive treats.

Recipe Overview

  • Difficulty Level: This recipe is easy, making it perfect for beginner bakers or those short on time during the holiday season.
  • Category: These bars are a sweet treat, ideal for dessert, snack time, or holiday gatherings.
  • Cuisine: These Christmas Cookie Bars draw inspiration from traditional holiday baking, combining classic American cookie flavors with a festive twist.
  • Cost: Ingredients are affordable and can easily fit into any holiday budget, making it a smart choice for large gatherings.
  • Season: Best made during the holiday season, these bars are perfect for Christmas celebrations.
  • Occasion: Versatile in their use, they are great for cookie exchanges, holiday parties, or family gatherings.

Why You’ll Love This Recipe

These Christmas Cookie Bars have the perfect balance of sweetness, making them a delightful treat for everyone. The rich chocolate chunks provide a decadent touch, and the buttery base offers a comforting flavor that evokes holiday warmth. Each bite melts in your mouth, filled with festive cheer that is bound to satisfy your sweet tooth.

Convenience is one of the greatest benefits of this recipe. With just one bowl required for mixing, clean-up is easy, allowing you to enjoy your time with family and friends during the busy holiday season. You can prepare the batter quickly and let the oven do the work!

In addition to being absolutely delicious, these bars include some nutritional benefits due to the ingredients used. Using high-quality chocolate can add antioxidants, and the butter provides healthy fats, making this treat enjoyable in moderation.

Socializing over holiday treats is one of the best parts of the season. Sharing these Christmas Cookie Bars can create cherished moments with friends and family. They make great gifts, too, packaged in colorful boxes or wrapped in festive ribbons.

Finally, the cost-effectiveness of this recipe is worth mentioning. With minimal ingredients that can be found in most pantries, these bars are accessible for anyone looking to bring seasonal joy without breaking the bank.

Historical Background and Cultural Significance

The origins of cookie bars can be traced back to the early 20th century when bakers began to experiment with more versatile forms of cookies. Christmas Cookie Bars, in particular, evolved as a convenient way to serve beloved holiday flavors in a compact form. Their rise in popularity coincided with the increase of communal celebrations during the holiday season.

Culturally, these cookie bars represent the heart of American holiday traditions. Families often come together to bake and share cookie bars with neighbors and friends, fostering a sense of community and celebration. The adoption of festive colors and themes in decorating these bars reflects the joy and creativity associated with Christmas festivities.

Over time, the recipe has evolved with various adaptations, incorporating different flavors, filling types, and decorations to suit local tastes and dietary preferences. While chocolate and sprinkles remain classic choices, experimental bakers often add ingredients like nuts or dried fruits for a personal touch.

Regional variations of cookie bars are common, as different areas boast unique spins on the classic recipe. From gingerbread to peppermint-infused bars, the creative possibilities are vast, allowing everyone to put their twist on this classic holiday treat.

Ingredient Deep Dive

Butter is a primary ingredient in many cookie recipes, including these bars. It provides a rich flavor profile and contributes to the lovely texture of baked goods. When selecting butter, use unsalted for greater control over the saltiness of your cookies. Store butter tightly wrapped in the fridge or freezer to maintain freshness.

Next up are chocolate chips, which are essential for adding sweetness and richness to these Christmas Cookie Bars. Choose high-quality chocolate chips, as they melt beautifully and enhance the overall flavor. Store chocolate in a cool, dry place and consider dark chocolate options for a more sophisticated taste.

Flour serves as the foundation for these bars. All-purpose flour is the most commonly used, providing the necessary structure for baking. When selecting flour, look for a brand that is finely milled and free of impurities. Store flour in an airtight container to keep it fresh and readily accessible for future baking endeavors.

Finally, sprinkles add festive flair and make these cookie bars a visual treat. While they contribute a fun color and texture, sprinkles contain sugar and artificial coloring. Opt for organic or natural sprinkles when possible for a healthier alternative, and store in a cool, dry place.

Common Mistakes to Avoid

  • Not measuring ingredients accurately: Baking is a science, and exact measurements are crucial for the perfect texture and flavor. Use measuring cups and spoons for accuracy.
  • Overmixing the batter: Overmixing can lead to dense, tough bars. Mix until just combined to achieve a light and chewy texture.
  • Using stale ingredients: Check the freshness of baking powder, baking soda, and flour before use to ensure optimal results.
  • Baking at incorrect temperatures: An oven thermometer can help you calibrate the temperature, preventing undercooked or burnt bars.
  • Not chilling the dough: Allow the dough to sit for a few minutes before baking, if specified, to help the bars maintain their structure.
  • Skipping parchment paper: Lining the baking pan with parchment paper allows for easy removal and cleanup.
  • Not allowing bars to cool properly: Cutting the bars too soon can cause them to crumble. Wait until they are completely cool.
  • Using low-quality chocolate: Invest in good chocolate for better flavor and melting quality.
  • Not testing for doneness: Insert a toothpick into the center; it should come out mostly clean with a few moist crumbs.
  • Ignoring storage instructions: Properly store leftover bars to maintain freshness and prevent them from drying out.

Essential Techniques

It’s important to know how to properly combine the ingredients for your Christmas Cookie Bars. Start by creaming together the butter and sugars until light and fluffy. This process incorporates air into the mixture and is crucial for achieving the desired texture. Common pitfalls include not mixing long enough or mixing too much; look for a light yellow color and fluffy consistency.

Equally important is the correct baking method. Preheat your oven and keep a consistent temperature while baking. Use an oven thermometer to ensure accuracy. Visual cues for success include a slight browning on the edges, indicating your bars are done without sacrificing the chewy center.

Pro Tips for Perfect Christmas Cookie Bars

1. **Use room temperature ingredients**: Let your butter and eggs come to room temperature for better incorporation.
2. **Experiment with flavors**: Try adding spices like cinnamon or nutmeg for a festive twist!
3. **Swirl in some frosting**: After the bars cool, drizzle some vanilla frosting on top for extra flavor and presentation.
4. **Add nuts for crunch**: Incorporate nuts like walnuts or pecans for added texture and flavor.
5. **Consider a chocolate swirl**: Melt some chocolate and swirl it into the batter before baking for a decadent touch.
6. **Customize the sprinkles**: Use seasonal sprinkles for a fun, decorative touch that celebrates the holidays.
7. **Bake in individual portions**: Spoon the mixture into muffin tins for perfectly portioned cookie bars.
8. **Check doneness carefully**: Be vigilant and check for doneness; the bars will continue to cook slightly even after removing them from the oven.

Variations and Adaptations

There are numerous regional variations of Christmas Cookie Bars that incorporate local flavors and specialties, such as peppermint bark or eggnog-infused bars. Each region can put its unique spin on the classic recipe, reflecting cultural traditions during the holiday season.

Seasonal adaptations can also enhance the flavors, like using pumpkin puree in the fall or berry compotes in the summer for a refreshing twist. For a healthier option, consider substituting some ingredients with alternatives such as whole wheat flour or coconut sugar for lower glycemic options.

Dietary modifications ensure everyone can enjoy these treats. For gluten-free versions, use almond or coconut flour; for dairy-free, swap out butter for coconut oil. Each modification can create a lovely, inclusive holiday treat.

Experiment with various flavor combinations to elevate your cookie bars. Incorporating flavors such as orange zest or sea salt can lead to a unique taste experience. Some may also prefer a denser or more cake-like texture by adjusting the flour content.

Lastly, consider presentation alternatives. Serve cookie bars in festive packaging, cut into various shapes, or garnished with fresh fruit or herbs for an updated, elegant twist on the classic cookie bar look.

Serving and Presentation Guide

Plating these Christmas Cookie Bars can significantly enhance their appeal. For a simple yet elegant presentation, stack the bars in a tiered tray, allowing guests to serve themselves. Alternatively, cut the bars into uniform shapes and arrange them on a colorful platter.

Garnishing ideas include drizzling melted chocolate over the top or sprinkling additional festive sprinkles. Serve with a dollop of whipped cream or a scoop of vanilla ice cream for a fun twist.

Consider traditional accompaniments like a glass of milk, hot cocoa, or even eggnog, making it a festive treat. For modern serving suggestions, place the bars on small dessert plates, heated slightly, for that freshly baked feel.

Temperature considerations are key; serve cookie bars at room temperature for an optimal taste experience. Portion control is essential; aim for uniform cutting to ensure equal dessert sizes and help with dietary management during the holidays.

Wine and Beverage Pairing

When it comes to wine pairings, a sweet dessert wine like Moscato complements the sugary elements of the bars perfectly. Alternatively, a robust port wine enhances the richness of the chocolate flavors.

For non-alcoholic options, pair with hot apple cider or spiced tea to create a cozy atmosphere. If you prefer coffee or tea pairings, a rich espresso complements the cookie bars beautifully, enhancing the chocolate flavor while balancing sweetness.

Temperature considerations for beverages are also essential; serve wines chilled, while coffee or tea should be enjoyed hot for the best experience. Offer diverse options to accommodate everyone’s preferences.

Storage and Shelf Life

To maintain the freshness of your Christmas Cookie Bars, store them in an airtight container at room temperature for up to a week. If you intend to store them longer, consider freezing them for up to three months.

When freezing, wrap individual bars in plastic wrap and place them in a resealable freezer bag. This method will allow for easy access to quick treats while preserving quality.

Check for signs of spoilage, such as changes in texture or an off smell before consuming. To reheat, place the bars in a preheated oven at 350°F for about 10 minutes, ensuring they regain their original softness.

Make Ahead Strategies

If you want to get a jump on holiday baking, these Christmas Cookie Bars can be prepared ahead. Make the batter up to 24 hours in advance and store it in the fridge or freeze it for longer storage before baking.

Alternatively, bake the bars ahead of time and store them without cutting. Before serving, allow them to cool completely and cut them into desired shapes or sizes.

Assembling the bars during a busy holiday gathering can be streamlined by pre-measuring your ingredients. Maintain flavor and texture by adding any toppings, like sprinkles, only prior to serving for the best visual appeal and freshness.

Scaling Instructions

If you need to adjust the size of your recipe, consider halving the ingredients if you want a smaller batch. When doubling or tripling the recipe, ensure to adjust your baking times slightly, as larger quantities can change cooking dynamics.

It may be wise to use multiple baking pans for large quantities to ensure even cooking. If scaling up, using larger equipment like a stand mixer can save time and effort in mixing the dough thoroughly.

Take note of storage considerations; larger quantities may require additional containers. Proper labeling will help you keep track of batch sizes when storing for later use.

Nutritional Deep Dive

For those mindful of dietary choices, understanding the macro breakdown is essential. Each bar contains a healthy serving of fats, carbohydrates, and proteins. It’s important to consider the portion you consume to maintain a balanced diet.

Micronutrient analysis can highlight nutritional benefits; for example, chocolate provides beneficial antioxidants, while flour contributes vital B vitamins. These elements can support overall health when enjoyed as part of a diversified diet.

If you are monitoring caloric intake, consider a smaller portion size or use lower-calorie substitutes without compromising taste significantly. Enjoying these bars in moderation allows you to indulge without derailing your nutritional goals.

Weight management tips are key when enjoying dessert treats like this. Pair a bar with a fresh fruit or a light dessert drink to enhance flavor without heavy calories, maintaining balance in your dessert choices.

Dietary Adaptations

For guests with gluten sensitivities or celiac disease, creating a gluten-free version is straightforward. Substitute all-purpose flour with almond flour or a gluten-free blend for equally delicious results.

Dairy-free variations can be achieved by using coconut oil or dairy-free butter, ensuring everyone can partake in the festivities. For those following a vegan diet, replace eggs with flaxseed meal as a binding agent.

Low-carb, keto, and paleo adaptations are possible by swapping regular flour with almond or coconut flour, using low-carb sweeteners to maintain sweetness. This approach keeps your bars delectable while catering to those specific dietary needs.

For people with specific allergies or intolerances, consider seeking out nut-free chocolate or using oil-based substitutions to create a delightful treat that everyone can enjoy.

Troubleshooting Guide

Texture issues are common, particularly if these cookie bars turn out too dry. Make sure to adjust baking time based on personal preferences, pulling them out slightly earlier if that’s your goal.

If your bars are overly sweet, balance the flavor by emerging sweetness with a touch of sea salt to enhance the existing flavors. Additionally, if you find the cookies lacking in richness, consider using a mixture of chocolates instead of one type to add depth.

For flavor balance, be cautious with added ingredients; spices can be potent, so start with smaller amounts and adjust gradually. Checking the taste before baking can help prevent overwhelming flavors from developing.

If temperature problems arise, such as baking too fast or unevenly, ensure the oven is preheated, and an oven thermometer is used for checking accuracy to avoid any unwanted surprises.

Ingredient substitutions can cause challenges. When making substitutions, consider the effects on moisture and baking time to ensure the integrity of the cookie bars is maintained.

Timing concerns can interfere with results, particularly if you’re working on a tight schedule. Prepare dough in advance or pre-cut bars for easy serving at gatherings to help mitigate stress.

Recipe Success Stories

Our community has shared numerous success stories from making these delicious Christmas Cookie Bars! Many have experimented with various flavorings, resulting in unique twists like incorporating peppermint or spices, with fantastic feedback on taste.

Readers frequently express their gratitude for providing a straightforward recipe, perfect for busy bakers. They love being able to make a large batch quickly, ideal for family parties and gatherings, creating lasting memories.

Adaptation stories abound, with some even swapping ingredients to cater to dietary needs like gluten-free or vegan options, all while maintaining the festive spirit of the recipe.

Photography tips are also a recurring theme; sharing how the vibrant colors of the bars bring joy and excitement into home kitchens has inspired many to share their own creations on social media.

Frequently Asked Questions

Can I freeze these cookie bars?

Yes, you can freeze these Christmas Cookie Bars! Wrap them tightly in plastic wrap and store them in an airtight container for up to three months. Thaw before serving for the best taste and texture.

How do I know when my cookie bars are done baking?

To determine doneness, insert a toothpick into the center. It should come out with a few moist crumbs but not wet batter. The edges will also appear slightly golden when done.

Can I use different types of chocolate?

Absolutely! Feel free to use milk chocolate, dark chocolate, or white chocolate chips, depending on your preference. You can even mix different varieties for a unique flavor.

What is the best way to store leftover cookie bars?

Store the cooled cookie bars in an airtight container at room temperature for up to a week. If they last longer, consider freezing them to maintain freshness.

Can I add nuts or dried fruit to the recipe?

Yes! Adding nuts, dried fruits, or even caramel bits can enhance the flavors and textures in your cookie bars. Just be sure to adjust quantities to maintain the dough’s balance.

Is there a gluten-free version of this recipe?

Yes! You can substitute regular flour with a gluten-free flour blend or almond flour to make these bars gluten-free while retaining their delicious taste and texture.

Can I prepare the dough in advance?

Definitely! You can prepare the dough ahead of time and store it in the refrigerator for up to 24 hours before baking, making it easy to whip them up for last-minute gatherings.

What should I serve with these cookie bars?

These cookie bars are delightful on their own, but they pair well with hot chocolate, coffee, tea, or even a scoop of vanilla ice cream for a delicious treat.

How can I make these bars look festive?

You can add colorful sprinkles, drizzle melted chocolate on top, or even use cookie cutters to shape them into festive designs for a cheery presentation!

Are these cookie bars suitable for kids to help make?

Yes! These cookie bars are perfect for kids to assist in making. They can help with mixing, adding ingredients, and decorating the finished bars after baking.

Can I change the flavoring of the bars?

Of course! Feel free to add spices like cinnamon, nutmeg, or almond extract to create a different flavor experience. Experimenting with flavors is part of the fun!

Additional Resources

For more delightful recipes, check out our related baking guides that feature holiday-themed desserts. Explore our detailed technique guides that can help refine your baking skills for all types of sweet treats.

If you’re interested in more information on the ingredients used in this recipe, we have extensive resources devoted to various types of chocolate and flour available on our blog.

Our equipment recommendations will help you choose the best tools for your baking adventures, whether you are preparing festive cookies or other incredible desserts.

Lastly, don’t miss our seasonal variations that can inspire you to adapt traditional recipes into modern favorites that can be enjoyed year-round.

Join the Conversation

We invite you to share your baking experiences and success stories with our community! Use social media to showcase your Christmas Cookie Bars creations, tagging us for a chance to be featured on our page.

Photography tips abound; bright colors and appealing presentations are key! Challenge your baking skills and creatively share your variations or enhancements to inspire others.

Feedback and reviews are essential for our growth, so let us know how this recipe worked for you. Engage with our community in the comments section and exchange tips and ideas to make this holiday season even sweeter!

The Recipe

Christmas Cookie Bars

Serves: 12 bars

Prep Time: 15 mins

Cook Time: 30 mins

Total Time: 45 mins

Kitchen Equipment Needed

  • Baking dish (9×13 inches)
  • Mixing bowl
  • Spatula
  • Measuring cups and spoons
  • Oven mitts
  • Cooling rack

Ingredients

  • 1 cup unsalted butter, softened
  • 1 cup granulated sugar
  • 1 cup brown sugar, packed
  • 2 large eggs
  • 2 teaspoons vanilla extract
  • 3 cups all-purpose flour
  • 1 teaspoon baking soda
  • 1 teaspoon salt
  • 2 cups chocolate chips
  • 1 cup festive sprinkles

Directions

  1. Preheat your oven to 350°F (175°C) and grease the baking dish or line it with parchment paper.
  2. In a large mixing bowl, cream together the softened butter, granulated sugar, and brown sugar until the mixture is light and fluffy.
  3. Add in the eggs, one at a time, mixing well after each addition, and then stir in the vanilla extract.
  4. In a separate bowl, whisk together the flour, baking soda, and salt.
  5. Gradually add the dry ingredients to the wet ingredients, mixing until just combined.
  6. Fold in the chocolate chips and half of the sprinkles, reserving the rest for topping.
  7. Spread the batter evenly in the prepared baking dish and sprinkle the remaining festive sprinkles on top.
  8. Bake for 25-30 minutes or until the edges are golden and a toothpick comes out clean from the center.
  9. Allow to cool in the pan for 10 minutes, then transfer to a wire rack to cool completely before cutting into bars.

Recipe Notes

  • Feel free to customize these cookie bars with your favorite ingredients like nuts, coconut, or dried fruits!
  • Store in an airtight container for up to a week, or freeze for longer shelf life.
  • Make a double batch for larger gatherings and enjoy even more holiday cookies!

Easy Rolo Pretzels with M&M Candies – Perfect Party Treat

Delicious Rolo Pretzels with M&M Candies – A Sweet and Salty Snack Delight!

⚖️
Difficulty
Easy

⏲️
Prep Time
10 mins

🕒
Cook Time
5 mins

⏱️
Total Time
15 mins

🍽️
Servings
24 pieces

Looking for a quick and delightful treat? These Rolo Pretzels with M&M candies are the perfect solution! Combining the salty crunch of pretzels with the sweet, melty goodness of Rolo candies, topped with colorful M&Ms, this snack is not just easy to make but incredibly fun to share. Perfect for parties, game nights, or simply satisfying that sweet tooth, this recipe captures the essence of sweet-and-salty perfection that your taste buds will love.

In just these quick steps, you’ll create an irresistible snack that boasts both texture and flavor. Each pretzel is a delightful surprise, as the Rolo candy melts into gooey sweetness, while the M&Ms provide a vibrant crunch. Perfect for all ages, making Rolo Pretzels with M&Ms is an enjoyable activity for the whole family.

Quick Recipe Highlights

  • Flavor Profile: The perfect combination of sweet chocolate, creamy caramel, and salty pretzel crunch creates a snack everyone will adore.
  • Texture: These treats offer a delightful contrast—crispy pretzels and soft, gooey chocolate.
  • Aroma: The rich scent of melting chocolate and buttery caramel fills the kitchen, making it hard to resist.
  • Visual Appeal: The vibrant colors of M&Ms against the golden pretzels create an eye-catching snack.
  • Skill Level Needed: This recipe is easy enough for beginners, requiring no special culinary skills.
  • Special Equipment: All you need is a baking tray and parchment paper!

Recipe Overview

  • Difficulty Level: This recipe is classified as easy. It involves minimal preparation and no intricate steps.
  • Category: Treats and Snacks – Great for parties or after-school snacks.
  • Cuisine: American, featuring popular snacks loved nationwide.
  • Cost: Inexpensive to make, with each piece costing just a few cents!
  • Season: Enjoy year-round but especially delightful during holidays and celebrations.
  • Occasion: Perfect for birthdays, holiday gatherings, or movie nights.

Why You’ll Love This Recipe

The unique taste and texture of Rolo Pretzels with M&M candies make them a standout treat. The rich sweetness of caramel combined with the salty pretzel base creates an unrivaled flavor combination that leaves you wanting more. Each bite brings a different sensation—crunchy, chewy, and melty—making it impossible to eat just one!

Besides being incredibly delicious, this recipe is also convenient. With minimal prep and cooking time, you can whip up a batch in less than 20 minutes! It’s a fantastic option for those unexpected guests or spontaneous movie nights when you need a quick treat on hand.

Nutritionally, while these treats are indulgent, they can also be part of a balanced diet. The use of pretzels offers a bit of fiber, and the candy adds a fun twist without overpowering your day-to-day eating habits. Enjoy these in moderation for a guilt-free deliciousness!

Socially, these Rolo Pretzels are perfect for sharing. They spark joy at gatherings, inviting fun conversations and laughter as everyone enjoys their favorite sweet and salty bite. Who can resist their charming appearance and delightful flavors? They make any occasion feel special.

Finally, from a cost perspective, this recipe is very budget-friendly. With just a few ingredients, you can serve a crowd without breaking the bank. Simple, tasty, and affordable—what’s not to love about these Rolo Pretzels with M&M candies?

Historical Background and Cultural Significance

The origins of combining chocolate and pretzels can be traced back to Pennsylvania, where soft pretzels are a staple. As time went on, inventive cooks started experimenting with various toppings, leading to proposals like these Rolo Pretzels, merging sweet and salty in delightful creations.

The cultural significance of these treats reflects America’s love for accessible and fun desserts. They’re often prepared for gatherings, showcasing their place in American snack culture as a favorite among both children and adults.

As the recipe evolved, adding colorful M&Ms became a popular twist, especially with kids. This adaptation not only enhances the visual appeal but also adds a playful crunch that turns an ordinary treat into an extraordinary one.

Regional variations have emerged, including variations using peanut butter cups or different types of chocolate, showcasing the versatile nature of this snack and its broad appeal across varying tastes and preferences.

Ingredient Deep Dive

Pretzels: Pretzels are rich in history, symbolizing good luck in many cultures. Packed with important nutrients including magnesium and iron, pretzels can be a good source of dietary fiber. When selecting pretzels, look for fresh, crunchy options that do not contain excessive preservatives. Store them in an airtight container to maintain their texture.

Rolo Candies: Rolo candies bring a sweet twist with their chewy caramel center, a treat that many associate with childhood memories. Rich in sugar, they provide a quick energy boost; however, enjoy them in moderation. When buying, choose well-stocked packages to ensure freshness, and store unused candies in a cool, dark environment to maintain their quality.

M&M’s: A classic candy, M&Ms are more than just colorful treats; they have become an icon in American culture. These bite-sized candies bring a fun crunch and vibrant colors to your dish. Look for bags with a mix of colors for an appealing presentation. Store your M&Ms in a cool place, and they can typically last for several months without losing flavor.

Common Mistakes to Avoid

  • Not pre-heating your oven can lead to uneven melting of the Rolo candies, resulting in hard candies instead of a gooey center.
  • Using stale pretzels will affect the texture; always ensure fresh, crunchy pretzels for the best results.
  • Overbaking the pretzels can cause the candies to burn, which will ruin the overall flavor and enjoyment of the snack.
  • Not spacing out the pretzels properly on the baking sheet can lead to them sticking together as they melt.
  • Skipping the cooling time after baking can result in messy bites; let them set to firm up before serving.
  • Choosing flavored or coated pretzels might alter the overall taste and texture, so stick to classic pretzels for the best combination.
  • Using the larger M&M’s can overshadow the taste of the Rolo; aim for the standard-sized candies for a balanced flavor.
  • Not covering the baking tray with parchment paper can lead to difficult cleanup after making this treat.

Essential Techniques

Melting Chocolate: This step is crucial for achieving the right consistency of the Rolo candies. Gently heat in the oven, keeping a close eye to prevent burning. Master this technique by removing from the oven just as they start to soften.

Cooling: Allowing the pretzels to cool thoroughly ensures that they hold their shape and remain deliciously gooey. Moving them too soon can cause a mess, so patience is key for optimal enjoyment!

Pro Tips for Perfect Rolo Pretzels with M&M Candies

1. Experiment with different types of pretzels, such as chocolate-covered or whole grain, for unique flavors.

2. Modify the candy toppings to suit your tastes; try adding crushed nuts or sprinkles for added texture.

3. For a more festive presentation, use seasonal M&Ms that reflect holidays or special occasions.

4. Store leftovers in an airtight container to keep them fresh for longer, ensuring the best possible flavor.

5. Consider adding a pinch of sea salt on top for an extra crunch and enhanced flavor contrast.

6. Always taste a bit of the melted Rolo to ensure the perfect sweetness balance before final assembly.

Variations and Adaptations

For a unique twist, consider using flavored chocolate-covered pretzels. Additionally, swapping out M&Ms for other candies like chocolate-covered almonds can offer a delicious spin on this classic treat. For a healthier adaptation, using dark chocolate Rolos can add a rich flavor without all the excess sugar.

Try introducing seasonal variations, like pumpkin spice M&Ms for autumn or red-and-green chocolate for the holidays, to keep things fun throughout the year. For dietary restrictions, gluten-free pretzels are widely available and can easily replace regular ones.

Serving and Presentation Guide

For an inviting presentation, group the Rolo Pretzels together on a festive serving platter. Place colored napkins underneath to enhance the appeal. Drizzle melted chocolate over the top to create an elegant finish and match the bright colors of the M&Ms. Consider serving them with a side of fruit or nuts to add a variety of textures to your snack spread.

Wine and Beverage Pairing

For a delightful wine pairing, consider a light dessert wine like Moscato or a sparkling wine that contrasts wonderfully with the sweetness of the Rolo Pretzels. If you’re seeking non-alcoholic alternatives, a rich chocolate milkshake or a creamy coffee drink pairs beautifully here. Regardless of your choice, serving at the right temperature will elevate your snack experience.

Storage and Shelf Life

To keep your Rolo Pretzels fresh, store them in an airtight container at room temperature for up to a week. If you want to prolong their lifespan, consider freezing them—just ensure to thaw them properly before serving to enjoy their chewy texture.

Make Ahead Strategies

Prepare all your ingredients in advance to streamline your baking process. Pre-assemble your pretzels and Rolos on the baking tray, then store them in the refrigerator until you’re ready to bake. This can help enhance their flavors by allowing them to meld a bit while they chill.

Scaling Instructions

To double this recipe for larger gatherings, simply increase the quantities of pretzels, Rolos, and M&Ms accordingly. Ensure your baking trays have enough space to allow for even melting of the candies. Adjust your baking times slightly if baking in larger batches, keeping an eye on the melting process to achieve the desired gooeyness.

Nutritional Deep Dive

Each Rolo Pretzel roughly contains around 70 calories, depending on snack sizes and ingredients used. They provide quick energy but are best enjoyed in moderation due to their sugar content. Aim for a balanced diet by enjoying these treats alongside healthier snacks for a complete nutrient profile!

Dietary Adaptations

For a gluten-free version, switch to gluten-free pretzels. Consider substituting the chocolate in Rolos with a dairy-free alternative for a vegan-friendly treat. Purchasing sugar-free M&Ms can cater to those on a low-sugar diet.

Troubleshooting Guide

If your Rolo candies do not melt properly, ensure your baking temperature is adjusted correctly, and check the freshness of your Rolos. If they become too crumbly upon cooling, ensure they weren’t overbaked and allow the candies to sit longer before serving.

Recipe Success Stories

Community feedback on these Rolo Pretzels has been overwhelmingly positive! Many love how easy and fun they are to make with family, and some have adapted the recipe by incorporating different candy toppings. Readers often share stunning photos showcasing their creations on social media, highlighting how these treats have become festive favorites.

Frequently Asked Questions

Can I use different types of pretzels? Yes! You can experiment with flavored or chocolate-covered pretzels, although classic pretzels provide the best sweet-to-salty balance.

How long can I store them? Rolo Pretzels can stay fresh in an airtight container for up to a week. If freezing, thaw them before serving for the best texture.

Is there a way to make them less sweet? While these treats are meant to be sweet, consider using dark chocolate Rolos or reducing the amount of M&Ms used to balance the flavors.

Can kids help with this recipe? Absolutely! They can assist in placing the Rolos on the pretzels before baking, making this a fun family activity.

Are these good for parties? Yes! Rolo Pretzels make great additions to any dessert table or snack spread, thanks to their fun colors and flavors.

Additional Resources

Explore more fun snack recipes, technique guides for candy-making, and insights on sweet and savory flavor pairings. For equipment recommendations, you might want to check our guide on essential baking tools and storage recommendations for your candy supplies. Seasonal variations also provide fresh ideas on how to keep your treats exciting!

Join the Conversation

We’d love to see your creations! Share your photos on social media and tag us. Your variations and feedback are invaluable to our community. Engage with fellow baking enthusiasts and exchange tips and tricks while enjoying these delicious Rolo Pretzels with M&M candies.

The Recipe

Rolo Pretzels with M&M Candies

Serves: 24 pieces

Prep Time: 10 mins

Cook Time: 5 mins

Total Time: 15 mins

Kitchen Equipment Needed

  • Baking tray
  • Parchment paper

Ingredients

  • 24 small pretzels
  • 24 Rolo candies
  • 24 M&M candies (assorted colors)

Directions

  1. Preheat your oven to 350°F (175°C) and line a baking tray with parchment paper.
  2. Place the pretzels on the baking tray, ensuring they are spaced apart.
  3. Place one Rolo candy on each pretzel and bake for 5 minutes, or until the candies are soft.
  4. Remove from the oven and immediately press an M&M candy into the center of each melted Rolo.
  5. Allow to cool completely before serving for the best texture.

Recipe Notes

  • For best results, allow cooled pretzels to sit for at least 30 minutes before serving.
  • Feel free to experiment with different types of candy toppings based on your preferences!

Best Stuffed Lemon Cookies with a Creamy Citrus Filling

Stuffed Lemon Cookies: A Zesty Delight

⚖️
Difficulty
Moderate

⏲️
Prep Time
30 mins

🕒
Cook Time
15 mins

⏱️
Total Time
45 mins

🍽️
Servings
24 cookies

Indulge in the refreshing taste of Stuffed Lemon Cookies, a delightful treat that marries the bright tartness of lemons with a rich, creamy filling. These cookies are perfect for anyone who loves a zesty twist in their desserts. The contrasting textures of soft, chewy cookie dough and the creamy, buttery lemon filling create an unforgettable experience with every bite. Whether enjoyed alone or shared with loved ones, these cookies are sure to brighten your day and tantalize your taste buds.

The Stuffed Lemon Cookies are not just visually appealing with their sunny yellow hue and tempting filling; they are a sensory delight too. Imagine the aroma of freshly baked cookies mingling with the invigorating scent of lemon zest, filling your kitchen with a warmth that prepares your senses for this delectable treat. This recipe is ideal for celebrations, afternoon tea, or any moment when you want to elevate your dessert game.

Quick Recipe Highlights

  • Flavor Profile: A perfect balance of sweet and tangy with a buttery finish.
  • Texture: Soft, chewy cookies with a smooth and creamy center.
  • Aroma: Inviting hints of citrus and vanilla wafting through the air.
  • Visual Appeal: Bright yellow color with a glossy filling that invites indulgence.
  • Skill Level Needed: Moderate; requires some baking experience but is approachable for enthusiasts.
  • Special Equipment: Stand mixer or hand mixer, baking sheets, and parchment paper.

Recipe Overview

  • Difficulty Level: These cookies are classified as moderate due to the multiple steps involved, including the preparation of both the dough and the filling.
  • Category: Perfect for a dessert table, tea parties, or holiday gatherings, these cookies shine in any dessert category.
  • Cuisine: While lemon desserts can be found across cultures, this recipe draws inspiration from classic American baking traditions, enhanced with citrus fruit for brightness.
  • Cost: Generally affordable, the main expense comes from quality butter and fresh lemons, making it a cost-effective dessert option.
  • Season: Lemon cookies are especially refreshing in spring and summer, but can be enjoyed year-round.
  • Occasion: Ideal for birthdays, celebrations, or simply to enjoy with family during a cozy afternoon.

Why You’ll Love This Recipe

Stuffed Lemon Cookies offer a unique flavor and texture that set them apart from other baked goods. The zesty lemon flavor bursts through the soft cookie, while the sweet, creamy filling is an indulgent contrast that enhances every bite. This harmonious combination makes for a delightful treat, perfect for any citrus lover.

In addition, these cookies are incredibly convenient to prepare. Once you’ve mixed the dough and made the filling, the assembly is quite straightforward. This makes it a great option for bakers looking for a fun and rewarding project without overwhelming complexity.

Nutritionally, lemons are rich in vitamin C, adding a healthy boost to your dessert. Coupled with the wholesome goodness of butter and flour, these cookies provide a delightful snack option without compromising on taste.

When it comes to social gatherings, these cookies shine. Their unique flavor profile is sure to intrigue guests, making them a conversation starter. Whether you’re hosting a party or bringing a dish to share, Stuffed Lemon Cookies are bound to impress.

Finally, the affordability of the ingredients means that you can enjoy these treats without breaking the bank. With little prep and cook time, this recipe allows for delicious homemade cookies at a fraction of the cost of store-bought alternatives.

Historical Background and Cultural Significance

The origins of lemon cookies can be traced back to various cultures that celebrate citrus fruits in their desserts. Used primarily in summer, lemons have symbolized freshness and vitality. These cookies, in their stuffed form, are a modern take on a classic theme, aiming to elevate the traditional cookie experience.

Lemon desserts in Western cuisines, especially American bakeries, grew in popularity in the 19th century as home baking flourished. The zest and juice were often added to cake and cookie recipes, infusing them with vibrant flavors that appealed to many.

The evolution of the recipe has seen many adaptations, from simple lemon sugar cookies to stuffed versions that offer a more exciting eating experience. Over time, bakers have experimented with different fillings, enhancing the lemon flavor with elements like cream cheese or lemon curd.

Regionally, variations abound, showcasing how different cultures incorporate local ingredients into their recipes. For instance, Mediterranean countries utilize olive oil alongside citrus, offering a unique twist on traditional cookie-making methods.

Ingredient Deep Dive

Lemons: A star ingredient, lemons not only impart a bright flavor to these cookies but also encourage hydration and aid in digestion due to their high vitamin C content. When selecting lemons, opt for those that feel heavy for their size and have vibrant, smooth skin. To maximize freshness, store them in the refrigerator, and they can last up to three weeks.

Butter: This rich and creamy ingredient is crucial for texture and flavor. Butter not only adds moisture but also gives the cookies a tender crumb. Opt for unsalted butter to control the salt levels in your recipe. Proper storage involves keeping it in a cool, airtight container, which can last several months in the freezer.

Common Mistakes to Avoid

  • Overmixing the Dough: Overmixing can cause dense cookies. Mix just until integrated.
  • Not Chilling the Dough: Skipping the chilling time can lead to cookies spreading too much. Chill for better shape.
  • Using Old Leavening Agents: Baking powder or baking soda loses potency over time. Check expiration dates for the best rise.
  • Incorrect Oven Temperature: Always preheat the oven. An unheated oven can alter cooking time and cookie texture.
  • Not Measuring Ingredients Accurately: Baking is a science. Measured ingredients ensure consistent results.
  • Ignoring Cooling Time: Let cookies cool on a wire rack to prevent sogginess.
  • Skipping the Zest: Zest adds flavor; don’t omit it. Use a microplane for best results.
  • Using Juiced Lemons: Always use fresh juice; bottled juice lacks the same flavor punch.

Essential Techniques

Mixing the Dough: Proper mixing integrates the butter and sugars, creating air pockets for fluffiness. Be careful not to overmix once the flour is added. Look for a soft, slightly sticky dough.

Making the Filling: A smooth filling is key. Beat the ingredients until fluffy and well combined. The filling should easily spread without being runny. If it doesn’t hold its shape, it may need more sugar or less liquid.

Pro Tips for Perfect Stuffed Lemon Cookies

1. Chill the dough for at least 30 minutes to prevent excessive spreading as they bake.

2. Use fresh lemons for zest and juice to capture the most robust flavor possible.

3. When stuffing, don’t overfill; a tablespoon of filling is sufficient to ensure a good cookie seal.

4. Experiment with different fillings like raspberry or cream cheese to find your favorite flavor combination.

5. Allow the cookies to cool completely before glazing to prevent melt.

6. If the dough seems too crumbly, add a tablespoon of milk or water to help bind it.

7. Rotate the baking sheet halfway through baking for an even color.

8. For a perfect finish, dust cooled cookies with powdered sugar before serving.

Variations and Adaptations

These cookies can be adapted in numerous ways to cater to personal tastes. For instance, try replacing the lemon filling with a berry compote for a different fruity experience. You can switch the citrus by using oranges or limes for a unique flavor twist.

Seasonally, these cookies lend themselves well to festive adaptations; adding spices like nutmeg or cinnamon can align the flavors with winter celebrations. Alternatively, topping with fresh fruit during summer creates a refreshing take.

Lastly, for dietary modifications, consider using alternative flours for gluten-free versions, or substitute coconut cream for the filling to cater to vegan diets. Each variation breathes new life into this classic recipe.

Serving and Presentation Guide

Presentation can elevate the experience of Stuffed Lemon Cookies. Arrange them on a beautiful cake stand or platter, drizzling them with a lemon glaze for a visual pop. Fresh lemon slices or zest curls can be placed around the base for garnish.

For an elegant touch, serve alongside a scoop of vanilla ice cream or a dollop of whipped cream, allowing diners to enjoy contrasting temperatures and textures. For a casual setting, these cookies can simply be served on a rustic wooden board.

Wine and Beverage Pairing

Pair these zesty cookies with a light, chilled Moscato or a sparkling Prosecco to complement the citrus flavors beautifully. For those who prefer non-alcoholic options, a refreshing iced tea infused with lemon or mint works wonderfully.

Serve with a delicate jasmine tea that coincides with the refreshing themes of lemon and enhances the aromatic experience. Ensure beverages are served at the right temperature to harmonize with the melt-in-your-mouth quality of the cookies.

Storage and Shelf Life

To store your Stuffed Lemon Cookies, place them in an airtight container at room temperature, where they will stay fresh for about 3-5 days. When freezing, ensure they are well-wrapped to prevent freezer burn; they can last up to 3 months.

Signs of spoilage to watch for include a dull appearance or mold. To reheat, briefly microwave them for about 10 seconds or warm in an oven at a low temperature to restore freshness.

Make Ahead Strategies

You can prepare the dough and filling ahead of time. Freeze the dough in rolled logs, then slice and bake when you’re ready to enjoy fresh cookies. Making the filling a day in advance allows the flavors to meld beautifully.

For optimal freshness, aim to assemble and bake your cookies within a day of preparing the dough. Remember to bring the dough to room temperature before baking if frozen.

Scaling Instructions

To halve the recipe, simply divide all ingredients by two; maintain the same preparation techniques for consistency. If doubling or tripling, be mindful of the baking time; you may need to bake in batches depending on your oven size.

Invest in good baking sheets and perhaps a larger mixer if frequently scaling up recipes, as this ensures even mixing and uniform baking.

Nutritional Deep Dive

Each cookie offers a delightful combination of macronutrients. From healthy fats in the butter to carbohydrates from flour and a bit of sugar, they strike a balanced treat. The use of fresh lemons also imbues vitamins and antioxidants that contribute positively to your diet.

That’s not to mention the potential dietary considerations, with portion control helping manage caloric intake. Moderation is key, ensuring that you can enjoy your favorite desserts while maintaining a balanced diet.

Dietary Adaptations

For those following a gluten-free diet, consider substituting all-purpose flour with almond flour or a gluten-free flour blend to achieve similar textures and flavors. Adjustments might be needed for baking times.

For a dairy-free version, swap the butter for coconut oil and use a plant-based alternative for the filling. There are numerous options available today, making it easier to adapt recipes to fit various dietary needs.

Troubleshooting Guide

If your cookies turn out too dry, consider adding a bit more butter or an egg in the next batch. Ensuring accurate measurements of dry ingredients is crucial to avoid dryness.

In cases where cookies have spread too much, check the chilling time and consider adjusting the flour measurement slightly for a thicker dough.

Recipe Success Stories

Our community loves these Stuffed Lemon Cookies, sharing successful baking experiences and the personal touches they’ve added to the recipe. From alternative fillings to unique glazes, feedback often highlights how adaptable the base recipe is.

Readers have remarked on photographing these cookies once prepared, enjoying the vibrant colors and textures that lend themselves well to social media sharing. These cookies not only taste amazing but visually impress, making them a favorite choice for gatherings.

Frequently Asked Questions

Can I make these cookies vegan? Yes, by substituting butter with coconut oil and using a plant-based filling, you can create a vegan version of these cookies.

How long do these cookies last? When stored properly in an airtight container, they can last up to 5 days at room temperature or 3 months in the freezer.

Can I use bottled lemon juice instead of fresh? While you can use bottled lemon juice, fresh lemon juice offers a brighter flavor and more depth.

Can I freeze the cookie dough? Yes, you can freeze the dough for up to 3 months. Allow it to thaw in the refrigerator before baking.

What if my dough is too sticky? If your dough is too sticky, chill it for a little longer, or add a tablespoon of flour at a time until you reach the desired consistency.

Are there any gluten-free options? Absolutely! Substitute all-purpose flour with a gluten-free alternative to make these cookies gluten-free.

Can I add other flavors to the filling? Yes, you can mix in other flavors such as vanilla or almond extract to the filling for additional flavor dimensions.

What is the best way to serve these cookies? These cookies are best served slightly chilled or at room temperature, often paired with tea or coffee.

Can I double the recipe? Yes, simply double all the ingredients and be mindful of adjusting your baking time as needed.

Why are my cookies spreading too much? Commonly, this can be attributed to insufficient chilling time. Make sure to chill your dough adequately before baking.

What’s the secret to perfect lemon flavor? To unlock the fullest lemon flavor, ensure you use both fresh zest and juice in your recipe.

Additional Resources

If you loved this recipe, consider exploring related citrus-based desserts, such as lemon bars or lime meringue pie. Learning various baking techniques is also beneficial, as they can enhance your overall dessert-making experience.

Check out equipment recommendations for your baking needs and explore ingredient deep dives for further insight into selecting quality ingredients for your baking endeavors.

Join the Conversation

We invite you to share your experiences while making Stuffed Lemon Cookies. Join our community on social media platforms, sharing success stories and photos of your baking adventures. Engage with us through comments and feedback, and don’t hesitate to share flavor variations or personal touches that made this recipe your own!

The Recipe

Stuffed Lemon Cookies

Serves: 24 cookies

Prep Time: 30 mins

Cook Time: 15 mins

Total Time: 45 mins

Kitchen Equipment Needed

  • Stand mixer or hand mixer
  • Baking sheets
  • Parchment paper
  • Mixing bowls
  • Measuring cups and spoons
  • Cooling rack

Ingredients

  • 2 ½ cups all-purpose flour
  • 1 tsp baking powder
  • ½ tsp baking soda
  • ½ tsp salt
  • 1 cup unsalted butter, softened
  • 1 cup granulated sugar
  • 1 large egg
  • 2 tbsp lemon zest
  • 2 tbsp lemon juice
  • 1 ½ cups lemon curd or cream cheese filling

Directions

  1. Preheat your oven to 350°F (175°C) and line baking sheets with parchment paper.
  2. Whisk together flour, baking powder, baking soda, and salt in a bowl; set aside.
  3. In a stand mixer, beat the softened butter and sugar until light and fluffy.
  4. Add in the egg, lemon zest, and lemon juice; mix until well combined.
  5. Gradually incorporate the flour mixture until just combined; do not overmix.
  6. Wrap dough in plastic wrap and chill for at least 30 minutes.
  7. Once chilled, scoop tablespoon-sized portions of dough and flatten slightly, placing a small amount of filling in the center before folding the dough over it to seal.
  8. Place the filled cookies on the prepared baking sheet, leaving space between each cookie.
  9. Bake for 12-15 minutes or until edges are lightly golden. Allow to cool on the baking sheet.
  10. Dust with powdered sugar or drizzle with glaze before serving if desired.

Recipe Notes

  • To store, keep in an airtight container at room temperature for up to 5 days.
  • Freezing the cookies is an option to enjoy later; they can last for up to 3 months in the freezer.
  • Consider experimenting with different fillings for variety.

Best Blueberry Cookies – Soft, Chewy, and Easy to Make

Delicious Blueberry Cookies: A Sweet and Mouthwatering Treat

⚖️
Difficulty
Easy

⏲️
Prep Time
15 mins

🕒
Cook Time
10 mins

⏱️
Total Time
25 mins

🍽️
Servings
24 cookies

Blueberry cookies are a delightful treat that brings the taste of summer to your kitchen all year round. With bursts of juicy blueberries nestled within a soft, chewy cookie, each bite offers an explosion of flavor. These cookies are perfect for any occasion, whether you’re enjoying a quiet afternoon snack or entertaining guests. The sweet and slightly tart notes of blueberries blend perfectly with the buttery dough, creating a harmonious balance that’s both comforting and satisfying.

Not only do these blueberry cookies taste fantastic, but they are also incredibly easy to make. In just a few simple steps, you can create a batch that will impress family and friends. The use of fresh or frozen blueberries allows for versatility, making this recipe a go-to in every baking enthusiast’s repertoire. You’ll be thrilled with how quickly they come together and how wonderful your kitchen smells as they bake.

Quick Recipe Highlights

  • Flavor Profile: These blueberry cookies have a delightful balance of sweetness and tartness, making them perfect for any sweet tooth.
  • Texture: Soft and chewy in the center with slightly crisp edges, these cookies provide a satisfying mouthfeel.
  • Aroma: The aroma of freshly baked cookies mingled with the scent of blueberries is irresistible and will fill your home with warmth.
  • Visual Appeal: The vibrant blue hues of the blueberries pop against the golden-brown cookie, making them visually stunning.
  • Skill Level Needed: Ideal for beginners, this recipe requires minimal baking skills and is easy to follow.
  • Special Equipment: No unusual equipment is needed—just basic baking tools like mixing bowls and baking sheets.

Recipe Overview

  • Difficulty Level: This easy blueberry cookie recipe is perfect for novice bakers and can be completed in under 30 minutes, making it accessible to all.
  • Category: These cookies fit perfectly in the dessert category, but they can also double as a delightful breakfast option with a cup of coffee.
  • Cuisine: Blueberry cookies are rooted in American baking traditions, where the use of seasonal fruits in desserts is celebrated.
  • Cost: The ingredients are generally affordable, making this recipe budget-friendly for everyone.
  • Season: While perfect for summer thanks to fresh blueberries, frozen ones make this recipe enjoyable in any season.
  • Occasion: Great for festive gatherings, casual get-togethers, or simply as a treat for yourself.

Why You’ll Love This Recipe

The taste and texture of blueberry cookies can evoke memories and create new ones. They are sweet yet tart, offering a flavor sensation that makes them addictive. The chewy interior contrasts wonderfully with the crisp edges, leading to a satisfying bite every time. Plus, who could resist the beautiful contrast of colors when enjoying them?

This recipe is incredibly convenient. With a short prep and cooking time, you can satisfy cookie cravings instantly. No need to wait for dough to chill or rise; these cookies are ready in under half an hour. This ease of preparation invites you to bake more often, lessening the efforts for delightful outcomes.

Nutritionally, these cookies feature blueberries, which are renowned for being rich in antioxidants and vitamins. By incorporating fruits into your treats, you’re not only indulging your sweet tooth but also enjoying a snack that’s good for you.

Socially, blueberry cookies are perfect for sharing. They can easily charm guests at parties or hand out warm bags of cookies to friends, inviting joy and delight into their day. Homemade cookies are a heartfelt gift that fosters connection and community.

Finally, the cost-effectiveness of this recipe is unparalleled. The ingredients are accessible and economical, allowing you to create dozens of cookies without breaking the bank. Whether you’re looking to treat your family or fancy a sweet break yourself, these blueberry cookies check all the boxes.

Historical Background and Cultural Significance

The origin of blueberry cookies can be traced back to the use of locally-sourced berries in traditional baking throughout the United States. Blueberries, which are native to North America, have been harvested by Indigenous peoples for centuries. With their versatility in recipes, the incorporation of blueberries into baked goods became popularized in the 19th century, marking a significant moment in American culinary history.

Culturally, blueberries symbolize both summer and abundance, often associated with fresh, home-cooked meals in American households. As more people embraced home baking throughout the years, blueberry cookies emerged as a staple that could be enjoyed by all.

Over time, recipes for blueberry cookies have evolved. Initially, these cookies may have simply featured blueberries and sugar; however, modern adaptations now include flavors such as lemon or almond, enhancing the overall experience. This evolution reflects the creativity of bakers and their desire to bring fresh takes on traditional recipes.

Regional variations also exist. In the New England area, for example, blueberry cookies are often made with wild blueberries, which offer a more intense flavor. The Southern states might add spices or nuts, creating regional specialties that celebrate local ingredients.

Ingredient Deep Dive

Blueberries are the star of this recipe, offering a burst of flavor and a myriad of health benefits. These berries are low in calories but high in vitamins C and K, and are rich in antioxidants. When selecting blueberries, look for plump, firm berries that are deep blue in color. Store them in a covered container in the fridge to maintain freshness, and avoid washing them until you’re ready to use them.

All-purpose flour serves as the backbone of the cookie dough. It’s versatile and widely used in baking, ensuring a balanced texture. When buying flour, choose a reputable brand and store it in an airtight container to keep it fresh. For those with gluten sensitivities, gluten-free flour can be an excellent substitute to maintain the cookies’ texture and flavor.

Butter is essential for achieving that delicious, rich taste and tender crumb in the cookies. Opt for unsalted butter to control the salt content in your recipe. When storing butter, keep it wrapped tightly to prevent it from absorbing fridge odors. For a dairy-free option, use coconut oil or a vegan butter blend.

Sugar adds sweetness, balancing the tartness of blueberries. You can use granulated sugar for the base, but consider experimenting with brown sugar for a deeper flavor. Store sugar in a cool, dry place to prevent clumping.

Eggs bind the ingredients together, providing moisture and helping the cookies to rise. When selecting eggs, look for organic or free-range options for better quality. Store eggs in their carton in the fridge to keep them fresh.

Common Mistakes to Avoid

  • Overmixing the dough can lead to tough cookies. Mix just until the ingredients are combined to keep them soft.
  • Using too much flour is a frequent error. Always measure flour correctly, using the spoon-and-level method for accuracy.
  • Not letting the cookies cool can cause them to break apart. Allow them to cool slightly on the baking sheet before transferring to a wire rack.
  • Using cold ingredients can prevent cookies from properly mixing. Ensure butter and eggs are at room temperature before preparing the dough.
  • Not baking at the right temperature may affect the texture. Always preheat the oven to ensure even baking.
  • Skipping the parchment paper can result in cookies sticking to the pan. It’s a simple step that prevents mess and ensures easy removal.
  • Not using enough blueberries can diminish flavor. Ensure a good amount is added to maximize the cookie’s taste.
  • Ignoring the “resting” time can affect the final texture. Allowing dough to chill helps to firm it up and leads to better baking results.
  • Underbaking or overbaking is commonly overlooked. Use a timer and check for golden edges and a soft center for perfect cookies.

Essential Techniques

Mastering the creaming method is crucial for making blueberry cookies. This technique emulsifies butter and sugar to create a light base for your cookies. To perfect this, ensure your butter is soft but not melted. Cream it with sugar until it’s fluffy and pale. This process traps air, promoting a lighter texture.

Understanding how to properly fold in blueberries can impact the final appearance and flavor. Gently fold them into the dough using a spatula, being mindful not to crush the berries. This method preserves their shape while evenly distributing them throughout the cookie dough, ensuring every bite is flavorful.

Measuring ingredients accurately is fundamental. Utilize a kitchen scale for precision or the spoon-and-level technique with dry ingredients. Correct measurements affect the performance of the dough, ensuring the proper cookie structure.

Knowing when cookies are done is critical for perfect baking. Look for golden edges and slightly underbaked centers, as they will continue to cook on the baking sheet after removal. This will prevent dry, overbaked cookies and retain the desired chewiness.

Pro Tips for Perfect Blueberry Cookies

1. Use fresh blueberries whenever possible for the best flavor and texture. However, if using frozen, do not thaw them before mixing; this keeps the dough from turning blue.

2. Add a teaspoon of lemon zest to enhance the flavor profile and elevate the taste of blueberries, creating a refreshing twist.

3. Chill the cookie dough for 30 minutes before baking to help the cookies maintain their shape and to improve the texture.

4. Space out the cookies adequately on the baking sheet to allow room for spreading; about 2 inches apart is ideal.

5. Add a sprinkle of sea salt on top of the cookies before baking to enhance sweetness and balance flavors beautifully.

6. Experiment with different types of sugar—brown sugar will add moisture and a hint of caramel flavor, enriching the cookie’s edges.

7. For decorative appeal, press a few extra blueberries on top of each cookie before baking to make them visually enticing.

8. Experiment with different add-ins, such as white chocolate chips or chopped nuts, to create variations that suit your taste.

Variations and Adaptations

To celebrate regional variations, try making your blueberry cookies with wild blueberries, which impart a more intense and slightly tart flavor. For a seasonal twist, consider adding spices like cinnamon or nutmeg to evoke fall vibes and complement the berries beautifully.

For those needing dietary modifications, turning these cookies gluten-free is easy with a straightforward substitute using almond flour or a gluten-free baking blend. Vegan options can be achieved by substituting eggs with flax eggs or applesauce, while using vegan butter.

Texture can also be modified—try adding rolled oats for a hearty version or replacing half of the flour with ground almonds for a nutty twist. If you prefer a crispy cookie texture, flatten the dough before baking for a crunchier finish.

Finally, consider presentation alternatives. Instead of classic cookie shapes, use cookie cutters to create fun designs for special events or holidays, enticing everyone to indulge in a whimsical treat.

Serving and Presentation Guide

To create an inviting setup, serve your blueberry cookies warm on a colorful plate. For a rustic touch, stack cookies beautifully and wrap them in parchment paper tied with twine. You can also sprinkle powdered sugar over the top for a stylish and festive look.

For an extra touch, serve with a side of cream cheese frosting or a scoop of vanilla ice cream, creating a delightful contrast of textures and flavors. Consider pairing your cookies with a warm beverage—coffee or herbal tea—enhancing the experience of enjoying these treats.

Temperature consideration is vital; serve cookies at room temperature to allow the flavors to shine through. If you plan to enjoy them later, they can be gently warmed in the microwave for a few seconds for that fresh-from-the-oven experience.

Portion control is also important, especially when baking a large batch. Offering cookies in pairs is a great way for everyone to indulge without overdoing it, making them perfect for sharing at gatherings.

Wine and Beverage Pairing

For a sophisticated pairing, consider a sweet Riesling or Moscato wine, both which complement the sweetness of blueberry cookies beautifully. The fruity notes of these wines will enhance the cookie’s flavors while offering a vibrant contrast.

For non-alcoholic alternatives, consider pairing your cookies with refreshing iced tea or lemonade. The tartness of these beverages can perfectly balance the richness of the cookie, ensuring a delightful harmony.

If you’re in the mood for warm beverages, a light coffee with floral notes or a chai latte would also match beautifully. The spices in the chai can elevate flavors, especially if you’ve chosen to add cinnamon or nutmeg to your cookie recipe.

Temperature plays a role in pairing; serve wines chilled and allow brewed beverages to cool slightly before enjoying with your cookies to fully appreciate their flavor notes.

Storage and Shelf Life

To maintain your blueberry cookies’ freshness, store them in an airtight container at room temperature. Ideally, they will last for about 1 week. For longer preservation, consider refrigerating them, which can extend their shelf life to about 2 weeks while maintaining their moisture.

Signs of spoilage include an off smell or visible mold, indicating that it’s time to discard any questionable cookies. To reheat, simply pop them in the microwave for 10-15 seconds to regain their softness.

For those looking to freeze cookies, allow them to cool completely, then place them in a freezer-safe container or bag. Properly stored, they can last up to 3 months in the freezer. When ready to enjoy, thaw them in the fridge overnight or for a few hours at room temperature.

When it comes to reheating from frozen, a 15-20 minute bake in a preheated oven will restore their fresh-baked goodness.

Make Ahead Strategies

Preparing your blueberry cookies in advance can be a game-changer, especially for busy days. Consider making the dough ahead of time and storing it in the fridge for up to 2 days. This allows the flavors to deepen and can save time on your baking day.

If you’re looking to minimize preparation on serving day, you can also pre-bake the cookies. Store them in an airtight container, and they will remain fresh for several days, making them ready for any snack cravings.

Quality doesn’t need to be sacrificed with make-ahead strategies. Just be sure to follow storage guidelines to maintain taste and texture. You can also consider adding fresh elements right before serving, such as whipped cream or a drizzle of glaze.

Freezing baked cookies is another excellent option for convenience; this way, you always have a treat on hand. It’s as simple as pulling a few out of the freezer and letting them thaw when you have unexpected guests.

Scaling Instructions

Scaling your blueberry cookies recipe can be straightforward. To halve the recipe, simply divide all ingredients by two, ensuring you adjust cooking times by checking the cookies a few minutes earlier than instructed.

Doubling or tripling the recipe is equally easy; however, ensure you have adequate mixing space. You could also divide the dough into smaller batches for easier handling, especially if you’re using a small stand mixer.

When modifying quantities, remember that baking is a science. Keep an eye on baking times, as larger batches may require slightly longer, while smaller batches will bake more quickly.

Always consider your storage options as well. Larger quantities may require additional container space, and you might want to freeze several batches for long-term enjoyment.

Nutritional Deep Dive

Blueberry cookies typically offer a good mix of macronutrients—carbohydrates from sugar and flour provide energy, while fat from butter contributes to the flavor and texture. These cookies pack a surprising fiber punch thanks to the blueberries, which bolster digestive health.

Micronutrient analysis reveals that these cookies are fortified with vitamin C and antioxidant properties, thanks to the blueberries, promoting overall wellness. It’s also important to remember the balance of ingredients to ensure a wholesome treat.

While indulging in cookies, portion sizes matter. Being mindful of how many cookies you consume at once can help maintain a balanced diet without excessive calories. Pairing them with healthier snacks can also balance indulgences.

For those managing weight, consider lighter baking options—like reducing sugar or substituting applesauce for butter—for a healthier spin, creating guilt-free treats that still satisfy a sweet tooth.

Dietary Adaptations

For gluten-free blueberry cookies, swap all-purpose flour with gluten-free flour blends or almond flour to accommodate those with gluten sensitivities without sacrificing texture.

Dairy-free versions can be achieved by using plant-based butter and flax eggs to replace conventional ingredients, allowing everyone to enjoy these delicious cookies.

If you’re following a vegan diet, substituting eggs with mashed ripe bananas or applesauce can yield similar results, ensuring the cookie remains delicious and moist.

For low-carb or keto diets, consider using almond flour and erythritol or stevia as sugar substitutes, creating a treat that’s guilt-free and low on carbs but still satisfying.

Paleo dieters can enjoy these cookies by employing coconut flour and natural sweeteners like honey or maple syrup, keeping to real food principles while indulging in a treat.

Troubleshooting Guide

Texture issues can arise if the dough is not mixed properly. Be sure to mix just until combined to avoid tough cookies. If your cookies come out flat, check your measurements; too much butter or sugar can lead to excess spread.

If the flavor balance is off, adjust the sweetness to your preference by adding more or less sugar, and consider a pinch of salt to enhance the sweetness of the blueberries.

Temperature problems often stem from an incorrect oven setting. Ensure your oven is at the right temperature before baking to avoid underbaking or overbaking your cookies.

Common equipment challenges include using a baking sheet that isn’t appropriately sized. Ensure your sheet allows adequate space for spreading and cooking evenly.

In case of ingredient substitutions, ensure you’re using suitable replacements to maintain the intended texture and flavor. For example, not all flours can be interchanged directly due to different absorption rates.

Timing concerns can lead to issues; factor in the time taken to prepare as well as baking. Keep a close watch on the cookies as they bake, removing them at the first sign of golden edges to prevent overbaking.

Recipe Success Stories

Our community has shared wonderful feedback about these blueberry cookies, with many enjoying the ease of preparation alongside the delightful taste. Adaptations such as adding nuts have earned rave reviews, showcasing the versatility of this recipe.

Readers often share photos of their baking successes and creative presentations, inspiring others to try the recipe. These cookie creations showcase the personal touch bakers bring to this beloved treat.

Success stories highlight how these blueberry cookies have become a staple in many homes, with families requesting them regularly. The adaptable nature of the recipe means it’s easy to cater to special requests or dietary needs.

Feedback often also includes creative variations, such as switching up the fruits or adding chocolate chips, inspiring innovation in the kitchen and motivating bakers to experiment with new flavors.

Frequently Asked Questions

Can I use frozen blueberries for this recipe?

Yes, you can use frozen blueberries! Simply fold them directly into the dough without thawing to prevent the batter from turning blue.

How do I store leftover cookies?

Store your cookies in an airtight container at room temperature for up to one week. You can also refrigerate them for up to two weeks if desired.

Can these cookies be made vegan?

Absolutely! Substitute butter with a plant-based alternative and replace eggs with flax eggs or applesauce for a fantastic vegan version.

What is the best way to freeze cookie dough?

To freeze cookie dough, scoop individual portions onto a baking sheet and freeze them until solid. Transfer to an airtight container or freezer bag for up to three months.

Can I add other fruits to this cookie recipe?

Yes! Feel free to experiment with various fruits such as raspberries or chopped strawberries for different flavors.

How do I know when the cookies are done baking?

Your cookies are done when the edges are golden brown and the centers appear slightly underbaked. They will firm up as they cool.

Is it important to chill the dough?

Chilling the dough helps to firm it up, which will help control spreading during baking, leading to better-shaped cookies.

Can I add spices to enhance the flavors?

Absolutely! Adding cinnamon or nutmeg can elevate the flavor profile of your blueberry cookies and make them cozy.

What if my cookies spread too much?

If your cookies spread excessively, check your measurements, especially with butter and flour, and consider chilling the dough before baking.

Can I make these cookies gluten-free?

Yes! Simply replace all-purpose flour with a gluten-free flour blend, and your cookies will be entirely gluten-free.

Additional Resources

If you enjoyed these blueberry cookies, check out other fruit-based recipes such as raspberry scones or strawberry shortcake. Discover technique guides for effective baking tips or ingredient information to enhance your cooking skills.

Investing in quality kitchen equipment can significantly improve your baking. Consider exploring baking sheets, mixing bowls, and other useful tools to enhance your culinary experience.

For seasonal variations, try incorporating accompanying fruits that pair well with blueberries, like peaches or citrus fruits, to keep your recipes fresh throughout the year.

Join the Conversation

We’d love to see how your blueberry cookies turn out! Share your pictures and baking experiences on social media. Your creativity might inspire someone else to try this delicious recipe!

Engage with our community through recipe reviews, and share any twists you’ve made on the classic blueberry cookie. Your suggestions can contribute to our ever-growing collection of beloved recipes.

Explore various ideas, provide photography tips, and become part of our enthusiastic baking community. We believe everyone’s creations deserve to be celebrated, and we can’t wait to hear your thoughts!

The Recipe

Blueberry Cookies

Serves: 24 cookies

Prep Time: 15 mins

Cook Time: 10 mins

Total Time: 25 mins

Kitchen Equipment Needed

  • Mixing bowls
  • Baking sheets
  • Whisk
  • Rubber spatula
  • Parchment paper

Ingredients

  • 1 cup of unsalted butter, softened
  • 1 cup of granulated sugar
  • 2 large eggs
  • 2 cups of all-purpose flour
  • 2 teaspoons of baking powder
  • 1 teaspoon of salt
  • 2 cups of fresh or frozen blueberries

Directions

  1. Preheat your oven to 350°F (175°C) and line baking sheets with parchment paper.
  2. In a mixing bowl, cream together the softened butter and sugar until light and fluffy.
  3. Beat in the eggs, mixing well after each addition.
  4. In another bowl, whisk together the flour, baking powder, and salt.
  5. Gradually add the dry ingredients to the wet ingredients, mixing until just combined.
  6. Gently fold in the blueberries without crushing them.
  7. Scoop tablespoon-sized portions onto the prepared baking sheets, spacing them 2 inches apart.
  8. Bake for 10-12 minutes, or until golden at the edges and soft in the center.
  9. Allow to cool on the baking sheets for a few minutes before transferring to a wire rack to cool completely.

Recipe Notes

  • For moister cookies, consider adding an extra egg yolk.
  • If you prefer, you can substitute half the blueberries with chocolate chips for a delicious twist.
  • Store excess cookies in an airtight container for up to a week at room temperature.
  • Feel free to add nuts for added crunch and flavor.

Best Lemon Sugar Cookies – Soft, Chewy, and Buttery

Lemon Sugar Cookies: A Delightful Citrus Treat

⚖️
Difficulty
Easy

⏲️
Prep Time
15 mins

🕒
Cook Time
10 mins

⏱️
Total Time
25 mins

🍽️
Servings
24 cookies

Lemon sugar cookies are the perfect dessert for any occasion that calls for a bright and refreshing treat. With their delightful balance of sweetness and zesty lemon flavor, these cookies are sure to elevate your dessert game. The crisp edges yield to a soft, chewy center while the lemon glaze drizzled over the top adds a refreshing touch that will make your taste buds sing. Whether you’re hosting a summer gathering or simply want to brighten up your afternoon tea, these lemon sugar cookies are the perfect solution.

The allure of lemon sugar cookies lies in their vibrant flavor and inviting aroma. As they bake, your kitchen will fill with the sweet and citrusy scent that can instantly lift spirits and attract guests to the oven. The gorgeous golden color of the cookies is simply irresistible, making them a visual delight as well. Every bite offers a lovely balance of tanginess and sweetness, providing a refreshing experience that is perfect for any time of day.

Quick Recipe Highlights

  • Flavor Profile: The cookies blend sweet vanilla with the tang of fresh lemon, making each bite a perfect harmony of flavors.
  • Texture: Crisp on the edges and soft in the center, these cookies offer a delightful mouthfeel that keeps you coming back for more.
  • Aroma: The fragrant notes of lemon zest combined with buttery sugar add a tantalizing aroma that will draw your family into the kitchen.
  • Visual Appeal: The bright yellow hue and glossy glaze make these cookies visually striking and perfect for any dessert plate.
  • Skill Level Needed: These cookies are easy to make, requiring basic mixing and baking techniques, making them perfect for novice bakers.
  • Special Equipment: You’ll need basic baking tools such as a mixing bowl, baking sheet, and parchment paper for optimal results.

Recipe Overview

  • Difficulty Level: These lemon sugar cookies are classified as easy, making them accessible for bakers of all skill levels.
  • Category: As a delightful dessert, they fit perfectly into the ‘cookies’ category, ideal for snacking or sharing.
  • Cuisine: Lemon sugar cookies reflect a quintessential American baking tradition that embraces citrus flavors in sweet treats.
  • Cost: The ingredients are affordable and easily obtainable, averaging around $5-$7 for a batch of 24 cookies.
  • Season: Lemon flavors are refreshing year-round, but these cookies are especially delightful in the spring and summer months.
  • Occasion: Perfect for celebrations, casual gatherings, or as a sweet treat for a cozy night at home.

Why You’ll Love This Recipe

These lemon sugar cookies are not just a treat; they create a joyful experience with their fresh taste and inviting aroma. The combination of sweet and tangy flavors appeals to a wide range of palates, ensuring that everyone at the table will appreciate their deliciousness. The soft, chewy center contrasted with the slightly crisp edges makes for a delightful texture that you won’t forget.

The convenience of the recipe makes it a favorite among busy bakers. With just a 15-minute prep time, you can have these delightful cookies ready in no time, making them a quick option for unexpected guests. Additionally, these cookies freeze beautifully, allowing you to prepare a double batch for later enjoyment. It’s hassle-free baking that fits into any schedule!

Nutritionally, while cookies should be enjoyed in moderation, the use of fresh lemon offers a dose of vitamin C, and the sugar is balanced with the freshness of zest. These cookies can be seen as a guilt-free indulgence that combines joy with a little nutrition.

Socially, lemon sugar cookies are a crowd-pleasing snack that encourages sharing. They’re perfect for gatherings, potlucks, or simply as a homemade gift to brighten someone’s day. Their fragrant aroma and striking appearance will prompt compliments from friends and family alike.

Lastly, with their reasonable cost and widely available ingredients, making lemon sugar cookies is an approachable endeavor for anyone. You can whip up a batch with pantry staples mainly—sugar, butter, flour, and lemons—making them a delightful option for your next baking adventure.

Historical Background and Cultural Significance

The origins of sugar cookies can be traced back to 18th-century Europe, with variations influenced by different cultural traditions. As bakers started to experiment with flavors, lemon emerged as a popular addition, particularly in American baking during the 20th century. These cookies became a staple at gatherings and celebrations, embodying the bright flavors of summer.

Cultural significance is reflected in how lemon sugar cookies are often associated with serendipitous events such as baby showers, birthdays, and holiday parties. Their cheerful appearance and fresh flavor make them an ideal treat for festivities, symbolizing joy and warmth in communal gatherings.

Over the years, the evolution of the lemon sugar cookie allowed for various adaptations, from adding poppy seeds to experimenting with different citrus varieties. The basic sugar cookie recipe has been embraced and modified by numerous cultures, each adding their unique twist.

Regional variations exist, with some areas favoring thicker cookies while others prefer a thinner, crispier texture. Whether frosted, glazed, or served plain, lemon sugar cookies resonate with home bakers across America, reflecting a cherished tradition.

Ingredient Deep Dive

Lemons

Lemons have a rich history tied to cultivation in Asia for thousands of years, eventually making their way to Europe and then America. They are celebrated for their bright flavor and versatility in cooking. Nutritionally, lemons are an excellent source of vitamin C, antioxidants, and have been linked to improved digestion.

When selecting lemons, look for firm, bright yellow fruit, which indicates freshness. Store lemons in the refrigerator to extend their shelf life, and consider using them within a week for the best flavor. You can easily substitute fresh lemons with lemon juice or lemon extract if needed, but fresh zest is irreplaceable in this cookie recipe.

Butter

Butter is a staple in baking that adds flavor, moisture, and consistency to baked goods. Its rich history dates back to ancient civilizations, with culinary use evolving on every continent. Nutritionally, butter provides fat that aids in flavor and texture but should be consumed in moderation due to calorie density.

Choose high-quality unsalted butter to control the salt levels in your baking. Store butter in the refrigerator and keep it in a sealed container to prevent it from absorbing flavors from other foods. All forms of butter, including plant-based mutants, could be used as substitutes; however, the taste may slightly differ.

Common Mistakes to Avoid

  • Overmixing the dough can lead to tough cookies instead of the desired soft texture. Mix just until ingredients are incorporated.
  • Using cold butter instead of softened butter can prevent proper creaming, resulting in dense cookies. Ensure butter is at room temperature before starting.
  • Not measuring flour correctly might alter the cookie’s density. Be sure to spoon flour into your measuring cup and level it off for accuracy.
  • Skipping the chilling step can lead to spreading cookies during baking. Chilling helps maintain the right shape, so don’t skip this crucial step.
  • Overbaking cookies will lead to dryness. Keep an eye on the desired doneness and remove them while they are still slightly underbaked for a chewy finish.
  • Ignoring the importance of zesting can reduce the lemon flavor drastically. Use a microplane to zest lemons finely for maximum impact.
  • Not letting cookies cool on the baking sheet can result in overly soft cookies. Let them cool for a few minutes before transferring to a wire rack.
  • Failing to rotate baking sheets can lead to uneven baking. Switch the sheets halfway through to ensure even color and texture.
  • Not investing in quality baking equipment could hinder your results. Use non-stick or parchment-lined sheets for the best outcomes.
  • Being afraid to experiment with flavors. Adding more zest or different citrus can elevate the cookie flavor significantly.

Essential Techniques

When baking lemon sugar cookies, one of the essential techniques is proper creaming of the butter and sugar. This step is vital as it incorporates air into the mixture, creating a light texture. To master this, ensure you beat the mixture for at least 3-5 minutes until it becomes light and fluffy. A common pitfall is rushing this step, which leads to denser cookies.

Another crucial technique involves measuring flour accurately. Too much flour can lead to dry cookies, while too little can make them spread excessively. Always use the spoon and level method or invest in a kitchen scale for precision. Look for a consistency that allows the dough to hold together yet remain slightly sticky.

Pro Tips for Perfect Lemon Sugar Cookies

Use fresh lemon juice and zest to enhance the cookie’s flavor—bottled juice lacks the brightness of fresh lemons. Consider adding a pinch of salt to balance the sweetness and elevate the flavor profile further. Ensure your ingredients are at room temperature for the best blending.

Experiment with different sugar ratios to find your preferred sweetness level. You can substitute half of the granulated sugar with brown sugar for a richer flavor. Monitor baking times closely, as each oven is different; remove cookies when they still appear slightly under-baked.

If you want to add a decorative touch, consider drizzling a light lemon glaze on top once cooled. Lastly, for a show-stopping presentation, sprinkle with colored sugar or edible glitter before baking for a festive appearance.

Variations and Adaptations

For regional variations, consider substituting the lemon with lime or orange for a different citrus experience. Seasonal adaptations can include adding seasonal spices like nutmeg or cinnamon during winter months. Dietary modifications such as gluten-free can easily be achieved by replacing regular flour with a gluten-free blend.

For flavor variations, try incorporating dried fruit or nuts, such as almonds or pistachios, into the dough for added texture. Texture modifications can also include rolling the dough in powdered sugar before baking for a sweeter crust. Presentation alternatives can involve shaping the cookies into holiday-themed designs or using cookie cutters for fun shapes.

Serving and Presentation Guide

Plating your lemon sugar cookies can enhance the dessert experience. Place them neatly on a colorful platter, and consider using parchment paper for a rustic touch. Garnishing with mint leaves or lemon slices can add visual appeal and freshness.

Traditional accompaniments such as tea or lemonade pair beautifully with these cookies, balancing their sweetness with tang. For modern serving suggestions, consider layering them in a mason jar for an attractive gift, or display them in a clear dessert stand for a beautiful presentation at parties.

Temperature considerations are essential; serve them at room temperature to maintain the right texture. For portion control, consider serving them alongside smaller bites or a fruit platter to balance the meal.

Wine and Beverage Pairing

Pair these lemon sugar cookies with a light-bodied white wine, such as Riesling or Moscato, which complements the citrus flavors. If non-alcoholic beverages are preferred, consider serving with flavored iced tea, lemonade, or sparkling water enhanced with fresh herbs for an elegant touch.

Coffee and tea serve as excellent partners due to the cookie’s sweet and tangy characteristics. Opt for a light roast coffee or a refreshing green tea to balance out the sweetness. Remember to serve all beverages chilled or at a comfortable temperature to enhance the overall tasting experience.

Storage and Shelf Life

Store lemon sugar cookies in an airtight container at room temperature for up to one week. For longer shelf life, consider freezing them. Ensure cookies are completely cooled before wrapping them tightly in plastic wrap or placing them in freezer-safe bags.

Signs of spoilage can include an off smell or visible mold; always check before consuming leftover cookies. Reheating is best done in an oven at a low temperature to preserve the texture rather than using a microwave, which can make them chewy.

Freezing guidelines state that cookies can be stored for up to three months in the freezer. Thaw them at room temperature for the best texture before serving.

Make Ahead Strategies

To prep lemon sugar cookies ahead, mix the dough and refrigerate it for up to 48 hours before baking. This resting time enhances flavor development. You can also roll dough into balls and freeze them on a baking sheet before placing in a storage container for quick baking later.

Quality impact should be minimal if the dough is stored correctly. When ready to bake, simply preheat your oven and bake directly from the freezer, adding a minute or two to the bake time. Fresh elements can be added post-baking, such as zest or glaze, to elevate the flavor right before serving.

Scaling Instructions

To halve the lemon sugar cookies recipe, simply divide all the ingredients by two, and keep an eye on the baking time, which may be slightly less due to the smaller batch. For those looking to double or triple the recipe, ensure you have adequate mixing equipment, as larger batches can require additional mixing time.

Timing modifications can include prepping the baking sheets and oven space before starting to save time. Lastly, consider storage considerations; larger quantities may need extra containers or bags to keep cookies fresh for longer.

Nutritional Deep Dive

Analyzing the macros for lemon sugar cookies reveals a balance of carbohydrates, proteins, and fats, primarily due to their sugar and butter content. Per cookie, they typically contain around 60 calories, with approximately 7 grams of sugar, 3 grams of fat, and minimal protein.

Micronutrient analysis shows that these cookies don’t pack a lot of vitamins or minerals but do include small doses of calcium and vitamin C from lemons. Their health benefits mainly stem from designated serving sizes, allowing you to enjoy them without excessive caloric intake.

For a weight management approach, consider the portion size and integrate them into an overall balanced diet. Conscious eating can help manage sweet indulgences effectively without the negative consequences.

Dietary Adaptations

For gluten-free versions, substitute regular flour with a 1:1 gluten-free blend. Ensure that your other ingredients, such as baking powder, are also gluten-free. Dairy-free adaptations can include using coconut oil or a vegan butter substitute in place of traditional butter.

Vegan adaptations can include using aquafaba or flaxseed meal as an egg substitute while maintaining the original texture. Low-carb options involve using erythritol or almond flour but require adjustments to the baking time.

Keto and paleo modifications might include utilizing coconut flour or nut flours for a healthier spin while keeping carbs minimal. On the other hand, low-FODMAP diets may require using lactose-free products to accommodate sensitive stomachs.

Troubleshooting Guide

If you encounter texture issues, such as excessive dryness, it could stem from overbaking or too much flour. To resolve this, ensure accurate measurements and check for doneness a few minutes early.

Flavor balance issues can arise if too much sweetness masks the lemon flavor. To fix this, add a pinch of salt or an extra zest to enhance the citrus notes. If the temperature goes wrong and cookies bake unevenly, rotating baking sheets in the oven should correct it.

For equipment challenges, such as dough sticking to the countertop, utilize flour or a silicone mat to ease the rolling process. If you’ve made substitutions, note that they can sometimes alter the final product, so stick to tested replacements when possible.

Timing concerns often lead to forgotten cookies; set timers and check frequently to avoid overbaking. With these detailed solutions in place, your baking experience will be much more successful.

Recipe Success Stories

Community feedback often highlights the delightful flavor profile of these lemon sugar cookies! Many readers have shared successes with unique variations, like adding sprinkles or experimenting with flavored icings.

Adaptation stories frequently showcase how bakers transformed the lemon sugar cookies into holiday treats by dyeing the icing or incorporating festive decorations. Readers emphasize the strong flavor that balances sweetness and citrus zest seamlessly, making them perfect for all occasions.

Photography tips suggest capturing the vibrant colors and inviting presentation of these cookies to showcase their appeal. Images highlighting decorated platters or creative serving suggestions inspire others to try these cookies for themselves.

Frequently Asked Questions

Q: Can I make the dough in advance?

A: Yes, you can prepare the dough ahead of time and refrigerate it for up to 48 hours before baking. This allows for a more developed flavor.

Q: How do I ensure my cookies don’t spread too much?

A: Chilling the dough before baking is essential. It helps the butter solidify, preventing the cookies from spreading too thin.

Q: Can I freeze these cookies?

A: Absolutely! Lemon sugar cookies freeze well. Wrap them in plastic wrap and store in an airtight container for up to three months.

Q: What can I use instead of butter?

A: You can use coconut oil or vegan butter as a substitute for traditional butter. This works well for both dairy-free and vegan variations.

Q: How do I prevent dry cookies?

A: Ensure not to overbake the cookies. They should be slightly underbaked when you take them out of the oven to maintain a chewy texture.

Q: What’s the best way to store these cookies?

A: Store them in an airtight container at room temperature for about a week. For longer storage, freeze them for later enjoyment.

Q: Can I use bottled lemon juice?

A: While fresh is preferable for flavor and aroma, bottled lemon juice can work in a pinch but may not offer the same intensity.

Q: Are these cookies vegan?

A: Traditional lemon sugar cookies are not vegan. However, they can easily be modified using vegan butter and flaxseed egg substitutes.

Q: Can I add other flavors?

A: Definitely! You can experiment with other citrus flavors such as lime or orange, or even add chocolate chips for a unique twist.

Q: What if my dough is too sticky?

A: If your dough is too sticky, you can add a little more flour during mixing, a tablespoon at a time, until it reaches a manageable consistency.

Q: What type of flour should I use?

A: All-purpose flour works best for these cookies. Avoid using cake flour, as it can lead to overly soft cookies.

Additional Resources

For those looking to explore related recipes, our site features a variety of citrus desserts that utilize similar principles and techniques. Additionally, check out our technique guides to learn more about cookie baking essentials, such as creaming and dough handling.

Ingredient information is readily available to understand the roles various components play in cookie recipes. Also, investing in quality baking equipment, such as silicone mats and quality baking sheets, can elevate your baking experiences.

Finally, consider seasonal variations as a way to keep your desserts fresh and interesting throughout the year!

Join the Conversation

We believe that sharing recipes breeds creativity, so don’t hesitate to post your own experiences on social media! Capture vibrant photos of your lemon sugar cookies and tag us—we love seeing community adaptations and variations.

Write reviews after trying the recipe, as they help new bakers decide where to start. Engaging with fellow bakers through reviews and sharing tips can enhance our learning and baking community! Remember, experimenting with this recipe can lead to delightful discoveries, so feel free to adapt and share.

The Recipe

Lemon Sugar Cookies

Serves: 24 cookies

Prep Time: 15 mins

Cook Time: 10 mins

Total Time: 25 mins

Kitchen Equipment Needed

  • Mixing bowl
  • Baking sheet
  • Parchment paper
  • Measuring cups and spoons
  • Electric mixer or whisk
  • Cooling rack

Ingredients

  • 1 cup unsalted butter, softened
  • 1 ½ cups granulated sugar
  • 1 egg
  • 2 teaspoons vanilla extract
  • 2 tablespoons lemon zest
  • ⅓ cup fresh lemon juice
  • 4 cups all-purpose flour
  • 2 teaspoons baking powder
  • ½ teaspoon salt

Directions

  1. Preheat oven to 350°F (175°C) and line baking sheets with parchment paper.
  2. In a bowl, cream together the softened butter and sugar until light and fluffy.
  3. Add in the egg, vanilla extract, lemon zest, and lemon juice, mixing until well combined.
  4. In another bowl, whisk together the flour, baking powder, and salt.
  5. Gradually add the dry ingredients to the wet mixture, mixing until just combined.
  6. Chill the dough for at least 30 minutes to prevent spreading.
  7. Scoop tablespoon-sized portions of dough onto the prepared baking sheets, spacing them evenly.
  8. Bake for 10-12 minutes, or until the edges are lightly golden.
  9. Remove from the oven and allow to cool on the baking sheets for 5 minutes before transferring to a cooling rack.

Recipe Notes

  • For a sweeter treat, drizzle lemon glaze over cooled cookies.
  • You can substitute half the sugar with brown sugar to enhance moisture.
  • Cookies can be stored in an airtight container for up to a week or frozen for longer storage.
  • If you prefer a stronger lemon flavor, increase the lemon zest to 3 tablespoons.