Best Tres Leches Cupcakes – Moist and Ready in 30 Minutes

Tres Leches Cupcakes: A Rich and Creamy Delight

⚖️
Difficulty
Medium

⏲️
Prep Time
30 mins

🕒
Cook Time
20 mins

⏱️
Total Time
50 mins

🍽️
Servings
12 cupcakes

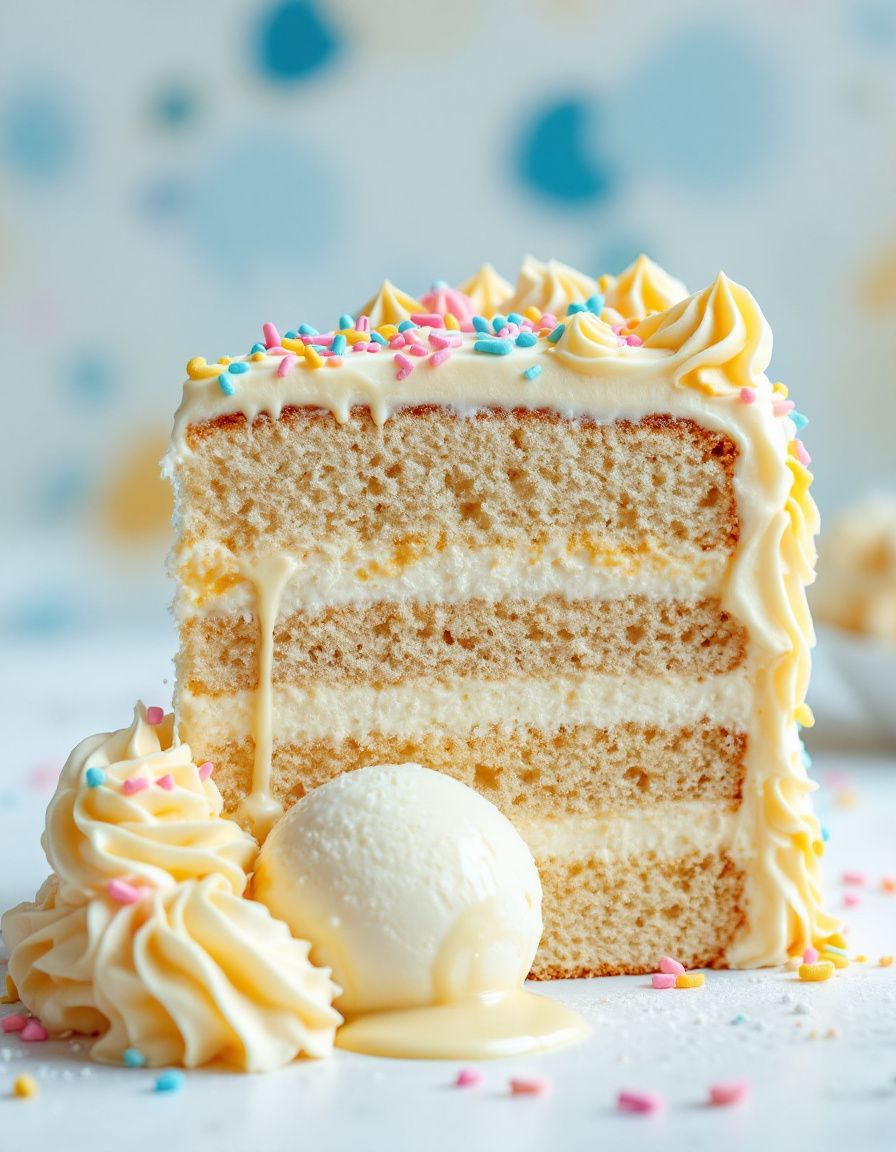
Tres Leches Cupcakes are a delightful twist on the classic tres leches cake, offering a bite-sized version of this beloved Latin American dessert. These cupcakes are soaked in a rich blend of three kinds of milk, making each bite incredibly moist and bursting with flavor. The creamy topping, often whipped cream, adds a lightness that perfectly balances the sweetness of the cake, transforming a traditional dessert into an exciting new treat.

The process of creating these cupcakes is an adventure in flavor and texture. From the moment you whip the egg whites to create a fluffy batter, to the moment you drizzle the milk mixture over the cupcakes, each step is an invitation to indulge in a creamy, dreamy experience. With their visually appealing look and inviting aroma, these cupcakes are perfect for any gathering or celebration, making them an instant favorite at parties or intimate family dinners.

Quick Recipe Highlights

  • Flavor Profile: The cupcakes boast a perfect balance of sweetness, creaminess, and a hint of vanilla, enhanced by the rich, milky soak.
  • Texture: Expect a moist, tender crumb that melts in your mouth, contrasted with the light, airy whipped cream topping.
  • Aroma: The delightful aroma of vanilla and sweet milk wafts through the air, inviting everyone to come and enjoy.
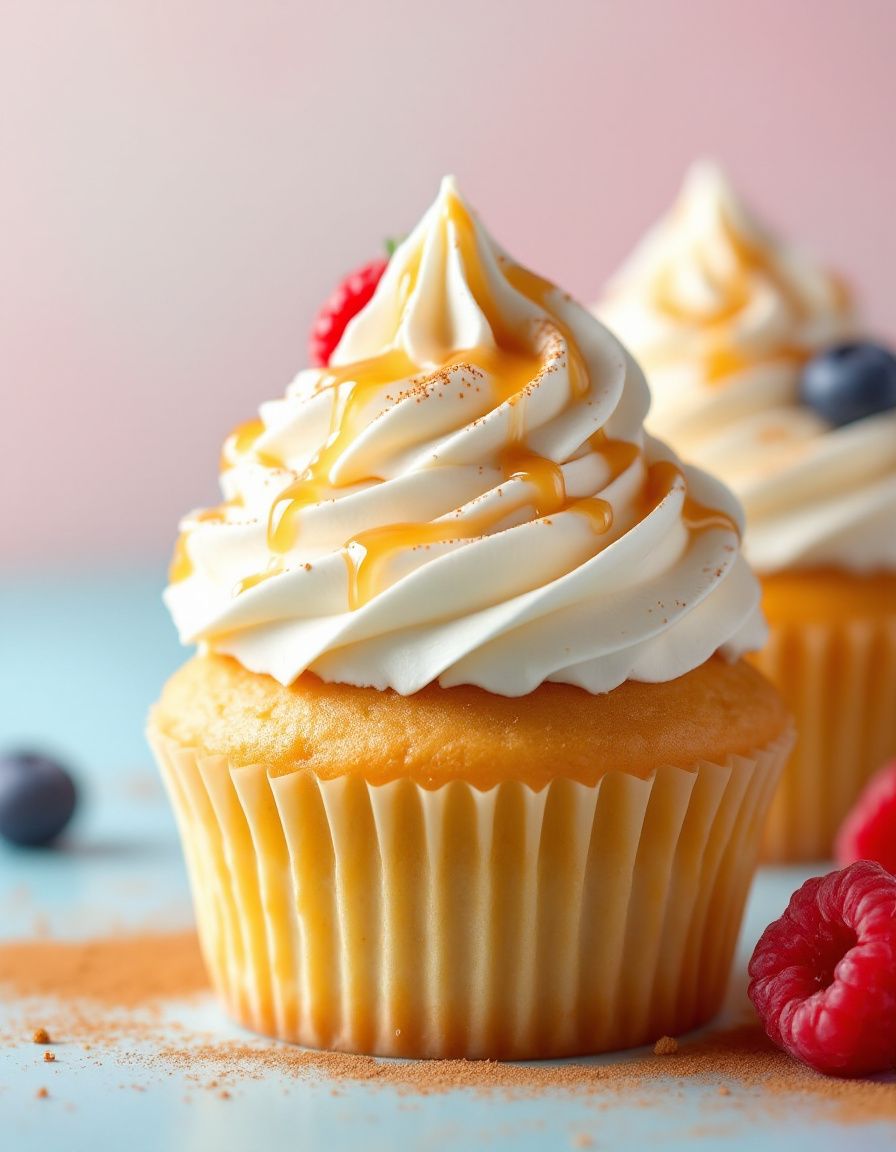
  • Visual Appeal: Topped with freshly whipped cream and a sprinkle of cinnamon or fruit, these cupcakes are as beautiful as they are delicious.
  • Skill Level Needed: This recipe requires basic baking skills, including mixing, folding, and whipping techniques.
  • Special Equipment: Use standard cupcake pans, mixing bowls, and an electric mixer for the best results.

Recipe Overview

  • Difficulty Level: These cupcakes are classified as medium in difficulty. While they require several steps, the process is straightforward, and the rewards are well worth the effort.
  • Category: Perfect for desserts, snacks, or special occasions, these cupcakes fit seamlessly into any celebratory menu.
  • Cuisine: Tres leches is a traditional Mexican dessert that has spread throughout Latin America, celebrated for its richness and unique texture.
  • Cost: Ingredients are generally affordable, making this a budget-friendly dessert option that impresses guests without breaking the bank.
  • Season: While these cupcakes are suitable year-round, they shine particularly in summer and spring, adding a refreshing treat to warm weather gatherings.
  • Occasion: Ideal for birthdays, anniversaries, or even casual get-togethers, these cupcakes are versatile and loved by many.

Why You’ll Love This Recipe

Tres Leches Cupcakes are a delicious treat, perfect for those who appreciate rich and creamy desserts. Each cupcake absorbs the milk soak, creating a heavenly texture that is both moist and tender. The fluffy whipped cream on top adds a light finish, making the entire experience incredibly satisfying and indulgent.

One of the best aspects of this recipe is its convenience. With straightforward instructions, even novice bakers can achieve delicious results. The ability to prepare these cupcakes in advance is another huge plus—simply soak them and refrigerate until serving, freeing you to enjoy your event without stress.

Nutritionally, while Tres Leches Cupcakes are a treat to be enjoyed occasionally, they provide an opportunity to use high-quality ingredients. By choosing organic dairy, you can enhance the taste while enjoying the benefits of better nutrition.

Socially, these cupcakes are perfect for sharing. Their charming appearance and delightful flavor invite conversation and compliments, making them a highlight on any dessert table.

Moreover, this recipe is economically accessible, as it does not require expensive ingredients. With just a few staples, you can create an impressive dessert that is sure to impress your friends and family.

Historical Background and Cultural Significance

The origins of Tres Leches Cake can be traced back to Latin America, with various countries claiming its creation. The cake is believed to have been inspired by the traditional dessert of soaking cakes in milk, likely dating back to the colonial period.

Culturally, tres leches represents celebration and hospitality in many Latin American countries, frequently served on birthdays and significant holidays. Its creamy essence and rich flavors make it a classic that evokes nostalgia among those who grew up enjoying it.

Over time, recipes for tres leches have evolved, adapting to regional tastes. Variations like adding fruit, nuts, or different flavored creams have emerged, contributing to its popularity.

Regional differences have also led to variations in preparation methods; for instance, some areas prefer a denser cake texture, while others favor a lighter sponge. Each region takes pride in its unique approach to this beloved dessert.

Ingredient Deep Dive

  • Flour: The base for cupcakes, flour provides structure. Opt for all-purpose flour for a balanced texture, and consider wheat flour for a nuttier flavor.
  • Flour is crucial in creating the right balance between tenderness and structure in cupcakes. It’s important to sift before measuring; this aerates the flour and leads to lighter cupcakes. Store flour in a cool, dry place to prolong its shelf life, and consider using it within six months for optimal freshness.

  • Milk: The heart of the tres leches, this is where the richness comes from. Whole milk adds the needed creaminess, while evaporated and condensed milk elevate flavors and sweetness.
  • Each type of milk contributes to a unique profile. Whole milk provides moisture, while sweetened condensed milk and evaporated milk add sweetness and depth. Look for products with no added preservatives, and once opened, store milk in the fridge. Substitute with coconut or almond milk for a non-dairy version.

  • Sugar: Essential for sweetness and moisture, sugar also helps with the cupcake’s browning and texture.
  • Sugar can be adjusted according to preference. Granulated sugar is standard, but brown sugar offers a richer taste. Keep sugar in a cool, airtight container to prevent clumping.

Common Mistakes to Avoid

  • Overmixing the batter: This can lead to dense cupcakes instead of light, fluffy ones. Mix until just combined.
  • Not beating egg whites properly: Undermixed whites will prevent the cake from rising. Look for stiff peaks during whipping.
  • Skimping on soaking time: Allowing the cupcakes to soak adequately ensures each bite is rich and creamy.
  • Not refrigerating: Tres leches cupcakes taste best chilled. Don’t skip this essential step.
  • Skipping the whipped cream topping: This lightens the dessert and enhances the flavor; it’s an essential element.
  • Using low-fat dairy: Stick with whole milk and creams for the richest flavor.
  • Inaccurate measuring of ingredients: Use kitchen scales for precision, especially for flour and sugar.
  • Forgetting to check for doneness: Use a toothpick; if it comes out clean, the cupcakes are ready!

Essential Techniques

Whipping Egg Whites: Properly whipped egg whites are essential for creating a fluffy cupcake. Use a clean bowl and beaters, and ensure that there are no yolks mixed in. Whip until stiff peaks form, allowing the cupcakes to rise beautifully.

Creaming Butter and Sugar: This technique incorporates air into the mixture, resulting in a lighter texture. Beat the butter until smooth before gradually adding sugar, mixing until fluffy. Avoid over-mixing once the eggs are added, to maintain aeration.

Pro Tips for Perfect Tres Leches Cupcakes

1. Use room temperature ingredients for a more even batter.
2. Don’t rush the soaking process; patience results in ultimate flavor absorption.
3. Chill the cupcakes for a couple of hours after soaking for the best taste.
4. Experiment with infused creams, such as vanilla bean or coconut, for added flavor.
5. Add a splash of rum or flavored extract for a unique twist.
6. For added presentation, garnish with fresh fruit or chocolate shavings before serving.
7. Use a serrated knife to slice off the tops if you plan to stack the whipped cream higher.
8. Store leftovers covered in the fridge to ensure they stay moist.

Variations and Adaptations

This recipe lends itself beautifully to adaptations. Consider adding a tropical twist by incorporating coconut milk as part of the soaking mixture. Alternatively, chocolate lovers can add cocoa powder to the batter for a rich chocolate version. For a fruity variation, try adding a layer of strawberries or mangoes atop the whipped cream.

For seasonal adaptations, pumpkin purée can be added to the batter during the fall months, giving a festive flavor to the cupcakes. Dietary modifications are also possible; gluten-free flour blends work well for those avoiding gluten, while a dairy-free milk option can replace traditional dairy.

Presentation is flexible too; consider using mini cupcake liners for bite-sized treats perfect for parties, or layer cupcakes with fruit and cream in trifle dishes for a stunning dessert display.

Serving and Presentation Guide

When serving Tres Leches Cupcakes, consider using simple yet elegant plating techniques. Arrange cupcakes on a beautiful platter, and sprinkle with cinnamon or shredded coconut for added visual appeal. A dollop of whipped cream and fresh berries enhances presentation while adding flavor.

Garnish ideas include mint leaves or citrus zest for a pop of color. Traditional accompaniments of fresh fruit, such as strawberries, serve to complement the flavors. For modern serving suggestions, use clear cups or jars to create individual servings with layers of cupcakes and cream.

An important tip: serve these cupcakes chilled, as they taste best refreshing and cool, allowing the full flavor profiles to shine.

Wine and Beverage Pairing

When it comes to pairing beverages with Tres Leches Cupcakes, consider a light dessert wine, such as a Moscato or a sweet Riesling. The delicate sweetness of the wine enhances the flavor of the cupcakes without overpowering them.

For a non-alcoholic alternative, try serving chilled hibiscus tea, which brings a refreshing tartness that pairs well with the rich creaminess of the cupcakes. For coffee lovers, a lightly brewed espresso or cappuccino serves as an excellent accompaniment, highlighting the dessert’s flavors.

Consider the serving temperature of beverages; chilled options will maintain a refreshing balance against the rich cupcakes.

Storage and Shelf Life

Tres Leches Cupcakes are best stored in the refrigerator due to the whipped cream topping and milk soak. Store them in an airtight container to maintain moisture and prevent drying out. They will remain fresh for about three days in the fridge, making them perfect for make-ahead dessert options.

If you notice any signs of spoilage, such as a sour smell or discoloration in the cream, it’s best to discard them. Freezing is not recommended due to the texture of the whipped cream but if necessary, cupcakes can be frozen before soaking for up to a month, ensuring freshness when you’re ready to prepare the dessert.

Make Ahead Strategies

Planning ahead is an excellent strategy when making Tres Leches Cupcakes. You can bake and cool the cupcakes a day in advance and leave them covered at room temperature. The soaking process can be done the day of serving, enhancing flavor without sacrificing texture as it absorbs the creamy mixture.

Ensure to store the whipped cream separately before serving, as it helps maintain its texture. Once ready to serve, quickly top the cupcakes and chill them to ensure they are nice and cold.

Scaling Instructions

If you’re looking to accommodate more guests, scaling up this recipe is straightforward. Doubling the ingredients will yield 24 cupcakes, but ensure to bake in batches if your oven can’t handle full pans. The cooking time may vary slightly with more cupcakes in the oven, so check for doneness accordingly.

For a smaller gathering, halving the recipe is an easy option. Simply divide all ingredients by two and adjust your pan size if necessary.

Nutritional Deep Dive

Each cupcake provides a delightful dessert experience, although they’re rich in calories and sugar. A macro breakdown shows a good source of carbohydrates and fats, thanks to the creamy toppings.

Micronutrient analysis may vary, but including whole dairy adds essential vitamins like calcium and vitamin D.

Enjoying each cupcake in moderation can fit well within a balanced diet, especially when shared among family and friends. For those monitoring portions, consider using mini cupcake liners to create smaller servings.

Dietary Adaptations

For a gluten-free version, substitute all-purpose flour with a gluten-free blend and ensure all other ingredients are also gluten-free certified.

Those with dairy concerns can adapt the recipe using almond or coconut milk, and whipped coconut cream instead of traditional whipped topping.

A vegan version can be achieved by swapping eggs for flaxseed meal or aquafaba, along with using non-dairy milk and cream.

Low-carb or keto modifications can be made by utilizing almond flour and a sugar substitute, turning this tasty dessert into a low-carb treat without sacrificing flavor.

Troubleshooting Guide

A common issue with these cupcakes might be overly dense texture, often caused by overmixing the batter. Aim for minimal mixing after adding flour to keep the texture light.

If the flavor lacks balance, consider adjusting sugar levels in the milk soak—taste it before pouring over the cupcakes.

If your whipped cream doesn’t hold its shape, ensure to chill your bowl and beaters before whipping and avoid overwhipping.

Timing can also be crucial; if they seem undercooked after the suggested time, do the toothpick test for doneness and adjust cooking times accordingly.

Recipe Success Stories

After sharing this delightful recipe, many bakers have raved about their results. From perfect texture to adjusted flavors, readers frequently comment on how this dessert has become a staple at family gatherings.

Several have shared tips on personal adaptations, such as the inclusion of unique flavor profiles, showcasing how versatile the cupcakes can be.

Readers have also expressed joy in capturing images of their creations, emphasizing how visually stunning the cupcakes are when garnished.

Photographic tips have pinpointed the best angles and lighting to highlight the inviting layers of whipped cream and milky goodness, making it a feast for the eyes as well as the palate.

Frequently Asked Questions

Can I use any type of milk?

A mix of whole milk, evaporated milk, and sweetened condensed milk is traditional, but you can substitute with alternatives like almond or coconut milk for a dairy-free variation.

How do I know when my cupcakes are done baking?

Insert a toothpick in the center of the cupcake; if it comes out clean or with a few crumbs, they are done. Be careful not to overbake.

Can I make this recipe vegan?

Yes, you can replace eggs with a flaxseed mixture and use vegan alternatives for the milk and whipped cream.

How long will these cupcakes last?

Stored in the fridge, they can last for about three days, but they are best enjoyed fresh.

What can I use instead of whipped cream?

You can use whipped coconut cream or a non-dairy whipped topping to suit dietary preferences.

Can I freeze these cupcakes?

It’s not recommended to freeze after soaking, but you can freeze the unsoaked cupcakes for later use.

What is the best way to serve them?

Serve chilled, topped with whipped cream and garnished with fresh fruit or toasted coconut for a beautiful presentation.

How can I make the cupcakes more flavorful?

Consider adding flavor extracts, such as almond or coconut, to the batter and soak for richer layers of flavor.

Can I make mini versions of these cupcakes?

Absolutely! Just reduce the baking time and adjust the soaking time as needed for smaller cupcakes.

Are these cupcakes suitable for children?

Yes, they are generally safe for children, but moderation is key due to their sweetness.

Additional Resources

For those looking to expand their dessert repertoire, consider exploring other Latin American flavors and dessert recipes. Recipes like flan or empanadas offer interesting variations that complement Tres Leches Cupcakes beautifully.

Technique guides on whipping cream or baking cupcakes can provide deeper insights into perfecting your baking skills. Understanding ingredient selection and equipment recommendations can further enhance your baking endeavors.

Consider exploring seasonal variations as well, aligning your baking with fresh ingredients to keep your offerings new and exciting.

Join the Conversation

We invite you to share your adventures in baking Tres Leches Cupcakes! Post pictures of your creations on social media, tag your friends, and inspire them to try this delightful recipe.

Feedback, variations, and learning alongside fellow baking enthusiasts enrich our community. Whether it’s through comments, recipe reviews, or personal adaptations, your experiences help others in their culinary journeys.

Let’s create a thriving community of dessert lovers who appreciate the rich history and delicious flavor of Tres Leches Cupcakes!

The Recipe

Tres Leches Cupcakes

Serves: 12 cupcakes

Prep Time: 30 mins

Cook Time: 20 mins

Total Time: 50 mins

Kitchen Equipment Needed

  • Cupcake pan
  • Parchment paper liners
  • Mixing bowls
  • Electric mixer
  • Toothpick for testing

Ingredients

  • 1 ½ cups all-purpose flour
  • 1 ½ tsp baking powder
  • ½ tsp salt
  • 1/3 cup unsalted butter, softened
  • 1 cup granulated sugar
  • 3 large eggs
  • 1 tsp vanilla extract
  • 1 cup whole milk
  • 1 cup sweetened condensed milk
  • 1 cup evaporated milk
  • 1 ½ cups heavy whipping cream

Directions

  1. Preheat your oven to 350°F (175°C) and line a cupcake pan with liners.
  2. In a mixing bowl, sift together flour, baking powder, and salt.
  3. In another bowl, cream the softened butter and sugar until light and fluffy; add the eggs, one at a time, mixing well after each addition. Add vanilla extract.
  4. Gradually mix the dry ingredients into the wet ingredients, alternating with the whole milk until well combined.
  5. Fill cupcake liners about 2/3 full with batter and bake for 18-20 minutes or until a toothpick inserted comes out clean.
  6. Once cooled, mix the sweetened condensed milk, evaporated milk, and remaining whole milk in a bowl.
  7. Using a toothpick, poke holes in the cooled cupcakes and slowly drizzle the milk mixture over each cupcake, allowing it to soak.
  8. For the frosting, whip the heavy cream until stiff peaks form and frost the soaked cupcakes generously.
  9. Garnish with cinnamon or fresh fruit if desired.

Recipe Notes

  • Adjust sweetness as needed based on personal preference.
  • Feel free to experiment with flavored extracts in the frosting.
  • These cupcakes are best served chilled and can be made a day in advance.

Best Sugar Cookie Cake – Soft, Sweet, and Family Favorite

Sugar Cookie Cake: The Ultimate Sweet Treat

⚖️
Difficulty
Easy

⏲️
Prep Time
15 mins

🕒
Cook Time
25 mins

⏱️
Total Time
40 mins

🍽️
Servings
12

Making a Sugar Cookie Cake is not just about satisfying your sweet tooth; it’s an experience that brings confort and joy to any gathering. When you take that first bite, you are greeted with a soft, buttery sweetness that twirls on your palate, leading to the rich vanilla undertones that are simply irresistible. This cake combines the classic flavor of sugar cookies with the warmth and charm of cake, making it the perfect dessert for birthdays, family gatherings, or a cozy evening at home. Just imagine a warm slice of Sugar Cookie Cake, adorned with colorful sprinkles or a drizzle of icing, tempting you to enjoy every crumb!

Not only is this cake delicious, but its texture is divine. The outer layer bakes to a gentle golden hue while the inside remains soft and moist. Each slice is visually stunning, making it a showstopper on your dessert table. The contrast of colors from sprinkles and icing brings an inviting vibe that tells a story of homemade love and care. You’ll find that the aroma of freshly baked sugar cookie cake fills your home with nostalgia, reminding you of baking days in your grandmother’s kitchen filled with laughter and joy. Enjoying a slice of this cake is like taking a warm hug, a perfect balance of taste and tenderness.

Quick Recipe Highlights

  • Flavor Profile: The cake features a rich, buttery sweetness complemented by vanilla and almond extracts that enhance the classic sugar cookie flavor.
  • Texture: Expect a soft, moist interior with a slight crispness on the edges, making it a delightful experience with each bite.
  • Aroma: The aromatic notes of baked sugar cookies mingle with hints of vanilla, creating an inviting experience as it bakes.
  • Visual Appeal: The cake has a nice golden crust and can be topped with colorful sprinkles or icing for a festive touch.
  • Skill Level Needed: This is an easy recipe, perfect for both novice and experienced bakers looking to create something delightful.
  • Special Equipment: Only basic baking equipment is required, such as mixing bowls, a whisk, and a round cake pan.

Recipe Overview

  • Difficulty Level: This Sugar Cookie Cake is designed for bakers of all skill levels, making it an ideal choice for those new to baking or experienced cooks wanting a simple yet rewarding treat.
  • Category: This delectable dessert falls under the category of cakes and cookies, perfect for celebrations and everyday treats alike.
  • Cuisine: While it takes inspiration from traditional American cookie recipes, this cake offers a versatile approach that can adapt to various culinary influences.
  • Cost: The cost of making this cake is quite budget-friendly, typically amounting to approximately $10, depending on ingredient availability.
  • Season: Sugar Cookie Cake is a favorite year-round; however, it shines during holidays and special occasions such as birthdays and festive gatherings.
  • Occasion: Ideal for birthdays, holidays, or simply as a sweet treat to brighten your day, this cake fits seamlessly into any celebration.

Why You’ll Love This Recipe

Sugar Cookie Cake is a delightful treat that not only satisfies your sweet cravings but also invites many flavor profiles that tantalize the taste buds. The harmonious blend of butter, sugar, and vanilla makes for an exquisite dessert that doesn’t overwhelm the palate. Enjoying this cake with friends and family creates cherished moments, as the familiarity of the flavors rekindles memories of joyful celebrations.

The convenience of preparing this cake is a massive plus. With minimal prep time and easy steps, you can whip it up in no time. It requires no complicated techniques, making it accessible for baking enthusiasts at any level. Furthermore, the straightforward ingredients simplify grocery shopping, allowing you to focus more on the joy of baking rather than searching for exotic items.

Nutritionally speaking, while Sugar Cookie Cake is a treat, it can also be paired with fruits or light creams to balance indulgence with nutrition. It’s a versatile dessert that can also be made healthier with simple substitutions like using whole wheat flour or natural sweeteners, making it suitable for various dietary preferences.

Hosting an event? This cake serves as an attractive centerpiece that sparks joy among your guests. With its bright colors and inviting aroma, it opens conversations and creates a delightful atmosphere. Whether served at a birthday party or a cozy get-together, it’s sure to end your culinary experience on a high note.

Cost-effective and accessible, Sugar Cookie Cake allows you to create an impressive dessert without breaking the bank. It’s a recipe you can easily scale up for larger gatherings, making it a staple in any baking repertoire. Whether it’s a casual family dinner or a festive celebration, you’ll find this delightful cake to be an approachable and enjoyable option.

Historical Background and Cultural Significance

The origins of sugar cookies date back to the early 18th century, where German settlers in America are credited with developing the recipe. Initially created to celebrate special occasions, sugar cookies quickly became a staple in American households. Over the decades, they transformed into various shapes and flavors, leading to the delightful Sugar Cookie Cake we enjoy today.

Sugar cookie variations are widespread, with each culture infusing unique twists. In the United States, the festive traditions around sugar cookies have become synonymous with holidays, especially Christmas, where decorating them is a beloved family activity. The evolution of sugar cookies to cake form brings forth a new dimension of flavor while maintaining the beloved essence of traditional cookies.

The cultural importance of sugar cookies extends beyond their deliciousness. They symbolize celebratory gatherings, communal baking sessions, and home-cooked love. This Sugar Cookie Cake version celebrates those moments, allowing people of all ages to indulge and connect over a shared favorite treat.

In contemporary baking, the Sugar Cookie Cake showcases regional variations. From adding chocolate chips to using flavored extracts, the cake continues to evolve in homes across the globe. Each version tells a story and reflects the tastes and preferences of those who bake it, illustrating the cake’s flexibility and enduring appeal.

Ingredient Deep Dive

Flour: Flour not only provides structure to the Sugar Cookie Cake but also contributes to its texture. It’s essential to choose the right type; all-purpose flour works best for achieving that perfect balance. When selecting flour, look for a finely milled product, and store it in an airtight container to maintain freshness. If you need a gluten-free option, almond flour or a gluten-free blend can be excellent substitutes.

Sugar: The sweetening agent in your sugar cookie cake provides the signature sweetness that everyone loves. White granulated sugar is typically used, but consider using brown sugar for a deeper flavor. Sugar has various health effects; while moderation is key, it also fuels our bodies. Aim for fresh sugar stored in a cool, dry place to prevent clumping and ensure its longevity.

Butter: Unsalted butter is crucial in building your cake’s flavor, moisture, and richness. It’s important to allow your butter to soften at room temperature before mixing for optimal texture. This fat source provides essential nutrients, including Vitamin A, and should be stored properly to avoid spoilage. For a healthier substitute, coconut oil can be used, lending a unique flavor to your cake.

Eggs: Eggs bind your ingredients together and provide moisture, contributing to a light and fluffy texture. Using fresh eggs ensures the integrity of your cake. If you’re vegan, consider flaxseed meal soaked in water as an alternative to eggs, maintaining the cake’s moisture and binding properties while adhering to dietary preferences.

Common Mistakes to Avoid

  • Not measuring ingredients accurately can lead to a cake that is too dense or too dry. Always use a kitchen scale or measuring cups for precision.
  • Overmixing the batter is a critical error; it can result in a tough texture. Mix just until the ingredients are combined, and no flour pockets remain.
  • Using cold butter instead of softened can yield a dense cake. Make sure your butter is at room temperature before starting the mixing process.
  • Failing to preheat the oven can affect baking time and cake texture. Always preheat your oven before placing the cake inside.
  • Not allowing the cake to cool properly before serving can lead to crumbling. Patience is key for the best results!
  • Ignoring the ingredient substitution ratios may cause flavor changes. Always research how to substitute ingredients correctly.
  • Baking with expired ingredients can impact flavor and texture. Always check expiration dates for freshness.
  • Skimping on mixing time can lead to uneven batter and inconsistent baking. Pay attention to mixing to ensure all ingredients are evenly integrated.
  • Not using parchment paper can lead to sticking. Line your baking pan to achieve easy removal and perfect slices.
  • Overbaking can dry out the cake, while underbaking may lead to a gooey texture. Always keep an eye on your cake in the oven.

Essential Techniques

Measuring Ingredients: Measuring accurately is crucial to the success of your Sugar Cookie Cake. Use the right tools, such as dry and liquid measuring cups, to ensure precise portions. Common pitfalls include packing flour too tightly or misreading liquid measurements. Aim for consistency in measurements to avoid fluctuations in your cake’s texture.

Mixing Batter: Blend your ingredients by starting at low speed to avoid flour clouds, then increase to a medium speed as the batter comes together. Look for a creamy consistency, ensuring everything is fully incorporated without mixing too much. The key is to stop when no dry ingredients are visible and avoid overworking the batter, which can affect the final texture.

Pro Tips for Perfect Sugar Cookie Cake

1. For added flavor, consider incorporating a dash of almond extract along with vanilla for a lovely twist on the traditional taste.
2. Experiment with toppings! Spread a layer of cream cheese frosting or whipped cream for a decadent visual presentation.
3. If you like texture, consider folding in some mini chocolate chips or nuts for added crunch.
4. Allow the cake to chill for a short time before slicing; this helps maintain its shape and improves flavor development.
5. Using a room-temperature egg creates a more homogenous batter, promoting a better rise and fluffy texture.
6. For enhanced flavor, use browned butter instead of regular unsalted butter; this adds a rich, nutty taste that complements the cake beautifully.
7. A light dusting of powdered sugar over the finished cake elevates its presentation and adds a touch of sweetness.
8. Consider scaling the recipe to make mini cakes in muffin tins for delightful individual servings, perfect for parties!

Variations and Adaptations

Indulging in variations of the Sugar Cookie Cake can elevate its flavor and style. For a regional twist, add spices like cinnamon or nutmeg for a warm, aromatic experience. Seasonal adaptations also abound; for winter, consider adding peppermint extract or candy cane pieces for a festive flair, while in the summer, fresh berries can provide a refreshing bite.

Dietary modifications allow everyone to enjoy this cake. For gluten-free enthusiasts, opt for a gluten-free flour mix that performs well in baking. Those on a dairy-free diet can utilize coconut or almond milk in place of regular milk and a plant-based butter substitute. Vegan eaters can replace eggs with flax or chia seeds, preserving texture while adhering to dietary preferences.

Flavor variations can include lemon zest for a tangy touch or orange zest for brightness. You might also incorporate chocolate chips or dried fruits for an attractive texture. Explore adding different icings or glazes, such as vanilla bean or lemon glaze, to customize the cake to your taste preferences.

For those looking to modify the presentation, consider going for a layered cake style with frosting in between each layer or creating a beautiful tiered design for parties. The possibilities are endless with this adaptable recipe format to suit personal tastes and celebrations!

Serving and Presentation Guide

To present your Sugar Cookie Cake beautifully, consider using a decorative cake stand. A simple yet elegant presentation can be achieved by lightly dusting powdered sugar over the top before serving or slicing fresh fruits to garnish the sides. For added flair, drizzle a sweet glaze or icing over the top, allowing it to pool slightly for a rustic look.

When serving, consider portion sizes—slice into even pieces to ensure everyone receives a generous serving. Utilize fun, colorful plates that coordinate with the theme of your gathering for an inviting atmosphere. If serving at an event, providing forks and small takeaway boxes can allow guests to enjoy a slice later.

Temperature is key! This cake can be enjoyed warm, so consider lightly warming slices in the microwave for about ten seconds before serving. Offering whipped cream or ice cream alongside creates a delightful contrast to the textural elements of the cake.

Wine and Beverage Pairing

Pairing nicely with Sugar Cookie Cake, consider a sweet white wine like Moscato or a light Pinot Grigio, which complement the cake’s sweetness without overwhelming it. For non-alcoholic options, a homemade vanilla cream soda or iced tea with lemon can refresh and enhance the overall experience.

Coffee and tea enthusiasts can elevate their enjoyment of this cake with a cup of strong coffee or a smooth Earl Grey tea. The warm notes of coffee contrast perfectly with the sweet flavors of the cake. When pairing beverages, consider the serving temperature, ideally offering drinks slightly chilled or piping hot depending on your guest preferences.

Storage and Shelf Life

To store your Sugar Cookie Cake, wrap it in plastic wrap or aluminum foil to maintain its freshness. Keep it in an airtight container on the counter for up to three days; for longer shelf life, refrigeration is an option but may slightly change the texture.

If you notice any moisture or signs of spoilage like unusual smells or a change in color, it’s best to discard it immediately. The cake can also be frozen for up to three months—just ensure it is well wrapped to prevent freezer burn. Before serving frozen slices, allow them to thaw at room temperature for a couple of hours, or warm them in the oven for the best texture.

Reheating the cake is simple; place a slice in the microwave for about ten seconds or warm it in a preheated oven at 350°F for five minutes. These methods help maintain the delightful flavors of the cake.

Make Ahead Strategies

Planning to make your Sugar Cookie Cake ahead of time? You can prepare the batter and store it in the refrigerator for up to 24 hours before baking. Just ensure it’s covered tightly to prevent any drying or tainting from other odors.

If you’ve baked the cake, letting it cool completely before wrapping it for storage will preserve texture and prevent sogginess. You can also bake the cake, let it cool, then freeze it for later, ensuring you enjoy the cake fresh when you need it.

When assembling the cake, consider making frosting a day in advance as well, keeping it stored in the fridge. This strategy saves time and allows flavors to meld beautifully. Prior to serving, remember to re-whip the frosting for the best consistency and flavor.

Scaling Instructions

If you want to adjust the size of your Sugar Cookie Cake, halving the recipe is straightforward—just divide each ingredient accordingly, ensuring you monitor baking times as smaller cakes may cook faster.

For those needing a larger cake for gatherings, doubling or tripling the recipe is easy. Use larger pans and be mindful that the baking time may increase slightly. It’s essential to test for doneness by inserting a toothpick into the center of the cake.

Be prepared to adjust your mixing and baking equipment when scaling; utilize larger bowls and pans, and consider using two oven racks if baking multiple cakes simultaneously. Maintain consistency in baking times by rotating the pans halfway through the process if using multiple trays.

Nutritional Deep Dive

The Sugar Cookie Cake is a delightful indulgence that can be part of a balanced diet when eaten in moderation. With approximately 250-300 calories per serving, it can fit into a treat category while providing essential energy.

Analyzing the macros, the cake typically includes fats from butter, which can be about 15 grams per slice, offering value when choosing quality ingredients. The cake contains around 35 grams of carbohydrates, primarily from sugars and flour, providing quick energy.

Understanding the ingredients can also influence the nutritional benefits of the Sugar Cookie Cake. Using whole grain flour and reducing added sugars can enhance fiber content and nutritional value, contributing to better health outcomes when aiming for balanced indulgences.

When enjoying, being conscious of portion sizes aids weight management. You can savor a small slice, allowing the rich flavors to satisfy your cravings without overindulgence, demonstrating that moderation can enhance your overall enjoyment without sacrificing taste.

Dietary Adaptations

For those with dietary restrictions, adapting the Sugar Cookie Cake can create an enjoyable treat for everyone. Gluten-free options abound; using almond flour or a gluten-free all-purpose blend can yield delicious results while ensuring those with sensitivities can partake.

Dairy-free adaptations can include coconut cream for a whipped topping and non-dairy butter substitutes, allowing for both texture and flavor without compromising dietary needs. Vegan bakers can simply replace eggs with chia or flaxseed to maintain the desired structure without using animal products.

Low-carb and keto enthusiasts may appreciate sugar alternatives like erythritol or monk fruit sweetener, coupled with almond flour, creating a dessert that fits into their eating plan while delivering delightful sweetness.

For those aiming for low-FODMAP options, consider substituting certain sweeteners and monitoring specific ingredient ratios for compatibility while maintaining the cake’s delightful taste and texture.

Troubleshooting Guide

If you encounter texture issues, such as the cake being too dry, ensure that you are not overbaking. Always keep an eye on the clock and check for doneness a few minutes before the suggested baking time.

Flavors that seem off can sometimes be improved with a pinch of salt, balancing sweetness and enhancing the overall flavor profile. Conversely, if the cake turns out too salty, consider pairing it with a sweeter frosting or glaze.

Temperature problems, such as undercooked centers, can arise from incorrect oven settings. Always check your oven’s calibration and adjust the recommended temperature as needed.

Equipment challenges can often stem from incorrect usage; for example, pan choices affect how evenly a cake cooks. Choosing the right material, such as a light-colored metal or glass, can impact baking outcomes.

Additionally, when substituting ingredients, remember that results can significantly vary based on ratios; research how to alter liquid quantities if replacing any critical components. Timing concerns can be mitigated by using a timer and keeping a consistent eye while baking, making adjustments more manageable.

Recipe Success Stories

Reader feedback on the Sugar Cookie Cake highlights success in its flavor and adaptability, connecting with various baking enthusiasts. Many home bakers have shared their experiences of transforming this cake into delightful variations that suit individual palates, including adding chocolate chunks or nuts for a crunchy experience.

Communities engage with this recipe not only by following instructions but also by showcasing their unique adaptations, reinforcing the idea that every baker can make this cake their own. Sharing photographs of their creations inspires others to try the recipe, fostering community encouragement in the kitchen.

A multitude of bakers have reported cheering victories, from perfect rises to rave reviews at gatherings, showcasing the versatility of the Sugar Cookie Cake. Whether it’s a small family dinner or a big celebration, the success stories trickle in, emphasizing the cake’s universal appeal.

Readers often share their photography tips for beautifully presenting the cake, recommending natural lighting for capturing vibrant colors. Additionally, feedback encourages explorers to document their variations, allowing others to witness their creativity and successes with the recipe.

Frequently Asked Questions

Can I make this cake ahead of time? Yes! You can bake the Sugar Cookie Cake a day in advance. Allow it to cool completely before wrapping it tightly in plastic wrap and storing it in an airtight container at room temperature.

What can I use instead of butter? If you’re looking for a dairy-free option, you can substitute butter with coconut oil or vegan butter, which will still yield a soft texture and great flavor.

How do I know when the cake is done baking? The best way to check is to insert a toothpick into the center of the cake. If it comes out clean or with a few crumbs, the cake is done.

Can I freeze this cake? Absolutely! Wrap the cooled cake tightly in plastic wrap, then aluminum foil, and it can be frozen for up to three months. Just make sure to thaw it in the refrigerator before serving.

What toppings do you recommend? For a delicious topping, try cream cheese frosting, whipped cream, or a simple glaze. Sprinkles or fresh fruit can also make for a visually appealing addition.

Can I make this cake without eggs? Yes, you can substitute eggs with flaxseed or chia seeds mixed with water. This will help bind the ingredients as needed for the recipe.

Is it possible to make mini versions of this cake? Yes! You can use a muffin tin to create mini cakes. Baking time will be shorter, so keep an eye on them while they are in the oven.

How can I enhance the flavor of the cake? You can add extracts like almond or lemon for a different flavor profile, or mix in chocolate chips or nuts for additional texture and taste.

What is the best way to mix the batter? Use a hand mixer or a stand mixer to combine all the ingredients thoroughly. Avoid overmixing to keep the cake light and airy.

Is there a gluten-free option for this recipe? Yes! You can substitute regular flour with a gluten-free blend, ensuring that all other ingredients are also gluten-free for safety.

Additional Resources

If you enjoyed this Sugar Cookie Cake recipe, consider exploring similar recipes for delightful treats like Snickerdoodle Cake or Vanilla Butter Cake. Each of these options offers a unique twist on classic flavors that you may enjoy.

Looking to expand your baking skills? Browse our technique guides related to mixing, measuring, and cake decoration to enhance your baking experience. Understanding the nuances of baking techniques can greatly improve your results.

For ingredient information, delve into our comprehensive sections that break down the benefits and uses of different types of flour, sugars, and flavorings, helping you make informed choices in your baking endeavors.

Additionally, consider equipment recommendations to help you in your baking journey. Investing in quality kitchen tools can lead to more consistent and enjoyable baking experiences.

If seasonal baking is your passion, keep an eye out for variants of this cake that celebrate different flavors, such as pumpkin spice for fall or fresh berries in summer to create adaptable recipes suited for any occasion.

Join the Conversation

Join our community for fun discussions around your Sugar Cookie Cake experiences! Share your photographs, variations, and tips for others to see. Engaging with fellow baking enthusiasts brings a sense of joy and camaraderie, where you can celebrate successes or troubleshoot challenges together.

Encourage others to leave reviews and feedback on this recipe. The more contributions we have, the better we can connect and improve our culinary skills as a community. Your insight could spark inspiration for someone else’s baking journey.

Stay connected through our social media channels where you can share your creations and tag us in your delicious moments! Together, we can celebrate the joy of cooking and baking, one sweet treat at a time.

The Recipe

Sugar Cookie Cake

Serves: 12

Prep Time: 15 mins

Cook Time: 25 mins

Total Time: 40 mins

Kitchen Equipment Needed

  • Mixing bowls
  • Electric mixer or whisk
  • Measuring cups and spoons
  • 8-inch round cake pan
  • Parchment paper (optional)

Ingredients

  • 2 ¾ cups all-purpose flour
  • 1 ¼ cups granulated sugar
  • 1 cup unsalted butter, softened
  • 2 large eggs
  • 2 tsp vanilla extract
  • 1 tsp almond extract
  • 1 tsp baking powder
  • ½ tsp salt
  • Sprinkles or frosting for topping (optional)

Directions

  1. Preheat your oven to 350°F (175°C) and grease the cake pan.
  2. In a medium bowl, cream together the softened butter and sugar until light and fluffy.
  3. Beat in the eggs one at a time, and then stir in the vanilla and almond extracts.
  4. In another bowl, whisk together the flour, baking powder, and salt.
  5. Gradually blend the dry ingredients into the wet mixture until just combined.
  6. Pour the batter into the prepared cake pan and smooth the top.
  7. Bake for 25-30 minutes, or until a toothpick inserted into the center comes out clean.
  8. Let it cool in the pan for 10 minutes before transferring it to a wire rack to cool completely.
  9. Once cool, top with sprinkles or frosting if desired.

Recipe Notes

  • For a richer flavor, try browning the butter before mixing it into the batter.
  • You can use gluten-free flour for a gluten-free option!
  • Store leftover cake in an airtight container at room temperature for up to three days.
  • This cake can be frozen for up to three months; wrap well to avoid freezer burn.

Easy Valentine’s Day Caramel Pretzel Bites (Ready in 30 Minutes)

Valentine’s Day Caramel Pretzel Bites: Sweet Meets Salty for a Perfect Treat

⚖️
Difficulty
Easy

⏲️
Prep Time
15 mins

🕒
Cook Time
10 mins

⏱️
Total Time
25 mins

🍽️
Servings
24 bites

This Valentine’s Day, elevate your sweet treats with these delightful Caramel Pretzel Bites. With a perfect blend of salty pretzels, smooth caramel, and a drizzle of chocolate, these bites are sure to impress your loved ones. Perfect for sharing, these simple yet delicious snacks encapsulate the essence of the holiday: sweetness, love, and a touch of whimsy. Whether you’re hosting a romantic dinner or a festive gathering, these Caramel Pretzel Bites are the ideal confection to celebrate the occasion.

Not only do they deliver an irresistible flavor combination, but they also cater to a variety of tastes, making them a hit with both kids and adults. Imagine the crunch of the pretzel wrapping around the gooey caramel, paired with the rich, dark chocolate drizzle. Each bite offers different textures and flavors, creating a memorable eating experience that captures the spirit of Valentine’s Day.

Quick Recipe Highlights

  • Flavor Profile: These Caramel Pretzel Bites are a delightful mix of sweet and salty, combining the rich taste of caramel with the crunch of pretzels.
  • Texture: Enjoy the crunch from the pretzels, the gooeyness of the warm caramel, and a smooth chocolate coating that binds it all together.
  • Aroma: The sweet aroma of melting caramel combined with a hint of saltiness from the pretzels creates an irresistible scent.
  • Visual Appeal: The contrast of golden caramel, dark chocolate drizzle, and the light brown pretzel makes these bites a festive addition to any Valentine’s celebration.
  • Skill Level Needed: This recipe is beginner-friendly and requires basic kitchen skills, making it perfect for novice cooks.
  • Special Equipment: You’ll need a baking sheet, parchment paper, and a microwave-safe bowl for melting the ingredients.

Recipe Overview

  • Difficulty Level: The Caramel Pretzel Bites are categorized as easy to make, making them accessible to cooks of all skill levels. The steps are straightforward and quick.
  • Category: This delicious treat falls under the dessert category, suitable for parties, gatherings, or festive occasions.
  • Cuisine: While they may not belong to a specific traditional cuisine, these bites blend Western dessert influences with a fun, homemade approach.
  • Cost: With common pantry ingredients, the recipe remains budget-friendly, approximately costing around $10 for all needed ingredients.
  • Season: Valentine’s Day is the perfect time for these bites, but they can also be enjoyed year-round for any celebration.
  • Occasion: Perfect for Valentine’s Day, but also great for birthdays, tailgating, or just as a sweet treat for yourself.

Why You’ll Love This Recipe

The combination of sweet and salty in these Caramel Pretzel Bites brings a unique taste that will tantalize your taste buds. Each bite begins with the satisfying crunch of a pretzel, followed by the creamy melted caramel. This combination isn’t just about flavor; it also offers a delightful texture experience. The contrast between the crunchy exterior and the gooey interior makes every bite irresistible.

In addition to being delicious, these treats are incredibly convenient to prepare. With minimal prep time and basic ingredients, you can whip up a batch in under half an hour. This makes them perfect for last-minute gatherings or parties where you want to impress without spending hours in the kitchen. Plus, they require no baking! Just melt, assemble, and enjoy!

From a nutritional standpoint, while indulgent, these bites can be a treat that brightens your day. Pretzels provide a small amount of fiber and are low in fat, while the caramel adds a hint of sweetness. If portioned appropriately, it satisfies your sweet tooth without being overwhelming. It’s all about enjoying it in moderation.

These Caramel Pretzel Bites are not just great for personal enjoyment; they are also excellent for social occasions. The sharing appeal of bite-sized treats encourages guests to mingle and enjoy a variety of flavors, making them a fun addition to any party spread. Your friends and family will appreciate your effort, providing a homemade touch that store-bought items can’t always match.

Finally, the affordability of the ingredients makes this recipe even more appealing. Despite being gourmet in taste, the overall cost is quite low, making it easy to create a delicious treat that won’t break the bank. It’s the perfect sweet for those looking to celebrate love and friendship without overspending.

Historical Background and Cultural Significance

The origins of caramel confections date back to the Middle East, where sugar was first crystallized. Over time, with the availability of new ingredients and techniques, caramel became a popular candy worldwide, leading to various adaptations, including caramel-filled treats like these pretzel bites. This combination of sweet caramel and salty pretzels uniquely speaks to modern culinary innovation.

In America, pretzels have a long-standing history, especially among German communities who brought their traditions over, paving the way for creative recipes like this one. The fusion of pretzels and caramel reflects the ongoing evolution of traditional ingredients into beloved modern snacks.

Although Caramel Pretzel Bites may not be traditional, their adaptability makes them significant in today’s culinary landscape. They represent the merging of different textures and tastes that cater to evolving palates and preferences.

Regional variations also exist; in some areas, these treats are draped in various chocolate flavors or topped with nuts, showcasing local preferences and ingredient availability. This evolution allows for a wide range of flavors and presentations to suit all occasions and celebrations.

Ingredient Deep Dive

Pretzels: Pretzels have been a staple in various cultures, particularly in Germany, where they symbolize good luck. Nutritionally, pretzels are low in fat and can provide some fiber if you choose whole grain options. When selecting pretzels, look for those that have a good crunch and flavor without being too salty. Store them in an airtight container to maintain their crispiness.

Caramel: Caramel has rich roots in candy-making traditions, and its handiwork involves cooking sugar until it melts and takes on a deep amber hue. The nutritional draw here is primarily from sugar; hence, moderation is key. Use fresh or homemade caramel to elevate your bites. Store leftover caramel in the fridge, and you can reheat it for future desserts.

Chocolate: Chocolate’s history spans thousands of years, originating from ancient Mesoamerican cultures. Dark chocolate, in particular, can offer health benefits due to its antioxidant properties. When selecting chocolate for drizzling, opt for high-quality chocolate that melts smoothly. Store chocolate in a cool, dry place to prevent it from blooming.

Common Mistakes to Avoid

  • Using stale pretzels: Ensure your pretzels are fresh and crunchy for the best texture.
  • Overheating the caramel: If you heat caramel too long, it can burn and become unusable; keep a close eye while melting.
  • Using low-quality chocolate: Cheap chocolate can affect the overall flavor; opt for higher quality for better results.
  • Skipping the parchment paper: This will make it difficult to remove your bites after they have set.
  • Not allowing enough cooling time: If you rush the cooling process, the bites may fall apart when you try to serve them.
  • Poorly measuring ingredients: Precision ensures a consistent outcome; always measure your ingredients carefully.
  • Not using a microwave-safe bowl: Glass bowls work best for melting to avoid any plastic melting into your ingredients.
  • Not letting the bites set properly: Allow bites plenty of time to chill in the fridge for best texture.
  • Forgetting to mix flavors: Feel free to add sea salt or crushed nuts for more depth in flavor.
  • Using too much caramel: A little goes a long way; too much can cause them to be overly sweet and messy.

Essential Techniques

Melting the Caramel: Melting caramel requires gentle heating. It’s vital to use a microwave-safe bowl and stir frequently to ensure even melting. Common pitfalls include overheating, leading to burnt caramel, identifiable by a dark color and bitter taste. The perfect melted caramel is smooth and pourable.

Drizzling Chocolate: To achieve an appealing chocolate drizzle, use a piping bag or a fork to create delicate patterns. Overheating chocolate can cause it to seize; watch for a glossy finish as the visual cue for success. If it becomes too thick, add a small amount of vegetable oil to thin it out.

Pro Tips for Perfect Valentine’s Day Caramel Pretzel Bites

1. Use mini pretzels for a bite-sized treat that’s easier to eat and more visually appealing.

2. Add a sprinkle of sea salt on top for a sweet and salty contrast that enhances flavor.

3. Experiment with different types of chocolate like milk, dark, or even white chocolate for varied tastes.

4. Refrigerate the assembled bites for a firmer texture, making them easier to enjoy.

5. For added fun, mix in toppings like crushed nuts or sprinkles before chocolate sets.

6. Create holiday-themed versions by using colored chocolate for special occasions.

7. Consider using homemade caramel for a richer flavor and better texture.

8. Store leftovers in an airtight container at room temperature for quick access later.

Variations and Adaptations

For a unique twist, consider making these bites with flavored pretzels, like cheddar or sesame. Additionally, seasonal adaptations can include using pumpkin spice flavors for autumn or peppermint for holiday gatherings. If you have dietary needs, explore using gluten-free pretzels or sugar-free caramel options for a healthier take on this sweet treat.

Incorporating various nuts can also enhance the texture and provide a crunch that pairs beautifully with caramel. If you’re looking to play with flavors, adding spices like cinnamon or cayenne can create an exciting flavor profile that surprises your guests.

For presentation, consider serving in cupcake liners for individual portions or stacking them on a decorative plate for a beautiful display. The options are endless, and each variation can showcase your creativity.

Serving and Presentation Guide

When it comes to serving your Caramel Pretzel Bites, consider using an elegant tray to enhance visual appeal. Plating on parchment paper can add a casual vibe while making cleanup easy. For garnishing, colorful toppings like sprinkles can add a festive touch.

Pairing with fresh fruits can create a refreshing contrast, particularly good for color contrast and flavor balance. Try serving them at room temperature for optimal enjoyment, but a brief chilling can help if they get too gooey.

For portion control tips, consider cutting each pretzel bite in half for smaller servings or providing bite-sized pieces on platters. This encourages sharing and allows more guests to indulge.

Wine and Beverage Pairing

For a delightful pairing, a sweet dessert wine like Port can complement the richness of the caramel and chocolate flavors. Alternatively, pairing with a fruity sparkling wine can add a refreshing contrast, enhancing the sweetness of the treats.

For non-alcoholic options, consider serving with hot chocolate or a flavored soda to balance the sweetness of the dessert. If coffee lovers are in attendance, a rich espresso could serve as a wonderful companion. Keep all beverages cool or warm, based on good beverage presentation.

Storage and Shelf Life

To keep your Caramel Pretzel Bites fresh, store them in an airtight container at room temperature for up to a week. You can refrigerate them for longer freshness but expect some texture change in the caramel. Always check for any signs of spoilage, like an off smell or abnormal texture, before consuming.

For longer storage, consider freezing them. Place the bites in a single layer on a baking sheet to freeze, then transfer them to a freezer-safe container. Reheating can be done by letting them sit at room temperature for a few minutes or using the microwave briefly.

Make Ahead Strategies

If you’re planning to make these bites ahead of time, prepare the caramel and pretzels separately. Melt the caramel and store it in an airtight container in the fridge. The pretzels can be stored at room temperature. Assemble the treats closer to when you plan to serve for the best texture and flavor.

Additionally, consider prepping ingredients like the chocolate in advance to streamline assembly. When reheating, ensure the bites are brought to room temperature before serving to enhance flavor.

Scaling Instructions

To halve this recipe, simply adjust the ingredients accordingly, ensuring enough space on your baking sheet remains for even spacing. Doubling or tripling can be done easily, just be mindful of your melting equipment capacity when working with larger quantities of caramel and chocolate.

Timing adjustments should not significantly change, but consider longer chilling times if making a larger batch. These adjustments will help maintain the treat’s quality and ensure a delicious outcome regardless of the portion size.

Nutritional Deep Dive

The macro breakdown of these treats highlights the blend of carbohydrates from the pretzels and sugars from the caramel and chocolate. Although a treat, moderation is key in maintaining a balanced diet. The bite delivers a chance to enjoy deconstructed flavors without compromising your dietary needs too heavily.

Micronutrient analysis shows minimal vitamins in these treats, indicating they are primarily a source of enjoyment rather than nutrition. However, incorporating dark chocolate does add some health benefits, including antioxidants. For those focused on weight management, enjoying a small portion can satisfy cravings without excessive calorie intake.

Dietary Adaptations

For gluten-free adaptations, use certified gluten-free pretzels. Dairy-free diets can substitute standard caramel with coconut or almond-based caramel alternatives. Additionally, there are various sugar-free options available that can cater to those on low-carb diets.

For vegan modifications, exploring plant-based chocolate and caramel will ensure that these bites remain 100% dairy-free. Keto dieters can substitute traditional sugary ingredients with low-carb options to maintain the treat’s identity without the added carbs.

Troubleshooting Guide

If your caramel turns out too hard, it may have been cooked too long; next time aim for a lighter color and remove from heat sooner. If too sticky, consider adding a bit of cream when reheating to soften it.

Texture issues can arise if the caramel and chocolate don’t set properly; make sure to follow cooling times accurately. If your pretzels are going soft, ensure they are stored in an airtight container away from moisture.

Recipe Success Stories

Community feedback has consistently praised the satisfaction these treats bring. Many readers have shared their success stories of hosting Valentine’s Day parties featuring these irresistible bites. Variations, such as adding nuts or different chocolate toppings, have garnered excitement among home bakers.

Several adaptations have emerged, encouraging users to mix in their favorite flavors, from spicy to fruity options. This flexibility shows how readers are making this recipe uniquely their own, ensuring it stands the test of time and trend.

Frequently Asked Questions

Can I make these bites ahead of time? Yes, prepare the caramel and pretzels separately to assemble ahead of serving for the best texture and freshness.

How do I store leftovers? Store in an airtight container at room temperature for up to a week, or refrigerate for longer freshness.

What’s the best type of pretzel to use? Use bite-sized mini pretzels for optimal flavor and ease of eating.

Can I use white chocolate instead of dark chocolate? Absolutely, feel free to experiment with different types of chocolate for various flavor profiles.

Are these bites suitable for kids? Yes! With the balance of flavors and fun textures, kids will love these treats.

What’s a good vegan alternative for caramel? Coconut or almond-based caramels make for excellent dairy-free substitutes.

Can I make these gluten-free? Yes, simply use certified gluten-free pretzels for this recipe.

What can I use instead of chocolate for drizzling? You can use melted peanut butter or even different flavored melting chocolates.

How can I prevent my chocolate from seizing? Avoid water exposure when melting; ensure all utensils are completely dry.

What’s the best way to reheat caramel? Place it in the microwave in short intervals to prevent burning.

Additional Resources

If you enjoy these Caramel Pretzel Bites, check out our other delightful dessert recipes that blend sweet and savory in creative ways. Explore technique guides for mastering caramel and chocolate melting, ensuring you’re equipped for successful baking. Ingredient information like sourcing high-quality chocolates and pretzels can further enhance your candy-making endeavors. Don’t miss our kitchen equipment recommendations to make your cooking experience enjoyable and efficient!

Join the Conversation

We love to hear from you! Share your Caramel Pretzel Bites photos on social media and engage with other readers. Your feedback and adaptations of the recipe can inspire future updates or new recipes. Join our community by leaving reviews and suggestions for variations you’ve tried, making our cooking space richer and more diverse!

The Recipe

Valentine’s Day Caramel Pretzel Bites

Serves: 24 bites

Prep Time: 15 mins

Cook Time: 10 mins

Total Time: 25 mins

Kitchen Equipment Needed

  • Baking sheet
  • Parchment paper
  • Microwave-safe bowl
  • Piping bag (optional)

Ingredients

  • 2 cups small pretzels
  • 1 cup caramel candies
  • 2 tbsp heavy cream (optional)
  • 1 cup chocolate (dark or milk)

Directions

  1. Preheat your oven to 350°F (175°C) and line a baking sheet with parchment paper.
  2. Spread the pretzels evenly on the prepared sheet.
  3. Melt the caramel candies in a microwave-safe bowl, stirring every 30 seconds until smooth.
  4. Drizzle the melted caramel over the pretzels and place in the oven for 5 minutes to warm.
  5. Remove from the oven and allow to cool for a few minutes.
  6. Melt the chocolate in the microwave, then drizzle over the cooled caramel pretzels.
  7. Allow the chocolate to set at room temperature or refrigerate for quicker results.
  8. Once set, break them into individual bites and serve!

Recipe Notes

  • Feel free to experiment with toppings such as crushed nuts or sea salt.
  • Store in an airtight container at room temperature for up to a week.
  • Substitute with gluten-free pretzels for dietary needs.

Easy Valentine’s Day Caramel Pretzel Bites (Ready in 30 Minutes)

Valentine’s Day Caramel Pretzel Bites: Sweet & Salty Delight for Your Loved Ones

⚖️
Difficulty
Easy

⏲️
Prep Time
15 mins

🕒
Cook Time
10 mins

⏱️
Total Time
25 mins

🍽️
Servings
24 bites

Valentine’s Day is the perfect occasion to indulge in sweet treats that express love and affection, and nothing says romance quite like these delightful Caramel Pretzel Bites. Combining the flavors of rich caramel, salty pretzels, and luscious chocolate, these bites are perfect for sharing with your beloved. They are not only easy to make but also provide an exciting flavor contrast that will tantalize your taste buds.

Imagine taking a bite of these Caramel Pretzel Bites to find a crunchy pretzel enveloped in gooey caramel and coated in smooth chocolate. They are perfect as a homemade gift for Valentine’s Day or simply as a delicious treat to celebrate the day of love. With every munch, the delightful combination of salty-sweet flavors will leave you wanting more. Whether you’re planning a romantic date night or a fun get-together with friends, these treats will surely be a hit.

Quick Recipe Highlights

  • Flavor Profile: Enjoy the harmonious blend of salty and sweet with depth from the caramel and richness from the chocolate.
  • Texture: Experience the crispness of the pretzels, the chewy consistency of caramel, and the smooth coating of chocolate.
  • Aroma: Relish the mouthwatering aroma of warm caramel mingled with the scent of melted chocolate.
  • Visual Appeal: These bites feature a beautiful golden hue from the caramel, contrasted with the dark chocolate coating.
  • Skill Level Needed: If you can melt chocolate and assemble snacks, you can master this simple yet impressive treat.
  • Special Equipment: A microwave-safe bowl, parchment paper, and baking tray are essential for this easy recipe.

Recipe Overview

  • Difficulty Level: This recipe is classified as easy, making it accessible for all skill levels. You don’t need prior baking experience, just some patience to let the bites set.
  • Category: This recipe falls into the dessert category, acting as a delightful treat suitable for any sweet tooth.
  • Cuisine: While this is a modern twist on chocolate-covered snacks, the use of caramel links it to classic confections popular across cultures.
  • Cost: This affordable treat can be made for under $10, making it budget-friendly for everyone.
  • Season: Perfect for Valentine’s Day, but also delightful for any festive occasion or simply as a weekend treat.
  • Occasion: These bites are great for romantic evenings, movie nights, or as a fun activity with kids.

Why You’ll Love This Recipe

The Caramel Pretzel Bites charm with their thrilling taste and texture, offering a satisfying crunch that perfectly complements the gooey caramel. The sweetness from the chocolate enhances the flavor profile, making each bite irresistible. This combination not only delights your taste buds but also evokes a sense of pure indulgence that feels like a warm embrace.

Convenience is a major benefit of this recipe. With minimal prep time and simple steps, you can whip up these bites in just 25 minutes. They can be made in advance, allowing you to enjoy your time with loved ones without spending hours in the kitchen. Plus, kids can join in on the fun of creating these treats, making it an enjoyable experience for the whole family.

From a nutritional perspective, the use of pretzels provides a bit of fiber and can offer a lighter alternative to traditional snacks. Pairing this with the sweet indulgence of caramel and chocolate creates a balanced treat that satisfies cravings without too much guilt.

Socially, these Caramel Pretzel Bites serve as an excellent conversation starter. They are perfect for sharing, making them great for gatherings and parties. Imagine everyone reaching for these delectable bites while sharing stories and laughter – it creates moments that you’ll cherish.

Lastly, these treats are cost-effective and accessible. With common pantry ingredients, anyone can easily create these delightful snacks without breaking the bank. This makes them a fantastic choice for last-minute gifts or treats during Valentine’s Day or any festive occasion.

Historical Background and Cultural Significance

The origin of caramel can be traced back to the 17th century, with sugar being melted to create a delectable candy. Initially, caramel was enjoyed as a simple sweet treat, but over time, it has evolved into various confections that include additional flavors and textures, including the modern take with pretzels.

Culturally, caramel has held a significant place in festivities, especially in culinary traditions that celebrate sweets. In many cultures, sharing candy represents affection, making Caramel Pretzel Bites an ideal gift for sweethearts on Valentine’s Day.

The evolution of the Caramel Pretzel Bites reflects our growing appreciation for the sweet-salty flavor combination. Recipes like these show how traditional candies can be adapted and modernized to suit contemporary tastes, marrying cultural significance with culinary innovation.

Regional variations of caramel treats vary across countries, from American turtle candies to French nougats. Each culture’s distinct take on caramel highlights its global appeal, making these bites a fascinating treat to explore while enjoying the diverse flavors.

Ingredient Deep Dive

Caramel: Caramel’s rich history includes its use in various desserts for centuries. This delightful ingredient is made through the process of cooking sugar until it melts and turns a beautiful golden color. Nutritionally, caramel is high in sugar, which provides quick energy, but should be consumed in moderation. When selecting caramel for your bites, consider using quality brands or making it homemade for enhanced flavor. Store caramel in a cool, dry place, and if you’re looking for substitutes, butterscotch or chocolate fudge can work too.

Pretzels: Pretzels have their origins in ancient Rome, symbolizing a bond or tie, which ties nicely into their sweet and salty nature. They provide a satisfying crunch in this recipe. Nutritionally, pretzels offer carbohydrates and fiber, but can be high in sodium. When buying pretzels, opt for unsalted versions if you want to control the saltiness of your bites. Store pretzels in an airtight container to maintain their crunchiness. Alternative options include tortilla chips or popcorn for a fun twist.

Common Mistakes to Avoid

  • Overheating chocolate: This can cause it to seize. Always melt in short intervals and at low heat.
  • Using stale pretzels: Ensure your pretzels are fresh for the best crunch and flavor.
  • Not cooling caramel: Allowing caramel to cool slightly before pouring can help it set better.
  • Skipping parchment paper: This can lead to messy cleanup. Always line your tray for easy removal.
  • Uneven coating: Make sure each pretzel bite is fully coated for consistent flavor.
  • Too much caramel: Avoid using excessive caramel that can make the bites soggy.
  • Ignoring chocolate tempering: For shiny results, ensure your chocolate is tempered correctly.
  • Forgetting presentation: Take time to plate these bites nicely for added visual appeal.

Essential Techniques

Melting chocolate is crucial for a smooth coating on the pretzels. Use a microwave or double boiler, and be careful not to overheat it. The ideal temperature is around 90°F to 92°F. Master this by stirring the chocolate frequently and stopping once it’s mostly melted; residual heat will finish the job.

Setting the caramel is essential to prevent it from being too runny. Let it cool slightly before pouring it over the pretzels, which will help it adhere better. A good visual cue is when the caramel is thick enough to coat the back of a spoon gently but still pourable.

Pro Tips for Perfect Valentine’s Day Caramel Pretzel Bites

1. Use high-quality chocolate for a richer flavor and smoother consistency.
2. Experiment with flavored pretzels like cheese or honey mustard for a unique twist.
3. Add a pinch of sea salt on top for a flavor contrast that enhances sweetness.
4. Mix in nuts or sprinkles for an added texture and visual appeal.
5. Allow the bites to cool completely before serving for the best texture.
6. Store any leftovers in an airtight container to maintain freshness.
7. Offer these bites in decorative packaging for a lovely gift option.
8. Create custom bite sizes by adjusting the amount of caramel used on each pretzel.

Variations and Adaptations

Explore regional variations by using local pretzel styles, such as sourdough pretzels for a tangy flavor twist. Seasonal adaptations can include adding spices like cinnamon during fall or crushed peppermint during winter holidays. For dietary modifications, consider using gluten-free pretzels or vegan chocolate to cater to specific dietary needs.

Flavor variations like using white chocolate instead of dark for a sweeter finish or incorporating Nutella as a drizzle can add excitement. For texture modifications, try drizzling the bites with caramel instead of dipping them. Presentation alternatives such as serving on a decorative plate or in small treat bags can enhance their appeal.

Serving and Presentation Guide

To elevate your Caramel Pretzel Bites, consider plating them on a beautiful serving tray or using muffin wrappers for an elegant touch. Garnish with a sprinkle of sea salt or crushed nuts on the bites for added texture and flavor.

Traditional accompaniments could include a warm cup of coffee or a glass of milk, enhancing the sweet experience. For modern serving suggestions, consider pairing with fresh berries or a small scoop of ice cream for a delightful dessert platter. Remember, serving temperature matters; these bites are best enjoyed at room temperature to appreciate the flavors fully. Portion control is also key, aiming for two to three bites per person for a balanced treat.

Wine and Beverage Pairing

For a delightful pairing, opt for a sweet dessert wine like Moscato to complement the caramel’s richness. If you prefer non-alcoholic options, hot chocolate or herbal tea can create a comforting flavor experience alongside these bites.

For coffee lovers, a rich espresso would pair beautifully, offering a nice contrast to the sweetness. When serving, ensure drinks are temperature appropriate; warm beverages are perfect during colder months, while chilled options are recommended for summer events.

Storage and Shelf Life

Store your Caramel Pretzel Bites in an airtight container at room temperature for optimal freshness. They can last for up to a week if kept properly. To maintain the best texture, avoid refrigerating, as this can cause the chocolate to become dull and the caramel to harden.

If you notice any changes in smell or texture, it’s best to discard them. Reheating is not usually recommended, but if desired, use only low heat to soften them slightly. For long-term storage, these bites can be frozen; just ensure they are tightly wrapped to prevent freezer burn.

Make Ahead Strategies

For those short on time, consider prepping the pretzels and caramel a day ahead. Store them separately in airtight containers until you’re ready to assemble. This saves time during busy schedules and maintains the quality of the ingredients.

When preparing bites in advance, ensure that they are fully set before storing, as this keeps them from becoming sticky. If you prefer taking them fresh, prepare the caramel and let it cool before drizzling on pretzels an hour before serving.

Scaling Instructions

Should you wish to scale your recipe for a larger gathering, simply double or triple the ingredient amounts. Make sure to adjust your baking sheets or trays accordingly to accommodate the increased batch.

When scaling down, halve the measurements while keeping an eye on the cooking time, which may vary slightly with smaller batches. If baking equipment adjustments are needed, consider using smaller trays or containers to ensure even coating. For proper storage, adjust quantities if you plan to save leftovers for future enjoyment.

Nutritional Deep Dive

The macro breakdown of each Caramel Pretzel Bite primarily consists of carbohydrates from pretzels and sugars from caramel and chocolate. While the bites provide quick energy, mindful eating is essential, especially considering portion sizes for those watching their sugar intake.

Micronutrient analysis can reveal small amounts of calcium from chocolate and fiber from pretzels, making them a slightly more layered snack. For those maintaining dietary considerations, being aware of serving sizes will help in weight management while indulging in these delightful treats.

Dietary Adaptations

For gluten-free adaptations, simply replace regular pretzels with gluten-free alternatives available in most grocery stores. If you are looking for a dairy-free option, select vegan chocolate and caramel brands ensuring all ingredients adhere to dietary needs.

Vegan adaptations can easily be made by using plant-based dairy alternatives in the chocolate. For those on a low-carb or keto diet, consider using sugar-free chocolate and pretzel alternatives for a guilt-free treat that fits within their lifestyle.

Troubleshooting Guide

If you encounter texture issues with your bites, it could be due to humidity affecting the caramel. Ensure your kitchen is dry while preparing. If the flavor balance is off, consider adding a sprinkle of sea salt or a dash of vanilla to enhance the taste.

Temperature problems during the coating process can arise from chocolate that cools too quickly. Keep the environment warm, and check the consistency before applying. If equipment challenges arise, ensure that all tools are dry and suited for melting processes to avoid complications.

Recipe Success Stories

Our community has shared numerous success stories, highlighting how these Caramel Pretzel Bites have brought joy during celebrations. Many readers have praised the delightful flavor combinations, often experimenting with their own twists that have resulted in unique variations that remain crowd favorites.

In particular, one reader successfully paired these bites with a homemade caramel sauce, enhancing the overall treat. Photography tips shared by fellow bakers have highlighted the importance of natural light for presenting these delectable treats, resulting in stunning visuals that illustrate their beauty.

Frequently Asked Questions

1. Can I use different types of chocolate for this recipe?
Yes! Feel free to experiment with dark, milk, or white chocolate based on your preference.

2. How should I store leftovers?
Leftovers can be stored at room temperature in an airtight container for up to a week.

3. Can I make these bites in advance?
Absolutely! You can prepare and store the components separately to save time when serving.

4. What can I use as a substitute for pretzels?
Alternative options include tortilla chips or even popcorn for a fun twist.

5. How do I prevent the caramel from sticking?
Ensure you use parchment paper when cooling the caramel-covered bites to prevent sticking.

6. Is there a vegan option for caramel?
Yes! Look for plant-based caramel products or make your own using coconut milk.

7. Can I freeze these bites for later?
Yes! Store them in an airtight container, individually wrapped, to enjoy later.

8. How can I enhance the flavor?
Adding a sprinkle of sea salt or using flavored pretzels can enhance the sweet-salty contrast.

9. How long does it take for the bites to set?
Allow the bites to cool for at least 30 minutes before serving to ensure they set properly.

10. Are there any gluten-free pretzel options?
Yes! Many brands offer gluten-free pretzel options that work just as well in this recipe.

Additional Resources

For those interested in further exploring sweet treats, our cooking blog features various related recipes such as chocolate-covered strawberries and homemade caramel popcorn.

Technique guides will help you master the skill of melting and tempering chocolate, offering tips on achieving the perfect consistency each time.

We also provide ingredient information, focusing on the health benefits and culinary uses of chocolate, pretzels, and other baking staples. For those wanting seasonal variations, check out our collection of festive recipes tailored for every holiday mood.

Join the Conversation

We encourage you to share your experiences making these delectable Valentine’s Day Caramel Pretzel Bites on social media. Use our hashtags to connect with fellow baking enthusiasts and showcase your beautiful creations!

If you have any questions or photography tips, feel free to engage with our community in the comments section. We love hearing about your variations and any adaptations you’ve made.

The Recipe

Valentine’s Day Caramel Pretzel Bites

Serves: 24 bites

Prep Time: 15 mins

Cook Time: 10 mins

Total Time: 25 mins

Kitchen Equipment Needed

  • Microwave-safe bowl
  • Parchment paper
  • Baking tray
  • Mixing spoon
  • Spatula

Ingredients

  • 1 bag of pretzels (about 10 oz)
  • 1 cup of soft caramel
  • 1 cup of chocolate chips (dark or milk)
  • Sea salt (optional, for garnishing)

Directions

  1. Preheat your oven to 300°F (150°C).
  2. Spread pretzels in a single layer on a parchment-lined baking tray.
  3. In a microwave-safe bowl, melt the caramel according to package instructions.
  4. Drizzle melted caramel over the pretzels, using a spatula to spread it if needed.
  5. Bake the pretzels with caramel for 5 minutes, allowing them to set slightly.
  6. While they are in the oven, melt the chocolate chips in the microwave.
  7. Remove pretzels from the oven and let them cool slightly.
  8. Dunk each pretzel bite into melted chocolate, fully coating each one.
  9. Remove excess chocolate and place the bites back on the parchment.
  10. If desired, sprinkle a little sea salt on each bite before it sets.
  11. Allow the bites to cool at room temperature until the chocolate and caramel firm up.

Recipe Notes

  • Store leftovers in an airtight container at room temperature.
  • Feel free to experiment with flavored chocolates for added excitement.
  • Adjust the amount of caramel based on your preference for a richer bite or a more subtle flavor.

Easy Valentine’s Day Mini Cakes – Ready in 30 Minutes

Easy Valentine’s Day Mini Cakes: A Sweet Delight for Your Loved Ones

⚖️
Difficulty
Easy

⏲️
Prep Time
30 mins

🕒
Cook Time
15 mins

⏱️
Total Time
45 mins

🍽️
Servings
12 mini cakes

There’s something undeniably special about creating a homemade dessert, especially for occasions like Valentine’s Day. These Easy Valentine’s Day Mini Cakes are not just visually stunning but also irresistibly delicious. Infused with flavors that charm the senses, they are an expression of love and creativity. Each bite is a delightful experience, combining moist cake layers with luscious frosting, perfect for sharing with that special someone or friends on this romantic day.

Imagine these mini cakes adorned with vibrant colors and playful designs, making them a perfect centerpiece for your Valentine’s Day celebration. They’re not just cakes, but tiny expressions of affection! Whether you’re surprising your significant other or indulging in a sweet treat for yourself, these mini cakes promise to deliver joy and sweetness in every bite.

Quick Recipe Highlights

  • Flavor Profile: Delightful layers of vanilla and chocolate flavors balance sweetness with a hint of richness.
  • Texture: The cakes are soft and fluffy, complemented by creamy frosting that melts in your mouth.
  • Aroma: The subtle scent of vanilla mingles with chocolate, creating a warm and inviting atmosphere.
  • Visual Appeal: Colorful decorations make these cakes visually striking, perfect for Valentine’s Day festivities.
  • Skill Level Needed: This recipe is simple enough for beginner bakers, making it a great project for anyone.
  • Special Equipment: A mini cake pan will help create the perfect shape, along with basic baking tools.

Recipe Overview

  • Difficulty Level: The Easy Valentine’s Day Mini Cakes are designed to be accessible for all skill levels, making them a fun baking adventure without the stress.
  • Category: These mini cakes fit perfectly into dessert categories, representing a heartwarming finish to any meal.
  • Cuisine: While these cakes draw inspiration from traditional baking methods, they have been modernized to suit contemporary tastes and styles.
  • Cost: The ingredients for these delightful mini cakes are quite affordable, making it possible to whip up a batch without breaking the bank.
  • Season: Best enjoyed during the romantic season of Valentine’s Day, these cakes add sweetness to any celebration throughout the year.
  • Occasion: Ideal for Valentine’s Day parties, anniversaries, or just as a sweet gesture to someone special.

Why You’ll Love This Recipe

The Easy Valentine’s Day Mini Cakes are not only tasty but also incredibly pleasing to the eye. Imagine each delicate layer filled with delectable frosting; every slice tells a story of sweet love. The soft texture coupled with a luscious topping makes these cakes uneasily resistible. Perfectly portioned, they fit beautifully in your hand or on a pretty plate. Each bite unleashes a fantastic burst of flavors that will keep you coming back for more.

In terms of convenience, this recipe is straightforward and quick. With minimal preparation and cook times, you won’t spend all day in the kitchen. These mini cakes are perfect for busy individuals who still want to create a memorable dessert without spending the entire day baking. Plus, the entire assembly can be a delightful group activity, making it a great way to bond while making delicious treats.

From a nutritional standpoint, you can control the ingredients and incorporate healthier swaps if you choose. By using organic ingredients or reducing sugar, these cakes can be made to suit dietary preferences without sacrificing taste. Plus, they offer a delightful way to share a special treat without overly indulging.

The festive nature of these mini cakes elevates social gatherings. They can effortlessly become the star of the dessert table at Valentine’s parties or date night dinners. Their eye-catching aesthetics can spark conversation and inspire compliments, creating a shared experience of joy and indulgence.

Finally, the cost-effectiveness of this recipe is worth noting. With ingredients that are readily available and usually inexpensive, you can create something special and delightful without the expense of gourmet desserts. Homemade always brings a personal touch, showcasing thoughtfulness without a hefty price tag.

Historical Background and Cultural Significance

Sweet treats have long been a symbol of love and affection, with origins dating back centuries. Mini cakes, particularly, began to rise in popularity with the emergence of baking as a household practice in Europe. These small delights often served as personal gifts, especially around romantic occasions, making them beloved choices for Valentine’s Day.

Culturally, mini cakes capture the essence of celebration and joy. In many households, baking is a cherished tradition, passed down through generations, connecting loved ones over the shared experience of creating something wonderful. These small creations often evoke memories of family gatherings, special occasions, and heartfelt gestures of love.

As the recipe evolved, bakers began to experiment with flavors, presentation, and decoration techniques, leading to the charming variations we see today. The evolution from larger cakes to these smaller, individual servings reflects modern lifestyles, where convenience and variety are valued. Today, mini cakes are often a charming centerpiece at celebrations like birthdays, weddings, and romantic evenings.

Regionally, different cultures have introduced their unique spins on mini cakes, celebrating local flavors and traditions. The diversity in ingredients and techniques reflects regional tastes and influences, allowing for endless adaptations and creativity in baking, making each celebration feel special.

Ingredient Deep Dive

Flour is a fundamental ingredient in baking, providing the structure needed for baked goods. It has a rich history, dating back to ancient civilizations where grains were ground to create flour. Nutritionally, flour serves as an energy source and, when whole grain varieties are used, offers fiber and nutrients. Choose high-quality all-purpose or cake flour for your cakes, and store in a cool, dark place to maintain freshness.

Sugar is more than just a sweetener; it plays a crucial role in the texture and flavor balance of baked goods. Historically, sugar has been a highly sought-after commodity, symbolizing richness and indulgence. In these mini cakes, sugar enhances sweetness and contributes to a tender crumb. For a healthier alternative, consider using natural sweeteners. Always ensure your sugar is sealed tightly to prevent clumping and maintain quality.

Common Mistakes to Avoid

  • Not measuring ingredients accurately can lead to inconsistencies in texture and flavor. Always use measuring cups and spoons for precision.
  • Overmixing the batter can result in dense cakes. Mix just until combined to ensure a light and fluffy texture.
  • Underbaking the mini cakes can cause them to sink. Use a toothpick test to check for doneness; it should come out clean.
  • Using cold ingredients can affect the batter’s consistency. Always bring eggs and dairy to room temperature before mixing.
  • Not preheating the oven can lead to improper baking times. Always preheat to ensure even cooking.
  • Skipping the cooling process can make the frosting slide off the cakes. Allow them to cool completely before decorating.
  • Using outdated baking powder or baking soda will affect rising. Check expiration dates before use.
  • Rushing through decoration leads to less aesthetically pleasing results. Take your time for a polished finish.

Essential Techniques

Understanding the creaming method is vital in achieving light and fluffy cakes. This technique involves beating butter and sugar until airy, which helps incorporate air into the batter. To master this, allow the butter to soften to room temperature for easier mixing, and look for a pale, fluffy consistency as a visual cue for success. Overcreaming can lead to overly airy cakes, while under-creaming may prevent proper rise.

Baking times and temperatures are crucial for perfect results. Familiarize yourself with your oven’s quirks; using an oven thermometer can help ensure accuracy. Visual cues for success include a golden top and springy texture. Adjust timing based on your oven or bake in smaller batches to promote even cooking.

Pro Tips for Perfect Easy Valentine’s Day Mini Cakes

For exceptionally fluffy cakes, sift your dry ingredients together. This ensures an even mix and eliminates clumps. Additionally, consider using room temperature ingredients for a smoother batter. This helps emulsification and leads to a better texture.

Experiment with flavors! Add zest from citrus fruits or a touch of vanilla extract to the batter for heightened taste. When applying frosting, put the cakes in the refrigerator for a short time before decorating to create a firmer surface, making piping easier and neater.

Use gel food coloring for vibrant colors that don’t alter the consistency of your frosting. Always keep your tools clean and dry, as moisture can cause clumping in frosting and impede smooth application.

Think ahead! Prepare your mini cakes in advance and freeze them for later use. Just be sure to wrap them tightly to preserve freshness. This allows you more time to focus on decorating or enjoying the occasion without the last-minute rush.

Add layers of different flavors or fillings; consider fruit preserves or creamy ganache to offer variety. Each cake can become a unique creation that represents the diverse flavors loved by those you’re sharing with.

Lastly, embrace creativity in your presentation! Use edible glitter, sprinkles, or fresh fruit to elevate the look. These minor details can make a big impact on the overall vibe of your dessert table.

Variations and Adaptations

Regional variations of mini cakes can offer delightful surprises. For example, introducing spices like cinnamon or nutmeg can evoke a warming sensation that speaks to seasonal flavors. Adapt your mini cakes by introducing seasonal fruits like strawberries or raspberries to reflect whatever is fresh and available.

Consider dietary modifications by experimenting with gluten-free flours or vegan substitute options like almond or coconut milk. These adaptations allow everyone at the celebration to indulge, regardless of dietary restrictions.

Flavor variations can include using different extracts such as almond or coconut to create unique twists. You may also consider incorporating chocolate chips for an added chocolatey punch that will excite any chocolate lover.

Texture modifications can easily be adjusted by varying the fats used. olive oil or applesauce can introduce moisture and dense texture, creating a unique experience compared to traditional butter-based mini cakes.

For presentation alternatives, use a variety of toppings from toasted coconut to crushed nuts for extra crunch and visual interest. Arrange the cakes on a whimsical platter for an inviting display that encourages sharing.

Serving and Presentation Guide

To plate your Easy Valentine’s Day Mini Cakes, consider a minimalist approach. Use a white or pastel-colored plate that allows the vibrant colors of the cakes to shine through. For garnishing, fresh flowers or edible rose petals can add elegance and a romantic touch.

For traditional accompaniments, serve with whipped cream, berries, or a drizzle of chocolate sauce to complement the flavors of the cakes. Modern serving suggestions can include a playful arrangement on a tiered stand to create height and visual intrigue.

Temperature considerations are key when enjoying these cakes; serve them at room temperature to fully experience the moist texture and flavor. Portion control tips can also enhance the experience, ensuring all guests can enjoy the sweet treat without feeling overwhelmed.

Wine and Beverage Pairing

Pair sparkling wines or prosecco with your Easy Valentine’s Day Mini Cakes for a celebratory feel. The effervescence of the wines will complement the sweetness of the cakes beautifully. For those looking for non-alcoholic alternatives, consider pairing with a cucumber-lime sparkling water, which offers a refreshing contrast.

Coffee lovers can enjoy a dark roast coffee or a cappuccino with the cakes, where the bitterness of the coffee contrasts nicely with the sweetness. Temperature considerations are also essential, serve the coffee hot, allowing its aromas to elevate the decadent experience.

Storage and Shelf Life

Store your Easy Valentine’s Day Mini Cakes in an airtight container at room temperature for 1-2 days. For longer storage, consider refrigerating them, which can keep them fresh for up to a week. Depending on the ingredients, freezing the mini cakes is also an option; wrap securely to avoid freezer burn and consume within 2-3 months.

Signs of spoilage to look out for include off smells or changes in texture. Always ensure cakes are thawed at room temperature before serving to regain moisture. Reheating is not typically required; however, if desired, a quick zap in the microwave for a few seconds can offer a lovely warm treat.

Make Ahead Strategies

Prep timelines for the Easy Valentine’s Day Mini Cakes can be cut down by preparing the batter in advance and refrigerating it overnight. This not only saves time but can actually enhance flavors as ingredients meld together. Once baked, mini cakes can be frozen, allowing you to bake in bulk to prepare for larger gatherings.

When planning for storage between steps, allow cakes to cool completely before wrapping them for freezing. Quality impact assessments suggest that freezing has little effect on taste; however, take caution not to overfreeze, as this can dry them.

For assembly tips, frost just before serving if possible; this keeps decorations fresh and vibrant. If preparing in advance, allow any fresh fruits or toppings to be added just before serving to maintain their quality and appearance.

Scaling Instructions

When halving the Easy Valentine’s Day Mini Cakes recipe, simply adjust the ingredient quantities, maintaining the same ratios. This is perfect if you’re celebrating with a smaller group or trying to streamline your dessert offerings.

Doubling or tripling the recipe can be effectively managed by working in batches. This works well especially if you have multiple mini cake pans. Remember to adjust baking times slightly, as increased volume can lead to longer cooking times.

Equipment adjustments may also be necessary; using different sized pans could affect the cooking time as well. Always start checking for readiness a few minutes earlier than stated in the recipe.

Nutritional Deep Dive

The Easy Valentine’s Day Mini Cakes offer a delicious indulgence; however, it’s important to consider their nutritional aspects. A typical serving size offers a delightful balance of carbohydrates, sugars, and fats. Be mindful of portion control; limiting to one piece can fit well within a balanced diet.

From a macro breakdown perspective, a well-balanced serving can include essential nutrients, but remember that it is still a treat. Consider the inclusion of more nutritious ingredients as you experiment with your cakes, such as substituting white flour for whole grain options to add fiber.

Micronutrient analysis can vary based on specific ingredients used. For example, using eggs provides a good source of protein and necessary vitamins, reinforcing the cakes’ nutritional profile.

Health benefits can be incorporated by adding in fruits, nuts, or seeds, providing antioxidants and beneficial fats. Dietary considerations should allow flexibility for personal preferences, enhancing the cake without sacrificing enjoyment.

Dietary Adaptations

For those following a gluten-free diet, this recipe can be modified using certified gluten-free flour. This simple swap allows everyone to join in the sweetness without distress.

Dairy-free individuals can use plant-based alternatives for butter and milk, achieving similar results without sacrificing flavor. Vegan options are also attainable by replacing eggs with flaxseed or applesauce, providing moisture and binding.

For low-carb or keto followers, pursue almond meal or coconut flour for a different texture profile while significantly lowering carb content. Always test the taste; flavor adaptations may be necessary.

Another approach is to explore paleo-friendly ingredients – substituting traditional sugar for honey or maple syrup can not only provide natural sweetness but also enhance flavors.

Troubleshooting Guide

If your mini cakes come out too dry, check your measurements; often, too little fat or overbaking are culprits. Keeping proper oven temperature and baking time in check can also impact quality.

For flavor balance issues, consider incorporating a pinch of salt to enhance sweetness and counteract excessive sugar. Taste and adjust your ingredients as you mix can improve results dramatically.

Temperature problems, like cakes sinking in the center, can indicate too high of an oven temperature or not enough time in the oven. Always verify your oven’s accuracy through checking with an external thermometer.

If ingredient substitutions are made, be cautious of changes in moisture; adjust the liquid content in your batter accordingly to maintain texture.

Recipe Success Stories

Community feedback highlights how the Easy Valentine’s Day Mini Cakes have created lasting memories during celebrations. Many bakers have shared their adaptation stories, mentioning how they use family traditions to inspire creativity. Positive reviews often center around ease of this recipe, making it a go-to for gatherings and surprising loved ones.

Open conversation within the community often leads to innovative variations, with readers suggesting unique flavors or decorating ideas that add flair. Many document their successes through beautiful photography, showcasing stunning results that invite others to try their hands at baking.

Frequently Asked Questions

What makes these mini cakes special for Valentine’s Day?

The Easy Valentine’s Day Mini Cakes are visually appealing and individually portioned, making them perfect for sharing. Their festive nature and the ability to be customized with decorations or flavors make them ideal for romantic occasions.

Can I make these cakes ahead of time?

Absolutely! The cakes can be made in advance and stored in an airtight container. They can even be frozen for later use, making them a convenient choice for those with busy schedules.

How can I customize the flavors?

You can experiment with different extracts, fillings, or toppings to make each mini cake unique. Consider using almond, lemon, or coconut extracts to enhance the flavor profile.

Are there gluten-free options available?

Yes, you can substitute traditional flour with gluten-free flour blends. Ensure you use certified gluten-free ingredients to avoid cross-contamination.

How do I store the mini cakes?

Store them covered at room temperature for 1-2 days. You can refrigerate them for up to a week or freeze them for longer storage. Don’t forget to wrap them well to preserve freshness!

Can I frost the mini cakes the day before serving?

Frosting them the day before is a great idea! Just be sure to store them in a cool place to maintain the frosting’s integrity.

What if my cakes sink in the middle?

Sinkage often results from insufficient baking time. Ensure you are checking doneness with a toothpick and adhere to the baking times outlined in the recipe.

Can I use alternatives for the frosting?

Certainly! You can opt for whipped cream, cream cheese frosting, or even a fruit glaze, depending on your preference and dietary needs.

Do I need special equipment to make these cakes?

A mini cake pan is recommended for perfectly shaped cakes, but you can also use muffin tins or other baking pans if needed.

How can I make the cakes more visually appealing?

Consider decorating with fresh fruit, edible flowers, or colorful sprinkles. Using different colored icings can also add a fun touch!

What’s the best way to serve these cakes?

They can be served on decorative plates or tiered stands for a festive presentation. Pairing them with drinks like sparkling wine or coffee can enhance the experience.

Additional Resources

For those interested in more sweet inspiration, our related recipes section offers a variety of dessert options that can complement the Easy Valentine’s Day Mini Cakes perfectly. Explore technique guides for specific baking skills that can enhance your overall confidence and ability in the kitchen.

Gaining a deeper understanding of ingredients can also be beneficial. Consider diving into equipment recommendations for different baking tools that could make your kitchen endeavors smoother!

Seasonal variations can transform the spirit of your baking, so keep an eye out for recipes that match different holidays or special events to keep the tradition alive.

Join the Conversation

We invite you to share your experiences on social media! Use hashtags to connect with fellow bakers who enjoy the Easy Valentine’s Day Mini Cakes. Post photos of your creation and share tips for customizing your cakes.

Engage with the community by providing feedback or suggestions based on your baking experience. Recipe reviews and adaptations help inspire others and contribute to a thriving community of passionate bakers.

Whether you’ve made variations or come up with unique tweaks to the recipe, we want to hear about it! Join the conversation today.

The Recipe

Easy Valentine’s Day Mini Cakes

Serves: 12 mini cakes

Prep Time: 30 mins

Cook Time: 15 mins

Total Time: 45 mins

Kitchen Equipment Needed

  • Mini cake pan
  • Mixer (hand or stand)
  • Measuring cups and spoons
  • Spatula
  • Cooling rack
  • Piping bags for frosting

Ingredients

  • 1 cup all-purpose flour
  • ½ cup granulated sugar
  • 1 teaspoon baking powder
  • ¼ teaspoon baking soda
  • ¼ teaspoon salt
  • 1/2 cup unsalted butter, softened
  • 2 large eggs
  • 1 teaspoon vanilla extract
  • ½ cup milk
  • Frosting of choice
  • Sprinkles or decorative toppings (optional)

Directions

  1. Preheat the oven to 350°F (175°C) and grease the mini cake pan.
  2. In a bowl, combine flour, sugar, baking powder, baking soda, and salt. Set aside.
  3. In another bowl, cream together the softened butter and sugar until light and fluffy.
  4. Add eggs, one at a time, mixing well after each addition; then stir in vanilla extract.
  5. Gradually incorporate the dry ingredients, alternating with milk until just combined.
  6. Pour the batter evenly into each cavity of the mini cake pan, filling them about 2/3 full.
  7. Bake for 10-15 minutes or until a toothpick inserted in the center comes out clean.
  8. Allow to cool in the pan for about 5 minutes before transferring to a cooling rack.
  9. Once cooled, frost the mini cakes with your choice of frosting and add optional decorations.

Recipe Notes

  • Feel free to experiment with different flavors by adding zest, extracts, or fruit purees to the batter.
  • This recipe can be doubled for larger gatherings. Just ensure even baking time for all quantities.
  • Store any leftovers in an airtight container to maintain freshness.

Best Valentine Cookies Recipe – Ready in 30 Minutes

Valentine Cookies: Sweet Treats for Your Loved Ones

⚖️
Difficulty
Easy

⏲️
Prep Time
15 mins

🕒
Cook Time
10 mins

⏱️
Total Time
25 mins

🍽️
Servings
24 cookies

Valentine’s Day is the perfect occasion to show your love and affection with homemade treats, and there’s nothing sweeter than festive Valentine cookies! These delightful cookies are buttery soft, perfectly sweet, and can be decorated to express your love. Ideal for gifting or enjoying with family and friends, they encapsulate the essence of Valentine’s Day festivities with their vibrant colors and charming shapes.

As the aroma of freshly baked cookies wafts through your home, hearts will be warmed, and smiles will abound. The process of baking these Valentine cookies serves not only to create a delectable treat but also to foster a sense of togetherness. Whether you’re making them as a surprise for a loved one or having a baking day with friends, these cookies are sure to bring joy and deliciousness to your celebrations.

Quick Recipe Highlights

  • Flavor Profile: These cookies are a delightful blend of sweet vanilla and buttery goodness, perfect for satisfying any sweet tooth.
  • Texture: Soft and chewy with a subtle crunch around the edges, each bite offers a satisfying mouthfeel.
  • Aroma: The sweet, buttery aroma with hints of vanilla creates a warm atmosphere that is truly inviting.
  • Visual Appeal: Vibrant pink and red icing lend a festive appearance that captures the essence of Valentine’s Day.
  • Skill Level Needed: With straightforward steps, this recipe is easy for both novice and experienced bakers.
  • Special Equipment: A rolling pin, cookie cutters, and a baking sheet are all you need for this fun and festive baking project.

Recipe Overview

  • Difficulty Level: This recipe is designed to be easy, making it perfect for bakers of all skill levels, including children supervised by adults.
  • Category: Enjoy these cookies as a delightful dessert or an inviting snack for gatherings on Valentine’s Day.
  • Cuisine: Influenced by classic American baking traditions, these cookies feature a textured base that everyone loves.
  • Cost: Inexpensive to prepare, this recipe primarily uses pantry staples that won’t break the bank.
  • Season: Best enjoyed during the winter and early spring, especially around Valentine’s Day.
  • Occasion: Perfect for romantic celebrations, classroom parties, or simply to enjoy at home with loved ones.

Why You’ll Love This Recipe

Baking Valentine cookies is not just about creating a delicious treat; it’s an experience filled with warmth and love. The advanced blending of flavors creates a delightful taste that will have everyone asking for seconds. The soft and chewy texture is irresistible, making each cookie a pleasure to eat. Plus, the charming decorations allow for creativity, which can be tailored to suit the preferences of the one you’re gifting!

Convenience is another key aspect of this recipe. With a total time of just 25 minutes, you can whip up a batch of these darling cookies without spending all day in the kitchen. Their straightforward preparation allows for quick assembly and minimal mess, making baking enjoyable rather than stressful.

Nutritionally, these cookies provide a small treat to brighten anyone’s day while still being relatively balanced when enjoyed in moderation. They can be an excellent way to provide a sweet energy boost during busy days.

Socially, these cookies can play a central role in gatherings and celebrations. Sharing a plate of fresh Valentine cookies transforms any occasion, fostering connections and creating joyful memories among family and friends.

Lastly, their cost-effectiveness cannot be overlooked. Using simple ingredients that are readily available means you can make these cookies without the hassle of finding specialty items, making them a staple in any festive home kitchen.

Historical Background and Cultural Significance

The tradition of baking cookies can be traced back hundreds of years, with variations across cultures that have evolved over time. Originating in Europe, cookies were once treasured treats that symbolized love and celebration, particularly on special occasions. Today, Valentine cookies are a modern representation of this historical passion for baking and sharing sweet delights with loved ones.

In cultures worldwide, cookies have often played a significant role in holiday celebrations and festivities. Valentine’s Day, in particular, has embraced this tradition, where nurturing relationships is central. Cookies marked with hearts or decorated with romantic themes symbolize affection and care, making them a staple of this holiday.

The evolution of Valentine cookies reflects society’s growing emphasis on homemade gifts as acts of love. As more people engage in baking, these cookies have transformed from mere treats to artistic expressions of creativity and sentiment, highlighting the effort put into making something special for someone dear.

Regional variations of Valentine cookies add a rich tapestry to their historical significance. In Italy, for example, Amaretti cookies are traditionally enjoyed on Valentine’s Day, while in France, heart-shaped macarons often take center stage, showcasing the unique cultural influences on cookie recipes around the world.

Ingredient Deep Dive

Flour: As the backbone of the cookie structure, flour is essential for creating the right texture. Whole wheat or all-purpose flour can be utilized, providing different flavors and nutritional profiles. When selecting flour, it’s crucial to choose a well-bleached kind for optimal results. Store flour in a cool, dry place to maintain its freshness. If gluten-free options are preferred, almond flour or coconut flour can be good substitutes.

Sugar: Sugar not only sweetens these cookies but also plays a fundamental role in achieving the desired texture. Brown sugar adds depth due to its molasses content, resulting in a richer flavor. When selecting sugar, granulated and brown sugars are standard, but other variations, like coconut sugar, can enhance nutritional content. Store in an airtight container to prevent clumping, and for healthier options, consider honey or agave syrup as sweeteners.

Butter: Butter is key in creating the delightful, rich flavor of these cookies. The quality of butter matters; unsalted butter provides the best control over salt content. It’s advisable to use room temperature butter for easy creaming with sugars. For a healthier alternative, coconut oil can be a suitable replacement. Store properly in the fridge or freezer to extend shelf life, and always bring to room temperature before measuring.

Eggs: Eggs also contribute to the structure and moisture of the cookies. They provide additional richness and aid in binding ingredients. When choosing eggs, organic or free-range options can elevate the nutritional aspect of the cookies. If dietary restrictions require alternatives, replacing eggs with flaxseed or applesauce can be beneficial. Store eggs in the refrigerator to maintain freshness and quality.

Common Mistakes to Avoid

  • Not measuring ingredients accurately: Using the incorrect measurements can affect texture and flavor. Always use measuring cups and spoons for precision.
  • Overmixing the dough: Overmixing can lead to tough cookies. Mix just until combined to ensure a tender result.
  • Using cold butter: Cold butter can hinder the creaming process. Make sure to use softened butter for optimal mixing.
  • Ignoring resting time: Allowing cookie dough to chill enhances flavor and texture. Avoid skipping this step!
  • Baking on ungreased sheets: Failing to grease or line baking sheets can lead to stuck cookies. Always use parchment paper for easy removal.
  • Not preheating the oven: Skipping this step can result in uneven baking. Always preheat for consistent results.
  • Baking for too long: Cookies continue to cook after being removed from the oven. Keep a close eye and pull them out at the right time!
  • Storing improperly: Incorrect storage can lead to hard cookies. Store in an airtight container to keep them fresh.

Essential Techniques

Creaming Butter and Sugar: This fundamental technique involves beating butter and sugar together to create a light, airy mixture. It’s essential for the desired texture in cookies. To master this, ensure butter is at room temperature and beat until the mixture is pale and fluffy. Watch for visual cues like a light color and volume increase, which indicates the process is complete.

Chilling the Dough: Chilling the cookie dough before baking solidifies fats, leading to thicker cookies. This step is vital to avoid spreading during baking. To ensure success, wrap the dough tightly and chill for at least 30 minutes. Look for a firm dough that holds shape when handled; this indicates readiness for baking.

Pro Tips for Perfect Valentine Cookies

Use quality ingredients for the best flavor; organic and fresh ingredients make a noticeable difference.
Experiment with different extracts; almond or peppermint extract can add unique flavors to your cookies.
Decorate with edible glitter or sprinkles for a festive touch; visual appeal enhances the enjoyment.
Keep your baking pans cool between batches; this prevents cookies from spreading too much.
For a chewier texture, slightly underbake the cookies, allowing them to set as they cool.
Store cookies in a single layer to maintain their shape and appearance; stacking can cause them to become misshapen.

Variations and Adaptations

Consider creating a gluten-free version using almond flour or a combination of gluten-free blends suitable for cookies. Enhance seasonal appeal by incorporating festive spices like cinnamon or nutmeg during the colder months. For audience-specific needs, adapt the recipe to be dairy-free by using dairy-free butter alternatives.

Flavor variations can include adding citrus zest for a fresh note or incorporating chocolate chips for added richness. When adapting the presentation, consider stacking decorated cookies in clear bags for gifting or arranging them on decorative plates for parties.

Serving and Presentation Guide

For a beautiful presentation, arrange cookies on a tiered cake stand for a stunning display at gatherings. Garnish with fresh berries or mint leaves for added color and vibrancy. Traditional accompaniments may include milk or coffee, enhancing the enjoyable experience.

When serving, consider the temperature of the cookies; they are best enjoyed warm or at room temperature. Portion control is key during gatherings; offer a variety to allow guests to try different flavors without overindulging.

Wine and Beverage Pairing

A light sparkling wine, like Prosecco, pairs wonderfully with sweet cookies, complementing their flavors. For those avoiding alcohol, consider a sweet soda or fruit punch, which offers a refreshing contrast. If coffee is preferred, choose a medium roast for a balanced tasting experience that enhances the sweetness of the cookies.

Ensure beverages are served chilled for the best experience; temperature can significantly impact flavor perception.

Storage and Shelf Life

Store cookies in an airtight container at room temperature for optimal freshness. They typically last 5 to 7 days when stored correctly. For longer storage, consider freezing them; wrap each cookie tightly in plastic wrap before placing them in a freezer-safe bag.

Look for signs of spoilage, including hardening or off smells, which indicate it’s time to discard. When reheating frozen cookies, allow them to thaw at room temperature or warm them in the microwave for a few seconds.

Make Ahead Strategies

Prepping the dough a day in advance can streamline baking on the day of your event. Store cookie dough wrapped in cling film in the fridge, allowing for easier handling. Additionally, baked cookies can be frozen as well; freeze them flat and then store in a container once solid.

Reheating cookies can bring back that fresh-baked taste, so plan on allowing a few minutes in the oven just before serving. Adding fresh ingredients like whipped cream or fruit toppings right before serving can enhance taste perfectly.

Scaling Instructions

If you want to halve the recipe, accurately divide all ingredients, adjusting the baking time as necessary. For doubling or tripling quantities, prepare in batches to ensure consistent mixing and baking. Modify equipment like using larger mixing bowls or more baking sheets to accommodate the increase.

Watch for timing adjustments during baking; larger batches might require slight changes to ensure proper cooking without overburning.

Nutritional Deep Dive

The macro breakdown reveals that each cookie typically contains carbohydrates, paired with some protein and fat from the butter and eggs. When analyzing micronutrients, these cookies provide vitamins like B12 and minerals such as calcium.

Health benefits may include energy boosts from the sugars and essential fats from butter. For those concerned with dietary considerations, these cookies can fit into most diets when enjoyed in moderation, always ensuring thoughtful portion analysis for weight management.

Dietary Adaptations

For gluten-free cookies, substitute regular flour with their gluten-free equivalents, ensuring compatibility in texture. Dairy-free adaptations can be made easily with non-dairy butter and milk options prevalent in stores today.

Those following a vegan diet can opt for egg replacements, such as flaxseed or applesauce while maintaining delicious taste and adherence to dietary preferences. Other modifications to consider include low-carb options using almond flour and sweeteners alongside keto-friendly ingredients.

Troubleshooting Guide

If the texture of your cookies turns out too dry, consider incorporating a tablespoon of milk or adding one more egg on the next batch. For flavor balance issues, a pinch of salt can help bring out sweetness without overpowering the cookies.

Temperature problems during baking may arise from an inaccurate oven thermostat; consider investing in an oven thermometer for precise results. When it comes to ingredient substitutions, remember that not all ingredients behave the same way, so target necessary adjustments when substituting items to ensure a successful bake.

Recipe Success Stories

Community feedback is essential to this Valentine cookie recipe, with many pointing out the delightful soft texture and fantastic flavor. Variation successes often include readers adding their favorite ingredients, like berries or different extract flavors, which many feel enhances the base recipe.

Adaptation stories showcase creativity, with some bakers customizing icing designs that reflect personal messages, making these cookies even more special. Readers often suggest practical tips for getting the perfect glossy icing, ensuring the cookies are not only delicious but visually impressive as well.

Frequently Asked Questions

1. Can I use margarine instead of butter? Yes, margarine can be used, but it may alter the flavor and texture slightly. Ensure it’s a stick variety to mimic butter’s consistency.
2. How can I achieve a softer cookie? Reducing the baking time slightly will yield a softer cookie. Additionally, avoid overmixing the dough and incorporate brown sugar.
3. What can I use instead of eggs? Flaxseed meal or applesauce makes excellent substitutes for eggs in cookies, providing moisture and binding.
4. Can I freeze these cookies? Yes, baked cookies can be frozen. Store them in airtight containers, separating layers with parchment for best results.
5. How should I decorate my cookies? Use royal icing, buttercream, or colored sugar sprinkles for creative decorating. Let your imagination guide you!
6. What are recommended serving sizes? Serving sizes can vary based on preference, but one to two cookies per serving is a good guideline.
7. Can I use whole wheat flour? Yes, you can substitute at least half of the flour with whole wheat flour for extra nutrition but expect a denser cookie.
8. How long can I store my cookies? Stored in an airtight container, cookies can last about a week; freezing extends their life up to three months.
9. What flavors can I add to the dough? Consider adding almond extract or citrus zest for a refreshing twist in flavor. Get creative!
10. Are these cookies suitable for shipping? Yes, you can ship these cookies if packed properly. Ensure they are stored in a sturdy container to prevent breakage.

Additional Resources

Explore related recipes like chocolate chip cookies or holiday sugar cookies for a diverse baking repertoire. Technique guides covering the art of icing and decorating can help elevate your cookie presentation skills.

Ingredient information on flour varieties and sugars can assist in making informed choices for healthier baking. Invest in good-quality baking sheets and mixing bowls to enhance your baking experience and achieve consistent results.

Join the Conversation

We invite everyone to share their baking experiences! Engage with us on social media by posting your homemade cookies and any adaptations you’ve tried. Your recipe reviews and creative variations not only enrich our community but inspire fellow bakers to experiment in their kitchens.

Photography tips can help showcase your delicious creations beautifully as well, letting others enjoy both your work and vision through their screens.

The Recipe

Valentine Cookies

Serves: 24 cookies

Prep Time: 15 mins

Cook Time: 10 mins

Total Time: 25 mins

Kitchen Equipment Needed

  • Baking sheet
  • Parchment paper
  • Mixing bowls
  • Rolling pin
  • Cookie cutters
  • Whisk
  • Spoon or spatula

Ingredients

  • 2 ¾ cups all-purpose flour
  • 1 teaspoon baking powder
  • ½ teaspoon salt
  • 1 cup butter, softened
  • 1 ½ cups granulated sugar
  • 1 egg
  • 1 teaspoon vanilla extract
  • Red and pink icing for decoration

Directions

  1. Preheat your oven to 350°F (175°C) and line baking sheets with parchment paper.
  2. In a bowl, whisk together the flour, baking powder, and salt.
  3. In another bowl, cream together the softened butter and sugar until fluffy.
  4. Add the egg and vanilla extract to the butter mixture, mixing well.
  5. Gradually add the dry ingredients to the wet ingredients until combined.
  6. Chill the dough for at least 30 minutes for better handling.
  7. Roll out the dough on a floured surface, and use cookie cutters to shape your cookies.
  8. Bake for 8-10 minutes or until just golden around the edges. Allow cooling completely.
  9. Decorate cookies with colored icing in festive patterns.

Recipe Notes

  • If you prefer more vibrant colors, consider using gel food coloring in the icing.
  • Store cooled cookies in an airtight container to keep them fresh.
  • Feel free to experiment with different shapes and sizes for added fun!

Delicious Baked Bacon, Egg, and Cheese Pinwheels Recipe

Baked Bacon, Egg, and Cheese Pinwheels: A Delicious Breakfast Delight

⚖️
Difficulty
Easy

⏲️
Prep Time
15 mins

🕒
Cook Time
25 mins

⏱️
Total Time
40 mins

🍽️
Servings
6 servings

Baked Bacon, Egg, and Cheese Pinwheels are the perfect delight to kickstart your day. These delightful pastries are not only quick to prepare but also bursting with flavor that will leave your taste buds dancing. Imagine warm, flaky pastry filled with crispy bacon, rich eggs, and gooey cheese that melts in your mouth. These pinwheels are easy to make and are ideal for breakfast or even a snack throughout the day.

What makes these pinwheels stand out is their versatility. You can easily customize the ingredients to suit your preferences, making them a hit for family brunches, casual gatherings, or even as meal prep for busy mornings. Not only do they promise excellent taste, but they also bring warmth and comfort to your table, making every bite a fulfilling experience.

Quick Recipe Highlights

  • Flavor Profile: Savory and satisfying, these pinwheels meld the smoky flavor of bacon with creamy cheese and hearty eggs, creating a delightful taste experience.
  • Texture: The buttery pastry offers a light crunch on the outside, perfectly contrasting the soft and creamy filling of eggs and cheese.
  • Aroma: Your kitchen will fill with mouth-watering aromas of cooked bacon and baked pastry, enticing everyone to the table.
  • Visual Appeal: Golden-brown pinwheels with melty cheese peeking through, garnished with fresh herbs, create an inviting dish that looks as good as it tastes.
  • Skill Level Needed: A beginner-friendly recipe, perfect for those who are new to cooking or baking.
  • Special Equipment: No fancy gadgets required; just basic kitchen tools like a baking sheet and a sharp knife will do the trick.

Recipe Overview

  • Difficulty Level: This recipe is simple enough for novice cooks. It involves basic techniques like rolling dough and whisking eggs, making it accessible for all skill levels.
  • Category: This dish is classified under breakfast and brunch foods but can easily serve as a delectable snack any time of the day.
  • Cuisine: While distinctly American with its use of bacon and cheese, this recipe can draw inspiration from various cultural breakfast trends, emphasizing the beloved combination of eggs and meat.
  • Cost: Economically friendly, the ingredients are relatively inexpensive, making it a perfect choice for budget-conscious cooks.
  • Season: These baked pinwheels shine all year round but can be especially welcomed during fall and winter months when heartier meals are favored.
  • Occasion: Ideal for brunch gatherings, weekend breakfasts, or as a fun appetizer for parties.

Why You’ll Love This Recipe

Baked Bacon, Egg, and Cheese Pinwheels are not just delicious; they offer a tantalizing taste experience that is hard to replicate. The combination of crispy bacon, fluffy scrambled eggs, and melted cheese creates a flavor explosion that brings comfort with every bite. These pinwheels make breakfast exciting and ensure that everyone leaves the table satisfied and happy.

The convenience of this recipe cannot be overstated. In just a few easy steps, you can create an impressive dish that will wow your family and friends. Whether you prep them in advance and bake them fresh in the morning or serve them right away, the ability to enjoy gourmet flavors without a long wait is a major win.

Nutritionally, these pinwheels provide a balanced blend of protein from the eggs and bacon along with carbohydrates from the pastry, making them a filling breakfast option. You can even tweak the recipe to incorporate vegetables or whole-grain pastry for an extra health boost.

When it comes to social gatherings, these pinwheels serve as a wonderful centerpiece. They are easy to share and perfect for fostering conversation as everyone gathers around the table. Furthermore, they are adaptable enough to fit various dietary needs, ensuring everyone has something delicious to enjoy.

Lastly, this recipe shines in cost-effectiveness. Using pantry staples and few fresh ingredients means you can effortlessly whip up a crowd-pleaser without breaking the bank. Enjoying a delicious breakfast at home has never been more accessible or affordable.

Historical Background and Cultural Significance

The origins of baked pinwheels can be traced back to various cultures that utilize dough-filled pastries as a means of creating delicious, portable meals. While the specific combination of bacon, egg, and cheese is distinctly American, the concept of rolling various fillings into a dough is found in numerous culinary traditions.

In America, breakfast pastries have become popular fare, especially in families where convenience meets tradition. The pinwheel format allows for easy sharing, making it a favorite at social gatherings or brunches where variety is key. Its cultural significance reflects a blend of savory flavors that many Americans cherish as comfort food.

Over time, the recipe has evolved, with many families incorporating their unique touches—be it different meats, plant-based alternatives, or varied cheese options—adding to the richness of this beloved dish. As a result, baked pinwheels showcase regional variations that celebrate local tastes and preferences.

Today, these pinwheels remain relevant not just in domestic kitchens but also in eateries and coffee shops, where they are often featured in breakfast menus. They signify a sociable way to enjoy breakfast or brunch, encapsulating the essence of sharing good food with loved ones.

Ingredient Deep Dive

Bacon

Bacon is a popular ingredient in many cuisines, particularly in the West, often seen as a beloved staple for breakfast. This cured meat brings a savory, smoky flavor to dishes, enhancing their overall taste. Nutritionally, bacon provides protein and important vitamins like B12, but it should be consumed in moderation due to its fat and sodium content. When selecting bacon, look for quality products with minimal additives, and store it in the refrigerator for optimal freshness. Alternatives such as turkey bacon or plant-based options can be used for healthier or dietary-specific recipes.

Eggs

Eggs are a versatile and essential ingredient found in countless recipes across cultures. They symbolize nutrition, offering high-quality protein, essential amino acids, and various vitamins and minerals. When buying eggs, opt for organic or free-range options when possible, as they often come from more humane farming practices. Fresh eggs can be stored in the refrigerator for several weeks, ensuring peak flavor and quality. If you’re looking to reduce cholesterol, consider using egg whites or substitutes in your recipes without losing the delightful texture and taste.

Cheese

Cheese adds a delectable creaminess to dishes, with dozens of varieties available, each offering distinct flavors and textures. In the case of these pinwheels, cheddar or mozzarella are common choices, providing a rich taste that pairs perfectly with eggs and bacon. Cheese is a source of calcium and protein, but many varieties can be high in fat and sodium. When selecting cheese, look for natural options with fewer additives or preservatives. For a lighter alternative, consider using fresh mozzarella or a reduced-fat version.

Puff Pastry

Puff pastry is a light, flaky pastry that adds an exceptional texture and richness to baked goods. Though it has origins in French cuisine, its versatility has made it a favorite in many culinary traditions. Rich in butter, puff pastry can elevate a dish into something special while also providing a satisfying crunch. When purchasing puff pastry, opt for high-quality brands that use real butter rather than margarine. To store leftover pastry, wrap it tightly and keep it frozen for future use.

Common Mistakes to Avoid

  • Overfilling the pinwheels can lead to bursting during baking, so be sure to apply just the right amount of filling.
  • Using stale or old puff pastry can result in a less flaky texture, so always use fresh materials for the best outcome.
  • Not properly sealing the edges of the pastry can lead to leaks and a messy baking sheet; ensure a tight roll is achieved.
  • Ignoring oven temperatures can result in uneven baking; always preheat your oven before placing the pinwheels inside.
  • Cutting the pinwheels too thick will prevent even cooking; aim for about 1-inch thickness for the best results.
  • Using cold filling can lead to soggy pastry; allow your filling to cool slightly before adding it to the dough.
  • Baking on an ungreased sheet can cause the pinwheels to stick; always line your baking sheet with parchment paper.
  • Not testing the pinwheels for doneness means you risk undercooking them; look for a golden-brown color as an indicator.
  • Skipping egg wash can lead to dull-looking pastries; always brush with an egg wash for that golden sheen.
  • Forgetting to let the pinwheels cool before serving can result in burnt tongues and a messy disappointment; patience is key!

Essential Techniques

Rolling the Dough

Rolling the dough evenly is vital for achieving uniform pinwheels. Aim for a thickness of about ¼ inch to ensure that the pastry bakes evenly. Use a floured surface and a rolling pin and apply an equal pressure throughout. Common pitfalls include rolling too thin, which can make the pastry dry, or too thick, which can lead to undercooked centers. Look for a consistent thickness without any tears in the pastry.

Sealing the Edges

Sealing the edges of the pinwheels prevents the filling from leaking out during baking. Use your fingers to pinch or fold the edges securely, and if necessary, brush with a bit of water or egg wash to enhance the seal. A common oversight is not pressing firmly enough, which can lead to unsealed seams. A successful seal will keep everything nestled snugly until it’s time to enjoy.

Egg Wash Application

Applying an egg wash gives your pinwheels an attractive, shiny finish. Simply whisk together an egg and a tablespoon of water, then brush it on the visible surfaces before baking. It’s essential to apply the wash evenly; overapplication can cause pooling of liquid. Look for a luscious golden color post-baking, which signals a perfect finish.

Baking at the Right Temperature

Baking at the correct temperature is crucial for achieving the desired flakiness and browning. Generally, a temperature of 400°F (200°C) works best for puff pastry. A common mistake is to bake at a lower temperature, which can lead to sogginess. To verify success, monitor the dough for a beautiful golden brown, indicating it’s perfectly cooked through.

Pro Tips for Perfect Baked Bacon, Egg, and Cheese Pinwheels

– Always let the filling cool slightly before adding it to the pastry; this prevents the dough from becoming soggy.
– For an added flavor kick, try mixing in fresh herbs or spices to the egg mixture, such as chives or paprika.
– Experiment with different cheese types, such as pepper jack or feta, to add depth to your pinwheels.
– Consider incorporating cooked vegetables like spinach or bell peppers for an extra nutritional boost.
– When offering these pinwheels at a gathering, serve them with various dipping sauces, such as salsa or ranch dressing, for fun flavor pairings.
– Store leftovers in an airtight container to enjoy them within a couple of days while ensuring they maintain their texture.
– For a delightful twist, sprinkle sesame seeds or poppy seeds on top before baking for an added crunch.
– Ensure even cooking by rotating the baking sheet halfway through the cooking time.

Variations and Adaptations

Regional variations of bacon, egg, and cheese pinwheels can include swapping out ingredients native to different cultures. For example, using Italian pancetta in place of bacon offers a different flavor profile. Seasonal adaptations can involve incorporating seasonal vegetables; zucchini and asparagus work great in springtime pinwheels.

For dietary restrictions, pinwheels can be made gluten-free using alternatives such as almond flour pastry or gluten-free puff pastry. If you’re catering to a vegan audience, substitute the egg and cheese with tofu scramble and nutritional yeast to maintain the rich flavor.

Flavor variations are endless; consider adding your favorite spices or hot sauces to the egg mixture for a spicy kick. To create a more dessert-like item, replace the savory ingredients with sweet combinations like Nutella and strawberries.

Presentation can also be modified; instead of traditional pinwheels, shape the pastry into fun swirls or serve them as bite-sized appetizers on skewers.

Serving and Presentation Guide

Create an inviting presentation by arranging the pinwheels on a vibrant platter, garnished with fresh herbs. Use a cookie cutter or a knife to slice them into uniform pieces to ensure visual appeal. Consider adding a variety of accompaniments such as a selection of dips or fresh fruits for contrasting colors.

Serve these pinwheels either warm or at room temperature. For parties, providing toothpicks for easy serving adds a nice touch. Lastly, consider temperature control by wrapping them in a clean kitchen towel to retain warmth during serving.

Wine and Beverage Pairing

When it comes to beverage pairings, a crisp, dry sparkling wine complements the rich flavors of the pinwheels beautifully. For non-alcoholic options, a fresh pressed apple juice or the brightness of lemonade can balance out the savory elements.

Coffee lovers might enjoy a smooth cold brew, while tea aficionados can opt for a floral tea, which can elevate the breakfast experience. Be sure to serve these drinks at optimal temperatures to enhance their flavor profiles alongside the warm pinwheels.

Storage and Shelf Life

Storing your baked pinwheels properly is essential to maintaining their delightful texture and flavor. Ideally, store cooked pinwheels in an airtight container in the refrigerator. They will last for about 3-4 days when stored correctly.

For longer storage, consider freezing the pinwheels before baking. Place them on a baking sheet until frozen solid, then transfer to a freezer-safe container. When reheating, ensure they are warmed through; a toaster oven works well to restore some of their original crispiness.

Signs of spoilage typically include a change in texture, unpleasant odor, or visible mold, so be sure to check before consuming.

Make Ahead Strategies

Preparing your pinwheels ahead of time can save you valuable morning minutes. Assemble the pinwheels as directed and place them on a baking sheet lined with parchment. Cover the sheet with plastic wrap and store it in the refrigerator for up to 24 hours.

For extra convenience, you can freeze them before baking—simply arrange on a baking sheet, freeze until solid, then transfer to a sealed container. When ready to bake, add a few extra minutes to the cook time if baking from frozen to ensure even cooking.

If you want to enhance the freshness, consider adding garnishing elements such as fresh herbs only just before serving. This ensures they maintain their vibrant color and aroma.

Scaling Instructions

Scaling your recipe can be easy with a few adjustments. To halve the recipe, simply cut all ingredients in half and follow the same cooking instructions.

For larger gatherings, doubling or even tripling the recipe is straightforward—just be mindful of your oven space. You might need to work in batches depending on the size of your baking sheets.

Adjust your cooking time slightly when scaling, as larger quantities may require extended cooking time to ensure even baking throughout.

Lastly, consider portioning out larger batches into smaller containers for easy serving or distribution, making it simple for guests to grab and go!

Nutritional Deep Dive

Each pinwheel packs a satisfying combination of macronutrients, offering a balanced portion of protein, fats, and carbohydrates. The combination of egg, bacon, and cheese adds quality protein and healthy fats, however, be cautious of total calorie counts, particularly if managing portions.

Micronutritionally, you’ll find Vitamin A from the eggs and calcium from the cheese, contributing to a balanced diet. For those mindful of dietary choices, it’s important to analyze ingredient proportions, adjusting as necessary to fit nutritional needs.

These pinwheels can be enjoyed as part of a balanced meal plan; portion management is key, considering that they can be richer than standard breakfast fare.

For those tracking intake, considering whole egg vs. egg whites or different cheese types can impact caloric values significantly. Always account for variation when making ingredient substitutions.

Dietary Adaptations

For gluten-free options, substitute conventional puff pastry with gluten-free dough alternatives such as almond or coconut flour-based pastries. This allows those with dietary restrictions to enjoy a similar texture and taste without gluten.

Dairy-free eaters can swap regular cheese for vegan varieties while using a plant-based substitute for eggs, ensuring everyone can enjoy these pinwheels without worry.

For those following a low-carb or keto diet, consider omitting the pastry and creating layers of egg, bacon, and cheese in a muffin tin for a similar bite-sized effect without the extra carbs.

If vegan cuisine is your focus, replace eggs with silken tofu and add nutritional yeast for a cheesy flavor, while using plant-based bacon alternatives.

Troubleshooting Guide

If the texture of your pinwheels turns out too dense, it may be due to rolling the dough too thick. Aim for an even thickness of ¼ inch for optimal flakiness and rise.

A lack of flavor balance might come from underseasoning the filling. Remember to season the eggs and other ingredients adequately prior to assembling the pinwheels for maximum impact.

If you experience issues with browning, your oven may not be calibrated correctly; consider using an oven thermometer to to check. Alternatively, adjust your cooking time and cover the pinwheels with foil for part of the baking process if they brown too quickly.

Sticking to the baking sheet can be avoided simply by using parchment paper or silicone mats. If dough becomes too sticky while you’re working, keep a light dusting of flour handy.

Recipe Success Stories

Our community loves the versatility of Baked Bacon, Egg, and Cheese Pinwheels! Many readers have shared their variations, swapping out different meats and cheeses, or incorporating seasonal vegetables. The flexibility of this recipe allows everyone to customize their experience while enjoying the foundational flavors.

Feedback highlights how easy this dish is for meal prep, with many families reporting back-to-back success throughout busy weekdays. The pinwheels have not only been a hit at home but also at gatherings, often being requested for potlucks and brunches.

Several successful adaptations include using ricotta with spinach or incorporating spicy sausage, showcasing how these pinwheels can cater to a wide range of tastes and preferences.

With tips about perfecting the puff pastry technique shared among readers, the community continues to inspire one another with photos and advice, enhancing the enjoyment of making this beloved dish.

Frequently Asked Questions

Can I make these pinwheels in advance?

Yes! You can assemble the pinwheels ahead of time and keep them in the refrigerator for 24 hours before baking. Alternatively, freeze before baking for a longer storage option.

What other fillings can I use in the pinwheels?

The beauty of pinwheels is their versatility. Feel free to experiment with various fillings such as sausage, ham, vegetables, or different cheeses based on your preference.

Can I use egg substitutes?

Absolutely! You can use flax eggs or commercial egg replacements for a plant-based option without sacrificing texture.

How do I store leftovers?

Store any leftover pinwheels in an airtight container in the refrigerator for up to 4 days, or freeze them for longer storage.

What toppings or dips can I serve with these pinwheels?

Consider serving with salsa, guacamole, or ranch dressing for a delightful twist. Fresh herbs as garnish can improve presentation as well!

Can I make these gluten-free?

Yes, simply utilize gluten-free puff pastry to create a gluten-free version of these pinwheels without affecting the taste.

What is the best way to reheat leftover pinwheels?

The best way is to reheat them in a toaster oven or an oven at 350°F (175°C) until heated through to maintain the crispy texture.

What is the ideal baking temperature?

For the best results, bake pinwheels at 400°F (200°C) to achieve perfectly cooked pastry that is golden brown.

How do I ensure my pinwheels stay crispy?

Use parchment paper on your baking sheet and avoid overpacking the filling to ensure that your pinwheels retain their flaky deliciousness.

Can these be served cold?

Yes, they can be enjoyed cold, making them a perfect portable option for picnics or meal prepping.

How many pinwheels does this recipe make?

This recipe yields about 6 servings, depending on how thick you cut each pinwheel. Typically, you can expect to get about 12-15 individual pinwheels.

Additional Resources

If you enjoyed these Baked Bacon, Egg, and Cheese Pinwheels, explore related recipes such as breakfast burritos or savory scones. Additionally, check out technique guides for mastering puff pastry or expanding your breakfast repertoire.

For ingredient information, considering the nutritional profiles of different cheeses or exploring alternatives to traditional bacon can enhance your culinary toolbox. Investing in quality kitchen equipment, like good baking sheets or heat-resistant spatulas, can improve your cooking experience, leading to consistently delicious outcomes.

Join the Conversation

We’d love to hear from you! Share your experience making Baked Bacon, Egg, and Cheese Pinwheels on social media and tag us. If you have photography tips, unique variations, or suggestions that worked for your family, post them for the community to see. Your feedback could inspire other home cooks and create connections through shared success stories.

Engagement with your fellow cooks not only helps improve skills but also creates a collaborative food-loving environment that we’re excited to continue!

The Recipe

Baked Bacon, Egg, and Cheese Pinwheels

Serves: 6

Prep Time: 15 mins

Cook Time: 25 mins

Total Time: 40 mins

Kitchen Equipment Needed

  • Baking sheet
  • Parchment paper
  • Rolling pin
  • Sharp knife
  • Small mixing bowl
  • Whisk

Ingredients

  • 1 sheet puff pastry, thawed
  • 6 slices of bacon, cooked and crumbled
  • 2 large eggs
  • 1 cup shredded cheese (cheddar or mozzarella)
  • Salt and pepper to taste
  • 1 egg, beaten (for egg wash)

Directions

  1. Preheat your oven to 400°F (200°C) and line a baking sheet with parchment paper.
  2. In a small mixing bowl, whisk together the eggs, crumbled bacon, and shredded cheese. Season with salt and pepper.
  3. Roll out the puff pastry on a lightly floured surface to about a ¼-inch thickness.
  4. Spread the egg mixture evenly over the pastry, leaving a small border around the edges.
  5. Carefully roll the pastry into a tight log and slice it into 1-inch pieces.
  6. Place the pinwheels on the prepared baking sheet and brush the tops with the beaten egg to create a shiny finish.
  7. Bake in the preheated oven for 20-25 minutes or until golden brown.
  8. Allow cooling slightly before serving, and enjoy!

Recipe Notes

  • For a spicy kick, add jalapeños or a dash of hot sauce to the egg mixture.
  • Feel free to incorporate vegetables into the filling, like sautéed spinach or mushrooms.
  • These can also be made ahead of time; simply freeze and bake as needed.
  • Try different cheeses or meats to customize these pinwheels to fit your family’s preferences.

Fluffy Cottage Cheese Cloud Bread: A Low-Carb Delight

Cottage Cheese Cloud Bread: Light and Fluffy Delight

⚖️
Difficulty
Easy

⏲️
Prep Time
10 mins

🕒
Cook Time
30 mins

⏱️
Total Time
40 mins

🍽️
Servings
4 servings

Cloud bread made with cottage cheese is a fantastic alternative for those seeking a low-carb, grain-free bread option. It’s incredibly light and fluffy, perfect for sandwiches or as a side to your favorite meals. The flavor is subtly creamy, which pairs beautifully with a variety of toppings, making it an adaptable option for any meal.

Whether you’re looking to cut carbs for dietary reasons or simply want to try something new, this cottage cheese cloud bread will impress your family and friends. The whipped egg whites give it an airy texture, making each bite a delight. Imagine the fluffy clouds of bread melting in your mouth while you savor the deliciousness of cottage cheese, a versatile ingredient packed with protein.

Quick Recipe Highlights

  • Flavor Profile: The cottage cheese adds a creamy, mild flavor that complements a variety of toppings and spreads.
  • Texture: Expect a light and airy bread-like structure that feels ethereal on the palate.
  • Aroma: It has a fresh, mild aroma, with notes of egg and cream that will entice you as it bakes.
  • Visual Appeal: The bread features a lovely golden-brown crust with a soft, fluffy interior, making it as pleasing to the eye as to the taste.
  • Skill Level Needed: This recipe is easy and beginner-friendly, requiring basic mixing and baking skills.
  • Special Equipment: You only need a mixing bowl, a whisk, and a baking sheet, making this a simple option for any home cook.

Recipe Overview

  • Difficulty Level: The cloud bread is easy to make, involving simple steps that even novice cooks can master without much trouble.
  • Category: It falls under the category of low-carb recipes, perfect for breakfast, snacks, or even lunch sandwiches.
  • Cuisine: This recipe is influenced by various low-carb diets and is suitable for many global cuisines, fitting seamlessly into your meals.
  • Cost: The ingredients are affordable and commonly found, making it budget-friendly for most families.
  • Season: Enjoy this recipe year-round, whether paired with seasonal ingredients or just on its own.
  • Occasion: Perfect for casual family meals, special gatherings, or anytime you crave a low-carb bread alternative.

Why You’ll Love This Recipe

The taste and texture of cottage cheese cloud bread make it an unforgettable experience. The lightness of the bread makes it a welcome alternative to traditional options, and its subtle flavor allows for endless topping possibilities, from savory spreads to sweet jams. You can enjoy it with avocado, deli meats, or your favorite nut butter for a quick snack.

One of the key benefits of this cloud bread is its convenience. The quick prep time (only 10 minutes) makes it ideal for busy mornings or spontaneous meals. The baking process is hands-off, allowing you to attend to other tasks while it cooks. With just a handful of simple ingredients, you can whip up this cloud bread whenever the craving strikes.

Nutritionally, cottage cheese is a powerhouse of protein, making this bread a great choice for anyone looking to increase their protein intake while reducing carbs. This bread option is also lighter on the stomach, providing a guilt-free pleasure without the bloating commonly associated with traditional bread.

Socially and entertainingly, cottage cheese cloud bread is a great conversation starter! It impresses guests with its uniqueness and encourages tastings of various spreads and toppings. It can easily become the center piece of a low-carb brunch or casual get-together.

Cost-effectively, this recipe uses affordable ingredients you likely already have in your pantry, making it a practical option during tough economic times. Opting for homemade cloud bread can save you money compared to purchasing specialty low-carb bread from the store.

Historical Background and Cultural Significance

Cottage cheese cloud bread has emerged as a popular alternative to traditional bread options primarily due to changing dietary trends focusing on low-carb, ketogenic, and gluten-free options. Its simplicity and adaptability have made it a staple for many seeking healthier lifestyles without sacrificing the joy of bread.

Culturally, cloud bread bridges the gap for those often struggling with dietary restrictions. It allows people from various backgrounds to enjoy the experience of bread, fostering inclusion during meal times, especially for gatherings where dietary needs must be considered.

The evolution of the recipe has seen several variations as cooks experiment with different ingredients. From adding nutritional yeast for an umami flavor to incorporating herbs and spices for unique twists, the cloud bread continues to evolve as a beloved staple for healthy eating enthusiasts.

Regionally, while traditional breads vary deeply across cultures, cloud bread serves as a universal option that can be adapted to suit any culinary tradition. People from all walks of life have embraced the idea, creating their versions to highlight local flavors or ingredients.

Ingredient Deep Dive

Cottage cheese serves as the backbone of cloud bread, bringing moistness and protein. Its history dates back to ancient times and is derived from curds and whey. Nutritionally, it is low in fat yet high in protein, making it a favorite amongst various diets. When selecting cottage cheese, opt for curds that are firm but not too dry for the best results. Store it in your fridge and ensure to consume it within a week after opening to maintain freshness, though a simple swap for ricotta could work in a pinch.

Eggs are another key ingredient, adding structure and richness. Their significance in various cuisines cannot be overstated, as they often symbolize fertility and nourishment. With high protein and essential vitamins, eggs elevate the nutritional profile of any dish they are part of. Choose organic or free-range eggs for better flavor and quality, and store them in a cool environment.

Baking powder provides the necessary lift, ensuring the cloud bread remains airy and fluffy. It has long been a vital ingredient in baking across cultures. While it is commonly used in sweet dishes, it plays a crucial role here in achieving the desired texture. Select quality brands and store in a dry, cool place to maintain potency for the best baking results.

Common Mistakes to Avoid

  • Not whisking the egg whites sufficiently: Properly whipped egg whites are crucial for creating the light and cloud-like texture.
  • Using too much cottage cheese: Too much moisture can result in dense bread, so measure carefully.
  • Skipping baking powder: Relying on eggs alone for leavening will yield a heavy loaf instead of a light one.
  • Baking at the wrong temperature: Ensure your oven is properly preheated; baking at inconsistent temperatures can affect rising.
  • Not letting it cool: Cloud bread needs time to set after baking, so resist the urge to slice too early.
  • Neglecting to line your baking sheet: This prevents sticking, which could ruin the aesthetic and function of the bread.
  • Ignoring ingredient temperature: Ingredients should be at room temperature for optimal blending.
  • Overbaking: Keep an eye on the cloud bread as it can turn dry if left in too long.

Essential Techniques

Whipping egg whites is critical to the success of cloud bread. To master this technique, ensure your bowl and beaters are clean and free from any grease. Gradually increase speed and continue until soft peaks form. Watch for visual cues like glossy, stiff peaks that do not droop when the whisk is lifted. Avoid over-whipping, which can curdle the texture.

Correctly folding ingredients is vital for maintaining airiness in the batter. Use a spatula to gently lift the mixture from the bottom and fold it over the surface, turning the bowl as you go. This technique ensures you don’t deflate the whipped egg whites. Be patient and avoid vigorous stirring, which can ruin the fluffy texture.

Pro Tips for Perfect Cottage Cheese Cloud Bread

To achieve the ultimate cottage cheese cloud bread, ensure all ingredients are at room temperature to help them mix uniformly. A pinch of salt can enhance flavor, so consider adding it to the egg whites while whipping. For added flavor, fold in herbs or garlic powder for a savory twist before baking. Be vigilant during the first half of baking, as you want to achieve a beautifully golden top without burning. Once baked, let it rest to solidify before slicing; this deepens the flavors. Finally, experiment with various toppings like smoked salmon or avocado for delightful presentations.

Variations and Adaptations

You can experiment with regional variations by adding spices that reflect your culture. For example, incorporating curry powder can give it an Indian twist. In seasonal adaptations, adding pumpkin puree in the fall can enhance the bread’s richness while introducing autumn flavors. Dietary modifications are easy; for vegan versions, consider using flaxseed meal mixed with water as an egg substitute. For those seeking different textures, try folding in finely shredded vegetables like zucchini for a nutritious boost, or opt for a sweeter version by adding a touch of honey or maple syrup.

Serving and Presentation Guide

When plating cottage cheese cloud bread, a simple arrangement with fresh greens or colorful vegetables can elevate its appearance. Garnishing with fresh herbs or drizzles of olive oil adds an upscale touch. Pair it with dips like hummus or tzatziki on a wooden board for a rustic presentation. Consider modern serving suggestions such as building unique open-faced sandwiches that highlight the cloud bread’s airy texture. Finally, serve warm for optimal flavor and texture retention while keeping portions reasonable for light snackings.

Wine and Beverage Pairing

For a delicious pairing with cottage cheese cloud bread, a crisp white wine such as Sauvignon Blanc complements the bread’s lightness beautifully. Alternatively, a light-bodied rosé works well for summer gatherings. For non-alcoholic options, sparkling water infused with lemon or mint refreshes the palate and enhances the flavors of the toppings. When served with breakfast, try pairing with a bold coffee or herbal tea to balance the mild flavors of the bread.

Storage and Shelf Life

To store cottage cheese cloud bread, place it in an airtight container and keep it in the refrigerator. It can last for about three days. For longer storage, wrap individual pieces in plastic wrap and freeze them for up to a month. If you notice any off-smells or a change in texture, it’s best to discard the bread. To reheat, simply warm in the oven for a few minutes to regain its lightness. Avoid microwaving, as this can make the bread rubbery.

Make Ahead Strategies

For an efficient meal prep strategy, consider making the cloud bread in advance and freezing individual slices. Thaw in the refrigerator overnight before serving. If you want to streamline preparation, you can separate the eggs and whip the whites ahead of time, storing them in the refrigerator until you’re ready. This strategy allows for quick assembly in the morning, providing a fresh taste without the hassle. To maintain freshness, add any perishable toppings only just before serving.

Scaling Instructions

If you want to halve the recipe, simply scale down all the ingredients while keeping the method the same. However, if you decide to double or triple it, adjust the baking time slightly as it may require longer for the increased volume. Ensure your mixing bowl is large enough to accommodate the extra ingredients without spilling. When scaling up, consider using two baking sheets if necessary to evenly distribute the cloud bread mixture for consistent baking.

Nutritional Deep Dive

The macros for cottage cheese cloud bread are notably favorable, offering high protein content with low carbohydrates. A standard serving can yield approximately 100 calories, 6g carbs, and 7g protein, making it an excellent snack or meal base. The micronutrient profile is rich, particularly with calcium and B vitamins from the cottage cheese and eggs. Portion control can help with weight management goals while enjoying a satisfying dish that keeps hunger at bay.

Dietary Adaptations

For gluten-free diets, cottage cheese cloud bread is inherently suitable as it contains no wheat. If dairy is a concern, consider using a lactose-free cottage cheese or a nut-based alternative to replicate texture. Vegans can replace eggs with a flaxseed mixture or applesauce as a binding agent. For low-carb enthusiasts, keeping the recipe as is maintains its keto-friendly status. Additionally, those following paleo diets can replace cottage cheese with blended nuts for a denser alternative.

Troubleshooting Guide

If the cloud bread comes out dense, double-check that the egg whites were thoroughly whipped for adequate volume. If experiencing issues with flavor, a dash of salt or herbs can help enhance the taste. For temperature problems, ensure that your oven’s thermostat is accurate; inconsistent heating can cause uneven cooking. If substituting ingredients, keep ratios consistent and maintain the same technique to achieve desired results.

Recipe Success Stories

Community feedback on cottage cheese cloud bread is overwhelmingly positive, with many sharing variations that include additional herbs or spices. Readers have noted success in using vegetable purees for added nutrition while delighting family and friends with the airy texture. Practical tips have emerged from users experimenting with toppings, suggesting that cloud bread works wonderfully with various accompaniments. Photography advice includes staging the bread against colorful backgrounds, enhancing visual appeal and engagement.

Frequently Asked Questions

Can I make cloud bread ahead of time?

Yes, you can prepare the cloud bread in advance and store it in the refrigerator for up to three days or freeze it for up to a month. Thaw it overnight before serving.

How do I achieve the best texture?

The key to achieving the perfect texture is properly whipping the egg whites until they reach stiff peaks, then folding them gently into the other ingredients to preserve airiness.

Can I flavor the cloud bread?

Absolutely! Consider adding herbs, spices, or even garlic powder to the mixture before baking for an additional flavor boost.

Does it freeze well?

Yes, cloud bread freezes excellently. Be sure to wrap slices individually to maintain freshness, and store them in an airtight container.

Is this recipe gluten-free?

Cottage cheese cloud bread is inherently gluten-free as it doesn’t contain any wheat or gluten products, making it safe for those with gluten sensitivities.

What toppings work well with cloud bread?

Consider avocado, smoked salmon, deli meats, or spreads like hummus or tzatziki for a delicious combination. Sweet options include nut butters and fruit preserves.

Can I substitute cottage cheese?

While cottage cheese provides a unique flavor and texture, you can experiment with ricotta or blended nuts for a dairy-free version, though results may vary.

How long does it take to bake?

Expect the baking time to be approximately 30 minutes, but keep an eye on the color to avoid over-baking.

Is this recipe suitable for a keto diet?

Yes, cottage cheese cloud bread is low in carbs and high in protein, making it an excellent choice for anyone following a ketogenic diet.

Can I make this recipe vegan?

To make a vegan version, substitute the eggs with a flaxseed mixture or applesauce and use nut-based cottage cheese for consistency.

Additional Resources

If you enjoyed making cottage cheese cloud bread, you might also explore additional low-carb recipes or technique guides that highlight egg usage in baking. Ingredients like yogurt can offer versatile alternatives, so consider incorporating them into your meals. Investing in quality kitchen equipment can enhance your cooking experience, while seasonal variations of this recipe can introduce new flavors and ingredients throughout the year.

Join the Conversation

We love to see your creations and adaptations of cottage cheese cloud bread! Share your photos on social media and use our hashtags to connect with the community. Engage with fellow food lovers in the comments, sharing your variations, tips, and tricks. Your feedback can inspire others to explore this delightful recipe. Let’s build a supportive community around healthy, delicious eating together!

The Recipe

Cottage Cheese Cloud Bread

Serves: 4 servings

Prep Time: 10 mins

Cook Time: 30 mins

Total Time: 40 mins

Kitchen Equipment Needed

  • Mixing bowl
  • Whisk or electric mixer
  • Baking sheet
  • Parchment paper

Ingredients

  • 1 cup cottage cheese
  • 4 large eggs, separated
  • 1/4 teaspoon baking powder
  • Salt, to taste

Directions

  1. Preheat your oven to 300°F (150°C) and line a baking sheet with parchment paper.
  2. In a mixing bowl, combine the cottage cheese, egg yolks, baking powder, and salt. Mix until well combined.
  3. In a separate bowl, beat the egg whites until stiff peaks form.
  4. Gently fold the egg whites into the cottage cheese mixture, being careful not to deflate the mixture.
  5. Scoop the mixture onto the prepared baking sheet, forming 4 equal mounds.
  6. Bake for 30 minutes or until the tops are golden brown.
  7. Remove from the oven and let cool before serving.

Recipe Notes

  • Store leftovers in an airtight container in the refrigerator for up to three days.
  • You can freeze the slices for up to a month; just ensure they are wrapped individually.
  • Experiment with different herbs or spices for a unique flavor.

Delicious Cinnamon Rolls with a Fruity Twist Recipe

Delicious Cinnamon Rolls with a Fruity Twist: Start Your Day Right!

⚖️
Difficulty
Moderate

⏲️
Prep Time
30 mins

🕒
Cook Time
25 mins

⏱️
Total Time
55 mins

🍽️
Servings
12 rolls

Indulging in freshly baked cinnamon rolls is a delightful way to start your morning, but imagine elevating that classic taste with a fruity twist! Our recipe for cinnamon rolls infused with strawberries combines the gooeyness of traditional rolls with the refreshing zing of strawberries. The sweet aroma wafts through your home as they rise and bake, enticing everyone to gather in the kitchen for warm, fluffy delights. Each bite is an explosion of flavor, juxtaposing the sweetness of cinnamon with the tartness of fresh strawberries, making every morning special.

Get ready to dive into a baking experience that not only fills your home with irresistible scents but also brings comfort and joy to the table. These cinnamon rolls are perfect for family brunches, celebrations, or even just a treat for yourself. Let’s explore this engaging recipe that is sure to satisfy your sweet tooth.

Quick Recipe Highlights

  • Flavor Profile: The balance of warm, aromatic cinnamon and sweet, juicy strawberries creates a perfectly harmonious flavor experience.
  • Texture: These rolls offer a soft, fluffy bite that pairs beautifully with the slight crunch of a sugary topping.
  • Aroma: As they bake, the delightful scents of cinnamon and fresh strawberries fill your kitchen, creating an inviting atmosphere.
  • Visual Appeal: Golden-brown rolls topped with a vibrant strawberry glaze make for an eye-catching centerpiece at any meal.
  • Skill Level Needed: While some baking experience helps, this recipe is straightforward for anyone ready to enhance their culinary skills.
  • Special Equipment: A baking sheet, mixing bowls, and a rolling pin are essential for creating these delicious rolls.

Recipe Overview

  • Difficulty Level: The moderate difficulty of this recipe comes from the dough preparation and rolling technique, but it’s manageable for aspiring bakers.
  • Category: This dish falls under brunch or dessert, making it versatile for either breakfast or afternoon snacking.
  • Cuisine: Cinnamon rolls are traditionally a staple in American baking, but the addition of strawberries gives a fresh twist influenced by seasonal fruit desserts.
  • Cost: The ingredients are generally affordable, making this a budget-friendly treat perfect for home baking.
  • Season: Strawberries peak in the spring and summer, making these cinnamon rolls a delightful seasonal treat.
  • Occasion: Ideal for celebrations like Mother’s Day or any family gatherings, they’re sure to impress guests!

Why You’ll Love This Recipe

The sweet and spicy taste of cinnamon rolls with a fruity twist not only tantalizes your taste buds but also invites you to indulge in a comforting tradition. With every bite, the soft texture of the dough blends with the juicy strawberries to create an unforgettable flavor combination. You’ll relish the way the sweetness of the rolls harmonizes with the slight tartness from the fruit, making this recipe a cherished addition to your breakfast repertoire.

Preparation is a breeze, especially with a simple dough that rises perfectly every time. You can whip up these rolls on a leisurely weekend morning or any time you need a quick brunch option that feels impressive without requiring professional baking skills. Your loved ones will be delighted when they enjoy the warm rolls fresh out of the oven, creating a cozy atmosphere in your kitchen.

These cinnamon rolls also pack a nutritional punch! Strawberries are rich in vitamins and antioxidants, making your indulgence feel a little more guilt-free. Plus, the overall recipe offers options for healthier ingredients, allowing you to cater to various dietary needs. Sharing these rolls can become a cheerful tradition, whether it’s with family or friends gathered around the breakfast table.

Serving these rolls not only satisfies sweet cravings but also turns any gathering into a special occasion. Imagine a table adorned with rolls, fresh fruit, and steaming mugs of coffee, inviting conversation and laughter. It’s perfect for brunches, holiday gatherings, or simply making an ordinary day feel extraordinary. The joy of baking and sharing these rolls further enhances the delightful experience.

From an economic standpoint, this fruity cinnamon roll recipe shines as a cost-effective option for elaborate breakfasts or brunch gatherings. With commonly found ingredients, you can create a dessert that rivals what you’d find at a café. The ability to scale the recipe up or down means you can satisfy a crowd or keep it intimate, making it a resourceful choice for any occasion.

Historical Background and Cultural Significance

Cinnamon rolls have their roots deeply embedded in European baking traditions, with the roll-style pastry appearing in Scandinavia around the 16th century. Known as “kanelbulle” in Sweden, these delightful treats became a staple of comfort food, celebrated as a go-to for gatherings and afternoon coffee breaks. Over time, the cinnamon roll made its way to America, where it evolved into the gooey, sweet version we enjoy today.

The cultural significance of cinnamon rolls is especially prominent during holidays and family celebrations in many cultures. In Sweden, for instance, there is a dedicated day, Kanelbullens Dag (Cinnamon Roll Day), celebrated each October, highlighting this dish’s importance in Swedish tradition. Similarly, in the U.S., cinnamon rolls are often associated with cozy family mornings and festive gatherings, creating joyous memories.

As recipes spread and evolved, the addition of various fillings became common. This has led to exciting modern variations that include everything from chocolate to fruit, with our fruity twist on the classic cinnamon roll being a delicious example. This evolution showcases the adaptability of cinnamon rolls, allowing them to cater to diverse tastes and preferences while remaining a beloved treat.

Regional variations exist as well, with some areas adding nuts or different spices to their versions. In some cultures, these rolls might be served alongside coffee as part of a larger tradition, reflecting their deep-seated place in communal and family settings. The transition from breakfast staple to dessert item in many places also showcases cinnamon rolls’ versatility, maintaining their relevance across meal times and occasions.

Ingredient Deep Dive

Flour: The backbone of any roll, flour determines the texture and structure of the dough. All-purpose flour works excellently, but for a lighter roll, consider bread flour for its higher protein content, which creates a chewier texture. When purchasing flour, opt for a brand that is fresh and properly stored to avoid spoilage. Be cautious not to over-measure, as too much flour can lead to dense rolls. Properly store your flour in a cool, dry place, ideally in an airtight container to maintain its quality.

Cinnamon: This aromatic spice is essential for that classic cinnamon roll flavor, providing warmth and sweetness. When selecting cinnamon, opt for Ceylon cinnamon for its superior taste compared to the common Cassia variety. Ground cinnamon is typically used, but whole cinnamon sticks can also be utilized when flavoring the dough or for infusions. Ceylon cinnamon contains lower levels of coumarin, making it a healthier option if consumed regularly. Store cinnamon in a dark, cool place, as light can degrade its flavor over time.

Strawberries: The star of this recipe, strawberries not only add bright flavor but also boost nutritional value. Rich in vitamin C, fiber, and antioxidants, strawberries offer a delightful counterbalance to the sweetness of the cinnamon rolls. When buying strawberries, look for ones that are bright red, firm, and fragrant. Always wash them gently under cold water just before use to preserve their texture. Store strawberries in the refrigerator, ideally unwashed and in a breathable container, and consume them within a few days for the best flavor.

Butter: This ingredient provides moisture and richness to the dough while contributing to the irresistible flaky texture that makes cinnamon rolls delightful. Use unsalted butter for the best control over the salt content in your recipe. Be mindful of temperature; butter that’s too warm can lead to greasy dough, while excessively cold butter may not blend well. Store butter in a cool place, preferably in an airtight container to prevent it from absorbing odors from nearby foods.

Yeast: Essential for the roll’s rise, yeast is responsible for fermentation, creating the airiness that defines quality cinnamon rolls. Active dry yeast is commonly used and should be stored in the fridge to extend its shelf life. To test its freshness, activate it with warm water and sugar; if it bubbles, you’re good to go! Avoid exposing yeast to high temperatures as it can kill the yeast and prevent proper rising.

Common Mistakes to Avoid

  • Using Cold Ingredients: Ensure your butter and milk are at room temperature; cold ingredients can prevent the dough from rising properly.
  • Overbaking: Keep an eye on your rolls as they bake. Overbaking can dry them out, so check for a light golden color.
  • Not Measuring Ingredients Accurately: Baking is science; using too much or too little of an ingredient can lead to undesirable results.
  • Skipping the First Rise: Allowing the dough time to rise is crucial for soft, fluffy rolls. Don’t rush this step!
  • Rolling Too Tight: When rolling the dough, ensure it’s snug but not overly tight to avoid dense rolls.
  • Poorly Greased Baking Dish: Ensure your baking dish is well greased to avoid sticking and to facilitate easy removal.
  • Ignoring Resting Times: Both the dough and the rolls need resting time to develop texture; don’t skip these steps!
  • Filling Too Much: While generous filling is tempting, too much can lead to messy baking and difficult rolling.
  • Using Expired Yeast: Always check your yeast’s expiration date to ensure it will activate properly.
  • Not Testing Oven Temperature: Oven temperatures can vary. Use an oven thermometer to ensure accuracy for baking success.

Essential Techniques

Proofing the Dough: This step is crucial for achieving fluffy rolls. It allows yeast to ferment, creating bubbles that contribute to texture and rise. To master this, place your dough in a warm, draft-free environment until it’s doubled in size, usually 1-2 hours. Common pitfalls include using incorrect temperatures or not allowing enough time for rising. The dough should feel elastic; if it’s too sticky, incorporate a little more flour to help with handling.

Rolling Technique: Proper rolling is essential for even baking and filling distribution. After the first rise, gently press the dough into a rectangle, then roll it tightly into a log shape. Start from the long side to create larger rolls. Pay attention to not roll too tightly, as this can compress the dough and lead to denser rolls. After rolling, ensure the seams are tucked well to prevent spills during baking.

Pro Tips for Perfect Cinnamon Rolls with a Fruity Twist

1. Use fresh, ripe strawberries for the best flavor and juiciness. Consider macerating them in sugar for added sweetness before adding to the filling.
2. Experiment with flavorings in the dough or filling, such as vanilla extract or citrus zest, to enhance depth.
3. For a richer filling, mix in a bit of cream cheese or mascarpone to the cinnamon mixture for a decadent twist.
4. Don’t rush the rising times. Each rise is crucial for developing that desirable fluffy texture.
5. Use a serrated knife or unwaxed dental floss to cut the rolls, as this helps preserve the structure without squishing them.
6. Drizzle with a simple glaze made with powdered sugar and milk for an extra touch of sweetness after baking.
7. Cover the rolls with foil if they brown too quickly in the oven, letting them bake through without burning.
8. For a unique twist, substitute cinnamon with cardamom or nutmeg for a different spice profile.

Variations and Adaptations

Incorporating different fruits is an easy way to switch things up; consider raspberries or blueberries for a new flavor experience. Seasonal adaptations could include incorporating pumpkin puree in the fall for a warm, spiced variation. For dietary modifications, using gluten-free flour blends can cater to those with restrictions, making it accessible for everyone. Adjusting the sweetness is easy; you can substitute brown sugar with coconut sugar for a lower glycemic option.

Texture modifications can include adding chopped nuts to the filling or topping for added crunch. Presentation can be altered by baking the rolls in a muffin tin for individual servings or drizzling a sweet glaze over each roll before serving. You can even layer in chocolate chips for added indulgence!

Serving and Presentation Guide

Plating can elevate your cinnamon rolls immensely. Use a large platter to display your rolls in a circular formation, or serve them individually on plates. Garnish with fresh strawberries or mint leaves for a fresh pop of color. Traditional accompaniments like cream cheese frosting pair beautifully, but you can also offer a selection of jams or flavored butters to enhance the experience.

Always serve cinnamon rolls warm, straight from the oven, or gently reheated. Consider the temperature of the glaze; it should be pourable but not hot when drizzled atop your rolls. Encourage portion control by cutting them evenly when serving to ensure everyone gets a share, without the temptation to overindulge.

Wine and Beverage Pairing

Wine pairings with cinnamon rolls may not be traditional, but a sweet sparkling wine can complement the fruity flavors exceptionally well. A Moscato or Prosecco brings a refreshing balance with its effervescence. For non-alcoholic options, serve with freshly brewed coffee or a light tea, such as chamomile or green tea, which enhance the overall flavor experience.

For those who enjoy traditionally paired beverages, an iced latte with vanilla can offer a creamy contrast to the rolls’ sweetness. When serving, ensure that any drink is at an ideal temperature to complement the warmth of the cinnamon rolls.

Storage and Shelf Life

To retain their freshness, store leftover cinnamon rolls in an airtight container at room temperature; they are best consumed within 2-3 days. If you have remaining rolls after that, consider refrigerating them to extend their shelf life for an additional few days. For longer storage, these rolls freeze exceptionally well; wrap them tightly in foil or freezer-safe bags to avoid freezer burn.

When reheating, consider the best method; for soft outcomes, use a microwave for 10-15 seconds, or heat in a preheated oven at 350°F (175°C) for about 10 minutes until warmed through. If your rolls are topped with glaze, add that after reheating to maintain its texture. Always check for signs of spoilage, such as an off smell or noticeable changes in texture, to ensure quality before consuming.

Make Ahead Strategies

For busy mornings, you can prepare the dough a day in advance. Allow it to rise in the refrigerator overnight to develop flavor. The next morning, simply roll out and form the rolls for a quicker baking process. Alternatively, you can freeze rolled, unbaked cinnamon rolls; just be sure to thaw them overnight in the refrigerator before baking.

Another tip includes preparing the filling and glazing ahead of time, allowing for a smoother assembly process on the day of baking. Additionally, consider baking a batch on weekends, providing delicious snacks throughout the week—just remember to leave them uncovered for the last few minutes to maintain their soft, gooey texture.

Scaling Instructions

Adjusting the recipe to suit your needs is simple. To halve the recipe, simply divide all the ingredients in half, being mindful of the rising times as they may differ slightly with reduced volumes. When doubling or tripling, consider using larger mixing bowls and baking sheets, as well as adjusting baking times accordingly to ensure even cooking.

Be aware that more considerable quantities may require extended rising times. Monitor dough closely, as the environment may affect how quickly it rises. Lastly, for large batches, you may want to bake them in separate batches to keep oven temperatures consistent for perfect results.

Nutritional Deep Dive

Each cinnamon roll offers a warm and comforting treat loaded with carbohydrates from flour, providing a source of energy. While cinnamon gives it anti-inflammatory properties, strawberries contribute vitamins and antioxidants, adding health benefits to this sweet indulgence. Consider the kitchen’s overall macro breakdown, focusing on protein from dairy and fats from butter, balancing each roll’s ingredients to promote energy and satisfaction.

For those tracking micronutrient intake, strawberries boost vitamin C levels significantly, providing skin and immune health benefits. Understanding the importance of portion size is crucial—while they are delicious, being conscious of how many you indulge in can help maintain balance in your diet. For those managing weight, consider enjoying one roll with a source of protein to help feel fuller longer.

Dietary Adaptations

This cinnamon roll recipe can easily adapt to meet various dietary needs. For a gluten-free version, substitute traditional flour with a quality gluten-free blend, ensuring it contains a binding agent. Those following a dairy-free diet can use almond or oat milk and dairy-free butter alternatives without compromising flavor.

Vegan replacements can be made by using plant-based butter and a flax egg. For those on a low-carb or keto diet, consider using almond flour and erythritol as sweeteners. The versatility inherent in this recipe means everyone can enjoy these delightful rolls regardless of dietary restrictions.

Troubleshooting Guide

If your rolls turn out too dense, the likely culprits are either overactive flour or insufficient rising time; be careful not to pack the flour in the measuring cup. For flavor balance, if your rolls taste overly sweet, consider cutting back on sugar and balancing flavors with a dash of salt or acidity to enhance overall depth.

If your rolls are not rising, check the yeast’s freshness and activation process; stale yeast will result in flat pastries. For uneven cooking, lay a few rolls closer together in the pan to help maintain their shape during baking. Monitor your oven temperature, as fluctuations may impact baking times dramatically; using an oven thermometer can prevent future issues.

If you find your rolls browning too quickly on top, consider tenting them with foil during baking to allow the inside to cook through without burning the exterior. Create a plan for next time, focusing on those desired changes for future baking success!

Recipe Success Stories

Many home bakers have shared their joy in making these cinnamon rolls, often highlighting the positive reactions from family and friends. Variations abound, with some readers experimenting by adding chocolate chips or other fruits, showcasing creativity and individuality. Success stories often emphasize how easy they found the preparation to be, making it an approachable recipe even for novice bakers.

Photography recommendations also emerge, with bakers sharing their beautiful takes on the rolls presented on colorful platters or styled with fresh fruit and herbs. Feedback often mentions the rolls becoming a favorite during brunch gatherings, emphasizing the role they play in creating memorable culinary experiences shared with loved ones.

Frequently Asked Questions

Can I use frozen strawberries? Yes! If using frozen strawberries, thaw and drain excess moisture to prevent sogginess in the filling.
Can I make the dough ahead of time? Absolutely! You can prepare the dough the day before and refrigerate it. Just let it come to room temperature before rolling it out.
How do I store leftover rolls? Store them in an airtight container at room temperature for up to three days, or freeze them for longer storage.
What if my rolls don’t rise? Check the freshness of your yeast and ensure your dough is in a warm, draft-free environment to help it rise properly.
Can I make these rolls gluten-free? Yes, substituting regular flour with a gluten-free flour blend will work; be sure to follow the package’s measurements.
How can I adjust the sweetness? Feel free to reduce the sugar in the dough or filling to your taste; honey or maple syrup can also be healthy alternatives.
What is the best way to reheat cinnamon rolls? Reheat in the microwave for about 10-15 seconds or in the oven at 350°F until warmed through.
Can I substitute the filling with cream cheese? Absolutely! Swapping in a cream cheese filling or adding it to the strawberry filling can create a rich, creamy contrast.
Are there dairy-free options? Yes, you can use plant-based butter and alternative types of milk for a dairy-free version.
Can I use other fruits? Yes, feel free to experiment with raspberries, blueberries, or even peaches during their season.

Additional Resources

For those seeking related recipes or techniques, our blog features a variety of bakery delights that align well with popular flavors like pumpkin spice rolls or chocolate croissants. Our ingredient pages also provide in-depth information about flour types or the best fruits to source in different seasons. For perfect cinnamon rolls, explore our guide to choosing the right yeast and troubleshooting common baking issues.

Join the Conversation

We would love to hear your feedback and experiences! Share your cinnamon roll adventures through social media, using our hashtag, or in our comments section. Engage with other baking enthusiasts, swap tips, and exchange delightful variations you’ve tried. Your thoughts and photographs are what keep our community vibrant, so let’s celebrate the joy of baking together!

The Recipe

Cinnamon Rolls with a Fruity Twist

Serves: 12 rolls

Prep Time: 30 mins

Cook Time: 25 mins

Total Time: 55 mins

Kitchen Equipment Needed

  • Mixing bowls
  • Baking sheet
  • Rolling pin
  • Measuring cups and spoons
  • Parchement paper (optional)
  • Stand mixer with a dough hook (optional)

Ingredients

  • 3 ½ cups all-purpose flour
  • ¼ cup granulated sugar
  • 1 packet active dry yeast (2 ¼ teaspoons)
  • ¾ tsp salt
  • ½ cup milk
  • ½ cup unsalted butter, melted
  • 2 large eggs
  • 1 tbsp ground cinnamon
  • 1 cup strawberries, chopped
  • ½ cup brown sugar
  • Powdered sugar (for glaze)
  • 1-2 tablespoons milk (for glaze)

Directions

  1. In a small bowl, combine the warm milk, sugar, and yeast. Let sit for 5-10 minutes until foamy.
  2. In a large mixing bowl, whisk together 2 cups of flour, salt, and cinnamon.
  3. Add the yeast mixture, melted butter, and eggs to the dry ingredients. Mix until combined.
  4. Gradually add the remaining flour until a soft dough forms. Knead for about 5 minutes until smooth.
  5. Place the dough in a greased bowl, cover, and let rise in a warm place until doubled, about 1 hour.
  6. Once risen, roll the dough on a floured surface into a rectangle about ¼ inch thick.
  7. Spread softened butter over the surface, sprinkle with brown sugar, cinnamon, and then chopped strawberries.
  8. Roll tightly from the long side and cut into 12 rolls. Place rolls in a greased baking dish.
  9. Cover with a cloth and let rise again for about 30 minutes.
  10. Preheat your oven to 350°F (175°C). Bake for 25 minutes or until golden brown.
  11. For the glaze, mix powdered sugar with milk until desired consistency and drizzle over warm rolls before serving.

Recipe Notes

  • For added richness, consider adding cream cheese to the filling mixture.
  • Rolls can be frozen before baking; thaw overnight in the fridge and bake as directed.
  • Substitute other fruits like raspberries for a different flavor twist.

Boost Engagement with Our Exclusive Facebook Broadcast Channel!

Join Our Exclusive Facebook Broadcast Channel! – Discover Delicious Recipes

⚖️
Difficulty
Easy

⏲️
Prep Time
15 mins

🕒
Cook Time
30 mins

⏱️
Total Time
45 mins

🍽️
Servings
4 servings

Join our exclusive Facebook Broadcast Channel to dive deep into this delightful recipe that combines convenience and flavor! In today’s fast-paced world, finding time to cook a meal that tantalizes the taste buds is essential. This inviting recipe not only saves time but also promises to impress your family and friends with its delicious components. Imagine the aroma wafting through your kitchen as you prepare this dish, making every moment spent cooking worthwhile.

Whether you’re a novice cook or have some experience under your belt, this recipe is easy to follow and yields mouthwatering results. The flavors harmonize beautifully, creating a dish that melts in your mouth while showcasing a colorful presentation that’s sure to wow your guests. So, let’s get started on this culinary journey, empowering you to whip up something extraordinary in your own kitchen.

Quick Recipe Highlights

  • Flavor Profile: A delightful balance of savory and sweet, this recipe enchants the palate with layers of richness.
  • Texture: The dish features a perfect harmony of crispy and tender elements that keep each bite interesting.
  • Aroma: Expect an enticing mix of fresh herbs and spices that will fill your kitchen with warmth.
  • Visual Appeal: A vibrant spectrum of colors presents beautifully, making it an inviting centerpiece on any table.
  • Skill Level Needed: Ideal for beginners but satisfying enough for experienced cooks seeking a quick yet impressive dish.
  • Special Equipment: Basic kitchen tools like a pot, pan, and cutting board are all you need to create this masterpiece.

Recipe Overview

  • Difficulty Level: This recipe is designed for everyone, with clear instructions that make it easy to master, ensuring a successful outcome without extensive culinary experience.
  • Category: Perfect for weeknight dinners, parties, or potlucks, it fits seamlessly into any mealtime occasion.
  • Cuisine: Influenced by traditional dishes, this recipe reflects a culinary heritage that appreciates home-cooked meals.
  • Cost: Budget-friendly ingredients make this dish accessible; it’s possible to prepare without breaking the bank.
  • Season: Enjoy this recipe year-round; its ingredients are widely available in any season.
  • Occasion: From casual family dinners to more festive gatherings, this dish adapts beautifully to any event.

Why You’ll Love This Recipe

The taste and texture of this recipe effortlessly draw you in with its rich flavors and delightful mouthfeel. Each bite offers a combination of crispy exteriors and tender interiors that create an unforgettable dining experience. The balance of savory notes ensures that this dish satisfies cravings without overwhelming the palate, making it a stunningly fresh choice for any table.

Convenience is at the heart of this recipe, making it a fantastic option for busy weeknights. The preparation is straightforward, and within a mere 45 minutes, you can have a delectable meal ready to serve. You’ll appreciate how little fuss is involved, leaving you with more time for relaxation or engaging with family and friends over dinner.

Nutritionally, this dish not only tantalizes your taste buds but also packs a punch with quality ingredients. Each component introduces beneficial nutrients, providing a satisfying meal that supports a healthy lifestyle. Make this recipe a staple, knowing that you’re nourishing your body while enjoying delightful flavors.

Socially, preparing this dish brings people together, offering an exciting culinary experience to share with loved ones. As you present your beautifully plated creation, the conversation flows easily as everyone enjoys the flavors and textures. It proves a statement of hospitality when you can serve something that’s as impressive as it is scrumptious.

Cost-effectiveness is another reason to love this recipe. With minimal, affordable ingredients required, you can create an elegant dish that doesn’t strain your budget. Perfect for both special occasions and everyday meals, this recipe ensures that deliciousness is accessible for all.

Historical Background and Cultural Significance

Discovering the origins of this recipe reveals a rich tapestry of culinary traditions that span generations. This dish is a modern twist on a classic, rooted deeply in family heritage, with each family member contributing their unique flair over the years. Whether it originated in bustling markets or cozy kitchens, its essence remains the same: to celebrate food and bring people together.

Culturally, recipes like this one play a vital role in maintaining family bonds and community spirit. They are often passed down through generations, embodying beloved traditions that define who we are. Sharing this dish at gatherings provides an opportunity to connect with past generations while crafting new memories for the future.

The evolution of this recipe showcases culinary ingenuity, adapting to modern tastes while retaining its core essence. Original ingredients may have shifted due to availability and innovation, but the love and care it embodies have stood the test of time, making it a cherished staple in many households.

Regional variations of this recipe highlight the diversity of culinary practices. Different spices, ingredients, or cooking techniques can infuse personal flavor and creativity into the dish. It’s fascinating to explore how culture and geography shape what a meal can become, making this recipe a canvas for culinary artistry.

Ingredient Deep Dive

For each significant ingredient in this recipe, understanding its cultural significance and history enriches the cooking experience.

Take **chicken**, for example. A staple protein in many diets, chicken has traveled across various cultures, symbolizing comfort and nourishment. Rich in lean protein, it provides essential nutrients, including B vitamins and minerals that support overall health. When selecting chicken, look for freshness, ensuring a vibrant color and minimal odor. Proper storage in refrigeration can extend its freshness, while freezing allows for long-term use.

Vegetables used in the dish bring not only vibrant color but also a wealth of nutritional benefits. With their high fiber content, they add crunch and freshness, essential for a balanced diet. Choosing seasonal, local vegetables enhances the dish’s flavor, and storing them in a cool, dark place keeps them fresh longer. If substitutions are necessary, feel free to get creative with other delicious vegetables that you enjoy.

Common Mistakes to Avoid

  • Skipping Ingredient Prep: Neglecting to prepare ingredients beforehand can lead to a chaotic cooking session. Read through the recipe before starting and gather all necessary components.
  • Not Preheating Equipment: Failing to preheat your oven or stovetop can result in uneven cooking. Always give appliances a moment to warm up before use.
  • Overcrowding: Placing too many items in the pan can cause steaming instead of searing. Cook in batches if necessary for optimal texture.
  • Ignoring Cooking Times: Deviating from the suggested cook time can lead to undercooked or overcooked dishes. Use a timer and monitor the cooking closely.
  • Inaccurate Measurements: Using a cup instead of a tablespoon can dramatically change the outcome of a recipe. Measure spices and liquids precisely for best results.
  • Neglecting to Taste: Not tasting the dish as you go can prevent you from adjusting the flavor. Sample at different stages to ensure it meets your expectations.
  • Using Old Ingredients: Always check the freshness of ingredients before use. Expired items can compromise the end result.
  • Forgetting to Rest: Allowing your dish to rest after cooking can enhance flavors. Embrace the pause for better taste and presentation.

Essential Techniques

Mastering fundamental techniques is crucial for this recipe’s success. Properly **searing** your protein adds depth and richness, enhancing both flavor and appearance. To achieve a crispy crust, ensure your pan is hot before adding the chicken. Avoid crowding the pan to allow for even cooking; a golden color indicates readiness to flip.

Controlling **seasoning** is vital. Understanding how salt enhances flavors while balancing spices helps create a delicious final dish. Taste frequently and adjust throughout the cooking process, ensuring a well-seasoned end product that pleases the palate.

Another essential technique is **plating**. Taking time to present your dish beautifully elevates the dining experience. Use contrasting colors and clean edges on plates to make each element stand out. Don’t be afraid to get creative; garnishing with fresh herbs or drizzling sauces can add eye-catching flair.

Pro Tips for Perfect Join Our Exclusive Facebook Broadcast Channel!

1. Always read through the entire recipe before beginning. This ensures that you understand the steps and can prepare effectively.

2. Invest in quality ingredients, particularly proteins and fresh produce; their flavors can make a significant difference.

3. Experiment with spices and herbs to personalize the flavor profile, adding your unique twist to the dish.

4. If the cooking time appears off, trust your senses; visual and textural cues are often more accurate than strict timing.

5. Engage friends and family during prep; cooking together can enhance the experience and turn it into a memorable event.

6. Make sure not to underestimate the importance of allowing for resting time, which enhances flavors and textures.

7. Keep a well-stocked pantry to make improvisation easier when needed while creating variations of the recipe.

8. Document your cooking journey with photos to share on social media; it inspires community and encourages others to try the recipe.

Variations and Adaptations

Explore the various ways to adapt this dish for seasonal ingredients, dietary needs, or personal preferences. **Regional variations** allow you to get creative; adding local spices can infuse new life into the dish. You might try different proteins, such as fish or tofu, to cater to diverse dietary requirements or flavor preferences.

**Seasonal adaptations** are a great way to utilize fresh, local produce. In the summer, consider incorporating grilled vegetables or fresh herbs that elevate the dish while highlighting the season’s best offerings. During colder months, opt for heartier ingredients to create a warming comfort dish.

For those with dietary modifications, this recipe can easily be adjusted. Swap in gluten-free alternatives for anyone with sensitivities, or omit dairy products to make it vegan. Flavorful substitutions maintain the original carrot without sacrificing taste.

Exploring **texture modifications** is another fascinating area. Consider slow-cooking the dish for a tender, melt-in-the-mouth experience or serve it with a zesty sauce on the side for added contrast. Experimenting with different presentation styles can also encourage engagement, making the dining experience memorable and unique.

Serving and Presentation Guide

Plating is an art, and there are numerous techniques to consider for optimal presentation. Begin with a **neat foundation**, ensuring that the plate is clean and free from drips. Introduce height by stacking elements creatively; this visual interest draws the eye.

Consider **garnishing ideas** that bring freshness, such as a sprinkle of fresh herbs or a drizzle of vibrant sauce. The contrast in colors can make the dish pop, enticing diners to dig in. Pair your dish with traditional accompaniments to balance flavors and create a cohesive meal.

Temperature is essential; serve your dish warm, as it enhances flavors and aromas. For cold dishes, ensure they are well-chilled for a refreshing experience. Finally, practice **portion control** to guide your servings, maintaining balance and preventing waste while showcasing culinary skill.

Wine and Beverage Pairing

Selecting the right beverage enhances your culinary experience. For this dish, consider a light **white wine**, such as Sauvignon Blanc or Pinot Grigio. The crispness complements the dish without overpowering its delicate flavors.

For non-alcoholic alternatives, sparkling water with a twist of lemon or a fruity mocktail can offer refreshing counterparts. If coffee or tea works well with your meal, opt for herbal varieties that won’t clash with the food’s essence.

Temperature also plays a pivotal role; ensure wine and beverages are served at their optimal temperatures to bring out the best flavors. Attention to detail during serving further elevates the meal’s overall experience.

Storage and Shelf Life

Understanding proper **storage methods** can greatly extend the shelf life of your dish. Storing leftovers in airtight containers in the fridge prolongs freshness, allowing you to enjoy them for several days.

Temperature requirements are critical; ensure dishes cool to room temperature before refrigerating to avoid condensation. Use glass or BPA-free containers for safe storage, particularly when reheating.

Be mindful of signs of spoilage, such as off-odors or unusual textures, while reheating guidelines ensure safety and enjoyment. If freezing, portion out servings for more accessible meals later while marking dates to keep track of freshness.

Make Ahead Strategies

Preparing certain elements ahead of time can streamline your cooking process. Create a **prep timeline**, chopping vegetables or marinating protein in advance. Store these components separately, ensuring freshness and maintaining flavors.

Assess the **quality impact** of each step; pre-cooked elements often taste just as good and can save time on busy days. When assembling your dish later, knowing how to quickly combine won’t just ease your workload but also enhance the final presentation.

Adding fresh components right before serving, like herbs or a sprinkle of cheese, reintroduces freshness into the meal, ensuring peak flavors when enjoying your dish.

Scaling Instructions

For those looking to adjust recipe portions, knowing how to scale is essential. Halving or doubling the recipe can serve various needs, from intimate dinners to larger gatherings. Adjust equipment and cooking times accordingly; larger quantities may require longer cooking or pressure adjustments.

Maintaining quality is key, so ensure that the method remains consistent while considering the dynamics of increased ingredient values. Store any leftovers according to the guidelines for optimal freshness, keeping your dish available for more meals.

Nutritional Deep Dive

A thorough understanding of this recipe’s nutritional values enhances awareness and promotes intelligent meal choices. Breaking down **macros**, you’ll find balanced amounts of protein, carbs, and fats, essential for sustaining energy levels and promoting wellness.

Micronutrient analysis reveals the vitamins and minerals offered by the ingredients. Each component contributes significantly to overall health, making this dish not just delicious but beneficial.

Consider **dietary necessities**; accommodating choices for various dietary patterns encourages enjoyment, ensuring everyone can share in the culinary delight without feeling excluded.

Dietary Adaptations

Flexibility in culinary practices opens avenues for various dietary modifications. For those requiring **gluten-free** options, easy swaps exist to ensure quality while maintaining taste integrity.

**Dairy-free adjustments** are straightforward, making room for plant-based alternatives that showcase a lovely flavor without lactose. Vegan adaptations can also shine through when incorporating various protein sources to maintain satisfaction.

**Low-carb or keto-friendly** versions replace high-carb elements with nutritious veg or alternative flours, letting you craft a satisfying meal suited for diverse dietary needs. Each adaptation celebrates the dish’s versatility while keeping flavor a priority.

Troubleshooting Guide

Avoiding common mishaps ensures a successful cooking experience. If texture issues arise, check whether you have overcooked or undercooked ingredients, adjusting cooking times as necessary. For a flavor imbalance, consider reevaluating your seasoning while tasting throughout the process.

Address heat-related problems by taking note of temperature consistency in your stove or oven. Equipment challenges can often be resolved with familiarity; understand the best methods for your appliances to avoid disruptions.

For ingredient substitutions, refer to the information section to find adequate replacements that won’t jeopardize the dish’s quality. Keeping timing concerns in mind while multitasking helps maintain the flow of cooking to achieve the desired results.

Recipe Success Stories

Community feedback shapes the evolution of culinary practices. Many readers have shared how experimenting with this recipe led to delightful variations that pleased their families. Others have captured stunning photography of their finished dishes, inspiring creativity and engagement within the cooking community.

Success stories often highlight adaptation anecdotes, showcasing new techniques or ingredient substitutions that optimized the recipe for personal preferences. It creates an exciting narrative around familiar meals, pushing culinary boundaries.

Receiving suggestions from your community can spark new ideas, driving innovation and unique adaptations that keep the original recipe alive in exciting ways.

Frequently Asked Questions

1. Can I make this dish ahead of time?

Absolutely! Many elements can be prepared in advance, making it perfect for meal prep. Just follow the storage recommendations to maintain freshness.

2. How can I adjust the serving size?

Scaling the recipe is simple! Feel free to double or halve the ingredients as needed. Just remember to adjust cooking times as appropriate.

3. What is the best way to reheat leftovers?

The microwave is a convenient option for quick reheating, but an oven can keep textures intact better. Use low heat to avoid overcooking.

4. What can I substitute for [specific ingredient]?

There are various substitutes listed in the ingredient section, allowing flexibility while maintaining the essence of the dish.

5. Is this recipe suitable for freezing?

Yes! Portion leftovers into airtight containers for freezing, but not all ingredients freeze well, so refer to the storage section for optimal results.

6. Can I modify the flavors easily?

Definitely! Adjust spices and herbs to bring in different flavors. Customizing to your taste is part of the fun of cooking!

7. What dishes pair well with this recipe?

Consider serving it with a side salad or crusty bread to complete your meal. Pairing with light beverages also enhances dining experience.

8. Is this dish kid-friendly?

Yes! Its mild flavors generally appeal to children. You can adjust spices as needed to cater to younger palates.

9. What are some common mistakes to watch out for?

Avoid overcrowding the pan and ensure proper seasoning to enhance flavors. Read the tips section for detailed guidance.

10. How can I make this recipe healthier?

Incorporate whole grains, cut back on fats, or increase vegetable portions. Substituting ingredients for healthier options is an excellent approach!

Additional Resources

For those inspired by this recipe, explore related culinary ideas that fit seamlessly into your cooking routine. Browse our collection of **technique guides** to enhance your cooking skills, or dive deeper into food lore with ingredient-specific information.

Don’t forget about equipment recommendations; investing in quality tools can elevate your culinary experiences tremendously. Consider seasonal variations, noting ingredients that peak at various times of the year, adding freshness and new discoveries to your meals.

Join the Conversation

We invite you to share your journey with this recipe on social media! Include enticing photos, note your cooking tips, and engage with others who may be trying their hand at this delightful dish. Your stories enrich our community, showcasing variations that inspire everyone to elevate their cooking game.

Let’s foster a supportive space encouraging creativity and experimentation in the kitchen; after all, every meal is an opportunity to connect and share joy with those around us.

The Recipe

Join Our Exclusive Facebook Broadcast Channel!

Serves: 4 servings

Prep Time: 15 mins

Cook Time: 30 mins

Total Time: 45 mins

Kitchen Equipment Needed

  • Large pot
  • Skillet or frying pan
  • Cutting board
  • Chef’s knife
  • Measuring spoons
  • Measuring cups

Ingredients

  • 2 cups of chicken, cubed
  • 1 cup of mixed vegetables (e.g., bell peppers, carrots)
  • 3 tablespoons of olive oil
  • 2 cloves of garlic, minced
  • 1 teaspoon of salt
  • ½ teaspoon of black pepper
  • 1 teaspoon of dried herbs (thyme, oregano, etc.)

Directions

  1. In a large pot, heat olive oil over medium heat.
  2. Add garlic and sauté until fragrant, about 1 minute.
  3. Introduce the chicken to the pot; season with salt, pepper, and herbs.
  4. Cook the chicken until browned, about 5-7 minutes.
  5. Add mixed vegetables and stir to combine.
  6. Cover and simmer for another 15-20 minutes or until chicken is cooked through.
  7. Remove from heat and let rest for 5 minutes before serving.
  8. Plate the chicken and vegetables, garnishing with fresh herbs if desired.

Recipe Notes

  • You can substitute chicken with tofu for a vegetarian option.
  • Feel free to use your choice of vegetables based on what’s in season.
  • Extra spices can be added for a spicier version if you enjoy heat.