Best S’mores Chocolate Chip Cookies with Gooey Marshmallow

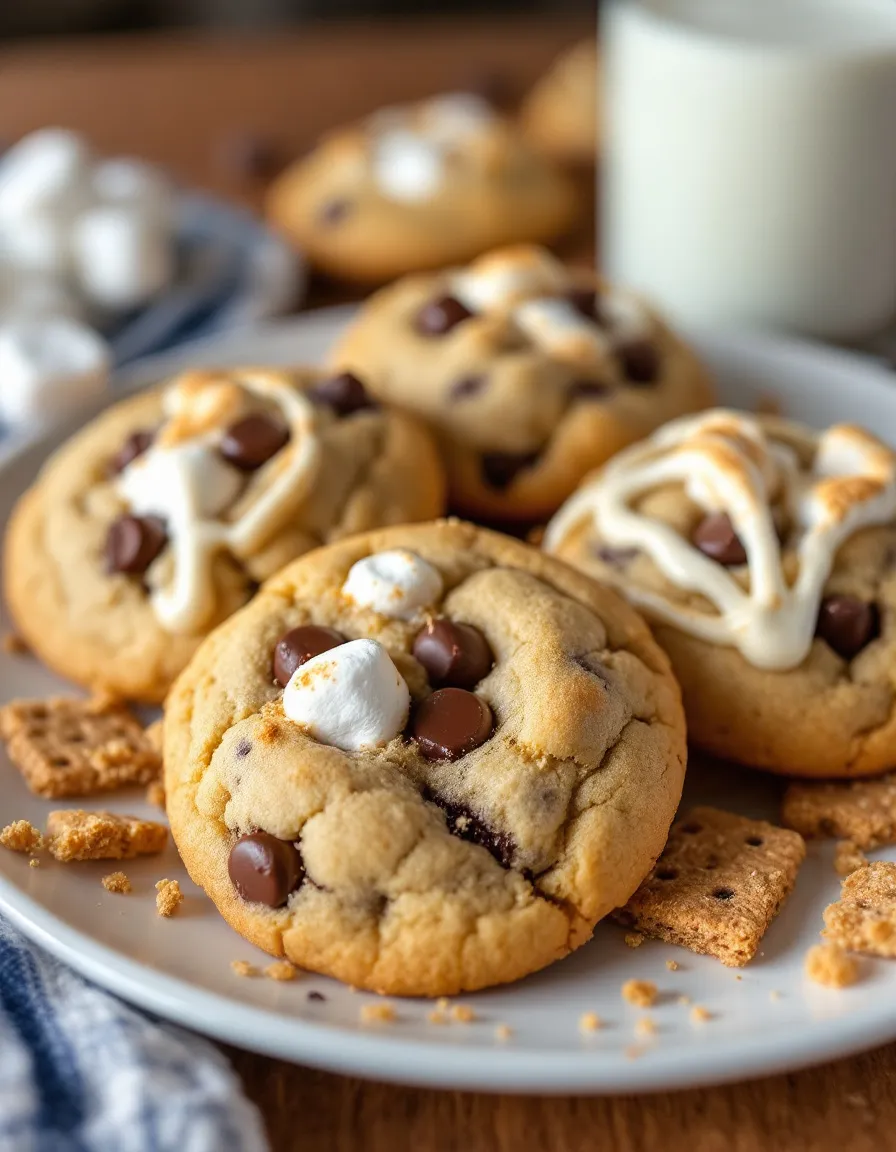
S’mores Chocolate Chip Cookies: A Delicious Twist on a Classic Treat

⚖️
Difficulty
Medium

⏲️
Prep Time
15 mins

🕒
Cook Time
12 mins

⏱️
Total Time
27 mins

🍽️
Servings
24 cookies

If you’re looking for a dessert that beautifully combines nostalgia with modern flavors, these S’mores Chocolate Chip Cookies are your answer. Imagine biting into a perfectly baked cookie that oozes melted chocolate while the graham cracker bits add a subtle crunch, mimicking the campfire favorite s’mores. The marriage of these flavors evokes warm memories of summer nights spent around the fire, making this treat perfect for any occasion, whether a cozy family gathering or a festive party with friends.

These S’mores Chocolate Chip Cookies bring comfort and joy in every bite. The gooeyness of the chocolate chips pairs perfectly with the soft, chewy texture of the cookie, while the marshmallows add a delightful sweetness that complements the rich, buttery flavor. Each cookie is a delightful fusion of textures — soft, chewy, and slightly crispy around the edges, creating a symphony of flavors that both kids and adults will love. Once you bite into them, you’ll find it hard to stop at just one!

Quick Recipe Highlights

  • Flavor Profile: These cookies feature a delightful mix of milk chocolate and graham cracker with hints of vanilla that perfectly embodies the classic s’mores experience.
  • Texture: The soft and chewy interior offers a wonderful contrast to the slightly crispy edges, with gooey marshmallows and crunchy chocolate bits throughout.
  • Aroma: The warm aroma of baked cookies combined with the sweet scent of melted chocolate and toasted marshmallows fills your kitchen with an inviting allure.
  • Visual Appeal: Golden brown cookies dotted with melty chocolate chunks and flecks of crushed graham crackers provide an enticing visual experience that is sure to please the eye.
  • Skill Level Needed: With a bit of mixing and measuring, this recipe is perfect for all skill levels, making it accessible to novice bakers and experienced chefs alike.
  • Special Equipment: No special equipment is required for this recipe, just a mixing bowl, a baking sheet, and a good spatula!

Recipe Overview

  • Difficulty Level: These cookies are classified as medium difficulty as they require basic baking skills and a few simple techniques, making them perfect for both beginners and more seasoned bakers.
  • Category: This recipe fits perfectly in the dessert category and is ideal for satisfying sweet cravings as a snack or at the end of a meal.
  • Cuisine: Influenced by American traditions, the s’mores flavor resonates with summer camp experiences and outdoor adventures, making these cookies a nostalgic favorite.
  • Cost: The ingredients for this cookie recipe are budget-friendly, costing around $10 total, making it an economical choice for a sweet treat.
  • Season: While s’mores are often associated with summer, these cookies can brighten any season, bringing warmth and sweetness even during winter months.
  • Occasion: Perfect for birthday parties, family gatherings, or cozy nights in, these cookies can elevate any occasion and are sure to impress guests.

Why You’ll Love This Recipe

The blend of chocolate and graham cracker in these S’mores Chocolate Chip Cookies creates an indulgent treat that satisfies your sweet tooth while delivering the nostalgia of traditional s’mores. The textures play a significant role as well; the soft, chewy cookies contrasted with the crunchy chocolate chips and gooey marshmallows make every bite an exciting experience. You won’t just taste the ingredients; you’ll evoke memories of camping trips and warm campfires, making them perfect for any occasion.

Preparation is a breeze with this recipe, allowing you to whip up a batch in no time. With just a few simple steps, even novice bakers will find success, making it a great choice for baking with kids or friends. Plus, the combination of familiar ingredients means you likely have most at home already, minimizing the need for special shopping trips.

These S’mores Chocolate Chip Cookies are not only a treat for the palate, but they also carry nutritional benefits. Using quality chocolate can provide antioxidants, while oats from crushed graham crackers add a touch of fiber. These cookies can serve as an occasional indulgence that can fit into a balanced diet when enjoyed in moderation.

Serving guests these delightful cookies can spark conversations and create a fun atmosphere. Their eye-catching appearance and familiar flavors make them a hit at gatherings. Whether you’re hosting a potluck or simply having friends over, these S’mores cookies are bound to be a crowd-pleaser, creating lasting memories associated with good food and company.

Cost-effective and accessible, making these cookies is an investment in happiness. With minimal ingredients and preparation time, they’re ideal for spontaneous baking sessions or when you need a quick dessert. Plus, any extras can be easily stored, ensuring that the sweet treats last for several days, making them a delightful option to satisfy late-night cravings or unexpected guests.

Historical Background and Cultural Significance

S’mores, a beloved American campfire treat, trace their origins back to the 1920s when Girl Scouts were known to concoct the combination of chocolate, marshmallows, and graham crackers. The phrase “some more” was eventually shortened to “s’mores,” reflecting the insatiable desire to keep enjoying more of these sweet delights. These cookies honor the traditional flavor combination while providing a new spin that allows us to experience the classic flavors in a fresh format.

The cultural significance of s’mores stretches beyond just a tasty treat; they symbolize camaraderie and sharing moments around a fire. This collective experience of roasting marshmallows and assembling s’mores fosters community and connection, making them a cherished feature at campsites, picnics, and beach bonfires. By transforming this experience into cookie form, these S’mores Chocolate Chip Cookies allow you to savor that nostalgia anywhere at any time.

As with many timeless recipes, adaptations and evolutions have occurred, particularly as s’mores gained popularity. In addition to traditional flavorings, you might now find variations featuring different types of chocolates, flavored marshmallows, or even unique toppings that pay homage to local ingredients, like peanut butter or coconut. Each variation adds a layer of personal preference while continuing to celebrate that classic chewy and crispy s’mores experience.

Regional variations of s’mores have emerged that reflect local tastes and traditions. In places like the Pacific Northwest, adding sea salt or local berries transforms the classic cookie into a gourmet treat. Some regions even embrace international influences by incorporating ingredients like dulce de leche or caramel, showcasing the evolution and creativity inherent in merging traditional recipes with modern flair.

Ingredient Deep Dive

Chocolate Chips

Chocolate chips are not just a tasty morsel; they bring richness and sweetness unparalleled in desserts. Originating in the United States in the 1930s, chocolate chips add a layer of texture and can be found in a plethora of desserts, making them a dessert pantry staple. Nutritionally, their antioxidant properties contribute to overall health when consumed in moderation.

When selecting chocolate chips, choose high-quality options with the cocoa content you prefer. Dark chocolate adds a rich taste while semi-sweet chips provide a more balanced sweetness. Store chocolate chips in a cool, dry place; they can easily last for several months. In a pinch, consider substituting with chopped chocolate bars or cocoa nibs, which can elevate the flavor profile.

Marshmallows

Marshmallows are the quintessential ingredient that gives s’mores their beloved sticky sweetness. While their origins date back to ancient Egypt, modern marshmallows are made primarily from sugar, water, and gelatin. They contribute a chewy texture and sweet flavor that complements chocolate remarkably well.

Choosing the right marshmallow is key; opt for fresh, high-quality marshmallows for better results. Store them in a cool, airtight container to maintain their fluffiness. If desired, you can swap them with vegan marshmallows or use homemade ones for a touch of personalization.

Graham Crackers

Graham crackers are a foundational component of the s’mores experience. Originally developed in the early 19th century by Sylvester Graham, these crackers were intended for a healthier lifestyle. Their unique, slightly sweet flavor and crunchy texture make them perfect for dessert applications.

When selecting graham crackers, look for whole-grain options for added nutrition. Store them in an airtight container to maintain freshness, and consider using crushed graham crackers for an alternative texture. If you’re looking for gluten-free options, many brands now offer gluten-free graham crackers that can be used interchangeably in this recipe.

Common Mistakes to Avoid

  • Overmixing the dough can lead to tough cookies. Mixing just until combined ensures a tender texture.
  • Not chilling the dough may result in cookies that spread too much during baking. A brief chill in the fridge allows for better shape retention.
  • Using stale chocolate chips or graham crackers can affect flavor. Always use fresh ingredients for the best results.
  • Skipping the parchment paper can lead to cookies sticking to the pan and uneven baking. Always line your baking sheet for easy removal.
  • Not preheating your oven could result in uneven baking. Allow sufficient time for the oven to reach the desired temperature.
  • Not testing cookie doneness may yield overcooked or undercooked cookies. Use the recommended bake time and check for slight browning around the edges.
  • Neglecting to measure ingredients accurately can lead to inconsistent texture. Use measuring cups and spoons to ensure precision.
  • Using a baking sheet that’s too small can lead to overcrowding. Space cookies evenly on the sheet for proper baking.
  • Ignoring cooling time can result in broken cookies. Let cookies cool as instructed to firm up before transferring.
  • Forgetting to sprinkle sea salt on top can limit flavor depth. A pinch of salt enhances sweetness and balances the flavors.

Essential Techniques

Mixing Cookie Dough

The method by which you mix your cookie dough is crucial for achieving the desired texture. Begin by creaming the butter and sugars until light and fluffy, which incorporates air and dissolves sugar for a tender cookie. Be careful not to overmix after adding the flour, as this can lead to tough cookies. Look for visual cues: the dough should be well combined with no patches of flour visible, yet still slightly soft and sticky.

Chilling the Dough

Chilling the dough is an often overlooked technique that improves cookies’ texture. Cold dough spreads less, resulting in thicker cookies with a chewy center and crisp edges. To chill, wrap the dough in plastic wrap and refrigerate for at least 30 minutes. Common pitfalls include skipping this step or rushing it; be patient for the best results! A well-chilled dough should be firm to the touch but still pliable.

Pro Tips for Perfect S’mores Chocolate Chip Cookies

1. Experiment with flavored chocolate chips such as peanut butter or white chocolate to create unique variations that enhance the s’mores experience.

2. For an extra gooey texture, add some marshmallow fluff into the dough before baking.

3. Use a cookie scoop for even-sized cookies that bake uniformly.

4. Add chopped nuts like pecans or walnuts for a crunchy contrast and nutty flavor.

5. To enhance the flavor, try using browned butter instead of regular butter; the nutty undertones will elevate your cookies.

6. After baking, top warm cookies with an additional chocolate piece to amplify the chocolate flavor and presentation.

7. For an extra boost of flavor, consider adding a teaspoon of vanilla extract or even a pinch of cinnamon to the dough.

8. Always let cookies cool on the baking sheet for a few minutes before transferring them to a wire rack to ensure they don’t break apart.

Variations and Adaptations

Regional variations of s’mores cookies can include unique additions like almond butter or coconut to reflect local tastes. Seasonal adaptations might introduce pumpkin spice or peppermint for that festive flair, especially around the holidays. Dietary modifications allow for gluten-free options like almond flour in place of regular flour, and vegan alternatives can include flax eggs and dairy-free chocolate chips for a guilt-free treat.

Flavor variations can lead you to mix in butterscotch chips or peanut butter for additional sweetness and complexity. Texture modifications could include using oatmeal for chewiness or adding crispy rice cereal for that delightful crunch. As for presentation, consider drizzling with melted chocolate or sprinkling additional graham cracker crumbs on top for a stunning finish.

Serving and Presentation Guide

When serving your S’mores Chocolate Chip Cookies, consider using decorative plates to amplify visual appeal. Adding a simple garnish such as a sprig of mint or a dusting of confectioner’s sugar can make a refined touch. Cookies can also be presented in a rustic cookie jar or on a wooden cutting board for a homely feel.

For an upscale twist, serve your cookies alongside a scoop of ice cream or with a homemade chocolate sauce for dipping. When considering portion sizes, aim for cookies that are about the size of your palm; this ensures a satisfying treat without going overboard. Keep in mind that temperature can influence enjoyment — serving them warm straight from the oven or lightly heated gives them a delightful gooey texture.

Wine and Beverage Pairing

Pairing your S’mores Chocolate Chip Cookies with beverages can enhance the overall experience. Consider rich dessert wines like port or a sweet dessert wine such as Moscato, which complement the cookies’ sweetness beautifully. For a more classic pairing, a cold glass of milk is a timeless choice that balances the richness of chocolate.

Non-alcoholic alternatives include coffee or a hot chocolate with a hint of peppermint for a festive twist. If you enjoy iced beverages, an iced latte can provide a refreshing contrast to the cookies’ sweetness while enhancing the chocolate flavors. Always serve these drinks at the appropriate temperature: cold drinks chilled and hot drinks steaming to fully enjoy the flavors.

Storage and Shelf Life

To keep your S’mores Chocolate Chip Cookies fresh, store them in an airtight container at room temperature. They can last for about a week before they start losing their fresh and chewy texture. For optimal freshness, you might consider freezing individual cookies; they should be wrapped in plastic wrap and placed in a freezer-safe bag, where they can last up to three months.

Signs of spoilage include changes in texture or off-smells. For best results, you can reheat them for a few seconds in the microwave to restore their chewy goodness. When freezing, remember to allow cookies to cool completely before wrapping to prevent condensation and freezer burn.

Make Ahead Strategies

For busy bakers, preparing S’mores Chocolate Chip Cookies ahead of time is ideal. You can make the dough in advance and chill it in the refrigerator for up to 48 hours. This allows you to bake fresh cookies at any moment without a long prep time.

When making ahead, remember to allow the dough to warm slightly before scooping it onto baking sheets to ensure even baking. Additionally, consider baking a large batch and freezing some so you can pull out a few cookies when unexpected guests arrive or you’re craving a late-night treat. Assembling fresh elements like marshmallows or chocolate on top just before baking can ensure they taste freshly made.

Scaling Instructions

If you want to make a smaller batch of S’mores Chocolate Chip Cookies, simply halve the ingredient amounts. This adjustment can be helpful when baking for fewer people or if you’re just trying them out for the first time.

For larger gatherings, consider doubling or tripling the recipe, ensuring you have ample baking sheets and adequate cooling space. Baking time may slightly vary with larger batches; always consult visual cues to determine doneness. For storage, remember to keep any uneaten cookies in separate containers to retain freshness.

Nutritional Deep Dive

In each S’mores Chocolate Chip Cookie, you’ll find a balance of macronutrients that satisfies your sweet cravings. Each cookie typically contains around 150 calories, with fats coming primarily from butter and chocolate. Protein content is modest, at around 2-3 grams per cookie, while carbohydrates mainly come from sugars and flour.

Micronutrient analysis shows that cookies can offer minimal amounts of important vitamins and minerals such as calcium from milk chocolate, iron from enriched flour, and dietary fiber from graham crackers. While they’re indulgent treats, enjoying them occasionally can fit within a balanced diet, particularly if paired with healthier meals throughout your day.

Dietary Adaptations

Making S’mores Chocolate Chip Cookies suitable for gluten-free individuals is straightforward. Using gluten-free flour, combined with the same ratios of ingredients, can yield delightful results. For those who are dairy-free, substitute butter with coconut oil or a vegan butter alternative, and use dairy-free chocolate chips to maintain flavor integrity.

For vegan versions, consider using flaxseed eggs or applesauce in place of eggs while ensuring the chocolate and marshmallows are plant-based. If you’re following a low-carb or keto diet, almond flour and sugar substitutes like erythritol can make for a reduced-carb alternative, allowing enjoyment without compromising dietary goals.

Troubleshooting Guide

If your cookies turn out too dry, check your ingredient measurements. Too much flour can lead to dryness, so ensure accuracy next time. Conversely, if the cookies are too gooey, it may be a sign to adjust the baking time or oven temperature, as underbaking can lead to overly soft centers.

Flavor balance can sometimes be an issue if the mixture lacks salt; a pinch can enhance sweetness and overall flavor. If you notice spreading while baking, consider chilling the dough longer, which can help maintain shape. Be mindful of oven calibration as a temperature discrepancy can result in inconsistent baking; using an oven thermometer can help ensure accurate temperatures.

Recipe Success Stories

Readers rave about the culinary magic these S’mores Chocolate Chip Cookies create. Community feedback highlights the delightful flavors and textures that mirror the classic campfire treat. Many have shared their adaptations, from adding peanut butter chips to experimenting with various types of chocolate, resulting in a tapestry of flavors!

Those who have baked these cookies often send in photos showcasing their creations, and it’s wonderful to see the variations and artistic presentations. Each baking story champions a love for sharing and experimenting, showcasing how versatile a simple cookie can be and sparking inspiration in home bakers everywhere.

Frequently Asked Questions

Can I use whole wheat flour instead of all-purpose flour?
Absolutely! Whole wheat flour will add a nuttier flavor and additional nutrients. Just note that it may alter the texture slightly, making it denser.

How do I keep the cookies from becoming too dry?
Ensure you’re accurately measuring your ingredients, particularly flour. Adding a tablespoon or two of milk can also help keep the cookies moist if the dough seems dry.

Can I freeze the cookie dough?
Yes! You can freeze the dough for up to three months. Just scoop the dough onto a baking sheet and freeze, then transfer to a freezer-safe bag. Bake directly from frozen, adding a couple of extra minutes to the baking time.

What should I do if my cookies spread too much while baking?
This might happen due to warm dough; chilling before baking can prevent excessive spreading. Alternatively, ensure your oven is fully preheated before baking to help them set quickly.

Can I substitute chocolate chips with something else?
Sure! You can replace chocolate chips with white chocolate or butterscotch chips, nuts, or even chopped chocolate bars for different flavor profiles.

How do I know when the cookies are done baking?
Look for slightly golden edges and a soft but set center. They will continue to firm up as they cool, so pull them from the oven when they still look a touch underbaked.

Can I make these cookies vegan?
Yes! Substitute the eggs with flax eggs and use dairy-free chocolate chips and vegan butter to make a delicious vegan version of these cookies.

What’s the best way to store leftover cookies?
Store them in an airtight container at room temperature for up to a week or freeze them for longer storage to maintain their deliciousness.

Can I add fruit to the cookies?
While it’s not traditional, adding dried fruit like cranberries or cherries can lend a nice tartness that complements the sweetness of the s’mores theme!

Are there any gluten-free options for this recipe?
Yes! You can use gluten-free flour blends that are designed for baking. Just make sure to follow the recommended measurements on the package for best results.

Additional Resources

If you loved these S’mores Chocolate Chip Cookies, you might enjoy other dessert recipes that evoke similar flavors, such as brownies or chocolate lava cakes. Technique guides in cookie baking can enhance your skills, featuring tips on glazing or decorating cookies for special occasions.

Explore ingredient information for chocolate varieties or tips on choosing the best marshmallows to ensure your treats are delightful every time. Also, explore seasonal variations such as summer treats or winter delights to keep your baking exciting year-round!

Join the Conversation

We’d love to hear about your experiences with these S’mores Chocolate Chip Cookies! Share your photos, variations, and feedback on social media to inspire fellow bakers. Engaging in recipe reviews and exchanges helps strengthen our community, and we encourage you to explore creative adaptations that resonate with your taste!

From tips for capturing perfect cookie photos to story-sharing about your s’mores baking adventures, participating in the conversation enriches our culinary journey. Let’s create cookies that not only taste good but bring us together!

The Recipe

S’mores Chocolate Chip Cookies

Serves: 24 cookies

Prep Time: 15 mins

Cook Time: 12 mins

Total Time: 27 mins

Kitchen Equipment Needed

  • Baking Sheet
  • Mixing Bowls
  • Electric Mixer
  • Parchment Paper
  • Cookie Scoop

Ingredients

  • 1 cup unsalted butter, softened
  • 3/4 cup brown sugar, packed
  • 3/4 cup granulated sugar
  • 2 large eggs
  • 2 teaspoons vanilla extract
  • 2 1/4 cups all-purpose flour
  • 1 teaspoon baking soda
  • 1/2 teaspoon salt
  • 1 cup chocolate chips
  • 1 cup marshmallows, halved
  • 1 cup crushed graham crackers

Directions

  1. Preheat your oven to 350°F (175°C) and line a baking sheet with parchment paper.
  2. In a large bowl, cream together the softened butter, brown sugar, and granulated sugar until light and fluffy.
  3. Add in the eggs one at a time, mixing well after each addition, followed by the vanilla extract until combined.
  4. In a separate bowl, whisk together the flour, baking soda, and salt.
  5. Gradually add the dry ingredients to the wet ingredients, mixing just until combined.
  6. Fold in the chocolate chips, marshmallows, and crushed graham crackers until evenly distributed throughout the dough.
  7. Using a cookie scoop, drop dough onto the prepared baking sheet, spacing them 2 inches apart.
  8. Bake cookies for 10-12 minutes or until golden brown around the edges.
  9. Allow cookies to cool on the baking sheet for a few minutes before transferring them to a wire rack to cool completely.

Recipe Notes

  • For extra flavor, try adding a sprinkle of sea salt on top before baking.
  • Feel free to experiment with different types of chocolate chips for a unique taste.
  • Store leftover cookies in an airtight container for up to a week.
  • You can freeze the dough to bake fresh cookies later.

Best Gingerbread Star Cookies – Perfect for Christmas Baking

Gingerbread Star Cookies: A Festive Treat for Your Holiday Celebrations

⚖️
Difficulty
Moderate

⏲️
Prep Time
20 mins

🕒
Cook Time
10 mins

⏱️
Total Time
30 mins

🍽️
Servings
24 cookies

As the holiday season approaches, the delightful aroma of freshly baked gingerbread wafts through the kitchen, evoking memories of family traditions and festive gatherings. Our Gingerbread Star Cookies are the perfect treat to embrace the warmth of the holidays. With their perfect balance of spices and sweetness, these charming cookies not only capture the spirit of the season but also bring people together around the baking counter. The rich flavors of ginger, cinnamon, and molasses create a deliciously chewy texture that will have your friends and family asking for more.

Imagine the delight on children’s faces as they decorate these star-shaped cookies with icing and sprinkles, transforming them into edible works of art. Not only do they taste incredible, but they also make wonderful gifts and party favors. Get ready to spread some holiday cheer as you bake and share these delightful treats with your loved ones!

Quick Recipe Highlights

  • Flavor Profile: These cookies boast a wonderful mix of warm spices, including ginger, cinnamon, and clove, balanced with rich molasses sweetness.
  • Texture: Expect a perfect chewy center with slightly crisp edges, making each bite a delightful experience.
  • Aroma: The aromatic spices will fill your home with the comforting scents of the holiday season.
  • Visual Appeal: The warm, golden-brown color of these cookies adorned with colorful icing creates a festive display.
  • Skill Level Needed: Suitable for home bakers with some experience; decorating can even be fun for beginners!
  • Special Equipment: Basic baking tools like cookie cutters, mixing bowls, and baking sheets are all you’ll need.

Recipe Overview

  • Difficulty Level: This cookie recipe is ideal for bakers who are comfortable handling dough and have some experience with rolling and cutting cookies.
  • Category: These cookies fall under the dessert category, perfect for holiday baking or sweet treats throughout the year.
  • Cuisine: Gingerbread cookies have a long-standing tradition in many cultures, particularly in European cuisines, symbolizing holiday cheer.
  • Cost: The ingredients used are relatively inexpensive, primarily consisting of pantry staples, ensuring budget-friendly baking.
  • Season: While gingerbread can be enjoyed year-round, these cookies shine brightest during the winter holiday season.
  • Occasion: Gingerbread Star Cookies are perfect for holiday parties, cookie exchanges, and family gatherings.

Why You’ll Love This Recipe

The flavor and texture appeal of our Gingerbread Star Cookies are simply unparalleled; they capture the essence of the holiday season with every bite. The warm spices combined with the molasses create a comforting flavor profile that resonates deeply with tradition. Each cookie offers a delightful chewiness complemented by a slight crispness around the edges, ensuring a wonderful mouthfeel. When these cookies are baked to a light golden-brown, their exterior becomes invitingly crunchy while preserving a soft, delicious interior.

Preparation is straightforward and enjoyable, making it a perfect activity for families or friends to bond over. The dough can be prepared in advance, allowing you to enjoy the cookie-decorating fun without the all-day baking commitment. This convenience adds to the recipe’s charm, turning an ordinary baking day into a festive occasion filled with laughter and creativity.

Nutritionally, ginger has been known for its anti-inflammatory properties and digestive benefits, making these cookies a slightly healthier indulgence during the holidays. Moreover, adding decorative touches with icing can be a fun way to engage children in baking while ensuring they get the essential experience of mixing flavors and crafting beautiful treats.

Socially, these cookies serve as a wonderful centerpiece for holiday gatherings. They can spark conversations as guests admire the creative decorations, and sharing them with friends enhances the season of giving. Their traditional essence often evokes nostalgic feelings, creating shared memories that extend beyond the simple act of eating.

Lastly, cost-effectiveness is key with our Gingerbread Star Cookies. Most ingredients are readily available and very affordable, allowing you and your loved ones to enjoy festive treats without breaking the bank. These cookies can also be a great alternative to store-bought holiday gifts, handmade with love and care.

Historical Background and Cultural Significance

The origin of gingerbread can be traced back to ancient civilizations, where ginger was prized for its medicinal properties. By the Middle Ages, gingerbread had become a popular delicacy in European countries, particularly in Germany, where it was often shaped into intricate designs and decorated. The tradition of baking gingerbread cookies during the holiday season emerged during this time, with recipes passed down through generations becoming a cherished part of holiday celebrations.

Culturally, these cookies symbolize warmth, nostalgia, and generosity. They are often associated with Christmas markets, where families would gather to enjoy the sweet treat while celebrating the festive season. As gingerbread evolved through history, it became a staple in many cultures, reflecting regional tastes and practices, whether it be simple cookies or elaborately decorated confections.

Over the years, recipes for gingerbread have evolved, adapting to new ingredients and techniques. While traditional recipes relied on honey and simple spices, modern variations incorporate flavors like chocolate and fruit. This evolution keeps the essence of gingerbread alive while inviting creativity and innovation in the kitchen.

Regionally, variations of gingerbread cookies can be found worldwide. From the Czech “trdelník” to the American gingerbread house, each version serves as a cultural marker, allowing families to celebrate their heritage while enjoying a beloved treat. These cookies foster a sense of community, with many families adhering to their unique recipes that reflect personal or regional history.

Ingredient Deep Dive

Ginger: An essential ingredient in gingerbread cookies, fresh ginger has a long history of use in cooking and medicine. Known for its distinct warming properties, ginger can aid in digestion and reduce inflammation. When selecting ginger, look for firm, smooth roots with a fresh scent. Store in a cool, dry place or freeze for long-term use, ensuring you always have it on hand for seasonal baking.

Molasses: This dark syrup is a key ingredient that provides depth of flavor and moisture to gingerbread cookies. Rich in vitamins and minerals, molasses also contributes to the chewy texture of baked goods. When choosing molasses, opt for unsulfured varieties for a milder taste. Store in a sealed container in a cool, dark place, and it will last for months, perfect for your holiday baking needs or other recipes requiring depth of flavor.

Common Mistakes to Avoid

  • Using expired spices: Always check the freshness of spices like ginger and cinnamon; old spices can lead to dull flavors in your cookies.
  • Not chilling the dough: Failing to chill the dough can result in cookies that spread too much during baking, losing their shape.
  • Overmixing: Overworking the dough can lead to tough cookies; mix just until combined.
  • Not measuring ingredients accurately: Precision is key in baking; use proper measuring cups for dry and liquid ingredients.
  • Skipping the baking sheet preparation: Ensure that your baking sheets are lined with parchment paper to prevent sticking.
  • Immediate icing application: Allow cookies to cool completely before icing to prevent melting and ensure neat designs.
  • Ignoring baking time: Check cookies a minute or two early to avoid overbaking.
  • Not tasting the dough: A quick taste of your dough ensures that the seasoning is just right before baking.

Essential Techniques

Chilling the dough is crucial when making Gingerbread Star Cookies. This process stiffens the butter in the dough, making it easier to roll out and shape. To master this technique, wrap the dough in plastic and chill it for at least 30 minutes. Watch for this visual cue: the dough should feel firm to the touch and not overly sticky when rolled out.

Another important technique is proper cookie decorating. Many home bakers can find this intimidating, but it need not be. Using piping bags or simple squeeze bottles can give you more control over your icing designs. If you encounter pitfalls such as flooding or spreading, practice on parchment paper first and adjust your icing consistency—thicker icing holds its shape better.

Pro Tips for Perfect Gingerbread Star Cookies

1. Use high-quality spices, as they define the cookie’s flavor. Freshly grated ginger adds a distinct zing.

2. Ensure all ingredients are at room temperature for better mixing and blending, which leads to even baking.

3. Experiment with different icing colors and sprinkles to give each cookie a unique personality.

4. Use a clean, floured surface when rolling out your dough to prevent sticking and ensure an even thickness for baking.

5. Keep an eye on the cookies during the final minutes of baking to find that perfect golden color.

6. For a delightful variation, consider adding chocolate chips or nuts into the dough for added flavor and texture.

7. Allow the cookies to completely cool on the baking rack before icing for best results.

8. Store cookies in an airtight container to maintain freshness, and enjoy them for longer!

Variations and Adaptations

Gingerbread can be adapted to fit various tastes and occasions. For a regional twist, consider adding local spices or flavors, such as nutmeg or vanilla. Seasonal adaptations, such as incorporating pumpkin spices during fall, can create a refreshing twist, while dietary modifications can lead to delicious results. For a gluten-free version, substitute traditional flour with almond or oat flour and ensure the other ingredients are gluten-free as well.

Flavor variations can be explored by adding citrus zest for a bright note, while texture modifications could involve incorporating finely chopped nuts or dried fruits. Presentation alternatives such as using cookie stamps or different shaped cutters can make the cookies even more festive and appealing during holiday celebrations.

Serving and Presentation Guide

When serving Gingerbread Star Cookies, consider elegant plating techniques that highlight their festive nature. A simple yet beautiful display can be created by stacking cookies on a decorative platter or arranging them in a colorful box tied with a festive ribbon. Garnishing ideas include sprinkling powdered sugar or edible glitter for an eye-catching touch.

Traditional accompaniments include hot cocoa or spiced tea, which complement the cookies’ warm flavors beautifully. For modern serving suggestions, consider a gingerbread cookie sandwich filled with cream cheese frosting or whipped cream, elevating the cookie experience. It’s essential to serve cookies at room temperature to maintain their ideal texture and flavor.

Wine and Beverage Pairing

For those looking to enjoy a beverage alongside Gingerbread Star Cookies, consider pairing them with a light red wine like Pinot Noir, whose berry notes complement the spicy sweetness of the cookies. Non-alcoholic alternatives include spiced apple cider or ginger beer, both of which enhance the cookies’ flavors.

If you prefer coffee or tea, opt for chai tea or a rich Americano to balance the sweetness while adding depth to your tasting experience. Ensure all beverages are served at the appropriate temperature to enhance flavor notes, making your holiday experience even more enjoyable.

Storage and Shelf Life

Proper storage is key to maintaining the freshness of your Gingerbread Star Cookies. Store them in an airtight container at room temperature, where they will stay fresh for up to a week. If you want to extend their shelf life, consider freezing the baked cookies. Place them in a single layer in a freezer-safe bag or container, separating layers with parchment paper. They will keep well for up to three months.

Be vigilant for signs of spoilage; any changes in texture or mold should prompt disposal. To reheat, simply place them in a warm oven for a few minutes to bring back their delightful chewiness without losing flavor.

Make Ahead Strategies

To save time during the busy holiday season, prepare the cookie dough in advance and store it in the refrigerator for up to three days. This allows you to enjoy the baking process while managing your time efficiently.

Once the cookies are baked, they can be easily decorated and stored in an airtight container, ready for gifting or serving. Timer tips suggest baking a large batch simultaneously, then assembling your decorated cookies over a few days—perfect for cookie exchanges or holiday parties!

Scaling Instructions

If you wish to halve the recipe, simply divide the amount of each ingredient by two, but maintain the same mixing and baking techniques. To double or triple the recipe, ensure you have sufficient mixing bowls and large baking sheets.

Watch the baking time closely when scaling, as larger volumes may require additional time to achieve that perfect bake. Remember to adjust the cooling and storage methods accordingly to prevent overloading your kitchen!

Nutritional Deep Dive

Each Gingerbread Star Cookie is a delightful balance of carbohydrates, proteins, and fats, providing energy and satisfying hunger. With molasses as a key ingredient, these cookies offer some beneficial minerals, such as iron and calcium, contributing to their overall nutritional profile.

In terms of specific dietary considerations, assess the portion size to ensure enjoyment without excess. The inclusion of spices, like ginger, not only contributes to flavor but also offers potential health benefits, supporting digestion and enhancing overall well-being during the festive season.

Dietary Adaptations

For those needing gluten-free options, substitute the all-purpose flour with a gluten-free blend tailored for baking. Make sure other ingredients are gluten-free as well, such as baking powder.

Vegan adaptations can also be made by replacing butter with coconut oil or vegan butter and using a flax egg instead of a regular egg. Each dietary consideration can be made deliciously without sacrificing the traditional gingerbread flavor and charm!

Troubleshooting Guide

For cookies that come out too dry, make sure not to overbake them—baking them just until they’re set will yield a softer texture. If your gingerbread cookies spread too much while baking, check that your dough was properly chilled before rolling it out.

In case the cookies lose their shape, consider using a bit more flour in your next batch and ensure your cutter is well-floured to prevent sticking. Timing is also crucial; relying on visual cues ensures that each batch receives the attention it needs.

Recipe Success Stories

Many home bakers have shared their experiences with these Gingerbread Star Cookies, noting that they’ve become a family tradition to prepare them together during the holidays. Readers often suggest varying the spices and making creative uses of icing to enhance flavor combinations and visual appeal.

Others have incorporated personal stories, sharing how they’ve adapted the recipe to suit their family’s tastes or dietary needs. These stories not only add to the recipe’s richness but also create a sense of community among bakers who share the love of holiday cookies.

Frequently Asked Questions

Can I freeze the dough? Yes, you can freeze the gingerbread dough for up to three months. Wrap it tightly in plastic wrap and store it in an airtight container.

How do I prevent spreading? Ensure your dough is well-chilled before rolling it out. Chilling helps maintain the shape during baking.

What can I use instead of molasses? You can replace molasses with honey or maple syrup, though the flavor profile will differ slightly.

Can I make these cookies vegan? Absolutely! Use vegan butter and a flax egg to create a delicious vegan version of these cookies.

How should I store my cookies? Store your gingerbread cookies in an airtight container at room temperature for up to a week, or freeze them for longer storage.

What are the best decorations for gingerbread cookies? Royal icing, edible glitter, and festive sprinkles make wonderful decorations for your gingerbread cookies!

Can I use fresh ginger instead of ground ginger? Yes, but adjust the quantity as fresh ginger is more potent than dried. Start with half the amount and adjust to taste.

Is it necessary to ice the cookies? Icing is not necessary, but it adds a touch of sweetness and visual appeal. You can enjoy them plain, too!

Why did my cookies turn out hard? Overbaking can result in hard cookies. Make sure to watch them closely and remove them from the oven when set.

What spices can I add for extra flavor? You can experiment with spices like nutmeg, cardamom, or allspice to add different flavor dimensions to your gingerbread.

Additional Resources

For further inspiration, check out related recipes that complement these Gingerbread Star Cookies. Other festive treats include sugar cookies and festive cakes, perfect for sharing during holiday gatherings. Technique guides for cookie decorating can enhance your skills, while ingredient information ensures you make the best selections when baking.

Seasonal variations of gingerbread recipes are also available, featuring adaptations for different flavors or dietary needs. These resources can enrich your baking experience and help you become a gingerbread expert!

Join the Conversation

We’d love to hear about your experiences with these Gingerbread Star Cookies! Share your creations on social media, using hashtags to inspire others. Check out tips for food photography that will help you capture irresistible images of your baked goods.

Leave a comment with your thoughts, variations, or successes with this recipe. Engage with the community, and let’s celebrate the joy of baking together!

The Recipe

Gingerbread Star Cookies

Serves: 24 cookies

Prep Time: 20 mins

Cook Time: 10 mins

Total Time: 30 mins

Kitchen Equipment Needed

  • Baking sheets
  • Parchment paper
  • Rolling pin
  • Cookie cutters
  • Mixing bowls
  • Electric mixer
  • Piping bags (for icing)

Ingredients

  • 3 cups all-purpose flour
  • 1 tablespoon ground ginger
  • 1 teaspoon ground cinnamon
  • ½ teaspoon ground cloves
  • ½ teaspoon baking soda
  • 1 cup unsalted butter, softened
  • 1 cup brown sugar
  • 1 cup molasses
  • 1 large egg
  • 2 teaspoons vanilla extract
  • Pinch of salt

Directions

  1. In a bowl, whisk together flour, ginger, cinnamon, cloves, baking soda, and salt.
  2. In a separate bowl, beat the butter and brown sugar until creamy. Add molasses, egg, and vanilla, then mix until smooth.
  3. Gradually add the dry ingredients to the wet mixture, mixing until fully combined.
  4. Wrap the dough in plastic and chill for at least 30 minutes.
  5. Preheat the oven to 350°F (175°C). Line baking sheets with parchment paper.
  6. Roll out the chilled dough on a floured surface to about ¼ inch thick.
  7. Use cookie cutters to cut out star shapes and place them on prepared baking sheets.
  8. Bake for 8-10 minutes or until set. Allow cooling on racks before icing.

Recipe Notes

  • Store baked cookies in an airtight container to maintain freshness.
  • If you like, you can substitute some of the spices for a personalized flavor.
  • Experiment with edible decorations for beautiful results!

Best Strawberry Sheet Cake with Fresh Strawberries

Delicious Strawberry Sheet Cake: The Perfect Summer Dessert

⚖️
Difficulty
Medium

⏲️
Prep Time
30 mins

🕒
Cook Time
25 mins

⏱️
Total Time
55 mins

🍽️
Servings
12 servings

Indulge in the sweet, mouthwatering delight of Strawberry Sheet Cake, a quintessential summer dessert that perfectly captures the essence of sun-ripened strawberries. This vibrant cake not only looks stunning with its lively hue but also promises a burst of flavors in every slice. Its sweet, moist body pairs exquisitely with a light and fluffy frosting, making it a delightful offering at any gathering—from festive family celebrations to casual picnics in the park. Let your taste buds wander through this heavenly experience!

The beauty of this Strawberry Sheet Cake lies in its simplicity and versatility. It can be made in larger quantities, making it an ideal choice for potlucks or large family gatherings. Imagine serving a generous slice to your loved ones, garnished with fresh strawberries and perhaps a mint sprig, bringing together vibrant colors and striking flavors. This cake epitomizes the joy of summer, leaving everyone asking for a second piece while savoring the nostalgic flavors that remind them of leisurely days and cherished memories.

Quick Recipe Highlights

  • Flavor Profile: This Strawberry Sheet Cake showcases delightful notes of fresh strawberries complemented by a creamy vanilla frosting.
  • Texture: The texture is a wonderful balance of moistness from the cake and creaminess from the frosting, creating a delightful mouthfeel.
  • Aroma: The cake emits a heavenly aroma of baked sweet vanilla and ripe strawberries, inviting everyone to take a bite.
  • Visual Appeal: Topped with decadent frosting and adorned with fresh strawberry slices, this cake is not only delicious but also visually stunning.
  • Skill Level Needed: While this cake requires some baking skills, the steps are straightforward, making it perfect for home bakers of all levels.
  • Special Equipment: A large baking sheet, mixing bowls, and an electric mixer are essential to achieve the perfect cake.

Recipe Overview

  • Difficulty Level: This recipe is categorized as medium, suitable for those who are comfortable with basic baking techniques and measurements.
  • Category: This is a dessert and can be served after meals, on special occasions, or simply as a delightful treat.
  • Cuisine: This cake draws from American baking traditions, often enjoyed in summer gatherings and backyard barbecues.
  • Cost: The ingredients are fairly inexpensive, making this a budget-friendly dessert option for any occasion.
  • Season: Summer is the best season for this cake, coinciding with strawberry picking and peak freshness.
  • Occasion: Perfect for birthdays, picnics, garden parties, or any festive event that calls for a crowd-pleasing dessert.

Why You’ll Love This Recipe

With its captivating flavor and inviting sweetness, the Strawberry Sheet Cake is bound to win over anyone who takes a bite. The rich yet delicate strawberry flavor, enhanced by a velvety frosting, creates an irresistible combination that beckons for more. Each mouthful melts in your mouth, leaving behind a delightful aftertaste that epitomizes summer’s bounty.

In addition to its wonderful taste, this cake is incredibly convenient to prepare. The straightforward mixing and baking methods allow even novice bakers to create this delectable dessert without stress. With just a few simple ingredients, it promises an impressive outcome that’s sure to impress friends and family.

Nutritionally speaking, strawberries are packed with vitamins, fiber, and antioxidants. They contribute to dietary health while also adding a natural sweetness to the cake. This makes it a relatively “healthier” dessert option compared to many others that may be packed with added sugars and unhealthy fats.

When it comes to entertaining, this cake shines as a show-stopping centerpiece. Its beautiful presentation, combined with a tantalizing flavor, makes it a fantastic conversation starter. Share slices among family and friends, and watch as the cake disappears, leaving behind laughter and satisfaction.

Finally, this dessert’s cost-effectiveness makes it an accessible choice for home bakers everywhere. With common baking ingredients and seasonal strawberries, this recipe provides an affordable way to make a joyful treat that showcases both skill and creativity.

Historical Background and Cultural Significance

The Strawberry Sheet Cake has its roots in American baking traditions, particularly in the southern regions where fresh strawberries are abundant. It’s often associated with summer gatherings, where the allure of sweet strawberries signifies warmth and celebration. This cake has evolved from simple family recipes passed down through generations to a beloved dessert featured in modern cookbooks.

Culturally, strawberries hold a special place in many communities, symbolizing the beauty of summer and seasonal abundance. They are commonly celebrated in fairs and festivals, reflecting the importance of agriculture and local produce. The Strawberry Sheet Cake serves as a reminder of these cultural roots, fostering connections during gatherings.

As this dessert became popular, various adaptations arose, with different regions incorporating their local flavors into the recipe. These evolutions highlight the diversity within American baking culture, where each family may add a unique twist, keeping traditions alive while embracing creativity.

Today, the Strawberry Sheet Cake remains a favorite across the country, showcasing the delightful combination of simplicity and deliciousness. Its presence in homes and gatherings exemplifies the joy of sharing food and creating lasting memories.

Ingredient Deep Dive

  • Strawberries: Strawberries are more than just a delicious fruit; they are packed with antioxidants and vitamins, vital for maintaining good health. When selecting strawberries, look for bright red, plump berries without blemishes. Store them in the refrigerator to prolong freshness, and remember they can be substituted with other berries for a twist.
  • Flour: The backbone of any cake, flour contributes to structure and texture. All-purpose flour is commonly used, but whole wheat flour can be a healthier option. Store flour in a cool, dry place and ensure you measure accurately to avoid dense cake. For gluten-free options, consider almond or coconut flour.
  • Sugar: Sugar not only sweetens the cake but also affects its moisture and texture. Granulated sugar is preferred for a light cake, though alternatives like honey or maple syrup can add unique flavors. Keep sugar in an airtight container to maintain its quality.
  • Butter: Butter enriches the cake with flavor and moisture. Use unsalted for better control over salt levels. When using butter, ensure it’s at room temperature for easier mixing. Substitute with plant-based margarine for a dairy-free version.
  • Eggs: Eggs contribute to the cake’s structure and moisture. They are essential for binding ingredients and providing richness. Always use fresh eggs, and opt for organic if possible. Aquafaba can be used as an alternative for a vegan adaptation.
  • Milk: Milk adds moisture and tenderness. Whole milk is ideal for richness, but nut milks can be substituted for dairy-free diets. Store milk in the fridge and use within the expiration date for best results.

Common Mistakes to Avoid

  • Not measuring ingredients accurately can lead to imbalances in texture and flavor. Always use measuring cups and spoons for precision.
  • Overmixing the batter might result in a tough cake. Mix just until combined to create a tender, light texture.
  • Neglecting to preheat the oven can affect the baking time and overall rise of the cake. Always preheat for uniform cooking.
  • Not sifting the flour can lead to lumps in the batter. This step is crucial for light, airy results.
  • Using cold ingredients can result in a dense cake. Allow ingredients like butter and eggs to reach room temperature before mixing.
  • Skipping the greasing of the pan may cause sticking. Ensure your baking sheet is properly greased or lined with parchment.
  • Checking for doneness too early can result in undercooked cake. Use a toothpick to check; it should come out clean when the cake is done.
  • Not allowing the cake to cool sufficiently before frosting can lead to melting frosting. Ensure it’s completely cooled for best results.
  • Ignoring the suggested baking times can affect texture. Keep an eye on the time and make adjustments based on your oven.
  • Underestimating the power of fresh ingredients, especially strawberries, can result in a less flavorful cake. Always use the freshest produce available.

Essential Techniques

  • Mixing Batter: This is crucial for achieving the right cake texture. Make sure to blend ingredients until just combined, as overmixing can make the cake dense.
  • Creaming Butter and Sugar: This step adds air to the batter, resulting in a fluffy texture. Aim for a light and pale mixture as a visual cue for success.
  • Whipping Egg Whites: This technique creates a light and airy cake texture. Ensure there’s no yolk in the whites and whip until stiff peaks form for optimal fluffiness.
  • Testing for Doneness: A toothpick inserted into the center of the cake should come out clean when fully baked. This visual check is essential for perfect results.
  • Frosting Application: Allow the cake to cool entirely, and use a spatula to spread the frosting evenly for a smooth finish. Presentation matters, so take your time here for great results.

Pro Tips for Perfect Strawberry Sheet Cake

  • For extra flavor, use pure vanilla extract instead of imitation vanillin. This enhances the cake’s overall aroma and taste.
  • Incorporate a splash of lemon juice or zest into the batter for a bright, zesty twist that complements the strawberries beautifully.
  • Consider adding chopped nuts for added texture. Walnuts or pecans can impart a pleasant crunch that contrasts with the soft cake.
  • Freeze extra strawberries and blend them into the frosting for a fresh strawberry taste that improves the frosting’s flavor.
  • Chill your frosting before application to ensure it spreads evenly and holds its shape on the cake.
  • Adding a layer of strawberry preserves between the cake layers can enhance the flavor and provide additional moisture.
  • For an elegant presentation, consider garnishing the cake with mint leaves or edible flowers for a vibrant touch.
  • Allow the cake to sit for a few hours after frosting to absorb the flavors and achieve a moist final texture.

Variations and Adaptations

  • For a gluten-free version, substitute regular flour with a gluten-free flour blend, ensuring the right texture and taste balance.
  • Try adding different fruits such as blueberries or raspberries for seasonal variations that keep the recipe fresh and exciting.
  • A vegan adaptation can be made using plant-based butter and replacing eggs with flaxseed meal mixed with water for binding.
  • Swap the vanilla frosting for a chocolate or cream cheese frosting for a delightful flavor contrast.
  • Add spices like cinnamon or nutmeg to the batter for a warm, autumnal twist that diversifies the traditional recipe.
  • Use a flavored yogurt instead of milk in the batter for added richness and a hint of tang that works excellently with strawberries.
  • Consider creating a layered cake by doubling the recipe and stacking two layers, enhancing the visual presentation and flavor intensity.
  • Serve in individual portions by making mini sheet cakes in smaller pans, perfect for gatherings and parties.

Serving and Presentation Guide

  • When plating the cake, use a serrated knife for clean, even slices to showcase the beautiful layers.
  • Garnish the top with fresh strawberries and a dusting of powdered sugar for an elegant finish that’s visually appealing.
  • Consider serving with a scoop of vanilla ice cream or whipped cream for additional indulgence and flavor contrast.
  • For a rustic look, serve pieces on wooden boards or slate platters, which create a warm, inviting atmosphere.
  • Pay attention to temperature: this cake is best served at room temperature after a short time out of the fridge, allowing flavors to shine.
  • Portion control can be managed by slicing the cake into smaller squares, perfect for serving at parties and ensuring everyone gets a treat.

Wine and Beverage Pairing

  • A light, fruity white wine like Sauvignon Blanc pairs beautifully with the freshness of the strawberries in this cake.
  • For non-alcoholic options, consider sparkling water with a splash of lemon, which complements the sweetness of the cake nicely.
  • A rich, creamy coffee can accentuate the dessert’s flavors, making for a lovely pairing with afternoon tea or coffee dates.
  • For an iced beverage, a sweet strawberry lemonade can provide a refreshing contrast, enhancing the summer vibe.
  • Chilled herbal teas can also work well, especially those infused with mint or citrus, balancing the sweetness of the cake.

Storage and Shelf Life

  • Store the cake in an airtight container in the refrigerator for up to 5 days, ensuring it stays fresh and moist.
  • If you prefer, freeze slices wrapped in plastic wrap followed by foil for up to 3 months—perfect for ready-to-eat desserts later.
  • Signs of spoilage include a dry, crumbly texture or off-smelling frosting; discard if these signs appear.
  • To reheat the cake, place slices in the microwave for 10-15 seconds, or thaw overnight in the refrigerator before serving.
  • When moving cake to the fridge or freezer, allow it to cool completely to preserve texture and frosting quality.

Make Ahead Strategies

  • Prepare the cake and frosting separately, then frost just before serving to maintain freshness.
  • You can also freeze the unfrosted cake layers wrapped securely, then thaw and frost on the day of your gathering.
  • Prep your ingredients the day before, measuring out flour, sugar, and other staples to save time.
  • Always store the frosting in the refrigerator if preparing ahead, and whip again before spreading to restore texture.
  • Keep cut fruit or garnishes fresh by storing them separately and adding them right before serving.

Scaling Instructions

  • To halve the recipe, simply reduce all ingredients by half; this works effectively for making smaller batch desserts.
  • For doubling or tripling, ensure you have adequate mixing capacity and adjust baking times as needed; larger cakes may require longer to bake.
  • Increased batches might need larger pans or multiple sheets; consider using multiple oven racks for efficient baking.
  • Adjust baking times based on your oven’s specifics, as well as the size of the pan used; larger cakes generally take longer to cook through.
  • When storing leftovers, consider using smaller containers for easier access to individual portions.

Nutritional Deep Dive

  • The macro breakdown of this cake offers a delightful balance of carbohydrates from sugar and flour, alongside protein from eggs and dairy.
  • Strawberries contribute vital vitamins like vitamin C and antioxidants, promoting overall health and well-being.
  • Health benefits include boosting immunity and heart health, thanks to the nutrients found in fresh strawberries and eggs.
  • For dietary considerations, moderation is key; enjoy cake as an occasional treat rather than a staple in daily diets.
  • Portion analysis indicates that a standard serving size strikes a balance between enjoyment and caloric intake, so consider serving slices accordingly.
  • Weight management tips include pairing the cake with fruit or light accompaniments rather than heavier items, promoting a balanced dessert experience.

Dietary Adaptations

  • Gluten-free options are easily achieved with the right flour substitute, providing the same delightful taste without gluten.
  • Dairy-free variants can be created by swapping out butter and milk for plant-based alternatives while maintaining moisture and flavor.
  • Vegan adaptations call for replacing eggs with flaxseed or chia seed mixtures, ensuring the structural integrity of the cake.
  • Low-carb versions might utilize almond or coconut flour, along with natural sweeteners like erythritol for lower sugar content.
  • Keto-friendly adaptations involve similar replacements while keeping the overall structures and flavors aligned.
  • Paleo enthusiasts can make this recipe by omitting processed sugars, opting for honey or maple syrup, and using coconut flour.
  • For low-FODMAP options, consider the quantities of each ingredient and pair with a low-FODMAP fruit for sensitive diets.

Troubleshooting Guide

  • Texture issues often stem from overmixing; if the cake is dense, next time mix just until ingredients are combined.
  • If the flavor balance seems off, consider adjusting the sugar content or adding a bit of salt to enhance flavors.
  • Temperature problems may indicate incorrect oven settings; ensure your oven is calibrated correctly and preheated adequately.
  • Equipment challenges may arise if you lack certain tools; be resourceful with items you have available, adapting as necessary.
  • Ingredient substitutions can cause issues; always try similar ingredients to maintain flavor and texture integrity in results.
  • Timing concerns often lead to under or overcooked cakes; use visual cues along with toothpick tests to determine doneness accurately.

Recipe Success Stories

  • Readers frequently share their joy of creating variations that reflect personal tastes, inspiring community creativity in adaptations.
  • Success stories often include delightful photographs of the cake, showcasing creative presentation styles and garnishes.
  • The recipe has inspired families to create their family traditions around baking together, building lasting memories over this beloved dessert.
  • Community feedback reveals how different variations have brought friends and family closer, providing a conversational focal point at gatherings.
  • Many readers suggest fantastic tips, including local ingredient finds that elevate the flavor and make the recipe uniquely their own.

Frequently Asked Questions

Q1: Can I use frozen strawberries instead of fresh?

A1: Yes, frozen strawberries can be used, but be sure to thaw and drain excess moisture to maintain the cake’s consistency.

Q2: How do I know when the cake is done baking?

A2: Insert a toothpick into the center; if it comes out clean or with a few crumbs, the cake is done. Overbaking can dry it out.

Q3: What if my frosting is too thin?

A3: If the frosting is too thin, try chilling it in the fridge for a bit to thicken or add more powdered sugar to achieve the right consistency.

Q4: Can I make this cake gluten-free?

A4: Absolutely! Use a 1:1 gluten-free flour blend to replace the all-purpose flour for a delicious gluten-free variant.

Q5: How should I store leftover cake?

A5: Store leftover cake in an airtight container in the fridge for up to 5 days, or freeze individual slices for longer shelf life.

Q6: What’s the best way to frost the cake?

A6: Wait until the cake is completely cool, then use a spatula to spread a generous layer of frosting on top and around the sides smoothly.

Q7: Can I add other fruits to the cake?

A7: Definitely! You can mix in blueberries, raspberries, or even peaches to create new flavor profiles while keeping the base recipe intact.

Q8: Is it okay to make the batter ahead of time?

A8: It’s best to bake the batter immediately for the best texture and rise. If needed, prepare dry ingredients beforehand and mix wet ingredients just before baking.

Q9: How can I make the cake more citrusy?

A9: Add lemon zest or orange zest to your batter to enhance the freshness and add a delightful citrus component to the flavors.

Q10: What’s the difference between cake flour and all-purpose flour?

A10: Cake flour has a lower protein content than all-purpose flour, resulting in a more tender crumb for cakes. If using cake flour, reduce the amount slightly for the best results.

Additional Resources

  • Explore our related recipes for more delightful desserts to complement your summer gatherings.
  • Check out our technique guides for mastering baking skills, from mixing to frosting, crucial for perfect results.
  • Learn more about the journey of strawberries from farm to table, enhancing your knowledge of this delicious ingredient.
  • For perfect equipment choices, look into our recommendations ensuring you’re well-equipped for your baking adventures.
  • Find ideas for seasonal variations which infuse your dessert table with fresh, vibrant flavors throughout the year.

Join the Conversation

You’re encouraged to share your Strawberry Sheet Cake creations on social media! Post your designs, variations, and any special touches you added to the recipe. Engage in our community by sharing reviews and providing tips based on your experiences. We relish seeing how our beloved recipes unite families and friends, bringing joy and sweet flavors to every table.

The Recipe

Strawberry Sheet Cake

Serves: 12

Prep Time: 30 mins

Cook Time: 25 mins

Total Time: 55 mins

Kitchen Equipment Needed

  • Large baking sheet
  • Mixing bowls
  • Electric mixer
  • Measuring cups and spoons
  • Spatula

Ingredients

  • 2 cups all-purpose flour
  • 1 ½ cups granulated sugar
  • 1 cup unsalted butter, softened
  • 4 large eggs
  • 1 cup milk
  • 2 cups fresh strawberries, mashed
  • 2 teaspoons baking powder
  • 1 teaspoon vanilla extract
  • Pinch of salt

Directions

  1. Preheat the oven to 350°F (175°C) and grease a large baking sheet.
  2. In a mixing bowl, cream the butter and sugar until light and fluffy.
  3. Add in the eggs one at a time, beating well after each addition.
  4. In another bowl, combine the flour, baking powder, and salt.
  5. Gradually add the dry ingredients to the wet mixture, alternating with the milk until well combined.
  6. Fold in the mashed strawberries and vanilla extract.
  7. Pour the batter into the prepared baking sheet and spread evenly.
  8. Bake for 20-25 minutes or until a toothpick comes out clean.
  9. Cool completely before frosting with your favorite icing.

Recipe Notes

  • For a richer flavor, consider using a cream cheese frosting.
  • Feel free to swap in other berries if strawberries are not available.
  • This cake can be made in advance and frozen without frosting for up to 3 months.

Easy Churros Poppers with Cinnamon Sugar Coating

Delicious Churros Poppers: A Joyful Treat

⚖️
Difficulty
Medium

⏲️
Prep Time
25 mins

🕒
Cook Time
10 mins

⏱️
Total Time
35 mins

🍽️
Servings
12 servings

Churros Poppers are the perfect bite-sized treat that brings joy to any occasion. They are crisp on the outside and soft on the inside, generously dusted with cinnamon sugar and served with a rich chocolate dipping sauce. Each popper offers a delightful burst of flavor that transports your taste buds to a festive Spanish market. Whether enjoyed at a party or as a sweet afternoon snack, these churros will satisfy your cravings and spark smiles all around.

The preparation of Churros Poppers may seem intricate, but with a few tips, they can be easily made at home. Made with simple pantry ingredients, the dough comes together quickly, providing the perfect canvas for filling with sweet surprises or enjoying plain. After frying, these treats are finished with a delectable sprinkling of cinnamon sugar, enhancing their allure and texture. Dip them in chocolate sauce, and you’ve got an irresistible combination that is sure to impress your guests.

Quick Recipe Highlights

  • Flavor Profile: Sweet and lightly spiced with cinnamon, complemented by a chocolate dip that adds a rich, indulgent element.
  • Texture: Crisp and golden on the outside while soft and airy on the inside, providing an exciting contrast in every bite.
  • Aroma: The warm scent of fried dough combined with fragrant cinnamon will fill your kitchen with a welcoming fragrance.
  • Visual Appeal: Golden-brown churros dusted in white sugar create an inviting visual, perfect for sharing.
  • Skill Level Needed: Perfect for home cooks looking to expand their repertoire; the steps are straightforward with practice.
  • Special Equipment: A piping bag, a deep-fryer or heavy-bottomed saucepan, and a candy thermometer for precision.

Recipe Overview

  • Difficulty Level: While the recipe may appear complex, it requires only basic frying skills and is manageable for most home cooks.
  • Category: A dessert that fits perfectly in the snack or sweet treat category, it can also serve as a festive party food.
  • Cuisine: Rooted in Spanish traditions, churros are often enjoyed at fairs and carnivals, showcasing the culture’s love for sweet fried dough.
  • Cost: Generally low-cost, with ingredients such as flour, sugar, and eggs being affordable staples found in most kitchens.
  • Season: Ideal for year-round enjoyment, churros can be particularly delightful during colder months when warm, sweet foods are most comforting.
  • Occasion: Perfect for birthday parties, family gatherings, or festive celebrations, churros never fail to delight children and adults alike.

Why You’ll Love This Recipe

Churros Poppers are not only a treat to the taste buds but also a feast for the senses. The buttery flavor combined with the sweetness of sugar creates an irresistible snack, satisfying even the most discerning sweet tooth. The light texture allows you to indulge without feeling overly full, making them perfect for sharing at gatherings. Dipped in rich chocolate, each bite provides a heavenly burst of flavor that is sure to please.

In terms of convenience, these Churros Poppers can be whipped up quickly, making them an ideal choice for last-minute dessert cravings or spontaneous gatherings. The simple ingredients mean you don’t have to run to the store to create this fantastic treat. Preparing them a few hours ahead of time allows you to enjoy time with family and friends while they wait to be devoured.

Nutritionally, while these poppers are an indulgent treat, they can fit into a balanced diet when enjoyed in moderation. Fried dough done right offers some energy, and when paired with a fresh fruit topping or served alongside berries, you can boost their nutritional value and create a delightful contrast of flavors and colors.

Socially, Churros Poppers are a fantastic way to bring people together. Whether enjoyed at a dessert party or served during a movie night, these sweet bites lead to laughter and shared moments. They inspire a communal experience as guests dip and taste together, making each occasion special.

With the low-cost ingredients and fast cooking time, Churros Poppers can easily become a regular feature at your home. They offer tremendous value and satisfaction without breaking the bank, making them an accessible dessert everyone can enjoy.

Historical Background and Cultural Significance

Churros originated in Spain, where they became popular among shepherds who needed portable food that could withstand long trips. Over the centuries, churros evolved, and now they are widely enjoyed not only in Spain but also in Latin America and beyond. Each region offers its unique twist on the classic, showcasing the versatility of this cherished treat.

Culturally, churros appear at many celebrations and festivals around the world. In Spain, they are commonly dipped in thick hot chocolate, creating a luxurious pairing cherished by many. Their presence at fairs and carnivals as street food makes them synonymous with fun and festivity, evoking happy memories and joyful gatherings.

As the recipe traveled beyond Spain, variations emerged, including the introduction of fillings that offer new flavor experiences. From chocolate to dulce de leche, these adaptations have only increased the popularity of churros, solidifying them as a beloved snack across many cultures.

Regional variations continue to thrive, with differences in size, texture, and fillings appearing globally. French “churros” have a delicate and flaky texture, while Mexican churros are often denser and come in a lengthier form, showcasing how this pastry has been embraced by numerous cultures.

Ingredient Deep Dive

Flour: The foundation of churros, flour contributes to the structure and texture. In Spanish cooking, all-purpose flour is commonly used, providing the right balance of strength and softness. Whole grain or gluten-free flours can also work, adding a unique flavor and nutritional profile. When selecting flour, look for quality brands that ensure consistent results.

Sugar: Sweetness is a key component in churros, enhancing their flavor and making them mouthwatering. Granulated sugar is the most widely used, but brown sugar can be included for a richer taste. It’s advisable to store sugar in a cool, dry place to avoid clumping and maintain its usability in recipes.

Eggs: Eggs add richness and moisture, helping bind the dough while also enriching the flavor. They are a nutritional powerhouse, providing protein and essential amino acids. Fresh eggs yield the best results, and it’s ideal to store them in the refrigerator to maintain their freshness.

Cinnamon: A classic addition for flavoring churros, cinnamon gives a warm, aromatic quality. The aromatic spice is rich in antioxidants and has anti-inflammatory properties. When purchasing cinnamon, consider using freshly ground for the best flavor, and store it in an airtight container away from heat to maintain its potency.

Common Mistakes to Avoid

  • Under-cooking the dough: If the dough is not cooked long enough, the churros will be dense and gummy instead of light and fluffy. Ensure that the mixture is cooked until fully incorporated and slightly dry.
  • Over-heating the oil: Too high oil temperatures can burn the churros before they fully cook. Use a thermometer to ensure the oil is at a steady 350°F (175°C) for optimal frying results.
  • Improper piping: When piping, avoid letting the dough rest too long as it may lose its shape. Also, ensure you pipe directly into the oil and not in globs for uniform frying.
  • Skipping the cinnamon sugar coating: Coating the churros immediately after frying adds a delightful sweetness and flavor. Do not skip this step as it greatly enhances the final taste.
  • Neglecting to dry on paper towels: After frying, churros should be placed on paper towels to absorb excess oil. This step is crucial for achieving a light texture.
  • Using stale ingredients: Always check the freshness of your baking powder and spices, as stale ingredients can affect the flavor and texture of your churros.
  • Frying too many at once: Overcrowding the frying pan can decrease the oil temperature resulting in soggy churros. Fry them in small batches to maintain a consistent heat.
  • Letting the dough sit: Once your dough is prepared, it’s best to fry them immediately for the lightest and crispest results. Prolonged sitting can lead to texture issues.

Essential Techniques

Mastering the dough: Creating the perfect churros dough is crucial to achieving the right consistency. The key is to cook it until it’s slightly drier than you might expect, allowing it to hold its shape while frying. Look for visual cues; the dough should easily pull away from the sides of the pan but not be overly tough.

Frying to perfection: Frying requires attention to oil temperature and batch size. The perfect churro should sizzle gently upon entering the oil. If the oil temperature is too low, the churros will absorb excess grease. Aim for a consistent 350°F (175°C) to achieve a crispy exterior while ensuring they cook through without burning.

Pro Tips for Perfect Churros Poppers

To achieve the best results with your Churros Poppers, follow these expert tips. First, ensure all your ingredients are at room temperature for even mixing and better results. Next, use a piping bag fitted with a star tip to create traditional ridges that hold the sugar and cinnamon better. For added flavor, consider infusing the frying oil with cinnamon sticks while heating for an enhanced aroma.

Always taste a small piece of the dough before frying to adjust sweetness as needed. This can help personalize the recipe for your tastes. Additionally, using a candy thermometer can ensure precise oil temperatures, while frying in small batches allows for better control over cooking. Finishing them with a powdered sugar dusting will add an elegant touch, making them perfect for serving.

For a fun twist, you can try different fillings such as dulce de leche or chocolate in the center of your churros. These variations can make your Churros Poppers even more exciting and loved by everyone. Lastly, serve them immediately after frying for the best texture and flavor.

Variations and Adaptations

Churros Poppers can be adapted to fit a range of preferences and occasions. For a regional twist, consider adding a hint of orange zest to the dough for a refreshing flavor reminiscent of traditional Spanish churros. Particularly during the fall season, incorporating pumpkin spice can offer a seasonal flair, appealing to autumn enthusiasts.

Dietary restrictions can also be accommodated by experimenting with gluten-free flours or plant-based substitutes to create vegan churros. Flavor variations, such as infusing the dough with matcha or espresso, can provide a unique take and appeal to adventurous palates.

Texture modifications, such as baking instead of frying, can create a lighter alternative that’s just as satisfying for those looking to cut down on oil. For a modern presentation, consider serving churros in a mason jar with a variety of dips placed artfully around them for dipping fun.

Serving and Presentation Guide

When presenting Churros Poppers, consider using a rustic wooden board for a charming look. Arrange the churros in clusters, creating an inviting spread that encourages sharing. Add a small bowl of chocolate sauce or dulce de leche for dipping and garnish with fresh fruits like strawberries or raspberries for a pop of color.

Drizzling chocolate sauce or caramel over the churros adds a visually appealing element atop their warm surface. When plating, consider using a dusting of powdered sugar or cinnamon sugar to enhance their allure while providing a textural contrast with the soft dough.

Temperature also plays a crucial role in serving; churros are best enjoyed warm. If you need to prepare them ahead, briefly warm them in the oven before serving to refresh their texture. Additionally, providing decorative toothpicks can create a fun, finger-food feel that enhances the experience of your guests while ensuring easy consumption.

Wine and Beverage Pairing

When pairing beverages with Churros Poppers, consider light, fruity wines like a Moscato or a lightly sweet Riesling that won’t overshadow the churro’s flavor. These wines complement the sweetness, elevating the overall dessert experience while providing a refreshing contrast.

For non-alcoholic options, serve with a rich hot chocolate or a flavored latte, such as vanilla or caramel, which echoes the churros’ flavor profile. When considering coffee pairings, both cappuccino and espresso offer a robust solution that enhances the dessert without overwhelming it.

If serving at a party, consider creating a churro bar with a variety of dipping sauces alongside the wine and coffee options. This encourages guests to experiment with different flavor combinations, enhancing the communal dining experience.

Storage and Shelf Life

If you have leftovers, proper storage is necessary to maintain the deliciousness of Churros Poppers. Allow them to cool completely before transferring them to an airtight container or resealable bag. Stored this way, they can last for up to three days at room temperature, although they are best when consumed fresh.

To extend their shelf life, consider freezing them. Spread the churros in a single layer on a baking sheet to freeze individually before transferring them to a larger container or freezer bag. This method helps prevent them from sticking together. When ready to enjoy, reheat in the oven for a few minutes until warm and crispy.

Check for signs of spoilage before consuming, including any off-odors or unusual textures, as these could indicate that the churros have gone bad. For reheating, a toaster oven offers excellent results, returning the churros to their delightful, crisp state.

Make Ahead Strategies

To reduce stress before serving, you can prepare many components of Churros Poppers ahead of time. The dough can be made a day in advance, wrapped well, and refrigerated until you’re ready to fry. This saves precious time and allows flavors to meld more beautifully.

You can also pre-make sauces, such as chocolate or caramel for dipping, which can sit in the fridge for up to a week. Just warm them slightly before serving to enhance the flavor and texture.

When setting up a churro station, arrange all components, including sauces and garnishes, ahead of time. This not only saves time but also ensures a smooth serving experience. Just before serving, fry the churros fresh to retain their irresistible crispy exterior.

Scaling Instructions

Scaling your Churros Poppers recipe is easy, whether you’re looking to halve or triple the ingredient amounts. To halve the recipe, simply divide each ingredient by two while maintaining the same cooking times, just ensuring that the number of churros you fry doesn’t overcrowd the oil.

Doubling or tripling the recipe may require adjustments to your frying equipment. Consider frying in batches to maintain quality and prevent temperature fluctuations in the oil. It’s also essential to keep an eye on the cooking time, as larger batches may need slightly more time in the oil.

Make sure to label any stored portions with the date made so you can keep track of freshness if you’re working in large volumes. Each batch can also be frozen after frying to maintain optimal flavor for future use.

Nutritional Deep Dive

Churros Poppers can be a delightful treat with their own unique nutrition profile. On a macro level, each popper typically provides a balance of carbohydrates from the flour, along with some fat from the frying process. While they are not a source of high protein, they can provide a quick energy boost.

Micronutritionally, the ingredients contribute small amounts of B vitamins, particularly from the flour and eggs, essential for energy metabolism. Cinnamon, known for its antioxidant properties, offers additional health benefits while enhancing flavor.

When considering portions, a serving typically consists of 2-3 churros, balancing indulgence with moderation. For those focused on weight management, enjoying churros as a treat rather than an everyday snack allows for flexibility while still relishing in their deliciousness.

Dietary Adaptations

For those following a gluten-free diet, churros can be adapted by using a blend of gluten-free flours like almond or coconut flour for similar texture and flavor without compromising on enjoyment. Ensure that your baking powder is also gluten-free.

For a dairy-free and vegan option, opt for plant-based milk and a non-dairy butter substitute in place of eggs. The result can still yield delightful churros without sacrificing the taste. Those following a low-carb or keto diet may explore alternatives such as almond flour or cheese-based churros for a unique twist.

Paleo followers may also enjoy churros by utilizing natural sweeteners like coconut sugar and incorporating healthier fat options. Through creativity and experimentation, churros can fit into various dietary lifestyles.

Troubleshooting Guide

Should you run into difficulties while preparing your Churros Poppers, here are common issues and solutions. For dry or tough churros, this typically indicates the dough was overcooked or overworked. Ensure just enough cooking time and gently mix without over-kneading.

If the churros are lacking flavor, ensure you’re adequately seasoning the dough; adding a pinch of salt can enhance overall sweetness. Should they absorb too much oil, this may suggest the oil temperature was too low, resulting in soggy churros; always aim for a consistent 350°F (175°C).

If they are not puffing up while frying, ensure the dough consistency is right—an overly dry mixture can impede puffing. If you find your churros are burning outside but raw inside, adjust the oil temperature down slightly while increasing cooking time.

Recipe Success Stories

The feedback from the community surrounding Churros Poppers has been overwhelmingly positive. Many home cooks have shared their stories of adapting the recipe to suit their tastes, such as experimenting with fillings or adding spices to the sugar coating.

Readers often rave about the ease of recipe and share their tips for successful frying and ways to personalize the dipping sauces. Photography enthusiasts showcase their beautiful churros, sharing gorgeous images that inspire others to try the recipe.

The success stories emphasize the joy that these poppers bring to gatherings, ultimately cementing their reputation as a crowd-pleaser. The communal aspect of sharing churros while dipping them into warm sauces creates moments of joy and satisfaction among family and friends.

Frequently Asked Questions

Q: Can I use a different type of flour for churros?
A: Yes, you can experiment with different flours. However, all-purpose flour provides the best texture for classic churros. Gluten-free options are also available for those with dietary restrictions.

Q: How do I store leftover churros?
A: After cooling, store churros in an airtight container at room temperature for up to three days or freeze for longer storage. For the best taste, consume them fresh.

Q: Can I make churros in advance?
A: Yes, you can make the dough a day ahead and refrigerate. Fry them fresh for the best results right before serving.

Q: Can I bake churros instead of frying them?
A: While churros are traditionally fried, you can bake them for a healthier version. Brush with oil and bake at 400°F (200°C) until golden.

Q: What can I serve with churros?
A: Churros are fantastic with chocolate sauce, caramel, dulce de leche, or even a creamy vanilla dip. Fruit preserves are also a delightful choice.

Q: How do I prevent churros from becoming soggy?
A: Ensure your oil is at the right temperature prior to frying, and avoid overcrowding the pan to ensure they fry evenly.

Q: How can I make churros firmer?
A: If you prefer firmer churros, slightly increase the flour in the dough recipe or reduce the cooking time until they reach the desired texture.

Q: Can I flavor the churro dough?
A: Absolutely! You can add vanilla extract or even citrus zest to the dough for elevated flavor enhancements.

Q: What if my dough is too stiff?
A: If you find your dough to be too stiff, you can add a little warm water or milk until it reaches a smooth, pipable consistency.

Q: Are churros suitable for freezing?
A: Yes, churros freeze well! Just ensure they are fully cooled before placing them in an airtight container for up to three months.

Additional Resources

For those looking to explore more recipes, consider checking out related sweet treats such as homemade donuts, funnel cakes, or even beignets. Each brings unique flavors while showcasing similar frying techniques.

Techniques guides focusing on frying methods and managing temperatures will also provide helpful insights. Working with dough can require practice, so don’t hesitate to reference instructional videos or cookbooks dedicated to pastry-making for further assistance.

Additionally, learning about the cultural significance of churros can enhance your experience at home—consider hosting a themed evening where you explore Spanish cuisine through various dishes alongside churros.

Join the Conversation

We encourage you to share your thoughts, experiences, and beautiful images of your Churros Poppers on social media. Engage with fellow food lovers by joining communities that explore sharing recipes and tips for perfecting these delightful treats.

Leave comments on your personal adaptations and variations. Readers love hearing about ways to make recipes more exciting or personalized. Your success can inspire others, and don’t forget to offer photography tips for capturing the perfect churro shot!

Let’s make Churros Poppers not just a recipe but a cherished part of your culinary journey, filled with joy, laughter, and delicious bites.

The Recipe

Churros Poppers

Serves: 12 servings

Prep Time: 25 mins

Cook Time: 10 mins

Total Time: 35 mins

Kitchen Equipment Needed

  • Deep-fryer or heavy-bottomed saucepan
  • Candy thermometer
  • Piping bag with star tip
  • Mixing bowl
  • Wooden spoon

Ingredients

  • 1 cup all-purpose flour
  • 1/4 teaspoon salt
  • 1 cup water
  • 2 tablespoons sugar
  • 1 teaspoon vanilla extract
  • 1/4 cup unsalted butter
  • 3 large eggs
  • Oil for frying
  • 1/2 cup sugar (for coating)
  • 1 tablespoon ground cinnamon (for coating)
  • Chocolate sauce for dipping

Directions

  1. In a saucepan over medium heat, combine water, butter, sugar, and salt. Bring to a boil.
  2. Remove from heat and stir in the flour until a dough forms.
  3. Allow the mixture to cool slightly, then beat in the eggs one at a time.
  4. Heat oil in a deep-fryer or saucepan to 350°F (175°C).
  5. Transfer dough to a piping bag fitted with a star tip.
  6. Pipe churro shapes into the hot oil, cutting them to your desired length.
  7. Fry until golden brown, about 2-3 minutes per side, then remove and drain on paper towels.
  8. In a shallow dish, mix sugar and cinnamon. Roll the warm churros in the mixture until coated.
  9. Serve with chocolate sauce for dipping and enjoy!

Recipe Notes

  • For variations, fill some churros with chocolate or cream before frying.
  • For a spicy kick, add a pinch of cayenne pepper to the cinnamon-sugar mix.
  • Explore different dipping sauces such as caramel or fruit preserves.

Easy Cinnamon Sugar Cruffins – Buttery, Flaky & Delicious

Cinnamon Sugar Cruffins: A Delightfully Sweet Treat

⚖️
Difficulty
Moderate

⏲️
Prep Time
30 mins

🕒
Cook Time
25 mins

⏱️
Total Time
55 mins

🍽️
Servings
12

Indulge in the delectable delight of Cinnamon Sugar Cruffins, a unique treat that brilliantly marries the tender texture of muffins with the flaky, buttery layers of croissants. These delightful baked goods are generously coated with cinnamon sugar, offering a perfect balance of sweetness and spice that beckons with each bite. Whether you’re enjoying them for breakfast, dessert, or a delightful snack, these cruffins will captivate your taste buds and warm your heart.

What makes Cinnamon Sugar Cruffins truly special is their delightful texture. The outer layer is crisp from the buttery finish, while the inside remains soft and pillowy. The cinnamon sugar adds an irresistible crunch that enhances the overall joy of this treat. Picture yourself biting into one fresh from the oven, the sweet aroma filling the air and the taste blending warm spices with buttery goodness. This delightful creation is perfect for brunch gatherings or cozy evenings spent with loved ones.

Quick Recipe Highlights

  • Flavor Profile: The rich buttery taste pairs perfectly with warm cinnamon and sugar, creating a comforting and familiar flavor that warms the soul.
  • Texture: Expect a flakey and tender pastry that melts in your mouth, with a crispy sugar crust that adds crunch.
  • Aroma: The inviting fragrance of cinnamon and sugar caramelizing in the oven is sure to lure everyone into the kitchen.
  • Visual Appeal: Beautifully golden-brown on the outside with a tempting dusting of sugar, these cruffins are a feast for the eyes.
  • Skill Level Needed: Requires basic baking skills and understanding of dough handling, but perfect for both novices and experienced bakers alike.
  • Special Equipment: A muffin tin is essential for shaping and baking the cruffins to achieve that perfect rise.

Recipe Overview

  • Difficulty Level: Moderate, as it requires a few key techniques in dough handling and layering, but is accessible for most home bakers willing to practice.
  • Category: This recipe fits beautifully in both the breakfast and dessert categories, providing a satisfying sweet option for any time of day.
  • Cuisine: A modern twist on traditional pastries, cruffins borrow elements from French and American culinary traditions.
  • Cost: The ingredient cost is relatively low, primarily consisting of pantry staples, making this a budget-friendly baking project.
  • Season: Perfect for all seasons, but especially cozy in autumn and winter when warm spices shine brightest.
  • Occasion: Ideal for brunch gatherings, holiday celebrations, or whenever you want to impress friends and family.

Why You’ll Love This Recipe

The charm of Cinnamon Sugar Cruffins lies in their wonderful taste and texture. The sweet cinnamon sugar coating combined with the soft, layered pastry makes for a dessert that is both comforting and indulgent. Served fresh out of the oven, these cruffins have a delightful crunch that quickly softens to a tender, fluffy inside. Every bite is a mix of buttery richness and the warm, inviting flavor of cinnamon, making it impossible to stop at just one.

Convenience and preparation should not be overlooked, as this recipe allows you to take your time layering the dough without pressure. Preparing the dough in advance means you can always have a delicious sweet treat ready to bake at a moment’s notice. Simply shape the cruffins and refrigerate them until you’re ready to bake, making them a perfect option for busy mornings or spontaneous gatherings.

Nutritionally, while these cruffins are indulgent, you can enjoy them in moderation as part of a balanced diet. The ingredients used can contribute to a fulfilling culinary experience without compromising your overall nutritional goals. Simple substitutions can make these treats slightly healthier without sacrificing their deliciousness.

Socially, nothing brings people together quite like the smell of freshly baked goods. These cruffins are perfect for sharing at parties, family gatherings, or casual coffee meet-ups. Their sweet, shareable nature encourages social interaction, making them as much about connection as they are about flavor.

Finally, the cost-effectiveness of this recipe sets it apart. Utilizing basic, affordable ingredients, anyone can enjoy these restaurant-quality treats from the comfort of their home. With relatively low preparation costs, bringing joy to friends and family has never felt so accessible.

Historical Background and Cultural Significance

Cinnamon Sugar Cruffins may be new in the pastry world, but their roots lie deeply in traditional baking techniques. The process of layering dough stems from croissant-making methods developed in France. These flaky pastries were often filled with sweet or savory ingredients, creating a tradition that celebrates layers and textures in baked goods.

The cultural significance of such pastries is immense, reflecting heritage and creativity through food. As bakers experiment with techniques and flavor combinations, treats like Cinnamon Sugar Cruffins emerge as modern takes on beloved classics. This recipe not only indulges the palate but encapsulates a spirit of innovation while paying homage to historical baking traditions.

Over time, the evolution of this recipe shows how food can adapt to modern tastes. With the rise of fusion cuisine, these cruffins combine the simplicity of muffins with the extravagance of pastries, making them a popular choice in bakeries and homes alike. This blending of culinary styles speaks to today’s diverse food culture and its appreciation for both comfort and novelty.

Regional variations also play a role in the joy of Cinnamon Sugar Cruffins. Different countries incorporate local ingredients or spices, giving each version a unique twist. Whether enjoyed in a café or made at home, these delightful pastries offer a taste of tradition while inviting individual creativity.

Ingredient Deep Dive

Flour: The backbone of any pastry, flour brings structure to the dough. Different types of flour offer various textures; for instance, all-purpose flour is suitable for most baking needs, while bread flour can lend a chewier texture due to its higher protein content. When selecting flour, choose fresh, high-quality options for optimal results. Store flour in a cool, dry place in an airtight container to maintain freshness.

Butter: Essential for the rich flavor and tender texture of cruffins, butter is critical to achieving the flaky layers. Choose unsalted butter for accurate control over the sweetness of your pastry. It’s best to use cold butter for lamination, as this ensures a light and airy texture. Leftover butter should be kept refrigerated and can be frozen for longer storage.

Cinnamon: This aromatic spice adds warmth and sweetness to the cruffins. It’s beneficial for flavor, and some studies suggest it may have anti-inflammatory and antioxidant properties. When choosing cinnamon, opt for Ceylon cinnamon for a sweeter flavor or Cassia for a more robust taste. Store cinnamon in a cool, dark place to preserve its potency.

Yeast: Yeast contributes to the leavening process, creating airy layers in the cruffins. Always check the expiration date on yeast packages for best results, as stale yeast can lead to flat pastries. Store dry yeast in a cool, dark area, and once opened, transfer it to an airtight container in the fridge or freezer for continuous freshness.

Common Mistakes to Avoid

  • Using warm ingredients: Always ensure that butter and other ingredients are at the correct temperature, preferably cold for optimal flakiness.
  • Not allowing the dough to rest: Resting time is crucial for gluten relaxation, which helps prevent the pastry from shrinking during baking.
  • Over-kneading the dough: Excessive kneading can create a tough texture; gently handling the dough enhances flakiness.
  • Skipping the refrigeration step: Chilling the laminated dough helps solidify the layers, preventing them from melding during baking.
  • Overfilling the muffin tin: It’s essential to only fill the cups halfway to allow for proper rise and expansion without overflow.
  • Not preheating the oven: A properly heated oven ensures even baking and allows for the perfect rise when the cruffins hit the heat.
  • Using the wrong type of cinnamon: Choosing between Ceylon and Cassia may alter the flavor profile; be certain to select your preferred spice.
  • Ignoring the baking time: Monitor your cruffins closely towards the end of the baking time to prevent them from overbaking and drying out.
  • Neglecting presentation: Taking time to dust with a little extra cinnamon sugar before serving can elevate the visual appeal significantly.
  • Failing to test for doneness: Invest in a toothpick or skewer before removing them from the oven; it should come out clean when the cruffins are fully cooked.

Essential Techniques

Dough Lamination: This technique is critical for building flaky layers in the cruffins. To master lamination, roll the dough into thin sheets, then fold it multiple times to create layers. It’s essential to keep the butter cold throughout the process to prevent it from melting into the dough. Watch for visual cues like visible butter layers when you roll; if they melt, take a break and chill the dough to ensure the cruffins rise perfectly.

Yeast Activation: Properly activating yeast is crucial for achieving a fluffy texture. Begin by dissolving yeast in warm water or milk with a bit of sugar, allowing it to sit until bubbly. Many bakers make the mistake of using water too hot, which can kill the yeast. Use a thermometer, or simply test the water with your finger; it should feel warm but not hot.

Pro Tips for Perfect Cinnamon Sugar Cruffins

Use high-quality ingredients for the best flavor; they truly make a difference in baked goods. Don’t rush the dough resting times; allowing the dough to relax is crucial for manageable pastry. Experiment with flavored sugars or additional spices for unique twists on the classic flavor profile. Make sure not to skip the brushing with butter before coating in cinnamon sugar; this enhances adhesion and flavor. Always monitor them closely while baking, as they can go from perfect to overdone quickly. Finally, serve them warm with a delightful glaze or accompaniment for the ultimate touch.

Variations and Adaptations

Feel free to explore regional variations by incorporating local spices or flavors; add cardamom for a unique take or try nutmeg for an added depth of flavor. Seasonal adaptations can involve stuffing them with autumnal flavors like pumpkin puree or winter spices. Consider dietary modifications, such as using gluten-free flour or dairy-free butter, allowing for enjoyment across various diets. Switch up textures by infusing the cruffins with fruit for moisture or nuts for crunch. When it comes to presentation, consider serving them with a drizzle of icing or dusting with powdered sugar for an elegant finish.

Serving and Presentation Guide

For a perfect presentation, place the cruffins on a tiered serving platter, emphasizing their golden-brown tops. Garnish with fresh mint or edible flowers for a pop of color; this elevates the overall aesthetic. Pairing them with coffee or a flavored tea adds to the experience, and light dusting of powdered sugar can complement their look and sweetness. Remember to serve them warm alongside a selection of spreads or dips, such as fruit preserves or whipped cream for an indulgent treat. Keeping the cruffins at room temperature enhances their flavor, while congratulating guests with perfectly portioned treats keeps the serving simple.

Wine and Beverage Pairing

When it comes to wine pairings, opt for a light, sweet white wine like Riesling, as its natural sweetness complements the cinnamon sugar. Alternatively, a crisp sparkling wine can refresh the palate while enhancing the flavors of the cruffins. If you’re searching for non-alcoholic alternatives, a freshly brewed chai tea can reflect the warm spices beautifully. For coffee lovers, consider pairing with an espresso or a vanilla latte to balance the sweetness. Always remember to serve your beverages chilled or hot, based on the chosen pairing, to enhance the overall dining experience.

Storage and Shelf Life

Storing Cinnamon Sugar Cruffins is straightforward; keep them in an airtight container at room temperature for up to 2 days, or refrigerate for up to a week to maintain freshness. If considering long-term storage, freezing is an option; place them in a freezer bag for up to 3 months. Always monitor for signs of spoilage, such as mold or unusual textures. Reheat cruffins in a low-temperature oven or microwave briefly to regain freshness and soften; avoid overheating to prevent them from becoming dry. Freezing recommendations include thorough wrapping to avoid freezer burn.

Make Ahead Strategies

To make Cinnamon Sugar Cruffins ahead of time, prepare and shape the dough, then refrigerate it overnight before baking. This saves time in the morning while allowing the flavors to meld. Consider precooking and cooling larger batches to freeze for busy days; just reheat before serving for a quick treat. Quality remains intact with strategic layering and proper storage between steps, ensuring the final product tastes freshly baked. Fresh component additions, like fruit or cream cheese fillings, can be incorporated right before baking for delightful surprises in every bite.

Scaling Instructions

When halving the recipe, tracking all ingredients accurately ensures a consistent flavor. For doubling or tripling, ensure you have adequate kitchen equipment and space for rising and baking. Adjust baking times if necessary; larger batches may require a few extra minutes. Timing modifications are essential as well; monitor closely to avoid drying or flattening. Keep in mind that storage considerations will change based on the size of the batch, especially when freezing. Proper planning will lead to success, even when varying quantities are involved.

Nutritional Deep Dive

Analyzing the nutritional content of Cinnamon Sugar Cruffins reveals a delightful treat that, while indulgent, can fit into various diets. The macro breakdown will vary based on ingredients used, but a basic cruffin typically provides a good balance of carbs and fats with moderate sugars. Consider nutrient considerations, such as including whole grains for extra fiber or experimenting with natural sweeteners. Portion control tips are useful here; enjoying one cruffin as a treat or sharing with friends can help manage overall intake. Understanding the nutritional benefits provides a fuller picture for mindful eating.

Dietary Adaptations

For those following gluten-free diets, consider using a gluten-free flour blend suitable for baking; replace traditional flour without compromising texture significantly. Dairy-free options include replacing butter with vegan alternatives, ensuring a similar fat content. Vegan variations can utilize flaxseed or chia for binding while avoiding all animal products; adjust the leavening agent accordingly. Low-carb and keto followers can experiment with almond flour or coconut flour, adapting sweetness using sugar alternatives. All adaptations can lead to equally delightful results, showcasing the versatility of the flavor profiles inherent in Cinnamon Sugar Cruffins.

Troubleshooting Guide

If your cruffins end up too dense, it might be due to over-kneading or not enough resting time. Ensure each step is followed carefully to allow yeast to activate properly. If they don’t rise sufficiently, check the freshness of your yeast; expired yeast will lead to flat pastries. Additionally, if the cruffins become too dry, it often results from extended baking times. Keep a closer watch towards the end of baking and check for visual cues instead of sticking solely to a timer. Balancing flavors is another common concern; consider adjusting sugar or spice components in future batches for optimal flavor.

Recipe Success Stories

Community feedback on Cinnamon Sugar Cruffins has been overwhelmingly positive, with many bakers sharing their personal twists. Adaptations such as chocolate chips or fruit fillings became popular, creating unique flavor experiences. Readers have reported delicious results, often leading to recipe requests and compliments. Photography tips also help – showcasing the flaky layers and golden tops encourages others to dive into this delightful treat. With countless variations and personal twists, success stories abound, making Cinnamon Sugar Cruffins a beloved addition to any home baker’s repertoire.

Frequently Asked Questions

Can I make these cruffins ahead of time?

Absolutely! You can prepare the dough and shape the cruffins a day in advance. Just refrigerate them until ready to bake, ensuring optimal freshness.

What can I substitute for butter?

You can use vegan butter or coconut oil for a dairy-free version. Ensure similar fat content for the best results.

Is there a gluten-free option?

Yes, you can substitute all-purpose flour with an appropriate gluten-free flour blend. Ensure the blend has a suitable binding agent for baking.

Can I freeze cruffins?

Yes, cruffins can be frozen. Store them in an airtight container for up to 3 months and simply reheat when ready to enjoy.

How many servings does this recipe yield?

This recipe yields approximately 12 delicious cruffins, depending on the size you make them.

What flavors can I add to this recipe?

You can get creative! Consider adding lemon zest, chocolate chips, or even fruit purees for unique variations.

How can I make them healthier?

Try reducing sugar, replacing some of the butter with applesauce for moisture, or experimenting with whole grain flour for added nutrition.

What is the best way to serve cruffins?

Serve them warm, dusted with powdered sugar, or accompanied by a fruit spread or glaze for extra indulgence.

Why did my cruffins come out flat?

This could be due to expired yeast or insufficient rising time. Ensure freshness in ingredients and monitor rising closely.

Can I double the recipe?

Yes, doubling should work great! Just ensure you have ample baking space, and always check for doneness as they may need additional baking time.

Additional Resources

Check out related recipes like our Maple Pecan Muffins or explore technique guides on lamination and yeast baking for a deeper understanding of pastry making. Essential ingredient information about spices or flour types can enhance your baking skills, while equipment recommendations will help you select the best tools for home baking. Seasonal variations incorporate holidays or festivities into your baking schedule, allowing for diverse options throughout the year.

Join the Conversation

Engaging with our community on social media helps spread the love for baking. Share your photographs of these scrumptious Cinnamon Sugar Cruffins and exchange feedback about your experience. We invite recipe reviews and suggestions for variations, fostering a vibrant community of bakers. Tag us to feature your creations and join our ever-growing family of baking enthusiasts!

The Recipe

Cinnamon Sugar Cruffins

Serves: 12

Prep Time: 30 mins

Cook Time: 25 mins

Total Time: 55 mins

Kitchen Equipment Needed

  • Muffin tin
  • Rolling pin
  • Mixing bowls
  • Whisk
  • Pastry brush

Ingredients

  • 2 cups all-purpose flour
  • 1/2 cup sugar
  • 1 teaspoon salt
  • 1 packet (2 1/4 tsp) active dry yeast
  • 1/2 cup warm milk
  • 1/4 cup unsalted butter, melted
  • 1 tablespoon cinnamon
  • 1/4 cup sugar (for cinnamon sugar mix)
  • 1 egg

Directions

  1. In a small bowl, activate yeast in warm milk and set aside for 5-10 minutes.
  2. In a large mixing bowl, combine flour, 1/2 cup sugar, and salt.
  3. Mix melted butter and egg into activated yeast, then combine with dry ingredients.
  4. Knead until elastic and smooth; let rise in a warm place until doubled in size, about 1 hour.
  5. Roll out the dough on a floured surface into a thin rectangle; brush with melted butter.
  6. Combine cinnamon and 1/4 cup sugar; sprinkle evenly over the dough.
  7. Fold the dough and cut into strips, then twist and place in the muffin tin.
  8. Allow to rise for another 30 minutes, then preheat the oven to 350°F (175°C).
  9. Bake for 20-25 minutes or until golden brown; cool before serving dusted with additional cinnamon sugar.

Recipe Notes

  • Feel free to experiment with different spices or add-ins like chocolate chips!
  • Store leftover cruffins in an airtight container at room temperature for up to 2 days.

Easy Lemon and Blueberry Soufra with Creamy Custard

Lemon and Blueberry Soufra: A Bright and Flavorful Twist

⚖️
Difficulty
Moderate

⏲️
Prep Time
30 mins

🕒
Cook Time
45 mins

⏱️
Total Time
1 hr 15 mins

🍽️
Servings
8 servings

Lemon and Blueberry Soufra is a delightful dessert that seamlessly balances the tanginess of fresh lemons with the sweetness of ripe blueberries. This vibrant dish not only captures the essence of summer but also offers a burst of flavors that tantalize the taste buds. As you take your first bite, the zesty lemon enhances the natural sweetness of the blueberries, creating a harmonious blend that leaves you craving more. The fluffiness of the soufra, combined with the juicy berries, gives it a light yet satisfying quality, making it an ideal treat for warm-weather gatherings or special occasions.

Beyond just its delightful taste, this Lemon and Blueberry Soufra also boasts appealing textures. The airy and soft nature of the soufra contrasts beautifully with the slightly chewy blueberries that punctuate each mouthful. Whether served warm or chilled, this dessert exudes a welcoming aroma that fills the room, enticing friends and family alike. Its bright yellow and blue colors create a visually stunning presentation, making it not just a treat for the palate but also for the eyes.

Quick Recipe Highlights

  • Flavor Profile: A refreshing balance of tart lemon and sweet, juicy blueberries.
  • Texture: Light, airy, and fluffy with bursts of blueberry goodness.
  • Aroma: Invoking scents of citrus and fresh berries that uplift the spirit.
  • Visual Appeal: Bright yellow and blue colors create an inviting presentation.
  • Skill Level Needed: Suitable for home cooks with a moderate level of expertise.
  • Special Equipment: Basic kitchen tools along with a baking dish are required.

Recipe Overview

  • Difficulty Level: Moderate, involving techniques such as folding and baking, while requiring timing precision for optimal texture.
  • Category: Dessert, perfect for summer soirées, brunches, or holiday feasts.
  • Cuisine: Influenced by Mediterranean and modern baking traditions, bringing a unique twist to classic flavors.
  • Cost: Ingredients are generally affordable, making it accessible for budget-conscious bakers.
  • Season: Ideally prepared in late spring and summer when blueberries are at their peak.
  • Occasion: A great choice for birthdays, picnics, or family gatherings, sure to impress your guests.

Why You’ll Love This Recipe

The taste and texture of this Lemon and Blueberry Soufra make it an instant favorite among dessert lovers. The tartness of fresh lemons makes every bite refreshing, while the plump blueberries provide natural sweetness that complements the citrus zest. The fluffy nature of the soufflé-like dessert is light enough to satisfy without overwhelming your palate, making it a delightful ending to any meal.

Convenience is another factor that enhances the appeal of this recipe. With a prep time of just 30 minutes, busy bakers can whip up this dessert to surprise their loved ones. The use of readily available ingredients keeps the preparation fuss-free, allowing you to focus on enjoying the cooking process, and you can make it ahead of time, freeing you from last-minute rushes.

Nutritionally, this dessert packs a punch. Blueberries are known for their antioxidant properties, while lemons add vitamin C, supporting the immune system. This dessert not only satiates your sweet tooth but also provides health benefits, making it a guilt-free indulgence.

From a social aspect, a beautifully baked Lemon and Blueberry Soufra serves as a conversational centerpiece, sparking joy among guests. Serving it at gatherings encourages sharing and creates memorable experiences; perfect for making new friends and connections while enjoying great food.

Cost-effectiveness is front and center with this dish. By leveraging seasonal fruits and simple ingredients, you can create a stunning dessert that doesn’t break the bank. Your guests will never guess how affordable it is, and it invites them to appreciate homemade goodness.

Historical Background and Cultural Significance

The origin story of the soufra is rich with tradition, tracing back to Mediterranean influences that celebrate fresh ingredients and simple preparations. Utilizing fruits like lemons and blueberries highlights the regions’ love for bright, refreshing flavors. This dessert can often be found at family gatherings, symbolizing unity and celebration among loved ones.

In Mediterranean cultures, desserts often play a significant role in festive occasions, with each family adding unique twists passed down through generations. The Lemon and Blueberry Soufra reflects this adaptability, merging various influences into one delicious dish that embodies shared culinary experiences.

Over the years, the evolution of this recipe has seen it transition from a humble home-cooked dish to a beloved dessert found in trendy cafés and restaurants. Today, it remains a testament to the joy of using seasonal produce and traditional baking techniques to craft delightful flavors and textures.

Regional variations of the soufra exist throughout the Mediterranean, often showcasing local fruits and flavors. From oranges in Italy to cherries in the Middle East, the essence of the soufra allows for creativity and personal expression, making it a versatile dessert that can be tailored to suit different tastes and seasonal offerings.

Ingredient Deep Dive

Lemons are a pivotal ingredient in this recipe, not just for their tangy flavor but also for their historical significance in various cuisines. Rich in vitamin C, lemons also provide a refreshing zing that elevates the flavor profile of desserts. When selecting lemons, look for firm, heavy fruits with vibrant yellow skin for the best juiciness. Store them in the refrigerator to prolong freshness, and consider using zest as a delightful garnish for additional flavor enhancement.

Blueberries are another star ingredient, celebrated for their sweetness and antioxidant properties. Known as a superfood, blueberries promote good health. When picking out blueberries, seek those that are firm with a deep blue color and a silvery bloom. They should be stored in the refrigerator and are best enjoyed fresh, though they can also be frozen for later use.

Common Mistakes to Avoid

  • Not zesting enough lemons: The zest adds an essential flavor; ensure you use both the zest and juice for a balanced taste.
  • Overbeating the egg whites: This can lead to a dry soufra; stop when soft peaks form for a light texture.
  • Skipping the cooling period: Letting the soufra cool in the oven helps it retain shape and texture.
  • Using unripe blueberries: Always select ripe, sweet blueberries to ensure the best flavor.
  • Baking at too high a temperature: This can burn the top; keep an eye on it to ensure even cooking.
  • Not greasing the baking dish: A thoroughly greased dish prevents sticking and ensures a smooth serving.
  • Overcrowding the baking dish: Allow enough space between portions for even baking and rising.
  • Ignoring ingredient temperatures: Make sure eggs and other ingredients are at room temperature for optimal blending and frothing.

Essential Techniques

Folding is a key technique in making the Lemon and Blueberry Soufra. This method allows you to combine the whipped egg whites with the lemon mixture without deflating the air you’ve incorporated into the eggs. To master folding, use a rubber spatula to gently lift the mixture from the bottom of the bowl, turning it over onto itself. Avoid stirring vigorously, as this will cause the mixture to lose its volume.

Baking the soufra requires attention to temperature control. To achieve a perfect bake, it’s essential to preheat your oven adequately and create a water bath if needed to maintain moisture. A few common pitfalls include checking the cake too early or rapidly cooling it down in a drafty environment, both of which can lead to a collapsed soufflé. Look for a golden top and a slight jiggle for success.

Pro Tips for Perfect Lemon and Blueberry Soufra

– Use fresh, organic lemons for the best flavor and health benefits, avoiding any waxy coatings present on store-bought ones.
– Incorporate blueberries at the end of the mixing process to prevent them from breaking down and losing their shape.
– After removing from the oven, turn off the heat and let the souffle rest to maintain its structure and prevent collapsing.
– Experiment with the ratio of lemon to blueberries based on personal preference, allowing for a customizable sweetness.
– Serve the soufra with a dollop of whipped cream or vanilla ice cream for extra indulgence.
– Consider adding a sprinkle of powdered sugar on top for a decorative finishing touch before serving.
– Pair with herbal tea or light sparkling wine to accentuate the flavors of the dessert.
– Always underbake slightly; this will keep the texture light and airy without becoming rubbery.

Variations and Adaptations

Regional variations are abundant with soufra. In places like Italy, it might feature orange zest instead of lemon, creating a different flavor profile while still being light and fluffy. Seasonal adaptations can include other berries like raspberries or blackberries when blueberries are out of season, giving you delicious alternatives that celebrate the changing seasons.

Dietary modifications are also accessible. For a gluten-free version, substitute regular flour with almond or coconut flour, adjusting the liquid ratios accordingly. If you’re looking for a vegan twist, try replacing eggs with aquafaba, the liquid from canned chickpeas, which whips up similarly to egg whites.

Flavor variations can be created by adding a hint of lavender or thyme, enhancing the aromatic profile and providing a standout taste. For other texture modifications, consider folding crushed almonds or a layer of Greek yogurt for additional creaminess.

Lastly, for special presentation ideas, serve your soufra in individual ramekins to captivate guests with a sophisticated touch or pour the mixture into a decorative mold for stunning shapes.

Serving and Presentation Guide

Plating this Lemon and Blueberry Soufra involves a few thoughtful techniques. Start by carefully removing it from the baking dish to maintain its structure, using a spatula to slide under it. Garnish with a few whole blueberries and a light dusting of powdered sugar or a sprig of mint for a delightful color contrast.

Consider traditional accompaniments such as whipped cream drizzled over the top or a scoop of lemon sorbet on the side, enhancing the citrus experience while adding refreshing coolness. Temperature is key; serve the soufra warm for that classic soufflé experience, or let it chill slightly for a more refreshing finish.

Portion control is important, especially if serving at a gathering. Cutting neatly into squares allows for easy serving, and an adjustable-size cake knife can aid in portioning without compromising the appearance.

Wine and Beverage Pairing

For wine pairings, a light, crisp white such as Sauvignon Blanc complements the citrus notes beautifully while enhancing the overall dessert experience. For sparkling options, a Prosecco provides refreshing effervescence that pairs well with the sweetness of the blueberries.

For those preferring non-alcoholic beverages, a homemade lemonade or iced herbal tea serves as an excellent choice, providing a refreshing and complementary flavor. Alternatively, consider serving with a fragrant chamomile tea, enhancing the softness and relaxing flavors of this dessert.

Coffee enthusiasts may appreciate an espresso served alongside, where the rich, dark notes contrast pleasantly with the lightness of the soufra. Temperature considerations remain vital; all beverages should be served chilled or at room temperature to maintain a harmonious serving experience.

Storage and Shelf Life

To store the Lemon and Blueberry Soufra effectively, keep it covered in an airtight container in the refrigerator to retain freshness and moisture. This dessert is best enjoyed within three days to appreciate its lightness, while longer storage may result in loss of texture.

For optimal temperature requirements, ensure the soufflé is allowed to cool completely before sealing it. Reheating can be done gently in the oven at a low temperature for a few minutes, avoiding any microwave methods as they diminish the airy structure.

Signs of spoilage include an off smell, discoloration, or a slimy texture, indicating it’s time to discard. If you wish to extend shelf life further, consider freezing individual portions, wrapping them tightly in plastic wrap and then in foil, carefully thawing them in the refrigerator when ready to enjoy.

Make Ahead Strategies

Planning ahead can make serving the Lemon and Blueberry Soufra a breeze. Prepare your lemon mixture and whip your egg whites separately before the event. This allows for minimal last-minute preparation. Storing the lemon base in the refrigerator can be ideal, allowing all flavors to meld beautifully.

Consider chilling the blueberries ahead of time to enhance their flavor further and provide a refreshing burst when baked. When assembling the soufra, everything can come together within minutes, ensuring a fresh and delightful result without being rushed.

Quality impact assessment is vital; refrigerating the batter too long before baking can affect the rising process. However, you can prepare side elements like whipped cream or garnishes a few hours in advance for a streamlined serving experience.

Fresh element additions such as mint or citrus zest can be strategically placed just before serving, ensuring that every plate looks vibrant and inviting.

Scaling Instructions

Scaling the lemon and blueberry soufra can be straightforward. If halving the recipe, consider the impact on cooking time and temperature; a smaller volume may require decreased cooking time and should be closely monitored for doneness.

Doubling or tripling the recipe involves using larger baking dishes or multiple batches, making sure to adjust cooking times accordingly, as larger quantities may take longer to set properly. Larger pans may deliver a flatter cake, causing different baking results, so consider raising oven temperature slightly to achieve the desired rise.

Equipment adjustments may be necessary, particularly with mixer size and oven space. Always anticipate sufficient room in the oven to ensure optimal heat circulation.

Timing modifications are essential, particularly when pulling the soufflé from the oven to allow for the ideal cooling period. Create layer sizes that contribute to even cooking across all portions.

Storage considerations include ensuring airtight packaging for any leftovers and monitoring portion size when scaling to avoid waste.

Nutritional Deep Dive

Delving into the nutritional aspects of the Lemon and Blueberry Soufra reveals the significance of each ingredient. The macro breakdown includes a balance of carbohydrates from flour and natural sugars from fruit. The egg content adds protein and fat, contributing to a well-rounded dessert option.

Micronutrient analysis shows the abundance of vitamin C from lemons and essential minerals like potassium present in blueberries. These nutrients support overall health and encourage a balanced diet, especially in delicious desserts.

Health benefits are notable; blueberries are linked to improved heart health, while lemons promote digestive health. These characteristics make this soufra a dessert you can feel good about indulging in.

Dietary considerations enhance its profile, making it suitable for various dietary needs with simple modifications, such as gluten-free or vegan versions, allowing everyone to enjoy this delightful dish.

Portion analysis indicates that a reasonable serving size keeps indulgence in check while appreciating the flavors; this lesson in moderation encourages mindful eating, essential in any balanced diet.

Dietary Adaptations

For those requiring a gluten-free version of Lemon and Blueberry Soufra, swap traditional flour for a blend of almond flour and cornstarch for similar texture. Ensure that your baking powder is also gluten-free to prevent cross-contamination.

Dairy-free adjustments can be made by utilizing almond or coconut milk in place of milk and omitting any butter, opting for vegan substitutes. This ensures that those with dietary restrictions can still savor a delightful dessert.

For a vegan adaptation, replace each egg with a quarter cup of aquafaba, whipped until peaks form. This substitution allows for an equally light and fluffy result while adhering to plant-based diets.

Low-carb or keto variations can be achieved by using erythritol or stevia as sweeteners instead of sugar, along with almond flour to reduce carb counts overall without sacrificing flavor.

Lastly, consider using low-FODMAP ingredients to cater to those sensitive to certain carbohydrates, making minimal adjustments to keep the dish flavorful and enjoyable.

Troubleshooting Guide

Texture issues are common; if the soufra becomes dense, check that egg whites were properly whipped. Aim for soft peaks and be gentle when folding in to maintain airiness.

Flavor balance is crucial; if it’s too tart, increase the sugar gradually until the desired sweetness is achieved, ensuring no overpowering flavors dominate.

Temperature problems can arise if the oven isn’t calibrated accurately; using an oven thermometer can ensure even cooking. Additionally, avoid opening the oven door prematurely to maintain heat.

Equipment challenges may present themselves if using mismatched baking dishes. Adjust baking times according to varying sizes and materials of pans used.

Ingredient substitutions can sometimes alter results; always research how replacements can affect baking chemistry to avoid mishaps in taste or texture.

Timing concerns can lead to disasters; always set timers and check doneness regularly to prevent overbaking, which could lead to a dry result.

Recipe Success Stories

Community feedback on the Lemon and Blueberry Soufra has been overwhelmingly positive, with many readers sharing how it became their go-to summer dessert. Adaptations have also sparked creativity, inspiring variations with other berries and flavors.

Many bakers report significant success when hosting gatherings, noting how the vibrant colors and delightful tastes encouraged more conversations and socializing. Guests talk about the lightness of the soufra, contrasting pleasantly with richer dishes often served during celebrations.

Adaptation stories reveal that some have creatively altered the recipe for themed events, integrating seasonal themes to highlight local produce. Others have mentioned capturing their presentations beautifully for social media, further popularizing this stunning dish.

Readers have been eager to share photography tips, providing insights into natural lighting and plating techniques that present the dessert at its very best. Community engagement continues to foster exploration and experimentation with this versatile recipe.

Frequently Asked Questions

Q1: Can I use frozen blueberries for this recipe?
A: Yes! Frozen blueberries can be substituted, but they should be added directly from the freezer to avoid excess moisture in the batter. Expect slight texture differences, but they still provide great flavor.

Q2: What can I use if I don’t have cake flour?
A: If you lack cake flour, you can substitute all-purpose flour by removing two tablespoons of flour from each cup and adding two tablespoons of cornstarch. This mix will help mimic the lighter texture of cake flour.

Q3: How do I know when the soufra is done baking?
A: The soufra is done when it is set in the center but slightly jiggly. A golden brown top and a puffed appearance are also telltale signs that it’s ready to enjoy.

Q4: Can I prepare the soufra ahead of time?
A: While it’s best to bake closer to serving time for optimal texture, you can prepare the batter in advance. Keep the components separate and chill until you’re ready to assemble and bake.

Q5: How do I store leftovers?
A: Place any leftovers in an airtight container in the refrigerator. It’s best consumed within three days to maintain its light and fluffy texture.

Q6: Is this recipe suitable for children?
A: Absolutely! The ingredients are simple and nutritious, making it an excellent option for a family-friendly dessert.

Q7: Can I make this dish gluten-free?
A: Yes! Substitute regular flour with gluten-free blends, and ensure any baking powder used is also gluten-free.

Q8: How can I lighten the flavors further?
A: For a lighter touch, consider adding a splash of vanilla extract or almond extract for extra complexity without overwhelming sweetness.

Q9: What is the best lemon variety to use?
A: Meyer lemons are fantastic for a less tart flavor, but you can also use standard lemons depending on your preference for tartness.

Q10: Is this dessert vegan-friendly?
A: You can make it vegan by replacing eggs with aquafaba for a similar fluffy texture and omitting any dairy ingredients.

Q11: Can I add other fruits besides blueberries?
A: Definitely! Feel free to experiment with raspberries, blackberries, or even diced stone fruits for a delightful new twist.

Q12: What can I serve alongside the Lemon and Blueberry Soufra?
A: Pair it with whipped cream, yogurt, or even a scoop of ice cream for a delightful dessert experience.

Additional Resources

If you’ve enjoyed the Lemon and Blueberry Soufra, consider exploring related recipes that highlight seasonal ingredients. Try a mixed berry tart or lemon drizzle cake for delightful variations.

For further technique guides, seek out resources on soufflé-making to deepen your understanding of this delightful cooking style, ensuring success with all soufflé desserts.

Explore ingredient information to understand the unique properties of blueberries and lemons. Dive into detailed discussions about their health benefits and culinary uses to inspire your kitchen adventures.

If you’re looking for essential equipment recommendations, invest in quality mixing bowls, a handheld mixer, and non-stick bakeware for the best results across your baking endeavors.

Finally, stay attuned to seasonal variations; exploring local farmer’s markets for fresh produce can enhance your recipes and creativity in the kitchen.

Join the Conversation

Engage with fellow bakers and dessert lovers on social media! Share your Lemon and Blueberry Soufra creations, tagged with #LemonBlueberrySoufra for a chance to be featured.

Photography tips: Utilize natural light and keep backgrounds simple to highlight your dish’s vibrant colors. A clean, white plate can enhance its visual appeal significantly.

Encourage recipe reviews and feedback by engaging with your culinary community. By sharing successes and tips, you’ll foster a supportive environment for baking enthusiasts.

Consider sharing your unique variations to inspire other cooks, demonstrating how one recipe can evolve into countless delicious versions. Join the conversation, learn from others, and aim to create memorable culinary experiences together.

The Recipe

Lemon and Blueberry Soufra

Serves: 8 servings

Prep Time: 30 mins

Cook Time: 45 mins

Total Time: 1 hr 15 mins

Kitchen Equipment Needed

  • Mixing bowls
  • Handheld mixer or stand mixer
  • Baking dish
  • Spatula
  • Measuring cups and spoons

Ingredients

  • 2 large lemons (juiced and zested)
  • 1 cup fresh blueberries
  • 3 large eggs (separated)
  • 1 cup sugar
  • ½ cup all-purpose flour
  • ½ teaspoon baking powder
  • Salt to taste
  • Butter for greasing the dish

Directions

  1. Preheat the oven to 350°F (175°C). Grease the baking dish with butter.
  2. In a bowl, combine lemon juice and zest, egg yolks, and half the sugar. Mix well.
  3. In another bowl, whisk the egg whites until soft peaks form; gradually add in the remaining sugar until stiff peaks form.
  4. Gently fold the egg yolk mixture into the beaten egg whites.
  5. Carefully add in the flour, baking powder, and salt, folding until well combined.
  6. Gently stir in the blueberries, taking care not to break them.
  7. Pour mixture into the prepared baking dish and bake for 35 to 45 minutes until golden and puffed up.
  8. Remove from the oven and let it cool slightly before serving.

Recipe Notes

  • For a sweeter option, add a bit more sugar based on your preference.
  • This dish can be served warm or chilled.
  • Refrigerate any leftovers for up to three days.

Easy King’s Hawaiian Cheesecake Danish with Creamy Filling

KING’S HAWAIIAN CHEESECAKE DANISH: A Tropical Delight

⚖️
Difficulty
Medium

⏲️
Prep Time
30 mins

🕒
Cook Time
25 mins

⏱️
Total Time
55 mins

🍽️
Servings
12 servings

Indulge in the tropical flavors of the KING’S HAWAIIAN CHEESECAKE DANISH, a delightful twist on the traditional Danish pastry. Bursting with the sweetness of fresh pineapple and rich cream cheese, this dessert not only satisfies the sweet tooth but also transports you straight to a sunny beach. The warm, flaky crust pairs perfectly with the creamy cheese filling, creating a contrast that is simply irresistible.

The unique flavor combination is what sets this recipe apart from other pastries. Imagine enjoying a soft, buttery Danish filled with a luscious cheesecake layer that mingles the lusciousness of pineapple with the richness of cream cheese. Whether served at a brunch gathering or as a dessert after dinner, this KING’S HAWAIIAN CHEESECAKE DANISH promises to bring smiles and delightful memories to your table.

Quick Recipe Highlights

  • Flavor Profile: This cheesecake Danish offers a delightful balance of sweetness from the pineapple and a tangy richness from the cream cheese.
  • Texture: The outer pastry is flaky and tender, perfectly complementing the smooth, creamy filling.
  • Aroma: The baking process fills your kitchen with enticing scents of fresh pineapple and warm butter.
  • Visual Appeal: Golden-brown pastry with a luscious creamy filling and a topping of caramelized pineapple presents a mouth-watering sight.
  • Skill Level Needed: Intermediate; mastering the Danish dough is essential yet rewarding.
  • Special Equipment: You will need a rolling pin, parchment paper, and a baking sheet.

Recipe Overview

  • Difficulty Level: Making the KING’S HAWAIIAN CHEESECAKE DANISH requires some baking skills, particularly in handling the dough and creating a perfect filling.
  • Category: This recipe falls under the breakfast or dessert category, making it versatile for different occasions.
  • Cuisine: Inspired by Hawaiian flavors, this recipe marries traditional Danish techniques with tropical ingredients.
  • Cost: The ingredients are relatively affordable, averaging $15-20 for full servings.
  • Season: Best enjoyed in warmer months when pineapple is in season, but delicious year-round.
  • Occasion: Perfect for brunches, holiday celebrations, or as a special treat for family gatherings.

Why You’ll Love This Recipe

The KING’S HAWAIIAN CHEESECAKE DANISH is a culinary delight that perfectly balances taste and texture. The creaminess of the cheese, combined with the sweetness of pineapple, creates an interplay of flavors that is both refreshing and indulgent at the same time. This recipe provides a unique way to enjoy your traditional Danish while adding a tropical twist. Each bite delivers a harmonious blend of rich and fruity, making it an instant crowd-pleaser.

Convenience is another strong suit of this recipe. While it does require some time to prep and bake, most of the work can be done in advance. This makes the KING’S HAWAIIAN CHEESECAKE DANISH ideal for gatherings—prepare it the day before and simply warm it before serving. Not only does this save time, but it allows the flavors to meld beautifully, enhancing the overall taste.

From a nutritional perspective, this Danish pastry offers a moderate indulgence. Incorporating fruit is always a bonus, and while it does contain cream cheese and sugar, you can control the sweetness and make it a more wholesome treat. Enjoying this Danish with a fresh fruit side or a dollop of yogurt can also add to the nutritional value, making it a more balanced option.

Socially, the KING’S HAWAIIAN CHEESECAKE DANISH acts as a fantastic centerpiece for gatherings. It’s visually stunning and sparks conversation, enticing guests to gather around for a slice. Sharing a homemade treat like this brings friends and family together, fueling happy memories that accompany each delicious bite.

Cost-effectiveness is another reason to fall in love with this recipe. Using common ingredients that you may already have in your pantry, you can create a show-stopping dessert at a fraction of restaurant prices. Plus, with a generous yield of 12 servings, it’s perfect for feeding a crowd without breaking the bank.

Historical Background and Cultural Significance

The KING’S HAWAIIAN CHEESECAKE DANISH has roots that intertwine Hawaiian influences with traditional European pastry techniques. Originating from the islands, the use of pineapple and cream cheese reflects the tropical climate and the availability of fresh ingredients. The recipe pays homage to the Hawaiian tradition of creating dishes that celebrate local produce, particularly pineapple, which is regarded as a symbol of hospitality and friendship.

Culturally, Hawaiian cuisine is marked by its diversity, resulting from a blend of influences from Polynesian, Asian, and European backgrounds. This combination has led to delightful flavor profiles, making dishes like the KING’S HAWAIIAN CHEESECAKE DANISH resonate with many food lovers. The introduction of cream cheese in the context of Hawaiian ingredients showcases the adaptability and creativity of bakers, bridging two worlds seamlessly.

Over time, the classic Danish has evolved to incorporate various fillings, with the KING’S HAWAIIAN variant standing out as a fruity, tropical departure from traditional options like almond or raspberry. This evolution highlights the significance of regional adaptations, showcasing how global influences can transform dishes into innovative culinary experiences.

Across various regions, the appreciation for the KING’S HAWAIIAN CHEESECAKE DANISH has only grown, often appearing in cafes and restaurants eager to provide a taste of Hawaii to their patrons. Its popularity signals a broader trend where traditional desserts are enhanced by local and seasonal ingredients, creating unique interpretations that celebrate both heritage and the evolving nature of cuisine.

Ingredient Deep Dive

Pineapple
Pineapple holds significant cultural importance in Hawaii, where it is often referred to as a symbol of hospitality and generosity. Rich in vitamins C and B6, this tropical fruit offers numerous health benefits, including aiding digestion and boosting the immune system. When selecting pineapples, look for those with a sweet fragrance and firm texture; store them at room temperature, and consume within a few days for optimal freshness. If pineapple isn’t available, mango or peaches can serve as excellent substitutes, adding their unique flavors to the Danish.

Cream Cheese
Cream cheese, a staple ingredient in cheesecakes, has historical ties to early American dairy production. Its creamy, tangy flavor profile enhances countless desserts and savory dishes alike. Nutritionally, cream cheese provides a good source of calcium and vitamins A and B6. When choosing cream cheese, opt for full-fat varieties for the best flavor and texture, and store it tightly wrapped in the refrigerator. If you prefer a lighter option, ricotta or Greek yogurt can be incorporated as substitutes, maintaining the creaminess while reducing calories.

Common Mistakes to Avoid

  • Skipping the Chilling Step: Skipping chilling the dough can result in a tougher pastry. Always allow it to rest to maintain the texture.
  • Overmixing the Filling: Overmixing can incorporate too much air, leading to cracks in the filling. Mix just until smooth.
  • Not Preheating the Oven: A well-preheated oven ensures even cooking. Make sure your oven is at the right temperature before baking.
  • Misestimating the Baking Time: Each oven is unique. Keep an eye during baking to avoid over-browning.
  • Using Cold Ingredients: Room temperature ingredients combine better and create a smoother filling.
  • Rushing the Cooling Process: Letting it cool down slowly is essential for the perfect texture; rushing can result in a gummy filling.
  • Ignoring the Roll Thickness: Rolling the dough too thin can lead to a crispy Danish rather than a flaky one. Aim for about 1/4 inch thickness.
  • Not Enough Egg Wash: An egg wash provides beautiful color and shine; don’t skip this important step!
  • Skipping the Topping: Toppings enhance flavor; consider adding toasted coconut flakes for an extra crunchy texture.
  • Forgetting to Vent the Pastry: Crispiness comes from venting the pastries so steam escapes; remember to score the top before baking.

Essential Techniques

Making the Dough
Creating the Danish dough is crucial for achieving that flaky texture. Start by combining cold butter with flour using a pastry cutter or food processor until the mixture resembles coarse crumbs. Cold butter creates layers, resulting in a perfect flaky pastry. Avoid overworking the dough, as it can lead to toughness; instead, start rolling once the dough forms a ball. Recognizing when the dough is properly chilled and ready to roll is essential for success.

Preparing the Filling
To master the cheesecake filling, beat cream cheese until creamy, then gradually add sugar and eggs. This process ensures a smooth and well-blended filling free of lumps. The texture should be velvety, and overmixing will introduce excess air, leading to cracks during baking. Look for a consistency that is creamy but not runny; achieving this balance is great to avoid common pitfalls associated with cheesecakes.

Pro Tips for Perfect KING’S HAWAIIAN CHEESECAKE DANISH

1. Chill your dough for at least 30 minutes before rolling it out. This will ensure a flaky texture while baking.
2. Use fresh pineapple for the topping; it adds a burst of flavor that’s truly irresistible.
3. Monitor your baking time closely; when the tops are golden brown, it’s time to take them out of the oven.
4. Let the pastry cool before slicing to achieve clean edges and a firmer texture.
5. Consider adding a drizzle of icing for an extra sweet touch just before serving.
6. If the cream cheese filling is too thick, you can add a small amount of heavy cream to loosen it.
7. Always score the top of the pastry lightly before baking to allow steam to escape.
8. Serve warm for the best experience; the flavors and textures are at their peak straight from the oven.

Variations and Adaptations

For regional variations of the KING’S HAWAIIAN CHEESECAKE DANISH, consider adjusting the fruit filling. Mango provides a tropical twist and pairs beautifully with cream cheese, while passion fruit adds an exotic flavor. In season, berries can also be substituted for a delightful berry-cheesecake fusion.

Seasonal adaptations often include substitutions based on availability. In autumn, try pumpkin puree in the cream cheese filling for a seasonal touch, while lime juice can offer a zesty kick, echoing a margarita flavor during summer months.

Dietary modifications can be made by using dairy-free cream cheese and vegan alternatives for a plant-based version. Additionally, using a gluten-free pastry recipe will allow those with dietary restrictions to enjoy this delicacy without worry.

To vary the texture, consider adding chopped nuts to the filling for crunch, or swirling in chocolate ganache for a rich chocolatey experience. Finally, experiment with garnishes—coconut flakes or toasted macadamia nuts can significantly enhance the overall presentation and texture.

Serving and Presentation Guide

When plating your KING’S HAWAIIAN CHEESECAKE DANISH, aim for visual appeal to complement its exquisite taste. Start by placing each piece on a vibrant plate that contrasts with the pastry color. Add a touch of edible flowers or mint leaves for a fresh look, balancing every slice with a scoop of whipped cream or a dollop of yogurt next to it for enhanced presentation.

Garnishing ideas include drizzling a thin line of icing over each piece or dusting with powdered sugar. Consider serving with fresh seasonal fruit to elevate its tropical flair. Adjusting your portion sizes can also change how the dessert is perceived—opt for smaller slices to encourage multiple tastings and a lighter feel.

Temperature is another essential factor—serve the Danish warm for a delightful experience, emphasizing the fresh flavors. For those who prefer it chilled, place in the refrigerator for a couple of hours after baking, then slice and serve.

Lastly, remember to consider portion control when serving. You want to leave guests wanting more without overwhelming their plates, making sure each slice is a perfect bite.

Wine and Beverage Pairing

When selecting a wine to complement the KING’S HAWAIIAN CHEESECAKE DANISH, consider fruity wines that can marry well with the tropical flavors—Moscatos or Rieslings, with their sweetness and fruity notes, pair beautifully with pineapple. A light sparkling wine can also enhance the experience, offering a refreshing contrast to the creamy filling.

For non-alcoholic alternatives, freshly squeezed pineapple or tropical juices serve as excellent pairs, enhancing the flavors of the dish while remaining refreshing. If you prefer coffee or tea, opt for a lightly brewed flower tea or a medium roast coffee that won’t overpower the dessert’s delicate flavors.

Temperature plays a role in serving drinks; ensure your wines are chilled, and any fruit juices are at a refreshing coolness to complement the warm Danish pastry. This enhances the overall dining experience, ensuring every component is thoughtfully placed.

Storage and Shelf Life

To maintain the freshness of your KING’S HAWAIIAN CHEESECAKE DANISH, store it in an airtight container in the refrigerator for up to three days. To avoid sogginess, place parchment paper between layers if stacking. If you wish to store it for longer, consider freezing it; wrap each individual piece tightly in plastic wrap, then place them in a freezer-safe container or zip-lock bag.

For temperature requirements, ensure the Danish cools completely before refrigerating or freezing. Signs of spoilage include an off smell or visible mold; discard any pastry that appears compromised. When reheating, use an oven preheated to 350°F; warm for about 10-15 minutes or until heated through.

For those planning to enjoy leftovers, consider reheating slices in a toaster oven for a crispy finish or microwaving them for just a few seconds to maintain softness but avoid overcooking, which can dry out the filling.

Make Ahead Strategies

Planning to make the KING’S HAWAIIAN CHEESECAKE DANISH in advance is a great way to ensure a stress-free day of serving. Begin by making the dough a day or two ahead; wrap it in plastic wrap and refrigerate. Alternatively, the cheesecakes can be prepared a day before baking and kept in the refrigerator.

During the baking day, simply assemble and bake—this reduces the time needed for preparation on your busy day! Assessing quality impact, freshly baked pastries will always taste better, and serving them warm enhances their appeal.

Another tip is to assemble the Danish the night before serving; keep it covered in the fridge and bake right before serving for ultimate freshness. Consider adding a fresh topping, like fruit or drizzle, just before serving to keep the presentation lively.

Finally, plan for any last-minute additions, like whipped cream, which can be quickly whipped up to freshen up your dessert!

Scaling Instructions

If you wish to serve the KING’S HAWAIIAN CHEESECAKE DANISH to a larger group, consider doubling the recipe. When scaling, ensure to use larger tools such as mixing bowls for your ingredients. Always adjust your baking time according to the volume of pastries; larger batches might require slightly longer baking.

For halving the recipe, keep in mind to modify ingredient measurements accurately to maintain the same flavor profile, and adjust your cooking utensils to smaller sizes to streamline the process.

Store any prepared Danish in individual portions in airtight containers to prevent them from sticking together. Ensure to monitor the baking time closely in case smaller quantities cook quicker than anticipated.

These scaling tips will help maintain the traditional flavor and texture, ensuring that every bite remains delicious regardless of the serving size.

Nutritional Deep Dive

The KING’S HAWAIIAN CHEESECAKE DANISH serves as a delightful indulgence, and understanding its nutritional composition is crucial. Each serving generally consists of about 250-300 calories, with a balanced mix of carbohydrates, fats, and proteins.

The macronutrient breakdown shows about 12-15 grams of fat largely from cream cheese and butter, which provides richness. With a moderate amount of sugar (around 10-12 grams), this dessert remains sweet without overwhelming your daily intake.

On the micronutrient side, the pineapple contributes significant amounts of vitamin C and manganese, vital for supporting metabolism and immune function. Incorporating fresh fruits enhances the fiber content, making the Danish a more balanced treat.

For those monitoring their dietary intake, maintaining portion control can help manage calories, while enjoying it alongside fresh fruits can enhance the meal’s overall nutritional value and make it more satisfying.

Dietary Adaptations

For gluten-free variations of the KING’S HAWAIIAN CHEESECAKE DANISH, substitute regular flour with an all-purpose gluten-free blend, ensuring a similar texture. It’s essential to verify that your baking powder and other added ingredients are also gluten-free to maintain compatibility.

For dairy-free adaptations, dairy-free cream cheese and coconut milk can replace traditional cream cheese, providing a similar smoothing quality while maintaining tropical flavor notes. If you’re catering to a vegan audience, consider using flax eggs and replacing butter with a vegan margarine option.

For those following a low-carb or keto diet, almond flour can replace all-purpose flour, and sweeteners like erythritol or stevia can be utilized in place of sugar to create a lower-carb version without sacrificing flavor.

Those on a Paleo diet can adapt by using coconut flour and coconut oil, while ensuring all other ingredients are compliant with the dietary principles. Explore these alternatives to make this delightful dessert accessible to various dietary preferences and restrictions.

Troubleshooting Guide

If your KING’S HAWAIIAN CHEESECAKE DANISH comes out overly dense, it might be due to overmixing the filling. Ensure you mix just until combined, and consider using room temperature ingredients to help achieve a fluffier texture. If you observe cracks in the cream cheese filling, you may have incorporated too much air during mixing, so be sure to mix gently.

If the crust is too tough, either the dough was overworked or not sufficiently chilled prior to baking. Always allow the dough to rest in the fridge, and avoid handling it too much. For a soggy bottom, ensure the bottom of the Danish cooks long enough by keeping an eye on it towards the end of the baking process.

Ultimately, should you experience issues with browning, adjust your oven temperature slightly; consider placing foil over the top if it browns too quickly. Use an oven thermometer to ensure accuracy; an inconsistent oven can lead to several baking problems.

Recipe Success Stories

Community feedback around the KING’S HAWAIIAN CHEESECAKE DANISH has been overwhelmingly positive. Many home bakers report successes in creating this beautiful dessert, with variations and personal twists that they proudly share. Photos of their creations often fill social media, showcasing how they’ve made the recipe their own, whether by using different fruits or adding unique toppings.

Adaptation stories frequently highlight how readers have incorporated seasonal fruits like berries or used local products for fillings that reflect their own cultures. These shared stories prove that food can transcend regions and personal stories, resonating with others who share a love for baking.

Readers often suggest their preparation tips, including advanced preparation strategies or serving variations, which can inspire others. This community engagement enriches the experience, allowing bakers to connect through their culinary endeavors.

Photography tips shared in this community inspire others to elevate their food photography, ensuring their beautiful KING’S HAWAIIAN CHEESECAKE DANISH looks as impressive in photos as it tastes. Of course, many highlight the power of natural light and presenting the pastry alongside vibrant tropical fruits for eye-catching visuals.

Frequently Asked Questions

Q: Can I freeze the KING’S HAWAIIAN CHEESECAKE DANISH?
A: Yes! This delicious Danish can be frozen. Wrap individual pieces in plastic wrap and place them in an airtight container for up to 2 months. When ready to eat, simply thaw in the fridge overnight before warming in the oven.

Q: What other fruits can I use besides pineapple?
A: Alternatives like mango, peach, or even mixed berries can be delightful substitutes for the filling. Feel free to get creative with seasonal fruits to keep the recipe fresh and exciting!

Q: Can I make the dough ahead of time?
A: Absolutely! The dough can be prepared ahead of time and kept in the refrigerator for up to 2 days. When you’re ready to bake, roll it out, fill, and shape.

Q: How do I know when the Danish is fully baked?
A: Look for a golden-brown color and a slight puff in the pastry. The filling should be set, not jiggly, when you gently shake the pan.

Q: Is there a way to make this recipe dairy-free?
A: Yes! Substituting dairy-free cream cheese and using plant-based butter can yield a delicious dairy-free version of this Danish.

Q: What’s the best way to serve the KING’S HAWAIIAN CHEESECAKE DANISH?
A: Serving it warm enhances its flavors. Pair it with a dollop of whipped cream or yogurt and a sprinkle of toasted coconut for a finishing touch.

Q: Can I use a store-bought pastry for this recipe?
A: Yes! If you’re short on time, using a pre-made puff pastry can save time. Just ensure to adjust the baking time accordingly.

Q: How can I make it less sweet?
A: To reduce sweetness, decrease the sugar in the filling, or use fresh fruit as a topping. Adjusting the amount of cream cheese can also balance out the flavor.

Q: Is this recipe suitable for breakfast or dessert?
A: This KING’S HAWAIIAN CHEESECAKE DANISH is versatile enough to serve as a delightful breakfast treat or a festive dessert!

Q: Can I add nuts to the recipe?
A: Yes! To add a crunchy texture, consider mixing in finely chopped nuts like macadamia or almonds in the filling or as a topping.

Additional Resources

If you enjoyed the KING’S HAWAIIAN CHEESECAKE DANISH, consider exploring other tropical-inspired recipes that highlight delicious flavors. Techniques guides on Danish pastry making can sharpen your skills, ensuring each bake turns out perfectly.

Delve into ingredient information focusing on tropical fruits, enhancing your culinary repertoire and expanding your creativity in the kitchen. Consider investing in quality equipment, such as a good mixing bowl set or baking sheets, to offer the best chances of success with your Danish.

Seasonal variations and ingredient swaps can inspire you to customize traditional recipes, allowing you to serve delicious homemade desserts that cater to various tastes and dietary needs. Never hesitate to experiment—let your creativity flow with every bake!

Join the Conversation

We invite you to join our community of home bakers! Share your experiences and adaptations of the KING’S HAWAIIAN CHEESECAKE DANISH on social media using the hashtag #KingsHawaiianDanish. Share your beautiful photos and connect with others who are also exploring this delightful recipe!

Photography tips shared within this community can significantly boost your skills, so don’t be shy to post your creations. Engage in recipe reviews and provide suggestions or variations that worked for you. Engaging with fellow food lovers enhances your culinary journey and encourages collaborative creativity in the kitchen.

Your passion fuels the collective exploration of delicious recipes, solidifying the connection between food, family, and fun. Let’s inspire each other to bake beautiful memories one Danish at a time!

The Recipe

KING’S HAWAIIAN CHEESECAKE DANISH

Serves: 12 servings

Prep Time: 30 mins

Cook Time: 25 mins

Total Time: 55 mins

Kitchen Equipment Needed

  • Rolling pin
  • Parchment paper
  • Baking sheet
  • Mixing bowl
  • Electric mixer
  • Measuring cups and spoons

Ingredients

  • 1 package (8 oz) cream cheese, softened
  • 1/2 cup granulated sugar
  • 1/2 cup crushed pineapple, drained
  • 1 tsp vanilla extract
  • 1 tube of KING’S HAWAIIAN Roll dough
  • 1 egg, for egg wash
  • Optional toppings: toasted coconut, fresh berries

Directions

  1. Preheat the oven to 350°F (175°C) and line a baking sheet with parchment paper.
  2. In a bowl, mix the softened cream cheese, sugar, crushed pineapple, and vanilla extract until smooth.
  3. Roll out KING’S HAWAIIAN Roll dough on a floured surface and cut into desired shapes.
  4. Place a spoonful of the cream cheese mixture in the center of each dough piece.
  5. Fold and seal the edges to create a pocket, ensuring it is tightly closed.
  6. Brush each Danish with egg wash and place on the prepared baking sheet.
  7. Bake for about 20-25 minutes or until golden brown and flaky.
  8. Once baked, cool slightly, then add optional toppings if desired.
  9. Enjoy warm or at room temperature!

Recipe Notes

  • Feel free to substitute the crushed pineapple with other fruits like mango or mixed berries.
  • For extra flavor, consider adding lemon zest to the cream cheese mixture.
  • Store leftovers in an airtight container in the fridge for up to 3 days.
  • You can freeze the unbaked Danish; just extend the cooking time if baking from frozen.

Easy Mini No-Bake Kit Kat Cheesecakes – Creamy & Crunchy

Delicious Mini No-Bake Kit Kat Cheesecakes: A Sweet Treat for Everyone

⚖️
Difficulty
Easy

⏲️
Prep Time
20 mins

🕒
Cook Time
0 mins

⏱️
Total Time
20 mins

🍽️
Servings
12

If you’re craving a delightful dessert that combines rich flavors and smooth textures, look no further than these Mini No-Bake Kit Kat Cheesecakes. This easy-to-make treat marries the creamy goodness of cheesecake with the crunchy chocolate delight of Kit Kats, creating a perfect balance of sweetness and texture. The best part? There’s no baking required, making it an ideal choice for warm days or last-minute gatherings.

These cheesecakes bring back childhood memories of snack time, wrapped up in a fun individual serving. Picture this: a luscious cheesecake filling, topped with crunchy pieces of Kit Kat and drizzled with chocolate. It’s a beautiful blend of nostalgia and modern dessert aesthetics, guaranteed to impress guests and satisfy cravings. Whether you’re serving them at a birthday party, holiday gathering, or simply a casual get-together, these petite desserts are sure to be the stars of the show.

Quick Recipe Highlights

  • Flavor Profile: The combination of creamy cheesecake and crunchy chocolate creates a delightful blend of flavors.
  • Texture: Enjoy the smooth, velvety filling paired with the crunch of Kit Kat pieces.
  • Aroma: The sweet aroma of chocolate mingles with the fresh scent of cream cheese.
  • Visual Appeal: The layered presentation topped with chocolate drizzle is visually striking.
  • Skill Level Needed: This simple recipe is perfect for beginners and veterans alike.
  • Special Equipment: Just a mixing bowl and cupcake tins are needed.

Recipe Overview

  • Difficulty Level: This recipe is rated easy, requiring minimal skills and only mixing ingredients.
  • Category: This dessert fits perfectly in the sweet treat category, ideal for parties or as an afternoon snack.
  • Cuisine: Drawing from American dessert traditions, it adds a modern twist with its no-bake approach.
  • Cost: Ingredients are budget-friendly, making this dessert accessible for everyone.
  • Season: Great for any season, but especially refreshing in warmer months.
  • Occasion: Perfect for birthdays, holidays, or just a fun family night in.

Why You’ll Love This Recipe

The taste and texture of these Mini No-Bake Kit Kat Cheesecakes are an absolute indulgence. The creamy filling melts in your mouth while the chocolate pieces add a satisfying crunch, satisfying all your dessert cravings in one bite. Each cheesecake is a perfect balance of sweet and creamy with a touch of richness from the chocolate, making it hard to stop at just one.

This recipe is not just delicious but incredibly convenient. With no baking required, you can whip these up in under 30 minutes. Just mix the ingredients, layer them, and refrigerate. It’s a perfect make-ahead dessert that allows you to spend more time with friends and family instead of being tied down in the kitchen.

On top of being a delicious treat, these cheesecakes can be a slightly healthier indulgence. You control the ingredients, allowing for adjustments based on dietary preferences. While it’s still a dessert, it can be made with lower fat cream cheese or lighter toppings, making it a bit more health-conscious without losing flavor.

Hosting friends or family? These mini cheesecakes are bound to impress! They offer a fun, interactive aspect to your dessert presentation. Guests will love the individual servings and the unique combination of flavors. It creates a delightful experience around the dining table.

Cost-effectiveness is another reason to love this recipe. It’s made with simple ingredients that are often already in your pantry. The ability to create an impressive and crowd-pleasing dessert for minimal investment is a plus for any home cook.

Historical Background and Cultural Significance

The history of cheesecake stretches back thousands of years, with origins traced to ancient Greece. It was initially served to athletes at the first Olympic Games in 776 BC, highlighting its popularity. Over time, cheesecake has evolved into various forms across different cultures, incorporating local ingredients and styles.

Kit Kat, on the other hand, made its debut in England in 1935. Initially launched as a chocolate-covered wafer bar, it quickly gained popularity globally. The combination of Kit Kat with cheesecake is a relatively modern innovation, showcasing the blending of traditional desserts with contemporary flavors.

This Mini No-Bake Kit Kat Cheesecake represents a fusion of these two rich culinary traditions, symbolizing how food can evolve by merging iconic treats into beloved desserts. Each bite tells a story of creativity, adaptation, and celebration of flavors from across the globe.

Regional variations of this dessert can be found, often with local ingredients or flavor twists. From different kinds of chocolate to unique flavoring in the cheesecake, it’s fascinating to see how recipes adapt in different cultures while keeping the core essence intact.

Ingredient Deep Dive

The primary ingredient, cream cheese, plays a significant role in the cheesecakes’ texture and flavor. Rich in calcium and protein, cream cheese also brings a creaminess that elevates the dessert experience. For selection, opt for full-fat or low-fat cream cheese based on preference, and store it tightly wrapped in the refrigerator to ensure its freshness. Cream cheese can also be substituted with Greek yogurt for a tangy twist.

Next, the Kit Kat bars that add a delicious crunch and chocolatey goodness contain cocoa and sugar, making them a favorite treat across the globe. Nutritionally, they provide a quick energy boost but should be consumed in moderation. When selecting Kit Kats, consider using different flavors available, and store them in a cool place to prevent melting.

Common Mistakes to Avoid

  • Not using room temperature cream cheese can lead to lumps in the mixture. Ensure it’s at room temperature for smoother results.
  • Overmixing the filling can incorporate too much air, causing the cheesecakes to crack while setting. Mix until just combined.
  • Skipping the refrigeration step will lead to a runny cheesecake. Allow enough time for them to set properly.
  • Incorrectly handling the Kit Kats while breaking them can result in uneven pieces. Use a sharp knife for clean cuts.
  • Using too much whipped cream can make the filling overly fluffy instead of creamy. Balance is key.
  • Not measuring your ingredients properly can affect the flavor and texture. Use measuring cups and spoons for accuracy.
  • Ignoring the importance of toppings can result in a less visually appealing dessert. Garnish thoughtfully for the best presentation.
  • Forgetting to line the cupcake tins can make for a messy extraction. Always use liners or grease the tins.
  • Not chilled serving plates can cause the cheesecakes to soften too quickly during serving. Chill your serving plates in advance.
  • Rushing the cooling process can affect the texture. Allow ample time in the fridge to stabilize before serving.

Essential Techniques

Mixing ingredients is crucial for the ideal cheesecake filling. It’s important to not overmix to avoid air bubbles that can lead to cracking. To master this, combine the cream cheese and sugar until smooth, and add other ingredients slowly.

Proper refrigeration is key to achieving the perfect consistency. By chilling the cheesecakes long enough, the mixture firms up to hold its shape when served. Common pitfalls include checking too early or not allowing enough time.

Pro Tips for Perfect Mini No-Bake Kit Kat Cheesecakes

1. Use a food processor for mixing the cheesecake filling, ensuring a perfectly smooth consistency.

2. For added flavor, incorporate a splash of vanilla or almond extract to the filling.

3. Crush some Kit Kats for the base layer to add extra chocolatey flavor.

4. Drizzle melted chocolate over the top for a beautiful finish that adds richness.

5. Experiment with different toppings like caramel or crushed nuts for variety.

6. Allow your cheesecakes to chill overnight for the best flavor melding.

7. If you prefer a gluten-free option, use gluten-free cookies for the crust.

8. Present your cheesecakes on an elegant platter for an upscale dessert experience.

Variations and Adaptations

For a twist on flavors, try using flavored Kit Kats, like matcha or strawberry, to match your preference. This can give your cheesecakes an exciting twist while maintaining the core recipe.

Seasonal adaptations include mixing in pumpkin puree or spices during the fall for a festive treat, or using fresh fruits like berries for a refreshing summer version.

For those with dietary restrictions, consider making a vegan version by substituting traditional ingredients with plant-based alternatives such as tofu or coconut cream.

If you’re looking for a different texture, try adding a layer of crunchy graham crackers or nuts between the filling and chocolate topping.

For presentation alternatives, use a clear jar to create layered versions of these cheesecakes, which can be visually stunning and are great for parties.

Serving and Presentation Guide

Plating techniques are essential for an impressive presentation. Consider using a simple white plate to allow the colors of the cheesecake to stand out.

Garnishing ideas include fresh mint leaves or a sprinkle of cocoa powder on top for added elegance. You can also use edible flowers for a colorful touch.

Traditional accompaniments might include a scoop of vanilla ice cream or fresh fruit on the side, blending perfectly with the flavors of the cheesecake.

Modern serving suggestions involve using mini dessert cups or jars, making them perfect for parties or events. This way, guests can enjoy individual servings easily.

Temperature considerations are also vital; serve these cheesecakes chilled for the best experience.

Portion control tips suggest serving them in cupcake liners or small glass jars for ideal serving sizes without overindulgence.

Wine and Beverage Pairing

For wine pairings, consider a sweet dessert wine or a light rosé. The fruit notes will complement the chocolate and cream well.

Non-alcoholic alternatives could include a rich hot chocolate or a versatile iced coffee, both of which frame the flavors beautifully without overpowering them.

Thoughtful coffee pairings may also enhance the dessert experience, with a light roast espresso bringing out the richness of the Kit Kat.

Temperature considerations are crucial when serving alongside drinks; make sure beverages are at the right temperature to create a balanced pair.

Serving suggestions might also include flavored seltzers or sparkling water with fruit, adding a refreshing contrast to the sweetness of the cheesecakes.

Storage and Shelf Life

Proper storage methods can help maintain the quality of your mini cheesecakes. Store uneaten cheesecakes in airtight containers in the fridge for up to 5 days.

Temperature requirements are vital for preserving flavor. Keep the cheesecakes refrigerated until serving time to prevent spoilage.

Container recommendations should include glass or plastic containers that can seal tightly to avoid drying out.

Signs of spoilage include off smells or a change in texture; if either is noted, it’s best to discard the dessert.

Reheating instructions aren’t applicable since these are served chilled, but if you made a crust that needs refreshing, a quick re-bake can help.

For those looking to freeze the cheesecakes, ensure they’re well-wrapped in plastic wrap and stored in a freezer-safe container for up to 3 months.

Make Ahead Strategies

For a simple prep timeline, you can prepare the cheesecake filling up to two days in advance, storing it in the refrigerator until assembly.

Storage between steps can include keeping the crust and filling separated in the fridge until ready to combine.

Quality impact assessment suggests that cheesecakes taste better the longer they chill, allowing flavors to meld beautifully.

Assembly tips include lining your cupcake tins with parchment for easy release and attractive presentation.

Reheating guidelines are not relevant for this dessert, but adding fresh toppings before serving can enhance the visual appeal.

Fresh element additions might involve adding fruit or whipped cream just before serving to ensure they stay intact and appealing.

Scaling Instructions

To halve the recipe, simply divide each ingredient amount accordingly and keep the same mixing and chilling instructions.

Doubling or tripling the recipe is straightforward as the ratios remain the same; just ensure you have larger vessels for mixing.

Equipment adjustments may require using larger mixing bowls and additional muffin tins or jars for serving the increased quantity.

Timing modifications may also involve adjusting chilling time if making a larger batch to ensure all are adequately set.

Storage considerations remain the same, allowing for ample time in the fridge to enjoy later.

Nutritional Deep Dive

The macro breakdown shows a balance of carbohydrates from the crust and sugars, alongside fats from the cream cheese, making this a richer dessert.

Micronutrient analysis highlights calcium from the cream cheese and essential vitamins from any fresh toppings you might use.

Health benefits include the enjoyment of a sweet treat with moderation, aiding in satiety and pleasure during dessert time.

Dietary considerations should take into account those wanting lower sugar or light variants, which are easily adjustable in this recipe.

Portion analysis may help with weight management; keeping servings small can satisfy cravings while controlling intake.

Dietary Adaptations

For gluten-free options, simply substitute regular cookies with gluten-free varieties in the crust.

To create a dairy-free version, consider using tofu or a nut-based cream cheese that approaches the same texture and flavor.

Vegan adaptations can be made using plant-based whipped cream and non-dairy chocolate to maintain the essence of the dessert.

If low-carb or keto is your preference, opt for almond flour for the crust and sugar substitutes for the filling.

The paleo diet can be accommodated by using natural sweeteners and raw nuts for the crust.

Low-FODMAP adjustments can manage lactose levels with suitable dairy alternatives and measured sugar allowances.

Troubleshooting Guide

Texture issues often arise from improperly blended ingredients. Ensure the mixture is smooth before filling the cups.

Flavor balance can be off if sugar content is not measured accurately. Adjust as necessary, adding flavors carefully.

Temperature problems can result in a soft filling when not chilled enough. Ensure refrigeration is sufficient before serving.

Equipment challenges might occur if you don’t have the right tools. Invest in quality mixing bowls and utensils for better results.

Ingredient substitutions may not always yield the same results. Look for tested substitutions to maintain flavor integrity.

Timing concerns when chilling can affect the structure. Always allow enough chill time regardless of batch size.

Recipe Success Stories

Community feedback has been overwhelmingly positive, with many sharing their adaptations and creative twists on the original recipe.

Variation successes often highlight the use of different chocolates and flavored crusts, enhancing the fundamental delight of these cheesecakes.

Readers have shared suggestions for enhancing the presentation, proving the visual appeal of these treats aligns perfectly with their taste.

Photography tips from the community emphasize the importance of lighting; shooting these cheesecakes in natural light can really enhance their beauty.

Frequently Asked Questions

Can I use different candies instead of Kit Kat?

Absolutely! Feel free to experiment with other chocolate bars or candies that appeal to you for a personal twist on the recipe.

How long can I store these cheesecakes?

These cheesecakes can be stored in the refrigerator for up to 5 days, or they can be frozen for longer storage.

Can I make these gluten-free?

Yes! Simply substitute the crust with gluten-free cookies, and ensure all other ingredients align with gluten-free standards.

Is this dessert suitable for vegan diets?

Yes, by using plant-based cream cheese and whipped cream, you can create a delicious vegan version of these cheesecakes.

What can I substitute for cream cheese?

Mascarpone, Greek yogurt, or non-dairy cream cheese can all work as great substitutes depending on the flavor profile you desire.

Can I prepare this dessert a day in advance?

Absolutely! In fact, making it the day before allows the flavors to meld together for a more delicious experience.

How do I remove the cheesecakes from the molds?

Using cupcake liners or greasing the molds can help with easy removal. Gently pull the sides to release them before lifting out.

Can I add fruit toppings?

Of course! Fresh fruit can add a burst of flavor and color to your cheesecakes, enhancing both taste and presentation.

How do I prevent my crust from being too dry?

Make sure your butter is melted and thoroughly mixed into the crumb mixture, ensuring it binds well without being overly dry.

What is the best way to serve them?

Serve chilled, and consider adding a dollop of whipped cream or a scoop of ice cream on the side for an extra treat.

Additional Resources

If you’re interested in more delightful treats, check out our recipes for chocolate mousse or mini fruit tarts that share a similar appeal.

Technique guides on how to properly mix and chill desserts can help ensure you achieve the perfect texture and flavor every time.

Learn more about ingredient options and where to find the best-quality chocolate and cream cheese for your dessert needs.

Equipment recommendations may also enhance your baking experience, including quality mixing bowls, spatulas, and cupcake tins.

For seasonal variations, consider summery fruit desserts or warm spiced options during the winter holidays that highlight festive flavors.

Join the Conversation

We love seeing your creations, so share your photos on social media with our hashtag and join the community in celebrating delicious desserts!

Photography tips can help you capture your desserts beautifully. Natural light and simple backgrounds often yield the best results.

Recipe reviews are always welcome, letting us know what worked for you or what variations you’ve tried enhances our culinary community.

Engaging with our community allows for sharing suggestions and encouraging one another in trying new creations!

Consider sharing your personal variations, as we embrace creativity and enjoy seeing how each recipe can be adapted!

The Recipe

Mini No-Bake Kit Kat Cheesecakes

Serves: 12

Prep Time: 20 mins

Cook Time: 0 mins

Total Time: 20 mins

Kitchen Equipment Needed

  • Mixing bowl
  • Cupcake tins or jars
  • Electric mixer
  • Spatula

Ingredients

  • 1 package cream cheese (8 oz), softened
  • 1/2 cup sugar
  • 1/4 cup heavy cream
  • 1 teaspoon vanilla extract
  • 10 Kit Kat bars, crushed
  • 1 cup crushed cookies for the crust
  • 1/4 cup butter, melted

Directions

  1. In a mixing bowl, combine crushed cookies and melted butter. Press the mixture into the bottom of cupcake tins.
  2. In another bowl, beat the softened cream cheese and sugar until smooth.
  3. Add heavy cream and vanilla extract to the cream cheese mixture, and mix until fully combined.
  4. Carefully fold in the crushed Kit Kat pieces.
  5. Pour the cheesecake mixture over the cookie crust, filling each cup.
  6. Refrigerate for at least 4 hours or until set.
  7. Serve chilled, garnished with additional Kit Kat pieces or chocolate drizzle if desired.

Recipe Notes

  • Feel free to use gluten-free cookies for a gluten-free option.
  • Store leftovers in an airtight container in the fridge for up to 5 days.

Classic Molded Cranberry-Orange Salad – Perfect for Holidays

Molded Cranberry-Orange Salad: A Refreshing Holiday Delight

⚖️
Difficulty
Easy

⏲️
Prep Time
10 mins

🕒
Cook Time
5 mins

⏱️
Total Time
15 mins

🍽️
Servings
6 servings

The Molded Cranberry-Orange Salad is a vibrant and refreshing dish that brings the essence of seasonal festivities to your table. With its beautiful jewel-like hue, this salad is not just a treat for the taste buds but also an eye-catching addition to any holiday gathering. Imagine cutting into the gelatinous mold, revealing glistening cranberries nestled among tangy orange segments, all infused with a hint of sweetness and tartness, making each bite a burst of flavor. This delightful salad is not only easy to prepare but also celebrates the rich, zesty flavors of the season.

Perfect for Thanksgiving or Christmas celebrations, Molded Cranberry-Orange Salad appeals to all ages, offering a unique combination of fruity freshness and a delightful texture. The easy-to-follow recipe allows you to whip this up in mere minutes, leaving you with plenty of time to focus on the rest of your holiday menu. Whether served as a side dish or a light dessert, this salad will surely be a hit that keeps everyone coming back for more.

Quick Recipe Highlights

  • Flavor Profile: The refreshing tartness of cranberries mingles beautifully with the bright citrus flavor of orange, creating a sweet and tangy harmony.
  • Texture: Each spoonful offers a delightful contrast of the smooth gelatin and the juicy bursts of fruit.
  • Aroma: The fresh, fruity scent of oranges combined with the distinct aroma of cranberries sets a cheerful mood.
  • Visual Appeal: Its striking red and orange colors make it an eye-catching centerpiece on your holiday table.
  • Skill Level Needed: This recipe requires basic kitchen skills and is perfect for novice cooks.
  • Special Equipment: Only a mold or a bowl is necessary to create this show-stopping salad.

Recipe Overview

  • Difficulty Level: The Molded Cranberry-Orange Salad is easy to prepare, making it suitable for cooks of all skill levels. It involves simple steps that lead to impressive results.
  • Category: This salad is typically served as a side dish or a light dessert during holiday meals, making it versatile and accommodating.
  • Cuisine: This dish stems from American culinary traditions, commonly served during Thanksgiving and Christmas celebrations, demonstrating the seasonal bounty.
  • Cost: With inexpensive ingredients like cranberries and oranges, this salad is budget-friendly, making it accessible for all family gatherings.
  • Season: Best enjoyed during the fall and winter months when both cranberries and oranges are in season, ensuring maximum flavor.
  • Occasion: Ideal for family gatherings, holiday dinners, and potlucks, this salad enhances any meal with its vibrant flavor and presentation.

Why You’ll Love This Recipe

The Molded Cranberry-Orange Salad is a delicious blend of flavors and textures that pleases the palate with its vibrant taste. The sweet and tangy cranberries perfectly complement the zesty orange, creating a refreshing experience. This salad’s unique gelatinous form adds a fun element to traditional meals, making it an exciting dish to serve during festive occasions. You and your guests will look forward to each refreshing bite, particularly as it contrasts the heavier dishes typical of holiday feasts.

This recipe’s convenience is another great reason to love it. With a prep time of just 10 minutes, you can quickly put it together and let the refrigerator do the work. This ease of preparation allows you to focus on other aspects of your holiday meal, making it a hassle-free addition to your menu. You’ll appreciate having a tasty, colorful dish that can be stored until serving time.

Nutritionally, this salad is a smart choice for those looking to balance their holiday meals. Loaded with antioxidants from the cranberries and dietary fiber from the oranges, it supports healthy digestion and adds essential vitamins to your diet. This makes it not just a treat, but a beneficial addition to any meal.

Serving this salad can also elevate social gatherings by impressing your guests with its unique presentation and refreshing taste. It encourages conversation and shares delightful flavors that everyone can enjoy together. The Molded Cranberry-Orange Salad brings a festive atmosphere to your table, making holidays more memorable.

Lastly, the cost-effectiveness of this recipe is a bonus for budget-conscious cooks. Utilizing seasonal fruits ensures you get the freshest ingredients while saving money. Additionally, this salad can easily be doubled or tripled without substantial cost increases, making it perfect for larger gatherings where everyone can taste the joy of the season.

Historical Background and Cultural Significance

The origin of the Molded Cranberry-Orange Salad can be traced back to the early 20th century when gelatin desserts started gaining popularity in American cuisine. These dishes were often showcased at dinner parties and family gatherings, representing sophistication and creativity in culinary art. The combination of cranberries and oranges came about due to their seasonal availability, and they quickly became favorites on holiday tables.

This salad holds cultural importance as it embodies the spirit of Thanksgiving and Christmas, symbolizing togetherness and appreciation for seasonal harvests. Traditionally, it was made in molds that added an aesthetic quality, elevating the dish’s appeal for festive occasions. The choice of flavors reflects the abundance of nature during the fall and winter months, connecting families with the bounty of the land.

Over the decades, the recipe has evolved, adapting to changing tastes and dietary preferences. Modern versions may incorporate other fruits or sweeteners, enhancing its versatility while maintaining the classic essence. Its flexibility has allowed it to remain a staple in holiday menus, showcasing the ability of traditional recipes to adapt and endure.

Regional variations have emerged across the United States, with some regions adding nuts or spices to personalize their salad. However, the core elements of cranberry and orange remain universal, representing an unbreakable bond through family traditions and shared meals.

Ingredient Deep Dive

Cranberries: Cranberries are a quintessential ingredient in this salad, prized for their bright red color and tangy flavor. Originating from North America, these berries were used by Native Americans for food and medicinal purposes. Nutritionally, cranberries are rich in antioxidants, promoting heart health and preventing urinary tract infections. When selecting cranberries, choose firm, glossy berries that are mostly bright red. For storage, keep them in the refrigerator in a sealed container to maintain freshness.

For substitutions, you may consider using dried cranberries in a pinch, but the texture and moisture content will differ. Make sure to adjust sugar levels since dried cranberries are often sweetened.

Oranges: The zesty profile of oranges complements cranberries beautifully, providing a sweet and tangy contrast. They have a rich history dating back to ancient cultures in Asia, eventually finding their way to America in the 18th century. Oranges are a significant source of vitamin C, which can enhance your immune system. When selecting oranges, look for firm and heavy ones with a vibrant color for the best taste. Store them in a cool, dry place or in the refrigerator for extended freshness.

If you’re looking to substitute, consider using mandarins or tangerines for a sweeter flavor that still pairs well with cranberries. Just be mindful of the fruit’s juiciness, which may affect the overall texture of the salad.

Common Mistakes to Avoid

  • Not allowing enough chilling time: This salad needs sufficient time in the fridge to set properly. Failing to do so can result in a watery consistency.
  • Using overripe fruit: Overripe cranberries or oranges can alter the flavor profile. Always select fresh, firm fruits for the best taste.
  • Forgetting to add sweetener: Some may skip sweetening the mixture altogether, leading to an overly tart salad. Taste and adjust sweetness as needed.
  • Improper molding: Be careful not to rush the setting process, as improper molding may cause the salad to fall apart when serving.
  • Neglecting to grease the mold: Not greasing the mold may make the salad difficult to release. Use a light coating of cooking spray for easy removal.
  • Skipping the fruit chopping step: Leaving cranberries or oranges whole will result in a clunky salad. Chop fruits finely for a more balanced texture.
  • Overmixing the gelatin: Stirring too vigorously can create air bubbles in the gelatin, making the final product less appealing. Stir gently until just combined.
  • Not letting it rest: This salad benefits from resting before serving, allowing flavors to meld together. Serving immediately can lead to less developed flavors.
  • Ignoring color combinations: Mixing in other fruits can dull the visual appeal of the salad. Stick to the classic red and orange for an eye-catching look.
  • Underestimating serving size: Always prepare a bit more than you think you’ll need, as this salad is often a crowd favorite.

Essential Techniques

One essential technique for making the Molded Cranberry-Orange Salad is properly preparing the gelatin. Knowing the right amount of water to mix with your gelatin can make all the difference in achieving the perfect texture. Ensure that it dissolves completely without clumping. If using powdered gelatin, allow it to bloom before mixing into the fruit concoction for optimal results.

An important aspect is molding the salad. Whether using a traditional mold or a simple bowl, greasing the interior lightly allows for easy release once set. To master this, use a gentle hand when pouring in the mixture and ensure there are no bubbles trapped against the sides. Tap the mold lightly on the countertop after pouring to remove any air pockets.

Pro Tips for Perfect Molded Cranberry-Orange Salad

1. Use fresh cranberries for the best flavor and color. If you’re using frozen, ensure they are thawed and drained well before incorporating.

2. Choose seedless oranges for a smoother texture and to avoid any added bitterness from the seeds.

3. Consider adding a splash of orange juice or zest for an extra burst of flavor, enhancing the overall brightness.

4. For added texture, include chopped nuts or shredded coconut for a delicious crunch that contrasts with the creamy gelatin.

5. Customize the sweetness by starting with less sugar, allowing you to fine-tune to personal preference.

6. Experiment with the shape of your mold to create fun designs, as this visually enhances the presentation of the dish.

7. Make it a day ahead! This salad benefits from sitting overnight, allowing the flavors to meld perfectly.

8. Serve the salad chilled, which enhances its refreshing quality and makes it a perfect palate cleanser.

Variations and Adaptations

Consider regional variations such as incorporating local fruits or nuts to create a personalized version. Grapes or pomegranate seeds can add new flavor elements while maintaining the theme of the salad. Seasonal adaptations might include using citrus when it’s abundant in winter while prioritizing cranberry availability during the fall months.

For dietary modifications, this recipe can be adapted for vegan diets using agar-agar instead of gelatin, ensuring the dish remains plant-based. If you want a low-sugar option, try using honey or maple syrup as sweeteners instead of granulated sugar.

Flavor variations can also be fun—add cinnamon or nutmeg for a spiced twist that captures the essence of holiday baking and creates a warm aroma.

Texture modifications can include using crushed ice cubes or gelato with the fruit, creating a sorbet-like consistency that is both refreshing and unique.

For presentation, serving in individual glasses or jars instead of a large mold can elevate the dining experience, making it not only stylish but also easy to portion.

Serving and Presentation Guide

When plating the Molded Cranberry-Orange Salad, consider using elegant glass dishes to showcase the beautiful colors. Garnish with mint leaves or a sprinkle of toasted coconut for additional visual appeal. Accompany the salad with a small scoop of whipped cream or a dollop of Greek yogurt, adding a creamy element that contrasts its refreshing nature.

Temperature is key; serve the salad chilled, as it enhances the crispness of the cranberries and the zest of the oranges. For portion control, consider slicing the salad into wedges or using cookie cutters to create fun shapes for individual servings, particularly during festive gatherings.

Wine and Beverage Pairing

For a delightful pairing with the Molded Cranberry-Orange Salad, consider a sparkling wine or Champagne. The bubbles provide a refreshing counterbalance to the salad’s tartness. A light Riesling, with its sweet notes, would also complement the flavors beautifully, enhancing the fruity profile of the dish. For non-alcoholic options, sparkling water with slices of orange and cranberries can be an elegant choice that ties in with the dish.

Additionally, a warm spiced apple cider could also serve as a fantastic accompaniment, offering a mixture of cozy and refreshing flavors that fit perfectly into a holiday gathering.

Storage and Shelf Life

The Molded Cranberry-Orange Salad can be stored in the refrigerator for up to 3-4 days in an airtight container. Ensure that it is fully set before placing it in a container to prevent any mixture from spilling. If you find that it begins to lose its vibrant color, try pressing plastic wrap directly against the surface to retain freshness.

For signs of spoilage, look for any off smells or changes in texture, such as excessive liquefaction. If your salad develops an unusual aroma or appears discolored, it’s best to discard it. Reheating isn’t necessary as this dish is intended to be served cold, but if you wish to store leftovers, make sure to keep it chilled.

Make Ahead Strategies

To alleviate stress during holiday preparations, the Molded Cranberry-Orange Salad can be made up to two days in advance. After preparing the salad and allowing it to set in the fridge, it can be stored until it’s ready to be served. This proactive approach gives you time to focus on other dishes without worrying about your salad.

To maintain the quality of the dish, consider preparing certain elements ahead of time—chop your cranberries and oranges, or mix the gelatins the night before to streamline the process. However, add any toppings or garnishes just before serving for optimal freshness and texture.

Scaling Instructions

If you wish to halve or double the recipe, the proportions of all ingredients can be adjusted accordingly without impacting the outcome. When doubling, be cautious with the amount of gelatin used, as too much can overly firm the salad. Always verify the integrity of the mold you are using to accommodate the adjusted recipe.

Timing modifications will also be key; while prep time remains roughly the same, cooking and chilling times may increase slightly due to larger quantities. Make sure to use appropriately sized bowls or molds to facilitate a proper set.

Nutritional Deep Dive

This Molded Cranberry-Orange Salad offers a delightful balance of macros with carbohydrates primarily coming from the fruits. The salad is naturally low in fat, making it a healthy choice for any festive spread. It contains sugars derived naturally from the fruits, but also poses a lower glycemic index than many sugar-heavy desserts.

Micronutrient analysis shows that this dish is high in vitamin C from oranges, contributing to a healthy immune system, and antioxidants from cranberries promoting overall wellness. Including this salad in your holiday meals not only enhances flavor but also supports nutritional goals.

Dietary Adaptations

For those following a gluten-free lifestyle, this salad is naturally gluten-free, making it an excellent addition to any menu. Adaptations for dairy-free diets can be achieved by utilizing plant-based sweeteners and ensuring any garnishes also align with dietary restrictions.

Vegan variations can easily be made by substituting gelatin with agar-agar. This alternative still provides the necessary gelatinous quality while adhering to plant-based guidelines. For those following low-carb or keto diets, sugar substitutes can create a low-sugar version that aligns with their nutritional needs.

Paleo adherents may enjoy this salad by emphasizing natural sugars and avoiding processed ingredients. Ensuring that all components are organic and use natural sweeteners will keep the flavor intact while adhering to dietary preferences.

Troubleshooting Guide

Texture issues can arise if the gelatin isn’t mixed properly, leading to a lumpy salad. To remedy this, ensure thorough mixing without over-stirring and give it enough time to set. If the salad is too firm, it may indicate that too much gelatin was used; future attempts can adjust the amount used for desired consistency.

Balancing flavors is essential; if the salad is too sour, consider increasing the sweetener in increments. Conversely, if too sweet, a bit of acidic juice can help restore balance. Temperature problems can occur if the salad isn’t chilled adequately; make sure to designate enough time in the fridge for it to set completely.

Recipe Success Stories

The Molded Cranberry-Orange Salad has garnered attention among cooks for its ease of preparation and delightful results. Many home cooks have shared stories of successfully impressing their guests at family gatherings with this vibrant dish. The creative variations others have shared have been inspiring, showcasing how this salad can adapt to personal tastes.

Readers often suggest pairing it with a range of mains, noting how it perfectly cuts through the richness of meat dishes and magnifies the overall meal experience. There’s also been an influx of social media posts showcasing photography of their beautiful, gelatinous salads, bringing this traditional recipe back into the limelight.

Frequently Asked Questions

1. Can I make this salad without gelatin? Yes, you can easily substitute gelatin with agar-agar or another vegan gel that can create the same nice texture. Just follow their specific instructions for use.

2. How long can I keep the salad in the fridge? This salad can be stored in the refrigerator for up to 3-4 days when sealed in an airtight container.

3. What if I can’t find fresh cranberries? If fresh cranberries are not available, you can use frozen cranberries. Just ensure they are thawed and drained well before mixing.

4. Can I add other fruits to this salad? Absolutely! You can add fruits like pineapples, apples, or even pomegranate seeds for additional flavors and textures.

5. Will the salad hold its shape if made a day ahead? Yes, preparing it a day in advance can enhance the flavor, and it will hold its shape well if properly set and stored.

6. How can I make it zestier? You can add a bit of fresh orange zest or a splash of orange juice to the gelatin mixture to enhance the citrus flavor.

7. What kind of mold is best to use? A traditional gelatin mold works well, but a simple bowl or a muffin tin can be used to create different shapes, too.

8. Can I veganize this dish? Yes! Use a plant-based gelatin substitute like agar-agar for a fully vegan version of this delicious salad.

9. Is this granulated sugar necessary? You can adjust the sugar content based on your taste or use alternative sweeteners to keep it healthier.

10. Can I freeze this salad? It is not recommended to freeze gelatin-based salads, as texture and consistency can be compromised upon thawing.

Additional Resources

Consider exploring related recipes such as a Classic Thanksgiving Turkey or Creamy Pumpkin Pie that would pair beautifully with the Molded Cranberry-Orange Salad. For those interested in mastering various techniques, check out ingredient guides for cranberries, oranges, and gelatin, to expand culinary knowledge. Equipment recommendations for optimal results include using quality glass mixing bowls and decorative serving dishes to enhance the presentation.

Join the Conversation

We invite you to share your experiences with the Molded Cranberry-Orange Salad on social media! Tag us with photos of your creations, and don’t hesitate to leave feedback on how it turned out for your holiday gatherings. Engagement enhances community interaction, where members can share unique adaptations and tips, ensuring everyone can enjoy this festive dish creatively.

The Recipe

Molded Cranberry-Orange Salad

Serves: 6 servings

Prep Time: 10 mins

Cook Time: 5 mins

Total Time: 15 mins

Kitchen Equipment Needed

  • Mixing Bowl
  • Whisk
  • Mold or Bowl for Setting
  • Measuring Cups and Spoons

Ingredients

  • 2 cups fresh cranberries
  • 2 oranges, segmented
  • 1 cup water
  • 1/2 cup granulated sugar
  • 1/2 cup gelatin powder (or 2 packets)
  • 1/4 cup orange juice

Directions

  1. In a saucepan, bring 1 cup of water to a boil. Remove from heat.
  2. Gradually stir in gelatin until completely dissolved, then mix in sugar and orange juice.
  3. Allow the mixture to cool slightly, then add in cranberries and orange segments, stirring gently.
  4. Grease your mold or bowl lightly and pour the mixture in.
  5. Cover and refrigerate for at least 2-3 hours or until set.
  6. To serve, gently run a knife around the edges and invert onto a serving plate.

Recipe Notes

  • This salad can be made one day in advance for ease of meal preparation.
  • Feel free to adjust sweetness based on your preference; taste before pouring into the mold.
  • Consider adding chopped nuts or shredded coconut for an extra crunch.

Easy Apple Turnovers with Flaky Puff Pastry

Delicious Apple Turnovers: A Sweet and Flaky Delight

⚖️
Difficulty
Medium

⏲️
Prep Time
30 mins

🕒
Cook Time
25 mins

⏱️
Total Time
55 mins

🍽️
Servings
8 Turnovers

Apple turnovers are an irresistible treat that perfectly balance sweet and tart flavors, encased in a flaky, golden pastry. As the aroma of baked apples and cinnamon wafts through your kitchen, it becomes impossible to resist the anticipation of biting into these delicious pastries. Each turnover is filled to the brim with tender, spiced apples that contrast beautifully with the crisp texture of the crust. This recipe is not only a crowd-pleaser but also a delightful way to celebrate seasonal fruit.

These scrumptious apple turnovers are perfect for any occasion, from brunch to dessert, satisfying sweet cravings and offering a nostalgic comfort food experience. Imagine serving these warm, fresh out of the oven, perhaps with a scoop of vanilla ice cream, enhancing the warmth and flavor. Make them your own by adjusting the spices and sweetness to your liking—this versatile pastry adapts beautifully to your preferences.

Quick Recipe Highlights

  • Flavor Profile: These apple turnovers offer a harmonious blend of sweet and tangy apple flavors perfectly complemented by warm spices like cinnamon and nutmeg.
  • Texture: The pastry is delightfully flaky, providing a satisfying crunch on the outside that gives way to a tender and juicy apple filling inside.
  • Aroma: The smell of butter, baked apples, and spices creates an inviting atmosphere, making these turnovers hard to resist.
  • Visual Appeal: Golden brown color with glossy, crisp edges, enhanced by a dusting of powdered sugar, they’re as pleasing to the eye as they are to the palate.
  • Skill Level Needed: With a medium difficulty level, these turnovers require some pastry handling but are achievable for both novice and experienced bakers alike.
  • Special Equipment: A rolling pin, a baking sheet, and parchment paper are essential for creating these lovely turnovers.

Recipe Overview

  • Difficulty Level: The medium difficulty level offers a challenge without being overwhelming, making this a great recipe for practice with pastry dough.
  • Category: These desserts fall under the pastry category and are ideal for coffee breaks, picnics, or cozy family gatherings.
  • Cuisine: The apple turnover is a staple in various cultures, inspired by traditional French and American pastry-making techniques.
  • Cost: The ingredients are relatively affordable, focusing on apples and pantry staples, making this a budget-friendly dessert option.
  • Season: Best served in the fall when apples are at their peak freshness, this recipe celebrates seasonal bounty and the warmth of autumn.
  • Occasion: Perfect for holidays like Thanksgiving or casual gatherings, making these turnovers a versatile addition to any event.

Why You’ll Love This Recipe

The taste and texture of apple turnovers create an inviting dessert that wraps the flavors of autumn in each bite. With the buttery, flaky pastry embracing the soft, spiced apple filling, every mouthful is a delightful balance of crunch and tenderness. The warm spices enhance the natural sweetness of the apples, making it a compelling dessert that resonates with all ages.

Convenience is another significant advantage of this recipe. Preparing the turnovers allows for an engaging kitchen experience, and they can easily be made ahead of time and frozen for later, preserving their freshness when baked straight from the freezer. This adaptability means that you can always have a sweet treat on hand without the hassle of impromptu baking.

In terms of nutritional advantages, apple turnovers harness the health benefits of apples, which are packed with fiber, antioxidants, and essential vitamins. While it’s a dessert, it can also be enjoyed in moderation as part of a balanced diet, allowing you to indulge without guilt.

Socially, apple turnovers serve as a fantastic conversation starter and centerpiece for gatherings. Their elevated presentation and homemade quality delight friends and families alike, making them a perfect addition to your next get-together. The pleasure of sharing these turnovers enhances the overall experience of any occasion.

Finally, the cost-effectiveness of apple turnovers makes them a go-to lifestyle treat. With simple, uncomplicated ingredients that are usually on hand, this recipe minimizes waste and maximizes delight, allowing everyone to enjoy a touch of homemade luxury without breaking the bank.

Historical Background and Cultural Significance

The history of apple turnovers dates back to ancient pastry-making traditions, with variations found in cultures worldwide. Originating in Europe, these pastries were a way to preserve fruits and flavors through the long winter months. Over time, they evolved into what we recognize today—delicious filled pastries that celebrate fruits at their peak.

In various cultures, apple turnovers have become a beloved dessert. In American cuisine, they signify the harvest, especially during the fall season when apples are abundant. They carry nostalgic ties to family gatherings and holiday festivities, becoming synonymous with cozy autumn evenings spent together.

The evolution of the turnover itself showcases the ingenuity of bakers who, over the centuries, have added their personal twists—whether through the addition of spices, different fillings, or pastry techniques. Each generation adds a new layer of creativity, ensuring that the tradition endures while adapting to modern culinary influences.

Regional variations also showcase the versatility of apple turnovers, with different countries offering unique spins on the traditional filling. For example, in some parts of Europe, you might find custards accompanying the apple filling, while in the U.S., caramel sauce or nuts might be added for flavor depth. These regional insights reflect local tastes and preferences, enhancing the global appreciation for apple turnovers.

Ingredient Deep Dive

Apples: Apples serve as the star ingredient in turnovers, with varieties like Granny Smith offering tartness and Honeycrisp providing a sweeter flavor. Rich in vitamins A and C, fiber, and antioxidants, apples contribute to a nutritious dessert option. To select the best apples, choose those that are firm without bruises, and store them in a cool, dark place to prolong freshness. Alternative fruits may include pears or berries if you wish to explore different fillings.

Butter: Butter enriches the pastry with flavor and flakiness. The history of butter in baking is deeply rooted, central to many classic pastry recipes. It’s crucial to use cold butter to achieve the desired flakiness in your dough. When selecting butter, pay attention to its fat content; higher fat ratios yield a better pastry. Store butter in the refrigerator, and if you have leftovers, it can easily be frozen for future use.

Puff Pastry: This flaky dough is fundamental to achieving the perfect turnover texture. Puff pastry has a rich culinary history originating in France, where meticulous layering of butter and dough creates its signature lift and flakiness. When buying puff pastry, look for high-quality brands that use minimal artificial ingredients. For homemade variations, you can explore recipes that require time and patience to fold and roll out the dough properly.

Common Mistakes to Avoid

  • Overworking the dough: This can result in tough pastry. Handle the dough lightly and avoid excessive kneading.
  • Using warm butter: Cold butter is key to flaky pastry; warm butter will disrupt the layering process.
  • Not chilling the dough: Chilling the dough allows the butter to firm, leading to better puff. Allow adequate chilling time before baking.
  • Filling too much: Overfilling can cause turnovers to burst open during baking. Opt for a moderate amount of filling.
  • Skipping egg wash: An egg wash enhances the golden color and glaze on the pastry; neglecting it can lead to pale turnovers.
  • Improper baking temperature: Baking at a too-low temperature can lead to soggy pastries. Ensure your oven is preheated before inserting the turnovers.
  • Not cutting vents: Failing to cut small slits can trap steam, causing the pastries to become soggy instead of crisp.
  • Ignoring resting times: Allow the turnovers to rest after baking; this helps the filling settle and prevents burning your tongue!

Essential Techniques

Making Flaky Pastry: Achieving the perfect flaky pastry involves using cold ingredients and implementing a folding technique. This method creates layers of dough and butter that bake up to be light and crisp. Common pitfalls include using warm butter or overmixing the ingredients, both of which can lead to a denser pastry. Visually, a properly made dough should appear smooth and slightly tacky but not sticky.

Sealing the Turnovers: Properly sealing the edges of the turnovers is critical for preventing leaks during baking. A good technique involves using a fork to crimp the edges after wetting them slightly, ensuring that the filling stays securely inside. Watch for signs of leaks during baking; if filled properly, you should have no issues.

Pro Tips for Perfect Apple Turnovers

– Use a mix of apple varieties to create depth of flavor; a combination of sweet and tart apples enhances the filling.
– Always keep your pastry ingredients cold; the colder they are, the flakier your pastry will be.
– For extra flavor, consider adding a splash of lemon juice to the apple filling to brighten the taste.
– Allow baked turnovers to cool slightly before serving; this helps maintain their structure and enhances the eating experience.
– Experiment with spices; try adding ginger or cardamom for a unique twist on the classic flavor profile.
– When baking, place the turnovers apart on the baking sheet to allow even puff and crispness.
– If you want an extra glaze, brush warm turnovers with a light syrup made from sugar and water after baking.
– Serve with a side of caramel or vanilla sauce for an extra indulgent dessert experience.

Variations and Adaptations

Apple turnovers can be creatively adapted to suit various tastes and seasons. For regional variations, consider using local fruits such as pears or berries in your filling. Seasonal adaptations like adding pumpkin spice during the autumn months can bring a festive twist to the recipe.

Dietary modifications allow for gluten-free options; utilize a gluten-free all-purpose flour blend while making the pastry. For a vegan version, substitute the butter for a plant-based alternative and use a flax egg for sealing. Flavor variations can also be implemented using spices like nutmeg or adding chocolate pieces to the apple filling for a decadent treat.

Texture modifications could include adding oats or nuts for a crunchy element or making a crumble topping to add diversity to the pastry. Presentation alternatives, such as drizzling a glaze or dusting with powdered sugar, can give these turnovers a unique flair, elevating their appeal during special occasions.

Serving and Presentation Guide

When plating apple turnovers, focus on visual appeal. Arrange them neatly on a platter, perhaps dusting them with powdered sugar for added elegance. To elevate the experience, serve them warm next to a scoop of ice cream or a dollop of whipped cream, providing guests with a delightful contrast of temperature and texture.

Consider modern serving suggestions, such as pairing the turnovers with a dash of cinnamon or a drizzle of caramel sauce. For a traditional touch, a side of vanilla custard can offer a wonderful complement. For temperature considerations, serving them warm enhances the flavors, while allowing them to cool slightly helps maintain their crispness.

Portion control is essential; cut them in half if you wish to serve as bite-sized desserts at parties, making it convenient for guests to enjoy while mingling.

Wine and Beverage Pairing

Pairing wines with apple turnovers can bring out the fruity flavors in the dessert. A light, sweet Riesling complements the apple’s sweetness perfectly, offering a refreshing balance. For those who prefer red, a Pinot Noir can provide depth without overshadowing the pastry’s delicate flavor.

For non-alcoholic options, consider apple cider; its rich apple flavor resonates beautifully with the dessert. If coffee or tea is on the menu, a lightly brewed chai or vanilla latte enhances the warm spices within the turnover, creating a classic pairing.

Temperature considerations are key—serve wines chilled and coffee or tea hot to create a comforting atmosphere that encourages leisurely enjoyment of your delicious apple turnovers.

Storage and Shelf Life

To ensure the best freshness, store apple turnovers in an airtight container at room temperature. They can last for 2-3 days; any longer, and it’s advisable to refrigerate them to maintain quality. For longer storage, freezing is an excellent option—wrap each turnover tightly in plastic wrap and store them in a freezer-friendly container; they can last for up to three months.

The signs of spoilage include an off smell or visible mold; when in doubt, it’s best to discard any questionable pastries. Reheating instructions suggest placing them in a preheated oven at 350°F (175°C) for 10-15 minutes to restore their crisp texture. For frozen turnovers, bake from frozen without thawing, increasing cook time by 5-10 minutes.

Make Ahead Strategies

To streamline the process, prepare the filling a day ahead and store it in the refrigerator. When you’re ready, simply assemble the turnovers just before baking. This strategy enhances flavors and saves time on busy days.

While chilling the pastry, consider rolling it out earlier and cutting the shapes needed, storing them between layers of parchment paper in the fridge to maintain freshness. This way, assembly becomes faster, allowing you to enjoy warm turnovers fresh out of the oven with minimal effort.

Maintain quality by pre-baking the turnovers without fully cooking; this technique allows you to finish baking them later for a freshly made taste without the hassle.

Scaling Instructions

If you wish to halve the apple turnover recipe, adjust the ingredients accordingly while preserving the baking times. Doubling or tripling the recipe is also simple; just ensure you have sufficient space on your baking sheets and adjust your oven rack placement to allow for even baking.

Equipment adjustments may include using larger mixing bowls or trays when scaling up to accommodate the larger quantity. Timing modifications may be necessary if using multiple trays, as you might need to bake in batches to achieve the desired crispiness without crowding the oven.

For storage considerations, remember to keep the turnovers layered with parchment paper to prevent sticking, especially when preparing larger batches for events or gatherings.

Nutritional Deep Dive

Each apple turnover features a macro breakdown rich in carbohydrates, primarily from the pastry and fruit filling. However, the fiber content from the apples contributes positively to digestion and overall health. A standard turnover typically contains around 200-300 calories, making it a moderate dessert option.

In terms of micronutrient analysis, apples are an excellent source of vitamin C and various phytonutrients, supporting cardiovascular health. However, be mindful of sugar and fat content; adjusting recipes to reduce sugar or use healthier fats can enhance the nutritional profile.

Health benefits are also evident in the use of whole fruits versus processed fillings, promoting a more wholesome dessert experience. Dietary considerations may include careful observation of portion sizes, particularly for those mindful of caloric intake—enjoying a turnover as a satisfying treat without overindulging is key.

Dietary Adaptations

For those following gluten-free diets, substitute regular flour with certified gluten-free flour, ensuring all other ingredients like baking powder are also gluten-free. A dairy-free version can be achieved by using substitutes for butter, such as coconut oil or vegan margarine.

Vegans can easily adapt the recipe by excluding the egg wash or replacing it with a plant-based alternative, while also modifying the filling to incorporate vegan-friendly ingredients. Low-carb and keto enthusiasts can experiment with almond flour crusts and reduce sugar alternatives for the apple filling.

Paleo followers may also enjoy these turnovers by utilizing nut-based crusts and sweetening with natural sugars like honey or maple syrup. Additionally, low-FODMAP variations can be tailored by choosing specific apple types and adjusting portion sizes—making this versatile dessert accessible to many.

Troubleshooting Guide

If you’re facing texture issues with your apple turnovers, it may stem from either over-kneading or improper chilling. Ensure that you handle the dough gently and maintain adequate chilling times to achieve the desired fluffiness. Should your turnovers absorb moisture and become soggy, consider pre-baking the filling lightly to prevent excess liquid.

For flavor balance, if the filling seems too sweet, a splash of citrus juice can brighten and elevate the overall taste. Ensuring you have a good mix of sweet and tart apples helps too. If you encounter temperature problems while baking, adjust your oven’s thermostat, as incorrect readings can result in uneven cooking.

If you’re not satisfied with your chosen ingredients, use substitutions wisely; for example, different fruit fillings can enhance diversity. Lastly, timing concerns can often be resolved by prepping fillings in advance or freezing assembled turnovers prior to baking to manage your schedule better.

Recipe Success Stories

Many readers have shared their successes with apple turnovers, noting how they’ve become a family staple in their homes. Customization has played a significant role, as people love sharing their variations—adding nuts, mixing different fruit fillings, or using a dash of unexpected spices.

Community feedback consistently praises the recipe for its simplicity and the delightful results it yields. Several bakers have reported discovering the joy in pastry-making through this straightforward approach, encouraging them to further explore the world of baked goods.

Shared photography tips emphasize capturing the golden-brown crust and the luscious filling peeking through. Presenting turnovers on colorful platters has proven to excite the taste buds before even taking a bite.

This recipe has transformed the dessert experiences at numerous gatherings, fostering a shared love for homemade baked goods that everyone enjoys. Ultimately, these turnovers have become a canvas for creativity and connection among those who try them.

Frequently Asked Questions

What kind of apples are best for apple turnovers?

A mix of sweet and tart apples, such as Granny Smith and Honeycrisp, works best for a balance of flavors in apple turnovers.

Can I prepare apple turnovers in advance?

Absolutely! You can prepare the filling and assemble the turnovers to bake fresh later, or freeze them before baking.

How do I store leftover apple turnovers?

Store apple turnovers in an airtight container at room temperature for up to three days, or refrigerate them for a longer shelf life.

Can I use store-bought puff pastry?

Yes, using store-bought puff pastry is a convenient alternative that saves time while still yielding delicious results.

What can I serve with apple turnovers?

These turnovers pair wonderfully with vanilla ice cream, whipped cream, or a drizzle of caramel sauce for a dessert treat.

How can I make my turnovers extra flaky?

Keep all your ingredients cold, avoid overworking the dough, and ensure the butter stays intact in the layers for maximum flakiness.

What is the best way to reheat apple turnovers?

Reheat in a preheated oven at 350°F for 10-15 minutes to restore the crispy texture of the pastry.

Can I make these turnovers gluten-free?

Yes, you can substitute regular all-purpose flour with a gluten-free flour blend to accommodate dietary needs.

How do I know when the turnovers are done baking?

They’re done when the pastry is golden brown and flaky, and the filling is bubbling slightly out of the slits.

Can I use other fruits instead of apples?

Yes, pears, peaches, and even mixed berries can be used for different delicious fruit turnovers!

Additional Resources

If you enjoyed making apple turnovers, consider trying related recipes such as pear turnovers or berry hand pies. For additional technique guides on pastry-making, explore articles focused on creating flaky crusts and mastering different pastry techniques.

Ingredient information highlighting the benefits of seasonal fruits can add to your culinary repertoire, allowing you to discover unique combinations. Kitchen equipment recommendations may also include investing in high-quality pastry tools to facilitate your baking adventures.

Lastly, seasonal variations can encourage creativity in the kitchen—experimenting with flavors, fillings, and presentations can lead to delightful new treats worth sharing!

Join the Conversation

We invite you to share your experiences with this apple turnover recipe! Connect with us on social media to showcase your photos of these delightful creations. Please leave comments with your insights and variations or any tips that helped you along the way.

Your feedback is invaluable; let us know how these turnovers brought warmth to your gatherings or how you’ve personalized them. Engage with our community by sharing your success stories and inviting others to try one of your variations. Together, let’s continue to celebrate the joy of baking and sharing delicious food!

The Recipe

Apple Turnovers

Serves: 8 Turnovers

Prep Time: 30 mins

Cook Time: 25 mins

Total Time: 55 mins

Kitchen Equipment Needed

  • Rolling pin
  • Baking sheet
  • Parchment paper
  • Mixing bowl
  • Fork for sealing

Ingredients

  • 2 cups of peeled and diced apples (Granny Smith and Honeycrisp)
  • 1/3 cup of granulated sugar
  • 1 tablespoon of lemon juice
  • 1 teaspoon of ground cinnamon
  • 1 tablespoon of all-purpose flour (for filling)
  • 1 package of puff pastry, thawed
  • 1 egg, beaten (for egg wash)
  • Powdered sugar (for dusting)

Directions

  1. Preheat the oven to 400°F (200°C) and line a baking sheet with parchment paper.
  2. In a mixing bowl, combine diced apples, granulated sugar, lemon juice, cinnamon, and flour; mix well and set aside.
  3. Roll out the puff pastry on a lightly floured surface and cut into 4 squares.
  4. Place a spoonful of the apple filling in the center of each square.
  5. Fold the pastry over to form a triangle and press the edges together; seal with a fork.
  6. Brush each turnover with the beaten egg for a golden finish.
  7. Bake in the preheated oven for 20-25 minutes or until the pastry is golden brown.
  8. Allow to cool slightly, then dust with powdered sugar before serving.

Recipe Notes

  • Feel free to experiment with different apple varieties for varied flavors.
  • For a richer taste, add a touch of nutmeg or vanilla extract to the filling.
  • Make ahead and freeze unbaked turnovers for effortless desserts later.